
Macro in Excel helps you to achieve that. In a layman’s language, a macro is defined as a recording of your routine steps in Excel that you can replay using a single button. For example, you are working as a cashier for a water utility company.
Contents
- 1 How use macros in Excel with example?
- 2 What is an example of a macro?
- 3 What is macro in Excel?
- 4 What is macros in Excel for beginners?
- 5 What is Excel macros and VBA?
- 6 What is a macro class 10?
- 7 What is a macro sentence?
- 8 What is macro explain?
- 9 How do I record a macro in Excel?
- 10 How do I setup a macro?
- 11 Is macros easy to learn?
- 12 Are Excel macros hard to learn?
- 13 How long learn macro Excel?
- 14 What is macro code?
- 15 What is the use of macro?
- 16 What is macro and its steps?
- 17 What is another word for macro?
- 18 What’s smaller macro or micro?
- 19 What is macro size?
- 20 How do I view a Macro in Excel?
How use macros in Excel with example?
Using the Code from Excel Macro Examples
- Open the Workbook in which you want to use the macro.
- Hold the ALT key and press F11. This opens the VB Editor.
- Right-click on any of the objects in the project explorer.
- Go to Insert –> Module.
- Copy and Paste the code in the Module Code Window.
Macro is defined as something that covers a large amount, or is large in size. An example of macro is the study of the key driving aspects of an economy; macro economics. An example of macro is a very close up photograph of an ant; a macro photograph.
What is macro in Excel?
If you have tasks in Microsoft Excel that you do repeatedly, you can record a macro to automate those tasks. A macro is an action or a set of actions that you can run as many times as you want. When you create a macro, you are recording your mouse clicks and keystrokes.
What is macros in Excel for beginners?
An Excel macro is an action or a set of actions that you can record, give a name, save and run as many times as you want and whenever you want. Macros help you to save time on repetitive tasks involved in data manipulation and data reports that are required to be done frequently.
What is Excel macros and VBA?
VBA Macros use the Visual Basic Application in Excel to create custom user-generated functions and speed up manual tasks by creating automated processes.One of its main uses is to change and customize the user interface by creating personalized toolbars, menus, dialog boxes, and forms.
What is a macro class 10?
A macro is an automated input sequence that imitates keystrokes or mouse actions. A macro is typically used to replace a repetitive series of keyboard and mouse actions and are common in spreadsheet and word processing applications like MS Excel and MS Word.
What is a macro sentence?
Using Macro in a Sentence
It comes from the Greek word makro, which means very long. For example, The company can finally begin production on a macro level. The photographer bought a new macro lens to get close pictures of her subjects.
What is macro explain?
A macro is an automated input sequence that imitates keystrokes or mouse actions. A macro is typically used to replace a repetitive series of keyboard and mouse actions and used often in spreadsheets and word processing applications like MS Excel and MS Word. The file extension of a macro is commonly .
How do I record a macro in Excel?
Record a Macro
- On the Developer tab, click Record Macro.
- Enter a name.
- Select This Workbook from the drop-down list. As a result, the macro will only be available in the current workbook.
- Click OK.
- Right mouse click on the active cell (selected cell).
- Select Percentage.
- Click OK.
- Finally, click Stop Recording.
How do I setup a macro?
How do I create macros?
- Using the mouse that you want to configure, start Microsoft Mouse and Keyboard Center.
- In the list under the button that you want to reassign, select Macro.
- Click Create a new Macro.
- In the Name box, type the name of the new macro.
- Click in Editor, and enter your macro.
Is macros easy to learn?
Put simply, VBA is the programming language used to write macros.The concept of a macro might seem complicated. But, learning to use them to your advantage is actually surprisingly simple.
Are Excel macros hard to learn?
Learning Excel macros is not tough if you have a coding background. Excel macros uses VBA as its language. So, if you need to create basic macros, you can just learn basic syntax and start coding in about 2 hours.
How long learn macro Excel?
If you want to, you can learn excel VBA in one week, by spending an hour each day. With some extra time for practicing. However, I would recommend doing it a bit slower, say 2-3 videos a day, with lots of coding practice.
What is macro code?
In Excel, macro code is a programming code which is written in VBA (Visual Basic for Applications) language. The idea behind using a macro code is to automate an action which you perform manually in Excel, otherwise.
What is the use of macro?
Macros are programs used to automate frequently used processes or tasks in Excel. A macro records operations and re-uses the sequence of mouse actions or keystrokes of anything you can do in Excel with keystrokes or a mouse.
What is macro and its steps?
A macro is a series of commands and instructions that you group together as a single command to accomplish a task automatically. Newer versionsOffice 2007. Word for the web. To save time on tasks you do often, bundle the steps into a macro. First, you record the macro.
What is another word for macro?
What is another word for macro?
| big | large |
|---|---|
| capacious | colossal |
| copious | enormous |
| global | huge |
| immense | jumbo |
What’s smaller macro or micro?
The difference is simply in the words. “Macro” refers to something large, where “micro” means small.
What is macro size?
Macro – anything that can be seen with the naked eye or anything greater than ~100 micrometer. Micro – 100 micrometers to 100 nanometers. Nano – 100 nanometers to 1 nanometer. Electrical and mechanical devices, components and systems are being manufactured in a variety of. sizes from macro to nano.
How do I view a Macro in Excel?
Working with recorded macros in Excel
In the Developer tab, click Macros to view macros associated to a workbook. Or press Alt+ F8. This opens the Macro dialog box.
Excel Macro is a record and playback tool that simply records your Excel steps and the macro will play it back as many times as you want. VBA Macros save time as they automate repetitive tasks. It is a piece of programming code that runs in an Excel environment but you don’t need to be a coder to program macros. Though, you need basic knowledge of VBA to make advanced modifications in the macro.
In this Macros in Excel for beginners tutorial, you will learn Excel macro basics:
- What is an Excel Macro?
- Why are Excel Macros Used in Excel?
- What is VBA in a Layman’s Language?
- Excel Macro Basics
- Step by Step Example of Recording Macros in Excel
Why are Excel Macros Used in Excel?
As humans, we are creatures of habit. There are certain things that we do on a daily basis, every working day. Wouldn’t it be better if there were some magical way of pressing a single button and all of our routine tasks are done? I can hear you say yes. Macro in Excel helps you to achieve that. In a layman’s language, a macro is defined as a recording of your routine steps in Excel that you can replay using a single button.
For example, you are working as a cashier for a water utility company. Some of the customers pay through the bank and at the end of the day, you are required to download the data from the bank and format it in a manner that meets your business requirements.
You can import the data into Excel and format. The following day you will be required to perform the same ritual. It will soon become boring and tedious. Macros solve such problems by automating such routine tasks. You can use a macro to record the steps of
- Importing the data
- Formatting it to meet your business reporting requirements.
What is VBA in a Layman’s Language?
VBA is the acronym for Visual Basic for Applications. It is a programming language that Excel uses to record your steps as you perform routine tasks. You do not need to be a programmer or a very technical person to enjoy the benefits of macros in Excel. Excel has features that automatically generated the source code for you. Read the article on VBA for more details.
Excel Macro Basics
Macros are one of the developer features. By default, the tab for developers is not displayed in Excel. You will need to display it via customize report
Excel Macros can be used to compromise your system by attackers. By default, they are disabled in Excel. If you need to run macros, you will need to enable running macros and only run macros that you know come from a trusted source
If you want to save Excel macros, then you must save your workbook in a macro-enabled format *.xlsm
The macro name should not contain any spaces.
Always fill in the description of the macro when creating one. This will help you and others to understand what the macro is doing.
Step by Step Example of Recording Macros in Excel
Now in this Excel macros tutorial, we will learn how to create a macro in Excel:
We will work with the scenario described in the importance of macros Excel. For this Excel macro tutorial, we will work with the following CSV file to write macros in Excel.

You can download the above file here
Download the above CSV File & Macros
We will create a macro enabled template that will import the above data and format it to meet our business reporting requirements.
Enable Developer Option
To execute VBA program, you have to have access to developer option in Excel. Enable the developer option as shown in the below Excel macro example and pin it into your main ribbon in Excel.
Step 1)Go to main menu “FILE”
Select option “Options.”


Step 2) Now another window will open, in that window do following things
- Click on Customize Ribbon
- Mark the checker box for Developer option
- Click on OK button

Step 3) Developer Tab
You will now be able to see the DEVELOPER tab in the ribbon

Step 4) Download CSV
First, we will see how we can create a command button on the spreadsheet and execute the program.
- Create a folder in drive C named Bank Receipts
- Paste the receipts.csv file that you downloaded

Step 5) Record Macro
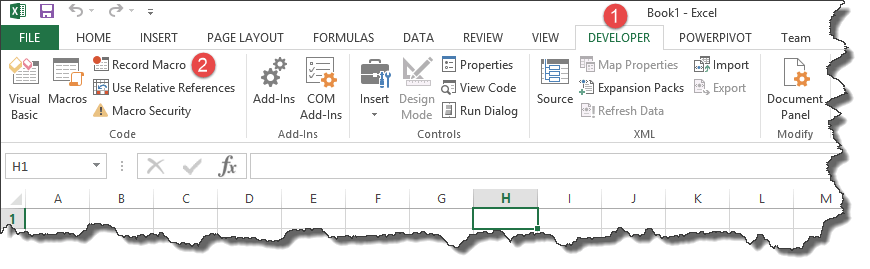
- Click on the DEVELOPER tab
- Click on Record Macro as shown in the image below
You will get the following dialogue window

- Enter ImportBankReceipts as the macro name.
- Step two will be there by default
- Enter the description as shown in the above diagram
- Click on “OK” tab
Step 6) Perform Macro Operations/Steps you want to record
- Put the cursor in cell A1
- Click on the DATA tab
- Click on From Text button on the Get External data ribbon bar
You will get the following dialogue window

- Go to the local drive where you have stored the CSV file
- Select the CSV file
- Click on Import button
You will get the following wizard

Click on Next button after following the above steps

Follow the above steps and click on next button

- Click on Finish button
- Your workbook should now look as follows

Step 7) Format the Data
Make the columns bold, add the grand total and use the SUM function to get the total amount.

Step  Stop Recording Macro
Now that we have finished our routine work, we can click on stop recording macro button as shown in the image below

Step 9) Replay the Macro
Before we save our work book, we will need to delete the imported data. We will do this to create a template that we will be copying every time we have new receipts and want to run the ImportBankReceipts macro.
- Highlight all the imported data
- Right click on the highlighted data
- Click on Delete
- Click on save as button
- Save the workbook in a macro enabled format as shown below

- Make a copy of the newly saved template
- Open it
- Click on DEVELOPER tab
- Click on Macros button
You will get the following dialogue window

- Select ImportBankReceipts
- Highlights the description of your macro
- Click on Run button
You will get the following data

Congratulations, you just created your first macro in Excel.
Summary
Macros simplify our work lives by automating most of the routine works that we do. Macros Excel are powered by Visual Basic for Applications.
Содержание
- How to Write Macros in Excel: Macro Tutorial – What is & Use
- What is an Excel Macro?
- Why are Excel Macros Used in Excel?
- What is VBA in a Layman’s Language?
- Excel Macro Basics
- Step by Step Example of Recording Macros in Excel
- Enable Developer Option
- Summary
- Excel VBA macro tutorial: how to create, change, copy and delete macros
- What are macros in Excel?
- Why use Excel macros?
- How to create a macro in Excel
- Recording a macro
- Writing a macro in Visual Basic Editor
- How to run macros in Excel
- How to enable macros in Excel
- How to change macro settings
- How to view, edit and debug VBA codes in Excel
- How to copy a macro to another workbook
- Copy the module containing a macro
- Copy the source code of a macro
- How to delete macros in Excel
- Deleting a macro from a workbook
- Deleting a macro via Visual Basic Editor
- How to save macros in Excel
- How to export and import macros in Excel
- Exporting macros
- Importing macros
- Excel macro examples
- Unhide all sheets in a workbook
- Hide active worksheet or make it very hidden
- Unmerge all merged cells in selected range
- Show a message box
- How to protect Excel macros
- Lock macro for viewing
- Password-protect macro from running
- Excel macro tips
- How to break VBA code into multiple lines
- How to make a macro accessible from any workbook
- How to undo a macro action
- Stop Excel from showing a security warning when there are no macros in a workbook
How to Write Macros in Excel: Macro Tutorial – What is & Use
Updated January 20, 2023
What is an Excel Macro?
Excel Macro is a record and playback tool that simply records your Excel steps and the macro will play it back as many times as you want. VBA Macros save time as they automate repetitive tasks. It is a piece of programming code that runs in an Excel environment but you don’t need to be a coder to program macros. Though, you need basic knowledge of VBA to make advanced modifications in the macro.
In this Macros in Excel for beginners tutorial, you will learn Excel macro basics:
Why are Excel Macros Used in Excel?
As humans, we are creatures of habit. There are certain things that we do on a daily basis, every working day. Wouldn’t it be better if there were some magical way of pressing a single button and all of our routine tasks are done? I can hear you say yes. Macro in Excel helps you to achieve that. In a layman’s language, a macro is defined as a recording of your routine steps in Excel that you can replay using a single button.
For example, you are working as a cashier for a water utility company. Some of the customers pay through the bank and at the end of the day, you are required to download the data from the bank and format it in a manner that meets your business requirements.
You can import the data into Excel and format. The following day you will be required to perform the same ritual. It will soon become boring and tedious. Macros solve such problems by automating such routine tasks. You can use a macro to record the steps of
- Importing the data
- Formatting it to meet your business reporting requirements.
What is VBA in a Layman’s Language?
VBA is the acronym for Visual Basic for Applications. It is a programming language that Excel uses to record your steps as you perform routine tasks. You do not need to be a programmer or a very technical person to enjoy the benefits of macros in Excel. Excel has features that automatically generated the source code for you. Read the article on VBA for more details.
Excel Macro Basics
Macros are one of the developer features. By default, the tab for developers is not displayed in Excel. You will need to display it via customize report
Excel Macros can be used to compromise your system by attackers. By default, they are disabled in Excel. If you need to run macros, you will need to enable running macros and only run macros that you know come from a trusted source
If you want to save Excel macros, then you must save your workbook in a macro-enabled format *.xlsm
The macro name should not contain any spaces.
Always fill in the description of the macro when creating one. This will help you and others to understand what the macro is doing.
Step by Step Example of Recording Macros in Excel
Now in this Excel macros tutorial, we will learn how to create a macro in Excel:
We will work with the scenario described in the importance of macros Excel. For this Excel macro tutorial, we will work with the following CSV file to write macros in Excel.
You can download the above file here
We will create a macro enabled template that will import the above data and format it to meet our business reporting requirements.
Enable Developer Option
To execute VBA program, you have to have access to developer option in Excel. Enable the developer option as shown in the below Excel macro example and pin it into your main ribbon in Excel.
Select option “Options.”
Step 2) Now another window will open, in that window do following things
- Click on Customize Ribbon
- Mark the checker box for Developer option
- Click on OK button
Step 3) Developer Tab
You will now be able to see the DEVELOPER tab in the ribbon
Step 4) Download CSV
First, we will see how we can create a command button on the spreadsheet and execute the program.
- Create a folder in drive C named Bank Receipts
- Paste the receipts.csv file that you downloaded
Step 5) Record Macro
- Click on the DEVELOPER tab
- Click on Record Macro as shown in the image below
You will get the following dialogue window
- Enter ImportBankReceipts as the macro name.
- Step two will be there by default
- Enter the description as shown in the above diagram
- Click on “OK” tab
Step 6) Perform Macro Operations/Steps you want to record
- Put the cursor in cell A1
- Click on the DATA tab
- Click on From Text button on the Get External data ribbon bar
You will get the following dialogue window
- Go to the local drive where you have stored the CSV file
- Select the CSV file
- Click on Import button
You will get the following wizard
Click on Next button after following the above steps
Follow the above steps and click on next button
- Click on Finish button
- Your workbook should now look as follows
Step 7) Format the Data
Make the columns bold, add the grand total and use the SUM function to get the total amount.
Step Stop Recording Macro
Now that we have finished our routine work, we can click on stop recording macro button as shown in the image below
Step 9) Replay the Macro
Before we save our work book, we will need to delete the imported data. We will do this to create a template that we will be copying every time we have new receipts and want to run the ImportBankReceipts macro.
- Highlight all the imported data
- Right click on the highlighted data
- Click on Delete
- Click on save as button
- Save the workbook in a macro enabled format as shown below
- Make a copy of the newly saved template
- Open it
- Click on DEVELOPER tab
- Click on Macros button
You will get the following dialogue window
- Select ImportBankReceipts
- Highlights the description of your macro
- Click on Run button
You will get the following data
Congratulations, you just created your first macro in Excel.
Summary
Macros simplify our work lives by automating most of the routine works that we do. Macros Excel are powered by Visual Basic for Applications.
Источник
Excel VBA macro tutorial: how to create, change, copy and delete macros
 by Svetlana Cheusheva, updated on March 14, 2023
This tutorial will set you on your way to learning Excel macros. You will find how to record a macro and insert VBA code in Excel, copy macros from one workbook to another, enable and disable them, view the code, make changes, and a lot more.
This article your entry point to the fascinating world of Excel macros. It covers the essential basics that you need to know to get started and provides links to the related in-depth tutorials.
What are macros in Excel?
is a set of commands or instructions stored in a workbook in the form of VBA code. You can think of it as a small program to perform a predefined sequence of actions. Once created, macros can be re-used anytime. Running a macro executes the commands it contains.
Typically, macros are used to automate repetitive tasks and daily routines. Skilled VBA developers can write really sophisticated macros that go well beyond reducing the number of keystrokes.
Quite often, you may hear people referring to a «macro» as «VBA». Technically, there is a distinction: a macro is a piece of code while Visual Basic for Applications (VBA) is the programming language created by Microsoft to write macros.
Why use Excel macros?
The main purpose of macros is to have more work done in less time. Like you use formulas to crunch numbers and manipulate text strings, you can use macros to perform frequent tasks automatically.
Let’s say, you are to create a weekly report for your supervisor. For this, you import various analytics data from a couple or more external resources. The problem is that those data are messy, superfluous, or not in the format that Excel can understand. That means you need to reformat dates and numbers, trim extra spaces and delete blanks, copy and paste information into appropriate columns, build charts to visualize trends, and do a lot more different things to make your report clear and user-friendly. Now, imaging that all these operations can be performed for you instantly in a mouse click!
Of course, building a complex macro takes time. Sometimes, it can take even more time than performing the same manipulations manually. But creating a macro is a one time set-up. Once written, debugged and tested, VBA code will do the job quickly and flawlessly, minimizing human errors and costly mistakes.
How to create a macro in Excel
There are two ways to create macros in Excel — by using the Macro Recorder and Visual Basic Editor.
Tip. Within Excel, most operations with macros are done via the Developer tab, so be sure to add Developer tab to your Excel ribbon.
Recording a macro
Even if you don’t know anything about programing in general and VBA in particular, you can easily automate some of your work just by letting Excel record your actions as a macro. While you are performing the steps, Excel closely watches and writes down your mouse clicks and keystrokes in the VBA language.
The Macro Recorder captures nearly everything that you do and produces a very detailed (often redundant) code. After you’ve stopped the recording and saved the macro, you can view its code in the Visual Basic Editor and make small changes. When you run the macro, Excel goes back to the recorded VBA code and executes the exact same moves.
To start recording, click the Record Macro button on either the Developer tab or the Status bar. 
For the detailed information, please see How to record macro in Excel.
Writing a macro in Visual Basic Editor
The Visual Basic for Applications (VBA) Editor is the place where Microsoft Excel keeps the code of all macros, both recorded and written manually.
In the VBA Editor, you can not only program a sequence of actions, but also create custom functions, display your own dialog boxes, evaluate various conditions, and most importantly code the logic! Naturally, creating your own macro requires some knowledge of the structure and syntax of the VBA language, which is beyond the scope of this tutorial for beginners. But there is nothing that would prevent you from reusing someone else’s code (say, the one you’ve found on our blog 🙂 and even a complete novice in Excel VBA should have no difficulties with that!
First, press Alt + F11 to open the Visual Basic Editor. And then, insert the code in these two quick steps:
- In the Project Explorer on the left, right-click the target workbook, and then click Insert >Module.
- In the Code window on the right, paste the VBA code.
When done, press F5 to run the macro. 
How to run macros in Excel
There are several ways to start a macro in Excel:
- To run a macro from a worksheet, click the Macros button on the Developer tab or press the Alt + F8 shortcut.
- To run a macro from the VBA Editor, press either:
- F5 to run the entire code.
- F8 to go through the code line-by-line. This is very useful for testing and troubleshooting.
Additionally, you can launch a macro by clicking a custom button or pressing the assigned shortcut. For full details, please see How to run macros in Excel.
How to enable macros in Excel
Because of security reasons, all macros in Excel are disabled by default. So, to use the magic of VBA codes to your advantage, you need to know how to enable them.
The easiest way to turn on macros for a specific workbook is to click the Enable Content button in the yellow security warning bar that appears at the top of the sheet when you first open a workbook with macros. 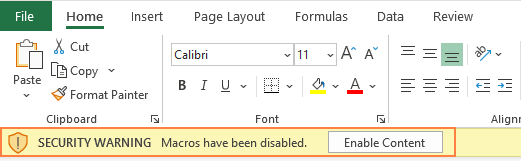
To learn more about macro security, please see How to enable and disable macros in Excel.
How to change macro settings
Microsoft Excel determines whether to allow or disallow VBA codes to be executed in your workbooks based on the macro setting selected in the Trust Center.
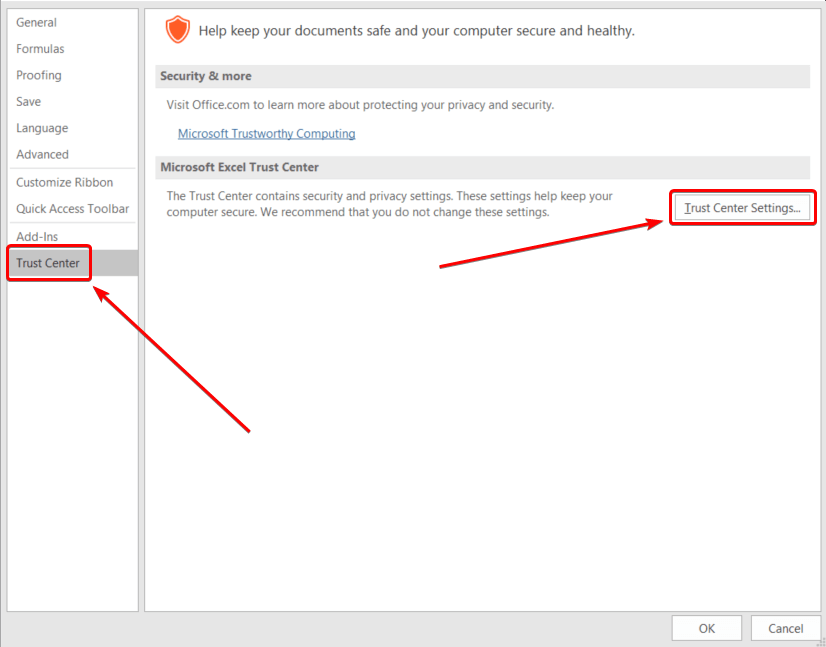
Here are the steps to access the Excel macro settings and change them if needed:
- Go to the File tab and select Options.
- On the left-side pane, select Trust Center, and then click Trust Center Settings… .
- In the Trust Center dialog box, click Macro Settings on the left, select the desired option, and click OK.
In the screenshot below, the default macro setting is selected: 
How to view, edit and debug VBA codes in Excel
Any changes to the code of a macro, whether it’s generated automatically by the Excel macro recorder or written by you, are made in the Visual Basic Editor.
To open the VB Editor, either press Alt + F11 or click the Visual Basic button on the Developer tab. 
To view and edit the code of a specific macro, in the Project Explorer on the left, double-click the module that contains it, or right-click the module and pick View Code. This open the Code window where you can edit the code.
To test and debug a macro, use the F8 key. This will take you through the macro code line-by-line letting you see the effect that each line has on your worksheet. The line currently being executed is highlighted in yellow. To exit debug mode, click the Reset button on the toolbar (blue square). 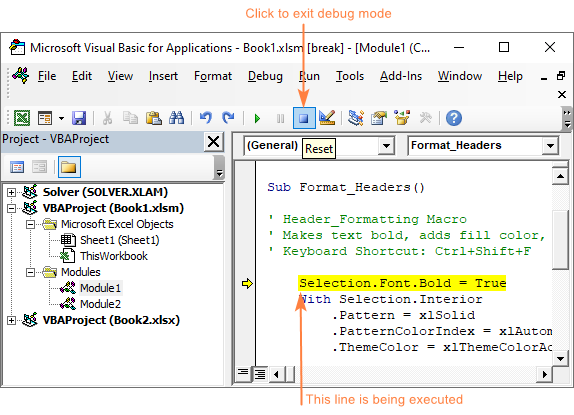
How to copy a macro to another workbook
You created a macro in one workbook and now want to reuse it in other files too? There are two ways to copy a macro in Excel:
Copy the module containing a macro
In case the target macro resides in a separate module or all the macros in the module are useful for you, then it makes sense to copy the whole module from one workbook to another:
- Open both workbooks — the one that contains the macro and the one where you wish to copy it.
- Open the Visual Basic Editor.
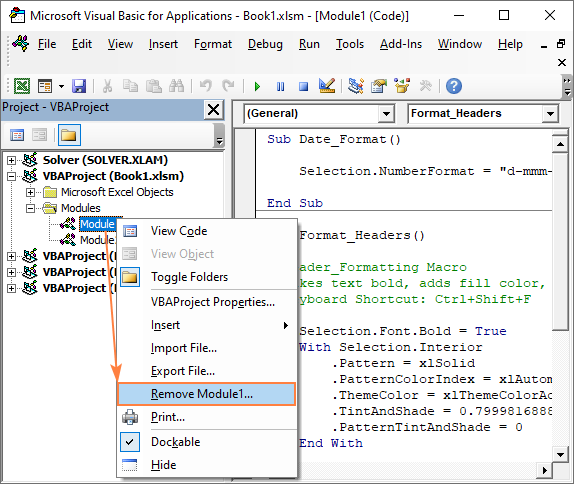
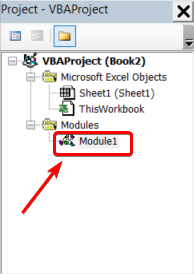
- In the Project Explorer pane, find the module containing the macro and drag it to the destination workbook.
In the screenshot below, we are copying Module1 from Book1 to Book2: 
Copy the source code of a macro
If the module contains many different macros while you need just one, then copy only the code of that specific macro. Here’s how:
- Open both workbooks.
- Open the Visual Basic Editor.
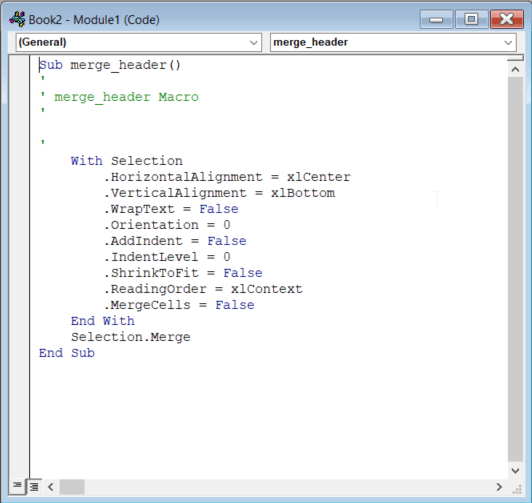
- In the Project Explorer pane, double-click the module containing the macro that you’d like to copy to open its Code window.
- In the Code window, find the target macro, select its code (beginning with Sub and ending with End Sub) and press Ctrl + C to copy it.
- In the Project Explorer, find the destination workbook, and then either insert a new module into it (right-click the workbook and click Insert >Module) or double-click an existing module to open its Code window.
- In the Code window of the destination module, press Ctrl + V to paste the code. If the module already contains some code, scroll down to the last code line, and then paste the copied macro.


How to delete macros in Excel
If you no longer need a certain VBA code, you can delete it by using the Macro dialog box or the Visual Basic Editor.
Deleting a macro from a workbook
To delete a macro directly from your Excel workbook, carry out these steps:
- On the Developer tab, in the Code group, click the Macros button or press the Alt + F8 shortcut.
- In the Macro dialog box, select the macro you want to remove and click Delete.

- To view all the macros in all open files, select All Open Workbooks from the Macros in drop-down list.
- To be able delete a macro in the Personal Macro Workbook, you need to unhide Personal.xlsb first.
Deleting a macro via Visual Basic Editor
A benefit of using the VBA Editor is that it enables you to delete an entire module with all the macros it contains in one go. Also, the VBA Editor allows deleting macros in the Personal Macro Workbook without unhiding it.
To permanently delete a module, perform these steps:
- In the Project Explorer, right-click on the module and choose Remove from the context menu.
- When asked whether you want to export the module before removing it, click No.
To remove a specific macro, simply delete its source code directly in the Code window. Or, you can delete a macro by using the Tools menu of the VBA Editor:
- From the Tools menu, choose Macros. The Macros dialog box will appear.
- In the MacrosIn drop-down list, select the project containing the unwanted macro.
- In the Macro Name box, select the macro.
- Click the Delete button.

How to save macros in Excel
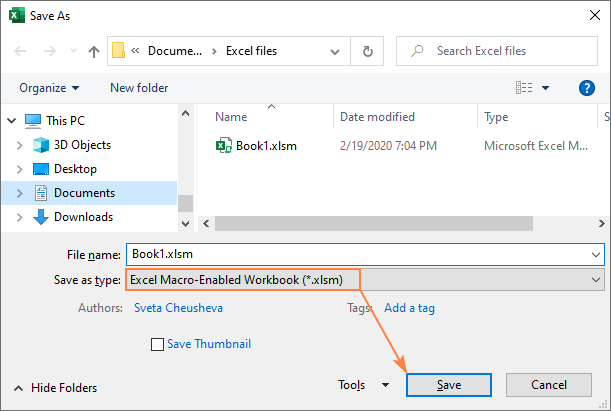
To save a macro in Excel, either recorded or written manually, just save the workbook as macro enabled (*.xlms). Here’s how:
- In the file containing the macro, click the Save button or press Ctrl + S .
- The Save As dialog box will appear. Choose Excel Macro-Enabled Workbook (*.xlsm) from the Save as type drop-down list and click Save:
How to export and import macros in Excel
If you’d like to share your VBA codes with someone or move them to another computer, the fastest way is to export the entire module as a .bas file.
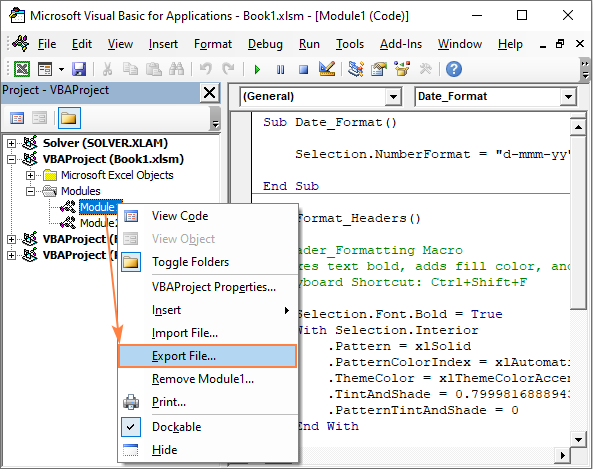
Exporting macros
To export your VBA codes, this is what you need to do:
- Open the workbook containing the macros.
- Press Alt + F11 to open the Visual Basic Editor.
- In the Project Explorer, right-click the Module containing the macros and select Export File.
- Navigate to the folder where you want to save the exported file, name the file, and click Save.
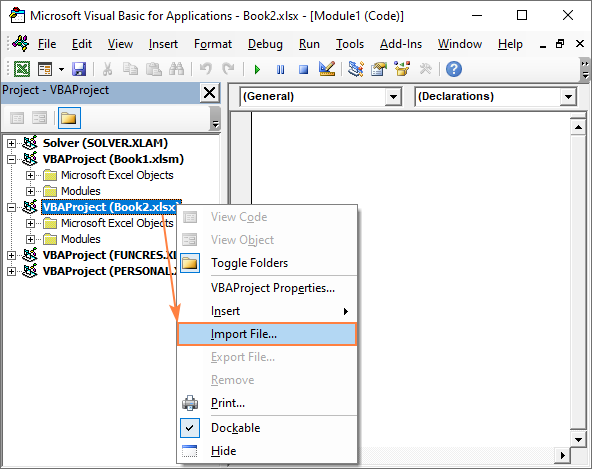
Importing macros
To import a .bas file with VBA codes into your Excel, please follow these steps:
- Open the workbook into which you want to import macros.
- Open the Visual Basic Editor.
- In the Project Explorer, right-click the project name and select Import File.
- Navigate to the .bas file and click Open.
Excel macro examples
One of the best ways to learn Excel VBA is by exploring code samples. Below you will find examples of very simple VBA codes that automate some basic operations. Of course, these examples won’t teach you coding, for this there exist hundreds of professional-grade VBA tutorials. We just aim to illustrate a few common features of VBA that will hopefully make its philosophy a little more familiar to you.
Unhide all sheets in a workbook
In this example, we use the ActiveWorkbook object to return the currently active workbook and the For Each loop to go through all the sheets in the workbook one-by-one. For each found sheet, we set the Visible property to xlSheetVisible.
Hide active worksheet or make it very hidden
To manipulate the currently active sheet, use the ActiveSheet object. This sample macro changes the Visible property of the active sheet to xlSheetHidden to hide it. To make the sheet very hidden, set the Visible property to xlSheetVeryHidden.
Unmerge all merged cells in selected range
If you want to perform certain operations on a range rather than the entire worksheet, use the Selection object. For example, the below code will unmerge all the merged cells in a selected range at one fell swoop.
Show a message box
To show some message to your users, use the MsgBox function. Here’s an example of such a macro in its simplest form:
In real-life macros, a message box is typically used for information or confirmation purposes. For instance, before performing a action (unmerging cells in our case), you display a Yes/No message box. If the user clicks «Yes», the selected cells are unmerged.
To test the code, select one or more range containing merged cells and run the macro. The following message will appear: 
Below are the links to more complex macros that automate challenging and time-consuming tasks:
How to protect Excel macros
If you’d like to prevent your macro from being viewed, modified or executed by others, you can protect it with password.
Lock macro for viewing
To protect your VBA codes from unauthorized viewing and editing, do the following:
- Open the VBA Editor.
- In the Project Explorer, right-click the project you’d like to lock, and choose VBAProject Properties…
- In the Project Properties dialog box, on the Protection tab, check the Lock project for viewing box, enter the password twice, and click OK.
- Save, close and reopen your Excel file.

When you try to view the code in the Visual Basic editor, the following dialog box will appear. Type the password and click OK. 
To unlock macros, just open the Project Properties dialog box again and remove a tick from the Lock project for viewing box.
Note. This method protects the code from viewing and editing but does not prevent it from being executed.
Password-protect macro from running
To protect your macro from being executed so that only the users who know the password could run it, add the following code, replacing the word «password» with your real password:
The macro uses the InputBox function to prompt the user to enter password: 
If the user’s input matches the hardcoded password, your code is executed. If the password does not match, the «Incorrect Password» message box is displayed. To prevent the user from peeping the password in the Visual Basic Editor, remember to lock the macro for viewing as explained above.
Note. Given the numbers of various password crackers available on the web, it is important to realize that this protection is not absolute. You can regard it rather as a protection against accidental use.
Excel macro tips
Excel VBA pros have devised tons of ingenious tricks to make their macros more effective. Below I will share a couple of my favorite ones.
If your VBA code actively manipulates the cell contents, you can speed up its execution by turning off screen refreshing and formula recalculating. After executing your code, turn this on again.
The following lines are to be added to the beginning of your code (after the lines that start with Dim or after the Sub line):
The following lines are to be added to the end of your code (before End Sub):
How to break VBA code into multiple lines
When writing code in the VBA editor, at times you may create very lengthy statements, so you have to scroll horizontally to view the end of the line. This does not affect the code execution but makes it difficult to examine the code.
To split a long statement into several lines, type a space followed by an underscore (_) at the point at which you want to break the line. In VBA, this is called the line-continuation character.
To continue the code on the next line correctly, please follow these rules:
- Do not split the code in the middle of argument names.
- Do not use an underscore to break comments. For multiple-line comments, type an apostrophe (‘) at the beginning of each line.
- An underscore must be the last character on a line, not followed by anything else.
The following code example shows how to break the statement into two lines:
How to make a macro accessible from any workbook
When you write or record a macro in Excel, usually it can only be accessed from that specific workbook. If you’d like to reuse the same code in other workbooks, save it to the Personal Macro Workbook. This will make the macro available to you whenever you open Excel.
The only obstacle is that the Personal Macro Workbook does not exist in Excel by default. To create it, you will need to record at least one macro. The following tutorial provides all the details: Personal Macro Workbook in Excel
How to undo a macro action
After executing a macro, its action cannot be reverted by pressing Ctrl + Z nor by clicking the Undo button.
Experienced VBA programmers can, of course, validate the input values and/or starting conditions before allowing the macro to make any changes to a worksheet, but in most cases that is quite complicated.
An easier way is to save the active workbook from within the macro’s code. For this, simply add the below line before letting your macro do anything else:
Optionally, you can also show a message box informing the user that the current workbook was saved right before executing the main code of the macro.
This way, if you (or your users) are not happy with the results, you can simply close, and then reopen the workbook.
Stop Excel from showing a security warning when there are no macros in a workbook
Have you ever found yourself in a situation where Excel continuously asks if you want to enable macros while you definitely know that there are no macros in this particular workbook?
The most likely reason is that some VBA code was added and then removed, leaving an empty module, which triggers the security alert. To get rid of it, simply delete the module, save the workbook, close and reopen it. If this does not help, do the following:
- For ThisWorkbook and for each individual sheet, open the Code window, press Ctrl + A to select all the code and delete it (even if the Code window looks empty).
- Delete any UserForms and Class Modules that the workbook contains.
That’s how you create and use VBA macros in Excel. I thank you for reading and hope to see you again on our blog next week!
Источник
You work in Excel every day and do the same things again and again. Why not automate those tasks? Or, maybe, you want Excel to do most of the work for you? Read on to learn what Excel macros are and how they can help you.
What are macros in Excel?
Excel is an extremely powerful tool for processing data in the form of spreadsheets. While most users use formulas, there is another way to manipulate data in Excel.
Excel macros are pieces of code that describe specific actions or contain a set of instructions. Every time you launch the macro, Excel follows those instructions step-by-step.
Why learn macros in Excel?
Macros are a must-have tool for an advanced Excel user. By using Excel macros you can avoid dull, repetitive actions or even create your own order management system for free.
Simple macros in Excel that will make things easier
There are lots of simple Excel macros that take just a few lines of code, but can save you hours. Excel can perform certain operations instantly, where it would take you a very long time to do the job manually.
For example, this macro will sort all worksheets alphabetically:
Sub SortSheetsTabName()
Application.ScreenUpdating = False
Dim ShCount As Integer, i As Integer, j As Integer
ShCount = Sheets.Count
For i = 1 To ShCount - 1
For j = i + 1 To ShCount
If Sheets(j).Name < Sheets(i).Name Then
Sheets(j).Move before:=Sheets(i)
End If
Next j
Next i
Application.ScreenUpdating = True
End Sub
The following code will unhide all hidden worksheets:
Sub UnhideAllWoksheets()
Dim ws As Worksheet
For Each ws In ActiveWorkbook.Worksheets
ws.Visible = xlSheetVisible
Next ws
End Sub
To unhide all rows and columns on a worksheet, use:
Sub UnhideRowsColumns()
Columns.EntireColumn.Hidden = False
Rows.EntireRow.Hidden = False
End Sub
Advanced Excel macros that can significantly improve your workflow
If you are running a business, you have to store and manipulate data. Small companies can keep records by hand and large enterprises can buy specialized software (which is rather expensive). But what about medium-sized businesses that can no longer settle for manual record-keeping, but still cannot afford costly software? This is where Excel with macros shines.
By combining advanced Excel macros you can create a CRM (Customer Relationship Management) system which will help you provide better services. If you sell goods, you need an inventory management tool and Excel spreadsheets enhanced with macros will fit your needs.
If your data is contained in multiple Excel workbooks, you can use Coupler.io to move them around. You can even add third-party sources, like Google Sheets, Airtable, BigQuery, etc. Data integration with Coupler.io does not require any programming skills and can be done in just a few clicks.
Check out the available integrations with Excel.
Other Excel macros examples
Below are a few examples of useful Excel macros.
Sometimes you might accidentally add extra spaces to the data in cells. This mistake will cause errors, thereby preventing you from making correct calculations. To remove unnecessary spaces from the selected cells, use the following code:
Sub TrimTheSpaces()
Dim MyRange As Range
Dim MyCell As Range
Set MyRange = Selection
For Each MyCell In MyRange
If Not IsEmpty(MyCell) Then
MyCell = Trim(MyCell)
End If
Next MyCell
End Sub
It is often the case that you need to protect your workbook with a password. You can do that in the user interface of Excel. However, if you use the same password for all of your workbooks, you have to re-enter it every time. This macro will do the job for you (don’t forget to replace “1234” with your own password!):
Sub ProtectSheets()
Dim ws As Worksheet
For Each ws In ActiveWorkbook.Worksheets
ws.Protect Password:="1234"
Next ws
End Sub
Using macros in Excel
As macros are programs that can do literally anything on your computer, using macros from untrusted sources is very risky. That’s why, when you open a workbook with macros in Excel, they will be disabled and you will see the following notification:
![]()
If you trust the source of the file, click Enable Content. That will add the workbook to the list of trusted documents and turn on its macros. The next time you open that workbook, there will be no warning.
You will see the above notification each time you open a workbook if it has been saved to an untrusted location. That can be a folder for temporary files or browser downloads. To avoid that, move the file to another folder or enable macros in the Excel Trust Center.
How to enable macros in Excel
If you do not want to see the security warning when opening Excel workbooks, you can permanently enable macros in the Trust Center.
To enable macros in the Excel Trust Center:
- In the upper-left corner, click the File tab and then select Options:

- In the Excel Options window, select Trust Center and then click Trust Center Settings:
- In the Trust Center, go to Macro Settings and then select Enable all macros:

Warning! Enabling macros for all workbooks is potentially risky because files from external sources may contain malicious code. If you open such a workbook, the macros may run automatically and corrupt your data or even cause hardware malfunctions.
How to use macros in Excel
If your workbook contains macros, you can run them by pressing Alt+F8. In the Macro window that opens, select the macro you need and click Run:

If you want to create new macros, you need to enable the Developer tab first.
To enable the Developer tab:
- In the upper-left corner, click the File tab and then select Options.
- In the Excel Options window, select Customize Ribbon and then enable the Developer checkbox in the Main Tabs area:

- Click OK to apply the changes.
In the Developer tab you can run existing macros by clicking the Macros button or create a new macro. For details on creating macros in Excel, see the following sections.

How to delete macros in Excel
To delete a macro in Excel:
- Open the Macro window in one of the following ways:
- Press Alt+F8.
- Select the Developer tab and click Macros.
- Select the macro that you want to delete and click Delete.

- Click Yes in the confirmation window that opens.
How to disable macros in Excel
Enabling Excel macros can make your computer vulnerable. Some macros will run when you open a workbook, which is especially dangerous if you have downloaded the workbook from an untrusted source. To prevent that, you can disable macros in Excel either with or without a notification.
To disable macros in Excel:
- In the upper-left corner, click the File tab and then select Options.
- In the Excel Options window, select Trust Center and then click Trust Center Settings.
- In the Trust Center, go to Macro Settings and then select one of the following options:
- Disable all macros without notification. Macros will be disabled and you will not see a security warning when opening a workbook with macros.
- Disable all macros with notification. Macros will be disabled but you will see a security warning when opening a workbook with macros and will be able to allow macros, if needed.

Writing macros in Excel
In Excel you can not only run ready-to-use macros, but also write your own macros to automate your daily tasks. We will provide a few methods below for creating macros in Excel. Anyone can write macros in Excel: from a complete beginner to an advanced user with programming skills.
How to record a macro in Excel
If you are unfamiliar with programming languages, the easiest way to create your own Excel macro is to record it.
To record a macro in Excel:
- In the Developer tab, click Record Macro:

- Enter the macro name and click OK:

Excel will start recording the macro.
- Perform the actions, that need to be included in the macro, then click Stop Recording:

The macro will be saved to the workbook.
Creating VBA macros in Excel
If you can write code in any programming language, you can easily learn the basics of Visual Basic for Applications and create Excel macros in the VBA editor.
To open the editor, click Visual Basic in the Developer tab.
Each workbook is a VBA project in the editor. The project contains worksheets as objects and modules with macros:

By default, macros recorded in the Developer tab are saved to Module1. For example, here is the macro that we recorded in the previous section:
As you can see in the picture above, a macro starts with Sub followed by the macro name and (). You can insert the macro description in the comment lines. Be sure to indent the macro body for better readability. The End Sub string designates the end of the macro.
Excel macros language
Macros in Excel are written in VBA (Visual Basic for Applications). This programming language is used not only in Excel, but also in other MS office applications.
VBA provides many of the tools that are available in advanced programming languages. For example, to create Excel macros, you can use the following:
- Variables
- ‘If’ statements
- ‘For’ cycles
- Loops
- Arrays
- Events
- Functions
Being an object-oriented language, VBA lets you manipulate the following objects:
- Application object
- Workbook object
- Worksheet object
- Range object
If you decide to turn your Excel worksheet into something much more powerful, like a CRM system, you can even create a graphical user interface with message boxes and user forms. To learn more about VBA, check out the official documentation.
Editing macros in Excel VBA editor
When creating macros in Excel, it may be difficult to get the desired result on the first try. By editing Excel macros and running them again, you can resolve errors and make your system work as expected.
To edit a macro in Excel VBA editor:
- In the Developer tab, click Visual Basic:

- In the VBA project tree, double-click the module with the macro that you want to edit:
- Edit the macro code, then save changes by clicking the Save button or pressing Ctrl+S.
The workbook with the macro will be saved.
You can press F5 or click Run in the editor to launch the macro:

Note: If a macro changes workbook data, those changes cannot be reversed using the Undo command in Excel.
The VBA editor has a built-in debugger that highlights errors in code. The line that follows the error is highlighted:

An easy way of learning how to create macros in Excel
In Excel you can record a macro by using the Record Macro button in the Developer tab. Then you can open the recorded macro in Excel VBA editor.
This is the easiest way to learn the VBA programming language. Just perform actions in the Excel user interface and see how they are interpreted in the macro code. Then you can change values and methods in the code to see how that affects the macro behavior.
Do I need Excel macros?
As you can see, macros can drastically enhance Excel features in many ways. By using macros, you can automate your daily operations and save yourself hours of time. Excel macros can even save you money if you decide to create an Excel-based order management system instead of buying costly software.
When you finish customizing your Excel workbook with macros, you may need to migrate your data from other sources, like Google Sheets or BigQuery.
-

A content manager at Coupler.io whose key responsibility is to ensure that the readers love our content on the blog. With 5 years of experience as a wordsmith in SaaS, I know how to make texts resonate with readers’ queries✍🏼

Back to Blog
Focus on your business
goals while we take care of your data!
Try Coupler.io
What is MACRO in Excel?
A macro in excel is a series of instructions in the form of code that helps automate manual tasks, thereby saving time. Excel executes those instructions in a step-by-step manner on the given data. For example, it can be used to automate repetitive tasks such as summation, cell formatting, information copying, etc. thereby rapidly replacing repetitious operations with a few clicks.
There are two methods to create the macros – The first is when you can record the macro, where Excel records every step automatically and then repeats it. The second is coding with VBAVBA code refers to a set of instructions written by the user in the Visual Basic Applications programming language on a Visual Basic Editor (VBE) to perform a specific task.read more, which requires good subject knowledge
Before recording a macro, the user has to activate the Developer tab in Excel. The Developer tabEnabling the developer tab in excel can help the user perform various functions for VBA, Macros and Add-ins like importing and exporting XML, designing forms, etc. This tab is disabled by default on excel; thus, the user needs to enable it first from the options menu.read more is a built-in option in Excel to create macros, generate VBA applications, design forms, import or export XML files, etc. Since it is disabled in Excel by default, it has to be enabled before creating and recording the macrosRecording macros is a method whereby excel stores the tasks performed by the user. Every time a macro is run, these exact actions are performed automatically. Macros are created in either the View tab (under the “macros” drop-down) or the Developer tab of Excel.
read more.
Table of contents
- What is MACRO in Excel?
- Enable the Developer tab
- Examples of Macros in Excel
- Example #1
- Example #2
- Adding the Macro Button
- How to View the Code of Macros?
- Creating Macro by Writing VBA Code
- How to Save the Recorded Macro in Excel?
- How to Enable “Macro Security Settings”?
- Frequently Asked Questions (FAQs)
- Recommended Articles
Let us learn the method to enable the Developer tab in Excel.
Enable the Developer tab
Below are the steps to activate the Developer tab in the Excel toolbar.
- Click on “options” in the File menu (as shown in the succeeding image).

- On clicking the “options”, the “Excel options” window will pop up.

- Select “customize ribbon” in the “Excel options” which provides a list of options in a dialog box.
Under “customize the ribbon”, select “main tabs”. Among the list of checkboxes, select “developer” and click “ok”.
- The worksheet displays the Developer tab, as highlighted in the succeeding image.

- The user can view options like “visual basic”, “macros”, “record macro”, etc. on the ribbon of Developer tab (as displayed in the image below).


Examples of Macros in Excel
Let us understand how to add macros in excel with the help of the following example.
Example #1
A list of data with different names is available in the table below. Some names have “.” symbol. We want to replace the “.” symbol with “_” by using macros in Excel.
You can download this Macro Excel Template here – Macro Excel Template

The steps to add an excel macro are listed as follows:
- Click the “record macro” option in the Developer tab.

- The “record macro” window will pop out. Name the macro “ReplaceDot” in the “macro name” box. To assign a keyboard shortcutAn Excel shortcut is a technique of performing a manual task in a quicker way.read more, type “Ctrl+q” in the “shortcut key” box.
Select the option “This Workbook” in the “store macro in” box, which will ensure the macro is stored in the particular workbook.
It is optional to fill the “description” box explaining the task. Finally, click the “ok” button.

- The “ReplaceDot” macro will start recording the user actions in Excel. The user will observe the “stop recording” button appearing in the Developer tab.

- Let us now start replacing the “.(dot)” in the names with “_(underscore)” by using the “find and replace” option. Enter “.” in the “find” and “ _” in the “replace” option, respectively. Then click the “replace all” button.
Note: Use the shortcut key “Ctrl+H” to use “find and replace” option.


- The “replace all” option replaces all the “.” (dots) with the “_” (underscores). The number of replacements and the resulting output is shown in the succeeding image.

- The final output is displayed in the below image.

- In the end, click the “stop recording” button on the Developer tab to stop the macro recording.
Example #2
We want to run the same task for a new list of names (displayed in the below image). We will run the macro “ReplaceDot,” created in the Developer ribbon.

- Select the “enable macro” option from the Developer ribbon to view the list of macros created in the Macro window. The users can choose and run the macros based on their requirement.
The succeeding image shows the result of macros running on the new list of names.

Adding the Macro Button
Let us assign a button to the macro instead of choosing the “enableTo enable macros simply means to run or execute a macro in a particular file in order to save the time spent on repetitive actions. To enable macros, select “enable all macros” from the “trust center” of the File tab (in the “options” button).
read more macroTo enable macros simply means to run or execute a macro in a particular file in order to save the time spent on repetitive actions. To enable macros, select “enable all macros” from the “trust center” of the File tab (in the “options” button).
read more” option.
There are many groups like Add-ins, Controls, and XML under the Developer ribbon.

- The user can choose the type of button to be created. Select the first button from “form controls” in the Controls tab.

- Drag the selected button anywhere in the Excel sheet. The “assign macro” dialogue box opens. The macros to be assigned are listed in the “macro name” box.
- Select the macro “ReplaceDot,” appearing in the list and click “ok”.

- A button appears in the worksheet. Right click the button and use “edit text” option to change the button text as “Button 3.” It is created on the right-hand side of the sheet, as shown in the below image.

- Select the new name list to implement the same task by running macros, as indicated in the previous section.

- Click the “Button 3” to run the assigned macro “ReplaceDot”.

- To change the button name, use the “edit text” option to replace the text “Button 3” with “ReplaceDot”.

Using the above steps, we can create, record, and assign the macro for various tasks and automate it.
How to View the Code of Macros?
The users can view the code for a recorded macro. Excel generates the code based on the steps carried out while recording the macro.
We can access the code using the shortcut “Alt+F11” or by editing the macro that was created earlier.
Let us view the code for the “ReplaceDot” macro using the following steps:
- Open the worksheet that contains the “ReplaceDot” macro. In the View tab, click the option “macros”. Select the “ReplaceDot” macro from the list and click the “edit” button.

- The “Microsoft Visual Basic for Applications” will be launched. The user can write or edit the code using this application. The below image shows the code of the “ReplaceDot” macro.

Creating Macro by Writing VBA Code
Before writing the VBA code, let us understand the “head” and “tail” of macros, which are the “sub” and “end sub.”

The user places the lines of VBA codes in the keyword “sub”. It executes the instructions in the code. The “end sub” keyword stops the execution of the “sub.”
Generally, there are two types of macros.
- “System Defined Function” – It performs actions like creating a link of all the worksheet names, deleting all worksheets and so on.
- “User-Defined Function” – To create a User Defined Function User Defined Function in VBA is a group of customized commands created to give out a certain result. It is a flexibility given to a user to design functions similar to those already provided in Excel.read more(UDF) in macro, the user uses the “function and end function” as the “head” and “tail” of the codes.
Note: A function returns a value, whereas the sub does not.
A macro is written on the Visual Basic EditorThe Visual Basic for Applications Editor is a scripting interface. These scripts are primarily responsible for the creation and execution of macros in Microsoft software.read more (VBE) of the “Microsoft Visual Basic for Applications”.
Let us learn the steps to write a simple macro in the VBA.
- Click the “module 1” in the “module” properties displayed on the left-hand side panel of the VBE window, and start writing the macro.

- Begin with “sub” followed by the macro name and end with “end sub”. The code is written between the “sub” and “end sub.”
The below image shows the “sub” and “end sub” for the macro named “simplemacro ( )”.
- Write code to display text in the message box. The “MsgBoxVBA MsgBox function is an output function which displays the generalized message provided by the developer. This statement has no arguments and the personalized messages in this function are written under the double quotes while for the values the variable reference is provided.read more” displays an input text message. All text in VBAText is a worksheet function in excel but it can also be used in VBA while using the range property. It is similar to the worksheet function and it takes the same number of arguments. These arguments are the values which needs to be converted.read more should be enclosed in double quotes.
For example, the code: MsgBox “Good Morning” (shown in the below image) displays the message “Good Morning” in the text box.

- The output is displayed in the succeeding image.

Hence, the same macro can be assigned buttons to automate the task.
How to Save the Recorded Macro in Excel?
After recording, the user saves the macro to reuse in any other worksheet in the future.
Let us follow the below-mentioned steps to save the macro:
- In the macro-enabled workbook, click “save as.”
- Select the “Excel macro-enabled workbook” option in the “save as type” box while saving the file.
- Finally, save the macros with the “.xlsm” file extension.

The guidelines for saving the macro names are stated as follows:
- Make sure that the name of recorded macros should start with letters (alphabets) or underscore.
- Use letters, numeric, and underscore characters.
- Avoid space, symbols, or punctuation marks.
- Maintain a maximum length of about 80 characters.
Note: When the user saves a macro’s name with space, Excel issues a warning (as shown in the succeeding image).

How to Enable “Macro Security Settings”?
In this section, let us learn to enable the “Macros security settings”.
When a user opens a workbook containing macros, a security warning – “Macros have been disabled” is displayed under the ribbon. Choose the “enable content” option in the box.

To eliminate the security warning, we need to change the “trust center settings” by using the following steps:
- Under the “trust center settings” in the File options, click “macro settings”.
- Choose the button, “Disable all macros with notification.”
- The security is enabled in the “Macro Security” of the Developer ribbon.

Note 1: The user can create absolute macros (functioning from cell A1) that help to reuse the macro in other worksheets.
Note 2: The usage of directional keys (rather than a mouse) for navigation in macros is reliable to add, delete, and change the data in the worksheet.
Frequently Asked Questions (FAQs)
1. What are macros in Excel?
Macros are a set of simple programs or instructions to automate the common and repetitive tasks performed in the Excel worksheet. It can be recorded, saved, and run multiple times as per the user’s requirement.
It is a time-saving tool involved in preparing data reports and manipulating data carried out frequently in a worksheet.
2. How to enable macros in Excel?
The users can eliminate the security warning in the worksheet and enable macros by using the following steps:
• Click “options” in the File tab.
• Select “trust center” in the “options” window.
• Choose the option “trust center settings”.
• Click “macro settings” on the left side of the navigation pane.
• Select “enable all macros” and click “ok”.
3. What is the difference between macro and VBA?
The difference between macro and VBA is stated as follows.
• Macros are programming codes that function in the Excel worksheet to perform automated and repetitive tasks. It saves the user’s time and extends the efficiency of Excel.
• Visual Basic for Applications (VBA) is a programming language of Excel used for creating macros.
Recommended Articles
This has been a tutorial to Macros in Excel. Here we discuss how to add Macros in Excel along with , along with practical examples and a downloadable template. You may also look at these useful functions in Excel –
- Excel Open XMLXML (Extensible Markup Language) is a text-based mark-up language that stores & organizes data in a human & machine-readable format. As it follows a specific script, you need to fulfill a particular set of prerequisites for importing the data into Excel or opening Excel Data into this format. read more
- VBA MacrosVBA Macros are the lines of code that instruct the excel to do specific tasks, i.e., once the code is written in Visual Basic Editor (VBE), the user can quickly execute the same task at any time in the workbook. It thus eliminates the repetitive, monotonous tasks and automates the process.read more
- MsgBox in Excel VBAVBA MsgBox function is an output function which displays the generalized message provided by the developer. This statement has no arguments and the personalized messages in this function are written under the double quotes while for the values the variable reference is provided.read more
Using Excel Macros can speed up work and save you a lot of time.
One way of getting the VBA code is to record the macro and take the code it generates. However, that code by macro recorder is often full of code that is not really needed. Also macro recorder has some limitations.
So it pays to have a collection of useful VBA macro codes that you can have in your back pocket and use it when needed.
While writing an Excel VBA macro code may take some time initially, once it’s done, you can keep it available as a reference and use it whenever you need it next.
In this massive article, I am going to list some useful Excel macro examples that I need often and keep stashed away in my private vault.
I will keep updating this tutorial with more macro examples. If you think something should be on the list, just leave a comment.
You can bookmark this page for future reference.
Now before I get into the Macro Example and give you the VBA code, let me first show you how to use these example codes.
Using the Code from Excel Macro Examples
Here are the steps you need to follow to use the code from any of the examples:
- Open the Workbook in which you want to use the macro.
- Hold the ALT key and press F11. This opens the VB Editor.
- Right-click on any of the objects in the project explorer.
- Go to Insert –> Module.
- Copy and Paste the code in the Module Code Window.
In case the example says that you need to paste the code in the worksheet code window, double click on the worksheet object and copy paste the code in the code window.
Once you have inserted the code in a workbook, you need to save it with a .XLSM or .XLS extension.
How to Run the Macro
Once you have copied the code in the VB Editor, here are the steps to run the macro:
- Go to the Developer tab.
- Click on Macros.

- In the Macro dialog box, select the macro you want to run.
- Click on Run button.

In case you can’t find the developer tab in the ribbon, read this tutorial to learn how to get it.
Related Tutorial: Different ways to run a macro in Excel.
In case the code is pasted in the worksheet code window, you don’t need to worry about running the code. It will automatically run when the specified action occurs.
Now, let’s get into the useful macro examples that can help you automate work and save time.
Note: You will find many instances of an apostrophe (‘) followed by a line or two. These are comments that are ignored while running the code and are placed as notes for self/reader.
In case you find any error in the article or the code, please be awesome and let me know.

Excel Macro Examples
Below macro examples are covered in this article:
Unhide All Worksheets at One Go
If you are working in a workbook that has multiple hidden sheets, you need to unhide these sheets one by one. This could take some time in case there are many hidden sheets.
Here is the code that will unhide all the worksheets in the workbook.
'This code will unhide all sheets in the workbook
Sub UnhideAllWoksheets()
Dim ws As Worksheet
For Each ws In ActiveWorkbook.Worksheets
ws.Visible = xlSheetVisible
Next ws
End Sub
The above code uses a VBA loop (For Each) to go through each worksheets in the workbook. It then changes the visible property of the worksheet to visible.
Here is a detailed tutorial on how to use various methods to unhide sheets in Excel.
Hide All Worksheets Except the Active Sheet
If you’re working on a report or dashboard and you want to hide all the worksheet except the one that has the report/dashboard, you can use this macro code.
'This macro will hide all the worksheet except the active sheet
Sub HideAllExceptActiveSheet()
Dim ws As Worksheet
For Each ws In ThisWorkbook.Worksheets
If ws.Name <> ActiveSheet.Name Then ws.Visible = xlSheetHidden
Next ws
End Sub
Sort Worksheets Alphabetically Using VBA
If you have a workbook with many worksheets and you want to sort these alphabetically, this macro code can come in really handy. This could be the case if you have sheet names as years or employee names or product names.
'This code will sort the worksheets alphabetically
Sub SortSheetsTabName()
Application.ScreenUpdating = False
Dim ShCount As Integer, i As Integer, j As Integer
ShCount = Sheets.Count
For i = 1 To ShCount - 1
For j = i + 1 To ShCount
If Sheets(j).Name < Sheets(i).Name Then
Sheets(j).Move before:=Sheets(i)
End If
Next j
Next i
Application.ScreenUpdating = True
End Sub
Protect All Worksheets At One Go
If you have a lot of worksheets in a workbook and you want to protect all the sheets, you can use this macro code.
It allows you to specify the password within the code. You will need this password to unprotect the worksheet.
'This code will protect all the sheets at one go
Sub ProtectAllSheets()
Dim ws As Worksheet
Dim password As String
password = "Test123" 'replace Test123 with the password you want
For Each ws In Worksheets
   ws.Protect password:=password
Next ws
End Sub
Unprotect All Worksheets At One Go
If you have some or all of the worksheets protected, you can just use a slight modification of the code used to protect sheets to unprotect it.
'This code will protect all the sheets at one go
Sub ProtectAllSheets()
Dim ws As Worksheet
Dim password As String
password = "Test123" 'replace Test123 with the password you want
For Each ws In Worksheets
ws.Unprotect password:=password
Next ws
End Sub
Note that the password needs to the same that has been used to lock the worksheets. If it’s not, you will see an error.
Unhide All Rows and Columns
This macro code will unhide all the hidden rows and columns.
This could be really helpful if you get a file from someone else and want to be sure there are no hidden rows/columns.
'This code will unhide all the rows and columns in the Worksheet
Sub UnhideRowsColumns()
Columns.EntireColumn.Hidden = False
Rows.EntireRow.Hidden = False
End Sub
Unmerge All Merged Cells
It’s a common practice to merge cells to make it one. While it does the work, when cells are merged you will not be able to sort the data.
In case you are working with a worksheet with merged cells, use the code below to unmerge all the merged cells at one go.
'This code will unmerge all the merged cells
Sub UnmergeAllCells()
ActiveSheet.Cells.UnMerge
End Sub
Note that instead of Merge and Center, I recommend using the Centre Across Selection option.
Save Workbook With TimeStamp in Its Name
A lot of time, you may need to create versions of your work. These are quite helpful in long projects where you work with a file over time.
A good practice is to save the file with timestamps.
Using timestamps will allow you to go back to a certain file to see what changes were made or what data was used.
Here is the code that will automatically save the workbook in the specified folder and add a timestamp whenever it’s saved.
'This code will Save the File With a Timestamp in its name
Sub SaveWorkbookWithTimeStamp()
Dim timestamp As String
timestamp = Format(Date, "dd-mm-yyyy") & "_" & Format(Time, "hh-ss")
ThisWorkbook.SaveAs "C:UsersUsernameDesktopWorkbookName" & timestamp
End Sub
You need to specify the folder location and the file name.
In the above code, “C:UsersUsernameDesktop is the folder location I have used. You need to specify the folder location where you want to save the file. Also, I have used a generic name “WorkbookName” as the filename prefix. You can specify something related to your project or company.
Save Each Worksheet as a Separate PDF
If you work with data for different years or divisions or products, you may have the need to save different worksheets as PDF files.
While it could be a time-consuming process if done manually, VBA can really speed it up.
Here is a VBA code that will save each worksheet as a separate PDF.
'This code will save each worsheet as a separate PDF
Sub SaveWorkshetAsPDF()
Dim ws As Worksheet
For Each ws In Worksheets
ws.ExportAsFixedFormat xlTypePDF, "C:UsersSumitDesktopTest" & ws.Name & ".pdf"
Next ws
End Sub
In the above code, I have specified the address of the folder location in which I want to save the PDFs. Also, each PDF will get the same name as that of the worksheet. You will have to modify this folder location (unless your name is also Sumit and you’re saving it in a test folder on the desktop).
Note that this code works for worksheets only (and not chart sheets).
Save Each Worksheet as a Separate PDF
Here is the code that will save your entire workbook as a PDF in the specified folder.
'This code will save the entire workbook as PDF
Sub SaveWorkshetAsPDF()
ThisWorkbook.ExportAsFixedFormat xlTypePDF, "C:UsersSumitDesktopTest" & ThisWorkbook.Name & ".pdf"
End Sub
You will have to change the folder location to use this code.
Convert All Formulas into Values
Use this code when you have a worksheet that contains a lot of formulas and you want to convert these formulas to values.
'This code will convert all formulas into values
Sub ConvertToValues()
With ActiveSheet.UsedRange
.Value = .Value
End With
End Sub
This code automatically identifies cells are used and convert it into values.
Protect/Lock Cells with Formulas
You may want to lock cells with formulas when you have a lot of calculations and you don’t want to accidentally delete it or change it.
Here is the code that will lock all the cells that have formulas, while all the other cells are not locked.
'This macro code will lock all the cells with formulas
Sub LockCellsWithFormulas()
With ActiveSheet
   .Unprotect
   .Cells.Locked = False
   .Cells.SpecialCells(xlCellTypeFormulas).Locked = True
   .Protect AllowDeletingRows:=True
End With
End Sub
Related Tutorial: How to Lock Cells in Excel.
Protect All Worksheets in the Workbook
Use the below code to protect all the worksheets in a workbook at one go.
'This code will protect all sheets in the workbook
Sub ProtectAllSheets()
Dim ws As Worksheet
For Each ws In Worksheets
ws.Protect
Next ws
End Sub
This code will go through all the worksheets one by one and protect it.
In case you want to unprotect all the worksheets, use ws.Unprotect instead of ws.Protect in the code.
Insert A Row After Every Other Row in the Selection
Use this code when you want to insert a blank row after every row in the selected range.
'This code will insert a row after every row in the selection
Sub InsertAlternateRows()
Dim rng As Range
Dim CountRow As Integer
Dim i As Integer
Set rng = Selection
CountRow = rng.EntireRow.Count
For i = 1 To CountRow
ActiveCell.EntireRow.Insert
ActiveCell.Offset(2, 0).Select
Next i
End Sub
Similarly, you can modify this code to insert a blank column after every column in the selected range.
Automatically Insert Date & Timestamp in the Adjacent Cell
A timestamp is something you use when you want to track activities.
For example, you may want to track activities such as when was a particular expense incurred, what time did the sale invoice was created, when was the data entry done in a cell, when was the report last updated, etc.
Use this code to insert a date and time stamp in the adjacent cell when an entry is made or the existing contents are edited.
'This code will insert a timestamp in the adjacent cell
Private Sub Worksheet_Change(ByVal Target As Range)
On Error GoTo Handler
If Target.Column = 1 And Target.Value <> "" Then
Application.EnableEvents = False
Target.Offset(0, 1) = Format(Now(), "dd-mm-yyyy hh:mm:ss")
Application.EnableEvents = True
End If
Handler:
End Sub
Note that you need to insert this code in the worksheet code window (and not the in module code window as we have done in other Excel macro examples so far). To do this, in the VB Editor, double click on the sheet name on which you want this functionality. Then copy and paste this code in that sheet’s code window.
Also, this code is made to work when the data entry is done in Column A (note that the code has the line Target.Column = 1). You can change this accordingly.
Highlight Alternate Rows in the Selection
Highlighting alternate rows can increase the readability of your data tremendously. This can be useful when you need to take a print out and go through the data.
Here is a code that will instantly highlight alternate rows in the selection.
'This code would highlight alternate rows in the selection
Sub HighlightAlternateRows()
Dim Myrange As Range
Dim Myrow As Range
Set Myrange = Selection
For Each Myrow In Myrange.Rows
   If Myrow.Row Mod 2 = 1 Then
      Myrow.Interior.Color = vbCyan
   End If
Next Myrow
End Sub
Note that I have specified the color as vbCyan in the code. You can specify other colors as well (such as vbRed, vbGreen, vbBlue).
Highlight Cells with Misspelled Words
Excel doesn’t have a spell check as it has in Word or PowerPoint. While you can run the spell check by hitting the F7 key, there is no visual cue when there is a spelling mistake.
Use this code to instantly highlight all the cells that have a spelling mistake in it.
'This code will highlight the cells that have misspelled words
Sub HighlightMisspelledCells()
Dim cl As Range
For Each cl In ActiveSheet.UsedRange
If Not Application.CheckSpelling(word:=cl.Text) Then
cl.Interior.Color = vbRed
End If
Next cl
End Sub
Note that the cells that are highlighted are those that have text that Excel considers as a spelling error. In many cases, it would also highlight names or brand terms that it doesn’t understand.
Refresh All Pivot Tables in the Workbook
If you have more than one Pivot Table in the workbook, you can use this code to refresh all these Pivot tables at once.
'This code will refresh all the Pivot Table in the Workbook
Sub RefreshAllPivotTables()
Dim PT As PivotTable
For Each PT In ActiveSheet.PivotTables
PT.RefreshTable
Next PT
End Sub
You can read more about refreshing Pivot Tables here.
Change the Letter Case of Selected Cells to Upper Case
While Excel has the formulas to change the letter case of the text, it makes you do that in another set of cells.
Use this code to instantly change the letter case of the text in the selected text.
'This code will change the Selection to Upper Case
Sub ChangeCase()
Dim Rng As Range
For Each Rng In Selection.Cells
If Rng.HasFormula = False Then
Rng.Value = UCase(Rng.Value)
End If
Next Rng
End Sub
Note that in this case, I have used UCase to make the text case Upper. You can use LCase for lower case.
Highlight All Cells With Comments
Use the below code to highlight all the cells that have comments in it.
'This code will highlight cells that have comments`
Sub HighlightCellsWithComments()
ActiveSheet.Cells.SpecialCells(xlCellTypeComments).Interior.Color = vbBlue
End Sub
In this case, I have used vbBlue to give a blue color to the cells. You can change this to other colors if you want.
Highlight Blank Cells With VBA
While you can highlight blank cell with conditional formatting or using the Go to Special dialog box, if you have to do it quite often, it’s better to use a macro.
Once created, you can have this macro in the Quick Access Toolbar or save it in your personal macro workbook.
Here is the VBA macro code:
'This code will highlight all the blank cells in the dataset
Sub HighlightBlankCells()
Dim Dataset as Range
Set Dataset = Selection
Dataset.SpecialCells(xlCellTypeBlanks).Interior.Color = vbRed
End Sub
In this code, I have specified the blank cells to be highlighted in the red color. You can choose other colors such as blue, yellow, cyan, etc.
How to Sort Data by Single Column
You can use the below code to sort data by the specified column.
Sub SortDataHeader()
Range("DataRange").Sort Key1:=Range("A1"), Order1:=xlAscending, Header:=xlYes
End Sub
Note that the I have created a named range with the name ‘DataRange’ and have used it instead of the cell references.
Also there are three key parameters that are used here:
- Key1 – This is the on which you want to sort the data set. In the above example code, the data will be sorted based on the values in column A.
- Order- Here you need to specify whether you want to sort the data in ascending or descending order.
- Header – Here you need to specify whether your data has headers or not.
Read more on how to sort data in Excel using VBA.
How to Sort Data by Multiple Columns
Suppose you have a dataset as shown below:

Below is the code that will sort the data based on multiple columns:
Sub SortMultipleColumns()
With ActiveSheet.Sort
 .SortFields.Add Key:=Range("A1"), Order:=xlAscending
 .SortFields.Add Key:=Range("B1"), Order:=xlAscending
 .SetRange Range("A1:C13")
 .Header = xlYes
 .Apply
End With
End Sub
Note that here I have specified to first sort based on column A and then based on column B.
The output would be something as shown below:


How to Get Only the Numeric Part from a String in Excel
If you want to extract only the numeric part or only the text part from a string, you can create a custom function in VBA.
You can then use this VBA function in the worksheet (just like regular Excel functions) and it will extract only the numeric or text part from the string.
Something as shown below:

Below is the VBA code that will create a function to extract numeric part from a string:
'This VBA code will create a function to get the numeric part from a string
Function GetNumeric(CellRef As String)
Dim StringLength As Integer
StringLength = Len(CellRef)
For i = 1 To StringLength
If IsNumeric(Mid(CellRef, i, 1)) Then Result = Result & Mid(CellRef, i, 1)
Next i
GetNumeric = Result
End Function
You need place in code in a module, and then you can use the function =GetNumeric in the worksheet.
This function will take only one argument, which is the cell reference of the cell from which you want to get the numeric part.
Similarly, below is the function that will get you only the text part from a string in Excel:
'This VBA code will create a function to get the text part from a string
Function GetText(CellRef As String)
Dim StringLength As Integer
StringLength = Len(CellRef)
For i = 1 To StringLength
If Not (IsNumeric(Mid(CellRef, i, 1))) Then Result = Result & Mid(CellRef, i, 1)
Next i
GetText = Result
End Function
So these are some of the useful Excel macro codes that you can use in your day-to-day work to automate tasks and be a lot more productive.
Other Excel tutorials you may like:
- How to Delete Macros in Excel
- How to Enable Macros in Excel?
Macro codes can save you a ton of time.
You can automate small as well as heavy tasks with VBA codes.
And do you know?
With the help of macros…
…you can break all the limitations of Excel which you think Excel has.
And today, I have listed some of the useful codes examples to help you become more productive in your day to day work.
You can use these codes even if you haven’t used VBA before that.
But here’s the first thing to know:
What is a Macro Code?
In Excel, macro code is a programming code which is written in VBA (Visual Basic for Applications) language.
The idea behind using a macro code is to automate an action which you perform manually in Excel, otherwise.
For example, you can use a code to print only a particular range of cells just with a single click instead of selecting the range -> File Tab -> Print -> Print Select -> OK Button.
How to use a Macro Code in Excel
Before you use these codes, make sure you have your developer tab on your Excel ribbon to access VB editor. Once you activate developer tab you can use below steps to paste a VBA code into VB editor.
List of Top 100 macro Examples (CODES) for VBA beginners
I have added all the codes into specific categories so that you can find your favorite codes quickly. Just read the title and click on it to get the code.

- This is my Ultimate VBA Library which I update on monthly basis with new codes and Don’t forget to check the VBA Examples Sectionꜜ at the end of this list.
- VBA is one of the Advanced Excel Skills.
- To manage all of these codes make sure to read about Personal Macro Workbook to use these codes in all the workbooks.
- I have tested all of these codes in different versions of Excel (2007, 2010, 2013, 2016, and 2019). If you found any error in any of these codes, make sure to share with me.
Basic Codes
These VBA codes will help you to perform some basic tasks in a flash which you frequently do in your spreadsheets.
1. Add Serial Numbers
Sub AddSerialNumbers()
Dim i As Integer
On Error GoTo Last
i = InputBox("Enter Value", "Enter Serial Numbers")
For i = 1 To i
ActiveCell.Value = i
ActiveCell.Offset(1, 0).Activate
Next i
Last:Exit Sub
End Sub
This macro code will help you to automatically add serial numbers in your Excel sheet which can be helpful for you if you work with large data.
To use this code you need to select the cell from where you want to start the serial numbers and when you run this it shows you a message box where you need to enter the highest number for the serial numbers and click OK. And once you click OK, it simply runs a loop and add a list of serial numbers to the cells downward.
2. Insert Multiple Columns
Sub InsertMultipleColumns()
Dim i As Integer
Dim j As Integer
ActiveCell.EntireColumn.Select
On Error GoTo Last
i = InputBox("Enter number of columns to insert", "Insert Columns")
For j = 1 To i
Selection.Insert Shift:=xlToRight, CopyOrigin:=xlFormatFromRightorAbove
Next j
Last: Exit Sub
End Sub
This code helps you to enter multiple columns in a single click. When you run this code it asks you the number columns you want to add and when you click OK, it adds entered number of columns after the selected cell. If you want to add columns before the selected cell, replace the xlToRight to xlToLeft in the code.
3. Insert Multiple Rows
Sub InsertMultipleRows()
Dim i As Integer
Dim j As Integer
ActiveCell.EntireRow.Select
On Error GoTo Last
i = InputBox("Enter number of columns to insert", "Insert Columns")
For j = 1 To i
Selection.Insert Shift:=xlToDown, CopyOrigin:=xlFormatFromRightorAbove
Next j
Last: Exit Sub
End Sub
With this code, you can enter multiple rows in the worksheet. When you run this code, you can enter the number of rows to insert and make sure to select the cell from where you want to insert the new rows. If you want to add rows before the selected cell, replace the xlToDown to xlToUp in the code.
4. Auto Fit Columns
Sub AutoFitColumns()
Cells.Select
Cells.EntireColumn.AutoFit
End Sub
This code quickly auto fits all the columns in your worksheet. So when you run this code, it will select all the cells in your worksheet and instantly auto-fit all the columns.
5. Auto Fit Rows
Sub AutoFitRows()
Cells.Select
Cells.EntireRow.AutoFit
End Sub
You can use this code to auto-fit all the rows in a worksheet. When you run this code it will select all the cells in your worksheet and instantly auto-fit all the row.
6. Remove Text Wrap
Sub RemoveTextWrap()
Range("A1").WrapText = False
End Sub
This code will help you to remove text wrap from the entire worksheet with a single click. It will first select all the columns and then remove text wrap and auto fit all the rows and columns. There’s also a shortcut that you can use (Alt + H +W) for but if you add this code to Quick Access Toolbar it’s convenient than a keyboard shortcut.
7. Unmerge Cells
Sub UnmergeCells()
Selection.UnMerge
End Sub
This code simply uses the unmerge options which you have on the HOME tab. The benefit of using this code is you can add it to the QAT and unmerge all the cell in the selection. And if you want to un-merge a specific range you can define that range in the code by replacing the word selection.
8. Open Calculator
Sub OpenCalculator()
Application.ActivateMicrosoftApp Index:=0
End Sub
In Windows, there is a specific calculator and by using this macro code you can open that calculator directly from Excel. As I mentioned that it’s for windows and if you run this code in the MAC version of VBA you’ll get an error.
9. Add Header/Footer Date
Sub DateInHeader()
With ActiveSheet.PageSetup
.LeftHeader = ""
.CenterHeader = "&D"
.RightHeader = ""
.LeftFooter = ""
.CenterFooter = ""
.RightFooter = ""
End With
End Sub
This macro adds a date to the header when you run it. It simply uses the tag «&D» for adding the date. You can also change it to the footer or change the side by replacing the «» with the date tag. And if you want to add a specific date instead of the current date you can replace the «&D» tag with that date from the code.
10. Custom Header/Footer
Sub CustomHeader()
Dim myText As String
myText = InputBox("Enter your text here", "Enter Text")
With ActiveSheet.PageSetup
.LeftHeader = ""
.CenterHeader = myText
.RightHeader = ""
.LeftFooter = ""
.CenterFooter = ""
.RightFooter = ""
End With
End Sub
When you run this code, it shows an input box that asks you to enter the text which you want to add as a header, and once you enter it click OK.
If you see this closely you have six different lines of code to choose the place for the header or footer. Let’s say if you want to add left-footer instead of center header simply replace the “myText” to that line of the code by replacing the «» from there.
Formatting Codes
These VBA codes will help you to format cells and ranges using some specific criteria and conditions.
11. Highlight Duplicates from Selection
Sub HighlightDuplicateValues()
Dim myRange As Range
Dim myCell As Range
Set myRange = Selection
For Each myCell In myRange
If WorksheetFunction.CountIf(myRange, myCell.Value) > 1 Then
myCell.Interior.ColorIndex = 36
End If
Next myCell
End Sub
This macro will check each cell of your selection and highlight the duplicate values. You can also change the color from the code.
12. Highlight the Active Row and Column
Private Sub Worksheet_BeforeDoubleClick(ByVal Target As Range, Cancel As Boolean)
Dim strRange As String
strRange = Target.Cells.Address & "," & _
Target.Cells.EntireColumn.Address & "," & _
Target.Cells.EntireRow.Address
Range(strRange).Select
End Sub
I really love to use this macro code whenever I have to analyze a data table. Here are the quick steps to apply this code.
- Open VBE (ALT + F11).
- Go to Project Explorer (Ctrl + R, If hidden).
- Select your workbook & double click on the name of a particular worksheet in which you want to activate the macro.
- Paste the code into it and select the “BeforeDoubleClick” from event drop down menu.
- Close VBE and you are done.
Remember that, by applying this macro you will not able to edit the cell by double click.
13. Highlight Top 10 Values
Sub TopTen()
Selection.FormatConditions.AddTop10
Selection.FormatConditions(Selection.FormatConditions.Count).S
tFirstPriority
With Selection.FormatConditions(1)
.TopBottom = xlTop10Top
.Rank = 10
.Percent = False
End With
With Selection.FormatConditions(1).Font
.Color = -16752384
.TintAndShade = 0
End With
With Selection.FormatConditions(1).Interior
.PatternColorIndex = xlAutomatic
.Color = 13561798
.TintAndShade = 0
End With
Selection.FormatConditions(1).StopIfTrue = False
End Sub
Just select a range and run this macro and it will highlight top 10 values with the green color.
14. Highlight Named Ranges
Sub HighlightRanges()
Dim RangeName As Name
Dim HighlightRange As Range
On Error Resume Next
For Each RangeName In ActiveWorkbook.Names
Set HighlightRange = RangeName.RefersToRange
HighlightRange.Interior.ColorIndex = 36
Next RangeName
End Sub
If you are not sure about how many named ranges you have in your worksheet then you can use this code to highlight all of them.
15. Highlight Greater than Values
Sub HighlightGreaterThanValues()
Dim i As Integer
i = InputBox("Enter Greater Than Value", "Enter Value")
Selection.FormatConditions.Delete
Selection.FormatConditions.Add Type:=xlCellValue, _
Operator:=xlGreater, Formula1:=i
Selection.FormatConditions(Selection.FormatConditions.Count).S
tFirstPriority
With Selection.FormatConditions(1)
.Font.Color = RGB(0, 0, 0)
.Interior.Color = RGB(31, 218, 154)
End With
End Sub
Once you run this code it will ask you for the value from which you want to highlight all greater values.
16. Highlight Lower Than Values
Sub HighlightLowerThanValues()
Dim i As Integer
i = InputBox("Enter Lower Than Value", "Enter Value")
Selection.FormatConditions.Delete
Selection.FormatConditions.Add _
Type:=xlCellValue, _
Operator:=xlLower, _
Formula1:=i
Selection.FormatConditions(Selection.FormatConditions.Count).S
tFirstPriority
With Selection.FormatConditions(1)
.Font.Color = RGB(0, 0, 0)
.Interior.Color = RGB(217, 83, 79)
End With
End Sub
Once you run this code it will ask you for the value from which you want to highlight all lower values.
17. Highlight Negative Numbers
Sub highlightNegativeNumbers()
Dim Rng As Range
For Each Rng In Selection
If WorksheetFunction.IsNumber(Rng) Then
If Rng.Value < 0 Then
Rng.Font.Color= -16776961
End If
End If
Next
End Sub
Select a range of cells and run this code. It will check each cell from the range and highlight all cells the where you have a negative number.
18. Highlight Specific Text
Sub highlightValue()
Dim myStr As String
Dim myRg As range
Dim myTxt As String
Dim myCell As range
Dim myChar As String
Dim I As Long
Dim J As Long
On Error Resume Next
If ActiveWindow.RangeSelection.Count > 1 Then
myTxt = ActiveWindow.RangeSelection.AddressLocal
Else
myTxt = ActiveSheet.UsedRange.AddressLocal
End If
LInput: Set myRg = _
Application.InputBox _
("please select the data range:", "Selection Required", myTxt, , , , , 8)
If myRg Is Nothing Then
Exit Sub
If myRg.Areas.Count > 1 Then
MsgBox "not support multiple columns"
GoTo LInput
End If
If myRg.Columns.Count <> 2 Then
MsgBox "the selected range can only contain two columns "
GoTo LInput
End If
For I = 0 To myRg.Rows.Count - 1
myStr = myRg.range("B1").Offset(I, 0).Value
With myRg.range("A1").Offset(I, 0)
.Font.ColorIndex = 1
For J = 1 To Len(.Text)
Mid(.Text, J, Len(myStr)) = myStrThen
.Characters(J, Len(myStr)).Font.ColorIndex = 3
Next
End With
Next I
End Sub
Suppose you have a large data set and you want to check for a particular value. For this, you can use this code. When you run it, you will get an input box to enter the value to search for.
19. Highlight Cells with Comments
Sub highlightCommentCells()
Selection.SpecialCells(xlCellTypeComments).Select
Selection.Style= "Note"
End Sub
To highlight all the cells with comments use this macro.
20. Highlight Alternate Rows in the Selection
Sub highlightAlternateRows()
Dim rng As Range
For Each rng In Selection.Rows
If rng.Row Mod 2 = 1 Then
rng.Style = "20% -Accent1"
rng.Value = rng ^ (1 / 3)
Else
End If
Next rng
End Sub
By highlighting alternate rows you can make your data easily readable, and for this, you can use below VBA code. It will simply highlight every alternate row in selected range.
21. Highlight Cells with Misspelled Words
Sub HighlightMisspelledCells()
Dim rng As Range
For Each rng In ActiveSheet.UsedRange
If Not Application.CheckSpelling(word:=rng.Text) Then
rng.Style = "Bad"
End If
Next rng
End Sub
If you find hard to check all the cells for spelling error then this code is for you. It will check each cell from the selection and highlight the cell where is a misspelled word.
22. Highlight Cells With Error in the Entire Worksheet
Sub highlightErrors()
Dim rng As Range
Dim i As Integer
For Each rng In ActiveSheet.UsedRange
If WorksheetFunction.IsError(rng) Then
i = i + 1
rng.Style = "bad"
End If
Next rng
MsgBox _
"There are total " & i _
& " error(s) in this worksheet."
End Sub
To highlight and count all the cells in which you have an error, this code will help you. Just run this code and it will return a message with the number error cells and highlight all the cells.
23. Highlight Cells with a Specific Text in Worksheet
Sub highlightSpecificValues()
Dim rng As range
Dim i As Integer
Dim c As Variant
c = InputBox("Enter Value To Highlight")
For Each rng In ActiveSheet.UsedRange
If rng = c Then
rng.Style = "Note"
i = i + 1
End If
Next rng
MsgBox "There are total " & i & " " & c & " in this worksheet."
End Sub
This code will help you to count the cells which have a specific value which you will mention and after that highlight all those cells.
24. Highlight all the Blank Cells Invisible Space
Sub blankWithSpace()
Dim rng As Range
For Each rng In ActiveSheet.UsedRange
If rng.Value = " " Then
rng.Style = "Note"
End If
Next rng
End Sub
Sometimes there are some cells which are blank but they have a single space and due to this, it’s really hard to identify them. This code will check all the cell in the worksheet and highlight all the cells which have a single space.
25. Highlight Max Value In The Range
Sub highlightMaxValue()
Dim rng As Range
For Each rng In Selection
If rng = WorksheetFunction.Max(Selection) Then
rng.Style = "Good"
End If
Next rng
End Sub
It will check all the selected cells and highlight the cell with the maximum value.
26. Highlight Min Value In The Range
Sub Highlight_Min_Value()

Dim rng As Range

For Each rng In Selection
	If rng = WorksheetFunction.Min(Selection) Then
		rng.Style = "Good"
	End If
Next rng

End Sub
It will check all the selected cells and highlight the cell with the Minimum value.
27. Highlight Unique Values
Sub highlightUniqueValues()
Dim rng As Range
Set rng = Selection
rng.FormatConditions.Delete
Dim uv As UniqueValues
Set uv = rng.FormatConditions.AddUniqueValues
uv.DupeUnique = xlUnique
uv.Interior.Color = vbGreen
End Sub
This codes will highlight all the cells from the selection which has a unique value.
28. Highlight Difference in Columns
Sub columnDifference()
Range("H7:H8,I7:I8").Select
Selection.ColumnDifferences(ActiveCell).Select
Selection.Style= "Bad"
End Sub
Using this code you can highlight the difference between two columns (corresponding cells).
29. Highlight Difference in Rows
Sub rowDifference()
Range("H7:H8,I7:I8").Select
Selection.RowDifferences(ActiveCell).Select
Selection.Style= "Bad"
End Sub
And by using this code you can highlight difference between two row (corresponding cells).
Printing Codes
These macro codes will help you to automate some printing tasks which can further save you a ton of time.
30. Print Comments
Sub printComments()
With ActiveSheet.PageSetup
.printComments = xlPrintSheetEnd
End With
End Sub
Use this macro to activate settings to print cell comments in the end of the page. Let’s say you have 10 pages to print, after using this code you will get all the comments on 11th last page.
31. Print Narrow Margin
Sub printNarrowMargin()
With ActiveSheet.PageSetup
.LeftMargin = Application
.InchesToPoints (0.25)
.RightMargin = Application.InchesToPoints(0.25)
.TopMargin = Application.InchesToPoints(0.75)
.BottomMargin = Application.InchesToPoints(0.75)
.HeaderMargin = Application.InchesToPoints(0.3)
.FooterMargin = Application.InchesToPoints(0.3)
End With
ActiveWindow.SelectedSheets.PrintOut _
Copies:=1, _
Collate:=True, _
IgnorePrintAreas:=False
End Sub
Use this VBA code to take a print with a narrow margin. When you run this macro it will automatically change margins to narrow.
32. Print Selection
Sub printSelection()
Selection.PrintOut Copies:=1, Collate:=True
End Sub
This code will help you print selected range. You don’t need to go to printing options and set printing range. Just select a range and run this code.
33. Print Custom Pages
Sub printCustomSelection()
Dim startpage As Integer
Dim endpage As Integer
startpage = _
InputBox("Please Enter Start Page number.", "Enter Value")
If Not WorksheetFunction.IsNumber(startpage) Then
MsgBox _
"Invalid Start Page number. Please try again.", "Error"
Exit Sub
End If
endpage = _
InputBox("Please Enter End Page number.", "Enter Value")
If Not WorksheetFunction.IsNumber(endpage) Then
MsgBox _
"Invalid End Page number. Please try again.", "Error"
Exit Sub
End If
Selection.PrintOut From:=startpage, _
To:=endpage, Copies:=1, Collate:=True
End Sub
Instead of using the setting from print options you can use this code to print custom page range. Let’s say you want to print pages from 5 to 10. You just need to run this VBA code and enter start page and end page.
Worksheet Codes
These macro codes will help you to control and manage worksheets in an easy way and save your a lot of time.
34. Hide all but the Active Worksheet
Sub HideWorksheet()
Dim ws As Worksheet
For Each ws In ThisWorkbook.Worksheets
If ws.Name <> ThisWorkbook.ActiveSheet.Name Then
ws.Visible = xlSheetHidden
End If
Next ws
End Sub
Now, let’s say if you want to hide all the worksheets in your workbook other than the active worksheet. This macro code will do this for you.
35. Unhide all Hidden Worksheets
Sub UnhideAllWorksheet()
Dim ws As Worksheet
For Each ws In ActiveWorkbook.Worksheets
ws.Visible = xlSheetVisible
Next ws
End Sub
And if you want to un-hide all the worksheets which you have hide with previous code, here is the code for that.
36. Delete all but the Active Worksheet
Sub DeleteWorksheets()
Dim ws As Worksheet
For Each ws In ThisWorkbook.Worksheets
If ws.name <> ThisWorkbook.ActiveSheet.name Then
Application.DisplayAlerts = False
ws.Delete
Application.DisplayAlerts = True
End If
Next ws
End Sub
If you want to delete all the worksheets other than the active sheet, this macro is useful for you. When you run this macro it will compare the name of the active worksheet with other worksheets and then delete them.
37. Protect all Worksheets Instantly
Sub ProtectAllWorskeets()
Dim ws As Worksheet
Dim ps As String
ps = InputBox("Enter a Password.", vbOKCancel)
For Each ws In ActiveWorkbook.Worksheets
ws.Protect Password:=ps
Next ws
End Sub
If you want to protect your all worksheets in one go here is a code for you. When you run this macro, you will get an input box to enter a password. Once you enter your password, click OK. And make sure to take care about CAPS.
38. Resize All Charts in a Worksheet
Sub Resize_Charts()
Dim i As Integer
For i = 1 To ActiveSheet.ChartObjects.Count
With ActiveSheet.ChartObjects(i)
.Width = 300
.Height = 200
End With
Next i
End Sub
Make all chart same in size. This macro code will help you to make all the charts of the same size. You can change the height and width of charts by changing it in macro code.
39. Insert Multiple Worksheets
Sub InsertMultipleSheets()
Dim i As Integer
i = _
InputBox("Enter number of sheets to insert.", _
"Enter Multiple Sheets")
Sheets.Add After:=ActiveSheet, Count:=i
End Sub
You can use this code if you want to add multiple worksheets in your workbook in a single shot. When you run this macro code you will get an input box to enter the total number of sheets you want to enter.
40. Protect Worksheet
Sub ProtectWS()
ActiveSheet.Protect "mypassword", True, True
End Sub
If you want to protect your worksheet you can use this macro code. All you have to do just mention your password in the code.
41. Un-Protect Worksheet
Sub UnprotectWS()
ActiveSheet.Unprotect "mypassword"
End Sub
If you want to unprotect your worksheet you can use this macro code. All you have to do just mention your password which you have used while protecting your worksheet.
42. Sort Worksheets
Sub SortWorksheets()
Dim i As Integer
Dim j As Integer
Dim iAnswer As VbMsgBoxResult
iAnswer = MsgBox("Sort Sheets in Ascending Order?" & Chr(10) _
& "Clicking No will sort in Descending Order", _
vbYesNoCancel + vbQuestion + vbDefaultButton1, "Sort Worksheets")
For i = 1 To Sheets.Count
For j = 1 To Sheets.Count - 1
If iAnswer = vbYes Then
If UCase$(Sheets(j).Name) > UCase$(Sheets(j + 1).Name) Then
Sheets(j).Move After:=Sheets(j + 1)
End If
ElseIf iAnswer = vbNo Then
If UCase$(Sheets(j).Name) < UCase$(Sheets(j + 1).Name) Then Sheets(j).Move After:=Sheets(j + 1)
End If
End If
Next j
Next i
End Sub
This code will help you to sort worksheets in your workbook according to their name.
43. Protect all the Cells With Formulas
Sub lockCellsWithFormulas()
With ActiveSheet
.Unprotect
.Cells.Locked = False
.Cells.SpecialCells(xlCellTypeFormulas).Locked = True
.Protect AllowDeletingRows:=True
End With
End Sub
To protect cell with formula with a single click you can use this code.
44. Delete all Blank Worksheets
Sub deleteBlankWorksheets()
Dim Ws As Worksheet
On Error Resume Next
Application.ScreenUpdating= False
Application.DisplayAlerts= False
For Each Ws In Application.Worksheets
If Application.WorksheetFunction.CountA(Ws.UsedRange) = 0 Then
Ws.Delete
End If
Next
Application.ScreenUpdating= True
Application.DisplayAlerts= True
End Sub
Run this code and it will check all the worksheets in the active workbook and delete if a worksheet is blank.
45. Unhide all Rows and Columns
Sub UnhideRowsColumns()
Columns.EntireColumn.Hidden = False
Rows.EntireRow.Hidden = False
End Sub
Instead of unhiding rows and columns on by one manually you can use this code to do this in a single go.
46. Save Each Worksheet as a Single PDF
Sub SaveWorkshetAsPDF()
Dimws As Worksheet
For Each ws In Worksheets
ws.ExportAsFixedFormat _
xlTypePDF, _
"ENTER-FOLDER-NAME-HERE" & _
ws.Name & ".pdf"
Next ws
End Sub
This code will simply save all the worksheets in a separate PDF file. You just need to change the folder name from the code.
47. Disable Page Breaks
Sub DisablePageBreaks()
Dim wb As Workbook
Dim wks As Worksheet
Application.ScreenUpdating = False
For Each wb In Application.Workbooks
For Each Sht In wb.Worksheets
Sht.DisplayPageBreaks = False
Next Sht
Next wb
Application.ScreenUpdating = True
End Sub
To disable page breaks use this code. It will simply disable page breaks from all the open workbooks.
Workbook Codes
These codes will help you to perform workbook level tasks in an easy way and with minimum efforts.
48. Create a Backup of a Current Workbook
Sub FileBackUp()
ThisWorkbook.SaveCopyAs Filename:=ThisWorkbook.Path & _
"" & Format(Date, "mm-dd-yy") & " " & _
ThisWorkbook.name
End Sub
This is one of the most useful macros which can help you to save a backup file of your current workbook.
It will save a backup file in the same directory where your current file is saved and it will also add the current date with the name of the file.
49. Close all Workbooks at Once
Sub CloseAllWorkbooks()
Dim wbs As Workbook
For Each wbs In Workbooks
wbs.Close SaveChanges:=True
Next wb
End Sub
Use this macro code to close all open workbooks. This macro code will first check all the workbooks one by one and close them. If any of the worksheets is not saved, you’ll get a message to save it.
50. Copy Active Worksheet into a New Workbook
Sub CopyWorksheetToNewWorkbook()
ThisWorkbook.ActiveSheet.Copy _
Before:=Workbooks.Add.Worksheets(1)
End Sub
Let’s say if you want to copy your active worksheet in a new workbook, just run this macro code and it will do the same for you. It’s a super time saver.
51. Active Workbook in an Email
Sub Send_Mail()
Dim OutApp As Object
Dim OutMail As Object
Set OutApp = CreateObject("Outlook.Application")
Set OutMail = OutApp.CreateItem(0)
With OutMail
.to = "Sales@FrontLinePaper.com"
.Subject = "Growth Report"
.Body = "Hello Team, Please find attached Growth Report."
.Attachments.Add ActiveWorkbook.FullName
.display
End With
Set OutMail = Nothing
Set OutApp = Nothing
End Sub
Use this macro code to quickly send your active workbook in an e-mail. You can change the subject, email, and body text in code and if you want to send this mail directly, use «.Send» instead of «.Display».
52. Add Workbook to a Mail Attachment
Sub OpenWorkbookAsAttachment()
Application.Dialogs(xlDialogSendMail).Show
End Sub
Once you run this macro it will open your default mail client and attached active workbook with it as an attachment.
53. Welcome Message
Sub auto_open()
MsgBox _
"Welcome To ExcelChamps & Thanks for downloading this file."
End Sub
You can use auto_open to perform a task on opening a file and all you have to do just name your macro «auto_open».
54. Closing Message
Sub auto_close()
MsgBox "Bye Bye! Don't forget to check other cool stuff on
excelchamps.com"
End Sub
You can use close_open to perform a task on opening a file and all you have to do just name your macro «close_open».
55. Count Open Unsaved Workbooks
Sub VisibleWorkbooks()
Dim book As Workbook
Dim i As Integer
For Each book In Workbooks
If book.Saved = False Then
i = i + 1
End If
Next book
MsgBox i
End Sub
Let’s you have 5-10 open workbooks, you can use this code to get the number of workbooks which are not saved yet.
Pivot Table Codes
These codes will help you to manage and make some changes in pivot tables in a flash.
56. Hide Pivot Table Subtotals
Sub HideSubtotals()
Dim pt As PivotTable
Dim pf As PivotField
On Error Resume Next
Set pt = ActiveSheet.PivotTables(ActiveCell.PivotTable.Name)
If pt Is Nothing Then
MsgBox "You must place your cursor inside of a PivotTable."
Exit Sub
End If
For Each pf In pt.PivotFields
pf.Subtotals(1) = True
pf.Subtotals(1) = False
Next pf
End Sub
If you want to hide all the subtotals, just run this code. First of all, make sure to select a cell from your pivot table and then run this macro.
57. Refresh All Pivot Tables
Sub vba_referesh_all_pivots()
Dim pt As PivotTable
For Each pt In ActiveWorkbook.PivotTables
pt.RefreshTable
Next pt
End Sub
A super quick method to refresh all pivot tables. Just run this code and all of your pivot tables in your workbook will be refresh in a single shot.
58. Create a Pivot Table
Follow this step by step guide to create a pivot table using VBA.
59. Auto Update Pivot Table Range
Sub UpdatePivotTableRange()
Dim Data_Sheet As Worksheet
Dim Pivot_Sheet As Worksheet
Dim StartPoint As Range
Dim DataRange As Range
Dim PivotName As String
Dim NewRange As String
Dim LastCol As Long
Dim lastRow As Long
'Set Pivot Table & Source Worksheet
Set Data_Sheet = ThisWorkbook.Worksheets("PivotTableData3")
Set Pivot_Sheet = ThisWorkbook.Worksheets("Pivot3")
'Enter in Pivot Table Name
PivotName = "PivotTable2"
'Defining Staring Point & Dynamic Range
Data_Sheet.Activate
Set StartPoint = Data_Sheet.Range("A1")
LastCol = StartPoint.End(xlToRight).Column
DownCell = StartPoint.End(xlDown).Row
Set DataRange = Data_Sheet.Range(StartPoint, Cells(DownCell, LastCol))
NewRange = Data_Sheet.Name & "!" & DataRange.Address(ReferenceStyle:=xlR1C1)
'Change Pivot Table Data Source Range Address
Pivot_Sheet.PivotTables(PivotName). _
ChangePivotCache ActiveWorkbook. _
PivotCaches.Create(SourceType:=xlDatabase, SourceData:=NewRange)
'Ensure Pivot Table is Refreshed
Pivot_Sheet.PivotTables(PivotName).RefreshTable
'Complete Message
Pivot_Sheet.Activate
MsgBox "Your Pivot Table is now updated."
End Sub
If you are not using Excel tables then you can use this code to update pivot table range.
60. Disable/Enable Get Pivot Data
Sub activateGetPivotData()
Application.GenerateGetPivotData = True
End Sub
Sub deactivateGetPivotData()
Application.GenerateGetPivotData = False
End Sub
To disable/enable GetPivotData function you need to use Excel option. But with this code you can do it in a single click.
Charts Codes
Use these VBA codes to manage charts in Excel and save your lot of time.
61. Change Chart Type
Sub ChangeChartType()
ActiveChart.ChartType = xlColumnClustered
End Sub
This code will help you to convert chart type without using chart options from the tab. All you have to do just specify to which type you want to convert.
Below code will convert selected chart to a clustered column chart. There are different codes for different types, you can find all those types from here.
62. Paste Chart as an Image
Sub ConvertChartToPicture()
ActiveChart.ChartArea.Copy
ActiveSheet.Range("A1").Select
ActiveSheet.Pictures.Paste.Select
End Sub
This code will help you to convert your chart into an image. You just need to select your chart and run this code.
63. Add Chart Title
Sub AddChartTitle()
Dim i As Variant
i = InputBox("Please enter your chart title", "Chart Title")
On Error GoTo Last
ActiveChart.SetElement (msoElementChartTitleAboveChart)
ActiveChart.ChartTitle.Text = i
Last:
Exit Sub
End Sub
First of all, you need to select your chart and the run this code. You will get an input box to enter chart title.
Advanced Codes
Some of the codes which you can use to preform advanced task in your spreadsheets.
64. Save Selected Range as a PDF
Sub HideSubtotals()
Dim pt As PivotTable
Dim pf As PivotField
On Error Resume Next
Set pt = ActiveSheet.PivotTables(ActiveCell.PivotTable.name)
If pt Is Nothing Then
MsgBox "You must place your cursor inside of a PivotTable."
Exit Sub
End If
For Each pf In pt.PivotFields
pf.Subtotals(1) = True
pf.Subtotals(1) = False
Next pf
End Sub
If you want to hide all the subtotals, just run this code. First of all, make sure to select a cell from your pivot table and then run this macro.
65. Create a Table of Content
Sub TableofContent()
Dim i As Long
On Error Resume Next
Application.DisplayAlerts = False
Worksheets("Table of Content").Delete
Application.DisplayAlerts = True
On Error GoTo 0
ThisWorkbook.Sheets.Add Before:=ThisWorkbook.Worksheets(1)
ActiveSheet.Name = "Table of Content"
For i = 1 To Sheets.Count
With ActiveSheet
.Hyperlinks.Add _
Anchor:=ActiveSheet.Cells(i, 1), _
Address:="", _
SubAddress:="'" & Sheets(i).Name & "'!A1", _
ScreenTip:=Sheets(i).Name, _
TextToDisplay:=Sheets(i).Name
End With
Next i
End Sub
Let’s say you have more than 100 worksheets in your workbook and it’s hard to navigate now.
Don’t worry this macro code will rescue everything. When you run this code it will create a new worksheet and create a index of worksheets with a hyperlink to them.
66. Convert Range into an Image
Sub PasteAsPicture()
Application.CutCopyMode = False
Selection.Copy
ActiveSheet.Pictures.Paste.Select
End Sub
Paste selected range as an image. You just have to select the range and once you run this code it will automatically insert a picture for that range.
67. Insert a Linked Picture
Sub LinkedPicture()
Selection.Copy
ActiveSheet.Pictures.Paste(Link:=True).Select
End Sub
This VBA code will convert your selected range into a linked picture and you can use that image anywhere you want.
68. Use Text to Speech
Sub Speak()
Selection.Speak
End Sub
Just select a range and run this code. Excel will speak all the text what you have in that range, cell by cell.
69. Activate Data Entry Form
Sub DataForm()
ActiveSheet.ShowDataForm
End Sub
There is a default data entry form which you can use for data entry.
70. Use Goal Seek
Sub GoalSeekVBA()
Dim Target As Long
On Error GoTo Errorhandler
Target = InputBox("Enter the required value", "Enter Value")
Worksheets("Goal_Seek").Activate
With ActiveSheet.Range("C7")
.GoalSeek_ Goal:=Target, _
ChangingCell:=Range("C2")
End With
Exit Sub
Errorhandler: MsgBox ("Sorry, value is not valid.")
End Sub
Goal Seek can be super helpful for you to solve complex problems. Learn more about goal seek from here before you use this code.
71. VBA Code to Search on Google
Sub SearchWindow32()
Dim chromePath As String
Dim search_string As String
Dim query As String
query = InputBox("Enter here your search here", "Google Search")
search_string = query
search_string = Replace(search_string, " ", "+")
'Uncomment the following line for Windows 64 versions and comment out Windows 32 versions'
'chromePath = "C:Program FilesGoogleChromeApplicationchrome.exe"
'Uncomment the following line for Windows 32 versions and comment out Windows 64 versions
'chromePath = "C:Program Files (x86)GoogleChromeApplicationchrome.exe"
Shell (chromePath & " -url http://google.com/#q=" & search_string)
End Sub
Formula Codes
These codes will help you to calculate or get results which often you do with worksheet functions and formulas.
72. Convert all Formulas into Values
Sub convertToValues()
Dim MyRange As Range
Dim MyCell As Range
Select Case _
MsgBox("You Can't Undo This Action. " _
& "Save Workbook First?", vbYesNoCancel, _
"Alert")
Case Is = vbYes
ThisWorkbook.Save
Case Is = vbCancel
Exit Sub
End Select
Set MyRange = Selection
For Each MyCell In MyRange
If MyCell.HasFormula Then
MyCell.Formula = MyCell.Value
End If
Next MyCell
End Sub
Simply convert formulas into values. When you run this macro it will quickly change the formulas into absolute values.
73. Remove Spaces from Selected Cells
Sub RemoveSpaces()
Dim myRange As Range
Dim myCell As Range
Select Case MsgBox("You Can't Undo This Action. " _
& "Save Workbook First?", _
vbYesNoCancel, "Alert")
Case Is = vbYesThisWorkbook.Save
Case Is = vbCancel
Exit Sub
End Select
Set myRange = Selection
For Each myCell In myRange
If Not IsEmpty(myCell) Then
myCell = Trim(myCell)
End If
Next myCell
End Sub
One of the most useful macros from this list. It will check your selection and then remove all the extra spaces from that.
74. Remove Characters from a String
Public Function removeFirstC(rng As String, cnt As Long)
removeFirstC = Right(rng, Len(rng) - cnt)
End Function
Simply remove characters from the starting of a text string. All you need is to refer to a cell or insert a text into the function and number of characters to remove from the text string.
It has two arguments «rng» for the text string and «cnt» for the count of characters to remove. For Example: If you want to remove first characters from a cell, you need to enter 1 in cnt.
75. Add Insert Degree Symbol in Excel
Sub degreeSymbol( )
Dim rng As Range
For Each rng In Selection
rng.Select
If ActiveCell <> "" Then
If IsNumeric(ActiveCell.Value) Then
ActiveCell.Value = ActiveCell.Value & "°"
End If
End If
Next
End Sub
Let’s say you have a list of numbers in a column and you want to add degree symbol with all of them.
76. Reverse Text
Public Function rvrse(ByVal cell As Range) As String
rvrse = VBA.strReverse(cell.Value)
End Function
All you have to do just enter «rvrse» function in a cell and refer to the cell in which you have text which you want to reverse.
77. Activate R1C1 Reference Style
Sub ActivateR1C1()
If Application.ReferenceStyle = xlA1 Then
Application.ReferenceStyle = xlR1C1
Else
Application.ReferenceStyle = xlR1C1
End If
End Sub
This macro code will help you to activate R1C1 reference style without using Excel options.
78. Activate A1 Reference Style
Sub ActivateA1()
If Application.ReferenceStyle = xlR1C1 Then
Application.ReferenceStyle = xlA1
Else
Application.ReferenceStyle = xlA1
End If
End Sub
This macro code will help you to activate A1 reference style without using Excel options.
79. Insert Time Range
Sub TimeStamp()
Dim i As Integer
For i = 1 To 24
ActiveCell.FormulaR1C1 = i & ":00"
ActiveCell.NumberFormat = "[$-409]h:mm AM/PM;@"
ActiveCell.Offset(RowOffset:=1, ColumnOffset:=0).Select
Next i
End Sub
With this code, you can insert a time range in sequence from 00:00 to 23:00.
80. Convert Date into Day
Sub date2day()
Dim tempCell As Range
Selection.Value = Selection.Value
For Each tempCell In Selection
If IsDate(tempCell) = True Then
With tempCell
.Value = Day(tempCell)
.NumberFormat = "0"
End With
End If
Next tempCell
End Sub
If you have dates in your worksheet and you want to convert all those dates into days then this code is for you. Simply select the range of cells and run this macro.
81. Convert Date into Year
Sub date2year()
Dim tempCell As Range
Selection.Value = Selection.Value
For Each tempCell In Selection
If IsDate(tempCell) = True Then
With tempCell
.Value = Year(tempCell)
.NumberFormat = "0"
End With
End If
Next tempCell
End Sub
This code will convert dates into years.
82. Remove Time from Date
Sub removeTime()
Dim Rng As Range
For Each Rng In Selection
If IsDate(Rng) = True Then
Rng.Value = VBA.Int(Rng.Value)
End If
Next
Selection.NumberFormat = "dd-mmm-yy"
End Sub
If you have time with the date and you want to remove it then you can use this code.
83. Remove Date from Date and Time
Sub removeDate()
Dim Rng As Range
For Each Rng In Selection
If IsDate(Rng) = True Then
Rng.Value = Rng.Value - VBA.Fix(Rng.Value)
End If
NextSelection.NumberFormat = "hh:mm:ss am/pm"
End Sub
It will return only time from a date and time value.
84. Convert to Upper Case
Sub convertUpperCase()
Dim Rng As Range
For Each Rng In Selection
If Application.WorksheetFunction.IsText(Rng) Then
Rng.Value = UCase(Rng)
End If
Next
End Sub
Select the cells and run this code. It will check each and every cell of selected range and then convert it into upper case text.
85. Convert to Lower Case
Sub convertLowerCase()
Dim Rng As Range
For Each Rng In Selection
If Application.WorksheetFunction.IsText(Rng) Then
Rng.Value= LCase(Rng)
End If
Next
End Sub
This code will help you to convert selected text into lower case text. Just select a range of cells where you have text and run this code. If a cell has a number or any value other than text that value will remain same.
86. Convert to Proper Case
Sub convertProperCase()
Dim Rng As Range
For Each Rng In Selection
If WorksheetFunction.IsText(Rng) Then
Rng.Value = WorksheetFunction.Proper(Rng.Value)
End If
Next
End Sub
And this code will convert selected text into the proper case where you have the first letter in capital and rest in small.
87. Convert to Sentence Case
Sub convertTextCase()
Dim Rng As Range
For Each Rng In Selection
If WorksheetFunction.IsText(Rng) Then
Rng.Value = UCase(Left(Rng, 1)) & LCase(Right(Rng, Len(Rng) - 1))
End If
Next Rng
End Sub
In text case, you have the first letter of the first word in capital and rest all in words in small for a single sentence and this code will help you convert normal text into sentence case.
88. Remove a Character from Selection
Sub removeChar()
Dim Rng As Range
Dim rc As String
rc = InputBox("Character(s) to Replace", "Enter Value")
For Each Rng In Selection
Selection.Replace What:=rc, Replacement:=""
Next
End Sub
To remove a particular character from a selected cell you can use this code. It will show you an input box to enter the character you want to remove.
89. Word Count from Entire Worksheet
Sub Word_Count_Worksheet()
Dim WordCnt As Long
Dim rng As Range
Dim S As String
Dim N As Long
For Each rng In ActiveSheet.UsedRange.Cells
S = Application.WorksheetFunction.Trim(rng.Text)
N = 0
If S <> vbNullString Then
N = Len(S) - Len(Replace(S, " ", "")) + 1
End If
WordCnt = WordCnt + N
Next rng
MsgBox "There are total " _
& Format(WordCnt, "#,##0") & _
" words in the active worksheet"
End Sub
It can help you to count all the words from a worksheet.
90. Remove the Apostrophe from a Number
Sub removeApostrophes()
Selection.Value = Selection.Value
End Sub
If you have numeric data where you have an apostrophe before each number, you run this code to remove it.
91. Remove Decimals from Numbers
Sub removeDecimals()
Dim lnumber As Double
Dim lResult As Long
Dim rng As Range
For Each rng In Selection
rng.Value = Int(rng)
rng.NumberFormat = "0"
Next rng
End Sub
This code will simply help you to remove all the decimals from the numbers from the selected range.
92. Multiply all the Values by a Number
Sub addNumber()
Dim rng As Range
Dim i As Integer
i = InputBox("Enter number to multiple", "Input Required")
For Each rng In Selection
If WorksheetFunction.IsNumber(rng) Then
rng.Value = rng + i
Else
End If
Next rng
End Sub
Let’s you have a list of numbers and you want to multiply all the number with a particular. To use this code: Select that range of cells and run this code. It will first ask you for the number with whom you want to multiple and then instantly multiply all the numbers with it.
93. Add a Number in all the Numbers
Sub addNumber()
Dim rng As Range
Dim i As Integer
i = InputBox("Enter number to multiple", "Input Required")
For Each rng In Selection
If WorksheetFunction.IsNumber(rng) Then
rng.Value = rng + i
Else
End If
Next rng
End Sub
Just like multiplying you can also add a number into a set of numbers.
94. Calculate the Square Root
Sub getSquareRoot()
Dim rng As Range
Dim i As Integer
For Each rng In Selection
If WorksheetFunction.IsNumber(rng) Then
rng.Value = Sqr(rng)
Else
End If
Next rng
End Sub
To calculate square root without applying a formula you can use this code. It will simply check all the selected cells and convert numbers to their square root.
95. Calculate the Cube Root
Sub getCubeRoot()
Dim rng As Range
Dimi As Integer
For Each rng In Selection
If WorksheetFunction.IsNumber(rng) Then
rng.Value = rng ^ (1 / 3)
Else
End If
Nextrng
End Sub
To calculate cube root without applying a formula you can use this code. It will simply check all the selected cells and convert numbers to their cube root.
96. Add A-Z Alphabets in a Range
Sub addsAlphabets1()
Dim i As Integer
For i = 65 To 90
ActiveCell.Value = Chr(i)
ActiveCell.Offset(1, 0).Select
Next i
End Sub
Sub addsAlphabets2()
Dim i As Integer
For i = 97 To 122
ActiveCell.Value = Chr(i)
ActiveCell.Offset(1, 0).Select
Next i
End Sub
Just like serial numbers you can also insert alphabets in your worksheet. Beloware the code which you can use.
97. Convert Roman Numbers into Arabic Numbers
Sub convertToNumbers()
Dim rng As Range
Selection.Value = Selection.Value
For Each rng In Selection
If Not WorksheetFunction.IsNonText(rng) Then
rng.Value = WorksheetFunction.Arabic(rng)
End If
Next rng
End Sub
Sometimes it’s really hard to understand Roman numbers as serial numbers. This code will help you to convert roman numbers into Arabic numbers.
98. Remove Negative Signs
Sub removeNegativeSign()
Dim rng As Range
Selection.Value = Selection.Value
For Each rng In Selection
If WorksheetFunction.IsNumber(rng) Then
rng.Value = Abs(rng)
End If
Next rng
This code will simply check all the cell in the selection and convert all the negative numbers into positive. Just select a range and run this code.
99. Replace Blank Cells with Zeros
Sub replaceBlankWithZero()
Dim rng As Range
Selection.Value = Selection.Value
For Each rng In Selection
If rng = "" Or rng = " " Then
rng.Value = "0"
Else
End If
Next rng
End Sub
For data where you have blank cells, you can use the below code to add zeros in all those cells. It makes easier to use those cells in further calculations.
More Codes
100. More VBA Examples and Tutorials
- User Defined Function [UDF] in Excel using VBA
- VBA Interview Questions
- Add a Comment in a VBA Code (Macro)
- Add a Line Break in a VBA Code (Single Line into Several Lines)
- Add a New Line (Carriage Return) in a String in VBA
- Personal Macro Workbook (personal.xlsb)
- Record a Macro in Excel
- VBA Exit Sub Statement
- VBA Immediate Window (Debug.Print)
- VBA Module
- VBA MSGBOX
- VBA Objects
- VBA With Statement
- Count Rows using VBA
- Excel VBA Font (Color, Size, Type, and Bold)
- Excel VBA Hide and Unhide a Column or a Row
- Excel VBA Range – Working with Range and Cells in VBA
- Apply Borders on a Cell using VBA in Excel
- Find Last Row, Column, and Cell using VBA in Excel
- Insert a Row using VBA in Excel
- Merge Cells in Excel using a VBA Code
- Select a Range/Cell using VBA in Excel
- How to SELECT ALL the Cells in a Worksheet using a VBA Code
- use ActiveCell in VBA in Excel
- How to use Special Cells Method in VBA in Excel
- How to use UsedRange Property in VBA in Excel
- VBA AutoFit (Rows, Column, or the Entire Worksheet)
- VBA ClearContents (from a Cell, Range, or Entire Worksheet)
- VBA Copy Range to Another Sheet + Workbook
- VBA Enter Value in a Cell (Set, Get and Change)
- VBA Insert Column (Single and Multiple)
- VBA Named Range
- VBA Range Offset
- VBA Sort Range | (Descending, Multiple Columns, Sort Orientation
- VBA Wrap Text (Cell, Range, and Entire Worksheet)
- How to CLEAR an Entire Sheet using VBA in Excel
- How to Copy and Move a Sheet in Excel using VBA
- How to COUNT Sheets using VBA in Excel
- How to DELETE a SHEET using VBA in Excel
- How to Hide & Unhide a Sheet using VBA in Excel
- How to PROTECT and UNPROTECT a Sheet using VBA in Excel
- RENAME a Sheet using VBA
- Write a VBA Code to Create a New Sheet
- VBA Worksheet Object
- Activate a Sheet using VBA
- Copy an Excel File (Workbook)
- VBA Activate Workbook (Excel File)
- VBA Close Workbook (Excel File)
- VBA Combine Workbooks (Excel Files)
- VBA Create New Workbook (Excel File)
- VBA Delete Workbook (Excel File)
- VBA Open Workbook (Excel File)
- VBA Protect/Unprotect Workbook (Excel File)
- VBA Rename Workbook (Excel File)
- VBA Save Workbook (Excel File)
- VBA ThisWorkbook (Current Excel File)
- VBA Workbook
- Declare Global Variable (Public) in VBA
- Range or a Cell as a Variable in VBA
- Option Explicit Statement in VBA
- Variable in a Message Box
- VBA Constants
- VBA Dim Statement
- VBA Variables (Declare, Data Types, and Scope)
- VBA Add New Value to the Array
- VBA Array
- VBA Array Length (Size)
- VBA Array with Strings
- VBA Clear Array (Erase)
- VBA Dynamic Array
- VBA Loop Through an Array
- VBA Multi-Dimensional Array
- VBA Range to an Array
- VBA Search for a Value in an Array
- VBA Sort Array
- How to Average Values in Excel using VBA
- Get Today’s Date and Current Time using VBA
- Sum Values in Excel using VBA
- Match Function in VBA
- MOD in VBA
- Random Number
- VBA Calculate (Cell, Range, Row, & Workbook)
- VBA Concatenate
- VBA Worksheet Function (Use Excel Functions in a Macro)
- How to Check IF a Sheet Exists using VBA in Excel
- VBA Check IF a Cell is Empty + Multiple Cells
- VBA Check IF a Workbook Exists in a Folder (Excel File)
- VBA Check IF a Workbook is Open (Excel File)
- VBA Exit IF
- VBA IF – IF Then Else Statement
- VBA IF And (Test Multiple Conditions)
- VBA IF Not
- VBA IF OR (Test Multiple Conditions)
- VBA Nested IF
- VBA SELECT CASE Statement (Test Multiple Conditions)
- VBA Automation Error (Error 440)
- VBA Error 400
- VBA ERROR Handling
- VBA Invalid Procedure Call Or Argument Error (Error 5)
- VBA Object Doesn’t Support this Property or Method Error (Error 438)
- VBA Object Required Error (Error 424)
- VBA Out of Memory Error (Error 7)
- VBA Overflow Error (Error 6)
- VBA Runtime Error (Error 1004)
- VBA Subscript Out of Range Runtime Error (Error 9)
- VBA Type Mismatch Error (Error 13)
- Excel VBA Do While Loop and (Do Loop While)
- How to Loop Through All the Sheets using VBA
- Loop Through a Range using VBA
- VBA FOR LOOP
- VBA GoTo Statement
- Input Box in VBA
- VBA Create and Write to a Text File
- VBA ScreenUpdating
- VBA Status Bar
- VBA Wait and Sleep
About the Author

Puneet is using Excel since his college days. He helped thousands of people to understand the power of the spreadsheets and learn Microsoft Excel. You can find him online, tweeting about Excel, on a running track, or sometimes hiking up a mountain.
Excel for Microsoft 365 Excel for Microsoft 365 for Mac Excel 2021 for Mac Excel 2019 Excel 2019 for Mac Excel 2016 Excel 2016 for Mac Excel 2013 Excel 2010 More…Less
If you have tasks in Microsoft Excel that you do repeatedly, you can record a macro to automate those tasks. A macro is an action or a set of actions that you can run as many times as you want. When you create a macro, you are recording your mouse clicks and keystrokes. After you create a macro, you can edit it to make minor changes to the way it works.
Suppose that every month, you create a report for your accounting manager. You want to format the names of the customers with overdue accounts in red, and also apply bold formatting. You can create and then run a macro that quickly applies these formatting changes to the cells you select.
How?
|
|
Before you record a macro Macros and VBA tools can be found on the Developer tab, which is hidden by default, so the first step is to enable it. For more information, see Show the Developer tab. |


|
|
Record a macro
|

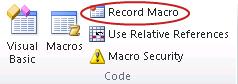
|
|
Take a closer look at the macro You can learn a little about the Visual Basic programming language by editing a macro. To edit a macro, in the Code group on the Developer tab, click Macros, select the name of the macro, and click Edit. This starts the Visual Basic Editor. See how the actions that you recorded appear as code. Some of the code will probably be clear to you, and some of it may be a little mysterious. Experiment with the code, close the Visual Basic Editor, and run your macro again. This time, see if anything different happens! |

Next steps
-
To learn more about creating macros, see Create or delete a macro.
-
To learn about how to run a macro, see Run a macro.
How?
|
|
Before you record a macro Make sure the Developer tab is visible on the ribbon. By default, the Developer tab is not visible, so do the following:
|
|
|
Record a macro
|
|
|
Take a closer look at the macro You can learn a little about the Visual Basic programming language by editing a macro. To edit a macro, in the Developer tab, click Macros, select the name of the macro, and click Edit. This starts the Visual Basic Editor. See how the actions that you recorded appear as code. Some of the code will probably be clear to you, and some of it may be a little mysterious. Experiment with the code, close the Visual Basic Editor, and run your macro again. This time, see if anything different happens! |
Need more help?
You can always ask an expert in the Excel Tech Community or get support in the Answers community.