
Start with the name, job title, company name, address, phone and email, all single-spaced. After that, add a double space and write the salutation. In business letters, it’s common to use “To” or “Dear,” followed by the full name or their title plus the last name.
Contents
- 1 Where do I find business letter templates in Word?
- 2 What is the best format for a business letter?
- 3 What are the 3 formats of a business letter?
- 4 How do you format a letter?
- 5 What is the template for an official letter?
- 6 How do you write a business letter format?
- 7 What is business letters and example?
- 8 How do you start a business letter?
- 9 What are the 14 types of business letter?
- 10 What are the parts of a business letter?
- 11 How do you space a business letter?
- 12 How do you write a business letter in 2020?
- 13 How do you start a formal letter 2020?
- 14 What is a professional business letter?
- 15 What is the format of the business?
- 16 What are the 7 parts of business letter?
- 17 What are the 10 types of business letter?
- 18 How do you end a business letter?
- 19 How do you start the first sentence of a business letter?
- 20 How do you start a letter instead of dear?
Where do I find business letter templates in Word?
To access the templates online:
- Visit Microsoft Letter Templates.
- Type your keyword into the “Search for a Template” bar, or scroll down to view popular categories including, “Resumes and Cover Letters.”
- When you find one you like, click on the letter title to preview the template.
What is the best format for a business letter?
Use a standard business letter format and template: The most widely used format for business letters is “block style,” where the text of the entire letter is justified left. The text is single spaced, except for double spaces between paragraphs.
What are the 3 formats of a business letter?
There are three main styles of business letter: block, modified block, and semi-block styles. Each is written in much the same way, including the same information, but the layout varies slightly for each one. Dear Name: In this type of modified block letter, all the paragraphs line up at the left margin.
These are the general rules you should follow to write a letter:
- Choose the right type of paper.
- Use the right formatting.
- Choose between block or indented form.
- Include addresses and the date.
- Include a salutation.
- Write the body of your letter.
- Include a complimentary close.
- List additional information.
What is the template for an official letter?
A heading that lists your address and the recipient’s address. A formal salutation. One paragraph stating your reasons for writing the letter. Another paragraph expanding further on the introduction paragraph.
How do you write a business letter format?
Business Letter Formats
- Full Block Form. Your Name. Address. Phone Number. E-mail (optional) Date.
- Indented Paragraphs Form. Your Name. Address. Phone Number. E-mail (optional) Date.
- Blocked Paragraphs Form. Your Name. Address. Phone Number. E-mail (optional) Date.
- Simplified Style Form. Your Name. Address. Phone Number. E-mail (optional)
What is business letters and example?
Typically, a business letter includes the following information at the top: Your contact information (Name, job title, company, address, phone number, email) The date. Recipient’s contact information (Name, job title, company, company address)
How do you start a business letter?
While “To whom it may concern:” and “Dear sir” or “Dear madam” are appropriate ways to start a business letter, using the recipient’s name in your salutation will make your business letter feel much warmer and more personal. Confirm and check spelling: Using the correct spelling shows professionalism or care.
What are the 14 types of business letter?
Common types of business letters include:
- Cover letters.
- Thank you letters.
- Complaint letters.
- Adjustment letters.
- Bad news letters.
- Acknowledgment letters.
- Memos.
- Congratulatory letters.
What are the parts of a business letter?
Parts of a Business Letter
- The Heading. The heading contains the return address with the date on the last line.
- Recipient’s Address. This is the address you are sending your letter to.
- The Salutation.
- The Body.
- The Complimentary Close.
- The Signature Line.
- Enclosures.
- Block.
How do you space a business letter?
Properly space the layout of the business letters you write, with space between the heading, the greeting, each paragraph, the closing, and your signature. Single-space your letter and leave a space between each paragraph. When sending typed letters, leave two spaces before and after your written signature.
How do you write a business letter in 2020?
Need help with a business letter format?
- Use a block format which keeps all of your writing in line with the left margin.
- Keep a 2.5cm (1″) margin of white space around your letter on all sides.
- Add an extra line between the sender address and the date.
- Add another line between the date and the recipient address.
How do you start a formal letter 2020?
How to Write a Formal Letter?
- Address or greet the concerned person properly like Dear Sir/Madam.
- Always mention the subject of writing the letter.
- Be concise in your letter.
- The tone of the letter should be very polite and not harsh.
- Write in a proper format and take care of the presentation of a letter.
What is a professional business letter?
A business letter is a professional piece of correspondence.Plus, it ensures that the letter’s recipient can focus on your message (and not on formatting inconsistencies, typos, or any other small but distracting errors).
What is the format of the business?
They are: Sole Proprietorship, Partnership, Corporation, Limited Liability Company, and Franchise. Each has different tax consequences, advantages, and disadvantages. As the business grows, changing the business format may also be beneficial.
What are the 7 parts of business letter?
Experts generally agree that there are seven basic parts in a business letter:
- Sender’s address. Optimally, you want to have printed company letterhead.
- Date. Whoever receives the letter needs to know when the letter was written.
- Recipient’s address.
- Salutation.
- Body.
- Closing/signature.
- Enclosures.
What are the 10 types of business letter?
There are many standard types of business letters, and each of them has a specific focus.
- Sales Letters.
- Order Letters.
- Complaint Letters.
- Adjustment Letters.
- Inquiry Letters.
- Follow-Up Letters.
- Letters of Recommendation.
- Acknowledgment Letters.
How do you end a business letter?
10 best letter closings for ending of a formal business letter
- 1 Yours truly.
- 2 Sincerely.
- 3 Thanks again.
- 4 Appreciatively.
- 5 Respectfully.
- 6 Faithfully.
- 6 Regards.
- 7 Best regards.
How do you start the first sentence of a business letter?
An opening paragraph
The first paragraph should state the purpose of the letter so that the reader knows what to expect. You can use phrases like: I am writing to inquire about …/thank you for …/apply for the position of …/complain about …/request …
How do you start a letter instead of dear?
You may start a letter with just a name, you don’t need to use “dear” at all. If you have no name, then just say “to whom it may concern“.
- Dear.
- To whom it may concern.
- {insert name of addressee}
- Greetings.
- Salutations.
- Hello.
- Ms./Mr./Mrs./Dr. {insert name of addressee}
- Sir/Madam.
Letters are still an important part of the world’s ecosystem. Even though letters have become an endangered form of communication, they are still important in formal settings and people still need to write letters for a multitude of different reasons. That being the case, even the computers of today are capable of allowing users to easily write letters using them. If you want to type a letter on a Windows computer, however, you have a few different options – you can either simply open up a fresh instance of WordPad and manually type and format your letter like a caveman, or you can opt for the fancier option and type your letter using Microsoft Word.
One might wonder how using typing a letter using Microsoft Word is the ‘fancier’ option – won’t you have to manually type and format your letter if you create it using Microsoft Word? Well, you’ll only have to type most of your letter if you type it using Microsoft Word, and if you do it right, your letter’s formatting will be taken care of for you. How is that possible? Well, Microsoft Word comes with a wide array of different document templates pre-installed on it – these templates also include templates for letters.
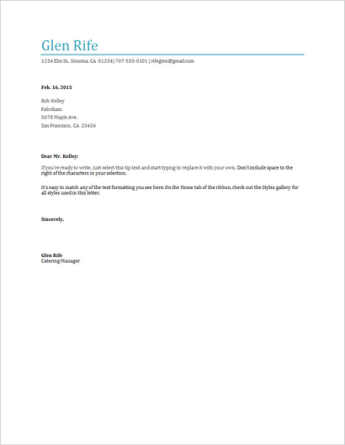
A letter template in Microsoft Word has an entire outline of what a letter should look like – from the greeting to the body and from the closing message to the signature area – and all you have to do is fill in the blanks and replace the placeholder text with the actual matter for your letter. Some letter templates even have visual elements meant to improve the appearance of your letter and make it more appealing and engaging. There are templates for all kinds of different letters, and if you don’t find a letter template that fits your requirements among the templates that came pre-installed on Word, you can simply download a template that is more your pace or get one from Microsoft Office Online.
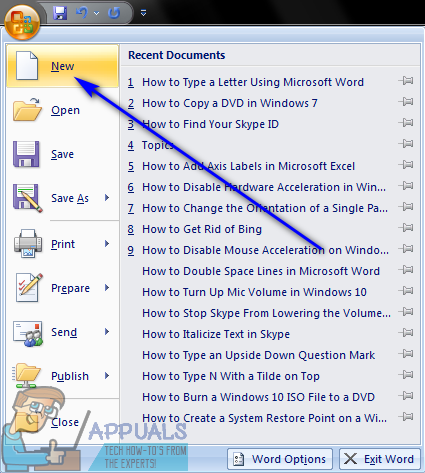
Typing a letter on Microsoft Word using a letter template is actually pretty easy. To use a letter template to type a letter on Microsoft Word, you need to:
- Launch Microsoft Word.
- Depending on what version of Microsoft Word you are using, click on File in the toolbar or on the Microsoft Office logo.
- Click on New.

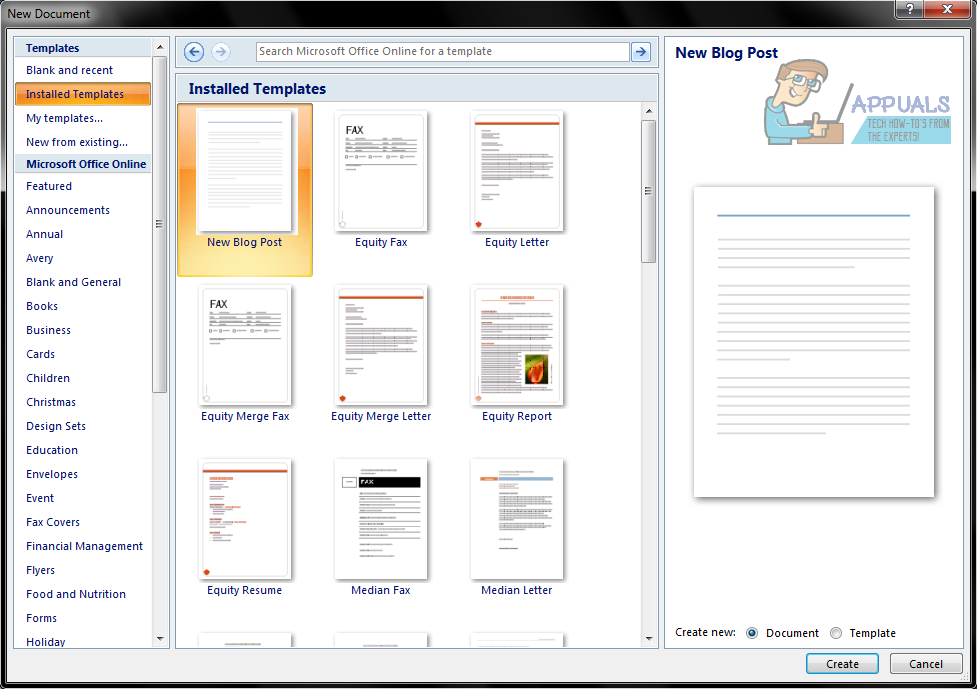
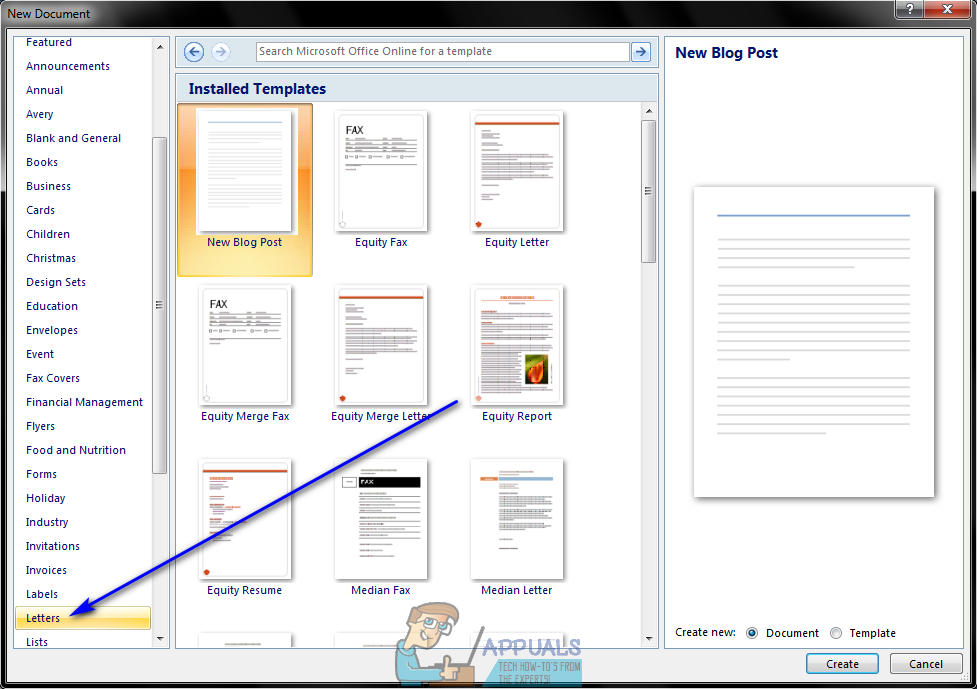
- In the left pane, click on Installed Templates under the Templates section.
- Look through the templates pre-installed on Word, look for a letter template that meets your requirements and click on it to select it. If you do not find a template that fits the bill in the templates installed on Microsoft Word, simply download one that is more what you’re looking for from the internet, or click on Letters in the left pane, locate a template that is exactly what you need and click on Download to download and use it.

- Click on Create. When you do so, Microsoft Word will create a new document based on the template you selected.
- Type in the corresponding information in the prompted spaces (your name, your address and the recipient’s name, for example), type in the body of the letter as you normally would, and sign the letter with your name in the space designated for your signature.

- Make sure the letter looks exactly how you wanted it to, and save it.

Once you’re done, you can go ahead and get the letter to whoever it is addressed to. You can email the letter to the recipient or print the letter out and have it sent to them. If you opt to have the letter printed out, it is recommended that you sign the letter with a pen instead of just your name in typing for a more professional and formal touch.

Kevin Arrows
Kevin Arrows is a highly experienced and knowledgeable technology specialist with over a decade of industry experience. He holds a Microsoft Certified Technology Specialist (MCTS) certification and has a deep passion for staying up-to-date on the latest tech developments. Kevin has written extensively on a wide range of tech-related topics, showcasing his expertise and knowledge in areas such as software development, cybersecurity, and cloud computing. His contributions to the tech field have been widely recognized and respected by his peers, and he is highly regarded for his ability to explain complex technical concepts in a clear and concise manner.
Back to top button
Writing a letter like this while you’re online is quick and easy.
Choose one of our letter templates, and open it in Word for the web to make it yours.
Tip: If you’re already in Word for the web, get to the letter templates by going to File > New, and then below the template images click More on Office.com.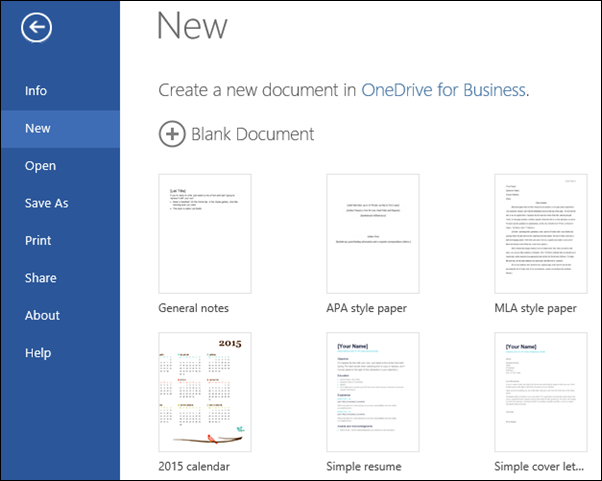
You’ll be on the Templates for Word page. In the list of categories, click Letters.
As you work on the letter, you’ll probably want to rename it.
Send your letter
When you’re finished, print it or send it out electronically. You can do this with the letter still open in Word for the web. No need to save it first (that’s already done for you).
Print it
To print it, press Ctrl+P, and wait for the Print dialog.
Note: If you don’t see a Print dialog box, click the link for opening a PDF version of your letter. From there, use the PDF program’s Print command.
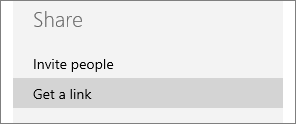
Send a link to your letter
For an electronic version of your letter, send out a link:
-
Near the top of the screen, click Share.
-
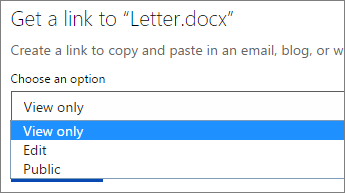
Under Share, click Get a Link.

-
Under Choose an option, click View only.
-
Click Create Link.
-
Click on the web address to select it, and then copy and paste it into an email, message, or post.
Need more help?
A business letter is a document that is used for formal correspondence between an organization and its clients, employees, partners or other stakeholders. The formality of the business letter often depends on the brand of the company, the purpose of the letter and the relationship between the sender and the receiver. In any case, it’s important to understand the conventions of business letter writing so you can adjust them based on your specific needs.
Selecting a Format and Template
Decide whether your letter will be sent to the recipient in hard copy or email format. This will depend on the purpose of the letter and the recipient. Business letters can be sent with sales proposals to clients, outlining the key points of the proposal. They can also be used to provide a reference for an employee. Figure out how the recipient would like the information you are sending and go with that format.
There are business letter templates available in Microsoft Word that can be used to format the content. In most cases, business letters follow a block style letter format, which means that all text is justified to the left of the page. The letter is single spaced, with double spaces between paragraphs. A double space is also known as a carriage return, and can be done by pressing “Enter” on the keyboard.
Setting Margins
In most business letter templates, the margins of the letter are set at 1 inch on all sides of the page. In some cases, you may need to adjust the margins of your business letter. For example, if your business letter is accompanying other documents like a sales proposal or spreadsheets that have different margins, you may want to adjust your letter margins to match the rest of the documents, providing a consistent look for the recipient.
Selecting Fonts
Fonts are categorized into two areas: serif and sans serif. Serif fonts have a small protruding stroke that is attached to the larger lines. Times New Roman, Garamond and Bookman Old Style are examples of serif fonts. Serif fonts are usually better for printed materials. Most businesses use Times New Roman.
Sans-serif fonts don’t have the small protruding strokes on the larger lines of the letters. Examples of sans-serif fonts are Arial, Helvetica and Verdana. Generally, sans-serif fonts are better used for online materials. Regardless of whether you choose a serif or sans-serif font, it’s best to avoid novelty fonts like Comic Sans or anything with cursive writing, as those can be difficult to read and appear unprofessional.
The size of font you choose may depend on the amount of content you have for your letter and other materials you’re sending with it. Match the other materials if possible for consistency. Most commonly, business letters are written in 10- or 12-point font size.
Writing Preliminaries
Start the business letter with your contact information, including your name, job title, address, phone number and email. Use single-space lines and then a double space before the date.
Write the date in the month, day, year format. Add another double space, and then write in the recipients contact information. Start with the name, job title, company name, address, phone and email, all single-spaced.
After that, add a double space and write the salutation. In business letters, it’s common to use “To” or “Dear,” followed by the full name or their title plus the last name. In business letters, use a colon after the name, instead of a comma as in personal letters.
Communicating the Message in the Body Paragraphs
Enter a double space and begin writing the body paragraphs. These should be single-spaced, with a double space between each paragraph. Keep the content succinct and clear. State the reason for the letter, some supporting information and a call to action if necessary.
Closing with an Appropriate Salutation
Add another double space and then end the letter with an appropriate closing, such as “Sincerely” or “Thank you for your time.” Enter a few double spaces to leave room for a signature, and then type your full name. If you’re printing the letter, you can sign it in blue or black ink. If you’re emailing the letter, you can use an electronic signature instead.
If you’re sending along additional documents with the letter, you can double space after your name and write “Enclosures.” After that, list the names of the documents you’re sending along on the next line.
![]()
Download Article
Learn the basics of formatting a Microsoft Word document
![]()
Download Article
- Formatting the Layout
- Formatting Text
- Adding Pictures, Graphs, & Tables
- Using a Formatted Template
- Saving in Other Formats
- Q&A
|
|
|
|
|
Microsoft Word is the world’s most popular word processing app. Depending on what kind of legal, formal, or personal paper you’re writing, each has its own formatting guidelines. Fortunately, Microsoft Word makes it easy to format the layout, text, and other objects in your document. If you’re new to using Microsoft Word, don’t worry. You can be formatting your document like a pro in no time. This wikiHow guide will teach you simple ways to format a Word document on your PC or Mac computer.
Things You Should Know
- You can find most of the formatting tools you’ll need in the Ribbon menu at the top of your document.
- If you don’t want to do all the formatting from scratch, try using one of Word’s premade templates.
- Save your document in different file formats using the Save a Copy or Save As menu.
-
1
Explore the Word user interface. You can access most of Word’s formatting tools from the Menu Bar or the Ribbon at the top of the window. You can modify which tools are visible using the View menu.
- The Menu Bar is the area at the top of the screen where you will find File, Edit, View, and other important menu commands.
- The Ribbon is at the top of your workspace and contains icons, menus, and shortcuts to common tasks.
-
2
Align your document. Different types of documents call for different text alignments. You can choose whether to align your entire document to the left, right, or at the center on the Home tab by clicking the Alignment buttons in the «Paragraph» section.
- These are the buttons that look like a small version of a document, with small black lines arranged according to their button’s alignment function.
- You can also adjust alignment by selecting the text and objects you want to align, right-clicking the selection, and choosing Paragraph. Select your preferred alignment from the Alignment menu under the General header.
- You can either set the alignment for the whole document or just a selected piece of text.
Advertisement
-
3
Set the line spacing of your document. Need to change your document to single or double-space? You can adjust the spacing of your entire document, or for selected text.
- If you haven’t begun typing or adding content to your Word document, click the Home tab, click the «Line and Paragraph Spacing» icon (a row of lines with vertical arrows to the left of the lines pointing up and down, and select an option.
- If your document already has text or other content, press Ctrl + A (PC) or Cmd + A (Mac) to select everything in the document, right-click the selection, and choose Paragraph. You can then choose your desired spacing from the «Line Spacing» menu.
- For a single-spaced document, choose 1.0. For double-spacing, choose 2.0.
- Many professional documents, like college essays and cover letters, should be double-spaced.
-
4
Adjust the page orientation. If you need to write the document in a different orientation, click the Layout tab at the top of Word, select Orientation, and choose either Portrait or Landscape.
-
5
Change the size of the paper. If you need to print the document on a specific paper size, click the Layout tab, click Size, and then select your desired size from the drop-down list.
- This will change the virtual size of the document you’re writing as well as the actual size of the printout.
-
6
Adjust the headers and footers. A header contains details that will appear on every page of the paper, such as page numbers, your name, or the document title.
- To set the header of your document, double-click on the topmost part of the page, and the header field will appear. You can also click the Insert tab and select Header.
- Footers are just like headers. All text in the footer will appear at the bottom of each page of your document. To set the footer, double-click on the bottommost part of the page, and the footer field will appear. You can also use the Footer button on the Insert tab.
- You can also format your headers and footers by selecting the View tab and clicking Header and Footer on the list. This action will open the headers and footers on your page and allow you to edit them.
-
7
Insert page or section breaks with the Breaks menu. Go to the Layout tab in the and click Breaks if you want to start a new page or section in your document. You can choose from a variety of types of breaks, including Page, Column, and Section. This is a very useful tool if you need to format different sections of your document in different ways.[1]
- For example, you can use section or page breaks to help you format your page numbers so that the numbering restarts with each new section.
-
8
Adjust the margin size with the Margins tool. Click the Margins button in the Layout tab and select a margin from the pre-defined margin settings listed on the drop-down list.
- If you want to use your own margin measurements, click Custom Margins at the very bottom of the drop-down list to set your own.
-
9
Add columns to split your text vertically on the page. If you need to create a newspaper-like document, you can do so by adjusting the format of the document to columns. Click the Layout tab, select the Columns option, and choose the number and alignment of columns from the drop-down list.
- The Columns button looks like a rectangle with two vertical columns of blue lines on it.
- If you want to create one, two, or three columns, you can do so from the preset options. If you’d like to create more, you’ll need to choose More Columns from the bottom of the dropdown menu.
- Note that this column option is different from the columns you get when you insert items like tables on your document.
-
10
Add bullets and numbers to make lists. Highlight the text that you would like to be numbered or bulleted and click the Numbering or Bullets button on the Home tab of the Ribbon.
- These buttons can be found side by side on the Ribbon, near the alignment buttons. The Numbering button displays three small lines with numbers to the left of the lines and the Bullets button displays three small lines with bullet points to the left of the lines.
- There’s also a third button that allows you to create more elaborate multi-level list styles, which is useful for formatting outlines.
-
11
Experiment with document styles. All documents have standard built-in styles (for example, Normal, Title, Heading 1). The default style for text is Normal. The template that a document is based on (for example, Normal.dotx) determines which styles appear on the Ribbon and on the Styles tab. You can see the current style presets for your document in the Home tab of the Ribbon.
- Before you apply a style, you can see all of the available styles and preview how they will appear when applied.
- On the Home tab, click a style to apply it to selected text.
- Click the Styles Pane button (the arrow pointing down and to the right) to view and select from advanced Style options.
- By default, Word applies a paragraph style (for example, Heading 1) to the entire paragraph. To apply a paragraph style to part of a paragraph, select only the specific part that you wish to modify.
-
12
Reveal hidden formatting symbols if you’re having trouble. Word documents often contain hidden code that can cause frustrating problems when you’re trying to modify your formatting. For instance, an invisible extra paragraph mark or section break can create unwanted spaces between paragraphs or lines of text. To see formatting symbols that are normally hidden so you can delete or modify them, you can click the ¶ button in the Home tab, or try one of the following:[2]
- On Windows, open File, select Options, and click Display. Tick the box next to Show all formatting marks.
- In Word for Mac, open the Word menu, then Preferences, then View. Check the box next to All in the Show Non-Printing Characters section of the View menu.
-
13
Use the View menu to change your view of the document. The View menu can let you change how your document looks in Word without actually making changes to the format. For example, Print Layout will show approximately what your document will look like when it’s printed out, while Web Layout will display the whole document in one long chunk without any page breaks.
- The View menu also lets you zoom in and out on your document.
- You can also change your view with the buttons and zoom slider at the bottom right side of the document pane, or with the View tab in the Ribbon.


Advertisement
-
1
Change the font face. On the Home tab, you will a drop-down menu containing a list of fonts to choose from. Use your mouse to select the text you want to change, then choose a font from the list.
-
2
Change font size and color. Also on the Home tab, you can change the size, color, and highlighting for your font. Select the text you want to format, then choose your options.
- By default, they will be set to the size and font associated with your document’s current Style settings. For example, if you’re using Word’s default template, the Normal style will use Calibri as the default font and 12 pt. as the default text size.
- Always consider the formatting guidelines of the document you are writing when choosing the font style and size.
- The standard font for most college and professional papers is Times New Roman font, text size 12.
-
3
Make text bold, underlined, or italicized. Besides setting the font style and size, you can also adjust the emphasis of words and lines in your document. Near the font and text size menus, you will see the Bold, Italics, and Underline buttons.
- Just click the buttons to make your text bold, underlined, or italicized.
- In this section, you can also find special text formatting options such as Strikethrough, Subscript, and Superscript.
-
4
Highlight text on the page. If you would like to change the background color behind selected text, similar to using a highlighter on a printed page, click the Text Highlight icon, which is a pen above a colored line.
- You can also add special text effects with the Text Effects button, which looks like a capital A with a glowing blue border.


Advertisement
-
1
Drag an image into your document. This is a quick way to add a picture to your Word document. Simply select an image on your desktop and drag and drop it into the document window. Make sure your image is placed exactly where you want it before you drop it.
- You can also insert an image by going to the Insert tab, then clicking Pictures. Select one of the options to browse for images on your computer, the web, or Word’s gallery of stock photos.
- You can also insert graphics or other media (such as video or audio clips) using the Shapes, Icons, or 3D Models, and Media buttons.
-
2
Enable text wrapping. Text wrapping changes the layout of your document, allowing the text to flow around the image no matter where it is placed. To turn on text wrapping:
- Right-click (or ctrl-click, on a Mac) on the image and hover over Wrap Text. Select the alignment that best suits your document. You will see a preview as you hover over each option.
- To change the location of the image in the document, select the image and then hold the Ctrl key. While holding the key, use the arrow keys to move the picture around the document.
- When you right-click or ctrl-click your image, you’ll also see an option in the context menu to add a caption under your image.
-
3
Edit your image in the Picture Format tab. Once you insert your image, you can select it to open a new Picture Format tab in the ribbon. From there, you can choose from a variety of tools, such as:
- Making corrections or adding artistic filters to the image
- Adding style effects, such as a drop shadow or frame, to the picture
- Entering alt text
- Tweaking the position of your image or changing the text-wrap settings
-
4
Add a graph or chart in the Insert tab. Click the Insert tab on the Ribbon, and then click the Chart option. Choose your preferred type of graph, such as a pie or bar chart, from the dropdown menu.
- Depending on the type of chart or graph you choose, Word may automatically launch Excel and create a new spreadsheet, where you can enter data for your chart.
-
5
Modify your graph. When you choose a graph type, a new tab will appear in the Ribbon menu called Chart Design. Navigate to that tab with the chart selected to make changes to the look of your graph or chart, or choose the Edit in Excel button to make changes to the data in your chart.
-
6
Use the Table tool to insert a table. If you want to add a table to your document, head over to the Insert tab and click the Table button. A menu will pop open where you can either scroll over a grid of squares to select your number of rows and columns, or select an option like Insert Table or Draw Table.
- Insert Table opens a pop-up menu where you can specify parameters like the number of rows and columns and whether or not the contents of the table autofit your document window.
- The Draw Table tool allows you to draw the table with your mouse directly in the document.
- Once you start creating a table, you’ll see several new table editing tools in the Layout tab.


Advertisement
-
1
Choose a template from the New Documents pane. Templates are a great way to create a nice-looking document without having to do all the formatting from scratch. To use one, open Word and select New from the side menu to create a new document, or select New from Template from the File menu. Click one of the templates on the screen to select it.[3]
- If you don’t see a template you like, use the Search bar at the top of the window to find one that fits your needs. For instance, use keywords like “flyer,” “resume,” or “research paper” to find different styles of templates.
-
2
Click Create to open the template. The template will open as a new document.
-
3
Select text within the template to modify it. Word templates are simply preformatted documents with text, graphics, and other elements already in place. To add your own text, select text anywhere on the document and type in your own. The new text will have the same format as whatever text you selected and replaced. You can also click on a blank area of the document and start typing to add new text.
- To select a single word, double-click it. You can select longer pieces of text by clicking and dragging your mouse, or positioning your cursor at the start of the selection and holding down Shift while pressing the Right Arrow key.
- You can also select and move, delete, or replace other elements in the template, such as images, graphs, or tables.
-
4
Modify your template with the Styles pane. Templates use styles to create their distinctive looks. If you want to change the look of the template, click the Styles button in the Home tab of the ribbon toolbar. Click the down arrow next to any of the style elements and select Modify Style… to make changes.
- You can also make any other types of changes you like using the rest of the tools in the ribbon menu or Format menu.
-
5
Save your modified template as a document. When you’ve made the changes you want to the template, save it the same way you would any other Microsoft Word document.


Advertisement
-
1
Click the file menu and select Save a Copy…. If you want to save a document as a file type other than .DOCX, you can do so with the Save a Copy function.
- If it’s a brand-new document that you haven’t already saved, select Save As… instead.
-
2
Open the File Format dropdown menu. You’ll see this menu at the bottom of the Save a Copy or Save As window.
-
3
Select the format you want from the menu. In addition to common formats like .DOC, .DOCX, .TXT and .RTF, you can also save your document as a PDF, an XML file, or a macro-enabled Word file.
- Check out the list of file formats that are supported in word here.


Advertisement
Add New Question
-
Question
What is Microsoft publishing?

UK_Gamer05
Community Answer
Publisher is a tool for making posters, leaflets, booklet,s etc. It’s for when you need to create something that isn’t a standard document.
-
Question
How do I move from page one to page two of a Word document?
UK_Gamer05
Community Answer
In Word 2016, on the insert tab, either select insert new page or page break.
Ask a Question
200 characters left
Include your email address to get a message when this question is answered.
Submit
Advertisement
Thanks for submitting a tip for review!
Tip
- Unless free-handedly writing your paper, consult the guidelines of your document first before adjusting its format.
- Besides the header, footer, and page layout formats (which affect the entire document), all the other formatting tools can be applied only on specific parts of the document.
About This Article
Thanks to all authors for creating a page that has been read 310,004 times.