
Excel for Microsoft 365 Word for Microsoft 365 PowerPoint for Microsoft 365 Excel 2021 Word 2021 PowerPoint 2021 Excel 2019 Word 2019 PowerPoint 2019 Excel 2016 Word 2016 PowerPoint 2016 Excel 2013 Word 2013 PowerPoint 2013 Excel 2010 Word 2010 PowerPoint 2010 More…Less
You can change the font size for all text or just selected text in desktop Excel, PowerPoint, or Word.
Change the default font size for all text
The way you change the default font size varies by app. Select your app below, and then follow the steps.
-
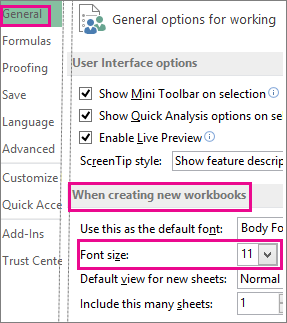
Click File > Options.
-
In the dialog box, click General.
-
Under When creating new workbooks, in the Font Size box, enter the font size you want.

Or, you can type in any size you want, between 1 and 409, in multiples of .5, such as 10.5 or 105.5. You can also choose a different default font style.
Note: To begin using the new default font size or font, you must restart Excel. The new default font and font size are used only in new workbooks created after you restart Excel; any existing workbooks are not affected. To use the new default font and size in existing workbooks, move worksheets from an existing workbook to a new workbook.
To change the font size for all slides, change it on the slide master. Every PowerPoint presentation contains a slide master with related slide layouts.
Note: If you want to change the theme, you should do that before changing the font, as a different theme may use different fonts.
-
On the View tab, click Slide Master.
In Slide Master View, the slide master is at the top of the thumbnail pane with the related layouts beneath it.
-
Click the slide master to change the font on all slides, or click any of the layouts to change the font size on just that layout.
-
On the slide master or layout, select the level of placeholder text for which you want to change the font size.
-
On the Home tab, click the font size you want in the Font Size box.
You can also type in any size you want in multiples of .1, such as 10.3 or 105.7.
The bullet automatically increases or decreases in size to match the font size changes.
-
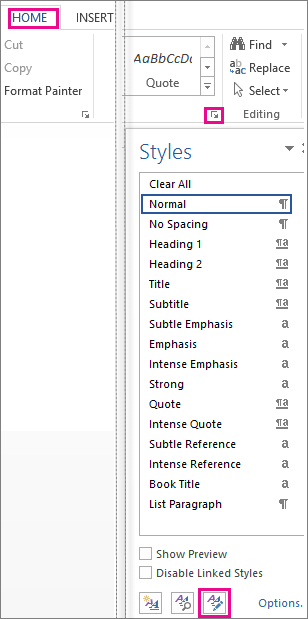
Open a new blank document.
-
On the Home tab, in the Styles group, click the dialog box launcher
..Or press Ctrl+Alt+Shift+S.
-
Click the Manage Styles button (third from left at the bottom).
-
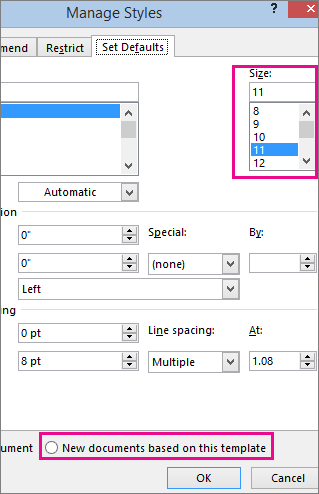
Click the Set Defaults tab and pick the size you want in the Size box.
You can also type in any size you want, between 1 and 1638, in multiples of .5, such as 10.5 or 105.5.
-
Click the New documents based on this template option.
-
Close and reopen Word. If you’re prompted to save the Normal template, say Yes.
Tip: You can also change the default font or font color on the Set Defaults tab.
 ..
..
When you set a default font, every new document you open will use the font settings you selected and set as the default. The default font applies to new documents that are based on the active template, usually Normal.dotm. You can create different templates to use different default font settings.
Change the size of selected text
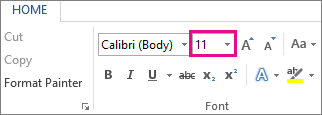
To change the font size of selected text in desktop Excel, PowerPoint, or Word:
-
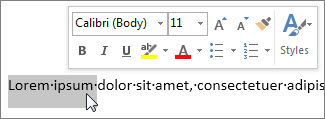
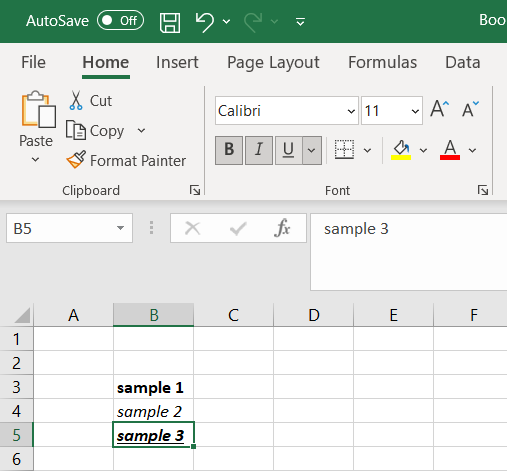
Select the text or cells with text you want to change. To select all text in a Word document, press Ctrl + A.
-
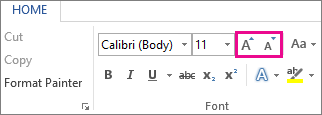
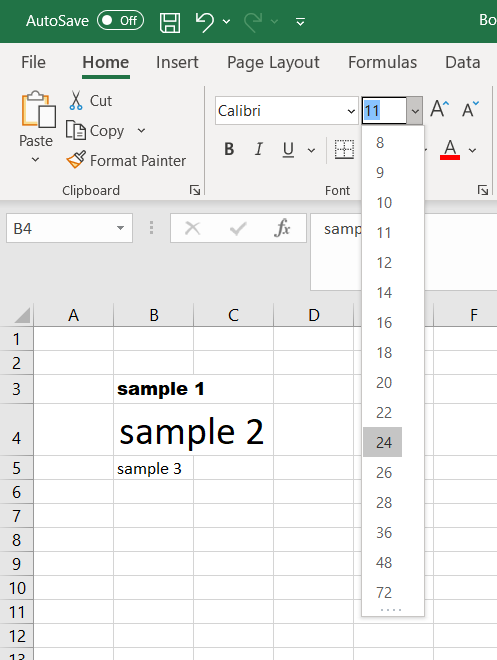
On the Home tab, click the font size in the Font Size box.
You can also type in any size you want, within the following limits:
-
Excel: between 1 and 409, between 1 and 409, in multiples of .5 (such as 10.5 or 105.5)
-
PowerPoint: between 1 and 3600, in multiples of .1 (such as 10.3 or 105.7)
-
Word: between 1 and 1638, in multiples of .5 (such as 10.5 or 105.5)
-
Tips:
-
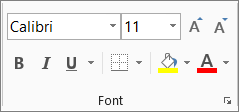
When you select text, a mini toolbar appears near your cursor. You can also change the text size in this toolbar.
-
You can also click the Increase Font Size or Decrease Font Size (Grow Font and Shrink Font in some earlier versions of Office programs) icons until the size you want is displayed in the Font Size box.
See Also
Change or set the default font in Word
Change the fonts in a footer on a slide
Change a theme (Excel and Word)
Format text in cells (Excel)
Need more help?
Содержание
- Change the font size
- Change the default font size for all text
- Format text in headers or footers
- Prevent the header and footer font size from changing when you scale the worksheet for printing
- Need more help?
- Excel Format Fonts
- Format Fonts
- Font Color
- Font Name
- Font Size
- Font Characteristics
- Chapter Summary
- Change the font size
- Change the default font size for all text
- How to control and understand settings in the Format Cells dialog box in Excel
- Summary
- More Information
- Number Tab
- Auto Number Formatting
- Built-in Number Formats
- Custom Number Formats
Change the font size

Our Virtual Agent can help answer your questions about fonts in Office.
You can change the font size for all text or just selected text in desktop Excel, PowerPoint, or Word.
Change the default font size for all text
The way you change the default font size varies by app. Select your app below, and then follow the steps.
Click File > Options.
In the dialog box, click General.
Under When creating new workbooks, in the Font Size box, enter the font size you want.
Or, you can type in any size you want, between 1 and 409, in multiples of .5, such as 10.5 or 105.5. You can also choose a different default font style.
Note: To begin using the new default font size or font, you must restart Excel. The new default font and font size are used only in new workbooks created after you restart Excel; any existing workbooks are not affected. To use the new default font and size in existing workbooks, move worksheets from an existing workbook to a new workbook.
To change the font size for all slides, change it on the slide master. Every PowerPoint presentation contains a slide master with related slide layouts.
Note: If you want to change the theme, you should do that before changing the font, as a different theme may use different fonts.
On the View tab, click Slide Master.

In Slide Master View, the slide master is at the top of the thumbnail pane with the related layouts beneath it.
Click the slide master to change the font on all slides, or click any of the layouts to change the font size on just that layout.
On the slide master or layout, select the level of placeholder text for which you want to change the font size.

On the Home tab, click the font size you want in the Font Size box.
You can also type in any size you want in multiples of .1, such as 10.3 or 105.7.
The bullet automatically increases or decreases in size to match the font size changes.
Источник
You can change the font, style, and size of the headers and footers that you want to print with along with contents of your worksheet. Also, there are options you can configure to ensure that the header and footer font size settings don’t change when you scale the worksheet for printing.
Follow these steps to format header / footer text:
Ensure that either a header or a footer (or both) have been added to the worksheet.
Open the worksheet containing the header or footer text you want to format.
Note: If you don’t have a header or footer, add them by clicking Insert > Header & Footer.
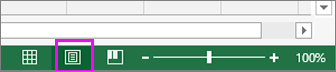
On the status bar, click the Page Layout View button.
Select the header or footer text you want to change.
On the Home tab in the Font group, set the formatting options that you want to apply to the header / footer.
When you’re done, click the Normal view button on the status bar.
If you don’t want the header and footer to scale with the document:
On the status bar, click the Page Layout View button, and then click Design and uncheck the Scale with Document box.

Tip: If you leave a check in the Scale with Document box, the header and footer font will scale along with the worksheet—and your header/footer Font settings likely won’t be reflected in the printout view.
For more information about working with titles, dates, and page numbers in headers and footers, see Headers and footers in a worksheet.
Need more help?
You can always ask an expert in the Excel Tech Community or get support in the Answers community.
Источник
Excel Format Fonts
Format Fonts
You can format fonts in four different ways: color, font name, size and other characteristics.
Font Color
The default color for fonts is black.
Colors are applied to fonts by using the «Font color» function.
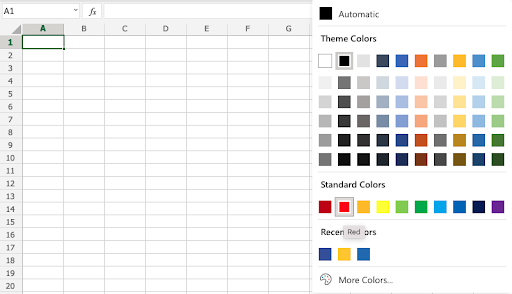
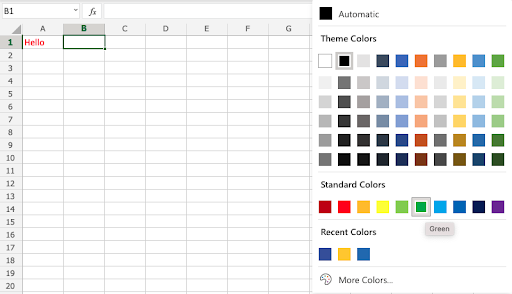
How to apply colors to fonts
- Select cell
- Select font color
- Type text
The font color goes for both numbers and text.
The Font color command remembers the color used last time.
Note: Custom colors are applied in the same way for both cells and fonts. You can read more about it in the Apply colors to cells chapter.
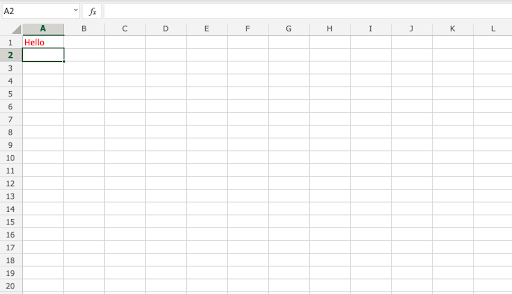
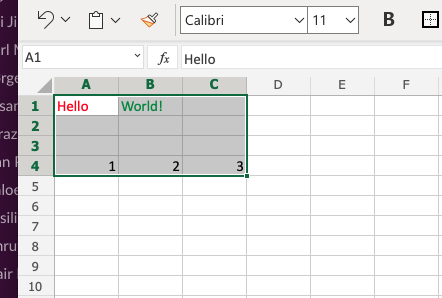
Lets try an example, step by step:
- Select standard font color Red
- Type A1(Hello)
- Hit enter
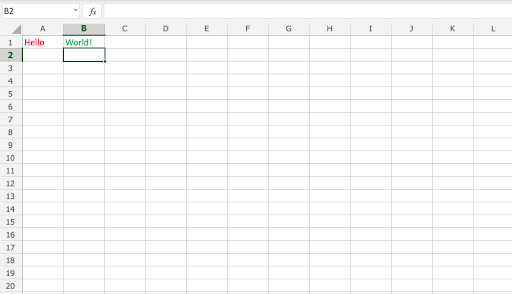
- Select standard font color Green
- Type B1(World!)
- Hit enter
Font Name
The default font in Excel is Calibri.
The font name can be changed for both numbers and text.
Why change the font name in Excel?
- Make the data easier to read
- Make the presentation more appealing
How to change the font name:
- Select a range
- Click the font name drop down menu
- Select a font
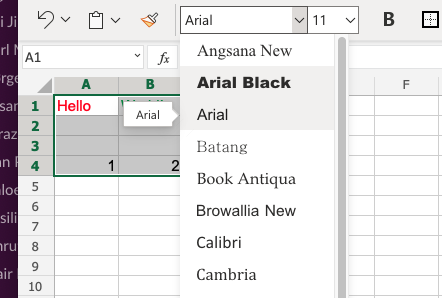
Let’s have a look at an example.
- Select A1:C4
- Click the font name drop down menu
- Select Arial
The example has both text ( A1:B1 ) and numbers ( A4:C4 )
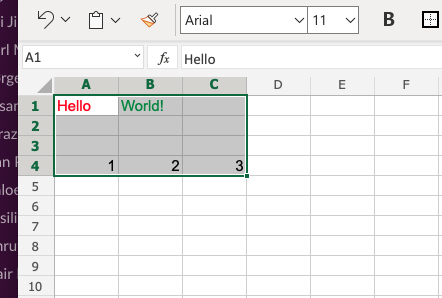
Good job! You have successfully changed the fonts from Calibri to Arial for the range A1:C4 .
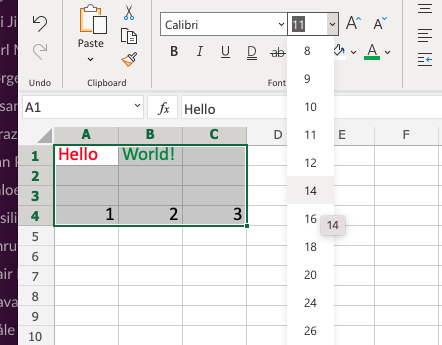
Font Size
To change the font size of the font, just click on the font size drop down menu:
Font Characteristics
You can apply different characteristics to fonts such as:
- Bold
- Italic
- Underlined
- Strike though
The commands can be found below the font name drop down menu:

Bold is applied by either clicking the Bold (B) icon in the Ribbon or using the keyboard shortcut CTRL + B or Command + B
Italic is applied by either clicking the Italic (I) icon or using the keyboard shortcut CTRL + I or Command + I
Underline is applied by either clicking the Underline (U) icon or using the keyboard shortcut CTRL + U or Command + U
Strikethrough is applied by either clicking the Strikethrough (ab) icon or using the keyboard shortcut CTRL + 5 or Command + Shift + X
Chapter Summary
Fonts can be changed in four different ways: color, font name, size and other characteristics. The fonts are changed to make the spreadsheet more readable and delicate.
Источник
Change the font size
Our Virtual Agent can help answer your questions about fonts in Office.
You can change the font size for all text or just selected text in desktop Excel, PowerPoint, or Word.
Change the default font size for all text
The way you change the default font size varies by app. Select your app below, and then follow the steps.
Click File > Options.
In the dialog box, click General.
Under When creating new workbooks, in the Font Size box, enter the font size you want.
Or, you can type in any size you want, between 1 and 409, in multiples of .5, such as 10.5 or 105.5. You can also choose a different default font style.
Note: To begin using the new default font size or font, you must restart Excel. The new default font and font size are used only in new workbooks created after you restart Excel; any existing workbooks are not affected. To use the new default font and size in existing workbooks, move worksheets from an existing workbook to a new workbook.
To change the font size for all slides, change it on the slide master. Every PowerPoint presentation contains a slide master with related slide layouts.
Note: If you want to change the theme, you should do that before changing the font, as a different theme may use different fonts.
On the View tab, click Slide Master.
In Slide Master View, the slide master is at the top of the thumbnail pane with the related layouts beneath it.
Click the slide master to change the font on all slides, or click any of the layouts to change the font size on just that layout.
On the slide master or layout, select the level of placeholder text for which you want to change the font size.
On the Home tab, click the font size you want in the Font Size box.
You can also type in any size you want in multiples of .1, such as 10.3 or 105.7.
The bullet automatically increases or decreases in size to match the font size changes.
Источник
How to control and understand settings in the Format Cells dialog box in Excel
Summary
Microsoft Excel lets you change many of the ways it displays data in a cell. For example, you can specify the number of digits to the right of a decimal point, or you can add a pattern and border to the cell. You can access and modify the majority of these settings in the Format Cells dialog box (on the Format menu, click Cells).
The «More Information» section of this article provides information about each of the settings available in the Format Cells dialog box and how each of these settings can affect the way your data is presented.
More Information
There are six tabs in the Format Cells dialog box: Number, Alignment, Font, Border, Patterns, and Protection. The following sections describe the settings available in each tab.
Number Tab
Auto Number Formatting
By default, all worksheet cells are formatted with the General number format. With the General format, anything you type into the cell is usually left as-is. For example, if you type 36526 into a cell and then press ENTER, the cell contents are displayed as 36526. This is because the cell remains in the General number format. However, if you first format the cell as a date (for example, d/d/yyyy) and then type the number 36526, the cell displays 1/1/2000.
There are also other situations where Excel leaves the number format as General, but the cell contents are not displayed exactly as they were typed. For example, if you have a narrow column and you type a long string of digits like 123456789, the cell might instead display something like 1.2E+08. If you check the number format in this situation, it remains as General.
Finally, there are scenarios where Excel may automatically change the number format from General to something else, based on the characters that you typed into the cell. This feature saves you from having to manually make the easily recognized number format changes. The following table outlines a few examples where this can occur:
| If you type | Excel automatically assigns this number format |
|---|---|
| 1.0 | General |
| 1.123 | General |
| 1.1% | 0.00% |
| 1.1E+2 | 0.00E+00 |
| 1 1/2 | # ?/? |
| $1.11 | Currency, 2 decimal places |
| 1/1/01 | Date |
| 1:10 | Time |
Generally speaking, Excel applies automatic number formatting whenever you type the following types of data into a cell:
Built-in Number Formats
Excel has a large array of built-in number formats from which you can choose. To use one of these formats, click any one of the categories below General and then select the option that you want for that format. When you select a format from the list, Excel automatically displays an example of the output in the Sample box on the Number tab. For example, if you type 1.23 in the cell and you select Number in the category list, with three decimal places, the number 1.230 is displayed in the cell.
These built-in number formats actually use a predefined combination of the symbols listed below in the «Custom Number Formats» section. However, the underlying custom number format is transparent to you.
The following table lists all of the available built-in number formats:
| Number format | Notes |
|---|---|
| Number | Options include: the number of decimal places, whether or not the thousands separator is used, and the format to be used for negative numbers. |
| Currency | Options include: the number of decimal places, the symbol used for the currency, and the format to be used for negative numbers. This format is used for general monetary values. |
| Accounting | Options include: the number of decimal places, and the symbol used for the currency. This format lines up the currency symbols and decimal points in a column of data. |
| Date | Select the style of the date from the Type list box. |
| Time | Select the style of the time from the Type list box. |
| Percentage | Multiplies the existing cell value by 100 and displays the result with a percent symbol. If you format the cell first and then type the number, only numbers between 0 and 1 are multiplied by 100. The only option is the number of decimal places. |
| Fraction | Select the style of the fraction from the Type list box. If you do not format the cell as a fraction before typing the value, you may have to type a zero or space before the fractional part. For example, if the cell is formatted as General and you type 1/4 in the cell, Excel treats this as a date. To type it as a fraction, type 0 1/4 in the cell. |
| Scientific | The only option is the number of decimal places. |
| Text | Cells formatted as text will treat anything typed into the cell as text, including numbers. |
| Special | Select one of the following from the Type box: Zip Code, Zip Code + 4, Phone Number, and Social Security Number. |
Custom Number Formats
If one of the built-in number formats does not display the data in the format that you require, you can create your own custom number format. You can create these custom number formats by modifying the built-in formats or by combining the formatting symbols into your own combination.
Before you create your own custom number format, you need to be aware of a few simple rules governing the syntax for number formats:
Each format that you create can have up to three sections for numbers and a fourth section for text.
The first section is the format for positive numbers, the second for negative numbers, and the third for zero values.
These sections are separated by semicolons.
If you have only one section, all numbers (positive, negative, and zero) are formatted with that format.
You can prevent any of the number types (positive, negative, zero) from being displayed by not typing symbols in the corresponding section. For example, the following number format prevents any negative or zero values from being displayed:
To set the color for any section in the custom format, type the name of the color in brackets in the section. For example, the following number format formats positive numbers blue and negative numbers red:
Instead of the default positive, negative and zero sections in the format, you can specify custom criteria that must be met for each section. The conditional statements that you specify must be contained within brackets. For example, the following number format formats all numbers greater than 100 as green, all numbers less than or equal to -100 as yellow, and all other numbers as cyan:
Источник
Excel is a powerful tool for data analysis, data visualization and data manipulation. It’s also a great tool for formatting text and numbers. One of the most popular formatting tasks is to adjust the font size. Here’s a guide on how to adjust font size in Excel.
What is the font size in Excel?
The default font size in Excel is 11 points. However, you can change this size by adjusting the cell font size to any size between 1 and 409 points.
How to Adjust Excel Font Size
It’s quite easy to change the font size in Excel. Just follow these steps:
- Select the cell range you want to change the font size for.
- Navigate to the Home tab and click on the Font Size box.
- Enter the number you want to set the font size to between 1 and 409 points.
- The font size should immediately change.
FAQ
How do I change the font size for all cells in a worksheet?
To change the font size for all cells in a worksheet, simply select the entire worksheet by clicking on the box in the upper left corner of the worksheet. Then follow the same steps as above to adjust the font size.
Can I set the font size to a decimal value?
No, you cannot set the font size to a decimal value. The font size must be an integer between 1 and 409 points.
What if I enter a font size that is less than 1 or greater than 409?
If you enter a font size that is less than 1 or greater than 409, Excel will automatically set the font size to the minimum/maximum allowed value.
Does adjusting font size affect the cell formatting?
No. Adjusting the font size will not affect the cell formatting.
Can I adjust font size directly from the Ribbon?
Yes, you can adjust font size directly from the Ribbon. Simply select the cell range you want to change, then navigate to the Home tab and select the “Font Size” option.
- https://answers.microsoft.com/en-us/msoffice/forum/all/excel-2011-font-size-must-be-between-1-and-409/7176cfe4-9501-4658-ab64-7ac8ac33b0c2
Format Fonts
You can format fonts in four different ways: color, font name, size and other characteristics.
Font Color
The default color for fonts is black.
Colors are applied to fonts by using the «Font color» function.
How to apply colors to fonts
- Select cell
- Select font color
- Type text
The font color goes for both numbers and text.
The Font color command remembers the color used last time.
Note: Custom colors are applied in the same way for both cells and fonts. You can read more about it in the Apply colors to cells chapter.
Lets try an example, step by step:
- Select standard font color Red
- Type A1(Hello)
- Hit enter
- Select standard font color Green
- Type B1(World!)
- Hit enter
Font Name
The default font in Excel is Calibri.
The font name can be changed for both numbers and text.
Why change the font name in Excel?
- Make the data easier to read
- Make the presentation more appealing
How to change the font name:
- Select a range
- Click the font name drop down menu
- Select a font
Let’s have a look at an example.
- Select
A1:C4 - Click the font name drop down menu
- Select Arial
The example has both text (A1:B1) and numbers (A4:C4)
Good job! You have successfully changed the fonts from Calibri to Arial for the range A1:C4.
Font Size
To change the font size of the font, just click on the font size drop down menu:
Font Characteristics
You can apply different characteristics to fonts such as:
- Bold
- Italic
- Underlined
- Strike though
The commands can be found below the font name drop down menu:
Bold is applied by either clicking the Bold (B) icon in the Ribbon or using the keyboard shortcut CTRL + B or Command + B
Italic is applied by either clicking the Italic (I) icon or using the keyboard shortcut CTRL + I or Command + I
Underline is applied by either clicking the Underline (U) icon or using the keyboard shortcut CTRL + U or Command + U
Strikethrough is applied by either clicking the Strikethrough (ab) icon or using the keyboard shortcut CTRL + 5 or Command + Shift + X
Chapter Summary
Fonts can be changed in four different ways: color, font name, size and other characteristics. The fonts are changed to make the spreadsheet more readable and delicate.

Changing the appearance of the text in a spreadsheet can make it easier to read. But how do you adjust the font, size and colour of the text? And how do you apply effects? In this article, we provide a quick guide to formatting text in Microsoft Excel.
How to Adjust Fonts in Excel
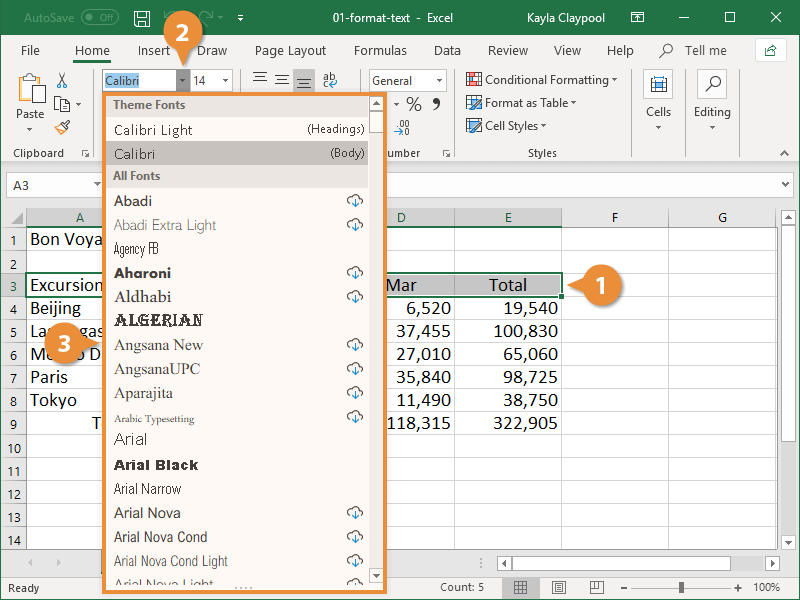
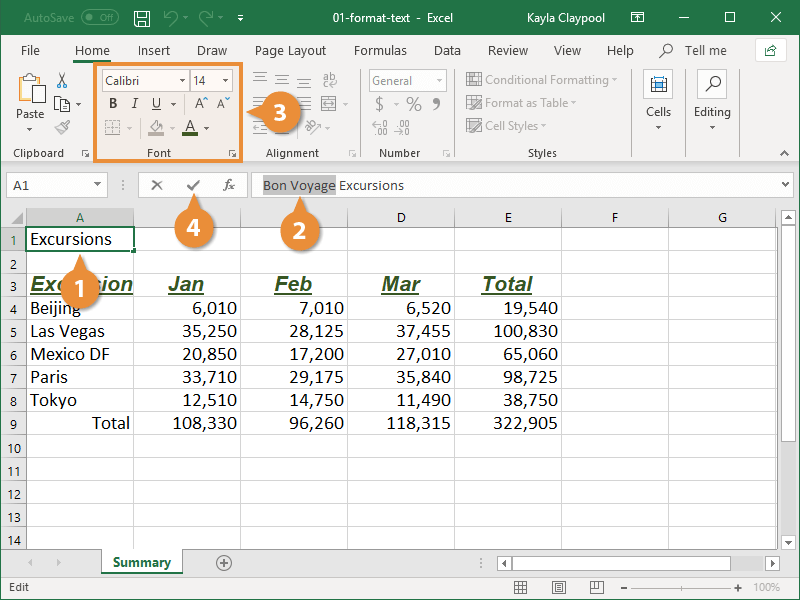
To change the font used in a cell in Microsoft Excel, you will need to:
- Select all of the cells that you wish to format with the cursor.
- Go to the Home tab on the main ribbon.
- Click the fonts dropdown (i.e. the menu with the name of the current font in it).
- Select the font you want to use from the list.
This will automatically change the typeface for any text already in the selected cell(s), plus any text later typed into the formatted cell(s).
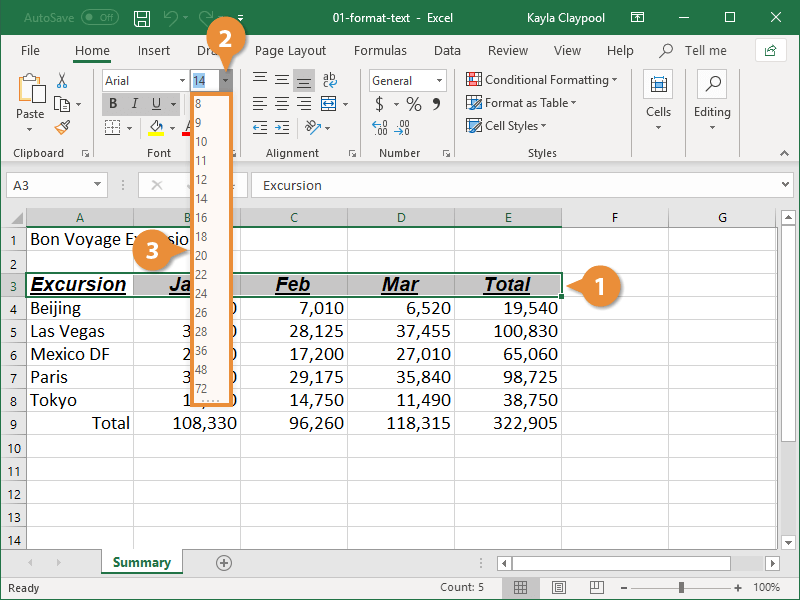
Changing the Font Size in Excel
To change the font size in Microsoft Excel, all you need to do is:
- Select the cell(s) you want to format with the cursor.
- Click the font size dropdown on the Home tab of the ribbon (i.e. the dropdown next to the main font menu).
- Select a value from the list to adjust the size of the text in the selected cell(s).
You can also increase or decrease the font size by one step via the capital ‘A’ buttons with up and down arrows next to this dropdown.
Changing the Font Colour in Excel
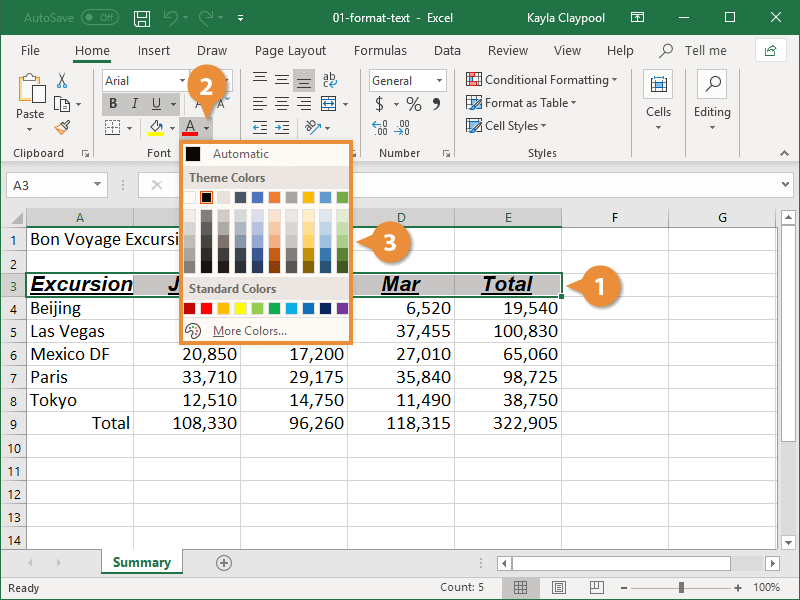
To change the font colour in Microsoft Excel:
- Select the cell(s) you want to format.
- Click the font colour button on the Home tab (see below).
- Select a colour from the options available (or click More Colors… at the bottom of this menu to open a new pop-up with custom colours).
You can also change the background colour of a cell by using the Fill Color option to the left of the font colour menu (i.e. the paint bucket icon).
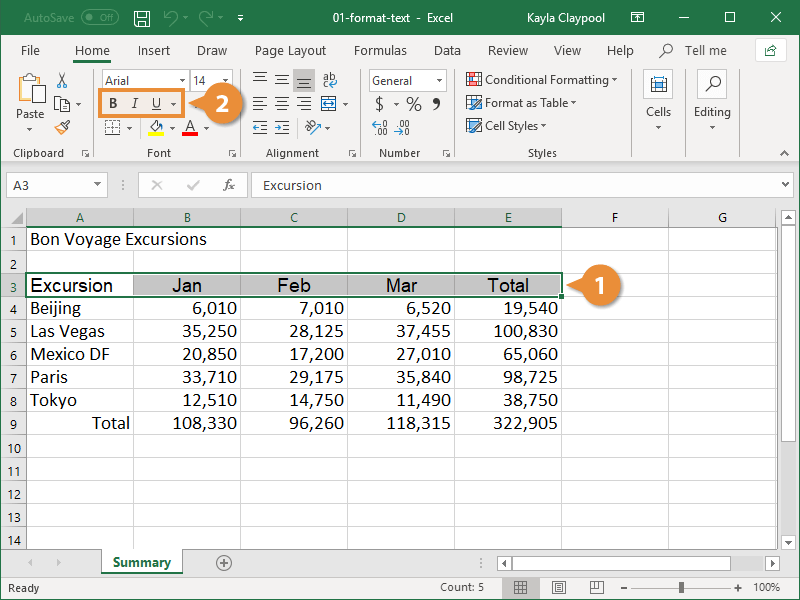
How to Apply Effects in Excel
In Excel, you can also apply italics, bold, and underlining to text. These effects can all be found next to each other in the font group of the Home tab.
Find this useful?
Subscribe to our newsletter and get writing tips from our editors straight to your inbox.
To apply your preferred style(s), select the cell(s) you wish to change, and then click on the B for bold, I for italics or U for underlining.
You also add strikethrough, subscript or superscript to text in Excel.
To do this, click the arrow in the bottom right of the font group to open the Format Cells pop-up. Make sure the Font tab is selected, then select your required formatting from the options in the Effects section of the window.
You can make changes to the font, font size and font colour from this pop-up window too, if required, though it is usually quicker to do it via the Home tab.
Formatting Part of a Cell
Finally, what if you want to format a specific part of the text within a cell rather than all the text in a cell? Here’s how you do this:
- Select the cell with the text you want to format.
- In the formula bar, select the specific text you would like to change.
- Choose your preferred formatting using the options set out above.
The change will then be applied in the selected cell, but not in the formula bar.
Expert Spreadsheet Proofreading
Hopefully, this post has explained some of the basics of formatting text in Excel. But you’ll also want the text in your spreadsheets to be error-free. Why not send in a document today and have it checked by our spreadsheet experts?
What is the best font to use in Excel? Here is a quick tip, fonts of the sans-serif group are the best for your Excel spreadsheet if readability is your goal. Calibri, Helvetica, Arial or Playfair are few examples. If used with the right alignment, spacing, and color, they can bring out the best in your Excel presentation.
Considering this, What font is easier read?
For online reading, sans-serif fonts (e.g. Arial, Verdana) are generally considered more legible than serif fonts (Times New Roman), narrow fonts or decorative fonts.
Subsequently What is the best font for accounting? Grotesque and geometric sans-serif fonts can suit accountants that identify as modern and that want to convey a certain cleanness of line. You might say they’re tranquil. Gill Sans – elegant and very British.
What is the best font for accounting reports?
There are many fonts well suited to professional financial reports and presentations. If you want to stand out from the crowd, but still project a professional image, consider serif fonts like Cambria/Cambria Math, Palatino or Whitney, all of which offer good numeric and symbol options, too.
What is the best font for invoices?
Helvetica
Helvetica remains the world’s most popular font. It’s best known for signage and when designing business forms, like invoices or receipts. It’s effortless to read because its large x-height makes it look larger than it is. That makes it a great choice when customers need to use very fine print.
Which font is the most readable?
The Most Easily Readable Fonts for Web and Print
- 1) Georgia. Source.
- 2) Helvetica. Source.
- 3) Open Sans. Source.
- 4) Verdana. Source.
- 5) Rooney. Source.
- 6) Karla. Source.
- 7) Roboto. Source.
- Arial. Source.
 Arial. Source.
What size font is most readable?
Size. Choose a font that’s at least 16 pixels, or 12 points. If many of your users are older adults, consider using an even larger font size—19 pixels or 14 points. A small font size is more difficult to read, especially for users with limited literacy skills and older adults.
What is the sharpest font?
The 10 best fonts
- Akzidenz-Grotesk. Probably the best typeface ever designed. …
- New Baskerville. Probably the best serif typeface ever designed. …
- DIN 1451. …
- Franklin Gothic. …
- HTF Didot. …
- Gotham. …
- Knockout. …
- Gill Shadow.
What font is used for financial statements?
From a readability point of view, the Times New Roman font is considered to be easier and faster to read compared with other commonly used fonts. Times New Roman is a serif typeface that first appeared in the British newspaper The Times on Oct.
What font does Finance use?
If you’re working on a finance project then try using Neue Haas Grotesk or Calibre. Other good fonts for finance include Open Sans, Graphik, Avenir, DIN, Pluto Sans, Work Sans, Proxima Nova, Neue Haas Unica, Calluna, Neue Haas Grotesk Display, Sofia Pro and Akkurat.
What font is used in banking?
Bank Gothic
| Category | Sans-serif |
|---|---|
| Designer(s) | Morris Fuller Benton |
| Foundry | American Type Founders |
| Date created | 1930–1933 |
| Re-issuing foundries | Bitstream, FontHaus, Linotype |
By default, Microsoft Office Excel 2010 uses the Body Font font in font size 11 (which is displayed as the Calibri font in font size 11 when you type data in a worksheet, header or footer, or text box). However, you can change the default font and font size for all new workbooks that you create.
What is the most professional font?
Many world-renowned companies use logos that are based on Helvetica—this is probably the most professional font of all times.
- Helvetica font.
- Futura font.
- Trajan font.
- Sabon font.
- Garamond font.
- Bodoni font.
- Rockwell font.
- Proxima Nova font.
Which font is the best for business letters and emails?
Times New Roman is the most common business letter font, according to Purdue Online Writing Lab. A serif font, Times New Roman can easily be read at many different sizes and appears professional for printed material. Times New Roman also remains the default font for many word processing programs.
What is the most professional font for email?
Stick to the classics. Familiar fonts like Arial, Verdana, Calibri, and Times New Roman all work well for professional emails. You may find that your email program uses one of these styles as a default. If not, they will be among the choices available in the program.
What is the best font for professional email?
Stick to the classics. Familiar fonts like Arial, Verdana, Calibri, and Times New Roman all work well for professional emails. You may find that your email program uses one of these styles as a default. If not, they will be among the choices available in the program.
What font do professional emails use?
Arial and Helvetica are the two best fonts to use for business email purposes — just make sure you don’t go any smaller than 10 points in size.
Is calibri easier to read than Arial?
There is an argument that serif fonts are more distinctive than sans serif fonts (without strokes, eg Arial, Calibri), and are therefore easier to read.
How big should the font be on a business card?
By choosing a font size between 8 and 11 pt. Most professionals agree that 10 pt is the ideal font size for business cards — although there are some exceptions to this rule.
What is the easiest font for seniors to read?
Colors and Fonts for Legible Text
“As for fonts, sans serif fonts are best,” recommends Dana. “Older adults and people with low vision have less difficulty processing type faces like Arial or Helvetica. Without the serifs, it’s easier to recognize characters.
What font do most websites use?
- Arial (sans-serif) Arial is the most widely used sans-serif font on the web. …
- Arial Black (sans-serif) Arial Black is another related font in the Arial family. …
- Verdana (sans-serif) …
- Tahoma (sans-serif) …
- Trebuchet MS (sans-serif) …
- Impact (sans-serif) …
- Times New Roman (serif) …
- Didot (serif)
What is a good modern font?
10 Best Modern Fonts
- Helvetica® Now.
- Proxima Nova.
- TT Norms Pro.
- FF DIN®
- Avenir® Next.
- Nexa™
- Cera Pro™
- Mont™
What is the most popular font on Microsoft Word?
They appear in order of popularity.
- Helvetica. Helvetica remains the world’s most popular font. …
- Calibri. The runner up on our list is also a sans serif font. …
- Futura. Our next example is another classic sans serif font. …
- Garamond. Garamond is the first serif font on our list. …
- Times New Roman. …
- Arial. …
- Cambria. …
- Verdana.
Join our Business, Advices & Skills Community and share you ideas today !
How to Format Text in Excel?
Formatting text in Excel includes color, font name, font size, alignment, font appearance in bold, underline, italic, background color of the font cell, etc.
Table of contents
- How to Format Text in Excel?
- #1 Text Name
- #2 Font Size
- #3 Text Appearance
- #4 Text Color
- #5 Text Alignment
- #6 Text Orientation
- #7 Conditional Text Formatting
- #1 – Highlight Specific Value
- #2 – Highlight Duplicate Value
- #3 – Highlight Unique Value
- Things to Remember
- Recommended Articles
You can download this Formatting Text Excel Template here – Formatting Text Excel Template
#1 Text Name
We can format the text font from default to any other available fonts in Excel. Likewise, we can insert any text value in any of the cells.
Under the “Home” tab, we can see so many formatting options available.
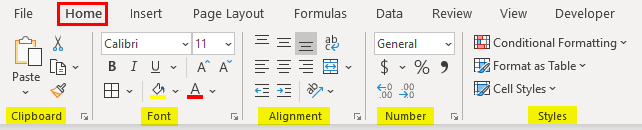
Formatting has been categorized into six groups: “Clipboard,” “Font,” “Alignment,” “Number,” and “Styles.”
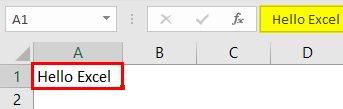
In this, we are formatting the font of cell value A1, “Hello Excel.” For this, under the “Font” category, click on the “Font Name” drop-down list and select the font name as per wish.
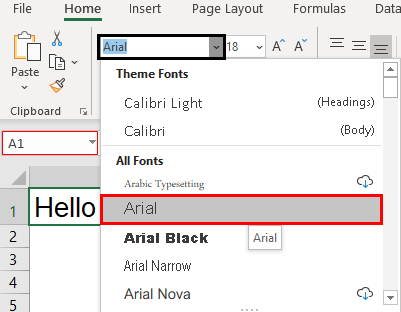
We hover over one of the font names above. We can see the quick preview in cell A1. If you are satisfied with the font style, click on the name to fix the font name for the selected cell value.
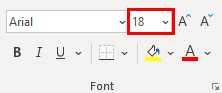
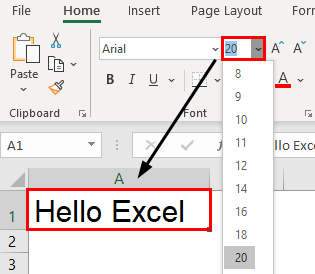
#2 Font Size
Similarly, we can also format the font size of the text in a cell. Just type the font size in numbers next to the font name option.
Enter the font size in numbers to see the impact.
#3 Text Appearance
We can modify the default view of the text value. For example, we can make the text value look bold, italic, and underlined. Look at font size and name options. We can see all these three options.
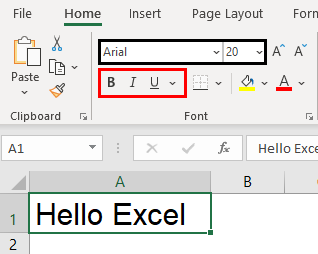
As per the format, we can apply formatting to text value.
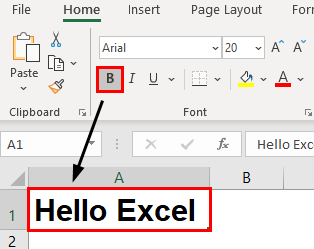
- We have applied the “Bold” formatting using the Ctrl + B shortcut excel keyAn Excel shortcut is a technique of performing a manual task in a quicker way.read more.
![]()
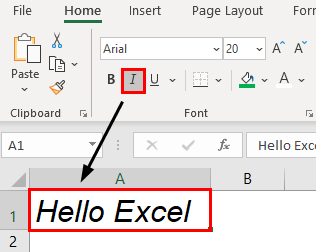
- To apply “Italic” formatting, use the Ctrl + I shortcut key.
![]()
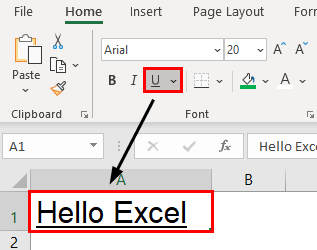
- To apply “Underline” formatting, use the Ctrl + U shortcut key.
![]()
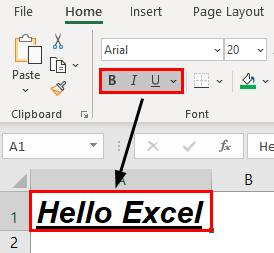
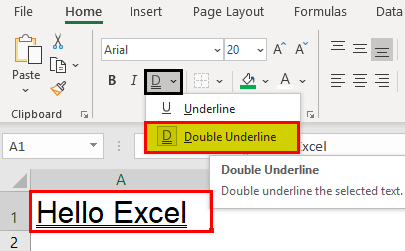
- The below image shows a combination of all the above three options.
- If we want to apply a double underline, click on the drop-down list of underline options and choose “Double Underline.”
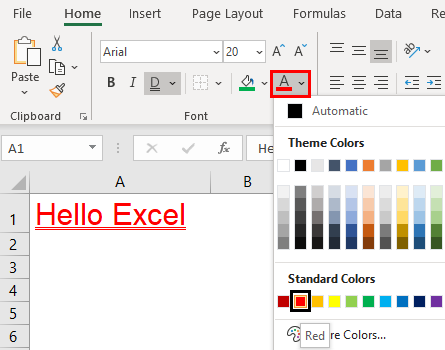
#4 Text Color
We can format the default font color (black) of text to any colors available.
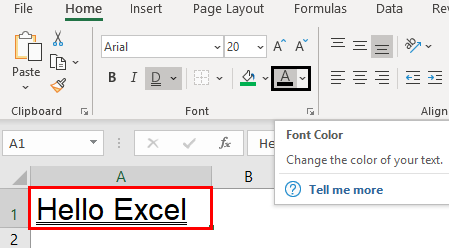
- Click on the drop-down list of the “Font Color” option and change as per choice.
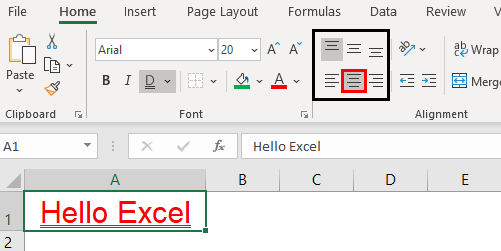
#5 Text Alignment
We can format the alignment of the Excel text under the “Alignment” group.
- We can do a left alignment, right alignment, middle alignment, top alignment, and bottom alignment.
#6 Text Orientation
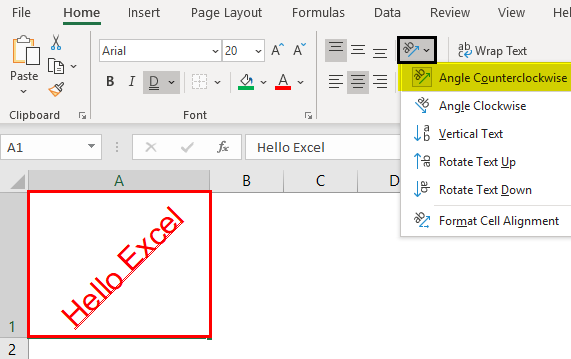
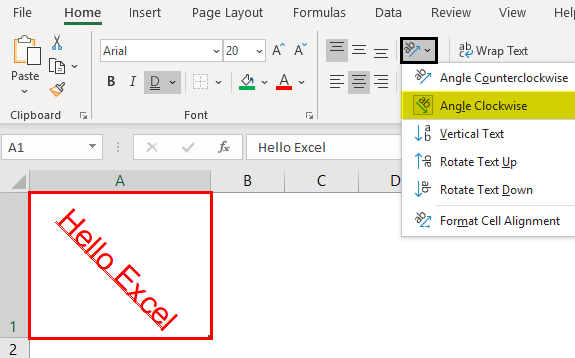
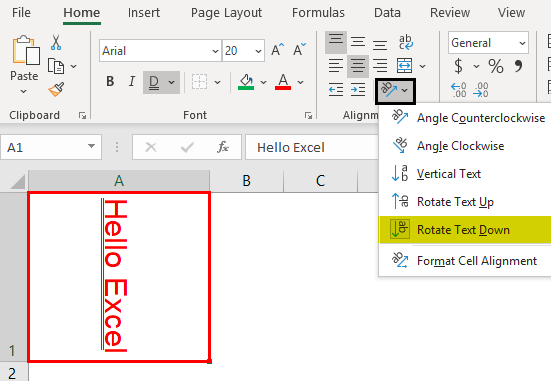
The important thing under “Alignment” is the “Orientation” of the text value.
Under “Orientation,” we can rotate text values diagonally or vertically.

- Angle Counterclockwise
- Angle Clockwise
- Vertical Text

- Rotate Text Up

- Rotate Text Down
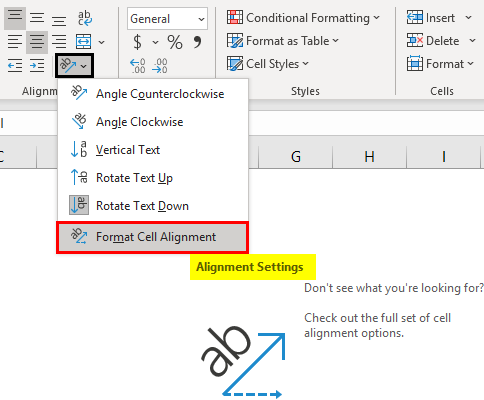
- Under “Format Cell Alignment, we have many options. Click on this option and experiment with some techniques to see the impact.
#7 Conditional Text Formatting
Let us see how to apply conditional formattingConditional formatting is a technique in Excel that allows us to format cells in a worksheet based on certain conditions. It can be found in the styles section of the Home tab.read more to text in Excel.
We have learned some of the basic text formatting techniques. How about the idea of formatting only a specific set of values from the group? If we want to find only duplicate values or find unique values.
These are possible through the conditional formatting technique.
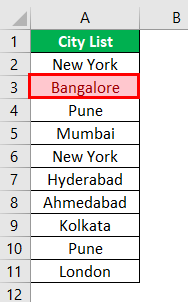
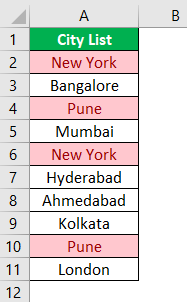
For example, look at the below list of cities.
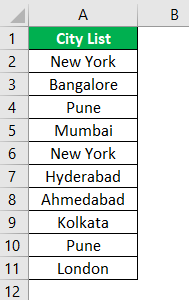
From this list, let us learn some formatting techniques.
#1 – Highlight Specific Value
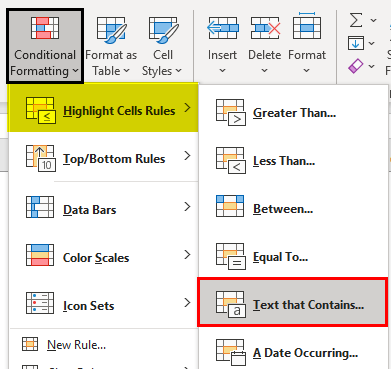
If we want to highlight only the specific city name, we can only highlight specific city names. For example, assume we want to highlight the city “Bangalore,” then select the data and go to conditional formatting.
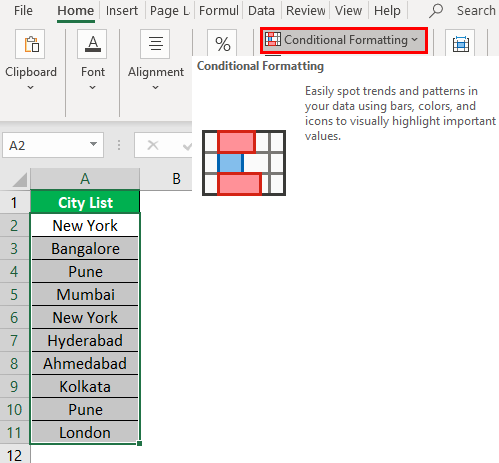
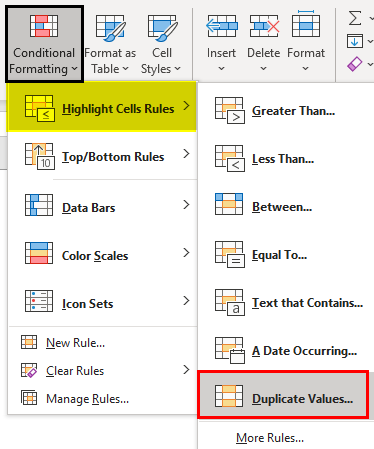
Click on the drop-down list in excelA drop-down list in excel is a pre-defined list of inputs that allows users to select an option.read more of “Conditional Formatting” >>> “Highlight cells Rules” >>> “Text that Contains.”
Now, we will see the below window.
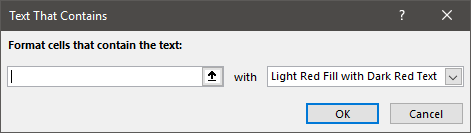
Next, we must enter the text value that we need to highlight.
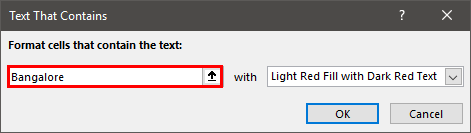
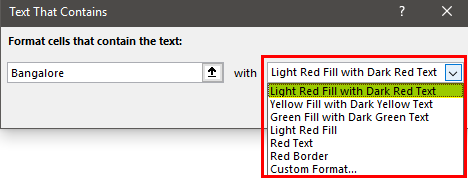
Now from the drop-down list, we must choose the formatting style.
Click on “OK.” Consequently, it will highlight only the supplied text value.
#2 – Highlight Duplicate Value
To highlight duplicate values in excelHighlight Cells Rule, which is available under Conditional Formatting under the Home menu tab, can be used to highlight duplicate values in the selected dataset, whether it is a column or row of a table.read more, follow the below path.
“Conditional Formatting” >>> “Highlight cells Rules” >>> “Duplicate Values.”
Again from the below window, we must select the formatting style.
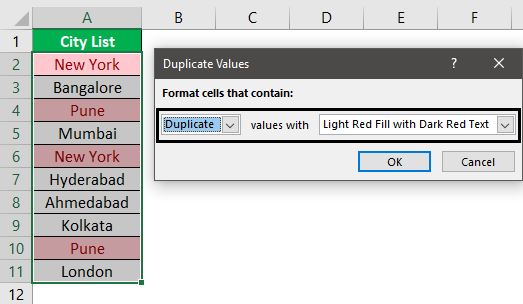
As a result, it will highlight only the text values that appear more than once.
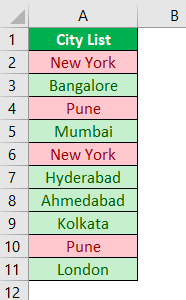
#3 – Highlight Unique Value
Like how we have highlighted duplicate values similarly, we can highlight all the unique values, i.e., text value that appears only once. Then, the formatting window chooses the “Unique” value option from the duplicate values.
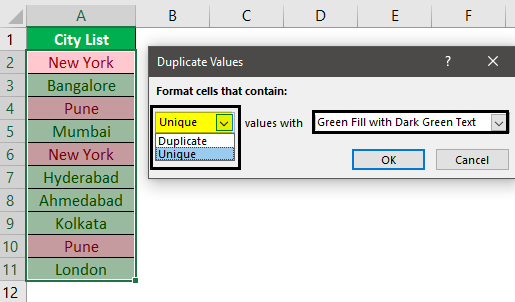
It will highlight only the unique values.
Things to Remember
- We must learn shortcut keys to format text values in Excel quickly.
- We can use conditional formatting to format some text values based on certain conditions.
Recommended Articles
This article is a guide to formatting text in Excel. We discuss formatting text using text name, font size, appearance, color, etc., with practical examples and downloadable Excel templates. You may learn more about Excel from the following articles: –
- Conditional Formatting in Dates
- Conditional Formatting along with Formulas
- Combine Text From Two Or More Cells
A quick way to change the appearance of your spreadsheet is to change the font of the text. A font is a set of letters, numbers, and punctuation symbols designed around a shared appearance. A font will have variations for size and styles, such as bold and italics.
Change Fonts
Changing the font is a quick and simple way to enhance the appearance of your spreadsheet.
- Select the cells you want to format.
- Click the Font list arrow on the Home tab.
When text is selected in a cell, you can also click the Font list arrow on the Mini Toolbar.
- Select the font you want to use.

Apply Bold, Italic, or an Underline
In addition to changing the font type, you can amplify your project using other features in the Font group such as Bold, Italic, or Underline.
- Select the text you want to format.
- Click the Bold, Italic, or Underline buttons on the Home tab.
- To bold, press Ctrl + B.
- To italicize, press Ctrl + I.
- To underline, press Ctrl + U.
Click the Dialog Box Launcher in the Font group to see additional font formatting options. From the dialog box, you can change the underline style and add effects.
Change Font Size
Changing the font size can help differentiate between titles, headers, and body text.
- Select the cells you want to format.
- Click the Font Size list arrow.
Font size is measured in points (pt.) that are 1/72 of an inch. The larger the number of points, the larger the font.
- Select the font size you want.
Click the Increase Font Size or Decrease Font Size buttons on the Home tab to adjust the font size.
Change Font Color
Changing font color makes text stand out against the white background of the spreadsheet.
- Select the cells you want to format.
- Click the Font Color list arrow.
When text is selected in a cell, you can also click the Font Color list arrow on the Mini Toolbar.
- Select a new color.
Format Part of a Cell
- Select the cell you want to format.
- In the formula bar, select the text you want to format.
- Select the text formatting you want to use.
- Press Enter.

FREE Quick Reference
Click to Download
Free to distribute with our compliments; we hope you will consider our paid training.
 Please Note:
This article is written for users of the following Microsoft Excel versions: 2007, 2010, 2013, 2016, 2019, and Excel in Microsoft 365. If you are using an earlier version (Excel 2003 or earlier), this tip may not work for you. For a version of this tip written specifically for earlier versions of Excel, click here: Changing Font Sizes.
![]()
Written by Allen Wyatt (last updated October 21, 2022)
This tip applies to Excel 2007, 2010, 2013, 2016, 2019, and Excel in Microsoft 365
Excel specifies the size of fonts in points, a unit of measurement typically used in typesetting. A point is equal to approximately 1/72 of an inch. To change the size of a font used in a selected cell or for information selected within a cell, you use the Home tab of the ribbon. In the Font group you’ll notice the Font Size tool. If you click on the arrow to the right of this tool you are presented with a drop-down list of point sizes you can specify for the current font.
To pick a point size, simply scroll through the list and choose the one you want. Click your mouse on the point size, and your text is updated. You are not limited to choosing a point size from those in the list, however. Excel allows you to specify any font size between 1 and 409 points. (This depends, of course, on the capabilities of your printer.) You can use the keyboard to enter, in the Font Size tool, any point size (or fractional point size to the nearest half point) desired. For instance, if you type 21.4, Excel increases the point size to 21.5. It is kind of fun to play around with various fractional point sizes to see how Excel modifies them.
ExcelTips is your source for cost-effective Microsoft Excel training.
This tip (8071) applies to Microsoft Excel 2007, 2010, 2013, 2016, 2019, and Excel in Microsoft 365. You can find a version of this tip for the older menu interface of Excel here: Changing Font Sizes.
Author Bio
With more than 50 non-fiction books and numerous magazine articles to his credit, Allen Wyatt is an internationally recognized author. He is president of Sharon Parq Associates, a computer and publishing services company. Learn more about Allen…
MORE FROM ALLEN
Searching for Characters
When using pattern matching in a search, you can specify individual characters or ranges of characters you want matched …
Discover More
Changing Excel’s Starting Date
When keeping track of dates, internally, Excel uses special date serial numbers that are based upon a specific day in the …
Discover More
Dragging and Dropping Pictures in a Document
Do you like to add pictures to your document just by dragging and dropping? What are you to do if it appears the …
Discover More
More ExcelTips (ribbon)
Adjusting Cell Margins for More White Space
Is the information in your cells too jammed up? Here are some ways you can add some white space around that information …
Discover More
Determining If a Cell is Bold
Want to figure out if the text in a cell is bold? The best approach is to use your own user-defined function, as …
Discover More
Shortcut to Merge Cells
Need to merge a bunch of cells together on a regular basis? You’ll love the two macros in this tip which can make short …
Discover More