A font is a graphical representation of text that may include a different typeface, point size, weight, color, or design.Software programs like Microsoft Word, Microsoft Excel, and WordPad allow users to change the font when typing text in the document or spreadsheet, as do web designers.
Contents
- 1 What is an example of a font?
- 2 What is a font style?
- 3 Where is the font in Word?
- 4 Is Arial a font?
- 5 How many fonts are there in Word?
- 6 What is font according to computer?
- 7 How do you set a font in Word?
- 8 Where are fonts located Windows 10?
- 9 What is font size in MS Word?
- 10 What is a font serif?
- 11 What is the font used on Google?
- 12 What is the best font?
- 13 How do I identify a font?
- 14 What is the font in Windows 10?
- 15 What fonts come standard on a PC?
- 16 What is font short answer?
- 17 Why are fonts used?
- 18 What is the purpose of font?
- 19 What is the default font of text in MS Word?
- 20 Why does my font keep changing in Word?
What is an example of a font?
For example Garamond, Times, and Arial are typefaces. Whereas font is a specific style of typeface with a set width, size, and weight. For example, Arial is a typeface; 16pt Arial Bold is a font. So typeface is the creative part and font is the structure.
What is a font style?
Font style refers to the size, weight, color and style of typed characters within a document, in an email or on a webpage. In other words, the font style changes the appearance of a complete set of characters that make up a typeface or font.
Where is the font in Word?
All fonts are stored in the C:WindowsFonts folder. You can also add fonts by simply dragging font files from the extracted files folder into this folder.
Is Arial a font?
Arial is an extremely versatile family of typefaces which can be used with equal success for text setting in reports, presentations, magazines etc, and for display use in newspapers, advertising and promotions.
How many fonts are there in Word?
While there are more than 700 font options in Word, Microsoft has commissioned five new custom fonts for Office, in a move away from the Calibri font that has been the default in Microsoft Office for nearly 15 years.
What is font according to computer?
A computer font is implemented as a digital data file containing a set of graphically related glyphs. A computer font is designed and created using a font editor.In the terminology of movable metal type, a font is a set of pieces of movable type in a specific typeface, size, width, weight, slope, etc.
How do you set a font in Word?
To use your favorite font in Word all the time, set it as the default.
- Go to Format > Font > Font. You can also press and hold. + D to open the Font dialog box.
- Select the font and size you want to use.
- Select Default, and then select Yes.
- Select OK.
Where are fonts located Windows 10?
Usually, this folder is either C:WINDOWS or C:WINNTFONTS. Once this folder is open, select the fonts you want to install from an alternate folder, and then copy and paste them into the Fonts folder. Have fun! This was extremely helpful.
What is font size in MS Word?
Font sizes are measured in points; 1 point (abbreviated pt) is equal to 1/72 of an inch. The point size refers to the height of a character. Thus, a 12-pt font is 1/6 inch in height. The default font size in Microsoft Word 2010 is 11 pts.
What is a font serif?
A serif is a decorative stroke that finishes off the end of a letters stem (sometimes also called the “feet” of the letters). In turn, a serif font is a font that has serifs, while a sans serif is a font that does not (hence the “sans”).
What is the font used on Google?
Product Sans is a contemporary geometric sans-serif typeface created by Google for branding purposes. It replaced the old Google logo on September 1, 2015.
Product Sans.
| Category | Sans-serif |
|---|---|
| Foundry | |
| Date created | September 1, 2015 |
| License | Proprietary |
| Design based on | Futura Neuzeit Grotesk Tempo |
What is the best font?
The 10 best fonts
- Akzidenz-Grotesk. Probably the best typeface ever designed.
- New Baskerville. Probably the best serif typeface ever designed.
- DIN 1451.
- Franklin Gothic.
- HTF Didot.
- Gotham.
- Knockout.
- Gill Shadow.
How do I identify a font?
The most graceful way to identify a font in the wild is with the free WhatTheFont Mobile app. Just launch the app and then snap a photo of the text wherever it appears—on paper, signage, walls, a book, and so on. The app prompts you to crop the photo to the text and then identify each character.
What is the font in Windows 10?
Segoe UI
Windows 10’s default system font, Segoe UI, looks pretty nice. However, if you have something better to replace it with, you can change the default system font on your Windows 10 PC. We’ll show you how to do this.
What fonts come standard on a PC?
The fonts that are most safe to use are:
- Arial / Helvetica.
- Times New Roman / Times.
- Courier New / Courier.
What is font short answer?
A font is a set of printable or displayable text character s in a specific style and size.Thus, Helvetica is a typeface family, Helvetica italic is a typeface, and Helvetica italic 10-point is a font. In practice, font and typeface are often used without much precision, sometimes interchangably.
Why are fonts used?
Fonts Guide the Reader About What Is More Important
This is universally used by writers on both digital and paper formats to show different actions, situations, speech, emotions, and emphasis. It is especially helpful for the reader when they are looking for specific information.
What is the purpose of font?
Fonts can create mood and atmosphere. Fonts can give visual clues about the order a document should be read in and which parts are more important than others. Fonts can even be used to control how long it takes someone to read a document. The professional printing industry has recognized this fact for a long time.
What is the default font of text in MS Word?
The default setting for a new, blank Microsoft Word document (2007 or newer) is called the Normal Style. This means that when you open a new document, a default font style (Calibri), line spacing (1.15 spaces with an additional 10 points after each line), and font size (11 points) are already in place.
Why does my font keep changing in Word?
If a document uses a font that is on your system, and then that document is opened on a system that doesn’t have the same font, Word will substitute a different font for the missing one. This can affect the appearance of the document, even when you subsequently open it back on your original system.
Calibri has been the default font for all things Microsoft since 2007, when it stepped in to replace Times New Roman across Microsoft Office.
Subsequently, What are standard fonts in Word?
Upon installation, Microsoft Word uses the Calibri font and 11 point font size by default.
Accordingly What is a modern font in Word?
Modern is the term used to categorize fonts created at that time or in the style of that time. Modern fonts are recognizable by their thin, long horizontal serifs, and clear-cut thick/thin transitions in the strokes. The stress is vertical, i.e. there is no slant on the letters.
Beside above, How do I identify a font in Word? Finding Text Not Using a Particular Font
- Press Ctrl+F. …
- Click the More button, if it is available.
- Make sure the Find What box is empty.
- Click Format and then choose Font. …
- Use the controls in the dialog box to specify that you want to find the Times Roman font you are using. …
- Click on OK.
What is the best font for Microsoft Word?
The Best Fonts to Use on Your Resume
- Calibri. Having replaced Times New Roman as the default Microsoft Word font, Calibri is an excellent option for a safe, universally readable sans-serif font. …
- Cambria. This serif font is another Microsoft Word staple. …
- Garamond. …
- Didot. …
- Georgia. …
- Helvetica. …
- Arial. …
- Book Antiqua.
also How do you change the font in a word theme? Change theme fonts
- On the Page Layout tab in Excel or the Design tab in Word, click Fonts, and pick the font set you want. …
- To create your own set of fonts, click Customize Fonts.
- In the Create New Theme Fonts box, under the Heading font and Body font boxes, pick the fonts you want.
How do I find out a font name?
How to identify fonts in pictures
- Step 1: Find a picture with the font you want identified. …
- Step 2: Open your favorite Web browser and navigate to www.whatfontis.com.
- Step 3: Click on the Browse button on the Web page and navigate to the picture you saved in Step 1.
What are 3 common font styles?
They appear in order of popularity.
- Helvetica. Helvetica remains the world’s most popular font. …
- Calibri. The runner up on our list is also a sans serif font. …
- Futura. Our next example is another classic sans serif font. …
- Garamond. Garamond is the first serif font on our list. …
- Times New Roman. …
- Arial. …
- Cambria. …
- Verdana.
What are the 4 major font types?
What are four main types of fonts?
- Serif fonts.
- Sans serif fonts.
- Script fonts.
- Display fonts.
What is the most common font?
Helvetica, the World’s Most Popular Font, Gets a Face-Lift. The 62-year-old typeface that’s used everywhere from subway signs to corporate logos has been updated for the 21st century.
What is the Friends font on Word?
The actual font used for the logo/intro of the show is called Gabriel Weiss’ Friends by, of course, Gabriel Weiss. It’s free for personal use. The colorful dots in between were added based on the design by Deborah Naysee.
How do I make text all the same font in Word?
How to Select All Text with Similar Formatting in Microsoft Word
- Select some text in your document that represents the formatting you want to change. …
- On the Home tab, click the Editing group button > Select > Select All Text With Similar Formatting.
- Apply a different style or change the formatting for the selected text.
How do you unify a font in Word?
To use your favorite font in Word all the time, set it as the default.
- Go to Format > Font > Font. You can also press and hold. + D to open the Font dialog box.
- Select the font and size you want to use.
- Select Default, and then select Yes.
- Select OK.
What is the most professional font and size?
The most common font used is black Times New Roman at 12 points in size. Other serif fonts, those that have tails, that work well include Cambria, Georgia, Garamond, Book Antiqua, and Didot. Sans serif fonts, those without tails, that work well include Calibri, Helvetica, Verdana, Trebuchet MS and Lato.
What is the prettiest font in Microsoft Word?
The Best Fonts to Use on Your Resume
- Calibri. Having replaced Times New Roman as the default Microsoft Word font, Calibri is an excellent option for a safe, universally readable sans-serif font. …
- Cambria. This serif font is another Microsoft Word staple. …
- Garamond. …
- Didot. …
- Georgia. …
- Helvetica. …
- Arial. …
- Book Antiqua.
What are theme fonts?
Theme fonts include two settings, one for headings and another for body. The Heading font applies to all Title placeholders and the Body font applies to all other text, including all other placeholders and default text in charts, tables, SmartArt, and individual textboxes.
How do I make my Word document look professional?
Here, we’ll show you how to format a Word document to make it look professional.
- Keep It Simple, Less Is More. …
- Choose a Context-Appropriate Typeface. …
- Use Standard Font Size and Color. …
- Use Standard Page Size and Margins. …
- Align Paragraphs to the Left. …
- Indent the First Lines of Paragraphs. …
- Place Images Between Paragraphs.
What are Microsoft Word styles?
What are Styles? Built-in styles are combinations of formatting characteristics that you can apply to text to quickly change its appearance. For example, applying the Heading 1 style might make text bold, Arial, and 16 point, and applying the Heading 2 style makes text bold, italic, Arial, and 14 point.
What is a font point size?
Font sizes are measured in points; 1 point (abbreviated pt) is equal to 1/72 of an inch. The point size refers to the height of a character. Thus, a 12-pt font is 1/6 inch in height. The default font size in Microsoft Word 2010 is 11 pts.
The font Google is using for branding purposes is called Product Sans is a geometric sans-serif typeface created by Google’s team in September 2015. Product Sans is a Futura-like font that you may recognize it from the current Google logo, which replaced the old, serif-font logo.
What is that font app?
WhatTheFont is a Shazam for fonts — a designer’s dream. The app is a mobile version of the website previously developed by MyFonts, and recognizes any font you point at with your camera, including a variation of similar fonts to go with it.
What are the 5 main types of fonts?
There are five basic classifications of typefaces: serif, sans serif, script, monospaced, and display. As a general rule, serif and sans serif typefaces are used for either body copy or headlines (including titles, logos, etc.), while script and display typefaces are only used for headlines.
What is the most professional font?
Many world-renowned companies use logos that are based on Helvetica—this is probably the most professional font of all times.
- Helvetica font.
- Futura font.
- Trajan font.
- Sabon font.
- Garamond font.
- Bodoni font.
- Rockwell font.
- Proxima Nova font.
What is the simplest font?
What Is the Easiest Font to Read? (10 Top Options)
- Arial. Arial is the standard font for many word processors, such as Microsoft Word and Google Docs. …
- Helvetica. Another old-school sans-serif typeface you may want to consider is Helvetica. …
- Georgia. …
- Merriweather. …
- Montserrat. …
- Futura. …
- Open Sans. …
- Lato.
First released on October 25, 1983 under the name Multi-Tool Word, which was later simplified to Microsoft Word. Among hundreds of word processor available today, Ms Word is one of the most popular word processor. The font that appears to be selected by default in a new Ms Word document is the default font. The default font varies depending on the version of Microsoft Word.
In Microsoft Word 2003 and earlier, the default font is “Times New Roman” with font size of 12 pt.
However, in a later version of Microsoft Word, i.e. Ms Word 2007 and later, the default font was changed to “Calibri“ with font size of 11 pt. Microsoft.
If you prefer other fonts over Calibri, you can set it as the default font for Ms Word.
Why Microsoft changed from Times New Roman to Calibri
Fonts was designed to optimize print prior to the advent of computers.. Times New Roman was invented for newspapers. However, as computer become more and more accessible to public, it was clear that more and more document were distributed in digital format and will never be printed.
Developers at Microsoft Word around early 2000s, thought that they might get better result with fonts on screen that was specifically designed for screen. Looking at the available screen resolution and technology used to displays, ClearType Font collection which includes Calibri, Cambria, Constantia etc was developed. It is believed to improve the appearance of text on certain types of monitors through the use of sub-pixel rendering technology.
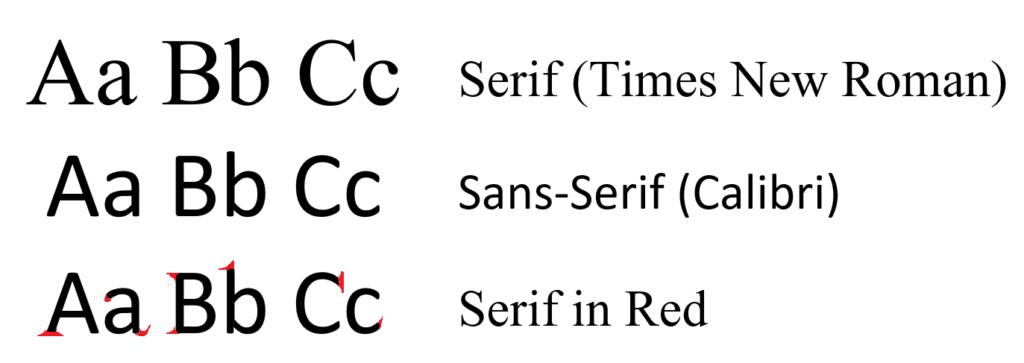
Times new roman, a type of Serif font has fine details in their font compared to Sans-Serif font like Calibri. These fine details make it beautiful for reading in print, but on-screen it may disappear or appear extra large deteriorating reading experience.
Since 2007, Calibri was adopted as default font for various Microsoft products including Windows, Office etc.
Conclusion
Default font in Ms Word was changed from Times New Roman (12 pt) to Caliri (11 pt) from Word 2007 due to its better on-screen display.
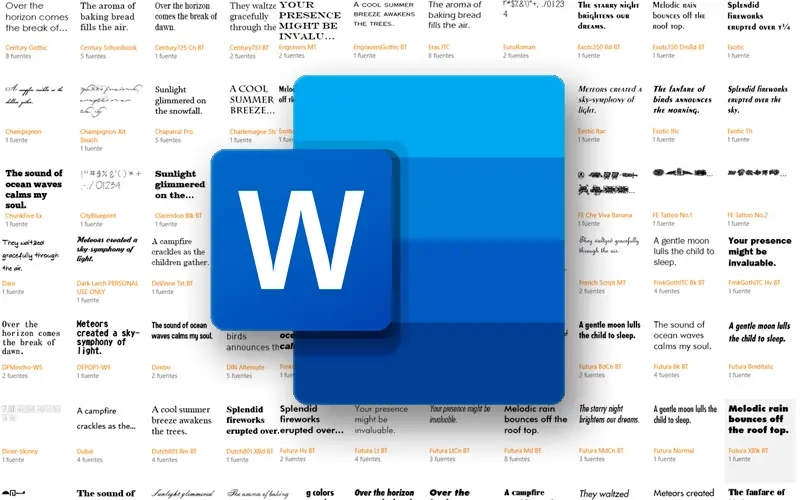
В Microsoft Office Word есть шрифты на любой вкус. Чтобы нестандартно оформить текст или напечатать красивую листовку, используйте оригинальную каллиграфию или графический объект. Но встроенные возможности программы меркнут в сравнении с тысячами разнообразных стилей, которые можно скачать в сети. Если вам не хватает того, что есть в офисе, узнайте, как установить шрифт в Ворд.

Где найти новый шрифт
Существуют целые сервера, на которых выложены коллекции бесплатной каллиграфии. Там сразу можно посмотреть, как будут выглядеть буквы и цифры. Вы подберёте печатные знаки под любые нужды. Доступна даже имитация рукописного ввода.
Перед тем как добавить шрифт в Word, его надо найти в интернете. Скачивайте файлы только из надёжных источников. Есть несколько проверенных сайтов. Например, «Fontspace» или «Xfont». После загрузки каллиграфию можно будет установить в Ворд. Если вы хотите посмотреть весь ассортимент, сделайте следующее:
- Откройте любой поисковик.
- Введите запрос «Скачать шрифт для Word». На первых страницах будут самые популярные сервисы. Можете задать конкретные параметры: «Готические буквы», «Фигурные символы», «Старославянская кириллица» и тому подобное. Всегда найдётся какой-нибудь новый, никем не используемый стиль.

- Зайдите на понравившийся сайт.
- Не загружайте исполняемые файлы с расширением .EXE — скорее всего, это вирус или другая вредоносная программа. Каллиграфия для Ворд имеет формат .TTF (True Type Font) или .OTF, а коллекции стилей хранятся в архивах .ZIP или .RAR.

- Если вы знаете, какой шрифт вам нужен, вбейте в строку поиска его название вместе с фразой «Скачать для Word». Так вы быстрее найдёте то, что хотите.


Лучше брать архив со стилями, а не качать по одному файлу. Вы сможете добавить несколько видов печатных знаков и уже в самой программе посмотреть, что вам подходит.
Когда вы нашли каллиграфию, можно разбираться, как вставить шрифт в Word.
- Распакуйте архив со стилями, если качали их в сжатом виде. Для этого надо установить архиватор. Подойдёт WinZip или WinRar. Кликните правой кнопкой мыши по файлу с коллекцией и в выпавшем списке выберите «Извлечь». Теперь вы можете копировать и перемещать данные, которые хранились в архиве. Чтобы посмотреть, как выглядят символы, откройте один из файлов с каллиграфией. И для этого не надо открывать Ворд.

- Перейдите в Пуск — Панель управления. В разделе «Оформление и персонализация» кликните значок «Шрифты». Он открывает папку со стилями символов в Word. В неё также можно войти через С:WindowsFonts. Чтобы лучше ориентироваться в панели управления, в меню «Просмотр» (находится в правом верхнем углу) выберете подходящие настройки отображения.

- Скопируйте скачанные файлы с каллиграфией в папку «Fonts» (не сам архив, а извлечённые из него данные). Новый вид символов должен появиться и в Office. Некоторые из них уже могут быть в системе. В таком случае появится диалоговое окно, предлагающее заменить имеющиеся печатные знаки. Не соглашайтесь, чтобы случайно не удалить «родные» стили офиса.


Если не получилось добавить их таким образом, попробуйте другой способ.
- Откройте папку с загруженной каллиграфией.
- Кликните по одному из файлов правой кнопкой мыши.
- Нажмите «Установить».

После этого стили точно отобразятся в Word.
Как добавить шрифты в файл Word
Если вы решите поработать с текстом на компьютере, на котором отсутствует используемая вами каллиграфия, она не отобразится. Но можно добавить стиль в прямо документ.
- Нажмите синюю кнопку «Файл». В Office 2007 это меню вызывается кликом на логотип в левой верхней части окна.
- Выберете «Параметры», раздел «Сохранение».

- Галочку рядом с пунктом «Внедрять шрифты в файл».


Лучше активировать эту опцию, если вы используете не только системные стили. У вас ведь не будет возможности установить свою каллиграфию на чужой ПК.
Как узнать название шрифта
Вам понравился внешний вид символов, но вы не знаете название этого дизайна? И как загрузить шрифты в Word, если вы не можете их найти? Не надо ходить по сайтам, надеясь случайно наткнуться на нужные символы. Название легко узнать. Для этого существуют специальные программы и даже целые сайты.
- What The Font. Популярный и надёжный сервис. Определяет вид каллиграфии по картинке. Найденный стиль можно сразу же скачать и установить в Word. Ресурс имеет свой форум. Если поиск по базе данных ничего не дал, можете спросить совета у других пользователей.
- Расширение для браузера Google Chrome. Сканирует HTML-код страницы и выдаёт название.
- Определяет шрифт, задавая вопросы о его внешнем виде. Если вы примерно представляете, что ищите, но конкретной информации у вас нет — этот ресурс подойдёт.
- Bowfin Printworks. Здесь можно подобрать стиль вплоть до мельчайших деталей. Спрашивает о форме каждого символа.
- Сообщество людей, которые занимаются дизайном каллиграфии или просто в ней разбираются. Надо создать тему и вставить рисунок с символами. Пользователи форума помогут найти нужный стиль.
- WhatTheFont для мобильных устройств. Сфотографируйте слово — приложение определит, какой это стиль.

Если вы увидели интересную каллиграфию в интернете или хотите расширить возможности Office, разберитесь, как установить новый шрифт в Word. Нестандартными надписями можно разбавить скучный текст. Их используют для листовок, поздравлений, открыток, презентаций. Их существуют тысячи — вы обязательно найдёте подходящий.
Fonts are born with the appearance of paper . The Egyptians and Romans already used a characteristic letter shape. With the popularization of printing in the mid-XNUMXth century, movable type gave birth to those of the humanist type, given their ease of woodcarving.
But it was not until the end of the XNUMXth century, hand in hand with personal computers, that digital sources were accessible to everyone. If the Apple Macintosh was not the first to introduce these features, he undoubtedly has brought about a real change in the treatment of typographic works.
Thanks to this beginning, today it is possible, with a single click, to change the style of an entire document.You can learn everything you need to know about fonts in this article. And you will transform a simple text into a document worthy of an expert.
A digital font or typography is an element of the text intended to give it an aesthetic . But more importantly, it is intended to be read correctly . It conveys a contextual message through its design. That is, depending on the style of letter we have chosen, it will accompany and will make sense of the content in one way or another .
For example, it is not the same to write a CV for an architect with a source with a fanciful characteristic as it is to write it with a more «Serious» . Likewise, a graphic designer portfolio written entirely with Times New Roman would be a mistake.
In this way and at different levels, the type of font we choose will be of the utmost importance for our message to arrive the way we want it to . Fortunately, Windows contains a large number of alternatives in terms font styles . All compatible with the entire Office suite including Microsoft Word .
«UPDATE ✅ Want to learn more about fonts in Microsoft Word documents? ⭐ ENTER HERE ⭐ and learn more now! ”
In addition, it is important to say that we can download so much on the Internet. Many of them free of charge .
Everything you need to know about fonts What are the most important parts of Word?
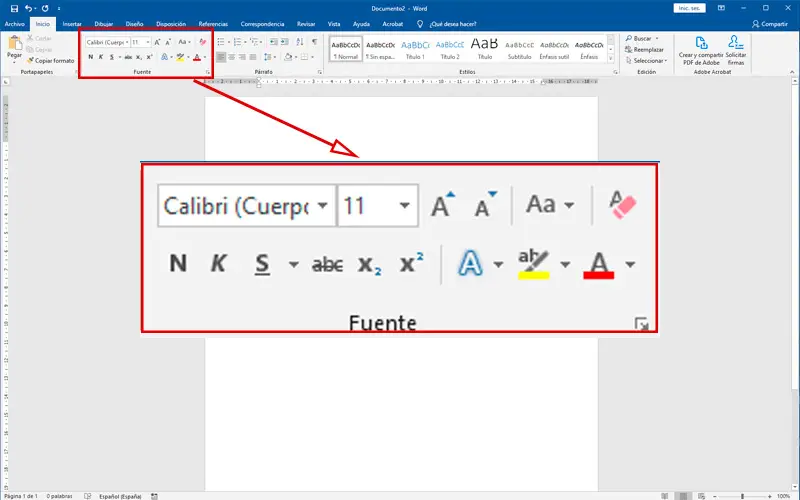
In the program ribbon we can find a section called «Source» . It can be found in the tab «Home» . In this box there are other buttons that will make the design of the letters that we will use. We will take Office 2019 as a basis .
Let’s see what they are:
- Source. In this list we will find all the fonts installed on our computer. They are shared by all programs that need it (Excel, Word, CorelDraw, Photoshop, etc.). In this drop-down list, they will appear in two groups, «Recently used» et «All sources» . In both cases, they are classified according to the alphabet. It is also possible to write his name so as not to search for it among all.
- Cut. Word allows us to choose the dimension that we will use in the text. They are measured in points . Each of them is equal to 0,35 millimeter . In other words, if we use a size 12 letter, when we print it, it will be about 4,2mm. We can indicate a size by these numbers or by using the tools located next to it. These two «AT» will help us to enlarge or reduce the size. This is very useful if you select a text with different points and want to change its assimilated measure.
- Bold. This utility increase the line thickness of each letter . This results in a more robust appearance in words. It can be used to highlight segments of a paragraph. Also to underline a few words that we consider important for the reader.
- Italics. makes the letters tilted to the right , to the top. It is commonly used to indicate that a term or phrase comes from a lexicon outside the language. For example, with foreign language words or new voices used by young people.
- Highlighted. This utility is often used to summarize physical texts. In the case of Word, this function is executed in a superior way with another tool . However, it can be used to make corrections or indicate a special feature in a word or idea.
- Closed off. A very popular tool for people who correct texts with feedback. Crossing out a word avoids deleting it and thus reports the error to the original publisher. It can be supplemented very well with other utilities such as «Insert a comment» that Word also has.
- Index. Together with the following element, they constitute a utility which is mainly used in academic texts of a chemical or mathematical nature. While it was used to add a footnote, it was replaced by a tool of the same name. At present it can work , for example, to write the formula for carbon dioxide under this form CO 2 .
- exponent . Like the previous item, its use is not regular, but it can be used to write exponential formulas to measurement units like square meters in m 2 .
- Effects . A decoration tool, with which you can give a special touch to texts. With it it is possible to add shading , of contours colorful reflections and other characteristics to the selected words.
- Highlighted. A very good utility for summarize and study a document. Add a bold, contrasting color background to words and phrases. Choose from a variety of fluorine shades, just like a highlighter.
- Color. As the name suggests, this change the text color . In this drop-down button, you can choose between millions of options . It is very useful in case you run out of specific ink in your printer or if you are going to use special paper with a tone other than white. If you want to revert to the standard, select «Automatique» .
Types of Fonts in Microsoft Word What are they and how are they different?
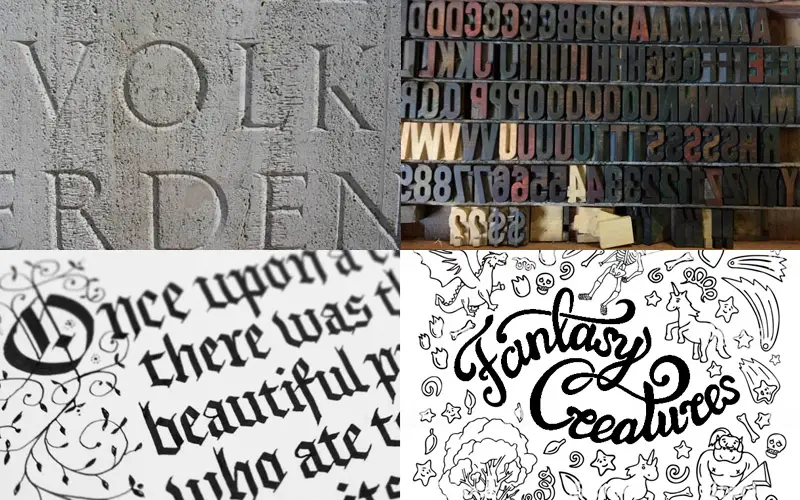
Historically, the sources have been grouped into four families . Each of them shares a group of characteristics. In case you want to narrow down a suitable choice, you can search among these types:
- Roman. This set of typography is characterized by the modulations in the lines and the finishing at the end of each letter . This feature and its name are due to the fact that in ancient rome , the letters engraved in the stone required to end with a «finish» to avoid cracks or detachments. It has long been preferred by graphic and editorial media for their publications as they have a high degree of readability and a sense of line .
- Dry stick. This family, unlike the previous one, has no serifs ( serifs ), since they were used with pieces of wood. It was used in headlines or highlighted words in newspapers and magazines because it left excess ink on the paper. At the currently, it is the most used in digital formats . His clear features avoid overloading long bodies of text and facilitate reading on monitors.
- Script or lettering. This set of fonts differs from others in that it tries to simulate handwriting . It is common to see them on invitation cards , ornamental posters or diplomas . They generate a feeling of elegance.
- Fancy or decorative . Fonts belonging to this family were not designed for a specific purpose. They are used casually . Graphic designers often use them in the creation of brands and logos.
In case you find a font that you like, but it is not installed on your computer and you don’t know what his name is . We recommend that you use pages such as myfonts.com where you can place a photo or capture the word. The site will return a series of results that could match your search.
If you have any questions, please leave them in the comments, we will get back to you as soon as possible, and it will be a great help for more community members as well. Thank you!

If you’ve already used MS Word before, you may already know the basics of formatting a document, and it may just be a matter of learning to do this using MS Word 2010. Either way, this article will cover the subject of formatting an MS Word document using MS Word 2010, making it an easy task for you to accomplish.
You can apply a font to either an entire document or to certain portions of a document. The choice is yours. To apply a font, click on the Home tab. You’ll see the toolbars, or groups, as pictured below.
Following is a zoom of the Home tab again. This is the left side where fonts are chosen, their size chosen, and can be bolded, italicized, and underlined among other things.
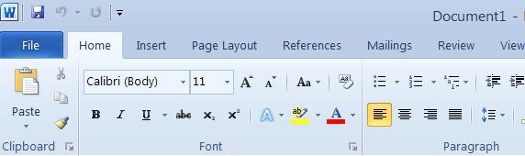
The type of font you’re currently using will appear. In the picture above, the current type of font is Calibiri. You can click on the arrow in that window to display other types of font available to use.
To change the type of font within a document or for the entire document, simply select the text to be formatted, then select your new font. It’s really that easy.
Note: You can also do all font formatting by selecting the arrow key beside the word Font at the bottom of the section. By clicking on this arrow, you can also alter character spacing.

Changing Font Size
Next to the type of font under the Home tab is a box that states the size of font currently being used. Using the picture above, the font size is 11. Once again, you can use the down arrow key to either enlarge or reduce the font size. To change the size of the font, simply select the text that you want to change, then select the new font size. You can change an entire document or just a portion. The choice is yours.
You can also use the two uppercase A’s beside the font size box to change the size of fonts you’re currently using.

Pushing the larger A will increase your font size by one for each time it’s clicked. On the other hand, clicking the smaller A will decrease the font size by one for each time it’s clicked.
Font Attributes
As we discussed earlier, you may want to select text to either boldface, italicize, or underline a section of text. The boldface command in MS Word is represented by an uppercase, boldfaced B. Italics are represented by an uppercase, italicized ‘I’, and underline by an uppercase U with a line under it. These buttons are located directly below the font type window. Locate them in the picture below.

To add italics, boldfaced, or underlining to any portion of a text within a document, select the desired text, then click the appropriate button (B for boldfaced, I for italic, or U for underline.)

Next to the commands for boldfaced, italics, and underline, you’ll see an ‘abc’ with a line through it. (abc) This is for strikethrough. When clicking on this button, it will put a line through any text you have selected.

Next to the strikethrough command, you’ll see ‘X2‘. This simply puts smaller text below the text line of the normal text. X2 is just the opposite, putting smaller text above the text line. This makes creating footnotes easier than it had been with previous versions of Word.
The uppercase A and lowercase A that are situated side by side allow you to change the case of selected text. You can change from lowercase to uppercase or vice versa , toggle tHe CaSe, or select other common capitalizations.
Font Color
Changing the font color is as simple as changing the font. Look for the uppercase A with a black bar under it as pictured below.

Select your text, then click on the button to choose the color you want to apply to the selected text.
You can also highlight selected text. To the left of the font color button, you’ll see a lowercase ‘ab’ with a marker near it. It is highlighted in yellow. Simply select the portion of text you want to highlight, click the button, and select the color of highlight that you want to apply.

Clear Formatting
To clear formatting within a document or a specified portion of text, simply select the text, then click on the ‘As’ with the eraser beside it. It’s located to the right of the two uppercase A’s that allow you to increase or decrease font size. (see the picture below.) By selecting the text and clicking on this button, it will remove all formatting done to the text and leave you with the default font and font size for the document.

Text Alignment
As with all word processing programs, you can either left, right, center or justify your text. You can either do one of these things to a portion of text or to the entire document.
This is an example of text that is aligned to the left.
This is text that is aligned to the right.
This text is centered.
The following text, selected from this article, is justified so that it is aligned between the left and right margins, adding space between letters if necessary. It gives the document a clean look.

The buttons or commands for aligning text are located under the Home tab above the ‘Paragraph’ label, as shown below.

In the above picture, the left alignment button is highlighted. Beside it is the center, then right, and then justify. To use these, simply select the text you want to align, and click on the appropriate button.
Deleting Text
You can delete text by using the Backspace and Delete keys. But you must remember that Backspace removes characters to the left of the cursor, and Delete removes characters to the right.
To delete blocks of text, select the text to be deleted and press either the Backspace or Delete key.
Moving Text
You can move selected text by holding the left mouse button and moving the cursor to the desired location in the document. When moving text, a small box appears near the mouse pointer and the cursor turns into a broken black line. You position the cursor in the place you want the text and release the left mouse button.
Wrap Text
Word 2010 can also wrap text around a picture, charts and graphs as in the example below.
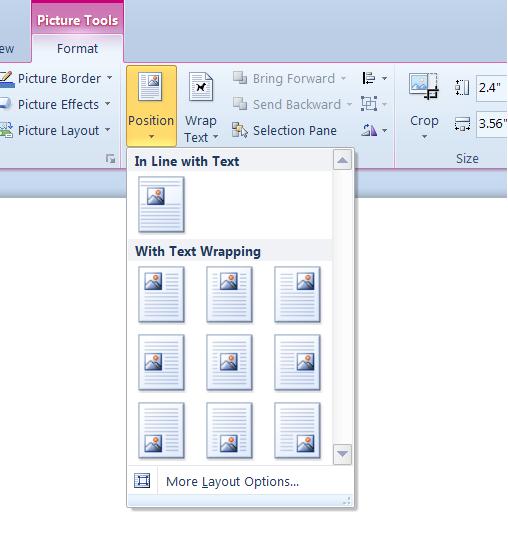
To wrap text around a picture or art object, double click on the object. The Picture Tools tab will appear in the ribbon.

In the Arrange group, click Position. A menu will unfurl. Select the desired position.
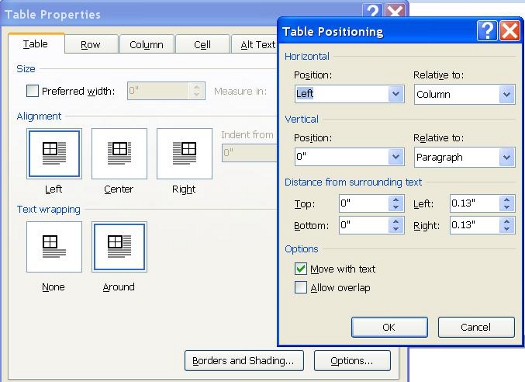
To wrap text around a table, click the table, then select the Layout tab in the menu. In the Table group, select Properties.
This is what you will see:
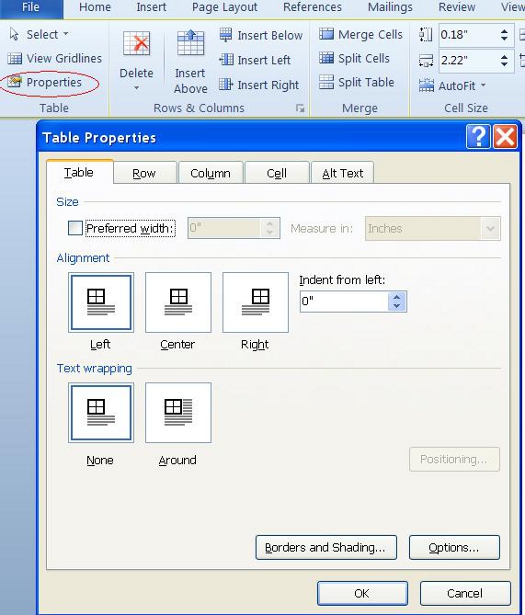
Under Text Wrapping, select Around. You can change the horizontal and vertical position of the table and other options by clicking Positioning. The dialogue box on the right, is what you will see when you click Positioning. Select the desired options and click OK.
Bulleted and Numbered Lists
The types of lists you can create are really simple and easy to remember. Bulleted lists have bullet points, numbered lists have numbers, and outline lists can contain letters and numbers. We’re going to learn how to create all three.
- If you want to create a list with existing text:
- Select the text you want to make a list.
(Note: Above is an example of a bulleted list.)
Click on the Home tab and go to the ‘Paragraph’ tab. Select either the bulleted or numbered list button, whichever you need, as pictured below.

(You’ll notice that the first button is for a bulleted list, the second for a numbered, and the third for an outline.)
When creating a new list:
1. Put the cursor in the document where you want to create the list.
2. Click either the bulleted or numbered list button.
3. Start to type.
(Note: Above is an example of a numbered list.)
Creating a Nested List
A nested list is defined as a list with several indentions in the text. Nested lists are often used for outlines and looks like the example below:
o Creating a list is easy.
o First you decide what kind of list you want.
Bulleted
Or Numbered
To create a nested list as the one above, click
to select the type of nested list you want, then use the to create an indention by placing the cursor at the beginning of the text to be indented, then clicking the bullet button . Format Your List
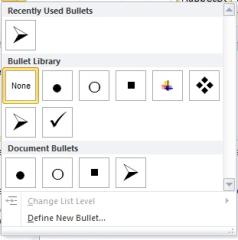
You can change the formatting of the bullets or numbering by using selecting either the arrow beside the bulleted or numbered list button, then making a selection from the drop down box.
Below is a picture of the different formats for bullets that you can choose from:
Sorting Lists
Once you create a list, you can also sort it alphabetically, either ascending or descending. There’s no need to worry about putting things in alphabetical order as you type. MS Word 2010 will do it for you.
To do this:
Create your list as outlined in the steps above.
Select the list or parts of the list to be alphabetized
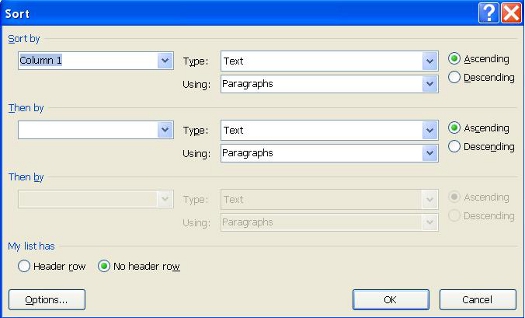
Click
and complete the dialogue box. (Default will sort your list descending.) It’s really that easy, as shown with the example list below.
The original bulleted list looked like this:
o Mango
o Orange
o Apple
o Fig
o Grape
o Apricot
But when you select the text in the list, then click
, the list is alphabetized for you.Take a look:
o Apple
o Apricot
o Fig
o Grape
o Mango
o Orange
You can sort paragraphs of text or lists using the sort ascending or sort descending button
. Indenting Paragraphs
Indenting paragraphs simply allows you to set different margins for different lines of text.
You have several options for indenting paragraphs:
First line : This controls the left boundary for the first line of the paragraph.
Hanging : Controls the left boundary for every line in the paragraph except the first one.
Left : Controls the left boundary for every line in the paragraph.
Right : Controls the right boundary for every line.
To indent paragraphs, you have two different options:
Option 1: Go to the Home tab on the Ribbon. Select the indent buttons in the Paragraph group. They are pictured below.
These allow you to indent left or indent right. The indention increases each time you click on the button.
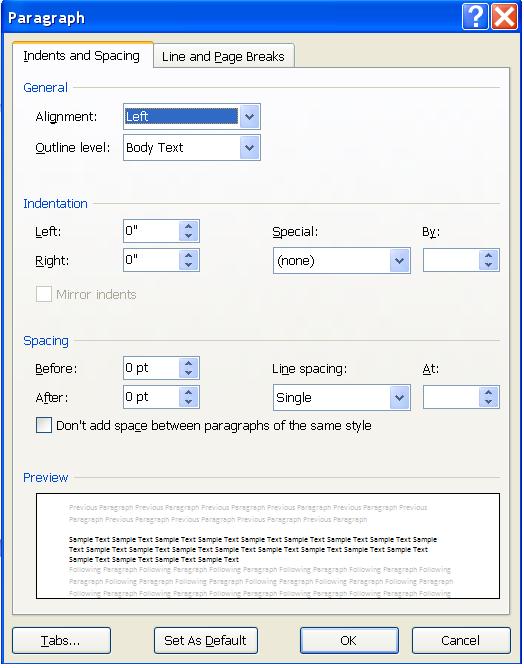
Option 2: Click the arrow on the Paragraph group tab. Click the Indents and Spacing tab. From this dialogue box, you can set indentions.
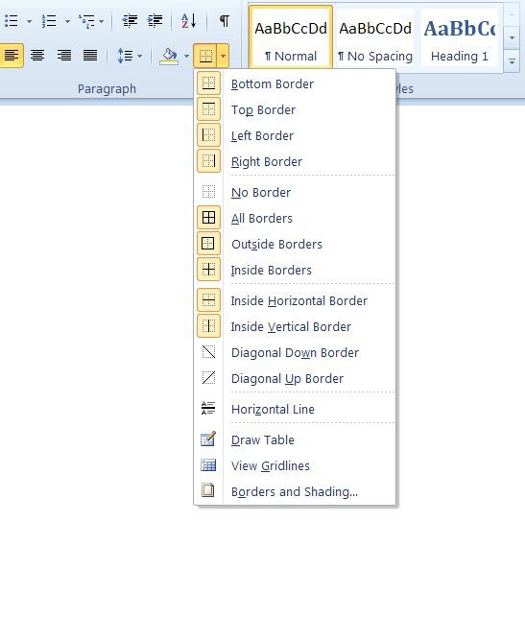
Add Borders or Shading to a Paragraph
Just as you can add a border or a color to an entire page, you can also add a border or color to an entire paragraph or a group of paragraphs.
To do this:
Select the Home tab on the Ribbon.
Click the Borders button in the Paragraph group.
A dropdown menu will open and allow you to select what type of border you want.
Apply Paragraph Styles
Style refers to the format of your paragraph. MS Word offers several quick styles that you can use. These include headings, no spacing, subtitles, emphasized text, list paragraph, etc. To apply a style, go to the Home tab on the Ribbon and go to the ‘Styles’ group. You’ll see some styles in white boxes (as pictured below). You can scroll through these styles to find one you want to use, or you can click the arrow in the ‘Styles’ tab to select the one you want.
Below are some different styles applied to text.
Subtle reference : The girl ran to the store to get some bread for dinner.
No spacing : The girl ran to the store to get some bread for dinner. (This style leaves out any spaces between lines that may have been inserted in prior paragraphs.)
Paragraph list : The girl ran to the store to get some bread for dinner. (Note the indention in this line that would signify a list.)
Getting to know the different styles and what they do to your text is a matter of using MS Word 2010 frequently.
Note: You can also apply a style to an entire document or individual lines, as well as paragraphs.