
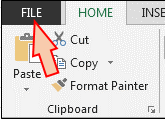
What is File tab and its uses?
File tab contains the basic required options such as New, Open, Save, Save as, Print, Share, Export, and Close options. Other than the aforementioned options, we can find account and Excel options tab, too.
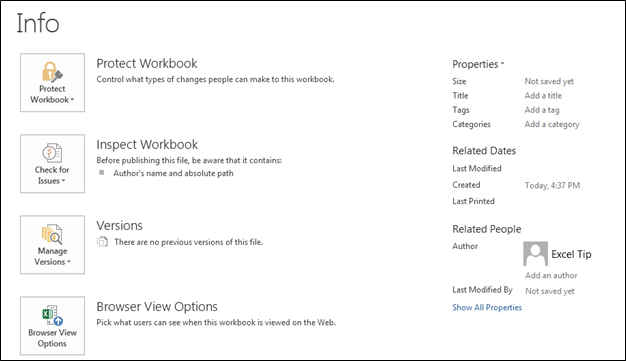
a) Info: — With this option, we can get the information about the particular Excel file. Created date, last modified date, Author name, Properties, versions etc.
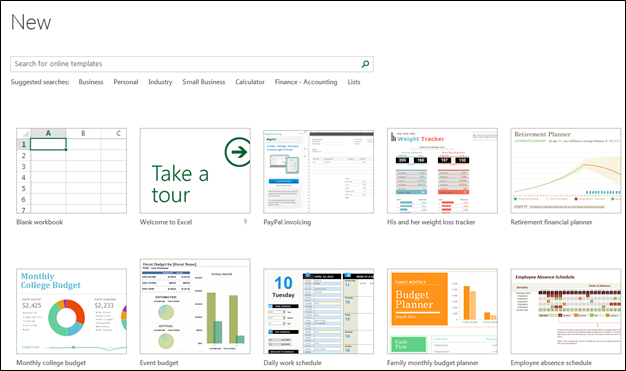
b) New: — We use this option to open the new Excel file. We can open new file using shortcut key, Ctrl+N or by Clicking on File tab > New > Blank workbook. If Excel file is not opened, then Press Window+R and type Excel, New Excel file will open.
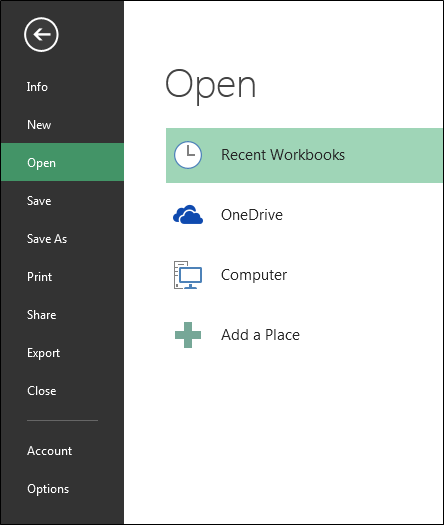
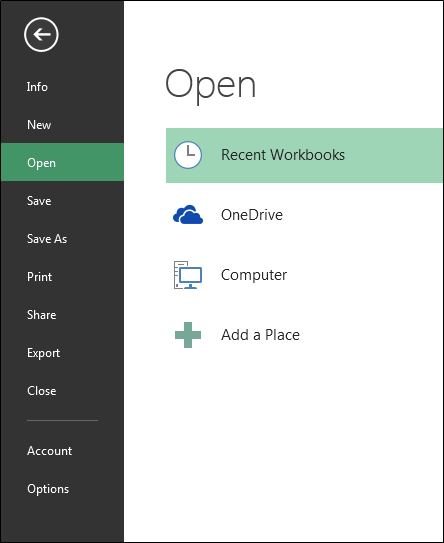
c) Open: — We use this option to open the existing file (shortcut Ctrl+O). “Open” option appears and you can choose to open the file.
Alternatively, File tab > Open > choose the file
d) Save: — We use this option to save the current file.
Shortcut: — Ctrl+S
Path: — Click on File tab >Save
e) Save as: — We use this option to make another copy or save the file at another place. F12 is the shortcut key to save as the file or we can save the file following these steps: — Click on File tab > Save as and then choose the location.

f) Print: — We use this option to print the current file. Ctrl+P is the shortcut key to print, or we can follow these steps: — File > Print and then we will have the page setup option. We can set the page according to our requirements.

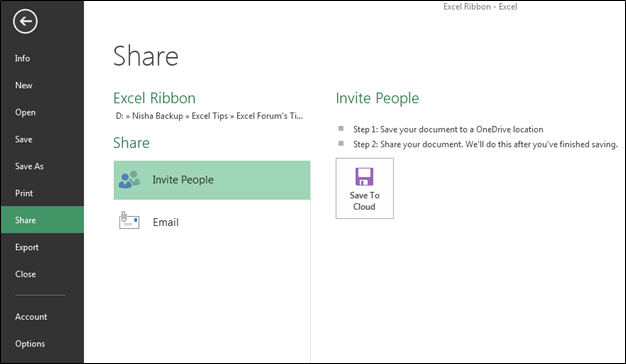
g) Share: — We use this option to share the file with multiple users and send it over email. To share the file we can follow the steps: — Click on File tab >Share.
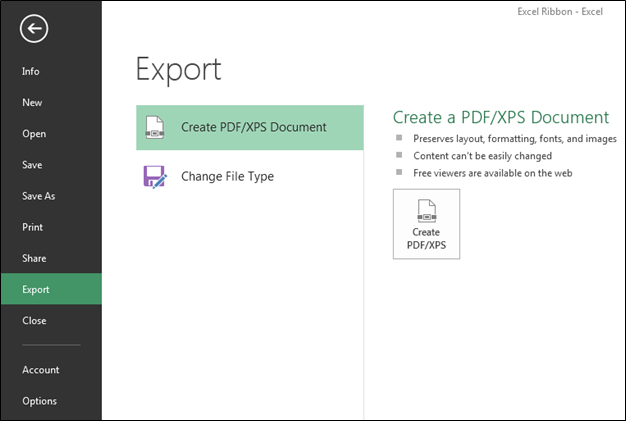
h) Export: — We use this option to export the file in PDF or XPS document and we can change the file type as well. To Export the file, we can follow the steps: — Click on File tab >Export. And then we can export it as per our requirement.
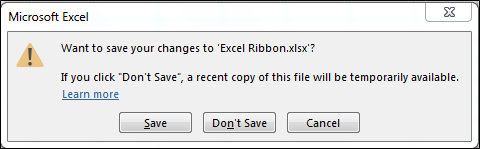
i) Close: — We use this option to close the file. Ctrl+W is the shortcut key to close the workbook or we can follow the steps: — Click on File tab >Close, active file will be closed. When we close the file, we get the confirmation message to save the file or not or cancel the command.
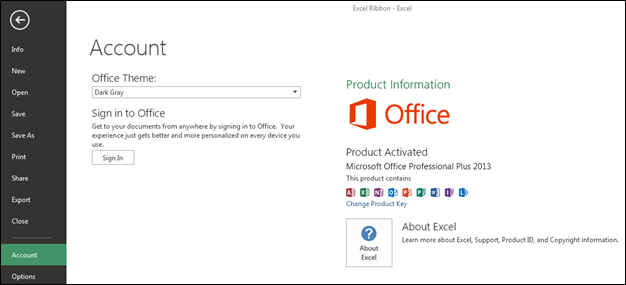
j) Account: — We use this option to sign in to our office account and we can change office theme, too. We can follow the steps: — Click on File tab >Active, Active window will appear.
k) Options: — It was in the tool menu of the previous versions of 2007 MS. We use this option to add extra and advanced features, like Developer tab, Power pivot, Analysis toolpak and many more. Also, we can change default settings, like font size, font style, number of sheets etc. In Excel options, we have 10 categories:-
1) General
2) Formulas
3) Proofing
4) Save
5) Language
6) Advanced
7) Customize Ribbon
 Quick Access toolbar
9) Add Ins
10) Trust Center

![]()
![]()
If you liked our blogs, share it with your friends on Facebook. And also you can follow us on Twitter and Facebook.
We would love to hear from you, do let us know how we can improve, complement or innovate our work and make it better for you. Write us at info@exceltip.com
Содержание
- Where are my worksheet tabs?
- Need more help?
- File Tab in Microsoft Excel
- www.TestsTestsTests.com
- Microsoft Excel FREE Resources Index Page
- The Backstage View: Using The File Tab
- * Saving and Opening a Workbook * Creating a New Workbook * Recent Places * Print Preview
- * Saving and Opening a Workbook
- * Creating a New Workbook
- * Recent Places
- * Print Preview
Where are my worksheet tabs?
If you can’t see the worksheet tabs at the bottom of your Excel workbook, browse the table below to find the potential cause and solution.
Note: The image in this article are from Excel 2016. Your view might be slightly different if you have a different version, but the functionality is the same (unless otherwise noted).
The window sizing is keeping the tabs hidden.
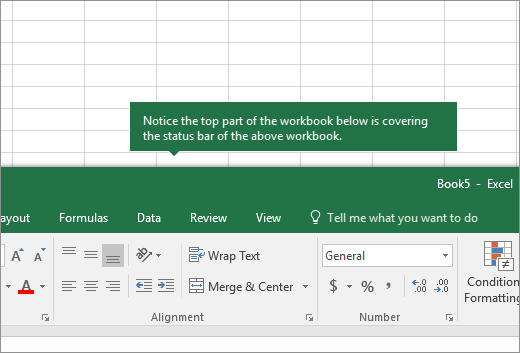
If you restore multiple windows in Excel, ensure that the windows are not overlapping. Perhaps the top of an Excel window is covering the worksheet tabs of another window.
The status bar has been moved all the way up to the Formula Bar.
Tabs can also disappear if your computer screen resolution is higher than that of the person who last saved the workbook.
Try maximizing the window to reveal the tabs. Simply double-click the window title bar.
If you still don’t see the tabs, click View > Arrange All > Tiled > OK.
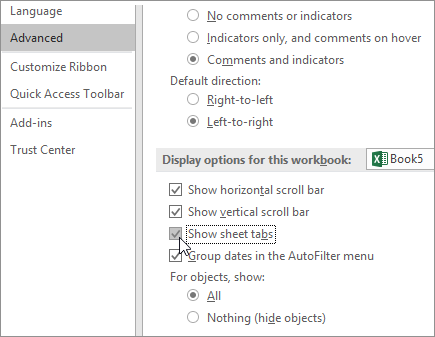
The Show sheet tabs setting is turned off.
First ensure that the Show sheet tabs is enabled. To do this,
For all other Excel versions, click File > Options > Advanced—in under Display options for this workbook—and then ensure that there is a check in the Show sheet tabs box.
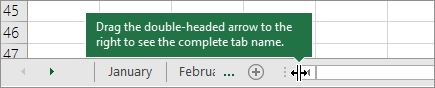
The horizontal scroll bar obscures the tabs.
Hover the mouse pointer at the edge of the scrollbar until you see the double-headed arrow (see the figure). Click-and-drag the arrow to the right, until you see the complete tab name and any other tabs.
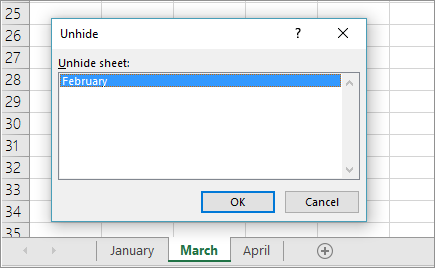
The worksheet itself is hidden.
To unhide a worksheet, right-click on any visible tab and then click Unhide. In the Unhide dialog box, click the sheet you want to unhide and then click OK.
Need more help?
You can always ask an expert in the Excel Tech Community or get support in the Answers community.
Источник
File Tab in Microsoft Excel
What is File tab and its uses?
File tab contains the basic required options such as New, Open, Save, Save as, Print, Share, Export, and Close options. Other than the aforementioned options, we can find account and Excel options tab, too.
a) Info: — With this option, we can get the information about the particular Excel file. Created date, last modified date, Author name, Properties, versions etc.
b) New: — We use this option to open the new Excel file. We can open new file using shortcut key, Ctrl+N or by Clicking on File tab > New > Blank workbook. If Excel file is not opened, then Press Window+R and type Excel, New Excel file will open.
c) Open: — We use this option to open the existing file (shortcut Ctrl+O). “Open” option appears and you can choose to open the file.
Alternatively, File tab > Open > choose the file
d) Save: — We use this option to save the current file.
Path: — Click on File tab >Save
e) Save as: — We use this option to make another copy or save the file at another place. F12 is the shortcut key to save as the file or we can save the file following these steps: — Click on File tab > Save as and then choose the location.
f) Print: — We use this option to print the current file. Ctrl+P is the shortcut key to print, or we can follow these steps: — File > Print and then we will have the page setup option. We can set the page according to our requirements.
g) Share: — We use this option to share the file with multiple users and send it over email. To share the file we can follow the steps: — Click on File tab >Share.
h) Export: — We use this option to export the file in PDF or XPS document and we can change the file type as well. To Export the file, we can follow the steps: — Click on File tab >Export. And then we can export it as per our requirement.
i) Close: — We use this option to close the file. Ctrl+W is the shortcut key to close the workbook or we can follow the steps: — Click on File tab >Close, active file will be closed. When we close the file, we get the confirmation message to save the file or not or cancel the command.
j) Account: — We use this option to sign in to our office account and we can change office theme, too. We can follow the steps: — Click on File tab >Active, Active window will appear.
k) Options: — It was in the tool menu of the previous versions of 2007 MS. We use this option to add extra and advanced features, like Developer tab, Power pivot, Analysis toolpak and many more. Also, we can change default settings, like font size, font style, number of sheets etc. In Excel options, we have 10 categories:-
Источник
www.TestsTestsTests.com

Microsoft Excel FREE Resources Index Page
- *45 Excel Tests & Quizzes
- * 43 Excel Tutorials
- * Excel Training
- * 43 Excel Tutorials with 42 Corresponding Tests
- * What is Excel?
- * What version of Excel?
- *Excel 2016 Tutorials & Excel Test Index
The Backstage View: Using The File Tab
* Saving and Opening a Workbook
* Creating a New Workbook
* Recent Places
* Print Preview
Many people believe that the real work behind any stage show happens backstage and that the real talent never makes it to the stage. This is certainly true to some extent for the Backstage View in Excel! This is where you will find options to save your workbook, give it a specific name, open existing workbooks, find workbooks you used a while ago and access many useful options. A way to remember the kind of options you find in this View is to think about all the functions that happen in the background of your workbook and are essential, but not necessarily visible in your actual workbook.
In many software programmes, the File button opens a menu as a list with functions such as save, save as, create new, print, open and options. The same is true for MS Office 2010, except instead of a list, the File tab opens a much more comprehensive view with the aforementioned options and a lot more.
1. To open the Backstage View, click on the green File tab on the far left-hand side of the Excel screen (circled in blue in the image below):

2. This will open the Backstage View:

3. Examine the Backstage View (pictured above). You will note three distinct panels.
4. The first panel (on the left-hand side) contains buttons for Save, Save As, Open, Close, Info, Recent, New, Print, Save & Send, Help, Options and Exit. When you click on any of these, Excel will display the options related to this button in the middle and far right panels. For example, in the image above, the Info button is selected which gives related options in the centre panel and the far right-hand panel. If we select a different button, for example New, the contents of the middle and far panel will change.
5. To close the Backstage View, simply click on one of the other usual Ribbon tabs, for example the Home tab, displayed at the top of the screen. Do not press Exit, this will exit Excel and close your worksheet!
* Saving and Opening a Workbook
Back in the good old days saving and opening a workbook probably meant placing a ledger in a waterproof packet, sticking a label on it and filing it in an archive with some mothballs. The job of retrieving the ledger again would most likely have been the job of a dedicated employee and may have meant him (or her) spending hours (maybe days) searching countless shelves for the workbook or ledger required.
Luckily for us in the 21st century, saving and opening a workbook means just a few clicks of the mouse.
You have two options for saving a Workbook. The first, Save, will save your workbook either using its existing name, if it had already been saved with a name in the past or Excel will prompt you to give the workbook a name and to save it in your desired location. Save As gives you the option to save a workbook that has already been saved in the past, with a new name in a new location.
1. To save a workbook, click on the Save button located on the left-hand panel in the Backstage View. If the workbook had not been saved before, the dialogue box pictured below will open. If it had been saved in the past, nothing visible will happen, but any edits you have made to the workbook since the last time it was saved, will be saved over the existing workbook.

2. Select the folder location where you wish to save your workbook and enter a name for your workbook in the File Name Box (circled in blue in the image above) and click the Save button. This will save a copy of your workbook to the location you chose and you will be able to continue working in the workbook. Any subsequent changes you make when you click the save button, will be saved into that file location into the workbook.
If you wish to save a copy of a workbook to a different location and/or with a new name, for example you may have a workbook containing a template you created for capturing your January expenses and you want to use the same template for your February expenses.
1. Go to the Backstage View and click the Save As button located in the left-hand panel. This will open the Save As dialogue box.
2. Follow the same steps as when you saved a workbook, select a folder to which to save the workbook and give it a new name in the File Name box and click Save.
You can also use the Save As button to save a workbook into a different format. For example, you may want to save a Workbook into a previous version of Excel if you wish to share a copy of the workbook with a colleague who does not have Excel 2010 installed.
1. Go to the Backstage View and click the Save As button. In the Save As dialogue box, select a folder to which to save the workbook and give your workbook a name.
2. Below the File Name box you will find the Save As Type box (circled in blue in the image below). Click the drop down arrow on this box to open a list of file type options to save your workbook as.

3. Choose the desired file type from the list and click save.
To open existing workbooks:
1. Click on the Open button located in the left-hand panel of the Backstage View. This will open the Open dialogue box:

2. Use the folder locations located on the left-hand side of the dialogue box (circled in blue in the image above) to locate the folder that contains your workbook.
3. When you have found the workbook you are looking for, either click it once and click the Open button (circled in blue in the image above) OR double click the workbook to open it directly.
TIP: You can quickly save a Workbook you are in without going to the Backstage View by holding down the control button on your keyboard and pressing the letter S (Ctrl+s). You can also quickly open a workbook by holding down the control button on your keyboard and pressing the letter O (Ctrl+o).
* Creating a New Workbook
If you need to create a new workbook, you can either start with a blank canvas (or worksheet in this instance!) or you can use one of the very useful templates included with Excel.
To create a New workbook:
1. In the Backstage View, click on the New button located in the left-hand panel.
2. This will open the Available Templates screen:

3. To open a blank work book, click on the Blank Workbook image (highlighted and circled in blue in the image above) and then click on the Create button (circled in blue in the image above). This will open a new blank workbook for you.
If you are feeling a little bit experimental, you may want to try any of the other options listed in the Available Templates screen under the heading Office.com Templates. There are some really useful options here, so go ahead and try some out.
Click on a template you think may be suitable for your needs and a screenshot of the selected template is displayed in the far right panel. If you wish to use the template, you need to click on the Download button (circled in blue in the image below):

To go back to the original list of templates, click on the Home button or use the back arrow located under the ‘Available Templates’ heading.
TIP: You can quickly create a new blank workbook without going to the Backstage View by holding down the control key on your keyboard and pressing the letter N (Ctrl+n).
* Recent Places
Excel saves the location of all the recent workbooks you have opened, created or edited. It also saves all the recent file locations you have opened or saved Excel files to. This option can either be a lifesaver or it could land you in serious hot water when you, for example, access workbooks you did not have permission to access or create workbooks of a sensitive nature that you may not want other users of your PC to know about. Your history of both accessing and creating workbooks, bill be displayed in the Recent list and it is therefore important to know where to locate this list and how to work with it.
1. To access the list of recent workbooks, go the Backstage View and click on the Recent button on the left-hand panel.
2. In the list of Recent Workbooks located in the middle panel, find the workbook you are looking for and click on it once to open it.
This is a great lifesaver if you cannot remember where you saved a file or if you need to quickly access a file without going through the process of navigating to the correct folder.
However, this list is dynamic and will change and be replaced by the most recently opened and worked-on workbooks. This means, if you wish to use it as a quick way of accessing a workbook you use on a weekly or monthly basis and you want to ensure it does not get bumped off the list, you will need to pin it to the list.
1. To pin a workbook to the Recent list, open the Recent Workbooks list in the Backstage View.
2. Study the icon located to the right-hand side of every workbook on the Recent list. You will note it looks like a drawing pin (circled in blue in the image below):

3. If you click the pin next to the workbook you wish to ‘pin’ to the list, once, it will change in appearance into a little blue pin and the item that you ‘pinned’ will be moved to the top of the Recent list. It will remain here until you click the pin again to ‘unpin’ it from the list:

In the same way you are able to view Recent Workbooks, you can also view Recent Places.
1. In the Backstage View, in the Recent screen, you will note in the right-hand panel next to the Recent Workbooks list, there is a list containing folders titled ‘Recent Places’. These folders represent all the recent file locations you have accessed or saved Workbooks to:

2. If you click on any of the items in this list, it will open the folder giving you the option to select the workbook you wish to open in Excel.
3. You can also pin frequently used folders to the Recent list to enable you to quickly access these. For example, you may have a folder containing all the budget workbooks you have created and by pinning this folder to the list, you can quickly access all your budget workbooks without having to find the folder.
* Print Preview
To avoid any interesting printing surprises, it is extremely advisable to always do a Print Preview of your workbook before pressing print. If your worksheet contains many columns of data, Excel will automatically break these off into A4 paper size and your work-of-art spreadsheet could end up printing over hundreds of pages. Although this may sound like a great conversation starter when you are standing at the printer waiting for aforementioned hundreds of pages to print, your level of coolness and office credibility may decrease with each printed sheet that contains only a few lines of data!
1. To view what your worksheet will look like before you take the leap to print, open the Backstage View.
2. In the left-hand panel, press the Print button. Don’t worry, this will NOT print your worksheet yet! It will open the Print options and preview section of the Backstage View:

3. The Preview screen located on the far right-hand panel will show you how your worksheet is going to print. At the same time that you consider the Preview, also have a look at how many pages your worksheet comprises (circled in blue in the image above). Click the arrows on either side to scroll through the pages.
4. The worksheet in this example is actually a single table that should easily be able to fit onto one sheet of paper and not four pages as illustrated in the example image above.
5. There are several ways to rectify this:
You can change the page orientation to ‘Landscape Orientation’ by clicking on the centre-panel button labelled ‘Portrait Orientation’.
If your worksheet still doesn’t fit the desired number of pages, a drastic but quick solution, is to click on the centre-panel button labelled ‘No Scaling’ and select ‘Fit Sheet On One Page’ or ‘Fit all Columns on One Page’.
6. Once you are happy with the Print Preview, indicate how many copies you would like to print in the Copies box (although it is advisable to only print one copy as a test) and press Print.
TIP: A shortcut to get to the Print options area of the Backstage View and Print Preview, is to hold down the control key on your keyboard and press the letter P (Ctrl + p).
Источник
Home
Home
Condensed version of the New and Open tabs
New
Here you can open a new blank workbook, access a number of great templates, or open one of Excel’s built in tutorials. These tutorials offer a great starting point for beginners or even some more advanced tutorials explaining features like Power Query.

Recent
The recent section shows your most recently opened and edited files. Clicking any of these files will launch that workbook. This section is great for pickup up where you left off or accessing your most used Excel files as they will most likely be in this list.

Pinned
Here you are able to quickly access your pinned files. You’ll want to pin your most important Excel files that you use daily or most frequently. Anywhere on the home tab, right click and select «Pin to list» to pin a workbook into this list.

Shared with Me
The shared with me section displays any workbook that someone else has shared from you. This feature exists for someone who likes working outside of email or the Microsoft Suite. This list will only display files from either your OneDrive (personal or business) or SharePoint Online.

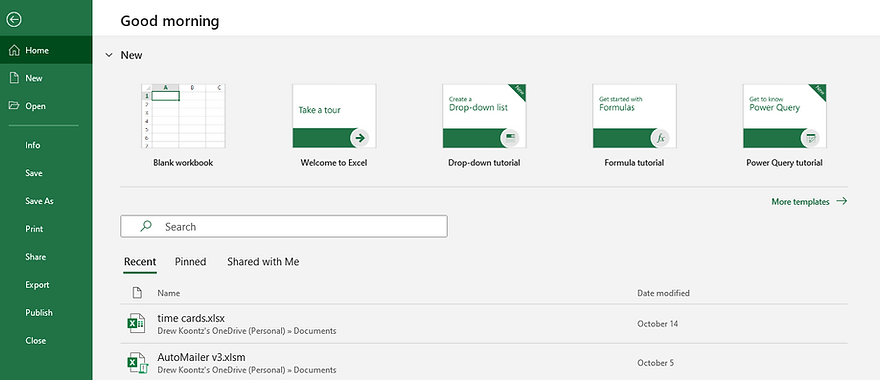
New
Open new workbooks, built-in templates, and tutorials

Blank Workbook
Your go to new workbook option. This will open a blank workbook with the default workbook options. Nothing like starting with a fresh blank workbook, get to creating!
Online Templates
A huge wealth of pre-built workbooks. If you can think of it there’s probably an online template dedicatd to it. I don’t use this option very much but I really should. Everything from chore schedules, Gantt planners, retirement planners, and every budget you could ever think of exist. They all come prepackaged and easy to use, no complicated formulas or formatting needed. Maybe just slight tweaking to perfectly suite your needs.

New
Open
Open existing workbooks from various sources

Recent
The recent section shows your most recently opened and edited files. Clicking any of these files will launch that workbook. This section is great for pickup up where you left off or accessing your most used Excel files as they will most likely be in this list.
Shared with Me
The shared with me section displays any workbook that someone else has shared from you. This feature exists for someone who likes working outside of email or the Microsoft Suite. This list will only display files from either your OneDrive (personal or business) or SharePoint Online.
OneDrive
Access files stored in your OneDrive. After logging into your Outlook account, you gain access to the OneDrive. Basically just cloud storage that can be used across all of your devices. Helpful if you’re moving between different computers often.
Other Locations
Gives you the ability to find files stored on your computer, across every file location on your computer, OneDrive, external hard drives, basically anywhere you can access files can be added on here.
Open
Info
All data and information related to the actual workbook file itself is stored here. Workbook level passwords, issues, history, and properties can be found under this tab.


Top Quick Options
At the top of the info window, there are a few different quick options relating to where the actual file is stored.
The top text in green is the workbook name, while the text string below it is the pathway in which it is stored. In this case, it is in my C: drive, and in my OneDrive.
Upload — This button will allow you to upload a copy of your workbook into a cloud location of your choice ( like one drive)
Share — Gives you the option to share a link via email or web link that enables others to edit/view the workbook. Good for collaboration.
Copy Path — Will copy the file pathway as seen up above. In this case:
C:UsersDrewKOneDriveEncyclopedia ExcelFunctions.xlsx
Copy Local Path — Will copy the file pathway like the above example but only if the workbook is stored on a local drive.
Open File Location — Opens the folder or location that the workbook is held in.
Protect Workbook
Allows you to protect the workbook with a variety of different security measures. You can protect the workbook, sheets, mark as final, mark as read only, and add a digital signature
Check for Issues
Offers tools to inspect document for hidden properties or personal information, checks for accessibility, and also checks for compatibility errors for earlier versions of Excel.
Version History
Allows you to view a files version history, track changes across all versions, and also restore to and older version in case of error or corruption.
Manage Workbook
This option will recover unsaved workbooks and allow you to browse recent unsaved files.
Browser View Options
Changes which sheets and options are visible when the workbook is opened and viewed on the web version of Excel. Can allow for tighter controlling.

Properties
Displays the workbook size and allows you to add meta descriptions and titles to the workbook. Can add a title, tag the workbook, and assign in a category for easier filing.
Related Dates
Shows the last time a workbook was modified (saved), when the workbook was initially created, and when the workbook was last printed.
Related People
Displays the original author or who created the workbook, and also who made the last save.
Related Documents
Gives you the ability to open the file location in which the workbook is saved.
Info
Save
This button has no menu associated with it and will simply save the workbook. The name and file pathway will remain the same, any new changes to the workbook will be saved after this button is pressed.
Save
Save As
Offers you the ability to save your workbook as a new file, either by renaming the file (such as adding version numbers) or changing the save location.
On the left side you see all of the locations that the file can be saved in, and then on the right, shows a more zoomed in version, giving you the ability to pick a file extension, file name, and lets you see what is in the chosen folder.

Save As
This tab houses all of the print options available to you when printing any part of your workbook.

Print & Copy Options
Pressing the large print button will execute a print based on the below settings. The copies section allows you to print multiple copies of a workbook.
Printer
This is where you select which printer or device you wish to print to. You can set up new printers, print to PDF, and print to other external devices here.
Settings
This section allows you to select what to print, either active sheet, whole workbook, or a selected area. You can also pick a page range.
The collate options, collated will print ordered copies, uncollated will print copies of the 1st page, then all copies of the 2nd page and so on.
Print orientation, will print in either landscape or portrait modes.
The paper size that you wish to print on
The print margins or how much space you wish to leave on the sides of the pages
Page scaling, this changes how the sheets fit on the page and will actually scale or zoom in/out to better fit on your printed page.
Share
Once a workbook is uploaded onto a cloud location like OneDrive, gives you options to share a link to the workbook. You can share through a direct link or email, and set various options and permissions for anyone accessing the file.

Here you can set whether or not anyone with the link can edit or only view the workbook.
You can also write in the name, email, or group that you would like to send it out to as well as adding a custom message to go along with the link.
Here you can copy a direct link that can be distributed however you would like to allow access into the workbook.
You can also choose to send a copy of the workbook, or a PDF using this bottom option.
Share
Export
The export tab has two major functions that give you direct and easy ways to export your workbook into properly share-able files, rather than raw Excel files.

The «Create PDF/XPS Document» button allows you to create a PDF or XPS version of your document. These file types preserve the layout, formatting, fonts, and images, while making it harder to change the content held within. A PDF is also accessible across most devices.

The «Change File Type» button allows you to convert the Excel file (usually the standard .xlsx) into a large amount of other file types such as: .xls, .xlsm, .xlsb, .xltx, .ods, .csv .txt, or .prn.
Export
Publish
For now, the publish option here only gives the option to publish a report or workbook directly into Power BI. The two main options here are uploading a workbook to Power BI and Exporting workbook data to Power BI.
Upload your workbook to Power BI — When you choose the upload option, the workbook will be uploaded as is, into a Power BI report, and will be seen as a data source by Power BI as an Excel Workbook. No changes can be made here, and is mostly useful if you have charts or PivotTables that you wish to be carried over to a Power BI report.
Export workbook data to Power BI — With the export option, any data tables or data saved to the Excel data model will be exported as a new dataset in Power BI. This is especially helpful as any changes made to the supporting Excel workbook will be pulled into a Power BI report upon a refresh. This allows you to take any Excel data dump workbook and transform it entirely inside Power BI.

Publish
Close
This button does not have a related menu, and will simply close the open workbook. If the workbook has unsaved changes, you will be prompted to save the workbook before it will close.
Close
Account
The account tab houses all of the options related to your personal Microsoft account, your office themes, as well as product information about your Microsoft subscription and office version.

Here is where you can see which account has signed into Microsoft Office, as well as manage the account privacy and reporting settings.
You can also set a office theme and background. The background will change the art style while theme will allow you to change Excel into dark mode.
You can add services here, for instance OneDrive, giving you better sharing and saving capabilities.

Information on how you are accessing Excel, whether through a subscription or a purchased one-time copy.
This button checks your latest Excel version and will install any available updates.
You can join and learn more information for new builds through Office Insider.
The About Excel button will supply some technical ID numbers as well as the software license terms.
The What’s New button will give you a run down on the latest features brought ito Excel.
Account
Feedback
This area allows you to submit feedback directly to Microsoft. Giving you a way to express anything that you like or dislike about the program, and even offer suggestions for new features and improvements.

If you like something, submit your positive feedback here. I’m sure the Microsoft Team loves getting these responses.
If you don’t like something, this button can notify them of potential bugs or areas for improvement.
If you have a good idea that you believe could improve Excel, submit it here. I believe the smooth scrolling coming out soon was first submitted on here.
Feedback
Options
This button will bring up the general Excel options menu available to every user. Within this menu you will find just about every option given to the users to customize their user experience and give tighter controls to specific excel functions.
Everything from interface options, formula options, changing how proofing works inside and outside of formulas, language, accessibility, and even add-ins, is all managed through this menu.

Options
Transcript
A tour of the File tab
In this lesson, we’re going to take a tour of the File tab. The File tab is also sometimes referred to as «backstage». Unlike the main stage where you do your work, the File tab is a place to go for tasks that don’t involve working on your data—for example, sharing files, printing, and changing Excel settings.
Let’s take a look.
The first thing to notice about the File tab is that, unlike other ribbon tabs, you aren’t able to see the worksheet when you’re on the File tab.
That’s because the File tab is meant for tasks and information that live behind the scenes, in the backstage area.
At the top left, we have common file operations, including Save, Save As, Open, and Close.
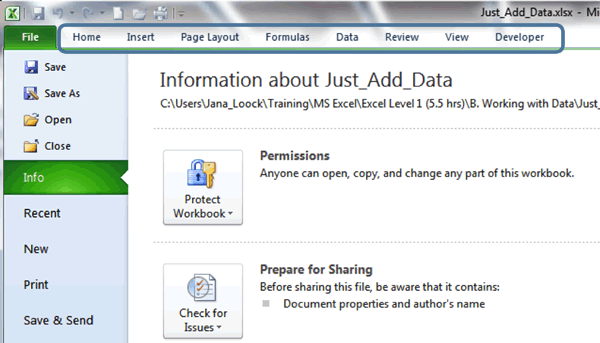
Next is the Info pane. The Info pane gives you access to workbook Permissions, Tools for preparing the workbook for sharing, and a way to get to previous versions of the file saved with Autosave. On the left side of the Info pane is file property information. This includes the date the file was created and last modified, as well as author information.
The Recent pane gives you access to recently opened workbooks and recently used folders. We cover the Recent pane in detail in an upcoming lesson.
The New pane allows you to create new workbooks. This can be a new blank workbook, or a new workbook using a template on your computer. Or, you can create a new workbook using one of the many Office.com templates.
The Print pane allows you to select a printer, and gives you access to the most commonly used settings for printing. It also shows a large print preview area which makes it easy to see if current settings are correct.
The Save and Send pane gives you options for sharing your workbook. You can email your workbook in several different ways, including as an attachment, as an email with a link, as a PDF or XPS document, or, as an internet fax.
You can also save the file to OneDrive, change the File Type, and create a PDF or XPS document.
The Help pane gives you access to help resources and Microsoft contact information.
Finally, the Options command opens Excel’s vast set of options in a separate window. We’ll explore Excel options in a future lesson.
Using the File Tab in Excel Tutorial – The Backstage View
* Saving and Opening a Workbook
* Creating a New Workbook
* Recent Places
* Print Preview
Many people believe that the real work behind any stage show happens backstage and that the real talent never makes it to the stage. This is certainly true to some extent for the Backstage View in Excel! This is where you will find options to save your workbook, give it a specific name, open existing workbooks, find workbooks you used a while ago and access many useful options. A way to remember the kind of options you find in this View is to think about all the functions that happen in the background of your workbook and are essential, but not necessarily visible in your actual workbook.
Test your Excel skills with the corresponding FREE Online Multiple Choice
Using the File Tab Excel Test
In many software programmes, the File button opens a menu as a list with functions such as save, save as, create new, print, open and options. The same is true for MS Office 2010, except instead of a list, the File tab opens a much more comprehensive view with the aforementioned options and a lot more.
1. To open the Backstage View, click on the green File tab on the far left-hand side of the Excel screen (circled in blue in the image below):
2. This will open the Backstage View:
3. Examine the Backstage View (pictured above). You will note three distinct panels.
4. The first panel (on the left-hand side) contains buttons for Save, Save As, Open, Close, Info, Recent, New, Print, Save & Send, Help, Options and Exit. When you click on any of these, Excel will display the options related to this button in the middle and far right panels. For example, in the image above, the Info button is selected which gives related options in the centre panel and the far right-hand panel. If we select a different button, for example New, the contents of the middle and far panel will change.
5. To close the Backstage View, simply click on one of the other usual Ribbon tabs, for example the Home tab, displayed at the top of the screen. Do not press Exit, this will exit Excel and close your worksheet!
* Saving and Opening a Workbook
Back in the good old days saving and opening a workbook probably meant placing a ledger in a waterproof packet, sticking a label on it and filing it in an archive with some mothballs. The job of retrieving the ledger again would most likely have been the job of a dedicated employee and may have meant him (or her) spending hours (maybe days) searching countless shelves for the workbook or ledger required.
Luckily for us in the 21st century, saving and opening a workbook means just a few clicks of the mouse.
You have two options for saving a Workbook. The first, Save, will save your workbook either using its existing name, if it had already been saved with a name in the past or Excel will prompt you to give the workbook a name and to save it in your desired location. Save As gives you the option to save a workbook that has already been saved in the past, with a new name in a new location.
1. To save a workbook, click on the Save button located on the left-hand panel in the Backstage View. If the workbook had not been saved before, the dialogue box pictured below will open. If it had been saved in the past, nothing visible will happen, but any edits you have made to the workbook since the last time it was saved, will be saved over the existing workbook.
2. Select the folder location where you wish to save your workbook and enter a name for your workbook in the File Name Box (circled in blue in the image above) and click the Save button. This will save a copy of your workbook to the location you chose and you will be able to continue working in the workbook. Any subsequent changes you make when you click the save button, will be saved into that file location into the workbook.
If you wish to save a copy of a workbook to a different location and/or with a new name, for example you may have a workbook containing a template you created for capturing your January expenses and you want to use the same template for your February expenses.
1. Go to the Backstage View and click the Save As button located in the left-hand panel. This will open the Save As dialogue box.
2. Follow the same steps as when you saved a workbook, select a folder to which to save the workbook and give it a new name in the File Name box and click Save.
You can also use the Save As button to save a workbook into a different format. For example, you may want to save a Workbook into a previous version of Excel if you wish to share a copy of the workbook with a colleague who does not have Excel 2010 installed.
1. Go to the Backstage View and click the Save As button. In the Save As dialogue box, select a folder to which to save the workbook and give your workbook a name.
2. Below the File Name box you will find the Save As Type box (circled in blue in the image below). Click the drop down arrow on this box to open a list of file type options to save your workbook as.
3. Choose the desired file type from the list and click save.
To open existing workbooks:
1. Click on the Open button located in the left-hand panel of the Backstage View. This will open the Open dialogue box:
2. Use the folder locations located on the left-hand side of the dialogue box (circled in blue in the image above) to locate the folder that contains your workbook.
3. When you have found the workbook you are looking for, either click it once and click the Open button (circled in blue in the image above) OR double click the workbook to open it directly.
TIP: You can quickly save a Workbook you are in without going to the Backstage View by holding down the control button on your keyboard and pressing the letter S (Ctrl+s). You can also quickly open a workbook by holding down the control button on your keyboard and pressing the letter O (Ctrl+o).
* Creating a New Workbook
If you need to create a new workbook, you can either start with a blank canvas (or worksheet in this instance!) or you can use one of the very useful templates included with Excel.
To create a New workbook:
1. In the Backstage View, click on the New button located in the left-hand panel.
2. This will open the Available Templates screen:
3. To open a blank work book, click on the Blank Workbook image (highlighted and circled in blue in the image above) and then click on the Create button (circled in blue in the image above). This will open a new blank workbook for you.
If you are feeling a little bit experimental, you may want to try any of the other options listed in the Available Templates screen under the heading Office.com Templates. There are some really useful options here, so go ahead and try some out.
Click on a template you think may be suitable for your needs and a screenshot of the selected template is displayed in the far right panel. If you wish to use the template, you need to click on the Download button (circled in blue in the image below):
To go back to the original list of templates, click on the Home button or use the back arrow located under the ‘Available Templates’ heading.
TIP: You can quickly create a new blank workbook without going to the Backstage View by holding down the control key on your keyboard and pressing the letter N (Ctrl+n).
* Recent Places
Excel saves the location of all the recent workbooks you have opened, created or edited. It also saves all the recent file locations you have opened or saved Excel files to. This option can either be a lifesaver or it could land you in serious hot water when you, for example, access workbooks you did not have permission to access or create workbooks of a sensitive nature that you may not want other users of your PC to know about. Your history of both accessing and creating workbooks, bill be displayed in the Recent list and it is therefore important to know where to locate this list and how to work with it.
1. To access the list of recent workbooks, go the Backstage View and click on the Recent button on the left-hand panel.
2. In the list of Recent Workbooks located in the middle panel, find the workbook you are looking for and click on it once to open it.
This is a great lifesaver if you cannot remember where you saved a file or if you need to quickly access a file without going through the process of navigating to the correct folder.
However, this list is dynamic and will change and be replaced by the most recently opened and worked-on workbooks. This means, if you wish to use it as a quick way of accessing a workbook you use on a weekly or monthly basis and you want to ensure it does not get bumped off the list, you will need to pin it to the list.
1. To pin a workbook to the Recent list, open the Recent Workbooks list in the Backstage View.
2. Study the icon located to the right-hand side of every workbook on the Recent list. You will note it looks like a drawing pin (circled in blue in the image below):
3. If you click the pin next to the workbook you wish to ‘pin’ to the list, once, it will change in appearance into a little blue pin and the item that you ‘pinned’ will be moved to the top of the Recent list. It will remain here until you click the pin again to ‘unpin’ it from the list:
In the same way you are able to view Recent Workbooks, you can also view Recent Places.
1. In the Backstage View, in the Recent screen, you will note in the right-hand panel next to the Recent Workbooks list, there is a list containing folders titled ‘Recent Places’. These folders represent all the recent file locations you have accessed or saved Workbooks to:
2. If you click on any of the items in this list, it will open the folder giving you the option to select the workbook you wish to open in Excel.
3. You can also pin frequently used folders to the Recent list to enable you to quickly access these. For example, you may have a folder containing all the budget workbooks you have created and by pinning this folder to the list, you can quickly access all your budget workbooks without having to find the folder.
* Print Preview
To avoid any interesting printing surprises, it is extremely advisable to always do a Print Preview of your workbook before pressing print. If your worksheet contains many columns of data, Excel will automatically break these off into A4 paper size and your work-of-art spreadsheet could end up printing over hundreds of pages. Although this may sound like a great conversation starter when you are standing at the printer waiting for aforementioned hundreds of pages to print, your level of coolness and office credibility may decrease with each printed sheet that contains only a few lines of data!
1. To view what your worksheet will look like before you take the leap to print, open the Backstage View.
2. In the left-hand panel, press the Print button. Don’t worry, this will NOT print your worksheet yet! It will open the Print options and preview section of the Backstage View:
3. The Preview screen located on the far right-hand panel will show you how your worksheet is going to print. At the same time that you consider the Preview, also have a look at how many pages your worksheet comprises (circled in blue in the image above). Click the arrows on either side to scroll through the pages.
4. The worksheet in this example is actually a single table that should easily be able to fit onto one sheet of paper and not four pages as illustrated in the example image above.
5. There are several ways to rectify this:
You can change the page orientation to ‘Landscape Orientation’ by clicking on the centre-panel button labelled ‘Portrait Orientation’.
If your worksheet still doesn’t fit the desired number of pages, a drastic but quick solution, is to click on the centre-panel button labelled ‘No Scaling’ and select ‘Fit Sheet On One Page’ or ‘Fit all Columns on One Page’.
6. Once you are happy with the Print Preview, indicate how many copies you would like to print in the Copies box (although it is advisable to only print one copy as a test) and press Print.
TIP: A shortcut to get to the Print options area of the Backstage View and Print Preview, is to hold down the control key on your keyboard and press the letter P (Ctrl + p).
Woohoo! Now that you have done the tutorial:
Test your Excel skills with the corresponding FREE Online Multiple Choice
Using the File Tab Excel Test
TRY THE NEXT TUTORIAL: The Views in Excel Tutorial
TRY THE NEXT TEST: The Views in Excel Test
* More from TestsTestsTests.com
How do I enable the File tab in Excel?
Open Excel Options from Excel 2010/2013/2016/2019 Ribbon if you do not have Classic Menu for Office
- Click the File tab;
- Click the Help button at left bar;
- In the middle pane, you will view the Options button under the Tools for Working With Office.
Why is there no File tab in Excel?
The Show sheet tabs setting is turned off. First ensure that the Show sheet tabs is enabled. To do this, For all other Excel versions, click File > Options > Advanced—in under Display options for this workbook—and then ensure that there is a check in the Show sheet tabs box.
Where can I find the File tab?
The File tab is the blue button in the upper-left corner. 2. When viewing the properties of a computer file, the top of the window contains one or more tabs called file tabs. Some software applications may integrate into the properties window, adding additional file tabs and information or functionality.
Why does my Excel not have a File tab?
What is the File tab in Excel?
The File tab replaces the Office button (or File menu) in previous versions of Excel and also includes commands new to Excel 2010. The new Backstage view contains all the document- and file-related commands, including Info, Save, Save As, Open, Close, Recent, New, Print, and Save & Send.
What is the name of File tab?
The four names of the file tab are Open, Save, Properties and Close. Explanation: The file tab is present in Microsoft Office software such as Microsoft Word, Microsoft Excel, etc.
How do I get a list of tabs in Excel?
Excel: Right Click to Show a Vertical Worksheets List
- Right-click the controls to the left of the tabs.
- You’ll see a vertical list displayed in an Activate dialog box. Here, all sheets in your workbook are shown in an easily accessed vertical list.
- Click on whatever sheet you need and you’ll instantly see it!
Where is the File tab in Word 2010?
The image below is of Microsoft Word 2010. The File tab is the blue button in the upper-left corner. 2. When viewing the properties of a computer file, the top of the window contains one or more tabs called file tabs.
How do I see my tabs in windows 10?
In Settings, click “System,” then select “Multitasking” from the sidebar. In Multitasking settings, locate the “Pressing Alt + Tab shows” drop-down menu and click it. When the menu appears, select “Open windows and all tabs in Edge.”
If you’re a relatively new user to Excel and to spreadsheets, you may not know the purpose of everything on the screen. Chances are, you’ll find simpler or more effective ways to work with your spreadsheets once you find out more about the interface and its tricks. Here’s a quick look at the parts of Excel.
Information in this article applies to Excel 2019, 2016, 2013; Excel for Microsoft 365, and Excel Online.
Excel Screen Elements
The Excel screen is filled with possibilities. After you learn what each section is for, you’ll create professional-looking spreadsheets in no time.
When you first open Excel and start with a blank worksheet, this is what you’ll see:
Across the top of the screen, you’ll find the ribbon that contains all of the commands, formulas, and features you’ll need to create data-intense spreadsheets. The main part of the screen is the worksheet where you’ll enter, edit, and analyze your data.
These are the other parts of the Excel screen you’ll use when creating worksheets:
Active Cell
The active cell is recognized by its green outline. Data is always entered into the active cell. Different cells are made active when you select them.
There are several ways to select cells. The method you use depends on the device you use and your preferences. Here are the different ways to select a cell and make it active:
- Click on a cell with the mouse.
- Tap a cell with your finger or stylus.
- Press the arrow keys on the keyboard to move to the cell.
Cells Are the Foundation of Excel
Cells are the rectangular boxes located in the central area of a worksheet. Cells contain labels, data, and formulas. To make worksheet data stand out, cells can be formatted to change the text or to add a fill color. Cells may also contain charts and images that explain the cell data.
Some important notes to know about cells include:
- Data entered into a worksheet is stored in a cell. Each cell holds only one piece of data at a time.
- A cell is the intersection point of a vertical column and a horizontal row.
- Each cell in the worksheet is identified by a cell reference, which is a combination of letters and numbers such as A1, F456, or AA34.
Column Letters
Columns run vertically on a worksheet, and each one is identified by a letter in the column header such as A, B, C, and D.
Formula Bar
The Formula Bar is located above the worksheet and displays the contents of the active cell. The Formula Bar is also used to enter or edit data and formulas.
Name Box
The Name Box is located to the left of the Formula Bar. The Name Box displays the cell reference or the name of the active cell. In the above image, cell G2 is the active cell.
Quick Access Toolbar
The Quick Access toolbar adds frequently used commands to the top of the Excel screen. Make your work go faster by adding commands to the Quick Access Toolbar instead of searching through the tabs to find what you need. To find these frequently used commands, select the Customize Quick Access Toolbar down arrow.
Ribbon
The Ribbon is the strip of buttons and icons located above the worksheet. When clicked on, these buttons and icons activate the various features of the program. First introduced in Excel 2007, the ribbon replaced the menus and toolbars found in Excel 2003 and earlier versions.
Ribbon Tabs
Ribbon tabs are part of the horizontal ribbon menu that contains links to various features of the program. Each tab – such as Home, Page Layout, and Formulas – contains a number of related features and options that are activated by clicking on the appropriate icon.
The File Tab
The File tab was introduced in Excel 2010, replacing the Excel 2007 Office Button, and it works differently than the others tabs. Instead of displaying options on the horizontal ribbon, the File tab opens a different screen.
Here’s what you’ll find in the File tab:
- Items that are related to file and document management, such as opening new or existing worksheet files, saving, and printing.
- The Options item alters the look of the program. From here, you’ll choose which screen elements to display, such as scroll bars and gridlines; it also contains options that activate a number of settings including automatic recalculation of worksheet files and choosing which languages to use for spell check and grammar.
Row Numbers
Rows run horizontally in a worksheet and are identified by a number in the row header.
Sheet Tabs
A new Excel workbooks opens with a single worksheet, but workbooks can contain multiple worksheets. Each worksheet has its own tab at the bottom of the screen. The Sheet tab displays the name of the worksheet, such as Sheet1 or Sheet2.
Here are a few tips when working with worksheets:
- Add sheets to an Excel workbook to keep datasets separate. Select New sheet which is found next to the Sheet tabs. If you prefer keyboard shortcuts, press either Shift+F11 or Alt+Shift+F1 to add a new worksheet to the left of the selected sheet.
- Rename a worksheet or change the tab color to make it easier to keep track of data in large spreadsheet files.
- Switch between worksheets to find the data you need. Select the tab of the sheet you want to access. If you prefer to use keyboard shortcuts, press Ctrl+PgUp or Ctrl+PgDn to change between worksheets.
Status Bar
The Status Bar, which runs horizontally along the bottom of the screen, can be customized to display a number of options, most of which display information about the current worksheet, data the worksheet contains, and the keyboard. The keyboard information includes whether the Caps Lock, Scroll Lock, and Num Lock keys are turned on or off.
Zoom Slider
Located in the bottom right corner of the Excel screen, the Zoom slider changes the magnification of a worksheet when you drag the slider box back and forth, or select Zoom Out or Zoom In located at either end of the slider.
Thanks for letting us know!
Get the Latest Tech News Delivered Every Day
Subscribe
The ribbon, tabs, commands gridlines, control buttons, etc. that a user can see and interact with on the screen after opening an Excel spreadsheet are called User Interface Environment in MS Excel.
Excel is an electronic spreadsheet program, developed by Microsoft Corporation. An Excel Spreadsheet is used to record, validate and analyze the numeric data for maintaining Payrolls, Selling and purchasing product orders, Progress Reports, family budgets, and more.
These are calculated whether using general, financial, logical, statistical, engineering or other functions and formulas. The features in the excel environment are explained below in the screenshot.

Table of Contents
- User Interface to MS Excel
- Quick Access Toolbar:
- File Menu:
- Tell me:
- Title Bar:
- Sign in:
- Share:
- Control Buttons:
- Ribbon:
- Ribbon Display Options:
- Tabs:
- Groups:
- Commands
- Name Box:
- Insert Functions:
- Formula bar:
- Row and Column Headings:
- Vertical/Horizontal Scrollbar:
- Page View Options:
- Zoom Slider/Toolbar:
- Click to Select All:
- Gridlines:
- Cell in Excel:
- Cell Address:
- Active Cell:
- Active Sheet/sheet tab:
- Range of cells:
- Sheet tabs:
- Insert New Worksheet:
Quick Access Toolbar:
The Quick Access Toolbar appears at the top left corner of the Excel application and other MS Office suites. The default commands of the Quick Access Toolbar are Save, Undo and Redo.
In the graphical user interface environment in MS Excel, the File menu is also known as the File Tab, used to control and access the file functions of the MS Office suite.
Officially, it handles files using the file menu commands such as new, open, save, save, print, share, export, publish, close, account and options. To read the File menu features in an Excel environment click here.
Tell me:
In the user interface of Microsoft Excel, the tell me to search box helps you search the command quickly and easily without going to the ribbon tab or group. Here you can type any command name you want to use or apply to the Sheet/Document.
Title Bar:
You can see the title bar at the top of the excel spreadsheet application (MS Office suites) with the name currently being used. The name of the workbook appears in the middle of the title bar. The name of the workbook here we called is a title.
Sign in:
Microsoft’s free account is used to purchase, activate, and access Microsoft services. You can save and receive your documents from anywhere using the service. You can also use this account to use and access OneDrive, Skype, and Microsoft store.
This option appears at the top right corner, underneath the close button, you can save your work on different platforms by sharing with caring. These Platforms are Google Cloud, One Drive, E-mail, Blogs, people, etc.
Control Buttons:
The Minimize, Restore Down/Maximize and Close buttons are called Control Buttons. These appear at the top right corner of the (MS Office Suite of Applications) Excel Spreadsheet.
Ribbon:

The Ribbon is a collection of groups, commands and functions and locates under each Tab such as Home, Insert, Design, Layout, References, Mailings, Review and View, It is designed to help you quickly and easily find the groups and commands to complete a task you want.
Ribbon Display Options:

The Ribbon Display options are located at the right corner of the title bar and the 4th position on the left of the Control buttons. The Ribbon Display Options include Auto-Hide Ribbon, Show Tabs, Show Tabs and Commands.
Tabs:

Home, Insert, Page Layout, Formulas, Data, Review, and view are called Tabs. Each tab is a form of group. Similarly, each Group is a form of the command.
Groups:

Each tab is a form of group. Similarly, each group is a form of the command. For example, Groups on the Home tab include Clipboard, Font, Alignment, Number, Style, Cells, and Editing.
Commands

A command is part of a group. And access to a specific piece of work. For example, the Font group commands include bold, italic, underline, etc.
Name Box:
It is the reference (address) for a specific cell or range of cells or you can set the name for a particular cell or range of cells in an excel spreadsheet.
Insert Functions:
It helps to get the result by using a particular function based on its arguments. This is one of the features of Excel.
Formula bar:
In the Formula bar, you can view and modify the function or formula that applies to any cell in the sheet for any calculation.
Row and Column Headings:
The column is a collection of Vertical light grey coloured lines containing the letters used to identify each column in a worksheet.
The column heading appears on the top of it (above the first row). The row is a collection of Horizontal light grey coloured lines containing the number used to identify each row in a worksheet. The Row Heading appears at the beginning of it (left of the first column).
Without Row and Column Headings in excel you cannot perform an autofill feature.
Vertical/Horizontal Scrollbar:
The scrollbar is used to view the worksheet in any part by using the Vertical or Horizontal scrollbar whether by moving up, down, left or right.
Page View Options:
Page View Options appear at the right but one on the taskbar. These are
Normal: Normal is a default view and is easier to work in this mode in the worksheet.
Page Layout: In the Page Layout mode, the worksheet is divided into more page sizes for print preview.
Page Break Preview: The Page Break Preview shows the worksheet as separate pages where there are the contents to see how a page look likes.
Zoom Slider/Toolbar:
To zoom in and out excel spreadsheet in the desired size, use the Zoom slider, which appears at the bottom right corner of the workbook.
Click to Select All:
Click on the top left of the common area (Under the Name Box) of the Column and Row Headings to select the entire worksheet. Just like Ctrl + A.
Gridlines:
The Gridlines are the collection of Horizontal and Vertical light grey coloured lines in a worksheet.
Cell in Excel:
In the Microsoft Excel Spreadsheet Environment, A cell is an Intersection of Rows and columns to form like a rectangle in a worksheet.
Cell Address:
The location of a cell is identified by its column letter and the row number is called, cell address or cell reference.
Active Cell:
An Active Cell in the graphical user interface is where it is bold with a dark outline. An Active cell is an identifiable mark that can be accepted to enter and edit the content.
Active Sheet/sheet tab:
For a selected worksheet that is currently being used, the name of the sheet tab is in bold and appears at the bottom left corner of the workbook.
Range of cells:
In the Microsoft Excel Spreadsheet Environment, More than two cells that are selected horizontally or vertically are called a range of cells.
Sheet tabs:
In the user interface environment in MS Excel, The name of the sheets that appears from the bottom left corner of the worksheet are called sheet tabs.
Insert New Worksheet:
To insert more worksheets in a workbook, click the insert sheet tab button, located right to the sheet tabs.
-
What is an Active cell in Excel?
An Active Cell is where it is bold with a dark outline. An Active cell is an identifiable mark that can be accepted to enter and edit the content.
-
What is an active Sheet?
For a selected worksheet that is currently being used, the name of the sheet tab is in bold and appears at the bottom left corner of the workbook.
-
What is the range of cells in excel?
In the Microsoft Excel Spreadsheet Environment, More than two cells that are selected horizontally or vertically are called a range of cells.
-
What is the sheet tab in excel?
In the Microsoft Excel Spreadsheet Environment, The name of the sheets that appears from the bottom left corner of the worksheet is called sheet tabs.
-
What is a cell Address in Excel?
The location of a cell is identified by its column letter and the row number is called, cell address or cell reference.
-
What are Gridlines in Excel?
The Gridlines are the collection of Horizontal and Vertical light grey-coloured lines in a worksheet.
-
What is Formula Bar in Excel?
In the Formula bar, you can view and modify the function or formula that applies to any cell in the sheet for any calculation.
-
What is Insert Function in Excel?
It helps to get the result by using a particular function based on its arguments. This is one of the features in excel.
-
What is Name Box in Microsoft Excel?
If you can see the reference (address) for a specific cell or range of cells or you can set the name for a particular cell or range of cells in an excel spreadsheet.
Subjects>Electronics>Computers

Wiki User
∙ 5y ago
Best Answer
![]() Copy
Copy
It is the main tab to deal things about the file itself. The
main ones being creating, opening, closing and saving files, and
also printing files. You can also get information about the file
and do other things like export the file.
Wiki User
∙ 5y ago
This answer is:
![]()
Study guides
Add your answer:
![]() Earn +
Earn +
20
pts
Q: What does the File tab in Excel do?
Write your answer…
Submit
Still have questions?
![]()
![]()
Related questions
People also asked
(01). WHAT IS THE EXCEL TAB / TAB SHEET?
Excel tab Sheet is a visual label that looks like a file folder tab. In Excel, a sheet tab shows the of a worksheet contained in the workbook.
Excel by default displays the Excel tab or tab sheet. Each Excel workbook contains at least one worksheet. We can create a number of worksheets in a workbook according to our requirements. Each worksheet shows as a tab at the bottom of the Excel window. These tabs help to manage the worksheets and move from one worksheet to another easily.
(02). WHAT IS THE EXCEL SCROLL BAR?
Excel scroll bar is a navigation bar in a worksheet using to move to the right side and to move to the downward.
In addition to the sheet tab, Excel displays Vertical Scroll Bar to the right side and Horizontal Scroll Bar to the bottom of the Excel screen. These scroll bars help to scroll up-and-down and side-to-side through a worksheet, respectively. The arrow keys on the keyboard or the scroll wheel on the mouse helps to move the scroll bars.
(03). WHY EXCEL SCROLL BAR MISSING & EXCEL TABS NOT SHOWING?
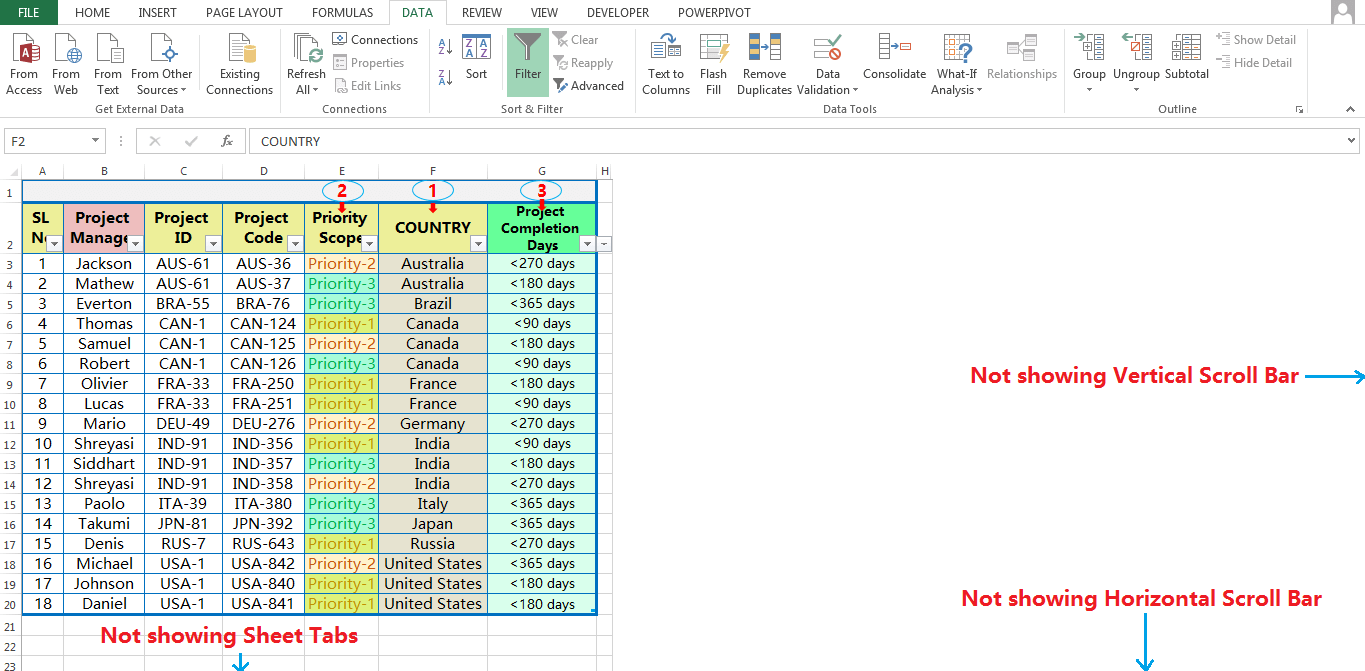
➢ Sometimes, while Excel opens it hides the scroll bar and sheet tab(s) accidentally.
➢ Sometimes, as per our requirement generally to increase the viewing area of the worksheet, hide the horizontal and vertical scroll bars manually.
Whatever is it, please note that changes in scroll bars and sheet tables are only applicable to the current workbook, not to other opened workbooks.
(i) Go to the File tab.

(ii) Select Options ➪ ‘Excel Options’ window opens.
Alternatively, use the excel shortcut Alt+F+T (sequentially press Alt, F, T) which will open the ‘Excel Options’ window.

(iii) Then select Advanced from the left sidebar ➪ scroll down to the Display options for this workbook section (about halfway down) ➪ select the Show horizontal scroll bar, Show vertical scroll bar, and Show sheet tabs checkboxes.

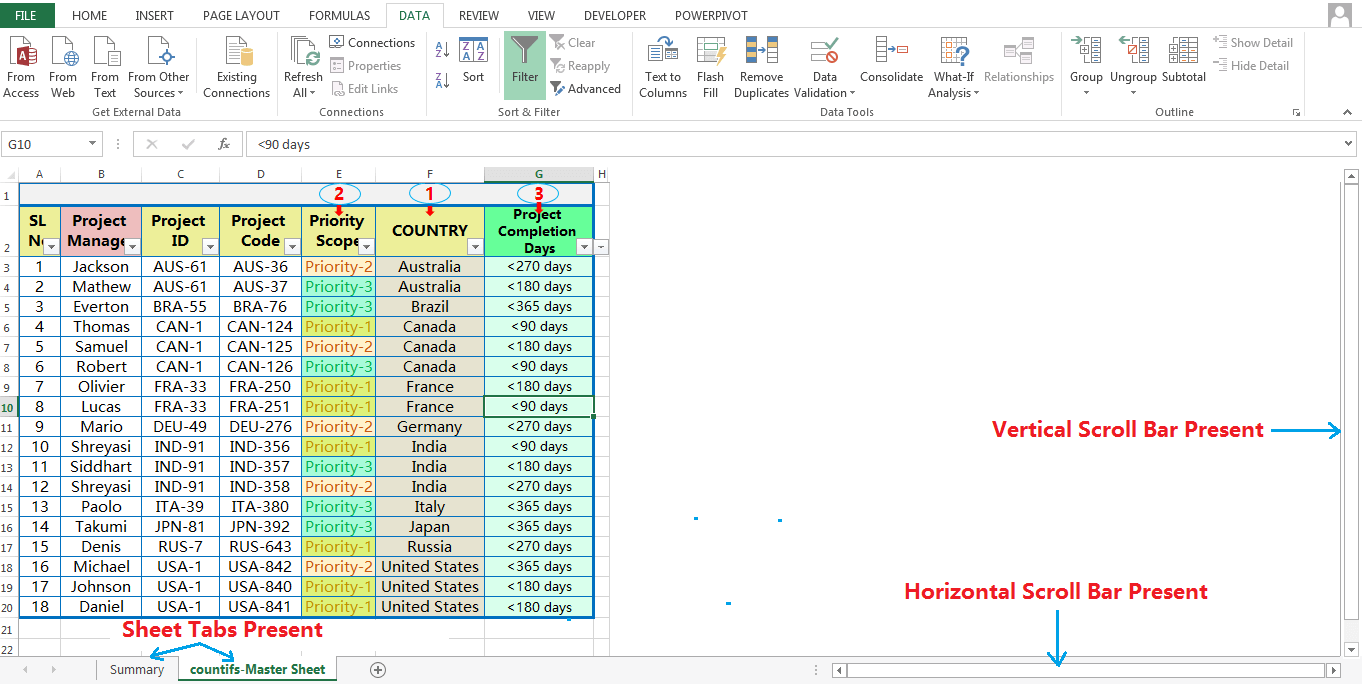
(iv) Click OK or press Enter to close the dialog box and return to the worksheet.
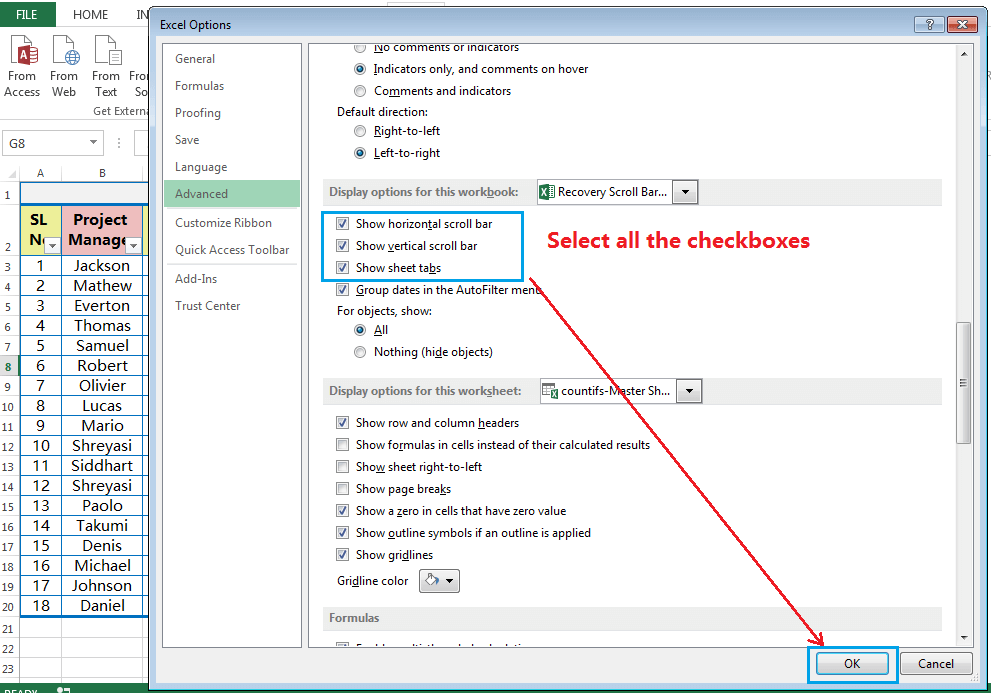
(v) The above process restores both the scroll bars and sheet tabs accordingly. If we uncheck all boxes, both the scroll bars and sheet tabs will hide.
(04). HOW TO RESIZE THE HORIZONTAL SCROLL BAR IN EXCEL?
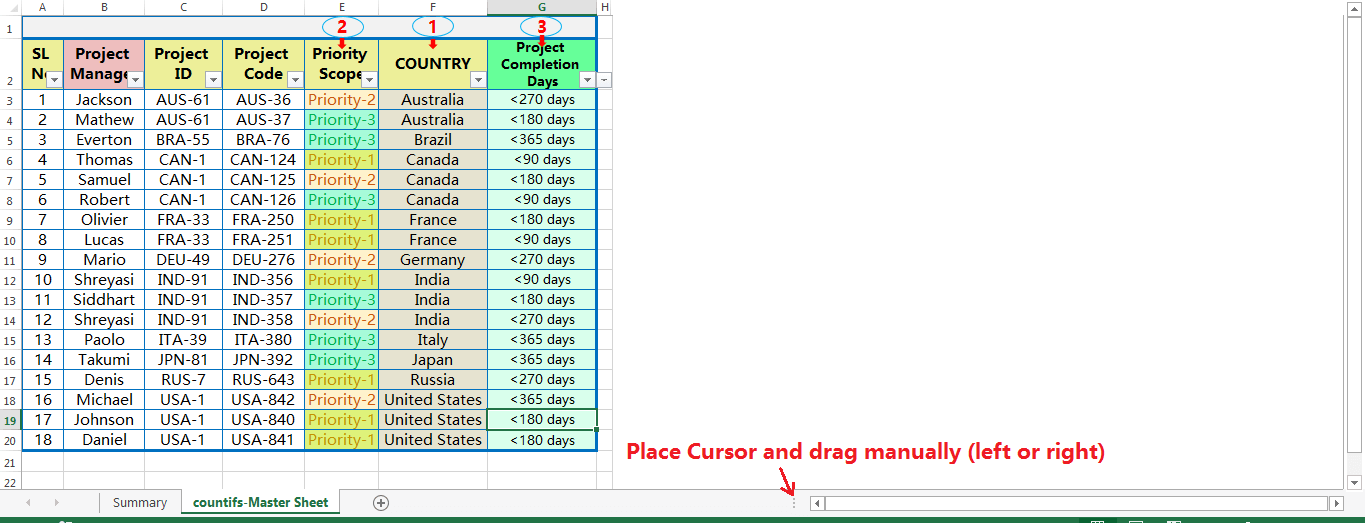
If there are a number of worksheets in a workbook, then the names of all tabs cannot be read at a glance. The only way to fix this is to shrink the size of the horizontal scroll bar manually.
Place the mouse pointer over the vertical ellipsis (three vertical dots) next to the horizontal scroll bar ➪ the mouse pointer changes to a double-headed arrow ➪ drag to the right to shrink the horizontal scroll bar or drag to the left to enlarge the scroll bar.
(05). HOW TO INSERT BLANK TAB SHEETS?
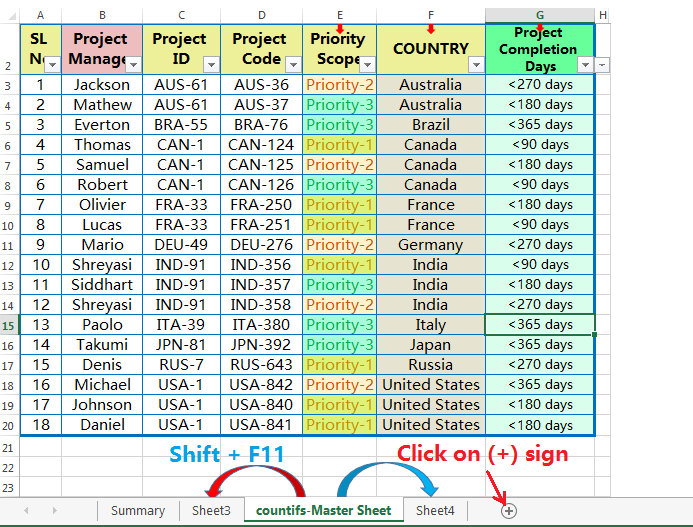
In a workbook, we can insert a Excel Tab or blank tab sheets in 3 ways:
(A). Insert Blank Tab Sheets: Using the Plus (+) icon Right to the Tab Bar
To insert a new sheet tab / Excel tab in a workbook, click the tab after which we want to insert the worksheet ➪ then click the plus icon (+) to the right of the tab bar.
(B). Insert Blank Tab Sheets: Using the Excel Shortcut
Alternatively, the best way to insert a new sheet tab is to press Excel shortcut Shift+F11, a new worksheet is inserted before the selected tab.
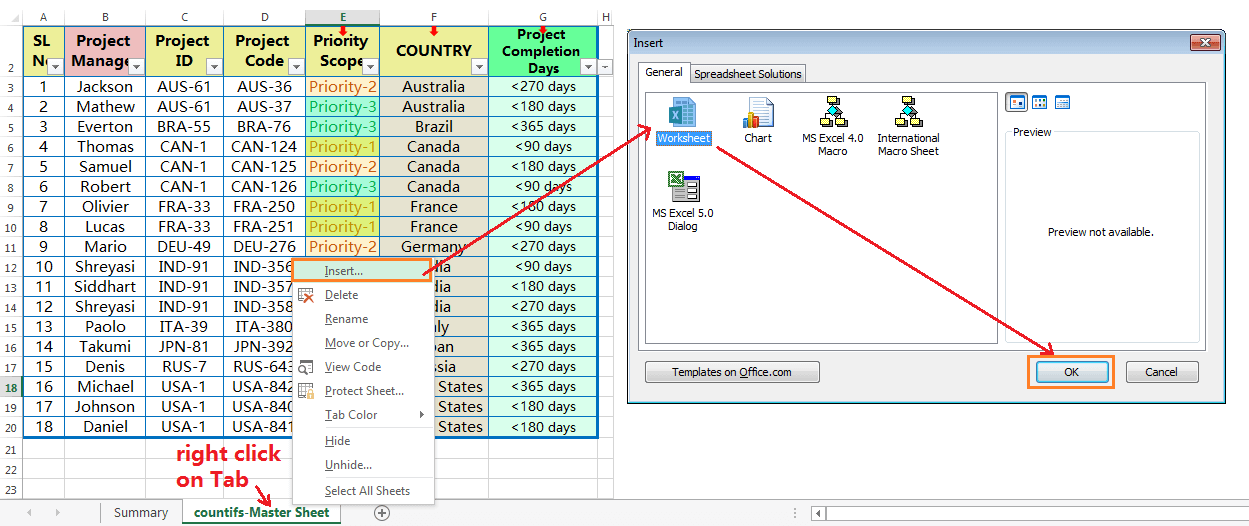
(C). Insert Blank Tab Sheets: Using the Ribbon
Alternatively, click the tab before which we want to insert the worksheet and then press right click on the mouse ➪ select Insert option ➪ Worksheet is selected by default ➪ Click OK or press Enter.
(06). HOW TO RENAME SHEET IN EXCEL?
Each workbook comprises one or more worksheets, and each worksheet is made up of individual cells. Each cell contains a value, a formula, or text. A worksheet also has an invisible draw layer, which holds charts, images, and diagrams. Each worksheet in a workbook is accessible by clicking on the tab sheet at the bottom of the workbook window.
By default, new tabs are named as Sheet1, Sheet2, etc., in sequential order. That means if there are multiple worksheets in a workbook, and each sheet has its name displayed in a sheet tab. It is helpful to rename each tab according to the database subject (max 31 characters long) to help us organize and find the data easily.
There are 03 ways to rename the Excel tab. Remember that each tab must have a unique name.
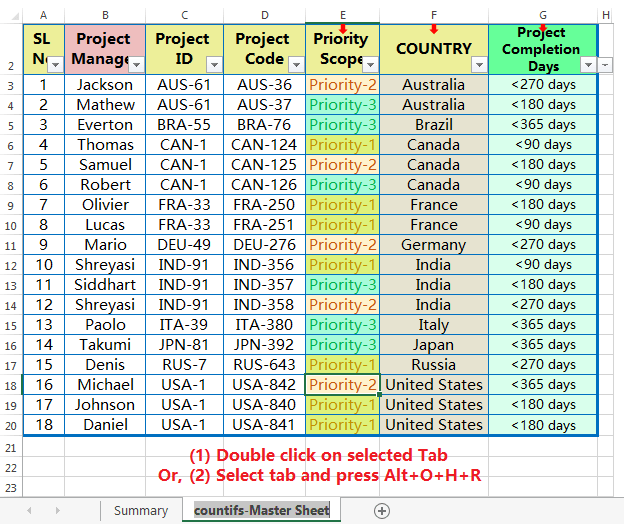
(A). Rename Sheet in Excel: Using the Mouse Double Click
Simply double click on the tab want to rename ➪ type a new name and press Enter.
(B). Rename Sheet in Excel: Using the Excel Shortcut
Press Excel Shortcut Alt+O+H+R (sequentially press Alt, O, H, R) which will activate the sheet rename ➪ type a new name, and press Enter.
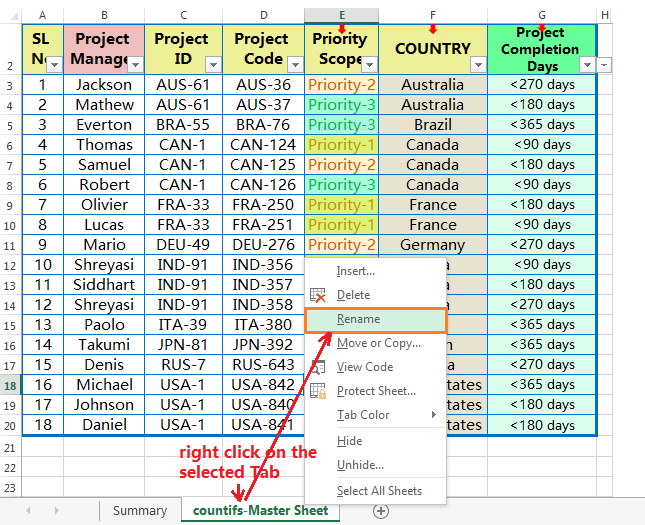
(C). Rename Sheet in Excel: Using the Mouse Right Click
Right-click on the selected Tab and click on the ‘Rename’ option ➪ type a new name and press Enter.
(07). MOVE OR COPY THE EXCEL TAB
If we can make an exact copy of the Excel tab (worksheet), we should try to avoid copy-paste to another new worksheet rather we prefer to use Move or Copy Tab to another location in the same workbook or another open workbook.
We can move or copy the Excel tab in two ways:
(A). Move or Copy the Excel Tab: Using Mouse Right Click
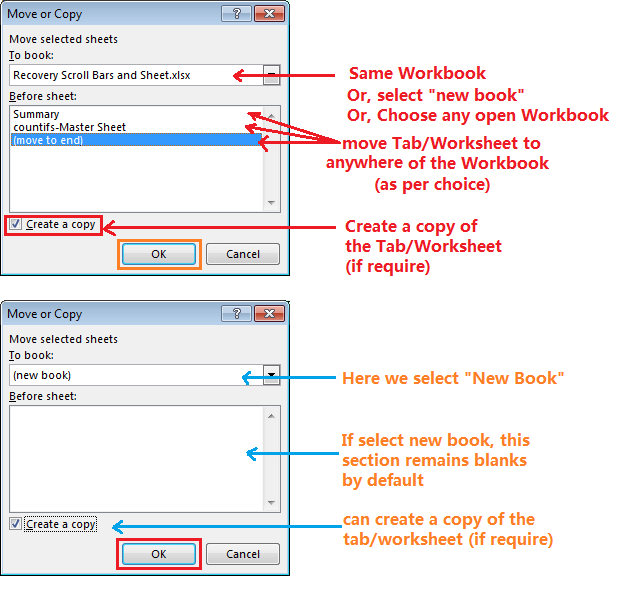
(i) Right-click on the sheet tab(s) want to move or copy ➪ select Move or Copy ➪ Open the Move or Copy dialog box, the currently active workbook is selected by default in the To Book drop-down list.
If we want to copy or move the tab to another existing workbook, make sure that this workbook should be opened and select it from the list. But if we want to copy or move the tab to another new workbook, just select the (new book) option from the list.
(ii) Then we move to the Before sheet list box just below the To Book, select the worksheet (tab) before which we want to insert the copied (or moved) tab.
(iii) After that, we go to the third option Create a copy. If we want to copy the tab, but not moving it, make sure the Create a copy box is checked and click OK. As a result, the duplicate tab is created. If the Create a copy box is not checked, the tab will be moved to the chosen location instead of copied.
(iv) Click on OK or press Enter to apply the activity.
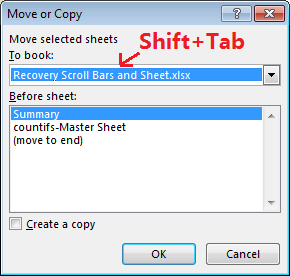
(B). Move or Copy the Excel Tab: Using the Excel Shortcut
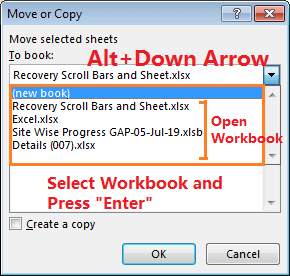
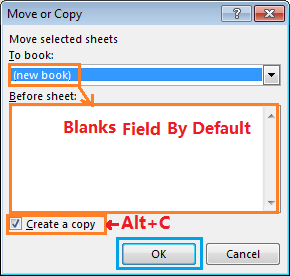
(i) Similarly, we can move or copy the Excel tab by using an Excel shortcut: Select the tab(s) want to move or copy ➪ press Alt+E+M (sequentially press Alt, E, M) to open the Move or Copy dialog box ➪ then press Shift+Tab which helps to go to the To Book drop-down list. Press Alt+Down Arrow (⬇) which will open the drop-down list. Select either (new book) or any one of the opened workbooks we want to copy or move the tab. Press Enter or click OK.

(ii) Then press Tab to move to the ‘Before sheet:’ list box section and choose the worksheet (tab) by up or down arrow keys before which we want to insert the copied (or moved) tab. Remember that if we select the (new book) option, then the Before sheet section remains blank.
(iii) In the third step, press Alt+C which will select the Create a copy checkbox.
(iv) At last, click OK by pressing the Spacebar or press Enter to apply the activity.
(08). HOW TO DELETE THE EXCEL TAB?
We can delete the unnecessary tab(s) from a workbook in two ways:
(A). Delete the Excel Tab: Using the Mouse Right Click
Right-click on a tab or on the multiple tabs (select by pressing Ctrl key) want to delete ➪ Select Delete from the list ➪ Excel window appears for getting confirmation from the user to delete it permanently, click on the Delete or press Enter. A worksheet or Tab has removed from the workbook.
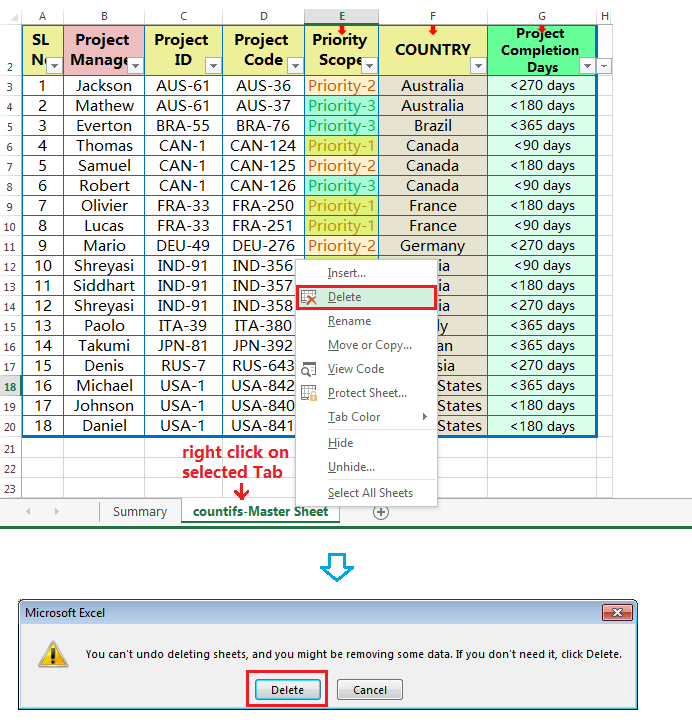
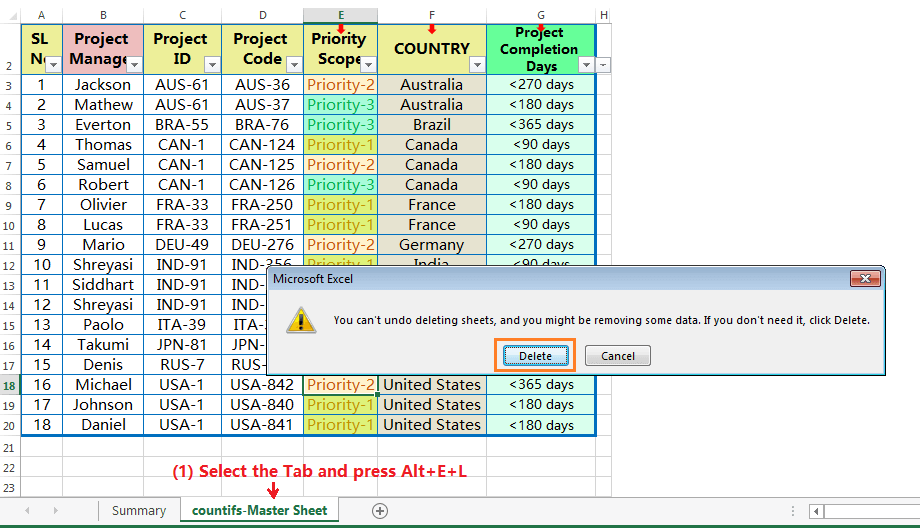
(B). Delete the Excel Tab: Using Excel Shortcut
Simply select the tab or tabs by pressing the Ctrl key we want to delete ➪ then press Alt+E+L (sequentially press Alt, E, L) ➪ an Excel window appears for getting confirmation from the user to delete it permanently, either click on Delete or press Enter. The selected worksheet or Tab has been removed from the workbook permanently.
(09). HOW TO HIDE OR UNHIDE TABS IN EXCEL?
Microsoft Excel shows sheet tab(s) at the bottom of the worksheet by default, which helps to navigate from one worksheet to another worksheet easily.
Most of the time, Excel users make different types of dashboards, kinds of summaries, and apply a combination of formulas in different worksheets based on the master database, but they would rather not show that data to other users. In this situation, they prefer to hide the worksheet(s). Remember that Excel allows hiding all worksheets except at least one.
We can hide the tab(s) from a workbook in three ways:
(A). Hide the Excel Tab(s): Using the Mouse Right Click
Select one or multiple worksheet tabs we want to hide in the Tab bar.
How to Select Multiple Excel Tabs or Worksheets?
⇒ If we want to select multiple adjacent tabs, click on the first tab and hold the Shift key and then click on the last tab. Therefore, multiple adjacent tabs or contiguous tabs are selected at a glance. 
⇒ If we want to select multiple non-adjacent tabs or non-contiguous tabs, then click on the individual tab one by one holding the Ctrl key.
After selecting the Tab or multiple tabs, right-click on the selection and select Hide from the context menu. Thus the selected tabs will be hidden from the Tab bar.

(B). Hide the Excel Tab(s): Using the Excel Shortcut
Select the contiguous tabs with the Shift key or non-contiguous tabs with the Ctrl key ➪ then press Alt+H+O+U+S (sequentially press Alt, H, O, U, S) Thus, all tabs would be hidden in a moment.
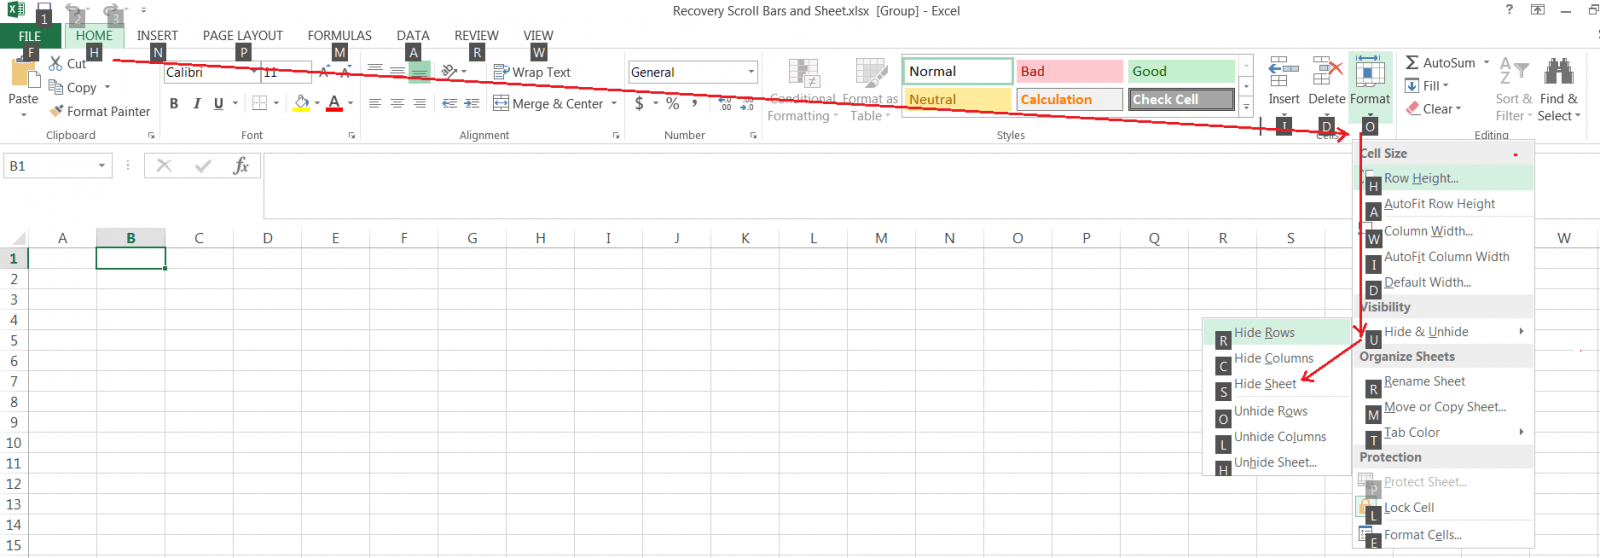
(C). Hide the Excel Tab(s): Using the Ribbon
Select the contiguous tabs with the Shift key or non-contiguous tabs with the Ctrl key ➪ Go to the Home tab ➪ Click on the Format drop-down in the ‘Cells‘ group ➪ Under Visibility section, point to the Hide & Unhide, a list opens and select the Hide Sheet.
(10). HOW CAN PERFORM EXCEL TAB NAVIGATION?
If there are multiple tabs, they may not all display at once, depending on the size of the Excel window. There are a couple of ways we can navigate from one tab to another.
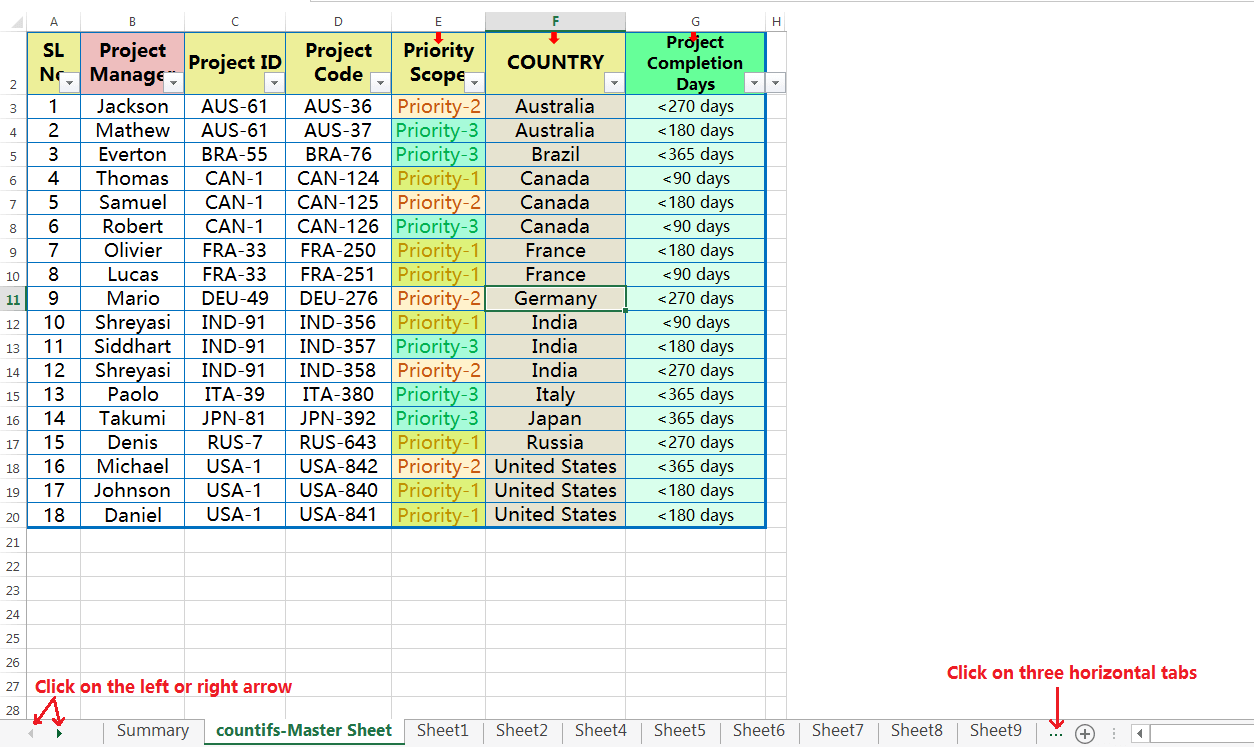
(A). Excel Tab Navigation: Using Three Horizontal Dots
There are three horizontal dots on one or both ends of the tab bar. If we click on the three dots on the left end, we navigate to the first tab in the left direction. If we click on the three dots on the right end, we navigate to the last tab in the right direction.
(B). Excel Tab Navigation: Using Right or Left Arrows
We can also click the right or left arrows on the left side of the tab bar to scroll through the tabs.
(C). Excel Tab Navigation: Using Excel Shortcut
The best way to move from one tab to the adjacent tab by using the Excel shortcut.
➢ Ctrl+Page Down: Navigate towards the right side
➢ Ctrl + Page Up: Navigate towards the left side
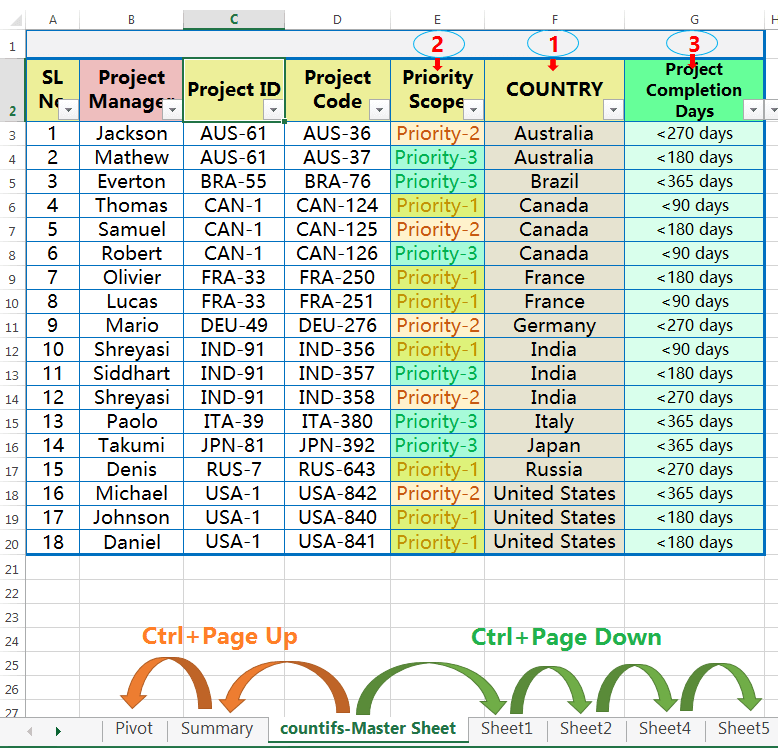
(11). HOW TO CHANGE TAB COLOR IN EXCEL?
If there are multiple tabs in a workbook, then tab identification, tab navigation becomes difficult. Thus we would like to use the same tab color with similar activity and make a group. For example, all types of ‘Summary tabs’ in a workbook to make a group with the same type of color. Similarly, all pivot table tabs to make a group with the same tab color. Therefore, we can easily identify the tabs by tab colors.
We can color the tab(s) in 03 ways:
(A). Change Tab Color in Excel: Using the Mouse Right Click
Select one or multiple worksheet tabs we want to make a group with a similar color ➪ right click on the selection with mouse ➪ go to the Tab Color ➪ a right-side color palette window opens ➪ choose any color and click on it.
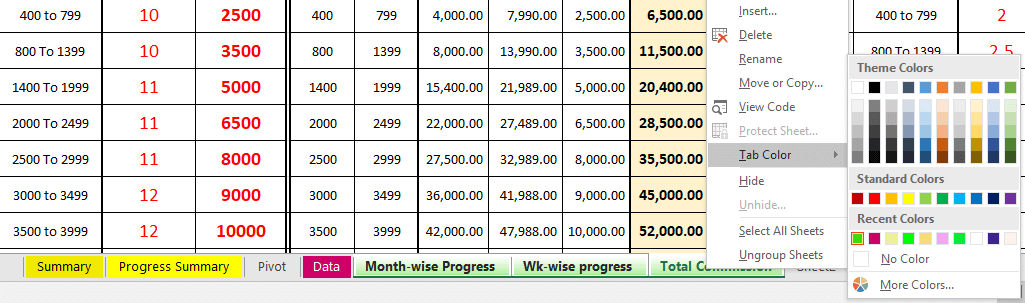
(B). Change Tab Color in Excel: Using the Excel Shortcut
 Select one or multiple worksheet tabs we want to make a group with similar color ➪ then press Alt+H+O+T (press sequentially Alt, H, O, T) ➪ choose any color from the color palette, and click on it.
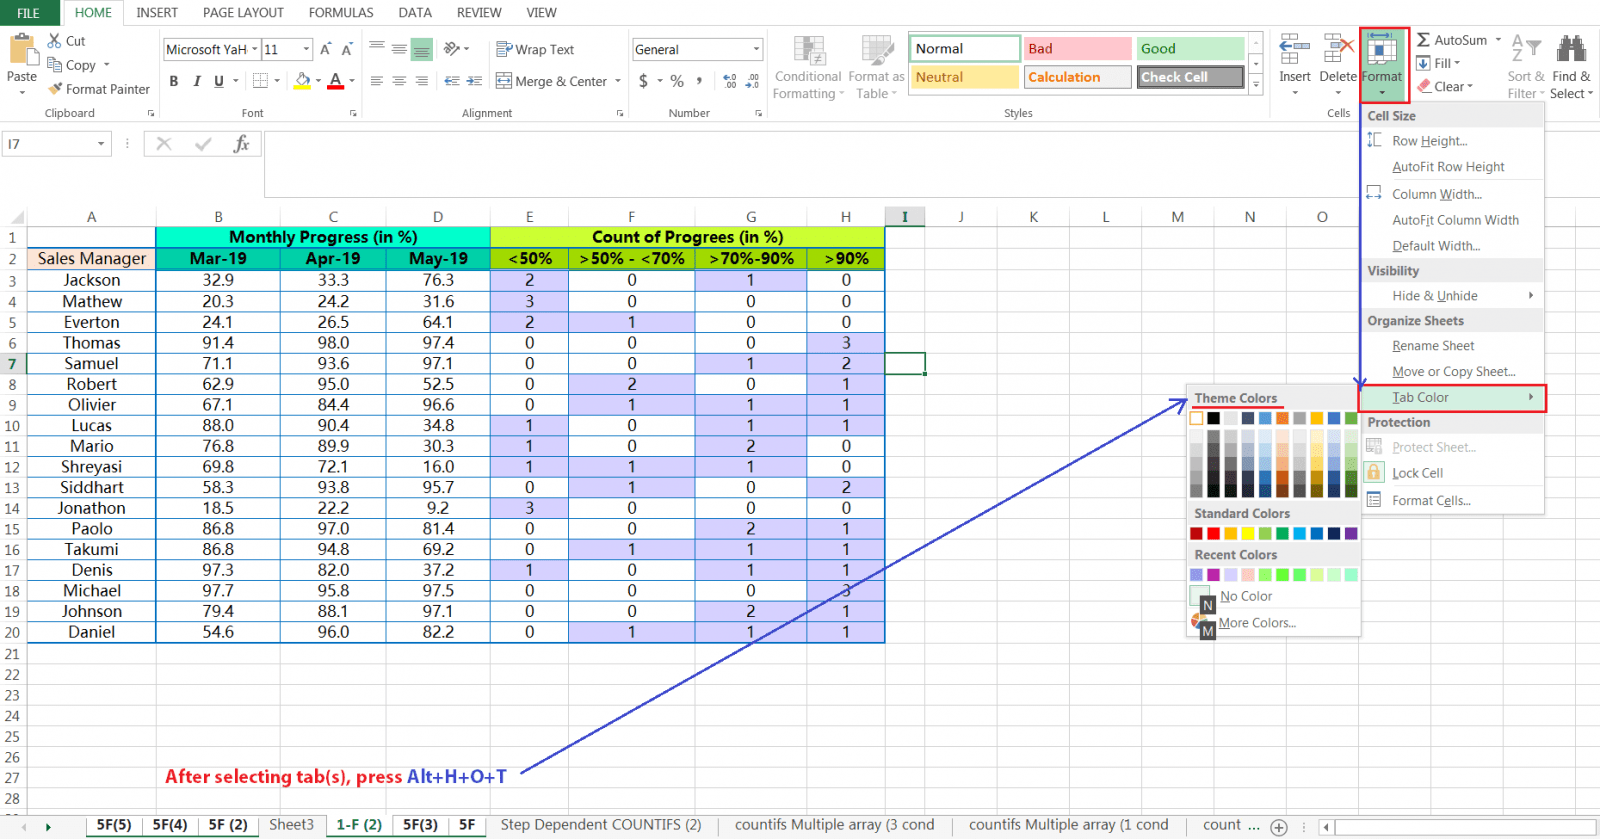
(C). Change Tab Color in Excel: Using the Ribbon
Select one or multiple worksheet tabs we want to make a group with similar color ➪ go to the ‘Home’ tab ➪ then click on the ‘Format’ drop-down under Cells section ➪ place the cursor on Tab Color ➪ a right-side color palette window opens ➪ select any color from the palette and click on it.
 If you would like to improve your academic and professional career as well, then the below courses help you a lot. Instead of Advanced Excel, a number of best courses suggested you through this platform that boosts your confidence and flies your career high.
  Advance Excel Forum
Premium Courses on ed2go

![]()
Advanced Microsoft Excel 2019/Office 365
Bestseller 4.9/5 
![]()
Microsoft Excel 2019 Certification Training (Voucher Included)
Bestseller 4.9/5 
![]()
Accounts Payable Specialist Certification with Microsoft Excel 2019 (Voucher Included)
Bestseller 4.9/5 
![]()
Accounts Payable Specialist Certification with Microsoft Excel 2019
Bestseller 4.9/5 
![]()
Executive Assistant (Voucher Included)
Bestseller 4.9/5 
![]()
Intermediate Oracle (Self-Paced Tutorial)
Bestseller 4.9/5 
![]()
Certified Internal Auditor with Microsoft Excel 2019
Bestseller 4.9/5 
![]()
Executive Assistant with Microsoft Office Specialist 2019 (Vouchers Included)
Bestseller 4.9/5 
![]()
Payroll Manager
Bestseller 4.9/5
Premium Courses on FutureLearn Limited
Project Management: Human Resources and Leadership
Cloud Computing Practitioner with AWS
Data Analytics for Business with Tableau
Practical Project Management
Become a Finance Manager. Start learning today.
![]()
Monash University – Data Science: Data Driven Decision Making![]()
Become a Project Manager. Start learning today.![]()
Premium Courses on Coursera

![]()
Data Visualization in Excel
Bestseller 4.9/5 
![]()
Everyday Excel, Part 1
Top Rated 5/5 
![]()
Everyday Excel, Part 2
Bestseller 4.9/5 
![]()
Success
Bestseller 4.9/5 
![]()
Advanced Data Science with IBM
Bestseller 4.9/5 ![]()
![]()
Predictive Analytics and Data Mining
Bestseller 4.9/5 ![]()
![]()
Organizational Analysis
Bestseller 4.9/5 
![]()
IBM Data Analyst
Bestseller 4.9/5 
![]()
Data Analysis and Presentation Skills: the PwC Approach Final Project
Bestseller 4.9/5
Premium Courses on Udemy

![]()
Microsoft Excel – Excel from Beginner to Advanced
Bestseller 4.7/5 
![]()
Microsoft Excel – Data Analysis with Excel Pivot Tables
Bestseller 4.6/5 
![]()
Excel PRO TIPS: 75+ Tips to go from Excel Beginner to Pro
Bestseller 4.7/5 
![]()
Microsoft Excel – Excel from Beginner to Advanced & VBA
Best Seller 4.9/5 
![]()
Google Professional Cloud Data Engineer
Bestseller 4.6/5 
![]()
Advanced Excel Skills-How to finish works faster
Best Seller 4.8/5 
30+ BEST ADVANCE EXCEL COURSES | By Coursera, Udemy |
36+ BEST ADVANCED EXCEL COURSE ONLINE | By ed2go |
10 Examples of Text to Columns || How to Split Cells/Columns in Excel
04 Best Ways: How to Transpose Data in Excel
How to use VLOOKUP Function in Excel || Must know Do OR Dont’s ||
03 Best Ways: Excel REVERSE VLOOKUP | VLOOKUP to the left |
03 Best Ways: EXCEL DOUBLE VLOOKUP/ IFERROR VLOOKUP/ NESTED VLOOKUP
04 Simple to Advanced Methods: How to Filter in Excel?
05 Best Ways: Create Password Protect Excel & Unprotect it
08 Best Examples: How to Use Excel Conditional Formatting?