Содержание
- Insert the current Excel file name, path, or worksheet in a cell
- Insert the current file name, its full path, and the name of the active worksheet
- Insert the current file name and the name of the active worksheet
- Insert the current file name only
- Need more help?
- 3 Effective Methods to Get the Path of the Current Excel Workbook
- Method 1: Check Workbook Information
- Method 2: Use Excel Functions
- Method 3: Use VBA Macros
- A Comparison between Those Methods
- Avoid Data Disaster is Next to Impossible
- Insert File Path in Excel
- Get Path and File Name
- File Name, Path, and Worksheet
- FIND the File Name Position
- Remove the Worksheet Name
- SUBSTITUTE Function
- Get Path Only
- How to get filename from path in Excel
- File path and file name
- Conservative method
- VBA with FileSystemObject
- VBA with a recursive function
- Using LAMBDA to get filename from path
- Using LAMBDA Function with different approach
Insert the current Excel file name, path, or worksheet in a cell
Let’s say you want to add information to a spreadsheet report that confirms the location of a workbook and worksheet so you can quickly track and identify it. There are several ways you can do this task.
Insert the current file name, its full path, and the name of the active worksheet
Type or paste the following formula in the cell in which you want to display the current file name with its full path and the name of the current worksheet:
Insert the current file name and the name of the active worksheet
Type or paste the following formula as an array formula to display the current file name and active worksheet name:
=RIGHT(CELL(«filename»),LEN(CELL(«filename»))- MAX(IF(NOT(ISERR(SEARCH(«»,CELL(«filename»), ROW(1:255)))),SEARCH(«»,CELL(«filename»),ROW(1:255)))))
To enter a formula as an array formula, press CTRL+SHIFT+ENTER.
The formula returns the name of the worksheet as long as the worksheet has been saved at least once. If you use this formula on an unsaved worksheet, the formula cell will remain blank until you save the worksheet.
Insert the current file name only
Type or paste the following formula to insert the name of the current file in a cell:
Note: If you use this formula in an unsaved worksheet, you will see the error #VALUE! in the cell. When you save the worksheet, the error is replaced by the file name.
Need more help?
You can always ask an expert in the Excel Tech Community or get support in the Answers community.
Источник
3 Effective Methods to Get the Path of the Current Excel Workbook
When you are working on an Excel workbook, you may need to refer to the path of this file. In this article, we will show you 3 methods to get the path.
Getting the path of the current workbook seems to be very easy. However, if you close the folder and couldn’t remember the exact location, you will find it hard to get the path especially, especially when there are many files in your computer. You can certainly use the search feature in your computer.
But if there are many files in your computer, you need to spend a lot of time on the search process. On the other hand, if there are many Excel files with the same name in different paths, you will still need to select them one by one. In order to get the path quickly, you can refer to the 3 methods below.
Method 1: Check Workbook Information
This method is very easy. Just click the tab “File” in the ribbon and you can get the information.
Here you will know the complete path of the current workbook. And then you can get access to the path easily.
Method 2: Use Excel Functions
You can only know the exact location of the path of current workbook. If you need to use the path in a worksheet, you can use Excel functions.
- Click the target cell in the worksheet.
- Now input the following formula into this cell”
- And then press the button “Enter” on the keyboard.


After that, you will see the path in the cell. Except for the path and the name of the current file, you can also know the active sheet.
On the other hand, when you don’t need the sheet name, you can also change the formula.
This formula will get the path to the name of the workbook.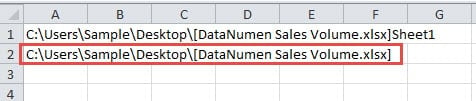
In addition, you can also get only the exact path without the name of the workbook. And the formula will be this:
When you press “Enter” on the keyboard, you will see the result immediately.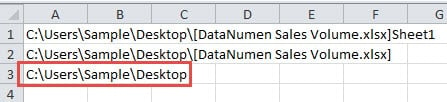
You can choose one of the formulas according to your actual need. When you need to use the path, you can copy it and paste as values. Therefore, only the path will leave in the target cell.
Method 3: Use VBA Macros
Except for the above two methods, you can also use VBA macros to finish this task.
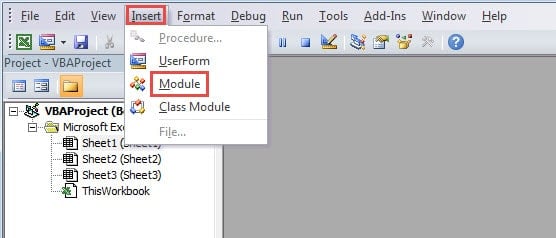
- Press the shortcut keys “Alt +F11” on the keyboard to open the Visual Basic editor.
- And then click the tab “Insert” in the toolbar.
- After that, choose the option “Module” in the sub menu.
- In this step, inputting the following codes into the new module:
There are three different macros in the codes. And for different purpose, the codes will be a little different. The first one will only get the path. The second one will get the path with the file name. And the last one will also get the worksheet name. You may also change the target cell in the codes according to your need.
- When you need to get the path, you can run the macro by clicking the button “Run Sub” or press the button “F5” on the keyboard. Thus, the result will appear in the designated cell.

A Comparison between Those Methods
In this table below, we have input the result of the comparison of the three methods.
Check Workbook Information Use Excel Functions This method will now change the current workbook. You can get 3 different types of the path by the different formulas. With just one click, you can get the result in your worksheet.
If you need to use the path in a cell, you need to spending time inputting the path manually. When you need to use the path itself instead of the result of formulas, you need to paste values only. If you have no idea about VBA, this method will is not suitable for you.
Now you must have a comprehensive understanding of the three methods. And the next time, you can choose the most suitable methods according to your need.
Avoid Data Disaster is Next to Impossible
If you need to use Excel to finish your work, you will certainly deal with a lot of data and information. Therefore, you will sometimes meet with data disaster. And it is impossible that anyone can fully avoid the occurrence of data disaster. When Excel corruption happens, the only thing you can do is to repair it immediately. And in order to repair Excel xlsx file, you can use a third-party tool. This tool is capable of repairing most of the problems in Excel. Therefore, even though you cannot avoid data disaster, you will never lose your data.
Источник
Insert File Path in Excel
Download the example workbook
This tutorial will demonstrate how to get the path and file name using a formula in Excel.
Get Path and File Name
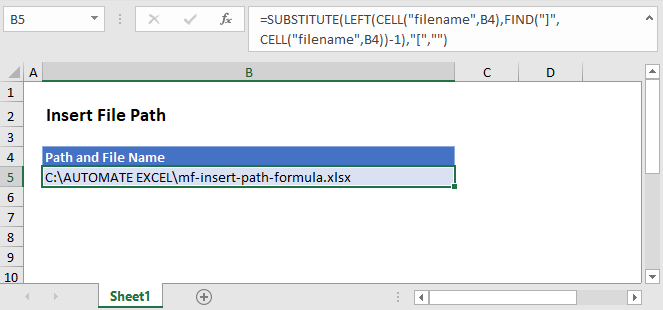
In Excel there isn’t a function to get the path and file name directly, but the CELL Function will return the file path, name, and sheet. Using the text functions FIND, LEFT, and SUBSTITUTE, we can isolate the path and file name.

Let’s step through the formula.
File Name, Path, and Worksheet
We use the CELL Function to return the file path, name, and sheet by entering “filename” as the info type.

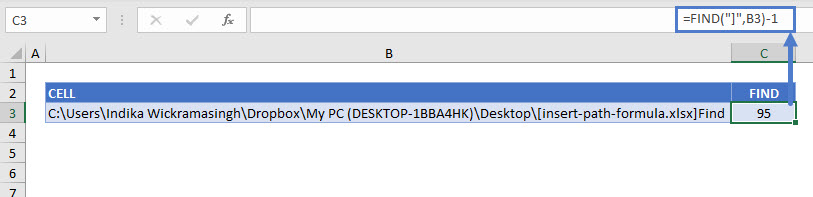
FIND the File Name Position
As shown above, the CELL Function returns the file path, name, and worksheet. We don’t need the worksheet or the square brackets, so we use the FIND function to determine the position of the last character (i.e. the one before “]”) of the file name.
Remove the Worksheet Name
Once we have the position of the file name’s last character, we use the LEFT Function to remove the name of the worksheet.

SUBSTITUTE Function
You can see above that there is still an open square bracket between the path and file names. Use the SUBSTITUTE function to replace the “[“ with an empty string.

Combining these steps into a single formula gives us:
Get Path Only
You might want to show the path only, without the file name. For this, we can stop at the LEFT Function with a little tweak. There’s no need to SUBSTITUTE since there won’t be any mid-string characters to delete. To return just the path, we find the position of the first character of the file name (“[“), instead of the last, and the path name is everything to the left.
Источник
How to get filename from path in Excel

In this guide, we’re going to show you how to get filename from path in Excel. We will cover how to do this with and without VBA.
File path and file name
A file path is a string identifier that specifies the unique location in a file system. It contains folders in a hierarchical order following by a file name. Each element is separated by a delimiter which is usually a backslash «». The goal of getting filename from path is to parse that filename after the last delimiter.

We will show you four different approaches to get filename from path in Excel.
Conservative method
Our first approach is using well known Excel functions MIN, SUBSTITUE and LEN to get the file name. You can use this formula in any Excel version.
This formula has couple of steps:
- At the inner section, all separators («») get replaced with empty strings.
- The formula subtracts the length of substituted path (1) from original path to find the number of separators.
- The outer SUBSTITUTE function replaces the last separator («») with «*». Obviously, the last separator’s instance is equal to number of separators (2).
- Finally, the FIND locates the «*» character, and the MID function parses the file name after the character.

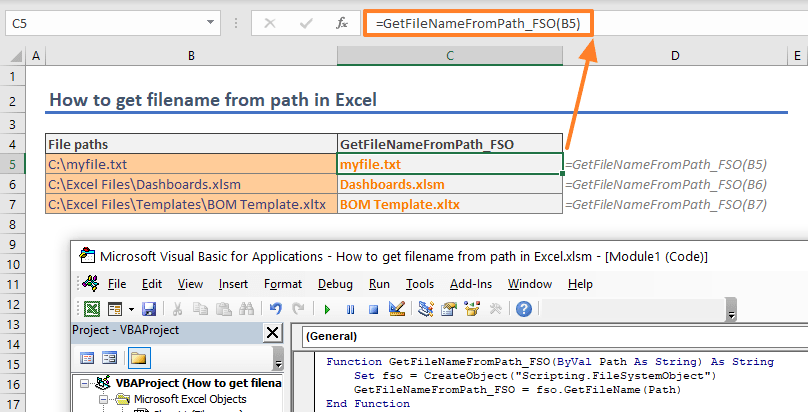
VBA with FileSystemObject
You can use VBA to create your own custom functions which you can use in worksheet as well. Of course, you can use this function in your macros as well.
The code is very short. It uses GetFileName method of FileSystemObject object. The important section of the code is the initializing of the object. The following code sets FileSystemObject object to fso variable.
Set fso = CreateObject(«Scripting.FileSystemObject»)
Once the object is initialized, use the GetFileName method by providing the path.
GetFileNameFromPath_FSO = fso.GetFileName(«C:Excel FilesDashboards.xlsm»)
The above line returns «Dashboard.xlsm» string. Here is the function version you can use in your worksheets as well.
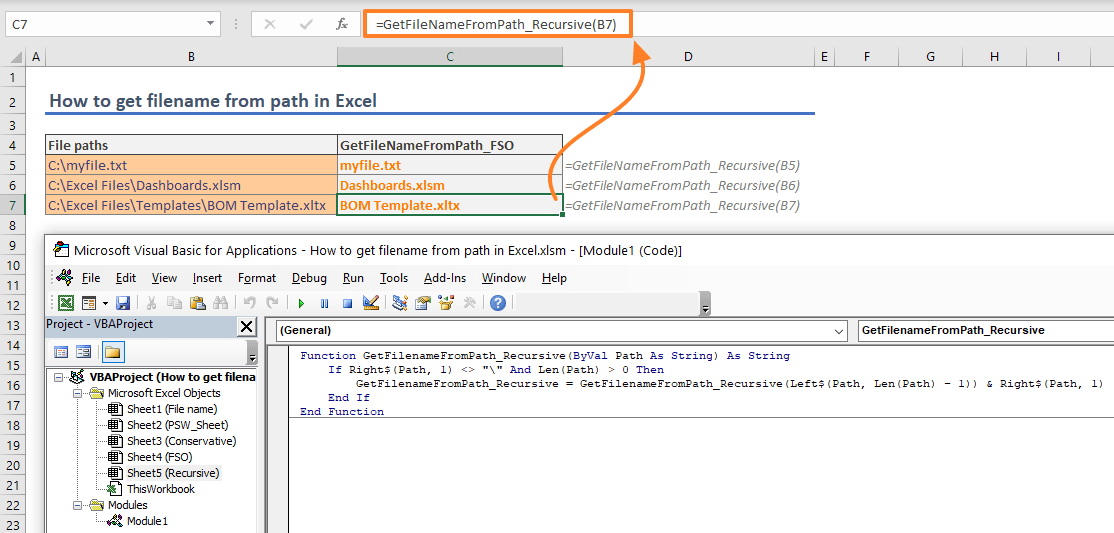
VBA with a recursive function
A recursive function is function which calls itself. The recursive approach acts like an iteration and helps us to parse values starting from the end of a string. You could have used recursive functions only in VBA until the LAMBDA function has been released. Because the most of Excel users do not have access to the LAMBDA function, we will show you VBA version which any Excel user can use.
This function has only few rows as well. The function’s name is GetFilenameFromPath_Recursive and take a single argument named Path.
The first row is a logical test that checks if the last character in the argument is a backslash («») or not and if the argument is not an empty string. If the test is passed, the function returns itself with the argument without its last character and the last character of the path. This is where the recursion occurs.
The function runs itself until coming up a backslash («») or not a character left. It parses the characters from the right side and combines them with each run.
The last row contains a standard End If statement which determines where the If block ends.
Using LAMBDA to get filename from path
If you are Microsoft 365 subscriber, you can create recursive functions without using VBA. Briefly, the LAMBDA function is a special function that converts named ranges into user defined functions. Its syntax allows you to define arguments and a custom formula which uses that defined arguments.
For example, let’s say my custom function will have two arguments and returns multiplication of two arguments. All I need to is creating a named range, such as «MyLambda» and enter the following formula into Refers to box.
| Syntax | Sample Formula | Sample Result |
| =LAMBDA(x, y, x*y) | =MyLambda(2,3) | 6 |

If you call the named range «MyLambda» in the «MyLambda» function, you will create a recursive function. Same logic can be applied to VBA function at previous section.
The following is the LAMBDA version of our VBA code. The function’s name is GetFileNameFromPath_Lambda. Check out how the function calls itself after IF function’s logical test.

Using LAMBDA Function with different approach
Alternatively, you can use the LAMBDA function without calling the «function name». The definition may sound complicated since you must call the function in the function by its name. This structure dictates you to update each occurrence of the name every time change the function’s name.
You can overcome this necessity by using another Microsoft 365-specific function called LET. The LET function allows you to define named ranges in a formula scope. You can define repeating values or blocks into these names and use them continuously.
If you define the name of the LAMBDA function in the formula, you can use the in-formula name over and over to make the function recursive. In our example, we create the name «Func» in the formula and call it within self. Outer LAMBDA function is to give the whatever name we want, «GetFileNameFromPath_LambdaMe».
Источник
Return to Excel Formulas List
Download Example Workbook
Download the example workbook
This tutorial will demonstrate how to get the path and file name using a formula in Excel.
Get Path and File Name
In Excel there isn’t a function to get the path and file name directly, but the CELL Function will return the file path, name, and sheet. Using the text functions FIND, LEFT, and SUBSTITUTE, we can isolate the path and file name.
=SUBSTITUTE(LEFT(CELL("filename",B2),FIND("]",CELL("filename",B2))-1),"[","")
Let’s step through the formula.
File Name, Path, and Worksheet
We use the CELL Function to return the file path, name, and sheet by entering “filename” as the info type.
=CELL(“filename”,B2)
FIND the File Name Position
As shown above, the CELL Function returns the file path, name, and worksheet. We don’t need the worksheet or the square brackets, so we use the FIND function to determine the position of the last character (i.e. the one before “]”) of the file name.
=FIND("]",B3)-1
Remove the Worksheet Name
Once we have the position of the file name’s last character, we use the LEFT Function to remove the name of the worksheet.
=LEFT(B3,C3)
SUBSTITUTE Function
You can see above that there is still an open square bracket between the path and file names. Use the SUBSTITUTE function to replace the “[“ with an empty string.
=SUBSTITUTE(D3,"[","")
Combining these steps into a single formula gives us:
=SUBSTITUTE(LEFT(CELL("filename",B2),FIND("]",CELL("filename",B2))-1),"[","")Get Path Only
You might want to show the path only, without the file name. For this, we can stop at the LEFT Function with a little tweak. There’s no need to SUBSTITUTE since there won’t be any mid-string characters to delete. To return just the path, we find the position of the first character of the file name (“[“), instead of the last, and the path name is everything to the left.
=LEFT(CELL("filename",B2),FIND("[",CELL("filename",B2))-1)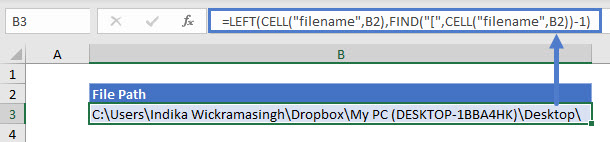
When you are working on an Excel workbook, you may need to refer to the path of this file. In this article, we will show you 3 methods to get the path.
Getting the path of the current workbook seems to be very easy. However, if you close the folder and couldn’t remember the exact location, you will find it hard to get the path especially, especially when there are many files in your computer. You can certainly use the search feature in your computer.
But if there are many files in your computer, you need to spend a lot of time on the search process. On the other hand, if there are many Excel files with the same name in different paths, you will still need to select them one by one. In order to get the path quickly, you can refer to the 3 methods below.
Method 1: Check Workbook Information
This method is very easy. Just click the tab “File” in the ribbon and you can get the information.
Here you will know the complete path of the current workbook. And then you can get access to the path easily.
Method 2: Use Excel Functions
You can only know the exact location of the path of current workbook. If you need to use the path in a worksheet, you can use Excel functions.
- Click the target cell in the worksheet.
- Now input the following formula into this cell”
=CELL(“filename”)
- And then press the button “Enter” on the keyboard.

After that, you will see the path in the cell. Except for the path and the name of the current file, you can also know the active sheet.
On the other hand, when you don’t need the sheet name, you can also change the formula.
= LEFT(CELL(“filename”),FIND(“]”,CELL(“filename”)))
This formula will get the path to the name of the workbook.
In addition, you can also get only the exact path without the name of the workbook. And the formula will be this:
=LEFT(CELL(“filename”),FIND(“[“,CELL(“filename”))-2)
When you press “Enter” on the keyboard, you will see the result immediately.
You can choose one of the formulas according to your actual need. When you need to use the path, you can copy it and paste as values. Therefore, only the path will leave in the target cell.
Method 3: Use VBA Macros
Except for the above two methods, you can also use VBA macros to finish this task.
- Press the shortcut keys “Alt +F11” on the keyboard to open the Visual Basic editor.
- And then click the tab “Insert” in the toolbar.
- After that, choose the option “Module” in the sub menu.

- In this step, inputting the following codes into the new module:
'get only the path
Sub GetPath1()
  Range("B1") = ActiveWorkbook.Path
End Sub

'get the path with the file name
Sub GetPath2()
  Range("B2") = ActiveWorkbook.FullName
End Sub

'get the path with the file name and the sheet name
Sub GetPath3()
  Range("B3") = ActiveWorkbook.FullName & "," & ActiveSheet.Name
End Sub
There are three different macros in the codes. And for different purpose, the codes will be a little different. The first one will only get the path. The second one will get the path with the file name. And the last one will also get the worksheet name. You may also change the target cell in the codes according to your need.
- When you need to get the path, you can run the macro by clicking the button “Run Sub” or press the button “F5” on the keyboard. Thus, the result will appear in the designated cell.
A Comparison between Those Methods
In this table below, we have input the result of the comparison of the three methods.
|
Comparison |
Check Workbook Information | Use Excel Functions |
Use VBA Macros |
|
Advantages |
This method will now change the current workbook. | You can get 3 different types of the path by the different formulas. | With just one click, you can get the result in your worksheet. |
|
Disadvantages |
If you need to use the path in a cell, you need to spending time inputting the path manually. | When you need to use the path itself instead of the result of formulas, you need to paste values only. | If you have no idea about VBA, this method will is not suitable for you. |
Now you must have a comprehensive understanding of the three methods. And the next time, you can choose the most suitable methods according to your need.
Avoid Data Disaster is Next to Impossible
If you need to use Excel to finish your work, you will certainly deal with a lot of data and information. Therefore, you will sometimes meet with data disaster. And it is impossible that anyone can fully avoid the occurrence of data disaster. When Excel corruption happens, the only thing you can do is to repair it immediately. And in order to repair Excel xlsx file, you can use a third-party tool. This tool is capable of repairing most of the problems in Excel. Therefore, even though you cannot avoid data disaster, you will never lose your data.
Author Introduction:
Anna Ma is a data recovery expert in DataNumen, Inc., which is the world leader in data recovery technologies, including repair Word document damage and outlook repair software products. For more information visit www.datanumen.com
Many a time, it is good to Display the location of the file in Excel.
Not just the file name, but the entire path of the file. It is a good reference to make sure you are working on the correct file and is also good if you print out the Excel. With this option, the file path always gets printed on paper..
How to Write a Formula that will Display the File Path in Excel, automatically.
One useful formula that can assist us is the CELL formula. I bet you didn’t know about this in-built Excel Function…
The CELL function can help us to display the address, colour, format, type or width of any cell.
The CELL Function takes a maximum of 2 arguments, and only the first one is mandatory.
=CELL(info_type, [reference])
So, if you write =CELL(“filename”) in any cell, you will get the Full Pathname of this Excel file, along with the Sheet Name.
For example, I got the filename displayed as below:
| D:[email-blasting-migration.xlsx]Sheet1 |
According to the Excel Help, the CELL function has the following arguments:
- info_type Required. A text value that specifies what type of cell information you want to return. The following list shows some of the possible values of the info_type argument and the corresponding results.
info_type Returns “address” Reference of the first cell in reference, as text. “col” Column number of the cell in reference. “color” The value 1 if the cell is formatted in color for negative values; otherwise returns 0 (zero). “contents” Value of the upper-left cell in reference; not a formula. “filename” Filename (including full path) of the file that contains reference, as text. Returns empty text (“”) if the worksheet that contains reference has not yet been saved. “format” Text value corresponding to the number format of the cell. The text values for the various formats are shown in the following table. Returns “-” at the end of the text value if the cell is formatted in color for negative values. Returns “()” at the end of the text value if the cell is formatted with parentheses for positive or all values.
Display only the Excel File Name, without the Sheet Name
To only print the File name, you can use this long formula:
=MID(CELL("filename"),SEARCH("[",CELL("filename"))+1, SEARCH("]",CELL("filename"))-SEARCH("[",CELL("filename"))-1)
Keep in mind that the file should be saved somewhere. If you just open a new workbook, and try these formulas, you will get a #VALUE ERROR. This error will disappear automatically once the file is saved, and the error will be replaced with the correct full file path name, and file name.
This formula to display the filename in Excel also works on the Mac. Any Excel for Mac version, including Excel X for Mac, to Excel 2004, 2008, 2011 for Mac also work fine in displaying the filename.
For example, for a file on Mac with the path HD:Users:local:Desktop, the formula returns
HD:Users:local:Desktop:(filename)Sheet1
Displaying the FilePath only
While writing macros in Excel, you may need the file’s path only, to pick up other files, or for any other reason. Just use this to get only the file’s path in Excel
=LEFT(CELL(“filename”,A1),FIND(“[“,CELL(“filename”,A1),1)-1)
In this formula, we remove the Sheet Name, which starts with the [ character.
How To Display Filename & File Path in Excel Worksheet Header or Footer
If you wish to display the file name and/or file path in the Excel sheet’s header or footer, then it is extremely simple. Simply go to the Ribbon. Choose Insert > Header & Footer

All you need to do is click on the File Path, File Name icons.
Alternatively, if you want to type it yourself, simply type the following in the header or the footer in Excel:
&[Path]&[File]
Use &[Path] for only the File Path, and &[File] for only the File’s name.
Hope it helps you in your life with Excel.
Now you can confidently display the filename and the file path in Excel
With the File Name of Excel files visible in the header, with the File Path, you won’t lose a file in the wrong location & find what you are looking for easily!
Do let me know if you need any other functions in Excel, or if you are facing a problem in Excel. We can help you to solve everyday issues in Excel easily at ExcelChamp.Net.
And subscribe to the Excel Tips Newsletter for more such tips to improve productivity in Excel.
Cheers,
Vinai Prakash
Vinai is the founder and principal trainer for Microsoft Excel Tips and Techniques seminars all over the world. To book Vinai to conduct an Excel training at your office for your company, do email to vinai@excelchamp.net.
Example
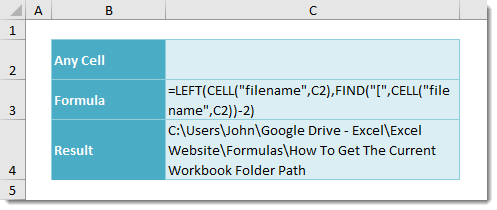
=LEFT(CELL("filename",C2),FIND("[",CELL("filename",C2))-2)
Generic Formula
=LEFT(CELL("filename",AnyCell),FIND("[",CELL("filename",AnyCell))-2)
- “filename” – This is a predefined Excel parameter input for the CELL function.
- AnyCell – This is can be any cell in any sheet of the workbook.
What It Does
This formula will return the folder path where the current workbook is saved.
How It Works
CELL(“filename”,AnyCell) will return the full folder path, file name and sheet name of the referenced cell. For my workbook this was the following location.
C:UsersJohnGoogle Drive – ExcelExcel WebsiteFormulasHow To Get The Current Workbook Folder Path[How To Get The Current Workbook Folder Path.xlsx]Sheet1
All we need to do is parse all the text up until the first square bracket [ seen above highlighted in yellow.
We will first need to find the location of [ using FIND(“[“,CELL(“filename”,AnyCell)). This will give us the location of the first occurrence of the [ character within our full location path. For my workbook this was 103.
This 103 value is the number of characters up to and including the [, but this includes a and [ character which we don’t want so we will need to subtract 2. We only want the left most 101 characters.
Now we can use the LEFT function to return the left most 101 characters. LEFT(CELL(“filename”,AnyCell),101) will then result in the following path.
C:UsersJohnGoogle Drive – ExcelExcel WebsiteFormulasHow To Get The Current Workbook Folder Path
About the Author
John is a Microsoft MVP and qualified actuary with over 15 years of experience. He has worked in a variety of industries, including insurance, ad tech, and most recently Power Platform consulting. He is a keen problem solver and has a passion for using technology to make businesses more efficient.
Say, I’m writing a VBA inside my excel file sample.xls. Now I want to get the full path of sample.xls in my VBA. How do I do it?
![]()
asked Dec 13, 2009 at 5:12
![]()
2
If you mean VBA, then you can use FullName, for example:
strFileFullName = ThisWorkbook.FullName
(updated as considered by the comments: the former used ActiveWorkbook.FullName could more likely be wrong, if other office files may be open(ed) and active. But in case you stored the macro in another file, as mentioned by user @user7296559 here, and really want the file name of the macro-using file, ActiveWorkbook could be the correct choice, if it is guaranteed to be active at execution time.)
![]()
answered Dec 13, 2009 at 9:57
![]()
FionnualaFionnuala
90.1k7 gold badges110 silver badges148 bronze badges
3
this is a simple alternative that gives all responses, Fullname, Path, filename.
Dim FilePath, FileOnly, PathOnly As String

FilePath = ThisWorkbook.FullName
FileOnly = ThisWorkbook.Name
PathOnly = Left(FilePath, Len(FilePath) - Len(FileOnly))
answered Mar 13, 2017 at 9:44
![]()
APWAPW
2913 silver badges3 bronze badges
1
   strScriptFullname = WScript.ScriptFullName
   strScriptPath = Left(strScriptFullname, InStrRev(strScriptFullname,""))
answered Dec 13, 2009 at 5:18
![]()
Mitch WheatMitch Wheat
294k43 gold badges465 silver badges540 bronze badges
1
If you need path only this is the most straightforward way:
PathOnly = ThisWorkbook.Path
![]()
lucascaro
15.9k3 gold badges37 silver badges47 bronze badges
answered Oct 27, 2018 at 5:39
![]()
LouisLouis
392 bronze badges
if you need path only without file name:
ActiveWorkbook.Path
it would return D:Folder
if you need file path with file name also:
ActiveWorkbook.FullName
it would return D:Foldersample.xls
if you need file name only:
ActiveWorkbook.Name
it would return sample.xls
so if you want combine file path and file name to get full directory don’t forget to add «» between. otherwise its simpler using .Path
![]()
Reeno
5,69911 gold badges39 silver badges50 bronze badges
answered Mar 17, 2021 at 4:17
![]()
ActiveWorkbook.FullName would be better I think, in case you have the VBA Macro stored in another Excel Workbook, but you want to get the details of the Excel you are editing, not where the Macro resides.
If they reside in the same file, then it does not matter, but if they are in different files, and you want the file where the Data is rather than where the Macro is, then ActiveWorkbook is the one to go for, because it deals with both scenarios.
![]()
Emil
7,20117 gold badges77 silver badges134 bronze badges
answered Dec 14, 2016 at 12:41
![]()
There is a universal way to get this:
Function FileName() As String
    FileName = Mid(Application.Caption, 1, InStrRev(Application.Caption, "-") - 2)
End Function
answered May 15, 2018 at 16:46
![]()
1
There are many cases, in which you want to show the sheet name or file name in an Excel cell. Don’t worry, you don’t have to use VBA and create a macro. Excel provides a (rough) formula for returning all the information you need. The bad news: In most cases it takes some complex modifications. The good news: Usually you can just copy and paste the formula you need.
Introduction: Get all the names you need
Fortunately, you don’t have to use VBA. There are formulas for each variation of the sheet name, file name and path. The main part of the formula is the =CELL() formula.
The CELL formula looks something like this: =CELL(“filename”,A1). That means that the CELL formula we have to use has two parts:
- The first part just says “filename”. It is important to add the quotation marks.
- The second part is optional and can link to any cell or workbook. If you leave it blank the current cell and workbook will be used.
The basic version of the CELL formula (=CELL(“filename”,A1) ) returns the full path, file name and sheet name. You can use this formula and cut it into the parts you need. Therefore you use string formulas like LEFT, LEN and so on. We won’t go into detail now as those formulas are highly specific and complex but rather provide the formulas for you to copy.
Note: We’ve published an article about three methods of how to get the sheet name. Maybe this one is interesting for you as well.
The formulas for sheet name, file name, path etc.
The formulas for inserting file names, sheet names or the path (with and without the extension) are very different. This table gives you an overview. If you want to copy the formulas, you can find them underneath again.
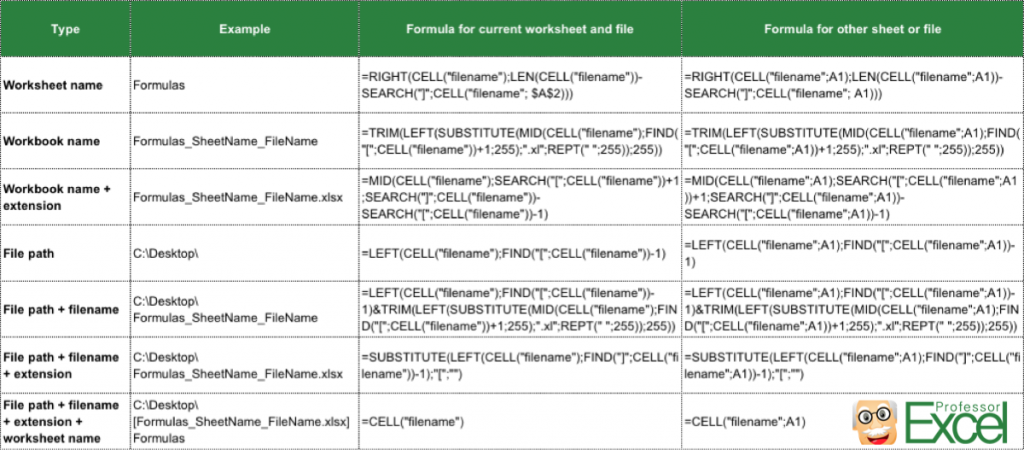
Copy these formulas for the current cell or sheet:
- Worksheet name (example: “Formulas”):
=RIGHT(CELL(“filename”),LEN(CELL(“filename”))-SEARCH(“]”,CELL(“filename”, $A$2))) - Workbook name (example: “Formulas_SheetName_FileName”):
=TRIM(LEFT(SUBSTITUTE(MID(CELL(“filename”),FIND(“[“,CELL(“filename”))+1,255),”.xl”,REPT(” “,255)),255)) - Workbook name + extension (example: “Formulas_SheetName_FileName.xlsx”):
=MID(CELL(“filename”),SEARCH(“[“,CELL(“filename”))+1,SEARCH(“]”,CELL(“filename”))-SEARCH(“[“,CELL(“filename”))-1) - File path (example: “C:Desktop”):
=LEFT(CELL(“filename”),FIND(“[“,CELL(“filename”))-1) - File path + filename (example: “C:DesktopFormulas_SheetName_FileName”):
=LEFT(CELL(“filename”),FIND(“[“,CELL(“filename”))-1)&TRIM(LEFT(SUBSTITUTE(MID(CELL(“filename”),FIND(“[“,CELL(“filename”))+1,255),”.xl”,REPT(” “,255)),255)) - File path + filename + extension (example: “C:DesktopFormulas_SheetName_FileName.xlsx”):
=SUBSTITUTE(LEFT(CELL(“filename”),FIND(“]”,CELL(“filename”))-1),”[“,””) - File path + filename + extension + worksheet name (example: “C:Desktop[Formulas_SheetName_FileName]Formulas”):
=CELL(“filename”) - Folder name (example: “Desktop”):
=TRIM(RIGHT(SUBSTITUTE(LEFT(CELL(“filename”),FIND(“[“,CELL(“filename”),1)-2),””,REPT(” “,100)),100))
Copy these formulas for any linked cell or sheet:
If you want to get the file name, sheet name or path from another cell or workbook, you can use one of the following formulas. Instead of “A1” you insert your cell reference.
- Worksheet name (example: “Formulas”):
=RIGHT(CELL(“filename”,A1),LEN(CELL(“filename”,A1))-SEARCH(“]”,CELL(“filename”, A1))) - Workbook name (example: “Formulas_SheetName_FileName”):
=TRIM(LEFT(SUBSTITUTE(MID(CELL(“filename”,A1),FIND(“[“,CELL(“filename”,A1))+1,255),”.xl”,REPT(” “,255)),255)) - Workbook name + extension (example: “Formulas_SheetName_FileName.xlsx”):
=MID(CELL(“filename”,A1),SEARCH(“[“,CELL(“filename”,A1))+1,SEARCH(“]”,CELL(“filename”,A1))-SEARCH(“[“,CELL(“filename”,A1))-1) - File path (example: “C:Desktop”):
=LEFT(CELL(“filename”,A1),FIND(“[“,CELL(“filename”,A1))-1) - File path + filename (example: “C:DesktopFormulas_SheetName_FileName”):
=LEFT(CELL(“filename”,A1),FIND(“[“,CELL(“filename”,A1))-1)&TRIM(LEFT(SUBSTITUTE(MID(CELL(“filename”,A1),FIND(“[“,CELL(“filename”,A1))+1,255),”.xl”,REPT(” “,255)),255)) - File path + filename + extension (example: “C:DesktopFormulas_SheetName_FileName.xlsx”):
=SUBSTITUTE(LEFT(CELL(“filename”,A1),FIND(“]”,CELL(“filename”,A1))-1),”[“,””) - File path + filename + extension + worksheet name (example: “C:Desktop[Formulas_SheetName_FileName]Formulas”):
=CELL(“filename”,A1) - Folder name (example: “Desktop”):
=TRIM(RIGHT(SUBSTITUTE(LEFT(CELL(“filename”,A1),FIND(“[“,CELL(“filename”,A1),1)-2),””,REPT(” “,100)),100))
Please note:
- The formulas are different for each language and regional settings. So you have to make sure to adapt it to your Excel version. Please check out the download below, it’s probably the easiest option for adapting the formulas to your settings.
- In order to insert the filename or path, you have to save your workbook first. It doesn’t work with a newly created Excel file.
Download an Excel file with all the formulas
In order to avoid any problems with language and regional settings, you can download all the above formulas with an Excel file.
Just open it and copy the complete cell to your desired location. The download starts instantly (no sign-up or any other annoyances…).
- Download link: Click here.
- File name: Formulas_SheetName_FileName.xlsx
- Size: 35 KB
- File type: XLSX
Anything missing? Suggestions for improvements? Please let us know and leave a comment.

Henrik Schiffner is a freelance business consultant and software developer. He lives and works in Hamburg, Germany. Besides being an Excel enthusiast he loves photography and sports.
A path is a unique location for a file or a folder. There are broadly two types of paths, absolute path, and relative path. An absolute path gives the location of a file from its root folder, while a relative path gives the location of a file from its current folder. Power Query, by default, provides an absolute path, which could cause problems while sharing the files, so we have to reduce the absolute path to a relative path. In this article, we will learn how to convert an absolute path to a relative path, using a power query editor, and make our source files sharable.
Problem with Absolute Path
By default, our excel sheets have the location for absolute paths and not the relative paths. Due, to this file sharing, is a big and significant issue. For example, an analyst is analyzing data in its intelligence tools source via power query from your PC, the tools work well until the files are in your PC, but stop working as soon as they are imported into the third person PC, this happens because the absolute path in the third person computer might be different, and our power query files are still searching for the old absolute path provided in my computer. To resolve this issue, one needs to convert this absolute path to the relative path, so that the files can access irrespective of one’s PC.
Excel Functions Used in Converting Absolute Path to Relative Path
Before moving forward, we need to have a crisp knowledge of all the excel functions, that will be used to convert an Absolute path to a Relative path. There are broadly three functions used: =CELL(), =LEFT(), =FIND(), for creating the required formula:
Cell Function
Syntax: =CELL(info_type, reference)
The cell function provides every information, you require, for a cell. One can get the value of a cell, its row number, address, filepath, etc. This topic could be quite big itself, but for converting absolute path to relative path, we only need to know about how to get the file path of a cell. There are two arguments in cell functions:
- Argument 1: Info_type is the first argument of cell function. The type of information you want to find for the specified cell. For example, “filepath”, provides the absolute path for the current cell.
- Argument 2: For which cell, do you want to extract the information. The cell reference can be absolute or relative.
Note: The excel file should be saved in some folder, then only the absolute path would appear, otherwise it will show an empty string returned. This is one of the common errors that users face while working with the =CELL(info_type, reference) function.
For example, find the absolute path of the current opened excel file. Following are the steps:
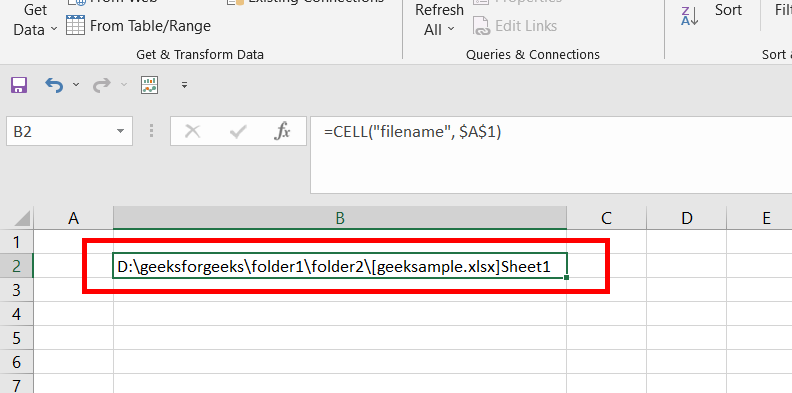
Step 1: Type =CELL(“filename”, $A$1), in cell B2, where “filename” provides the absolute reference of the file, and $A$1 is the reference to cell A1.
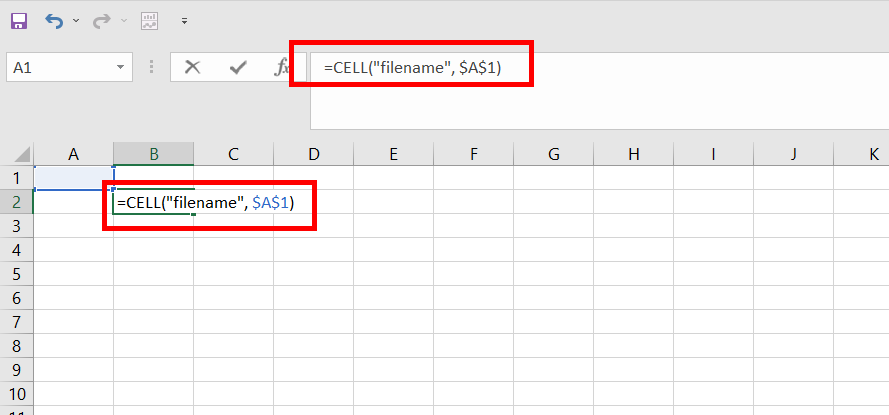
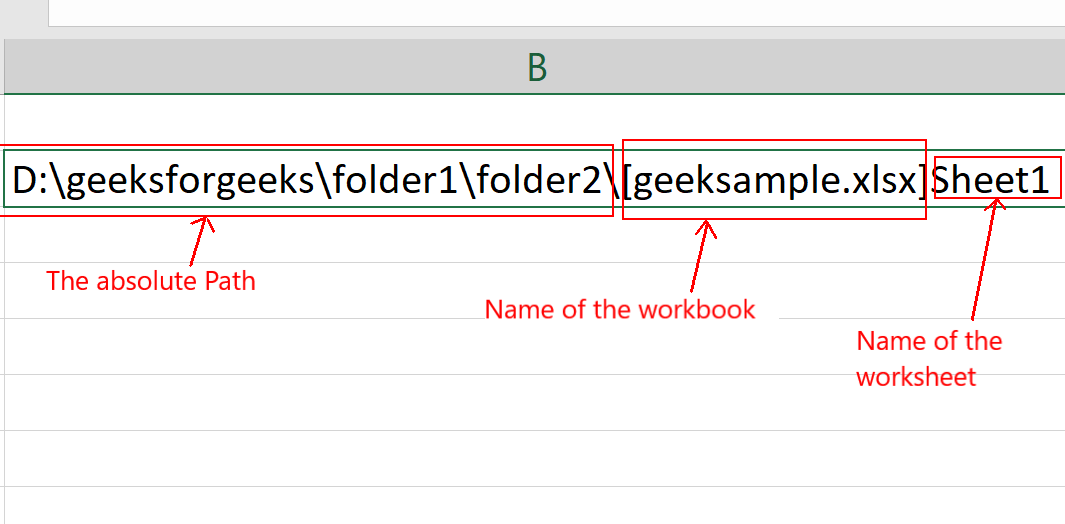
Step 2: Press Enter. The absolute Path of the current excel file appears in cell B2 i.e. D:geeksforgeeksfolder1folder2[geeksample.xlsx]Sheet1.
Step 3: The path before the bracket is the absolute path for that excel file. The text inside the square brackets is the name of the workbook, and at last, is the name of the worksheet.
Find Function
Syntax: =FIND(find_text, within_text, [start_num])
The function finds the first starting index of the location of a finding text in the given string. The indexing is 1-based. For example, if you are given a string “geeksforgeeks”, and you want to find the position of “ks” in your given string, then the answer returned by the =FIND() function will be 4. There are three arguments in the find function, but for converting the absolute path to a relative path, we will require only the first two arguments.
- Argument 1: Find_text is the first argument of the find function. The find_text is the string that needs to be found in the given string. The first occurrence of the find_text is printed using the =FIND() function.
- Argument 2: Within_text is the second argument of the find function. The within_text is the original string in which find_text is searched.
- Argument 3: This is an optional argument. It tells from which index you should start the search in the within_text.
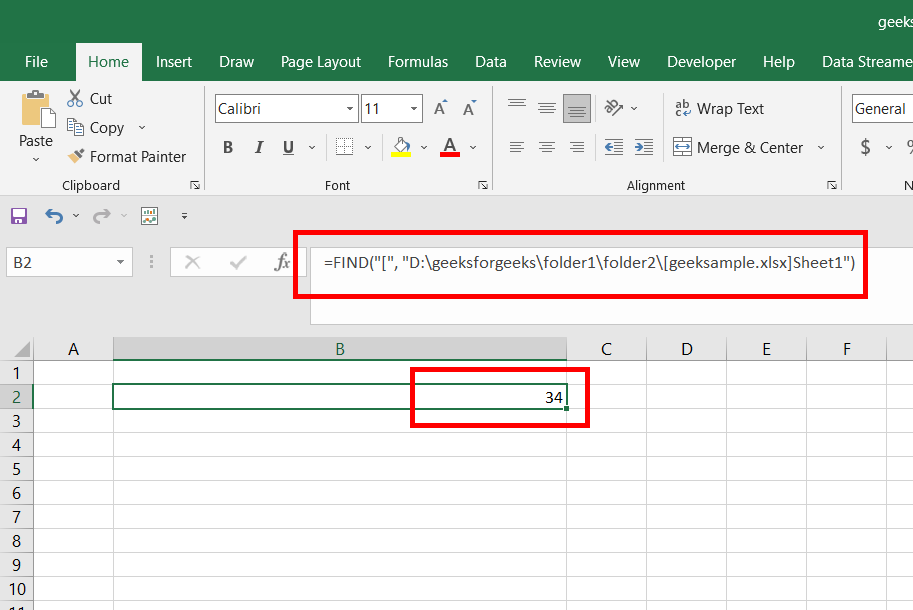
For example, you recently found the absolute path for the current excel file, our task is to find the index of “[” (square bracket) in the given string i.e. “D:geeksforgeeksfolder1folder2[geeksample.xlsx]Sheet1”. Following are the steps:
Step 1: Type =FIND(“[“, “D:geeksforgeeksfolder1folder2[geeksample.xlsx]Sheet1”), in the cell B2, where Argument1 is “[“ and Argument2 is “D:geeksforgeeksfolder1folder2[geeksample.xlsx]Sheet1”. Press Enter.
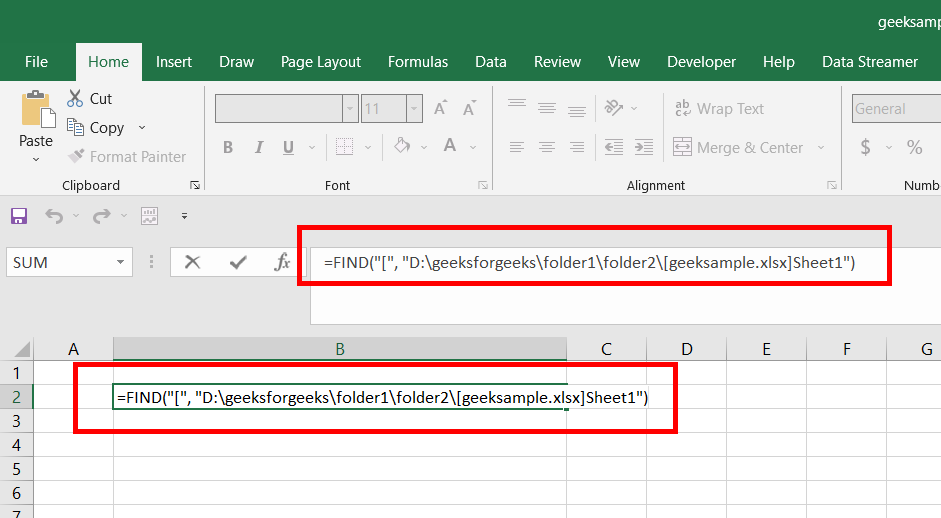
Step 2: We can see 34 appear in cell B2. This is because the “[“ appears at the 34th (1-based indexing) index in the original string.
Left Function
Syntax: =LEFT(text, [num_chars])
The function returns the prefix substring of a string, according to the user-specified number of characters. The indexing is 1-based. For example, if you are given a string “geeksforgeeks”, and you want to find the first four(4) characters in the given string, then we can use the =LEFT() function, to achieve this, the function will return a prefix substring “geek”. There are two arguments in the left function.
- Argument 1: The first argument is the text string. The text string is the string for which the prefix substring has to be returned.
- Argument 2: The second argument is num_chars. The num_chars is the number of characters you want from the starting of the text string.
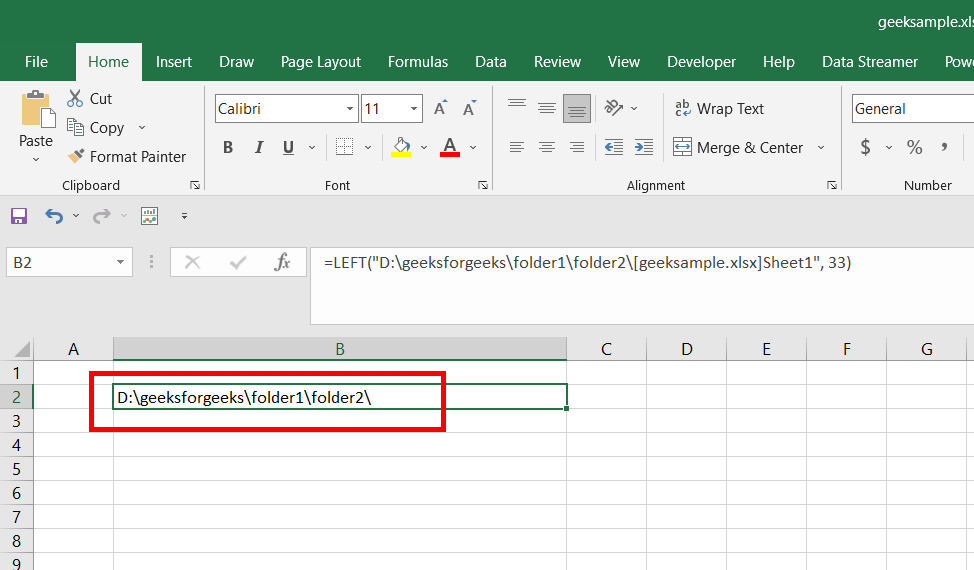
For example, you recently found the absolute path of the current worksheet, and you also found the index of the square bracket “[” i.e. 34, our task is to find the prefix substring before the “[” (square bracket) which means the number of character to be 33. Following are the steps:
Step 1: Type =LEFT(“D:geeksforgeeksfolder1folder2[geeksample.xlsx]Sheet1”, 33), in the cell B2, where argument1 is the original string, for which prefix substring has to be returned, and the second argument is the number of characters for which this given string has to be returned.
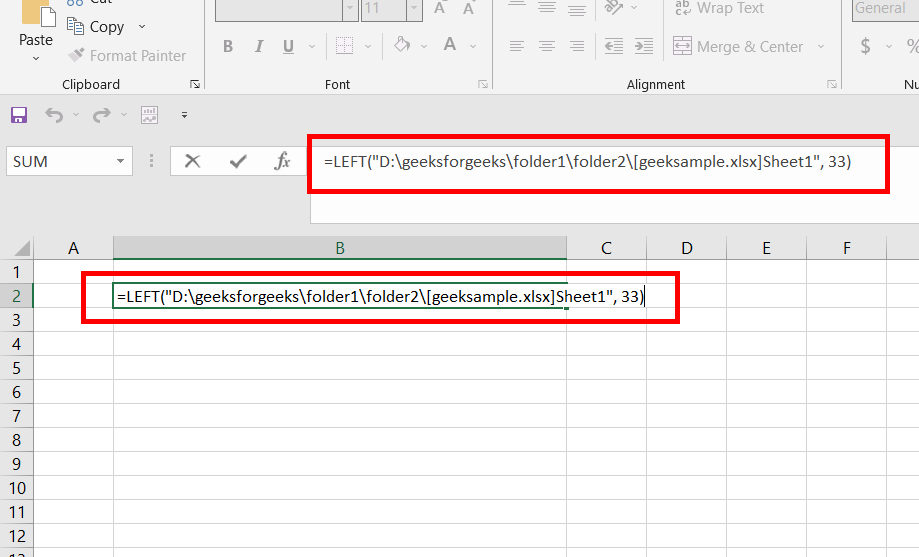
Step 2: Press Enter. All first 33 characters will appear in cell B2 i.e. “D:geeksforgeeksfolder1folder2”.
Converting Absolute Path to Relative Path in Power Query
Now, you know everything to convert an absolute path to a relative path, in a power query. We will take the same example and file location which we did, for understanding the functions. The absolute path for the current file is “D:geeksforgeeksfolder1folder2housing.csv”.This needs to be converted into the relative path. Following are the steps:
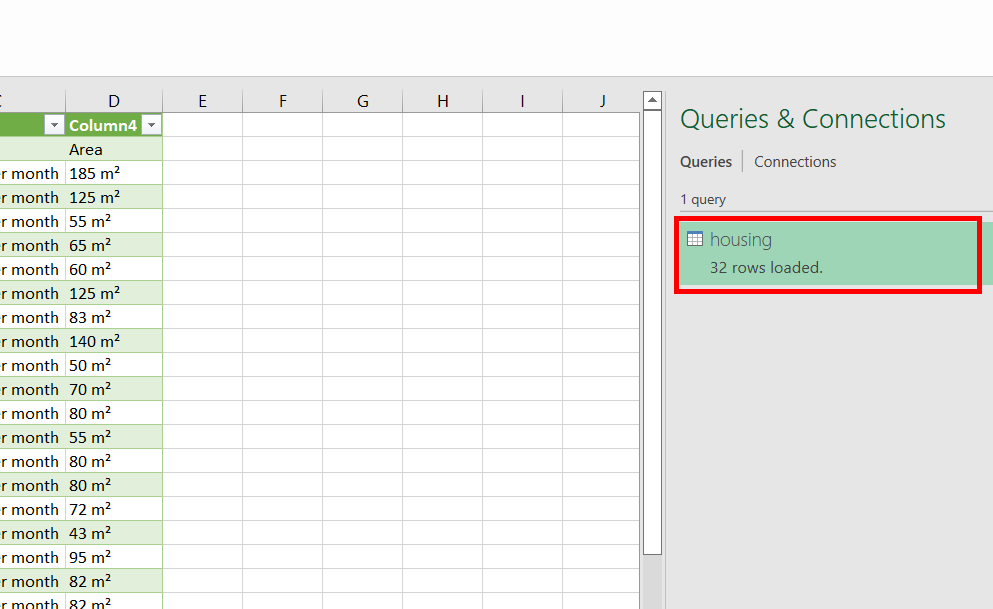
Step 1: As you are understanding an advanced topic of power query, so we will assume that you know how to get data from a CSV or xlsx file in power query. Imported a table, in the current sheet name “housing”, using Get Data.
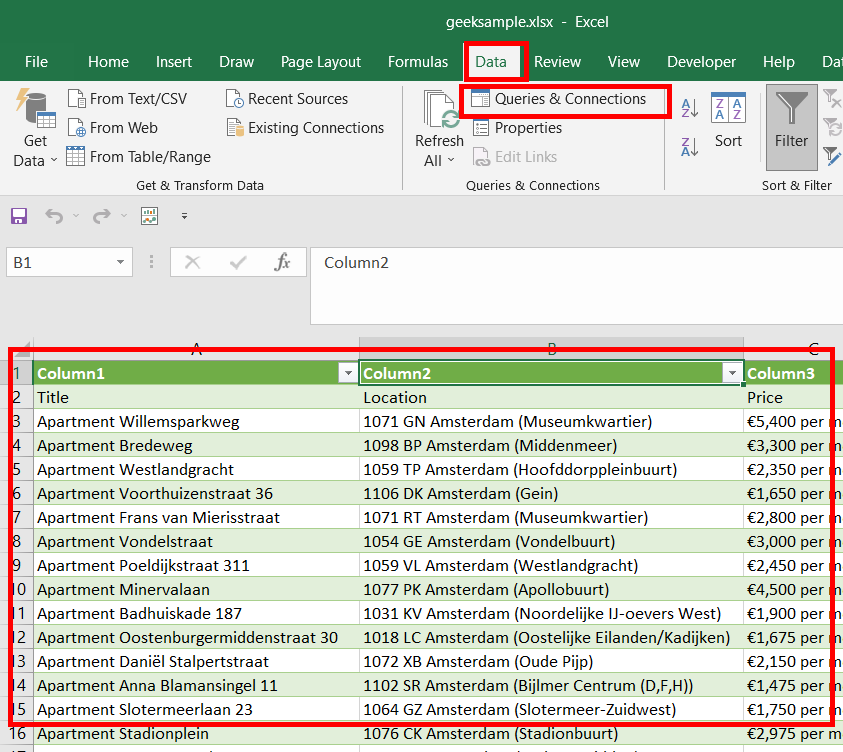
Step 2: Now, on the right side of your screen, you will have the housing data set, that you imported. Double-click on it and the power query editor will be launched. The main aim for step1 and step2 is to open our power query editor.
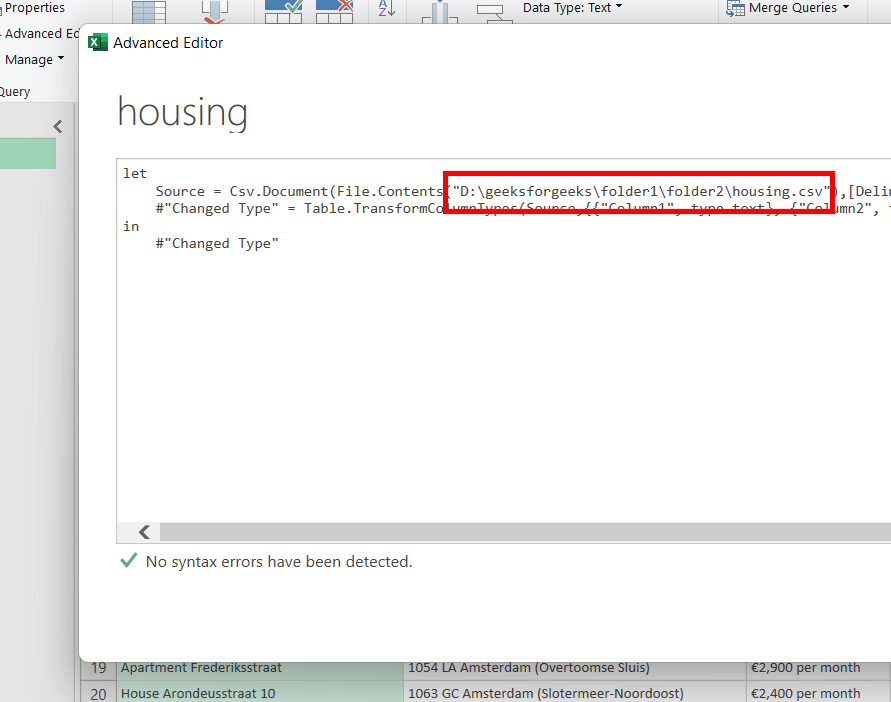
Step 3: The power Query editor is opened. In the Home tab, under the Query section, click on Advanced Editor.

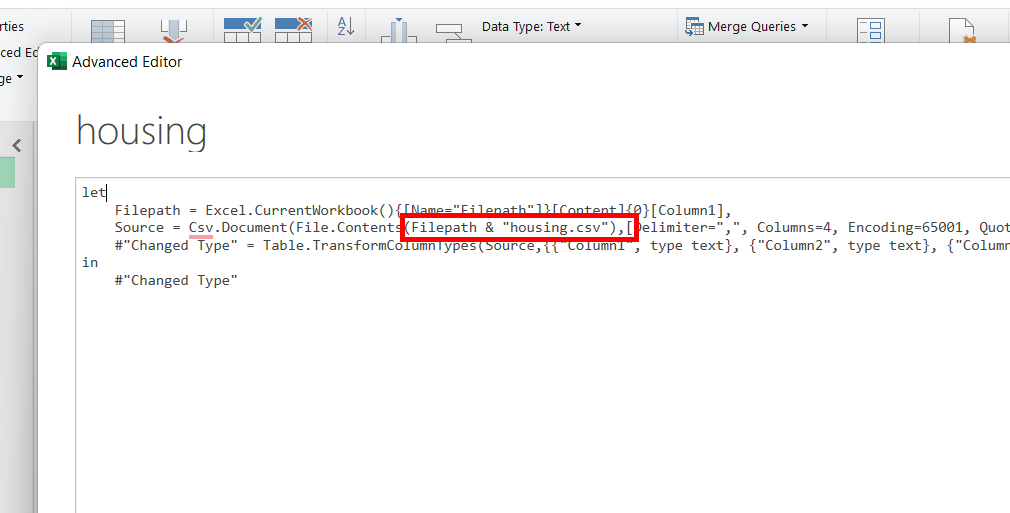
Step 4: The Advanced Editor is opened. You can observe that the M-code is written in the picture shown below, and the absolute path for the current CSV file is “D:geeksforgeeksfolder1folder2housing.csv”. Our task is to convert this absolute path into a relative path.
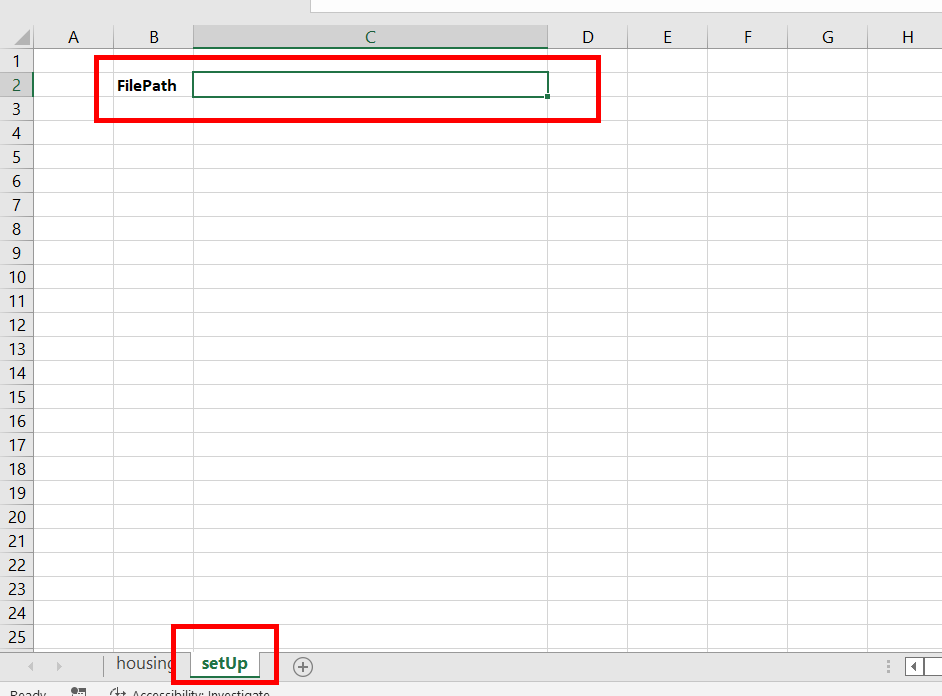
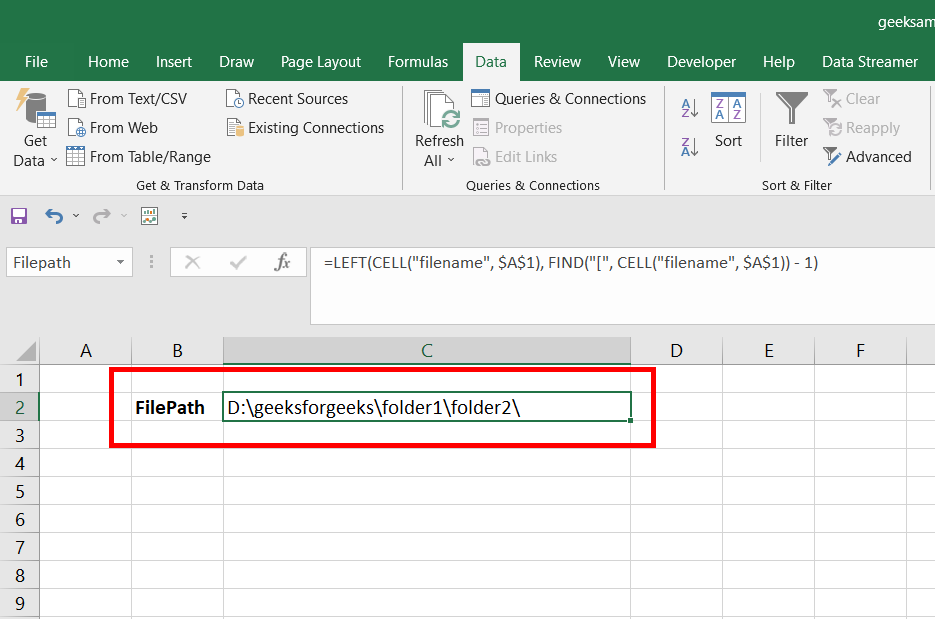
Step 5: Close all the windows, and return back to the “housing” worksheet. Now, create a new worksheet, named “setUp”. Cell B2 has the value FilePath.
Step 6: Now, comes the most important step. Now, if you have understood the examples provided while explaining the different functions like =CELL(), =FIND(), =LEFT(), then this will be a very easy step for you. The formula written is: =LEFT(CELL(“filename”, $A$1), FIND(“[“, CELL(“filename”, $A$1)) – 1). The formula simply extracts the text written before the square bracket “[“, in the absolute path, i.e. from “D:geeksforgeeksfolder1folder2[geeksample.xlsx]setUp” to “D:geeksforgeeksfolder1folder2” .
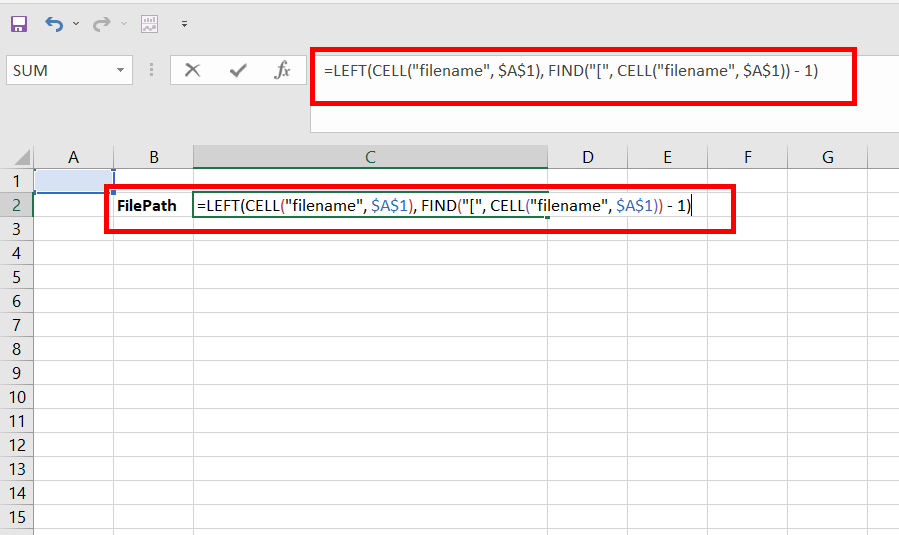
Step 7: Press Enter. “D:geeksforgeeksfolder1folder2” appears in the cell C2.
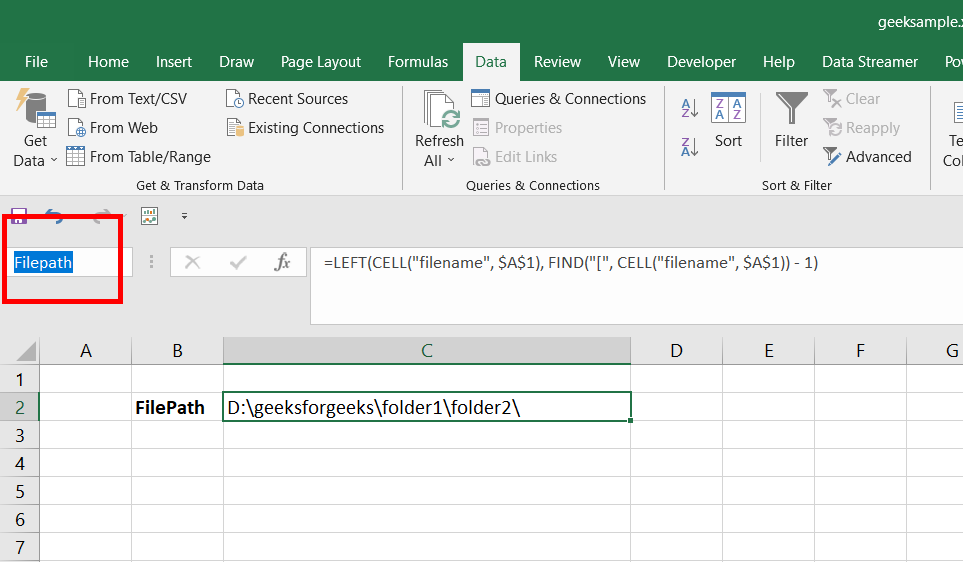
Step 8: Change the name of the cell, C3 to Filepath.
Step 9: Now, repeat steps 1, 2, and 3. This will open our advance editor again. Now, add this single line of M-code in your advanced editor, “Filepath = Excel.CurrentWorkbook(){[Name=”Filepath”]}[Content]{0}[Column1],”. This code simply stores the reference of the cell C3(Filepath) in the variable “Filepath”.
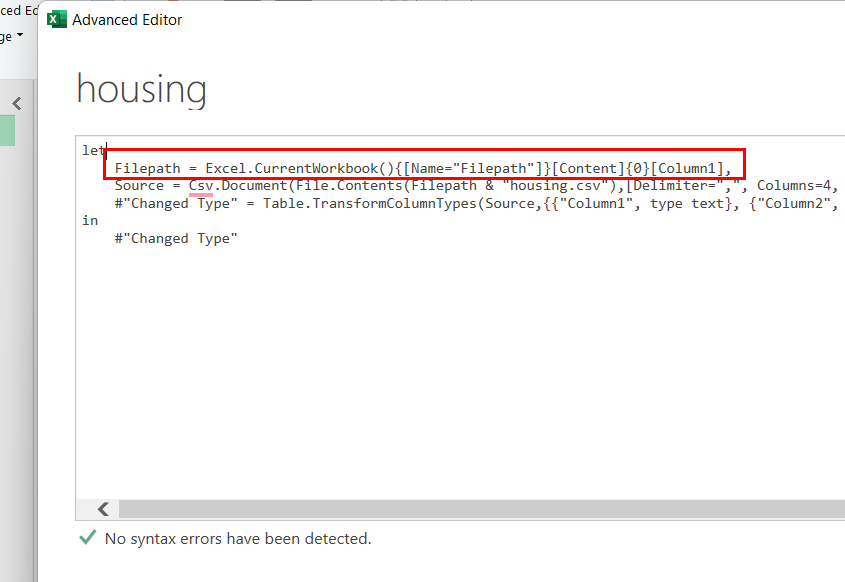
Step 10: Now, come to the second line of M-code, where some File content is stored in the variable “Source”. Inside the File.Contents function, change “D:geeksforgeeksfolder1folder2housing.csv” to ” Filepath & “housing.csv” “. Close all the windows, and return back to the “housing” worksheet, this converts your absolute path to the relative path of the current added data in your worksheet.