
When you are working on an Excel workbook, you may need to refer to the path of this file. In this article, we will show you 3 methods to get the path.
Getting the path of the current workbook seems to be very easy. However, if you close the folder and couldn’t remember the exact location, you will find it hard to get the path especially, especially when there are many files in your computer. You can certainly use the search feature in your computer.
But if there are many files in your computer, you need to spend a lot of time on the search process. On the other hand, if there are many Excel files with the same name in different paths, you will still need to select them one by one. In order to get the path quickly, you can refer to the 3 methods below.
Method 1: Check Workbook Information
This method is very easy. Just click the tab “File” in the ribbon and you can get the information.
Here you will know the complete path of the current workbook. And then you can get access to the path easily.
Method 2: Use Excel Functions
You can only know the exact location of the path of current workbook. If you need to use the path in a worksheet, you can use Excel functions.
- Click the target cell in the worksheet.
- Now input the following formula into this cell”
=CELL(“filename”)
- And then press the button “Enter” on the keyboard.


After that, you will see the path in the cell. Except for the path and the name of the current file, you can also know the active sheet.
On the other hand, when you don’t need the sheet name, you can also change the formula.
= LEFT(CELL(“filename”),FIND(“]”,CELL(“filename”)))
This formula will get the path to the name of the workbook.
In addition, you can also get only the exact path without the name of the workbook. And the formula will be this:
=LEFT(CELL(“filename”),FIND(“[“,CELL(“filename”))-2)
When you press “Enter” on the keyboard, you will see the result immediately.
You can choose one of the formulas according to your actual need. When you need to use the path, you can copy it and paste as values. Therefore, only the path will leave in the target cell.
Method 3: Use VBA Macros
Except for the above two methods, you can also use VBA macros to finish this task.
- Press the shortcut keys “Alt +F11” on the keyboard to open the Visual Basic editor.
- And then click the tab “Insert” in the toolbar.
- After that, choose the option “Module” in the sub menu.

- In this step, inputting the following codes into the new module:

'get only the path
Sub GetPath1()
  Range("B1") = ActiveWorkbook.Path
End Sub

'get the path with the file name
Sub GetPath2()
  Range("B2") = ActiveWorkbook.FullName
End Sub

'get the path with the file name and the sheet name
Sub GetPath3()
  Range("B3") = ActiveWorkbook.FullName & "," & ActiveSheet.Name
End Sub
There are three different macros in the codes. And for different purpose, the codes will be a little different. The first one will only get the path. The second one will get the path with the file name. And the last one will also get the worksheet name. You may also change the target cell in the codes according to your need.
- When you need to get the path, you can run the macro by clicking the button “Run Sub” or press the button “F5” on the keyboard. Thus, the result will appear in the designated cell.

A Comparison between Those Methods
In this table below, we have input the result of the comparison of the three methods.
|
Comparison |
Check Workbook Information | Use Excel Functions |
Use VBA Macros |
|
Advantages |
This method will now change the current workbook. | You can get 3 different types of the path by the different formulas. | With just one click, you can get the result in your worksheet. |
|
Disadvantages |
If you need to use the path in a cell, you need to spending time inputting the path manually. | When you need to use the path itself instead of the result of formulas, you need to paste values only. | If you have no idea about VBA, this method will is not suitable for you. |
Now you must have a comprehensive understanding of the three methods. And the next time, you can choose the most suitable methods according to your need.
Avoid Data Disaster is Next to Impossible
If you need to use Excel to finish your work, you will certainly deal with a lot of data and information. Therefore, you will sometimes meet with data disaster. And it is impossible that anyone can fully avoid the occurrence of data disaster. When Excel corruption happens, the only thing you can do is to repair it immediately. And in order to repair Excel xlsx file, you can use a third-party tool. This tool is capable of repairing most of the problems in Excel. Therefore, even though you cannot avoid data disaster, you will never lose your data.
Author Introduction:
Anna Ma is a data recovery expert in DataNumen, Inc., which is the world leader in data recovery technologies, including repair Word document damage and outlook repair software products. For more information visit www.datanumen.com
Содержание
- 3 Effective Methods to Get the Path of the Current Excel Workbook
- Method 1: Check Workbook Information
- Method 2: Use Excel Functions
- Method 3: Use VBA Macros
- A Comparison between Those Methods
- Avoid Data Disaster is Next to Impossible
- VBA Get Workbook Path & Location in Excel
- Syntax to Get complete Path of the Workbook in Excel VBA
- Macro to Get Path of the Workbook in Excel VBA
- VBA Code to Get Location of the current Workbook in Excel
- Instructions to Run VBA Macro Code or Procedure:
- Other Useful Resources:
- Get full workbook name and path
- Related functions
- Summary
- Generic formula
- Explanation
- Dave Bruns
- Get workbook path only
- Related functions
- Summary
- Generic formula
- Explanation
- Get path and filename
- Locate the opening square bracket
- Extract path
- LET function improvement
- How to get the excel file name / path in VBA
- 7 Answers 7
3 Effective Methods to Get the Path of the Current Excel Workbook
When you are working on an Excel workbook, you may need to refer to the path of this file. In this article, we will show you 3 methods to get the path.
Getting the path of the current workbook seems to be very easy. However, if you close the folder and couldn’t remember the exact location, you will find it hard to get the path especially, especially when there are many files in your computer. You can certainly use the search feature in your computer.
But if there are many files in your computer, you need to spend a lot of time on the search process. On the other hand, if there are many Excel files with the same name in different paths, you will still need to select them one by one. In order to get the path quickly, you can refer to the 3 methods below.
Method 1: Check Workbook Information
This method is very easy. Just click the tab “File” in the ribbon and you can get the information.
Here you will know the complete path of the current workbook. And then you can get access to the path easily.
Method 2: Use Excel Functions
You can only know the exact location of the path of current workbook. If you need to use the path in a worksheet, you can use Excel functions.
- Click the target cell in the worksheet.
- Now input the following formula into this cell”
- And then press the button “Enter” on the keyboard.

After that, you will see the path in the cell. Except for the path and the name of the current file, you can also know the active sheet.
On the other hand, when you don’t need the sheet name, you can also change the formula.
This formula will get the path to the name of the workbook.
In addition, you can also get only the exact path without the name of the workbook. And the formula will be this:
When you press “Enter” on the keyboard, you will see the result immediately.
You can choose one of the formulas according to your actual need. When you need to use the path, you can copy it and paste as values. Therefore, only the path will leave in the target cell.
Method 3: Use VBA Macros
Except for the above two methods, you can also use VBA macros to finish this task.
- Press the shortcut keys “Alt +F11” on the keyboard to open the Visual Basic editor.
- And then click the tab “Insert” in the toolbar.
- After that, choose the option “Module” in the sub menu.
- In this step, inputting the following codes into the new module:
There are three different macros in the codes. And for different purpose, the codes will be a little different. The first one will only get the path. The second one will get the path with the file name. And the last one will also get the worksheet name. You may also change the target cell in the codes according to your need.
- When you need to get the path, you can run the macro by clicking the button “Run Sub” or press the button “F5” on the keyboard. Thus, the result will appear in the designated cell.
A Comparison between Those Methods
In this table below, we have input the result of the comparison of the three methods.
Check Workbook Information Use Excel Functions This method will now change the current workbook. You can get 3 different types of the path by the different formulas. With just one click, you can get the result in your worksheet.
If you need to use the path in a cell, you need to spending time inputting the path manually. When you need to use the path itself instead of the result of formulas, you need to paste values only. If you have no idea about VBA, this method will is not suitable for you.
Now you must have a comprehensive understanding of the three methods. And the next time, you can choose the most suitable methods according to your need.
Avoid Data Disaster is Next to Impossible
If you need to use Excel to finish your work, you will certainly deal with a lot of data and information. Therefore, you will sometimes meet with data disaster. And it is impossible that anyone can fully avoid the occurrence of data disaster. When Excel corruption happens, the only thing you can do is to repair it immediately. And in order to repair Excel xlsx file, you can use a third-party tool. This tool is capable of repairing most of the problems in Excel. Therefore, even though you cannot avoid data disaster, you will never lose your data.
Источник
VBA Get Workbook Path & Location in Excel
VBA Get Workbook Path in Excel. We deal with multiple workbooks at a time. We may want to know Workbook path and its location. In the following tutorial we will learn to get Workbook complete Path and location using Path and FullName properties of Workbook.
Syntax to Get complete Path of the Workbook in Excel VBA
Here is the syntax of to Get Path of the Workbook in Excel VBA.
Where expression represents Workbook object.
Path represents a property of Workbook. It returns Workbook complete Workbook path.
Macro to Get Path of the Workbook in Excel VBA
Let us see the following macro to get path of the active Workbook in Excel VBA.
Here is the output screenshot of above macro.
VBA Code to Get Location of the current Workbook in Excel
Here is the following VBA Code to Get Location of the current Workbook in Excel.
Let us see the output screenshot of above VBA code.
Instructions to Run VBA Macro Code or Procedure:
You can refer the following link for the step by step instructions.
Other Useful Resources:
Click on the following links of the useful resources. These helps to learn and gain more knowledge.
Источник
Get full workbook name and path
Summary
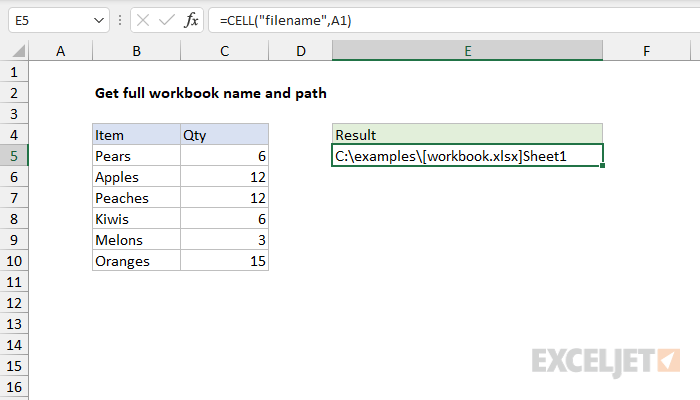
To get a full path and name for the current workbook, you can use the CELL function and a reference to any cell in the workbook. In the example shown, the formula is:
You must save the worksheet in order to get the a result.
Note: the CELL function is a volatile function and can cause performance problems in larger or more complicated worksheets.
Generic formula
Explanation
The CELL function can return various information about a worksheet. CELL can get things like address and filename, as well as information about the formatting used in the cell. The type of information to be returned is specified by the info_type argument.
In this example, we want the path, name, and sheet for the current workbook. To get this information, the info_type argument is set to «reference» in a formula like this:
With this configuration, CELL will return the name in this format:
Note that you must save the worksheet in order to get the a result.
The second argument, reference, is optional and can be any cell in the worksheet. If reference is not supplied, CELL will return the name of the current «active sheet» which may or may not be the sheet where the formula exists, and might even be in a different workbook. To avoid confusion, use A1 for reference.
Dave Bruns
Hi — I’m Dave Bruns, and I run Exceljet with my wife, Lisa. Our goal is to help you work faster in Excel. We create short videos, and clear examples of formulas, functions, pivot tables, conditional formatting, and charts.
Источник
Get workbook path only
Summary
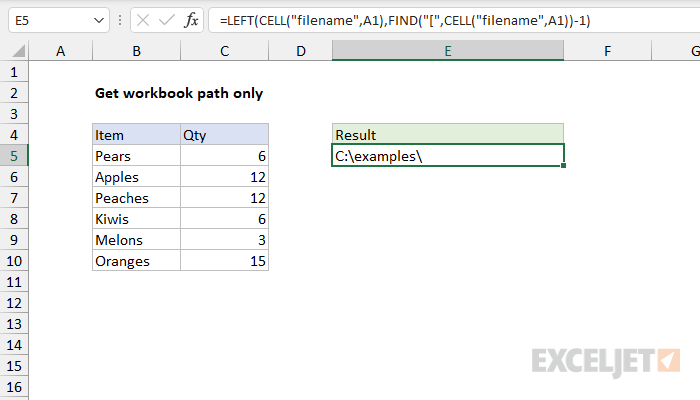
To get the path to the current workbook without workbook name, you can use a formula based on the CELL function, together with the LEFT function and FIND function. In the example shown, the formula in E5 is:
The result is a path without the filename like this: «C:path».
Generic formula
Explanation
In this example, the goal is to get the workbook path without workbook name. The formula used to perform this task appears in cell E5:
At a high level, this formula works in 3 steps:
- Get the full path and filename
- Locate the opening square bracket («[«)
- Extract all text up to the opening square bracket («[«)
Get path and filename
To get the path and file name, we use the CELL function like this:
The info_type argument is «filename» and reference is A1. The cell reference is arbitrary and can be any cell in the worksheet. The result is a full path like this as text:
Note the sheet name (Sheet1) appears at the end, and workbook name appears inclosed in square brackets, [workbook.xlsx].
Locate the opening square bracket
The location of the opening square bracket («[«) is calculated with FIND like this
The FIND function returns the location of «[» (13) from which 1 is subtracted to get 12. We subtract 1 because we want to remove all text starting with the «[» that precedes the workbook name. Or, to put it the other way, we want to extract all text up to the «[«.
In the previous step, we located the «]» at character 27, then stepped back to 12. This number is returned directly to the LEFT function as the num_chars argument. The text argument is again provided by the CELL function as described above:
The LEFT function returns the first 12 characters of text as the final result:
LET function improvement
The CELL function is called twice in the formula because we need the path twice, once for the FIND function to locate the opening square bracket («[«), and once for the LEFT function to extract all text before the «[«.
In Excel 365, the LET function makes it possible to declare and assign variables inside a formula. With LET, the formula above can be streamlined somewhat by declaring and defining a «path» just one time like this:
The formula logic is the same as explained above, but the CELL function is used just once.
Источник
How to get the excel file name / path in VBA
Say, I’m writing a VBA inside my excel file sample.xls. Now I want to get the full path of sample.xls in my VBA. How do I do it?
7 Answers 7
If you mean VBA, then you can use FullName, for example:
(updated as considered by the comments: the former used ActiveWorkbook.FullName could more likely be wrong, if other office files may be open(ed) and active. But in case you stored the macro in another file, as mentioned by user @user7296559 here, and really want the file name of the macro-using file, ActiveWorkbook could be the correct choice, if it is guaranteed to be active at execution time.)
this is a simple alternative that gives all responses, Fullname, Path, filename.

If you need path only this is the most straightforward way:
if you need path only without file name:
it would return D:Folder
if you need file path with file name also:
it would return D:Foldersample.xls
if you need file name only:
it would return sample.xls
so if you want combine file path and file name to get full directory don’t forget to add «» between. otherwise its simpler using .Path

ActiveWorkbook.FullName would be better I think, in case you have the VBA Macro stored in another Excel Workbook, but you want to get the details of the Excel you are editing, not where the Macro resides.
If they reside in the same file, then it does not matter, but if they are in different files, and you want the file where the Data is rather than where the Macro is, then ActiveWorkbook is the one to go for, because it deals with both scenarios.
Источник
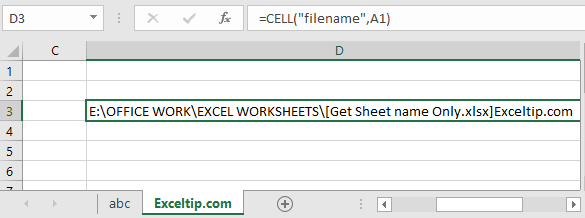
In this article, we will learn How to find an active workbook path in Excel.
CELL function in Excel
Cell function in Excel gets you the information regarding worksheets like col, contents, filename, ..etc.
Syntax
“filename” : gets the full name of the sheet of the reference cell
A1 : Sheet’s cell reference

But we need to extract just the sheet name. Basically the last name.
As you can see the sheet name starts after ] (closed big bracket sign). For that we just need its position in the text and then we will extract the sheet name.
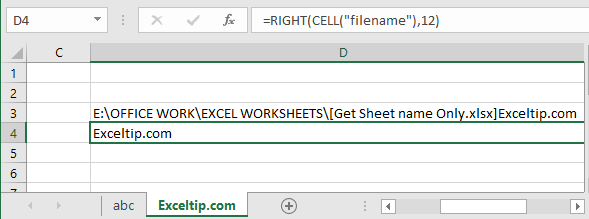
Here I counted the characters from the last of the result which was 12. But we cannot do this every time.
So for extracting the sheet name from the full name, we need to find the position of the ] (closed big bracket sign)
Use the formula to find ]
=FIND(«]«,CELL(«filename»,A1))
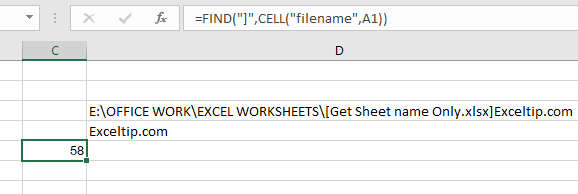
58 is the position of ] .
Now we our formula is completed now
=MID(CELL(«filename»,A1),FIND(«]»,CELL(«filename»,A1))+1,255)
Explanation:
CELL(«filename»,A1) : Gets you the full name of the worksheet
FIND(«]»,CELL(«filename»,A1))+1 : this function gets you the position of ] and add +1 because we need the position of the first char of only the sheet name.
255 : Max word limit of sheet name by Excel.
MID : MID function extracts the specific substring from the text using the position from start to end.
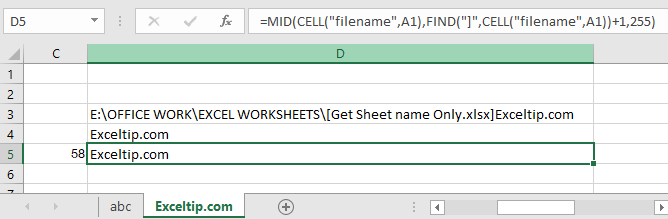
Here we extracted the filename using the formula.
Now we have one more formula, instead of using the MID function. Use the RIGHT function.
RIGHT function extracts the specific substring from the last of the text.
Use the formula:
=RIGHT(CELL(«filename»,A2),LEN(CELL(«filename»,A2))-FIND(«]», CELL(«filename»,A2)))
Explanation:
FIND(«]», CELL(«filename»,A2)) : Extracts the position of sheet name char.
LEN(CELL(«filename»,A2)) : gets the length of the text(filename)
RIGHT : RIGHT function extracts the string from the text using its position.
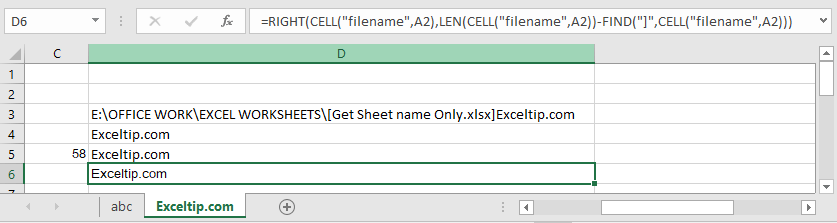
As you can see, this function works fine too. Yesss…Now we have 2 different formulas with logic used to extract only the sheet name.
How to get only the sheet name using VBA in Excel
VBA example
We have data in three sheets and we want to consolidate data from all of them to the main sheet. Data from each sheet should have a sheet name at the end.


On clicking the “Consolidate data along with sheet name” button, data will be consolidated on the main sheet.

Code explanation
SheetCount = Application.Worksheets.Count
The above code is used to get the count of the worksheet within the workbook.
LastRow = ActiveCell.SpecialCells(xlLastCell).Row
The above code is used to get the row number of the last cell.
Range(«A2:F» & LastRow).Select
The above code is used to select all the data starting from cell A2.
Selection.Copy
The above code is used to copy the selected data.
Range(Selection, Cells(LastRow, 7)).Value = Sheets(Counter).Name
The above code is used to assign the sheet name to the selected cell.
Please follow below for the code
Option Explicit
Sub ConsolidateDataWithSheetName()

'Declaring variables
Dim Counter As Integer
Dim SheetCount As Integer
Dim LastRow As Long

'Disabling screen updates
Application.ScreenUpdating = False


'Getting the count of worksheets in the workbook
SheetCount = Application.Worksheets.Count

For Counter = 2 To SheetCount

        Sheets(Counter).Activate

        Range("A2").Select

        'Getting the row number of the last cell
        LastRow = ActiveCell.SpecialCells(xlLastCell).Row

        'Selecting all the data in the workbook
        Range("A2:F" & LastRow).Select

        'Copying the selected data
        Selection.Copy

        Sheets("Main").Activate

        Range("A2").Select
        LastRow = ActiveCell.SpecialCells(xlLastCell).Row
        LastRow = LastRow + 1

        'Pasting the copied data to last row on the Main sheet
        Cells(LastRow, 1).Select
        ActiveSheet.Paste

        Cells(LastRow, 7).Select
        LastRow = ActiveCell.SpecialCells(xlLastCell).Row

        'Adding the sheet name along with the data
        Range(Selection, Cells(LastRow, 7)).Value = Sheets(Counter).Name

Next

End Sub
Hope this article about How to find an active workbook path in Excel is explanatory. Find more articles on calculating values and related Excel formulas here. If you liked our blogs, share it with your friends on Facebook. And also you can follow us on Twitter and Facebook. We would love to hear from you, do let us know how we can improve, complement or innovate our work and make it better for you. Write to us at info@exceltip.com.
Related Articles :
All About Excel Named Ranges : excel ranges that are tagged with names are easy to use in excel formulas. Learn all about it here.
The Name Box in Excel : Excel Name Box is nothing but a small display area on top left of excel sheet that shows the name of active cell or ranges in excel. You can rename a cell or array for references.
How to Get Sheet name of worksheet in Excel : CELL Function in Excel gets you the information regarding any worksheet like col, contents, filename, ..etc.
How to use Dynamic Named Ranges in Excel : A dynamic name range is a name used for the array or range that expands and shrinks according to data. Learn more about dynamic named ranges here.
How to Create Drop Down List with Color in Excel : Add colors to the drop down list in Excel using Conditional formatting and data validation.
Join first and last name in excel : Join two or more values or names using the CONCATENATE function or & operator. This article explains how to add two or more cells in Excel.
Popular Articles :
50 Excel Shortcuts to Increase Your Productivity : Get faster at your tasks in Excel. These shortcuts will help you increase your work efficiency in Excel.
How to use the VLOOKUP Function in Excel : This is one of the most used and popular functions of excel that is used to lookup value from different ranges and sheets.
How to use the IF Function in Excel : The IF statement in Excel checks the condition and returns a specific value if the condition is TRUE or returns another specific value if FALSE.
How to use the SUMIF Function in Excel : This is another dashboard essential function. This helps you sum up values on specific conditions.
How to use the COUNTIF Function in Excel : Count values with conditions using this amazing function. You don’t need to filter your data to count specific values. Countif function is essential to prepare your dashboard.
Example
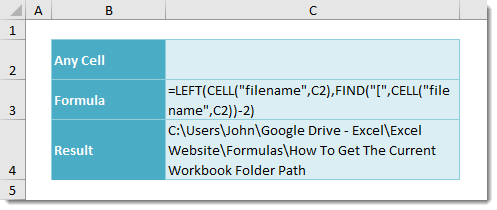
=LEFT(CELL("filename",C2),FIND("[",CELL("filename",C2))-2)
Generic Formula
=LEFT(CELL("filename",AnyCell),FIND("[",CELL("filename",AnyCell))-2)
- “filename” – This is a predefined Excel parameter input for the CELL function.
- AnyCell – This is can be any cell in any sheet of the workbook.
What It Does
This formula will return the folder path where the current workbook is saved.
How It Works
CELL(“filename”,AnyCell) will return the full folder path, file name and sheet name of the referenced cell. For my workbook this was the following location.
C:UsersJohnGoogle Drive – ExcelExcel WebsiteFormulasHow To Get The Current Workbook Folder Path[How To Get The Current Workbook Folder Path.xlsx]Sheet1
All we need to do is parse all the text up until the first square bracket [ seen above highlighted in yellow.
We will first need to find the location of [ using FIND(“[“,CELL(“filename”,AnyCell)). This will give us the location of the first occurrence of the [ character within our full location path. For my workbook this was 103.
This 103 value is the number of characters up to and including the [, but this includes a and [ character which we don’t want so we will need to subtract 2. We only want the left most 101 characters.
Now we can use the LEFT function to return the left most 101 characters. LEFT(CELL(“filename”,AnyCell),101) will then result in the following path.
C:UsersJohnGoogle Drive – ExcelExcel WebsiteFormulasHow To Get The Current Workbook Folder Path
About the Author
John is a Microsoft MVP and qualified actuary with over 15 years of experience. He has worked in a variety of industries, including insurance, ad tech, and most recently Power Platform consulting. He is a keen problem solver and has a passion for using technology to make businesses more efficient.
The Excel Personal Macro Workbook is the workbook that contains all your created macros in one place.
This workbook usually opens whenever you start Excel, but since it is hidden, you cannot see it.
The exact location of the Personal Macro Workbook, though, can be a little hard to find, since you will not find it in your Documents folder, along with your other Excel documents.
In this tutorial, we will show you how to find the location of your Excel Personal Macro Workbook.
We will also show you how you can view the personal workbook, in case you want to make edits to any of your macros.
Why is there a Personal Macro Workbook in Excel?
When you write or record a macro in Excel, you can only access it from the particular workbook where it was created.
But recreating macros every time you open a new workbook can just be futile.
So Excel lets you store your frequently required macros in one place (the Personal Macro Workbook), which is always open in the background whenever you start the Excel application.
In this way, your macros are accessible all the time and in any workbook!
How to Create an Excel Personal Macro Workbook?
Every time you write or record a macro, Excel gives you the option to save it in the Excel personal macro workbook.
If you don’t already have an Excel Personal Macro Workbook, you can create one very easily as follows:
- From the Developer menu, click on ‘Record Macro’ under the ‘Code’ group.

- This will open the Record Macro window.
- Type in a name for the Macro (if you want) and from the dropdown menu under ‘Store macro in:” select ‘Personal Macro Workbook’.
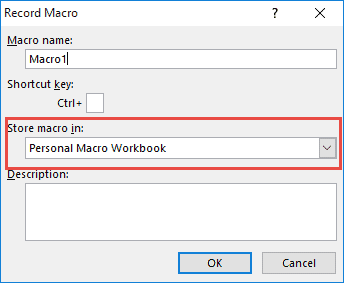
- Click OK.
- This will now start recording your macro. If you have a macro that you want to record then go ahead and record it, otherwise, simply move to the next step.
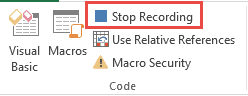
- Click ‘Stop recording’ from the Developer tab.
- You are now done recording your macro.
- Close the Excel window, and you will be asked if you want to save the macro you just recorded to the Personal Macro Workbook.
- Click Save.
Your Personal Macro Workbook should now be created.
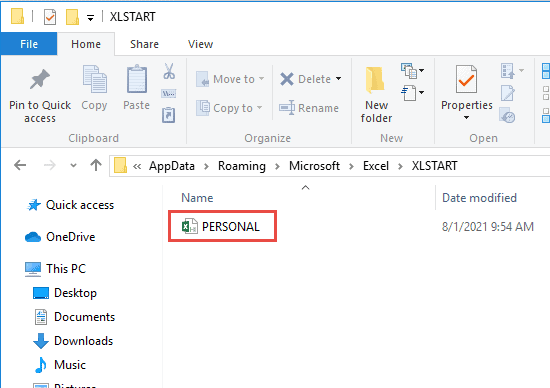
The Personal Macro Workbook is always stored in a special file named ‘personal.xlsb’ in newer Excel versions (2007 onwards). In earlier versions, it is saved as ‘personal.xls’.
Personal Macro workbook is always stored in the XLSTART folder.
Excel always looks in this folder whenever it launches. So any file stored here gets loaded as soon as Excel starts.
The problem is, the location of this folder may be a little tricky for us to find.
So here’s a simple hack that you can use to quickly get the location of the XLStart folder.
- From the Developer tab, select Visual Basic.

- This will open the Visual basic Developer window.
- You will see the Project window on the left, containing a list of all your VBA projects and modules under them.
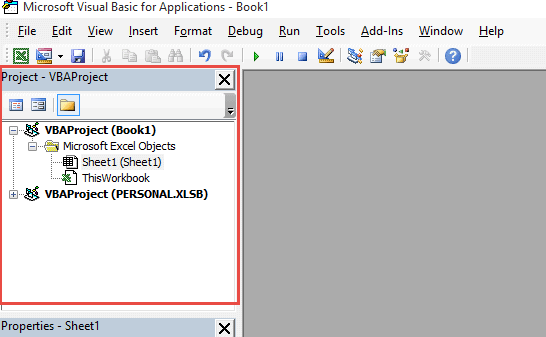
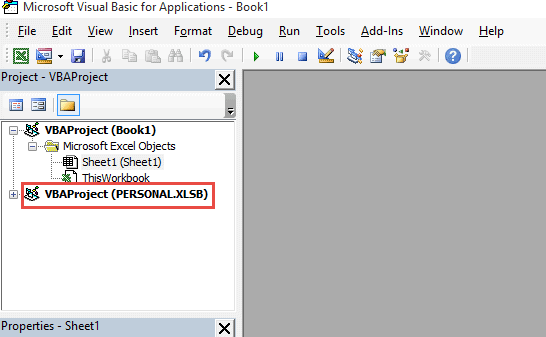
- Select ‘VBAProject (PERSONAL.XLSB)’.
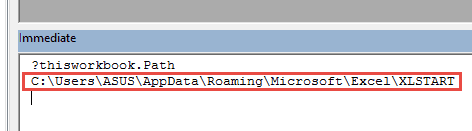
- Under the Immediate window (at the bottom of your Developer window), type “?thisworkbook.Path”.
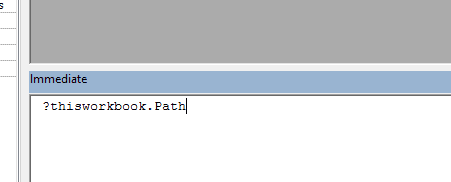
- Press the Return key
- You should now see the path of the folder that contains the ‘Personal.xlsb’ file in your computer.
- Copy this path and paste it into the File location bar of your File Explorer and press the return key.
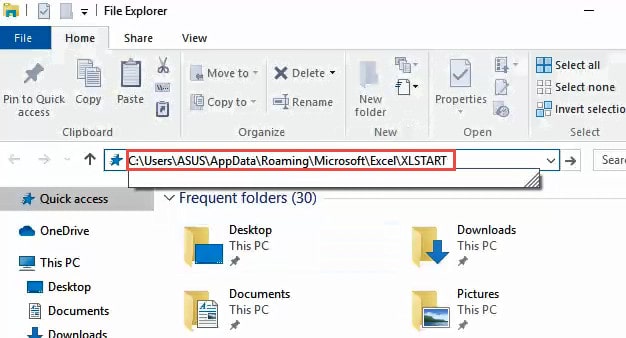
You should now be able to see your personal macro workbook as ‘personal.xlsb’ in the XLSTART folder.
How to Unhide a Personal Macro Workbook
The Personal macro workbook is always available in any open Excel workbook. The reason we don’t see it though is that it remains hidden in the background.
You might want to see this workbook, maybe to make edits to macros stored in it, or for any other purpose.
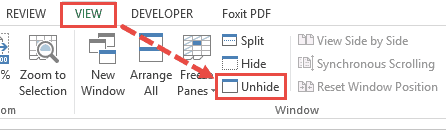
To view the personal macro workbook, you need to simply unhide it.
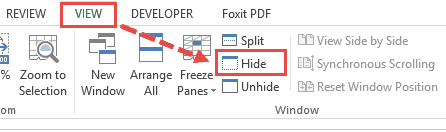
Here’s how you can do this:
- From the View menu, select the ‘Unhide’ button (under the ‘Window’ group).
- This will open the Unhide dialog box, from where you can select the hidden workbook that you want to unhide.
- Select ‘Personal’ from the list of workbooks displayed in the box and click OK.
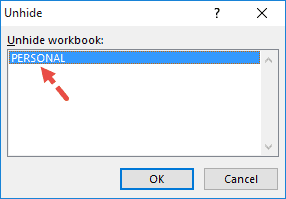
- This will unhide your personal macro workbook and bring it to the foreground.
This workbook is basically blank, consisting only of macros that you had saved. However, if there’s certain information or data that you want to make available in all workbooks then you can go ahead and add it to the personal macro workbook.
To hide the workbook once again, simply click on View->Hide.
In this tutorial, we explained what the Excel Personal Macro workbook is, how it works as well as how to locate it in your computer’s files and folders.
We also showed you how to view the workbook, make changes to it, and then how to hide it again, so that it keeps running in the background without interfering.
We hope this was helpful.
Other Excel tutorials you may also like:
- How to Remove Macros from Excel? 3 Simple Methods
- How to Select Rows with Specific Text in Excel
- How to Delete a Sheet in Excel Using VBA
- How to Unhide All Rows in Excel with VBA
- Using Application.EnableEvents in VBA in Excel (Explained with Examples)
- How to Start Excel in Safe Mode
Permalink
Cannot retrieve contributors at this time
| title | keywords | f1_keywords | ms.prod | api_name | ms.assetid | ms.date | ms.localizationpriority |
|---|---|---|---|---|---|---|---|
|
Workbook.Path property (Excel) |
vbaxl10.chm199121 |
vbaxl10.chm199121 |
excel |
Excel.Workbook.Path |
f4cbf76a-2ed3-63b7-3262-45403d6f086e |
05/29/2019 |
medium |
Workbook.Path property (Excel)
Returns a String that represents the complete path to the workbook/file that this workbook object represents.
Syntax
expression.Path
expression A variable that represents a Workbook object.
[!includeSupport and feedback]
VBA Get Workbook Path in Excel. We deal with multiple workbooks at a time. We may want to know Workbook path and its location. In the following tutorial we will learn to get Workbook complete Path and location using Path and FullName properties of Workbook.
Table of Contents:
- Objective
- Syntax to get complete path in Excel VBA
- Macro to Get path of the active Workbook in Excel
- VBA Code to Get Location of the current Workbook in Excel
- Instructions to Run VBA Macro Code
- Other Useful Resources
Syntax to Get complete Path of the Workbook in Excel VBA
Here is the syntax of to Get Path of the Workbook in Excel VBA.
expression.Path
Where expression represents Workbook object.
Path represents a property of Workbook. It returns Workbook complete Workbook path.
Macro to Get Path of the Workbook in Excel VBA
Let us see the following macro to get path of the active Workbook in Excel VBA.
'VBA Get path of the active Workbook in Excel
Sub VBA_Get_ActiveWorkbook_Path()
'Variable declaration
Dim sWorkbookPath As String
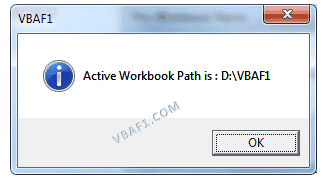
sWorkbookPath = ActiveWorkbook.Path
MsgBox "Active Workbook Path is : " & sWorkbookPath, vbInformation, "VBAF1"
End Sub
Here is the output screenshot of above macro.
VBA Code to Get Location of the current Workbook in Excel
Here is the following VBA Code to Get Location of the current Workbook in Excel.
'VBA Get Location of the current Workbook in Excel
Sub VBA_Get_CurrentWorkbook_Location()
'Variable declaration
Dim sWorkbookLocation As String
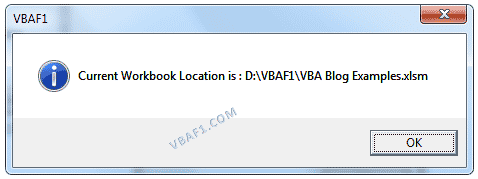
sWorkbookLocation = ThisWorkbook.FullName
MsgBox "Current Workbook Location is : " & sWorkbookLocation, vbInformation, "VBAF1"
End Sub
Let us see the output screenshot of above VBA code.
Instructions to Run VBA Macro Code or Procedure:
You can refer the following link for the step by step instructions.
Instructions to run VBA Macro Code
Other Useful Resources:
Click on the following links of the useful resources. These helps to learn and gain more knowledge.
VBA Tutorial VBA Functions List VBA Arrays in Excel Blog
VBA Editor Keyboard Shortcut Keys List VBA Interview Questions & Answers
This post will guide you how to get the current workbook path in Excel. How do I insert workbook path only into a cell with a formula in Excel.
Table of Contents
- Get workbook path with Document Location
- Get workbook path with Formula
- Related Functions
Get workbook path with Document Location
You can get the workbook path from the document location feature, and copy the location to a cell. Do the following steps:
#1 go to File tab, and click Options menu from the popup menu list. And the Excel Options dialog will open.
#2 click Quick Access Toolbar option, and select All commands from the drop down list of the Choose commands from. And then select Document Location value, click Add button to add it into Quick Access Toolbar.
#3 click OK button. The workbook path is displayed in the Quick Access toolbar. Press Ctrl +C to copy it.
Get workbook path with Formula
You can also use a formula based on the LEFT function, the Cell function, and the FIND function to get workbook path only in Excel. Just like this:
=LEFT(CELL("filename",B1),FIND("[",CELL("filename",B1))-1)
Type this formula into a cell and then press Enter key.
Let’s see how this formula works:
The Cell function will be used to get the full name and path of the workbook file.
The Find function will return the location number of the first left square bracket.
The left function will extract the workbook path based on the number returned by the Find function.
- Excel Find function
The Excel FIND function returns the position of the first text string (substring) from the first character of the second text string.The FIND function is a build-in function in Microsoft Excel and it is categorized as a Text Function.The syntax of the FIND function is as below:= FIND (find_text, within_text,[start_num])… - Excel LEFT function
The Excel LEFT function returns a substring (a specified number of the characters) from a text string, starting from the leftmost character.The LEFT function is a build-in function in Microsoft Excel and it is categorized as a Text Function.The syntax of the LEFT function is as below:= LEFT(text,[num_chars])… - Excel CELL function
The Excel CELL function returns information about the formatting, location, size, or contents of a cell.The syntax of the CELL function is as below:= CELL (info_type,[reference])…
In this example, the goal is to get a normal path to the current workbook, without a sheet name, and without the square brackets («[ ]») that normally enclose the workbook name. This is a pretty simple problem in the latest version of Excel, which provides the TEXTBEFORE function. In older versions of Excel, you can use a more complicated formula based on the LEFT and FIND functions. Both options use the CELL function to get a full path to the current workbook. Read below for a full explanation.
Get workbook path
The first step in this problem is to get the workbook path, which includes the workbook and worksheet name. This can be done with the CELL function like this:
CELL("filename",A1)
With the info_type argument set to «filename», and reference set to cell A1 in the current worksheet, the result from CELL will be a full path as a text string like this:
"C:pathtofolder[workbook.xlsx]sheetname"
Notice the workbook name is enclosed in square brackets («[name]»). This is close to what we want, but there are still two tasks that remain:
- Remove the sheet name
- Remove the square brackets («[ ]»)
The best way to do this depends on what Excel version you have. If you have the latest version of Excel, you should use a formula based on the TEXTBEFORE function. Otherwise, you can use the LEFT and FIND functions as explained below.
TEXTBEFORE option
In the worksheet shown above, the formula in E5 is:
=SUBSTITUTE(TEXTBEFORE(CELL("filename",A1),"]"),"[","")This is an example of nesting. The CELL function is nested inside the TEXTBEFORE function, which is nested inside the SUBSTITUTE function. Working from the inside out:
- The CELL function returns the full path as a text string, as explained above.
- The TEXTBEFORE function returns all text before the closing square bracket («]»).
- The SUBSTITUTE function replaces the opening square bracket («[«) with an empty string («»).
The final result is a path to the workbook like this:
C:pathtofolderworkbook.xlsxLegacy Excel
In older versions of Excel without the TEXTBEFORE function, you can use a formula based on LEFT, CELL, FIND, and SUBSTITUTE:
=SUBSTITUTE(LEFT(CELL("filename",A1),FIND("]",CELL("filename",A1))-1),"[","")
At a high level, this formula works in 4 steps:
- Get the full path and filename
- Locate the closing square bracket («]»)
- Remove sheet name and «]»
- Remove the opening square bracket («]»)
Note: the CELL function is called twice in the formula because we need the path twice, once for the FIND function to locate the «]», and once for the SUBSTITUTE function to remove the «]». CELL is a volatile function and can cause performance problems in larger or more complicated worksheets.
Get path and filename
To get the path and file name, we use the CELL function like this:
CELL("filename",A1) // get path and filename
The info_type argument is «filename» and reference is A1. The cell reference is arbitrary and can be any cell in the worksheet. The result is a full path like this as text:
C:examples[workbook.xlsx]Sheet1Note the sheet name(«Sheet1») appears at the end.
Locate the closing square bracket
The location of the closing square bracket («]») is calculated like this
FIND("]",CELL("filename",A1))-1 // returns 26
The FIND function returns the location of «]» (27) from which 1 is subtracted to get 26. We subtract 1 because we want to remove text starting with the «]» that follows the filename.
Remove sheet name
In the previous step, we located the «]» at character 27, then stepped back to 26. This number is returned directly to the LEFT function as the num_chars argument. The text argument is again provided by the CELL function:
LEFT("C:examples[workbook.xlsx]Sheet1",26)
The LEFT function returns the first 26 characters of text.
C:examples[workbook.xlsx
At this point, LEFT has removed the sheet name, but notice the opening square bracket «[» remains.
Remove opening square bracket
The result from LEFT is returned to the SUBSTITUTE function as the text argument:
=SUBSTITUTE("C:examples[workbook.xlsx","[","")
SUBSTITUTE is configured to remove the opening square bracket by setting old_text to «[» and new_text to an empty string («»). The final result returned by SUBSTITUTE is:
C:examplesworkbook.xlsx