
This post provides an in-depth guide to the VBA Userform starting from scratch.
The table of contents below shows the areas of the VBA UserForm that are covered and the section after this provides a quick guide so you can refer back to the UserForm code easily.
“The system should treat all user input as sacred.” – Jef Raskin
A Quick Guide to the VBA UserForm
The following table provides a quick guide to the most common features of the UserForm
| Function | Examples |
|---|---|
| Declare and create | Dim form As New userformCars |
| Declare and create | Dim form As userformCars Set form = New userformCars |
| Show as modal | form.Show OR form.Show vbModal |
| Show as non modal | form.Show vbModeless |
| Unload | Private Sub buttonCancel_Click() Unload Me End Sub |
| Hide | Private Sub buttonCancel_Click() Hide End Sub |
| Getset the title | form.Caption = «Car Details» |
The Webinar
If you are a member of the website, click on the image below to view the webinar for this post.
(Note: Website members have access to the full webinar archive.)

Introduction
The VBA UserForm is a very useful tool. It provides a practical way for your application to get information from the user.
If you are new to UserForms you may be overwhelmed by the amount of information about them. As with most topics in VBA, 90% of the time you will only need 10% of the functionality.
In these two blog posts(part 2 is here) I will show you how to quickly and easily add a UserForm to your application.
This first post covers creating the VBA Userform and using it as modal or modeless. I will also show you how to easily pass the users selection back to the calling procedure.
In the second part of this post I will cover the main controls such as the ListBox, the ComboBox(also called the Dropdown menu), the TextBox and the CheckBox. This post will contain a ton of examples showing how to use each of these controls.
Related Articles
VBA Message Box
VBA UserForm Controls
Download the Code
What is the VBA Userform?
The VBA UserForm is a dialog which allows your application to get input from the user. UserForms are used throughout all Windows applications. Excel itself has a large number of UserForms such as the Format Cells UserForm shown in the screenshot below.

Excel’s “Format cells” UserForm
UserForms contain different types of controls such as Buttons, ListBoxes, ComboBoxes(Dropdown lists), CheckBoxes and TextBoxes.
In the Format Cells screenshot above you can see examples of these controls:
- Font, Font style and Size contain a textbox with a ListBox below it
- Underline and Color use a Combobox
- Effects uses three CheckBoxes
- Ok and Cancel are command Buttons
There are other controls but these are the ones you will use most of the time.
The Built-in VBA Userforms
It is important to note that VBA has some useful built-in UserForms. These can be very useful and may save you having to create a custom one. Let’s start by having a look at the MsgBox.
VBA MsgBox
The VBA message box allows you to display a dialog to the user. You can choose from a collection of buttons such as Yes, No, Ok and Cancel.

You can easily find out which of these buttons the user clicked on and use the results in your code.
The following code shows two simple examples of using a message box
' https://excelmacromastery.com/
Sub BasicMessage()

    ' Basic message
    MsgBox "There is no data on this worksheet "
    ' Basic message with "Error" as title
    MsgBox "There is no data on this worksheet ", , "Error"

End Sub
In the next example, we ask the user to click Yes or No and print a message displaying which button was clicked
' https://excelmacromastery.com/
Sub MessagesYesNoWithResponse()

    ' Display Yes/No buttons and get response
    If MsgBox("Do you wish to continue? ", vbYesNo) = vbYes Then
        Debug.Print "The user clicked Yes"
    Else
        Debug.Print "The user clicked No"
    End If

End Sub
In the final example we ask the user to click Yes, No or Cancel
' https://excelmacromastery.com/
Sub MessagesYesNoCancel()

    ' Display Yes/No buttons and get response
    Dim vbResult As VbMsgBoxResult

    vbResult = MsgBox("Do you wish to continue? ", vbYesNoCancel)

    If vbResult = vbYes Then
        Debug.Print "The user clicked Yes"
    ElseIf vbResult = vbNo Then
        Debug.Print "The user clicked No"
    Else
        Debug.Print "The user clicked Cancel"
    End If

End Sub
You can see all the MsgBox options here.
InputBox
If you want to get a single piece of text or value from the user you can use the InputBox. The following code asks the user for a name and writes it to the Immediate Window(Ctrl + G):
' Description: Gets a value from the InputBox
' The result is written to the Immediate Window(Ctrl + G)
' https://excelmacromastery.com/vba-userform/
Sub GetValue()

    Dim sValue As String
    sValue = Application.InputBox("Please enter your name", "Name Entry")

    ' Print to the Immediate Window
    Debug.Print sValue

End Sub
You can add validation to the InputBox function using the Type parameter:
' https://excelmacromastery.com/
Public Sub InputBoxTypes()

    With Application
        Debug.Print .InputBox("Formula", Type:=0)
        Debug.Print .InputBox("Number", Type:=1)
        Debug.Print .InputBox("Text", Type:=2)
        Debug.Print .InputBox("Boolean", Type:=4)
        Debug.Print .InputBox("Range", Type:=8)
        Debug.Print .InputBox("Error Value", Type:=16)
        Debug.Print .InputBox("Array", Type:=64)
    End With

End Sub
You can download the workbook with all the code examples from the top of this post.
GetOpenFilename
We can use the Windows file dialog to allow the user to select a file or multiple files.
The first example allows the user to select a file
' Print the name of the selected file
sfile = Application.GetOpenFilename("Excel Files (*.xlsx),*.xlsx")
Debug.Print sfile
The following example allows the user to select multiple files
' https://excelmacromastery.com/
Sub GetMultipleFiles()

    Dim arr As Variant
    arr = Application.GetOpenFilename("Text Files(*.txt),*.txt" _
        , MultiSelect:=True)

    ' Print all the selected filenames to the Immediate window
    Dim filename As Variant
    For Each filename In arr
        Debug.Print filename
    Next

End Sub
Note: If you need more flexibility then you can use the File Dialog. This allows you to use the “Save as” file dialog, select folders and so on.
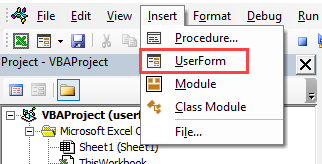
How to Create a VBA UserForm
If the built-in UserForms do not cover your needs then you will need to create your own custom Userform. To use a UserForm in our code we must first create one. We then add the necessary controls to this Userform.
We create a UserForm with the following steps
- Open the Visual Basic Editor(Alt + F11 from Excel)
- Go to the Project Window which is normally on the left(select View->Project Explorer if it’s not visible)
- Right-click on the workbook you wish to use
- Select Insert and then UserForm(see screenshot below)

Creating a Userform
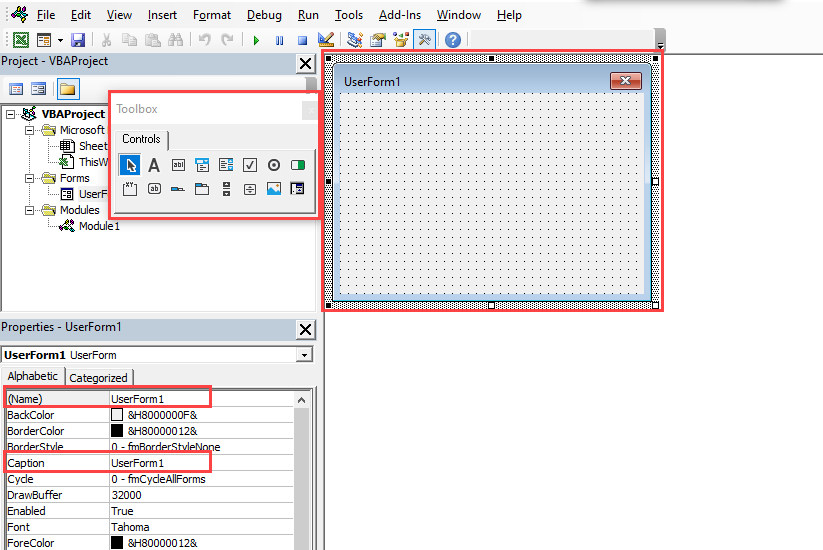
A newly created UserForm will appear. Anytime you want to access this Userform you can double click on the UserForm name in the Project window.
The Toolbox dialog should also be visible. If it’s not visible select View->Toolbox from the menu. We use the toolbox too add controls to our UserForm.

The UserForm Toolbox
Designing the VBA UserForm
To view the design of the UserForm, double click on it in the Project window. There are three important windows we use when creating our UserForms.
- The UserForm
- The properties window – this is where we can change the setting of the Userform and its controls
- The toolbox – we use this to add new controls to our UserForm

UserForm Windows
A Very Simple VBA UserForm Example
Let’s have a look at a very simple UserForm example.
You can download this and all the code examples from the top of this post.
- Create a new UserForm
- Rename it to userformTest in the (Name) property in the properties window
- Create a new module(Right-click on properties window and select Insert->Module)
- Copy the DislayUserForm sub below to the module
- Run the sub using Run->Run UserForm Sub from the menu
- The UserForm will be displayed – you have created your first UserForm application!
- Click on the X in the top right of the UserForm to close
' https://excelmacromastery.com/
Sub DisplayUserForm()

    Dim form As New UserFormTest
    form.Show

End Sub
Setting the Properties of the UserForm
We can change the attributes of the UserForm using the properties window. Select View->Properties Window if the window is not visible.
When we click on the UserForm or a control on a UserForm then the Properties window displays the attributes of that item.

VBA Properties Window
Generally speaking, you only use a few of these properties. The important ones for the UserForm are Name and Caption.
To change the name of the UserForm do the following
- Click on the UserForm in the Project window or click on the UserForm itself
- Click in the name field of the properties window
- Type in the new name
The Controls of the VBA UserForm
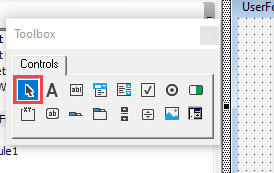
We add controls to the UserForms to allow the user to make selections, enter text or click a button. To add a control use the steps below
- Go to the toolbox dialog – if not visible select View->Toolbox
- Click on the control you want to add – the button for this control will appear flat
- Put the cursor over the UserForm
- Hold down the left mouse button and drag until the size you want
The following table shows a list of the common controls
| Control | Description |
|---|---|
| CheckBox | Turn item on/off |
| ComboBox | Allows selection from a list of items |
| CommandButton | Click to perform action |
| Label | Displays text |
| ListBox | Allows selection from a list of items |
| Textbox | Allows text entry |
Adding Code to the VBA UserForm
To view the code of the UserForm
- Right-click on the UserForm in the properties windows(or the UserForm itself) and select “View Code”
- You will see a sub called UserForm_Click. You can delete this when you create your first sub
Note: If you double click on a control it will bring you to the click event of that control. This can be a quicker way to get to the UserForm code.
Adding Events to the VBA UserForm
When we use a UserForm we are dealing with events. What this means is that we want to perform actions when events occur. An event occurs when the users clicks a button, changes text, selects an item in a ComboBox, etc. We add a Sub for a particular event and place our code in it. When the event occurs our code will run.
One common event is the Initialize event which occurs when the UserForm is created at run time. We normally use this event to fill our controls with any necessary data. We will look at this event in the section below.

To add an event we use the ComboBoxes over the code window(see screenshot above). The left one is used to select the control and the right one is used to select the event. When we select the event it will automatically add this sub to our UserForm module.
Note: Clicking on any control on the UserForm will create the click event for that control.
The Initialize Event of the VBA UserForm
The first thing we want to do with a UserForm is to fill the controls with values. For example, if we have a list of countries for the user to select from we could use this.
To do this we use the Initialize event. This is a sub that runs when the UserForm is created(see next section for more info).
To create the Initialize event we do the following
- Right-click on the UserForm and select View Code from the menu.
- In the Dropdown list on the left above the main Window, select UserForm.
- This will create the UserForm_Click event. You can ignore this.
- In the Dropdown list on the right above the main Window, select Initialize.
- Optional: Delete the UserForm_Click sub created in step 2.

Adding the Initialize Event
We can also create the Initialize event by copying or typing the following code
Private Sub UserForm_Initialize()

End Sub
Once we have the Initialize event created we can use it to add the starting values to our controls. We will see more about this in the second part of this post.
Initialize versus Activate
The UserForm also has an Activate event. It is important to understand the difference between this and the Initialize event.
The Initialize event occurs when the actual object is created. This means as soon as you use on of the properties or functions of the UserForm. The code example below demonstrates this
Dim frm As New UserForm1

' Initialize will run as UserForm is created
' the first time we use it
frm.BackColor = rgbBlue

frm.Show
We normally reference the UserForm first by calling Show which makes it seem that displaying the UserForm is triggering the Initialize event. This is why there is often confusion over this event.
In the example below calling Show is the first time we use the UserForm. Therefore it is created at this time and the Initialize event is triggered.
Dim frm As New UserForm1

' Initialize will run here as the Show is the
' first time we use the UserForm
frm.Show
The Activate event occurs when the UserForm is displayed. This can happen using Show. It also occurs any time the UserForm is displayed. For example, if we switch to a different window and then switch back to the UserForm then the Activate event will be triggered.
We create the Activate event the same way we create the Initialize event or we can just copy or type the following code
Private Sub UserForm_Activate()

End Sub
- Initialize occurs when the Userform is created. Activate occurs when the UserForm is displayed.
- For each UserForm you use – Initialize occurs only once, Activate occurs one or more times.
Calling the VBA UserForm
We can use the VBA UserForm in two ways
- Modal
- Modeless
Let’s look at each of these in turn.
Modal Userform
Modal means the user cannot interact with the parent application while this is visible. The excel Format cells dialog we looked at earlier is a modal UserForm. So are the Excel Colors and Name Manager dialogs.
We use modal when we don’t want the user to interact with any other part of the application until they are finished with the UserForm.
Modeless Userform
Modeless means the user can interact with other parts of the application while they are visible. An example of modeless forms in Excel is the Find dialog(Ctrl + F).
You may notice that any Excel dialog that allows the user to select a range has a limited type of Modeless – the user can select a range of cells but cannot do much else.
Modal versus Modeless
The actual code to make a UserForm modal or modeless is very simple. We determine which type we are using when we show the UserForm as the code below demonstrates
Dim frm As New UserFormFruit

' Show as modal - code waits here until UserForm is closed
frm.Show vbModal

' Show as modeless - code does not wait
frm.Show vbModeless

' default is modal
frm.Show
As the comments above indicate, the code behaves differently for Modal and Modeless. For the former, it waits for the UserForm to close and for the latter, it continues on.
Even though we can display any UserForm as modal or modeless we normally use it in one way only. This is because how we use them is different
Typical use of a Modal form
With a Modal UserForm we normally have an Ok and a Cancel button.

The Ok button normally closes the UserForm and performs the main action. This could be saving the user inputs or passing them back to the procedure.
The Cancel button normally closes the UserForm and cancels any action that may have taken place. Any changes the user made on the UserForm are ignored.
Typical use of a Modeless form
With a Modeless UserForm we normally have a close button and an action button e.g. the Find button on the Excel Find Dialog.
When the action button is clicked an action takes place but the dialog remains open.
The Close button is used to close the dialog. It normally doesn’t do anything else.
A VBA UserForm Modal Example
We are going to create a Modal UserForm example. It is very simple so you can see clearly how to use a UserForm.
You can download this and all the code examples from the top of this post.
The following UserForm allows the user to enter the name of a fruit:

We use the following code to show this UserForm and to retrieve the contents of the fruit textbox:
' PROCEDURE CODE
' https://excelmacromastery.com/
Sub UseModal()

    ' Create and show form
    Dim frm As New UserFormFruit

    ' Display Userform - The code in this procedure
    ' will wait here until the form is closed
    frm.Show

    ' Display the returned value
    MsgBox "The user has selected " & frm.Fruit

    ' Close the form
    Unload frm
    Set frm = Nothing

End Sub

' USERFORM CODE
' Returns the textbox value to the calling procedure
Public Property Get Fruit() As String
    Fruit = textboxFruit.Value
End Property

' Hide the UserForm when the user click Ok
Private Sub buttonOk_Click()
    Hide
End Sub
What you will notice is that we hide the UserForm when the user clicks Ok. We don’t set it to Nothing or unload it until after we are finished retrieving the user input. If we Unload the UserForm when the user clicks Ok then it no longers exists so we cannot access the values we want.
Using UserForm_QueryClose to Cancel the UserForm
We always want to give the user the option to cancel the UserForm. Once it is canceled we want to ignore any selections the user made.
Each form comes with an X in the top right-hand corner which allows the user to cancel it:

The X button on the UserForm
This button cancels the UserForm automatically – no code is necessary. When the user clicks X the UserForm is unloaded from memory. That is, it no longer exists so we will get an error if we try to access it. The code below will give an error if the user clicks on the X
' https://excelmacromastery.com/
Sub DisplayFruit()

    Dim frm As New UserFormFruit
    frm.Show

    ' ERROR HERE - If user clicks the X button
    Debug.Print frm.Fruit

End Sub

To avoid this error we want to prevent the UserForm from being Unloaded when the X button is clicked. To do this we use the QueryClose event.
We create a variable first at the top of the UserForm code module. We also add a property so that we can read the variable when we need to retrieve the value:
Private m_Cancelled As Boolean

Public Property Get Cancelled() As Variant
    Cancelled = m_Cancelled
End Property
Then we add the UserForm_QueryClose event to the UserForm module:
' https://excelmacromastery.com/
Private Sub UserForm_QueryClose(Cancel As Integer _
                                       , CloseMode As Integer)

    ' Prevent the form being unloaded
    If CloseMode = vbFormControlMenu Then Cancel = True

    ' Hide the Userform and set cancelled to true
    Hide
    m_Cancelled = True

End Sub
In the first line, we prevent the UserForm from being unloaded. With the next lines, we hide the UserForm and set the m_Cancelled variable to true. We will use this variable later to check if the UserForm was canceled:
We can then update our calling procedure to check if the UserForm was canceled
' PROCEDURE CODE
' https://excelmacromastery.com/
Sub DisplayFruit()

    Dim frm As New UserFormFruit
    frm.Show

    If frm.Cancelled = False Then
        MsgBox "You entered: " & frm.Fruit
    Else
        MsgBox "The UserForm was cancelled."
    End If

End Sub
If we want to add a Cancel button it is simple to do. All we need to do is Hide the form and set the variable m_Cancelled to true. This is the same as we did in the QueryClose Event above:
' https://excelmacromastery.com/vba-userform/
Private Sub buttonCancel_Click()
    ' Hide the Userform and set cancelled to true
    Hide
    m_Cancelled = True
End Sub

Using the Escape key to cancel
If you want to allow the user to cancel using the Esc it is simple(but not obvious) to do. You set the Cancel property of your ‘Cancel’ button to True. When Esc is pressed the click event of your Cancel button will be used.

Putting All the Modal Code Together
The final code for a Modal form looks like this:
' USERFORM CODE
' https://excelmacromastery.com/
Private m_Cancelled As Boolean

' Returns the cancelled value to the calling procedure
Public Property Get Cancelled() As Boolean
    Cancelled = m_Cancelled
End Property

' Returns the textbox value to the calling procedure
Public Property Get Fruit() As String
    Fruit = textboxFruit.Value
End Property

Private Sub buttonCancel_Click()
    ' Hide the Userform and set cancelled to true
    Hide
    m_Cancelled = True
End Sub

' Hide the UserForm when the user click Ok
Private Sub buttonOk_Click()
    Hide
End Sub

' Handle user clicking on the X button
Private Sub UserForm_QueryClose(Cancel As Integer _
                                  , CloseMode As Integer)

    ' Prevent the form being unloaded
    If CloseMode = vbFormControlMenu Then Cancel = True

    ' Hide the Userform and set cancelled to true
    Hide
    m_Cancelled = True

End Sub

' PROCEDURE CODE
' https://excelmacromastery.com/
Sub DisplayFruit()

    ' Create the UserForm
    Dim frm As New UserFormFruit

    ' Display the UserForm
    frm.Show

    ' Check if the user cancelled the UserForm
    If frm.Cancelled = True Then
        MsgBox "The UserForm was cancelled."
    Else
        MsgBox "You entered: " & frm.Fruit
    End If

    ' Clean up
    Unload frm
    Set frm = Nothing

End Sub
&nbps;
You can use this code as a framework for any Modal UserForm that you create.
VBA Minimize UserForm Error
We are now going to use a simple example to show how to use a Modeless VBA UserForm. In this example, we will add a customer name to a worksheet each time the user clicks on the Add Customer button.
You can download this and all the code examples from the top of this post.

The code below displays the UserForm in Modeless mode. The problem with this code is that if you minimize Excel the UserForm may not be visible when you restore it:
' PROCEDURE CODE
' https://excelmacromastery.com/
Sub UseModeless()

    Dim frm As New UserFormCustomer
    ' Unlike the modal state the code will NOT
    ' wait here until the form is closed
    frm.Show vbModeless

End Sub
The code below solves the problem above. When you display a Userform using this code it will remain visible when you minimize and restore Excel:
' https://excelmacromastery.com/
Sub UseModelessCorrect()

    Dim frm As Object
    Set frm = VBA.UserForms.Add("UserFormCustomer")

    frm.Show vbModeless

End Sub
An important thing to keep in mind here is that after the frm.Show line, the code will continue on. This is different to Modal where the code waits at this line for the UserForm to be closed or hidden.
When the Add button is clicked the action occurs immediately. We add the customer name to a new row in our worksheet. We can add as many names as we like. The UserForm will remain visible until we click on the Close button.
The following is the UserForm code for the customer example:
' USERFORM CODE
' https://excelmacromastery.com/
Private Sub buttonAdd_Click()
    InsertRow
End Sub

Private Sub buttonClose_Click()
    Unload Me
End Sub

Private Sub InsertRow()

    With Sheet1

        ' Get the current row
        Dim curRow As Long
        If .Range("A1") = "" Then
            curRow = 1
        Else
            curRow = .Range("A" & .Rows.Count).End(xlUp).Row + 1
        End If

        ' Add item
        .Cells(curRow, 1) = textboxFirstname.Value
        .Cells(curRow, 2) = textboxSurname.Value

    End With

End Sub
Part 2 of this post
You can find the second part of this post here.
What’s Next?
Free VBA Tutorial If you are new to VBA or you want to sharpen your existing VBA skills then why not try out the The Ultimate VBA Tutorial.
Related Training: Get full access to the Excel VBA training webinars and all the tutorials.
(NOTE: Planning to build or manage a VBA Application? Learn how to build 10 Excel VBA applications from scratch.)
In this Article
- VBA UserForms
- Built in VBA UserForms
- Message Box
- Input Box
- Get Open Filename
- Excel Default Dialogs
- Inserting a New User Form
- Using the Toolbox
- Adding an Exit Button to Your Form
- Adding a Label Control to a Form
- Adding a Text Control to the Form
- Initialize and Activate Events on a Form
- Saving Your Application and Forms
- Modal and Non-Modal Forms
- Closing a Form
- Enabling and Disabling Controls
This tutorial will discuss VBA UserForms.
VBA UserForms
The Userform is a very important part of programming in VBA. It allows you to build a professional looking user interface to communicate with the users of your VBA application. It also allows you to totally control the user in what they are doing to your workbook.
You can, of course, use worksheet cells to accept parameters from the user, but the userform produces a far better user experience.
By expanding the height and width of your userform to the size of the Excel window, you can make your application look like a normal Windows application, with the user being totally unaware that they are using Excel as the host.
All the normal Windows controls, such as drop downs, list boxes, tick boxes are available to you. You also have a huge range of methods, events and properties to use to enhance the user experience.
An important point is that when you display a userform that is built in or is modal, you cannot edit your code in the VBE nor access any Excel functionality. Only when the form is closed will the cursor appear in your code.
Built in VBA UserForms
Excel VBA as several built-in forms that can be used to communicate with the user.
Message Box
This is the most commonly used form in VBA. It simply displays a text message, possibly informing a user that they have entered invalid input or that a VBA process has finished running. In their simplest form, they display a text string, but you can also add an icon such as a question or exclamation mark, and give the message box a different title.
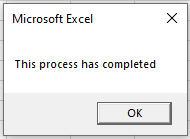
This is a basic example. There is only one button to click, and the title bar says ‘Microsoft Excel’
The code to produce this is very straightforward:
Sub TestMsgBox()
MsgBox "This process has completed"
End Sub
You can use different parameters to add buttons, icons, and change the title bar
Sub TestMsgBox()
Dim Ret As Variant
Ret = MsgBox("Are you sure?", vbYesNo Or vbQuestion, "My Application")
If Ret = vbYes Then
    'Your process here
Else
    Exit Sub
End If
End Sub
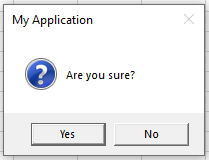
This code adds in a ‘Yes’ and ‘No’ button and a question mark icon, and sets the title bar. Note that you can combine the styles of the message box by using the ‘Or’ operator
Also, when you are returning a value from a message box, the return variable must be defined as a variant or vbMsgBoxResult, and the message box statement must use brackets,
Input Box
There is a very simple input box built into VBA, although it is quite restrictive in what you can do with it. If you can, it is better to design a custom userform
Sub TestInputBox()
Dim Ret As String
Ret = InputBox("Please enter your name", "Enter Name")
MsgBox Ret
End Sub
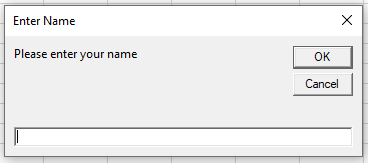
You can also add a default value for the input into the parameters.
Get Open Filename
This allows you to utilize the Windows file dialog within your VBA code. It looks very impressive to the user when it is running, but it is very simple to incorporate and you automatically get all the file dialog functionality with it.
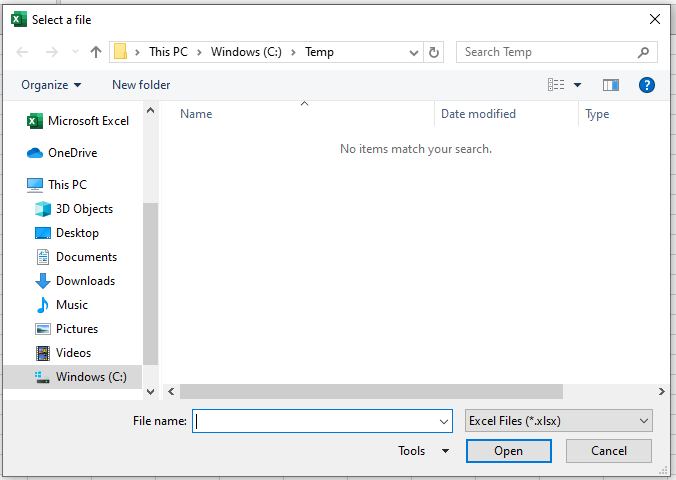
The code restricts the user to only see Excel files. Unfortunately, they could type in a non-Excel filename into the File name box, and click the open button, so you would need some code to ensure that an Excel file has been selected.
Use the ‘ChDir’ command to change the default directory to your own requirements before displaying the file dialog
Note the use of wildcards in the FileFilter parameter. The Excel files to display could be pre 2007, have macros, or be binary so the filter is ‘.xls*’.
Sub TestFileDialog()
Dim MyFile As String
ChDir "C:temp"
MyFile = Application.GetOpenFilename("Excel Files (*.xls*),*.xls*", , "Select a file")
MsgBox MyFile
End Sub
If required, you can allow the user to select several files at once by using the MultiSelect parameter. The default is False (single select only)
Sub TestFileDialog()
Dim MyFile As Variant
ChDir "C:temp"
MyFile = Application.GetOpenFilename("Excel Files (*.xls*),*.xls*", , "Select a file", , True)
For Each f In MyFile
    MsgBox f
Next f
End Sub
The user holds down the Shift key in the file dialog to select multiple files.
The For Each loop displays the full path and name of each file selected
Excel Default Dialogs
Within Excel VBA, there is a Dialogs collection which you can use to display any standard Excel dialog. The downside is that you cannot access the parameters that the user has chosen or change the appearance of the dialog, but these dialogs can be useful in directing the user to a standard Excel function, and allowing them to choose specific parameters within the dialog.
A good example of this is to display the ‘Print’ dialog from VBA:
Sub TestPrintDialog()
Application.Dialogs(xlDialogPrint).Show
End Sub
When you open the brackets in the Dialogs collection, you will see a list of a huge number of constants for built-in dialogs. It is worth experimenting with some of these options within your code
VBA Coding Made Easy
Stop searching for VBA code online. Learn more about AutoMacro — A VBA Code Builder that allows beginners to code procedures from scratch with minimal coding knowledge and with many time-saving features for all users!

Learn More
Inserting a New User Form
You can design your own custom user forms by inserting a userform into the Visual Basic Editor (VBE)
You do this by selecting Insert | UserForm on the VBE menu bar.
Click on ‘UserForm’ and a new blank form will appear ready for you to develop on
The actual form itself (shown as ‘UserForm1’) looks quite small, but you can use the handles around it to enlarge or make it even smaller by dragging the handles with your cursor.
There is a properties window in the bottom left-hand corner of the screen. As the focus is directly on the form itself, this contains all the properties for the form specific to that form.
Note that when you start adding controls such as combo boxes and command buttons, these controls all have their own set of properties, and they can be very different in what you can do with each of them.
The properties that you see currently only apply only to the form itself.
The ‘Name’ property is the name used to define your form object within the VBA code. You may want to use something more meaningful for the object name, so that when you are reviewing your code, it is obvious which form is being used.
The ‘Name’ property will also reflect through to the ‘Project Explorer’ window in the top left-hand corner of the screen
You will want to alter the title bar of your form to something different from ‘UserForm1’, and you can do this by typing in your new text at the ‘Caption’ property
You can make a huge number of changes to how your form is seen by the user. You can alter colours, add images e.g. a corporate logo, change the position using ‘Left’ and ‘Top’, change the size using ‘Height’ and ‘Width’, change the mouse pointer, and many more
All of these properties can also be changed programmatically for any control that you have added to your form. For example, a user may select from a list box control, and you may want to disable or hide other controls based on the user’s choice
Using the Toolbox
You will notice that when you click on the form itself, a toolbox pop-up appears. If you click anywhere else e.g. the properties pane, it will disappear, but re-appear when your click on the form.
The toolbox provides the real mechanics of the form design. This enables you to add the normal Windows controls that users are familiar with to your form.
You will have notice that on the form, there is a network of dots. This is a ‘snapgrid’ so that when you add a control to the form, it will automatically align the position to the rows and columns of dots. This helps enormously with aligning your controls so that your do not get a ragged appearance of the controls
Should you click on a control, and then decide not to use it, clicking on the ‘Arrow’ icon in the top-left corner of the toolbox will change your cursor back to normal.
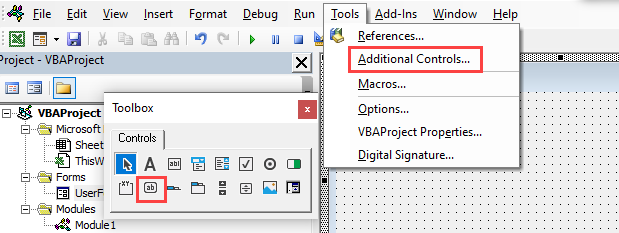
You can add additional controls to the toolbox by using Tools | Additional Controls on the VBE menu. There are a considerable number of these available, but depending on you Windows and Excel versions, they do not always work so some experimentation is often required.
Also, your users may not have access to some of these additional controls or be running older versions of Windows and Excel, which may cause problems. In large organizations, especially if they are global, there is no such thing as a standard build PC that you can rely on!
Adding an Exit Button to Your Form
A Command button is simple to add to the form. This looks the same way as buttons that you see in other Windows forms, usually as an ‘OK’ or ‘Cancel’ button.
Click on the Command Button icon in the toolbox. This is the second icon from the left on the bottom row of icons. See the image above. It has the letters ‘ab’ on it.
You can either hold your mouse button down and drag the control onto your form, or you can move the cursor to the form, where it will change to a ‘cross’ cursor and you can position and size your button
If you drag the control to the form, you will get the default sizing of the button. Moving the cursor to the form allows you to change the size of the button by dragging the ‘cross’ cursor across your form
Your form will now look like this:

The button will have default text as the caption, but you will want to change it to your own requirements. You can click on the text within the button (‘CommandButton1’) and this will allow you to edit the caption directly.
You can also change it in the properties window (bottom left-hand corner of screen). You will see a property called ‘Caption’ and you can edit the value for this. Change this to ‘Exit’
As with the form properties, the ‘Name’ property defines the name that will be used in your VBA code. You may want to use a name that is more meaningful and obvious within your code. You can enter this against the ‘Name’ property.
You can re-position the button by dragging it about on the form, and you can resize it by clicking on the button handles (white square boxes) and dragging the handles to make it larger or smaller
You can also re-size the button by changing the Height and Width values in the properties window
You can view your form in Excel by clicking on the green triangle in the VBE toolbar, or pressing F5

You can call your form from VBA code within a module by using the ‘Show’ method
Sub ShowForm()
UserForm1.Show
End Sub
Your user form is effectively a global object and can be called from anywhere within your code
Currently, your command button does nothing because there is no VBA code behind it. You have to write this yourself! All that can happen at the moment is that you can click on the ‘Close’ X in the top right-hand corner of your form.
To add VBA code, double click on the button on the form
This will take you to the normal VBA code window, and will show the default event of click.
You use the ‘Hide’ method to close the form, and you can also add in any other code, such as a message box to confirm to the user what has happened.
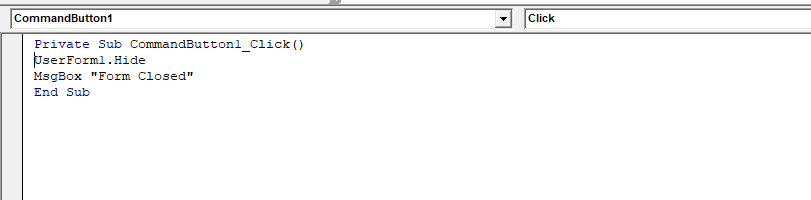
Note that the code window has two drop downs at the top. The first one allows you to select your form controls, and the second shows all the events that are available for you to add code. The obvious one for a button is the ‘Click’ event, but there are others such as ‘Double Click’ or ‘Mouse Move’
When you run your form now, the button actually does something. The form vanishes and a message box is displayed confirming that the form is closed
You can, of course, enlarge the exit code. You may wish to display another form, or take action on parameters that the user has entered on your form
VBA Programming | Code Generator does work for you!
Adding a Label Control to a Form
Label controls are for prompting the user as to what sort of data they need to input to a control on the form e.g. text box, drop down, etc. A label has no borders by default, but these can be added through the properties window if required.
As a control, they are read only to the user and are simply a way of putting text on the form, whether it is a bold heading, or an instruction of what to enter or choose.
To add a label, click on the ‘A’ icon in the toolbox (top row, second from left) and either double click on it or move your cursor to the form and select position and size.
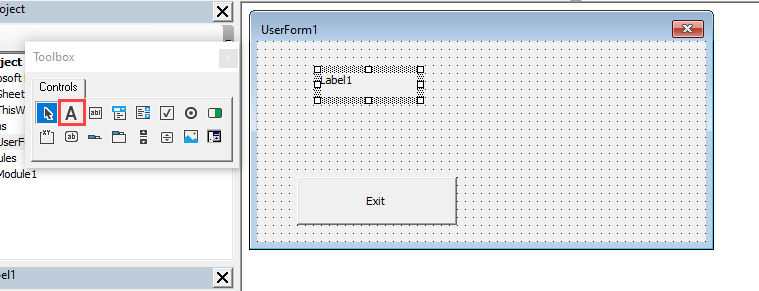
Using the ‘Caption’ property in the properties window, or clicking on the label control, you can enter the text for the label control.
Note that the text will wrap according to the size of the label control, and if the string of text is too long, it will not appear completely on the form, so you need to be careful of the sizing of the label control.
Using the properties window, you can change the appearance of the label control, with different colours, fonts, back style e.g. if it overlays an image and you want it to be transparent
No code needs to be created for a label control. The main purpose is to add text to the form so that the user can see how all the other controls work
Adding a Text Control to the Form
A text control is used to allow the user to input text e.g entering a name or comments
The text control is added from the toolbox by clicking on the text control icon (top row, third from left) and double clicking or dragging the control into position on your form.
The text control is often confused with the label control, but the text control is the one for user input
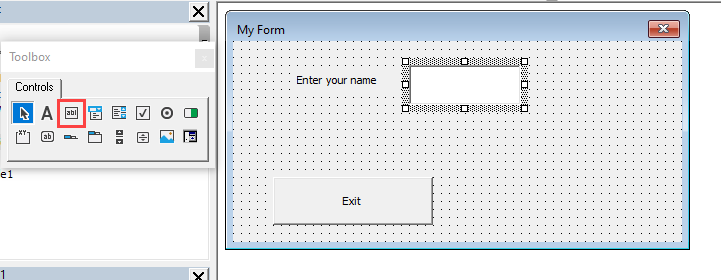
The ‘Enter your name’ text is a label control, as previously described, and we now have a white text box ready for the user to type something into
Using the properties window, you can change the colours, fonts, special effects, or use password characters for your text box. Enormous flexibility is available
One very important property for a text box is the ‘MultiLine’ property. If you want the user to enter a large amount of text into the text control e.g. comments, then the ‘MultiLine’ property must be set to True.
It is a default of False which means that however big you make your text box, the text entered will stay on one continuous line and will scroll out of the text box. It will not wrap around within the box.
There is no pop-up when you right click on your text box when it is running, but CTRL+V will work for Paste, and CTRL+C will work for Cut, should the user want to cut and paste text to and from other applications
Again, you have to write your own code to deal with text that the user has typed in. You may wish to transfer it to a cell in a worksheet
You can add this code into the ‘Change’ event for the text box
Private Sub TextBox1_Change()
Sheets("Sheet1").Range("A1").Value = TextBox1.Value
End Sub
You may also want to put some validation code in to check that the user is not entering rubbish which will have disastrous effects on your application
The change event is no good for this because it is called every time the user types in a new character. The user could start typing a string of text and instantly find that they have broken your validation rules before they have completed a valid text.
You use the ‘Exit’ event. This is triggered when the user moves the focus to another control on the form, which means that the user is no longer entering data.
Private Sub TextBox1_Exit(ByVal Cancel As MSForms.ReturnBoolean)
If IsNull(TextBox1.Value) Or Len(TextBox1.Value) < 4 Then
    MsgBox "Name is invalid", vbCritical
    TextBox1.SetFocus
End If
End Sub
When the user clicks on another control on the form, this code tests for either a null value in the text box, or less than 4 characters. If the test is true, then a message box with a critical icon appears to inform the user that the name is invalid, and the focus is moved back to the offending text box for the user to correct.
Note that even if the user clicks on the Exit button, the text box exit event will be performed first, so this prevents the user exiting without correcting the input
Initialize and Activate Events on a Form
When VBA first creates and builds a form it triggers an ‘Initialize’ event. However, because the form is also displayed at this point, it also triggers an ‘Activate’ event. From then onwards, every time the form appears using the ‘Show’ method or it appears as part of a hierarchy of forms, then the ‘Activate’ event is triggered, but not the ‘Initialize’ event
The ‘Initialize’ event only happens once, but the ‘Activate’ event can happen many times
On your form you may want to set up default values from the worksheet in the input controls e.g. text boxes, so that these appear on the first use of the form, but the user can overwrite the defaults and these new values will remain in place so long as the code is running
Private Sub UserForm_Initialize()
TextBox1.Value = Sheets("Sheet1").Range("A1").Value
If TextBox1.Value=”” Then
	TextBox1.Visible=False
Else
	TextBox1.Visible=True
End If
End Sub
You can find the ‘Initialize’ event in the second drop down in the code window, and the userform name in the first drop down.
This code will use the value at cell A1 on ‘Sheet1’ as the default value in the text box created earlier in this article. When the form appears for the first time, the default value will appear. The user can then overwrite the default value and this will be retained. If CellA1 is blank the text box will be hidden otherwise is will be visible
The default value could also be hard coded:
TextBox1.Value = “John Smith”You may also want to make sure that the values that the user has entered re-appear whenever the user fires up that form within that particular Excel session. VBA code can easily write the values back to cells within the workbook using the ‘Exit’ event on a control, and re-instate them using the ‘Activate’ event on the form
Private Sub TextBox1_Exit(ByVal Cancel as MSForms.ReturnBoolean)
Sheets("Sheet1").Range("A10").Value = TextBox1.Value
End Sub
Private Sub UserForm_Activate()
TextBox1.Value = Sheets("Sheet1").Range("A10").Value
End Sub
This code will make the user’s values persistent and also ensure that they are saved off with the rest of the workbook
Saving Your Application and Forms
When you save your Excel workbook containing your forms, all the forms and their VBA code get saved as well. However, any values that the forms hold whilst they are displayed will be lost.
It is important to write code so that when the user exits the workbook, or the form, the values are written back to cells within the workbook and so are preserved.
Modal and Non-Modal Forms
The form itself has a property ‘Show Modal’. This is set by default to True, but it can be changed to False (non-modal)
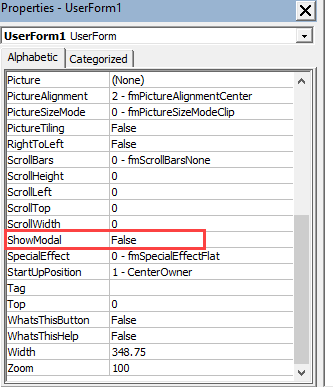
If a form is modal, it means that none of the Excel functionality can be accessed while the form is being displayed. This includes your code in the VBE window. You can view the code, but the cursor and keyboard are disabled.
In a non-modal form, you can access all the Excel functionality, including the VBE window, whilst the form is being displayed.
This is important from the point of view of controlling user behaviour
AutoMacro | Ultimate VBA Add-in | Click for Free Trial!
Closing a Form
However well you write your code to force the user down a certain route, they can easily circumvent it by clicking on the ‘Close’ X in the top right-hand corner of the form
You can prevent this happening by modifying the ‘QueryClose’ event of the form
Private Sub UserForm_QueryClose(Cancel As Integer, CloseMode As Integer)
Cancel = True
MsgBox "This action is disabled"
End Sub
The ‘QueryClose’ event is triggered when the user clicks the ‘Close’ X of the form. This code cancels the action, so the user is forced to use your ‘Exit’ button and the code that you have behind it.
Enabling and Disabling Controls
All controls on your form have a property called ‘Enabled’ which is set to True or False. If it is False, then the control is greyed out. It can be seen but cannot be used.
There is also a property called ‘Visible’ which again is set to True or False.
You can write code to either make a certain control unusable, or to make it totally invisible to the user. Using an ‘If’ statement, you can choose the circumstances when you need to do this
For example, you could disable the ‘Exit’ button initially, until the user has entered a value into the TextBox1 (name)
Private Sub UserForm_Initialize()
CommandButton1.Enabled = False
End Sub
Private Sub TextBox1_Change()
If Len(TextBox1.Value) > 0 Then
    CommandButton1.Enabled = True
Else
    CommandButton1.Enabled = False
End If
End Sub
This code uses the form ‘Initialize’ event to disable the exit button (Command Button 1) when the form first appears and then uses the ‘Change’ event on TextBox1 (name) to enable the Exit button if something has been typed in or disable it if the box is blank.
The ‘Change’ event is triggered every time a new character is typed in or deleted from the text box. If the user tries to enter text to make the button enabled, and then deletes all the text, the button will instantly be disabled

В настоящей заметке рассматриваются методы создания пользовательских форм и работы с ними.[1] Пользовательские диалоговые окна создаются на основе технологии пользовательских форм, к которым можно получить доступ из редактора Visual Basic (VBE; подробнее см. Настройка среды Visual Basic Editor).
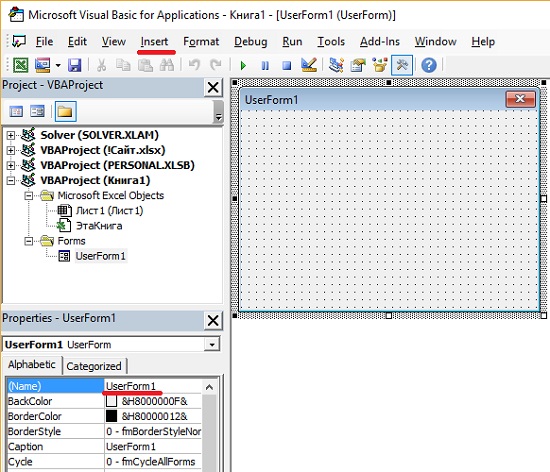
Рис. 1. Окно новой пустой формы UserForm
Скачать заметку в формате Word или pdf, примеры в формате архива
Стандартная последовательность шагов при этом следующая:
- Вставьте новую форму UserForm в проект VBAProject рабочей книги.
- Добавьте элементы управления в форму UserForm.
- Настройте свойства добавленных элементов управления.
- Создайте процедуры «обработчики событий» для элементов управления. Эти процедуры добавляются в модуль кода UserForm и выполняются при возникновении различных событий (например, при щелчке на кнопке).
- Разработайте процедуру, которая отображает форму UserForm. Эта процедура находится в модуле VBA (а не в модуле кода для формы UserForm).
- Определите простой способ вызова на выполнение процедуры, созданной в п. 5. Можно поместить кнопку на рабочий лист, команду ленты и т.д.
Рассмотрим эти шаги подробнее.
Вставка новой формы UserForm
Чтобы добавить в проект форму UserForm, запустите VBE (например, нажав в Excel клавиши <Alt+F11>), выберите рабочую книгу в окне Project и выполните команду Inserts –> UserForm). Формы UserForm получают такие имена, как UserForm1, UserForm2 и т.д. Можно переименовать форму, изменив свойство Name в окне Properties (см. рис. 1). Если это окно не отображается, нажмите в VBE клавишу <F4>. В рабочей книге может быть произвольное количество форм UserForm, а каждая форма включает единственное пользовательское диалоговое окно.
Добавление элементов управления в пользовательское диалоговое окно
Чтобы добавить элементы управления в форму UserForm, воспользуйтесь панелью Toolbox. Обратите внимание, что в VBE отсутствуют команды меню, предназначенные для добавления элементов управления. Если панель Toolbox не отображена на экране, пройдите по меню View –> Toolbox (рис. 2).

Рис. 2. Окно Toolbox для добавления элементов управления в пользовательскую форму
Щелкните на той кнопке в панели Toolbox, которая соответствует добавляемому элементу управления. После этого щелкните внутри диалогового окна для создания элемента управления (используется размер элемента по умолчанию). Также можно щелкнуть на элементе управления и, перетащив его границы в диалоговом окне, задать необходимый размер в пользовательском диалоговом окне. Добавленному элементу управления назначается имя, которое состоит из названия типа элемента управления и числового кода. Рекомендуется их переименовать, чтобы в коде VBA было понятно, с чем вы имеете дело. Согласитесь, что РrоductListBox звучит лучше, чем ListBox1.
Элементы управления в окне Toolbox
Форма UserForm, которая показана на рис. 3, размещена в файле all userform controls.xlsm.

Рис. 3. Эта форма UserForm содержит 15 элементов управления
Элемент управления CheckBox (6) предоставляет пользователю возможность выбрать один из двух вариантов: включить или выключить. Если галочка установлена, то CheckBox имеет значение True, в противном случае – False.
ComboBox (4) подобен объекту ListBox (5). Отличие заключается в том, что ComboBox представляет раскрывающийся список, в котором в определенный момент времени отображается только одно значение. Кроме того, пользователю в поле списка разрешено вводить значение, которое необязательно представляет одну из опций объекта ComboBox.
Каждое создаваемое диалоговое окно будет иметь как минимум один элемент управления CommandButton (10). Обычно используются кнопки ОК и Отмена.
Элемент управления Frame (9) применяется в качестве оболочки для других элементов управления. Он добавляется в диалоговое окно либо в целях эстетики, либо из соображений логического группирования однотипных элементов управления. Элемент управления Frame требуется в случае, если в диалоговом окне содержится более одного набора элементов управления OptionButton.
Элемент управления Image (15) используется для представления графического изображения, которое сохранено в отдельном файле или вставляется из буфера обмена. Графическое изображение сохраняется вместе с рабочей книгой. Таким образом, вместе с рабочей книгой передавать другому пользователю копию графического файла необязательно. Некоторые графические файлы занимают много места, поэтому их включение в рабочую книгу приведет к радикальному увеличению ее размера.
Элемент управления Label (2) отображает текст в диалоговом окне.
Элемент управления ListBox (5) предоставляет список опций, из которого пользователь может выбрать один вариант (или несколько). Вы вправе указать диапазон на листе, который содержит элементы списка. Этот диапазон может состоять из нескольких столбцов. Кроме того, элемент управления ListBox может заполняться с помощью кода VBA.
Элемент управления MultiPage (12) позволяет создавать диалоговые окна с несколькими вкладками, которые подобны появляющимся после выбора команды Формат ячеек. По умолчанию элемент управления MultiPage состоит из двух вкладок.
Элемент управления OptionButton (7) применяется при выборе пользователем одного варианта из нескольких. Эти элементы управления всегда группируются в диалоговом окне в наборы, содержащие не менее двух опций. Когда один элемент управления OptionButton выбран, все остальные элементы управления OptionButton текущей группы автоматически становятся неактивными. Если в пользовательском диалоговом окне содержится более одного набора элементов управления OptionButton, то каждый из таких наборов должен иметь собственное значение свойства GroupName. В противном случае все элементы управления OptionButton в диалоговом окне рассматриваются как члены одной группы. Также можно вставить элементы управления OptionButton в объект Frame, что приведет к их автоматическому группированию.
Элемент управления RefEdit (16) используется тогда, когда пользователь должен выделить диапазон ячеек на листе.
Элемент управления ScrollBar (13) в некотором смысле подобен элементу управления SpinButton. Разница заключается в том, что пользователь может перетаскивать ползунок объекта ScrollBar для изменения значения с большим приращением. Элемент управления ScrollBar рекомендуется использовать при выборе значения из большого диапазона.
Элемент управления SpinButton (14) позволяет выбрать значение после щелчка на одной из двух кнопок со стрелками. Одна из них применяется для увеличения значения, а вторая — для уменьшения. Элемент управления SpinButton часто используется совместно с элементами управления TextBox и Label, которые содержат текущее значение элемента управления SpinButton.
Элемент управления TabStrip (11) подобен элементу управления MultiPage, однако использовать его сложнее. Элемент управления TabStrip, в отличие от MultiPage, не выступает контейнером для других объектов. Как правило, элемент управления MultiPage обладает более широкими возможностями.
Элемент управления TextBox (3) позволяет пользователям вводить текст в диалоговом окне.
Элемент управления ToggleButton (8) имеет два состояния: включен и выключен. Щелчок на кнопке приводит к изменению состояния на противоположное и к изменению внешнего вида кнопки. Этот элемент управления может иметь значение True (активен) или False (неактивен). Он не относится к «стандартным» элементам управления, поэтому использование двух элементов управления OptionButton или одного CheckBox может оказаться более удачным вариантом.
Использование элементов управления на рабочем листе
Элементы управления пользовательскими диалоговыми окнами могут встраиваться в рабочий лист (без использования UserForm). Доступ к элементам управления можно получить, пройдя в Excel Разработчик –> Элементы управления –> Вставить. Для использования подобных элементов в составе рабочего листа требуется гораздо меньше усилий, чем для создания пользовательского диалогового окна. Кроме того, в данном случае можно не создавать макросы, поскольку элемент управления можно связать с ячейкой рабочего листа.
Например, если на рабочий лист вставить элемент управления CheckBox, его можно связать с нужной ячейкой, задав свойство LinkedCell. Если флажок установлен, в связанной ячейке отображается значение ИСТИНА. Если же флажок сброшен, то в связанной ячейке отображается значение ЛОЖЬ. Например, на рис. 4 переключатель «Фикс. Ставка 20%» связан с ячейкой Н15. Рисунок отображает рабочий лист, содержащий некоторые элементы управления ActiveX (см. файл activex worksheet controls.xlsx). Книга включает связанные ячейки и не содержит макросов.

Рис. 4. Элементы управления ActiveX без макросов
Элементы управления на рабочем листе могут происходить из двух источников:
- Элементы управления формами. Эти элементы управления являются внедряемыми объектами.
- Элементы управления ActiveX. Эти элементы управления являются подмножеством элементов, доступных в пользовательских диалоговых окнах.
Эти элементы управления работают не одинаково. После добавления элемента управления ActiveX в рабочий лист Excel переходит в режим конструктора. В этом режиме можно настраивать свойства любого элемента управления рабочего листа, добавлять или изменять процедуры обработки событий для элемента управления, а также изменять его размер или положение. Для отображения окна свойств элемента управления ActiveX воспользуйтесь командой Разработчик –> Элементы управления –> Свойства.
Для создания простых кнопок можно использовать элемент управления Button (Кнопка), который находится на панели инструментов Формы (Form). В этом случае обеспечивается возможность запуска макроса. Если же воспользоваться элементом управления CommandButton, который относится к группе элементов управления ActiveX, то после щелчка на нем вызывается связанная процедура обработки событий (например, CommandButton1_Click), которая находится в модуле кода объекта Лист (Sheet). Связать макрос с этой процедурой нельзя.
Если Excel находится в режиме конструктора, тестирование элементов управления невозможно. В этом случае нужно выйти из режима конструктора, щелкнув на кнопке Разработчик –> Элементы управления –> Режим конструктора. Эта кнопка работает, как переключатель.
Настройка элементов управления пользовательского диалогового окна
Продолжим описание использования элементов управления в UserForm. После того, как элементов управления помещен в диалоговое окно, его можно переместить и изменить размер. Можно выделить несколько элементов управления. Для этого следует удерживать нажатой клавишу <Shift> и щелкать на объектах либо обвести указателем мыши необходимые элементы управления.
В форме UserForm содержатся вертикальные и горизонтальные направляющие, которые помогают выровнять добавленные в диалоговое окно элементы управления. При добавлении или перемещении элемент управления привязывается к направляющим, что облегчает упорядочение таких элементов в окне. Если вы не используете направляющие, можете их отключить, выбрав в VBE команду Tools –> Options. В диалоговом окне Options перейдите на вкладку General и выберите соответствующие параметры в разделе Form Grid Settings.
Меню Format окна VBE предоставляет несколько команд, которые позволяют точно разместить и выровнять элементы управления в диалоговом окне. Перед использованием этих команд необходимо указать элементы управления, к которым они будут применяться (рис. 5).

Рис. 5. Выравнивание элементов в форме UserForm
Если выделено несколько элементов управления, на выделяющей рамке одного из них (обычно последнего) вместо обычных черных маркеров появляются белые. Это означает, что этот элемент управления играет роль основы, на базе которой определяются размеры и расположение других элементов управления.
Изменение свойств элементов управления
Каждый элемент управления характеризуется набором параметров, которые определяют внешний вид и поведение элемента управления. Свойства элемента управления можно изменять в следующих случаях:
- В момент проектирования при разработке пользовательского диалогового окна. Для этого используется окно Properties.
- В процессе выполнения, когда пользовательское диалоговое окно отображается на экране. Для этого воспользуйтесь инструкциями VBA.
Работа с окном Properties. В VBE окно Properties позволяет изменять свойства выделенного элемента управления (это может быть обычный элемент управления или сама форма UserForm, рис. 6).

Рис. 6. Окно Properties для выделенного элемента управления OptionButton
В окне Properties есть две вкладки. На вкладке Alphabetic свойства выбранного объекта отображаются в алфавитном порядке. На вкладке Categorized эти свойства сгруппированы по категориям. Обе вкладки отображают одни и те же свойства.
Для того чтобы изменить свойство, необходимо щелкнуть на нем и ввести новое значение. Некоторые свойства могут принимать только ограниченный набор допустимых значений, выбираемых из соответствующего списка. После щелчка на таком свойстве в окне Properties будет отображена кнопка со стрелкой, указывающей вниз. Щелкните на этой кнопке, чтобы выбрать значение из предложенного списка. Например, свойство TextAlign может принимать одно из следующих значений: 1 — fmTextAlignLeft, 2 — fmTextAlignCenter и 3 — fmTextAlignRight.
После выделения отдельных свойств (например, Font и Picture) рядом с ними отображается небольшая кнопка с троеточием. Щелчок на этой кнопке приводит к вызову диалогового окна настройки свойства.
Для свойства Picture элемента управления Image необходимо указать графический файл или вставить изображение из буфера обмена. В последнем случае следует сначала скопировать его в буфер обмена, а затем выбрать свойство Picture элемента управления Image и нажать комбинацию клавиш <Ctrl+V> для вставки содержимого буфера обмена. Если выделить два или более элементов управления одновременно, в окне Properties отобразятся только те свойства, которые являются общими для этих объектов.
Объекту UserForm присущ ряд свойств, значения которых можно изменять. Эти свойства применяются в качестве значений, заданных по умолчанию, для элементов управления, которые добавляются в пользовательские диалоговые окна. Например, если изменить свойство Font пользовательского диалогового окна, все добавленные в окно элементы управления будут применять этот шрифт.
Общие свойства. Каждый элемент управления имеет как собственный набор уникальных свойств, так и ряд общих свойств, присущих другим элементам управления. Например, все элементы управления имеют свойство Name и свойства, определяющие его размер и расположение на форме (Height, Width, Left и Right). Если вы собираетесь работать с элементом управления с помощью кода VBA, присвойте ему значащее имя. Например, первый элемент управления OptionButton, который добавлен в пользовательское диалоговое окно, по умолчанию получит имя ОрtionButton1. В коде ссылка на этот объект будет выглядеть следующим образом: OptionButton1.Value = True. Но если элементу управления OptionButton присвоить описательное имя (например, obLandscape), то можно использовать такой оператор: obLandscape.Value = True.
Многие пользователи предпочитают имена, которые указывают на тип объекта. В предыдущем примере был использован префикс ob, который указывает на то, что объект является элементом управления OptionButton.
Можно изменять значения свойств нескольких элементов управления одновременно. Например, вы вправе создать на форме несколько элементов управления OptionButton и выровнять их по левому краю. Для этого достаточно выделить все элементы управления OptionButton и изменить значение свойства Left в окне Properties. Все выделенные элементы управления примут новое значение свойства Left.
Чтобы получить доступ к справочной информации о свойствах различных элементов управления, щелкните на свойстве в окне Properties и нажмите клавишу <F1>.
Советы по использованию клавиатуры. Многие пользователи предпочитают перемещаться по диалоговым окнам с помощью клавиатуры. Комбинации клавиш <Таb> и <Shift+Tab> позволяют циклически переключаться между элементами управления. Чтобы удостовериться, что диалоговое окно корректно реагирует на команды с клавиатуры, обратите внимание на такие моменты: порядок просмотра элементов управления и комбинации клавиш.
Порядок просмотра определяет последовательность, в которой активизируются элементы управления после нажатия пользователем клавиши <Таb> или комбинации клавиш <Shift+Tab>. Кроме того, порядок активизации указывает, какой элемент управления по умолчанию выделяется на форме первым. Если пользователь вводит текст в элемент управления TextBox, то этот элемент считается активным. Если после этого щелкнуть на элементе управления OptionButton, то именно он станет активным. Элемент управления, назначенный первым для просмотра, будет активным в момент открытия диалогового окна.
Для того чтобы указать порядок активизации, выберите команду View –> Tab Order. Кроме того, можно щелкнуть правой кнопкой мыши на UserForm и выбрать пункт Тab Order из появившегося контекстного меню. Excel отобразит диалоговое окно Tab Order (Порядок просмотра, рис. 7).

Рис. 7. В диалоговом окне Tab Order измените порядок просмотра элементов управления
Также можно указать порядок активизации элемента управления с помощью окна Properties (см. рис. 6, самое последнее из отраженных свойств). Первый активизируемый элемент управления будет иметь свойство Tablndex = 0. Изменение значения свойства Tablndex текущero объекта приведет к изменению значений свойств Tablndex других элементов правления. Изменения вносятся автоматически. Вы можете удостовериться в том, что значения свойства Tablndex всех элементов управления не больше количества элементов управления в диалоговом окне. Если нужно удалить элемент управления из списка активизируемых объектов, то присвойте его свойству TabStop значение False.
Одни элементы управления, такие как Frame и MultiPage, служат контейнерами для других элементов управления. Элементы управления в таком контейнере имеют собственный порядок просмотра (активизации). Для установки порядка просмотра группы элементов управления OptionButtons, находящихся внутри элемента управления Frame, выделите элемент управления Frame до того, как будет выполнена команда View –> Tab Order.
Большинству элементов управления диалогового окна можно назначить комбинацию клавиш. Таким образом, пользователь получит доступ к элементу управления, нажав <Alt> и указанную клавишу. Применив свойство Accelerator в окне Properties, можно определить клавишу для активизации элемента управления.
Некоторые элементы управления, например, TextBox, лишены свойства Accelerator, поскольку не отображают значение свойства Caption. Но к таким элементам можно получить доступ с помощью клавиатуры, воспользовавшись свойством Label. Присвойте клавишу элементу управления Label и расположите его в порядке просмотра перед элементом TextBox.
Отображение пользовательского диалогового окна
Для того чтобы отобразить пользовательское диалоговое окно с помощью VBA, необходимо создать процедуру, которая вызывает метод Show объекта UserForm. Форму UserForm невозможно отобразить, не выполнив как минимум одну строку кода VBA:
|
Sub ShowForm() UserForm1.Show End Sub |
Данная процедура должна располагаться в стандартном модуле VBA, а не в модуле формы UserForm. При отображении пользовательская форма остается на экране до тех пор, пока ее не скроют. Обычно в нее добавляют элемент управления CommandButton, который запускает процедуру закрытия формы. Эта процедура либо выгружает пользовательскую форму с помощью метода Unload, либо удаляет ее с экрана с помощью метода Hide объекта UserForm.
Отображение немодальной формы. По умолчанию отображается модальная форма. Это означает, что форма должна исчезнуть с экрана прежде, чем пользователь выполнит какие-либо действия на рабочем листе (т.е. редактирование данных невозможно). Немодальную форму также можно отобразить. В этом случае вы вправе продолжать работу в Excel, не скрывая саму форму. Для отображения немодальной формы используется следующий синтаксис:
UserForm1.Show vbModeless
Тестирование пользовательского диалогового окна. Обычно в процессе разработки возникает необходимость в тестировании формы UserForm. Для этого можно воспользоваться одним из способов:
- выполните команду Run –> Run Sub/UserForm;
- нажмите <F5>;
- щелкните на кнопке Run Sub/UserForm, которая находится на стандартной панели инструментов.
Выбор одного из этих методов приводит к запуску события инициализации диалогового окна. Как только диалоговое окно будет отображено в тестовом режиме, можно проверить порядок активизации объектов, а также поддержку комбинаций клавиш.
Отображение пользовательского диалогового окна на основе значения переменной. В некоторых случаях приходится выбирать, какое окно UserForm будет отображено. Если название пользовательского диалогового окна хранится в виде строковой переменной, можно воспользоваться методом Add для добавления объекта UserForm в коллекцию UserForms с последующим обращением к методу Show из коллекции UserForms. В приведенном ниже примере название объекта UserForm присваивается переменной MyForm, после чего отображается пользовательское диалоговое окно.
|
MyForm = «UserForm1» UserForms.Add(MyForm).Show |
Загрузка пользовательского диалогового окна. В VBA поддерживается оператор Load. Загрузка пользовательского диалогового окна приводит к сохранению объекта формы в памяти. Однако до тех пор пока не будет выполнен метод Show, форма останется невидимой для остальной части программы. Для загрузки окна UserForm1 воспользуйтесь оператором:
Load UserForm1
Если вы применяете сложное диалоговое окно, то вам может понадобиться предварительно загрузить его в память, чтобы в случае необходимости быстро отобразить его с помощью метода Show. Как правило, использовать метод Load в подобном случае не имеет смысла.
О процедурах обработки событий. Как только диалоговое окно появляется на экране, пользователь начинает с ним взаимодействовать, т.е. генерирует события. Например, щелчок на элементе управления CommandButton приводит к возникновению события Click объекта CommandButton. Вам необходимо создать процедуры (обработчики событий), которые будут выполняться при возникновении соответствующих событий.
Процедуры обработки событий находятся в модуле кода объекта UserForm. Наряду с этим процедура обработки события может вызывать другие процедуры, которые находятся в стандартном модуле VBA.
В коде VBA можно изменять свойства элементов управления, пока пользовательское диалоговое окно отображается на экране (т.е. на этапе выполнения). Например, можно назначить элементу управления ListBox процедуру, которая изменяет текст элемента управления Label при выборе элемента списка.
Закрытие пользовательского диалогового окна
Для закрытия формы UserForm1 воспользуйтесь командой: Unload UserForm1. Если же код находится в модуле кода формы UserForm, воспользуйтесь оператором: Unload Me. В этом случае ключевое слово Me применяется для идентификации пользовательской формы.
Обычно в коде VBA команда Unload выполняется только после того, как форма UserForm выполнит все свои функции. Например, форма UserForm может содержать элемент управления CommandButton, который используется в качестве кнопки ОК. Щелчок на этой кнопке приводит к выполнению заранее определенного макроса. Одна из функций макроса заключается в выгрузке формы UserForm из памяти. В результате пользовательское диалоговое окно отображается на экране до тех пор, пока макрос, содержащий оператор Unload, не завершает свою работу.
Когда форма UserForm выгружается из памяти, элементы управления, содержавшиеся на ней, возвращаются в первоначальное состояние. Другими словами, в коде нельзя обращаться к значениям, указываемым пользователем, после того как форма будет выгружена из памяти. Если значения, введенные пользователем, будут применяться позже (после выгрузки диалогового окна UserForm), то необходимо присвоить их переменной с областью действия Public, которая определена в стандартном модуле VBA. Кроме того, значение всегда можно сохранить в ячейке листа.
Окно формы UserForm автоматически выгружается из памяти после того, как пользователь щелкает на кнопке Закрыть (обозначается символом х в заголовке окна). Это действие также приводит к возникновению события QueryClose объекта UserForm, за которым следует событие Terminate пользовательского диалогового окна. Объект UserForm может использовать метод Hide. После его вызова диалоговое окно исчезает, но остается в памяти, поэтому в коде можно получить доступ к различным свойствам элементов управления:
UserForml.Hide
Если ваш код находится в модуле кода объекта UserForm, можно воспользоваться оператором:
Me.Hide
Если по какой-либо причине пользовательское диалоговое окно должно быть немедленно скрыто в процессе выполнения макроса, воспользуйтесь методом Hide в самом начале процедуры, а затем укажите команду DoEvents. Например, в следующей процедуре форма UserForm немедленно исчезнет после того, как пользователь щелкнет на кнопке CommandButton1. Последний оператор процедуры выгружает пользовательское диалоговое окно из памяти.
|
Private Sub CommandButton1_Click() Me.Hide Application.ScreenUpdating = True For r = 1 To 10000 Cells(r, 1) = r Next r Unload Me End Sub |
В рассматриваемом примере переменной ScreenUpdating присвоено значение True, в результате чего Excel полностью скрывает окно UserForm. Если этот оператор не использовать, окно UserForm остается видимым.
Пример создания пользовательского диалогового окна
В примере представлено диалоговое окно, предназначенное для получения имени и пола пользователя. В диалоговом окне вы найдете элемент управления TextBox, используемый для ввода имени, и два элемента управления OptionButton для указания пола. Информация, полученная в диалоговом окне, заносится в пустую строку рабочего листа.
Создание пользовательской формы. Создайте рабочую книгу, содержащую только один рабочий лист. Нажмите комбинацию клавиш <Alt+F11> для активизации VBE. В окне Project выберите проект рабочей книги и выполните команду Inserts –> UserForm. Воспользуйтесь окном Properties для изменения значения свойства Caption формы UserForm на Укажите имя и пол (если окно Properties не отображается, нажмите <F4>).

Рис. 8. Создание пользовательской формы
Добавьте элемент управления Label и настройте его свойства (рис. 9):
Свойство Значение
Accelerator И
Caption Имя:
Tablndex 0

Рис. 9. Пользовательская форма с элементами управления
Добавьте элемент управления TextBox и измените его свойства:
Name TextName
Tablndex 1
Добавьте элемент управления Frame и измените его свойства:
Caption Пол
Tablndex 2
Добавьте элемент управления OptionButton в состав элемента Frame и измените его свойства:
Accelerator М
Caption Мужчина
Name OptionMale
Tablndex 0
Добавьте еще один элемент управления OptionButton в состав элемента Frame и измените его свойства:
Accelerator Ж
Caption Женщина
Name OptionFemale
Tablndex 1
Добавьте элемент управления CommandButton за пределами элемента Frame и измените его свойства:
Caption OK
Default True
Name OKButton
Tablndex 3
Добавьте еще один элемент управления CommandButton и настройте его свойства:
Caption Отмена
Default False
Name CloseKButton
Tablndex 4
При создании нескольких похожих элементов управления может оказаться, что быстрее копировать существующий элемент управления, чем создавать новый. Для копирования элемента управления удерживайте нажатой клавишу <Ctrl> при перетаскивании элемента управления, что приведет к созданию копии. После этого останется изменить свойства скопированного элемента управления.
Создание кода для отображения диалогового окна. После создания элементов управления на лист необходимо добавить элемент управления ActiveX, называемый Кнопка (CommandButton). Эта кнопка будет запускать процедуру, которая предназначена для отображения формы UserForm. Для этого выполните следующие действия:
- Перейдите в окно Excel (например, воспользуйтесь комбинацией клавиш <Alt+F11>).
- Выберите команду Разработчика –> Элементы управления –> Вставить и щелкните на значке Кнопка (CommandButton), который находится в разделе Элементы ActiveX.
- Разместите кнопку на рабочем листе. Чтобы измените ее подпись, щелкните на кнопке правой кнопкой мыши и выберите в контекстном меню команду Объект CommandButton –> Edit. Для изменения других свойств объекта щелкните на нем правой кнопкой мыши и выберите команду Properties.
- Дважды щелкните на объекте CommandButton. Это приведет к активизации VBE. При этом отобразится модуль кода для листа с открытой пустой процедурой обработки событий объекта CommandButton, который расположен на рабочем листе.
- Введите единственный оператор в процедуру CommandButton1_Click (рис. 10). В процедуре используется метод Show объекта UserForml для отображения пользовательского диалогового окна.

Рис. 10. Процедура CommandButton1_Click вызывается после щелчка на кнопке рабочего листа
Тестирование диалогового окна. После щелчка на кнопке, находящейся на рабочем листе, ничего не произойдет. Точнее, кнопка будет выделена, но это не приведет к инициализации каких-либо действий. Причина этого заключается в том, что программа Excel по-прежнему остается в режиме конструктора, в который она переходит автоматически после добавления элемента управления ActiveX. Для выхода из режима конструктора щелкните на кнопке Разработчик –> Элементы управления –> Режим конструктора. Если же требуется изменить кнопку, снова перейдите в режим конструктора. После выхода из режима конструктора щелчок на кнопке приведет к отображению пользовательского диалогового окна.
Когда диалоговое окно будет отображено, введите произвольный текст в текстовом поле и щелкните на кнопке ОК. В результате ничего не произойдет, что совершенно естественно, так как для объекта UserForm не создано ни одной процедуры обработки событий. Для закрытия диалогового окна щелкните на крестике в его заголовке.
Добавление процедур обработки событий. Перейдите в VBE. Удостоверьтесь в том, что пользовательское окно отображено на экране, и дважды щелкните на кнопке Отмена. Активизируется окно кода для формы UserForm, а также добавляется пустая процедура CloseButton_Click. Обратите внимание, что название процедуры состоит из имени объекта, символа подчеркивания и названия обрабатываемого события. Добавьте в процедуру единственный оператор:
|
Private Sub CloseButton_Click() Unload UserForm1 End Sub |
Эта процедура, которая вызывается после щелчка на кнопке Отмена, выгружает из памяти форму UserForm1.
Щелкните на значке View Object в верхней части окна Project Explorer или дважды кликните на строке UserForm1, чтобы отобразить форму UserForm1. Дважды щелкните на кнопке ОК и введите код процедуры – обработчика событий для события Click объекта OKButton:
|
1 2 3 4 5 6 7 8 9 10 11 12 13 14 15 16 17 18 19 20 21 22 23 24 25 26 27 28 29 |
Private Sub OKButton_Click() Dim NextRow As Long ‘ Проверка активности листа Лист1 Sheets(«Лист1»).Activate ‘ Проверка ввода имени If TextName.Text = «» Then MsgBox «Введите имя.» TextName.SetFocus Exit Sub End If ‘ Определение следующей пустой строки NextRow = _ Application.WorksheetFunction.CountA(Range(«A:A»)) + 1 ‘ Передача имени Cells(NextRow, 1) = TextName.Text ‘ Передача пола If OptionMale Then Cells(NextRow, 2) = «Мужчина» If OptionFemale Then Cells(NextRow, 2) = «Женщина» ‘ Очистка элементов управления для ввода следующей записи TextName.Text = «» TextName.SetFocus OptionMale = False OptionFemale = False End Sub |
Перейдите в Excel и щелкните на кнопке еще раз, чтобы отобразить пользовательское диалоговое окно. С его помощью можно добавлять новые имена в рабочий лист.
Процедура OKButton_Click работает следующим образом. Сначала она проверяет, активен ли лист Лист1, введено ли имя. После этого запускается функция Excel СЧЁТЗ (CountA) для определения следующей пустой ячейки в столбце А. Затем текст из текстового поля TextBox передается в определенную ячейку столбца А. С помощью операторов If определяется выделенный элемент управления OptionButton, что обеспечивает запись соответствующего текста в столбец В (пол). Далее элементы диалогового окна очищаются и окно перезапускается, чтобы обеспечить возможность введения следующей записи. Заметим, что щелчок на кнопке ОК не приведет к закрытию диалогового окна. Для завершения ввода данных (и выгрузки пользовательского диалогового окна) щелкните на кнопке Отмена.
Проверьте работоспособность комбинаций клавиш: Alt+М – активизирует мужской пол, Alt+Ж – женский. Рабочая книга с рассмотренным примером находится в файле get name and sex.xlsm.
События объекта User Form
Каждый элемент управления в форме UserForm (а также сам объект UserForm) разрабатывается для того, чтобы реагировать на определенные события. Эти события возникают в результате действий пользователя или генерируются программой Excel. Можно создать код, который будет выполняться при возникновении определенного события. Некоторые действия приводят к возникновению сразу нескольких событий. Например, щелчок на кнопке со стрелкой, направленной вверх, в элементе управления SpinButton приведет к возникновению события SpinUp и события Change. После того как пользовательское диалоговое окно будет отображено с помощью метода Show, Excel сгенерирует события Initialize и Activate объекта UserForm. В Excel также поддерживаются события, связанные с объектами Sheet (Лист), Chart (Диаграмма) и ThisWorkbook (ЭтаКнига).
Получение дополнительных сведений о событиях. Для того чтобы получить информацию о событиях, которые генерируются конкретным элементом управления, выполните следующее:
- Добавьте элемент управления в пользовательское диалоговое окно.
- Дважды щелкните на элементе управления, чтобы открыть модуль кода для объекта UserForm. VBE вставит пустую процедуру обработки события, принятого по умолчанию.
- Щелкните на раскрывающемся списке в правом верхнем углу окна модуля и просмотрите полный список событий, которые поддерживаются текущим элементом управления (на рис. 11 показан список событий для элемента управления CheckBox).
- Выберите событие из списка, и VBE создаст пустой обработчик события.

Рис. 11. Список событий для элемента управления CheckBox
Имя процедуры обработки событий включает имя объекта, который сгенерировал событие. Таким образом, если изменить имя элемента управления, придется внести соответствующие изменения и в имя процедуры обработки события. Имя процедуры не изменяется автоматически! Чтобы облегчить работу, присвойте описательные имена элементам управления до того, как приступите к созданию процедуры обработки соответствующих событий.
События объекта UserForm. Несколько событий непосредственно связано с отображением и выгрузкой объекта UserForm:
- Происходит перед загрузкой и отображением формы UserForm. Не происходит, если объект UserForm до этого был скрыт.
- Происходит в момент активизации объекта UserForm.
- Происходит в момент деактивизации объекта UserForm. Не происходит при сокрытии формы UserForm.
- Происходит перед выгрузкой объекта UserForm.
- Происходит после выгрузки объекта UserForm.
Важно правильно выбрать подходящее событие для процедуры обработки событий, а также проанализировать порядок выполнения событий. Использование метода Show приводит к возникновению событий Initialize и Activate (в указанном порядке). Применение команды Load приводит к вызову события Initialize. Команда Unload вызывает события QueryClose и Terminate (в указанном порядке). Метод Hide не приводит к вызову каких-либо событий.
В файле userform events.xlsm описанные события перехватываются и в момент возникновения события возникает окно сообщения. Если изучение событий объекта UserForm вызывает у вас затруднения, то, проанализировав код этого примера, вы получите ответы на многие вопросы.
События элемента управления SpinButton. Для того чтобы разобраться в концепции событий, мы подробно рассмотрим события, связанные с элементом управления SpinButton (рис. 12). Файл spinbutton events.xlsm демонстрирует применение событий, генерируемых объектами SpinButton и UserForm (первый содержится во втором). Рабочая книга включает несколько процедур обработки событий — по одной для каждого события элемента управления SpinButton и объекта UserForm. Каждая из этих процедур добавляет текст в столбце А с описанием события.

Рис. 12. События элемента управления SpinButton
Пользователь может управлять объектом SpinButton с помощью мыши или (если элемент управления активен) клавиш управления курсором. Когда пользователь щелкает мышью на верхней кнопке элемента управления SpinButton, происходят следующие события: Enter (генерируется только в том случае, если элемент управления неактивен); Change; SpinUp.
Пользователь может нажать клавишу <Таb> для того, чтобы сделать активным элемент управления SpinButton. Только после этого можно использовать клавиши управления курсором для изменения значения элемента управления. Если все именно так и происходит, то события генерируются в следующем порядке: Enter; KeyDown; Change; SpinUp (или SpinDown); KeyUp.
Элемент управления SpinButton может изменяться в коде VBA, что также провоцирует возникновение соответствующих событий. Например, оператор SpinButton1.Value = 0 устанавливает свойство Value элемента управления SpinButton1 равным 0, а это приводит к возникновению события Change. Такой результат достигается только в том случае, если исходное свойство Value не равно нулю.
Вы вправе предположить, что выполнить отмену генерирования событий можно, установив свойство EnableEvents объекта Application равным False. Но это свойство поддерживается только объектами, которые являются «истинными» в Excel: Workbook, Worksheet и Chart.
Совместное использование элементов управления SpinButton и TextBox. Элемент управления SpinButton имеет свойство Value, но не может отображать значение этого свойства. В большинстве случаев требуется, чтобы пользователь мог изменить значение элемента управления SpinButton непосредственно, а не многократно щелкая на элементе управления. Эффективным решением может стать объединение элемента управления SpinButton с элементом управления TextBox, что позволяет пользователю вводить значение элемента управления SpinButton непосредственно, используя для этого поле элемента управления TextBox. Кроме того, щелчок на элементе управления SpinButton позволит изменить значение, отображаемое в элементе управления TextBox.
На рис. 13 приведен пример (см. также файл spinbutton and textbox.xlsm). Свойство Min элемента управления SpinButton имеет значение 1, а свойство Мах— значение 100. Таким образом, щелчок на одной из стрелок элемента управления SpinButton приведет к изменению значения в пределах от 1 до 100. Код, реализующий «связывание» элементов управления SpinButton и TextBox сводится к созданию процедур обработки событий, которые будут синхронизировать свойство Value элемента управления SpinButton и свойство Text элемента управления TextBox.

Рис. 13. Комбинирование элементов управления SpinButton и TextBox
Представленная процедура выполняется каждый раз при возникновении события Change элемента управления SpinButton. Таким образом, процедура выполняется тогда, когда пользователь щелкает на элементе управления SpinButton или изменяет его значение, нажав одну из клавиш управления курсором.
|
Private Sub SpinButton1_Change() TextBox1.Text = SpinButton1.Value End Sub |
Если пользователь введет значение непосредственно в элемент управления TextBox, то будет сгенерировано событие Change, после чего должен выполняться следующий код:
|
Private Sub TextBox1_Change() Dim NewVal As Integer NewVal = Val(TextBox1.Text) If NewVal >= SpinButton1.Min And _ NewVal <= SpinButton1.Max Then _ SpinButton1.Value = NewVal End Sub |
Эта процедура начинается с вызова функции VBA Val, которая преобразует текст элемента управления TextBox в числовое значение (если элемент управления TextBox содержит строку, то функция Val возвращает значение 0). Следующий оператор определяет, попадает ли значение в указанный диапазон допустимых значений. Если это так, то свойство Value элемента управления SpinButton устанавливается равным значению, которое введено в поле элемента управления TextBox.
Пример организован таким образом, что щелчок на кнопке ОК (которая называется OKButton) передает значение элемента управления SpinButton в активную ячейку. Процедура обработки события Click элемента управления CommandButton выглядит следующим образом:
|
Private Sub OKButton_Click() ‘ Enter the value into the active cell If CStr(SpinButton1.Value) = TextBox1.Text Then ActiveCell = SpinButton1.Value Unload Me Else MsgBox «Некорректная запись.», vbCritical TextBox1.SetFocus TextBox1.SelStart = 0 TextBox1.SelLength = Len(TextBox1.Text) End If End Sub |
Данная процедура выполняет проверку: анализируются текст, введенный в поле элемента управления TextBox, и значения элемента управления SpinButton. Такая процедура обрабатывает ситуации неверного ввода данных. Например, если пользователь введет в поле элемента управления TextBox текст Зt, то значение элемента управления SpinButton не изменится, а результат, который помещается в активную ячейку, будет отличным от ожидаемого. Обратите внимание, что значение свойства Value элемента управления SpinButton преобразуется в строку с помощью функции CStr. Это позволяет предотвратить ошибку, которая возникает, когда числовое значение сравнивается с текстовым. Если значение элемента управления SpinButton не соответствует содержимому элемента управления TextBox, то на экране отображается специальное сообщение. Причем объект TextBox активен, а его содержимое — выделено (с помощью свойств SelStart и SelLength). Таким образом, пользователю проще исправить неправильные значения.
О свойстве Tag. Каждый объект UserForm и каждый элемент управления имеет свойство Tag. Оно не представляет конечные данные и по умолчанию не имеет значения. Свойство Tag можно использовать для хранения информации, которая будет применена в программе. Например, можно создать набор элементов управления TextBox в пользовательском диалоговом окне. От пользователя требуется ввести текст только в некоторые из них. В отдельные поля вводить текст необязательно. Можно применять свойство Tag для идентификации полей, которые нужно заполнять. В таком случае значение свойства Tag — это строка, например, Required. Поэтому при написании кода обработки введенных пользователем данных можно ссылаться на свойство Tag.
Приведенный ниже пример представляет собой функцию, которая проверяет все элементы управления TextBox объекта UserForm1 и возвращает количество пустых текстовых полей, которые требуют ввода информации.
|
Function EmptyCount() Dim ctl As Control EmptyCount= 0 For Each ctl In UserFormi.Controls If TypeName(ctl) = «TextBox» Then If ctl.Tag = «Required» Then If ctl.Text = «» Then EmptyCount = EmptyCount + 1 End If End If End If Next ctl End Function |
Ссылка на элементы управления пользовательского диалогового окна
При работе с элементами управления, находящимися в форме UserForm, код VBA обычно содержится в модуле кода объекта UserForm. Кроме того, на элементы управления диалогового окна можно ссылаться из модуля кода VBA общего назначения. Для выполнения этой задачи необходимо задать правильную ссылку на элемент управления, указав имя объекта UserForm. В качестве примера рассмотрим процедуру, которая введена в модуле кода VBA. Эта процедура отображает пользовательское диалоговое окно, которое называется UserForm1.
|
Sub GetData () UserForm1.Show End Sub |
Предположим, что в диалоговом окне UserForm1 содержится текстовое поле TextBox1 и вам необходимо указать значение текстового поля по умолчанию:
|
Sub GetData() UserForm1.TextBox1.Value = «Джон Доу» UserForm1.Show End Sub |
Еще одним способом установки значения по умолчанию является использование события Initialize объекта UserForm. Можно написать код процедуры UserForm_Initialize, который будет располагаться в модуле кода диалогового окна:
|
Private Sub UserForm_Initialize() TextBox1.Value = «Джон Доу» End Sub |
Обратите внимание, что при обращении к элементу управления из модуля кода диалогового окна необязательно вводить в ссылку имя объекта UserForm. Подобное определение ссылок на элементы управления имеет свое преимущество: всегда можно воспользоваться средством Auto List Member, которое позволяет выбирать имена элементов управления из раскрывающегося списка.
Вместо того чтобы использовать фактическое имя объекта UserForm, предпочтительнее применить имя Me. В противном случае, если имя объекта UserForm изменится, вам придется изменять все ссылки (с его участием) в коде.
Использование коллекций элементов управления. Элементы управления пользовательских диалоговых окон образуют отдельную коллекцию. Например, следующий оператор отображает количество элементов управления в форме UserForm1:
MsgBox UserForm1.Controls.Count
В VBA не поддерживаются коллекции для каждого типа элемента управления. Например, не существует коллекции элементов управления CommandButton. Но тип элемента управления можно определить с помощью функции TypeName. Следующая процедура использует структуру For Each для циклического просмотра элементов коллекции Controls. В результате отображается количество элементов управления CommandButton, которые входят в коллекцию элементов управления объекта UserForm1 (этот код вы найдете в файле all userform controls.xlsm).
|
Sub CountButtons() Dim cbCount As Integer Dim ctl As Control cbCount = 0 For Each ctl In UserForm1.Controls If TypeName(ctl) = «CommandButton» Then _ cbCount = cbCount + 1 Next ctl MsgBox cbCount End Sub |
Настройка панели инструментов Toolbox
Если объект UserForm активен в редакторе VBE, на панели Toolbox отображаются элементы управления, которые можно добавить в пользовательское диалоговое окно. Панель Toolbox изначально содержит одну вкладку. Щелкните на ней правой кнопкой мыши и в контекстном меню выберите параметр New Page (Добавить страницу). Кроме того, можно изменить текст, который отображается на вкладке. Для этого выберите параметр Rename (Переименовать) из контекстного меню.
Рекомендуется предварительно настроить элементы управления и сохранить их для дальнейшего использования. Можно, например, в форме создать элемент управления CommandButton, который настроен на выполнение роли кнопки ОК. Можно изменять параметры кнопки: Width (Ширина), Height (Высота), Caption (Подпись), Default (По умолчанию) и Name (Имя). После этого перетащите модифицированный элемент управления CommandButton на панель инструментов Toolbox. Это приведет к созданию элемента управления. Щелкните на элементе управления правой кнопкой мыши, чтобы переименовать его или изменить значок.
Также можно создать раздел панели Toolbox, в котором будет содержаться несколько элементов управления. Например, вы вправе создать два элемента управления CommandButton, которые будут представлять кнопки ОК и Отмена. Настройте их так, как это необходимо. Затем выберите обе кнопки и переместите их на панель инструментов Toolbox. Впоследствии можно использовать новый элемент управления панели Toolbox для быстрого создания необходимых кнопок.
Этот метод также применим к элементам управления, которые используются в качестве контейнера. Например, создайте элемент управления Frame и добавьте в него четыре модифицированных элемента управления OptionButton (соответствующим образом расположив их на форме). После этого перетащите элемент управления Frame на панель инструментов Toolbox, чтобы создать модифицированный элемент управления Frame.
Можно разместить модифицированные элементы управления на отдельной вкладке панели Toolbox. Таким образом, появляется возможность экспортировать вкладку панели Toolbox для совместного применения другими пользователями Excel. Для экспорта вкладки панели Toolbox щелкните на ней правой кнопкой мыши и выберите пункт меню Export Page.
Среди прилагаемых к заметке файлов находится страничный файл под именем newcontrols.pag, который включает некоторые настроенные элементы управления. Можно импортировать этот файл в качестве новой вкладки окна Toolbox. Щелкните правой кнопкой мыши на вкладке и выберите команду Import Page. В результате панель Toolbox будет как на рис. 14.

Рис. 14. В окне Toolbox появилась страница с новыми элементами управления
Добавление элементов управления ActiveX
В пользовательском диалоговом окне содержатся и другие элементы управления ActiveX, разработанные компанией Microsoft и независимыми производителями. Для того чтобы добавить дополнительные элементы управления ActiveX на панель инструментов Toolbox, щелкните правой кнопкой мыши на ней и выберите пункт Additional Controls (Дополнительные элементы управления). В результате будет отображено диалоговое окно, показанное на рис. 15.

Рис. 15. В диалоговом окне Additional Controls можно найти дополнительные элементы управления ActiveX
В диалоговом окне Additional Controls содержатся все элементы управления ActiveX, установленные в системе. Выберите элементы управления, которые необходимо добавить на панель инструментов. После этого щелкните на кнопке ОК для добавления значков каждого из выбранных элементов управления. Не все элементы управления ActiveX, установленные в системе, поддерживаются пользовательскими диалоговыми окнами. Более того, большая их часть не поддерживается, к тому же некоторые элементы управления требуют лицензии на использование в приложениях. Если лицензия отсутствует, на экране появится сообщение об ошибке.
Создание шаблонов диалоговых окон
Зачастую при создании пользовательского диалогового окна каждый раз на форму добавляются одни и те же элементы управления. Например, все пользовательские диалоговые окна имеют два элемента управления CommandButton, используемых в качестве кнопок ОК и Отмена. В предыдущем разделе рассматривались методы комбинирования элементов управления с целью получения одного элемента управления, обладающего функциями двух. Еще одной программной уловкой может служить шаблон диалогового окна, который при необходимости импортируется для последующего создания на его основе других проектов. Преимущество шаблонного подхода заключается в следующем: процедуры обработки событий сохраняются вместе с шаблоном.
Начните с создания пользовательского диалогового окна, содержащего все элементы управления и настройки, которые необходимо повторно использовать в других проектах. После этого убедитесь, что диалоговое окно выделено. Выберите команду File –> Export File (или нажмите комбинацию клавиш <Ctrl+E>). После этого на экране появится запрос на ввод имени файла. Затем для создания проекта на основе шаблона выполните команду File –> lmport File, чтобы загрузить ранее сохраненное диалоговое окно.
Имитация диалоговых окон Excel. Внешний вид и поведение диалоговых окон Windows изменяются от программы к программе. При разработке приложений для Excel рекомендуется придерживаться стиля диалоговых окон Excel. Наилучшим методом изучения эффективных способов создания диалоговых окон является повторное создание одного из стандартных диалоговых окон Excel. Например, удостоверьтесь, что вы правильно определили комбинации клавиш и активизировали элементы управления. Для создания копии одного диалогового окна Excel следует протестировать его в различных условиях. Один только анализ диалоговых окон Excel поможет улучшить познания в вопросах структуры окон и методов создания элементов управления. Со временем вы убедитесь, что невозможно повторить отдельные диалоговые окна Excel даже с помощью VBA.
[1] По материалам книги Джон Уокенбах. Excel 2010. Профессиональное программирование на VBA. – М: Диалектика, 2013. – С. 405–438.
Add the Controls | Show the Userform | Assign the Macros | Test the Userform
This chapter teaches you how to create an Excel VBA Userform. The Userform we are going to create looks as follows:

Add the Controls
To add the controls to the Userform, execute the following steps.
1. Open the Visual Basic Editor. If the Project Explorer is not visible, click View, Project Explorer.
2. Click Insert, Userform. If the Toolbox does not appear automatically, click View, Toolbox. Your screen should be set up as below.

3. Add the controls listed in the table below. Once this has been completed, the result should be consistent with the picture of the Userform shown earlier. For example, create a text box control by clicking on TextBox from the Toolbox. Next, you can drag a text box on the Userform. When you arrive at the Car frame, remember to draw this frame first before you place the two option buttons in it.
4. Change the names and captions of the controls according to the table below. Names are used in the Excel VBA code. Captions are those that appear on your screen. It is good practice to change the names of controls. This will make your code easier to read. To change the names and captions of the controls, click View, Properties Window and click on each control.
| Control | Name | Caption |
|---|---|---|
| Userform | DinnerPlannerUserForm | Dinner Planner |
| Text Box | NameTextBox | |
| Text Box | PhoneTextBox | |
| List Box | CityListBox | |
| Combo Box | DinnerComboBox | |
| Check Box | DateCheckBox1 | June 13th |
| Check Box | DateCheckBox2 | June 20th |
| Check Box | DateCheckBox3 | June 27th |
| Frame | CarFrame | Car |
| Option Button | CarOptionButton1 | Yes |
| Option Button | CarOptionButton2 | No |
| Text Box | MoneyTextBox | |
| Spin Button | MoneySpinButton | |
| Command Button | OKButton | OK |
| Command Button | ClearButton | Clear |
| Command Button | CancelButton | Cancel |
| 7 Labels | No need to change | Name:, Phone Number:, etc. |
Note: a combo box is a drop-down list from where a user can select an item or fill in his/her own choice. Only one of the option buttons can be selected.
Show the Userform
To show the Userform, place a command button on your worksheet and add the following code line:
Private Sub CommandButton1_Click()
DinnerPlannerUserForm.Show
End Sub
We are now going to create the Sub UserForm_Initialize. When you use the Show method for the Userform, this sub will automatically be executed.
1. Open the Visual Basic Editor.
2. In the Project Explorer, right click on DinnerPlannerUserForm and then click View Code.
3. Choose Userform from the left drop-down list. Choose Initialize from the right drop-down list.
4. Add the following code lines:
Private Sub UserForm_Initialize()
NameTextBox.Value = «»
PhoneTextBox.Value = «»
CityListBox.Clear
With CityListBox
.AddItem «San Francisco»
.AddItem «Oakland»
.AddItem «Richmond»
End With
DinnerComboBox.Clear
With DinnerComboBox
.AddItem «Italian»
.AddItem «Chinese»
.AddItem «Frites and Meat»
End With
DateCheckBox1.Value = False
DateCheckBox2.Value = False
DateCheckBox3.Value = False
CarOptionButton2.Value = True
MoneyTextBox.Value = «»
NameTextBox.SetFocus
End Sub
Explanation: text boxes are emptied, list boxes and combo boxes are filled, check boxes are unchecked, etc.
Assign the Macros
We have now created the first part of the Userform. Although it looks neat already, nothing will happen yet when we click the command buttons on the Userform.
1. Open the Visual Basic Editor.
2. In the Project Explorer, double click on DinnerPlannerUserForm.
3. Double click on the Money spin button.
4. Add the following code line:
Private Sub MoneySpinButton_Change()
MoneyTextBox.Text = MoneySpinButton.Value
End Sub
Explanation: this code line updates the text box when you use the spin button.
5. Double click on the OK button.
6. Add the following code lines:
Private Sub OKButton_Click()
Dim emptyRow As Long
Sheet1.Activate
emptyRow = WorksheetFunction.CountA(Range(«A:A»)) + 1
Cells(emptyRow, 1).Value = NameTextBox.Value
Cells(emptyRow, 2).Value = PhoneTextBox.Value
Cells(emptyRow, 3).Value = CityListBox.Value
Cells(emptyRow, 4).Value = DinnerComboBox.Value
If DateCheckBox1.Value = True Then Cells(emptyRow, 5).Value = DateCheckBox1.Caption
If DateCheckBox2.Value = True Then Cells(emptyRow, 5).Value = Cells(emptyRow, 5).Value & » » & DateCheckBox2.Caption
If DateCheckBox3.Value = True Then Cells(emptyRow, 5).Value = Cells(emptyRow, 5).Value & » » & DateCheckBox3.Caption
If CarOptionButton1.Value = True Then
Cells(emptyRow, 6).Value = «Yes»
Else
Cells(emptyRow, 6).Value = «No»
End If
Cells(emptyRow, 7).Value = MoneyTextBox.Value
End Sub
Explanation: first, we activate Sheet1. Next, we determine emptyRow. The variable emptyRow is the first empty row and increases every time a record is added. Finally, we transfer the information from the Userform to the specific columns of emptyRow.
7. Double click on the Clear button.
8. Add the following code line:
Private Sub ClearButton_Click()
Call UserForm_Initialize
End Sub
Explanation: this code line calls the Sub UserForm_Initialize when you click on the Clear button.
9. Double click on the Cancel Button.
10. Add the following code line:
Private Sub CancelButton_Click()
Unload Me
End Sub
Explanation: this code line closes the Userform when you click on the Cancel button.
Test the Userform
Exit the Visual Basic Editor, enter the labels shown below into row 1 and test the Userform.
Result:

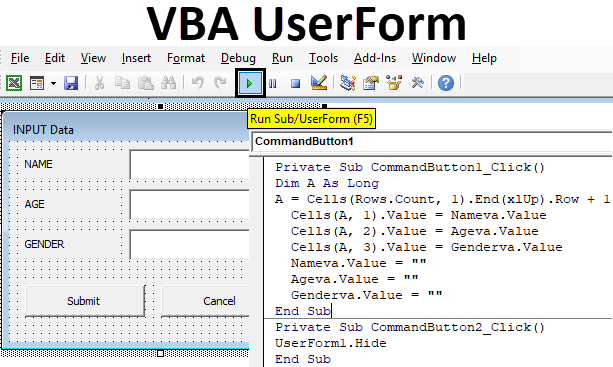
Excel VBA UserForm
In Excel VBA, we have a very useful tool which is known as UserForm. It is a practical way of getting information from a user. What is a UserForm in VBA? UserForm is like a wizard box or a dialog box in which we ask users to input data, and it has some instructions on it.
VBA UserForm is also inbuilt in excel and can be created by the developers. To use the VBA userform first, we need to activate the developer tab from the Options tab. Once the developer tab is activated, we can go ahead in Excel VBA and create UserForms. Userforms are used to store data in excel. It can be compared to google forms, where we have a specific set of instructions and ask the user to input data as per the instructions.
UserForm is widely used everywhere. In UserForm, the data entered by the user gets stored in the corresponding column. It is the most practical way in excel to take input from the user and store the data in excel relatively in the correct location.
How to Create UserForm in Excel VBA?
Below are the different examples to create UserForm in Excel using VBA code.
You can download this VBA UserForm Excel Template here – VBA UserForm Excel Template
Excel VBA UserForm – Example #1
First, let us get to the basic of the UserForm. How to view a UserForm and what a UserForm is.
- In the Excel worksheet, go to the Developer’s tab and click on the Visual Basic editor.
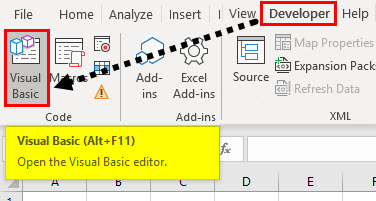
- Now how do we add a userform to this blank screen? In the insert tool, click on UserForms.
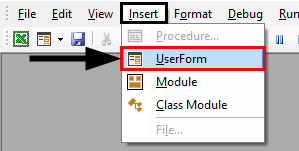
- A new wizard box opens up, and it is blank, which is our blank userform.

- It is currently named as userform1 as we have not given it any name. We can do that by changing its name from the properties option on the left-hand side of the screen.
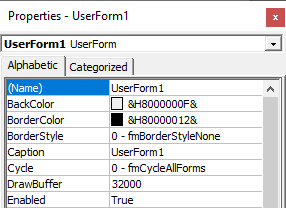
- Let us change the name to the sample form and see the result.
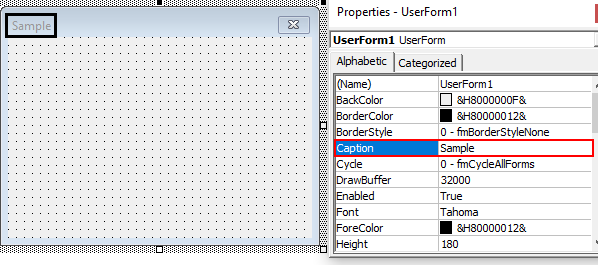
Our userform is named as a sample now.
- Now let us try to change the color of the userform. In the properties toolbox, we have a dropdown provided to us named as back color; we can select any set of colors we want.
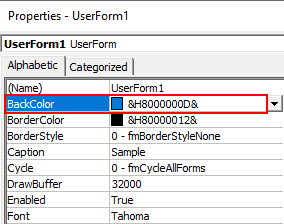
- After I have selected the option for black color, my sample UserForm’s color has been changed as follows,
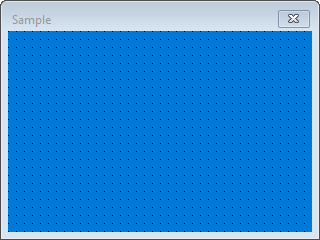
- How do we run this userform? Make sure that we have clicked on the userform itself and click on the run button shown in the screenshot below. When we click on the run button, we can see that a blank form appears on the excel screen.
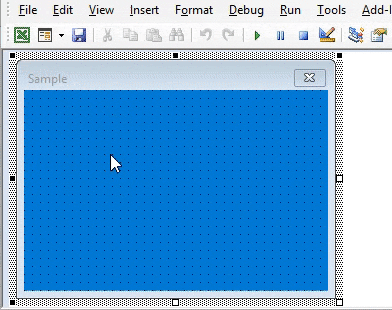
It has no other options than to close it because we have not added any other buttons to it.
Excel VBA UserForm – Example #2
Let’s see how to add buttons to a userform to input the data in Excel VBA. We will make a simple VBA userform in which we will ask the user to enter his name, age, and sex. The steps involved in making such userform is as follows.
- In the Excel worksheet, go to the developer’s tab and click on the visual basic editor.

- Now in the insert tab, click on userform to open a userform window.
- We need to add buttons to this userform in order to get input from the user. We can see that a toolbox is also opened beside our userform, which has the control buttons.
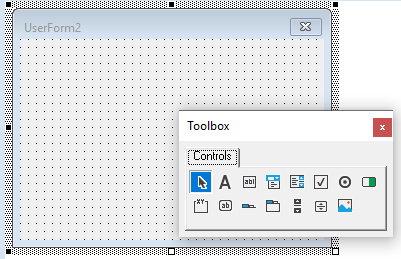
This toolbox has various controls in it, which is used in UserForms.
- So for our example, we need a name, age, and gender to be input by the user. We Basically need three labels which will represent our instructions. Click on Labels.
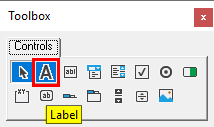
- Hover the mouse on userform and click and drag to insert a label in the userform.
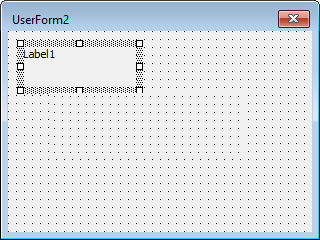
- Currently, it is named as label 1; we need to change the label name to “Name” for the instruction to the user. Click on the label and delete the default name provided and insert the new name.
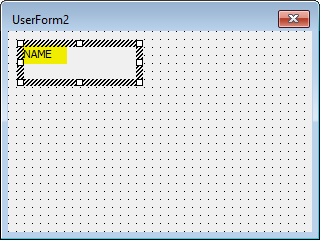
- Now insert the label for Age and Gender in a similar way and rename them.
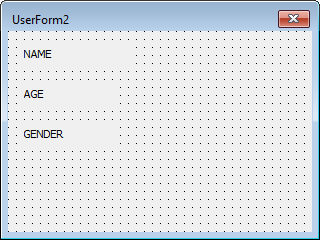
- Now adjacent to the labels, we need to insert a text box so that the user can input values. From the toolbox controls, click on TextBox.
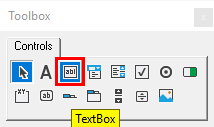
- Hover the mouse adjacent to the labels and click on the form.
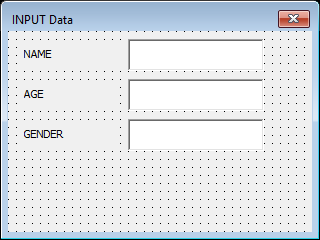
- Now let us insert the command button in the userform, which will store the data for us. From the toolbox controls, click on CommandButton.
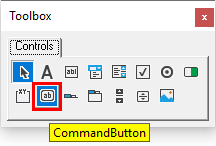
- Hover the mouse on the form.
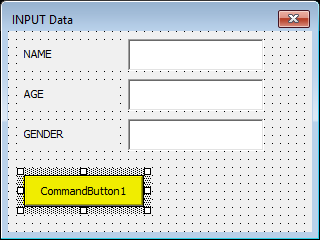
- Change the caption of CommandButton1 to “Submit”.
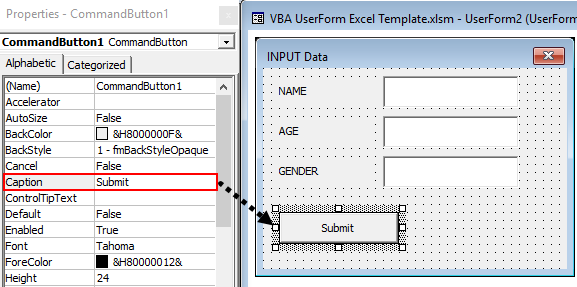
- Insert one CommandButton and call it as “Cancel”.
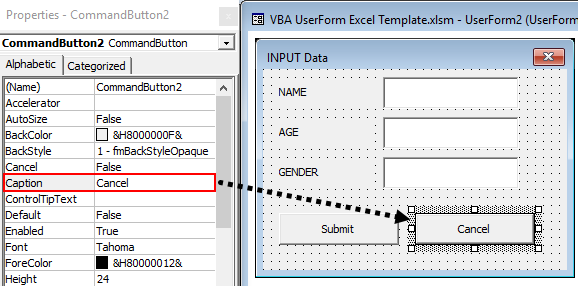
- The next step is to rename each of the Textboxes so that we can easily use them in our codes; for name rename the textbox against it as Nameva for name value and for age as Ageva similarly for gender as Genderva for gender value,
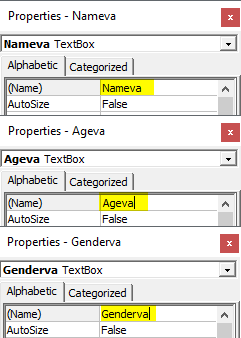
- Run the UserForm by clicking on the play button or by pressing the F5 key.
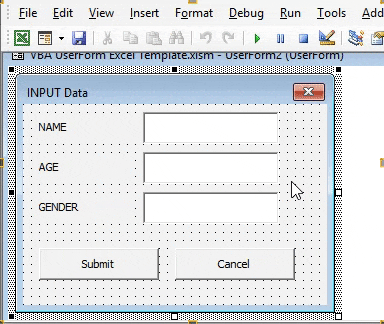
- In the Excel Sheet, write the header for the data has to be entered as follows.
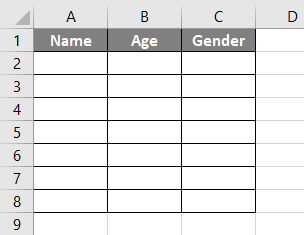
- Double click on the submit button, which will open the code window for us for the submit button as follows.
Code:
Private Sub CommandButton1_Click()

End Sub
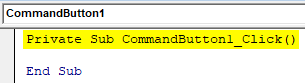
- In the code window, Declare a variable as long as shown below.
Code:
Private Sub CommandButton1_Click()

Dim A As Long

End Sub
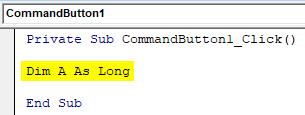
- Now let us move the first vacant cell in the first column with the following code.
Code:
Private Sub CommandButton1_Click()

Dim A As Long
A = Cells(Rows.Count, 1).End(xlUp).Row + 1

End Sub
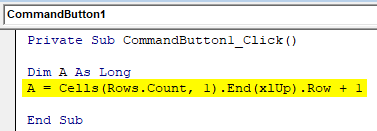
- Let us store the value provided by the user in the worksheet by the following code.
Code:
Private Sub CommandButton1_Click()

Dim A As Long
A = Cells(Rows.Count, 1).End(xlUp).Row + 1
  Cells(A, 1).Value = Nameva.Value
  Cells(A, 2).Value = Ageva.Value
  Cells(A, 3).Value = Genderva.Value
  Nameva.Value = ""
  Ageva.Value = ""
  Genderva.Value = ""

End Sub
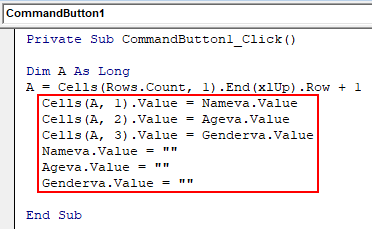
- Now double click on the Cancel button; this will also show you the auto macro name like this.
Code:
Private Sub CommandButton2_Click()

End Sub
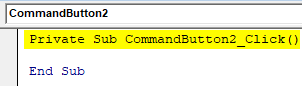
- Use the below code.
Code:
Private Sub CommandButton2_Click()

UserForm1.Hide

End Sub
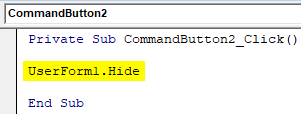
- Run the userform from the run button provided or by pressing the F5 key, and we get the following result.
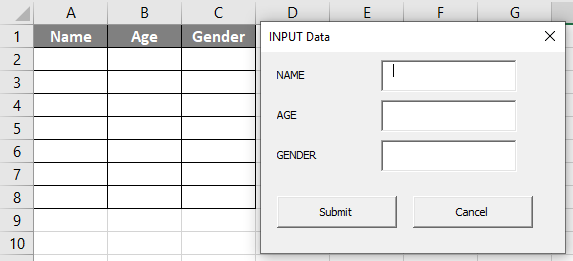
- Enter the values in the text boxes as follows.
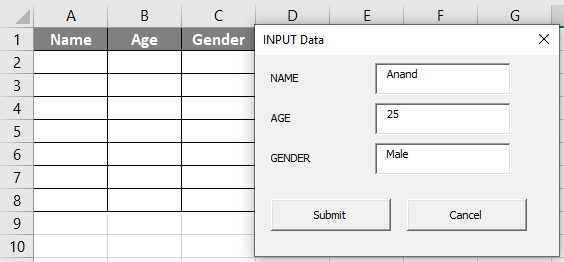
- Press the Submit button to see the result in the excel sheet as follows.
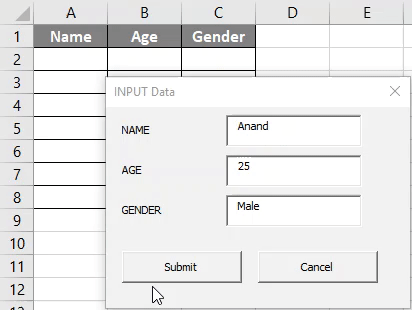
This is how we create a userform to get the data from the user.
Things to Remember
- Userforms are inbuilt or can be created by the developer in VBA.
- The properties of userform can be changed from the properties wizard box in VBA.
- Userforms need to have buttons in order to fetch data from the user.
- To run a userform, make sure that the userform is selected.
Recommended Articles
This is a guide to VBA UserForm. Here we discuss how to Create UserForm in Excel using VBA code along with some practical examples and a downloadable excel template. You can also go through our other suggested articles –
- VBA TextBox
- VBA List Box
- VBA Code
- VBA XLUP
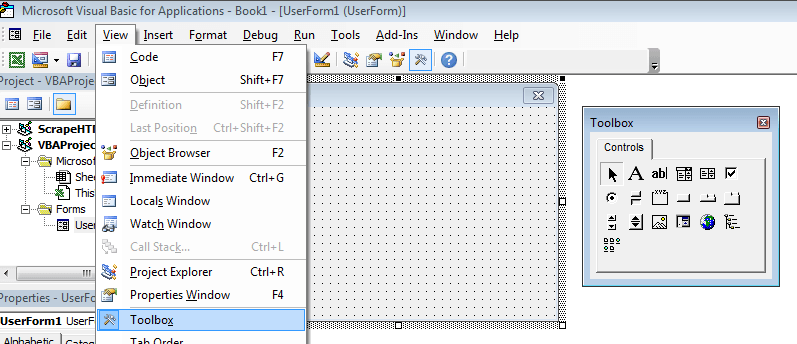
The Excel VBA UserForm allows you to create a new Excel custom Window with select Form or ActiveX controls such a Button, ListBox, CheckBox and other controls. You can Show or Hide the UserForm and customize it as needed.
Below you will find a complete tutorial on how to create and customize your own Excel VBA UserForm.
Create VBA UserForm
User Forms fill the gap where a Message Box won’t do. UserForms allow you to create custom forms with Buttons, Combo-boxes, Scrollbars and many more controls.
Open the VBA Project to add a new UserForm

A new UserForm will be inserted into your VBA Project under a new branch called Forms.
Open the new UserForm and the Toolbox to view controls
Let’s create a simple form. First we need to see what form controls can we add to it. To view the Toolbox go to the View menu and select Toolbox:
Add Button to UserForm
Now let’s add a simple button to our new form. To do that we simply need to drag it from the Toolbox. Hit the Button icon and drag it to the new form:
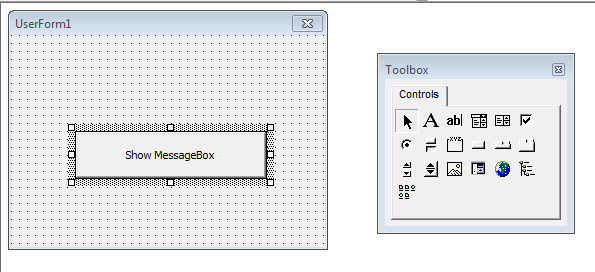
To add code to your Button – double-click the button on the UserForm. This will navigate you to the code section of the UserForm. You can also go to the View code section as shown below:
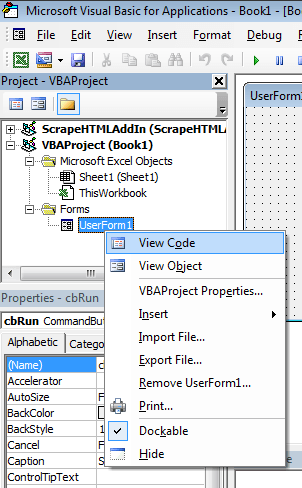
This should create the following code stub:
Private Sub CommandButton1_Click()

End Sub
Let’s just add a simple MessageBox to the new form to see that the button works:
Private Sub CommandButton1_Click()
 MsgBox "Hello this is CommandButton1!"
End Sub
Show / Hide User Form
Now as we have created our new UserForm let’s put it to the test. Below a simple example of how to execute your UserForm:
Sub TestUserForm()
 Dim uf as UserForm1
 Set uf = New UserForm1
 uf.Show 'Will make the UserForm Visible
End Sub
Try clicking on the button to see that it works!
If you want to close the VBA UserForm use the Hide procedure. I replaced the contents of the Button Click procedure above as per below:
Private Sub CommandButton1_Click()
 uf.Hide 'Will close / hide the UserForm
End Sub
UserForm Events
VBA Events are procedures that run automatically when something happens. VBA UserForm events are similar to VBA Worksheet or VBA Workbook events. The following is a list of available VBA UserForm events for Excel:
| UserForm Event | Description |
|---|---|
| Activate | VBA UserForm is activated (is front facing application against other forms or Excel windows) |
| AddControl | A Control is added to the VBA UserForm at run time |
| BeforeDragOver | A Mouse Drag and Drop operation is in progress (before drop) |
| BeforeDropOrPaste | Left click is released and data is dropped and pasted |
| Click | Left click on the VBA UserForm (not a control) |
| DblClick | Double left click on the VBA UserForm (not on a control) |
| Deactivate | UserForm loses focus |
| Initialize | Runs when the UserForm is created (to initialize the form e.g. add items to lists etc.) |
| KeyDown | Any keyboard button is pressed while the VBA UserForm is Active |
| KeyPress | An ANSI key is pressed when VBA UserForm is Active |
| KeyUp | Any keyboard button key is released while VBA Userform is active |
| Layout | Size of the UserForm was changed at run time |
| MouseDown | Any mouse button is pressed on the VBA UserForm (not a control) |
| MouseMove | Mouse is moved over the VBA UserForm |
| MouseUp | Mouse is released over the VBA UserForm |
| QueryClose | VBA UserForm is closed or memory released |
| RemoveControl | A control is removed from VBA UserForm at run time |
| Resize | VBA UserForm is resized |
| Scroll | VBA UserForm is scrolled |
| Terminate | VBA UserForm is removed from memory |
| Zoom | Occurs when VBA UserForm is zoomed |
Adding UserForm Events
To add Events to your UserForm use the drop-downs in the VBA Module of the Form:
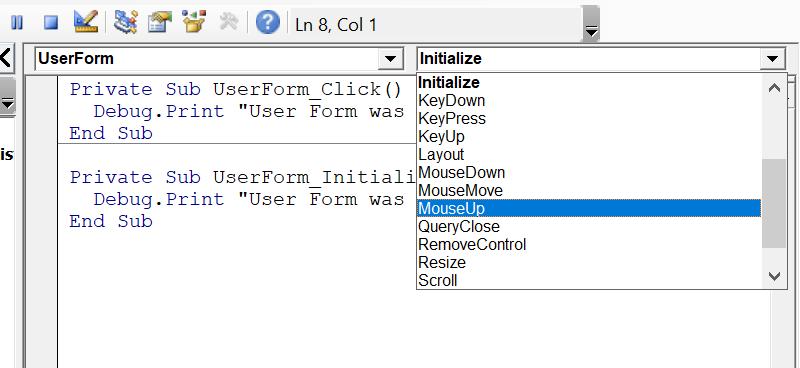
Below are examples UserForm events:
Private Sub UserForm_Click()
  Debug.Print "User Form was clicked!"
End Sub

Private Sub UserForm_Initialize()
  Debug.Print "User Form was created!"
End Sub
Forms and Controls in Excel VBA
Any Windows Application is equipped with set of objects called windows controls. Forms and Controls in Excel VBA topics give you the complete understanding of developing application with Forms and Controls.
In This Section:
- What Are UserForms?
- What Are ActiveX Controls?
- What Are The Different UserForm Controls & Use?
- Practical Learning: Developing A Simple UserForm
- Example File
What Are UserForms?
Any Windows Application is equipped with set of objects called windows controls. The Main control is called a Form, it is the primary window contains different types of controls which allow user to interact with the computer. The following is a simple form to calculate square value of a given number.
You can enter the any numerical value in TextBox and Push the Command Button to see the result (Example file is attached in this post).

What Are UserForm Controls or ActiveX Controls?
UserForm Controls are objects which you can be placed onto UserForms to interact with your data. There are several ActiveX controls which help users to do different activities with data, each control have different functionality.
We can place form controls on user forms based on our requirement, then add the code for each control to perform required tasks. Following are most commonly used control and their uses.
What Are The Different UserForm Controls & Use?
You can click on the ToolBox to see the various controls available in the VBE (Visual Basic Environment).

| Control | Control Name | Description |
|---|---|---|
| Label | You can use this contol to display the text on the userform | |
| Text box | Enable user to enter some text or data | |
| Command button | Push Button, uses to runs a macro that performs an action when a user clicks it | |
| Combo Box | Drop-down list can be used to provide the interface to select one item from the list of items | |
| List Box | List Box can be used to provide the interface to select one or more item from the list of items | |
| Frame | Layout element which groups common elements | |
| Option Button | Allow user to select an exclusive option from the list of choices | |
| Check Box | Allow user to select one ore more options from the list of choices | |
| Image | You can use this to display a image on the userform |

Forms and Controls in Excel VBA – Practical Learning: Developing A Simple UserForm
Now we will develop a simple userform, follow the below steps to create a userform to Find Square Values of a given number.
Step 1: Open VBE by pressing Alt+F11

Step 2: Goto Menu Bar -> Insert -> Click on UserForm

It should look like this:

Step 3: Click On ToolBox and Add Three Labels, One TextBox and Two Command Buttons as shown below


Step 4: Now Click On the First Label and Change the Caption of the Label as “Enter a Value” – as shown below

Similarly, change the caption of second Label as “Square Value”, Caption of the Third Label as blank(just delete the captions, we need this blank label to show the square value of the given value), Command Button1 as “Find Square Value”, Command Button2 as “Exit”, it should look like this:

Step 5: Now Double Click On the First Command Button (Find Suare Value), It will take you to the form code module, place the following code
Private Sub CommandButton1_Click()
 'Calculate Square Value
 Label3.Caption = TextBox1.Value * TextBox1.Value
End Sub
Similarly add the following code for Exit Button:
Private Sub CommandButton2_Click()
 'Exit Form
 Unload Me
End Sub
Now- your code module should look like this:

Step 6: Click on the Useform (left pane) to view the designed Form and Click on the Run Button to test it


Step 7:You can insert an ActiveX Command Button in the Worksheet and Add the following code to call the userform from your Worksheet
Private Sub CommandButton1_Click()
    'Call userform
    UserForm1.Show
End Sub
Example File
A Powerful & Multi-purpose Templates for project management. Now seamlessly manage your projects, tasks, meetings, presentations, teams, customers, stakeholders and time. This page describes all the amazing new features and options that come with our premium templates.
Save Up to 85% LIMITED TIME OFFER

All-in-One Pack
120+ Project Management Templates
Essential Pack
50+ Project Management Templates
Excel Pack
50+ Excel PM Templates
PowerPoint Pack
50+ Excel PM Templates
MS Word Pack
25+ Word PM Templates
Ultimate Project Management Template
Ultimate Resource Management Template
Project Portfolio Management Templates
Related Posts
-
- What Are UserForms?
- What Are UserForm Controls or ActiveX Controls?
- What Are The Different UserForm Controls & Use?
- Forms and Controls in Excel VBA – Practical Learning: Developing A Simple UserForm
- Example File
VBA Reference
Effortlessly
Manage Your Projects
120+ Project Management Templates
Seamlessly manage your projects with our powerful & multi-purpose templates for project management.
120+ PM Templates Includes:
6 Comments
-
Ali
February 23, 2015 at 10:21 AM — ReplyHi sir, loved your website! The only thing I would like to point out is that you’ve interchanged the icons for Command buttons and Frame in your indroduction. Might get confusing for newbies!
Thanks and keep up the good work!
Ali! -
PNRao
March 2, 2015 at 7:44 PM — ReplyThanks lot Ali- Changed now! PNRao!
-
Tracey-lee
March 5, 2015 at 11:35 PM — ReplyThank you soooo much for all the information that you have shared as well as the time. I am a newbie and really appreciate your site.
-
Naresh
August 31, 2015 at 8:38 PM — ReplyThank u very much sir…i’m new for this website but i noticed that u care of our request or comments…so once again thank u…
-
PNRao
August 31, 2015 at 11:06 PM — ReplyYou are most welcome Naresh! I am glad you found this useful.
Thanks-PNRao! -
Adnan
November 19, 2015 at 9:10 PM — ReplyThank you verrrry much. most of the time I find what am looking for in your site. God bless you.
Effectively Manage Your
Projects and Resources
ANALYSISTABS.COM provides free and premium project management tools, templates and dashboards for effectively managing the projects and analyzing the data.
We’re a crew of professionals expertise in Excel VBA, Business Analysis, Project Management. We’re Sharing our map to Project success with innovative tools, templates, tutorials and tips.
Project Management
Excel VBA
Download Free Excel 2007, 2010, 2013 Add-in for Creating Innovative Dashboards, Tools for Data Mining, Analysis, Visualization. Learn VBA for MS Excel, Word, PowerPoint, Access, Outlook to develop applications for retail, insurance, banking, finance, telecom, healthcare domains.
Page load link

3 Realtime VBA Projects
with Source Code!
Go to Top
Excel VBA Userform
Userform in VBA are customized user-defined forms made to take input from a user in a form format. Although it has different sets of controls to add, such as text boxes, checkboxes labels, etc., to guide a user to input a value and store the value in the worksheet, every part of the UserForm has a unique code with it.
UserForm is an object within the Excel interface. Inside this UserForm, we can create other useful custom dialog boxes to get the data from the user. When working with a Macro file created by your senior or downloaded from the internet, you must have seen a UserForm.

In this article, we will show you how to create a similar UserForm to store the data from the user.
Table of contents
- Excel VBA Userform
- How to Create Userform?
- Formatting Userform
- VBA Code
- Recommended Articles
- How to Create Userform?
How to Create Userform?
Let us start.
You can download this VBA Userform Excel Template here – VBA Userform Excel Template
- Like how you insert a new module similarly, you need to click on the INSERT button in Visual Basic Editor to insert UserForm.

- It will also insert the UserForm as soon as you click on this.

Before we tell you how to program this, let me show you how to format this UserForm.

Formatting Userform
Selecting the UserForm, press the F4 key to show you the “Properties” window.

Using this “Properties” window, we can format this UserForm. We can name it. We can change the color, border style, etc.
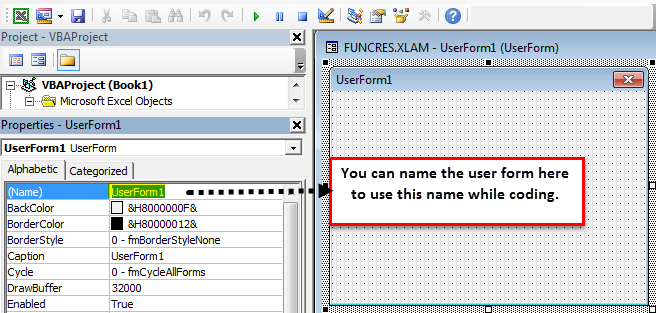

Like this, try other properties to get the sight of the UserForm.
Now, for this UserForm, insert a toolbox.

Now, we will see a “Toolbox” like this.

At this moment, the UserForm is inserted, not programmed. To know how it works, click on the “Run” button. We will see the form on the excelThe form in Excel simplifies data entry by allowing us to view, add, edit, and delete one record in a horizontal orientation. It is a hidden feature that isn’t accessible through the ribbon tools. This functionality must be added using the quick access toolbar option under the File tab.read more worksheet.

Now, use the toolbox to draw the label.

Enter the text as “Employee Name” inside the label.

For this label, we can format it by using properties. For example, we have entered the text as “Employee Name:” and can see this in the properties window under “Caption.”

Insert one more label. You can either click on a toolbox or drag the current label by holding the Ctrl key to insert one more label. You will have a replica of the current label.

Now, we will have the same label.

Change the name to “Employee ID.”

Now, insert one more label and name it “Department.”

Now, from the toolbox, insert a text box.

Name this text box as Employee Name in the “Properties” window.

Like this, insert two more text boxes from “Employee ID” and “Department,” respectively. Name those text boxes as per their heading.

Similarly, please do it for the “Department.”

Now, from the toolbox, insert “Command Button.”

Change the name of the “CommandButton” to “SubmitButton” and change the caption to “Submit.“

Insert one more button and call it “Cancel.”

Now, to see run, press the “Run” button or use the F5 key and see how your UserForm looks like in Excel.
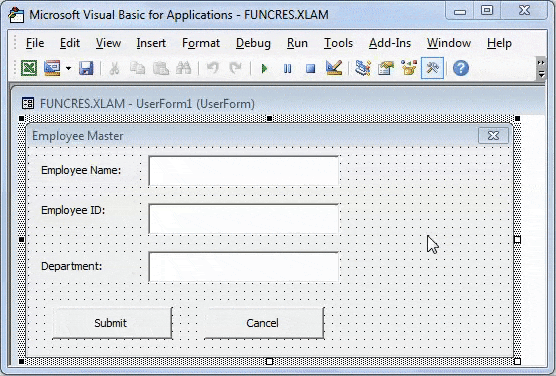
Now, it is coming into shape.
VBA Code
Now, the user will enter data, so we need to program this to store the data entered by the user on this form.
Double click on the SUBMIT button, which will take you to the Macro window with an auto-created Macro like the one below.

It says, “SubmitButton” click. Remember we had given a name for the SUBMIT button as “SubmitButton.”

So, whenever we want to call this button, we can call this by this name (submit button). Inside this Macro, copy and paste the below code.
Code:
Private Sub SubmitButton_Click()

  Dim LR As Long

   LR = Cells(Rows.Count, 1).End(xlUp).Row + 1

   Cells(LR, 1).Value = EmpName.Value
   Cells(LR, 2).Value = EmpID.Value
   Cells(LR, 3).Value = Dept.Value

   EmpName.Value = ""
   EmpID.Value = ""
   Dept.Value = ""

End Sub

- EmpName.Value here EmpName is the text box name we had given while creating the employee name text box.
- EmpID.Value here EmpID is the text box name of the “Employee ID” text box.
- Dept.Value this is the “Department” text box name.
So, clicking the “Submit” button will store the values in the mentioned cells.
Now, double-click on the “Cancel” button. It will also show you the auto macro name like this.

Please copy the below code and paste it.
Code:
Private Sub CancelButton_Click()

 MyUserForm.Hide

End Sub

MyUserForm is the name we had given to the UserForm. MyUserForm.Hide means clicking the CANCEL button, which will hide the UserForm.
Now, create a template like this in the worksheet.

Delete all the other sheets in the workbook except this template sheet.
Now, go to Visual Basic Editor.
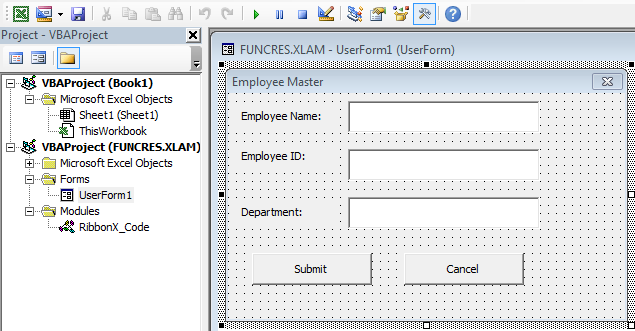
And run the Macro using the F5 key or manually. We will see the UserForm in front of us.
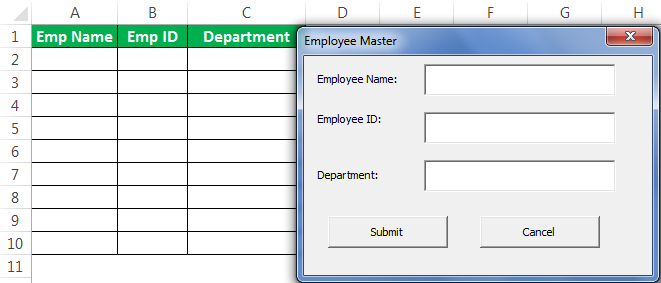
Enter the Employee Name, Employee ID, and Department name.
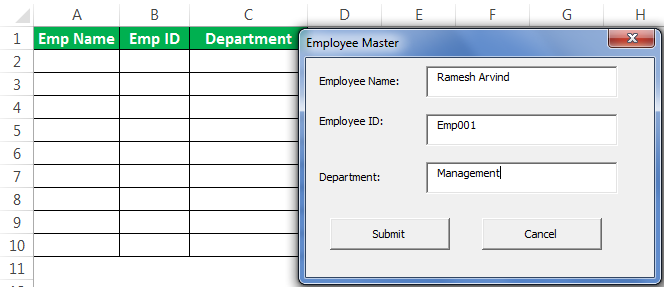
Now, if you click on the SUBMIT button, it will store the values on the template we have created.

Like this, you can keep entering the names. The UserForm will keep storing the values entered by the user in the specified cells.
So, by using the USERFORM, we can create wonderful projects to get information from the user.
Recommended Articles
This article has been a guide to VBA UserForm. Here, we learn how to create an Excel VBA UserForm to store data from the user, along with a practical example and downloadable template. Below you can find some useful Excel VBA articles: –
- GoTo in VBA
- VBA DateAdd
- InputBox in VBA
- Paste Special in VBA
- VBA Max