
Содержание
- Excel Services Overview
- Scenarios and Features
- Business Intelligence Portal and Workbook Analysis
- Managing Workbooks
- Programmatic Access through Custom .NET Applications
- User-Defined Functions (UDFs)
- ECMAScript (JavaScript, JScript)
- JavaScript user-defined functions (UDFs)
- JavaScript Object Model
- REST API
- REST ODATA
- Общие сведения о службах Excel
- Сценарии и функции
- Портал бизнес аналитики и анализ книги
- Управление книгами
- Программный доступ с помощью настраиваемых приложений .NET
- Пользовательские функции (UDF)
- ECMAScript (JavaScript, JScript)
- Пользовательские функции JavaScript (UDF)
- Объектная модель JavaScript
- REST API
- ODATA REST
Excel Services Overview
Excel Services is a service application that enables you to load, calculate, and display Microsoft Excel workbooks on Microsoft SharePoint. Excel Services was first introduced in Microsoft Office SharePoint Server 2007.
By using Excel Services, you can reuse and share Excel workbooks on SharePoint portals and dashboards. For example, financial analysts, business planners, or engineers can create content in Excel and share it with others by using an SharePoint portal and dashboard—without writing custom code. You can control what data is displayed, and you can maintain a single version of your Excel workbook. There are four primary interfaces for Excel Services:
An Excel Web Access web part, which enables you to view and interact with a live workbook by using a browser
Excel Web Services for programmatic access
An ECMAScript (JavaScript, JScript) object model for automating and customizing, and to drive the Excel Web Access control and help build more compelling, integrated solutions as well as the ability to user user-defined functions to extend the ECMAScript (JavaScript, JScript) object model
A Representational State Transfer (REST) API for accessing workbook parts directly through a URL
The Excel Interactive View feature has been disabled. For information about removing this feature from your website, see Removing Excel Interactive View from a webpage.
You can also extend Excel Calculation Services by using user-defined functions (UDFs).
For more information about Excel Calculation Services, see Excel Services Architecture.
By using Excel Services, you can view live, interactive workbooks by using only a browser. This means that you can save Excel workbooks and interact with them from within portal sites.You can also interact with Excel-based data by sorting, filtering, expanding, or collapsing PivotTables, and by passing in parameters; this provides the ability to perform analysis on published workbooks. You can interact with a workbook without changing the published workbook—which is valuable for report authors and report consumers.Excel Services supports workbooks that are connected to external data sources. You can embed connection strings to external data sources in the workbook or save them centrally in a data connection library file.You can also make selected cells in worksheets editable by making them named ranges (parameters). Items that you choose to make viewable, when you save to Excel Services, appear in the Parameters pane in Excel Web Access. You can change the values of these named ranges in the Parameters pane and refresh the workbook. You can also use the portal’s filter web part to filter several web parts (Excel Web Access and other types of web parts) together.However, you cannot use Excel Services to create new workbooks or to edit existing workbooks. To author a workbook for use with Excel Services, you can use Microsoft Excel 2013.
Microsoft Excel Online, part of Office Online, also supports Excel workbooks in the browser. For more information about Excel Online, see Get started with the new Office.
Excel Services also has a Web service. You can use Excel Web Services to load workbooks, set values in cells and ranges, refresh external data connections, calculate worksheets, and extract calculated results (including cell values, the entire calculated workbook, or a snapshot of the workbook). In SharePoint, you can also save, save a copy, and participate in collaborative editing sessions by using Excel Web Services.
Excel Services supports UDFs, which you can use to extend the capabilities of Excel Calculation Services—for example, to implement custom calculation libraries or to read data from Web services and data sources that are not natively supported by Excel Services.Excel Services is designed to be a scalable, robust, enterprise-class server that provides feature and calculation fidelity with Excel.
Scenarios and Features
Excel Services supports many different scenarios and features, some of which are described in this section.
Business Intelligence Portal and Workbook Analysis
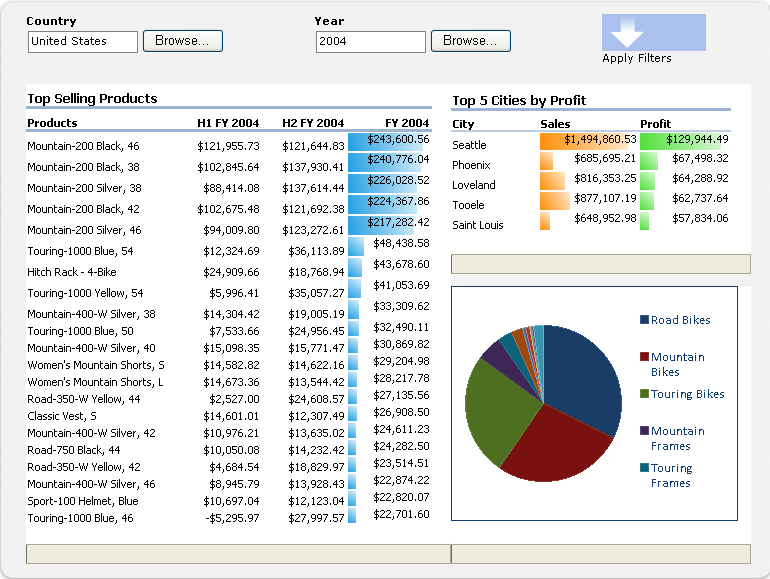
A business intelligence portal displays scorecards and reports, and enables users to explore data by using only a browser. The BI Center feature in SharePoint Server includes a business intelligence portal and dashboard functionalities. Figure 1 shows a report center dashboard with a library of reports, a chart, and Key Performance Indicators (KPIs) already set up.
Excel Services also enables you to calculate data on the server. Excel Services participates in the BI Center by providing the ability to calculate and expose Excel-based content on integrated BI dashboards.You can display an Excel workbook by using the Excel Web Access web part, connect to external data sources, and further interact with the data in the workbook.
Figure 1 shows a dashboard with a filter web part, and Excel workbooks displayed by using Excel Web Access web parts.
Figure 1. Dashboard with filtering and Excel content
In addition to participating in integrated dashboards, Excel Services can also be used to display all or part of Excel workbooks to enable users to interact with that content in the familiar Excel user interface. Figure 2 shows a range being displayed, and cells being exposed for user input through parameters. Designating specific cells as parameters enables users to change values in those cells in a worksheet by using the edit boxes in the right pane. Excel Services then recalculates the worksheet based on the new values.
If you want to use certain functionalities in Excel or if you want to analyze a workbook by using all Excel functionalities, you can open a workbook in Excel by clicking Open in Excel. You can also open a workbook in Excel to print it and to work offline.
To open a workbook by using the Open in Excel command, you must have «open» rights. For more information, see the next section, Managing Workbooks, and User Permissions and Permission Levels on TechNet. Users who do not have «open» rights can still open a snapshot in Excel.
Figure 2. Using the Parameters pane
You can also analyze, pivot, and interact with data by using Excel Web Access.
For more information about Excel Services and business intelligence capability in SharePoint, see the business intelligence documentation in SharePoint Server Help.
Managing Workbooks
The workbook management and lockdown capabilities of Excel Services enable you to:
Maintain only one copy of a workbook, that is created and changed by a trusted author in a central, secure place, instead of maintaining multiple copies on each user’s computer. The correct version of the worksheet is easier to find, share, and use from within Excel, SharePoint, and other applications.
Secure and protect workbook models and back-end data. You can give users view-only rights to limit access to the workbook. For example, you can prevent users from opening a workbook by using Excel or you can control what they are allowed to view in a workbook. Users can have browser-based access to the content in a workbook that the author wants to share, but no ability to open the workbook in the Excel client, view formulas, or view supporting content or other intellectual property that may be in the workbook.
Create snapshots of a workbook.
Excel Services is optimized for many users and many workbooks. It can also help load-balance calculation across the server farm.
For more information about managing workbooks by using Excel Services, see the SharePoint Server documentation on TechNet or SharePoint Server Help.
Programmatic Access through Custom .NET Applications
You can create custom applications—for example, ASP.NET applications—that:
Call Excel Web Services to access, parameterize, and calculate workbooks.
Open, refresh external data, set cells or ranges, recalculate, participate in collaborative editing sessions with other applications or people, save, and save as.
Use custom workflows to schedule calculation operations or send e-mail notifications. (This uses SharePoint capabilities and is not a native part of Excel Services.)
User-Defined Functions (UDFs)
You can also use Excel Services UDFs, which enable you to use formulas in a cell to call custom functions that are written in managed code and deployed to SharePoint Server.
For more information about UDFs in Excel Services, see Understanding Excel Services UDFs.
ECMAScript (JavaScript, JScript)
You can also use the JavaScript object model in Excel Services to automate, customize, and drive the Excel Web Access web part control. You can use the JavaScript object model to build more compelling and integrated solutions.
JavaScript user-defined functions (UDFs)
New in Microsoft Excel Services and Microsoft SharePoint, ECMAScript (JavaScript, JScript) UDFs enable you to add custom functions to Excel when you are using an embedded Excel workbook with OneDrive or an Excel Web AccessExcel Web Access web part in SharePoint. Besides the built-in functions that you use in Excel, you can add your own, custom functions using JavaScript UDFs that you can call from inside formulas in .
JavaScript UDFs are similar to UDFs that you can create for Microsoft Excel. The difference is that JavaScript UDFs are only used in workbooks embedded in a webpage and only exist on that webpage.
JavaScript Object Model
The Excel Services JSOM API now includes the following:
The ability to reload the embedded workbook. Now you can reset the embedded workbook to the data in the underlying workbook file.
User-created floating objects. The EwaControl object has new methods that let you add/remove floating objects that you create.
More control over viewable area of the Ewa control.
SheetChanged Event. This event raises when something changes on a sheet, such as updating cells, deleting or clearing cells, copying, cutting or pasting ranges, and undo/redo actions.
Enabling data validation. You can now validate data that is entered by a user.
REST API
You can use the REST API in Excel Services to access workbook parts or elements directly through a URL. The discovery mechanisms built into the Excel Services REST API enable developers and users to explore the content of the workbook manually or programmatically.
For more information about the REST API in Excel Services, see Excel Services REST API.
REST ODATA
New in Microsoft Excel Services and Microsoft SharePoint, by using the new OData functionality in the Excel Services REST API, you can request the tables inside an Excel workbook as OData. For example, to request Excel metadata about available resources in the SampleWorkbook.xlsx workbook using a REST call, you use the following syntax.
http:// /_vti_bin/ExcelRest.aspx/Docs/Documents/SampleWorkbook.xlsx/model For more information about the REST API, see the
Excel Services 2010 REST API documentation in the SharePoint SDK documentation.
To request metadata about available resources in the SampleWorkbook.xlsx workbook using OData, use the same REST syntax, except replace /Model with /Odata as in the following request.
From there you can use OData system query options to get specific information about tables inside the workbook.
Источник
Общие сведения о службах Excel
Службы Excel – это приложение службы, позволяющее загружать, вычислять и отображать книги Microsoft Excel в Microsoft SharePoint. Службы Excel впервые представлено в Microsoft Office SharePoint Server 2007.
С помощью Службы Excel можно повторно и совместно использовать книги Excel на порталах и панелях мониторинга SharePoint. Например, финансовые аналитики, бизнес-планировщики или инженеры могут создавать содержимое в Excel и предоставлять его для общего доступа с помощью портала и панели мониторинга SharePoint без написания пользовательского кода. Можно управлять отображением данных и поддерживать единую версию книги Excel. Есть четыре основных интерфейса для Службы Excel:
Веб-часть Excel Web Access, которая позволяет просматривать динамическую книгу и взаимодействовать с ней через браузер
Веб-службы Excel для программного доступа.
Объектная модель ECMAScript (JavaScript, JScript) для автоматизации и настройки, контроля элемента управления Веб-клиент Excel, помощи в создании более удобных интегрированных решений, а также для предоставления пользовательских функций для расширения возможностей объектной модели ECMAScript (JavaScript, JScript).
Интерфейс REST API для доступа к частям книг непосредственно по URL-адресу
Функция интерактивного представления Excel отключена. Сведения об удалении этой функции с веб-сайта см. в статье Удаление интерактивного представления Excel с веб-страницы.
Вы также можете расширять службы вычислений Excel с помощью пользовательских функций (UDF).
Дополнительные сведения о службах вычислений Excel см. в разделе Архитектура службы Excel.
С помощью Службы Excel можно просматривать интерактивные книги с помощью только браузера. Это означает, что можно сохранять книги Excel и взаимодействовать с ними из сайтов портала.Также можно взаимодействовать с данными на основе Excel путем сортировки, фильтрации, развертывания или свертывания сводных таблиц, а также передачи в них параметров; это предоставляет возможность выполнения анализа опубликованных книг. Можно взаимодействовать с книгой без изменения опубликованной книги, что ценно для авторов и потребителей отчетов.Службы Excel поддерживает книги, подключенные к внешним источникам данных. Можно внедрять строки подключения к внешним источникам данных в книгу или сохранять их централизованно в файле библиотеки подключений к данным.Также можно делать выбранные ячейки на листах редактируемыми, делая их именованными диапазонами (параметрами). Элементы, выбранные для отображения, при сохранении в Службы Excel отображаются в области Параметры в Веб-клиент Excel. Значения этих именованных диапазонов можно изменять в области Параметры и обновлять книгу. Вы также можете использовать веб-часть фильтра портала для фильтрации нескольких веб-частей (Excel Web Access и других типов веб-частей) вместе. Однако вы не можете использовать службы Excel для создания или редактирования существующих книг. Чтобы создать книгу для использования с Службы Excel, можно использовать Microsoft Excel 2013.
Microsoft Excel Online, входящий в состав Office Online, также поддерживает книги Excel в браузере. Дополнительные сведения о Excel Online см. в статье Начало работы с новым Office.
Для Службы Excel также есть веб-служба. Можно использовать Веб-службы Excel для загрузки книг, задания значений в ячейках и диапазонах, обновления подключений к внешним данным, вычисления данных на листах и извлечения вычисленных результатов (включая значения ячеек, вычисленные данные книги целиком или снимок книги). В SharePoint также можно выполнять сохранение (в том числе копий) и участвовать в сеансах совместного редактирования при помощи Веб-службы Excel.
Службы Excel поддерживает UDF, которые можно использовать для расширения возможностей Службы вычислений Excel например, для реализации настраиваемых библиотек вычисления или для чтения данных из веб-служб и источников данных, не поддерживаемых Службы Excel.Службы Excel разработан как масштабируемый, надежный сервер корпоративного класса, предоставляющий функции и точность вычислений Excel.
Сценарии и функции
Службы Excel поддерживает множество различных сценариев и функций, некоторые из которых описаны в этом разделе.
Портал бизнес аналитики и анализ книги
Портал бизнес-аналитики отображает системы показателей и отчеты и позволяет пользователям просматривать данные только в браузере. Функция Центра бизнес-аналитики в SharePoint Server включает в себя портал бизнес-аналитики и функции панели мониторинга. На рисунке 1 показана панель мониторинга центра отчетов с уже настроенной библиотекой отчетов, диаграммой и ключевыми показателями эффективности (KPI).
службы Excel также позволяет вычислять данные на сервере. службы Excel участвует в центре бизнес-аналитики, предоставляя возможность вычислять и предоставлять содержимое на основе Excel на интегрированных панелях мониторинга бизнес-аналитики. Вы можете отобразить книгу Excel с помощью веб-части Excel Web Access, подключиться к внешним источникам данных и дополнительно взаимодействовать с данными в книге.
На рис. 1 показана панель мониторинга с веб-частью фильтра и книгами Excel, отображаемыми с помощью помощи веб-частей Excel Web Access.
Рис. 1. Панель мониторинга с фильтрацией и содержимым Excel

Помимо участия в интегрированных панелях мониторинга, Службы Excel также можно использовать для отображения всех или части книг Excel для предоставления пользователям возможности взаимодействия с их контентом в знакомом пользовательском интерфейсе Excel. На рисунке 2 показан отображаемый диапазон и ячейки, предоставляемые для ввода пользователем через параметры. Обозначение определенных ячеек как параметров позволяет пользователям изменять значения в этих ячейках на листе с помощью полей редактирования в правой области. Затем Службы Excel повторно вычисляет лист на основе новых значений.
Если требуется использовать определение функциональные возможности в Excel или анализировать книгу с использованием всех функциональных возможностей Excel, можно открыть книгу в Excel, нажав кнопку Открыть в Excel. Также можно открыть книгу в Excel для ее печати и для работы в автономном режиме.
Чтобы открыть книгу с помощью команды Открыть в Excel, необходимы права на открытие. Дополнительные сведения см. в следующем разделе Управление книгами и Разрешения пользователей и уровни разрешений в TechNet. Даже пользователи, не обладающие правами на открытие, могут открывать моментальные снимки в Excel.
Рис. 2. Использование панели «Параметры»
Также можно анализировать, сводить данные и взаимодействовать с ними при помощи Веб-клиент Excel.
Дополнительные сведения о Службы Excel и возможности бизнес-аналитики в SharePoint см. в документации по бизнес-аналитике в справке SharePoint Server.
Управление книгами
Возможности управления книгами и их блокировки в Службы Excel позволяют:
Сохранять только одну копию книги, которая создается и изменяется доверенным автором в централизованном, безопасном расположении, вместо хранения нескольких копий на компьютере каждого пользователя. Правильную версию листа проще найти, предоставить для общего доступа и использовать в Excel, SharePoint и других приложениях.
Обеспечивать безопасность и защиту моделей книг и внутренних данных. Можно предоставить пользователям права только на просмотр, чтобы ограничить доступ к книге. Например, можно запретить пользователям открывать книгу в Excel или ограничить их возможности просмотра книги. Пользователи могут иметь доступ к контенту книги, открытому автором для общего доступа, через браузер, но не иметь возможности открыть книгу в клиенте Excel, просматривать формулы, вспомогательный контент или другую интеллектуальную собственность, которая может содержаться в книге.
Создание снимков книги.
Приложение Службы Excel оптимизировано для большого числа пользователей и книг. Также оно может помогать при балансировке вычислительной нагрузки в ферме серверов.
Дополнительные сведения об управлении книгами с помощью службы Excel см. в документации по SharePoint Server на сайте TechNet или Справке по SharePoint Server.
Программный доступ с помощью настраиваемых приложений .NET
Можно создавать настраиваемые приложения например, приложения ASP.NET, которые:
Вызывают Веб-службы Excel для доступа, параметризации и вычисления книг.
Открывают, обновляют внешние данные, задают ячейки или диапазоны, повторно вычисляют, участвуют в сеансах совместного редактирования с другими приложениями или пользователя, сохраняют, а также сохраняют с изменением имени или формата.
Используют настраиваемые потоки операций для планирования операций вычисления или отправки уведомления по электронной почте. (Для этого используются возможности SharePoint, не собственная часть Службы Excel.)
Пользовательские функции (UDF)
Кроме того, можно использовать пользовательские функции Службы Excel, позволяющие с помощью формул в ячейках вызывать настраиваемые функции, написанные в управляемом коде и развернутые в SharePoint Server.
Дополнительные сведения об определяемых пользователем функций в службы Excel см. в статье Общие сведения об определяемых пользователем службы Excel.
ECMAScript (JavaScript, JScript)
Объектную модель JavaScript можно также использовать в службы Excel для автоматизации, настройки и управления веб-частью Excel Web Access. Можно использовать объектную модель JavaScript для построения более удобных и интегрированных решений.
Пользовательские функции JavaScript (UDF)
Пользовательские функции ECMAScript (JavaScript, JScript) в Microsoft службы Excel и Microsoft SharePoint позволяют добавлять пользовательские функции в Excel при использовании встроенной книги Excel с OneDrive или веб-части Excel Web AccessExcel Web Access в SharePoint. Кроме встроенных функций, используемых в Excel, вы можете добавить собственные настраиваемые функции с помощью пользовательских функций JavaScript, которые можно вызвать из внутренних формул в .
Определяемые пользователем функции JavaScript похожи на определяемые пользователем функции , которые можно создать для Microsoft Excel. Разница заключается в том, что определяемые пользователем функции JavaScript используются только в книгах, внедренных в веб-страницу, и существуют только на этой веб-странице.
Объектная модель JavaScript
API JSOM для Службы Excel теперь включает следующие функции:
Возможность перезагрузить внедренную книгу. Теперь вы можете сбросить данные внедренной книги, вернув данные из файла базовой книги.
Перемещаемые объекты, созданные пользователем. Для объекта EwaControl существуют новые методы добавления или удаления созданных вами перемещаемых объектов.
Больший контроль над видимой областью элемента управления Ewa.
Событие SheetChanged. Это событие возникает при каких-либо изменениях на листе, таких как обновление ячеек, удаление или очистка ячеек, копирование, вырезание и вставка диапазонов, отмена и повтор действия.
Включение проверки данных. Теперь вы можете проверить данные, введенные пользователем.
REST API
Можно использовать API-интерфейс REST в Службы Excel для прямого доступа к частям книги по URL-адресу. Механизмы обнаружения, встроенные в Службы Excel API-интерфейс REST, позволяют разработчиками и пользователям просматривать контент книги вручную или программно.
Дополнительные сведения о REST API в службы Excel см. в службы Excel REST API.
ODATA REST
Новые возможности Microsoft службы Excel и Microsoft SharePoint. С помощью новой функции OData в СЛУЖБЫ EXCEL REST API можно запрашивать таблицы в книге Excel в виде OData. Например, чтобы запросить метаданные Excel о доступных ресурсах в книге SampleWorkbook.xlsx с помощью вызова REST, используйте следующий синтаксис.
http:// /_vti_bin/ExcelRest.aspx/Docs/Documents/SampleWorkbook.xlsx/model Дополнительные сведения о REST API см. в разделе
API-интерфейс REST служб Excel 2010 документации по пакету SDK SharePoint.
Чтобы запросить метаданные о доступных ресурсах в книге SampleWorkbook.xlsx с помощью OData, используйте тот же синтаксис REST, но заменив /Model на /Odata, как показано в приведенном ниже запросе.
Здесь вы можете использовать параметры системных запросов OData, чтобы получать конкретные сведения о таблицах в книге.
Источник
Часть 3. Использование COM-серверов Microsoft Office
Основные объекты серверов Excel и Word
Объекты Excel
Объекты Word
Позднее связывание
Раннее связывание
Практика
показывает, что приложения Microsoft
Office (Excel,
Word, Power
Point и т.п.)
являются одними из наиболее часто
используемых Windows-приложений.
Каждое из них является СОМ-сервером, а
следовательно, любой входящий в него объект
может быть использован вашей программой
как собственный.
Существуют два способа обращения к методам и свойствам СОМ-объекта: путем ссылки
на его библиотеку типов (раннее связывание) и по имени (позднее связывание).
Для Object Pascal предпочтительным является раннее связывание, так как в этом
случае компилятор может проконтролировать правильность обращения к свойствам
и методам внешних объектов, а создаваемый им код исполняется, как правило, быстрее.
В то же время базовый язык обращения к серверам Microsoft Office — Visual Basic
for Application (VBA) не поддерживает работу с указателями и, следовательно,
не может использовать интерфейсы. Специально для такого рода языков (помимо
VBA c указателями не работают также языки JavaScript, SmallTalk и некоторые
другие) в технологию СОМ введены диспинтерфейсы, позволяющие обращаться к методам
и свойствам по имени, а не по адресу. При инсталлировании Office можно установить
справку по VBA, в которой детально описываются интерфейсы серверов Microsoft
Office с указанием назначения методов и свойств, а также параметров обращения
к ним. Фактически это единственные доступные программисту документы, на которые
ему следует опираться при программировании доступа к мощным возможностям серверов
Microsoft Office. Замечу, что при стандартном инсталлировании Microsoft Office
справки по VBA не устанавливаются. Если в каталоге Program Files | Microsoft
Office | Office вы не найдете файлов vbaxl8.hlp1
(справка по Excel), vbawrd8.hlp (справка по Word) и т. п., вы должны их
добавить с помощью аплета Пуск | Настройка | Панель управления | Установка и
удаление программ.
В версию 5 Delphi включены компоненты страницы Servers,
позволяющие обращаться к СОМ-объектам этих
серверов с помощью библиотек типов, однако
эти компоненты практически не
документированы. Более того, сами
библиотеки уже внедрены в пакет dclaxserver50,
так что с помощью этой версии Delphi
мне так и не удалось получить их тексты. Во
всех случаях изучение обширных текстов
библиотек (например, файл Excel_TLB.pas
содержит более 20 тыс. строк) мало что дает
даже опытному программисту.
В этом разделе приводятся краткое
описание основных объектов двух наиболее
популярных серверов — Excel
и Word, а
также примеры использования Excel
в стиле VBA
(по имени) и с помощью компонентов страницы Servers.
Поскольку специально для версии MS
Office 97
язык VBA
был существенно расширен, этот материал
нельзя использовать для работы с более
ранними версиями пакета.
Основные объекты серверов Excel и Word
В терминологии VBA
используются
понятия «объект» и «коллекция». Объект —
это обычный интерфейсный объект СОМ,
имеющий свойства, методы и события.
Коллекция — это группа однотипных объектов.
Например, главный объект сервера Excel
— Application
определяет основные свойства и методы
сервера, а коллекция Worksheets
представляет собой
набор табличных страниц в текущей рабочей
книге и т.д. Представленные ниже иерархии
объектов и коллекций взяты из файлов vbaXXX.hlp. В отличие от объектов VCL
они построены не по принципу наследования,
а по функциональной подчиненности.
Объекты Excel
Сервер Excel — это мощный табличный процессор,
реализующий размещение и обработку
различного рода данных (как числовых, так и
текстовых), в том числе построение
на их основе графиков и диаграмм. При работе
с Excel создается
так называемая рабочая книга (файл данных) с
одним или несколькими листами. Все листы
одной рабочей книги могут быть связаны друг
с другом, что позволяет организовать
совместные вычисления над размещенными на
них данными.
На рис. 1 представлена функциональная структура объектов
и коллекций Excel.
Объект Application имеет многочисленные свойства,
методы и события, управляющие сервером в
целом. Только с его помощью, например, можно
визуализировать полнофункциональное окно
текстового процессора. Его центральное
свойство Workbooks предоставляет доступ ко всем
открытым в процессоре рабочим книгам.
У каждой рабочей книги есть
свойства Worksheets
и Charts,
представляющие собой коллекции листов и
диаграмм. Первоначально коллекция Workbooks
пуста. Чтобы создать хотя бы одну рабочую
книгу, нужно обратиться к методу Workbook.Add,
который создает рабочую книгу с
количеством пустых листов, определяемым
значением свойства Application.SheetsInNewWorkbook. У
каждого рабочего листа есть свойство Cells(I,J), определяющее содержимое
ячейки, лежащей на пересечении I-го
ряда с J-м
столбцом (нумерация рядов и столбцов
начинается с 1). Если при обращении к Cells
номера столбца и ряда опущены, считается,
что речь идет о текущем диапазоне ячеек,
заданном значением свойства Worksheets.Range.
Если необходимо изменить умалчиваемые
свойства столбца или ряда, используются
объекты Worksheets.Columns и
Worksheets.Rows. Помимо рабочих листов с рабочей книгой
связывается объект Charts,
представляющий собой коллекцию диаграмм. С
каждой диаграммой связывается объект SeriesCollection,
хранящий данные, по которым строится
диаграмма.
Объекты Word
Текстовый процессор Word
является популярнейшим средством создания
и оформления (форматирования) текстовых
документов. При работе с Word
фундаментальными понятиями являются
документ, абзац и стиль. Документ
определяет файл данных. Абзац — это
совокупность символов, обрамленная
служебными символами конца строк, разрыва
колонки или разрыва раздела. Наконец, стиль
— это совокупность признаков оформления
текста: его шрифт, положение на странице,
выравнивание и т.п. Стиль — непременный
атрибут каждого абзаца, то есть изменение
стиля абзаца автоматически приводит к его
переформатированию. Однако стиль может
изменяться внутри абзаца — для выделения
группы символов шрифтом, цветом символов и (или)
фона и т.п.
На рис. 2 показана функциональная иерархия объектов Word.
Центральный объект Application
имеет такое же назначение, что и
одноименный объект Excel,
– он определяет свойства, методы и события
на уровне всего сервера. Его свойство Documents представляет собой коллекцию открытых
документов. Посредством метода Open этого объекта можно открыть ранее
созданный документ, а метода Add — создать новый документ, основанный на
стандартном шаблоне Normal.dot. Каждый документ имеет коллекцию абзацев
Paragraphs.
С помощью таких методов этого объекта, как Add, InsertParagraph,
InsertParagraphAfter,
InsertParagraphBefore,
можно вставить новый абзац в уже
существующий текст или добавить абзац в
конец документа. В свою очередь, каждый
абзац имеет многочисленные свойства,
позволяющие нужным образом
отформатировать текст. Как и в Excel,
важную роль в иерархии объектов Word
играет объект Range, определяющий диапазон абзацев. Свойство
Text этого объекта содержит текст диапазона.
Позднее связывание
Приведенный ниже пример взят из моей
практики и, думаю, сможет пригодиться и вам.
В нем прайс-лист крупного оптового
поставщика книг создается с помощью Excel.
Необходимость в обращении к Excel возникла по той причине, что прайс-лист
периодически (примерно раз в две недели)
рассылается многочисленным покупателям,
которые составляют на его основе заказы на
поставку книг. У получателей прайс-листов
нет средств прочтения отчетов в
стандартном для Delphi
формате Quick Report
(файлы с расширением qrp). Экспорт прайс-листов в файлы других
форматов не позволяет получать документы
высокого качества, поэтому я решил для
создания прайс-листов использовать
средства Excel.
На рис. 3 показан прайс-лист в окне Excel, а на рис.
4 — вид формы примера на этапе конструирования.
Перед началом работы над проектом следует скопировать все файлы BOOKS.*
в отдельную папку на жестком диске (потребуется чуть больше 800 Кбайт
свободного пространства) и связать с папкой псевдоним BDE BIBLDATA типа Standard.
Эту процедуру упростит программа SetupBooks.exe, расположенная в том же каталоге
CD-ROM.
Начните новый проект и поместите на форму компоненты Query1, Label1, Button1 и ProgressBar1.
Для компонента Query1 измените значение свойства Name на Books, свяжите его
с псевдонимом BIBLDATA и поместите в свойство SQL такой запрос:
SELECT
  BookID, bName, bAuthor, bPublish, bOpt, bPages, bYear
FROM
  Books
WHERE
  bQuan>0
ORDER BY
bName
Создайте для него все объекты-поля.
В свойство Caption
компонента Label1
поместите значение Щелкните по кнопке Пуск,
чтобы создать таблицу Excel,
в такое же свойство кнопки — значение Пуск и измените имя компонента ProgressBar1 на pb.
В окне кода в разделе private класса TForm1 поместите поле Excel типа Variant.
В предложении uses укажите ссылку на модуль COMObj и напишите следующий обработчик
события OnClick кнопки Button1 (см. листинг 1).
Теперь небольшие пояснения. Переменные Sheet и Range
введены только для сокращения текста
программы: везде вместо Sheet,
например, можно писать Excel.Workbooks[1].Sheets[1]. С версией Delphi 4 поставлялись файлы XLCONST.PAS и XLCONST.DCU, в которых определены используемые в
документации vbaxl8.hlp константы xlXXX.
С версией 5 эти файлы не поставляются,
поэтому я использую их числовые
эквиваленты. Ширина полей печатного
документа Excel
задается во внутренних единицах,
соответствующих приблизительно 3,5 мм, так
что указанные в операторах Sheet.PageSetup.ХХХMargin значения установят левое, нижнее и
правое поля шириной 1,1 см, а верхнее — 1,4 см.
Ширина столбца определяется в символах
текста, умещающегося в столбце без
отсечения.
Переменная Excel
определяет поле класса TForm1. При создании класса в него
автоматически помещается значение VarEmpty. После завершения работы с Excel
пользователь может закрыть его. Но в моей
программе Excel не визуализировался, его работа
проходила «за кулисами», а созданная
таблица записывалась в указанный
пользователем файл с помощью оператора Excel.Workbooks[1].SaveAs(FileName).
После этого Excel закрывался. Поскольку в нашем случае Excel
показывает свое окно, а пользователь может
его не закрыть, полезно написать такой
обработчик события OnDestroy формы:
procedure   TForm1.FormDestroy(Sender: TObject);
begin
  if not VarIsEmpty(Excel) then
    Excel.Quit
end;
Запуская пример, помните, что
создание прайс-листа с помощью Excel
— процесс достаточно длительный. На моем
компьютере (400 МГц, 64 Мбайт) он занял около
минуты (для примера — аналогичный прайс-лист
средствами Quick Report
создается менее чем за 2 с). В конце
обработчика в метку lb
помещается общее время работы.
Раннее связывание
Следующий пример в функциональном плане повторяет предыдущий. В нем также с помощью Excel
создается прайс-лист, но на этот раз используется доступ непосредственно через
интерфейсы сервера. Вас ожидает «сюрприз»: время выполнения второго примера
на 40 с больше! Я не смог найти разумного объяснения этому феномену, но оба
примера находятся на сопровождающем диске, так что вы в любой момент можете
убедиться в этом сами.
Поскольку форма второго примера в точности повторяет форму первого, я не буду
объяснять, что нужно сделать для ее создания. Добавьте только на форму компонент
TExcelApplication и настройте его свойства: Name=Excel, AutoConnect=True, AutoQuit=True.
Если вы используете форму предыдущего примера как шаблон, не вставляйте поле
Excel в класс TForm1. Обработчик Button1Click должен выглядеть так (см. листинг
2).
Как видите, он во многом напоминает
обработчик предыдущего примера. Поэтому
остановлюсь на различиях.
При обращении к свойству SheetsInNewWorkbook,
как и во многих других случаях обращения к
интерфейсным свойствам и методам,
требуется указание идентификатора языка
локализации (lcid).
Значением 0 кодируется умалчиваемый язык.
Этот же идентификатор передается вторым
параметром обращения к методу Excel.Workbooks.Add. Первым параметром нужно указать имя
файла (в формате WideString),
если рабочая книга уже была ранее создана,
или «пустой» параметр EmptyParam,
если книга создается впервые.
Все мои попытки работать с объектами Range оказались неудачными. Чтобы вы не
слишком осуждали меня, я поместил
библиотеку типов Excel_TLB.pas
в каталог размещения примера — полистайте
ее на досуге и попробуйте найти нужное
решение для изменения ширины колонок и
полей листа, а также для раскрашивания
диапазона, выравнивания текста и т.п.
Есть свои нюансы и при обращении к
ячейкам. Во-первых, ими владеет объект Application,
а не Sheet.
Во-вторых, обращение к конкретному элементу
коллекции Cells (как и любой другой коллекции) возможно
только через ее свойство Item.
Подводя итоги, еще раз хочу обратить ваше
внимание на то, что по времени выполнения
позднее связывание хотя бы не проигрывает
раннему — во всяком случае, для
рассмотренных примеров. Если учесть, что
единственными доступными подавляющему
большинству программистов документами по
серверам MS
Office
являются справочные файлы vbaXXX.hlp, можно сделать вывод: использование
вариантов (позднее связывание) проще,
удобнее, а главное — намного понятнее, чем
непосредственная работа с интерфейсами (раннее
связывание).
КомпьютерПресс 6’2001
From time to time, someone does something with PHP that is truly unique — something that goes far beyond the norm of PHP applications listed at Hotscripts and leaves you truly impressed by the capabilities of this language.
One prime example is Jedox’s Worksheet Server, a truly unique combination of Microsoft Excel and PHP that enables users to build «online spreadsheets».
I first heard of Worksheet Server in December of last year and was so fascinated by the idea that I had to drop by Jedox (a couple of hours from home) to find out more. Since then, I’ve been messing with an evaluation copy of Worksheet Server, in spare moments, in an attempt to determine its significance as a tool for building Web applications.
If you’ve read Generating Spreadsheets with PHP and PEAR, you’ll know I’m not averse to using Excel with PHP when it makes a better choice than a normal HTML table for displaying data. Worksheet Server works in the opposite direction, the starting point being an Excel spreadsheet and the end result being a working PHP Web application.
This is a technological review of Worksheet Server as seen through the eyes of a PHP developer.
On today’s workbook:
- Introducing Worksheet Server: Worksheet what?
- First Impressions: thoughts as a naive Excel user
- The PHP Developers View: generated code and extending
- SUM(A1:A3): conclusions
Introducing Worksheet Server
The fundamental purpose of Worksheet Server is to enable Excel users to build Web applications using an environment in which they’re already confident. As a Web developer, the best way to think of Worksheet Server is as a design tool for building specialized PHP applications, where the tool just happens to be Excel.
Worksheet Server consists of two distinct software packages: a Web platform (Apache, PHP and the Worksheet Server code bundled in an easy-to-install form) and a set of add-ons for Excel itself, to help you design and publish applications. I’ll refer to the latter half as the «WS Excel Designer» to avoid confusion.
The Worksheet Server Life Cycle
The easiest way to grasp what Worksheet Server does is to consider the «life cycle» of an application built and deployed with it.
Step 1: Design
Design of an application begins with an Excel spreadsheet, 99% of the work being no different than creating a normal spreadsheet.
Special WS Excel Designer macros are available to perform tasks like adding hyperlinks and images to the application, so that they appear correctly as HTML in the Web environment. Further, Worksheet Server functions are also available, such as the MYSQLDATA function, which populates a cell with a result from a MySQL query. These are used just like normal Excel functions, but only take on meaning once they’re run on the Web server.
Step 2: Build
The designer, happy with the spreadsheet, «builds» the application for the Worksheet Server Web environment, using another WS Excel Designer macro.
In practice, a ZIP file is generated, which contains everything Worksheet Server needs to know about the application.
Step 3: Publish
In Worksheet Server (the Web server), administrators publish the application. They first log into the «Application Center» (a PHP application that manages multiple Worksheet Server applications), upload the ZIP file, «compile» it (a process which generates the PHP scripts for the application), then start the application (the application becomes available on a unique URL on the Web server).
Step 4: Security
The administrators log into the new application using the URL obtained from the Application Center. They create login accounts for end users, giving them privileges to access the application.
Step 5: Start work!
End users can now log in (over the Web) and begin to work with the application. They no longer work with separate local copies of the same spreadsheet; rather, they collaborate via a dynamic Web application. This looks largely the same as the original spreadsheet, but allows them to work concurrently (changes are reflected immediately) and may connect them with a wide variety of other remote data sources (databases, Web services and so on).
Step X: Re-design
If changes are required to the design of the application, the above cycle starts over, minus the effort of setting up user accounts. The designers continue work where they left off, using their saved .xls file (or an up-to-date copy they’ve downloaded from Worksheet Server), then re-publishing the application.
Worksheet Server acts as an active code generator (rather than a passive code generator — see this post for thoughts on active vs. passive code generation). The code running on the Web server is not meant to be modified directly (although there are opportunities for you to write «external» PHP code to interact with it). As such, Worksheet Server allows designers to make incremental changes to their applications without breaking anything.
That hopefully makes it clear what Worksheet Server actually is. Of course, seeing the end result helps even more — the best place to look is Jedox’s online demos (note that both the application, and the Excel file used to create it, are available).
First Impressions
With an evaluation copy of Worksheet Server and a copy of the manual in hand, I took it for a spin, installing it and following the introductory tutorial that walks you through the building of a basic application. The manual itself is straightforward, and wastes no time overloading the reader with extraneous information. It’s focused on getting down to real work as quickly as possible. I wish more technical documents were written this way.
Set Up
Installing Worksheet Server is a two-stage process.
Step one involves the installation of the Web environment. You can run the server both on Linux and Windows (there’s no requirement for Windows-specific extensions, despite Excel being the design tool). I chose Windows, ignoring Linux on the other partition, as I figured it would save booting between the two while working with Excel on the same system.
The installation involves simply running the installer program and watching it set up Apache, PHP and the Worksheet Server software; there’s very little requirement for user intervention and no awkward questions that would stump a non-techie.
Being used to setting up PHP/Apache by hand, I was a little suspicious of what I’d find on closer inspection once the installation was complete. I was quickly relieved to discover not only the latest stable releases (e.g. PHP 4.3.6), but a sensible PHP configuration (e.g. register_globals switched off and error_reporting set to E_ALL). Jedox seem to know what they’re doing.
All the standard Windows PHP extensions are available along with additional extensions developed by Jedox in-house. A license file is required to run the Worksheet Server application (simply a matter of copying it to the correct location) and, once that was done, I was able immediately to login to the online «Application Center».
Step two involves installing the WS Excel Designer, which requires an additional license file to work properly. With the file in place, the quick way to do this is to simply start Excel, then open an .xla file that Jedox provides, which adds an extra menu, containing WS Excel Designer tools, for the duration of the session. The smarter route is to use the Excel Add-Ins manager to attach the new menu permanently. Note that Excel 2000 is a minimum requirement.
Overall, installation is very easy and is geared, clearly, for users who aren’t interested in becoming sysadmins.
Instant Application
Following the introductory tutorial, I was impressed by how easy it was to work with WS Excel Designer. It really takes only a few minutes for anyone who has experience with Excel to get a grip on the WS Excel Designer extensions. Generally, the process of building a Worksheet Server application is no different than that of a normal spreadsheet and the added functionality does not intrude on the normal «flow» of spreadsheet creation. Some experience is needed to understand how the spreadsheet will look when it’s finally deployed online, but this is more a question of fine tuning.
With my spreadsheet design in place, it was a simple matter of saving the spreadsheet using WS Excel Designer macro, then switching to a Web browser to upload it.
The «Application Center», which runs on the Web server and is used to upload and deploy applications, has a simple but clean interface, which is generally intuitive to work with. A little more reading of the manual is required to ascertain exactly what the different buttons and menus do, but I never found myself overwhelmed and, with a few clicks, had the application compiled and running.
Heading to the published URL, I first logged in through an administrator account and created a new user to access the application. Logging back in with the new account, I saw my spreadsheet, now running as a live PHP Web application.
I was very impressed by how little time it had taken to get this far.
Look and Feel
The visual design process within Excel translates directly to the generated Web application. In other words, the cell structure of a given Excel worksheet, the formulas and relationships between cells (even across multiple worksheets), the font sizes and colors will all manifest on the Web server.
Worksheet Server even allows you to add charts to the spreadsheet for publication, assuming you use the Excel Chart Wizard or some of the special functions WS Excel Designer provides. Online the charts are rendered with help from JpGraph.
Note that some «quirks» need to be considered, bearing in mind that Excel, as a presentation tool, doesn’t map directly to «HTML + Web browser». Jedox recommend setting the default font as Arial, which is widely supported both across browsers and operating systems, and encourage you to keep font sizes within a particular range, to prevent strange-looking results. They also advise you to keep worksheets to a reasonable page size (both horizontally and vertically), to fit the ergonomics of a Web browser and make the application easy to navigate (who likes intensive scrolling?).
Different «skins» are provided when you compile the application, to allow you to apply general changes to the look and feel (mainly affecting the panels that appear at the top and bottom).
Generally, the Web version is a pretty fair copy of what I was working with in Excel. If you compare each original Excel file online (linked next to each demo) with its demo, you can see how the original design matches the end result.
Navigation
Top level navigation is provided by a panel added to the top and bottom of the display. These provide access to general Worksheet Server functionality. Depending on the application and environment, further functionality, such as downloading the spreadsheet in Excel format, exporting all the data in the application as an XML document or rendering the sheet as a printable PDF, is also available from the top panel.
Modifiable cells in the spreadsheet are displayed as form input text fields, and use JavaScript to control the cursor between enter-key strokes, making cell navigation similar to Excel.
Spreadsheets comprising multiple worksheets are navigable either via a drop down menu or by construction a special menu sheet in Excel. You can see the difference by comparing the Outline Demo with the Basel II Cockpit Demo.
I imagine Excel users should be fairly happy in this environment.
View Source
A comparison of the displays in Firefox and Internet Explorer shows they’re a pretty close match (without obvious accessibility issues).
A glance over the source HTML reveals many tables, which may not please everyone, but this is tabular data, after all. A scattering of upper case tag names suggests a little cleaning up may be needed, and the style attribute is used in many tags.
This does mean you’re pretty much required to modify structure via Excel, rather than applying clever CSS tricks, but, as I mentioned before, Worksheet Server is an active code generator; you’re not meant to modify the end result directly.
Limitations
Not all Excel functionality can be used when building Worksheet Server applications, and these limitations are identified clearly in the Worksheet Server manual.
For example, from Excel’s «Controls» toolbar, only the «listbox», «drop down» and «check box» controls may be used, while embedded images will be ignored (although charts may be added using the Chart Wizard or special functions).
No support is provided for Excel tools such as «Goal Seek» and «Scenarios»; Visual Basic macros are another no-go. The lack of support for Visual Basic may, at first glance, seem like a show-stopper. In practice, Worksheet Server replaces VB with a true multi-user environment backed by PHP when you need to accomplish something unusual. Remember, Worksheet Server is an application design tool, rather than some Excel add-on that blindly exports spreadsheets to HTML. Jedox recommend you start each application with a fresh spreadsheet, and encourage you to plan its design with the specific aim of delivering a Web application.
The only other significant limitation, for those that use it, is matrix functions are not supported.
Otherwise, all the in-built functions that you can embed in an Excel spreadsheet are supported directly online with a PHP function of the same name.
Hierarchical Data
One feature of Worksheet Server that will be new to Excel users is the notion of Report Entities.
Excel is designed to be a single-user application and the way it organises data is really only suitable for use by one person at a time. By contrast, Worksheet Server is geared to a multi-user environment and, to make this possible, it uses a feature called Report Entities. This allows a tree of worksheets to be defined, each generated from the same source spreadsheet, while allowing data to be grouped and aggregated.
The best way to understand how Report Entities work is by looking at the Outline Demo. Once you’re logged in, you’ll notice that a drop down menu is available from the top panel, allowing you to change Reporting Entity to either «Total», «North», «West» or «East». The «North», «West» and «East» regions represent Sales areas in this demo, and regional sales managers would use their respective Report Entity to enter sales data. The «Total» sheet is the top level Reporting Entity and combines the data from each of the child entities. This view would be available to the Chief Sales Executive, allowing him or her to see the big picture of sales and drill down to each region as needed.
Notice how all four Reporting Entities have the same design; all are generated from the same spreadsheet, built in Excel. At the same time, the figure displayed in the top left cell of the Total sheet represents the sum of the same cell in each of the child entities.
To create Reporting Entities, all that’s required is that you define them in the online administration interface for the application, and specify the hierarchy. You can also determine which users have access to which entities; this allows you to restrict your Sales Manager for the «North» region to the relevant entity, for example. What’s impressive about Reporting Entities is that, once they’re defined as a tree, Worksheet Server takes care of all of the rest, automatically calculating the values of cells in top level entities without requiring any modifications to the original design.
Reporting Entities play a big part in making Worksheet Server applications into powerful, multi-user collaboration tools.
The PHP Developer’s View
That gives you an idea of how Worksheet Server looks to an Excel user — but how does it fit with PHP development as a whole?
Mental Olympics
The first conceptual hurdle a PHP developer has to overcome lies in the way data is represented in a worksheet server application. It’s likely that you see a table and immediately think «SQL result set, rendered in a loop», given that a large portion of Web applications are exactly this.
In a typical Worksheet Server application, the HTML table cells are a representation of an Excel spreadsheet. Each cell will typically be either «raw data» — values that were hard coded, entered by users or fetched individually from a database — or «compound data», the result of formulas applied to the «raw data» cells.
Behind the scenes, Worksheet Server stores the data contained in cells in serialized form to the filesystem. It manages file locking to prevent multiple users updating the same value at the same time, and takes the latest data from here each time a page refresh occurs.
The second mental leap required of developers involves understanding that you’re dealing with generated code; you are not intended to modify a Worksheet Server application directly. Instead, you need to use the defined «extension points» Worksheet Server provides, which I’ll discuss in a moment.
Calling PHP Functions from Excel
For simple applications, your involvement as a PHP developer may not be required at all. The WS Excel Designer puts a lot of functionality at the disposal of Excel users — they can even connect to a database, perform a query and embed parts of the result in cells using Excel special functions provided by Worksheet Server.
For example, to insert into a cell within Excel a single username fetched from a MySQL database, the following functions can be used, all of which are provided by Worksheet Server.
In cell A1 of the spreadsheet, you might have the following:
MYSQLINIT('mydatabase','harryf','secret');

Cell: A1
The MYSQLINIT() function takes the connection settings for the database and provides a connection resource with which you can execute queries.
Next, in cell A2, you enter:
MYSQLEXEC(A1,"SELECT * FROM users");

Cell: A2
Notice that the first argument «points» to the cell A1, where MYSQLINIT was used (and where the connection to MySQL was created). The second argument is the query itself.
Finally, in cell D15, for example, you enter:
MYSQLDATA(A2,15,2)

Cell: D15
Here, A2 points to the cell in which the query was performed, ’15’ refers to a row number in the query result set and ‘2’ refers to the column number in the row.
The data fetched by this query is not available to the designer working with Excel. It is only available once application is published online. The Excel functions are translated to their PHP equivalents automatically, making the referenced data available to the users.
Of course, it doesn’t stop with MySQL — Worksheet Server provides similar functionality for the ODBC access to databases, OLAP functionality using a PHP extension the Jedox team developed itself, and very cool SOAP support which looks very much like the MySQL example above but is initialized using a WSDL URL. There are also drawing and graph functions, provided by Jedox, which make up for limitations when using Excel’s native functionality. All this is available to the designer working with Excel and requires no extra effort in PHP.
Out of a Job?
You’re probably asking, «If designers can do so much with Worksheet Server, what’s left for me to do?» Indeed, in basic applications, for which the default Worksheet Server functionality is adequate, there’s little or no need for a PHP developer to get involved.
But of course, software development is never that easy. Someone always comes up with a unique requirement, or there’s some essential data which has to be retrieved from some unsupported source, at which point knowledge of PHP is an essential requirement. What’s more, if PHP is already part of the landscape, why not integrate Worksheet Server applications with existing applications? Enter PHP developer…
The mechanisms Worksheet Server provides for extending its functionality and talking with other PHP applications are both straightforward and powerful. There’s no need to start messing with generated code.
Embrace and Extend
The most basic form of communication between Worksheet Server and other Web applications is via the Hyperlink function, which provides the usual possibilities to pass variables to the «outside» using GET variables in the URL. That may not be too exciting, but it will solve many simple problems, such as being able to link back to a Web interface for the remote data source used to populate a particular cell.
The next mechanism is that, in taking advantage of files, Worksheet Server will attempt to include them automatically, if it can find them.
In the process of responding to a page request, Worksheet Server looks for the scripts before_recalc.inc and after_recalc.inc — these are included, respectively, before and after the contents of the cells are recalculated for the current request (assuming you have created them). Output generated in both of these files will be displayed before the HTML for the worksheet is displayed, but this is not really their intended purpose; instead, they allow you to set up the environment before recalculation occurs, then to respond to the calculation, perhaps updating a database that relies on the result.
Another script that Worksheet Server will attempt to include is userfunc.inc, which is the place to define (or include) your own PHP functions. These will be called for you in accordance with what was placed in the Excel spreadsheet itself, or from calls within before_recalc.inc and after_recalc.inc scripts.
It’s worth being aware that Worksheet Server applications make all cells in a sheet available as global PHP variables, with names like $S1_B2 (which refers to sheet 1, cell B 2). The words «global» and «variables» may set alarm bells ringing, and you will need to be cautious about defining variables of the same name. That said, how often do you find yourself naming a variable $S1_B2? Remember also that register_globals is switched off. Locating the variables in the global scope makes life easy for those adding their own Worksheet Server functionality. It’s likely that some Excel users will begin exploring PHP, out of need or interest, once they start using Worksheet Server.
A Custom Function
An example which illustrates the point can be achieved using the special Excel function, defined by Worksheet Server, called SHOWBUTTON(). This takes three arguments: a value and a name (corresponding to the HTML input tag attributes name and value) and a title that’s displayed as the mouse is moved over the button. It also generates a form button for users to click in the application. Imagine I place the function in a cell within the Excel worksheet as follows:
SHOWBUTTON("Stock Check","doStockCheck","Tell Warehouse to Check Stock")Once I’ve done this, I can check to see if a user of the application clicked on the button, using after_recalc.inc as follows:
<?php
if ( isset($_POST['doStockCheck']) ) {
// Call my own PHP function, defined in userfunc.inc
doStockCheck();
}
Now, in userfunc.inc, I can define the doStockCheck() function like so:
<?php

function doStockCheck() {

    // Include our own DB library

    require_once 'lib/db/db_conn_manager.php';

    // Fetch values from the global cell values

    $productName = mysql_escape_string( $GLOBALS['S1_D6'] );

    $requiredQuantity = mysql_escape_string( $GLOBALS['S1_D7'] );

    // Build a query

    $sql = "INSERT INTO stock_required

                (name,quantity)

            VALUES ('$productName','$requiredQuantity');";

    // Insert the data

    DBC::execute($sql);

}
Here, you can see how the global cell variables might be used. The variables are defined and initialized in generated PHP scripts, complete with relationships between cells (using Worksheet Server’s implementations of Excel functions in PHP).
The functions you implement in the userfunc.inc script can also be «called» directly by naming them in the Excel sheet. In other words, a designer can identify the PHP function name you’ve implemented in a cell while working with the spreadsheet, and it will be executed on the Web server each time the value of the cell is recalculated.
As such, you could regard a Worksheet Server application as a giant «component» and use the functions you define to invoke code in the rest of your «framework», for instance, using your logging library to keep track of Worksheet Server users (note that Worksheet Server already has a native logging mechanism, but you may have a requirement to integrate it with your existing infrastructure).
Coping With Change
One issue that normally concerns me when I’m considering code generation tools is how well my «add on» logic will survive the changes to the generated code.
As already mentioned, Worksheet Server is an active code generator (you shouldn’t mess directly with the PHP in generates). The question is: will functions you’ve added by able to survive changes to the generated code?
My guess is that, in most cases, there’d be no need to alter code you’ve added, so long as the changes to the original spreadsheet a minor.
Of course, if the designer changes the name of a function call they’ve placed in the spreadsheet, it would require modification to its PHP implementation (but hopefully that would be planned in advance).
Otherwise, the only change that could have a significant impact would occur if you moved cells’ locations, so that code that accessed a given cell would no longer point to the correct location. It’s not common for users to move cells in an Excel spreadsheet once an initial structure is in place, so such problems should be infrequent. In the worse case, a simple fix would be to define a usefully named PHP constant that identifies a cell, allowing it to be quickly modified to reflect changes in cell location.
Access Control
As an alternative to its internal access control mechanism, Worksheet Server supports the use of LDAP for authentication. This should fit nicely with existing infrastructure found in medium-to-large organisations.
To switch a Worksheet Server application from its in-built access control system to an LDAP server, all that’s required is that you define a script ldap.inc that contains the functions GetLDAPUsergroups(), providing Worksheet Server with a list of available groups, and CheckLDAPAccount(), which takes a username and password and should return a value that indicates whether or not the user is valid. An additional (optional) spreadsheet function is also available; LDAPDATA() allows you to pass to Worksheet Server further information about a user, such as email address and phone number.
Of course, not everyone uses LDAP and, if you’re placing Worksheet Server applications on an existing Website, it’s likely you’ve already implemented your own security mechanism. The good news is that Worksheet Server doesn’t actually know whether the security data source, used inside the CheckLDAPAccount(), actually was an LDAP server. Instead, you could implement code to check the user against a table in MySQL, for example.
Generated Code
When an application is compiled in the online «Application Center», it creates a directory structure into which the generated PHP source is placed along with HTML templates, log files, serialized data files, user account databases and everything else that’s needed to run the application.
Worksheet Server defines its own file extensions for PHP source code, avoiding the ‘.php’ extension, and organising the scripts by their function. For example, an ‘.xcc’ file contains cell calculations that define the relationships between cells. A snippet of an ‘.xcc’ file for the Quick Demo application is shown below:
<?PHP

$S2_C7 = $S2_C6+$S2_C5;

$S2_D7 = $S2_D6+$S2_D5;

$S2_E7 = $S2_E6+$S2_E5;

$S2_F7 = $S2_F6+$S2_F5;

$S2_G5 = SUMxl(ARRAY(1,4,$S2_C5,$S2_D5,$S2_E5,$S2_F5));

$S2_G6 = SUMxl(ARRAY(1,4,$S2_C6,$S2_D6,$S2_E6,$S2_F6));

// ...
You can see the global cell variables in use again, a line like $S2_C7 = $S2_C6+$S2_C5; meaning cell C7 is the sum of cells C6 and C5 while $S2_G5 = SUMxl(ARRAY(1,4,$S2_C5,$S2_D5,$S2_E5,$S2_F5)); is the equivalent of placing the Excel function =SUM(C5:G5) in cell G5 of a worksheet.
Other file extensions, such as ‘.xlr’ and ‘.xic’, contain application-wide PHP configuration settings and code to execute when a form post is made, respectively.
Of course, you need worry about none of this, as it’s all generated code, but it’s interesting to see how Worksheet Server is designed. Alongside these files, you can create the before_recalc.inc, after_recalc.inc, userfunc.inc and ldap.inc scripts discussed above, which Worksheet Server looks for automatically, and executes if they’re found.
The PHP source code that powers Worksheet Server is encrypted with Zend’s Encoder; this is, after all, a commercial product. While the PHP hacker in me found it a little frustrating not to be able to see what was happening behind the scenes, I can imagine this has the benefit of forcing developers to use the «interfaces» Worksheet Server provides, rather that falling prey to the temptation of making «just a few small changes».
SUM(A1:A3)
The basic idea behind Worksheet Server — using Excel as a design tool for Web applications — is highly ingenious. It’s the sort of thing developers discuss over coffee: «Wouldn’t it be cool to…». The difference, in Jedox’s case, is that those developers actually went ahead and did it.
Despite a relatively short exposure to Worksheet Server, the impression I got was of a mature software product (the version I was working with was 2.1.x). I didn’t run into any serious bugs or headaches; everything I tried worked as expected. Judging from the type of features Jedox has added to recent releases, the team has established a solid code base and is now able to address «nice-to-have» suggestions from users.
What impressed me most was how quickly powerful applications could be built using this product. Assuming you have experience with Excel, the design process is simply an extension of spreadsheet creation. Adding functionality to a published application using PHP is also straightforward — all the PHP functions are at your disposal.
Worksheet Server has clearly been developed with deep understanding of Excel and how people use it. There’s no «mystery functionality» and the feeling I got was of an application that real people would use.
On a side note, one thing that surprised me was how well PHP fits with the expectations of Excel users, and how closely it parallels Visual Basic when used in Excel. I can imagine advanced Excel users finding PHP an incremental step (rather than a giant leap) when extending Worksheet Server.
What also struck me was how Jedox has built its product on a stack of Open Source software (Apache, PHP, PHP libraries etc.) to deliver a slick, finished product that can be viewed as a whole, rather than as loose collection of parts. What’s more, Worksheet Server combines the power of Excel and PHP to provide the best of both worlds. This combination in itself makes Worksheet Server a unique application and makes a fascinating case study of where future markets may lie for commodity software development.
Of course, Worksheet Server is a commercial product, and looking at the pricing it’s clear this package isn’t meant for the home user. Some, at the more radical end of Open Source, may argue the fundamental «wrongness» of using Open Source as a foundation for commercial product, but the rest of us, who like to eat and have a roof over our heads, realise that money has to come from somewhere. Worksheet Server adds significant value to the Open Source on which it’s built, smoothing rough edges and giving end users a highly finished product. Clearly, there has to be a return on investment; without it, software like Worksheet Server would never happen.
Worksheet Server is also good news for PHP developers, as it brings our favourite platform to users who are likely unaware of its existence, and has the potential to create new job opportunities in industries in which PHP is yet to have an impact.
Ultimately, Worksheet Server brings Excel to the Web. It turns the single user spreadsheet into a dynamic application with full access to the «Enterprise» (databases, Web services, etc.). Companies whose employees rely on Excel as a tool for reporting and manipulating data spend a great deal of time and effort managing collaboration, struggling to merge data from multiple copies of the same sheet, and puzzling over how to get current information from all sorts of corporate data sources. Worksheet Server solves all those problems, leveraging the Web to bring huge advantages to corporate Excel users, and is (as far as I’m aware) the only product of its kind.
From Wikipedia, the free encyclopedia
Excel Services is a server technology included in SharePoint 2010 and SharePoint 2007. This shared service enables users to load, calculate, and display Excel 2010 workbooks on Microsoft Office SharePoint Server 2010.
Using Excel Services, users can reuse and share Excel workbooks on Microsoft Office SharePoint Server 2010 portals and dashboards. For example, they can create content in Excel 2010 and share it by using an Office SharePoint Server 2007 portal and dashboard. The entire workbook or just parts of it (such as just a single sheet, chart or table) can be shared.
End-users can view live, interactive workbooks using only a web browser. They can also interact with workbooks to explore data, and analyze Pivot Table reports and charts by using a browser. Excel Services supports workbooks that are connected to external data sources. Users can embed connection strings to external data sources in the workbook or save them centrally in a data connection library file.
Selected cells in worksheets can be made editable by making them named ranges or «parameters». Items which are set as «viewable», when they save to Excel Services, will appear in the Parameters pane in the browser. Users can change the values of these named ranges in the parameters pane and refresh the workbook. They can also use the portal’s filter Web Part to filter several Web Parts (Excel Web Access and other types of web parts) together.
References[edit]
- Asnash et al. (2007). Beginning Excel Services. Wiley. ISBN 0-470-10489-9
- Prish, S. (2007). Professional Excel Services. Wiley. ISBN 0-470-10486-4
External links[edit]
- Official Excel Services 2007 website
- Official Excel Services 2010 website
What is an Excel RTD Server?
«Microsoft Excel provides a new worksheet function, RTD, that allows you
to call a Component Object Model (COM) Automation server for the purpose of
retrieving data real-time. This article describes how to use Visual Basic to
create a RealTimeData Server for use with Excel’s RTD function.»
The interface for the COM server is described in the article as:
«ServerStart
Called
when Excel requests the first RTD topic for the server. ServerStart
should return a 1 on success, and a negative value or 0 on failure. The first
parameter of the ServerStart method is a callback object that the
RealTimeData server uses to notify Excel when it should gather updates from the
RealTimeData server.
ServerTerminate
Called
when Excel no longer requires RTD topics from the RealTimeData server.
ConnectData
Called
whenever Excel requests a new RTD topic from the RealTimeData server.
DisconnectData
Called
whenever Excel no longer requires a specific topic.
HeartBeat
Called by
Excel if a given interval has elapsed since the last time Excel was notified of
updates from the RealTimeData server.
RefreshData
Called
when Excel is requesting a refresh on topics. RefreshData is called
after the server notifies Excel that updates exist, and it returns a count of
the topics to update along with the topic id and value for each topic.»
The complexity is (in my view) around three of these methods. RefreshData
is called by Excel to PULL data into Excel. But Excel only calls
RefreshData after a PUSH notification has been sent to Excel by the RTD
Server. By way of analogy — the push notification is like receiving a
postcard from the mailman telling you that there is a parcel waiting for
you. When you are ready to collect the parcel, you call
RefreshData. This hybrid push/pull model has benefits in that the single
threaded user interface thread of Excel has to be respected. Remember
that if you click F2 on a cell and it enters edit mode then the entire cell
based user interface is locked. This means that code that sends data to
Excel has to be aware of this reality and work within these constraints.
The other issue is around ConnectData/DisconnectData. Each time a new
call to RTD is made from a worksheet the ConnectData method implemented in your
RTD Server will be called. In C# this is created as:
IRtdServer.ConnectData(int TopicID, ref Array Strings, ref bool GetNewValues)
So, the values in topic1…topic 253 will be based as strings within the
Array. So potentially over time a large number of these calls will be
made. Now, think about how you would handle this when two cells are
identical. Let’s take an edge case — I put the same formula into every
cells in an Excel 2007 worksheet
Rows=1048576
Columns=16384
= 17,179,869,184
cells in total
The RTD Server code has to be able to handle this and not blow up. Hence
the way that the ConnectData array is processed is critical to performance. If
you tried to subscribe to the same market data element 17 billion times you’d
probably find that it acts like a massive memory leak or it simply crashes
Excel.
The
DisconnectData method has to simply be managed such that there is no chance to
leak memory. In one RTD implementation I have seen (not mine), each time
a new call to ConnectData is made some memory was allocated. This memory
was not freed by DisconnectData. Hence this would cause failure towards
the end of the trading day as the PC running Excel ran out of memory.
This can be tested by adding a large number of RTD calls from a spreadsheet and
then deleting the cells while monitoring memory usage.
This
leads to the point that the connection from the Excel user interface via the
RTD function and RTD Server must be optimised to ensure that it can scale up
and down properly and that there is no path-dependent bug introduced by adding
and removing RTD function calls in the user interface.
«When
you use multiple instances of Microsoft Office Excel together with your
RealTimeData (RTD) server, you may receive the following message:
The
real-time data server ‘servername.classname’ is not responding. Would you like
Microsoft Excel to attempt to restart the server?
Therefore,
your RTD server is unable to send update notifications to multiple instances of
Excel.»
Further:
«You
may receive this message if your RTD server is an ActiveX EXE that is built for
MultiUse instancing, which is a default setting for ActiveX EXE projects in
Visual Basic. An ActiveX EXE that is MultiUse can be shared among clients.
Separate Excel instances cannot share RTD servers. When Excel starts an RTD
Server, Excel calls the RTD Server ServerStart method and then passes it
a reference to the CallBack object for that instance of Excel.
Therefore, if two instances of Excel try to share the same RTD server, the
second instance replaces the CallBack object for the first instance.
This behavior invalidates the CallBack object for the first
instance.»
And the resolution suggested:
«Use
SingleUse instancing for ActiveX EXE components that will act as RTD servers
for Excel. When you build ActiveX EXE components as SingleUse, each instance of
Excel has its own instance of the RTD server. Another solution is to use
an ActiveX DLL for your RTD server instead of an ActiveX EXE. ActiveX DLLs load
in the same process space as their clients, and each instance of Excel always
has its own instance of the RTD server.»
This seems reasonable but then pushes us to a different problem. If the
way to resolve the issue is to pull the RTD Server into the Excel process space
then we end up with multiple instances of the RTD server running. The
problem with that model is that the code that sits behind the COM RTD Server is
then duplicated for each RTD server instance. If that code connects to third
party libraries such as TIB R/V, Solace, Tervela, Terracotta Universal
Messaging, IBM MQ Series then you’d getting into a potential minefield.
The solution is to make sure that you understand not just the threading model
of your implementation language but also that of your middleware and COM.
Hence why RTD Servers are easy to implement in a reference implementation
but quite a bit harder in a field implementation.
If you look within Excel at the formula helper you see the following:
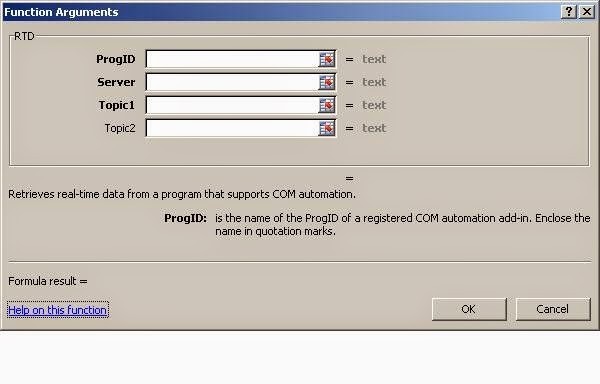 |
| Excel 2007 RTD Function Wizard User Interface |
|
The above
|
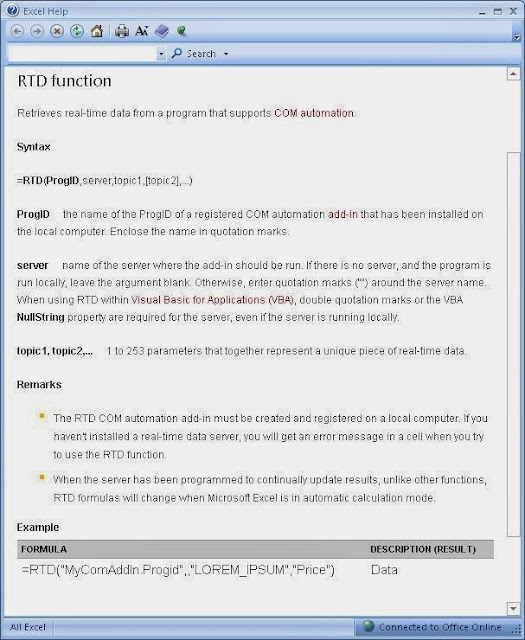
The above
extract from the help file shows that Excel 2007 supports between 1 and 253
parameters to uniquely identify a request to make to the RTD Server.
If we
look at the Excel user interface we see some disagreement on the number of
parameters:
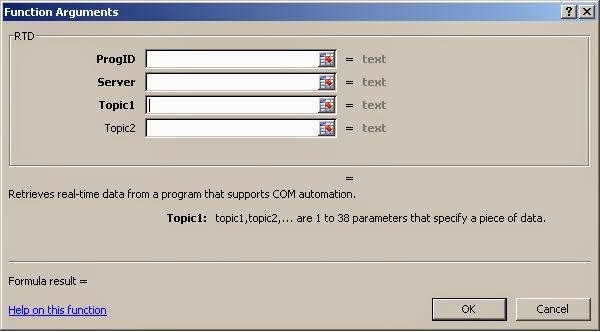 |
| Excel 2007 user interface suggested a maximum of 38 parameters |
Take a classic use-case for Excel
RTD Servers — that of publishing real-time trading information from a Trading
Platform such as Fidessa, CRD, Orc or similar to an Excel spreadsheet to allow
for a dashboard to be created by a someone in trading or middle office.
Imagine that we know the order identifier for an order to trade a particular
stock. So an Excel RTD function call may look
like:=RTD(«vendor.rtdserver»,»»,»ID2313451″,»Executed_Quantity»)
Equally a realistic implementation could look like this:
=RTD(«MyComAddIn.Progid»,,»ID2313451″,»»,»»,»»,»»,»»,»»,»»,»»,»»,»»,»»,»»,»»,»»,»»,»»,»»,»»,»»,»»,»»,»»,»»,»»,»»,»»,»»,»»,»»,»»,»»,»»,»»,»»,»»,»»,
«»,»»,»»,»»,»»,»»,»»,»»,»»,»»,»»,»»,»»,»»,»»,»»,»»,»»,»»,»»,»»,»»,»»,»»,»»,»»,»»,»»,»»,»»,»»,»»,»»,»»,»»,»»,»»,»»,»»,»»,»»,»»,»»,»»,»»,»»,
«»,»»,»»,»»,»»,»»,»»,»»,»»,»»,»»,»»,»»,»»,»»,»»,»»,»»,»»,»»,»»,»»,»»,»»,»»,»»,»»,»»,»»,»»,»»,»»,»»,»»,»»,»»,»»,»»,»»,»»,»»,»»,»»,»»,»»,»»,
«»,»»,»»,»»,»»,»»,»»,»»,»»,»»,»»,»»,»»,»»,»»,»»,»»,»»,»»,»»,»»,»»,»»,»»,»»,»»,»»,»»,»»,»»,»»,»»,»»,»»,»»,»»,»»,»»,»»,»»,»»,»»,»»,»»,»»,»»,
«»,»»,»»,»»,»»,»»,»»,»»,»»,»»,»»,»»,»»,»»,»»,»»,»»,»»,»»,»»,»»,»»,»»,»»,»»,»»,»»,»»,»»,»»,»»,»»,»»,»»,»»,»»,»»,»»,»»,»»,»»,»»,»»,»»,»»,»»,
«»,»»,»»,»»,»»,»»,»»,»»,»»,»»,»»,»»,»»,»»,»»,»»,»»,»»,»»,»»,»»,»»,»»,»»,»»,»»,»»,»»,»»,»»,»»,»Executed_Quantity»)
This more subtle challenge is now becoming clearer — the namespace of the
function needs to be defined in a sensible way. What does this mean?
Both of
the above cases could be the correct implementation for a particular case to
see the executed quantity for an order with the ID 2313451. The issue
clearly is to allow the user to understand the topics that are listed and what
can be done with them.
There are
a number of ways to do this:
-
User documentation to show
the user that, for example, to see the price/earnings ratio for a stock
they need to put the instrument identifier in topic 1 and the string
«p_e_ratio» in topic 75 -
Helper functions written in
VBA to simplify this — so a new function could be written as
=Get_PERatio_ByRIC(«VOD.L»)
The point
here is that the technology challenge is part of the problem, the main part (in
my experience) is understanding the use-cases and business requirements
alongside the data that is available from the back-end system.
In
summary:
-
The
ConnectData/DisconnectData issues described above need to be addressed for
a robust implementation. -
The RefreshData usage has to
fit within the constraints of the Excel run-time as well as the RTD
threading model and the ‘back-end’ threading model. -
The namespace model and/or
helper user-defined-functions need to be documented fully. -
The subtleties of bridging
from C# (or Java or whatever other implementation language)
to
COM must be understood.
A
follow-on post will show a simple implementation of an RTD Server in C#.
Further suggested reading:
Why manually perform repetitive data-related tasks in Excel when you can use the power of the application to automate them? In this article, we will explain how you can save time, reduce errors, and automate basic tasks with Excel automation and provide shortcuts and professional tips for getting started.
Included on this page, you’ll find details on what excel automation is, steps on how to automate excel dashboards and reports, and more.
What Is Excel Automation?
Using Excel’s automation tools, you can accomplish a variety of steps — like importing CSV files, adding headers, moving columns, formatting text, and more — with a single click.
Additionally, if you go on vacation, you could send a spreadsheet to a fellow employee who can do the same thing without having to reinvent the wheel. More advanced versions of automation allow you to add custom logic, so that the automated process can take different steps based on the results of prior steps.
While there is some overlap, there are three main ways to automate tasks in Excel:
-
Macros: A sequence of actions that have been recorded and can be reused. They can be user-generated or received from other users or downloaded.
-
Visual Basic: A programming language built into Microsoft Office products. Visual Basic (also knowns as Visual Basic for Applications or VBA) allows a user to to choose and modify pre-selected pieces of code via a graphical user interface, called Visual Basic Editor (VBE). Macros are saved in VBA, and can be viewed and edited in the VBE.
-
Add-ins: Third-party programs that can be downloaded and connected to Excel. Add-ins (sometimes referred to as plug-ins) can be created in Visual Basic, or in other programming languages.
Some common uses for automation include the following:
-
Adding standard formatting cells, ranges, rows, columns, or worksheets
-
Saving a worksheet in a particular format (like PDF) with a particular file name format (e.g., DailySalesReportxxxxxxxx, where the x’s are replaced with the current date)
-
Moving columns or rows into a certain order
-
Creating and formatting a chart based on data in a worksheet
-
Creating and formatting a table
-
Creating UserForms
Benefits of Using Excel Automation
In addition to saving time and reducing the effort expended, there are advantages to automating tasks in Excel. These include the following:
Standardized document formats and consistent results
-
Error reduction
-
Better reporting
-
No programming knowledge required (if macros or add-ins are used)
-
Integration with apps such as Microsoft Word and PowerPoint
-
Reduction in brain drain due to staff turnover
-
Ability to get work done when someone is out of the office
Challenges to Using Macros for Automation
There are a few issues to be aware of when using macros and VBA code, but that doesn’t mean it’s not worth the initial investment in time to make Excel automation work for you. Keep the following in mind when using macros:
-
They can do things you don’t expect (such as deleting data), so ensure you understand how they work.
-
They can be malicious, so it’s imperative to verify that you can trust the source of the macro or code.
-
Not all macros will work correctly on all platforms, and some platforms (such as browser-based versions of Excel or Excel on mobile devices) don’t run macros at all.
Saving a workbook as a template does not save the macros. In order to save a macro in a standard template, you’ll need to save it as a macro-enabled template, which has the extension XLSM.
How to Use Excel Macros to Automate Tasks
First, decide which steps you want your macros to perform. The next step is to record yourself performing the selected steps. The last step is to run the macro and verify that it performs as expected. Follow the tutorial below to learn how to perform each of these steps in Excel.
Recording a Macro
Macros are created by using the macro recorder. The macro recorder remembers a series of steps a user performs, which can be repeated whenever needed. It’s easy to create macros in this way because users just need to perform actions that they already know how to do. Open an Excel workbook that you want to automate to get started.
-
From the Tools menu, click Macro, click Record New Macro.
2. Click in the box under Macro name in the pop-up window, and type a name for your Macro.
3. Choose where to store the macro from the dropdown menu. There are three options; choose one that fits your needs:
-
This Workbook: The macro is only available in the current workbook.
-
New Workbook: A new workbook opens and the macro is only available in that workbook.
-
Personal Workbook File: This allows a user to use a macro from any Excel workbook opened on that same computer. These files will have the extension .xlsb.
If desired, enter a shortcut key (more on this later). If you enter a letter that’s used by the OS, you’ll get a politely-worded message to change it. Click OK.
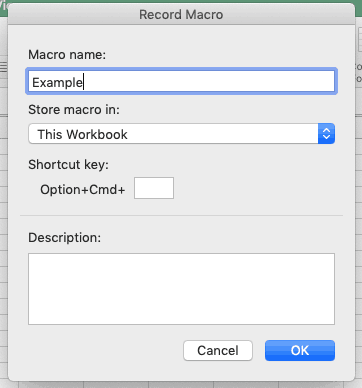
4. The recording indicator appears below the navigation buttons.
5. Perform the steps you want to automate, and click the macro recording indicator when done. It’ll change appearance and look like this.
From this point forward, you can also click this button to start recording a new macro.
Running a Macro
Once a macro is recorded, you’ll want to run it. Excel provides a few different ways to run your macros. Use this list to decide which method is right for you:
-
Menu: Click Tools, click Macro, click Macros…, then click the title of the macro. In Windows, simultaneously press alt+F8 to bring up this option.
Select the macro you want and click Run. If you don’t see your macro, it may be stored in a different workbook.
-
Keyboard Shortcut: If a shortcut was created when you first named the macro, you can run the macro by keying that shortcut. The key combination for Windows is Control+Shift+ the letter you chose; for Mac, it is Option+Command+ the letter you chose.
-
You can also add a shortcut after the fact. Simply click Tools, click Macro, click Macros…, click the title of the macro, and then click Options.
-
-
Worksheet Button: You can add a button to the spreadsheet that can be assigned to run a macro. If you send the spreadsheet to another person, they can easily see how to run the macro. To add a button:
-
Click the Developer tab (if the Developer tab is not showing, here are the instructions to add it).
-
Click Button. A button will appear on your spreadsheet (the first one will be called Button1, etc.). Click on it, and assign the desired macro.
-
Double click on the button to edit its display name.
-
- Toolbar Button: For quick access, you can add a button to a toolbar. You can find instructions for this task here.
How to Use Visual Basic to Do Excel Automation
Visual Basic is more complicated to use than macros because it requires some knowledge of the Basic programming language. When macros are created, Excel saves them as Visual Basic; existing macros can be edited in the Visual Basic Editor (VBE), which is the interface in Excel.
How to Do Excel Automaton without Macros
Add-ins are third-party programs that can be downloaded and connected to Excel. Some examples are AutomateExcel, HelpSystems Automate, Kloudio, Analytics Canvas, Insight Software, PowerOLAP, and Domo. They are also available from companies like Peltier Technical Services, Inc..
If you have programming chops or know someone who does, add-ins that interact with Excel can be developed in languages such as Python, SQL, C#, M, Java, C++, and D. These can be customized to do many things.
How to Automate Excel Reports
The creation of reports can be automated via any of the available methods. If it’s a simple report, it can be done with a macro. For more advanced reports, some VBA coding or an add-in will be required.
For reports, steps like opening a source file, removing unneeded data, formatting cells, adding titles, and adding the current date are all doable.
How to Automate Excel Dashboards
Dashboards can also be automated via any of the available methods. For a dashboard, steps like accessing a source file, copying data from cells in the source file to cells in the dashboard, and updating the date and time are all feasible.
How to Automate Excel Using Visual Basic
You can use Visual Basic to automate tasks in Excel. Visual Basic gives users more control over the steps than do macros; however, users need to have knowledge of the programming language. You can find more information on how to get started with Visual Basic here.
How to Automate Word Documents from Excel
If you want to add data in an Excel worksheet to a Word document, and keep the data update in the Word document as it changes in the worksheet, you simply need to copy and paste.
When you paste the Excel cells into the Word document, click on the Paste Options button in Word, and select one of the options that say Link to Excel. As long as the documents are on the same computer, the Word document will automatically update as the Excel data changes.
For more complicated data sets, use Visual Basic or other programming languages to open a Word document and input Excel data into the document. Instructions for this are beyond the scope of an introductory-level article, but they can be found online for anyone looking for a challenge.
How to Learn Excel Automation
Like any other skill, education and practice are key. Find a resource that explains what you are trying to learn, and then practice, practice, practice. Macros are fairly easy to learn on the job, especially for a series of simple steps. You can also get a manual, find an online tutorial, or take a class.
Peltier advises, “I would suggest that people take a project they really think would benefit from automation and just start working on it. Start out with a small piece of it, like opening the file and copying the data in the right worksheet. Figure out how to automate that, then figure out the next step, and find a few web sites where they have a lot of good examples and just go back to them. But do it with that specific project in mind so that your motivation is there; when you finish you’ll have something that’ll save you an hour a day or more.”
Visual Basic coding is more difficult, but can be learned the same way. There are also many tutorials online and in manuals that can help you learn how to use VBA. Or, if you’re a learn-by-doing person, record some macros and look at the code to figure out how it works. There are also classes available.”
To view the code for a particular macro, click Tools, click Macro…, click the name of the macro, and click Edit.
Says Peltier, “I started learning it about 20 years ago by recording my own macros and then seeing what code was recorded, then saying, ‘Ok, I want it to work a little bit differently than what I recorded.’ So you go and you play around with that. There is a wealth of information about Visual Basic for Excel on the internet. People end up reading examples on my site or other sites like Stack Overflow, or tMrExcel.com to find all kinds of stuff.”
What Are Excel Automation Servers?
An automation server (sometimes called an automation component) is a subtype of automation add-ins that are built into Excel. An automation server is an application that opens programmable objects (aka automation objects) in other applications (aka automation clients).
Developers use automation add-ins as a library of functions that can be called from cells in a worksheet. There are two ways to control an automation server: late binding (the objects are not declared until run-time) and and early binding (the objects are declared during design). Early binding is considered better because the application knows in advance what’s coming.
How to Use the Excel Object Model in Automation
The Excel Object Model is each entity in Excel, which has properties that can be called on or changed via add-ins, VBA, or macros. Objects include an entire workbook, a worksheet, a row, a column, a range of cells, an individual cell, a pivot table, a chart, and the active cell or range of cells.
Some common properties are Name, Value, Row Number, Column Number, if it’s protected, if it contains a formula, and its display properties.
Code can reference the properties of an entity and use that to make a change. For example, it can look at the value of a cell and if it’s less than a target, it can change the color of the text in that cell to red. Code can also change the properties of an entity. For example, you can rename a worksheet from the default (e.g. Sheet1) to something else (e.g. February 2018 Expenses).
Other Tasks that Can Be Accomplished via Excel Automation
Dashboards and reports aren’t the only tasks you can automate in Excel. In fact, there are a variety of other things that can be automated as well. The following list of actions can be automated in Excel — use it to get ideas of how you can implement automation in your own workflow.
Enhancing Data Readability
-
Create a chart
-
Create and format tables
-
Create a table of contents
-
Create a cover page
-
Display a UserForm
-
Expand pivot table data
-
View locations that are listed in spreadsheet as points on a map
Manipulating Data
-
Delete rows that meet certain criteria (e.g., blank or negative values)
-
Schedule obtaining data from other sources and insert it in a cell
Editing and formatting
-
Format text
-
Format cells
-
Insert a formula
-
Add headers to a column
-
Open a document (e.g. csv file, xlsx file)
-
Remove duplicate rows
-
Add or remove sheets
-
Convert a vector (i.e. a row) to a matrix
-
Convert a matrix to a vector
-
Copy a cell’s format
-
Select the contents of a cell and copy it to other cells
Notifications
-
Send an email when a cell value hits a certain threshold
-
Send an email whenever a particular macro is run
Other
-
Return the column or row of a cell based on its contents (i.e., the cell with value 5309 is in column AA)
-
Show the formula in a cell
-
Find a word in a string that meets criteria (e.g., 10 characters, starts with L, etc,)
-
Find the last used cell
-
Save and close all open workbooks
-
Manage data sets larger than excel size limits
Connecting Data Across Your Work with Cross-Sheet Formulas in Smartsheet
Empower your people to go above and beyond with a flexible platform designed to match the needs of your team — and adapt as those needs change.
The Smartsheet platform makes it easy to plan, capture, manage, and report on work from anywhere, helping your team be more effective and get more done. Report on key metrics and get real-time visibility into work as it happens with roll-up reports, dashboards, and automated workflows built to keep your team connected and informed.
When teams have clarity into the work getting done, there’s no telling how much more they can accomplish in the same amount of time. Try Smartsheet for free, today.
Приложения Excel и Office Server, в совокупности, предоставляют возможность во время разработки проектной документации воспользоваться механизмами сотрудничества, которые невозможно реализовать только стандартными средствами Excel. Следует отметить, что если ваша проектная группа, подобно большинству проектных групп, немногочисленна и при совместной разработке проектной документации у вас не возникает серьезных проблем, тогда использование Office Server будет напоминать стрельбу по воробьям из пушек.
В таком случае для достижения своих целей вы можете с успехом воспользоваться встроенными возможностями Office наряду с одноранговыми сетевыми возможностями Windows или сетевыми возможностями Windows-сервера. В наших статьях мы рассматриваем Excel с точки зрения управления проектами, поэтому в Office Server нас интересует главным образом возможность централизовать хранение и разработку всей проектной документации.
Специалисты Microsoft позаботились о том, чтобы предоставить пользователям как можно более широкий выбор вариантов. Например, портальный продукт SharePoint может выглядеть явным излишеством в сравнении со скромными потребностями вашего простого офиса управления проектами (Project Management Office — РМО). Все, что вам действительно нужно, это создать ряд документов в Excel и Word и предоставить возможность другим пользователям редактировать эти документы, сохраняя их под другими именами. Нет проблем! Имеющиеся в вашем распоряжении инструменты Office позволят организовать сотрудничество, необходимое в рамках этого достаточно простого окружения.
Возможно, перед вами стоит несколько более сложная задача, для решения которой может потребоваться некий портальный вариант, однако вы не желаете создавать для себя дополнительных проблем, обращаясь к системному администратору за помощью в установке WSS или MOSS и создании библиотеки совместно используемых документов. Но и тогда все, что вам может понадобиться, содержится в Office Live. А если вы относитесь к числу тех пользователей, которые предпочитают создать централизованный РМО, базирующийся на потоке работ с полномасштабным сотрудничеством и автоматическим обновлением документов, тогда вашим выбором должен быть WSS или MOSS. При условии, что вы уже располагаете действующим порталом SharePoint, реализация такого РМО тоже не составит труда.
Дальше, в статье про создание хранилища документов, мы будем исходить из того, что ряд базовых элементов MOSS уже установлен. Обратите внимание: сама по себе установка этих элементов может, по сути, оказаться целью отдельного проекта. Для руководителя проекта это означает необходимость вступать в переговоры с командой системного администратора, которой предстоит выполнить соответствующую работу. Итак, мы имеем следующие исходные.
- Некто уже установил MOSS на компьютере, на котором функционирует Windows Server, и выполнил обновления, упоминавшиеся в статье про использование Excel и SharePoint для управления проектами. Мы рекомендуем использовать MOSS на компьютере, специально выделенном для этой цели, а не на сервере, где выполняются другие приложения. Несмотря на то, что этот сервер может и не быть контроллером домена Windows Server, он обязательно должен являться составной частью этого домена, чтобы просматривать список пользователей в Active Directory.
- Тот, кто отвечает за распознавание имен, должен гарантировать, что пользователи могут открыть свой интернет-обозреватель, ввести наименование сайта MOSS и найти его по имени. Иными словами, если главному сайту MOSS присвоено имя PMServer, тогда для его поиска пользователю достаточно открыть интернет-обозреватель и в его адресной строке ввести http://PMServer. Обратите внимание, что для продвижения по этому сайту все пользователи должны использовать свой интернет-обозреватель, но для просмотра тех или иных документов они могут пользоваться другими продуктами Office.
- В рамках MOSS созданы пользователи (обратите внимание: их перечень указан в Active Directory). Каждого из них следует поместить в определенную группу.
- Чтобы управлять сайтом MOSS, вы должны принадлежать к группе пользователей Home Owner. В противном случае вам придется разработать какую-либо методологию, чтобы пользоваться ею при добавлении тех или иных пользователей.
Ваш системный администратор может назначить главному сайту MOSS какой-либо другой номер порта (помимо порта 80, предусмотренного по умолчанию) с целью обеспечения дополнительной безопасности. Допустим, этому Web-сайту назначен порт 8080. В этом случае пользователи должны помнить о том, что перейти на указанный Web-сайт можно, воспользовавшись следующим адресом: http://PMHome:8080.
Добавить нового пользователя довольно просто. На главной странице портала MOSS выберите команду Site Actions → Site Settings → People and Groups (Действия → Установки сайта → Пользователи и группы). Оказавшись в результате выполнения этой команды на Web-странице People and Groups: Home Members (Пользователи и группы: Локальные пользователи), выберите команду New → Add Users (Создать → Пользователей). На следующей Web-странице введите имя добавляемого пользователя или название новой группы пользователей (обратите внимание, что добавленный пользователь
может принадлежать ранее созданной группе пользователей). Затем укажите права нового пользователя.
В настоящее время существует семь категорий разрешений, предоставляемых пользователям.
- Полный контроль (Full control). Таким правом обладают только «владельцы» сайта.
- Разработка (Design). Пользователи с такими правами могут работать со списками и библиотеками документов (в том числе и редактировать их), а также управлять страницами Web-сайта.
- Содействие (Contribute). При наличии этого разрешения пользователи имеют право редактировать элементы списков и документы, а также просматривать Web-страницы.
- Чтение (Read). С такими правами можно только читать содержимое Web-сайта, но не редактировать.
- Утверждение (Approve). Обладатели такого разрешения могут редактировать и утверждать страницы, элементы списков и документы, которые будут выложены на сайте.
- Управление иерархией (Manage Hierarchy). Иерархические разрешения позволяют пользователям создавать сайты, а также редактировать страницы, элементы списков и документы на сайтах.
- Ограниченное чтение (Restricted Read). Читатели, получившие такое разрешение, могут только читать текущие документы на данном сайте, но не их исторические версии. Они не могут просматривать список прав пользователей.
Три базовые группы пользователей
Новому пользователю следует назначить один из семи возможных разрешений. Но в качестве альтернативного варианта можно просто включить его в одну из трех базовых групп MOSS, указанных ниже.
- Home Owners. Входящие в эту группу пользователи наделены неограниченными правами, поэтому круг таких лиц должен быть строго ограниченным.
- Home Members. Члены группы имеют право выкладывать на данный сайт документы. Иногда таких людей называют авторами.
- Home Visitors. Пользователи данной группы могут читать документы, но не обладают правом добавлять новые или удалять существующие документы. Эти люди называются читателями.
Пользователь, не включенный в список в рамках MOSS, вообще не имеет права доступа к соответствующему Web-сайту, даже если у него есть надлежащая учетная запись, позволяющая войти в домен.
Нового пользователя можно добавить в ранее созданную группу (с определенными правами доступа к Web-сайту) либо назначить ему индивидуальные права доступа, касающиеся только этого пользователя. В первом случае установите переключатель Add user to SharePoint group, а затем выберите название группы из расположенного ниже раскрывающегося списка. Во втором — установите переключатель Give user permission directly, а затем выберите необходимые разрешения.
Многие организации располагают определенной структурой WSS, SPS или MOSS. Если вы тоже работаете в организации, где уже имеется истинная портальная структура, а разным подразделениям которой выделены вложенные Web-сайты, то вполне возможно, что ваш администратор пожелает создать вложенный сайт и для вас. Допустим, что ваш главный сайт носит имя ACME, а пользователи обращаются к нему, задавая адрес http://ACME. Системный администратор создает для вас вложенный сайт, который называется РМНоmе. Пользователи будут обращаться к нему, задавая адрес http://ACME/РМНоmе. Управление разрешениями осуществляется указанным выше способом, а доступ пользователей можно легко ограничить лишь кругом лиц, которым требуется обращаться к документам с вашего вложенного сайта.
Единственная разница заключается в том, что ACME рассматривается как портальный сайт, к которому «подвешено» множество вложенных сайтов. В рамках своего сайта вы можете создавать и другие вложенные сайты, например для каждого выполняемого проекта или для разных типов документов, с которыми приходится иметь дело вашему РМО. Это лишь некоторые из огромного множества вариантов, имеющихся в вашем распоряжении. Здесь все зависит от ваших потребностей и творческих способностей.
Если вам надоели походы по магазинам, метания в поисках предметов, которые украсили бы ваш быт и одновременно были бы непохожими на большинство других, то стоит попробовать свои силы в столярном деле, тем более что современный рынок предлагает широкий ассортимент строительных и отделочных материалов, из которых можно изготовить практически любую мебель — от паллетных стеллажей и стандартной корпусной до эксклюзивных вариантов.
In this SharePoint tutorial, we will discuss how to configure the excel service application in SharePoint 2013/2016. Also, we will check, what is excel services in SharePoint? Which version of SharePoint support Excel Services? Why & Where we use Excel Services in SharePoint 2013? Advantages with Excel Services in SharePoint 2013/2016.
What is Excel Services in SharePoint 2013?
Excel service is a shared service in SharePoint that provides you a facility to publish Excel workbooks on SharePoint portal for better collaboration. These published workbooks cab be fully secured and managed across the users as per the business needs.
The beauty of excel service is excel workbook will be rendered in the browser seamlessly. So user really no need to have office installed on their machine.
Which version of SharePoint support Excel Services?
Excel services will be available only in the Enterprise version of SharePoint server 2013. Excel Services consists of Excel Calculation Services, the Excel Web Access Web Part, and Excel Web Services for programmatic access.
Why & where we use Excel Services in SharePoint 2013?
In SharePoint 2013 Enterprise portals Excel services play a key & vital role. Excel service is primarily used for Business Intelligence scenarios. As part of BI, Excel workbooks can connect to external content sources to generate reports and can be easily published in SharePoint document libraries.
Since Excel Services can render workbooks in browser it will be much quicker and easily readable. This really gives a free hand to collaborate the reports/documents across the organization.
Advantages with Excel Services in SharePoint 2013/2016
Excel Service will provide below a list of advantages:
- Edit and browse the workbooks in a browser
- Sharing workbooks
- Building business intelligence (BI) dashboards
- Report building in Power view & Power pivot
Let us learn step by step approach to configure excel services in SharePoint 2013.
Log on to the SharePoint Application server as a FARM administrator account
Open Central Admin as administrator. Open Manage Service Applications in the below path
Central Administration -> Application Management ->Manage Service Applications (under Service Applications).

Click on New service application and select “Excel Service Application” as shown in the below screenshot.

Enter the below mandatory fields:
- Service application Name
- Application pool name
- Select the desired managed account
- Once you enter all the required fields click on the “OK” button

Once you click on OK button SharePoint will create a new Excel Service Application.

As soon as the service application is created ensure than “Excel Calculation Services” is running as part of services on the server.
SharePoint 2013 Central Administration -> Application Management -> Manage Services on Server (under Service Applications)


The last step is to check the user permissions on the content database.
- Log on to SQL server with an admin account
- Launch SQL server management studio
- Select the right content DB
- Expand Security
- Select Users option
- Select the right user and ensure the login name
- Ensure the right permissions DBOwner & SPDataAccess


Configure excel services SharePoint 2013 PowerShell
Below PowerShell commands configure excel services in SharePoint 2013/2016.
Syntax:
$webApp = Get-SPWebapplication << URL of the web application >>
$webApp.GrantAccessToProcessIdentity(<<"service account">>)
Example:
$webApp = Get-SPWebapplication "http://sharepoint13:12345"
$webApp.GrantAccessToProcessIdentity("mstechnologySPFARM")Now Excel services configured successfully it is time for us to test it.
As I mentioned above excel services primarily uses in SharePoint BI, so Follow the below steps to ensure the same:
Create a new site collection with Business Intelligence template in the same web application.
Web application: http://sharepoint13:12345/
BI Site collection: http://sharepoint13:12345/sites/bi/
Note: Change URL as per your organization/company policies
Navigate to BI Site collection and open site content
Open “Documents” document library
You must see “Excel Service Sample Workbook.xlsx” file. Double click on that file.
Notice the URL you will see “xlviewer.aspx” which proves that this excel has been rendered using excel services.

You may like the following SharePoint tutorials:
- How to get SharePoint features using PowerShell
- Customize access denied page in SharePoint 2013/2016
- How to create a custom master page in SharePoint using design manager
- Configure user profile service application in SharePoint 2016 step by step tutorial
- Create and use image mapping in SharePoint Online
- How to export user permission in SharePoint using PowerShell
- SharePoint change list URL
- SharePoint bcs step by step
- How to make SharePoint site read only?
In this tutorial, we learned what is excel services in SharePoint? advantages of using excel services in SharePoint 2013/2016? Then we learned how to configure excel services in SharePoint 2013/2016.

I am Krishna.Vandanapu a SharePoint architect working in IT from last 13+ years, I worked in SharePoint 2007, 2010, 2013, 2016 and Office 365. I have extensive hands on experience in customizing SharePoint sites from end to end. Expertise in SharePoint migration tools like Sharegate, Doc Ave and Metalogix. Migrated SharePoint sites from SharePoint 2007 to 2010 and 2010 to 2013 several times seamlessly. Implementing CSOM with Microsoft best practices. Spent quality time in configuring SharePoint application services like User Profile, Search, Managed Meta data services etc. Now exploring SharePoint Framework and SharePoint 2019