
Excel for Microsoft 365 Excel for Microsoft 365 for Mac Excel 2021 Excel 2021 for Mac Excel 2019 Excel 2019 for Mac Excel 2016 Excel 2016 for Mac Excel 2013 Excel 2010 Excel 2007 More…Less
You can use a Form control button or a command button (an ActiveX control) to run a macro that performs an action when a user clicks it. Both these buttons are also known as a push button, which can be set up to automate the printing of a worksheet, filtering data, or calculating numbers. In general, a Form control button and an ActiveX control command button are similar in appearance and function. However, they do have a few differences, which are explained in the following sections.
|
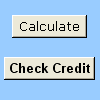
Button (Form control)
|
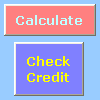
Command button (ActiveX control)
|
In the sections below, learn how to add a macro to a button in Excel—for Windows or the Mac.
Note: ActiveX controls are not supported on the Mac.
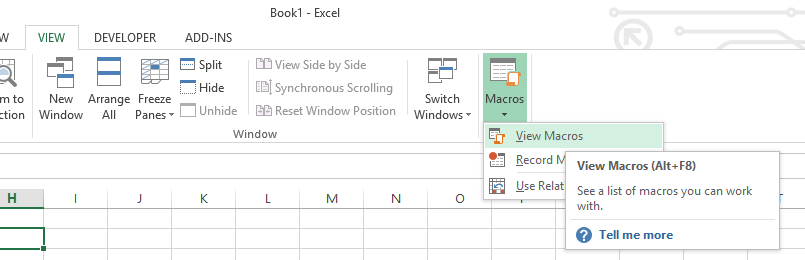
Macros and VBA tools can be found on the Developer tab, which is hidden by default.
The first step is to enable it. For more information, see the article: Show the Developer tab.

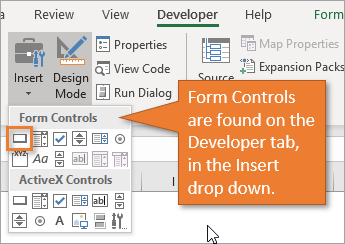
Add a button (Form control)
-
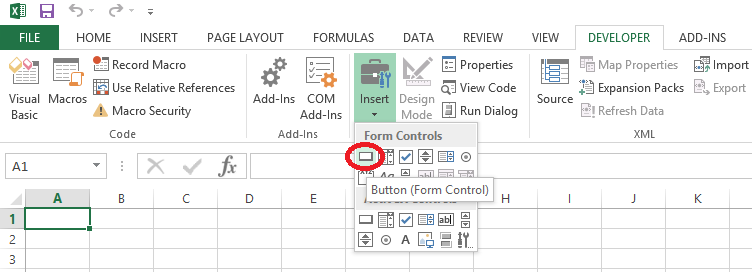
On the Developer tab, in the Controls group, click Insert, and then under Form Controls, click Button
 .
. -
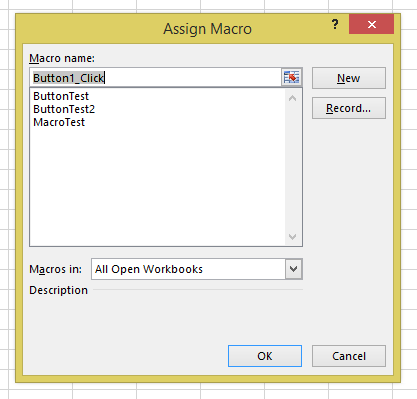
Click the worksheet location where you want the upper-left corner of the button to appear. The Assign Macro popup window appears.
-
Assign a macro to the button, and then click OK.
-
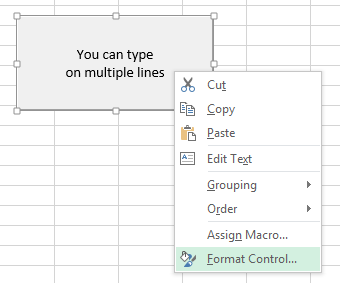
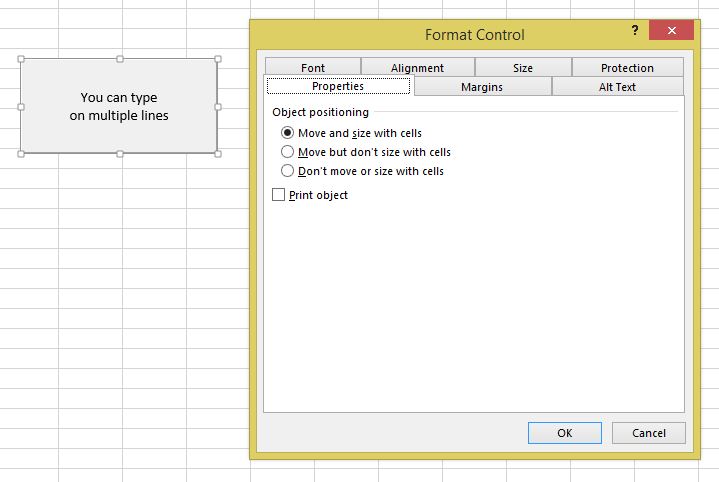
To specify the control properties of the button, right-click the button, and then click Format Control.
 .
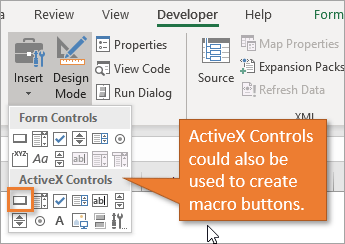
.Add a command button (ActiveX control)
-
On the Developer tab, in the Controls group, click Insert, and then under ActiveX Controls, click Command Button
. -
Click the worksheet location at which you want the upper-left corner of the command button to appear.
-
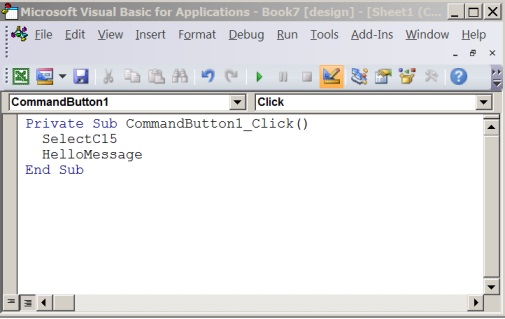
In the Controls group, click View Code. This launches the Visual Basic Editor. Ensure that Click is chose in the drop-down list on the right. The sub procedure CommandButton1_Click (see the figure below) runs these two macros when the button is clicked: SelectC15 and HelloMessage.
-
In the subprocedure for the command button, do either of the following:
-
Enter the name of an existing macro in the workbook. You can find macros by clicking Macros in the Code group. You can run multiple macros from a button by entering the macro names on separate lines inside the subprocedure.
-
As necessary, add your own VBA code.
-
-
Close the Visual Basic Editor, and click Design Mode
to ensure design mode is off. -
To run the VBA code that is now part of the button, click the ActiveX command button that you just created.
-
To edit the ActiveX control, make sure that you are in design mode. On the Developer tab, in the Controls group, turn on Design Mode.
-
To specify the control properties of the command button, on the Developer tab, in the Controls group, click Properties
. You can also right-click the command button, and then click Properties.Note: Before you click Properties, make sure that the object for which you want to examine or change properties is already selected.
The Properties box appears. For detailed information about each property, select the property, and then press F1 to display a Visual Basic Help topic. You can also type the property name in the Visual Basic Help Search box. The following table summarizes the properties that are available.
 to ensure design mode is off.
 . You can also right-click the command button, and then click Properties.
|
If you want to specify |
Use this property |
|---|---|
|
General: |
|
|
Whether the control is loaded when the workbook is opened. (Ignored for ActiveX controls.) |
AutoLoad (Excel) |
|
Whether the control can receive focus and respond to user-generated events. |
Enabled (Form) |
|
Whether the control can be edited. |
Locked (Form) |
|
The name of the control. |
Name (Form) |
|
The way the control is attached to the cells below it (free floating, move but do not size, or move and size). |
Placement (Excel) |
|
Whether the control can be printed. |
PrintObject (Excel) |
|
Whether the control is visible or hidden. |
Visible (Form) |
|
Text: |
|
|
Font attributes (bold, italic, size, strikethrough, underline, and weight). |
Bold, Italic, Size, StrikeThrough, Underline, Weight (Form) |
|
Descriptive text on the control that identifies or describes it. |
Caption (Form) |
|
Whether the contents of the control automatically wrap at the end of a line. |
WordWrap (Form) |
|
Size and Position: |
|
|
Whether the size of the control automatically adjusts to display all the contents. |
AutoSize (Form) |
|
The height or width in points. |
Height, Width (Form) |
|
The distance between the control and the left or top edge of the worksheet. |
Left, Top (Form) |
|
Formatting: |
|
|
The background color. |
BackColor (Form) |
|
The background style (transparent or opaque). |
BackStyle (Form) |
|
The foreground color. |
ForeColor (Form) |
|
Whether the control has a shadow. |
Shadow (Excel) |
|
Image: |
|
|
The bitmap to display in the control. |
Picture (Form) |
|
The location of the picture relative to its caption (left, top, right, and so on). |
PicturePosition (Form) |
|
Keyboard and Mouse: |
|
|
The shortcut key for the control. |
Accelerator (Form) |
|
A custom mouse icon. |
MouseIcon (Form) |
|
The type of pointer that is displayed when the user positions the mouse over a particular object (standard, arrow, I-beam, and so on). |
MousePointer (Form) |
|
Whether the control takes the focus when clicked. |
TakeFocusOnClick (Form) |
Macros and VBA tools can be found on the Developer tab, which is hidden by default, so the first step is to enable it
-
Go to Excel > Preferences… > Ribbon & Toolbar.
-
In the Customize the Ribbon category, in the Main Tabs list, select the Developer check box, and then click Save.
Add a button (Form control)
Follow these steps:
-
On the Developer tab, click Button
. -
Click the worksheet location where you want the upper-left corner of the button to appear. The Assign Macro popup window appears.
Note: If you have already inserted a button, you can right-click on it, and select Assign Macro.
-
Assign a macro to the button and click OK.
-
To specify the control properties of the button, right-click it, and then select Format Control….
Add a command button (Visual Basic control)
-
On the Developer tab, click Button
. -
Click the worksheet location where you want the upper-left corner of the command button to appear.
Note: If you have already inserted a button, you can right-click on it, and select Assign Macro.
-
In the Assign Macro dialog box, select New, which will open the Visual Basic Editor (VBE) to a pane with the following code:
  Sub ButtonX_Click()

  End Sub
-
In the subprocedure for the command button, between the Sub and End Sub lines, do either of the following:
-
Enter the name of an existing macro in the workbook. You can run multiple macros from a button by typing the macro names on separate lines inside the sub procedure
-
Add your own VBA code.
-
-
Click Design Mode
to ensure that design mode is off, then close the Visual Basic Editor window. -
To edit the button, right-click it and choose Visual Basic.
-
To specify the control properties of the button, right-click it, and then select Format Control….
Need more help?
You can always ask an expert in the Excel Tech Community or get support in the Answers community.
See Also
-
Add or edit a macro for a control on a worksheet
-
Enable or disable macros in Office files
-
Enable or disable ActiveX settings in Office files
Need more help?
Want more options?
Explore subscription benefits, browse training courses, learn how to secure your device, and more.
Communities help you ask and answer questions, give feedback, and hear from experts with rich knowledge.
Содержание
- Add a Button and Assign a Macro in Excel
- Excel Buttons
- Run a Macro From a Button
- The Excel Developer Tab
- Add a Macro Button
- Assigning a Macro to a Button
- Assign Existing Macro to a Button
- Edit an Existing Macro Before Assigning to a Button
- Record a Macro and Assign to Button
- Write VBA Procedure and Assign to Button
- Change Macro Assigned to Button
- How to Adjust Button Properties in Excel
- Move or Resize Excel Button
- Rename Button
- Format Button
- Assign a Macro to a Shape
- Assign a Macro to a Hyperlink
- Quick start: Create a macro
- Next steps
- Need more help?
- Назначение макроса кнопке
- Добавление кнопки макроса на панель быстрого доступа
- Добавление кнопки макроса в группу на ленте
- Более новые версии
- Excel 2011 для Mac
Add a Button and Assign a Macro in Excel
Excel Buttons
In Excel, Buttons are used to call Macros. This tutorial will cover how to create Excel buttons, assign Macros to them, adjust their properties, and more.
By default, Excel macros are accessible in a list via the “Macros” button on the View ribbon.
Often though, you’ll want to provide easy access to a particular macro directly on your worksheet. This can be achieved using a Button control.
A Button control looks like a Microsoft Windows button, and runs a macro when clicked. It’s a much handier way to access your most commonly used macros, and is an easy way to expose custom functionality to other users of your workbook.
Run a Macro From a Button
To run a Macro from a button in Excel, simply click the button:
The Excel Developer Tab
Buttons are accessible via the Developer Tab.

Unfortunately, Excel hides the Developer tab by default. If you don’t see the Developer Ribbon, follow these steps:
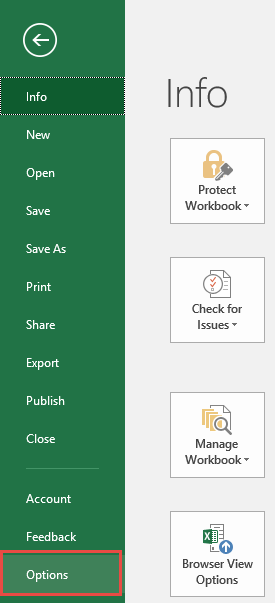
- Click File >Options in the list on the left-hand border
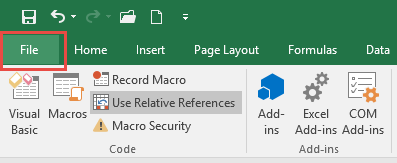
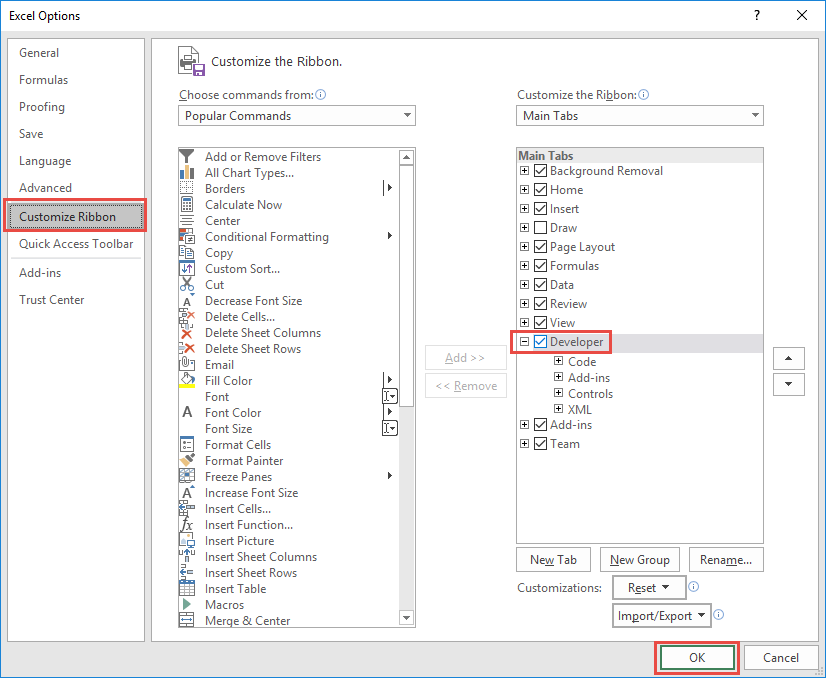
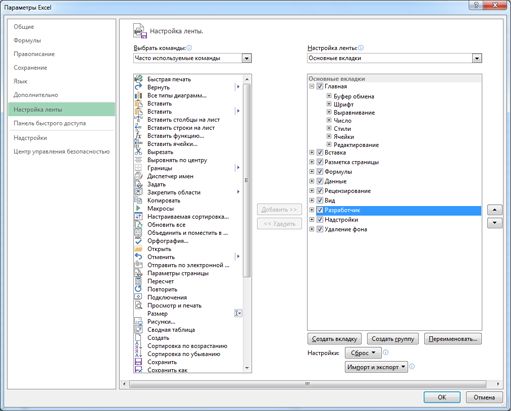
- In the Options dialog select Customize Ribbon > Customize the Ribbon > Main Tabs and add a check-mark in the box for “Developer”, and click OK.
Add a Macro Button
In Excel, select the Developer tab, then click on the “Insert” dropdown in the Controls section. There are several types of controls divided into two sections, “Form Controls” and “ActiveX Controls”.
For now, just click on the Button control under “Form Controls”. Next, move the mouse anywhere over the worksheet surface, then hold left-click and drag the mouse to draw the outline of a rectangle. When you release left-click, a new dialog will appear titled “Assign Macro”.
Assigning a Macro to a Button
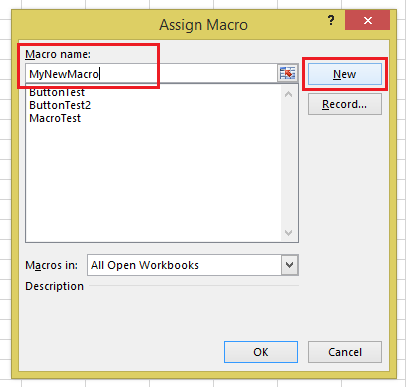
Here you can assign an existing Macro to the button, record a new macro, create a new macro from scratch using VBA, or click “Cancel” and return to your button later.
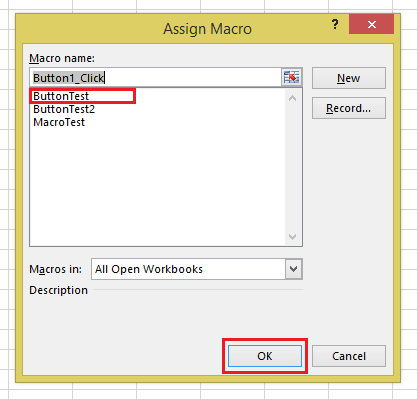
Assign Existing Macro to a Button
To assign an existing Macro, you simply select the macro’s name in the list, then click OK.
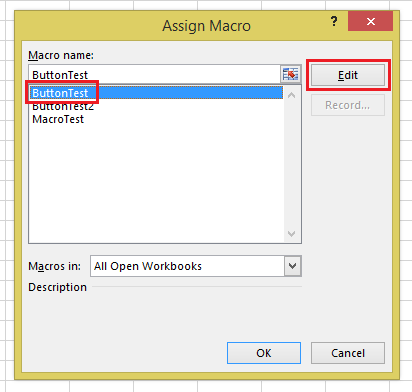
Edit an Existing Macro Before Assigning to a Button
To edit a macro before assigning it to the button, select the macro’s name in the list and click the “Edit” button (the “New” button text changes to “Edit”).
Record a Macro and Assign to Button
To record a new macro and assign it to the button, click “Record…”. This brings up the Record Macro dialog, where you specify a name and click “OK”. The button will be assigned that macro. Meanwhile, Excel will remain in a recording state until you click “Stop Recording” in the “Code” section of the Developer tab. 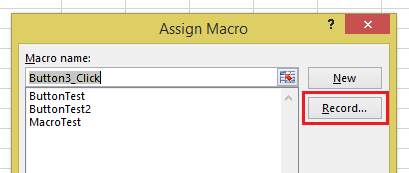
Write VBA Procedure and Assign to Button
To write a new macro for the button, type a new name for your macro in the textbox at the top of the dialog, then click “New”. Excel will bring up the VB Editor, in which you’ll see a new empty macro procedure with the name you entered. This procedure will be stored in a new module, visible in the Project window.
Change Macro Assigned to Button
To change the Macro that’s assigned to a button, simply right-click the button and select Assign Macro:
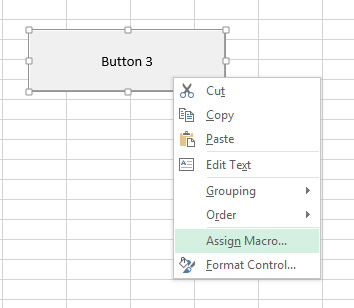
Here you can see the assigned Macro and make any desired changes.

How to Adjust Button Properties in Excel
Move or Resize Excel Button
After you’ve placed a button, you can easily move or resize it. To perform any of these actions, right-click on the button. Then you can left-click and drag the button to your desired location or resize it.
Rename Button
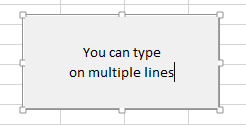
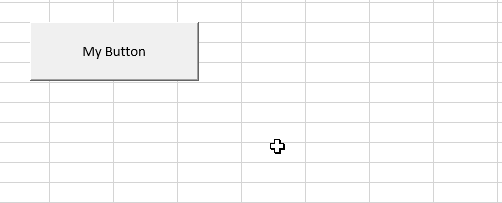
With the button selected, left-click on the button text to edit.
To add multiple lines, simple press the ENTER key.
Format Button
To format other button properties, Right-Click > Format Control
Here you can adjust font sizes, and many other button properties:
Of particular note is the “Properties” tab, which changes how the button behaves as surrounding rows and columns are inserted, deleted, resized, or hidden/unhidden.
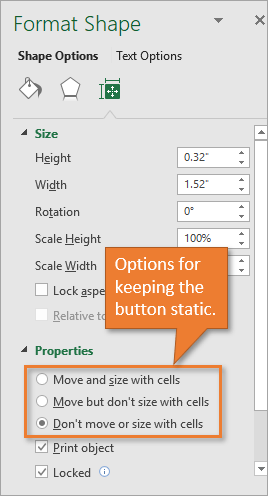
- Move and size with cells: The button will move and resize when rows and columns are changed.
- Move but don’t size with cells: The button will move, but not resize.
- Don’t move or size with cells: The button will not move or resize.
- Finally, Print Object can set the object to appear on printouts. This is unchecked by default, but can be toggled on if desired.
Assign a Macro to a Shape
Besides buttons, macros can assigned to other objects like Pictures, Textboxes, and Shapes. With a Picture or Shape, you can make a button that looks any way you like. Excel includes a wide variety of customizable Shapes including polygons, arrows, banners, and more that may be better suited to your worksheet than a regular button control.
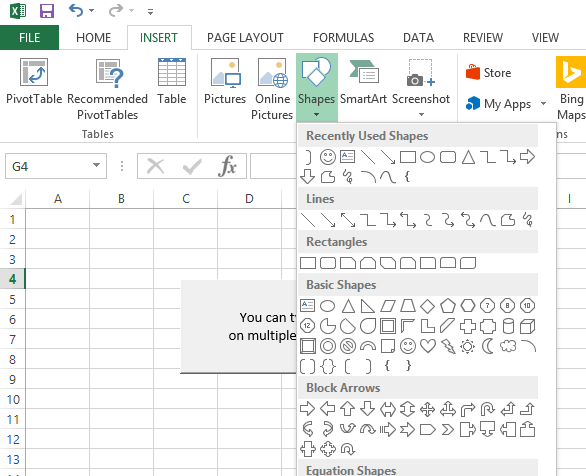
Shapes are accessed from the Insert tab:
Select the shape you want from the Shape dropdown, draw it onto your worksheet as you would a button control, then right-click it and select “Assign Macro…” from the pop-up dialog. The options are the same as assigning a macro to a button.
Assign a Macro to a Hyperlink
Macros can also be assigned to hyperlinks by using VBA Events. Events are procedures that are triggered when certain actions are performed:
- Open/Close/Save Workbook
- Activate / Deactivate Worksheet
- Cell Values Change
- Click Hyperlink
- and more.
Events require knowledge of VBA. To learn more about events, visit our VBA Tutorial.
Источник
Quick start: Create a macro
If you have tasks in Microsoft Excel that you do repeatedly, you can record a macro to automate those tasks. A macro is an action or a set of actions that you can run as many times as you want. When you create a macro, you are recording your mouse clicks and keystrokes. After you create a macro, you can edit it to make minor changes to the way it works.
Suppose that every month, you create a report for your accounting manager. You want to format the names of the customers with overdue accounts in red, and also apply bold formatting. You can create and then run a macro that quickly applies these formatting changes to the cells you select.

Before you record a macro
Macros and VBA tools can be found on the Developer tab, which is hidden by default, so the first step is to enable it. For more information, see Show the Developer tab.

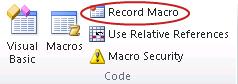
In the Code group on the Developer tab, click Record Macro.
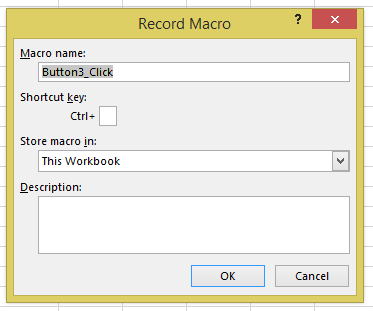
Optionally, enter a name for the macro in the Macro name box, enter a shortcut key in the Shortcut key box, and a description in the Description box, and then click OK to start recording.
Perform the actions you want to automate, such as entering boilerplate text or filling down a column of data.
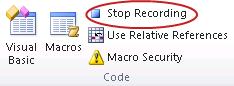
On the Developer tab, click Stop Recording.

Take a closer look at the macro
You can learn a little about the Visual Basic programming language by editing a macro.
To edit a macro, in the Code group on the Developer tab, click Macros, select the name of the macro, and click Edit. This starts the Visual Basic Editor.
See how the actions that you recorded appear as code. Some of the code will probably be clear to you, and some of it may be a little mysterious.
Experiment with the code, close the Visual Basic Editor, and run your macro again. This time, see if anything different happens!
Next steps
To learn more about creating macros, see Create or delete a macro.
To learn about how to run a macro, see Run a macro.
Before you record a macro
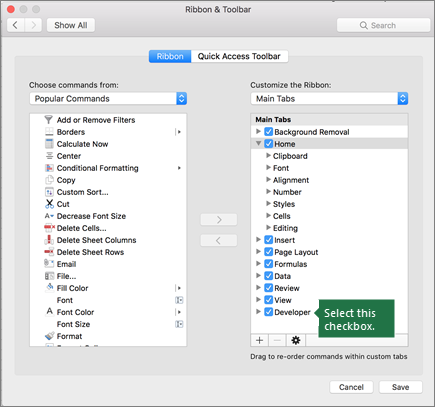
Make sure the Developer tab is visible on the ribbon. By default, the Developer tab is not visible, so do the following:
Go to Excel > Preferences… > Ribbon & Toolbar.
In the Customize the Ribbon category, in the Main Tabs list, select the Developer check box, and then click Save.
On the Developer tab, click Record Macro.
Optionally, enter a name for the macro in the Macro name box, enter a shortcut key in the Shortcut key box, and a description in the Description box, and then click OK to start recording.
Perform the actions you want to automate, such as entering boilerplate text or filling down a column of data.
On the Developer tab, in the Code group, click Stop Recording.
Take a closer look at the macro
You can learn a little about the Visual Basic programming language by editing a macro.
To edit a macro, in the Developer tab, click Macros, select the name of the macro, and click Edit. This starts the Visual Basic Editor.
See how the actions that you recorded appear as code. Some of the code will probably be clear to you, and some of it may be a little mysterious.
Experiment with the code, close the Visual Basic Editor, and run your macro again. This time, see if anything different happens!
Need more help?
You can always ask an expert in the Excel Tech Community or get support in the Answers community.
Источник
Назначение макроса кнопке
С помощью кнопки (управления формы) можно запускать макрос, который выполняет действие при ее нажатии пользователем. Например, таким образом можно автоматизировать печать листа, фильтрацию данных либо расчеты.
После создания макросаего можно назначить кнопке, нажатой для запуска макроса. Макрос можно назначить кнопке на панели быстрого доступа или кнопке в личной группе на ленте.
Если вы хотите, чтобы кнопка макроса была доступна в других книгах, назначьте ее макросам, созданным в личной книге.
Добавление кнопки макроса на панель быстрого доступа
Откройте вкладку Файл и выберите пункт Параметры, а затем — категорию Панель быстрого доступа.
В списке Выбрать команды из выберите пункт Макрос.

Выберите макрос, для который нужно назначить кнопку.
Нажмите кнопку Добавить, чтобы переместить макрос в список кнопок на панели быстрого доступа.
Чтобы заменить значок макроса по умолчанию другой кнопкой для макроса, нажмите кнопку Изменить.
В области Символвыберите значок кнопки для макроса.

Чтобы использовать более имя кнопки, в поле Отображаемая имя введите нужное имя.
В имя кнопки можно ввести пробел.
Дважды нажмите кнопку ОК.
Новая кнопка появится на панели быстрого доступа, где ее можно нажать, чтобы запустить макрос.
Совет: После сохранения книгикнопки, которые вы назначаете макросам в личной книге, будут доступны во всех открытых книгах.
Добавление кнопки макроса в группу на ленте
Щелкните Файл > Параметры > Настроить ленту.
В списке Основные вкладки в списке Настроить ленту, если он еще не был проверен,в поле Разработчик.
Выберите вкладку, на которой вы хотите добавить свою группу.
Например, выберите Главная, чтобы добавить группу на вкладку Главная.
Выберите Новая группа.
При этом новая группа (настраиваемая) будет добавлена на вкладку, которую вы выбрали.
Чтобы использовать более понятное имя для новой группы, нажмите кнопку Переименовать ,введите нужное имя в поле Отображаемая группа и нажмите кнопку ОК.
В имени можно ввести пробел. Например, введите Мои макросы.
Чтобы добавить макрос в группу, в списке Выбрать команды из выберите пункт Макрос.
Выберите макрос, который вы хотите добавить в новую группу, и нажмите кнопку Добавить. Макрос будет добавлен в группу Мои макросы.
Чтобы использовать более имя, нажмите кнопку Переименовать и введите нужное имя в поле Отображаемого имени.
В имени можно ввести пробел.
В области Символвыберите значок кнопки для макроса.
Дважды нажмите кнопку ОК.
Новая группа появится на вкладке, на которой можно нажать кнопку для запуска макроса.
Совет: После сохранения книгикнопки, которые вы назначаете макросам в личной книге, будут доступны во всех открытых книгах.
Более новые версии
На вкладке Разработчик в группе Элементы управления щелкните Кнопка.
Если вкладка «Разработчик» недоступна:
Перейдите в Excel > параметры. > ленты & панели инструментов.
В разделе Настройка ленты в разделе Основныевкладки, в разделе Разработчики нажмите кнопку ОК.
Щелкните на листе место, где должен быть расположен левый верхний угол кнопки.
В диалоговом окне Назначение макроса щелкните имя макроса, который вы хотите назначить кнопке, и нажмите ОК.
Чтобы изменить размер кнопки, перетащите маркеры.
Чтобы задать свойства кнопки, щелкните ее, нажав клавишу CONTROL, или щелкните ее правой кнопкой мыши, а затем выберите форматирование.
Excel 2011 для Mac
На вкладке Разработчик в группе Элементы управления формы щелкните Кнопка.
Если вкладка «Разработчик» недоступна:
В правой части ленты нажмите кнопку  и выберите параметры ленты.
В разделе Настройки установите флажок Разработчик.
Щелкните на листе место, где должен быть расположен левый верхний угол кнопки.
В диалоговом окне Назначение макроса щелкните имя макроса, который вы хотите назначить кнопке, и нажмите ОК.
Чтобы задать свойства кнопки, щелкните ее, нажав клавишу CONTROL, или щелкните ее правой кнопкой мыши, а затем выберите форматирование.
Источник
Adblock
detector
Bottom Line: Learn how to create macro buttons in a worksheet that run VBA code when clicked. Includes how to format buttons and prevent them from moving and resizing on the sheet.
Skill Level: Intermediate
Video Tutorial
Download the Excel File
Here’s the Excel workbook that I use in the video so you can follow along and practice what you’re learning.
Making User-Friendly Macro Buttons in Your Spreadsheets
Macros make life easier. Buttons make life easier. It’s only natural to marry the two and make the processes you repeatedly have to perform as simple as possible.
You can literally run through a hundred steps with just one small click using macros and buttons–which, of course, is both empowering and gratifying.
Kristen, a member of our VBA Pro Course, loves to add buttons to her spreadsheets for this reason.
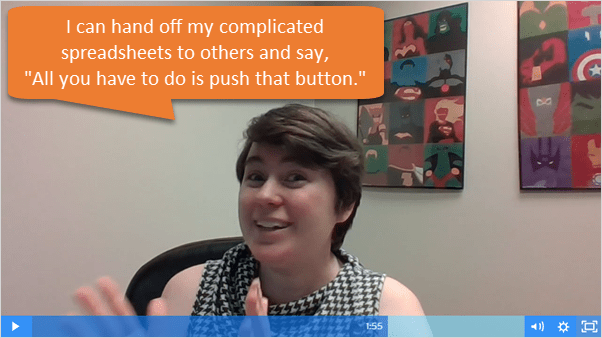
You can watch the entire video to learn more about Kristen’s story with learning VBA, and how she uses macro buttons.
For this tutorial, we’re using macros that have already been created. If you don’t know how to create macros yet, then checkout one of my free webinars to learn the basics getting started with macros & VBA.
So let’s take a look at how to create a button and assign a macro to it.
3 Types of Macro Buttons for Worksheets
In this post I explain three different types of buttons you can place on a worksheet.
- Shapes
- Form Control Buttons
- ActiveX Control Buttons
We’ll start with my favorite…
1. Using Shapes to Create Macro Buttons
In my opinion, the best way to create macro buttons is to use shapes. Shapes give us the most styling/formatting options, and we can make them look like buttons you click every day on modern web pages.
Below, we will create the button on a worksheet and assign a macro to it. Here are the steps to create the macro button:
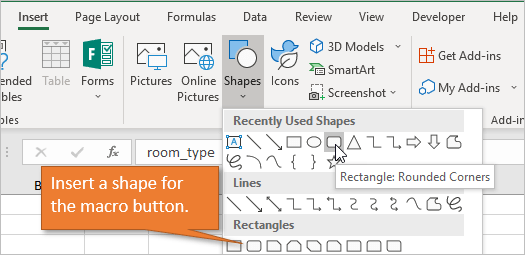
1. Draw a shape on the sheet (Insert tab > Shapes drop-down > Rectangle shape).
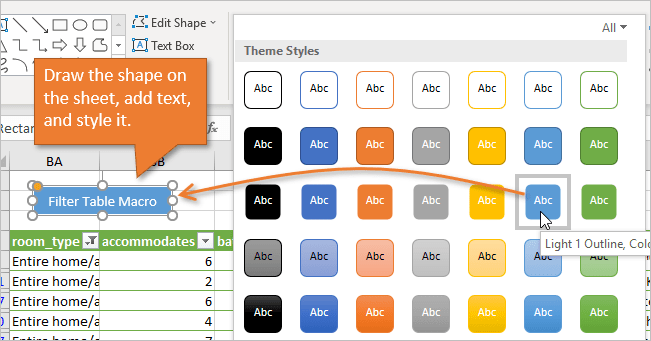
2. Add text to the shape (Right-click > Edit Text | or double-click in the shape).
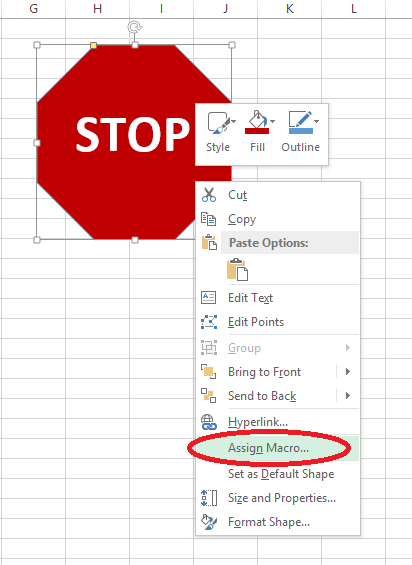
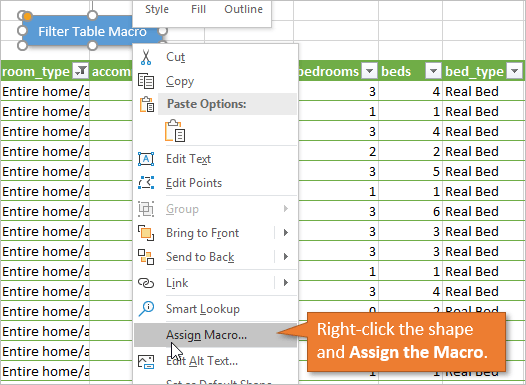
3. Assign the macro (Right-click the border of the shape > Assign Macro…)
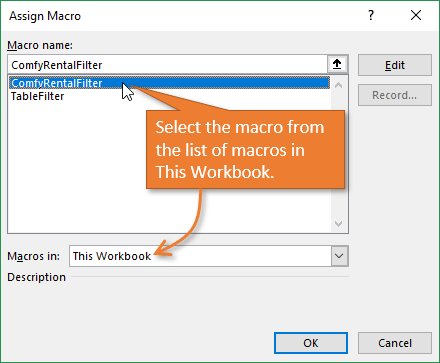
4. Select the macro from the list. It’s important to note that the macro should be selected from the This Workbook list so that when you share the workbook with other users, the macro will be shared as well.
If you assign the macro from another workbook, the button will not work for the people you share the workbook with.
5. Press OK.
When you hover your mouse over the shape it will now turn into the hand pointer cursor. Clicking the shape will run the macro.
That’s it! That’s how you assign a macro to a button that you’ve created right on the worksheet.
Modifying the Button
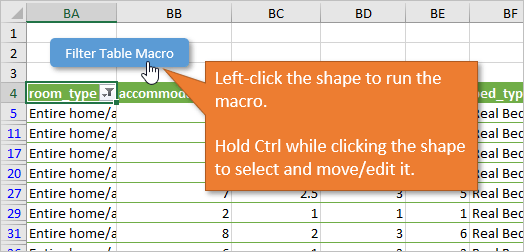
If you need to select the shape to change its look or move it, hold the Ctrl key while clicking the shape. This will prevent the macro from running and allow you to modify the shape. Excel offers a ton of options on the Format tab for changing the shape style, shape effects, font color or size, etc.
Preventing the Button from Resizing with Cell Changes
Depending on your settings, it’s likely that when you change the size of the column or row that your button is on, the button size will change as well. If you don’t want that to happen, you can easily adjust the settings to keep the button static.
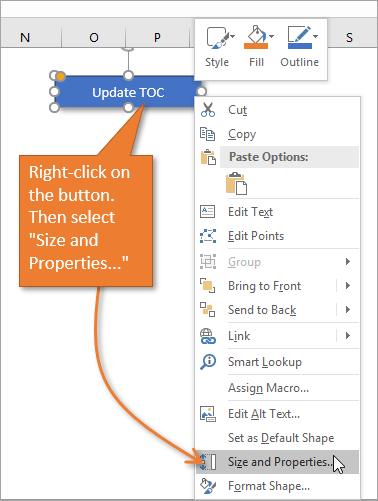
First, just right click on the button and choose Size and Properties…
This will bring up the Format Shape pane. There are options for you to choose from in the Properties section, depending on whether or not you want the button to move or resize when changes are made to your sheet.
2. Using Form Controls to Create Macro Buttons
The next option for macro buttons is Form Controls. They are essentially the same in terms of set-up.
The difference between Controls and Shapes is the styling.
Form Control buttons do give the appearance of being pressed when you click on them, which is kind of cool. However, they unfortunately look like a button you’d find on an early version of Windows.
We cannot change the color of the button either. The only formatting options are for the font type, size, and color.
Insert a Form Control Button
To add a Form Control button, just go to the Developer tab and click on the Insert button. A drop-down gives you options under Form Controls.
3. Using ActiveX Controls for Macro Buttons
The last option is ActiveX Control buttons.
The ActiveX Control buttons do have more formatting options and you can change the button color.
They also require you to add an event macro in the sheet module that will run when the button is clicked. This is done by right-clicking the button and choosing View Code.
You can add other event triggers like double-click. This could perform a different action/macro when the button is double-clicked.
However, I don’t recommend the ActiveX Control buttons. In my experience they are glitchy in terms of consistent appearance. They can end up really big or really small when changes are made to the sheet or when the file is shared back and forth between users.
Placing Buttons in the Ribbon or Toolbar Instead
Another option is to place your macro buttons on any of the tabs in the Excel Ribbon or Quick Access Toolbar.
This is video #3 in my 4-part video series on the Personal Macro Workbook. This technique is best for macros that you will only run on your computer because the ribbon button customizations do not travel with the workbook.
If you do want the ribbon buttons to travel with the workbook then you can use XML code to customize the ribbon. I’ll write an article on that in the future, and I do cover extensively in my VBA Pro Course, along with how to create add-ins.
Related Tutorials
I have a couple other posts for you to check out on this topic. Take a few minutes to give them a look!
- How to Create VBA Macro Buttons for Filters in Excel
- Macro Buttons to Add Fields to Pivot Tables
- How to Add a Yes No Pop-up Message Box to a Macro Before It Runs
- How to Enable the Developer Tab in Excel
Conclusion
My overall recommendation is to keep it simple and stick to using shapes for macro buttons. They give you the most formatting options, and are easy to setup and modify.
What will you create macro buttons for? I’d love to hear how you plan to put these buttons to work. If you have any comments or questions about running a macro button that you’ve created, please leave a comment below.
Thank you! 🙂
Excel Buttons
In Excel, Buttons are used to call Macros. This tutorial will cover how to create Excel buttons, assign Macros to them, adjust their properties, and more.
By default, Excel macros are accessible in a list via the “Macros” button on the View ribbon.
Often though, you’ll want to provide easy access to a particular macro directly on your worksheet. This can be achieved using a Button control.
A Button control looks like a Microsoft Windows button, and runs a macro when clicked. It’s a much handier way to access your most commonly used macros, and is an easy way to expose custom functionality to other users of your workbook.
Run a Macro From a Button
To run a Macro from a button in Excel, simply click the button:
The Excel Developer Tab
Buttons are accessible via the Developer Tab.
Unfortunately, Excel hides the Developer tab by default. If you don’t see the Developer Ribbon, follow these steps:
- Click File > Options in the list on the left-hand border
- In the Options dialog select Customize Ribbon > Customize the Ribbon > Main Tabs and add a check-mark in the box for “Developer”, and click OK.
Add a Macro Button
In Excel, select the Developer tab, then click on the “Insert” dropdown in the Controls section. There are several types of controls divided into two sections, “Form Controls” and “ActiveX Controls”.
For now, just click on the Button control under “Form Controls”. Next, move the mouse anywhere over the worksheet surface, then hold left-click and drag the mouse to draw the outline of a rectangle. When you release left-click, a new dialog will appear titled “Assign Macro”.

Assigning a Macro to a Button
Here you can assign an existing Macro to the button, record a new macro, create a new macro from scratch using VBA, or click “Cancel” and return to your button later.
Assign Existing Macro to a Button
To assign an existing Macro, you simply select the macro’s name in the list, then click OK.
Edit an Existing Macro Before Assigning to a Button
To edit a macro before assigning it to the button, select the macro’s name in the list and click the “Edit” button (the “New” button text changes to “Edit”).
Record a Macro and Assign to Button
To record a new macro and assign it to the button, click “Record…”. This brings up the Record Macro dialog, where you specify a name and click “OK”. The button will be assigned that macro. Meanwhile, Excel will remain in a recording state until you click “Stop Recording” in the “Code” section of the Developer tab.
Write VBA Procedure and Assign to Button
To write a new macro for the button, type a new name for your macro in the textbox at the top of the dialog, then click “New”. Excel will bring up the VB Editor, in which you’ll see a new empty macro procedure with the name you entered. This procedure will be stored in a new module, visible in the Project window.
Change Macro Assigned to Button
To change the Macro that’s assigned to a button, simply right-click the button and select Assign Macro:
Here you can see the assigned Macro and make any desired changes.
How to Adjust Button Properties in Excel
Move or Resize Excel Button
After you’ve placed a button, you can easily move or resize it. To perform any of these actions, right-click on the button. Then you can left-click and drag the button to your desired location or resize it.
Rename Button
With the button selected, left-click on the button text to edit.
To add multiple lines, simple press the ENTER key.
Format Button
To format other button properties, Right-Click > Format Control
Here you can adjust font sizes, and many other button properties:

Of particular note is the “Properties” tab, which changes how the button behaves as surrounding rows and columns are inserted, deleted, resized, or hidden/unhidden.
- Move and size with cells: The button will move and resize when rows and columns are changed.
- Move but don’t size with cells: The button will move, but not resize.
- Don’t move or size with cells: The button will not move or resize.
- Finally, Print Object can set the object to appear on printouts. This is unchecked by default, but can be toggled on if desired.
Assign a Macro to a Shape
Besides buttons, macros can assigned to other objects like Pictures, Textboxes, and Shapes. With a Picture or Shape, you can make a button that looks any way you like. Excel includes a wide variety of customizable Shapes including polygons, arrows, banners, and more that may be better suited to your worksheet than a regular button control.
Shapes are accessed from the Insert tab:
Select the shape you want from the Shape dropdown, draw it onto your worksheet as you would a button control, then right-click it and select “Assign Macro…” from the pop-up dialog. The options are the same as assigning a macro to a button.
Assign a Macro to a Hyperlink
Macros can also be assigned to hyperlinks by using VBA Events. Events are procedures that are triggered when certain actions are performed:
- Open/Close/Save Workbook
- Activate / Deactivate Worksheet
- Cell Values Change
- Click Hyperlink
- and more.
Events require knowledge of VBA. To learn more about events, visit our VBA Tutorial.
We can automate the most common tasks in Excel to avoid unnecessary time consumption. Regarding automation, VBA macros are the way to go forward in Excel. Once the macro coding is completed, we need to execute that program to get the assigned job done. You must have already seen a button that can do the job in many of the worksheets, so once the programming is done, we can assign that work to one of the buttons so that the given job will be executed by click of the button. So in this article, we will take you through creating an Excel button to perform the task.
Table of contents
- Create a Macro Button in Excel
- 3 Methods to Create Button in Macro Excel?
- #1 – Using Shapes
- #2 – Using Form Control Shapes & Active X
- Things to Remember
- Recommended Articles
- 3 Methods to Create Button in Macro Excel?
3 Methods to Create Button in Macro Excel?
As we know, macro coding is the perfect way to automate tasks. However, there is another small thing we can do to execute that code. Macro and buttons are the ideal combinations. It is like a “typical Indian marriage of boy likes a girl and girl likes a boy.” With just the click of the button, we can execute hundreds of lines, so some of the complex reports can be automated and handed over to our team members. But then, we have to click the button to get the job done.
So, we can create a button in three ways in Excel. Those are below:
- Shapes
- Active X Control
- Form Control in ExcelExcel Form Controls are objects which can be inserted at any place in the worksheet to work with data and handle the data as specified. These controls are compatible with excel and can create a drop-down list in excel, list boxes, spinners, checkboxes, scroll bars.read more
You are free to use this image on your website, templates, etc, Please provide us with an attribution linkArticle Link to be Hyperlinked
For eg:
Source: Create Button Macro in Excel (wallstreetmojo.com)
We will see each one of them in detail now.
You can download this Create Button Excel Template here – Create Button Excel Template
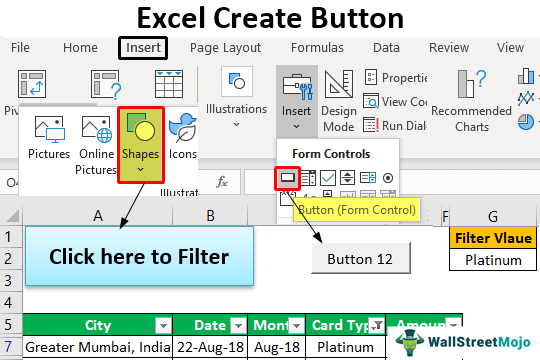
#1 – Using Shapes
The best and easiest way to create a button to assign a macro is using “Shapes” in Excel. We can insert a wide variety of shapes in Excel, and also we can format these shapes as we would like to make them look.
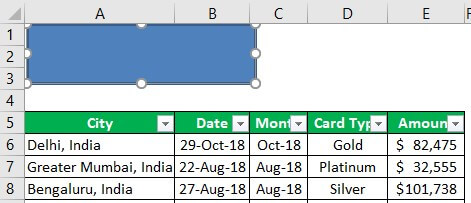
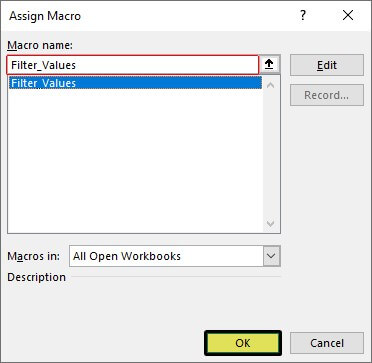
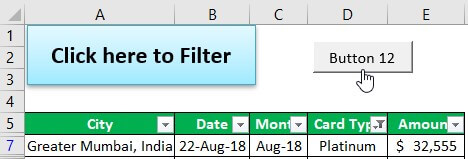
Before inserting shapes, below is the macro we had written to filter values in the below data.
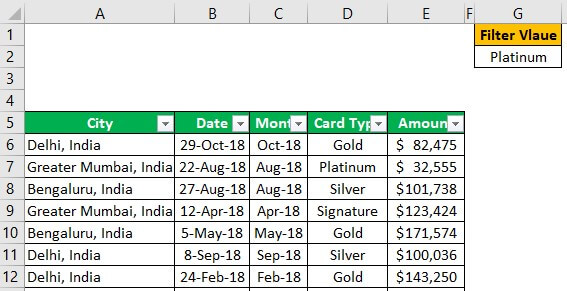
We have data in columns from A to E. In the G2 cell, we have created a drop-down list of all the card types, the card type that we choose in the G2 cell should be filtered out in the data. For this, below is the excel macroA macro in excel is a series of instructions in the form of code that helps automate manual tasks, thereby saving time. Excel executes those instructions in a step-by-step manner on the given data. For example, it can be used to automate repetitive tasks such as summation, cell formatting, information copying, etc. thereby rapidly replacing repetitious operations with a few clicks.
read more code we have written.
Code:
Sub Filter_Values()

 Dim LR As Long
 Dim LC As Long
 Dim Rng As Range

 LR = Cells(Rows.Count, 1).End(xlUp).Row
 LC = Cells(5, Columns.Count).End(xlToLeft).Column

 Set Rng = Cells(5, 1).Resize(LR, LC)
 Rng.AutoFilter Field:=4, Criteria1:=Range("G2").Value

End Sub
Upon running the above code, it will filter the values which are selected in the cell G2 cell. Every time we need to open the Visual Basic EditorThe Visual Basic for Applications Editor is a scripting interface. These scripts are primarily responsible for the creation and execution of macros in Microsoft software.read more, and we need to run the code.
So, now we will insert shapes to assign the macro.
Follow the below-given steps to assign macro to shape.
- We must first go to the “Insert” tab in Excel and find the “Shapes ” option.

- Once we click on the ” Shapes ” drop-down list, we see many shape options. Select any of the shapes and draw on the worksheet.

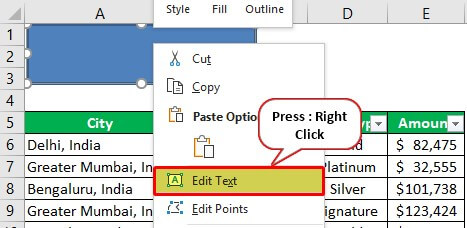
- After adding the shapes, we need to enter some text values, so right-click on the shape and choose “Edit Text.”

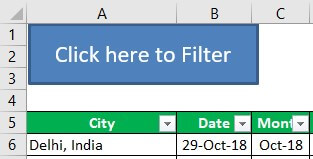
- We must enter the text as we would like to convey the message to the user.

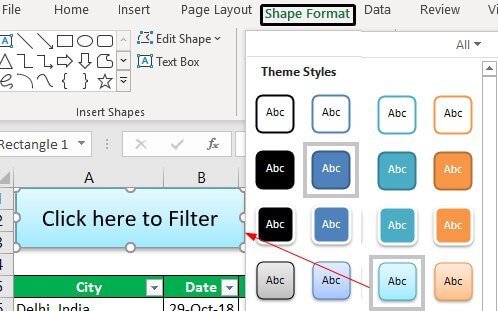
It is the default view of the shape. - We can format the shape under the “Format” tab.

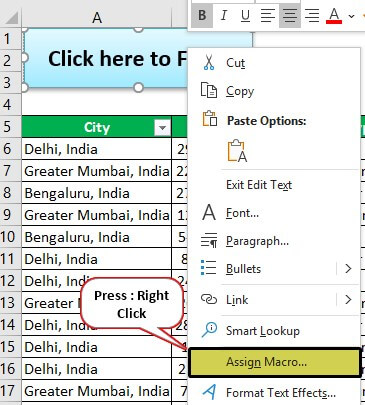
- Once the proper formatting is given to the shape, we need to click and choose “Assign Macro.”

- Once the proper formatting is given to the shape, right-click and choose “Assign Macro.” Next, we must select the macro we would like to assign to the shape.

- Now click on “OK,” Currently, the macro has been assigned to the shape.
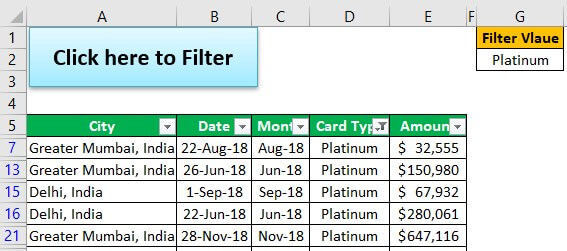
We see the hand pointer indicating the click option when we hover on the shape. If we click, it will execute the assigned macro, and the value in cell G2 will be filtered.


#2 – Using Form Control Shapes & Active X
Under the the developer tabEnabling the developer tab in excel can help the user perform various functions for VBA, Macros and Add-ins like importing and exporting XML, designing forms, etc. This tab is disabled by default on excel; thus, the user needs to enable it first from the options menu.read more, we have an option called “Insert.” Under this, we have “Form Control” and “Active X Control.”
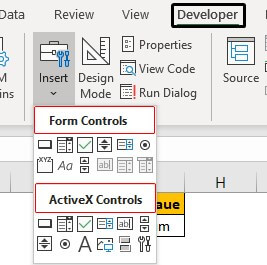
From “Form Controls,” we must select the “Button” option.
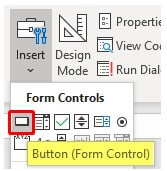
Then, draw this on the worksheet, and immediately we will get a list of macros.
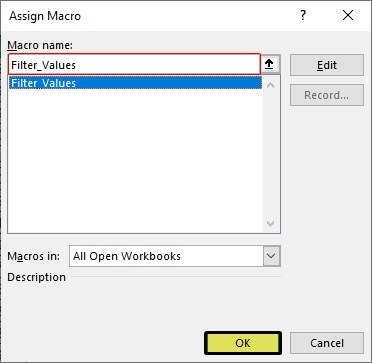
We need to choose the macro we would like to assign and click on “OK” to close the above window.
As a result, now, a button is created to run the macro.
Like this, we can create a button in Excel to execute the macro.
Things to Remember
- The Active X Control button requires further coding knowledge, so not covered in this article.
- The basic difference between “Shape” and “Form Controls” is the formatting and style they look like.
Recommended Articles
This article has been a guide to Create Button Macro in Excel. Here, we discuss the top 3 methods using shapes, active X control, form controls, examples, and downloadable Excel templates. You may learn more about Excel from the following articles: –
- VBA Macros
- Record Macros in Excel
- VBA Tutorial