
Содержание
- Excel [DEPRECATED]
- General Limits
- Creating a connection
- Default
- Throttling Limits
- Actions
- Delete row [DEPRECATED]
- Parameters
- Get row [DEPRECATED]
- Parameters
- Returns
- Get rows [DEPRECATED]
- Parameters
- Returns
- Get tables [DEPRECATED]
- Parameters
- Returns
- Insert row [DEPRECATED]
- Parameters
- Returns
- Update row [DEPRECATED]
- Parameters
- Returns
- Definitions
- Table
- Connect to Excel from Power Apps
- Step 1 — Format your data as a table in Excel
- Step 2 — Store your Excel file in a cloud location
- Step 3 — Add Excel as a data source for your Power App
- Method 1 — Start from Excel
- Start from Excel with new connector
- Method 2 — Add new data source
- Other connectors
- Known limitations
- Excel Online (OneDrive)
- Known Issues and Limitations
- Column names handling
- Concepts and examples
- General Limits
- Throttling Limits
- Actions
- Add a key column to a table
- Parameters
- Add a row into a table
- Parameters
- Returns
- Add a row into a table [DEPRECATED]
- Parameters
- Returns
- Create table
- Parameters
- Returns
- Create worksheet
- Parameters
- Returns
- Delete a row
- Parameters
- Get a row
Excel [DEPRECATED]
Microsoft Excel is a spreadsheet developed by Microsoft. Connect to your Microsoft Excel spreadsheets in your file services like OneDrive for Business, OneDrive, Dropbox, Box, etc. You can perform various actions such as create, update, get, and delete on rows in a table.
This connector is available in the following products and regions:
| Service | Class | Regions |
|---|---|---|
| Power Automate | Standard | All Power Automate regions except the following: В В В В — В China Cloud operated by 21Vianet |
| Power Apps | Standard | All Power Apps regions except the following: В В В В — В China Cloud operated by 21Vianet |
| Contact | |
|---|---|
| Name | Microsoft |
| URL | Microsoft Power Automate Support Microsoft Power Apps Support |
| Connector Metadata | |
|---|---|
| Publisher | Microsoft |
| Website | https://products.office.com/excel |
The Excel Connector currently connects to Tables only. It will insert a column called __PowerAppsId__ to the Table if there is no such column. This column is used to keep track of changes in the row.
To use this connector in Power Apps, learn more here.
This connector is deprecated in Power Automate, Logic Apps and Power Apps. Please try using the new connectors to work with Excel files: Excel Online (Business) and Excel Online (OneDrive).
LIMITS
The following are some of the limits and restrictions:
- Maximum number of rows and columns on a worksheet — 1048576 rows and 16384 columns
General Limits
| Name | Value |
|---|---|
| Maximum file size (in bytes) | 2000000 |
| Maximum number of requests being processed by the connector concurrently (per Excel file) | 100 |
Creating a connection
The connector supports the following authentication types:
| Default | Parameters for creating connection. | All regions | Not shareable |
Default
Applicable: All regions
Parameters for creating connection.
This is not shareable connection. If the power app is shared with another user, another user will be prompted to create new connection explicitly.
| Name | Type | Description | Required |
|---|---|---|---|
| Connection to file source | connection | Connection to file source | True |
Throttling Limits
| Name | Calls | Renewal Period |
|---|---|---|
| API calls per connection | 100 | 60 seconds |
Actions
Deletes a row from an Excel table
Retrieves a single row from an Excel table
Retrieves rows from an Excel table
Retrieves table names from an Excel file
Inserts a new row into an Excel table
Updates an existing row in an Excel table
Delete row [DEPRECATED]
Deletes a row from an Excel table
Parameters
Excel file name
Excel table name
Unique identifier of the row to delete
Get row [DEPRECATED]
Retrieves a single row from an Excel table
Parameters
| Name | Key | Required | Type | Description |
|---|---|---|---|---|
Excel file name
Excel table name
Unique identifier of row to retrieve
Returns
Get rows [DEPRECATED]
Retrieves rows from an Excel table
Parameters
| Name | Key | Required | Type | Description |
|---|---|---|---|---|
Excel file name
Excel table name
Total number of entries to retrieve (default = all).
The number of entries to skip (default = 0).
Returns
Get tables [DEPRECATED]
Retrieves table names from an Excel file
Parameters
| Name | Key | Required | Type | Description |
|---|---|---|---|---|
Excel file name
Returns
Represents a list of tables.
Insert row [DEPRECATED]
Inserts a new row into an Excel table
Parameters
| Name | Key | Required | Type | Description |
|---|---|---|---|---|
Excel file name
Excel table name
Row to insert into the specified Excel table
Returns
Update row [DEPRECATED]
Updates an existing row in an Excel table
Parameters
| Name | Key | Required | Type | Description |
|---|---|---|---|---|
Excel file name
Excel table name
Unique identifier of the row to update
Row with updated values
Returns
Definitions
Table
Represents a table.
| Name | Key | Required | Type | Description |
|---|---|---|---|---|
The name of the table. The name is used at runtime.
Источник
Connect to Excel from Power Apps
Excel is a connection that becomes a data source when added to Power Apps. To connect to Excel from Power Apps, follow these three steps.
Step 1 — Format your data as a table in Excel
Ensure that the Excel data you want to use in Power Apps is formatted as a table in Excel.
Step 2 — Store your Excel file in a cloud location
Store the Excel file in a cloud-storage account, such as Dropbox, Google Drive, OneDrive, and OneDrive for Business. There are two versions of the Excel connector. The newer version of the connector can access more cloud locations.
Step 3 — Add Excel as a data source for your Power App
There are currently two ways to add the Excel table as a data source in your application. These two different approaches each uses a slightly different version of the connector.
- When you add Excel as a data source, it may create a column called _PowerAppsId_, with a unique ID for each row of your Excel table. This column helps Power Apps know which rows to change. If you already have a unique identifier for each row, you may identify it for Power Apps as part of this process.
- This article explains different methods to start creating an app using Excel, and how the different methods use different versions of the connector. However, for a detailed step-by-step instructions to create an app using Excel, see Create a canvas app from scratch based on Excel data.
Method 1 — Start from Excel
If you choose this method, you’ll use an older version of the connector.
You can automatically add Excel and create a 3 screen application by creating a canvas app with data from an Excel file
When you’re finished, you’ll have an application and in the Data Source window, you’ll see your data source has been added with a OneDrive connector.

Start from Excel with new connector
If you want to start with data from Excel, but with the newer version of the connector, create an app from scratch from Excel first. Then, drop the OneDrive or any other cloud data source that stores your Excel file, and then readd the Excel data source using the new connector (Excel Online (Business)). Because the names of the tables are the same and the file is the same, the Power Apps will connect to the updated data source and work without any more changes required.

Method 2 — Add new data source
If you choose this method, you’ll use updated version of the connector.
You can create a blank canvas app (or you can modify an existing one) and then choose to add a new Excel data source.
The Excel Online (Business) Connector allows users to work with Excel files in document libraries that are supported by Microsoft Graph (OneDrive for Business, SharePoint sites (preview), and Microsoft 365 Groups).
The ability to connect to Excel files on SharePoint sites is still in Preview. Connecting to Excel files on OneDrive is supported.
There were several limitations of the old Excel connector including the fact that only a single user could work with the Excel file at a time and you couldn’t access files on a SharePoint site (preview).
The updated Excel Online (Business) Connector is faster, more robust, allows for multiple users, and can work with all standard document libraries (OneDrive for Business, SharePoint sites (preview), and Microsoft 365 Groups.)
To add Excel as a data source, find the Excel Online (Business) connector in the list of connectors.

The Excel Online (Business) connector allows you to choose from more locations to find your Excel file. OneDrive is just one of them. To find a file that is OneDrive, go to OneDrive, and pick your Excel file.

Once you’ve selected your Excel file, and then table within it, you’ll have added a new Excel data source to your application. You can verify the use of the newer version of the connector with the presence of an Excel icon, as opposed to a OneDrive icon for older connector version.

Other connectors
For information about how to connect to other types of data, see the list of connections for Power Apps.
Known limitations
For information about how to share Excel data within your organization, review these limitations.
Источник
Excel Online (OneDrive)
Excel Online (OneDrive) connection provider lets you work with Excel files stored in OneDrive. This connection provider only supports personal (MSA) accounts.
This connector is available in the following products and regions:
| Name | Path | Type | Description |
|---|---|---|---|
| Service | Class | Regions |
|---|---|---|
| Logic Apps | Standard | All Logic Apps regions |
| Power Automate | Standard | All Power Automate regions except the following: В В В В — В China Cloud operated by 21Vianet |
| Power Apps | Standard | All Power Apps regions except the following: В В В В — В China Cloud operated by 21Vianet |
| Connector Metadata | |
|---|---|
| Publisher | Microsoft |
Known Issues and Limitations
- The maximum size of an Excel file that is supported by the Excel Online (OneDrive) connector is 5 MB.
- The data may not be up to date (there may be some delay) when filtering or sorting is used in the List rows present in a table action.
- The List rows present in a table action supports basic filtering and sorting:
- Supports the following filter functions: eq, ne, contains, startswith, endswith.
- Only 1 filter function can be applied on a column.
- Only 1 column can be used for sorting.
- The List rows present in a table action returns up to 256 rows by default. In order to get all rows, please turn on pagination.
- An Excel file may be locked in OneDrive for an update or delete up to 12 minutes since the last use of the connector.
- Simultaneous file modifications made by other connectors or manual edits are not supported. Users should avoid writing data to a single Excel file from multiple clients concurrently (Excel Desktop, Excel Web, Power Automate, LogicApps or PowerApps). This can cause possible merge conflicts and data inconsistency.
- The connector supports files in Microsoft Excel Open XML Spreadsheet (*.xlsx) and Microsoft Excel Binary Workbook (.xlxb) formats.
- The connector retrieves rows for 500 columns maximum in the List rows present in a table action. Rows for first 500 columns are returned by default. You can provide comma-separated list of specific columns to retrieve in Select Query parameter.
- The connector doesn’t support using OData parameters for tables that contain hidden columns.
- The connector timeout caused by re-calculations can occur, either there are complicated formulas or there are too many rows in the worksheet. In both cases, data can be inserted multiple times because of retry policy. As a workaround, please see if the formulas could be simplified or reduced. Otherwise, you may set calculation mode for this workbook to Manual. For more details, please refer here
- Write access to a file is required for all actions, otherwise Graph API would return 403 Forbidden error. Also, connector will return the 502 BadGateway error if the spreadsheet is in a read-only mode. To disable read-only mode, please learn more here.
- Filter Query / Order By / Select Query operation parameters support only alphanumeric column names.
- Pivot tables are not supported due to Graph API limitations.
- If a user makes too many requests within a short period of time, it is possible to get a 429 response. The throttling limit is unique to each request and it varies based on the request count, memory used, and other important factors.
- In operations such as Delete a row , the key column field is case-sensitive .
- In case of multiple matches in operations such as Update a row , Delete a row operations, only the first row will be updated/deleted.
- Changes committed by operations such as Create a row , Update a row , Delete a row do not always take affect immediately after successful response from a corresponding Power Automate, LogicApps or Power Apps actions. Delays up to 30 seconds are expected due to underlying backend service limitations.
- The connector can populate up to 64000 rows automatically if Insert auto generated id into Excel table option is selected during a table import in PowerApps.
- Tables column headers that contain only a number can cause unexpected behavior in operations such as Update a row , Delete a row due to underlying backend service limitations. As a workaround please rename such columns so that they contain other characters as well.
- An Excel file may be modified and a new version may be visible in Version history of the file even when a «read-only» action is executed. This behavior is by design due to internal save mechanisms of the connector’s backend service.
Column names handling
Please note that column names in the action’s response results may be transformed in order to be compatible with OData format:
| Character | Encoded value |
|---|---|
| . | _x002e_ |
| @ | _x0040_ |
| : | _x003a_ |
| # | _x0023_ |
E.g. Column [one]#1 -> Column [one]_x0023_1
Concepts and examples
- Key column : column in a table that will be use to search a value ( key value )
- Key value : value in the key column that will be used to identify a specific row.
Take the following table as an example. To perform a row operation in the second row of the table, the key column should be Column 1 and key value should be 200 .
| Column 1 | Column 2 | Column 3 |
|---|---|---|
| 100 | A-2 | A-3 |
| 200 | B-2 | B-3 |
| 300 | C-2 | C-3 |
General Limits
| Name | Value |
|---|---|
| Maximum number of identity column variants that can be used to Get/Insert/Update/Delete a row from a single excel table. Current value is set to 2, which means that up to two column name variants should be in use across workflows for one particular table. | 2 |
| Maximum number of rows the connector can populate automatically if ‘Insert auto generated id into Excel table option’ is selected during a table import in PowerApps. | 64000 |
Throttling Limits
| Name | Calls | Renewal Period |
|---|---|---|
| API calls per connection | 100 | 60 seconds |
Actions
Add a key column to an Excel table. The new column will be appended to the right. The new key column must be unique in the table.
Add a new row into the Excel table.
This action has been deprecated. Please use Add a row into a table instead.
Add a new row into the Excel table.
Create a new table in the Excel workbook.
Create a new worksheet in the Excel workbook.
Delete a row using a key column.
Get a row using a key column. This action will retrieve all the values of the specified row given a column and key column.
Get a list of tables in the Excel workbook.
Get a list of worksheets in the Excel workbook.
List rows present in a table.
Update a row using a key column. The input value will overwrite the specified cells and columns left blank will not be updated. In order to append (instead of overwrite) a value, use the «Get a row» action to retrieve the content first.
Add a key column to a table
Add a key column to an Excel table. The new column will be appended to the right. The new key column must be unique in the table.
Parameters
Select an Excel file through File Browse.
Select a table from the drop-down.
Provide the key column name.
Add a row into a table
Add a new row into the Excel table.
Parameters
| Name | Key | Required | Type | Description |
|---|---|---|---|---|
Select an Excel file through File Browse.
Select a table from the drop-down.
Row to add into the specified Excel table.
Returns
Add a row into a table [DEPRECATED]
This action has been deprecated. Please use Add a row into a table instead.
Add a new row into the Excel table.
Parameters
| Name | Key | Required | Type | Description |
|---|---|---|---|---|
Select an Excel file through File Browse.
Select a table from the drop-down.
Row to insert into the specified Excel table.
Returns
Create table
Create a new table in the Excel workbook.
Parameters
| Name | Key | Required | Type | Description |
|---|---|---|---|---|
Select an Excel file through File Browse.
Enter the Excel table name.
Enter the table address using A1 notation.
Enter the columns names separated by ‘;’ or ‘,’.
Returns
Create worksheet
Create a new worksheet in the Excel workbook.
Parameters
| Name | Key | Required | Type | Description |
|---|---|---|---|---|
Select an Excel file through File Browse.
Returns
Delete a row
Delete a row using a key column.
Parameters
| Name | Key | Required | Type | Description |
|---|---|---|---|---|
Select an Excel file through File Browse.
Select a table from the drop-down.
Select a column from the drop-down.
Enter the key value.
Get a row
Get a row using a key column. This action will retrieve all the values of the specified row given a column and key column.
Источник
Adblock
detector
| Name | Key | Required | Type | Description |
|---|---|---|---|---|
Using Excel in offices is very common, and today It is one of the most used tools by companies. This program developed by Microsoft belongs to the Office suite that also includes programs such as Word, Powerpoint, Outlook, among others.
Excel is a spreadsheet that allows you to manipulate numeric and text data in tables formed by the union of rows and columns. It is intended to perform calculations and/or keep certain records of a company’s data.
Many employees use Excel to perform basic or complex calculations that would otherwise require a lot of effort and time. And for this, some have created xls connectors.
Working with Excel sheets is no longer rigid: you can create as many connectors as you need and in the combinations you prefer.
But what are Excel connectors? We’ll tell you then.
Table of Contents
- 1 What is an Excel Connector?
- 2 What Excel connectors exist?
- 2.1 OR Connector
- 2.2 Y connector
- 2.3 I connector
- 2.4 XO-connector
What is an Excel Connector?
The functionality of the Excel connector allows extract structured data into an excel sheet and dump them in singular fields or in a group of fields included in the panel of a process.
Integrates spreadsheet capabilities and allows you to upload an Excel file with previously configured operations and formulas.
The Excel Connector has a set of operations that allow you to read data from and write it to the Excel file to, in this way, let Excel handle the calculations and then read the results and store them in the company’s data model.
Therefore, the Excel connector it cannot be used to load data into files that are loaded using forms or expressions.
What Excel connectors exist?
OR Connector
It is a complement of the IF function. Use the OR function, one of the logical functions, to determine if some conditions of a test are TRUE.
OR function returns TRUE if any of its arguments evaluate to TRUE, and returns FALSE if all of its arguments evaluate to FALSE.
A common use for the OR function is expand the usefulness of other functions perform logical tests.
For example, the IF function performs a logical test, and then returns one value if the test evaluates to TRUE and another value if the test evaluates to FALSE.
Through the use of the OR function as the logical test of the IF function you can test different conditions instead of just one.
Y connector
It is a complement to the IF function. It allows evaluating several logical expressions and knowing if all of them are true. If all are true, return the response with the true value, if one of the conditions is not met, it returns the response with the value false.
I connector
When you need to find data that meets more than one condition, such as units sold between one month and another, or units sold by a specific supplier, you can use the AND and OR functions together.
XO-connector
The XO function is a logical function. I know used to return logic unique to all arguments. The function returns TRUE when the number of TRUE inputs is odd, and FALSE when the number of TRUE inputs is equal.
If you want to apply the XO function you must select the cell where you want to see the result. Then press the icon Insert function that is placed on the top toolbar, or right-click the selected cell and choose the Insert Function option from the menu.
Press the icon that is located in the formula bar, and select the Logical function group in the list, click on the XO function, and enter the corresponding arguments separated by commas. Finally, press Enter. You can see the result in the chosen cell.
The content of the article adheres to our principles of editorial ethics. To report an error click here!.

Data Everywhere’s Excel Connector is an Excel Add-in. It is a program that is installed inside of your desktop version of Excel and gives your locally installed Excel the ability to communicate directly with Data Everywhere. Your spreadsheets can now send and receive data automatically with Data Everywhere, and with any other system that is integrated with Data Everywhere, for example, via a Data Everywhere database connector.
Features
- Automatically retrieve data from other systems, via Data Everywhere
- Publish data out to other systems, via Data Everywhere
- Share feed with other users
- View a full history of all changes to the data
System Requirements
The Excel Connector supports Excel on Windows. The connector does not support Mac Excel.
User Guide for the Excel Connector
Excel Connector Overview
The excel connector is a custom connector for User & Group Sync, internally developed by the resolution team to aid with support cases. Since SAML 5.0 / User & Group Sync 2.0 it is already part of the app, for its ease of use and numerous advantages as an alternative to direct database modifications. Note that the import option should be used with caution.
![]()
By design, the Excel Import option of the Excel Connector will modify the information stored in your user directory to include data that has been manually manipulated and transformed on an excel file.
To avoid unexpected results, make sure you understand the consequences of every import, and always test in a development or staging environment before using the connector.
If you have doubts or questions about the process, please do not hesitate to contact us via https://www.resolution.de/go/support.
Features
-
Export the set of users from either the internal user directory of the Atlassian application or your Identity Provider into an Excel file
-
Import users and their attributes from an existing Excel file
![]()
Note that the following attributes are read-only and won’t be modified with any import:
-
ATTRIBUTE_ID
-
ATTRIBUTE_IS_ADMIN
-
ATTRIBUTE_IS_SYSADMIN
-
ATTRIBUTE_JIRA_KEY
-
ATTRIBUTE_CONFLUENCE_KEY
Use Cases
Migrations
-
Ensure username matches to prepare migrations from the Atlassian application’s internal directory to an Identity Provider with User & Group Sync
-
Export users and import them back into the Atlassian application’s internal directory before deprecating LDAP
Periodic exports
-
Create scheduled reports for auditing purposes
Bulk operations
-
Create new users
- Migrate users from one directory to another (see full tutorial)
-
Update user profiles
-
Rename users (see full tutorial)
-
Modify user attributes
-
Modify group memberships
-
Requirements
-
SAML SSO 3.5.4 or later or User & Group Sync 1.4.4 or later
- SAML SSO versions before 5.0 and User & Group Sync before 2.0 require the Excel connector to be installed first, please read here
-
Ideally a staging/ development environment to test the functionality before applying any changes to the user directories
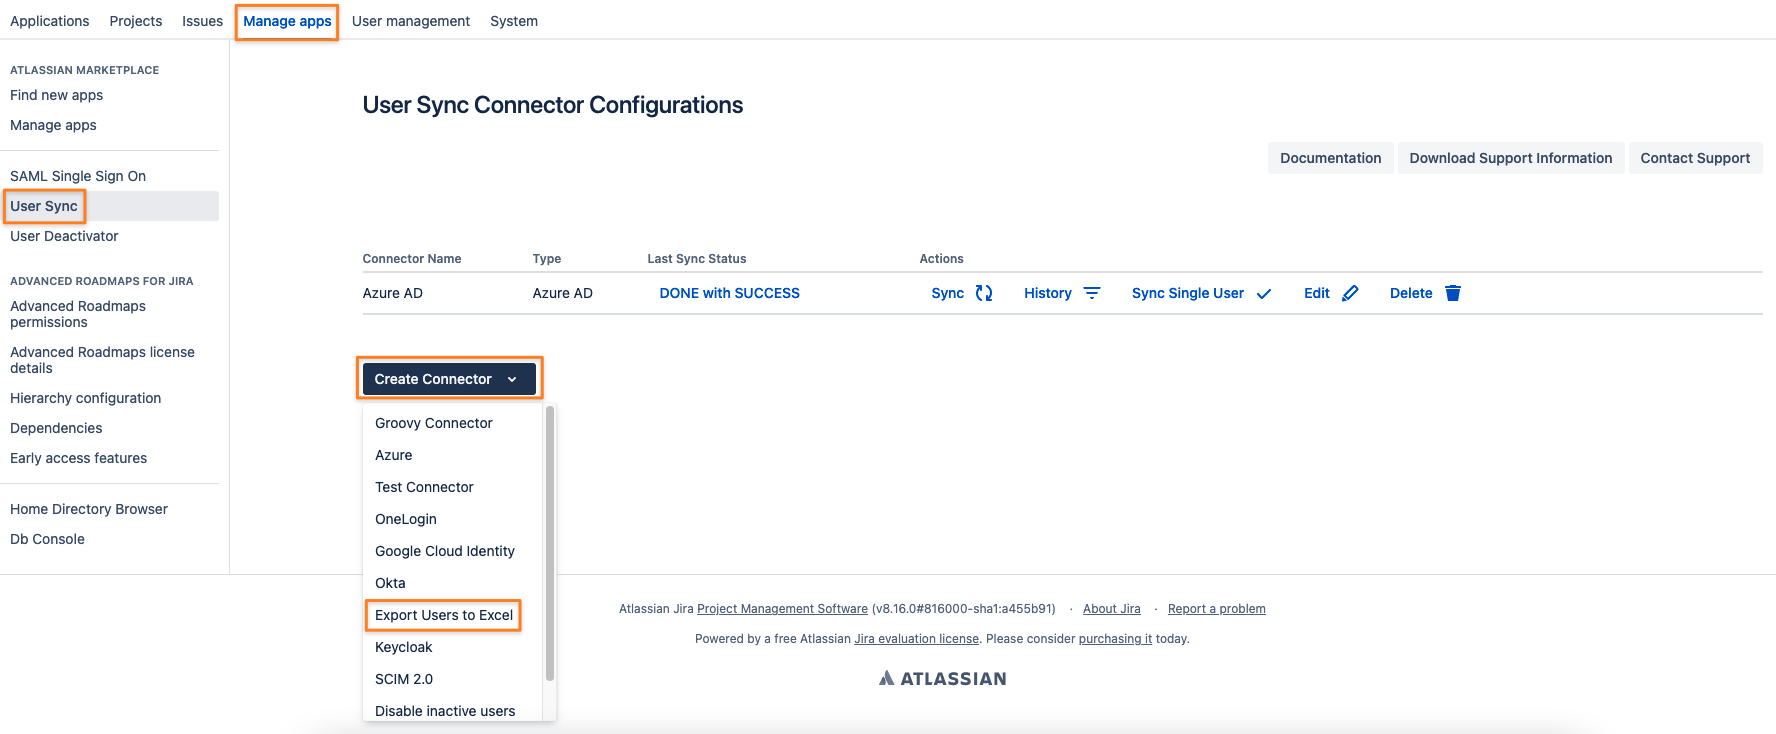
How to activate the Excel Connector
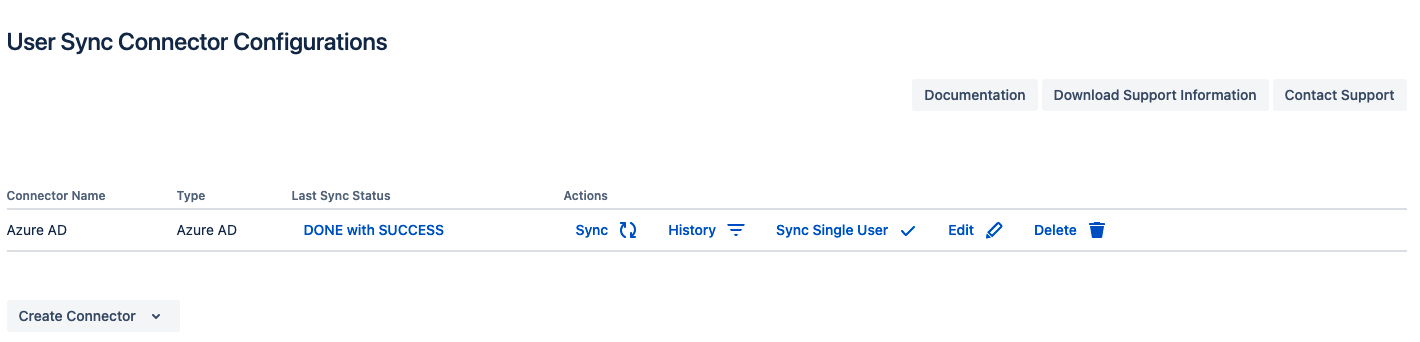
Navigate to the User & Group Sync connector list first:
Now press the key sequence xls on your keyboard. You’ll notice a confirmation: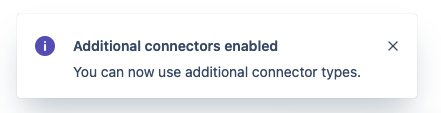
The Create Connector pick list now offers more connector types, two of them are
Export Users to Excel and Import Users from Excel connector: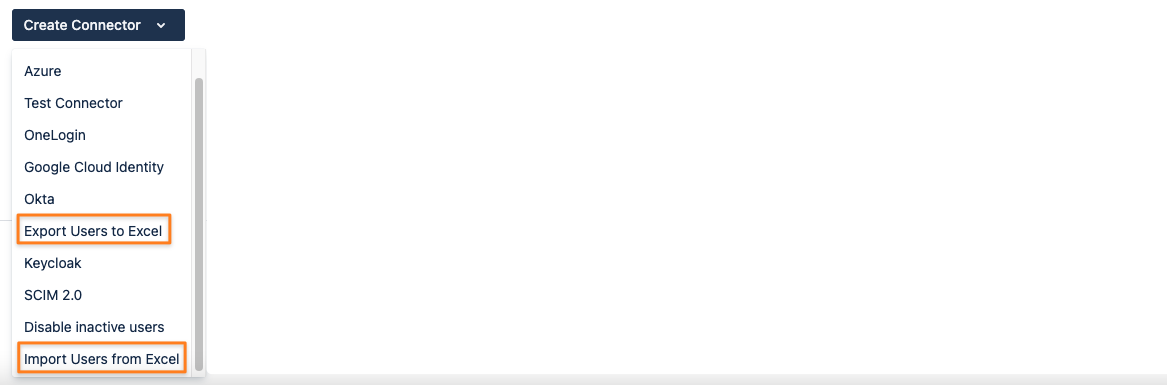
![]()
Please be aware that you need to enter the key sequence again whenever you reload the User & Group Sync page or continue working on it another day.
Additional connector types which have been added already will be preserved in the connector list, but you can’t add new ones, until you repeat the key sequence again.
![]()
We always recommend upgrading to the latest version of SAML SSO/ User & Group Sync, so that you can use the latest version of the Excel Connector as well.
How to Export Users with the Excel Connector
With the Excel Connector you can export the users stored in any user directory connected to your Atlassian applications.
![]()
The Excel Connector will export every user stored in the selected directory.
![]()
If you want to use the export to make modifications to existing users and import them back into the same user directory, remember to import only the modified users and delete the users without changes from the file.
Step 1: Adding a new User & Group Sync Connector
-
Navigate to User & Group Sync in the User Management tab of the Administration section (Jira) or search for it in the general configuration list (Confluence)
- type the key sequence xls on your keyboard and wait for the confirmation popup
-
Click on Create Connector
-
Select the Export Users to Excel option
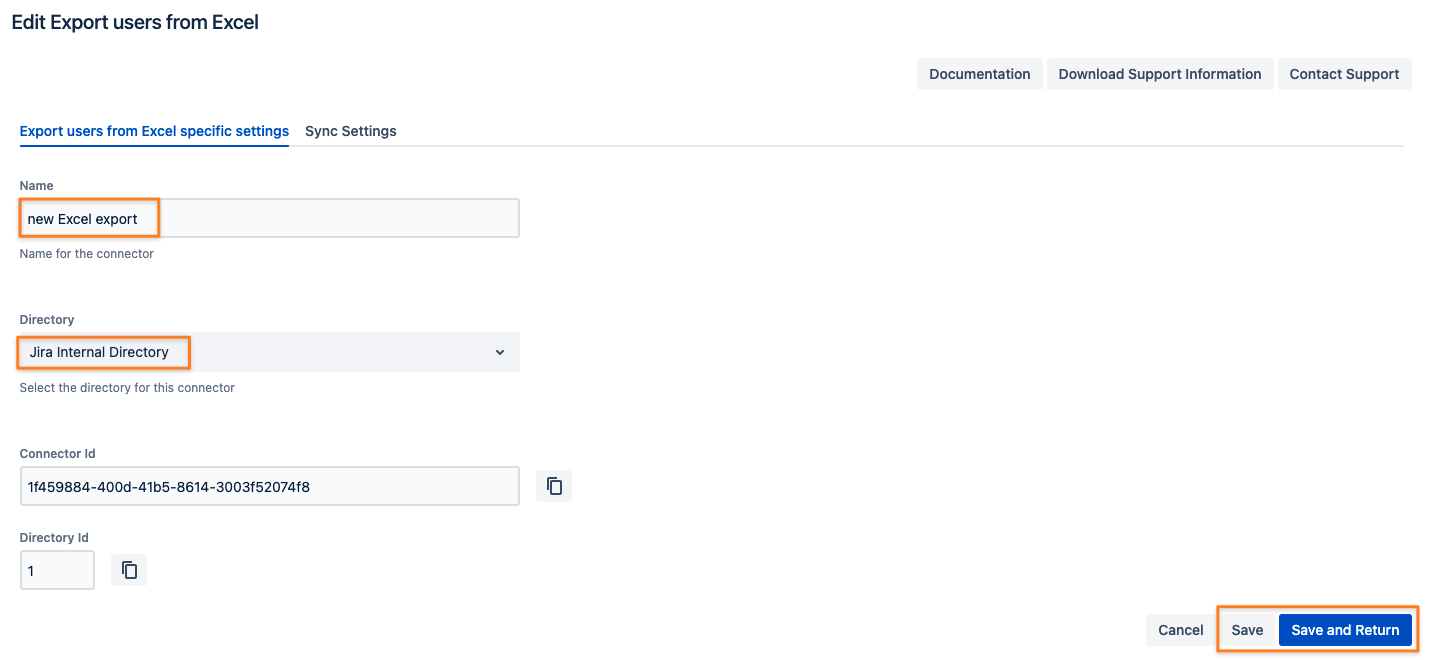
Step 2: Export settings
-
Name the excel export connector
-
Select the User Directory you want to export
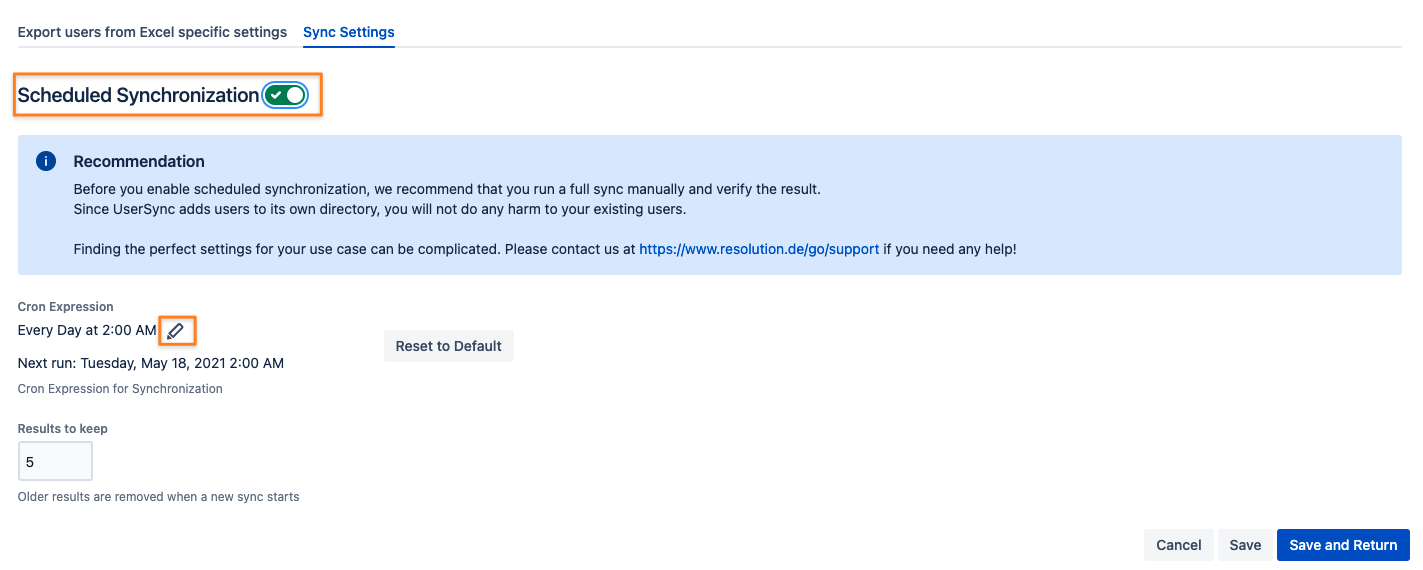
-
If you’re using the export for reporting or auditing, you can also enable scheduled synchronization via the Sync Settings tab

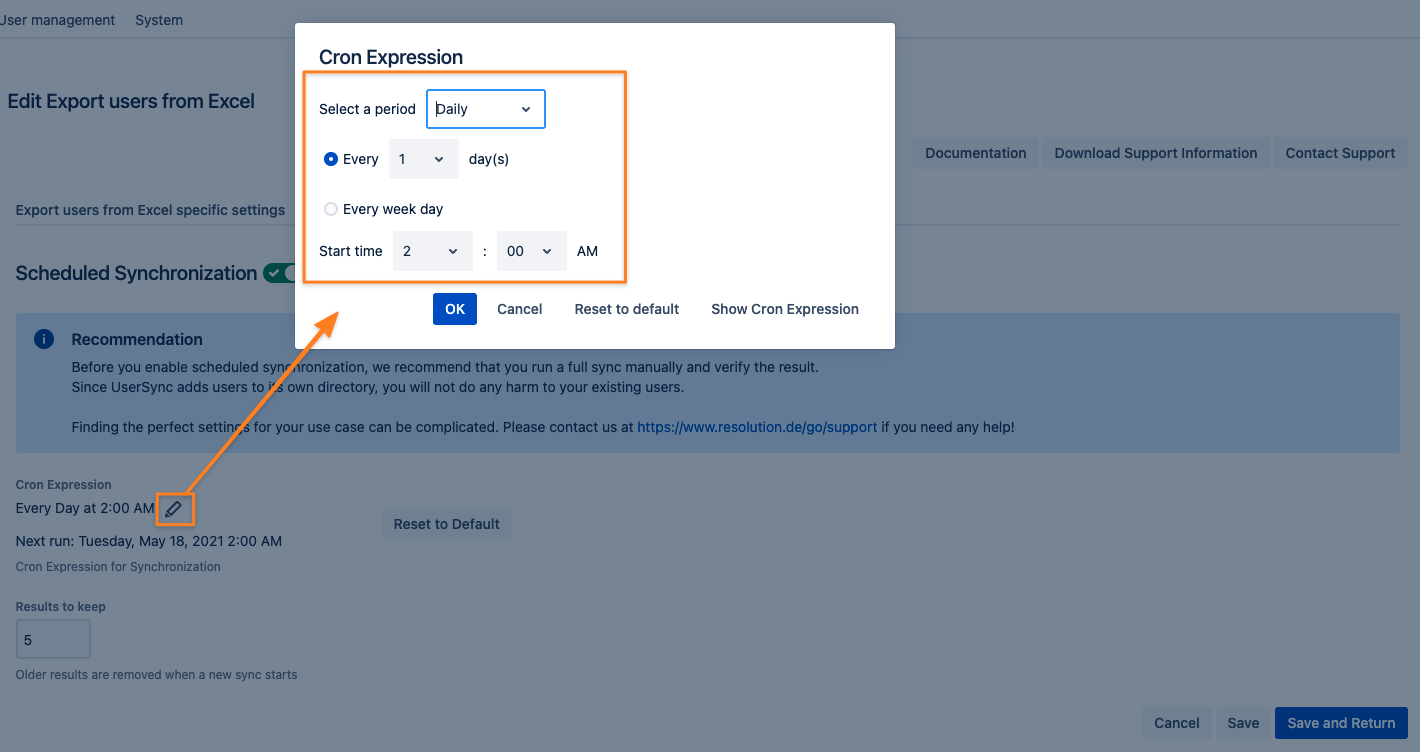
-
click on the Cron Expression pencil icon and change it according to your needs and press OK
-
Press Save and Return
Step 3: Running the synchronization
-
After saving the connector, you can press the Sync button

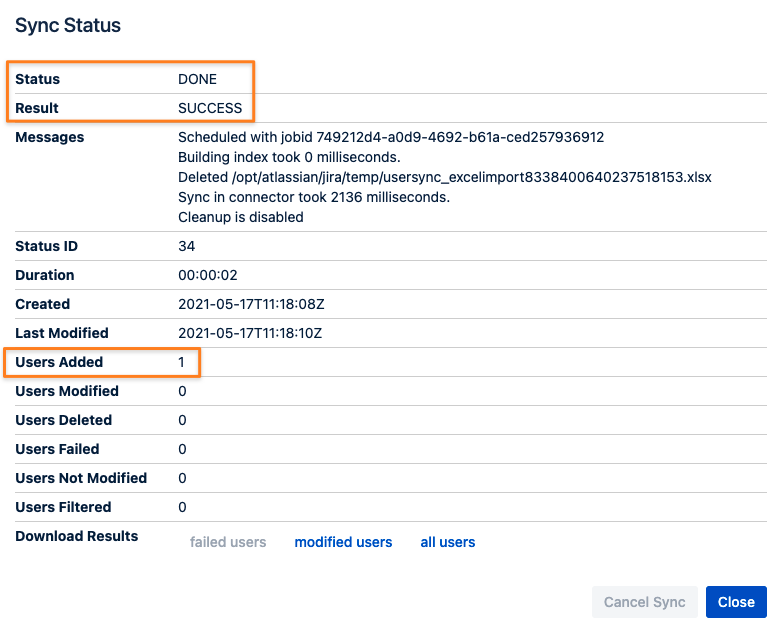
Step 4: Checking the Sync Status message
-
The Result field will confirm whether the synchronization has been successful or not
-
The Messages field will include the location and file name of the export on the server

Step 5: Saving the Excel file
-
press the Generated File link at the bottom of the modal window to download the excel file.
How to Import Users with the Excel Connector
Step 1: Adding a new User & Group Sync Connector
-
Navigate to User & Group Sync in the User Management tab of the Administration section (Jira) or search for it in the general configuration list (Confluence)
- type the key sequence xls on your keyboard and wait for the confirmation popup
-
Click on Create Connector
-
Select the Import Users from Excel option
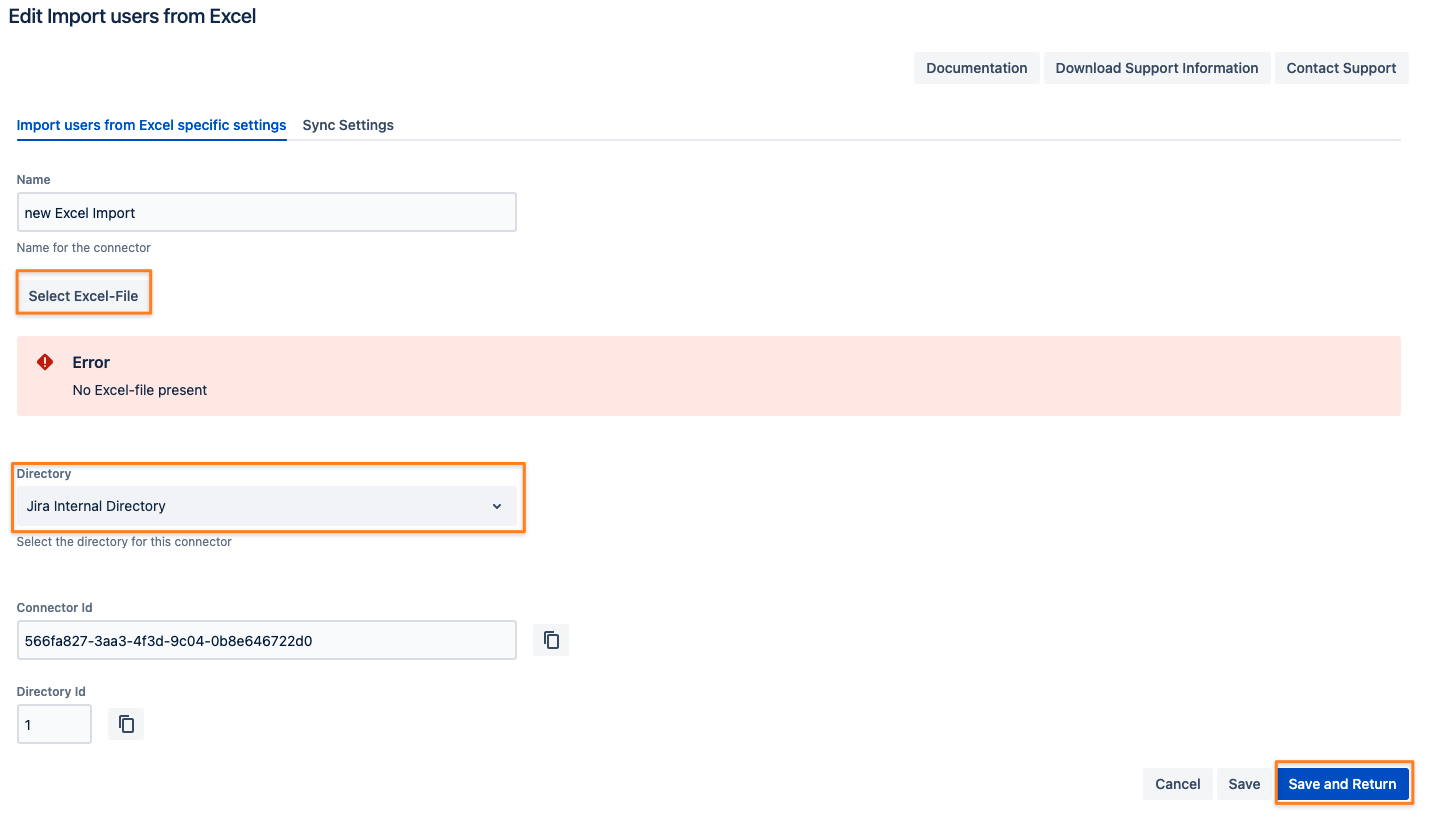
Step 2: Import settings
-
change the Excel import connector name if you like (optional)
-
Select the Excel file to be imported
- Select the target User Directory
-
Press Save and Return
Step 3: Running the synchronization
Now you can start the sync/ import process.

Once complete, you’ll see the amount of users added:
Step 4: Maintenance
Once synchronized, an excel import will display an Invalid! message, indicating that the original file is no longer present.
Note that the sync button has disappeared and the synchronization cannot be run again.

At this stage, it’s safe to delete the entry and remove it from your list of connectors.

Excel is a simple and popular data source. However, it imposes size limitations when we connect using the OneDrive, Google Drive, or other cloud connectors. This is the connector that Power Apps uses when we create an auto-generated app using the ‘start with data’ option, and this is the connector that app builders traditionally use. Specifically, this size limitation prevents us from accessing spreadsheets with more than 2000 rows, or spreadsheets that are greater than 2MB. There are more details in my post here:
If we need to work with larger spreadsheets, the answer is to use the ‘Excel for Business’ connector. This connector supports much larger spreadsheets that are stored in OneDrive for Business, a SharePoint list, or a SharePoint document library.
This post walks through how to use this connector, including the limitations, and the support for delegation.
How to use the Excel for Business connector.
To use this connector, we add a connection using the ‘Excel Online (Business)’ connector.
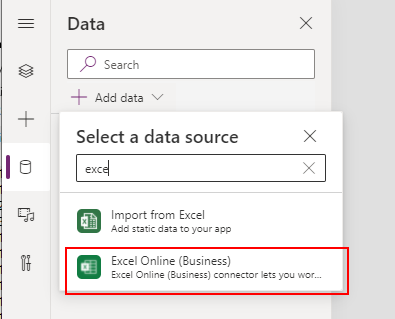
The next step prompts us to select an Excel file from OneDrive for Business or from SharePoint. When
we select an Excel spreadsheet and choose a table, Power Apps prompts us to choose a primary key
field.
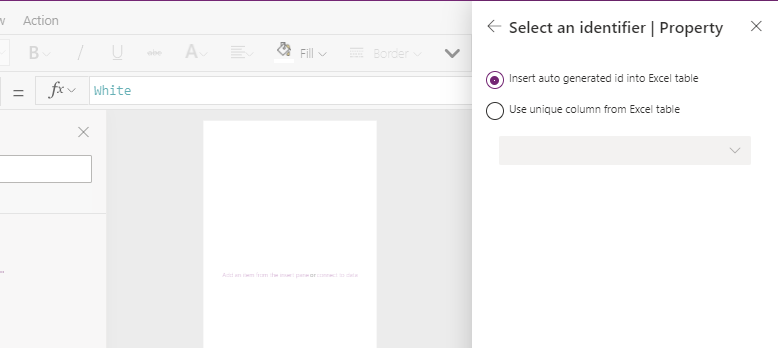
If the target spreadsheet doesn’t include a unique column, we can choose the option to insert an auto generated id column into the Excel table. This effectively adds a «_PowerApps_ID» column, in the same way that the OneDrive connector works.
Once we add the data source, we can access the spreadsheet data as we would expect, through gallery controls and formulas.
As a tip — notice how the icon colour of the connector is green, rather
than the blue colour of the traditional OneDrive connector. This is useful because in cases where we need to help app-builders, we can more easily identify the connector that they’re using by asking if they chose the ‘green connector’, or the ‘blue connector’.
What are the limitations of the Excel Online (Business) connector?
At the time of writing (May 2021), the documentation does not appear to be up-to-date. For example, it still states that the connector does not support Power Apps when in fact it does. Also, there have been positive improvements in the way that the connector supports multiple users, which are also not reflected that in the documentation.
For reference, the here’s the link to the documentation.
The screenshot from the documentation beneath highlights the «issues and limitations», which is applicable mainly to logic apps. Several of these points are out of date, but the document still serves as a useful reference point, particularly during the testing of our apps.
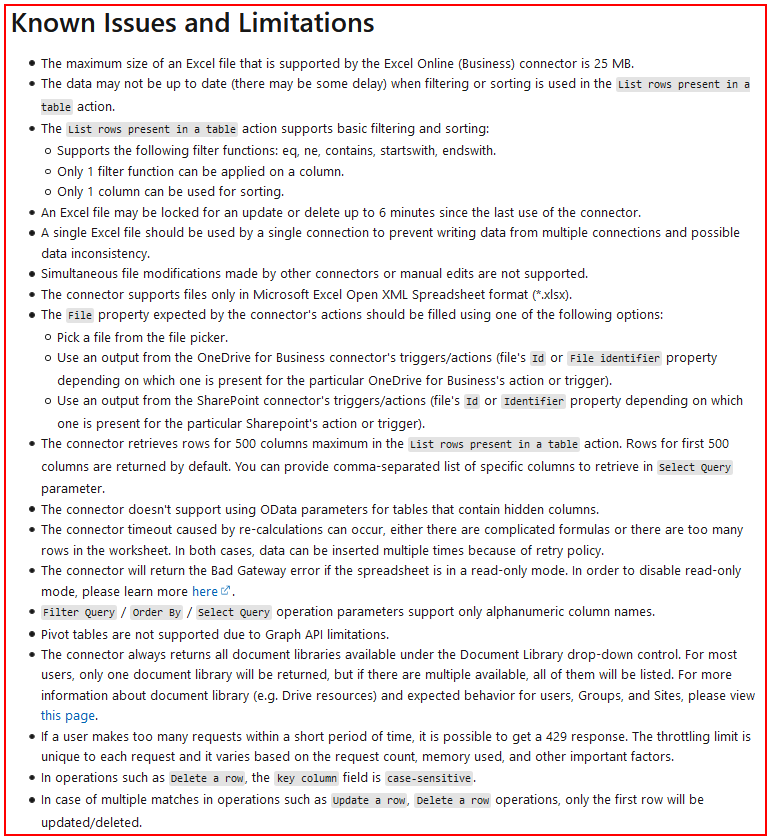
We’ll now examine some of these known limitations in a bit more depth.
What’s the spreadsheet size limitation with the Excel for Business connector?
In my test, the maximum acceptable Excel spreadsheet size limit was 50MB. When I attempted to upload a large Excel spreadsheet above 50MB, I received the error beneath. 50 MB is is a big improvement over the 2MB limit that the OneDrive connector imposes.

What are the row size limitations with the Excel for Business connector?
The row size limit is 64,000 records. As before, here’s the error message that I received when I attempted to attach a table that exceeds this size. Again, this is a big improvement over the OneDrive connector’s 2,000 row limit.
Is it possible to access rows above row 2000?
The most restrictive limitation of the OneDrive connector is that it is not delegable, and not possible to access records above row 2,000.
The great news is that the Excel for business connector does not suffer from this same limitation.
To demonstrate, I added a data table and
set the items property to a formula that combines the Filter and Sort functions. There were no delegation warnings, and I was able to retrieve records that were interspersed throughout a 64,000 row spreadsheet (the source spreadsheet is ordered sequentially by the PropertyID column).
To understand which functions and operators are delegable with the Excel for Business connector, I tested each available function and operator against a text column, and the reults are shown in the matrix beneath.
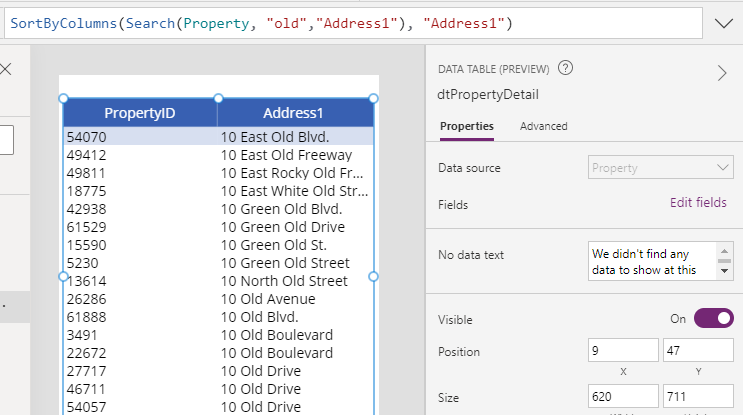
One of the most notable findings is that the search function is delegable. This is important because it enables us to carry out a «contains» type search, and it is a function that is not delegable with SharePoint.
As the screenshot beneath shows, there are no delegation warnings when we call the Search function to find records that contain the word «old» in the address field. As we can see from the PropertyID values, the result correctly displays records throughout the 64,000 table.
So far, the Excel connector appears to perform very well. However, it suffers from at least 3 limitations, which we’ll now examine.
Limitation 1 — Number columns are not supported
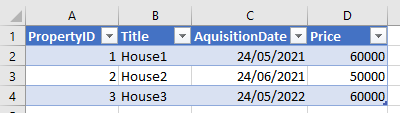
The first limitation is that the connector does not support numeric columns. Let’s take the example of the price column in the spreadsheet beneath, which is correctly formatted as a number column (notice how the numbers in the cell are right aligned, which verifies that Excel correctly recognises the values as numbers).
When I connect to this spreadsheet from Power Apps, it recognises the price column as text rather than a number. In the screenshot
of a form beneath, notice how the ‘abc’ icon appears next to the price field,
rather than the ‘123’ icon.
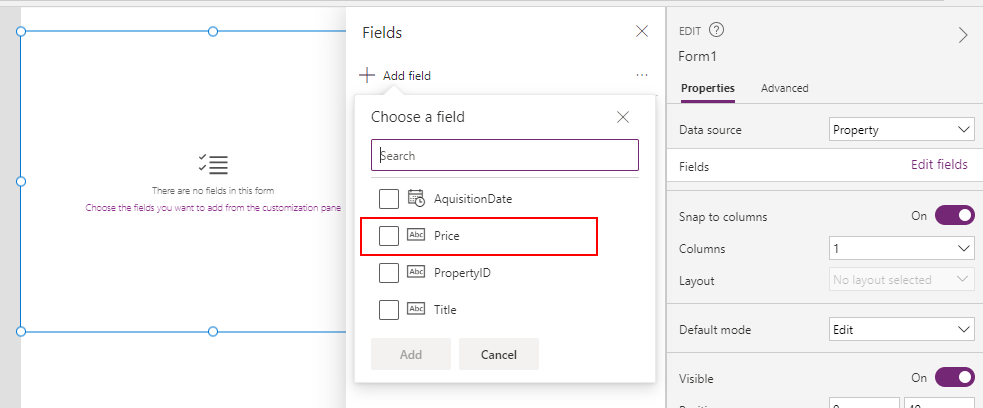
It seems impossible to configure Excel or Power Apps to correctly recognise numeric columns. For practical purposes therefore, the connector does not support numeric columns.
This causes a problem because it prevents us from filtering numeric values using operators such as greater than/less than, and it also prevents us from sorting records in numeric ascending or descending order.
Limitation 2 — It’s not possible to filter by date values
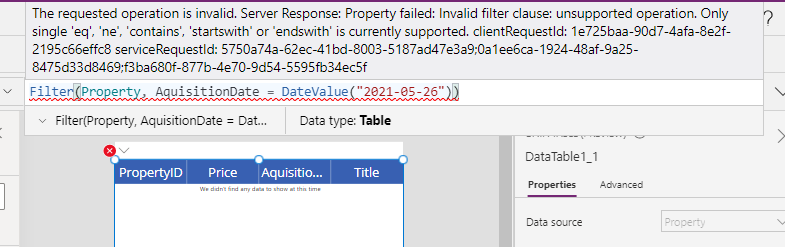
A second limitation is that although the Excel connector recognises date columns, it’s not possible to filter by date columns. If we attempt to filter by a specific date, we receive the following error:
The requested operation is invalid. Server response. Invalid filter source: unsupported operation. Only single ‘eq’, ‘ne’, ‘contains’, ‘startswith’, or ‘endswith’ is currently supported.
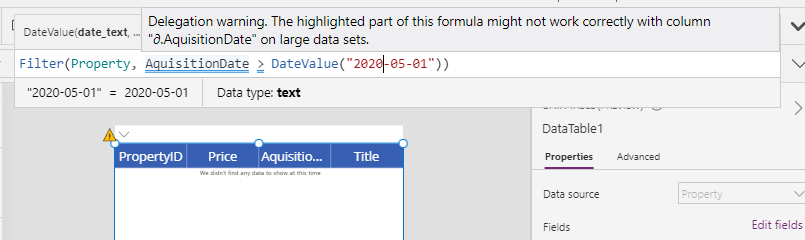
If we attempt to filter a date column using greater than or less than operators, we receive a delegation error. The result always returns no records, even if the filter operation targets results that fall within the first part of the spreadsheet within the limits of the row count setting. This is obviously incorrect behaviour.
Limitation 3 — With text columns, it isn’t possible to filter by more than one column
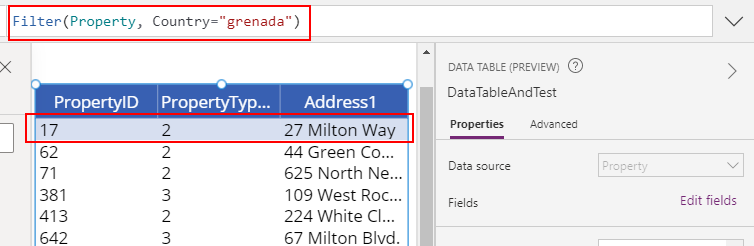
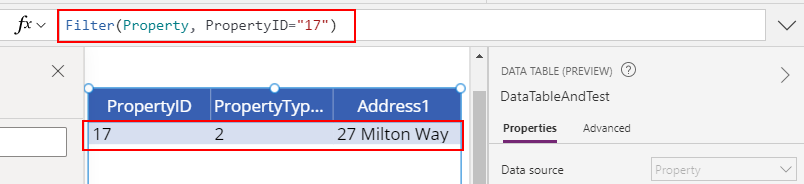
The third limitation is that we can filter by single column only. To highlight the severity of this issue, here’s a quick demonstration. It’s possible to filter for all records that match country «grenada». Notice here how the first such result relates to PropertyID 17.
It’s also possible to filter by PropertyID 17, as shown beneath.
But if we combine both of these two conditions like so, we receive the delegation warning as shown in the screenshot beneath.
Filter(Property, PropertyID="17" And Country="grenada")
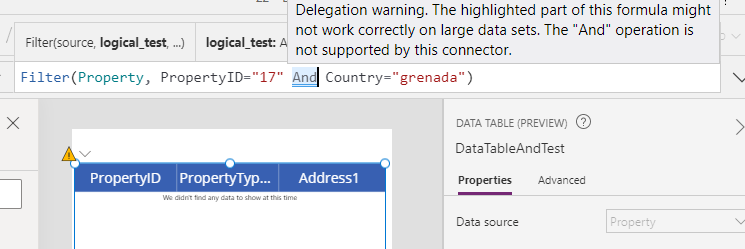
What’s worse however, is that the output doesn’t include the target record, even although it falls within the row count limit (which is set to default value 500 here).
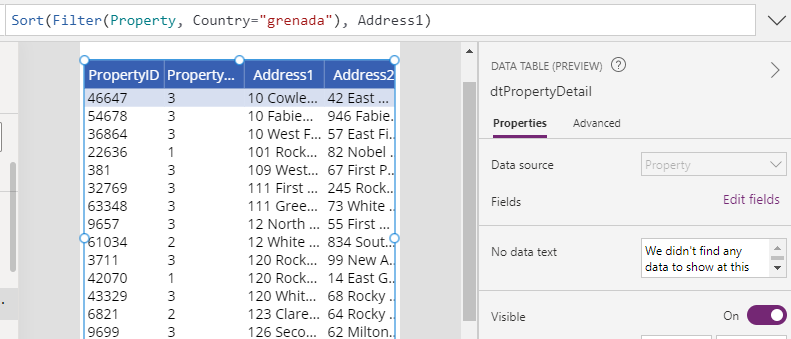
To address the thrid limitation and to search or to filter by multiple columns, we can work around this issue by applying the «With» technique. Here, we apply a with statement to filter first by the condition that excludes most records. We then filter the output further by the second condition.
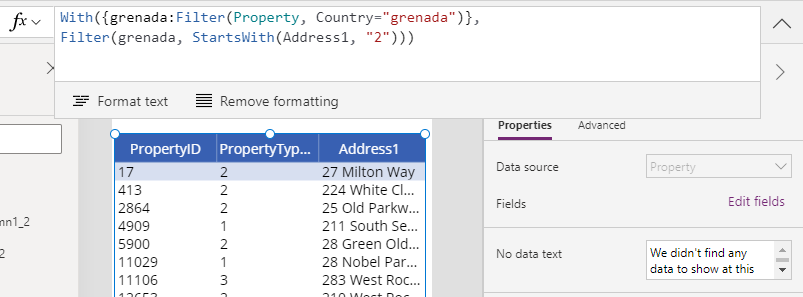
As an example, here’s the syntax to filter records where the country matches «grenada» and the Address1 field starts with «2».
.
With({grenada:Filter(Property, Country="grenada")},
     Filter(grenada, StartsWith(Address1, "2"))
)
To filter by additional columns, we would nest each additional statment inside a with statement. Here’s how to extend the above formula to return records that also match PropertyTypeID 2.
With({grenada:Filter(Property, Country="grenada")},
     With({grenada2:Filter(grenada, StartsWith(Address1, "2"))},
          Filter(grenada2, PropertyTypeID="2")
     )
)
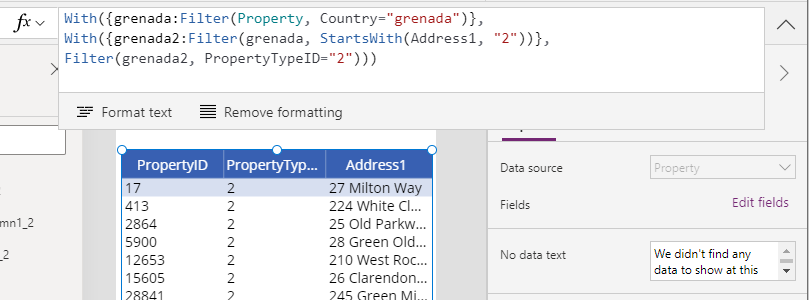
As the screenshot above shows, this has enabled us to filter by 3 columns.
Conclusion
In order to work with larger Excel spreadsheets (up to 50MB and 64,000 rows) we can use the Excel for business connector. This provides better delegable support for filter operations, and a benefit is that it supports the use of the search function to carry out «contains» searches.
However, there are several limitations. It doesn’t correctly recognise numeric columns, and it doesn’t support the ability to filter by date columns. As we might expect, it also doesn’t support the storage of images (unlike the OneDrive/Excel connector).
A severe limitation is that it does not natively support the ability to filter by multiple columns. In order to filter by multiple columns, it’s necessary to apply delegation workarounds, such as the pattern that utilises the With function.