
You can use a comma-delimited list, a cell range, or a named range to define the options in a drop-down list. This video focuses on how to use a cell range and named range.
Want more?
Create a drop-down list
Add or remove items from a drop-down list
Remove a drop-down list
Lock cells to protect them
You can use a comma-delimited list, a cell range, or a named range to define the options in a drop-down list.
We used a comma-delimited list in the previous video.
You might use such a list if there are just a few values, and they are unlikely to change.
If you need to change the list entries, such as adding and deleting entries, this type of drop-down list is more time consuming to manage.
We’ll cover managing drop-down lists in video 4.
A comma-delimited list is also case sensitive.
This can be a problem when someone types an entry instead of picking it from the list.
For example, typing YES in all capital letters returns an error, if error messages are enabled, which is the default.
To avoid the problem, let’s use a cell range for the entries in the drop-down list.
Select a cell where you want a drop-down list.
Click the DATA tab, and click Data Validation.
In the Data Validation dialog, set Allow to List; this enables a list in the cell.
Leave In-cell drop-down selected; this enables a drop-down list in the cell.
Leave Ignore blank selected; we’ll cover this in the next video.
To provide the options in your drop-down list, click in Source and select the cell range that contains the options.
It can be on a different worksheet, as in this example, giving you greater flexibility in configuring and protecting the worksheets. We’ll cover this in video 4.
The range must be a single row or column, and click OK.
Verify the cell contains a drop-down list with the options provided by the cell range.
To use this drop-down list in other locations, copy it to other cells.
Select the cell.
If it shows a text or number entry, press Delete to clear it.
This way, text and numbers won’t appear in the destination cells, so it doesn’t seem like an entry was already selected.
You can use the keyboard shortcut Ctrl+C to copy the cell.
Then select the destination cells and press Ctrl+V to paste it.
These cells now have the drop-down list.
A named range, such as Fruits, is easier to remember than a cell range, such as A2:A37.
To use a named range for the options in your drop-down list, you start by creating one.
Select the cell range you want to name.
In the name box, type the name you want for the range. For example, «_Veggies».
The first character of a name must be a letter or an underscore.
The rest of the name can be letters, numbers, periods, and underscores.
A name can’t have spaces.
And you can’t use predefined statements, such as true or false, or cell references, such as A1.
When you select the cells of a named range, you’ll see the name in the name box.
Now, you are ready to create a drop-down list that uses the named range.
Select the cell where you want a drop-down list. Click Data Validation, select List, click in Source, press F3, select the name, click OK, and click OK again.
Verify the cell contains the drop-down list with the entries provided by the named range, and copy the list to the other cells.
Up next, Input and error messages.
A Word Drop-down list lets you quickly choose one of several options. It’s a fast way to make new documents with a standardized pattern. Don’t be scared, it’s easy to create even though the word ‘Developer’ is involved.
We’ll show you how to make drop-down lists, change the bland ‘Choose an item.’ default text and how to add other text when the drop-down list doesn’t have what you need.
-
Drop down list – Content Control
- Properties and settings
- Add Drop Down choices
- Change ‘Choose an item’ text
- Another drop down list example
- Add something to the list – Go Combo
Drop-down lists can be for anywhere there’s a selection of options. Choosing a product, department, location. We’ll stick with the most common use, the honorific ‘Dear ….’ at the start of a letter.
Firstly, you need to ensure that the Developer Tab is enabled. Can’t see the Developer tab? … How to get the Developer Tab in Office apps
Drop down list – Content Control
Now you can select the Developer Tab | Controls Group | Drop-down List Content Control option

From here, a drop-down box will be added to your document which you can then customize. To customize, select the Properties tab under the Controls group.

Properties and settings
Here in the Properties, you can edit the title, box, tag, colour or style for your drop-box.
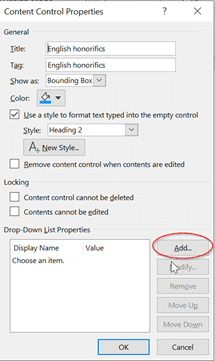
Show As – Bounding Box is the familiar drop down list.
Start/End tag is more obvious in the edit window.
None – hides the control and shows only the first option.
Color is useful to make the drop down control more obvious in Word.
Style lets you fix how the text will appear when typing into an empty control.
There are also Locking settings such as Content control cannot be deleted, and Contents cannot be edited for your drop box. Select those as suits your situation.
From there, select the Add button to add your choices for the drop-down list.
Add Drop Down choices
Simply type in your choice in the Display Name and select OK, you can type as many options as you’d like.
Word will automatically make Display Name and Value the same – that’s what you’ll want in most situations. Display Name is what appears in the editable document and the final printed doc. Value is saved in the document for programmatic retrieval.
If you need to make any changes… simply click on the Display Name and select Modify, likewise if you need to delete the choice, you can select remove, or move the choices up and down on the list.

In our example, we’ve selected a whole bunch of different English Honorifics.

Now when you select OK and go to your drop-down box, you can easily select your choice from the list.
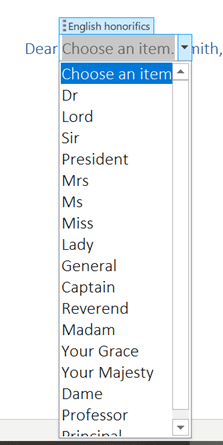
Once you have made your choice and click outside of the drop-box, the box will disappear until clicked again.

Change ‘Choose an item’ text
The default ‘Choose an item.’ text that appears in the control could do with a change to explain better what each selection is for.
To change that opening text, click on the Design Mode button then that text can be edited and formatted.

Another drop down list example
At the end of a letter template, there could be another drop-down list.

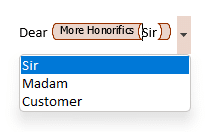
Add something to the list – Go Combo
The Drop Down List control is good for fixed lists which have the only options possible, if you need let the user type something else, you’ll need a Combo box instead.
More often, there are exceptions which you’ll want to type in specially for each document.
In our honorifics example, there might be a title missed (Lord High Poobah, Cardinal etc) or you want to make it personal with a first name.
If you want the flexibility to type other text there are two choices:
Allow the drop-down list to be deleted. Then other text can be typed in it’s place.
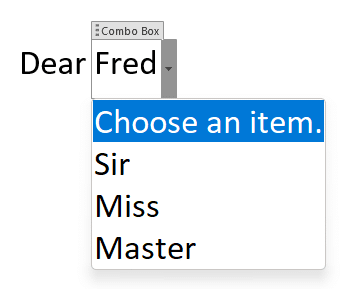
Use a Combo box control instead. On the Developer tab it’s the next button to the left of Drop Down box.
The combo box allows other text to be typed into the control box area in addition to selecting one of the drop down options.
Add different symbols for each bullet in Word or PowerPoint list
Automatic worksheet/tabs list in Excel – the new better way
How to get the Developer Tab in Office apps
All Word’s Table of Contents options

Make data entry easier or avoid issues like misspellings by adding a drop-down list in Word. It takes only a minute, and we’ll show you how.
You don’t have to make a long, fillable form in Microsoft Word to take advantage of form controls. You may have just one or two spots where you want to add something like a drop-down list. This allows you or your reader to select an item from your choices. It can help eliminate errors with data entry and spelling.
Here, we’ll show you how to add a simple drop-down list to a Word document.
Add the Drop-Down Form Control
You must use the Developer tab to work with form controls in Word. If you don’t see this tab, you can add it easily by following our how-to, How to Enable the Developer Tab on the Microsoft Office Ribbon.
- Place your cursor in the document where you want to add the drop-down list.
- Go to the Developer tab and click the Drop-Down List Content Control button.
- You’ll see the control pop into your document as a box with “Choose an item.” inside. You can then move on to setting up the list.

Next, you’ll add the list of items, give the control a name, and adjust a few other settings per your preference. Select the control, go back to the Developer tab, and click Properties in the Controls section of the ribbon.

The Content Control Properties window will open, ready for your list details.

Title and Tag: Enter the Title and, optionally, a Tag you want to use for the list.
Show as: By default, this is set to Bounding Box. If you prefer, you can change it to display with Start/End Tags.

Color and Style: If you want to give your control color or a particular style, you can select those next.
Remove the control: Optionally, you can remove the control when contents are edited by checking the next box.
Locking: You’ll see two locking options for the control. So you can restrict it from being deleted and the contents from being edited by checking one or both of those options.
Add Your List Items
Finally, you’ll add your list of items. You’ll notice that “Choose an item.” is a list option. You can keep it, edit it by clicking Modify, or delete it by clicking Remove.

Next, click Add to insert a list item. The Value will automatically enter as you type the Display Name. Click OK when you finish. Then continue to insert your remaining list items the same way.

Once you have all of your list choices, you can rearrange them using the Move Up and Move Down buttons on the right.

When you’re happy with your list set up, click OK to apply the properties.

And that’s all there is to it! To use the drop-down list, click it and choose an option using the arrow.

Limit Data Entry Options Using a Drop-Down List in Word
A drop-down list is a useful form control in Word for simplicity or to avoid data entry issues. You can make sure that only specific items are available for yourself or others to select.
For more, take a look at how to automate forms in Word with custom fields or how to create a simple Word checklist.
![]()
Раскрывающийся список — это самый удобный способ позволить людям выбирать определенные элементы для поля в документе Microsoft Word. Возможность добавления раскрывающегося списка немного скрыта в Microsoft Word, но это руководство упрощает ее.
Как включить вкладку «Разработчик» в Microsoft Word
Функция раскрывающегося списка доступна на скрытой вкладке «Разработчик» в Microsoft Word. Вы можете перейти к параметрам Word в Windows и macOS, чтобы включить это меню, настроив ленту.
В Windows вы можете включить вкладку «Разработчик» в Microsoft Word, выбрав «Файл» > «Параметры». В диалоговом окне «Параметры» выберите «Настроить ленту» на боковой панели. С правой стороны в разделе «Настройка ленты» включите меню «Разработчик» и нажмите кнопку «ОК».

На Mac перейдите в меню Word > «Настройки» > «Лента и панель инструментов». Здесь вы можете выбрать опцию «Разработчик» и нажать «Сохранить».
Теперь вы вернетесь в документ Microsoft Word и вверху увидите вкладку «Разработчик» между вкладками «Вид» и «Справка».
Примечание. Вы также можете добавить вкладку «Разработчик» в Microsoft Excel и Microsoft PowerPoint, выполнив те же действия.
Как создать раскрывающийся список в Microsoft Word
Чтобы добавить раскрывающийся список в документ Microsoft Word, щелкните вкладку «Разработчик» вверху и выберите «Управление содержимым раскрывающегося списка». Этот раскрывающийся список будет пустым по умолчанию, и вам придется настроить его, чтобы добавить полезные параметры в текстовое поле.

Чтобы настроить раскрывающийся список, щелкните один раз внутри поля. Нажмите кнопку «Свойства», расположенную в разделе «Управление» на вкладке «Разработчик» в Microsoft Word.

В окне «Свойства элемента управления содержимым» вы увидите несколько параметров, которые помогут вам настроить раскрывающийся список.
Вы можете добавить заголовок, тег и сначала выбрать дизайн и цвет коробки. Тонкий цвет лучше всего подходит для большинства людей, потому что раскрывающееся меню не должно отвлекать внимание от других частей документа Word. Параметр с надписью «Удалить управление содержимым при редактировании содержимого» является важным флажком в окне «Свойства элемента управления содержимым». Если вы включите это, раскрывающийся список автоматически изменится на обычный текст при выборе параметра.
В разделе «Блокировка» вы можете выбрать, хотите ли вы разрешить редактирование или удаление раскрывающегося списка. Наконец, раздел «Свойства раскрывающегося списка» является наиболее важным. Вы можете нажать кнопку «Добавить», чтобы ввести каждый параметр в раскрывающийся список. Ваши дополнения появятся под подзаголовком Отображаемое имя. Если вы допустили ошибку, вы можете нажать «Изменить», чтобы изменить текст в любом из ваших вариантов.
Кнопка «Удалить» позволит вам избавиться от нескольких параметров из раскрывающегося меню, и вы можете использовать кнопки «Вверх» или «Вниз», чтобы изменить порядок различных параметров. Когда вы закончите вносить изменения, нажмите OK, чтобы закрыть диалоговое окно.

После добавления раскрывающегося списка в документ вы можете щелкнуть стрелку вниз в правой части меню, чтобы открыть средство выбора. Выберите нужный вариант, и он будет записан как ваш ответ в раскрывающемся списке.
Поле со списком против раскрывающегося списка в Microsoft Word
На вкладке «Разработчик» в Microsoft Word вы увидите кнопку с надписью «Управление содержимым поля со списком» рядом с «Управление содержимым раскрывающегося списка». Эти два параметра похожи, потому что оба они позволяют вам представить список вариантов, но они не одинаковы.
Поле со списком позволяет людям добавлять свои собственные записи в дополнение к тем, которые представлены в раскрывающемся списке. Вы можете обращаться с полем со списком как с заполняемой формой и вводить все, что хотите. В отличие от поля со списком раскрывающийся список нельзя использовать в качестве поля формы в Microsoft Word.
Чтобы добавить поле со списком в документ Word, сначала вы должны добавить вкладку «Разработчик», как мы описали ранее. Затем нажмите кнопку «Управление содержимым поля со списком» в группе «Элементы управления» меню ленты в документе Word.

Это добавит поле со списком в документ. Чтобы настроить его, вы можете переместить курсор в поле со списком, щелкнуть один раз, а затем выбрать кнопку «Свойства» в меню ленты.
После того, как поле со списком вставлено в ваш документ, вы можете либо выбрать один из параметров в нем, либо дважды щелкнуть внутри поля, чтобы вместо этого ввести собственный ответ.
Если вы работаете с другими приложениями Microsoft Office, опция Combo Box также доступна в PowerPoint и Access.
Удалить раскрывающийся список или поле со списком в Microsoft Word
Если вы хотите удалить раскрывающийся список или поле со списком из документа Word, вы можете щелкнуть правой кнопкой мыши тот, который хотите удалить, и выбрать «Удалить управление содержимым». Кроме того, вы также можете переместить курсор в левую часть поля со списком или раскрывающегося списка.

Когда курсор инвертируется, щелкните один раз, чтобы выбрать раскрывающийся список или поле со списком, и нажмите Backspace или Delete на клавиатуре, чтобы удалить его.
Настройте свои документы еще больше
Раскрывающийся список — это лишь один из многих способов добавить немного интерактивности в ваш документ. Поскольку вы начали настраивать свои документы Word, вас также может заинтересовать создание пользовательских ярлыков в Microsoft Office.
Теперь, когда вы узнали, как создать раскрывающийся список в Microsoft Word, попробуйте создать его и в Excel. Если вы предпочитаете пакет Google приложениям Microsoft Office, вы можете вместо этого попробовать использовать раскрывающийся список в Google Sheets.
Table of Contents
- How do you create a drop down list with multiple selections in Word?
- How do you insert a drop-down list?
- How do you create a selection box in Word?
- How do I do multiple choices in Word?
- How do I create a drop down list in Word for Mac?
- How do I create a drop-down list in Word for Mac?
- How do I copy and paste a drop down list in Word?
- How do you put drop down in word?
- How do you edit a drop down menu?
- What is a drop down menu in Microsoft Word?
- What is a drop down tab?
Place the cursor in the form where you want the multi-selection list and then go to the Controls Task Pane (View > Design Tasks > Controls). Under the Repeating and Optional section, click Multiple-Selection List Box. Configure the multi-select list box as you would a standard List Box.
How do you create a drop down list with multiple selections in Word?
Place the cursor in the form where you want the multi-selection list and then go to the Controls Task Pane (View > Design Tasks > Controls). Under the Repeating and Optional section, click Multiple-Selection List Box. Configure the multi-select list box as you would a standard List Box.
How do you insert a drop-down list?
Create a drop-down list
- Select the cells that you want to contain the lists.
- On the ribbon, click DATA > Data Validation.
- In the dialog, set Allow to List.
- Click in Source, type the text or numbers (separated by commas, for a comma-delimited list) that you want in your drop-down list, and click OK.
How do you create a selection box in Word?
Just position your cursor in the document where you want a check box, switch to the “Developer” tab, and then click the “Check Box Content Control” button. You should see a check box appear wherever you placed your cursor.
How do I do multiple choices in Word?
On the form template, place the cursor where you want to insert the control. If the Controls task pane is not visible, click More Controls on the Insert menu, or press ALT+I, C.
How do I create a drop down list in Word for Mac?
Click the Form Fields Options button on the Developer tab of the Ribbon. The Drop-Down Form Field Options dialog opens….
- Drop-Down Item: Type an item to appear in the drop-down list.
- Add: Adds your typed Drop-Down item to the Items in Drop-Down List.
- Remove: Removes a selected item from the Items in the Drop-Down List.
How do I create a drop-down list in Word for Mac?
How do I copy and paste a drop down list in Word?
Please do as follows to copy Excel drop down list to Word document.
- Open the worksheet contains the drop down list you want to copy to Word document.
- Select the drop down list cell and copy it by pressing the Ctrl + C keys simultaneously.
- Go to the Word document, click Home > Paste > Paste Special.
How do you put drop down in word?
To insert a drop down list in a Word document, please do as follows: 1. Click File > Options. 2. In the opening Word Options dialog box, please (1) click Customize Ribbon in left bar, (2) check Developer in the right box, and (3) click the OK button. See screenshot: 3. Now the Developer tab is added in the Word Ribbon.
Simply select the menu you would like to edit from the Select a menu to edit dropdown list and then click the Select button.
A drop-down menu is a list of items that appear whenever a piece of text or a button is clicked. This is a graphical approach presented to users from which they can choose a value from the list presented. A drop-down menu is also known as a pull-down menu, pull-down list, drop-down list or drop-down box.
Description: Drop Down Tabs is a horizontal CSS tabs menu that supports a second level drop down menu for each of its tabs. The entire interface is rendered in plain HTML, making the script very easy to customize, plus all of its contents are search engine friendly.