
Содержание
- VBA – Dialog Box
- Message Box
- Syntax
- Simple Message Box
- YesNo Message Box
- Adding a Title
- Input Box
- VBA Coding Made Easy
- VBA Code Examples Add-in
- Dialog Boxes in Excel
- What is the use of dialog boxes?
- Types of Dialog boxes
- The Dialog Box and Dialog Box Launcher in Excel
- Find the Dialog Box Launcher
- Access Function Dialog Boxes
- Work With Non-Dialog Box Options
- Overview of forms, Form controls, and ActiveX controls on a worksheet
- What is a form?
- Types of Excel forms
- Data form
- Worksheet with Form and ActiveX controls
- Form controls
- MessageBox in Excel VBA
- Message Box
- Creating a Basic Message Box in VBA
- Buttons in MessageBox
- Different Icons in Excel VBA
- Values returned by Buttons
- Editing Title in a Msg Box
VBA – Dialog Box
In this Article
This article will demonstrate how to use Dialog Boxes in VBA.
Dialog Boxes are used to return information to the user. The most common dialog box that is used is the Message Box, but we can also use the Input Box.
Message Box
Syntax
The syntax of the Message Box is as follows:

Argument
Explanation Prompt
Message returned to the user – required
Visual Basic buttons – defaults to OK if omitted
Title of Message box – optional
Simple Message Box
A simple message box just requires the prompt – the message you are returning to your user. The OK button will automatically be displayed.

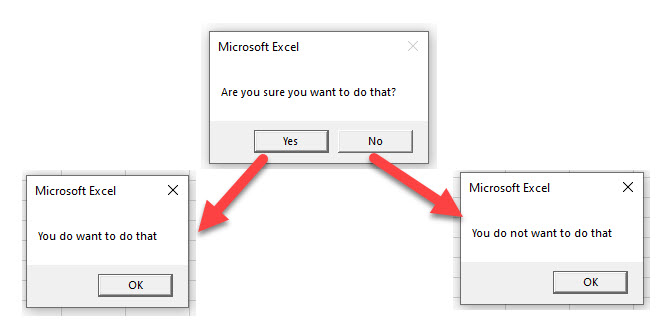
YesNo Message Box
Adding in buttons can make you message box more flexible.
We can select the type of box from a drop down list of VB constants.
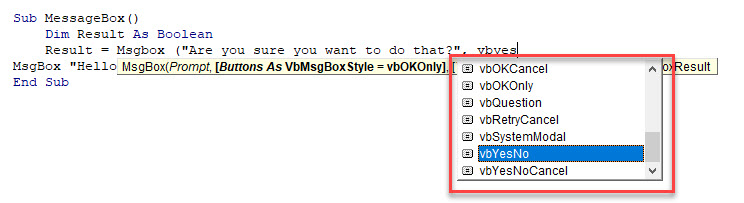
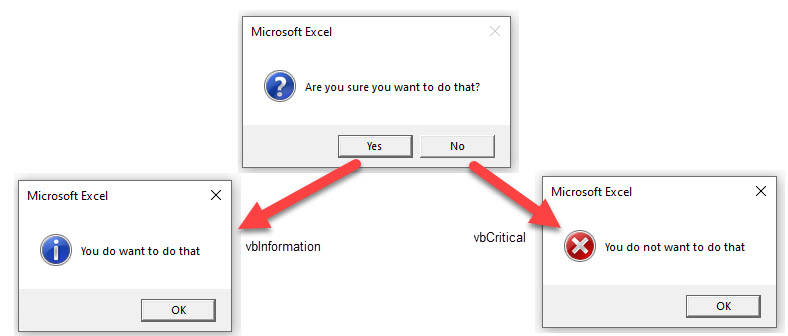
As well as the Yes/No button, we can icons to display in our message box to indicate to the user what type of message is being displayed.
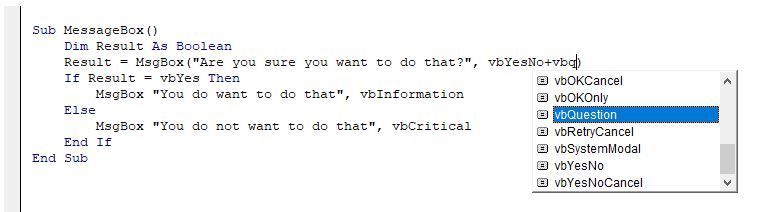
NOTE: if you do not select a button constant, but do select an information constant, you need to omit the brackets from around the message box arguments.
Adding a Title
We can also fill in the title argument.

For a more detailed article about Message Boxes, click here.
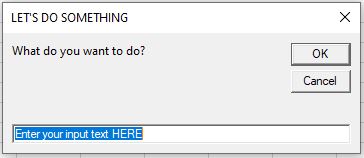
Input Box
An input box is a Dialog Box that asks the user a question, and returns a result.
For a more detailed article about Input Boxes, click here.
VBA Coding Made Easy
Stop searching for VBA code online. Learn more about AutoMacro — A VBA Code Builder that allows beginners to code procedures from scratch with minimal coding knowledge and with many time-saving features for all users! 

VBA Code Examples Add-in
Easily access all of the code examples found on our site.
Simply navigate to the menu, click, and the code will be inserted directly into your module. .xlam add-in.
Источник
Dialog Boxes in Excel
In this post, you will learn more about Dialog Boxes in Excel and how to use them with-in your Excel spread she
What is the use of dialog boxes?
A dialog box is a temporary window, where an application creates to retrieve user input. An application typically uses dialog boxes to prompt the user for additional information for menu items.
The following are the ways to use the dialog boxes.
- First, prepare an excel sheet with the required details in it.

Types of Dialog boxes
- When a Typical dialog box displays on the screen, it will remain until the user dismisses it. By clicking on the ok button, the task selected from the dialog box will be performed, and by clicking on the Cancel button, the dialog box will close without taking any action.
- The image below is an example for Typical dialog box.
- Navigating dialog boxes is very easy, click the command that you want to use. Although dialog boxes were designed for mouse users, you can also use the keyboard. Every dialog box button has also a text name on the button.
- The image below is an example for Navigating Dialog Boxes.
- Several Excel dialog boxes are tabbed dialog boxes. When you select a tab, a panel with relevant commands is visible. Tabbed dialog boxes are highly convenient because you can make several changes in a single dialog box. After you have made all your setting changes, click OK.

We will hope that this article was useful and understandable.
Источник
The Dialog Box and Dialog Box Launcher in Excel
Input information and make choices about Excel worksheet features
:max_bytes(150000):strip_icc()/laptop-with-alarm-clock-and-mug-103891309-5bdf473cc9e77c00511bae8e.jpg)
A dialog box in Excel is a screen where you input information and make choices about different aspects of the current worksheet or its content, such as data, charts, and graphic images.
The information in this article applies to Excel versions 2019, 2016, 2013, 2010, and Excel for Mac.
Find the Dialog Box Launcher
One way to open dialog boxes is to use the dialog box launcher. The launcher is a small downward-pointing arrow located in the bottom right corner of individual groups or boxes on the ribbon.
Examples of groups with a dialog box launcher include:
- The Font and Number groups on the Home tab
- The Charts group on the Insert tab
- The Page Setup and Sheet Options groups on the Page Layout tab
Access Function Dialog Boxes
Not all dialog box launchers in Excel are found in the corner of ribbon groups. Some, such as those found under the Formulas tab, are associated with individual icons on the ribbon.
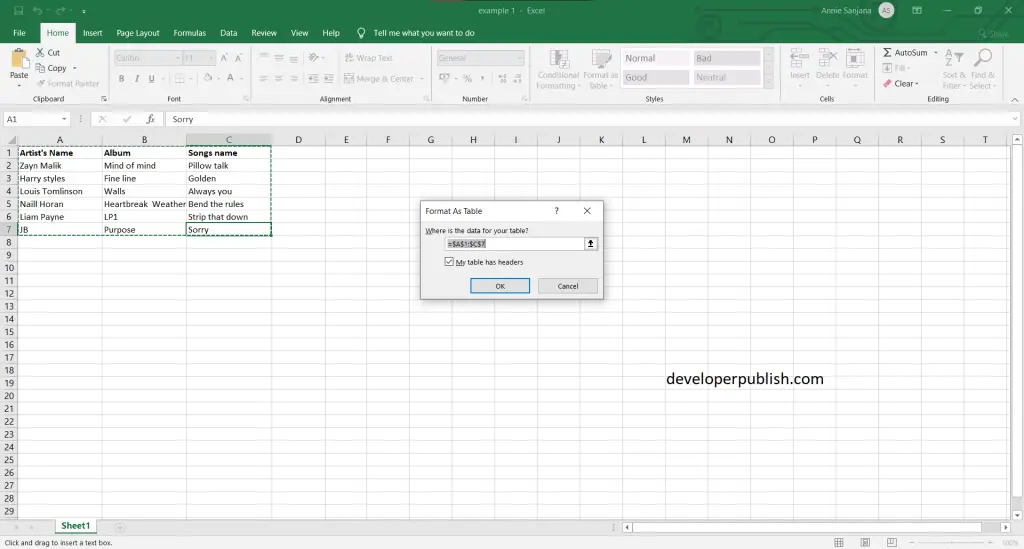
The dialog box makes it easy to enter information related to the function’s arguments, such as the location of data and other input options.
The Formulas tab in Excel contains groups of functions that have similar purposes in the Function Library. Each group name has a dialog box launcher associated with it. When you select these down arrows, a drop-down menu opens and displays individual function names. Selecting a function’s name in the list opens its dialog box.
Work With Non-Dialog Box Options
It is not always necessary to access features and options in Excel through a dialog box. For example, many of the formatting features found on the Home tab of the ribbon, such as the bold feature, are found on single choice icons. Select these icons once to activate the feature and select a second time to turn the feature off.
Источник
Overview of forms, Form controls, and ActiveX controls on a worksheet
Important: This feature isn’t available in Office on a Windows RT PC. Want to see what version of Office you’re using?
 By using forms and the many controls and objects that you can add to them, you can make data entry on your worksheets easier and improve the way your worksheets look. You can also do this yourself with little or no need for Microsoft Visual Basic for Applications (VBA) code.
A worksheet form is not the same thing as an Excel template. A template is a pre-formatted file that can get you started creating a workbook that looks the way you want. A form contains controls, such as boxes or dropdown lists, that can make it easier for people who use your worksheet to enter or edit data. To find out more about templates you can download, see Excel templates.
What is a form?
A form, whether printed or online, is a document designed with a standard structure and format that makes it easier to capture, organize, and edit information.
Printed forms contain instructions, formatting, labels, and blank spaces for writing or typing data. You can use Excel and Excel templates to create printed forms.
Online forms contain the same features as printed forms. In addition, online forms contain controls. Controls are objects that display data or make it easier for users to enter or edit data, perform an action, or make a selection. In general, controls make the form easier to use. Examples of common controls include list boxes, option buttons, and command buttons. Controls can also run assigned macros and respond to events, such as mouse clicks, by running Visual Basic for Applications (VBA) code.
You can use Excel in several ways to create printed and online forms.
Types of Excel forms
There are several types of forms that you can create in Excel: data forms, worksheets that contain Form and ActiveX controls, and VBA UserForms. You can use each type of form by itself, or you can combine them in different ways to create a solution that’s right for you.
Data form
A data form provides a convenient way to enter or display one complete row of information in a range or table without scrolling horizontally. You may find that using a data form can make data entry easier than moving from column to column when you have more columns of data than can be viewed on the screen. Use a data form when a simple form of text boxes that list the column headings as labels is sufficient and you don’t need sophisticated or custom form features, such as a list box or spin button.
 Excel can automatically generate a built-in data form for your range or table. The data form displays all column headers as labels in a single dialog box. Each label has an adjacent blank text box in which you can enter data for each column, up to a maximum of 32 columns. In a data form, you can enter new rows, find rows by navigating, or (based on cell contents) update rows and delete rows . If a cell contains a formula, the formula result is displayed in the data form, but you cannot change the formula by using the data form.
Worksheet with Form and ActiveX controls
A worksheet is a type of form that enables you to enter and view data on the grid, and there are several control-like features already built-in to Excel worksheets, such as comments and data validation. Cells resemble text boxes in that you can enter and format them in a variety of ways. Cells are often used as labels, and by adjusting cell height and width and merging cells, you can make a worksheet behave like a simple data entry form. Other control-like features, such as cell comments, hyperlinks, background images, data validation, conditional formatting, embedded charts, and AutoFilter can make a worksheet behave like an advanced form.
For added flexibility, you can add controls and other drawing objects to the drawing canvas of a worksheet, and combine and coordinate them with worksheet cells. For example, you can use a list box control to make it easier for a user to select from a list of items. Or, you can use a spin button control to make it easier for a user to enter a number.
Because controls and objects are stored on the drawing canvas, you can display or view controls and objects alongside associated text that is independent of row and column boundaries without changing the layout of a grid or table of data on your worksheet. Most of the time, many of these controls can also be linked to cells on the worksheet and do not require VBA code to make them work. You can set properties that determine whether a control floats freely or moves and resizes together with a cell. For example, you might have a check box that you want to move together with its underlying cell when the range is sorted. However, if you have a list box that you want to keep in a specific location at all times, you probably do not want it to move together with its underlying cell.
Excel has two types of controls: Form controls and ActiveX Controls. In addition to these sets of controls, you can also add objects from the Drawing tools, such as a AutoShapes, WordArt, SmartArt graphic, or text boxes.
The following sections describe these controls and drawing objects, and also explain how to work with these controls and objects in more detail.
Form controls
Form controls are the original controls that are compatible with earlier versions of Excel, starting with Excel version 5.0. Form controls are also designed for use on XLM macro sheets.
You use Form controls when you want to easily reference and interact with cell data without using VBA code, and when you want to add controls to chart sheets. For example, after you add a list box control to a worksheet and linking it to a cell, you can return a numeric value for the current position of the selected item in the control. You can then use that numeric value in conjunction with the INDEX function to select different items from the list.
You can also run macros by using Form controls. You can attach an existing macro to a control, or write or record a new macro. When a user of the form clicks the control, the control runs the macro.
However, these controls cannot be added to UserForms, used to control events, or modified to run Web scripts on Web pages.
Источник
MessageBox in Excel VBA
Message Box is one of the most frequently used functions in VBA Macro. The message box is a dialogue box that appears on the screen as an extra window. The dialogue box that appeared asks input from the user and returns a constant/code/number accordingly or it can use to display messages. In this article, we will learn how to create different types of message boxes in VBA Macro.
Message Box
A message box is a dialogue box that displays information that can be text, date, number, etc. like as shown in the below image. In Excel, we can easily create a message box using VBA.

Parts of a message box:
1. Title: The title of a message box specifies what properties or functions will this dialogue box performs. While writing a message box in VBA macro it is not mandatory to write a title. A title does not have multiple lines. If a title is not mentioned then by default the title becomes Microsoft Excel.

2. Prompt: The prompt is the heart of the message box. It specifies the work to be done or the information provided in a detailed manner. While writing a message box function it is mandatory to write a prompt statement. You can also display tables, dates, and numbers in the prompt. You can also add multiple lines in the prompt area.

3. Buttons: While working with basic Excel, you might have configured the different buttons that appear in a dialogue box. For example, Yes/No, Retry, Help, Abort/Retry/Ignore, etc. You can create and use any of the buttons, according to your requirement. While writing a message box function it is not mandatory to specify the buttons. By default, Ok appears.

Creating a Basic Message Box in VBA
In Excel, we can easily create a message box with the help of the MsgBox function.
Syntax:
Msgbox “prompt(mandatory)”, buttons(temporary), “title(temporary)”, “helpfile(temporary)”, “context(temporary)”
- Prompt: Prompt is the detailed information of the MsgBox. It is mandatory to add a prompt while writing the MsgBox function. You can also add multiple lines to the prompt.
- Buttons: It is the temporary argument that you wish to add. By default, it shows only the Ok button. To add custom buttons, you have the code for each button. For example, vbRetryCancel, vbOkOnly.
- Title: It is the temporary argument of the MsgBox function. You cannot add multiple titles to a message box.
- HelpFile: This is a very rare argument that is passed on while creating a MsgBox. This argument is only provided when you are using a help button. When you are passing the help file, you have to use context arguments also.
- Context: It is only used with the help file and help button. You need to have a numeric help context number to the appropriate help topic.
Follow the below steps:
Step 1: The MsgBox keyword is used to create a message box is MsgBox. So write MsgBox. Start with a double quote and write the prompt you want to display. Press Enter.

Step 2: Click on the Run button.

Step 3: The Message Box appears. Here, the VBA code has stopped running and will not get executed until we select any of the buttons in the message box. Click Ok.

Step 4: The VBA code resumes.

Buttons in MessageBox
When you have typed a prompt in the MsgBox function. The next argument is separated with a comma(,). Now, the VBA editor gives us a list of buttons that can be added to the MsgBox function. You can select and add the button according to your requirements.

The types of buttons in the MsgBox.
1. vbOkOnly(Default): This is the default button that appears. To create this button follow the following steps:
Step 1: Write the code. vbOkOnly is the code that helps create only the Ok button.

Step 2: The MsgBox contains only the Ok button.

2. vbOkCancel: vbOkCancel code tells the VBA compiler to show Ok and cancel buttons while displaying the MsgBox. To create this button follow the following steps:
Step 1: Write the code. vbOkCancel is the code that helps create the Ok and Cancel buttons.

Step 2: The MsgBox contains both Ok and Cancel.

3. vbAbortRetryIgnore: This code displays Abort, Retry and Ignore buttons in the message box. To create this button follow the following steps:
Step 1: Write the code. vbAbortRetryIgnore is the code that helps create the Abort, Retry, and Ignore buttons.

Step 2: The MsgBox contains all three Abort, Retry and Ignore.

4. vbYesNoCancel: vbYesNoCancel code displays Yes, No, and Cancel buttons in the message box. To create this button follow the following steps:
Step 1: Write the code. vbYesNoCancel is the code that helps create the Yes, No, and Cancel.

Step 2: The MsgBox contains all three Yes, No, and Cancel.

5. vbYesNo: vbYesNo code displays Yes and No buttons in the message box. To create this button follow the following steps:
Step 1: Write the code. vbYesNo is the code that helps create the Yes and No.

Step 2: The MsgBox contains both Yes and No.

6. vbRetryCancel: vbRetryCancel code displays Retry and Cancel buttons in the message box. To create this button follow the following steps:
Step 1: Write the code. vbRetryCancel is the code that helps create the Retry and Cancel.

Step 2: The MsgBox contains both Retry and Cancel.

7. vbDefaultButton2: You can use any of the default buttons. There are four types of default buttons. vbDefaultButton1, vbDefaultButton2, vbDefaultButton3, vbDefaultButton4. Here, vbDefaultButton2 is the button that is selected by default when a Msgbox appears. If you press Enter, then it automatically gets selected. To create this button follow the following steps:
Step 1: Write the code. Using vbAbortRetryIgnore creates three-button Abort, Retry and Ignore. vbDefaultButton2 is the code that helps us select the second default button i.e. Retry.

Step 2: The MsgBox appears and the default is Retry.

Different Icons in Excel VBA
While working with basic excel. You have come across different warnings and information. These all are represented with symbols. For example, a yellow exclamation for warning, a blue color question marks for information, etc. Here, we have discussed some of the icons that can appear in a message box.
1. vbCritical: This icon is a red cross. This red cross is used to display a critical message. To create this icon follow the following steps:
Step 1: Write the code. vbCritical creates a red cross.

Step 2: The message box with a critical icon appears.

2. vbQuestion: This icon is a blue question mark. This blue question mark is used to display when you forgot something to choose in a procedure. To create this icon follow the following steps:
Step 1: Write the code. vbQuestion creates a blue Question Mark.

Step 2: The message box with a Question icon appears.

3. vbExclamation: This icon is a yellow exclamation mark. It is used to represent an error when the entered data doesn’t match with the already present data. To create this icon follow the following steps:
Step 1: Write the code. vbExclamation creates a yellow exclamation mark.

Step 2: The message box with a ! (exclamation) icon appears.

4. vbInformation: This icon is a blue I mark that represents information. To create this icon follow the following steps:
Step 1: Write the code. vbInformation creates a blue I information mark.

Step 2: The message box with an i(information) icon appears.

Values returned by Buttons
Till now, you have studied how to create a message box and the different buttons associated with it. Now, we will learn how you can create nested message boxes and also with some conditions that are more practical in the real designing of a dialogue box. A message box returns a code or a constant according to the buttons applied. Some of the most commonly used constants and their return value are given in the table below.
| Constant | Value |
|---|---|
| vbOKOnly | 0 |
| vbOKCancel | 1 |
| vbAbortRetryIgnore | 2 |
| vbYesNoCancel | 3 |
| vbYesNo | 4 |
| vbRetryCancel | 5 |
Note: You can use values as well as constant interchangeably while comparing the boolean expressions.
For example, given Yes, No, and Cancel buttons. Display a message box accordingly. So to do this task follow the following steps:
Step 1: Write the code. The initial MsgBox will return a value and it will get stored in a variable name ans. If you click yes, then it will go inside the if condition else it will output the other one. Click on the Run button.

Step 2: A dialogue box appears. Click on Yes.

Step 3: A dialogue box appears. Click Ok.

Editing Title in a Msg Box
You can edit the title in a message box. By default, it shows Microsoft Excel as the title. In the MsgBox, function the third argument is for writing your custom title. It is a temporary argument. Follow are the following steps:
Step 1: Write the code. The third argument is your custom title.

Step 2: A dialogue box with the title “Be a geek” appears.
Источник
In this post, you will learn more about Dialog Boxes in Excel and how to use them with-in your Excel spread she
What is the use of dialog boxes?
A dialog box is a temporary window, where an application creates to retrieve user input. An application typically uses dialog boxes to prompt the user for additional information for menu items.
The following are the ways to use the dialog boxes.
- First, prepare an excel sheet with the required details in it.
Types of Dialog boxes
- When a Typical dialog box displays on the screen, it will remain until the user dismisses it. By clicking on the ok button, the task selected from the dialog box will be performed, and by clicking on the Cancel button, the dialog box will close without taking any action.
- The image below is an example for Typical dialog box.
- Navigating dialog boxes is very easy, click the command that you want to use. Although dialog boxes were designed for mouse users, you can also use the keyboard. Every dialog box button has also a text name on the button.
- The image below is an example for Navigating Dialog Boxes.
- Several Excel dialog boxes are tabbed dialog boxes. When you select a tab, a panel with relevant commands is visible. Tabbed dialog boxes are highly convenient because you can make several changes in a single dialog box. After you have made all your setting changes, click OK.
We will hope that this article was useful and understandable.
Input information and make choices about Excel worksheet features
Updated on October 14, 2019
A dialog box in Excel is a screen where you input information and make choices about different aspects of the current worksheet or its content, such as data, charts, and graphic images.
The information in this article applies to Excel versions 2019, 2016, 2013, 2010, and Excel for Mac.
Find the Dialog Box Launcher
One way to open dialog boxes is to use the dialog box launcher. The launcher is a small downward-pointing arrow located in the bottom right corner of individual groups or boxes on the ribbon.
Examples of groups with a dialog box launcher include:
- The Font and Number groups on the Home tab
- The Charts group on the Insert tab
- The Page Setup and Sheet Options groups on the Page Layout tab
Access Function Dialog Boxes
Not all dialog box launchers in Excel are found in the corner of ribbon groups. Some, such as those found under the Formulas tab, are associated with individual icons on the ribbon.
The dialog box makes it easy to enter information related to the function’s arguments, such as the location of data and other input options.
The Formulas tab in Excel contains groups of functions that have similar purposes in the Function Library. Each group name has a dialog box launcher associated with it. When you select these down arrows, a drop-down menu opens and displays individual function names. Selecting a function’s name in the list opens its dialog box.
Work With Non-Dialog Box Options
It is not always necessary to access features and options in Excel through a dialog box. For example, many of the formatting features found on the Home tab of the ribbon, such as the bold feature, are found on single choice icons. Select these icons once to activate the feature and select a second time to turn the feature off.
Thanks for letting us know!
Get the Latest Tech News Delivered Every Day
Subscribe
All of Microsoft Excel’s settings are accessible in the one dialog box, Excel Options. You can access this dialog box by clicking on the File tab and clicking on Options. The Excel Options dialog box provides a list of setting categories (down the left-hand side) that you can click on to access the related settings.
Contents
- 1 Where is the Options menu in Excel?
- 2 Where is the Excel Options dialog box on Mac?
- 3 What is the Excel dialog box?
- 4 Where is the hidden dialog box in Excel?
- 5 How do I set options in Excel?
- 6 Where is Excel Advanced Options on Mac?
- 7 How do I open the dialog box in Excel on a Mac?
- 8 How do I open cell Format dialog box in Excel for Mac?
- 9 Where is the dialog box launcher located?
- 10 Where are advanced options in Excel?
- 11 How do you show a dialog box?
- 12 How do I find a lost dialog box?
- 13 How do I close a dialog box in Excel?
- 14 How do I add answer options in Excel?
- 15 How do I add options to a column in Excel?
- 16 How do you make pre selected options in Excel?
- 17 What is the shortcut key for Find dialog box?
- 18 What is the shortcut key to open the Open dialog box *?
- 19 How do you open the Open dialog box?
- 20 How do I open a series dialog box in Excel?
Click the Tools drop down menu under Menus tab; Then you will view the Excel Options item. Click it, and you will enter into Excel Options window.
Where is the Excel Options dialog box on Mac?
I am trying to find “Options” so I can access the Add-Ins dialogue box, as well as locate a personal worksheet that I have a Macro in. I am using version 16, 365 on a Mac. Any ideas?
What is the Excel dialog box?
A dialog box in Excel is a screen where you input information and make choices about different aspects of the current worksheet or its content, such as data, charts, and graphic images.
Where is the hidden dialog box in Excel?
Hover your mouse over the application on the tool bar. It should bring up one or more thumbnails of instances/documents open for that application. Hover your mouse over the thumbnail of the instance/document with the hidden dialog box.
How do I set options in Excel?
Create a drop-down list
- Select the cells that you want to contain the lists.
- On the ribbon, click DATA > Data Validation.
- In the dialog, set Allow to List.
- Click in Source, type the text or numbers (separated by commas, for a comma-delimited list) that you want in your drop-down list, and click OK.
Where is Excel Advanced Options on Mac?
On a Mac, Preferences is the approximate equivalent of Options on a PC. The listing normally is found in the Application Menu. You’ll find what you’re looking for if you go to Excel> Preferences> View – Show in Workbook.
How do I open the dialog box in Excel on a Mac?
We can use the Ctrl and G or the F5 button in Windows to open the ‘Go To’ dialog box. In Mac, we can use the ^ and G or the Fn and F5 button to open the box.
How do I open cell Format dialog box in Excel for Mac?
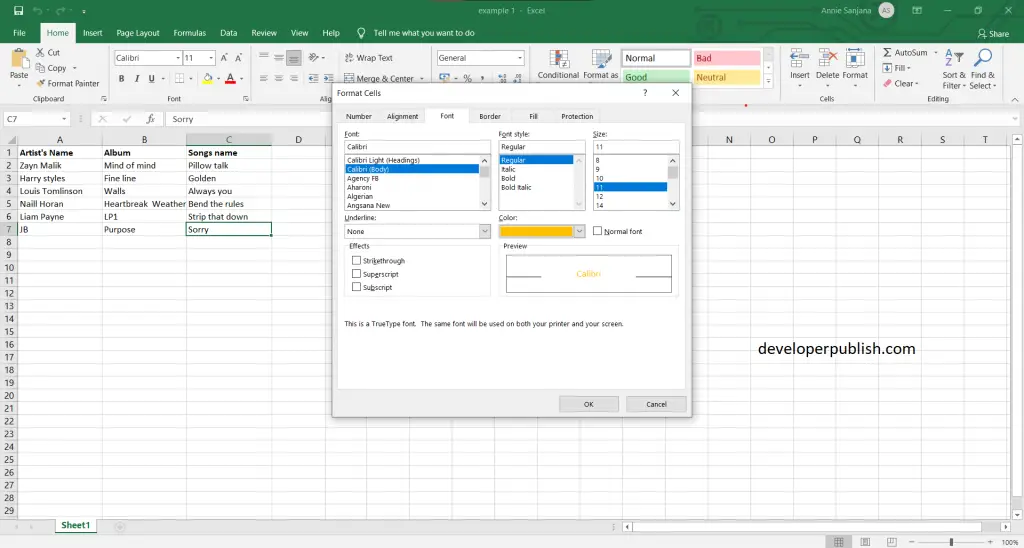
To open the Format Cells dialog box, do one of the following.
- Select the cell you want to format. PC users: right-click the cell. Mac users: press Control and click the cell. From the shortcut menu, click Format Cells.
- On the Home tab, in the Number group, click the arrow .
Where is the dialog box launcher located?
Click the Home tab. In the Fonts group, click the dialog box launcher button. The button is found in the lower-right corner of the Font group. Use the Dialog box launcher to open the Font dialog box.
Where are advanced options in Excel?
Click the File tab and then choose Options. In the left pane, select Advanced.
How do you show a dialog box?
To display a dialog box
- Navigate to the event handler with which you want to open the dialog box. This can happen when a menu command is selected, when a button is clicked, or when any other event occurs.
- In the event handler, add code to open the dialog box.
How do I find a lost dialog box?
Hold down the WINDOW and SHIFT keys and press the LEFT or RIGHT arrow keys on the keyboard to navigate the missing dialog box into view.
- Execute a command to activate the dialog box.
- Press ALT+SPACEBAR on the keyboard.
- Press M (MOVE) on the keyboard.
How do I close a dialog box in Excel?
To do this, you need to press ( ESC ) key and it will close the dialog box.
How do I add answer options in Excel?
Follow the steps in the video above, or:
- From the DATA tab, select Data Validation.
- Click Data Validation in the drop-down list.
- In the dialog box, select List from the Allow drop-down menu.
- In the source field, type the choices you’d like your drop down menu to include, separated by commas.
- Click OK.
How do I add options to a column in Excel?
To insert a single column: Right-click the whole column to the right of where you want to add the new column, and then select Insert Columns. To insert multiple columns: Select the same number of columns to the right of where you want to add new ones. Right-click the selection, and then select Insert Columns.
How do you make pre selected options in Excel?
Set default value (preselected value) for drop down list with formula
- Create a drop down list.
- Then in the Data Validation dialog, under Settings tab, select List from Allow list, and then select the value you want to show in the drop down list to Source textbox.
What is the shortcut key for Find dialog box?
Ctrl+Shift+F is the shortcut key to open find dialog box.
What is the shortcut key to open the Open dialog box *?
CTRL + F12 help to open dialogue box.
How do you open the Open dialog box?
Open an application and then press Ctrl-O, or click the Open icon, to display the Open dialog box. Right-click any of the files or folders displayed in that dialog and you’ll see a context menu pop open. This is the same context menu you’ll find in Explorer windows.
How do I open a series dialog box in Excel?
In the Editing section of the Home tab, click “Fill” and then select “Series”. On the Series dialog box, the Series in option is automatically selected to match the set of cells you selected.
Home / Excel Basics / How to Open Dialog Box in Excel
In Excel, to get to more options of any option category you can open the dialog box and use those options directly from the dialog box. Apart from this, there are a few options that need to be used directly from a dialog box.

In this tutorial, we will look at how to open and use a dialog box use an option.
Open a Dialog Boxes from the Ribbon
- Go to the Tab from where you want to open the option.
- Move to the options group.
- Hover your cursor on the small arrow at the bottom right.
- Click on it to open the options dialog box.

The moment you click on it, Excel will open the dialog box for that option. And, when you click on the arrow from the font group, it opens the format dialog box and opens the font tab from there.

On the ribbon, you have multiple tabs, but not all the tabs have that down arrows in the options groups to open the dialog box.
Dialog Box Options
As I said, there are a few options that you need to use directly from a dialog box. For example, the find and replace option. When press the keyboard shortcut (Ctrl + F) it gives you a dialog box where you need to enter the value that you want to find.

Excel Options Dialog Box
Excel Options also have a dialog box. When you open the options, File ⇢ More ⇢ Options. You will get a large dialog box with all the options that you can make a change to in your Excel environment.
