
Open the template or a document based on the template whose default settings you want to change. On the Format menu, click Font, and then click the Font tab. Make any changes that you want, and then click Default. Note: Most of the styles in Word are based on the Normal style.
Contents
- 1 How do I get Microsoft Word back to default settings?
- 2 What is the default Microsoft Word format?
- 3 Why is it important to understand the default settings in Microsoft Word?
- 4 How do I change the default text in Word?
- 5 What are the default setting of left and right margins?
- 6 What does a default setting do?
- 7 What is the default font in MS Word 2010?
- 8 What is the default font in MS Word 2007?
- 9 How do I change the default font in Windows 10?
- 10 What are the default margins in Word?
- 11 What are normal margin settings in Word?
- 12 Why are my Microsoft Word margins messed up?
- 13 What does the word default mean on a computer?
- 14 What is default give example?
- 15 What is the meaning of default mode?
- 16 How do I change the default settings in Word 2010?
- 17 What is the default font in Word 2016?
- 18 How do I set the default font in Word 2010?
- 19 How do I change the default settings in Word 2007?
- 20 How do I set the default font in Microsoft Word 2007?
How do I get Microsoft Word back to default settings?
Unfortunately, there is no button in Word to reset the program to its default settings. However, you can rename Word’s global template to see if that fixes its problems. If Word continues to have issues or it runs very slow, another option is to delete Word’s registry key.
The Normal. dotm template opens whenever you start Microsoft Word, and it includes default styles and customizations that determine the basic look of a document.dotm will be applied to documents that you create in the future. When you have finished, click the File tab, and then click Save.
Why is it important to understand the default settings in Microsoft Word?
By educating and guiding users, default values help reduce errors. It’s therefore important to select helpful defaults, rather than those based on the first letter of the alphabet or whatever the first option on your original list happened to be. Defaults can also affect your company’s bottom line.
How do I change the default text in Word?
Go to Format > Font > Font. + D to open the Font dialog box. Select the font and size you want to use. Select Default, and then select Yes.
What are the default setting of left and right margins?
Margins are the space between the edge of the paper and the text.By default, Word sets all margins left, right, top, and bottom to 1 inch.
What does a default setting do?
A default, in computer science, refers to the preexisting value of a user-configurable setting that is assigned to a software application, computer program or device.Such an assignment makes the choice of that setting or value more likely, this is called the default effect.
What is the default font in MS Word 2010?
Calibri 11
The default font style and size in Microsoft Word 2010 is Calibri 11. Below are the steps to change Word’s default font settings. 1. Click the Dialog box launcher located in the lower right hand corner of the Font Group.
What is the default font in MS Word 2007?
Calibri font
By default, Microsoft Office Word 2007 uses the Calibri font in font size 11 when you type text in a document, but you can change the default font and font size for all new documents that you create.
How do I change the default font in Windows 10?
Open the “Start” menu, search for “Settings,” then click the first result. You can also press Windows+i to quickly open the Settings window. In Settings, click “Personalization,” then select “Fonts” in the left sidebar. On the right pane, find the font that you want to set as the default and click the font name.
What are the default margins in Word?
Word’s default margins are 1 inch on each side of the page, but you can change the margins to accommodate the needs of your document.
Word includes several built-in margin settings that you can choose from.
- Click the Layout tab.
- Click Margins button.
- Select a new margin setting.
What are normal margin settings in Word?
Both the MLA and APA style guides require 1-inch margins on the top, bottom and both sides of the page. In most cases, when you open Microsoft Word, the margins will already be set to 1-inch. To be sure you have the margins set to 1-inch: Click on the Page Layout tab.
Why are my Microsoft Word margins messed up?
If your document is in Print Layout view and the top and bottom margins appear to be cut off, the option for hiding margins has been switched on. Here’s how to switch it off: Point to the top or bottom of a page until the pointer becomes a double-pointed arrow, and then double-click.
What does the word default mean on a computer?
In computer technology, a default (noun, pronounced dee-FAWLT ) is a predesigned value or setting that is used by a computer program when a value or setting is not specified by the program user.The program is said to default when it uses a default value or setting.
What is default give example?
Default is defined as the action of failing to fulfill an obligation. An example of default is the action you take when you fail to pay your credit card.
What is the meaning of default mode?
the default mode network (sometimes called the default network) refers to a group of interconnected brain structures that are hypothesized to be part of a functional system activated when one is awake but not involved in any specific mental exercise.
How do I change the default settings in Word 2010?
How to change Default setting in word 2010
- Press Ctrl+D to open the Font dialog.
- Select your desired font.
- Click Set as Default.
- In the ensuing dialog, choose the radio button for “All documents based on the Normal. dotm template” and click OK.
What is the default font in Word 2016?
Calibri
By default, the font of each new document is set to Calibri. However, Word provides many other fonts you can use to customize text. Select the text you want to modify. On the Home tab, click the drop-down arrow next to the Font box.
How do I set the default font in Word 2010?
Changing the default typeface in Word 2010 and later versions is easy:
- Open any Word document.
- Right-click somewhere in the document and choose “Font”.
- In the Font dialog box, select your preferred typeface and any other settings you want to change (e.g., font size).
- Click the “Set As Default” button.
How do I change the default settings in Word 2007?
- Right-click the desktop’s lower left corner, and then click “Control Panel” to launch the Control Panel.
- Click “Programs” then click “Default Programs” to open the Default Programs window.
- Click “Set Your Default Programs.”
How do I set the default font in Microsoft Word 2007?
Word 2007
- Open a new document, click on the Home tab, click on the Font Dialog Box Launcher (as shown in the screenshot below) and select the Font tab.
- Select a new font and size in the Font dialog box, and then click Default.
- Click Yes to make the changes permanent.
Table of Contents
- What is the default style in Microsoft Word?
- Is the default font style in MS Word?
- How do I change the default style in Word 2016?
- How do I get Microsoft Word back to default settings?
- How do I remove the default formatting in Word?
- How do you keep formatting in Word?
- Where is formatting in Word?
- How do I remove formatting in Word 2016?
- How do I fix a messed up Word document?
- Why is word changing my formatting?
- Why is my word formatting weird?
- Why is formatting in Word so difficult?
- How do you show all formatting in Word?
- What are the 4 types of formatting?
- How do I change formatting in Word 2010?
- How do you clear all formatting in Word 2013?
- How do I remove all character formatting in Word?
- How do you delete in Word 2013?
- What does Clear Formatting mean?
- How do you clear formatting in a Word document?
- How many types of alignment are there?
- What are the three types of alignment?
- What is an alignment?
- What is left alignment in MS Word?
- How do I flush left in Word?
- How do I align text to the left in Word?
Note: Most of the styles in Word are based on the Normal style. Changing the default font also changes the Normal style, which affects any other style that is built on the Normal style.
Is the default font style in MS Word?
Go to Format > Font > Font. + D to open the Font dialog box. Select the font and size you want to use. Select Default, and then select Yes.
How do I change the default style in Word 2016?
How to change your Word 2016 default font style
- Open Word.
- Open any document or create a new document.
- Click the Home tab in the top left corner.
- Under the Fonts block, click the expand button.
- Select your desired Font style.
- Click Set as Default in the bottom left corner.
How do I get Microsoft Word back to default settings?
Unfortunately, there is no button in Word to reset the program to its default settings. However, you can rename Word’s global template to see if that fixes its problems. If Word continues to have issues or it runs very slow, another option is to delete Word’s registry key.
How do I remove the default formatting in Word?
Clear formatting from text
- Select the text that you want to return to its default formatting.
- In Word: On the Edit menu, click Clear and then select Clear Formatting. In PowerPoint: On the Home tab, in the Font group, click Clear All Formatting .
How do you keep formatting in Word?
Preserving formatting when others work on your document
- Click the File tab then click Options.
- Click Customize Ribbon.
- In the Customize Ribbon box, check the Developer check box.
- Click OK.
- Click the Developer tab.
- In the Templates group, click Document Template.
- Uncheck Automatically update document styles.
Where is formatting in Word?
Open one word document, in the group of the “Menus” tab at the far left of the Ribbon of word 2007/2010/2013, you can view the “Format” menu and execute many commands from the drop-down menu of Format.
How do I remove formatting in Word 2016?
To remove text formatting, follow these steps:
- Click the Home tab.
- In the Font group, click the Clear Formatting command button. Text formats are removed from selected text or from all new text typed.
How do I fix a messed up Word document?
Step 1: Repair document In Word, select File on the Ribbon, and then select Open. In the Open dialog box, click once to highlight your Word document. Select the arrow on the Open button, and then select Open and Repair.
Why is word changing my formatting?
This happens because Word can “absorb” explicit formatting changes into the underlying style. When this occurs, any other document elements that used that style automatically change to reflect the newly applied format. Choose Styles and Formatting from the Format menu. Word displays the Styles and Formatting task pane.
Why is my word formatting weird?
You need to turn on the view of white space between pages. It is easy to accidentally toggle this setting by double-clicking at the top or bottom of a page in Print View. You can also manage it by Word Options > Display and turn on the checkbox for “Show white space between pages in Print Layout view”.
Why is formatting in Word so difficult?
Margins, fonts, adding page numbers—all pretty straightforward. It is sometimes difficult to find the way to do something like that because Word has so many tools available to you. That might be all the answer you need. But since you asked about formatting, I will also say that Word tends to choke on complexity.
How do you show all formatting in Word?
Turn the display of formatting marks on or off
- Go to File > Options > Display.
- Under Always show these formatting marks on the screen, select the check box for each formatting mark that you always want to display regardless if the Show/Hide. button is turned on or off.
What are the 4 types of formatting?
To help understand Microsoft Word formatting, let’s look at the four types of formatting:
- Character or Font Formatting.
- Paragraph Formatting.
- Document or Page Formatting.
- Section Formatting.
How do I change formatting in Word 2010?
In this article 1In your document, select the text you want to format. 2In the lower-right corner of the Styles group on the Home tab, click the dialog box launcher. 3Click the Options link in the lower right corner of the Styles task pane. 4Select the option All Styles from the Select Styles to Show drop-down list.
How do you clear all formatting in Word 2013?
Summary – How to clear formatting in Word 2013 Select the desired text, or press Ctrl + A to select the entire document. Click the Home tab at the top of the window. Click the Clear All Formatting button in the Font section of the ribbon.
How do I remove all character formatting in Word?
Use Ctrl + A to select all text in a document and then click the Clear All Formatting button to remove the formatting from the text (aka character level formatting.)
How do you delete in Word 2013?
Delete a page
- Press Ctrl+G to summon the Go To tab in the Find and Replace dialog box.
- Choose Page from the Go to What list.
- Type the number of the page you want to delete.
- Click the Go To button and then click the Close button.
- Press the F8 key.
- Press Ctrl+PgDn (the Page Down key).
- Press the Delete key.
What does Clear Formatting mean?
With Clear Formatting function, you can remove all the formatting on a block of selected text, or a paragraph, or the whole text. The formatting such as font, size, text attributes (bold or italic), and color you applied in the text can be cleared with one click, and then the text will return to its default style.
How do you clear formatting in a Word document?
It’s a two step process and here it is:
- Open the Google Doc you want to clear formatting from.
- Highlight all text you want to clear formatting from (it’s ok if there is plain text included too).
- Either: Click the remove formatting button in the toolbar OR. Click “Format” then “Clear formatting” OR. Shortcut keys:
How many types of alignment are there?
four
What are the three types of alignment?
There are three main types of alignments available – front-end, thrust and four-wheel.
What is an alignment?
An alignment refers to the adjustment of a vehicle’s suspension. Your suspension points your vehicle’s tires straight down the road when it is properly aligned. Although it is commonly referred to as a wheel alignment, the result can effect multiple points on your vehicle.
What is left alignment in MS Word?
Left align, left alignment, or left justify is text, pictures, graphics, or page formatting that aligns text along the left side of a page or containing element. This text has a ragged right edge because it is left-aligned instead of being right aligned.
How do I flush left in Word?
Flush Left and Flush Right On the Same Line
- Make sure the paragraph is formatted as left-aligned.
- Choose the Tabs option from the Format menu. Word displays the Tabs dialog box.
- Insert a right-aligned tab near the right edge of the line.
- Click on Set.
- Click on OK.
- Type your text.
How do I align text to the left in Word?
Align the text left or right
- Select the text that you want to align.
- On the Home tab, in the Paragraph group, click Align Left or Align Right .
You can change the default settings for new documents by making changes to the Normal template that new documents are based on. You can modify the Normal template to change its default formatting or content so that any new document that you create will use the new settings.
Important: If you mistakenly modify the Normal template, you can easily restore the default behavior by deleting, renaming, or moving it. The Normal template is automatically recreated the next time that you open Word. However, the same cannot be said for other templates. You should always create a copy of any other template before you change it.
Change the default font
Changing the default font in any template means that the font is used in every new document that is based on that template. For example, the default font for new blank documents is based on the Normal template.
-
Open the template or a document based on the template whose default settings you want to change.
-
On the Format menu, click Font, and then click the Font tab.
-
Make any changes that you want, and then click Default.
Note: Most of the styles in Word are based on the Normal style. Changing the default font also changes the Normal style, which affects any other style that is built on the Normal style.
Change the default character spacing
Changing the default character spacing in any template means that the settings for scale, spacing, position, kerning, and other typographic features are used in every new document that is based on that template. For example, the character spacing for new blank documents is based on the Normal template.
-
Open the template or a document based on the template whose default settings you want to change.
-
On the Format menu, click Font, and then click the Advanced tab.
-
Make any changes that you want, and then click Default.
Change the default margins
Changing the default margins in any template means that the margin settings are used in every new document that is based on that template. For example, the margins for new blank documents are based on the Normal template.
-
Open the template or a document based on the template whose default settings you want to change.
-
On the Format menu, click Document, and then click the Margins tab.
-
Make any changes that you want, and then click Default.
Change the default layout
Changing the default layout in any template means that the section breaks, headers and footers, and other layout attributes are used in every new document that is based on that template. For example, the layout attributes for new blank documents are based on the Normal template.
-
Open the template or a document based on the template whose default settings you want to change.
-
On the Format menu, click Document, and then click the Layout tab.
-
Make any changes that you want, and then click Default.
Change other default settings in the Normal template
You can customize the Normal template and change default settings for many aspects of a document, such as text formatting, paragraph formatting, document formatting, styles, text, pictures, AutoText entries, and keyboard shortcuts. To make changes to Normal.dotm, you must open the file from Word. If you open Normal.dotm from the Finder, Word will create a new blank document based on the template.
-
On the File menu, click Open.
-
In the Open dialog box, browse to the folder that contains the Normal.dotm file.
-
If you are using Word 2016 for Mac, go to /Users/username/Library/Group Containers/UBF8T346G9.Office/User Content/Templates
-
If you are using Word for Mac 2011, go to /Users/username/Library/Application Support/Microsoft/Office/User Templates/My Templates
Note: If you are using Mac OS X 10.7 (Lion), the Library folder is hidden by default. To browse to the Library folder from the Open dialog box, press COMMAND + SHIFT + G , and in the Go to folder box, type ~/Library.
-
-
Double-click Normal.dotm. The Normal template opens.
-
In the Normal template, make the changes that you want.
-
Save and close the Normal template.
Tips:
-
If you make extensive changes to your Normal template, we recommend that you periodically back up the file. To back up your Normal template, copy the file and rename it, or move it to another location.
-
You can quickly and easily format a whole document to give it a professional and modern look by applying a document theme. A document theme is a set of formatting choices that can include a color scheme (a set of colors), a font scheme (a set of heading and body text fonts), and an effects scheme (a set of lines and fill effects). To apply a theme:
-
In Word 2016 for Mac, on the Design tab, click Themes, and then choose a theme.
-
In Word for Mac 2011, on the Home tab, under Themes, click Themes, and then choose a theme.
-
-
You can change the page margins in your doc and create custom margins. But the next time you create a new document, Word for the web will revert to the Normal margin setting of one inch on each side of the page.
Styles (Word 2007 and later)
Introduction
To use Word properly, one should use Styles. Whilst this can be a bit of a mantra, it is most certainly true: if you don’t
keep your styles under control, you will, sooner or later, be unable to maintain your document as you wish, especially so if
numbering is involved.
To effectively use styles you must understand what is presented to you. You must know what styles are shown where, be able to find
the ones you have used, and those you want, and apply them where you want them.
Unfortunately, Microsoft has chosen to make it almost impossible for all but the experts. There will always be problems with
every feature, and it simply isn’t possible to please everybody all the time, but with styles, and particularly the styles
user interface, Word seems to be striving for a new low. There is no easy way to explain what is a large and significant part of
the product, and I can only apologise up‑front for diving right in and trying to pull the strands together as I go.
After a look at styles, and some of the user interface, I’m going to take a look at the XML that is,
now, the preferred storage mechanism for documents. Why not join me on my adventure?.
A Blank Document and Some Styles
When you start with a blank document in Word, the Styles available for your use are, at least superficially, a combination of
those built into Word and those that exist in your Normal Template.
Your Normal Template is a bit like your DNA, bearing the scars of your personal history: the styles in your
Normal Template bring with them all the changes you’ve made, deliberately or accidentally, over all your years working with
Word. I can’t imagine what you see, so I will start from the beginning. If you start from scratch in Word 2013, this is
something like what you will see at the top right of your screen:

The Built-in Home Tab in Word 2013
There are several points of interest here, the first, perhaps, being how many styles you can see. The image above shows what a user
of a typical modern wide screen is presented with straight out of the box: you may see more or fewer. In my own typical configuration
I see just three: “¶ Normal”, “¶ No Spac…”, and “Heading 1”.
This is what Word thinks important.
You will note that some of the names are truncated and followed by ellipses; this has no special significance; it only means that
the names are too long to fit in the space available. If you hover your mouse over an individual style item, the full name will be
shown in what used to be called a ToolTip.
Words often fail me when describing the Ribbon, partly because information is so hard to discover, but the styles are shown in the
Ribbon in what Word calls the Quick Styles Gallery, or sometimes just the Styles Gallery. At the
right hand edge of the gallery there are three small icons, the bottom one of which looks like an arrow head with a line over it.
If you click on this, the gallery will expand, exactly how depending on your own screen configuration; in this instance it needs
just two lines for all the default styles to show:

The Expanded Quick Styles Gallery in Word 2013
The styles included in the gallery are called Primary Styles. According to the official standard, primary styles
are those designated as particularly important for the current document. The following styles are those that, by default, and on
your behalf, Microsoft has designated as being of particular importance to your empty document:
-
Normal. All content in all Word documents is styled; unless you specify otherwise, it is styled in the Normal
Style. Word treats the Normal Style as its own and it is generally best for users just to accept this and use other styles.The symbol, ¶, that precedes the name is called a pilcrow and is used to signify a paragraph or, in this case, a
Paragraph Style. -
No Spacing. As you can see from the pilcrow, this is another paragraph style but, if you have never seen it
before, the “No Spacing” Style probably makes no sense to you.Prior to Word 2007, the Normal Style used, by default, the Times New Roman (TNR) font.
The TNR font was designed for The Times newspaper and was a serif font, that is all
the letters had little extra marks at the ends of the lines, called serifs. This was to make the letters more distinct and
easier to read when printed on low quality newsprint. TNR has been, and remains, a very popular font
but it is entirely the wrong type of font for use on crystal clear monitors and modern clean white paper.With Word 2007, Microsoft introduced some new sans serif fonts, which did not have serifs
(sans is French for without), designed to be easier to read on the media on which they were used. The Normal
style was changed to use the new Calibri font and, again, to make it easier to read, the spacing between lines, and between
paragraphs, was increased.The No Spacing style was added to Word as a basic style, the same as the Normal style in all respects except
for line and paragraph spacing, which were left as they had been in the Normal style in earlier versions of Word. -
Heading 1 and Heading 2. The Heading styles are meant to be used to structure a document,
and have various characteristics that are beyond this overview. The actual styling applied by default seems to vary by release,
rather suggesting that Microsoft is unsure how best to do it: in Word 2013, Headings are styled in the
Calibri Light font.You will have noticed that these style names are not preceded by a pilcrow and that the styles are not, thus, paragraph styles.
Microsoft calls them Linked Styles. A linked style is actually two styles: a paragraph style and a character
style, the character style having the font characteristics of the linked paragraph style. The distinction is a technical one, to
some extent, but it can lead to misunderstanding and confusion. From what is shown in the Ribbon, you cannot tell the difference
between a character style and a linked style, and care should be taken when using styles with which you are unfamiliar. -
Title and Subtitle. If your document has a title and, perhaps, a subtitle, these are the styles to use. These
are, again, linked styles. -
Subtle Emphasis, Emphasis, Intense Emphasis. Readers with knowledge of web programming may understand the term
“Emphasis”, which is, essentially, web-speak for Italic. Perhaps it makes sense for there to be
consistent terminology but, although Word does understand HTML, it is not, primarily, a web page editor.
Personally I am uncertain whether the qualified Subtle and Intense styles really deserve a
place on the front row, so to speak, but they are examples of how styles can be used.These are Character Styles: they can only hold character formatting, primarily font characteristics. These
particular styles, by default, merely apply italic formatting, and font colour. That, at least, is the impression they try to give;
the reality is, of course, more complex. If you have any knowledge of web programming, and understand the meaning of emphasis in
the context it is used here, you will also know something of cascading style sheets. Word has a similar system
of style inheritance but, in this case, does not use web terminology for it.Styles inherit characteristics from whatever they are based on. The emphasis styles are based on what Word
describes as the Default Paragraph Font. It is important to understand that this means the font as defined
in the style applied to the paragraph of which the text forms a part, not the font applied to the text to which the emphasis
may be applied. If you had, whether using styles or not, applied some formatting to some text (font size, colour, weight, etc.)
and wanted to emphasise part of it, these styles would not be appropriate. They would explicitly format the text in the font
defined in the paragraph and then apply the emphasis over the top of that; they would not apply any emphasis to the text as it
had been formatted. -
Strong. Strong is to Bold, as Emphasis is to
Italic. -
Quote, Intense Quote. Microsoft assumes that these two linked styles are useful enough to
be included in the Ribbon. Perhaps you do, too. -
Subtle Reference, Intense Reference. Two more styles, this time character styles, that
Microsoft seem to think might be useful. -
Book Title. Another character style.
-
List Paragraph. Many, many, documents include lists of one sort or another. At last, perhaps, we have a
paragraph style that might really be useful. A quick look at this style shows it to be indented and no more: no bullets, or
numbers, or anything you might associate with a list.
I have tried to give accurate descriptions of style types as they have appeared, and to describe and explain the styles presented,
but you may think some of my comments, especially the later ones, a bit terse. That is because I find it difficult to believe that
a significant number of Word users will find it helpful to have these styles given such prominence in the user interface. If they
were really useful they wouldn’t suffer arbitrary changes in each new release of the product and my best guess is they are,
in some way, considered exemplary.
The Styles Pane
That’s it, anyway. That’s what you get for your money with Word. You will want to change this, so now it’s time to
look a bit deeper. Underneath the gallery in the Ribbon is the name of the Group within the Ribbon:
Styles. To the right of this, in the far right bottom corner of the group is an arrowhead even more miniscule than
those at the side of the gallery. This one is called the Dialog Launcher; once you know its name it becomes a little
easier to imagine what it might do. This actually launches a Task Pane, rather than a Dialog, but the difference is immaterial for the
moment. Click on it and this Task Pane will appear, by default at the right hand side of your window:

The Default Styles Task Pane in Word 2013
Here, at the moment, with one exception, you can see the same styles you saw in the gallery in the Ribbon. There is one little bit
of extra information: you will remember that Normal, and a couple of other styles in the gallery, were explicitly
shown with a pilcrow to indicate that they were paragraph styles. Here, as well as the pilcrow, you can see a lower case letter
“a”, which indicates a character style, and an underlined pilcrow and letter “a” together, indicating a
linked style. These icons give some hint as to the nature of these styles, and here, though not in the Ribbon, you can tell the
difference between a character style and a linked style.
The one exception is the item, “Clear All”, at the top. You may be able to hazard a guess as to what this does, and you
probably wouldn’t be too far wide of the mark. There used to be a way to remove this, and still is, with VBA,
or by manipulating the underlying XML, but I cannot find how to do so in the user interface. I shall, for the
most part, ignore it for the rest of this discussion.
At the bottom of the pane are three icons, none of which are instantly recognisable. Hover over them each in turn and you will
discover that they are identified as “New Style”, “Style Inspector”, and “Manage Styles”: whether
this knowledge helps you on first sight is questionable, but I hope I will be able to help throw some light on it shortly. Beside
these icons you can see the text: “Options…”; the ellipsis is following a convention that pre‑dates task
panes by many years, though one that may be unfamiliar in this context, and indicates that there is more to see, probably via a
dialog, which should be revealed by clicking it. This is, in a sense, confirmed by noting that the text is underlined when you
hover over it, suggesting that it is probably a hyperlink. As task panes are built with HTML, it is,
technically, a hyperlink, but it doesn’t behave exactly like one as the dialog that is invoked prevents further interaction
with the task pane.
Just before looking at the Options dialog, you will note that there are two options deemed important enough to have pride of place
in the main pane: “Show Preview”, and “Disable Linked Styles”. The Disable Linked Styles
option affects behaviour on the document surface, and will be addressed later: it is hard to see why it has been placed here. The
Show Preview option will change the presentation of the pane as shown below:

The Styles Task Pane in Word 2013, showing Style Previews
Here you see samples of the styles, in much the same way as the swatches are presented in the gallery. This option is, fairly
obviously, relevant here but why it is not presented as part of the options dialog (see below) I have no idea.
Clicking on the Options… hyperlink brings you this:

The Styles Pane Options Dialog in Word 2013
Being recommended is a confusing notion that, in the two places it is used, means two different things. You can not recommend a
style: being ‘recommended’ simply means that a style is not being explicitly hidden (or what is called semi‑hidden,
of which more, later). You can not recommend a sort order, either: styles are assigned priority numbers, and sorting ‘as
recommended’ means no more than sorting in ascending numeric order of priority. The order in which the default styles are
sorted, both in the gallery and in the task pane, is a result of the somewhat arbitrary priorities that Microsoft has assigned
those styles.
Instead of showing recommended styles you can, apart from “All styles” show styles “in use”, or styles
“in current document”. You may, on occasion, be surprised at what Word considers to be in use or, indeed, in the
current document, but, selecting either, on a default system with a blank document will give a short list.

The Styles Pane showing Styles in Use in a blank document in Word 2013
If your document is blank, you might be surprised that the list is not even shorter. How can two styles be in use, or in the
current document, when it is empty or, more accurately, as I’m sure you know, contains but a single terminal paragraph mark?
The paragraph mark does, by default have a style of Normal, but the Heading 1 style is,
in fact, not in use at all.
Word, to an extent, structures documents around headings, and considers them important in various ways, so important that it tells
you, by default, that they are in use when they are not. Word lies because it wants you to be able easily to select
Heading styles, but it has taken a drop of truth serum, and there is a special option that affects their visibility.
If you look back at the Options dialog you will see a checked checkbox with the legend: “Show next heading
when previous level is used”. Heading 1 is there right in front of you, almost demanding your attention.
If you use Heading 1, Heading 2 will then appear in the list, and so on, not quite ad
infinitum, but all the way to Heading 9. If you don’t want this you can uncheck the checkbox and
Heading 1 will no longer be listed.
If you choose to see All Styles, you will get a list of over 100, many of which may make little sense to you. If
you have Show Preview checked you will get a glimpse of how they will appear, but if you have them sorted ‘as
recommended’, the order will appear arbitrary. For the most part, they do have fairly descriptive names, and some of them will
be automatically applied by Word when it thinks them appropriate: Footnote Text, for example, for text in footnotes.
It is unlikely, however, that you will use many of them as provided. There is just one final point worth making, and that is that the
only styles you see here are paragraph styles, character styles, and linked (paragraph and character) styles. There are other types
of style that are presented elsewhere.
I don’t want to dwell too much on every option, and will leave you look at the effect of different sort orders; it is only
really the default ‘as recommended’ that cannot be easily understood, although sorting by font may throw up a surprise
that I may touch on later. Briefly, the other options will not make any difference in the blank document I have been using thus far,
but in a document that has been worked on for any length of time, choosing them can give a good indication of the professionalism
of the author, and can often overwhelm.
Managing Styles
You may remember that the tip, when you hovered over the right hand one of the three icons, was “Manage Styles”. If you
click on this, you get a dialog:

The Edit tab of the Manage Styles Dialog in Word 2013
What is far from obvious here is that the sort order and ‘show recommended styles only’ checkbox are options that relate
only to this dialog, in fact only to the first three tabs of this dialog. The same sort options are available as for the task pane
itself but they affect only the list of styles within the dialog. What is equally far from obvious is that the sort order you choose
is not remembered but whether or not the checkbox is checked is remembered (in the Word Data key in the registry).
The tab that shows first is the Edit tab, about which I have little to say; from here you can, well, edit your
styles. It isn’t really the most intuitive location for the functionality, but it is only two clicks away from the Ribbon,
which might be thought to make it, in the jargon, discoverable.
Some of the styles you see listed may be unknown to you, and some of them will certainly be a surprise if this is your first visit
here. If you have ‘show recommended styles only’ checked, you will see, at the top of the list, the same
‘recommended’ styles as are shown in the Styles Pane. You may be confused by Heading 2,
parenthetically described as “Hide Until Used” but, as noted earlier, Word exhibits some unique behaviour with heading
styles, and its listing here is of no real consequence.
A bigger surprise awaits when you scroll through the list: after the styles shown in the pane, you will see styles called
“Table Grid”, “Table Grid Light”, and over 100 more, all prefixed with a small 2×2 checkerboard symbol:

Table Styles in the Manage Styles Dialog in Word 2013
These are styles of another type: Table Styles. Table styles are not presented in the styles pane, even when you
choose to show “All styles”, and their appearance here as recommended styles just makes the list difficult to navigate.
To look a bit further and see another different type of style, uncheck the ‘show recommended styles only’ box, and scroll
down to these oddly named List Styles:

List Styles in the Manage Styles Dialog in Word 2013
Word wants you to see these and it isn’t going to make it easy to escape.
Recommending Styles
The next tab is the Recommend tab:

The Recommend tab of the Manage Styles Dialog in Word 2013
One nice feature of new dialogs is that they are resizable, and this is indicated by the small patch of grey hatching in the bottom
right hand corner. I have resized this one to show a little more than you see by default and here, at last, you start to get a hint
about how ‘recommending’ works.
Unfortunately, Word does not show you the style types on this tab, but it does have an unexplained number beside each style instead.
If you uncheck show recommended styles only, and scroll to the bottom of the list (assuming you have the list
sorted as recommended) you will see many of the styles say “last” instead of a number. The numbers (“last”
being equivalent to 100) control the recommended sort order; if you look at the list you will see that the styles are in the same
order as those in the Styles Pane.
Below the list of styles is a clutch of buttons. Selecting “All” or “Built‑In” will both have the same
effect until you have created some of your own, non built‑in, styles, and it is difficult to imagine many actions you would
want to do en masse to either selection. You can select as few or as many styles as you wish, using standard
mechanisms, and a little experimentation will soon show you the effect on the selection of the four buttons in the ‘set
priority’ section.
What may not be immediately obvious is that, if you select one of table styles or list styles, all the buttons will be greyed out
indicating that you can’t actually do anything with these. If you select one of these styles along with one, or more, of the
paragraph or character styles, the buttons will not be greyed out but they will not have any effect on the table or list styles.
The table and list styles really do just get in the way of doing what you want to do.
The buttons to select whether or not styles show as recommended styles, have legends that reflect the settings that can be applied
and you may recognise “Hide until used” as parenthetical text that appears after many style names in the list.
Hide Until Used is a useful setting that stops you getting drowned in a sea of styles you neither need nor want
to see. Hide, on the other hand, seems rather pointless: there can be very few circumstances where you really want
to hide a style you are using. To see the effect of hiding a style, however, choose, and select, a style you are using and click
on “Hide”; the style name will turn (or remain) grey and “(Always Hidden)” will appear after its name in
the list. The style will then stop appearing in the Styles Pane and the Styles Gallery.
Restricting Styles
I’ve tried to go through the presentation of basic styles in the Ribbon, and in the Styles Pane, and give you some idea of
what you see and why, which is really all I want to look at, at the moment. For some sort of completion, however, I will take a brief
look at the other tabs in the dialog. On the next, tab, “Restrict”, we find this:

The Restrict tab of the Manage Styles Dialog in Word 2013
Here you, again, see your list of styles. Below the list are some buttons for some generic selections; you are still able, of course,
to make your own selections but it isn’t easy from the long list. Having made your selection you can permit,
or restrict, the styles. By default, styles are permitted, and if you restrict one a little padlock will appear
beside its name, but that is all! On this tab you can restrict any, or all, styles, including the table styles and list styles even
though, thus far, you know nothing about them.
Below the buttons there is a checkbox labeled “Limit formatting to permitted styles”. For your restricting to have any
effect you must check this. When you do so you will see that the “Allow AutoFormat to override formatting” becomes enabled.
This gives you a hint about the complexities to come: styles can be applied by other features of Word and it is clearly going to take
a lifetime to master this feature! Look at the checkboxes below and you see “Block Theme or Scheme switching” and
“Block switching to a different style set”. Themes? Schemes?
Style Sets? What are these? I’m sorry to say that I’m not going to tell you, not yet anyway; these
complications are far beyond the scope of this overview.
What I am going to tell you, just because it is so ridiculous, is a little bit more about restriction. Invoke the
Manage Styles dialog, select the Restrict tab, select a style – say No Spacing
– and click “Restrict”; as noted above, a little padlock will appear beside the style name. Now check the “Limit
Formatting” checkbox and click “OK”. You will be shown this dialog:

Start Enforcing Protection in Word 2013
Here you can set a password so that, you might think, the styles you have restricted cannot be used without entering the password.
Word does warn you that ‘malicious’ users can remove the password, and I’m sure I have said before that this is
child’s play. This superficial kind of protection, however, can serve a purpose in tending to stop users accidentally undoing
all your good work. Enter a password (twice) and press OK.
You can easily check to ensure that your restrictions are protected. One way is to return to the Restrict tab in
the Manage Styles dialog, uncheck the Limit Formatting checkbox, and click “OK”.
This time you will be shown this dialog:

Password Input to Unprotect a Document in Word 2013
In order to remove the protection, you must enter the password; this is entirely in keeping with what one would expect, but ‑
Cancel the unprotect dialog and return to the Manage Styles dialog while your restrictions are
still in effect. Here you can permit the style you previously restricted and, if you wish, restrict some others;
in other words you can completely change the restrictions without ever being asked for the password. I did not know this, I stumbled
across it entirely by accident as I was preparing this article but it seems to be the case in Word 2007, Word 2010, and Word 2013.
Put another way, this feature has, presumably, never been used. I can only speculate as to the reasons for this, but it seems somehow
representative of the Styles user interface, as it currently exists.
Setting Defaults, and More
The final tab is the “Set Defaults” tab:

The Set Defaults tab of the Manage Styles Dialog in Word 2013
Document defaults are not a style; you cannot format text or paragraphs as document default;
document defaults are, however, what all paragraph and character styles are based on. The user interface, as you can see above, gives
a very limited set of attributes but, as far as I know, all paragraph and character attributes can be set as document defaults, if
you know how to do it (which I may describe later).
Just before moving on, a brief word about the options at the bottom of the dialog. Most of the time you will want the changes you
make to affect only the document you are working on but there may be situations where you want changes made in the template; all I
will say is: be careful!
Finally, the “Import/Export” button takes you to the old Organizer Dialog, now with just two tabs: the Styles tab, of
which more in due course, and the Macro Project Items tab, which has nothing at all to do with styles. The jump to this separate
dialog is one way: you cannot come back.
The Story So Far: A Quick Summary
I like to think that readers of my ramblings know, at least, the basics, and I have not shown you how to use styles at all. I have
told you a little about the styles that come with Word, and the way in which Word presents them to you, and I have gone in to some
detail about what Word calls Managing Styles. I had intended to show you what happened when I asked for help by
clicking the question mark icon in the top right hand corner, but that bit of uselessness will have to wait for another time and
another article. There is much more to come, but now I want to take a look behind the scenes to try to understand what should
happen, what is happening, and what might happen when documents are changed in ways that cannot be achieved through Word. The next
page, to be found herehere [link to the next page in the series at LatentStyles.php] is about what the standard calls
Latent Styles.
A style is a group of formatting settings stored under a single name. Using styles and style sets rather than formatting ad hoc has several advantages:
- The document looks professional and is easy to read.
- Styles provide consistency and can apply several formatting properties at one time.
- Heading styles can be used to create tables of contents and outlines.
- If you change the formatting properties of a style, all instances of the style are updated with the formatting changes.
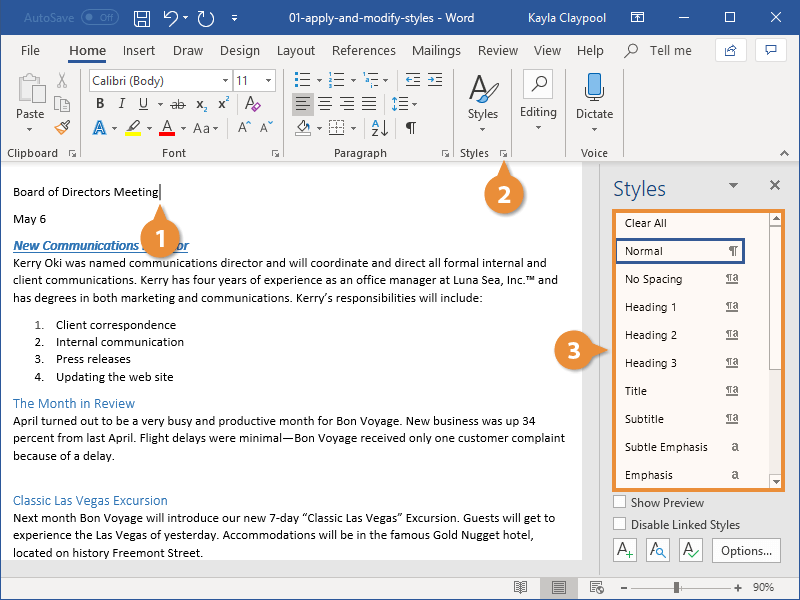
Apply a Style
Word includes several built-in styles that cover most basic formatting needs in a document.
- Click in the paragraph or select the text you want to apply a style to.
- Click the Styles group dialog box launcher on the Home tab.
- Select a style from the Styles pane.

Alternatively, you can browse within the Styles gallery on the ribbon, which will also preview the formatting used in the style, but it’s often easier to choose from all the available styles at once by clicking the dialog box launcher.
The style is applied to the text or paragraph.
Change Style Sets
Another advantage to using styles throughout your document is the ability to quickly change how those styles appear using Style Sets.
Style Sets will update the appearance of the built-in default styles. This way, you can format these elements at once instead of one by one.
- Click the Design tab.
- Open the Style Set gallery by clicking the gallery’s More button.
- Select a Style Set.
Thumbnails previewing the available Style Sets appear.
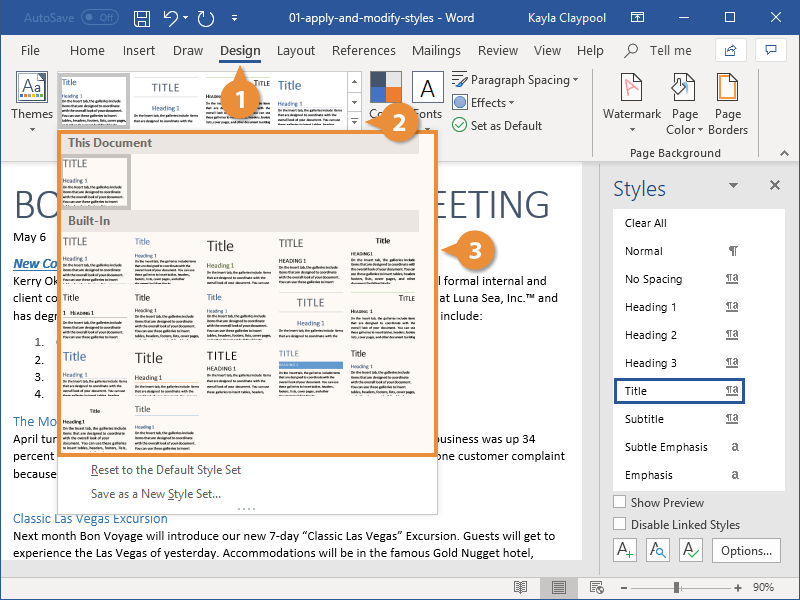
The new Style Set is applied, affecting all the default styles used in the document.
| Default Styles | |
|---|---|
| Normal | The document’s main body text. Any text not using another style is set in Normal. |
| No Spacing | Normal text, with no additional spacing between paragraphs. |
| Heading 1, 2, 3 | Three levels of headings to use in your document, with outline levels automatically applied. |
| Title | A larger heading, useful for the main title of a document. |
| Subtitle, Subtitle Emphasis | Subtitle text, styled to complement the Title style, along with an additional style for emphasis. |
| Emphasis, Intense Emphasis, Strong | These styles are meant to emphasize text in a document. Emphasis usually italicizes, Strong usually bolds, and Intense Emphasis will usually do both. |
| Quote, Intense Quote | These styles will separate blocks of text to display a quote. |
| Subtle Reference, Intense Reference, Book Title | These styles are meant for text used to cite references and book titles. |
| List Paragraph | This style is automatically applied when text is used in a numbered or bulleted list. |
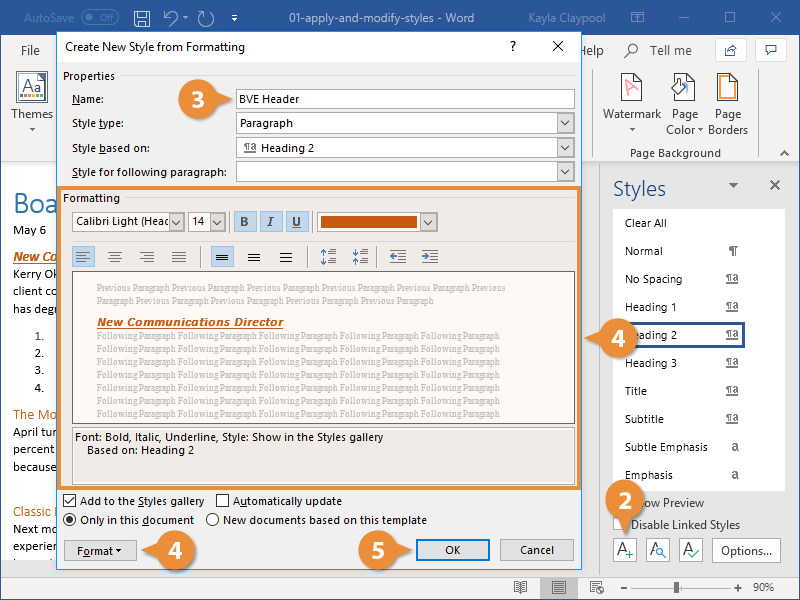
Create a Style
You can also create your own styles, saving a set of formatting to use easily in other places. If the need arises, creating a style is quick and easy. There are five different types of styles:
- Character: Includes any type of character formatting, such as font size, type, color, and effects. These styles can be applied to any selected text.
- Paragraph: Includes any type of paragraph formatting, such as paragraph, tab, border, and bullets and numbering formats. These styles will be applied to entire paragraphs.
- Linked: Uses a combination of character and paragraph formatting properties. These styles will be applied to entire paragraphs as well.
- Table: Provides a consistent style for all borders, shading, alignment and fonts in tables.
- List: Applies similar alignment, numbering or bullet characters and fonts to lists.
You can also base a style on another style. The new style will inherit the formatting of the original style, as well as any changes made to the original style later.
- Format the selected text the way you’d like it to appear in your style.
- Click the New Style button, in the Styles pane.
- Give the new style a name.
- Make any additional adjustments to the style formatting.
- Click OK.
The differences between the selected text that was formatted and the style that it’s based on will be captured. The style that it’s based on will also be listed here.
Basic formatting commands are found right in this dialog box. To customize more advanced formatting, click the Format button and select a category from the menu.
The new style is created and can be applied to other text in the document.
Modify a Style
One of the benefits of using styles is that when you make a change to one, everything that’s using the style is automatically updated.
- Change the formatting of some text using a style.
- Click that Style’s list arrow in the Styles pane.
- Select Update [style name] to Match Selection.
To delete a style, select Delete or Revert to [style name]. If there is no option to delete the style, reverting it back to the style it was based on effectively deletes the style.
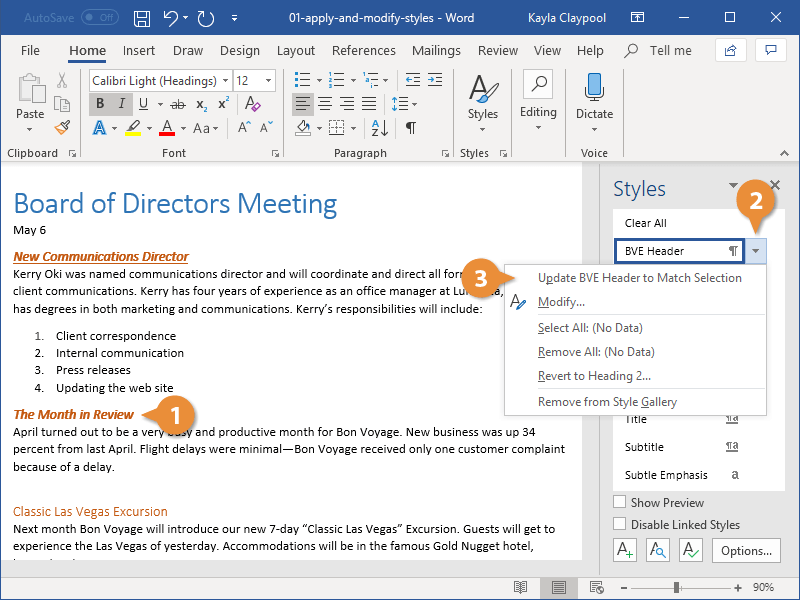
The style is updated, and the changes you made are applied to all text that uses the style.
Only Show Styles in Use
There are a lot of built-in styles that don’t get used and get in the way of the styles you’re working with. You can change the Styles pane settings to show only the styles used in a document.
- Click Options in the Styles pane.
- Click the Select styles to show list arrow.
- Select In use.
- Click OK.
The Style Pane Options dialog box opens.
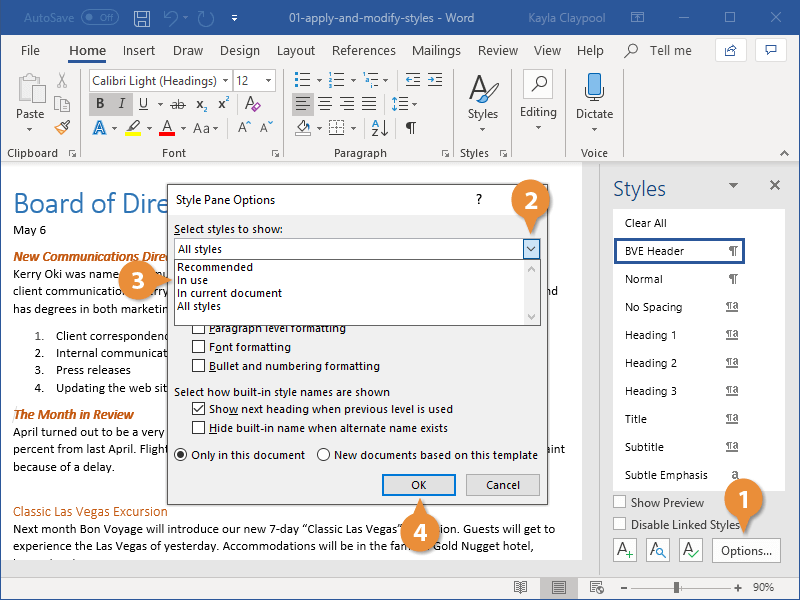
Now only the styles used in the document are shown in the Styles pane.

FREE Quick Reference
Click to Download
Free to distribute with our compliments; we hope you will consider our paid training.