
Содержание
- Find out which data sources are used in a workbook data model
- Need more help?
- Manage data source settings and permissions (Power Query)
- What linked data types are available in Excel?
- List of linked data types in Excel
- What Is A Data Source In Excel?
- Where is data source in Excel?
- How do you use data sources in Excel?
- What is my data source?
- How do I find the data source of a chart in Excel?
- How do I change the data source in Excel?
- How do you add a data source?
- What are examples of data sources?
- What are the different types of data sources?
- Where do you source data?
- What is the source data for chart?
- How can you locate the data source for a specific chart?
- How do you automatically change the source data in a chart?
- How do I fix data source error in Excel?
- What is data source folder in Windows 10?
- How do I enable data connections in Excel?
- What is the need to create data source?
- What is data source document?
- What is used to create a new data source?
- What do you mean by data sourcing?
- What are the 5 types of data?
Find out which data sources are used in a workbook data model
If you’re working with data that’s been added to an Excel data model, then sometimes, you may lose track of which tables and data sources were added to the data model.
Note: Make sure you have enabled the Power Pivot add-in. For more information, see Start the Power Pivot add-in for Excel.
Here are a few easy steps you can follow to determine exactly what data exists in the model:
In Excel, click Power Pivot > Manage to open the Power Pivot window.
View the tabs in the Power Pivot window.
Each tab contains a table in your model. Columns in each table appear as fields in a PivotTable Field List. Any column that is grayed-out has been hidden from client applications.
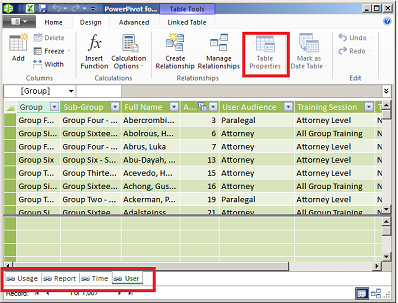
To view the origin of the table, click Table Properties.
If Table Properties is grayed out and the tab contains a link icon indicating a linked table, the data originates from a sheet in the workbook rather than an external data source.
For all other types of data, the Edit Table Properties dialog shows the connection name and query used to retrieve the data. Make a note of the connection name, and then use Connection Manager in Excel to determine the network resource and database used in the connection:
In Excel, click Data > Connections.
Select the connection used to populate the table in your model.
Click Properties > Definition to view the connection string.
Note: Data models were introduced in Excel 2013. You use them to create PivotTables, PivotCharts, and Power View reports that visualize data from multiple tables. Learn more about data models in Create a Data Model in Excel.
Need more help?
You can always ask an expert in the Excel Tech Community or get support in the Answers community.
Источник
Manage data source settings and permissions (Power Query)
When you need to view or manage an external data source, it pays to know the right dialog box for your needs:
Use the Recent Sources dialog box to display frequently used data sources that you have already imported and as a convenient list for making changes to the connection information of each data source.
Use the the Edit Permissions dialog box to locate or update data source credentials or to set privacy levels. For more information, see Set privacy levels.
Use the Query Options dialog box to set additional security options on native database queries, certificates, and authentication services. Boost the safety level of your data even further.
Be careful sharing a workbook with other people who might want to refresh the data or make changes to it. Depending on how the data source credentials are set up, they may need to request access to the data source to avoid refresh errors. Furthermore, depending on the privacy setting, they may not be able to view sensitive data, such as salaries or project release dates. This is particularly important when collaborating with a workbook and making changes to it. When an occasional data conflict occurs, usually the first person to make the change wins. But if the data is refreshed later, those changes may be lost. For more information, see Share external data by using an ODC file.
Excel maintains a list of recently used data sources as a convenience for you to locate and manage them when that’s required.
Do one of the following:
In Excel Select Data > Recent Sources.
In Power Query Editor Select Home > Recent Sources.
The Recent Sources dialog appears.
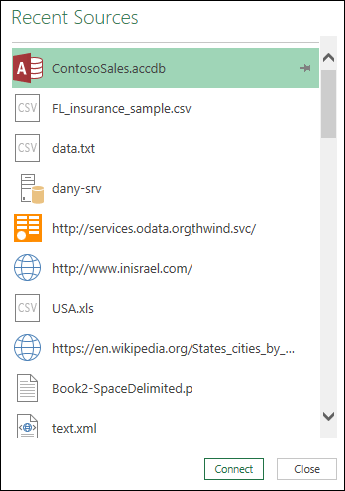
Select a data source from the list, and then select Connect.
The Navigator dialog box appears. Each data source has a different set of options.
Tip Right click a data source in the list to perform additional commands, such as Copy the path or manage pin entries.
To display the Data Source Settings dialog box, do one of the following:
In Power Query Select File > Home > Data Source Settings.
In Excel Select Data > Get Data > Data Source Settings.
Select one of the following:
Data sources in current workbook This is the default option and it also displays the Change source button at the bottom.
Global permissions To change permissions for all your workbooks.
If there are many data sources, enter a search phrase in the Search data source settings box or select the Sort  button on the right to sort by the name or kind of data source.
To change a data source, select it, select Data Source, and then make changes in the dialog box for that data source. This is the same dialog box you see when you first imported the data. Each kind of data source has a different dialog box.
Tip For a database with a Native Database Query (such as SQL), you can only view the SQL statement from this dialog box. For more information on how to edit the SQL statement, see Import data from a database using Native Database Query (Power Query).
Using the Clear Permissions/ Clear All Permissions button, you can clear permissions for the selected data source or for all data sources. Be careful using this command. Once the permissions are cleared, you can’t get them back.
To display the Edit Permissions dialog box, select a data source from the list, and then select Edit Permissions.
Under Credentials, notice that the permission type of the data source is identified, such as Anonymous.
To remove the permission, select Delete. The permission type now says Not Specified.
To add or change a permission, select Edit.
In the dialog box left pane (colored green), select the credential type you want:
Note The password is not encrypted when sent. Some data sources do not support specific credential types.
Anonymous Anyone can use the data source and no credentials are required.
Windows Enter your Windows username and password.
Basic Enter a username and password.
Web API Enter a key required to access the Web source which sometimes requires pre-registration.
Organizational account Sign in to your work or school account.
To display the Query Options dialog box, do one of the following:
In the Power Query Editor select File > Options and Settings > Query Options.
In Excel Select Data > Get Data > Query Options.
Select Security under GLOBAL in the left pane.
Do one or more of the following in the right pane:
Under Native Database Queries Select or clear Require user approval for new native database queries.
Under Certificate Revocation Check Select or clear Enable certificate revocation check.
Connections to an HTTPS data source may be insecure if the certificate for the connection was compromised, The revocation check ensures that certificates known to be compromised can’t be used. This check may fail for self-signed certificates or certificates used for proxying connections. If those certificates cannot be given a proper CRL Distribution point, then this check should be disabled. Otherwise, this check should be enabled.
Under Web Preview Warning Level, select:
None Never display a warning before showing a web preview.
Moderate Display a warning before showing a web preview if the URL hasn’t been entered explicitly or approved as trusted during the session.
Strict Always display a warning before showing a web preview.
Under Approved ADFS Authentication Services, note the following:
When you login, you are sometimes prompted to approve an unknown authentication services. A list of approved unknown authentication services is displayed. If you delete an entry from this list, you remove the approval and will be prompted again on login.
If there is no approved list, you see the message: “You have not approved any authentication services on this computer.”
For Excel Services, use the Excel Services Authentication Settings dialog box:
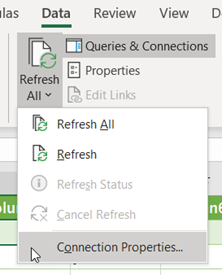
Select Data > Queries & Connections.
Select the Queries tab to display the queries in the workbook.
Right click the query you want, and then select Properties.
In the Query Properties dialog box, select the Definition tab.
Источник
What linked data types are available in Excel?
After June 11, 2023, data types by Wolfram will no longer be supported and can’t be refreshed. However, Bing, Power Query, and Organization data types will still be supported.
Linked data types connect to reputable sources of data, such as Bing, Wolfram, Power BI and more, so you can access information about a variety of subjects without ever leaving Excel. There are lots of linked data types available with more to come, and this page will be updated with what’s currently available.
Note: Linked data types are only available to Worldwide Multi-Tenant clients (Microsoft 365 accounts,) but data types from different sources may have different requirements. To check the source, select the data type icon in the cell of a converted data type > in the card, scroll to the bottom for the source name. For detailed requirements, see How to access data types in the FAQ.
List of linked data types in Excel
Data types are organized into topic groups so it’s easier to find the right button in the ribbon to convert with. To open the data types gallery, go to the Data tab in Excel > Data Types group > expand the dropdown.
Note: Most data types require a Microsoft 365 subscription to use, but data types from different sources may have different requirements to use them. To check the requirements, see How to access data types in the FAQ. To check the source, select the data type icon in the cell of a converted data type to open the card, then scroll to the bottom for the source name.
Источник
What Is A Data Source In Excel?
Data sources contain the data that you want to retrieve and use for analysis.To use Excel files as a data source, you must ensure that the worksheet data is in list format. This means that the data must be set up in a database format consisting of one or more named columns.
Where is data source in Excel?
Locate the Source Data
Select any cell in the pivot table. On the Ribbon, under the PivotTable Tools tab, click the Analyze tab (in Excel 2010, click the Options tab). In the Data group, click the top section of the Change Data Source command.
How do you use data sources in Excel?
You can also import data into Excel as either a Table or a PivotTable report.
- Select Data > Get Data > From Database > From SQL Server Analysis Services Database (Import).
- Enter the Server name, and then select OK.
- In the Navigator pane select the database, and then select the cube or tables you want to connect.
What is my data source?
A data source is the location where data that is being used originates from. A data source may be the initial location where data is born or where physical information is first digitized, however even the most refined data may serve as a source, as long as another process accesses and utilizes it.
How do I find the data source of a chart in Excel?
Right-click the chart, and then choose Select Data. The Select Data Source dialog box appears on the worksheet that contains the source data for the chart.
How do I change the data source in Excel?
You can change the data source of a PivotTable to a different Excel table or a cell range, or change to a different external data source. Click the PivotTable report. On the Analyze tab, in the Data group, click Change Data Source, and then click Change Data Source.
How do you add a data source?
To create a dataset as a data source, run the Data Source Configuration Wizard by selecting Project > Add New Data Source. Choose the Database data-source type, and follow the prompts to specify either a new or existing database connection, or a database file.
What are examples of data sources?
The most common examples of these are:
- Databases.
- Flat files.
- Web services.
- Other sources such as RSS feeds.
What are the different types of data sources?
There are three types of data sources:
- relational.
- multidimensional (OLAP)
- dimensionally modeled relational.
Where do you source data?
Here are 15 free data sources covering government, health, economics, entertainment, science and social media around the world:
- 1) Google Scholar.
- 2) U.S. Census Bureau.
- 3) European Union Open Data Portal.
- 4) Data.gov.
- 5) Google Public Data Explorer.
- 6) Social Mention.
- 7) Pew Research Center’s Internet Project.
What is the source data for chart?
To create a chart:
Select the cells you want to chart, including the column titles and row labels. These cells will be the source data for the chart.
How can you locate the data source for a specific chart?
Using the Chart Shortcut Menu
The easiest way to adjust the source data of a chart is to right mouse click and select “Source Data” and click on the series tab. You can select either the chart area or the plot area to display this shortcut menu.
How do you automatically change the source data in a chart?
As long as worksheet calculation is set to Automatic, Excel will automatically update the chart when values in the source data change. You can verify that Calculation is set to automatic on the Formulas tab of the ribbon. Just click Calculation Options and confirm that Automatic is checked.
How do I fix data source error in Excel?
Please click the file->Options and Settings->Data Source Settings, you will get the following data source settings navigator. Then select change source(highlighted in red line), please check the path and open file as right format.
What is data source folder in Windows 10?
By default, there are a number of folders under the Documents folder, one of which is the My Data Sources folder, If you look at the Address Bar at the top of the screen, you will see >Documents>My Data Sources. If you click on Documents, it will take you back to the Documents folder.
How do I enable data connections in Excel?
Well-known Member
- Activate Microsoft Excel, click on File on the top left.
- Choose Options, Trust Center, Trust Center Settings.
- On the left choose External Content, then “Enable all Data Connections (not recommended)”
- Select OK, then exit and reopen your spreadsheet.
What is the need to create data source?
Before you create a data source, you must be aware of the database connection parameters for the data source you want to connect to. If you are unaware of the database connection parameters, contact your system administrator. The steps involved in creating a data source are: Adding the Driver to the Classpath.
What is data source document?
The data source is a document, spreadsheet or database that contains personalized information such as names, addresses, and phone numbers. The Main Document can be a Form Letter, Labels, Email, or Directory.
What is used to create a new data source?
Answer: DataSource is a name given to the connection set up to a database from a server. The name is commonly used when creating a query to the database. The data source name (DSN) need not be the same as the filename for the database.
What do you mean by data sourcing?
Data sourcing is the process by which companies extract and integrate data from multiple internal and external sources. This procedure creates the firm’s data infrastructure that is used for handling daily workflows and achieving various business objectives.
What are the 5 types of data?
Common data types include:
Источник
If data is always on a journey, then Excel is like Grand Central Station. Imagine that data is a train filled with passengers that regularly enters Excel, makes changes, and then leaves. There are dozens of ways to enter Excel, which imports data of all types and the list keeps growing. Once data is in Excel, it’s ready to change shape just the way you want using Power Query. Data, like all of us, also requires «care and feeding» to keep things running smoothly. That’s where connection, query, and data properties come in. Finally, data leaves the Excel train station in many ways: imported by other data sources, shared as reports, charts, and PivotTables, and exported to Power BI and Power Apps.

Here are the main things you can do while data is in the Excel train station:
-
Import You can import data from many different external data sources. These data sources can be on your machine, in the cloud, or half-way around the world. For more information, see Import data from external data sources.
-
Power Query You can use Power Query (previously called Get & Transform) to create queries to shape, transform, and combine data in a variety of ways. You can export your work as a Power Query Template to define a data flow operation in Power Apps. You can even create a data type to supplement linked data types. For more information, see Power Query for Excel Help.
-
Security Data privacy, credentials, and authentication are always an ongoing concern. For more information, see Manage data source settings and permissions and Set privacy levels.
-
Refresh Imported data usually requires a refresh operation to bring in changes, such as additions, updates, and deletes, to Excel. For more information, see Refresh an external data connection in Excel.
-
Connections/Properties Each external data source has assorted connection and property information associated with it that sometimes requires changes depending on your circumstances. For more information, see Manage external data ranges and their properties, Create, edit, and manage connections to external data, and Connection properties.
-
Legacy Traditional methods, such as Legacy Import Wizards and MSQuery, are still available for use. For more information, see Data import and analysis options and Use Microsoft Query to retrieve external data.
The following sections provide more details of what’s going on behind the scenes at this busy, Excel train station.
There are connection, query, and external data range properties. Connection and query properties both contain traditional connection information. In a dialog box title, Connection Properties means there is no query associated with it, but Query Properties means there is. External data range properties control the layout and format of data. All data sources have an External Data Properties dialog box, but data sources that have associated credential and refresh information use the larger External Range Data Properties dialog box.
The following information summarizes the most important dialog boxes, panes, command paths, and corresponding help topics.
|
Dialog Box or Pane |
Tabs and tunnels |
Main Help topic |
|---|---|---|
|
Recent sources Data > Recent Sources |
(No tabs) Tunnels to Connect > Navigator dialog box |
Manage data source settings and permissions |
|
Connection Properties Data > Queries & Connections > Connections tab > (right click a connection) > Properties |
Usage tab |
Connection properties |
|
Query Properties
Data > Existing Connections > (right click a connection) > Edit Connection Properties |
Usage tab |
Connection properties |
|
Queries & Connections Data > Queries & Connections |
Queries tab |
Connection properties |
|
Existing Connections Data > Existing Connections |
Connections tab |
Connect to external data |
|
External data properties |
Used in tab (from Connection Properties dialog box) Refresh button on the right tunnels to Query Properties |
Manage external data ranges and their properties |
|
Connection Properties > Definition tab > Export Connection File |
(No tabs) Tunnels to |
Create, edit, and manage connections to external data |
Data in an Excel workbook can come from two different locations. The data may be stored directly in the workbook, or it may be stored in an external data source, such as a text file, a database, or an Online Analytical Processing (OLAP) cube. This external data source is connected to the workbook through a data connection, which is a set of information that describes how to locate, log in to, and access the external data source.
The main benefit of connecting to external data is that you can periodically analyze this data without repeatedly copying the data to your workbook, which is an operation that can be time consuming and prone to error. After connecting to external data, you can also automatically refresh (or update) your Excel workbooks from the original data source whenever the data source is updated with new information.
Connection information is stored in the workbook and can also be stored in a connection file, such as an Office Data Connection (ODC) file (.odc) or a Data Source Name file (.dsn).
To bring external data into Excel, you need access to the data. If the external data source that you want to access is not on your local computer, you may need to contact the administrator of the database for a password, user permissions, or other connection information. If the data source is a database, make sure that the database is not opened in exclusive mode. If the data source is a text file or a spreadsheet, make sure that another user does not have it open for exclusive access.
Many data sources also require an ODBC driver or OLE DB provider to coordinate the flow of data between Excel, the connection file, and the data source.
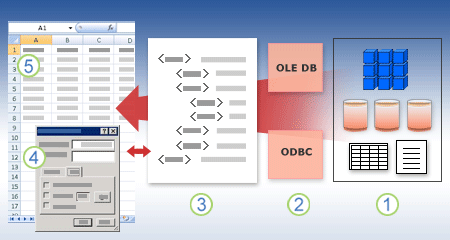
The following diagram summarizes the key points about data connections.
1. There are a variety of data sources that you can connect to: Analysis Services, SQL Server, Microsoft Access, other OLAP and relational databases, spreadsheets, and text files.
2. Many data sources have an associated ODBC driver or OLE DB provider.
3. A connection file defines all the information that is needed to access and retrieve data from a data source.
4. Connection information is copied from a connection file into a workbook, and the connection information can easily be edited.
5. The data is copied into a workbook so that you can use it just as you use data stored directly in the workbook.
To find connection files, use the Existing Connections dialog box. (Select Data > Existing Connections.) Using this dialog box, you can see the following types of connections:
-
Connections in the workbook
This list displays all the current connections in the workbook. The list is created from connections that you already defined, that you created by using the Select Data Source dialog box of the Data Connection Wizard, or from connections that you previously selected as a connection from this dialog box.
-
Connection files on your computer
This list is created from the My Data Sources folder that is usually stored in the Documents folder.
-
Connection files on the network
This list can be created from a set of folders on your local network, the location of which can be deployed across the network as part of the deployment of Microsoft Office group policies, or a SharePoint library.
You can also use Excel as a connection file editor to create and edit connections to external data sources that are stored in a workbook or in a connection file. If you don’t find the connection that you want, you can create a connection by clicking Browse for More to display the Select Data Source dialog box, and then clicking New Source to start the Data Connection Wizard.
After you create the connection, you can use the Connection Properties dialog box (Select Data > Queries & Connections > Connections tab > (right click a connection) > Properties) to control various settings for connections to external data sources, and to use, reuse, or switch connection files.
Note Sometimes, the Connection Properties dialog box is named the Query Properties dialog box when there is a query created in Power Query (formerly called Get & Transform) associated with it.
If you use a connection file to connect to a data source, Excel copies the connection information from the connection file into the Excel workbook. When you make changes by using the Connection Properties dialog box, you are editing the data connection information that is stored in the current Excel workbook and not the original data connection file that may have been used to create the connection (indicated by the file name that is displayed in the Connection File property on the Definition tab). After you edit the connection information (with the exception of the Connection Name and Connection Description properties), the link to the connection file is removed and the Connection File property is cleared.
To ensure that the connection file is always used when a data source is refreshed, click Always attempt to use this file to refresh this data on the Definition tab. Selecting this check box ensures that updates to the connection file will always be used by all workbooks that use that connection file, which must also have this property set.
By using the Connections dialog box, you can easily manage these connections, including creating, editing, and deleting them (Select Data > Queries & Connections > Connections tab > (right click a connection) > Properties.) You can use this dialog box to do the following:
-
Create, edit, refresh, and delete connections that are in use in the workbook.
-
Verify the source of external data. You may want to do this in case the connection was defined by another user.
-
Show where each connection is used in the current workbook.
-
Diagnose an error message about connections to external data.
-
Redirect a connection to a different server or data source, or replace the connection file for an existing connection.
-
Make it easy to create and share connection files with users.
Connection files are particularly useful for sharing connections on a consistent basis, making connections more discoverable, helping to improve security of connections, and facilitating data source administration. The best way to share connection files is to put them in a secure and trusted location, such as a network folder or SharePoint library, where users can read the file but only designated users can modify the file. For more information, see Share data with ODC.
Using ODC files
You can create Office Data Connection (ODC) files (.odc) by connecting to external data through the Select Data Source dialog box or by using the Data Connection Wizard to connect to new data sources. An ODC file uses custom HTML and XML tags to store the connection information. You can easily view or edit the contents of the file in Excel.
You can share connection files with other people to give them the same access that you have to an external data source. Other users don’t need to set up a data source to open the connection file, but they may need to install the ODBC driver or OLE DB provider required to access the external data on their computer.
ODC files are the recommended method for connecting to data and sharing data. You can easily convert other traditional connection files (DSN, UDL, and query files) to an ODC file by opening the connection file and then clicking the Export Connection File button on the Definition tab of the Connection Properties dialog box.
Using query files
Query files are text files that contain data source information, including the name of the server where the data is located and the connection information that you provide when you create a data source. Query files are a traditional way for sharing queries with other Excel users.
Using .dqy query files You can use Microsoft Query to save .dqy files that contain queries for data from relational databases or text files. When you open these files in Microsoft Query, you can view the data returned by the query and modify the query to retrieve different results. You can save a .dqy file for any query that you create, either by using the Query Wizard or directly in Microsoft Query.
Using .oqy query files You can save .oqy files to connect to data in an OLAP database, either on a server or in an offline cube file (.cub). When you use the Multi-Dimensional Connection Wizard in Microsoft Query to create a data source for an OLAP database or cube, an .oqy file is created automatically. Because OLAP databases aren’t organized in records or tables, you can’t create queries or .dqy files to access these databases.
Using .rqy query files Excel can open query files in .rqy format to support OLE DB data source drivers that use this format. For more information, see the documentation for your driver.
Using .qry query files Microsoft Query can open and save query files in .qry format for use with earlier versions of Microsoft Query that cannot open .dqy files. If you have a query file in .qry format that you want to use in Excel, open the file in Microsoft Query, and then save it as a .dqy file. For information about saving .dqy files, see Microsoft Query Help.
Using .iqy Web query files Excel can open .iqy Web query files to retrieve data from the Web. For more information, see Export to Excel from SharePoint.
An external data range (also called a query table) is a defined name or table name that defines the location of the data brought into a worksheet. When you connect to external data, Excel automatically creates an external data range. The only exception to this is a PivotTable report connected to a data source, which does not create an external data range. In Excel, you can format and lay out an external data range or use it in calculations, as with any other data.
Excel automatically names an external data range as follows:
-
External data ranges from Office Data Connection (ODC) files are given the same name as the file name.
-
External data ranges from databases are named with the name of the query. By default Query_from_source is the name of the data source that you used to create the query.
-
External data ranges from text files are named with the text file name.
-
External data ranges from Web queries are named with the name of the Web page from which the data was retrieved.
If your worksheet has more than one external data range from the same source, the ranges are numbered. For example, MyText, MyText_1, MyText_2, and so on.
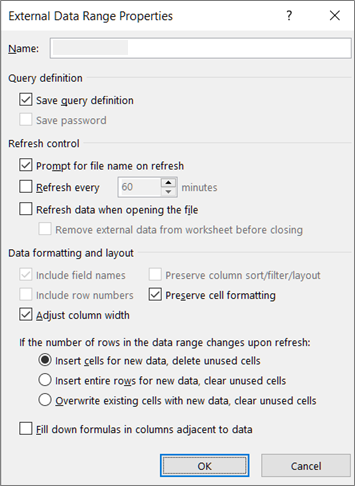
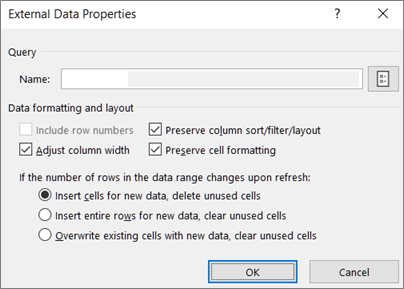
An external data range has additional properties (not to be confused with connection properties) that you can use to control the data, such as the preservation of cell formatting and column width. You can change these external data range properties by clicking Properties in the Connections group on the Data tab, and then making your changes in the External Data Range Properties or External Data Properties dialog boxes.
|
|
|
There are several data objects (such as an external data range and PivotTable report) that you can use to connect to different data sources. However, the type of data source that you can connect to is different between each data object.
You can use and refresh connected data in Excel Services. As with any external data source, you may need to authenticate your access. For more information, see Refresh an external data connection in Excel. For more information about credentials, see Excel Services Authentication Settings.
The following table summarizes which data sources are supported for each data object in Excel.
|
Excel |
Creates |
OLE |
ODBC |
Text |
HTML |
XML |
SharePoint |
|
|
Import Text Wizard |
Yes |
No |
No |
Yes |
No |
No |
No |
|
|
PivotTable report |
No |
Yes |
Yes |
Yes |
No |
No |
Yes |
|
|
PivotTable report |
No |
Yes |
No |
No |
No |
No |
No |
|
|
Excel Table |
Yes |
Yes |
Yes |
No |
No |
Yes |
Yes |
|
|
XML Map |
Yes |
No |
No |
No |
No |
Yes |
No |
|
|
Web Query |
Yes |
No |
No |
No |
Yes |
Yes |
No |
|
|
Data Connection Wizard |
Yes |
Yes |
Yes |
Yes |
Yes |
Yes |
Yes |
|
|
Microsoft Query |
Yes |
No |
Yes |
Yes |
No |
No |
No |
|
Note: These files, a text file imported by using the Import Text Wizard, an XML file imported by using an XML Map, and an HTML or XML file imported by using a Web Query, do not use an ODBC driver or OLE DB provider to make the connection to the data source.
Excel Services workaround for Excel tables and named ranges
If you want to display an Excel workbook in Excel Services, you can connect to and refresh data, but you must use a PivotTable report. Excel Services does not support external data ranges, which means that Excel Services does not support an Excel Table connected to a data source, a Web query, an XML map, or Microsoft Query.
However, you can work around this limitation by using a PivotTable to connect to the data source, and then design and layout the PivotTable as a two-dimensional table without levels, groups, or subtotals so that all desired row and column values are displayed.
Let’s take a trip down database memory lane.
About MDAC, OLE DB, and OBC
First of all, apologies for all the acronyms. Microsoft Data Access Components (MDAC) 2.8 is included with Microsoft Windows . With MDAC, you can connect to and use data from a wide variety of relational and nonrelational data sources. You can connect to many different data sources by using Open Database Connectivity (ODBC) drivers or OLE DB providers, which are either built and shipped by Microsoft or developed by various third parties. When you install Microsoft Office, additional ODBC drivers and OLE DB providers are added to your computer.
To see a complete list of OLE DB providers installed on your computer, display the Data Link Properties dialog box from a Data Link file, and then click the Provider tab.
To see a complete list of ODBC providers installed on your computer, display the ODBC Database Administrator dialog box, and then click the Drivers tab.
You can also use ODBC drivers and OLE DB providers from other manufacturers to get information from sources other than Microsoft data sources, including other types of ODBC and OLE DB databases. For information about installing these ODBC drivers or OLE DB providers, check the documentation for the database, or contact your database vendor.
Using ODBC to connect to data sources
In the ODBC architecture, an application (such as Excel) connects to the ODBC Driver Manager, which in turn uses a specific ODBC driver (such as the Microsoft SQL ODBC driver) to connect to a data source (such as a Microsoft SQL Server database).
To connect to ODBC data sources, do the following:
-
Ensure that the appropriate ODBC driver is installed on the computer that contains the data source.
-
Define a data source name (DSN) by using either the ODBC Data Source Administrator to store the connection information in the registry or a DSN file, or a connect string in Microsoft Visual Basic code to pass the connection information directly to the ODBC Driver Manager.
To define a data source, in Windows click the Start button and then click Control Panel. Click System and Maintenance, and then click Administrative Tools. Click Performance and Maintenance, click Administrative Tools. and then click Data Sources (ODBC). For more information about the different options, click the Help button in each dialog box.
Machine data sources
Machine data sources store connection information in the registry, on a specific computer, with a user-defined name. You can use machine data sources only on the computer they are defined on. There are two types of machine data sources — user and system. User data sources can be used only by the current user and are visible only to that user. System data sources can be used by all users on a computer and are visible to all users on the computer.
A machine data source is especially useful when you want to provide added security, because it helps ensure that only users who are logged on can view a machine data source, and a machine data source cannot be copied by a remote user to another computer.
File data sources
File data sources (also called DSN files) store connection information in a text file, not the registry, and are generally more flexible to use than machine data sources. For example, you can copy a file data source to any computer with the correct ODBC driver, so that your application can rely on consistent and accurate connection information to all the computers it uses. Or you can place the file data source on a single server, share it between many computers on the network, and easily maintain the connection information in one location.
A file data source can also be unshareable. An unshareable file data source resides on a single computer and points to a machine data source. You can use unshareable file data sources to access existing machine data sources from file data sources.
Using OLE DB to connect to data sources
In the OLE DB architecture, the application that accesses the data is called a data consumer (such as Excel), and the program that allows native access to the data is called a database provider (such as Microsoft OLE DB Provider for SQL Server).
A Universal Data Link file (.udl) contains the connection information that a data consumer uses to access a data source through the OLE DB provider of that data source. You can create the connection information by doing one of the following:
-
In the Data Connection Wizard, use the Data Link Properties dialog box to define a data link for an OLE DB provider.
-
Create a blank text file with a .udl file name extension, and then edit the file, which displays the Data Link Properties dialog box.
See Also
Power Query for Excel Help
Need more help?
Want more options?
Explore subscription benefits, browse training courses, learn how to secure your device, and more.
Communities help you ask and answer questions, give feedback, and hear from experts with rich knowledge.
You all must have heard of Excel Workbook Connections but do know how to manage workbook connection in Excel? Well if you are not having any idea of enabling data connection in Excel workbook.
In that case our, this Excel workbook connections tutorial will help in grabbing every pinch of information reading this. So, that any Excel user can easily perform and manage external data connections in Excel.
What Is Data Connection In Excel?
Data of any Excel workbook can only be bring from different locations. Firstly, either the data is directly stored in your Excel workbook. Or secondly it may be saved in the external data source, like a database, an OLAP (Online Analytical Processing cube) or text file.
Using the data connection in Excel, external data sources are well connected with Excel workbook. Basically this data connection in Excel contains set of information about how to log in, query, locate, and perfectly access the external data source.
After connecting your excel workbook with external data source. One can easily use the refresh option to extract the updated data from their workbook. Using this way, user can get the most updated version of their data including the changes made in the data since it was last refreshed.
Well the Connection information can be stored in a connection file or in the workbook like Universal Data Connection (UDC) file (.udcx) or Office Data Connection (ODC) file (.odc)
These connection files are very useful to share connections on regular basis also to facilitate data source administration.
If you are using the connection file for connecting with the data source. Then in that case Excel will copies down the connection details from the connection file into your Excel workbook.
Different Ways To Perform Excel Workbook Connections
In this Excel workbook connections tutorial we will learn 3 different ways to use Data Connection In Excel 2010/2013/2016/2019:
- Workbook Connections dialog box
- Creating an Office Data Connection (ODC) file (.odc)
- Refresh external data connection
Method 1: Excel Workbook Connections Using Workbook Connections Dialog Box
![]()
Excel Workbook Connections dialog box option helps in easy managing of single or multiple connections with the external data sources of your workbook. Apart from this the Workbook Connections dialog box is helpful to perform the following tasks:
- It helps to edit, refresh, create and delete connections which are used in Excel workbook.
- Show the location of each connection that is already been used in the current Excel workbook.
- Easy diagnosis of error message regarding external data connections.
- With this option, user can either redirect connection to different data or to the different server. Or alternatively user can easily replace the connection file with the existing connection.
- It becomes too easy to make & share connection files.
Steps To Manage Excel Workbook Connection Using Workbook Connections Dialog Box
Here is how to manage connections in your current using Excel workbook i.e by using Workbook Connections dialog box:
Identify a connection
In the top portion of the dialog box, all connections in the workbook are displayed automatically with the following information:
| Column | Comment |
| Name | connection name is, defined within Connection Properties dialog box. |
| Description | A short description about connection, is mentioned in Connection Properties dialog box. |
| Last refreshed | when was the connection was last refreshed such as it’s date and time appears in this section. If it is blank, then it means that the connection has not refreshed yet. |
Add a connection
- Tap to the Add option to get the dialog box of Existing Connections.
Display Connection Information
- For this you need to choose a connection from the opened Existing Connections dialog box.
- Now hit the Properties option and this will open the dialog box of Connection Properties.
Refresh The External Data.
- Hit the arrow option present next to the Refresh option. After then perform anyone of the following:
- If you want to refresh any specific connections only, then make selections of those connections. After then tap to the Refresh option.
- For refreshing all connections of your workbook, just clear off all the connections. After that tap to the Refresh All option.
- If you want to get the status information about refresh operation then choose the connections about which you want to extract information. After then hit on the Refresh Status option.
- For stopping down the current running refresh operation just tap to the Cancel Refresh option.
Remove One Or More Connections
- Choose the connections which you wants to remove from your Excel workbook. After then tap to the Remove option.
Notes:
- Well this option appears disabled to you if your workbook is protected one or if it is an object, like PivotTable report, which uses the protected connection.
- Removing connection will only deletes off the connection. It will not remove any data or any object from your Excel workbook.
Important: By removing connection you are actually breaking the connection with the data source which may leads to cause unintentional consequences, Like different formula results or you may face difficulty in accessing Excel features.
Method 2: Excel Workbook Connections Using Refresh External Data Connection Option
User can connect their Excel workbook with an external data source, like to another Excel workbook, SQL Server database or an OLAP cube.
Well this connection information gets displayed on your workbook as PivotTable report, PivotChart, table.
For keeping the data of your Excel workbook updated you can make use of “Refresh” option to link the data with its source.
So whenever you will refresh your connection, you will only get the most current updated data.
Step To Use Refresh External Data Connection Option
For connections just tap to any cell of your Excel table which uses the connection. After then perform any of the following operation:
- Automatically refresh data when excel workbook is opened
- Automatically refresh data at regular interval
Step To Automatically Refresh Data When Excel Workbook Is Opened
- Tap to the cell present within the external data range.
- Now on the Data tab, go to the Queries & Connections Hit the arrow key present within the Refresh All option, and from this tap to the Connection Properties.

- From the opened dialog box of Connection Properties dialog tap to the Usage tab, within Refresh control. After then choose the check box “Refresh data when opening the file”.
- In order to save your workbook with the complete query definition excluding external data. You need to choose the check box “Remove data from the external data range before saving the workbook”.
Step To Automatically refresh data at regular interval:
- Tap to the cell present within the external data range.
- Now on the Data tab, go to the Queries & Connections Hit the arrow key present within the Refresh All option, and from this tap to the Connection Properties.
- In the opened Connection Properties dialog box. Hit Usage tab option.
- Choose the check box Refresh every. After then set the minute interval that will automatically refresh your data after certain period of time.
Method 3: Excel Workbook Connections By Creating An Office Data Connection (ODC) File

By making use of the Data Connection Wizard or Connection Properties dialog box one can easily use their Excel worksheet to create an Office Data Connection (ODC) file (.odc).
- You can perform any of the following task:
- Make new connection with data source. To catch more information, have a look at following topics :
- Connect to SQL Server Analysis Services Database (Import)
- Import or export text files
- Move data from Excel to Access
- Make new connection with data source. To catch more information, have a look at following topics :
- Or you can just make use of the existing connection. For more information, see Connect to (Import) external data.
- After then save the connection detail into the connection file. For this, just make a tap to the Export Connection File option present on the Definition tab of Connection Properties dialog box. This will open the File Save dialog box, so save your current connection information into the ODC file.
Wrap Up:
Hopefully, all the above mentioned fixes to setup Excel Workbook Connections will help you in easy using of data connection in your respective Excel 2010/2013/2016/2019 application. Apart from this if you you have any other query to ask then, ask it in our comment section.


Priyanka is an entrepreneur & content marketing expert. She writes tech blogs and has expertise in MS Office, Excel, and other tech subjects. Her distinctive art of presenting tech information in the easy-to-understand language is very impressive. When not writing, she loves unplanned travels.
Skip to content
![]()
You receive an Excel workbook with a PivotTable and don’t know what data it is referring to? Or you have added a column or row to your data and want to adapt the Pivot Table? Unfortunately the function for seeing and changing the data source of a Pivot Table is a little bit hidden. Luckily, once you know where to find the button, it’s quite to see and change the source of the Pivot Table simple.
Steps for seeing and changing the data source of a Pivot Table
For seeing or changing the source data of a Pivot Table you have to click on the ‘Change Data Source’ button on the Analyze ribbon. Therefore (and if you haven’t found it yet) follow these steps (the numbers in the list below are corresponding to the picture):
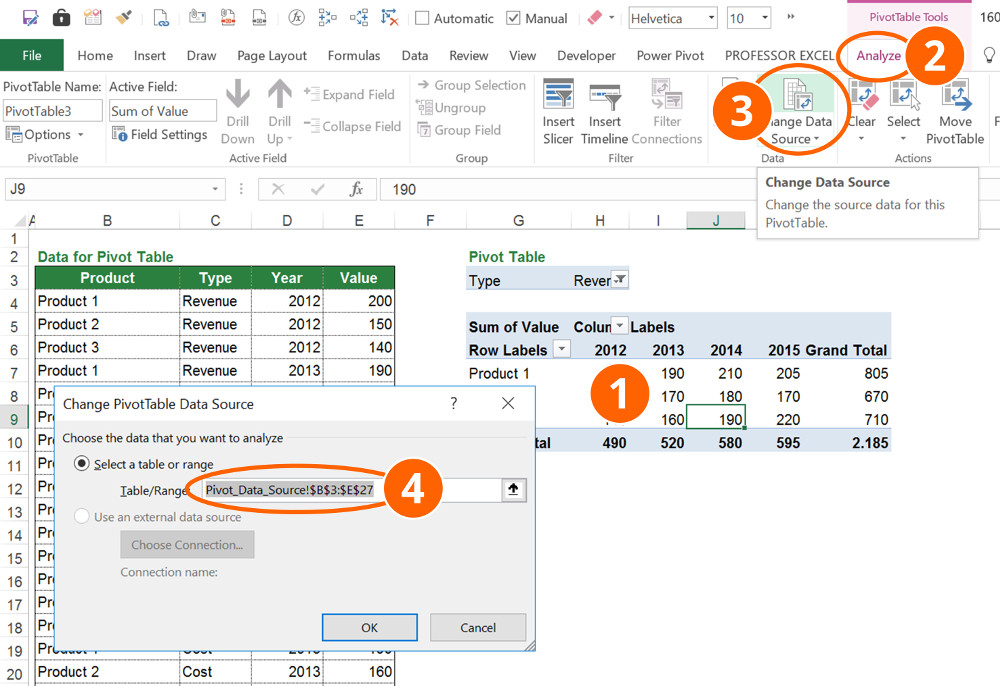
- Click anywhere into your Pivot Table so that the two Pivot Table ribbons ‘Analyze’ and ‘Design’ are shown.
- Go to the Analyze ribbon.
- Click on ‘Change Data Source’ in the middle of the Analyze ribbon.
- Now you can see and change the source of your Pivot Table. You can also see, if the PivotTable is referring to another file.
For large data sets (>500,000 rows) refreshing the data might take some time.
Further reading
If you are interested: We got a lot more articles about PivotTables in Excel. Here is some selection:
- Pivotable: How to Prepare Data for Creating Pivot Tables in Excel. This is a comprehensive step-by-step guide of how to prepare your data – which is as so often not in a pivottable shape – for inserting a PivotTable.
- How to Avoid Changing the Column Width With Each Pivot Table Update: Each time you refresh the data of your PivotTable it changes the column width? Here is how you stop that.
- Pivot Tables: How to Create a Pivot Table in Excel: How to create a PivotTable.
- How to Work With Large Data and PowerPivot: If you got a large amount of data it might be time to try the free add-in PowerPivot.

Henrik Schiffner is a freelance business consultant and software developer. He lives and works in Hamburg, Germany. Besides being an Excel enthusiast he loves photography and sports.
We use cookies on our website to give you the most relevant experience by remembering your preferences and repeat visits. By clicking “Accept”, you consent to the use of ALL the cookies.
.
Excel is a combination of rows and columns, and these rows and columns store our data, which in other terms are named records. As Excel is the most common tool, we reserve the data in Excel, making it a database. Therefore, when we put data in Excel in some form of tables in rows and columns and give the table a name, that is a database in Excel. We can also import data from other sources in Excel, given the data format is proper with the Excel format.
For example, you may create a company’s sales report of different regions on a database in Excel for easy access and complete control over data management while working with the program.
Creating an Excel Database
Having the data in Excel will make life easier for you because Excel is a powerful tool where we can play with the data. If you maintain the data in other sources, you may not correctly get all the formulas, dates, and time format. I hope you have experienced this in your daily work. Having the data in the right database platform is very important. Having the data in Excel has its pros and cons. However, if you are a regular user of Excel, it is much easier to work with Excel. This article will show you how to create a database in Excel.
Table of contents
- Creating an Excel Database
- How to Create a Database in Excel?
- Things to Remember While Creating a Database in Excel
- Recommended Articles
You are free to use this image on your website, templates, etc, Please provide us with an attribution linkArticle Link to be Hyperlinked
For eg:
Source: Database in Excel (wallstreetmojo.com)
How to Create a Database in Excel?
We do not see any of the schools are colleges teaching us to Excel as the software in our academics. Whatever business models, we learn a theory until joining the corporate company.
The biggest problem with this theoretical knowledge is it does not support real-time life examples. But, nothing to worry about; we will guide you through the process of creating a database in Excel.
We need to design the Excel worksheet carefully to have accurate data in the database format.
You can download this Create Database Excel Template here – Create Database Excel Template
Follow the below steps to create a database in Excel.
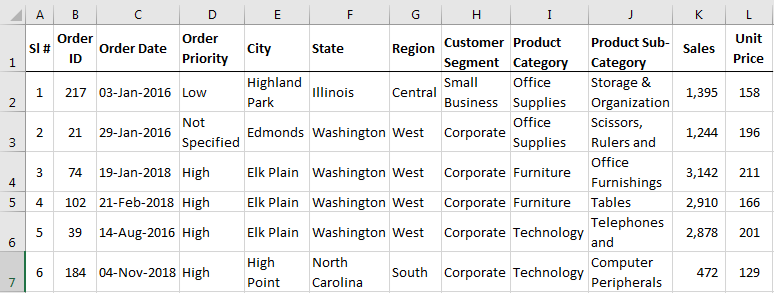
- We must first ensure all the required columns and name each heading properly.

- Once the headers of the data table are clear, we can easily start entering the data just below the respective column headings.

In database terminology, rows are called Records, and columns are called Fields.
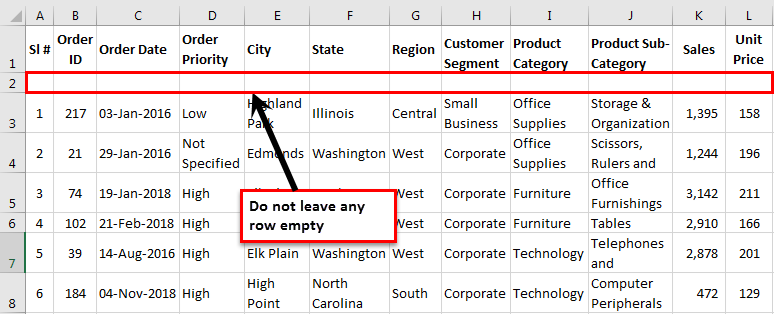
- We cannot leave a single row empty when entering the data. For example, we have entered the headings in the first row, and if we start entering the data from the third row by leaving the 2nd row empty, we are gone.

Not only the first or second row, but we also cannot leave any row empty after entering certain data into the database field.
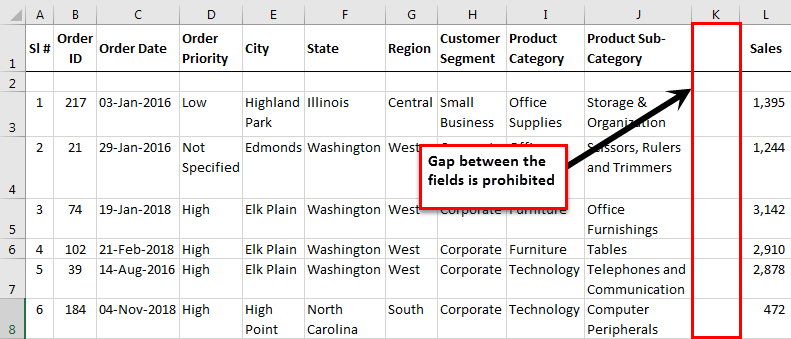
- As we said, each column is called Fields in the database. Similarly, we cannot have an empty field between the data.
We need to enter the fields one after the other. Having a gap of even one column or field is strictly prohibited.

I am so stressed about not having an empty record or field because when the data needs to be exported to other software or the web, as soon as the software sees the blank record or field, it assumes that it is the end of the data. Therefore, it may not consider the full data.
- We must fill in all the data carefully.
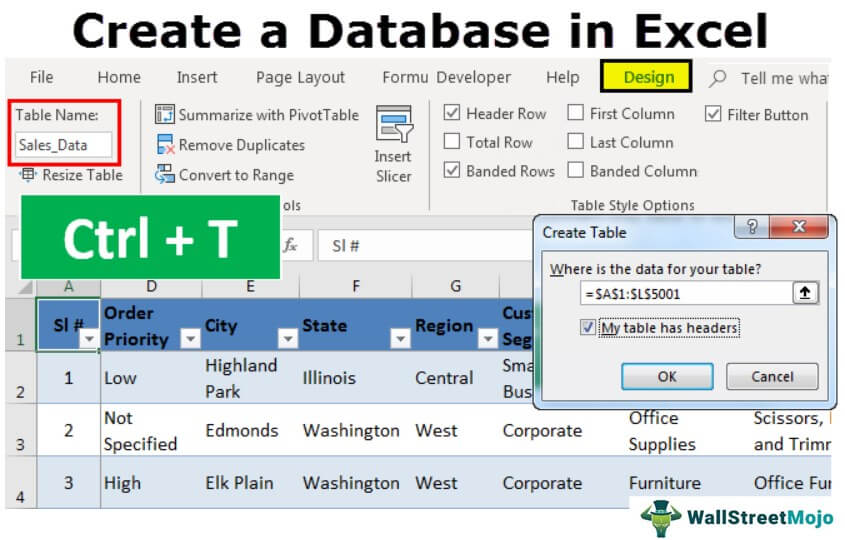
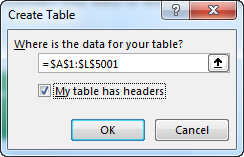
In the above image, I have data all the way from row 1 to row 5001. - The final thing we need to do is convert this data to an excel table. By selecting the data, press Ctrl + T.

- Here, we need to make sure the My table has a header checkbox is ticked and the range is selected properly.

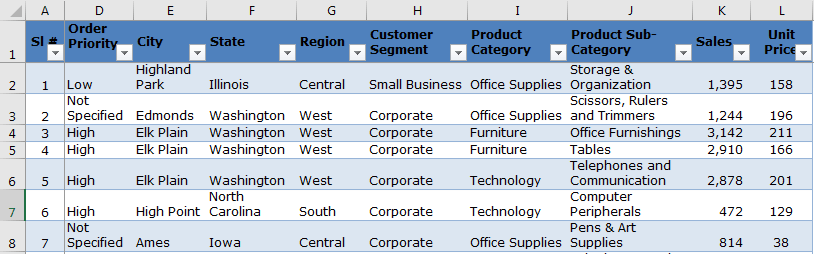
- Then, we must click on OK to complete the table creation. As a result, we may have a table like this now.

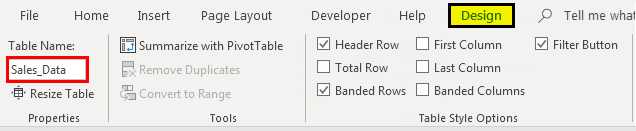
- We must now give a proper name to the table under the table Design tab.

- Since we have created a table, automatically, it would expand whenever we enter the data after the last column.
We have the database ready now. Follow the pros and cons below to have a good hand on your database.


Things to Remember While Creating a Database in Excel
- We can upload the file to MS Access to have a secure database and back up a platform.
- Since we have all the data in Excel, it is very easy for your calculations and statistics.
- Excel is the best tool for database analysis.
- Easy to read and not complicated because of clear fields and records.
- We can filter out the records by using auto filters.
- If possible, sort the data according to date-wise.
- As the data keeps growing, Excel will slow down considerably.
- We cannot share more than 34 MB files with others in an email.
- We can Apply the Pivot tableA Pivot Table is an Excel tool that allows you to extract data in a preferred format (dashboard/reports) from large data sets contained within a worksheet. It can summarize, sort, group, and reorganize data, as well as execute other complex calculations on it.read more and give a detailed analysis of the database.
- We can download the workbook and use it for your practice purpose.
Recommended Articles
This article is a guide to Databases in Excel. Here, we discuss creating a database in Excel with examples and downloadable Excel templates. You may also look at these useful functions in Excel: –
- Excel Database Template
- Match Data using Excel Functions
- Forms for Data Entry in Excel
- Create a Data Table in Excel
- SUMIFS with Dates