
Word for Microsoft 365 Outlook for Microsoft 365 Word 2021 Outlook 2021 Word 2019 Outlook 2019 Word 2016 Outlook 2016 Word 2013 Outlook 2013 Word 2010 Word 2007 More…Less
You can use styles to quickly apply a set of formatting choices consistently throughout your document. If you want formatting choices that are not available from the built-in styles and themes available in Word, you can modify an existing style and customize it to suit your needs. You can change the formatting (such as font size, color, and text indentation) in styles applied to titles, headings, paragraphs, lists, and so on. You can also select formatted text in your document to create a new style in the Styles gallery.
The styles covered in this article are located in the Styles gallery, a visual menu located on the Home tab. To apply a style, simply select the text you want to format, and then click the style you want in the Styles gallery. To learn more, see Apply a style to text in Word.

Modify an existing style
You can modify an existing style in the Styles gallery in two ways:
-
Modify a style by updating it to match formatting in your document
-
Modify a style manually in the Modify Style dialog box
Modify a style by updating it to match formatting in your document
If you have text in your document that already has a style applied, you can change the formatting of that text and apply it to the style in the Styles gallery.
-
Select text in your document that has the style applied, such as Heading 1.
When you select text that has a style applied, that style is highlighted in the Styles gallery.

-
Format the selected text with the new attributes that you want.
For example, you might want to change the point size for the Heading 1 style from 16 points to 14 points.
-
On the Home tab, in the Styles group, right-click the style that you want to change, and then click Update [Style Name] to Match Selection.
Note: All text with the style that you changed will automatically change to match the new style that you defined.
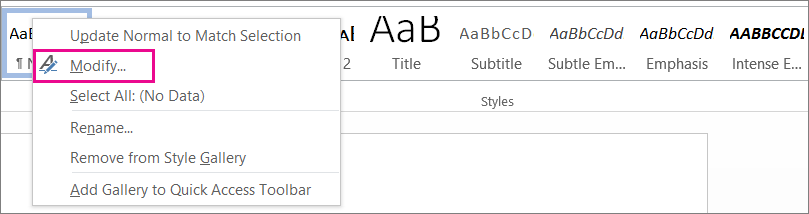
Modify a style manually in the Modify Style dialog box
You can modify a style directly in the Styles gallery, without using the text in your document.
-
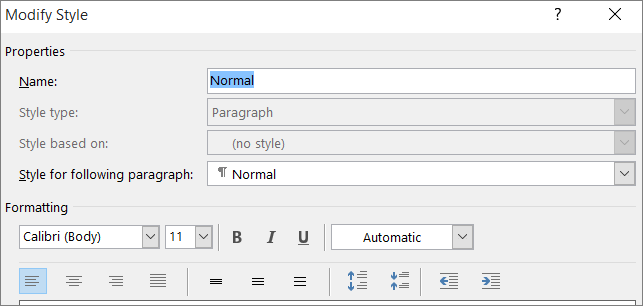
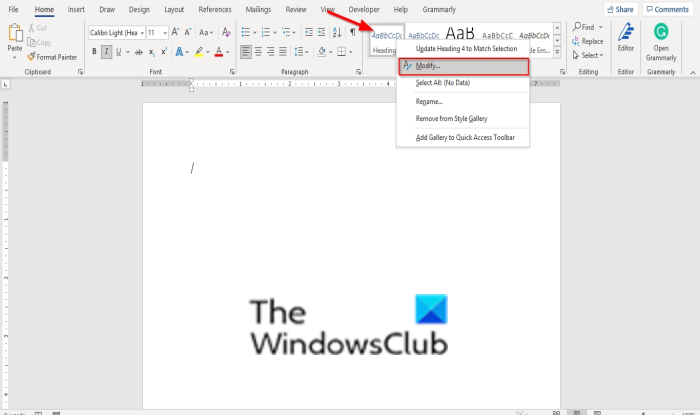
On the Home tab, right-click any style in the Styles gallery and click Modify.
-
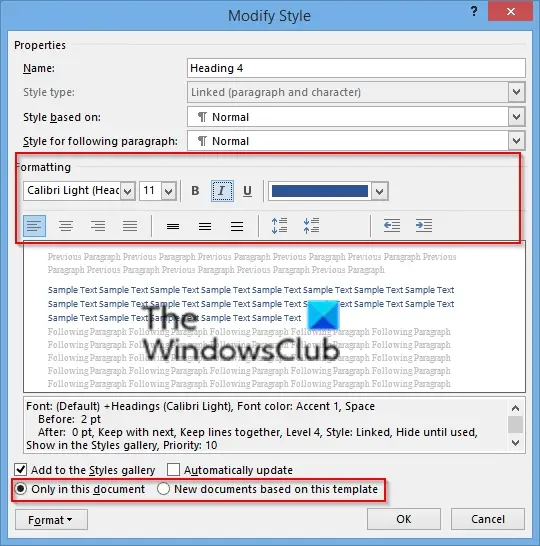
In the Formatting section, make any formatting changes you want, such as font style, size, or color, alignment, line spacing, or indentation.
-
Choose whether the style change applies to the current document or to all future documents.

Create a new style based on document formatting
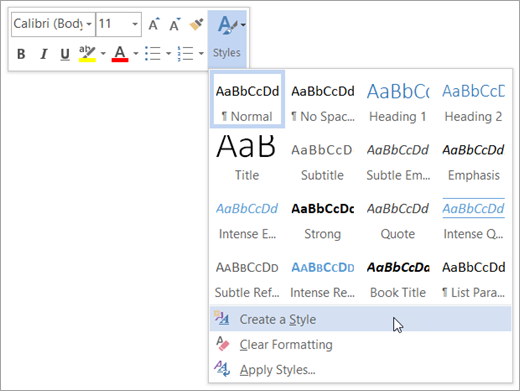
You can select formatted text in your document to create a new style that you add to the Styles gallery.
-
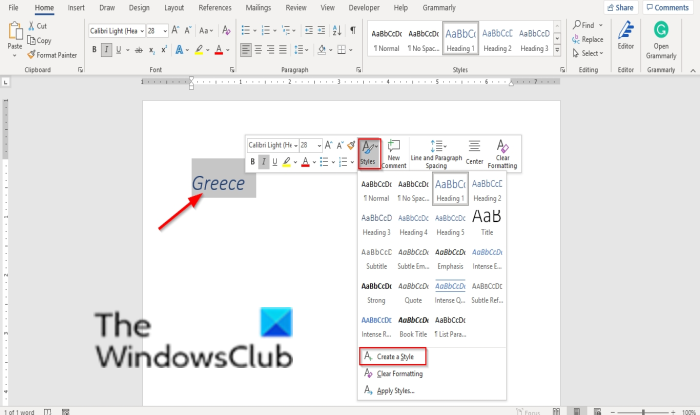
Right-click the text on which you want to base a new style.
-
In the mini toolbar that appears, click Styles, and then click Create a Style.
-
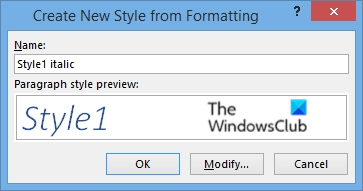
In the Create New Style from Formatting dialog box, give your style a name and click OK.
Your new style will now appear in the Styles gallery.
Note: If you want your new style to appear in all new Word documents, right-click it in the Styles gallery, click Modify, and then select New documents based on this template at the bottom of the dialog box.
-
Right-click the text on which you want to base a new style, point to Styles, and then click Save Selection as a New Quick Style.
-
In the Create New Style from Formatting dialog box, give your style a name and click OK.
Your new style will now appear in the Styles gallery.
Note: If you want your new style to appear in all new Word documents, right-click it in the Styles gallery, click Modify, and then select New documents based on this template at the bottom of the dialog box.
See also
Apply a style to text in Word
Need more help?
Want more options?
Explore subscription benefits, browse training courses, learn how to secure your device, and more.
Communities help you ask and answer questions, give feedback, and hear from experts with rich knowledge.
Download PC Repair Tool to quickly find & fix Windows errors automatically
In Microsoft Word, styles are a combination of predefined font style, color, and size that you can apply to text to change its appearance. If you do not want the built-in styles offered in Word, you can modify an existing built-in or create a new style.
What are the advantages of using styles in Word?
Built-in styles in Microsoft Word help users to format a document with a consistent and professional look quickly. Using custom new styles, you can create a combination of font style, color, and size to change the appearance of a Word document.
Follow the methods below to customize and create a new style in Word.
- Modifying an existing style by updating it to match formatting in your document
- Modifying a style manually in the Modify Style dialog box
- Create a new style
- Remove new style from Style gallery
1] Modifying an existing style by updating it to match formatting your document
Select a text that has a style applied for example Heading 1.
The text selected style is highlighted in the Styles gallery.
Then format the styled text, for instance, changing the size for Heading 1 from 16 to 26.
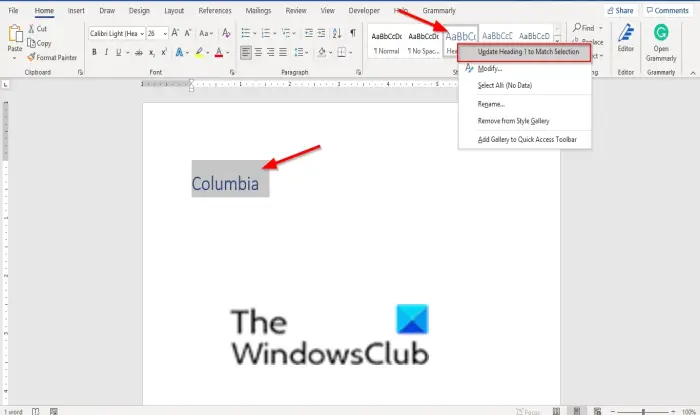
On the Home tab, in the Styles group, right-click the style that you want to change, then click Update (Style Name) to Match Selection.
2] Modifying a style manually in the Modify Style dialog box
You can modify a style in the Styles gallery without using the text in your document.
On the Home tab in the Styles gallery, right-click any style in the Styles gallery and select Modify.
A Modify Style dialog box will open.
In the Formatting section, you can make any formatting changes you want such as font style, size, color, alignment, line spacing, or indentation.
You can choose if the style change applies to the current document or to all future documents.
Then click OK.
3] Create a new style
You can select a formatted text in your document to create a new style to add to your Styles gallery.
Right-click the text that you want to add as a new style to the Styles gallery.
In the mini toolbar that appears, click Styles and then click Create a Style.
A Create new style from Formatting dialog box will open.
Give your style a name and click OK.
The new style will appear in the Styles gallery.
4] Remove new style from Style gallery
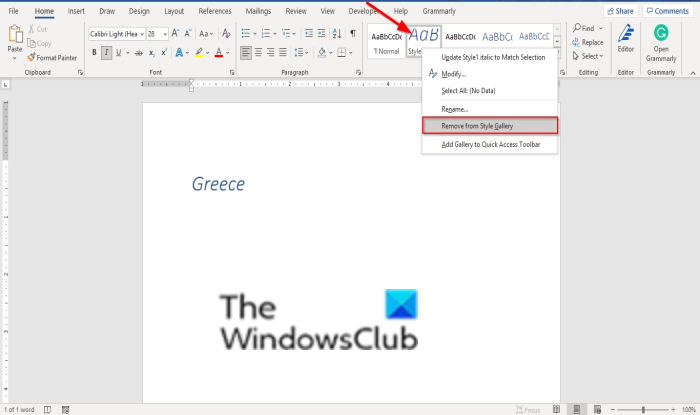
Right-click the style you have just created in the Styles gallery and select Remove from Styles gallery.
We hope this tutorial helps you understand how to customize and create a new style in Word; if you have questions about the tutorial, let us know in the comments.
How do you modify a style?
In order to modify a style in Microsoft Word, you need to choose the style first in the Styles section. Then, right-click on the style and choose the Modify option. Next, you can change or customize things as per your requirements. No matter which style you choose, the process of modifying it is the same.
That’s all! Hope it helped.

Shantel has studied Data Operations, Records Management, and Computer Information Systems. She is quite proficient in using Office software. Her goal is to become a Database Administrator or a System Administrator.
Microsoft Word allows its users to personalize their experience. With our guides below, you can learn where to look for settings and how to change them. Features can be useful to someone but make Word hard to use for another person. When looking around in Word’s settings, you might even find features you never knew existed. If you want to learn about Word’s many options, follow the steps below.

Quick Answer
When you open up Microsoft Word, you can find each one of its settings somewhere in the menu above the ribbon. Click on the File menu, then choose Options to bring up the many options necessary to alter Word’s features.

These allow you to customize the application to work how you want it to. You can also use the View menu from the ribbon to change the way Word looks.

You can often change settings by adding or removing a tick in the box next to a setting. You can find more settings by clicking on buttons that bring up further options in a tab.
After altering settings, click OK to apply the changes. Experts recommend that you restart Word for your customized settings to work.
How to change your ribbon on Windows
There are many ways you can personalize the ribbon in Office products, including Word.
What can you change in the ribbon?
Before you make any changes, it’s important to review what you can alter in the ribbon.
One way to customize your ribbon is to rearrange tabs and commands in the most beneficial way. You can even hide and unhide tabs and commands you use less often.
If needed, you can hide the entire ribbon itself.
You can also export your customized ribbon and import different ribbons.

What can you not change in the ribbon?
You can’t change the size of the ribbon itself or the size of the icons and text inside it.
Changing your screen resolution is an option if you want to resize your ribbon. Note that everything else will also scale accordingly to the resolution you choose.
It’s impossible to change the color of the ribbon unless you change the theme that Word is using.
How to change default settings
If you want to change the default settings for new documents, you can make changes to the Normal template. Every new document uses the Normal template when it’s created.
When you modify the Normal template, every new document will adjust to the changes. This allows you to personalize your Word experience further.
- Open Word and go to the File menu.

- Click on Open.

- Navigate to C:UsersusernameAppDataRoamingMicrosoftTemplates.
- Open the Normal template (Normal.dotm).
You can change the default font, character spacing, margins, layout, and some other settings. Make your desired changes as you would to any document, then Save.
Your defaults will be updated to the new settings.
Note: You can always restore the default Normal template. This will change Word back to its original settings for new documents.
Restore the Normal template by deleting, renaming or moving it. This will cause Word to recreate the original Normal template automatically.
However, you can’t use this method for any of the other templates. You should always make a backup of any template you plan to tamper with.
How to change the spelling, grammar, and proofing settings
Want to change the way Word is handling your spelling and grammar? You can customize many settings related to this topic.
- Select the File menu.
- Click on Options.
- Find the Proofing tab. This allows you to optimize your experience using Word to help you type.
- Enable or disable any feature, then click the OK button to save your changes.
You can also find extra settings for features such as AutoCorrect and AutoFormat by clicking the AutoCorrect options button.

Conclusion
The instructions above open the door for anyone curious about Word’s many settings. Of course, you can check other tabs and windows for more ways of altering how Word behaves that weren’t mentioned above.
Don’t be afraid to change things around. You can always return to Word’s default settings. Follow this video by HOWZA to quickly get everything back to normal.
Aside from changing settings in Word, we got a lot of tips on our blogs! One of which is how you can effectively add or remove buttons from the toolbars in Office.
If you’re looking for a software company you can trust for its integrity and honest business practices, look no further than SoftwareKeep. We are a Microsoft Certified Partner and a BBB Accredited Business that cares about bringing our customers a reliable, satisfying experience on the software products they need. We will be with you before, during, and after all the sales.
Further Reading
» 7 Microsoft Word Hacks You Need to Know
» How to Collaborate In Microsoft Word
» Google Docs vs. Microsoft Word: Which One Is Suitable for You?
» What’s New in Office 2021: Everything You Need To Know
» An Insanely Simple Way To Improve Productivity With Microsoft Word
» Top 14 Microsoft Word Tricks and Tips that you Should Know

For the last lesson in this Geek School series, we’re going to show you how to use Styles, Style Sets, and Themes to save a lot of time when formatting your documents by creating reusable settings that can be applied to all of your documents.
Up until now, you’ve been learning about how to create documents and implement formatting bit by bit. In other words, you create a document and changes you make are typically localized. In this lesson, we step back a bit and show you how styles can take the work out of creating a consistent look and feel that you can control from a central location rather than having to needlessly apply changes to each and every part.
Styles are very useful for generating a table of contents but that is but only one use for them.
The main function for styles is to allow you to quickly set titles, subheadings, section headings apart from one another by giving them unique fonts, font characteristics, and sizes. By grouping these characteristics into styles, you can create documents that have a consistent look without having to manually format each section header. Instead you set the style and you can control every heading set as that style from central location.
With styles you can:
- Apply a consistent look across the whole document instead of having to format each section individually.
- Automatically number section headers.
- Apply same font to the entire text body.
- Apply the same font to header sections.
- Use a consistent paragraph spacing.
- Pick a default color scheme for SmartArt, charts, and shapes.
- Pick from a number of pre-designed styles use them as your own and modify them.
Let’s go over some examples to give you a better idea of what some of these mean. First, note the “Styles” section on the “Home” tab.

It expands to reveal more:
Click on the small arrow in the lower right corner for a floating “Styles” panel.
This windows stays visible so you can use it as you work through your documents. You can move it outside the application window, and also dock it right or left side of it.
The style dialog box like format shape floats independent of Microsoft Word. That means you can move it outside the document to make more room or even more it to a second monitor if you are using dual monitors.
Click “options” and you can select how the styles pane is shown and sorted:
Each style can be applied differently and you can hover over the symbol to the right to see exactly how it is applied.
If you click on that symbol, you are presented with a dropdown options menu, which gives you further control over the styles in your current document.
You can modify a selected style, which will apply to all instances of that style throughout the document. In this case, there are 109 of them. Here you can also select or clear all instances of that style, and remove it completely from the “style gallery.”
Along the bottom of the pane are three buttons, which have some pretty important functions.
New Style
If you click “new style” the resulting dialog box will let you create a new style using existing formatting. As you apply new characteristics to the style, you can see how it will look in the preview.
You can dig into the nitty-gritty specifics of the style including the format, such as if you want it to have bullets, borders, fonts, text effects, and so on. From there, you can add the style to just that document, or you can add it to the template so every document has that style from there on.
Style Inspector
Use the style inspector to “inspect” styles throughout your document. This feature is useful for stripping formatting or further changing it.
You can also click each style for a drop-down options menu, allowing you to modify and build a new style, select all instances of that style in the document or completely clear them.
Click the bottom-left button to show the “reveal formatting” pane to see how your document is formatted. This is somewhat similar to or at least hearkens back to “Reveal Codes” in WordPerfect.
Manage Styles
The “manage styles” button allows you to quickly edit styles such as to modify their appearance, reorder their recommended order of appearance, restrict which ones are available, and set new defaults to current styles.
It’s useful to know how to take control of your styles because used well and wisely, they can give you a lot of power with your documents.
Style Sets
The “Design” tab brings all of the formatting options you can apply to a document in one place.
“Document Formatting” section shows you how the heading and text would look if you pick one of the combinations there. Each of these combinations is called a “Style Set.” If you briefly hover over each style set, the formatting of your document will change to preview how it would look. If you click on the style set, it will be applied to your current document. This is non-destructive, so if you don’t like the new style, you can just as easily change it.
Similar to other sections throughout Word, if you click the scrollbar on the right edge, it will expand to a full menu. Further options at the bottom allow you to reset your style set to the default or save your current style as a new set.
The right side of the document formatting section contains functions for changing your colors, fonts, paragraph spacing, add effects, and set your changes as the default style set.
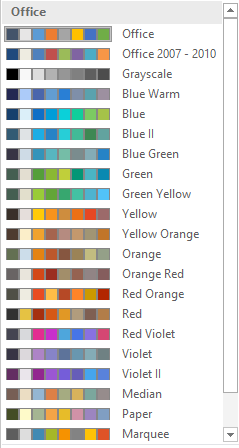
Changing the colors simply means that shapes, SmartArt, charts, and text will affected.
There are plenty of built-in color schemes to choose from, however, if none these strike your fancy, or you have specific colors you want to use, you can click “Customize Color” at the bottom. Here you’ll have virtually limitless choices, and you can save your new custom color set and use it later.
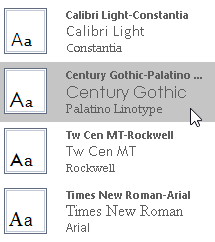
The “Fonts” menu contains predefined schemes that you can select based on the old Office theme, or a font family.
Select “Customize Fonts” at the bottom of the menu to quickly create a new custom set based on your personal favorite font family. In the screenshot below, we see you can assign a “heading font” and “body font” and then give it a name, save it, and then apply it to your current and future documents (“set as default”).
If you choose a new font style, you can see it reflected in the font section of the “Home” tab.
“Paragraph Spacing” contains a variety of built-in styles, which should please all but the most picky. Again, to see how your document is affected by these, you can hover over each one and the changes will be previewed in your document.
Note the “Custom Paragraph Spacing” option at the bottom of this menu.
The effects menu allows you to quickly change the effect of design elements such as shapes, SmartArt, and charts.
If you want to preserve any changes to your style set permanently as the default, then you can click “set as default.” A dialog box will appear asking you to confirm.
Finally, if you want to use a custom style set in the future, but you do not want to apply it as the default. You can save it as a template file. Right-click on the style set and then “Save.”
Note, we’ll cover templates shortly. Here you should simply know that if you want to use your new custom template in the future, you would only need to double-click on the *.dotx file or open it from Word.
Note the option “Add Gallery to Quick Access Toolbar” simply means that if you want quick access to the document formatting gallery, it can be accessed from the QAT at the top of the Word window.
Modifying Styles
Suppose we only want to modify Heading 2.
For example, let’s say we want to center, bold, and italicize it. The quickest way to do this would be to change the selected style, then right-click on that style in the “Styles” section on the “Home” tab, in this case Heading 2, and select “Update Heading 2 to Match Selection.” All instances of Heading 2 will now reflect your changes throughout the document.
Themes
The style set you are greeted with when you click on the “Design” tab comprises the “Office” theme. Other themes can be accessed by clicking on the “Themes” button on the left of the “Design” tab.
A theme comprises a whole new bunch of style sets, each with its own fonts, color, spacing and anything else previously discussed.
Note at the bottom, there are further options to rest the theme to the template, browse for custom themes on your computer, as well as save the current theme, assuming you’ve altered or customized it, as a new theme. This is different from saving a style set. Remember, a style set saves as a template file (.dotx). A theme is saved as a theme file (.thmx) and each theme file:
Themes are remarkably simple and a very effective way to apply a complete look and feel to your documents in a matter of seconds.
Conclusion
And that’s it for the How-To Geek School’s Guide to Word Formatting. It’s been fun, we’ve learned a lot, and hope you did too! If you missed any part of this series, or simply want to review something again, you can easily do so by clicking any of the links in the table of contents at the beginning of the article.
READ NEXT
- › How to Get a Refund on the PlayStation Store
- › The New Winamp Is Here, but It’s Not What You’d Expect
- › Save Hundreds on Elegoo’s New PHECDA Laser Engraver Through Kickstarter
- › Five Types of Phone Damage That Aren’t Covered by Your Free Warranty
- › Spotify Is Shutting Down Its Free Online Game
- › Android’s Nearby Share Has (Unofficially) Arrived on Mac

Customizing Word User Interface: What is and isn’t customizable
Posted on Wednesday, July 17th, 2013 at 8:25 am by .
Word is a stalwart… a pillar of the Office application suite. It’s been around since I was in junior high. It’s ubiquitous. And because of its familiarity, it is not possible to know whether Microsoft Word has adjusted to the needs of its users or if it is vice-a-versa.
For the casual or infrequent user of an Office application, the best path to productivity is to adjust to the application. This type of user should learn the main commands as presented by the app. If they run into trouble, they can hit F1 of search Google (or BING!).
But for the advanced user who views Word as essential to their daily grind at the office… Word needs to do some adjusting to the user. This user has well defined grooves in their workday. They work spans across multiple teams, departments, companies, and applications. Microsoft Word can be a player in these processes and you can put Word in the best position possible. But how?
Well, the best way to know where and how to utilize Word is to understand its strengths. Today, we’ll go a long way toward this goal by covering the customization options supported by Word’s user interface and Add-in Express.
- Customizing the Word Ribbon
- Customizing Word CommandBars
- Creating custom Backstage views
- Building custom Word task panes
- Customizing Word context menus
Word 2007 – 2013 utilize the Office Ribbon toolbar. The ribbon is the place for buttons and other controls that allow users to take action and invoke the features your solutions provides.
If you read Pieter’s article covering Outlook’s UI customization options, then you know everything you need to know. Granted, Word is simpler because there is a single window type and there are only documents to as the main “data type” (verses Outlook’s two windows and multiple item types).

Just add an ADXRibbonTab component to the AddinModule and start designing the Ribbon’s layout.

And just like you can with Outlook, you can use the Ribbon’s Context property to display your custom Ribbon only for a specific Word context.

For example, by setting the Context property to Word.TabSetHeaderAndFooterTools, your custom ribbon will display only when the user works with the header and footer design view.

Customizing Word CommandBars
The CommandBars (or toolbar) are relevant to Word 2003 and older. That might sound old and deprecated but the fact is, a significant number of companies still use these Word versions. As a result, it behooves you to support CommandBars in your Word solutions. You do this by adding an ADXCommandBar control to the AddinModule.

The above image shows an ADXCommandBar in its visual designer in Visual Studio. The design closely mirrors the custom ribbon. Given command bars do not have a control that equates to the Ribbon’s split button control, this design uses the combination of the drop down control combined with a command bar control. It’s not the same but it’s close.

With command bars, you can host .NET control by adding an ADXCommandBarAdvancedControl to the command bar. Then you add a .NET control to the AddinModule design surface and specify it as the value in the Host property of the ADXCommandBarAdvancedControl.
Creating custom Backstage views
The Backstage view, introduced with Word 2010, contains the commands intended for working “with” a document (as opposed to working “on” a document). These are the commands that exist behind the scenes. The have their own view so that they don’t clutter the Ribbon and the main UI. Creating a custom Word Backstage is easy as adding the ADXBackstageView component to the AddinModule. Well almost… you will need to add controls and configure them using the Add-in Express visual designer.

The backstage is a good location to place options and administrative features.

Creating custom Word task panes
Microsoft Word supports custom task panes. Task panes display within the Word window next to a document. They are intended to aid the user as they create a document. They are good place to add features that allow them to insert content or view issues within the active document… all without interrupting them with nasty dialog boxes.

Add-in Express’s Advanced Task Panes go further than standard Office task panes by supporting four display locations (top, bottom, left, and right). You specify where to display the panes initially, and if you allow it, the user can move it to any supported location.

In addition, Add-in Express automatically saves the custom pane’s display state. You don’t need to write code to do it.
As you see in the screenshot above, the additional features are within reach, elegant, and quite useful for the task at-hand.
Customizing Word context menus
The context menu is the right-click menu that provides users with useful, contextual relevant commands. You can add a custom context menu to Word add-ins by adding either one of these:
- ADXRibbonContextMenu – use this for Word 2010 and Word 2013.
- ADXContextMenu – use these for Word 2007 and earlier
Using the visual designer, you can quickly design your ribbon context menus…

… and your context menus…

… and impress your users.

***
Word’s user interface provides several customization options. With what’s possible, there is no reason you can’t build beautiful UIs for your solutions that provide a pleasurable experience to your users.
Word add-in development in Visual Studio for beginners
- Part 1: Word add-in development – Application and base objects
- Part 3: Customizing Word main menu, context menus and Backstage view
- Part 4: Creating custom Word ribbons and toolbars
- Part 5: Building custom task panes for Word 2013 – 2003
- Part 6: Working with Word document content objects
- Part 7: Working with Word document designs, styles and printing
- Part 8: Working with multiple Microsoft Word documents
- Part 9: Using custom XML parts in Word add-ins
- Part 10: Working with Word document properties, bookmarks, content controls and quick parts
- Part 11: Populating Word documents with data from external sources
- Part 12: Working with Microsoft Word templates
Although there are several free alternatives to Word, Microsoft’s word processing program continues to be the most widely used in the world. One of the most important features of Word is the styles feature. By using styles, you can set text formatting uniformly across a document, ensuring a document’s fonts, font colour, and line spacing are all the same.
Many styles are already preset in Microsoft Word. But how can they be optimally used and adapted when necessary? And how to create new styles? These questions will be answered in the following sections.
Contents
- The various types of Word styles
- Paragraph styles
- Character styles
- Table styles
- List styles
- What are the advantages of Word styles when formatting a text?
- Where can I find preset Word styles?
- How can I create new Word styles?
- Creating a table of contents through a style in Word
- Adapting the layout for a table of contents
- Customise text in a table of contents
- Creating a table of contents through a style in Word
- How can I customise existing Word styles?
- Matching the current formatting
- Manually customising existing styles
The various types of Word styles
To ensure that a document looks uniform and professional, Microsoft offers four types of styles in Word:
- Paragraph styles
- Character styles
- Table styles
- List styles
Paragraph styles
These styles determine the appearance of a text in terms of whole paragraph sections, and allow you to format large sections of text. A paragraph style may contain format settings for character style, however it also determines the overall design of a paragraph. In a new Word document, the paragraph style Standard is usually preset for the entire text. Paragraph styles format the following attributes:
- Indents and spacings
- Line and page breaks
- Borders and shading
- Lists
- Tabs
- All character attributes
In Word, paragraph styles are marked by the ¶ sign in the styles menu (This can be found by clicking the lower most right arrow in the styles gallery on the start tab.)
Character styles
Character styles determine the appearance of text in terms of individual characters, and are mainly used to format smaller sections of text, e. g. highlighting words. Character styles do not format the features of the entire paragraph, but rather format the following attributes:
- Font
- Font size
- Font colour
- Bold, italic, or underlined markings
Character styles are marked by the a-sign in the styles menu.
Table styles
Table styles in Word format the following attributes for tables:
- Header row
- Grid lines
- Accent colour
List styles
List styles in Word format the following attributes for lists:
- The format of bulleted lists
- The format of numbered lists
- Indents
What are the advantages of Word styles when formatting a text?
Preset as well as custom styles make it easier to work on a text document. This is particularly noticeable when editing complex documents, such as final papers or manuscripts. Initially, manual formatting may seem to be easier and quicker, but for longer texts it’s more efficient to use Word styles instead of repeatedly formatting sections of text separately. The following six reasons outline the advantages of using styles in Word:
- Continuity: Format results in a consistent document layout.
- Efficiency: Once the style has been created, it can be applied to any section of the document without having to be changed.
- Adaptability: If only one style is used consistently within a document, then only this style needs to be adjusted when necessary to edit the whole document.
- Navigation: The navigation function makes it possible to switch quickly between sections of the document. To use this function, go to the view tab and select navigation pane. The section of the document which you are looking at will be highlighted here.
- Automatic table of contents: When using Word styles for headings consistently within one document, it’s possible to automatically create a table of contents which you can customise in just a few clicks.
- Outline: It’s possible to gain an overview of the document using the outline view function in Microsoft Word, which can be found in the view tab. In the outline view it’s possible to move individual sections of a document clearly and with full control. In this view, the headings are arranged hierarchically – if there’s a plus sign on the left side of a heading, it means that it has another text level below it, while a minus sign is followed by continuous text only.
The default outline view displays all levels of the document. For a better overview, it’s possible to display only two levels, for example. This view is also suitable for making corrections to the structure of a text and moving text sections around within the document swiftly and with ease. If the corresponding levels are marked with a style, they can be quickly and conveniently moved to the desired position using the outline view tools.
Note
In the outline view, text selection is important. If only the heading is selected, but the entire body text is displayed, Word assumes that only the heading is to be moved. If the text is hidden, however, the entire section will be moved.
Where can I find preset Word styles?
Preset styles in Word can be found under the style gallery, on the start tab. To apply a style to a section of text from the style gallery, highlight the relevant text and then click on the style you wish to select. The style in use will be marked by a light blue border.

To display additional Word styles, use the down arrow on the right side of the style gallery, or open the style gallery by clicking on the menu arrow.

Alternatively, you can also assign the styles for headings using a shortcut. To do this, use the key combination «alt» and the respective level of the heading, for example:
Heading 1:»Alt» + «1».
Heading 2:»Alt» + «2».
Note
When assigning paragraph styles, the cursor must either be in the paragraph with no characters highlighted, or you must highlight the entire paragraph. If you highlight one section, only that section will be formatted, and not the entire paragraph. This is different when assigning character styles: you must select all relevant characters, as just hovering the cursor over a relevant word will not be enough.
How can I create new Word styles?
If you want formatting options that are not available in the preset Word styles, you can easily create them yourself and add them to the style gallery:
- Under the start tab, click on the arrow in the lower right corner of the styles gallery.
- Select the create a style icon in the style side menu – at the bottom on the left.

- Name the style
- Specify the style type: either paragraph, character, linked (paragraph and character), table and list. If you want the style to be based on an existing one, you can specify this under style based on.
- Should you want to set a style for the following paragraph, you can specify an appropriate one for it.
- Set the font, font size, and other possible formatting options.
- As soon as you confirm the style by clicking “OK”, you’ll be able to find your new creation in the style gallery.
Alternatively, it’s possible to create a style by highlighting text:
- Right click on the highlighted text
- Select styles on the right-hand side in the mini-menu
- Select create a style from the style menu that appears
- Select modify.
Creating a table of contents through a style in Word
A key advantage in using styles in Word is that it allows you to automatically create a table of contents. To create a table of contents using a style, go to the references tab, and select a style for the table in the table of contents menu. If you change the text structure later, you can update the table of contents by clicking the update table of contents option.
Adapting the layout for a table of contents
You can also customise the layout and text formatting of a Word style for tables of contents:
- On the references tab, open the table of contents menu and click the custom table of contents option.
- In the table of contents dialog box, make any changes you want to the display of page numbers and fillers.

- To adjust the overall appearance, select format under general and click on the desired format
- If you want to change the number of levels displayed in the table of contents, click on show levels
- Check the result in the print preview and web preview panes
- Confirm with «OK»
Customise text in a table of contents
The presentation of the text in the table of contents can also be adapted using a Word template:
- Open the table of contents dialog box as described above
- Click on modify and change the formats to from template

- In the styles list, select the level you want to customize and click modify.

- Make the formatting changes as described above
- If you select add to quick styles gallery, you’ll find the created style in the gallery
- Confirm with «OK»
How can I customise existing Word styles?
In Word, you can also change existing styles from the quick style gallery. The adjustment is possible in two ways:
- Update a style by customising it to match the current formatting in a document
- Manual customisation in the dialog box
Matching the current formatting
If a Word style has already been applied to the text, you can customise it and include it in the quick Styles gallery:
- Select the text, e. g. with «heading 2», to which you have applied the Word style. You can see which style was used in the quick styles gallery – the corresponding style will be marked with a light blue border.
- Format the text and adjust features such as font, font size, and colour.

- In the styles gallery, right-click the style that you want to customise and confirm with update [style name].

Note
Adapting the styles automatically adapts all text parts which are assigned to this style.
Manually customising existing styles
A Word style from the styles gallery can also be changed manually. This process is possible regardless of the text in the document:
- Right-click on a Word style in the styles gallery and select modify
- Make the desired adjustments, such as font size or colour, in the modify style menu

- Select add to styles gallery at the bottom of the menu to access the style later.
HiDrive Cloud Storage with IONOS!
Based in Germany, HiDrive secures your data in the cloud so you can easily access it from any device!
![]() Highly secure
Highly secure
![]() Shared access
Shared access
![]() Available anywhere
Available anywhere

Word documents: how to save as a PDF file
If you want to send a Word document or prepare it for printing, it’s recommended you know how to save it as a PDF file. This way, you can be sure that the formatting of your document won’t change and that others will not be able to edit it without permission. For simple conversion tasks, the save function in Word is often sufficient. However, there are some dedicated tools which offer a wider…
Word documents: how to save as a PDF file

How to recover unsaved Word documents
If either Word or your PC crashes while working on a Word document, don’t panic! Recovering unsaved Word documents is easy to do; even damaged or deleted files are not always lost. Microsoft has numerous tools built into its popular text program which allow you to retrieve the edited or in-progress file. And if these tools don’t work, Windows and special repair and recovery tools offer plenty of…
How to recover unsaved Word documents

How to create a table of contents in Word
Microsoft Word makes it easy to create smart text documents with its diverse template styles. This includes pre-formatted table of contents templates. With our illustrated, step-by-step guide, we’ll show you how to find the templates and how to customise the design.
How to create a table of contents in Word

How to insert a watermark in Word
Sometimes you need to clearly label your document with words like “Sample,” “Draft,” “Example” or “Confidential”. In Microsoft Word, you can use watermarks to do this. This practical design tool allows you to display barely visible but impressive text or graphics that sit behind the actual text. In this tutorial, we will teach you how to insert a watermark in Word.
How to insert a watermark in Word
How to remove a watermark in Word
Watermarks are a handy way to label documents in Microsoft Word. You can insert a watermark so that your text or your company logo sits discreetly in the background of the page. However, sometimes you might not be happy with how the watermark looks, or you don’t need the watermark at all anymore. We’ll show you two ways to remove a watermark in Word.
How to remove a watermark in Word
Microsoft Word now arrives on our systems chocked full of useful templates, styles, and themes to help shape the layout of your document. Microsoft has created a pretty good system: immensely open for an absolute novice, but with enough depth to be consistently used throughout the business world.
Customizing your document layout settings is easy, and we’ll show you how to do it in Word 2013 and Word 2016.
What Can You Change?
Many, many things. We’ll start with the Quick Access Toolbar Tabs you see immediately when opening a new Word document, with a focus on the Home, Insert, Design, and Layout tabs as they contain the bulk of the document customization tools you’ll need.
- Home: Fonts, Paragraphs, and Styles, as well as Clipboard and Editing options
- Insert: Tables, Illustrations, Media, Headers & Footers, Text Boxes, and Symbols
- Design: Themes, including colors and fonts, and Page Backgrounds
- Layout: Page Setup, Paragraphs, and Arrange
These are your manual tools. You can set up a range of formatting options before you begin editing your document to ensure the same structure and style is applied throughout, as well as using the same tools to edit your document when work is in progress. You’re probably familiar with how to change the Font, colors, sizes, and how to apply the Bold, Italicized and underlined formats to your text. These are easily applied.
Styles
But it can be much faster and usually much easier to apply pre-designed Styles to your document as you move through. The Styles are made up of individual settings, so always apply the same formatting to your document. There is a Style for «Heading 1» which will appear the same within a web-page. There is a «Title» Style which applies a 28pt font and condenses the text slightly. There is a «Quote» Style which applies an indent to the left and right of the document, italicizes your text, and grants it a different color. For instance:
This was a very quick snippet illustrating how to apply basic Styles to your document. Play around with the other styles and learn how they affect the visual presentation of your work, and what a difference that can make to your reader (and also to your own workflow!).
Create Your Own Style
You’re super stylish, right? Good, because I’m not. I have a big ginger beard and everything. Enough of that. In the video I showed you how to access the additional Styles menu. It is the tiny arrow indicating there is a pop-out menu awaiting your inspection. Alternatively, hit CTRL + SHIFT + ALT + S. At the bottom of the new Styles menu are three icons:
- New Style: Pretty self-explanatory. If you find yourself frequently tweaking a specific facet of your Word document layout, you should absolutely turn it into an easily applicable custom Style.
- Style Inspector: The Style Inspector can be pretty handy if you receive a document with lots of new and «unusual» formatting. Just open the inspector and select the area of the document you’d like to know more about. You can also reset the formatting for the selected text from within the inspector, using the red eraser icons on the right.
- Manage Styles: You can use the Manage Styles option to make any alterations to existing Styles, including your own.
When creating your own Style, you don’t have to start from scratch. The options Style type and Base style on can be handy to make slight tweaks to existing styles, suiting them for your editing needs. Just be sure to save them as something different!
Themes
Nestled in the Design tab are options for Themes and Document Formatting. Just as a Style applies a specific set of formatting instructions to a single section (or a whole document, if you like), a Theme is designed to format your entire document, altering all of the available styles.
Two of the best features of the Themes section are the interchangeable colors and fonts.

Once you’ve selected your Theme, you can alter the aesthetic of the document using one of the pre-designed color schemes, or design your own.
Similarly, you can select from collections of fonts that will be implemented throughout the document. It is an extremely easy way to alter the visual presentation of your document while maintaining a uniform, professional approach.
Document Formatting applies a complete «Style set» to your document. For instance, in the above video, the Heading 2 formatting Style is a standard, whereas in the next short clip, you’ll see the same Heading 2 Style (and Title Style) change as I rollover each Document Formatting option.
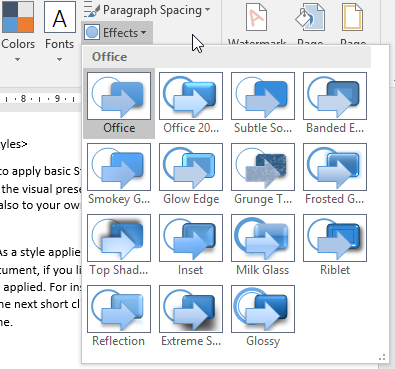
Another handy, but underused tool is Effects. Just as selecting a Theme alters the appearance of the text and formatting, selecting an Effect alters the appearance of each image throughout the document. There are options for regular Office, Glow Edge, Extreme Shadow, and plenty more, so you can select one that matches the voice of your work.
Templates
There are other extremely easy ways to apply consistent formatting throughout your entire document. Microsoft included literally thousands of free templates for you to use, covering a huge range of topics. Need a Business Report for a Graphic Design outfit? You’re covered. Need Valentine’s Day Sweetheart Supper & Pie Auction invitations (wat?!)? For some reason, you’re covered.
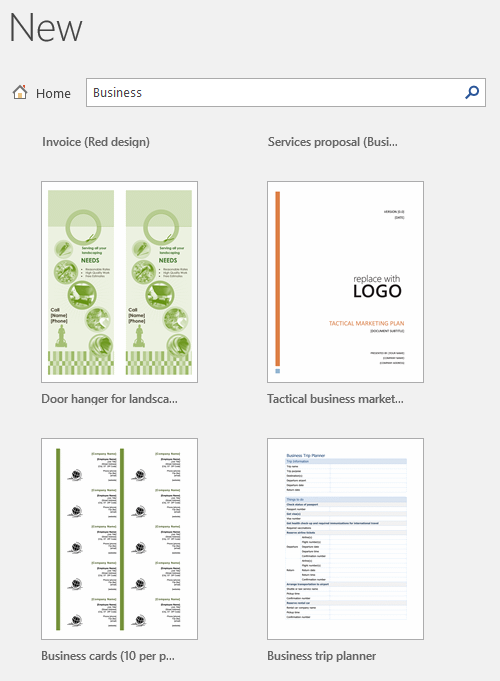
And although I poke fun at the latter of those examples, the templates can be tweaked to your own specifications extremely easily within Word, using the other design and layout tools available to you.
Choose any template, and open it. Look at the design of the document: where the indents are, where the text boxes are placed, if any specific styles have been applied, and then have a little play around. Move things, click things, change settings, and you’ll understand more about the composition of the template.
3 Advanced Formatting Tips
To round our Word layout settings article off, I’ll share three advanced formatting tips with you.
1. Section Breaks
Section breaks are a crazy useful formatting tool, especially if working on a document consisting of different facets of information that would benefit from an individual style. For instance, you can apply custom formatting to a single area, such as an alternative header or footer, or even a whole new page numbering system, but importantly leaving the rest of the document intact.
Head to the Layout tab, and select Breaks. It will open a drop-down menu containing various options:
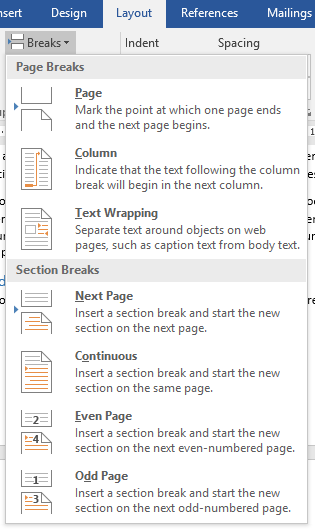
Select a section break that suits your document, but note that inserting a Next Page section break will also insert a Page Break, which can be problematic, if that isn’t what you’re after. In this case, use the Continuous Break option.
Once you implement a specific section style you like, you can always copy it to the next section break.
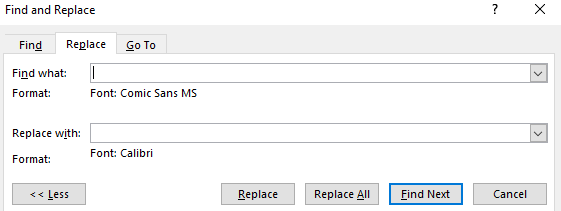
2. Using Find and Replace
This slightly overlooked formatting tool can be a lifesaver when performing editing duties, but using the Find and Replace tool can help you scour the entire document for the specific formatting issues you need to change.
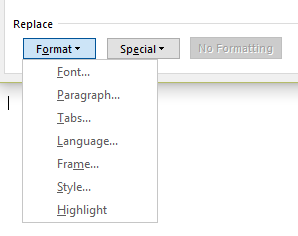
Press CTRL + H to open the Find and Replace tool. In the bottom-right you should spot Format, which opens a drop-down menu. You can now select from the range of additional replacement fields. Each options opens a new dialogue box where you can specify what you’re attempting to replace, and leaving the Find What/Replace With fields empty will change all of the matching formatting.
3. Formatting a List
You’d think altering the appearance of a numbered list would be jolly easy, but it can be surprisingly frustrating.
Head to the Home tab. In the Paragraph section, look for the paragraph symbol and select it.
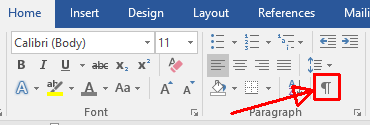
Look at the end of each entry in your numbered list.

You can now select the individual paragraph markers. When you’ve selected the list items you’d like to change (hold CTRL while making your selection to edit multiple options), head to the Home tab and select the format you’d prefer from the drop-down list options.

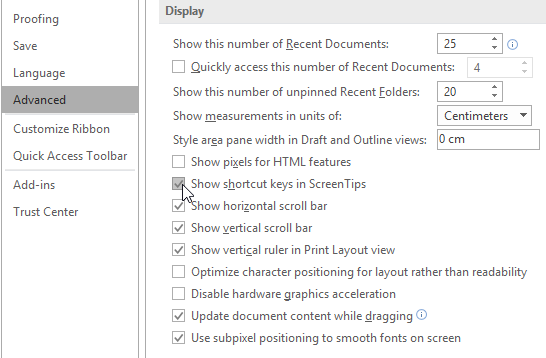
Bonus Tip: Display Shortcuts
Microsoft Word does a pretty good job of showing you ScreenTips where possible. Just hover over almost any icon and you’ll get a minute snippet of information detailing exactly what the button does. You can make these ScreenTips more interesting by adding their relevant shortcut, so each time you rollover to check, you can attempt to remember the shortcut instead.
Head to File > Options > Advanced. Under Display, ensure Show shortcut keys in ScreenTips. Then press OK.
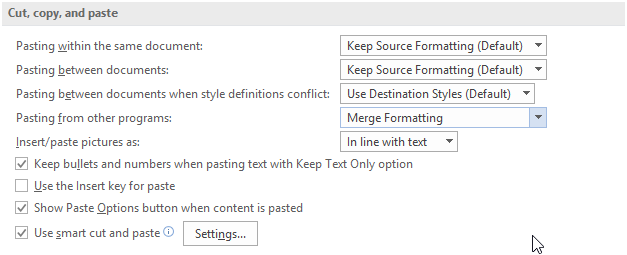
Bonus Tip 2: Configure Your Cut and Paste Settings
This is another tiny tip, but if you’re pasting snippets of text from other documents or programs, it can make a massive difference.
Head to File > Options > Advanced. Under Cut, copy, and paste you’ll see five options:
- Pasting within the same document
- Pasting between documents
- Pasting between documents when style definitions conflict
- Pasting from other programs
- Insert/paste pictures as
Select whether you’d like your pasted text to Keep Source Formatting, Merge Formatting, or Keep Text Only. There are also other options for you to consider. For instance, even after ensuring the formatting of any text copied from another program will be merged, I like to see the Show Paste Options button, just in case I need to make an alteration.
Formatting in Word Online
Word Online is part of the free online Office suite offered by Microsoft. It allows you to create and edit documents for free, provided you have a Microsoft account. Word Online offers much of the functionality of the desktop version, but there are some formatting omissions you might bump into.
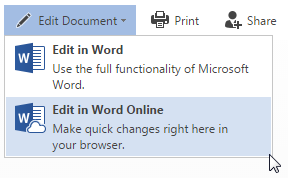
The base level of formatting is all as standard, but Online doesn’t come with support for Themes or Section Breaks, as well as only allowing «Portrait» as your document orientation. Similarly, while your indents and tab settings will be imported from the desktop version of Word (or elsewhere), Word Online also restricts rulers and gridlines, so adding more can prove difficult.
However, if you are looking to make some basic edits on the move, or simply have no need for the additional formatting power of Word itself, Word Online makes a solid replacement.
Go Forth and Make Things Pretty
You now have the knowledge to make any Word document beautiful, easy to read, with oodles of visually engaging formatting. Take some time to play with the formatting settings. If you familiarize yourself with the basic formatting settings, you’ll find more advanced formatting options a synch!
Now that you know how to format Word documents like a pro, try your skills on a custom brochure or pamphlet. You can start with templates and change them to your likes.