
This article describes the keyboard shortcuts and function keys in Word for Windows.
Notes:
-
To quickly find a shortcut in this article, you can use Search. Press Ctrl+F, and then type your search words.
-
If an action that you use often does not have a shortcut key, you can record a macro to create one. For instructions, go to Create or run a macro or Use a screen reader to create a macro in Word.
-
If you are using Microsoft Word Starter, be aware that not all the features listed for Word are supported in Word Starter. For more information about the features available in Word Starter, go to Word features that are not fully supported in Word Starter.
-
Get these keyboard shortcuts in a Word document at this link: Word 2016 for Windows keyboard shortcuts.
In this topic
-
Frequently used shortcuts
-
Ribbon keyboard shortcuts
-
Navigate the document
-
Preview and print documents
-
Select text and graphics
-
Edit text and graphics
-
Work with web content
-
Work with tables
-
Review a document
-
Work with references, citations, and indexing
-
Work with mail merge and fields
-
Work with text in other languages
-
Work with document views
-
Use function key shortcuts
Frequently used shortcuts
This table shows the most frequently used shortcuts in Microsoft Word.
|
To do this |
Press |
|---|---|
|
Open a document. |
Ctrl+O |
|
Create a new document. |
Ctrl+N |
|
Save the document. |
Ctrl+S |
|
Close the document. |
Ctrl+W |
|
Cut the selected content to the Clipboard. |
Ctrl+X |
|
Copy the selected content to the Clipboard. |
Ctrl+C |
|
Paste the contents of the Clipboard. |
Ctrl+V |
|
Select all document content. |
Ctrl+A |
|
Apply bold formatting to text. |
Ctrl+B |
|
Apply italic formatting to text. |
Ctrl+I |
|
Apply underline formatting to text. |
Ctrl+U |
|
Decrease the font size by 1 point. |
Ctrl+Left bracket ([) |
|
Increase the font size by 1 point. |
Ctrl+Right bracket (]) |
|
Center the text. |
Ctrl+E |
|
Align the text to the left. |
Ctrl+L |
|
Align the text to the right. |
Ctrl+R |
|
Cancel a command. |
Esc |
|
Undo the previous action. |
Ctrl+Z |
|
Redo the previous action, if possible. |
Ctrl+Y |
|
Adjust the zoom magnification. |
Alt+W, Q, then use the Tab key in the Zoom dialog box to go to the value you want. |
|
Split the document window. |
Ctrl+Alt+S |
|
Remove the document window split. |
Alt+Shift+C or Ctrl+Alt+S |
Top of Page
Close a task pane
To close a task pane using the keyboard:
-
Press F6 until the task pane is selected.
-
Press Ctrl+Spacebar.
-
Use the arrow keys to select Close, and then press Enter.
Ribbon keyboard shortcuts
The ribbon groups related options on tabs. For example, on the Home tab, the Font group includes the Font Color option. Press the Alt key to display the ribbon shortcuts, called Key Tips, as letters in small images next to the tabs and options as shown in the image below.

Note: Add-ins and other programs can add new tabs to the ribbon and might provide access keys for those tabs.
You can combine the Key Tips letters with the Alt key to make shortcuts called Access Keys for the ribbon options. For example, press Alt+H to open the Home tab, and Alt+Q to move to the Tell Me or Search field. Press Alt again to see Key Tips for the options for the selected tab.
Depending on the version of Microsoft 365 you are using, the Search text field at the top of the app window might be called Tell Me instead. Both offer a largely similar experience, but some options and search results can vary.
In Office 2013 and Office 2010, most of the old Alt key menu shortcuts still work, too. However, you need to know the full shortcut. For example, press Alt, and then press one of the old menu keys E (Edit), V (View), I (Insert), and so on. A notification pops up saying you’re using an access key from an earlier version of Microsoft 365. If you know the entire key sequence, go ahead and use it. If you don’t know the sequence, press Esc and use Key Tips instead.
Use the Access Keys for ribbon tabs
To go directly to a tab on the ribbon, press one of the following access keys. Additional tabs might appear depending on your selection in the document.
|
To do this |
Press |
|---|---|
|
Move to the Tell Me or Search field on the Ribbon to search for assistance or Help content. |
Alt+Q, then enter the search term. |
|
Open the File page to use Backstage view. |
Alt+F |
|
Open the Home tab to use common formatting commands, paragraph styles, and the Find tool. |
Alt+H |
|
Open the Insert tab to insert tables, pictures and shapes, headers, or text boxes. |
Alt+N |
|
Open the Design tab to use themes, colors, and effects, such as page borders. |
Alt+G |
|
Open the Layout tab to work with page margins, page orientation, indentation, and spacing. |
Alt+P |
|
Open the References tab to add a table of contents, footnotes, or a table of citations. |
Alt+S |
|
Open the Mailings tab to manage Mail Merge tasks and to work with envelopes and labels. |
Alt+M |
|
Open the Review tab to use Spell Check, set proofing languages, and to track and review changes to your document. |
Alt+R |
|
Open the View tab to choose a document view or mode, such as Read Mode or Outline view. You can also set the zoom magnification and manage multiple document windows. |
Alt+W |
Top of Page
Work in the ribbon with the keyboard
|
To do this |
Press |
|---|---|
|
Select the active tab on the ribbon and activate the access keys. |
Alt or F10. To move to a different tab, use access keys or the arrow keys. |
|
Move the focus to commands on the ribbon. |
Tab key or Shift+Tab |
|
Move between command groupings on the ribbon. |
Ctrl+Left or Right arrow key |
|
Move among the items on the ribbon. |
Arrow keys |
|
Show the tooltip for the ribbon element currently in focus. |
Ctrl+Shift+F10 |
|
Activate the selected button. |
Spacebar or Enter |
|
Open the list for the selected command. |
Down arrow key |
|
Open the menu for the selected button. |
Alt+Down arrow key |
|
When a menu or submenu is open, move to the next command. |
Down arrow key |
|
Expand or collapse the ribbon. |
Ctrl+F1 |
|
Open the context menu. |
Shift+F10 Or, on a Windows keyboard, the Windows Menu key (between the right Alt and right Ctrl keys) |
|
Move to the submenu when a main menu is open or selected. |
Left arrow key |
Top of Page
Navigate the document
|
To do this |
Press |
|---|---|
|
Move the cursor one word to the left. |
Ctrl+Left arrow key |
|
Move the cursor one word to the right. |
Ctrl+Right arrow key |
|
Move the cursor up by one paragraph. |
Ctrl+Up arrow key |
|
Move the cursor down by one paragraph. |
Ctrl+Down arrow key |
|
Move the cursor to the end of the current line. |
End |
|
Move the cursor to the beginning the current line. |
Home |
|
Move the cursor to the top of the screen. |
Ctrl+Alt+Page up |
|
Move the cursor to the bottom of the screen. |
Ctrl+Alt+Page down |
|
Move the cursor by scrolling the document view up by one screen. |
Page up |
|
Move the cursor by scrolling the document view down by one screen. |
Page down |
|
Move the cursor to the top of the next page. |
Ctrl+Page down |
|
Move the cursor to the top of the previous page. |
Ctrl+Page up |
|
Move the cursor to the end of the document. |
Ctrl+End |
|
Move the cursor to the beginning of the document. |
Ctrl+Home |
|
Move the cursor to the location of the previous revision. |
Shift+F5 |
|
Move the cursor to the location of the last revision made before the document was last closed. |
Shift+F5, immediately after opening the document. |
|
Cycle through floating shapes, such as text boxes or images. |
Ctrl+Alt+5, and then the Tab key repeatedly |
|
Exit the floating shape navigation and return to the normal navigation. |
Esc |
|
Display the Navigation task pane, to search within the document content. |
Ctrl+F |
|
Display the Go To dialog box, to navigate to a specific page, bookmark, footnote, table, comment, graphic, or other location. |
Ctrl+G |
|
Cycle through the locations of the four previous changes made to the document. |
Ctrl+Alt+Z |
Top of Page
Navigate the document using the browse options in Word 2007 and 2010
In Word 2007 and 2010, you can browse the document by various types of objects, such as fields, footnotes, headings, and graphics.
|
To do this |
Press |
|---|---|
|
Open the list of browse options to define the type of object to browse by. |
Ctrl+Alt+Home |
|
Move to the previous object of the defined type. |
Ctrl+Page up |
|
Move to the next object of the defined type. |
Ctrl+Page down |
Top of Page
Preview and print documents
|
To do this |
Press |
|---|---|
|
Print the document. |
Ctrl+P |
|
Switch to print preview. |
Ctrl+Alt+I |
|
Move around the preview page when zoomed in. |
Arrow keys |
|
Move by one preview page when zoomed out. |
Page up or Page down |
|
Move to the first preview page when zoomed out. |
Ctrl+Home |
|
Move to the last preview page when zoomed out. |
Ctrl+End |
Top of Page
Select text and graphics
|
To do this |
Press |
|---|---|
|
Select text. |
Shift+Arrow keys |
|
Select the word to the left. |
Ctrl+Shift+Left arrow key |
|
Select the word to the right. |
Ctrl+Shift+Right arrow key |
|
Select from the current position to the beginning of the current line. |
Shift+Home |
|
Select from the current position to the end of the current line. |
Shift+End |
|
Select from the current position to the beginning of the current paragraph. |
Ctrl+Shift+Up arrow key |
|
Select from the current position to the end of the current paragraph. |
Ctrl+Shift+Down arrow key |
|
Select from the current position to the top of the screen. |
Shift+Page up |
|
Select from the current position to the bottom of the screen. |
Shift+Page down |
|
Select from the current position to the beginning of the document. |
Ctrl+Shift+Home |
|
Select from the current position to the end of the document. |
Ctrl+Shift+End |
|
Select from the current position to the bottom of the window. |
Ctrl+Alt+Shift+Page down |
|
Select all document content. |
Ctrl+A |
Top of Page
Extend a selection
|
To do this |
Press |
|---|---|
|
Start extending the selection. |
F8 In the extend selection mode, clicking a location in the document extends the current selection to that location. |
|
Select the nearest character to the left or right. |
F8, Left or Right arrow key |
|
Expand the selection. |
F8 repeatedly to expand the selection to the entire word, sentence, paragraph, section, and document. |
|
Reduce the selection. |
Shift+F8 |
|
Select a vertical block of text. |
Ctrl+Shift+F8, then press the arrow keys |
|
Stop extending the selection. |
Esc |
Top of Page
Edit text and graphics
|
To do this |
Press |
|---|---|
|
Delete one word to the left. |
Ctrl+Backspace |
|
Delete one word to the right. |
Ctrl+Delete |
|
Open the Clipboard task pane and enable the Office Clipboard, which allows you to copy and paste content between Microsoft 365 apps. |
Alt+H, F, O |
|
Cut the selected content to the Clipboard. |
Ctrl+X |
|
Copy the selected content to the Clipboard. |
Ctrl+C |
|
Paste the contents of the Clipboard. |
Ctrl+V |
|
Move the selected content to a specific location. |
F2, move the cursor to the destination, and then press Enter. |
|
Copy the selected content to a specific location. |
Shift+F2, move the cursor to the destination, and then press Enter. |
|
Define an AutoText block with the selected content. |
Alt+F3 |
|
Insert an AutoText block. |
The first few characters of the AutoText block, and then press Enter when the ScreenTip appears. |
|
Cut the selected content to the Spike. |
Ctrl+F3 |
|
Paste the contents of the Spike. |
Ctrl+Shift+F3 |
|
Copy the selected formatting. |
Ctrl+Shift+C |
|
Paste the selected formatting. |
Ctrl+Shift+V |
|
Copy the header or footer used in the previous section of the document. |
Alt+Shift+R |
|
Display the Replace dialog box, to find and replace text, specific formatting, or special items. |
Ctrl+H |
|
Display the Object dialog box, to insert a file object into the document. |
Alt+N, J, J |
|
Insert a SmartArt graphic. |
Alt+N, M |
|
Insert a WordArt graphic. |
Alt+N, W |
Top of Page
Align and format paragraphs
|
To do this |
Press |
|---|---|
|
Center the paragraph. |
Ctrl+E |
|
Justify the paragraph. |
Ctrl+J |
|
Align the paragraph to the left. |
Ctrl+L |
|
Align the paragraph to the right. |
Ctrl+R |
|
Indent the paragraph. |
Ctrl+M |
|
Remove a paragraph indent. |
Ctrl+Shift+M |
|
Create a hanging indent. |
Ctrl+T |
|
Remove a hanging indent. |
Ctrl+Shift+T |
|
Remove paragraph formatting. |
Ctrl+Q |
|
Apply single spacing to the paragraph. |
Ctrl+1 |
|
Apply double spacing to the paragraph. |
Ctrl+2 |
|
Apply 1.5-line spacing to the paragraph. |
Ctrl+5 |
|
Add or remove space before the paragraph. |
Ctrl+0 (zero) |
|
Enable AutoFormat. |
Ctrl+Alt+K |
|
Apply the Normal style. |
Ctrl+Shift+N |
|
Apply the Heading 1 style. |
Ctrl+Alt+1 |
|
Apply the Heading 2 style. |
Ctrl+Alt+2 |
|
Apply the Heading 3 style. |
Ctrl+Alt+3 |
|
Display the Apply Styles task pane. |
Ctrl+Shift+S |
|
Display the Styles task pane. |
Ctrl+Alt+Shift+S |
Top of Page
Format characters
|
To do this |
Press |
|---|---|
|
Display the Font dialog box. |
Ctrl+D or Ctrl+Shift+F |
|
Increase the font size. |
Ctrl+Shift+Right angle bracket (>) |
|
Decrease the font size. |
Ctrl+Shift+Left angle bracket (<) |
|
Increase the font size by 1 point. |
Ctrl+Right bracket (]) |
|
Decrease the font size by 1 point. |
Ctrl+Left bracket ([) |
|
Switch the text between upper case, lower case, and title case. |
Shift+F3 |
|
Change the text to all upper case. |
Ctrl+Shift+A |
|
Hide the selected text. |
Ctrl+Shift+H |
|
Apply bold formatting. |
Ctrl+B |
|
Add a bulleted list. |
Ctrl+Shift+L |
|
Apply underline formatting. |
Ctrl+U |
|
Apply underline formatting to the words, but not the spaces. |
Ctrl+Shift+W |
|
Apply double-underline formatting. |
Ctrl+Shift+D |
|
Apply italic formatting. |
Ctrl+I |
|
Apply small caps formatting. |
Ctrl+Shift+K |
|
Apply subscript formatting. |
Ctrl+Equal sign ( = ) |
|
Apply superscript formatting. |
Ctrl+Shift+Plus sign (+) |
|
Remove manual character formatting. |
Ctrl+Spacebar |
|
Change the selected text to the Symbol font. |
Ctrl+Shift+Q |
Top of Page
Manage text formatting
|
To do this |
Press |
|---|---|
|
Display all nonprinting characters. |
Ctrl+Shift+8 (do not use the numeric keypad) |
|
Display the Reveal Formatting task pane. |
Shift+F1 |
Top of Page
Insert special characters
|
To do this |
Press |
|---|---|
|
Insert a line break. |
Shift+Enter |
|
Insert a page break. |
Ctrl+Enter |
|
Insert a column break. |
Ctrl+Shift+Enter |
|
Insert an em dash (—). |
Ctrl+Alt+Minus sign (on the numeric keypad) |
|
Insert an en dash (–). |
Ctrl+Minus sign (on the numeric keypad) |
|
Insert an optional hyphen. |
Ctrl+Hyphen (-) |
|
Insert a nonbreaking hyphen. |
Ctrl+Shift+Hyphen (-) |
|
Insert a nonbreaking space. |
Ctrl+Shift+Spacebar |
|
Insert a copyright symbol (©). |
Ctrl+Alt+C |
|
Insert a registered trademark symbol (®). |
Ctrl+Alt+R |
|
Insert a trademark symbol (™). |
Ctrl+Alt+T |
|
Insert an ellipsis (…) |
Ctrl+Alt+Period (.) |
|
Insert the Unicode character for the specified Unicode (hexadecimal) character code. For example, to insert the euro currency symbol ( Tip: To find out the Unicode character code for a selected character, press Alt+X. |
The character code, then press Alt+X |
|
Insert the ANSI character for the specified ANSI (decimal) character code. For example, to insert the euro currency symbol, hold down Alt and press 0128 on the numeric keypad. |
Alt+the character code (on the numeric keypad) |
 ), type
 Top of Page
Work with web content
|
To do this |
Press |
|---|---|
|
Insert a hyperlink. |
Ctrl+K |
|
Go back one page. |
Alt+Left arrow key |
|
Go forward one page. |
Alt+Right arrow key |
|
Refresh the page. |
F9 |
Top of Page
Work with tables
Move around in a table
|
To do this |
Press |
|---|---|
|
Move to the next cell in the row and select its content. |
Tab key |
|
Move to the previous cell in the row and select its content. |
Shift+Tab |
|
Move to the first cell in the row. |
Alt+Home |
|
Move to the last cell in the row. |
Alt+End |
|
Move to the first cell in the column. |
Alt+Page up |
|
Move to the last cell in the column. |
Alt+Page down |
|
Move to the previous row. |
Up arrow key |
|
Move to the next row. |
Down arrow key |
|
Move one row up. |
Alt+Shift+Up arrow key |
|
Move one row down. |
Alt+Shift+Down arrow key |
Top of Page
Select table content
|
To do this |
Press |
|---|---|
|
Select the content in the next cell. |
Tab key |
|
Select the content in the previous cell. |
Shift+Tab |
|
Extend a selection to adjacent cells. |
Shift+Arrow keys |
|
Select a column. |
Select the top or bottom cell of the column, and then press Shift+Up or Down arrow key |
|
Select a row. |
Select the first or last cell in the row, and then press Shift+Alt+End or Home. |
|
Select the whole table. |
Alt+5 on the numeric keypad, with Num Lock switched off |
Top of Page
Insert paragraphs and tab characters in a table
|
To do this |
Press |
|---|---|
|
Insert a new paragraph in a cell. |
Enter |
|
Insert a tab character in a cell. |
Ctrl+Tab |
Top of Page
Review a document
|
To do this |
Press |
|---|---|
|
Insert a comment. |
Ctrl+Alt+M |
|
Turn change tracking on or off. |
Ctrl+Shift+E |
|
Close the Reviewing Pane. |
Alt+Shift+C |
Top of Page
Work with references, citations, and indexing
Use the following shortcuts to add references to your document, such as a table of contents, footnotes, and citations.
|
To do this |
Press |
|---|---|
|
Mark a table of contents entry. |
Alt+Shift+O |
|
Mark a table of authorities entry (citation). |
Alt+Shift+I |
|
Choose citation options. |
Alt+Shift+F12, Spacebar |
|
Mark an index entry. |
Alt+Shift+X |
|
Insert a footnote. |
Ctrl+Alt+F |
|
Insert an endnote. |
Ctrl+Alt+D |
|
Go to the next footnote. |
Alt+Shift+Right angle bracket (>) |
|
Go to the previous footnote. |
Alt+Shift+Left angle bracket (<) |
Top of Page
Work with mail merge and fields
To use the following keyboard shortcuts, the Mailings ribbon tab must be selected. To select the Mailings tab, press Alt+M.
Perform a mail merge
|
To do this |
Press |
|---|---|
|
Preview the mail merge. |
Alt+Shift+K |
|
Merge a document. |
Alt+Shift+N |
|
Print the merged document. |
Alt+Shift+M |
|
Edit a mail-merge data document. |
Alt+Shift+E |
|
Insert a merge field. |
Alt+Shift+F |
Top of Page
Work with fields
|
To do this |
Press |
|---|---|
|
Insert a DATE field. |
Alt+Shift+D |
|
Insert a LISTNUM field. |
Ctrl+Alt+L |
|
Insert a PAGE field. |
Alt+Shift+P |
|
Insert a TIME field. |
Alt+Shift+T |
|
Insert an empty field. |
Ctrl+F9 |
|
Update the linked information in a Word source document. |
Ctrl+Shift+F7 |
|
Update the selected fields. |
F9 |
|
Unlink a field. |
Ctrl+Shift+F9 |
|
Switch between a selected field code and its result. |
Shift+F9 |
|
Switch between all field codes and their results. |
Alt+F9 |
|
Run GOTOBUTTON or MACROBUTTON from a field displaying field results. |
Alt+Shift+F9 |
|
Go to the next field. |
F11 |
|
Go to the previous field. |
Shift+F11 |
|
Lock a field. |
Ctrl+F11 |
|
Unlock a field. |
Ctrl+Shift+F11 |
Top of Page
Work with text in other languages
Set the proofing language
Every document has a default language, typically the same default language as your computer’s operating system. If your document also contains words or phrases in a different language, it’s a good idea to set the proofing language for those words. This not only makes it possible to check spelling and grammar for those phrases, but it also enables assistive technologies like screen readers to handle them appropriately.
|
To do this |
Press |
|---|---|
|
Display the Language dialog box to set the proofing language. |
Alt+R, U, L |
|
Set default languages. |
Alt+R, L |
Top of Page
Insert international characters
To type a lowercase character by using a key combination that includes the Shift key, hold down the Ctrl+Shift+symbol keys simultaneously, and then release them before you type the letter.
Note: If you type extensively in another language, you might prefer to switch to a different keyboard instead.
|
To insert this |
Press |
|---|---|
|
à, è, ì, ò, ù, |
Ctrl+Grave accent (`), the letter |
|
á, é, í, ó, ú, ý |
Ctrl+Single quotation mark (‘), the letter |
|
â, ê, î, ô, û |
Ctrl+Shift+Caret (^), the letter |
|
ã, ñ, õ |
Ctrl+Shift+Tilde (~), the letter |
|
ä, ë, ï, ö, ü, ÿ, |
Ctrl+Shift+Colon (:), the letter |
|
å, Å |
Ctrl+Shift+At sign (@), a or A |
|
æ, Æ |
Ctrl+Shift+Ampersand (&), a or A |
|
œ, Œ |
Ctrl+Shift+Ampersand (&), o or O |
|
ç, Ç |
Ctrl+Comma (,), c or C |
|
ð, Ð |
Ctrl+Single quotation mark (‘), d or D |
|
ø, Ø |
Ctrl+Forward slash (/), o or O |
|
¿ |
Ctrl+Alt+Shift+Question mark (?) |
|
¡ |
Ctrl+Alt+Shift+Exclamation point (!) |
|
ß |
Ctrl+Shift+Ampersand (&), s |
Top of Page
Use Input Method Editors for East Asian languages
|
To do this |
Press |
|---|---|
|
Switch to the Japanese Input Method Editor (IME) for a 101-key keyboard, if available. |
Alt+Tilde (~) |
|
Switch to the Korean Input Method Editor (IME) for a 101-key keyboard, if available. |
Right Alt |
|
Switch to the Chinese Input Method Editor (IME) for a 101-key keyboard, if available. |
Ctrl+Spacebar |
Top of Page
Work with document views
Word offers several different views of a document. Each view makes it easier to do certain tasks. For example, Read Mode enables you view the document as a horizontal sequence of pages, which you can quickly browse using the Left and Right arrow keys.
Switch the document view
|
To do this |
Press |
|---|---|
|
Switch to the Read Mode view. In Word 2007 and 2010, this is called Full Screen Reading view. |
Alt+W, F |
|
Switch to the Print Layout view. |
Ctrl+Alt+P |
|
Switch to the Outline view. |
Ctrl+Alt+O |
|
Switch to the Draft view. |
Ctrl+Alt+N |
Top of Page
Outline a document
These shortcuts only apply when the document is in the Outline view.
|
To do this |
Press |
|---|---|
|
Promote a paragraph. |
Alt+Shift+Left arrow key |
|
Demote a paragraph. |
Alt+Shift+Right arrow key |
|
Demote the paragraph to body text. |
Ctrl+Shift+N |
|
Move the selected paragraphs up. |
Alt+Shift+Up arrow key |
|
Move the selected paragraphs down. |
Alt+Shift+Down arrow key |
|
Expand the text under a heading. |
Alt+Shift+Plus sign (+) |
|
Collapse the text under a heading. |
Alt+Shift+Minus sign (-) |
|
Expand or collapse all text or headings. |
Alt+Shift+A |
|
Hide or display the character formatting. |
Forward slash (/) (on the numeric keypad) |
|
Switch between showing the first line of body text and showing all body text. |
Alt+Shift+L |
|
Show all headings with the Heading 1 style. |
Alt+Shift+1 |
|
Show all headings with the specified heading level. |
Alt+Shift+Heading level number |
|
Insert a tab character. |
Ctrl+Tab |
Top of Page
Move through the document in Read Mode
|
To do this |
Press |
|---|---|
|
Move to the beginning of the document. |
Home |
|
Move to the end of the document. |
End |
|
Go to a specific page. |
Type the page number, then press Enter |
|
Exit Read Mode. |
Esc |
Top of Page
Use function key shortcuts
|
Key |
Description |
|---|---|
|
F1 |
|
|
F2 |
|
|
F3 |
|
|
F4 |
|
|
F5 |
|
|
F6 |
|
|
F7 |
|
|
F8 |
|
|
F9 |
|
|
F10 |
|
|
F11 |
|
|
F12 |
|
Top of Page
See also
Word help center
Basic tasks using a screen reader with Word
Use a screen reader to explore and navigate Word
Screen reader support for Word
This article describes the keyboard shortcuts and function keys in Word for Mac.
Notes:
-
The settings in some versions of the Mac operating system (OS) and some utility applications might conflict with keyboard shortcuts and function key operations in Microsoft 365 for Mac. For information about changing the key assignment for a keyboard shortcut, see Mac Help for your version of macOS, your utility application, or refer to Shortcut conflicts.
-
If you don’t find a keyboard shortcut here that meets your needs, you can create a custom keyboard shortcut. For instructions, go to Create a custom keyboard shortcut for Office for Mac.
-
Many of the shortcuts that use the Ctrl key on a Windows keyboard also work with the Control key in Word for Mac. However, not all do.
-
To quickly find a shortcut in this article, you can use Search. Press Command+F, and then type your search words.
For the best experience using your keyboard with the ribbon, enable your keyboard to access all controls.
-
To open the System Preferences, press
 +Spacebar, type system preferences, and press Return.
 -
To go to Keyboard Settings, type keyboard and press Return.
-
In the Shortcuts tab, press Control+F7 to change the Full Keyboard Access setting from Text boxes and lists only to All Controls.
In this topic
-
Frequently used shortcuts
-
Shortcut conflicts
-
Navigate the document
-
Select text and graphics
-
Edit text and graphics
-
Work with tables
-
Drawing
-
Work with fields
-
Outline a document
-
Review a document
-
Use footnotes and endnotes
-
Work with right-to-left languages
-
Use function key shortcuts
Frequently used shortcuts
This table lists frequently used shortcuts in Word for Mac.
|
To do this |
Press |
|---|---|
|
Undo the previous action. |
|
|
Redo the previous action, if possible. |
|
|
Cut the selected content to the Clipboard. |
|
|
Copy the selected content to the Clipboard. |
|
|
Paste the contents of the Clipboard. |
|
|
Display the shortcut menu for the selected item. * |
Shift+F10 |
|
Display the Go To dialog box. |
|
|
Display the Spelling and Grammar dialog box. |
|
|
Enable extended selection mode. |
F8 |
|
Switch to the next window. |
|
|
Switch to the previous window. |
|
|
Display the Save As dialog box. |
|
|
Find text (move focus to the Search in Document box). |
|
|
Display the Find and Replace pane. |
Control+H |
|
Display the Print dialog box. |
|
|
Close the current document. |
|
|
Expand or minimize the ribbon. |
|
|
Find the next spelling or grammatical error. The Check spelling as you type feature must be enabled. |
Option+F7 |
|
Open the Dictionary. |
In Word 2011, Option+Shift+F7 |
Top of Page
Shortcut conflicts
Some Word for Mac keyboard shortcuts conflict with default macOS keyboard shortcuts. This topic flags such shortcuts with an asterisk ( * ). To use these shortcuts, you may have to change your Mac keyboard settings to change the shortcut for the key.
Change system preferences for keyboard shortcuts
-
From the Apple menu, select System Preferences.
-
Select Keyboard.
-
Select the Shortcuts tab.
-
Select Mission Control.
-
Clear the check box for the keyboard shortcut conflicting with the Word for Mac shortcut that you want to use.
Navigate the document
|
To do this |
Press |
|---|---|
|
Move the cursor one word to the left. |
Option+Left arrow key |
|
Move the cursor one word to the right. |
Option+Right arrow key |
|
Move the cursor up by one paragraph. |
|
|
Move the cursor down by one paragraph. |
|
|
Move the cursor to the beginning of the current line. |
Home |
|
Move the cursor to the end of the current line. |
End |
|
Move the cursor to the top of the previous page. |
On a MacBook, press |
|
Move the cursor to the top of the next page. |
On a MacBook, press |
|
Move the cursor to the beginning of the document. |
On a MacBook, press |
|
Move the cursor to the end of the document. |
On a MacBook, press |
|
Move the cursor to the previous insertion point. |
Shift+F5 |
|
Move the cursor by scrolling the document view up by one screen. |
Page up |
|
Move the cursor by scrolling the document view down by one screen. |
Page down |
Top of Page
Select text and graphics
Tip: If you know the key combination to move the cursor, you can generally select the text by using the same key combination while holding down Shift. For example,  +Right arrow moves the cursor to the next word, and +Shift+Right arrow selects the text from the cursor to the beginning of the next word.
|
To do this |
Press |
|---|---|
|
Select multiple items that are not next to each other. |
Select the first item that you want, hold down |
|
Select text. |
Shift+Arrow keys |
|
Select the word to the left. |
Shift+Option+Left arrow key |
|
Select the word to the right. |
Shift+Option+Right arrow key |
|
Select from the current position to the beginning of the current line. |
Shift+Home |
|
Select from the current position to the end of the current line. |
Shift+End |
|
Select from the current position to the beginning of the current paragraph. |
|
|
Select from the current position to the end of the current paragraph. |
|
|
Select from the current position to the top of the screen. |
Shift+Page up |
|
Select from the current position to the bottom of the screen. |
Shift+Page down |
|
Select from the current position to the beginning of the document. |
|
|
Select from the current position to the end of the document. |
|
|
Select from the current position to the bottom of the window. |
|
|
Select all document content. |
|
Top of Page
Extend a selection
|
To do this |
Press |
|---|---|
|
Start extending the selection. * |
F8 In the extend selection mode, clicking a location in the document extends the current selection to that location. |
|
Select the nearest character to the left. |
F8, Left arrow key |
|
Select the nearest character to the right. |
F8, Right arrow key |
|
Expand the selection. |
F8 repeatedly to expand the selection to the entire word, sentence, paragraph, section, and document. |
|
Reduce the selection. * |
Shift+F8 |
|
Select a vertical block of text. |
|
|
Stop extending the selection. |
Esc |
Top of Page
Edit text and graphics
|
To do this |
Press |
|---|---|
|
Cut the selected content to the Clipboard. |
F2 |
|
Copy the selected content to the Clipboard. |
F3 |
|
Paste the contents of the Clipboard. |
F4 |
|
Display the Paste Special dialog box. |
|
|
Cut the selected content to the Spike. |
|
|
Paste the contents of the Spike. |
|
|
Copy the selected formatting. |
|
|
Paste the copied formatting. |
|
|
Create an AutoText entry. |
Option+F3 |
Top of Page
Align and format paragraphs
|
To do this |
Press |
|---|---|
|
Center the paragraph. |
|
|
Justify the paragraph. |
|
|
Align the paragraph to the left. |
|
|
Align the paragraph to the right. |
|
|
Indent the paragraph. |
Control+Shift+M |
|
Remove a paragraph indent. |
|
|
Create a hanging indent. |
|
|
Remove a hanging indent. |
|
|
Apply single-spacing to the paragraph. |
|
|
Apply double-spacing to the paragraph. |
|
|
Apply 1.5-line spacing to the paragraph. |
|
|
Enable AutoFormat. |
|
|
Apply the Normal style. |
|
|
Apply the Heading 1 style. |
|
|
Apply the Heading 2 style. |
|
|
Apply the Heading 3 style. |
|
|
Apply the List style. |
|
|
Insert a nonbreaking space. |
Option+Spacebar |
Top of Page
Format characters
|
To do this |
Press |
|---|---|
|
Increase the font size. |
|
|
Decrease the font size. |
|
|
Increase the font size by 1 point. |
|
|
Decrease the font size by 1 point. |
|
|
Display the Font dialog box. |
|
|
Switch the text between upper case, lower case, and title case. |
Shift+F3 |
|
Change the text to all upper case. |
|
|
Apply bold formatting. |
|
|
Add a bulleted list. |
|
|
Apply underline formatting. |
|
|
Apply underline formatting to the words, but not the spaces. |
|
|
Apply double-underline formatting. |
|
|
Apply italics formatting. |
|
|
Apply small caps formatting. |
|
|
Apply strike-through formatting. |
|
Top of Page
Insert special characters
|
To do this |
Press |
|---|---|
|
Insert an empty field. |
|
|
Insert a line break. |
Shift+Return |
|
Insert a page break. |
|
|
Insert a column break. |
|
|
Insert a nonbreaking hyphen. |
|
|
Insert a registered trademark symbol (®). |
Option+R |
|
Insert a trademark symbol (™). |
Option+2 |
Top of Page
Work with tables
Move around in a table
|
To do this |
Press |
|---|---|
|
Move to the next cell and select its content. |
Tab key |
|
Move to the previous cell and select its content. |
Shift+Tab |
|
Move to the next row. |
Down arrow key |
|
Move to the previous row. |
Up arrow key |
|
Move to the first cell in the row. |
Control+Home |
|
Move to the last cell in the row. |
Control+End |
|
Move to the first cell in the column. |
Control+Page up |
|
Move to the last cell in the column. |
Control+Page down |
|
Add a new row to the bottom of the table. |
Tab key, at the end of the last row |
|
Insert a row. |
|
Top of Page
Select table content
|
To do this |
Press |
|---|---|
|
Select the content in the next cell. |
Tab key |
|
Select the content in the previous cell. |
Shift+Tab |
|
Extend a selection to adjacent cells. |
Shift+Arrow keys |
|
Select a row. |
Select the first or last cell in the row, and then press Shift+Alt+End or Home. |
Top of Page
Resize table columns with the ruler
|
To do this |
Press |
|---|---|
|
Retain the column sizes to the right and change the table width. |
Drag the column boundary in the ruler |
|
Move a single column line and retain the table width. |
Shift+Drag the column boundary in the ruler |
|
Equally resize all columns to the right and retain the table width. |
|
|
Proportionally resize all columns to the right and retain the table width. |
|
Top of Page
Resize table columns directly in a table
Tip: To finely adjust the column width and display the column’s measurements in the ruler when you resize the column, turn off the snap-to functionality by pressing Option with the shortcut keys.
|
To do this |
Press |
|---|---|
|
Move a single column line and retain the table width. |
Drag the column boundary |
|
Retain column sizes to the right and change the table width. |
Shift+Drag the column boundary |
|
Equally resize all columns to the right and retain the table width. |
|
|
Proportionally resize all columns to the right and retain the table width. |
|
Top of Page
Insert paragraphs and tab characters in a table
|
To do this |
Press |
|---|---|
|
Insert a new paragraph in a cell. |
Return |
|
Insert a Tab character in a cell. |
Option+Tab |
Top of Page
Drawing
|
To do this |
Press |
|---|---|
|
Toggle drawing mode. |
|
Top of Page
Work with fields
|
To do this |
Press |
|---|---|
|
Insert a DATE field. |
Control+Shift+D |
|
Insert a LISTNUM field. |
|
|
Insert a PAGE field. |
Control+Shift+P |
|
Insert a TIME field. |
Control+Shift+T |
|
Insert an empty field. |
|
|
Update the selected fields. * |
F9 |
|
Switch between a field code and its result. * |
Shift+F9 |
|
Switch between all field codes and their results. |
Option+F9 |
|
Run GOTOBUTTON or MACROBUTTON from a field displaying field results. |
Option+Shift+F9 |
|
Lock a field. |
|
|
Unlock a field. |
|
Top of Page
Outline a document
These shortcuts only apply when the document is in the Outline view.
|
To do this |
Press |
|---|---|
|
Promote a paragraph. |
Control+Shift+Left arrow key |
|
Demote a paragraph. |
Control+Shift+Right arrow key |
|
Demote the paragraph to body text. |
|
|
Move the selected paragraphs up. * |
Control+Shift+Up arrow key |
|
Move the selected paragraphs down. * |
Control+Shift+Down arrow key |
|
Expand the text under a heading. |
Control+Shift+Plus sign (+) |
|
Collapse text under a heading. * |
Control+Shift+Minus sign (-) |
|
Expand all body text and headings, or collapse all body text. |
Control+Shift+A |
|
Switch between showing the first line of body text and showing all body text. |
Control+Shift+L |
|
Show all headings with the specified heading level. |
Control+Shift+Heading level number |
Top of Page
Review a document
|
To do this |
Press |
|---|---|
|
Insert a comment. |
|
|
Turn change tracking on or off. |
|
|
Move to the beginning of a comment. |
Home |
|
Move to the end of a comment. |
End (The End key is not available on all keyboards.) |
|
Move to the beginning of the list of comments. |
|
|
Move to the end of the list of comments. |
|
Top of Page
Use footnotes and endnotes
|
To do this |
Press |
|---|---|
|
Insert a footnote. |
|
|
Insert an endnote. |
|
Top of Page
Work with right-to-left languages
Word supports right-to-left functionality for languages that work in a right-to-left or a combined right-to-left, left-to-right environment for writing, editing, and displaying text. In this context, right-to-left languages refers to any writing system that is written from right to left and includes languages that require contextual shaping, such as Arabic, and languages that do not.
Before you can use these keyboard shortcuts, you need to ensure keyboard shortcuts are enabled for the language you are using:
-
Go to Apple > System Preferences > Keyboard.
-
On the Input Sources tab, select the language for which you want to enable shortcuts.
-
On the right side of the tab, select the check box for Enable keyboard shortcuts.
|
To do this |
Press |
|---|---|
|
Switch the writing direction to right-to-left. |
Control+ |
|
Switch the writing direction to left-to-right. |
Control+ |
Top of Page
Use function key shortcuts
Word for Mac uses the function keys for common commands, including Copy and Paste. For quick access to these shortcuts, you can change your Apple system preferences so you don’t have to press the Fn key every time you use a function key shortcut.
Note: Changing system function key preferences affects how the function keys work on your Mac, not just in Word. After changing this setting, you can still perform the special features printed on a function key. Just press the Fn key. For example, to use the F12 key to change your volume, press Fn+F12.
If a function key doesn’t work as you expect it to, press the Fn key in addition to the function key. If you don’t want to press the Fn key each time, you can change your Apple system preferences. For instructions, go to Change function key preferences.
The following table provides the function key shortcuts for Word for Mac.
|
Key |
Description |
|---|---|
|
F1 |
|
|
F2 |
|
|
F3 |
|
|
F4 |
|
|
F5 |
|
|
F6 |
|
|
F7 |
|
|
F8 |
|
|
F9 |
|
|
F10 |
|
|
F11 |
|
Top of Page
Change function key preferences
-
In the Apple menu, select System Preferences.
-
Select Keyboard.
-
On the Keyboard tab, select the check box for Use all F1, F2, etc. keys as standard function keys.
See also
Word help center
Basic tasks using a screen reader with Word
Use a screen reader to explore and navigate Word
Screen reader support for Word
This article describes the keyboard shortcuts in Word for the web.
Notes:
-
If you use Narrator with the Windows 10 Fall Creators Update, you have to turn off scan mode in order to edit documents, spreadsheets, or presentations with Microsoft 365 for the web. For more information, refer to Turn off virtual or browse mode in screen readers in Windows 10 Fall Creators Update.
-
To quickly find a shortcut in this article, you can use Search. Press Ctrl+F and then type your search words.
-
When you use Word for the web, we recommend that you use Microsoft Edge as your web browser. Because Word for the web runs in your web browser, the keyboard shortcuts are different from those in the desktop program. For example, you’ll use Ctrl+F6 instead of F6 for jumping in and out of the commands. Also, common shortcuts like F1 (Help) and Ctrl+O (Open) apply to the web browser – not Word for the web.
In this topic
-
Frequently used shortcuts
-
Ribbon keyboard shortcuts
-
Navigate the document
-
Edit and format the document
-
Work with comments
Frequently used shortcuts
This table lists the most frequently used shortcuts in Word for the web.
Tip: To quickly create a new document in Word for the web, open your browser, type Word.new in the address bar, and then press Enter.
|
To do this |
Press |
|---|---|
|
In the Reading view, open a PDF-based view tagged to work with screen readers. |
Press the Tab key until you reach the Accessibility Mode button, and then press Enter |
|
Find text in the Reading view. |
Ctrl+F or F3 |
|
Find text in the Editing view. |
Ctrl+F or Ctrl+G |
|
Find and replace text in the Editing view. |
Ctrl+H |
|
Hide the task pane, if one is open. |
Esc |
|
Switch to the Zoom control. |
Alt+Period, W, then Q or Alt+Windows logo key, W, then Q |
|
Print the document. |
Ctrl+P |
|
Move to the next landmark region. |
Ctrl+F6 |
|
Go to the Tell Me or Search text field. |
Alt+Q |
Top of Page
Ribbon keyboard shortcuts
Word for the web offers shortcuts called access keys to navigate the ribbon. If you’ve used access keys to save time on Word for desktop computers, you’ll find access keys very similar in Word for the web.
On a Windows computer, access keys all start with Alt+Period (.) or Alt+Windows logo key, then add a letter for the ribbon tab. For example, to go to the Review tab, press Alt+Period, R or Alt+Windows logo key, R.
If you’re using Word for the web on a Mac computer, press Control+Period (.) to start.

-
To get to the ribbon, press Alt+Period or Alt+Windows logo key. You can alternatively press Ctrl+F6 until you reach the Home tab.
-
To move between tabs on the ribbon, press the Tab key.
-
To hide the ribbon so you have more room to work, press Ctrl+F3. Repeat to display the ribbon again.
Go to the access keys for the ribbon
To go directly to a tab on the ribbon, press one of the following access keys:
|
To do this |
Press |
|---|---|
|
Open the Tell Me or Search text field on the ribbon to type a search term. |
Alt+Period, Q or Alt+Windows logo key, Q |
|
Open the File tab to use the Backstage view. |
Alt+Period, F or Alt+Windows logo key, F |
|
Open the Home tab to format text and use the Find tool. |
Alt+Period, H or Alt+Windows logo key, H |
|
Open the Insert tab to insert a picture, link, comment, header or footer, or a page number. You can also access the Symbol gallery. |
Alt+Period, N or Alt+Windows logo key, N |
|
Open the Page Layout tab to set page margins, orientation, and size, and paragraph spacing. |
Alt+Period, A or Alt+Windows logo key, A |
|
Open the References tab to insert a table of contents, footnotes, or endnotes. |
Alt+Period, S or Alt+Windows logo key, S |
|
Open the Review tab to check spelling, add comments, or track and review changes to your document. |
Alt+Period, R or Alt+Windows logo key, R |
|
Open the View tab to choose a view, open the Navigation pane, edit the Header & Footer, and to Zoom the document view. |
Alt+Period, W or Alt+Windows logo key, W |
Top of Page
Use Search
To find an option or perform an action quickly, use the Search text field. To learn more about the Search feature, go to Find what you need with Microsoft Search.
Note: Depending on the version of Microsoft 365 you are using, the Search text field at the top of the app window might be called Tell Me instead. Both offer a largely similar experience, but some options and search results can vary.
-
Select the item or place in your document, presentation, or spreadsheet where you want to perform an action.
-
To go to the Search text field, press Alt+Q.
-
Type the search words for the action that you want to perform. For example, if you want to add a bulleted list, type bullets.
-
Press the Down arrow key to browse through the search results.
-
Once you’ve found the result that you want, press Enter to select it and to perform the action.
Work in the ribbon tabs and menus
The following shortcuts can save time when you work with the ribbon tabs and ribbon menus.
|
To do this |
Press |
|---|---|
|
Select the active tab on the ribbon, and activate the access keys. |
Alt+Period or Alt+Windows logo key. To move to a different tab, use an access key or the Tab key. |
|
When a Ribbon tab is selected, move the focus to the tab commands. |
Enter, then Tab key or Shift+Tab |
|
Activate a selected button. |
Spacebar or Enter |
|
Open the list for a selected command. |
Spacebar or Enter |
|
Open the menu for a selected button. |
Alt+Down arrow key |
|
When a menu or submenu is open, move to the next command. |
Down arrow key |
|
Collapse or expand the ribbon. |
Ctrl+F3 |
Top of Page
Navigate the document
|
To do this |
Press |
|---|---|
|
Move the cursor right by one word. |
Ctrl+Right arrow key |
|
Move the cursor left by one word. |
Ctrl+Left arrow key |
|
Move the cursor up by one paragraph. |
Ctrl+Up arrow key |
|
Move the cursor down by one paragraph. |
Ctrl+Down arrow key |
|
Move the cursor to the beginning of the current line. |
Home |
|
Move the cursor to the end of the current line. |
End |
|
Move the cursor to the beginning of the document. |
Ctrl+Home |
|
Move the cursor to the end of the document. |
Ctrl+End |
|
Select text. |
Shift+Arrow keys |
|
Select the word to the right. |
Shift+Ctrl+Right arrow key |
|
Select the word to the left. |
Shift+Ctrl+Left arrow key |
|
Select the paragraph above. |
Shift+Ctrl+Up arrow key |
|
Select the paragraph below. |
Shift+Ctrl+Down arrow key |
|
Select from the current position to the beginning of the line. |
Shift+Home |
|
Select from the current position to the end of the line. |
Shift+End |
|
Select from the current position to the beginning of the document. |
Shift+Ctrl+Home |
|
Select from the current position to the end of the document. |
Shift+Ctrl+End |
|
Select all document content. |
Ctrl+A |
Top of Page
Edit and format the document
|
To do this |
Press |
|---|---|
|
Cut the selected content to the Clipboard. |
Ctrl+X |
|
Copy the selected content to the Clipboard. |
Ctrl+C |
|
Paste the content from the Clipboard. |
Ctrl+V |
|
Undo the previous action. |
Ctrl+Z |
|
Redo the previous action. |
Ctrl+Y |
|
Shrink the font size. |
Ctrl+Left bracket ([) |
|
Grow the font size. |
Ctrl+Right bracket (]) |
|
Apply bold formatting to the selected text. |
Ctrl+B |
|
Apply italic formatting to the selected text. |
Ctrl+I |
|
Underline the selected text. |
Ctrl+U |
|
Align the paragraph to the left. |
Ctrl+L |
|
Align the paragraph to the right. |
Ctrl+R |
|
Center the paragraph. |
Ctrl+E |
|
Justify the paragraph. |
Ctrl+J |
|
Create a bulleted list. |
Ctrl+Period (.) |
|
Create a numbered list. |
Ctrl+Slash (/) |
Top of Page
See also
Word help center
Basic tasks using a screen reader with Word
Use a screen reader to explore and navigate Word
Screen reader support for Word
In Microsoft Word and other word processor programs, pressing Ctrl+Home moves to the beginning of the document, if not already there. If you pressed Ctrl+Shift+Home, everything from the text cursors current position to the start of the document would be highlighted.
Contents
- 1 What does Ctrl home do in Microsoft Word?
- 2 What happens when you press Ctrl home?
- 3 Where is Ctrl home on laptop?
- 4 What are the Ctrl commands for word?
- 5 Why does Ctrl home not work?
- 6 What is the Home key in Mac?
- 7 What is the Home key in Excel?
- 8 What is control home on a Mac for Excel?
- 9 How do you use Ctrl home?
- 10 What does home button look like?
- 11 How do I save using Ctrl?
- 12 What are the 20 shortcut keys?
- 13 What does Ctrl Z do in Word?
- 14 How do you go to home on a Mac?
- 15 How do you get the home button on the 60 keyboard?
- 16 Where is control home in Excel?
- 17 What are the home keys on a keyboard?
- 18 What does Alt F9 do in Excel?
- 19 What is alt home?
- 20 What are home keys Class 9?
Ctrl+Home moves the cursor to the Home position—that is, the beginning of the document.
What happens when you press Ctrl home?
Ctrl + Home – Pressing Ctrl and Home at the same time takes you to the very beginning of the document, text, worksheet, or page. With languages that write left-to-right, pressing Ctrl+Home moves to the top-left of the page.
Where is Ctrl home on laptop?
The Home key is commonly found on desktop and laptop keyboards. The key has the opposite effect of the End key. In limited-size keyboards where the Home key is missing the same functionality can be reached via the key combination of Fn + ← . Its standard symbol ⇱ from ISO/IEC 9995-7, ie.
What are the Ctrl commands for word?
General Program Shortcuts
- Ctrl+N: Create a new document.
- Ctrl+O: Open an existing document.
- Ctrl+S: Save a document.
- F12: Open the Save As dialog box.
- Ctrl+W: Close a document.
- Ctrl+Z: Undo an action.
- Ctrl+Y: Redo an action.
- Alt+Ctrl+S: Split a window or remove the split view.
Why does Ctrl home not work?
If you are trying to use the Home/7 key on the number keypad, you must be sure that Number Lock is not activated; even then, on some keyboards, this keyboard combination may not be recognized in the simulation. Therefore, the best practice is to use the dedicated Home key on your keyboard.
What is the Home key in Mac?
The “Home” button on a Mac keyboard: Fn + Left Arrow
This is the exact same function as hitting the “Home” button on a Windows PC.
What is the Home key in Excel?
The keyboard’s Home key by itself takes you to the cell in column A of your active cell’s row, or with Ctrl+Home takes you to cell A1. If Freeze Panes is being used, Home takes you to the Freeze Panes column of the active cell’s row, and Ctrl+Home takes you to the Freeze Panes’ intersecting cell.
What is control home on a Mac for Excel?
Using a laptop or other ‘condensed’ keyboard? If so, in order to get the left arrow key to work as the Home key you need to use the fn key as well, so the stroke would be: fn+Cmd+Left Arrow or fn+Ctrl+Left Arrow – either will work.
How do you use Ctrl home?
Alternatively referred to as Control Home and C-Home, Ctrl+Home is a shortcut key that moves the cursor to the end of a document. To use the keyboard shortcut Ctrl+Home, press and hold either Ctrl key on the keyboard and while continuing to hold, press the Home key with either hand.
What does home button look like?
The Home key is usually a round or square software button situated in the middle of your navigation bar.
How do I save using Ctrl?
Save as is located in the file tab of the worksheet in excel but there are also some keyboard shortcuts of using it, one being on the quick access tool bar or we can press F12 and display the save as option or we press the keyboard shortcut CTRL + S which opens the save as dialog box for us to save the file in the
What are the 20 shortcut keys?
Basic Windows keyboard shortcuts
- Ctrl+Z: Undo. No matter what program you’re running, Ctrl+Z will roll back your last action.
- Ctrl+W: Close.
- Ctrl+A: Select all.
- Alt+Tab: Switch apps.
- Alt+F4: Close apps.
- Win+D: Show or hide the desktop.
- Win+left arrow or Win+right arrow: Snap windows.
- Win+Tab: Open the Task view.
What does Ctrl Z do in Word?
To reverse your last action, press CTRL+Z. You can reverse more than one action. To reverse your last Undo, press CTRL+Y. You can reverse more than one action that has been undone.
How do you go to home on a Mac?
Click Finder in the Dock to make sure it’s the active application. Push command+shift+H for home. Or, push command+shift+G for ‘go’ and enter ~/ to go to your home folder. Or in the top menu bar, click on Go > Home.
How do you get the home button on the 60 keyboard?
For example, you can still get Home by pressing Fn-Pn-semicolon (press and hold both Fn and Pn, then press the semicolon key). However don’t worry, you will not have to do that to get Home, because it will be on Fn-P.
Where is control home in Excel?
Useful Excel keyboard shortcuts
| Action | Windows key combination | Mac key combination |
|---|---|---|
| GENERAL SHORTCUTS | ||
| Move to the cell to the left | Shift-Tab | left arrow |
| Move to the beginning of a row | Home | Home or Fn-left arrow |
| Move to the beginning of a worksheet | Ctrl-Home | Control-Home or Control-Fn-Left arrow |
What are the home keys on a keyboard?
The home keys are where you place your fingers when you are learning to type. The home keys include F, D, S, and A on the left of the keyboard, and J, K, L, and ; (semicolon) on the right of the keyboard.
What does Alt F9 do in Excel?
Ctrl+Alt+F9: Calculates all worksheets in all open workbooks, regardless of whether they have changed since the last calculation.
What is alt home?
Alt+Home is a keyboard shortcut most often used to open the homepage in the active tab.Alt+Home in Internet browsers. Alt+Home in Microsoft Word. Related keyboard shortcuts and keys.
What are home keys Class 9?
Home key is the one which is used to return the cursor to the beginning of the line. This happens in documents only where we can edit. In cases where the documents cannot be edited, the home key is used to return the cursor to the beginning of the document.
Updated: 03/13/2021 by

Alternatively written as Control+Home and C-Home, Ctrl+Home is a keyboard shortcut that moves the cursor to the beginning of a document.
How to use the Ctrl+Home keyboard shortcut
To use this keyboard shortcut, press and hold either Ctrl key, and while continuing to hold, press the Home key.
Ctrl+Home in an Internet browser
In all major Internet browsers (e.g., Chrome, Edge, Firefox, IE, Opera), pressing Ctrl+Home scrolls to the beginning of the web page, if not already there.
- Firefox shortcuts
- Google Chrome shortcuts
- Internet Explorer shortcuts
Ctrl+Home in Excel and other spreadsheet programs
In Microsoft Excel, pressing Ctrl+Home moves to the A1 cell.
Tip
If you pressed Ctrl+Shift+Home, everything from the text cursor’s current position to A1 would be highlighted.
- Full list of Excel shortcuts.
Ctrl+Home in Word and other word processors
In Microsoft Word and other word processor programs, pressing Ctrl+Home moves to the beginning of the document, if not already there.
Tip
If you pressed Ctrl+Shift+Home, everything from the text cursor’s current position to the start of the document would be highlighted.
- Full list of Microsoft Word shortcuts.
Ctrl+Home in command line edit command
When editing a file using the edit command in an MS-DOS or Windows command line, pressing Ctrl+Home scrolls to the top of the document.
Below are links to related keyboard shortcuts and individual key pages.
- Alt+Home
- Ctrl
- Home
Ctrl, Home key, Keyboard shortcut, Keyboard terms
Даже если Вы знакомы с Microsoft Word, Вы можете быть удивлены количеством и разнообразием сочетаний клавиш, которые Вы можете использовать для ускорения работы, и, как правило, они делают операции более удобными.
Итак, кто-нибудь ожидает, что Вы запомните все эти комбинации клавиш? Конечно нет! Все потребности разные, поэтому некоторые из них будут более полезны для Вас, чем другие. И даже если Вы просто подберете несколько новых трюков, это того стоит.
Кроме того, хотя наш список горячих клавиш довольно длинный, это далеко не полный список всех клавиатурных комбо, доступных в Word. Мы попытались написать только наиболее полезные сочетания клавиш. И Вы с удовольствием узнаете, что почти все эти горячие клавиши существуют уже давно, поэтому они должны быть полезны независимо от того, какую версию Word Вы используете.
Общие горячие клавиши программы
В Microsoft Word есть много общих горячих клавиш программ, которые облегчают Вам выполнение всего, от сохранения документа, до отмены ошибки.
- Ctrl + N: создать новый документ
- Ctrl + O: открыть существующий документ
- Ctrl + S: сохранение документа
- F12: открыть диалоговое окно «Сохранить как»
- Ctrl + W: закрыть документ
- Ctrl + Z: отменить действие
- Ctrl + Y: повторить действие
- Alt + Ctrl + S: разделить окно или удалить разделенный вид
- Ctrl + Alt + V: просмотр макета печати
- Ctrl + Alt + O: просмотр структуры
- Ctrl + Alt + N: черновик
- Ctrl + F2: предварительный просмотр печати
- F1: открыть панель справки
- Ctrl + F: поиск в документе
- F7: запуск проверки орфографии и грамматики
- Shift + F7: открыть тезаурус. Если Вы выбрали слово, Shift + F7 ищет это слово в тезаурусе.
Перемещение в документе
Вы можете использовать сочетания клавиш, чтобы легко перемещаться по всему документу. Это может сэкономить время, если у Вас длинный документ и Вы не хотите прокручивать весь документ или просто хотите перемещаться между словами или предложениями.
- Стрелка влево/вправо: переместите точку вставки (курсор) на один символ влево или вправо
- Ctrl + стрелка влево/вправо: переместить одно слово влево или вправо
- Стрелка вверх/вниз: перемещение вверх или вниз по одной линии
- Ctrl + стрелка вверх/вниз: перемещение вверх или вниз по одному абзацу
- End: переход к концу текущей строки
- Ctrl + End: переход к концу документа
- Home: переход к началу текущей строки
- Ctrl + Home: переход к началу документа
- Page Up/Page Down: перемещение вверх или вниз по одному экрану
- Ctrl + Page Up/Page Down: переход к предыдущему или следующему объекту просмотра (после выполнения поиска)
- Alt + Ctrl + Page Up/Page Down: переход в верхнюю или нижнюю часть текущего окна
- F5: откройте диалоговое окно «Поиск» с выбранной вкладкой «Перейти», чтобы Вы могли быстро перейти к определенной странице, разделу, закладке и т. д.
- Shift + F5: цикл через последние три местоположения, где была помещена точка вставки. Если Вы только что открыли документ, Shift + F5 переместит Вас до последней точки, которую Вы редактировали, перед закрытием документа.
Выбор текста
Возможно, Вы заметили в предыдущем разделе, что клавиши со стрелками используются для перемещения точки вставки, а клавиша Ctrl используется для изменения этого движения. Использование клавиши Shift для изменения большого количества этих комбинаций клавиш позволяет Вам выбирать текст по-разному.
- Shift + стрелка влево/вправо: продлить текущий выбор одним символом влево или вправо
- Ctrl + Shift + Стрелка влево/вправо: продлить текущий выбор одним словом влево или вправо
- Shift + стрелка вверх/вниз: расширение диапазона вверх или вниз по одной линии
- Ctrl + Shift + стрелка вверх/вниз: расширение выделения до начала или конца абзаца
- Shift + End: увеличить выделение до конца строки
- Shift + Home: продлить выделение до начала строки
- Ctrl + Shift + Home/End: расширить выделение до начала или конца документа
- Shift + Page Down/Page Up: расширенный выбор вниз или вверх на один экран
- Ctrl + A: выделить весь документ
- F8: войти в режим выбора. В этом режиме Вы можете использовать клавиши со стрелками, чтобы расширить свой выбор. Вы также можете нажать F8 до пяти раз, чтобы расширить выделение. Первое нажатие переводит в режим выбора, второе нажатие выбирает слово рядом с точкой вставки, третье выбирает все предложение, четвертое — все символы в абзаце, а пятый — весь документ. Нажатие Shift + F8 работает в том же цикле, но назад. И Вы можете нажать Esc каждый раз, чтобы выйти из режима выбора.
- Ctrl + Shift + F8: выбор столбца. После выбора столбца Вы можете использовать клавиши со стрелками влево и вправо, чтобы расширить выделение на другие столбцы.
Редактирование текста
Word также предоставляет ряд сочетаний клавиш для редактирования текста.
- Backspace: удаление одного символа влево
- Ctrl + Backspace: удалить одно слово слева
- Delete: удалить один символ вправо
- Ctrl + Delete: удалить одно слово справа
- Ctrl + C: копирование или графика в текст буфера обмена
- Ctrl + X: вырезать выделенный текст или графику в буфер обмена
- Ctrl + V: вставить содержимое буфера обмена
- Alt + Shift + R: копировать верхний или нижний колонтитул, используемые в предыдущем разделе документа
Применение форматирования символов
В Word также есть множество клавиатурных комбо для применения форматирования символов и форматирование абзаца, но это описано в следующем разделе. Вы можете использовать горячие клавиши для применения форматирования к выделенному тексту или к тому, что Вы печатаете дальше, если текст не выбран.
- Ctrl + B: форматирование полужирным шрифтом
- Ctrl + I: применить курсивное форматирование
- Ctrl + U: применить форматирование подчеркивания
- Ctrl + Shift + W: применить форматирование подчеркивания к словам, но не к пробелам между словами
- Ctrl + Shift + D: применить двойное форматирование подчеркивания
- Ctrl + D: открыть диалоговое окно шрифта
- Ctrl + Shift + < или >: Уменьшить или увеличить размер шрифта на один заданный размер за раз
- Ctrl + [ или ]: Уменьшить или увеличить размер шрифта по одной точке за раз
- Ctrl + =: применить форматирование подстроки
- Ctrl + Shift + клавиша плюс: применить форматирование верхнего индекса
- Shift + F3: циклический формат для Вашего текста. Доступные форматы — это начало предложения (первая буква в начале, все остальные в нижнем регистре), строчные, прописные, заглавные буквы (первая буква в каждом заглавном слове) и случай переключения (который отменяет все, что там есть).
- Ctrl + Shift + A: Форматирует все буквы в верхнем регистре
- Ctrl + Shift + K: Форматирует все буквы в нижнем регистре
- Ctrl + Shift + C: копирует форматирование символа выделения
- Ctrl + Shift + V: вставляет форматирование на выделенный текст
- Ctrl + Space: удаляет все ручное форматирование символов из выделения
Применение форматирования абзаца
И точно так же, как с форматированием символов, Word имеет кучу горячих клавиш, характерных для форматирования абзацев.
- Ctrl + M: увеличивает отступ абзаца на один уровень каждый раз, когда уы нажимаете его
- Ctrl + Shift + M: уменьшает отступ абзаца на один уровень при каждом нажатии
- Ctrl + T: увеличивает висячий отступ каждый раз, когда Вы нажимаете
- Ctrl + Shift + T: каждый раз, когда Вы нажимаете кнопку, уменьшает висячий отступ
- Ctrl + E: центрировать абзац
- Ctrl + L: выровнять по левому краю абзац
- Ctrl + R: выровнять по правому краю абзац
- Ctrl + J: обозначить абзац
- Ctrl + 1: установка однократного интервала
- Ctrl + 2: установить двойной интервал
- Ctrl + 5: установить 1,5 интервал строк
- Ctrl + 0: удаление одного интервала строки перед абзацем
- Ctrl + Shift + S: открыть всплывающее окно для применения стилей
- Ctrl + Shift + N: применить обычный стиль абзаца
- Alt + Ctrl + 1: применить стиль заголовка 1
- Alt + Ctrl + 2: применить стиль заголовка 2
- Alt + Ctrl + 3: применить стиль заголовка 3
- Ctrl + Shift + L: применить стиль списка
- Ctrl + Q: удалить все форматирование абзаца
Вставка
- Shift + Enter: вставить разрыв строки
- Ctrl + Enter: вставка разрыва страницы
- Ctrl + Shift + Enter: вставить разделитель столбца
- Ctrl + дефис(-): добавить необязательный дефис. Необязательный дефис говорит Word не использовать дефис, если слово не сломается в конце строки. Если это так, Word будет использовать дефис, где Вы его разместили.
- Alt + Ctrl + дефис(-): вставить тире
- Ctrl + Shift + дефис(-): вставить неразрывный дефис. Это говорит Word не сломать слово в конце строки, даже если там есть дефис. Это было бы полезно, например, если бы Вы включили что-то вроде номера телефона и хотели убедиться, что все это появилось на одной строке.
- Ctrl + Shift + Пробел: вставить неразрывное пространство
- Alt + Ctrl + C: вставить символ авторского права
- Alt + Ctrl + R: вставить символ зарегистрированного товарного знака
- Alt + Ctrl + T: вставить символ товарного знака
Работа с контурами
- Alt + Shift + Стрелка влево/вправо: продвигать (перемещаться влево) или понижать (перемещать вправо) линию
- Ctrl + Shift + N: понизить уровень контуров до обычного текстового текста
- Alt + Shift + стрелка вверх/вниз: перемещение линии с помощью точки вставки вверх или вниз в контуре
- Alt + Shift + Plus или Minus: развернуть или свернуть текст под заголовком
- Alt + Shift + A: развернуть или свернуть весь текст или заголовки в контуре
- Alt + Shift + L: показать первую строку основного текста или всего текста тела
- Alt + Shift + 1: показать все заголовки, в которых применяется стиль заголовка 1
- Alt + Shift + любая другая цифра: показать все заголовки этого уровня
Работа с таблицами
- Tab: перейти к следующей ячейке в строке и выбрать ее содержимое, если есть
- Shift + Tab: переход к предыдущей ячейке в строке и выбор ее содержимого, если есть
- Alt + Home/End: переход к первой или последней ячейке в строке
- Alt + Page Up/Page Down: переход к первой или последней ячейке в столбце
- Стрелка вверх/вниз: переход к предыдущей или следующей строке
- Shift + стрелка вверх/вниз: выберите ячейку в строке выше или ниже точки вставки или выбора. Продолжайте нажимать это комбо, чтобы выбрать больше ячеек. Если у Вас есть несколько ячеек в выбранной строке, это комбо выбирает те же самые ячейки в строке выше или ниже.
- Alt + 5 на клавиатуре (с выключенным NumLock): выбрать всю таблицу
Надеемся, Вы нашли несколько новых сочетаний клавиш, чтобы облегчить Вашу жизнь с Word.
Общие клавиши используются для выполнения наиболее распространенных действий:
- Ctrl + N — создать новый текстовый файл;
- Ctrl + O — открыть последнее задание;
- Ctrl + S — сохранить изменения (быстрое сохранение);
- Ctrl + W — закрыть редактор;
- Ctrl + Z — отменить предыдущее действие;
- Ctrl + Y — повторить действие.
Перемещение в документе
Вы можете использовать сочетания клавиш для удобной навигации по документу. Это может сэкономить ваше время, если у вас длинный документ и вы не хотите прокручивать или просто хотите легко перемещаться между словами или фразами.
- Стрелка влево / вправо: перемещает точку вставки (курсор) на один символ влево или вправо
- Ctrl + стрелка влево / вправо: перемещение на одно слово влево или вправо
- Стрелка вверх / вниз: перемещение на одну строку вверх или вниз
- Ctrl + стрелка вверх / вниз: перемещение вверх или вниз по одному абзацу за раз
- Конец: перейти в конец текущей строки
- Ctrl + End: перейти в конец документа
- Home: перейти в начало текущей строки
- Ctrl + Home: перейти к началу документа
- Page Up / Page Down: переход на один экран вверх или вниз
- Ctrl + Page Up / Page Down: переход к предыдущему или следующему элементу просмотра (после поиска)
- Alt + Ctrl + Page Up / Page Down: перемещение вверх или вниз в текущем окне
- F5 — открывает диалоговое окно «Поиск» с выбранной вкладкой «Перейти», чтобы вы могли быстро перейти к определенной странице, разделу, закладке и т.д.
- Shift + F5: прокручивает до трех последних позиций, где была размещена точка вставки. Если вы только что открыли документ, Shift + F5 переместит вас в последнюю точку, которую вы редактировали, перед закрытием документа.
Применение форматирования абзаца
Как и в случае форматирования символов, в Word есть различные сочетания клавиш для форматирования абзацев.
| Действие | Сочетание клавиш |
|---|---|
| Увеличивайте отступ абзаца на один уровень каждый раз, когда вы нажимаете на него | Ctrl + M |
| Уменьшает отступ абзаца на один уровень при каждом нажатии на него | Ctrl + Shift + M |
| Увеличивайте выступ при каждом нажатии | Ctrl + T |
| Уменьшение выступа при каждом нажатии кнопки | Ctrl + Shift + T |
| Центрировать абзац | Ctrl + Mi |
| Выровнять абзац по левому краю | Ctrl + L |
| Выровнять абзац по правому краю | Ctrl + R |
| Отметить абзац | Ctrl + J |
| Установка единого интервала | Ctrl + 1 |
| Установить двойной интервал | Ctrl + 2 |
| Установить межстрочный интервал 1,5 | Ctrl + 5 |
| Удалить интерлиньяж перед абзацем | Ctrl + |
| Открыть всплывающее окно для применения стилей | Ctrl + Shift + S |
| Применить обычный стиль абзаца | Ctrl + Shift + N |
| Применить стиль заголовка 1 | Alt + Ctrl + 1 |
| Применить стиль заголовка 2 | Alt + Ctrl + 2 |
| Применить стиль заголовка 3 | Alt + Ctrl + 3 |
| Применить стиль списка | Ctrl + Shift + L |
| Удалить все форматирование абзаца | Ctrl + Q |
Работа с таблицами
Перемещение между таблицами работает не так, как перемещение по обычному тексту. Вместо того, чтобы щелкать то место, куда вы хотите перейти, или использовать клавиши со стрелками, попробуйте следующие комбинации:
- Tab: перейти к следующей ячейке в строке и выбрать ее содержимое (если есть)
- Shift + Tab: перейти к предыдущей ячейке строки и выбрать ее содержимое (если есть)
- Alt + Home / End: перейти к первой или последней ячейке в строке
- Alt + Page Up / Page Down: переход к первой или последней ячейке столбца
- Стрелки вверх / вниз: переход к предыдущей или следующей строке
- Shift + стрелка вверх / вниз: выберите ячейку в строке выше или ниже точки вставки. Продолжайте щелкать, чтобы выбрать более одной ячейки. Если вы выбрали несколько ячеек в строке, эта комбинация выберет те же ячейки в строке выше или ниже.
- Alt + 5 на цифровой клавиатуре (с отключенным NumLock): выбрать всю таблицу
Редактирование и форматирование документа
|
Действие |
Ключ |
|
Отменить предыдущее действие. Читайте также: Залив из индейки на Новый год, пошаговый рецепт с фото |
CTRL + Z |
|
Если возможно, отмените предыдущее действие. |
CTRL + Y |
|
Вырезать выделенное содержимое в буфер обмена. |
CTRL + X |
|
Скопируйте выделенное содержимое в буфер обмена. |
CTRL + C Читайте также: Рецепт слоеного теста с ветчиной и сыром с пошаговыми фото |
|
В буфере обмена. |
CTRL + V |
|
Дублируйте выбранную форму или изображение. |
CTRL + D |
|
Текст выделен жирным шрифтом. Читайте также: Котлеты из фарша без молока |
CTRL + ДА |
|
Отображает выделенный текст курсивом. |
CTRL + I |
|
Подчеркнуть выделенный текст. |
CTRL + U |
|
Копировать форматирование из выделенного текста |
CTRL + SHIFT + C |
|
Сделайте отступ в абзаце. |
CTRL + M |
|
Вы должны выровнять абзац. |
CTRL + J |
|
Выровнять абзац по левому краю. |
CTRL + L |
|
Выровнять абзац по правому краю |
CTRL + R |
|
Вы в центре абзаца. |
CTRL + E |
Применение форматирование символов
В Word также есть несколько сочетаний клавиш для применения форматирования к символам (а также для форматирования абзацев, но мы рассмотрим эти комбинации в следующем разделе). Вы можете использовать эти сочетания клавиш, чтобы применить форматирование к выделенному тексту, и если текст не выбран, это форматирование будет применено к тому, что вы будете набирать в следующий раз в точке вставки.
- Ctrl + B: сделать текст жирным
- Ctrl + I: выделить текст курсивом
- Ctrl + U: подчеркивает текст
- Ctrl + Shift + W: подчеркивать слова, но оставлять пробелы между словами без подчеркивания
- Ctrl + Shift + D: сделать текст двойным подчеркиванием
- Alt + z + 4 (нажатие последовательно или одновременно): зачеркнутый текст
- Alt + z + x + x (нажатие последовательно): очищает все форматирование
- Ctrl + D или Ctrl + Shift + f: открывает диалоговое окно Шрифт
- Ctrl + Shift +!: Увеличить размер шрифта
- Ctrl + Shift + (: уменьшить размер шрифта
- Ctrl + =: маленький нижний индекс (переключение для преобразования выбранных символов в нижние индексы)
- Ctrl + Shift + =: маленький надстрочный символ (переключает для преобразования выбранных символов в надстрочные символы)
- Shift + F3: округлить форматы прописных букв для текста. Доступные форматы: «Как в предложениях» (первая буква в верхнем регистре, остальные в нижнем регистре), «все в нижнем регистре», «ВСЕ ЗАГЛАВНЫЕ буквы», «Начать с верхнего регистра» (первая буква каждого слова в верхнем регистре) и «ИЗМЕНИТЬ регистр» (изменить регистр букв в обратном порядке).
- Ctrl + Shift + A: сделать все буквы заглавными
- Ctrl + Shift + K: преобразовать все буквы в нижний регистр
- Ctrl + Shift + C: скопировать форматирование символов выделенного текста (БОЛЬШЕ НЕ РАБОТАЕТ?)
- Ctrl + Shift + V: вставить форматирование в выделенный текст (БОЛЬШЕ НЕ РАБОТАЕТ?)
- Ctrl + Space: удалить все ручное форматирование из выделенного текста (сохранить формат стиля)
Работа с слиянием и полями
Чтобы использовать следующие сочетания клавиш, вам необходимо выбрать вкладку «Письма» на ленте. Чтобы выбрать вкладку Буквы, нажмите Alt + M.
Работа с полями
|
Действие |
Сочетание клавиш |
|---|---|
|
Вставка поля ДАННЫХ. |
ALT + SHIFT + D |
|
Введите поле LISTNUM. |
CTRL + ALT + L |
|
Вставка поля СТРАНИЦА. |
ALT + SHIFT + P |
|
Вставьте поле ВРЕМЯ. |
ALT + SHIFT + T |
|
Пожалуйста, введите пустое поле. |
CTRL + F9 |
|
Обновите связанные данные в документе Microsoft Word. |
CTRL + SHIFT + F7 |
|
Обновите выбранные поля. |
F9 |
|
Прекратите общение с лагерем. |
CTRL + SHIFT + F9 |
|
Переключение между кодом выбранного поля и его значением. |
SHIFT + F9 |
|
Переключайтесь между кодами всех полей и их значениями. |
ALT + F9 |
|
Запустите gotOBUTTON или MACROBUTTON из поля, отображающего результаты поля. |
ALT + SHIFT + F9 |
|
Перейти к следующему полю. |
F11 |
|
Перейти к предыдущему полю. |
SHIFT + F11 |
|
Полевой блок. |
CTRL + F11 |
|
Снятие полевого замка. |
CTRL + SHIFT + F11 |
Редактируем абзац
Программа Word выполняет действия с абзацами, аналогичные форматированию букв.
- Ctrl + M: уменьшает отступ на один абзац на один уровень за раз при каждом нажатии этих клавиш;
- Ctrl + Shift + M: уменьшать абзац на один уровень за раз при каждом нажатии этих клавиш;
- Ctrl + T: увеличить отступ абзаца во время этого нажатия;
- Ctrl + Shift + T: уменьшить отступы абзаца во время нажатия;
- Ctrl + E: установить абзац по центру;
- Ctrl + L: абзац выравнивается по левому краю;
- Ctrl + R: абзац выравнивается по правому краю;
- Ctrl + J: абзац выравнивается по ширине;
- Ctrl + 1: установить единичный интервал;
- Ctrl + 2: установить двойной интервал;
- Ctrl + 5: установить интервал 1,5 строки;
- Ctrl + 0: удалить интерлиньяж перед абзацем;
- Ctrl + Shift + S: открывает всплывающее окно «Применить стили»;
- Ctrl + Shift + N Применить к абзацу обычный стиль»;
- Alt + Ctrl + 1: применить параметр «Заголовок 1»;
- Alt + Ctrl + 2: применить параметр «Заголовок 2»;
- Alt + Ctrl + 3: применить параметр «Заголовок 3»;
- Ctrl + Shift + L: применить стиль данного списка;
- Ctrl + Q: отменить все изменения, внесенные в абзацы.
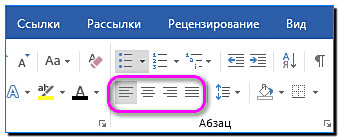
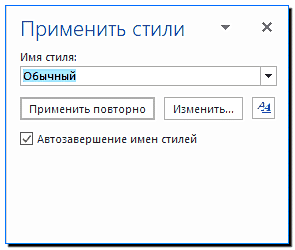

Вставка
- Shift + Enter: вставить разрыв строки
- Ctrl + Enter: вставить разрыв страницы
- Ctrl + Shift + Enter: вставить разделитель столбцов
- Ctrl + тире (-): добавить дополнительный тире. Необязательный дефис указывает Word не использовать дефис, если слово не заканчивается в конце строки. В этом случае Word будет использовать дефис в том месте, где вы его ввели.
- Alt + Ctrl + дефис (-): введите дефис
- Ctrl + Shift + дефис (-): ввод неразрывного дефиса. Это говорит Word не разрывать слово в конце строки, даже если есть дефис. Это было бы полезно, например, если вы указали что-то вроде номера телефона и хотите, чтобы все они отображались в одной строке.
- Ctrl + Shift + Пробел: введите неразрывный пробел
- вставить символ авторского права
- Alt + Ctrl + R: введите символ товарного знака
- Alt + Ctrl + T: введите символ товарного знака
Выбираем текст
В предыдущем методе мы использовали кнопки со стрелками для перемещения курсора. Кнопка Ctrl помогла изменить это движение. Использование клавиши Shift поможет вам еще больше отредактировать текст.
- Shift + стрелка влево / вправо: расширяет эту функцию элементом влево или вправо;
- Ctrl + Shift + стрелка влево / вправо: расширяет выполняемое действие на одно слово влево или вправо;
- Shift + стрелка вверх / вниз: развернуть диапазон вверх или вниз по прямой;
- Ctrl + Shift + стрелка вверх / вниз: увеличить выделение в начале или в конце абзаца;
- Shift + End: расширяет выделенную часть к концу строки;
- Shift + Home: удлиняет выделенную часть до начала строки;
- Ctrl + Shift + Home / End: развернуть выделенную часть в начале текста или в конце текста;
- Shift + Page Down / Page Up: перемещение вверх или вниз листа;
- Ctrl + A: выделить весь текст документа;
- F8: войти в режим выбора. В этом режиме вы можете использовать стрелки, чтобы расширить свой выбор. Вы можете пять раз нажать клавишу F8 и увеличить выбранную область. Первое нажатие переключает в режим выбора, второе нажатие выделяет слово рядом с курсором. Третьим щелчком выделяется все предложение. Четвертый выбирает все элементы абзаца. При пятом нажатии выделяется весь текст. Нажимая Shift + F8, мы выполняем то же действие, но в обратном порядке. Для выхода из указанного режима нужно нажать кнопку Esc;
- Ctrl + Shift + F8: выбрать столбец. После выбора столбца вы можете использовать кнопки со стрелками влево и вправо, чтобы развернуть выбранную часть и перейти на другие столбцы.
Редактирование текста
Word также предоставляет ряд сочетаний клавиш для редактирования текста.
- Backspace: удалить один символ слева
- Ctrl + Backspace: удалить одно слово слева
- Удалить: удалить один символ справа
- Ctrl + Del: удалить одно слово справа
- Ctrl + C: копировать текст или изображение в буфер обмена
- Ctrl + X: вырезать выделенный текст или графику в буфер обмена
- Ctrl + V: вставить содержимое буфера обмена
- Ctrl + F3: вырезать выделенный текст на Spike. Спайк — интересная опция в обычном буфере обмена. Вы можете продолжать вырезать текст на Spike, и Word все запомнит. Когда вы вставляете содержимое Spikes, Word вставляет все, что вы вырезали, но помещает каждый элемент в отдельную строку.
- Ctrl + Shift + F3: вставить содержимое вершин
- Alt + Shift + R: копирует верхний или нижний колонтитул, использованный в предыдущем разделе документа
Основные горячие клавиши Google Chrome
Google Chrome — один из самых популярных браузеров в России. Пришло время ознакомиться с некоторыми полезными сочетаниями клавиш.
42. Ctrl + T: открыть новую вкладку.
Mac: Command + T.
43. Ctrl + Shift + T: открыть последнюю закрытую вкладку.
Mac: Command + Shift + T.
44. Ctrl + Shift + N: открывает новое окно в режиме «Приватный просмотр».
Mac: Command + Shift + N.
45. Ctrl + D: добавить страницу в закладки.
Mac: Command + D.
46. Ctrl + R — перезагрузить страницу.
Mac: Command + R.
47. Ctrl + L — выделяет URL-адрес страницы в адресной строке.
Mac: Command + L.
48. Ctrl + F — поиск по странице.
Mac: Command + F.
49. Ctrl + J — смотреть свои загрузки в Chrome.
Mac: Command + Shift + J.
Форматирование
- Ctrl + D или Ctrl + Shift + F — комбинация для отображения диалогового окна «Персонаж»;
- Ctrl + B / I — выделить выделение или абзац жирным или курсивом;
- Ctrl + U — применить подчеркивание сплошной линией;
- Ctrl + Shift + W — подчеркивать предложения без пробелов Форматировать абзацы в Word.
Представленные ниже команды нужны для выравнивания строк текста в Word, форматирования заголовков и субтитров, выбора определенного диапазона, например:
- Ctrl + E — центрировать абзац;
- Ctrl + L / R — выравнивание влево / вправо;
- Ctrl + J — по ширине;
- Ctrl + 1/2/5 — установить одинарный / двойной / полуторный интервал.
CTRL + ALT + функциональные клавиши
| Действие | Сочетание клавиш |
|---|---|
| Просмотр системной информации | CTRL + ALT + F1 |
| Подбор команды | CTRL + ALT + F2 |
С помощью представленных выше сочетаний клавиш можно быстро выполнять различные задачи при работе с документами в Microsoft Word, и, конечно же, невозможно запомнить все сочетания клавиш, поэтому добавьте эту страницу в закладки и используйте ее при необходимости.
В арсенале текстового редактора Microsoft Word имеется довольно-таки большой набор полезных функций и инструментов, необходимых для работы с документами. Многие из этих средств представлены на панели управления (ленте), удобно распределены по вкладкам и тематическим группам, откуда к ним и в несколько кликов можно получить доступ. Однако быстрее да и просто удобнее выполнять необходимые действия посредством горячих клавиш. Сегодня расскажем об основных комбинациях, которые можно и нужно использовать в работе с программой и непосредственно докуменами.
Горячие клавиши в Ворде
Ввиду обилия комбинация горячих клавиш, которые предоставляют возможность быстрого и удобного выполнения того или иного действия в Word или вызова необходимой функций, мы рассмотрим далеко не все из них, а только самые необходимые и, что не менее важно, простые для запоминания.
CTRL+A — выделение всего содержимого в документе
CTRL+C — копирование выделенного элемента/объекта
Урок: Как в Ворде копировать таблицу
CTRL+X — вырезать выделенный элемент
CTRL+V — вставить предварительно скопированный или вырезанный элемент/объект/фрагмент текста/таблицу и т.д.
CTRL+Z — отмена последнего действия
CTRL+Y — повтор последнего действия
CTRL+B — установить полужирный шрифт (применимо как к предварительно выделенному тексту, так и к тому, который вы только планируете набирать)
CTRL+I — установить шрифт “курсив” для выделенного фрагмента текста или текста, который вы собираетесь набрать в документе
CTRL+U — установить подчеркнутый шрифт для выделенного фрагмента текста или того, который вы хотите напечатать

Урок: Как сделать подчеркивание текста в Word
CTRL+SHIFT+G — открытие окна “Статистика”
Урок: Как в Word посчитать количество символов
CTRL+SHIFT+SPACE (пробел) — вставка неразрывного пробела
Урок: Как в Ворде добавить неразрывный пробел
CTRL+O — открытие нового/другого документа
CTRL+W — закрытие текущего документа
CTRL+F — открытие окна поиска
Урок: Как в Word найти слово
CTRL+PAGE DOWN — переход к следующему месту изменения
CTRL+PAGE UP — переход к предыдущему месту изменения
CTRL+ENTER — вставка разрыва страницы в текущем месте
Урок: Как в Ворде добавить разрыв страницы
CTRL+HOME — при уменьшенном масштабе отображения перемещает к первой странице документа
CTRL+END — при уменьшенном масштабе отображения перемещает к последней странице документа
CTRL+P — отправить документ на печать

Урок: Как в Word сделать книгу
CTRL+K — вставка гиперссылки

Урок: Как в Ворде добавить гиперссылку
CTRL+BACKSPACE — удаление одного слова, расположенного слева от указателя курсора
CTRL+DELETE — удаление одного слова, расположенного справа от указателя курсора
SHIFT+F3 — изменение регистра в предварительно выделенном фрагменте текста на противоположный (меняет большие буквы на маленькие или наоборот)

Урок: Как в Word сделать большие буквы маленькими
CTRL+S — сохранение текущего документа
На этом можно закончить. В этой небольшой статье мы рассмотрели основные и самые необходимые горячие клавиши в Microsoft Word. Обозначенных выше комбинаций достаточно для того, чтобы быстрее и продуктивнее работать с текстовыми документами в этой программе.
Еще статьи по данной теме:
Помогла ли Вам статья?
 Приветствую Вас, дорогие гости компьютерного сайта. В этой статье мы рассмотрим комбинации горячих клавиш Microsoft Word, что бы увеличить свои навыки в работе, а так же уменьшить время на использование различных функций в данной программе.
Как я уже говорил, Вы можете увеличить скорость работы в несколько раз, если будете использовать горячие клавиши. Как и с программой Microsoft Excel, многие работают в текстовом редакторе Word. Это еще одна полезная программа из Microsoft Office. И так давайте рассмотрим сочетания клавиш наиболее используемые в работе.
Ctrl + A — Выделить документ целиком.
Ctrl + C — Копировать выделенный фрагмент.
Ctrl + X — Вырезать выделенный фрагмент.
Ctrl + V — Вставить из буфера обмена копированный/вырезанный фрагмент.
Ctrl + F — Открыть окно поиска.
Ctrl + Y — Повторить последнее действие.
Ctrl + Z — Отменить последнее действие.
Ctrl + B — Выделить жирным выбранный текст.
Ctrl + I — Выделить курсивом выбранный текста.
Ctrl + U — Подчеркнуть выделенный текст.
Ctrl + K — Вставить ссылку.
Ctrl + S — Сохранить открытый документ (альтернативная комбинация Shift + F12).
Ctrl + W — Закрыть документ.
Ctrl + N — Создать документ.
Ctrl + O — Открыть документ.
Ctrl + D — Открыть окно шрифтов.
Ctrl + Space (Пробел) — Сделать шрифт по умолчанию для выделенного текста.
Ctrl + M — Отступ абзаца.
Ctrl + T — Увеличение отступа слева.
Ctrl + E — Выравнивание абзаца по центру экрана.
Ctrl + L — Выравнивание абзаца по левой стороне экрана.
Ctrl + R — Выравнивание абзаца по правой стороне экрана.
Ctrl + J — Выравнивание по формату.
Ctrl + Shift + L — Маркированный список.
Ctrl + 0 (ноль) — Увеличить или уменьшить интервал перед абзацем на одну строку.
Ctrl + 1 — Одинарный междустрочный интервал.
Ctrl + 2 — Двойной междустрочный интервал.
Ctrl + End — Переместиться в конец документа.
Ctrl + Home — Переместиться в начало документа.
Ctrl + [стрелка влево] — Перемещение на одно слово влево.
Ctrl + [стрелка вправо] — Перемещение на одно слово вправо.
Ctrl + [стрелка вверх] — Переход к началу строки или абзаца.
Ctrl + [стрелка вниз] — Переход к концу абзаца.
Ctrl + Del — Удалить слово справа от курсора.
Ctrl + Backspace — Удалить слово слева от курсора.
Ctrl + Shift + F — Изменить шрифт.
Ctrl + Shift + > — Увеличить размер шрифта.
Ctrl + Shift + < — Уменьшить размер шрифта.
Shift + F3 — Изменить регистр букв. Заглавная Буква В Начале Каждого Слова. ПРОПИСНЫЕ или нижний регистр выделенного текста, для изменения нужно несколько раз нажать на комбинацию этих клавиш.
Ctrl + F1 — Открыть меню Панель задач.
Ctrl + F2 — Отображение предварительного просмотра.
Ctrl + Enter — Переход на следующую строку.
Ctrl + ] — Увеличить шрифт выделенного текста.
Ctrl + [ — Уменьшить шрифт выделенного текста.
Shift + Alt + D — Вставить текущую дату (ДД.ММ.ГГГГ).
Shift + Alt + T — Вставить текущее время (ЧЧ:ММ:СС).
Использование функциональных клавиш в Microsoft Word.
Про функциональные клавиши F1-F12 я уже рассказывал вот здесь, они широко используются в Microsoft Windows, во множествах программ. Функциональные клавиши позволяют получить доступ к каким-либо функциям очень быстро, достаточно нажать одну из кнопок, а что означает каждая из них для Microsoft Word, можно ознакомиться чуть ниже.
F1 — Открыть меню «Справка».
F2 — Переместить текст или картинку.
F3 — Вставить элемент «Автотекст».
F4 — Повторить последнее действие (Word 2000+).
F5 — Открыть меню «Правка».
F6 — Перейти к следующей области.
F7 — Проверка орфографии и грамматики выделенного текста.
F8 — Расширение выделения.
F9 — Обновить выделенные поля.
F10 — Перейти в строку «Меню».
F11 — Перейти к следующему полю.
F12 — Открыть меню «Сохранить как».
В дополнение к указанным выше комбинациям клавиш Word, Вы так же можете использовать свою мышку для удобства работы. Кстати, не забудьте прочитать интересную статью о секретах компьютерной мыши, в которой найдете очень полезные функции.
- Двойной щелчок левой кнопкой выделит слово на которое щелкнули.
- Тройной щелчок левой кнопкой выделит весь абзац.
- Схватите выделенный текст левой кнопкой и переместите в нужное место, потом отпускайте кнопку.
- Держите клавишу Ctrl и крутите колесо мыши чтобы уменьшить или увеличить размер документа.
Вот такие небольшие советы новичкам по работе с Microsoft Word, с использованием комбинаций горячих клавиш и использованием сочетаний клавиш мыши.
Даже если вы хорошо знакомы с Microsoft Word, отлично управляетесь со всеми его настройками и многое из списка вам знакомо, многое из этого списка используется, например, в Google Chrome, всегда можно повысить продуктивность или сократить количество кликов мышкой, не отвлекаясь от клавиатуры и полета мысли.
Какова вероятность того, что вы запомните все эти комбинации клавиш? Маловероятно! Даже если вы возьмете на вооружение несколько самых необходимых — это сильно облегчит вам жизнь.

Я собрал довольно много горячих клавиш, но, говорят, их гораздо больше и запомнить и использовать их все могут, вероятно, только Джедаи.
Общие горячие клавиши программы
- Ctrl + N: создать новый документ
- Ctrl + O: открыть существующий документ
- Ctrl + S: сохранение документа
- F12: откройте диалоговое окно «Сохранить как»
- Ctrl + W: закрыть документ
- Ctrl + Z: отменить действие
- Ctrl + Y: повторить действие
- Alt + Ctrl + S: Разделить окно или удалить разделенный вид
- Ctrl + Alt + O: Просмотр структуры
- Ctrl + Alt + N: черновик
- Ctrl + F2: предварительный просмотр
- F1: откройте панель справки
- F9: обновить коды полей в текущем выборе
- Ctrl + F: поиск
- F7: Запуск проверки орфографии и грамматики
- Shift + F7: откройте тезаурус. Если вы выбрали слово, Shift + F7 ищет это слово в тезаурусе.
Перемещение в документе
Вы можете использовать сочетания клавиш, чтобы легко перемещаться по всему документу. Это может сэкономить время, если у вас длинный документ и вы не хотите прокручивать или просто хотите легко перемещаться между словами или предложениями.
- Стрелка влево / вправо: переместите точку вставки (курсор) на один символ влево или вправо
- Ctrl + стрелка влево / вправо: переместить одно слово влево или вправо
- Стрелка вверх / вниз: перемещение вверх или вниз по одной линии
- Ctrl + стрелка вверх / вниз: перемещение вверх или вниз по одному абзацу
- End: переход к концу текущей строки
- Ctrl + End: переход к концу документа
- Home: переход к началу текущей строки
- Ctrl + Home: переход к началу документа
- Page Up / Page Down: перемещение вверх или вниз по одному экрану
- Ctrl + Page Up / Page Down: переход к предыдущему или следующему объекту просмотра (после выполнения поиска)
- Alt + Ctrl + Page Up / Page Down: переход в верхнюю или нижнюю часть текущего окна
- F5: откройте диалоговое окно «Поиск» с выбранной вкладкой «Перейти», чтобы вы могли быстро перейти к определенной странице, разделу, закладке и т. д.
- Shift + F5: цикл через последние три местоположения, где была помещена точка вставки. Если вы только что открыли документ, Shift + F5 переместит вас до последней точки, которую вы редактировали, перед закрытием документа.
Выбор текста
В предыдущем разделе клавиши со стрелками используются для перемещения курсора, а клавиша Ctrl используется для изменения этого движения. Использование клавиши Shift для изменения большого количества этих комбинаций клавиш позволяет вам выбирать текст по-разному.
- Shift + стрелка влево / вправо: продлить текущий выбор одним символом влево или вправо
- Ctrl + Shift + Стрелка влево / вправо: продлить текущий выбор одним словом влево или вправо
- Shift + стрелка вверх / вниз: расширение диапазона вверх или вниз по одной линии
- Ctrl + Shift + стрелка вверх / вниз: расширение выделения до начала или конца абзаца
- Shift + End: Увеличить выделение до конца строки
- Shift + Home: продлить выделение до начала строки
- Ctrl + Shift + Home / End: Расширить выделение до начала или конца документа
- Shift + Page Down / Page Up: расширенный выбор вниз или вверх на один экран
- Ctrl + A: выберите весь документ
- F8: Войдите в режим выбора. В этом режиме вы можете использовать клавиши со стрелками, чтобы расширить свой выбор. Вы также можете нажать F8 до пяти раз, чтобы расширить выделение. Первое нажатие переходит в режим выбора, второе нажатие выбирает слово рядом с курсором, третье выбирает все предложение, четвертое — все символы в абзаце, а пятое — весь документ. Нажатие Shift + F8 работает в том же цикле, но назад. Нажав Esc, чтобы выйти из режима выбора.
- Ctrl + Shift + F8: выбор столбца. После выбора столбца вы можете использовать клавиши со стрелками влево и вправо, чтобы расширить выделение на другие столбцы.
Редактирование текста
Word также предоставляет ряд сочетаний клавиш для редактирования текста.
- Backspace: удаление одного символа влево
- Ctrl + Backspace: удалить одно слово слева
- Delete: удалить один символ вправо
- Ctrl + Delete: удалить одно слово справа
- Ctrl + C: копировать текст или изображение в буфера обмена
- Ctrl + X: вырезать выделенный текст или графику в буфер обмена
- Ctrl + V: Вставить содержимое буфера обмена
- Ctrl + F3: Вырезать выделенный текст на Spike. Спайк — интересный вариант в обычном буфере обмена. Вы можете продолжать резки текста на Спайк, и Word запоминает все это. Когда вы вставляете содержимое Spikes, Word вставляет все, что вы разрезаете, но помещает каждый элемент в свою линию.
- Ctrl + Shift + F3: вставить содержимое Spikes
- Alt + Shift + R: копировать верхний или нижний колонтитул, используемые в предыдущем разделе документа
Применение форматирования символов
- Ctrl + B: форматирование полужирным шрифтом
- Ctrl + I: применить курсивное форматирование
- Ctrl + U: применить форматирование подчеркивания
- Ctrl + Shift + W: применить форматирование подчеркивания к словам, но не пробелы между словами (вот это крутое, всегда не мог понять как это сделать)
- Ctrl + Shift + D: применить двойное форматирование подчеркивания
- Ctrl + D: открыть диалоговое окно Шрифты
- Ctrl + [ или ]: Уменьшить или увеличить размер шрифта по одной точке за раз
- Ctrl + =: форматирование подстроки
- Ctrl + Shift + Плюс: форматирование в верхний индекс
- Shift + F3: циклический формат для вашего текста. Доступные форматы — формат предложения (первая буква в начале письма, все остальные в нижнем регистре), строчные, прописные, заглавные буквы (первая буква в каждом заглавном слове) и формат переключения (который отменяет все, что там есть).
- Ctrl + Shift + A: Форматирует все буквы в верхний регистр
- Ctrl + Shift + K: Форматирует все буквы в нижний регистр
- Ctrl + Shift + C: копирует форматирование символа выделения
- Ctrl + Shift + V: вставляет форматирование на выделенный текст
- Ctrl + Space: удаляет все ручное форматирование символов из выделения
Применение форматирования абзаца
Как и с форматированием символов, Word умеет проделывать и для форматирования абзацев.
- Ctrl + M: Увеличивает отступ абзаца на один уровень каждый раз при нажатии
- Ctrl + Shift + M: уменьшает отступ абзаца на один уровень при каждом нажатии
- Ctrl + T: Увеличивает отступ каждый раз, когда вы нажимаете его
- Ctrl + Shift + T: каждый раз, когда вы нажимаете кнопку, уменьшает отступ
- Ctrl + E: Центрировать абзац
- Ctrl + L: выровнять по левому краю
- Ctrl + R: выровнять по правому краю
- Ctrl + J: Обозначить абзац
- Ctrl + 1: установка однократного интервала
- Ctrl + 2: установить двойной интервал
- Ctrl + 5: установить 1,5 интервала строк
- Ctrl + 0: удаление одного интервала строки перед абзацем
- Ctrl + Shift + S: открыть всплывающее окно для применения стилей
- Ctrl + Shift + N: применить обычный стиль абзаца
- Alt + Ctrl + 1: применить стиль заголовка 1
- Alt + Ctrl + 2: применить стиль заголовка 2
- Alt + Ctrl + 3: применить стиль заголовка 3
- Ctrl + Shift + L: применить стиль списка
- Ctrl + Q: удалить все форматирование абзаца
Произвольные символы и возможности страницы
- Shift + Enter: Вставить разрыв строки
- Ctrl + Enter: вставка разрыва страницы
- Ctrl + Shift + Enter: вставьте разделитель столбца
- Alt + Ctrl + C: вставить символ авторского права ©
- Alt + Ctrl + R: вставить символ зарегистрированного товарного знака ®
- Alt + Ctrl + T: Вставить символ товарного знака ™
Работа с таблицами
Перемещение в таблицах не очень похоже на перемещение в обычном тексте. Вместо того, чтобы кликнуть мышкой, попробуйте эти сочетания:
- Tab: перейти к следующей ячейке в строке и выбрать ее содержимое, если есть
- Shift + Tab: перейти к предыдущей ячейке в строке и выбрать ее содержимое
- Alt + Home / End: переход к первой или последней ячейке в строке
- Alt + Page Up / Page Down: переход к первой или последней ячейке в столбце
- Стрелка вверх / вниз: переход к предыдущей или следующей строке
- Shift + стрелка вверх / вниз: выберите ячейку в строке выше или ниже точки курсора или выбора. Продолжайте нажимать, чтобы выбрать больше ячеек. Если у вас есть несколько ячеек в выбранной строке
- Alt + 5 на клавиатуре (с выключенным NumLock): выберите всю таблицу
Многие из этих комбинаций работают так же в Excel и других компонентах Microsoft Office. Надеюсь, вы нашли несколько новых сочетаний клавиш, которые точно войдут в жизнь в Word!
I have had several people in my Microsoft Word training classes asking if there is a good list of word shortcuts. Microsoft have produced an article but I have composed a list of the best and most useful ones that I have come across from working with word over the last 20 years. As Word has changed and developed over the years with plenty of new versions, some of these areas may be unfamiliar to you. So if you would like to find out more about using Word and getting the most from it, do have a look at attending one of our courses such as the Microsoft Word Office Users course.
|
Shortcuts Keys |
Operation |
|
Ctrl+X |
Cut |
|
Ctrl+C |
Copy |
|
Ctrl+V |
Paste |
|
Ctrl+Z |
Undo |
|
Ctrl+Y |
Redo |
|
Ctrl+S |
Save |
|
Ctrl+P |
Shortcuts for moving around easily / quickly in Word
|
Home |
Beginning of line |
|
End |
End of line |
|
Ctrl + Home |
Go to start of document |
|
Ctrl + End |
Go to end of document |
|
Right Arrow |
Right one character |
|
Left Arrow |
Left one character |
|
Ctrl+Right Arrow |
Right one word |
|
Ctrl+Left Arrow |
Left one word |
|
Up Arrow |
Up one line |
|
Down Arrow |
Down one line |
|
Ctrl+Up Arrow |
Up one paragraph |
|
Ctrl+Down Arrow |
Down one paragraph |
|
F4 |
Repeat last command |
|
Ctrl + A |
Select Whole Document |
Text Formatting Shortcuts in Word
|
Ctrl+B |
Bold |
|
Ctrl+I |
Italics |
|
Ctrl+U |
Underline |
|
Ctrl+Shift+L |
Bulleted list |
|
Ctrl+L |
Align left |
|
Ctrl+R |
Align right |
|
Ctrl+E |
Align centre |
|
Ctrl+[ |
Shrink font size |
|
Ctrl+] |
Grow font size |
I hope you find this list of shortcuts useful and do feel free to ask us if you need any assistance or want to attend one of our courses.