
It is easy to read the data presented in comma-separated values format by opening with Excel but scrambled data makes it hard to read. There are also a few problems associated, like unexpected data changes, by changing the format when the CSV file is opened directly. This article shows different ways to convert the CSV files into Excel by covering the following topics.
Excel has a handling feature for various data presented in different formats, including Comma Separated Values (CSV). In addition, it contains various useful functions that help import these files and easily convert them into Excel sheet tables. As a result, it is the most commonly used for transmitting and storing data related to contacts, statistical information, and calendar appointments.
This section facilitates examples of ways to convert the Comma Separated Values files into excel.
Table of contents
- What Is Converting CSV Files In Excel?
- Explanation
- How To Open, Import & Convert CSV File Into Excel?
- How to Use CSV Files in Excel?
- Important Things To Note
- Recommended Articles
You are free to use this image on your website, templates, etc, Please provide us with an attribution linkArticle Link to be Hyperlinked
For eg:
Source: <strong>Converting CSV Files in Excel</strong> (wallstreetmojo.com)
- Converting CSV files in excel is an easy process. CSV stands for Comma separated Values. It indicates that the values will be separated by a comma.
- We can have CSV files in Excel in two different ways. One is by importing the file, and the other one is by opening the file.
- We should remember that the format of the CSV file inserted using the open method will be in .csv format and will not change into .xlsx or .xls formats.
- For CSV files, excel allows a maximum of 1,048,576 rows and 16,384 columns.
Explanation
We have been using the data available in CSV format for several years. It indicates that data is separated by a comma using the common fields. Different ways are available to convert the CSV files into Excel. Those include:
- Direct opening of CSV files with Excel.
- Double-clicking and opening the file through the windows explorer option.
- Importing CSV files into worksheets.
The main intention behind the conversion of CSV data into Excel is that supportability. Each comma-separated value is placed into each cell to separate easily with the conversion. The data presented in the CSV format limits the capabilities of a user in generating insights from the data in performing the data analysis.
How To Open, Import & Convert CSV File Into Excel?
Let us discuss some examples of the comma-separated values file in Excel to understand how to open, import and convert CSV files into Excel.
You can download this CSV Files into Excel Template here – CSV Files into Excel Template
Example #1 – Open CSV File In WorkSheet
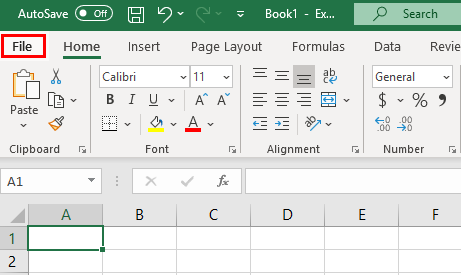
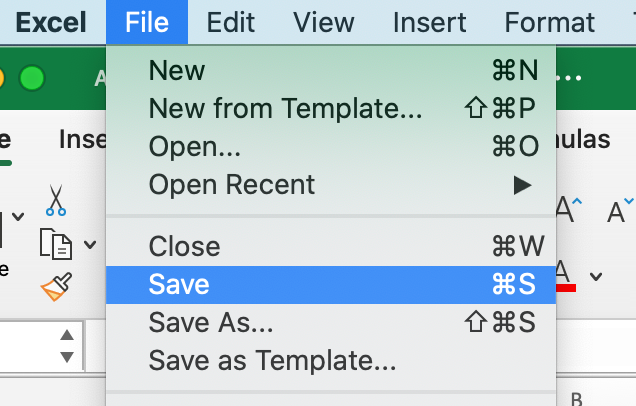
Step 1: We must open the Excel worksheet and go to the File menu.
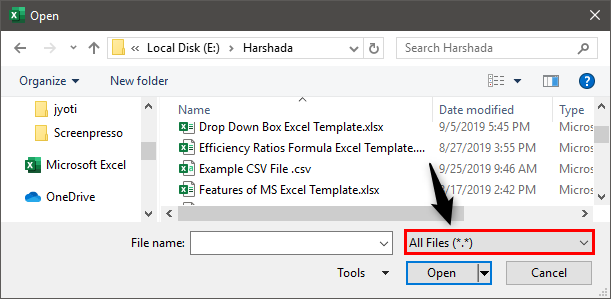
It shows the Open dialog box, as shown in the figure.

Step 2: Then, we need to go to the CSV file’s directory. Select All Files on the right of the File name field.
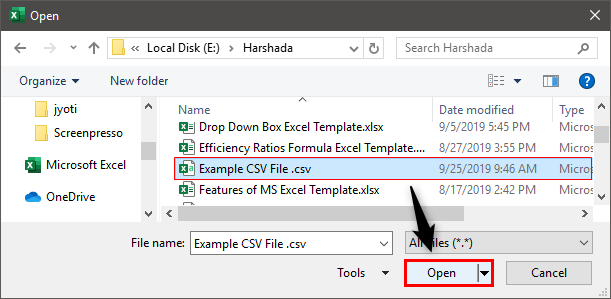
Select the name of the CSV file. Then, click on Open to open the file with Excel.
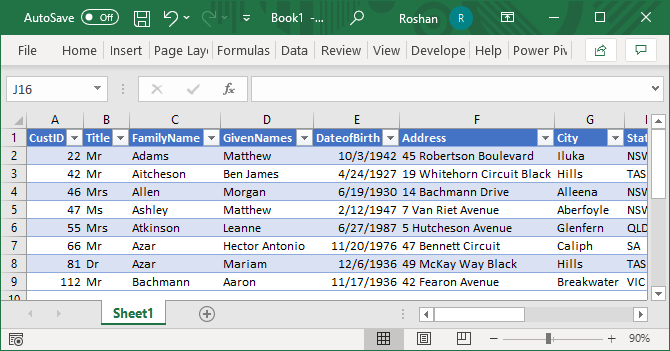
Step 3: It directly displays the data in the new workbook, as shown in the figure.
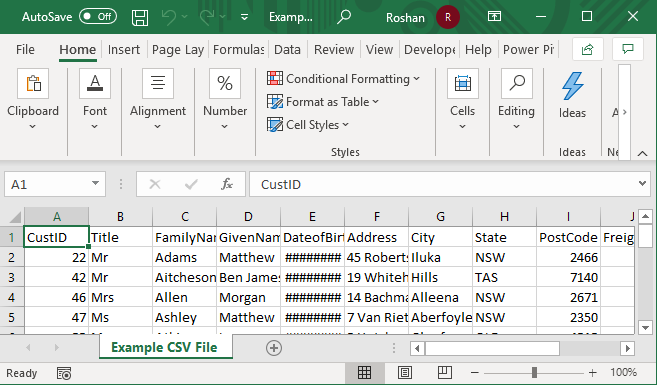
Data separated by a comma is placed into each cell in the Excel sheet.
Step 4: We need to apply the formatting to the title fields to differentiate the headers of columns.
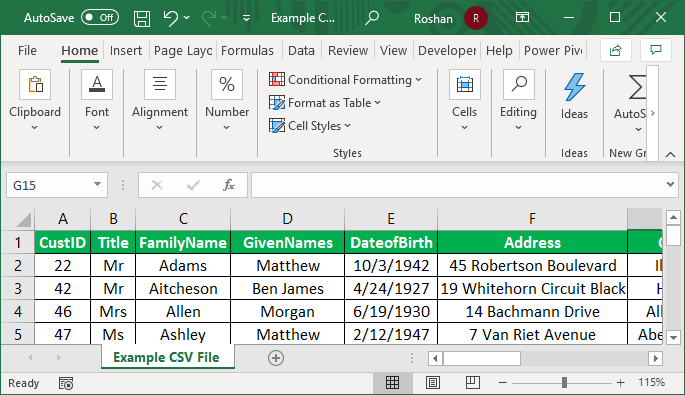
Step 5: Use the data for required purposes by applying the excel functions and formula.
Note: In this Excel, if we open a .txt file instead of a .csv file, Import Text Wizard is used to import the data into Excel.
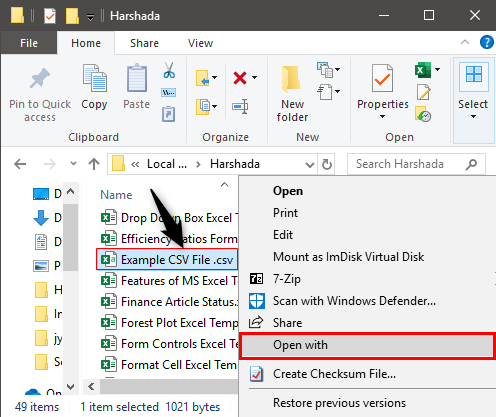
Example #2 – Using Windows Explorer
Step 1: We must go to the CSV file’s directory. Right-click on the file and choose Open with.
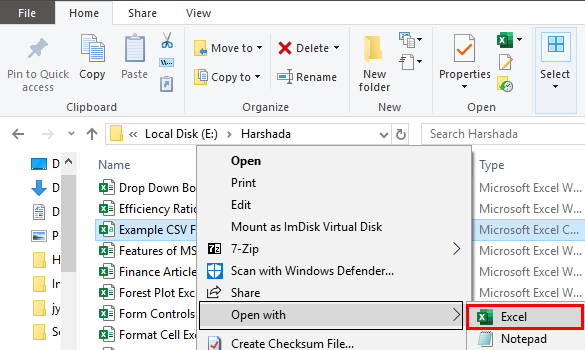
Step 2: Select the choose default program option on the right side of the Open with command, as shown in the figure. Then, choose Excel (desktop) among the recommended programs.
Step 3: As a result, now, the file is opened, and data is displayed, as shown in the figure.

Example #3 – Import CSV File Through External Data
This method requires a lot of steps to import data compared to the other two techniques. However, it helps in importing the data into the current worksheet.
The steps to import CSV files through external data are as follows:
- First, we must open an Excel worksheet and place the cursor into a cell where we want to locate the data by importing from a .txt file or .csv file.

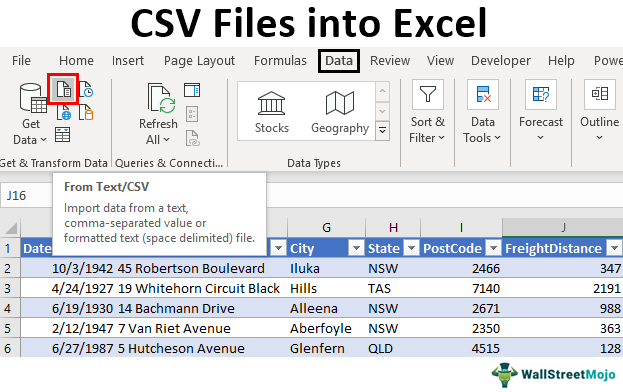
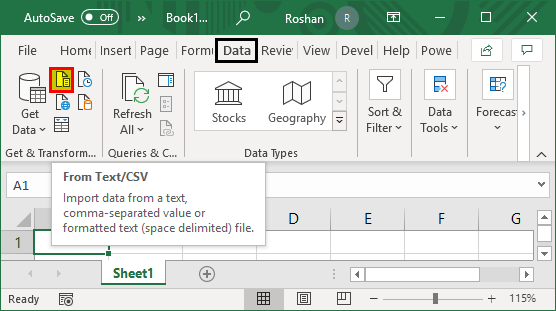
- Then, we need to go to the Data tab on the ribbon and click From Text/CSV under the Get External Data group, as shown in the screenshot.

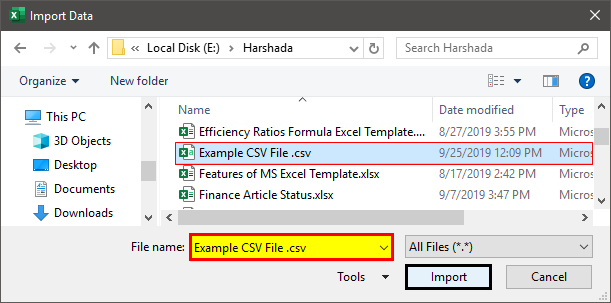
- Browse to the location of the CSV or txt file to import the data. Then, select the .csv file and click on the Import button.

- The Example CSV File wizard will open when clicking on Import.

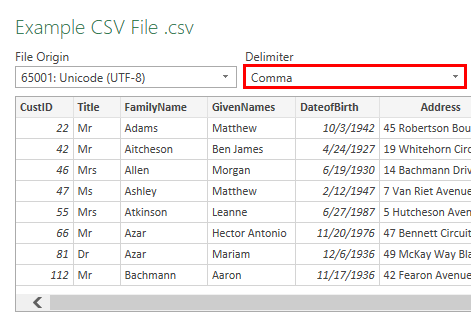
- Then we need to set the delimiter as Comma and click on ‘Load to’ to move to the next step.

- It opens the ‘Import data’ dialog box. Here, we must choose the existing worksheet, place the cell address, and click OK.

- Consequently, the data will be imported into the Excel sheet, as shown in the screenshot.


We can use the data for various purposes in Excel.
How to Use CSV Files in Excel?
- Storing data and performing the required calculations on the data.
- Improving the security of the files as Excel files are not opened by any other software.
- Possible to save the data in tabular format with the extension of .xls and .xlsx.
- Display of data in rows and columns to represent the fields.
- Using the required format for the data of different types.
- Development of graphs and charts on the numerical data if presented.
- Using the statistical analysis of the data.
- Using the programming and macros and developing the data in developer mode.
- Improving the flexibility in reading large data by using sorting and filtering.
Important Things To Note
- Opening the CSV files is an easy way to convert the CSV data into Excel, and it does not change the file format to .xls or .xlsx
- Default settings are provided for when the .csv file is opened with Excel.
Frequently Asked Questions
1. What is CSV file in excel?
CSV (Comma separated Values) are the values separated by commas in Excel. This feature is available in any version, from 365 to 2007 version.
2. What are the two ways to insert CSV files into Excel?
In Excel, we have 2 ways to insert CSV files. One is by importing and another, by opening. The shortcut to open a CSV file in Excel is Ctrl +O.
3. Which is better? Opening or importing a CSV file into Excel?
Though both methods are used commonly to insert CSV files into Excel, opening a file uses default data formatting settings. We cannot decide how to display the data.
If the data has other values (such as data formats), it is better to import the CSV file into Excel to control how to display the data.
Recommended Articles
This article is a guide to CSV files into Excel. Here, we discuss how to open, import, and convert CSV files into Excel, practical examples, and a downloadable Excel template. You may learn more about Excel from the following articles: –
- Excel CSV UTF8
- CSV vs. Excel
- What is OneDrive Excel?
- Power Query Excel

You might have heard of a CSV file but what does it mean?
In this article, we are going to learn what a CSV file is, and how to open and export them using Microsoft Excel and Google Sheets.
What is a CSV file?
CSV stands for Comma Separated Values. This is a file that contains data separated by commas and is usually used in spreadsheets and databases.
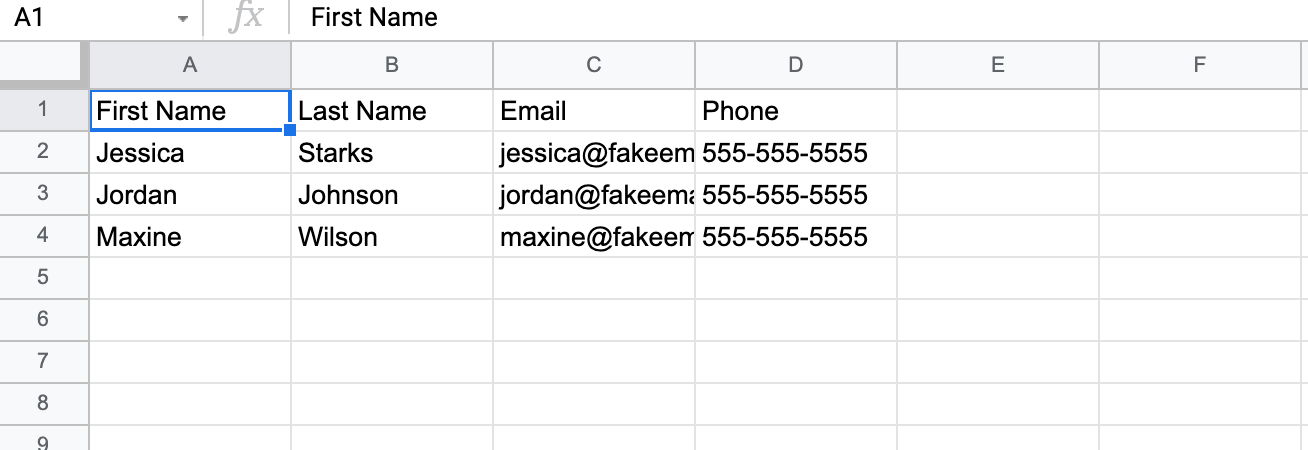
This is an example of a CSV file. We have two categories of Full Name and Major and the data is separated by commas.
Full Name,Major
Dave Wilson,Computer Science Major
Kelly Clarks,Music Major
James Anderson,Business Major
Sometimes the separation of the data doesn’t have to be a comma. It could be a space or semicolon.
This separator is called a delimiter but the most commonly used is a comma.
CSV files are very useful because you can share information between different programs as long as they can open up the file.
For example, I can create a CSV file in Microsoft Excel and import that data into my contacts.

How to Create and Export a CSV file in Microsoft Excel
Microsoft Excel is a powerful tool that allows you to organize your data in the form of spreadsheets. The most common use cases for Excel would be to create budgets, sort and store data, and create charts or graphs.
Here are the steps for creating and exporting a CSV file in Excel.
- Click to open Microsoft Excel and go to File > New

2. Add data inside the spreadsheet
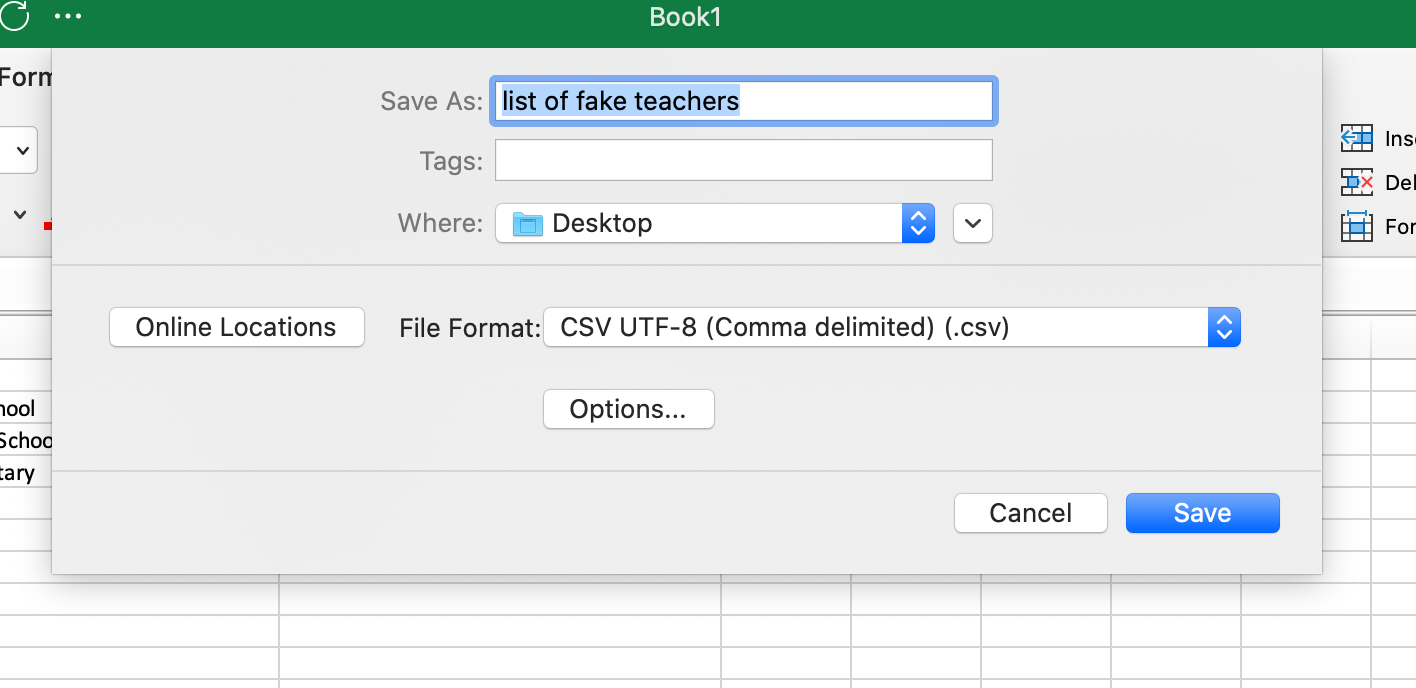
3. Go to File > Save
4. For the file format, choose .csv and click Save
How to Open a CSV File in Microsoft Excel
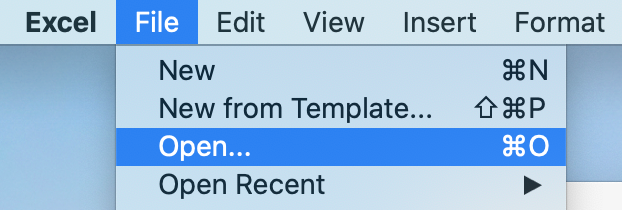
- Open Excel and go to File > Open…
2. Find the CVS file and click on Open
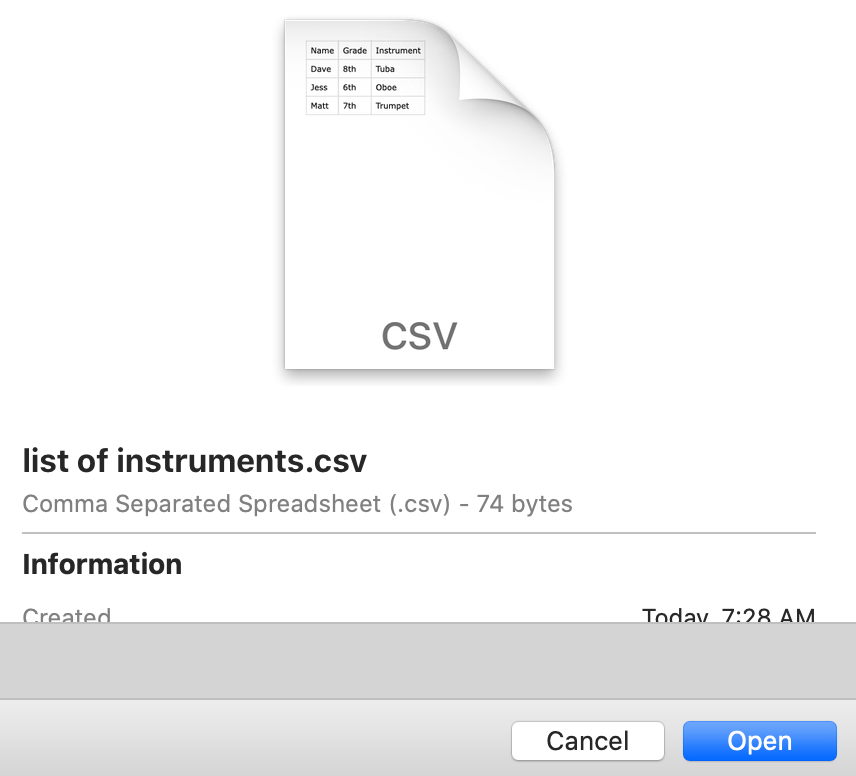
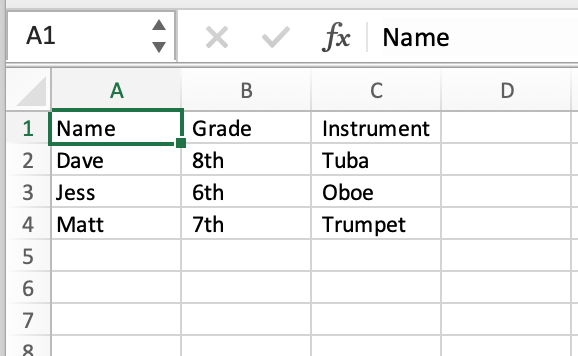
You should then see your data opened in a spreadsheet:
How to Create and Export a CSV file in Google Sheets
If you have a Google account, you can create and export CSV files using Google Sheets.
- Sign into your Google account

2. Under Google Apps, scroll down and click on Sheets

3. To create a new Google Sheet, click on Blank

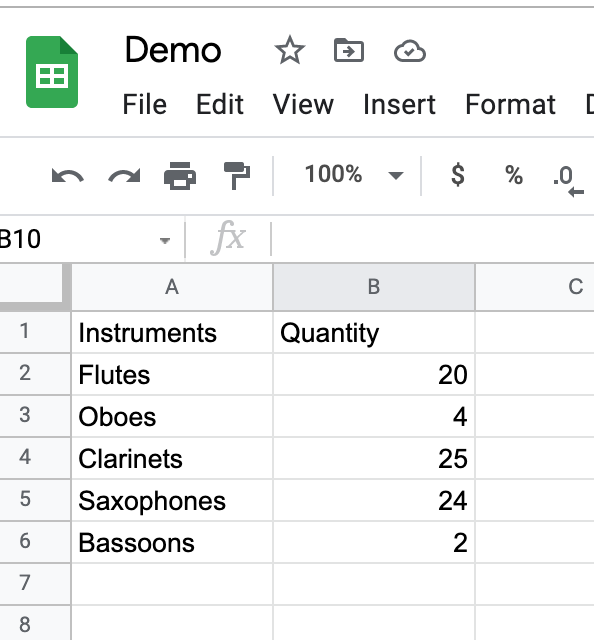
4. Add data and name your spreadsheet
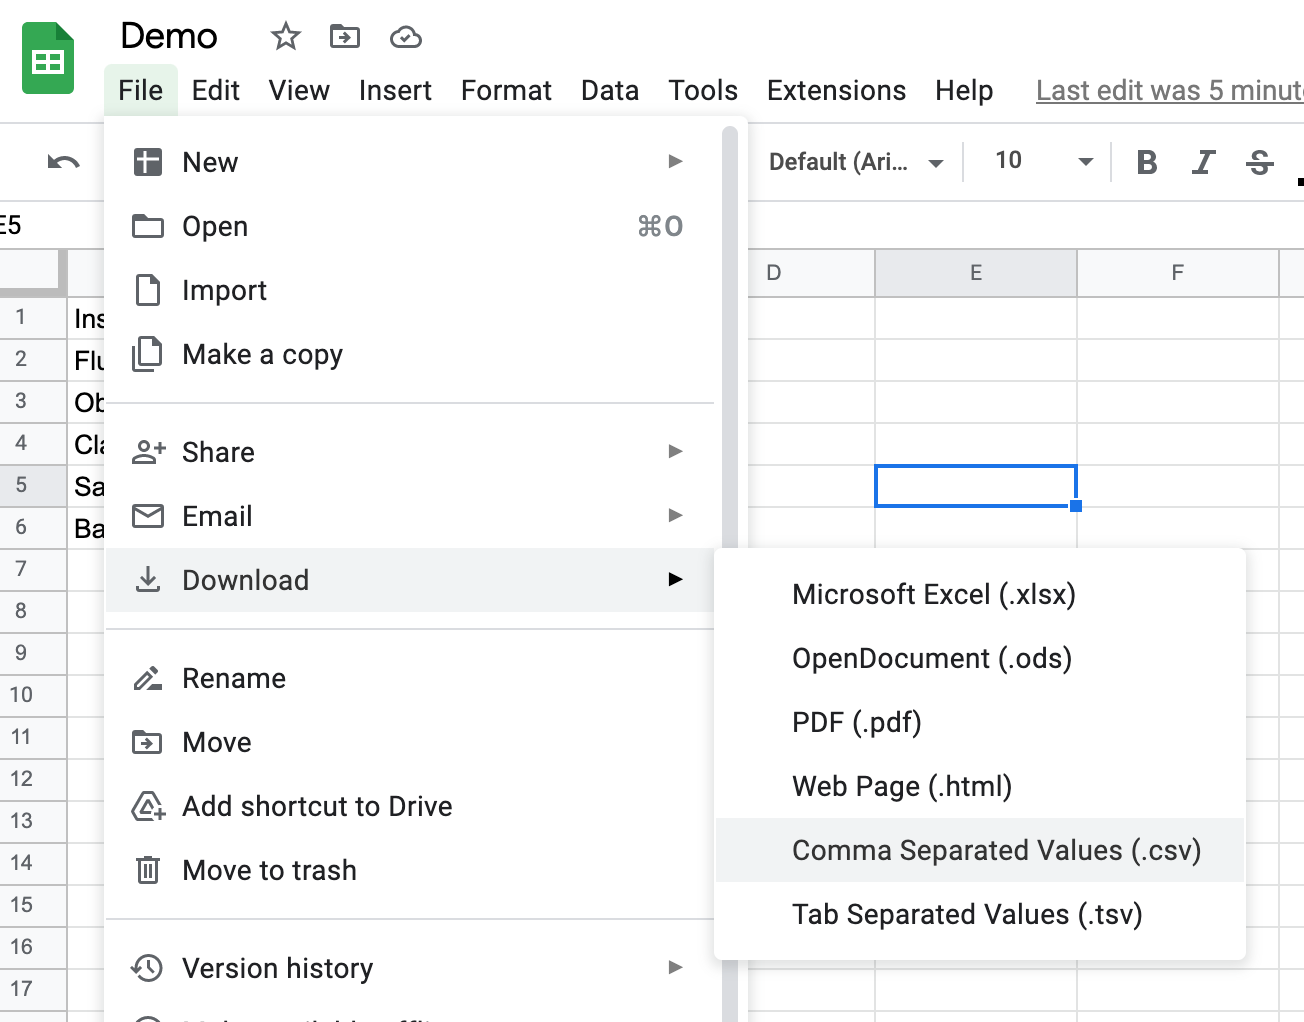
5. Click File > Download and choose the Comma Separated Values option
The file should then download to your machine where you can open it in any program that opens CSV files.
How to Open a CSV File in Google Sheets
- Open up a Blank Google Spreadsheet
2. Click on File > Import
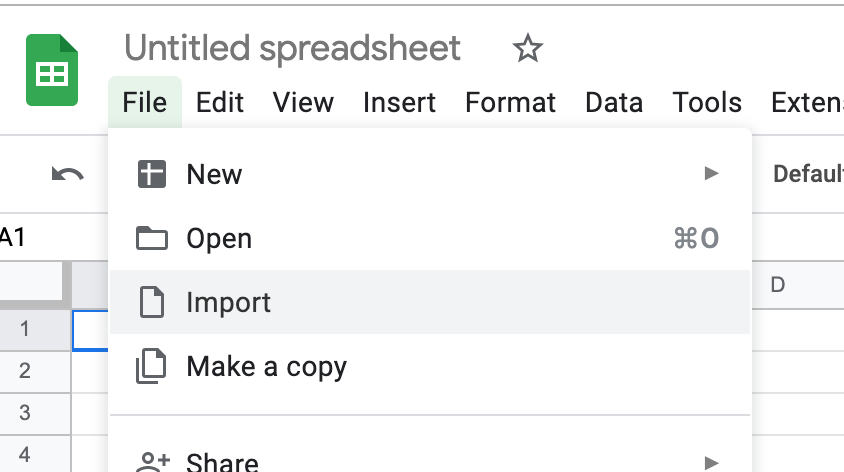
You have four options to choose from.
- Import file from Google Drive
- Import files shared with you
- Import recent Files
- Import Files from your computer

3. To import a file from your computer, click on Upload
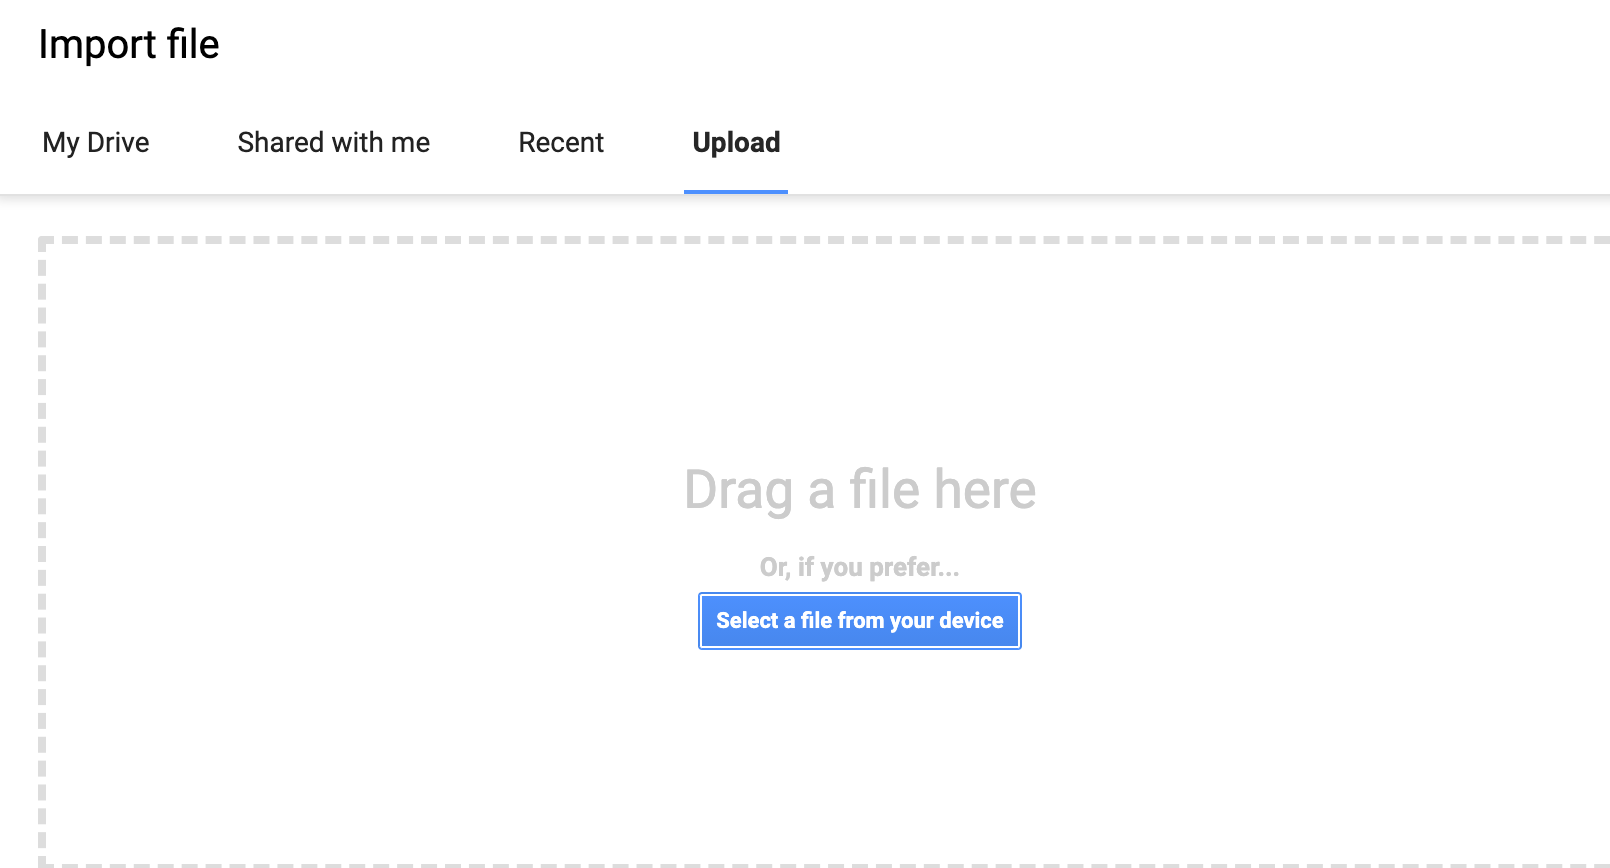
4. Select a file from your computer. You should then see a pop up window like this:
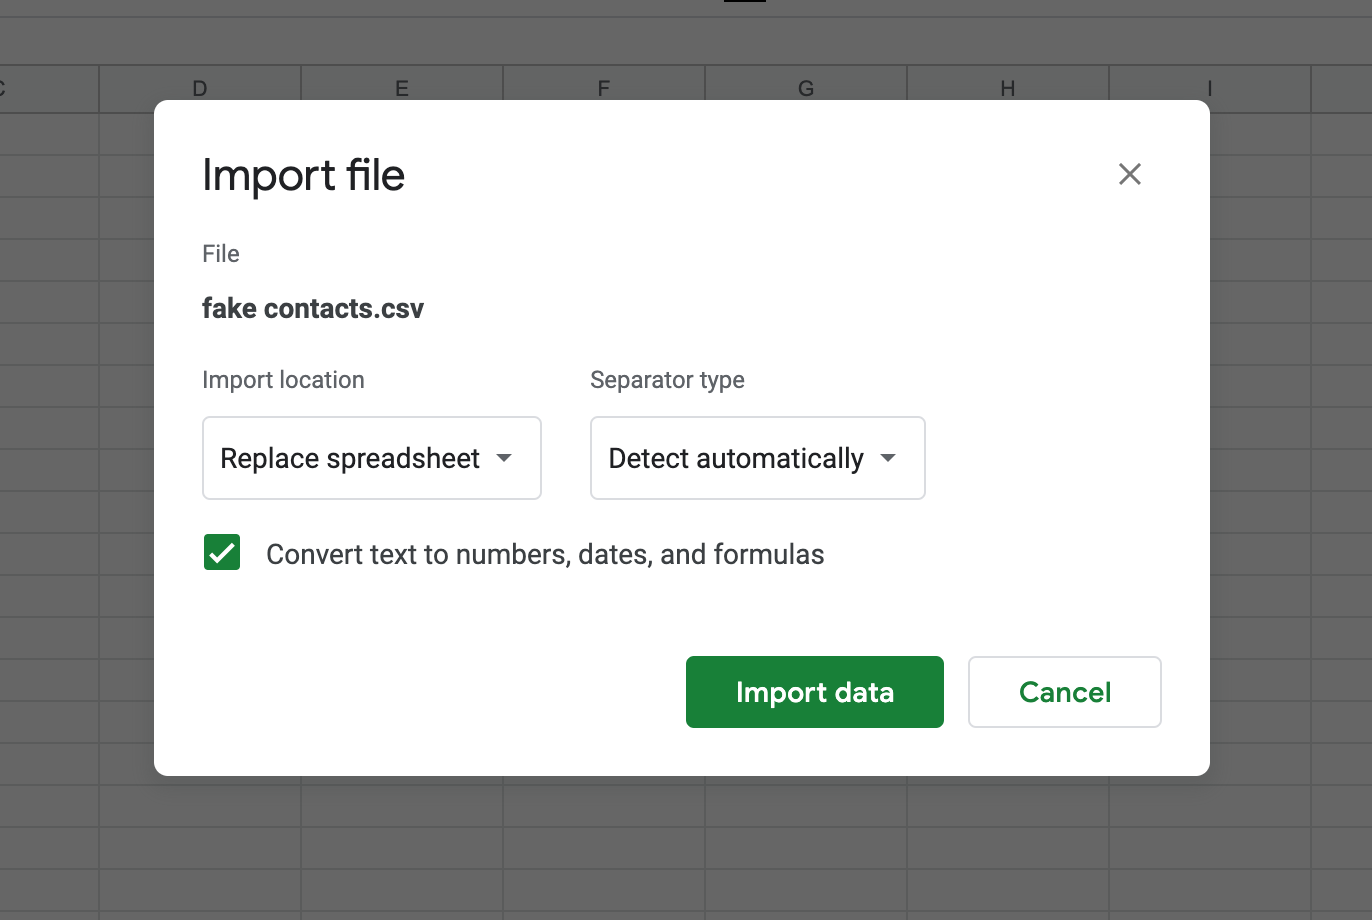
You can choose to leave the default option or change your separator type.

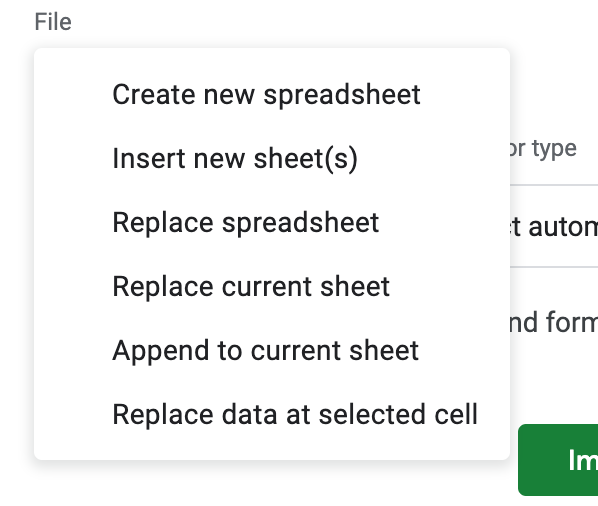
You can also choose to leave the default option or change the import location.
Once you are done, click on the Import data button.

You should now see the imported information appear in your Google Spreadsheet.
That is how to create, open, and export CSV files in Microsoft Excel and Google Sheets.
Learn to code for free. freeCodeCamp’s open source curriculum has helped more than 40,000 people get jobs as developers. Get started
CSV is an HTML-separated value file. It allows data to be saved in a tabular format. CSVs are similar to a spreadsheet of garden variety, but they have a. csv extension. CSV files can work with almost any spreadsheet program such as WPS office and WPS Spreadsheets.
They can be used for a variety of business purposes. These files allow companies to export large amounts of data to a concentrated database.
They also serve two primary business functions:
1. CSV files can be created by website developers because they are plain-text files.
2. Because they are plain text, it is easier to import them into a spreadsheet or other storage database.
3. To organize large quantities of data more efficiently.
One of the main goals in online commerce is to reach as many clients as possible. CSV files can be manipulated in many ways by ecommerce businesses owners because they are simple to organize. CSV files can be used to import and export important information such as order or customer data to and from your database.
How to create a csv file in Excel?
1.In your WPS spreadsheet select file.
2.Then Click on the save button.
3.Now open file type option and select CSV.
4.Then click on save.
What is the purpose of CSV file?
CSV (comma separated values) is a type of text file that allows data to be saved in a table-structured format .
CSV files can be used to import and export important information such as order or customer data to and from your database. An ecommerce company that purchases customer data via a social media site would be a good example.WPS Office is the most popular spreadsheet program for editing and opening CSV files. Many software programs allow you to download CSV files.Your online network will likely send consumer information to you in CSV format. This makes it easy and quick to exchange data. CSV files can be converted to other file types if they are correctly formatted. CSV files can also be converted to other file types easily if they are correctly formatted.
How to convert CSV file to Excel?
If a comma-delimited file (. extension) is opened directly, Excel will open it and remove any leading zeros from the data field. The leading zeros must not be lost if you want to upload the file as Excel. You can do this by changing the columns to text.
1. Open the WPS spreadsheet and select CSV file.
2. Now click on Save As button and select Excel.
3. The CSV file will converted.
The following steps will allow you to correctly open CSV files within Excel: First, open a blank Excel file. Next, click Get Data >From File > From Text/CSV. Choose the file to open, then click Import.
(1) View and subscribe to WPS Academy
(2) Download and use WPS Office for free to edit Word/Excel/PPT/PDF.
Have you learned about ( Text files to excel )? If you want to know more about Word features, you can follow WPS Academy to learn. You can also download WPS Office to edit word documents, excel, and PowerPoint for free of cost. Download now! And get an easy and enjoyable working experience.
In computers, there are various file extensions and file types. Txt, pdf, xlsx, and other popular file extensions Have you ever come across an a.csv file? It is not widely used or popular among the general public. If you want to learn about CSV files, how to use them, when to use them, and why to use them, you’ve come to the right place. Let’s get started.
Table of Contents
- What is CSV File?
- How does the CSV file look?
- Why use CSV?
- When to Use CSV?
- Advantages of CSV File
- Disadvantages of CSV File | Limitation of CSV File
- How to Create CSV File using Excel?
- How to Open CSV File in Excel?
- How to Open CSV File in Google Sheet?
- CSV File vs Text File
- CSV File vs xlsx File
What is CSV File?
CSV file stands for Comma Separated Value file.CSV file is a type of plain text file that is a common format used for data exchange between different applications. It is used in programming and the data field.CSV file handles only tabular data. Data inside the CSV file will be number, string only, and does not contain formulas, etc.
How does the CSV file look?
Ans: CSV file looks like this:

In detail overview of content inside CSV file.
1. CSV file extension should be .csv.
2. The standard format of CSV data is defined by rows and columns.
3. Each row ends by newline then the next row begins.
4. Each column is separated by a comma. But other delimiters like colon, semicolon, space, equal sign, a tab is also used. But the last value is not followed by a comma.
Eg. «Diwas»,»Poudel»,45,»Jhapa, Nepal»
5. Each line in the CSV file is called a record and this acts as a row of data in a table.
6. Leading and trailing space of character between comma field separators are ignored and trimmed out.
Eg. Diwas , Poudel,45, «Jhapa, Nepal» resolves to «Diwas» and «Poudel«
7. The fundamental concept of separating fields from commas is simple, but when field data contain commas as well then the situation becomes complicated. Because there is no standard method for doing this. But general solutions look like this:
The solution for this is: Enclose the field in double-quotes.
Example from Point 4, ie. «Jhapa, Nepal» has a comma within a single field so quoted whole data in double quotes
8. If any field has double-quote characters then those characters must be surrounded by double-quotes.
For example, » Diwas «Raj» can be written as «Diwas»»Raj»»»
CSV is data and database file extensions.Some other file of this types are : .dat, .db, .sql, .tar, .mdb etc.
The IETF document RFC 4180 first published in 2005 contains the standards for the data format of CSV files.RFC 4180 is a technical standard that formalizes the CSV file format and defines the MIME text type in CSV as well as the handling of text fields.
Why use CSV?
1 It is used to import and export the data from one application to another.
2 It is a platform-independent file. You can create a CSV file in a Windows environment and can open the same file in Linux and Mac environments.
3 Large number of applications can open this file easily. Some applications that can open this file are excel, office, google sheets, LibreOffice, GenScriber, OpenOffice Calc, Fresh Books, Mobi systems OfficeSuite, etc.
4 It can be easily imported into the database.
5 Importing data into Excel takes up more memory, whereas importing CSV files takes significantly less memory, and reading those CSV files in excel will be much faster.
A database program that keeps data which cannot be read by other applications then, in this case, that proprietary format can export into CSV format and save it as a CSV file, and later it can be easily imported into another spreadsheet program and database application.
When to Use CSV?
Here is the list of when to use the CSV file.
- When your data can take tabular structure.
- When you want to transfer small to medium scale data.
- Transfer data from one application to another as long as both applications support CSV and can open CSV files.
- CSV files can also be used for backup data.
Advantages of CSV File
Here are some advantages of CSV File as compared to other files.
- Text in CSV Files is human-readable.
- CSV Files can be easily edited manually.
- Parsing CSV Files is simple to implement.
- CSV Files can be processed by almost all the applications.
- CSV Files are easy to generate.
- CSV Files are faster to handle.
- CSV Files are smaller in size
- CSV Files can be easily imported into most databases.
- If the data volume is very large basic data and the scheme is more or less flat then CSV could be one of the best for transferring data as compared to XML and JSON.
- CSV supports streaming processing, you do not have to keep a whole file in memory
Disadvantages of CSV File | Limitation of CSV File
Here are some disadvantages of CSV Files.
- CSV files are unable to handle complex data. Only good for basic data only.
- No separation of numeric data from text data.
- Some databases do not support CSV files for data import.
- CSV files are not fully standardized. There is a lack of universal standard rules for handling CSV data. Ways of handling data are different. The problem for solving points 4. 6. 7. and 8. of «How does CSV files look» are also different from person to person
- No standard way to represent controlled characters.
- CSV file will not be properly imported if the required field(mandatory field) is blank and if data has been quoted.
- CSV files will not be properly imported if data in the CSV file contains an unsupported character.
- CSV file does not have standard ways of representing binary data.
- Everything in CSV is a string. It has no type.
- The CSV file format has very limited support for special characters.
- There is no standard predetermined way to represent control characters in CSV files.
- The most popular CSV libraries are badly optimized, which means that CSV parsing is slower.
How to Create CSV File using Excel?
The steps are as shown below:
1 Open file you want to save in CSV format in excel.
2 Goto File >Save As > Select the desired location you want to save.
3. Give the name to the CSV file and under «save as type» select «CSV MS-DOS» and then click on OK

There are various formats to save CSV files but ms excel provides 4 formats. They are :
- CSV Macintosh
- CSV MS-DOS
- CSV Comma Delimited
- CSV UTF-8 (Comma Delimited)
How to Open CSV File in Excel?
Opening the CSV file is very simple. Let’s look at opening CSV files in various application
Opening CSV File in MS EXCEL
- First, make sure you have installed the MS Excel application
- Then right-click on the CSV file that you like to open. Then click on «OpenWith«.Then click on Excel.
How to Open CSV File in Google Sheet?
Because Google Sheet is a spreadsheet app that deals with data, it is sometimes necessary to open a CSV file in Google Sheet.
Here are the steps:
1 First of all Open Google Sheets
2 Click on ‘File’
3 Next click on ‘Import’

4 Then Next Goto Upload Tab
5 Then Click on ‘Select a file from your device‘

6 Now select your desired CSV File to open in Google Sheet
7 In the next screen click on the ‘Import data‘ button.

8 Then click on the ‘Open Now’ link to open the CSV file.

CSV File vs Text File
- Data in .txt files have no formatting for distinguishing each data.
- Data in .csv files can be distinguished by a specific delimiter generally commas. But any other delimiter like a pipe, tab, or any single value character. Most of the applications can distinguish each data and treat them are tabular data.
CSV File vs xlsx File
CSV Files and XLSX Files are different. Differences between CSV File and XLSX File are as follows.
| CSV File | XLSX File |
| CSV stands for Comma Separated Values. It is a plain text file that contains a series of data separated by delimiters generally commas. | XLSX stands for Excel Microsoft Office Open XML Format Spreadsheet file. It is Microsoft Excel Spreadsheet used for storing, organizing, and analyzing the data. |
| CSV files only contain delimited data and we cannot use formulas on them. | In XLSX files, we can store data as well as can perform formatting, use formula, and macro, and generates Pivot Table, and VBA code on it. |
| CSV files can be opened and edited by all text editors. | XLSX cannot be edited or opened by text editors. |
| CSV generally consumes less memory than xlsx files. | XLSX consumes more memory while importing data. |
| Data of CSV will only be text or number. | Data of XLSX may contain text, numbers, charts, and graphs |
| Less Complicated than XLSX files. | More Complicated than CSV files |
| In CSV no operations on data can be performed | In XLSX operations on data can be performed. |
FAQ
Why is CSV bigger than Excel?
Ans: Because XLSX files are compressed files. If there are many repeated data in excel then XLSX files are generally smaller than CSV files.
Is the CSV file editable?
Ans: You can open and edit CSV files in notepad, word, excel, libre, and any other text editor.
Do CSV files have row limits?
Ans: Actually CSV files do not have any row limits. If you open CSV files in excel then it won’t hold more than 1 million data.
Are CSV files better than XLSX?
Ans: CSV files are less complicated and faster than Excel files. Also, CSV files consume less importing than Excel while importing data.
Does CSV remove all formatting?
Ans: CSV files only save text and value so they do not have any formatting like bold, italic, underline, fonts, etc.If you have formatted data in excel and while converting it into CSV files then all formatting gets removed.
Can we use a formula in CSV data?
Ans: No. We cannot perform any formula and operations on data like we used to do in Excel.
Does CSV support multiple tabs or worksheets?
Ans: CSV doesn’t have multiple tabs or worksheets as Excel does. One CSV file contains only one tab.
How do you make a CSV file readable?
Ans: CSV files are already readable and can be read by a variety of applications such as notepad, excel, MS Word, Google Sheets, and so on. Let’s take a look at the reading difficulty by opening a csv file in these applications.
- Notepad: Hard to read the data in a proper format
- Google Sheet: Easy to read if you use text to column function
- MSWord: Hard to read the data as data will not be transferred in column format.
- MS Excel: Easy to read if use the text to column functions
If you’re looking for information on CSV files, you’ve come to the right place. Whether you’re a novice and don’t know what CSV stands for or you’re a veteran sysadmin looking for a refresher course, this guide has you covered. If, on the other hand, you were looking for you’re nearest CVS pharmacy, you may want to double-check the spelling of your Google search. Regardless of how you got here, join us as we take a deep dive into the tabular world of CSV files.
What Is a CSV File
A CSV file is a plain text file containing tabular data that is separated by a delimiter. The term CSV, which stands for comma-separated values, is derived from the file extension .CSV. Each row in a CSV file is a new record, and each record contains fields that are separated by a designated delimiter. CSV files are commonly used to import and export data in and out of applications.
CSV File Structure
If you’ve ever used a spreadsheet application, such as Microsoft Excel or Google Sheets, then you’ll be familiar with tabular data. Tabular data just means that data is structured into a table format, consisting of rows and columns. Like this:
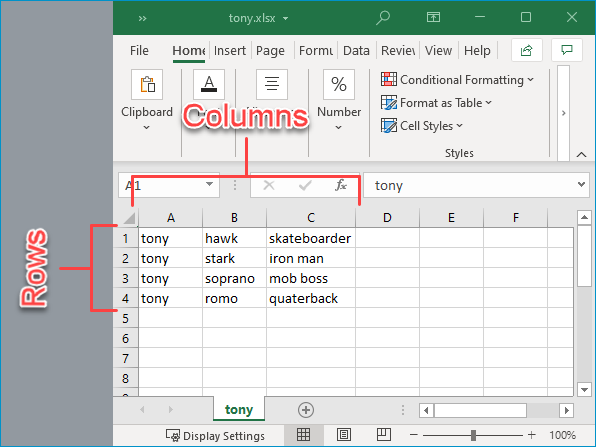
Here we have an Excel file of famous Tony’s. Why? Because it was the first name that I thought of. Don’t judge me.
As you can see, we have four rows of data across three columns. Each row represents a record, and each column represents a field. Formatting data into a table like this makes the information easy to understand and digest for both people and computers. For instance, you can quickly glance at this data and see that Tony Hawk is a skateboarder while Tony Stark is Iron Man. Even without column headers, you can quickly understand how to data is associated, but more on that in a minute.
Now let’s compare this to a CSV file containing the same data.
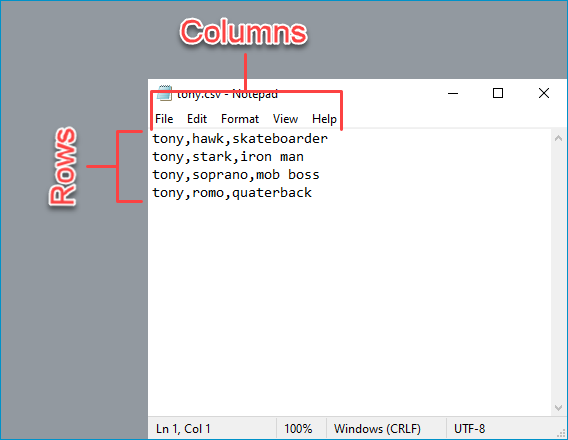
As you’ll notice, the data is still structured into rows and columns; we just don’t have the tabled graphical interface anymore because were using a text editor rather than Excel to open the file. Instead, you’ll see that each row is separated by a line break, and each column is separated by a comma. This layout is the most common format for CSV files. However, CSV files aren’t fully standardized, and there are a few structuring components that are worth mentioning.
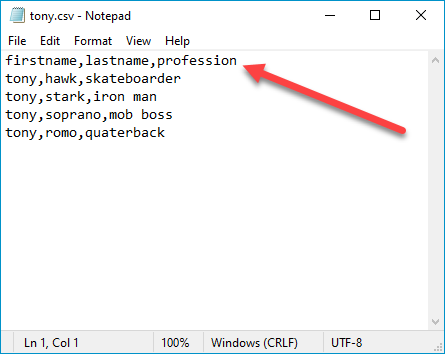
First, depending on the intended use of the CSV file, you may want to include a header line. A header line is essentially like labeling columns in a spreadsheet. When including a header line, it should always be added as the first line of a CSV file, and it should follow the same format as the rest of the CSV file. Here’s what my Tony CSV file looks like with a header line added.
Next, as the name suggests, the most common delimiter used in CSV files is the comma, but that doesn’t mean you have to use commas. In fact, just about any character can be used as a delimiter, but we’ll cover that more in the next section.
Another thing to watch out for is removing unnecessary blank spaces surrounding your delimiters. I ran into a couple of issues with my CSV files caused by having blank spaces next to my delimiters.
Lastly, ensure each line or record contains the same amount of delimiters. If one line contains more or fewer delimiters than the rest of the file, it will throw off the formatting and most likely mess things up if you are trying to import that data into an application.
CSV Delimiters
A delimiter is a character that’s been designated to mark the end of one unit of data and the beginning of the next unit of data. As we mentioned, while commas are the most common, almost any character can be designated as a delimiter in a CSV file. Some of the more commonly used characters include semicolons, tabs, and pipes.
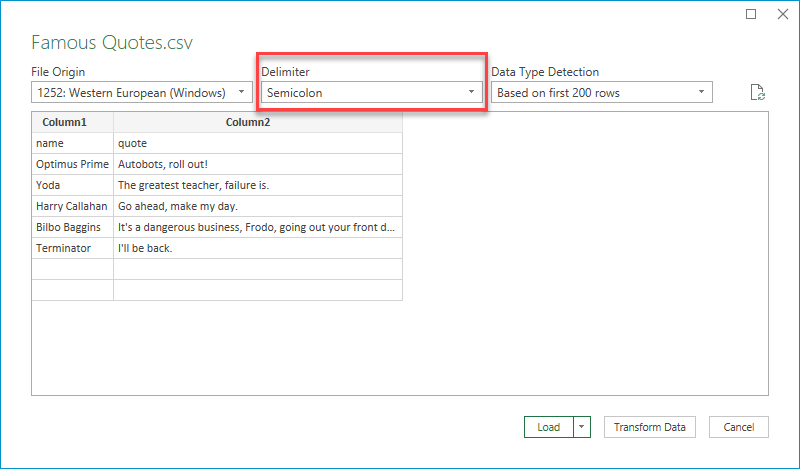
One reason why users may decide to use a character other than a comma is if commas are present in the data being separated. Whenever an application that is parsing CSV data comes across the designated delimiter character, it will consider that character a delimiter, whether it was meant to be a delimiter character or not. Here’s an example.

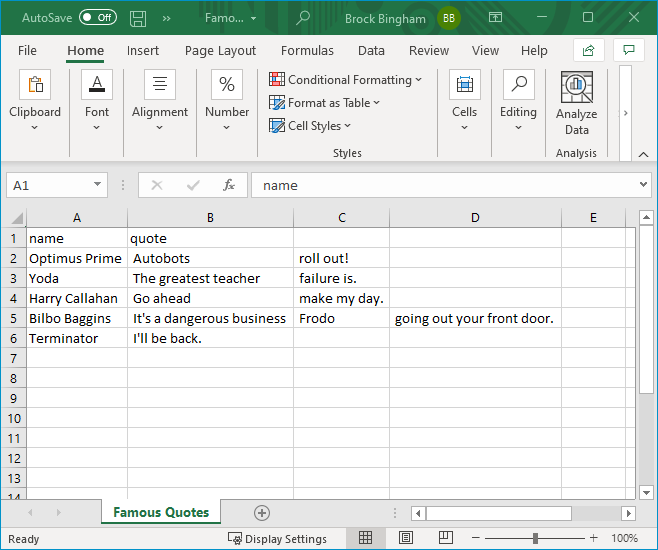
In this CSV file of famous quotes, the header line indicates that there are only two columns, name and quote. However, the quotes themselves contain commas which will cause the data to be parsed incorrectly.
Here’s what happens when we open this CSV file in Excel.
As you can see, Excel counted each comma as a delimiter and moved each value following a delimiter into its own column. Obviously, this isn’t what we want, but there are two ways to get around this. The first option is to use a less common character, or a character you know isn’t contained in the data, as the delimiter. The second option is to wrap the data in quotes. Let’s take a look at both options.

Here we’ve changed each delimiter character to a semicolon. However, if we just open this CSV in Excel, look what happens.
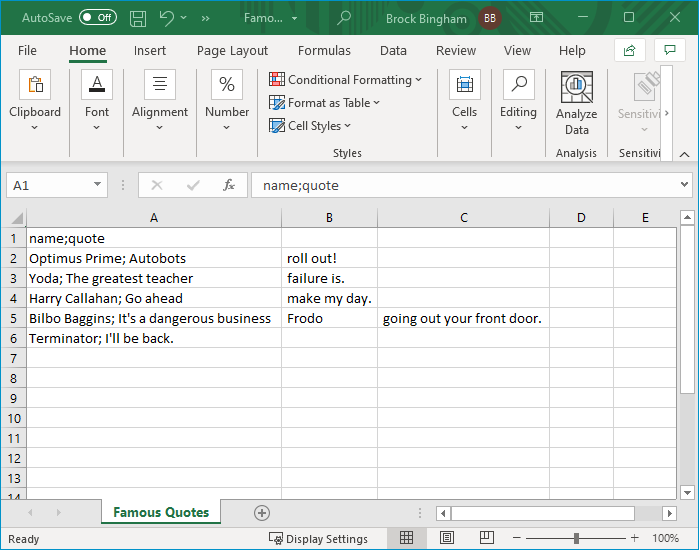
Even though we’ve changed the delimiter, Excel still counts each comma as a delimiter instead of the semicolons. By default, Excel always expects each comma to be a delimiter. To get around this behavior, we need to import the data instead of just opening the file with Excel. Here’s how.
-
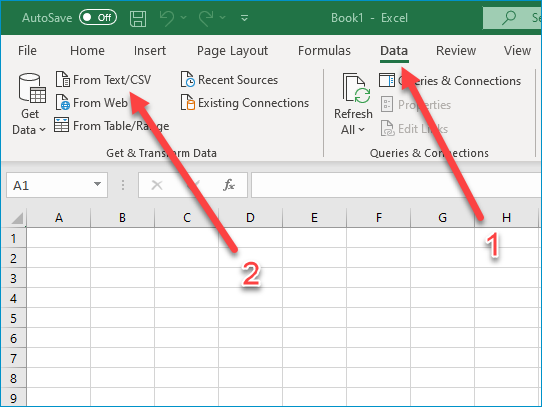
With Excel open, click on the Data menu option.
-
In the Get & Transform Data ribbon section, click From Text/CSV.

-
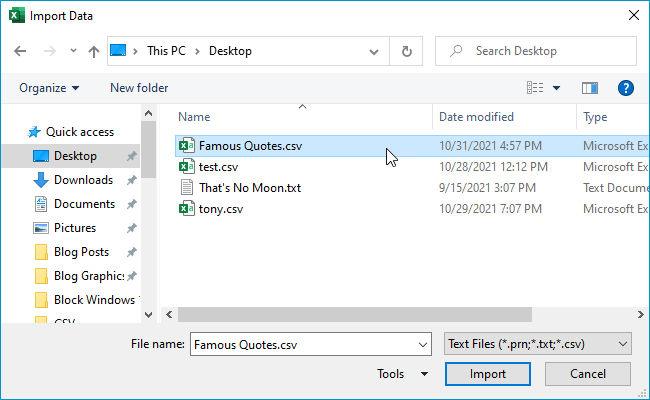
Navigate to the CSV file, select it, and click Import.
-
The import wizard will open and attempt to automatically detect the delimiter. In my case, it automatically detected the semicolon as the delimiter. If it fails to detect the correct delimiter, you can manually select it.
-
If you need to modify anything else, you can click the Transform Data button to make further changes, such as designating the first row as the header row. Once you’ve finished making your changes, click Load.
After clicking Load, you’ll notice that all of the data has been imported correctly.
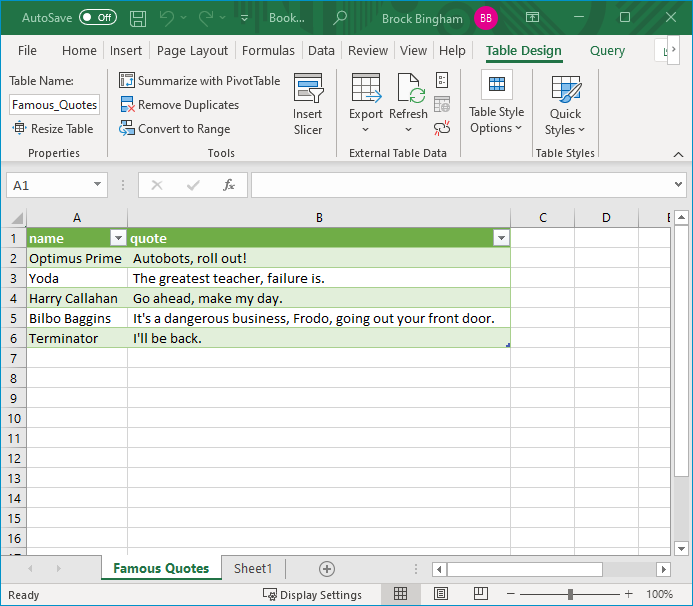
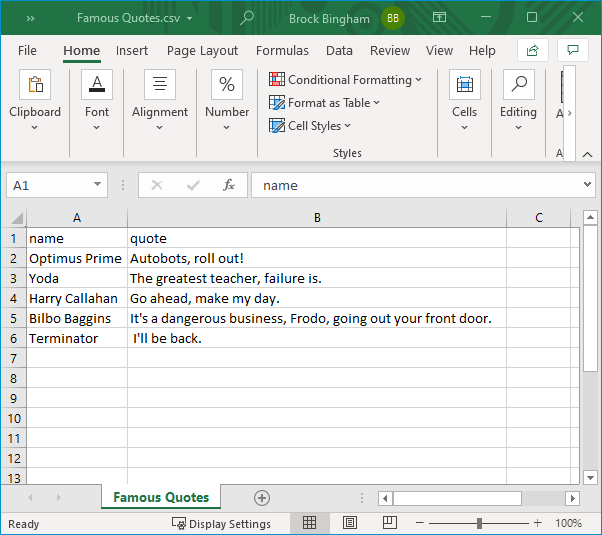
The other option to deal with delimiter characters contained in the data is to wrap the data in quotes. I’ve modified the CSV file again and replaced the semicolons with commas, and wrapped any data containing commas with quotes.

In this format, Excel will immediately recognize the formatting and properly import the data without using the import wizard.
While both options are viable, deciding which format is best for you often depends on the application that will be parsing the information. Does the application automatically detect or let you custom select the delimiter? How does the application handle values wrapped in quotes? Always thoroughly test these types of situations before dealing with production data.
How to Create a CSV File
Creating a CSV file is easy, and since CSV files are plain text files, many applications can do it. Here are a few different ways to create a CSV file.
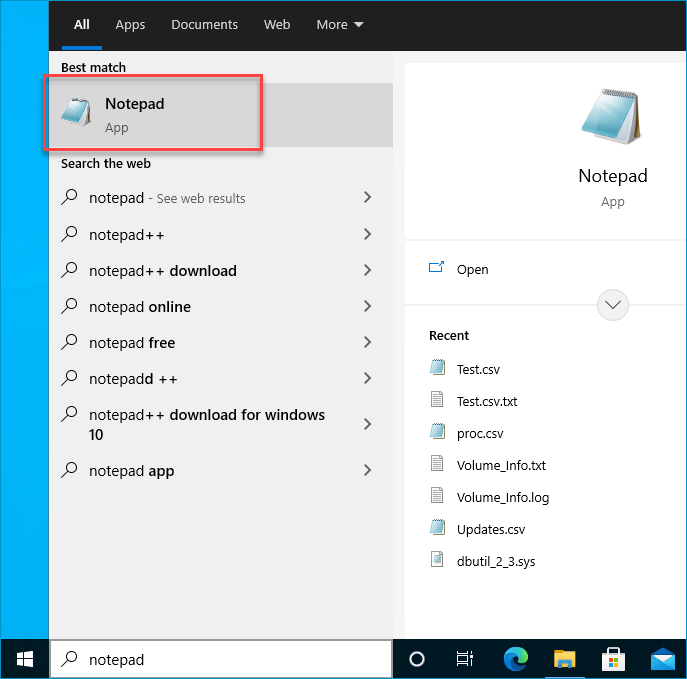
Create a CSV File With Notepad.exe
-
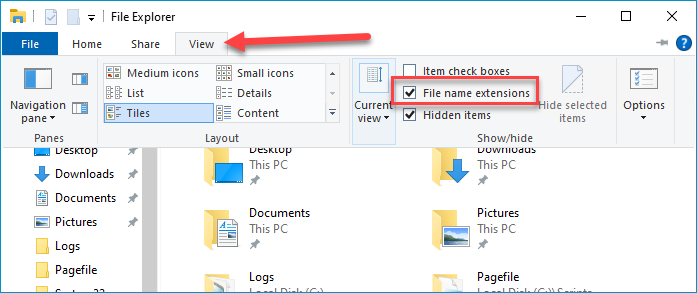
Make sure you have «view file name extensions» turned on by opening up File Explorer, clicking View, then selecting File name extensions.
-
In the search bar, type notepad and click on the Notepad application.
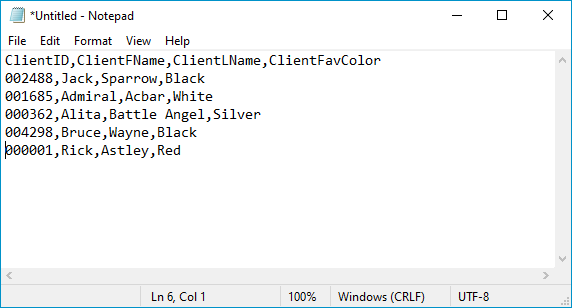
-
Enter your CSV data.
-
When you are finished, click File > Save As.
-
In the Save As window, change the Save as type: to All Files (*.*).
-
Enter a name for the file followed by .csv.
-
Click Save.

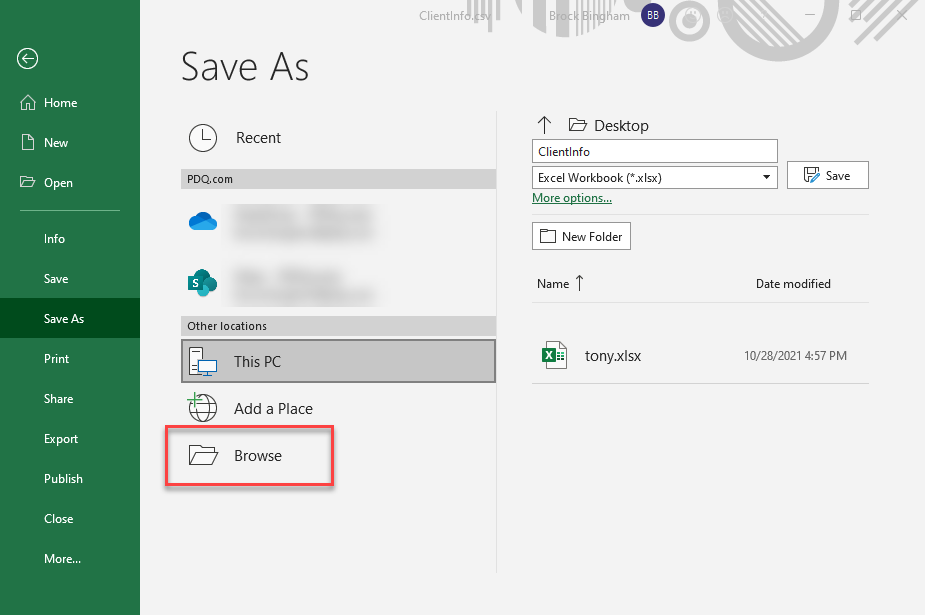
Create a CSV File with Microsoft Excel
-
Open a new blank workbook or an existing file containing data in Excel.
-
Enter the data into the necessary fields.
-
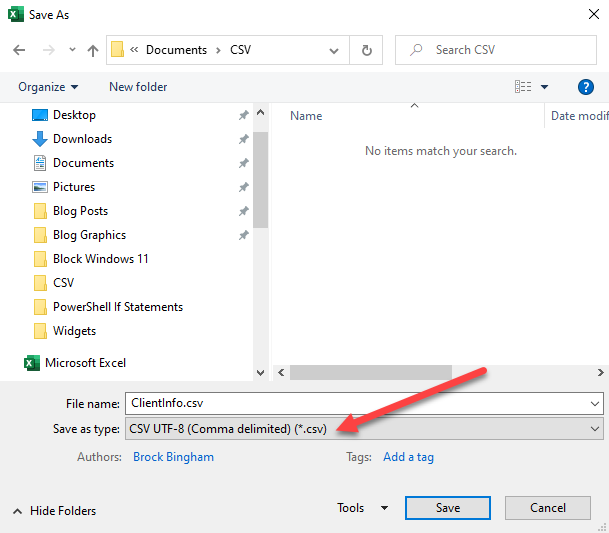
When finished, click File > Save As, then click Browse.
-
Navigate to the location you want to save the file.
-
In the Save as type: field, change the drop-down to CSV UTF-8 (Comma delimited) (*.csv).
-
Enter a file name and click Save.
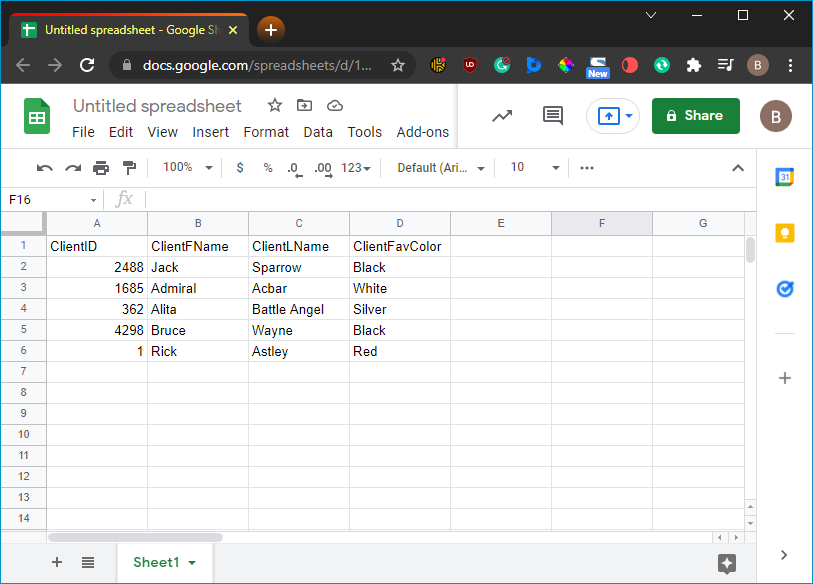
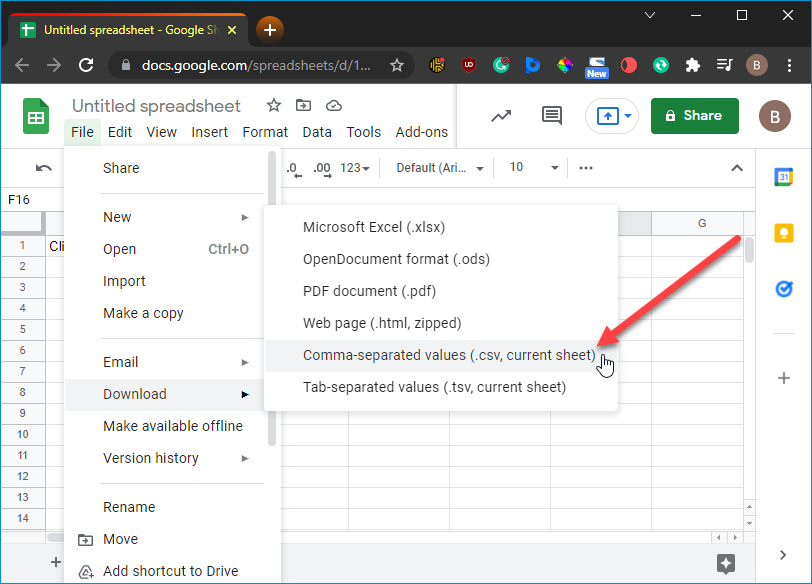
Create a CSV File with Google Sheets
-
With a new Google Sheet document open, enter your data into the fields.
-
When you’ve finished inputting your data, click File > Download > Comma-separated values (.csv, current sheet).
-
The file will be downloaded to your Downloads folder. If you didn’t title the sheet, the file will be called Untitled spreadsheet — Sheet1.csv, which you can then rename. Or, you could be smart, unlike me, and title it before downloading it.
Creating CSV files is pretty easy, though it generally depends on the application you’re using to create it.
How to Create a CSV File With PowerShell
Creating CSV files manually is one way to get things done. But, if manually inputting a bunch of data doesn’t sound like your cup of tea, then you may want to look into generating your CSV files with a shell or scripting language like PowerShell.
Often the data you want to compile into a CSV file already exists somewhere. Maybe you want to extract data from a platform like Active Directory or retrieve a list of services running on a computer. Using PowerShell to retrieve data and export it into a CSV file is extremely useful.
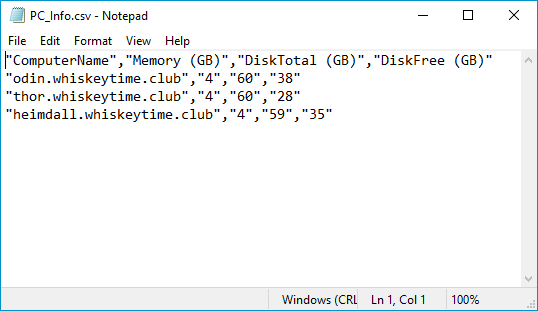
Here’s a PowerShell script that will scan multiple computers and export their name, total memory, disk size, and free disk space to a CSV file.
#Create an advanced function that requires and accepts computer names parameters.

[CmdletBinding()]

param(

[Parameter(Mandatory)]

[String[]]$Computers

)
#Designate a variable to store the results of our foreach loop.
$Results = @()
foreach ($Computer in $Computers){
#Retrieve memory amount, total disk space, and free disk space and format in GBs.
$Memory = (Get-CimInstance Win32_PhysicalMemory -ComputerName $Computer | Measure-Object -Property Capacity -Sum).sum /1gb
$DiskTotal = "{0:n0}"-f ((Get-CimInstance Win32_LogicalDisk -Filter drivetype=3 -ComputerName $Computer | Measure-Object -Property Size -Sum).sum /1gb)
$DiskFree = "{0:n0}"-f ((Get-CimInstance Win32_LogicalDisk -Filter drivetype=3 -ComputerName $Computer | Measure-Object -Property FreeSpace -Sum).sum /1gb)
#Create a PSCustomObject containing the retrieved data which will be stored in the $Results variable.
$Output = [PSCustomObject]@{
ComputerName = $Computer
"Memory (GB)" = $Memory
"DiskTotal (GB)" = $DiskTotal
"DiskFree (GB)"= $DiskFree
}
$Results += $Output
}
#Exports the data contained in the $Results variable to a CSV file.
$Results | Export-CSV -Path "C:CSVPC_Info.csv" -NoTypeInformation -Force
This script will ask you to provide the computer names you want to run the script against. This is great if you only have a handful of computers you need to enter. If you need to run this script against a lot of computers, you may want to point the script to an existing source, such as a CSV file containing computer names or an OU in Active Directory. Also, make sure you change the path to export your CSV where you want.
Here are the results of running this script against my computers.
And we can open this file in Excel to make it a little easier to read.
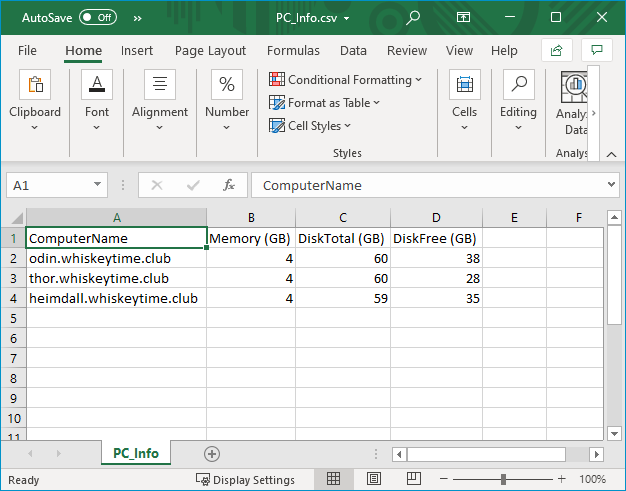
Returning data for three computers using PowerShell probably doesn’t save much time. However, if you target hundreds or thousands of computers with this script, you’ll see how valuable PowerShell can be.
Export Useful CSV Files Using PDQ Inventory
If you’re looking to get computer information into a CSV file, look no further than PDQ Inventory. PDQ Inventory is a system management tool that scans and collects hardware and software data from the computers in your network environment. That data is then used to organize and group your systems into collections, making it easy for you to identify which systems have what resources. The best part is once you sync PDQ Inventory with Active Directory, all this happens automagically. Don’t believe me? Try it out for yourself with a 14-day free trial.
Once your devices have been scanned, you can use the reports built into PDQ Inventory to export this data into CSV files. Here’s how it works.
-
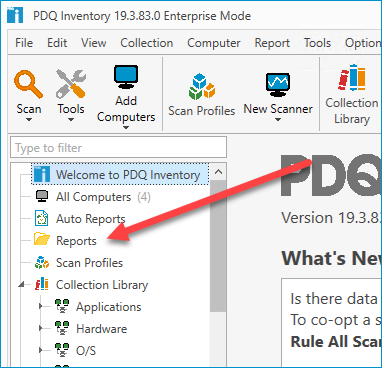
With PDQ Inventory open, click on the Reports menu in the navigation tree.
-
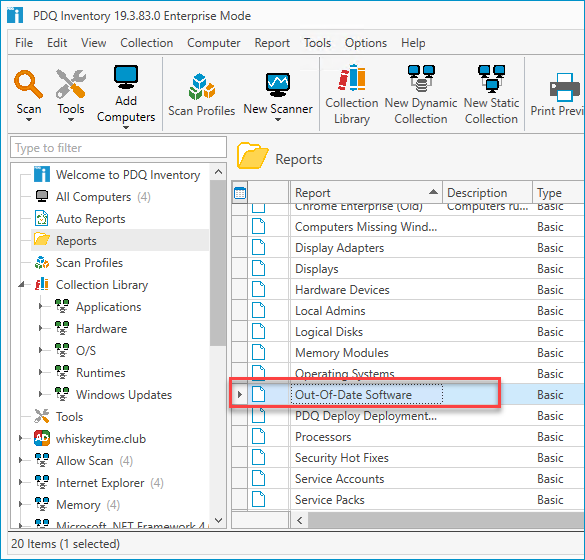
Double-click on any report. I’ll use the Out-Of-Date Software report for this example.
-
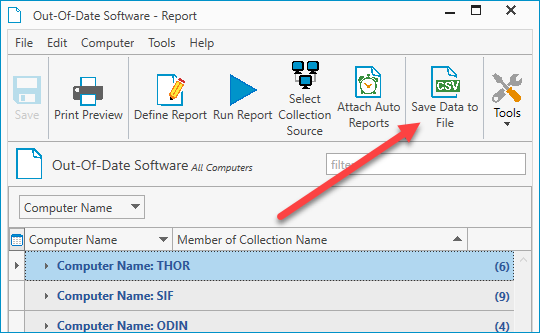
With the report open, click Save Data to File.
-
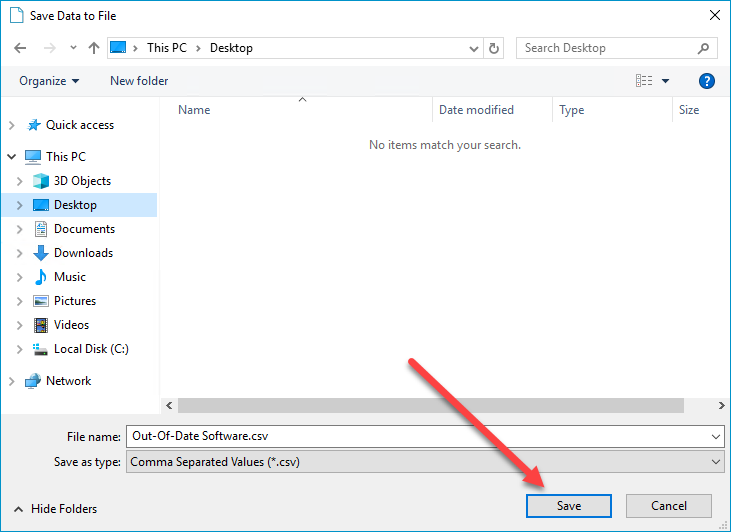
Navigate to where you want to save your file and click Save.
-
With our file saved, let’s navigate to it and open it to see how it turned out.
-
And here’s our final result.
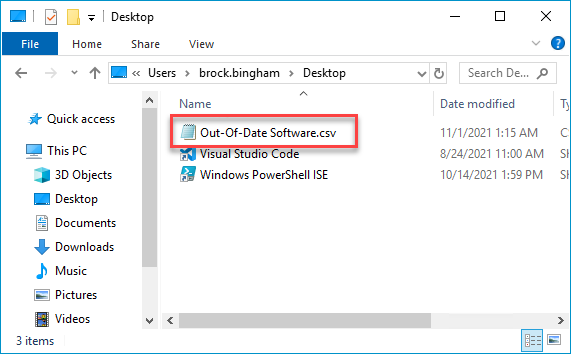
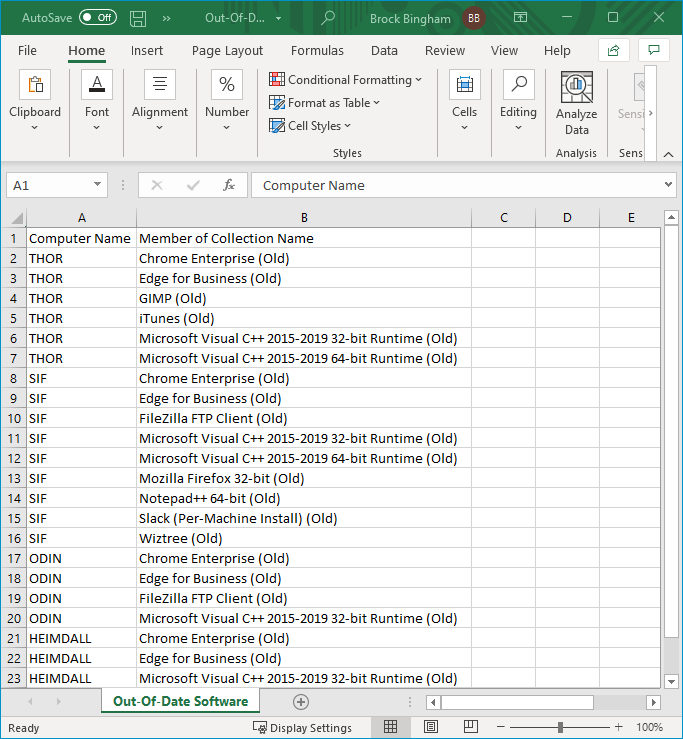
With just a few clicks, we generated a CSV file containing all of our computers with out-of-date software.
Wrapping Up
CSV files are great. Because they’re plain text files, they’re super versatile, their file size never really gets too large, they’re easy to make, and tons of modern applications can take advantage of them. In addition, if you’re a PowerShell user, there’s not much you can’t do with a CSV file and a good PowerShell script.

Brock Bingham
Born in the ’80s and raised by his NES, Brock quickly fell in love with everything tech. With over 15 years of IT experience, Brock now enjoys the life of luxury as a renowned tech blogger and receiver of many Dundie Awards. In his free time, Brock enjoys adventuring with his wife, kids, and dogs, while dreaming of retirement.
Import or export text (.txt or .csv) files
There are two ways to import data from a text file with Excel: you can open it in Excel, or you can import it as an external data range. To export data from Excel to a text file, use the Save As command and change the file type from the drop-down menu.
There are two commonly used text file formats:
-
Delimited text files (.txt), in which the TAB character (ASCII character code 009) typically separates each field of text.
-
Comma separated values text files (.csv), in which the comma character (,) typically separates each field of text.
You can change the separator character that is used in both delimited and .csv text files. This may be necessary to make sure that the import or export operation works the way that you want it to.
Note: You can import or export up to 1,048,576 rows and 16,384 columns.
Import a text file by opening it in Excel
You can open a text file that you created in another program as an Excel workbook by using the Open command. Opening a text file in Excel does not change the format of the file — you can see this in the Excel title bar, where the name of the file retains the text file name extension (for example, .txt or .csv).
-
Go to File > Open and browse to the location that contains the text file.
-
Select Text Files in the file type dropdown list in the Open dialog box.
-
Locate and double-click the text file that you want to open.
-
If the file is a text file (.txt), Excel starts the Import Text Wizard. When you are done with the steps, click Finish to complete the import operation. See Text Import Wizard for more information about delimiters and advanced options.
-
If the file is a .csv file, Excel automatically opens the text file and displays the data in a new workbook.
Note: When Excel opens a .csv file, it uses the current default data format settings to interpret how to import each column of data. If you want more flexibility in converting columns to different data formats, you can use the Import Text Wizard. For example, the format of a data column in the .csv file may be MDY, but Excel’s default data format is YMD, or you want to convert a column of numbers that contains leading zeros to text so you can preserve the leading zeros. To force Excel to run the Import Text Wizard, you can change the file name extension from .csv to .txt before you open it, or you can import a text file by connecting to it (for more information, see the following section).
-
Import a text file by connecting to it (Power Query)
You can import data from a text file into an existing worksheet.
-
On the Data tab, in the Get & Transform Data group, click From Text/CSV.
-
In the Import Data dialog box, locate and double-click the text file that you want to import, and click Import.
-
In the preview dialog box, you have several options:
-
Select Load if you want to load the data directly to a new worksheet.
-
Alternatively, select Load to if you want to load the data to a table, PivotTable/PivotChart, an existing/new Excel worksheet, or simply create a connection. You also have the choice of adding your data to the Data Model.
-
Select Transform Data if you want to load the data to Power Query, and edit it before bringing it to Excel.
-
If Excel doesn’t convert a particular column of data to the format that you want, then you can convert the data after you import it. For more information, see Convert numbers stored as text to numbers and Convert dates stored as text to dates.
Export data to a text file by saving it
You can convert an Excel worksheet to a text file by using the Save As command.
-
Go to File > Save As.
-
Click Browse.
-
In the Save As dialog box, under Save as type box, choose the text file format for the worksheet; for example, click Text (Tab delimited) or CSV (Comma delimited).
Note: The different formats support different feature sets. For more information about the feature sets that are supported by the different text file formats, see File formats that are supported in Excel.
-
Browse to the location where you want to save the new text file, and then click Save.
-
A dialog box appears, reminding you that only the current worksheet will be saved to the new file. If you are certain that the current worksheet is the one that you want to save as a text file, click OK. You can save other worksheets as separate text files by repeating this procedure for each worksheet.
You may also see an alert below the ribbon that some features might be lost if you save the workbook in a CSV format.
For more information about saving files in other formats, see Save a workbook in another file format.
Import a text file by connecting to it
You can import data from a text file into an existing worksheet.
-
Click the cell where you want to put the data from the text file.
-
On the Data tab, in the Get External Data group, click From Text.
-
In the Import Data dialog box, locate and double-click the text file that you want to import, and click Import.
Follow the instructions in the Text Import Wizard. Click Help
on any page of the Text Import Wizard for more information about using the wizard. When you are done with the steps in the wizard, click Finish to complete the import operation. -
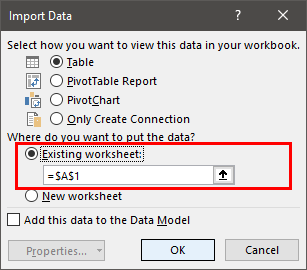
In the Import Data dialog box, do the following:
-
Under Where do you want to put the data?, do one of the following:
-
To return the data to the location that you selected, click Existing worksheet.
-
To return the data to the upper-left corner of a new worksheet, click New worksheet.
-
-
Optionally, click Properties to set refresh, formatting, and layout options for the imported data.
-
Click OK.
Excel puts the external data range in the location that you specify.
-
 on any page of the Text Import Wizard for more information about using the wizard. When you are done with the steps in the wizard, click Finish to complete the import operation.
If Excel does not convert a column of data to the format that you want, you can convert the data after you import it. For more information, see Convert numbers stored as text to numbers and Convert dates stored as text to dates.
Export data to a text file by saving it
You can convert an Excel worksheet to a text file by using the Save As command.
-
Go to File > Save As.
-
The Save As dialog box appears.
-
In the Save as type box, choose the text file format for the worksheet.
-
For example, click Text (Tab delimited) or CSV (Comma delimited).
-
Note: The different formats support different feature sets. For more information about the feature sets that are supported by the different text file formats, see File formats that are supported in Excel.
-
-
Browse to the location where you want to save the new text file, and then click Save.
-
A dialog box appears, reminding you that only the current worksheet will be saved to the new file. If you are certain that the current worksheet is the one that you want to save as a text file, click OK. You can save other worksheets as separate text files by repeating this procedure for each worksheet.
-
A second dialog box appears, reminding you that your worksheet may contain features that are not supported by text file formats. If you are interested only in saving the worksheet data into the new text file, click Yes. If you are unsure and would like to know more about which Excel features are not supported by text file formats, click Help for more information.
For more information about saving files in other formats, see Save a workbook in another file format.
The way you change the delimiter when importing is different depending on how you import the text.
-
If you use Get & Transform Data > From Text/CSV, after you choose the text file and click Import, choose a character to use from the list under Delimiter. You can see the effect of your new choice immediately in the data preview, so you can be sure you make the choice you want before you proceed.
-
If you use the Text Import Wizard to import a text file, you can change the delimiter that is used for the import operation in Step 2 of the Text Import Wizard. In this step, you can also change the way that consecutive delimiters, such as consecutive quotation marks, are handled.
See Text Import Wizard for more information about delimiters and advanced options.
If you want to use a semi-colon as the default list separator when you Save As .csv, but need to limit the change to Excel, consider changing the default decimal separator to a comma — this forces Excel to use a semi-colon for the list separator. Obviously, this will also change the way decimal numbers are displayed, so also consider changing the Thousands separator to limit any confusion.
-
Clear Excel Options > Advanced > Editing options > Use system separators.
-
Set Decimal separator to , (a comma).
-
Set Thousands separator to . (a period).
When you save a workbook as a .csv file, the default list separator (delimiter) is a comma. You can change this to another separator character using Windows Region settings.
Caution: Changing the Windows setting will cause a global change on your computer, affecting all applications. To only change the delimiter for Excel, see Change the default list separator for saving files as text (.csv) in Excel.
-
In Microsoft Windows 10, right-click the Start button, and then click Settings.
-
Click Time & Language, and then click Region in the left panel.
-
In the main panel, under Regional settings, click Additional date, time, and regional settings.
-
Under Region, click Change date, time, or number formats.
-
In the Region dialog, on the Format tab, click Additional settings.
-
In the Customize Format dialog, on the Numbers tab, type a character to use as the new separator in the List separator box.
-
Click OK twice.
-
In Microsoft Windows, click the Start button, and then click Control Panel.
-
Under Clock, Language, and Region, click Change date, time, or number formats.
-
In the Region dialog, on the Format tab, click Additional settings.
-
In the Customize Format dialog, on the Numbers tab, type a character to use as the new separator in the List separator box.
-
Click OK twice.
Note: After you change the list separator character for your computer, all programs use the new character as a list separator. You can change the character back to the default character by following the same procedure.
Need more help?
You can always ask an expert in the Excel Tech Community or get support in the Answers community.
See Also
Import data from external data sources (Power Query)