
Содержание
- Design a configuration for generating documents in Excel format
- Add a new ER format
- Excel file component
- Manual entry
- Template import
- Sheet component
- Range component
- Nested components
- Data typing
- Row handling
- Replication
- Enabling
- Resizing
- Cell component
- Page break component
- Page component
- Overview
- Structure
- Limitations
- Applicability
- Footer component
- Header component
- Edit an added ER format
- Update a template
- Validate an ER format
- Control the calculation of Excel formulas
- Example 1: Format footer content
- Example 2: Fixing the merged cells EPPlus issue
- Limitations
- Known EPPlus library limitations
- External data sources
Design a configuration for generating documents in Excel format
You can design an Electronic reporting (ER) format configuration that has an ER format component that you can configure to generate an outbound document in a Microsoft Excel workbook format. Specific ER format components must be used for this purpose.
To learn more about this feature, follow the steps in the article, Design a configuration for generating reports in OPENXML format.
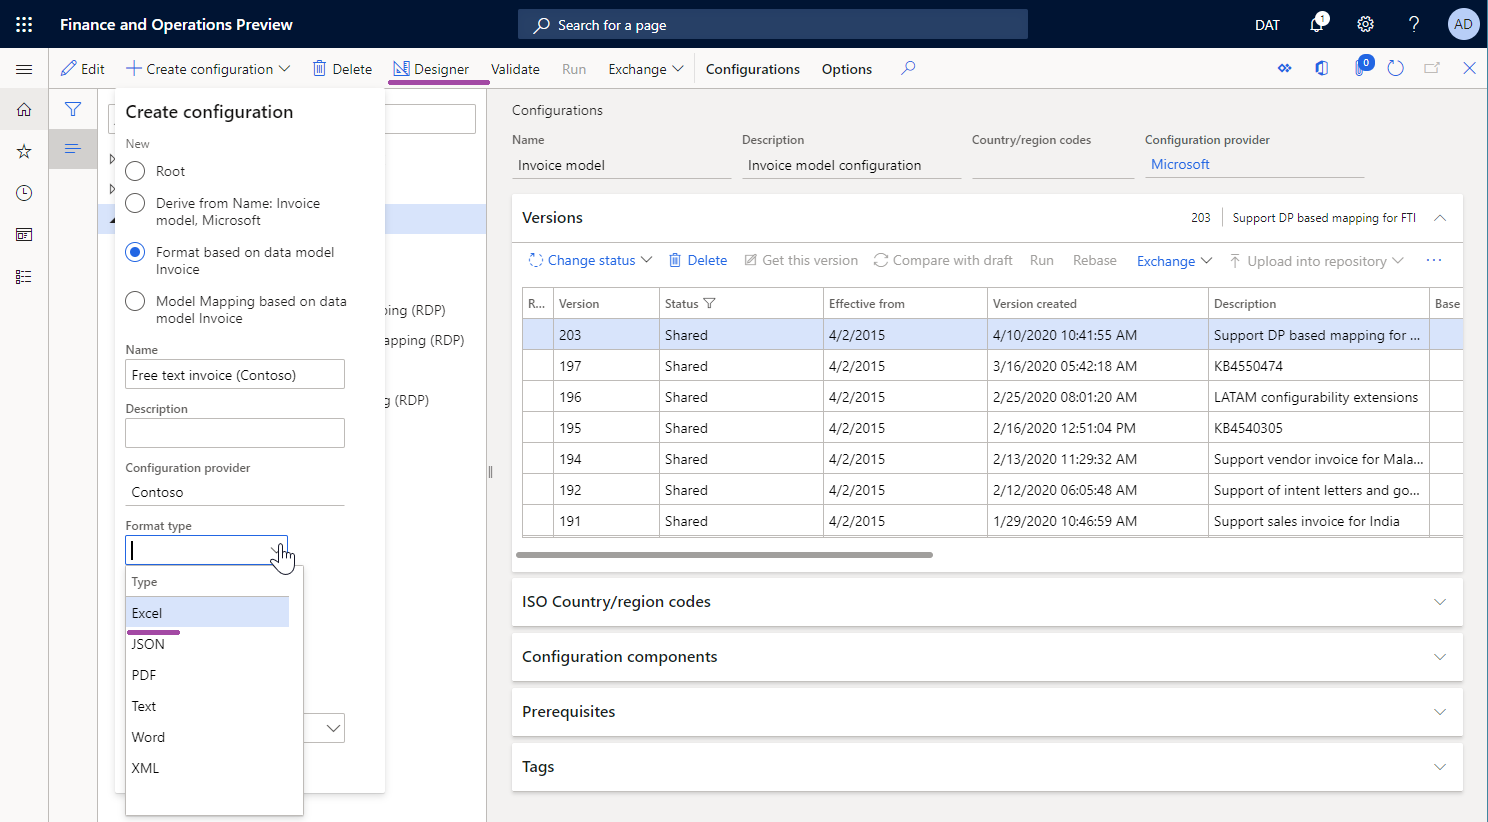
Add a new ER format
When you add a new ER format configuration to generate an outbound document in an Excel workbook format, you must either select the Excel value for the Format type attribute of the format or leave the Format type attribute blank.
- If you select Excel, you can configure the format to generate an outbound document only in Excel format.
- If you leave the attribute blank, you can configure the format to generate an outbound document in any format that is supported by the ER framework.
To configure the ER format component of the configuration, select Designer on the Action Pane, and open the ER format component for editing in the ER Operation designer.
Excel file component
Manual entry
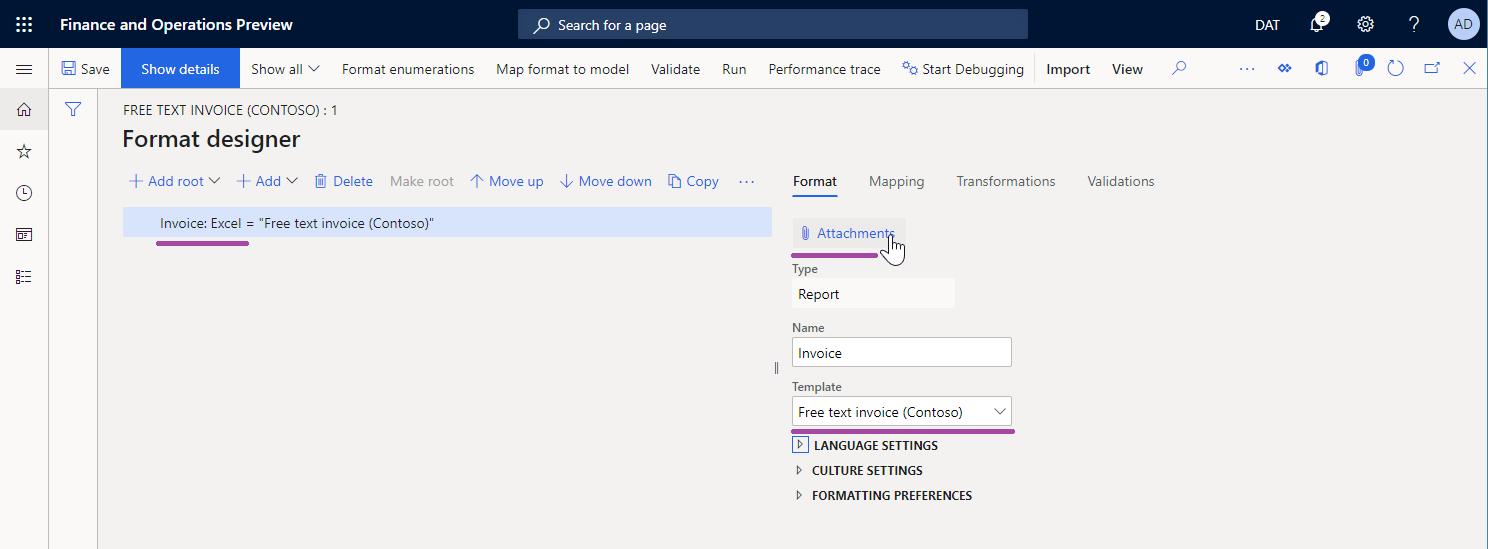
You must add an ExcelFile component to the configured ER format to generate an outbound document in Excel format.
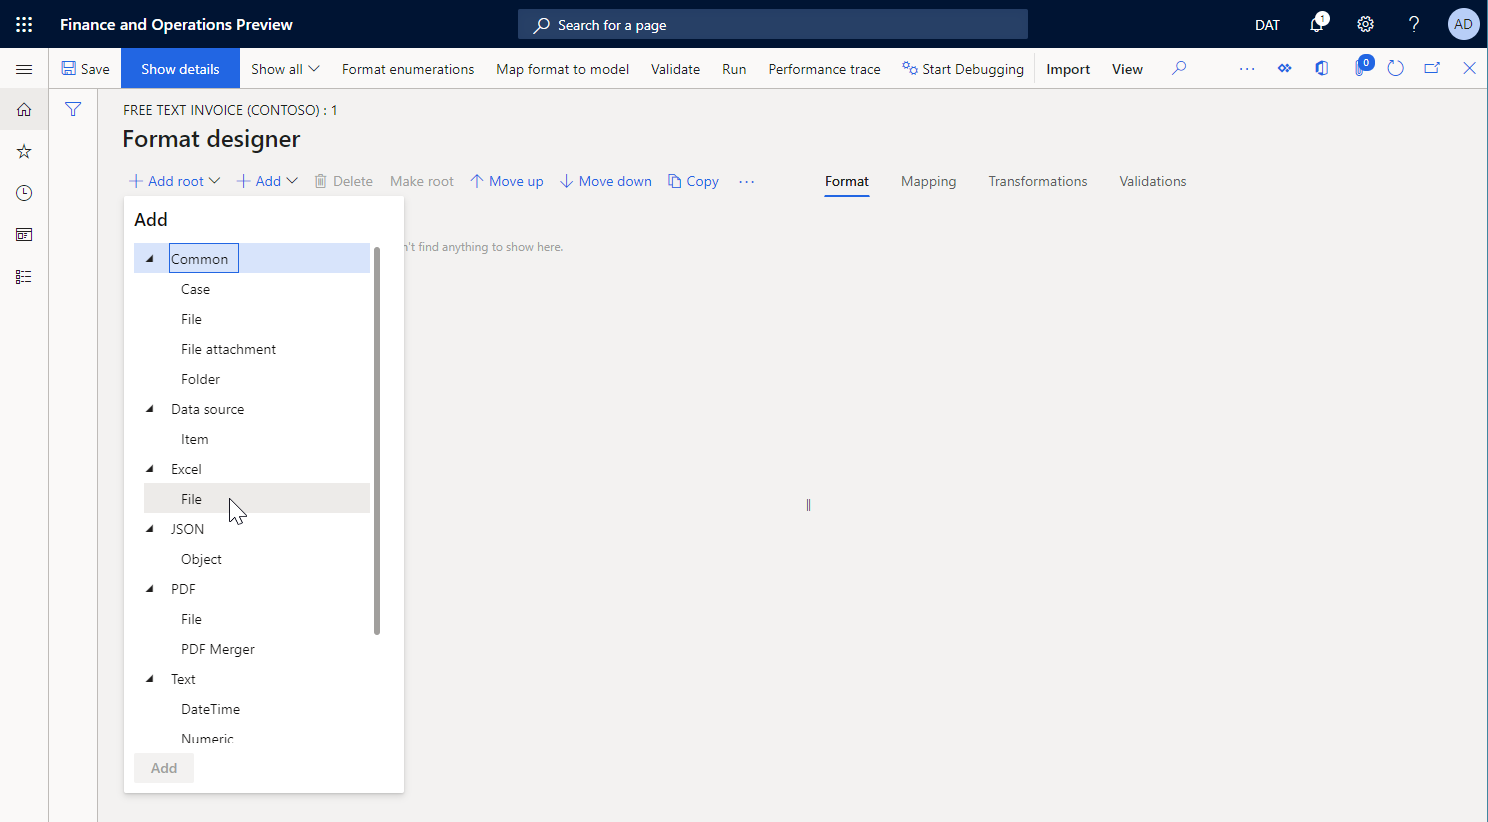
To specify the layout of the outbound document, attach an Excel workbook that has the .xlsx extension to the ExcelFile component as the template for outbound documents.
When you manually attach a template, you must use a document type that has been configured for that purpose in the ER parameters.
To specify how the attached template will be filled in when you run the configured ER format, you must add nested Sheet, Range, and Cell components to the ExcelFile component. Each nested component must be associated with an Excel named item.
Template import
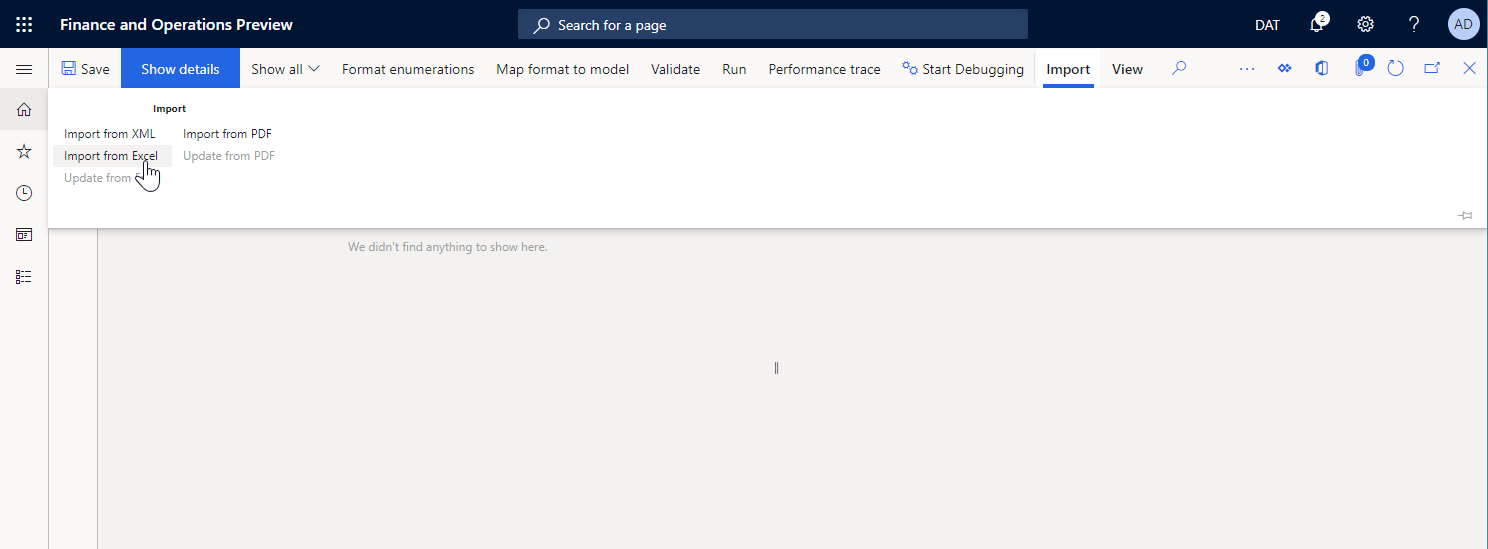
You can select Import from Excel on the Import tab of the Action Pane to import a new template into a blank ER format. In this example, an ExcelFile component will be created automatically, and the imported template will be attached to it. All required ER components will also be created automatically, based on the list of Excel named items that are discovered.
If you want to create the optional Sheet element in the editable ER format, set the Create Excel Sheet format element option to Yes.
Sheet component
The Sheet component indicates a worksheet of the attached Excel workbook that must be filled in. The name of the worksheet in an Excel template is defined in the Sheet property of this component.
This component is optional for Excel workbooks that contain a single worksheet.
On the Mapping tab of the ER Operation designer, you can configure the Enabled property for a Sheet component to specify whether the component must be put in a generated document:
- If an expression of the Enabled property is configured to return True at runtime, or if no expression is configured at all, the appropriate worksheet will be put in the generated document.
- If an expression of the Enabled property is configured to return False at runtime, the generated document won’t contain a worksheet.
Range component
Nested components
Data typing
The Range component can have other nested ER components that are used to enter values in the appropriate ranges.
If any component of the Text group is used to enter values, the value is entered in an Excel range as a text value.
Use this pattern to format entered values based on the locale that is defined in the application.
If the Cell component of the Excel group is used to enter values, the value is entered in an Excel range as a value of the data type that is defined by the binding of that Cell component. For example, the data type might be String, Real, or Integer.
Use this pattern to enable the Excel application to format entered values based on the locale of the local computer that opens the outbound document.
Row handling
The Range component can be configured as vertically replicated, so that multiple rows are generated in an Excel worksheet. The rows can be generated by the parent Range component or by its nested Range components.
In version 10.0.26 and later, you can force a generated worksheet to keep the generated rows on the same page. In the ER format designer, set the Keep rows together option to Yes for the parent Range component in the editable ER format. ER will then try to keep all the content that is generated by that range on the same page. If the height of the content exceeds the remaining space on the current page, a page break will be added, and the content will start at the top of the next new page.
We recommend that you configure the Keep rows together option only for ranges that span the whole width of a generated document.
The Keep rows together option is applicable only to Excel > File components that are configured to use an Excel workbook template.
The Keep rows together option can be used only when the Enable usage of EPPlus library in Electronic reporting framework feature is enabled.
This feature can be used for Range components that reside under the Page component. However, there is no guarantee that page footer totals will be correctly calculated by using Data collection data sources.
To learn how to use this option, follow the example steps in Design an ER format to keep rows together on the same Excel page.
Replication
The Replication direction property specifies whether and how a range will be repeated in a generated document:
No replication – The appropriate Excel range won’t be repeated in the generated document.
Vertical – The appropriate Excel range will be repeated vertically in the generated document. Each replicated range will be put below the original range in an Excel template. The number of repetitions is defined by the number of records in a data source of the Record list type that is bound to this ER component.
Horizontal – The appropriate Excel range will be repeated horizontally in the generated document. Each replicated range will be put to the right of the original range in an Excel template. The number of repetitions is defined by the number of records in a data source of the Record list type that is bound to this ER component.
Enabling
On the Mapping tab of the ER Operation designer, you can configure the Enabled property for a Range component to specify whether the component must be put in a generated document:
- If an expression of the Enabled property is configured to return True at runtime, or if no expression is configured at all, the appropriate range will be filled in in the generated document.
- If an expression of the Enabled property is configured to return False at runtime, and if this range doesn’t represent the entire rows or columns, the appropriate range won’t be filled in in the generated document.
- If an expression of the Enabled property is configured to return False at runtime, and this range represents the entire rows or columns, the generated document will contain those rows and columns as hidden rows and columns.
Resizing
You can configure your Excel template to use cells to present textual data. To ensure that the whole text in a cell is visible in a generated document, you can configure that cell to automatically wrap the text inside it. You can also configure the row that contains that cell to automatically adjust its height if the wrapped text isn’t fully visible. For more information, see the «Wrap text in a cell» section in Fix data that is cut off in cells.
Because of a known Excel limitation, even if you configure cells to wrap text, and you configure the rows that contain those cells to automatically adjust their height to fit the wrapped text, you might not be able to use the AutoFit and Wrap text Excel features for merged cells and the rows that contain them.
As of Dynamics 365 Finance version 10.0.23, when you’re working in a generated document, you can force ER to calculate the height of every row that was configured to automatically fit its height to the content of nested cells whenever that row contains at least one merged cell that was configured to wrap the text inside it. The calculated height is then used to resize the row to ensure that all cells in the row are visible in the generated document.
Be aware that this functionality might not work as expected when a custom font is used to format a merged cell. Because Excel doesn’t embed custom fonts, it doesn’t provide information about custom font size. Therefore, the size of the merged cell can be incorrectly estimated.
To start to use this functionality when you run any ER formats that were configured to use Excel templates to generate outbound documents, follow these steps.
- Go to Organization administration >Workspaces >Electronic reporting.
- On the Localization configurations page, in the Related links section, select Electronic reporting parameters.
- On the Electronic reporting parameters page, on the Runtime tab, set the Autofit row height option to Yes.
When you want to change this rule for a single ER format, update the draft version of that format by following these steps.
Go to Organization administration > Workspaces > Electronic reporting.
On the Localization configurations page, in the Configurations section, select Reporting configurations.
On the Configurations page, in the configurations tree in the left pane, select an ER configuration that is designed to use an Excel template to generate outbound documents.
On the Versions FastTab, select the configuration version that has a status of Draft.
On the Action Pane, select Designer.
On the Format designer page, in the format tree in the left pane, select the Excel component that is linked to an Excel template.
On the Format tab, in the Adjust row height field, select a value to specify whether ER should be forced, at runtime, to change the height of rows in an outbound document that is generated by the edited ER format:
- Default – Use the general setting that is configured in the Autofit row height field on the Electronic reporting parameters page.
- Yes – Override the general setting, and change the row height at runtime.
- No – Override the general setting, and don’t change the row height at runtime.
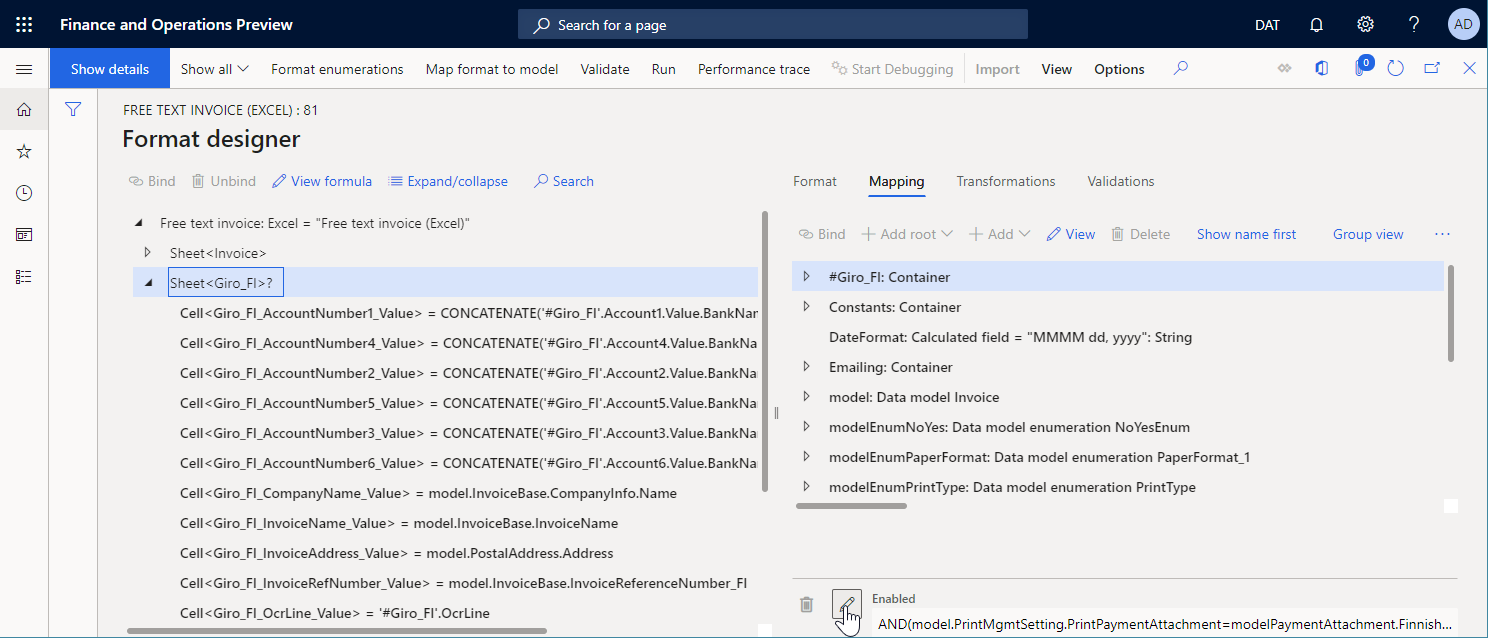
Cell component
The Cell component is used to fill in Excel named cells, shapes, and pictures. To indicate an Excel named object that must be filled in by a Cell ER component, you must specify the name of that object in the Excel range property of the Cell component.
On the Mapping tab of the ER Operation designer, you can configure the Enabled property for a Cell component to specify whether the object must be filled in in a generated document:
- If an expression of the Enabled property is configured to return True at runtime, or if no expression is configured at all, the appropriate object will be filled in in the generated document. The binding of this Cell component specifies a value that is put in the appropriate object.
- If an expression of the Enabled property is configured to return False at runtime, the appropriate object won’t be filled in in the generated document.
When a Cell component is configured to enter a value in a cell, it can be bound with a data source that returns the value of a primitive data type (for example, String, Real, or Integer). In this case, the value is entered in the cell as a value of the same data type.
When a Cell component is configured to enter a value in an Excel shape, it can be bound with a data source that returns a value of a primitive data type (for example, String, Real, or Integer). In this case, the value is entered in the Excel shape as the text of that shape. For values of data types that aren’t String, the conversion to text is done automatically.
You can configure a Cell component to fill in a shape only in cases where a shape text property is supported.
When a Cell component is configured to enter a value in an Excel picture, it can be bound with a data source that returns a value of the Container data type that represents an image in binary format. In this case, the value is entered in the Excel picture as an image.
Every Excel picture and shape is considered to be anchored by its upper-left corner to a specific Excel cell or range. If you want to replicate an Excel picture or shape, you must configure the cell or range that it’s anchored to as a replicated cell or range.
If you plan to use an image with custom scaling and aspect ratio at runtime, we recommend you set the option Respect pictures scaling of the parent Excel file component to Yes to apply the scaling and aspect ratio as a placeholder of that image in the Excel template you are using.
To learn more about how to embed images and shapes, see Embed images and shapes in documents that you generate by using ER.
Page break component
The PageBreak component forces Excel to start a new page. This component isn’t required when you want to use Excel’s default paging, but you should use it when you want Excel to follow your ER format to structure paging.
Page component
Overview
You can use the Page component when you want Excel to follow your ER format and structure pagination in a generated outbound document. When an ER format runs components that are under the Page component, the required page breaks are automatically added. During this process, the size of the generated content, the page setup of the Excel template, and the paper size that is selected in the Excel template are considered.
If you must split a generated document into different sections, each of which has a different pagination, you can configure several Page components in every Sheet component.
Structure
If the first component under the Page component is a Range component where the Replication direction property is set to No replication, this range is considered the page header for pagination that is based on the settings of the current Page component. The Excel range that is associated with this format component is repeated at the top of every page that is generated by using the settings of the current Page component.
For correct pagination, if the Rows to repeat at top range is configured in your Excel template, the address of this Excel range must equal the address of the Excel range that is associated with the previously described Range component.
If the last component under the Page component is a Range component where the Replication direction property is set to No replication, this range is considered the page footer for pagination that is based on the settings of the current Page component. The Excel range that is associated with this format component is repeated at the bottom of every page that is generated by using the settings of the current Page component.
For correct pagination, the Excel ranges that are associated with the Range components should not be resized at runtime. We don’t recommend that you format cells of this range by using the Wrap text in a cell and Autofit row height Excel options.
You can add multiple other Range components between the optional Range components to specify how a generated document is filled in.
If the set of nested Range components under the Page component doesn’t comply with the previously described structure, a validation error occurs at design time in the ER format designer. The error message informs you that the issue can cause problems at runtime.
To generate correct output, don’t specify a binding for any Range component under the Page component if the Replication direction property for that Range component is set to No replication, and the range is configured to generate page headers or page footers.
If you want pagination-related summing and counting to compute running totals and totals per page, we recommend that you configure the required Data collection data sources. To learn how to use the Page component to paginate a generated Excel document, complete the procedures in Design an ER format to paginate a generated document in Excel format.
Limitations
When you use the Page component for Excel pagination, you won’t know the final number of pages in a generated document until the pagination is completed. Therefore, you can’t calculate the total number of pages by using ER formulas and print the correct number of pages of a generated document on any page before the last page.
To achieve this result in an Excel header or footer by using the special Excel formatting for headers and footers.
Configured Page components aren’t considered when you update an Excel template in the editable format in Dynamics 365 Finance version 10.0.22. This functionality is considered for further releases of Finance.
If you configure your Excel template to use conditional formatting, it might not work as expected in some cases.
Applicability
The Page component works for the Excel file format component only when that component is configured to use a template in Excel. If you replace the Excel template with a Word template and then run the editable ER format, the Page component will be ignored.
The Page component works only when the Enable usage of EPPlus library in Electronic reporting framework feature is enabled. An exception is thrown at runtime if ER tries to process the Page component while this feature is disabled.
An exception is thrown at runtime if an ER format processes the Page component for an Excel template that contains at least one formula that refers to a cell that isn’t valid. To help prevent runtime errors, fix the Excel template as described in How to correct a #REF! error.
The Footer component is used to fill in footers at the bottom of a generated worksheet in an Excel workbook.
You can add this component for every Sheet component to specify different footers for different worksheets in a generated Excel workbook.
When you configure an individual Footer component, you can use the Header/footer appearance property to specify the pages that the component is used for. The following values are available:
- Any – Run the configured Footer component for any page of the parent Excel worksheet.
- First – Run the configured Footer component for only the first page of the parent Excel worksheet.
- Even – Run the configured Footer component for only the even pages of the parent Excel worksheet.
- Odd – Run the configured Footer component for only the odd pages of the parent Excel worksheet.
For a single Sheet component, you can add several Footer components, each of which has a different value for the Header/footer appearance property. In this way, you can generate different footers for different type of pages in an Excel worksheet.
Make sure that each Footer component that you add to a single Sheet component has a different value for the Header/footer appearance property. Otherwise, a validation error occurs. The error message that you receive notifies you about the inconsistency.
Under the added Footer component, add the required nested components of the TextString, TextDateTime, or other type. Configure the bindings for those components to specify how your page footer is filled in.
You can also use special formatting codes to correctly format the content of a generated footer. To learn how to use this approach, follow the steps in Example 1, later in this article.
When you configure ER formats, be sure to consider the Excel limit and the maximum number of characters for a single header or footer.
The Header component is used to fill in headers at the top of a generated worksheet in an Excel workbook. It’s used like the Footer component.
Edit an added ER format
Update a template
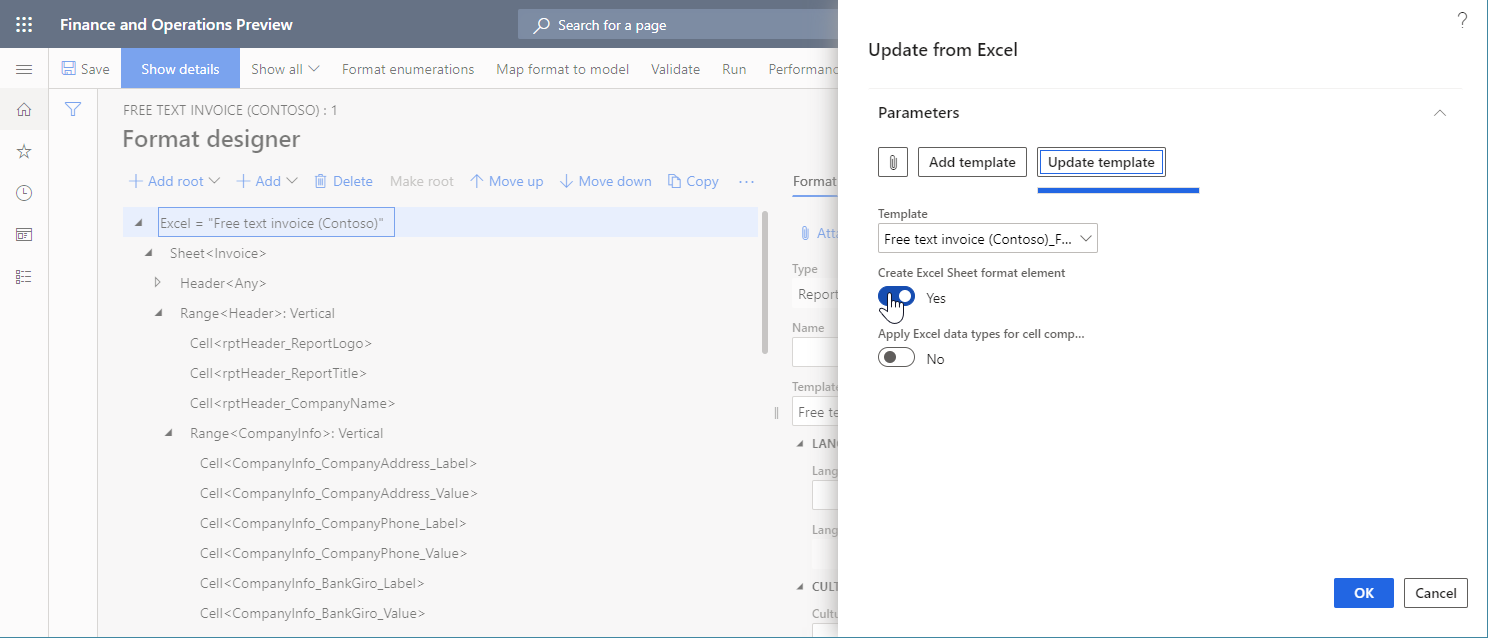
You can select Update from Excel on the Import tab of the Action Pane to import an updated template into an editable ER format. During this process, a template of the selected ExcelFile component will be replaced by a new template. The content of the editable ER format will be synced with the content of the updated ER template.
- A new ER format component will automatically be created for every Excel name if the ER format component isn’t found in the editable format.
- Every ER format component will be deleted from the editable ER format if the appropriate Excel name isn’t found for it.
Set the Create Excel Sheet format element option to Yes if you want to create the optional Sheet element in the editable ER format.
If the editable ER format originally contained Sheet elements, we recommend that you set the Create Excel Sheet format element option to Yes when you import an updated template. Otherwise, all nested elements of the original Sheet element will be created from scratch. Therefore, all bindings of the re-created format elements will be lost in the updated ER format.
In version 10.0.28 and later, you can use the Update Excel Header and Excel Footer format elements option.
When you set this option to No, the Excel Header and Excel Footer format elements remain unchanged, even if the corresponding headers or footers have been updated in the worksheets of the imported template in the Excel workbook format.
When you set this option to Yes, Excel Header and Excel Footer format elements will change when the corresponding headers or footers are updated in worksheets of the imported template in the Excel workbook format.
- If the structure of a worksheet header or footer hasn’t been changed, or if it has only been appended, the structure of the corresponding Excel Header or Excel Footer format element is updated. Bindings of format elements that are nested under this Excel Header or Excel Footer format element will be preserved.
- If the structure of a worksheet header or footer has been changed, the corresponding Excel Header or Excel Footer format element is re-created. Bindings of format elements that are nested under this Excel Header or Excel Footer format element will be removed.

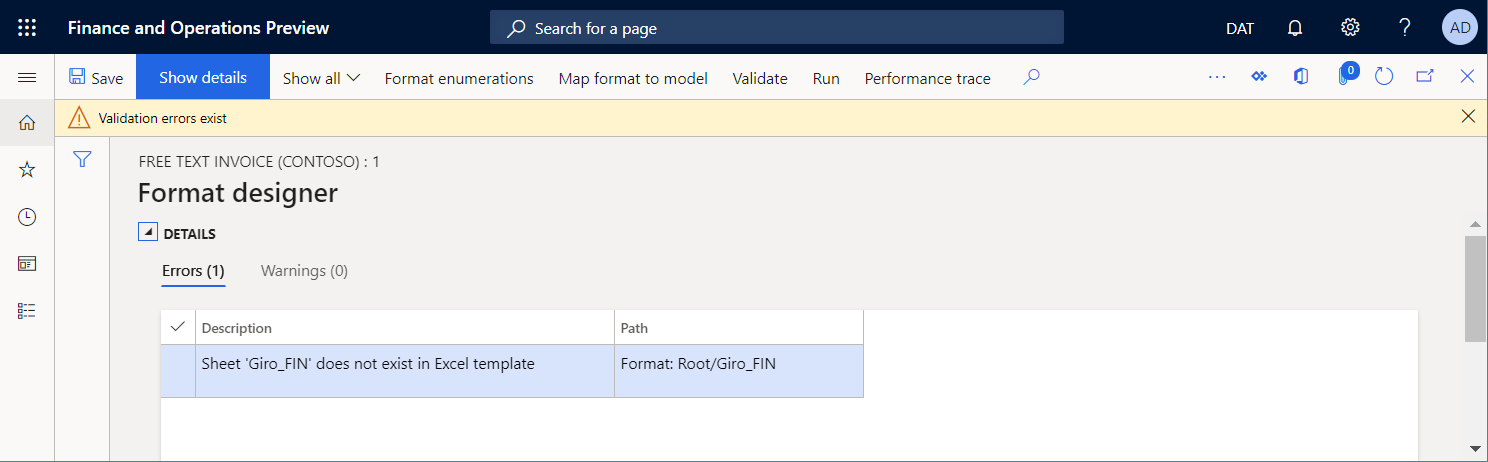
Validate an ER format
When you validate an ER format that can be edited, a consistency check is done to make sure that the Excel name is present in the Excel template that is currently used. You will be notified about any inconsistencies. For some inconsistencies, the option to automatically fix issues will be offered.
Control the calculation of Excel formulas
When an outbound document in a Microsoft Excel workbook format is generated, some cells of this document might contain Excel formulas. When the Enable usage of EPPlus library in Electronic reporting framework feature is enabled, you can control when the formulas are calculated by changing the value of the Calculation Options parameter in the Excel template that is being used:
Select Automatic to recalculate all dependent formulas every time a generated document is appended by new ranges, cells, etc.
This might cause a performance issue for Excel templates that contain multiple related formulas.
Select Manual to avoid formula recalculation when a document is generated.
Formula recalculation is manually forced when a generated document is opened for preview using Excel. Don’t use this option if you configure an ER destination that assumes the usage of a generated document without its preview in Excel (PDF conversion, emailing, etc.) because the generated document might not contain values in cells that contain formulas.
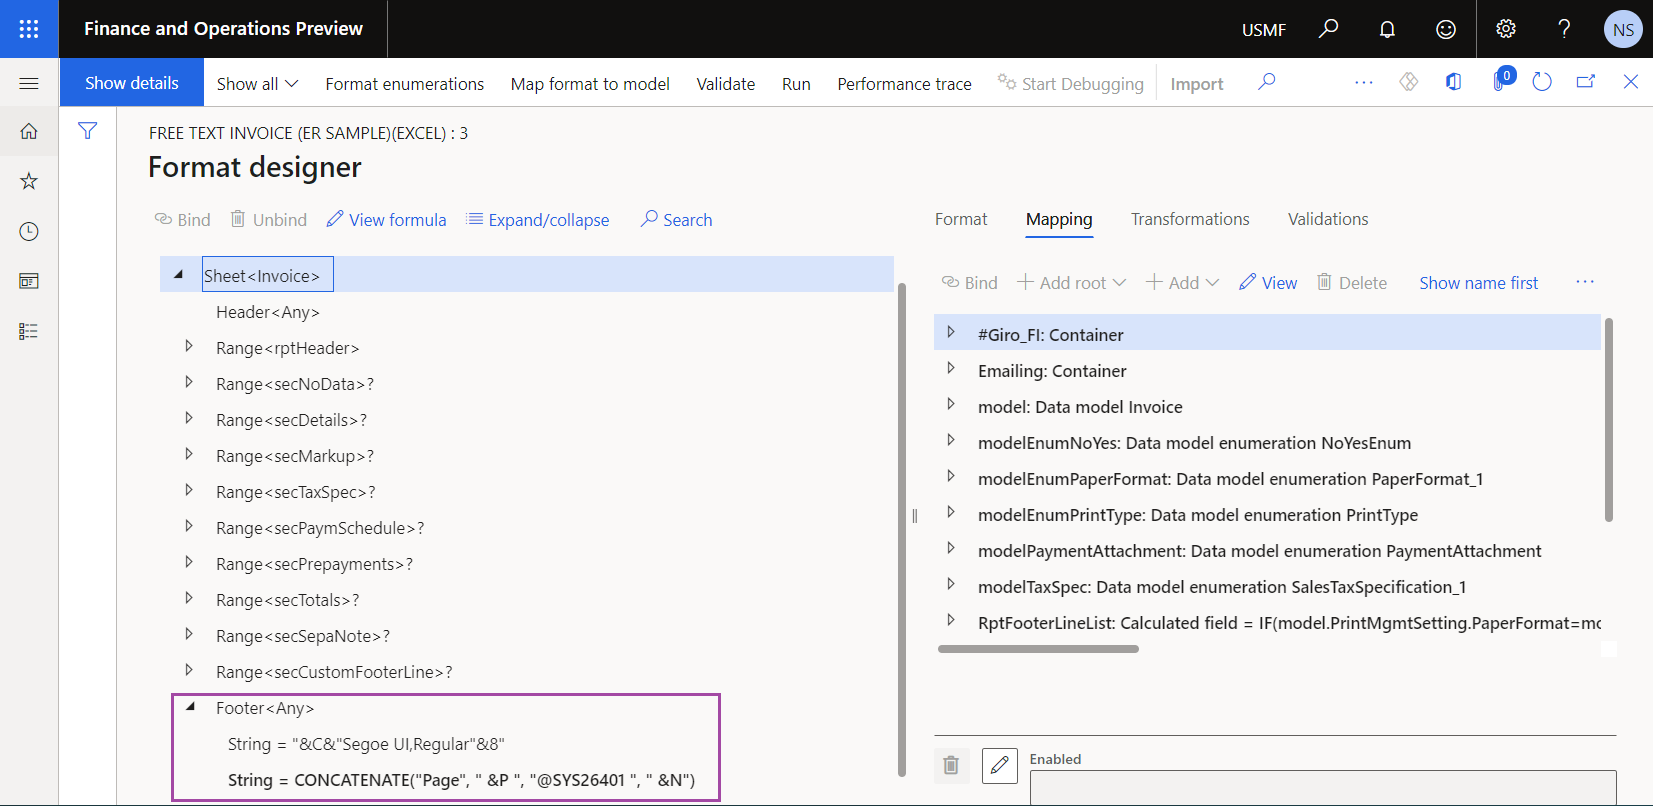
Example 1: Format footer content
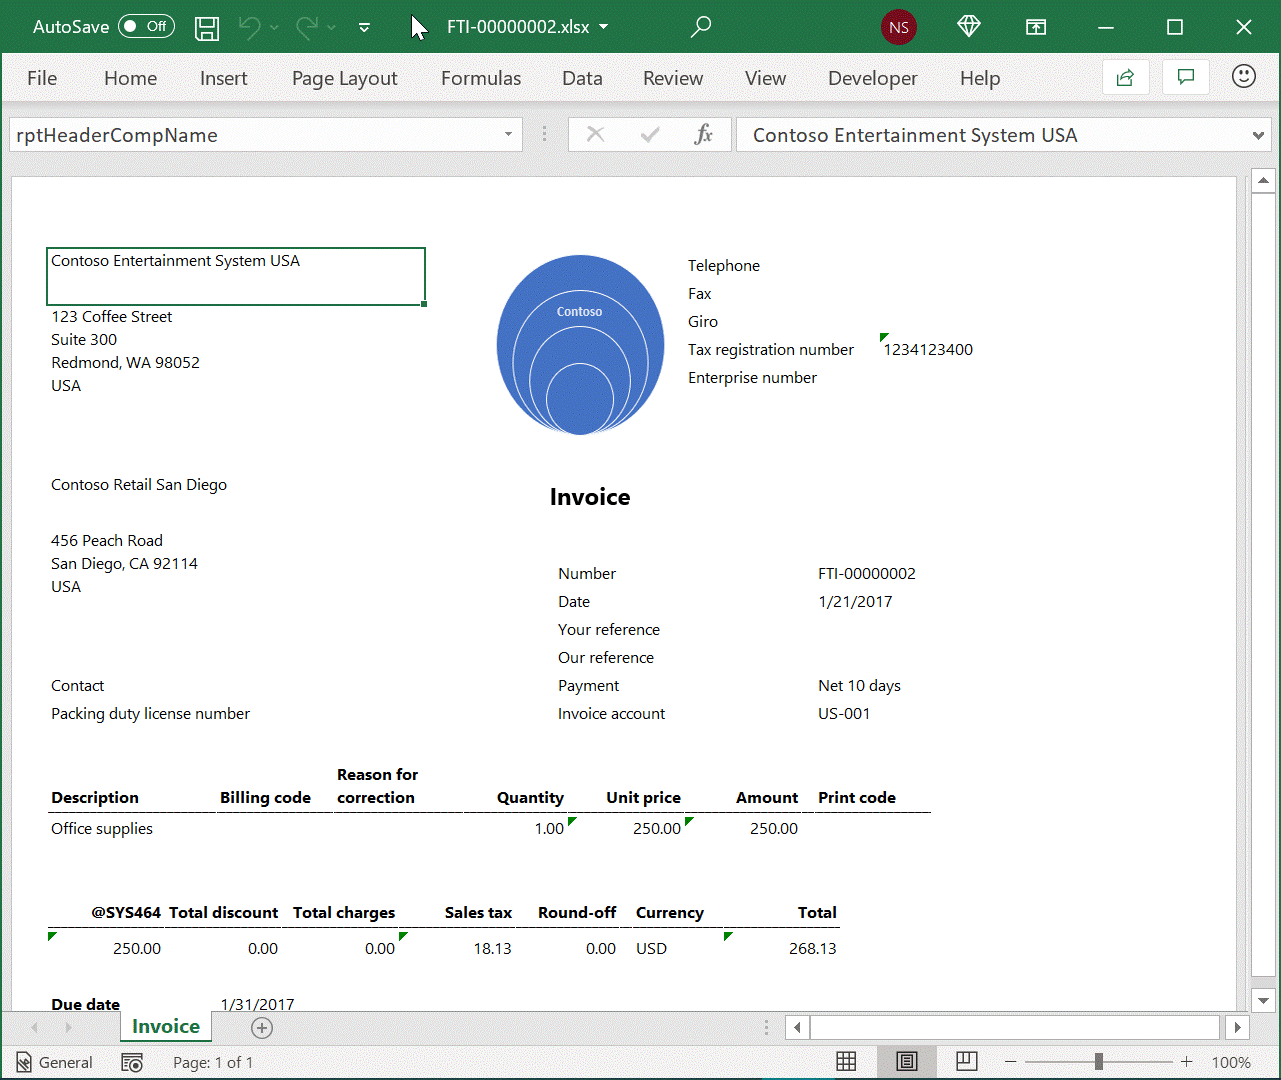
Use the provided ER configurations to generate a printable free text invoice (FTI) document.
Review the footer of the generated document. Notice that it contains information about the current page number and the total number of pages in the document.
In the ER format designer, open the sample ER format for review.
The footer of the Invoice worksheet is generated based on the settings of two String components that reside under the Footer component:
The first String component fills in the following special formatting codes to force Excel to apply specific formatting:
- &C – Align the footer text in the center.
- &»Segoe UI,Regular»&8 – Present the footer text in the «Segoe UI Regular» font at a size of 8 points.
The second String component fills in the text that contains the current page number and the total number of pages in the current document.
Customize the sample ER format to modify the current page footer:
Create a derived Free text invoice (Excel) custom ER format that is based on the sample ER format.
Add the first new pair of String components for the Footer component of the Invoice worksheet:
- Add a String component that aligns the company name on the left and presents it in 8-point «Segoe UI Regular» font («&L&»Segoe UI,Regular»&8»).
- Add a String component that fills in the company name (model.InvoiceBase.CompanyInfo.Name).
Add the second new pair of String components for the Footer component of the Invoice worksheet:
- Add a String component that aligns the processing date on the right and presents it in 8-point «Segoe UI Regular» font («&R&»Segoe UI,Regular»&8»).
- Add a String component that fills in the processing date in a custom format («В «&DATEFORMAT(SESSIONTODAY(), «yyyy-MM-dd»)).
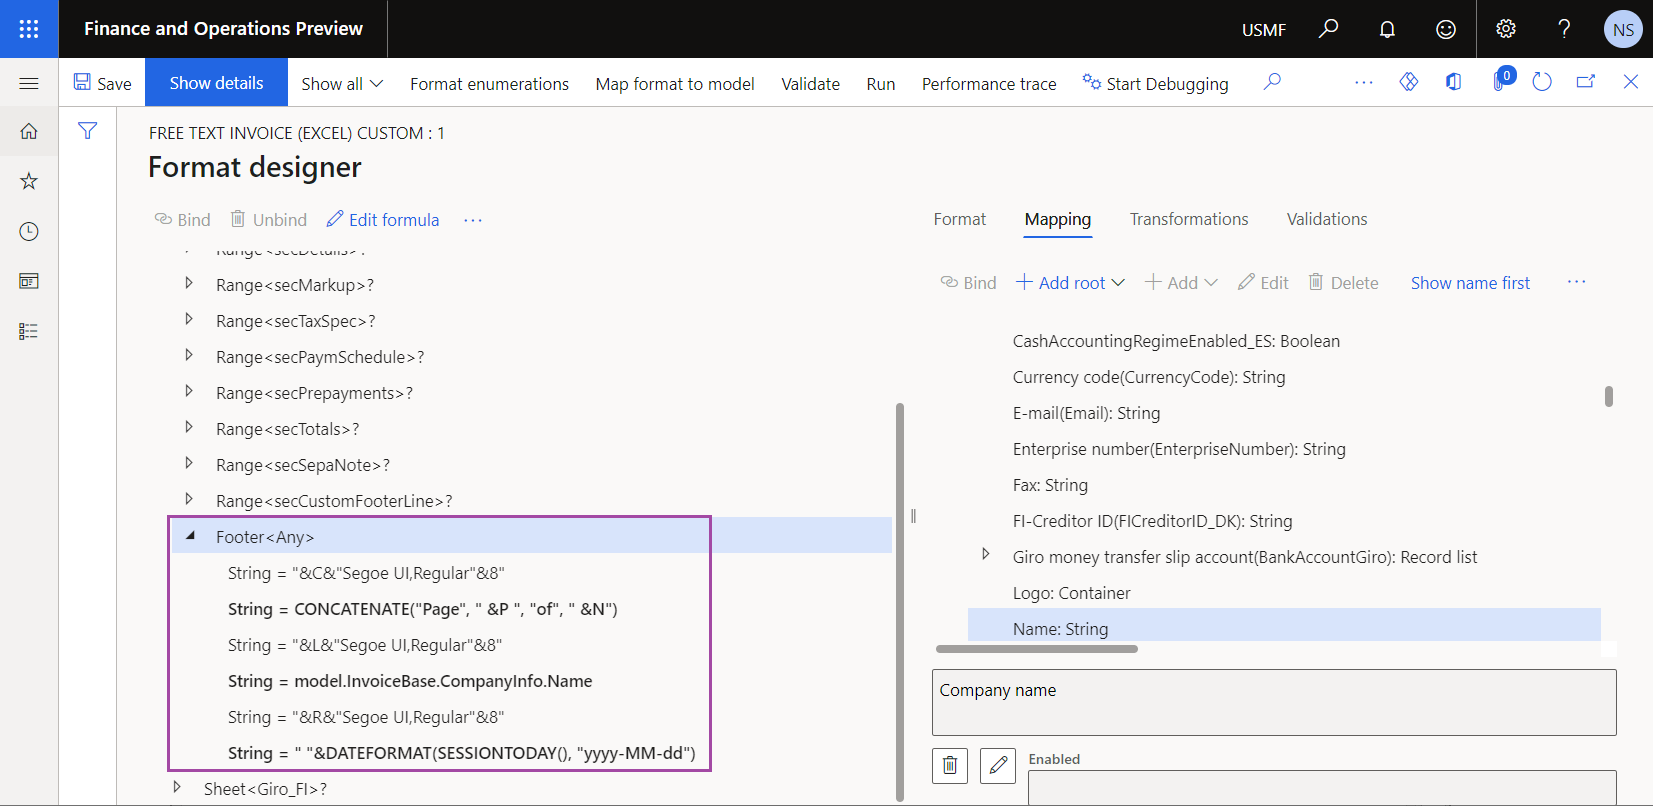
Complete the draft version of the derived Free text invoice (Excel) custom ER format.
Configure Print management to use the derived Free text invoice (Excel) custom ER format instead of the sample ER format.
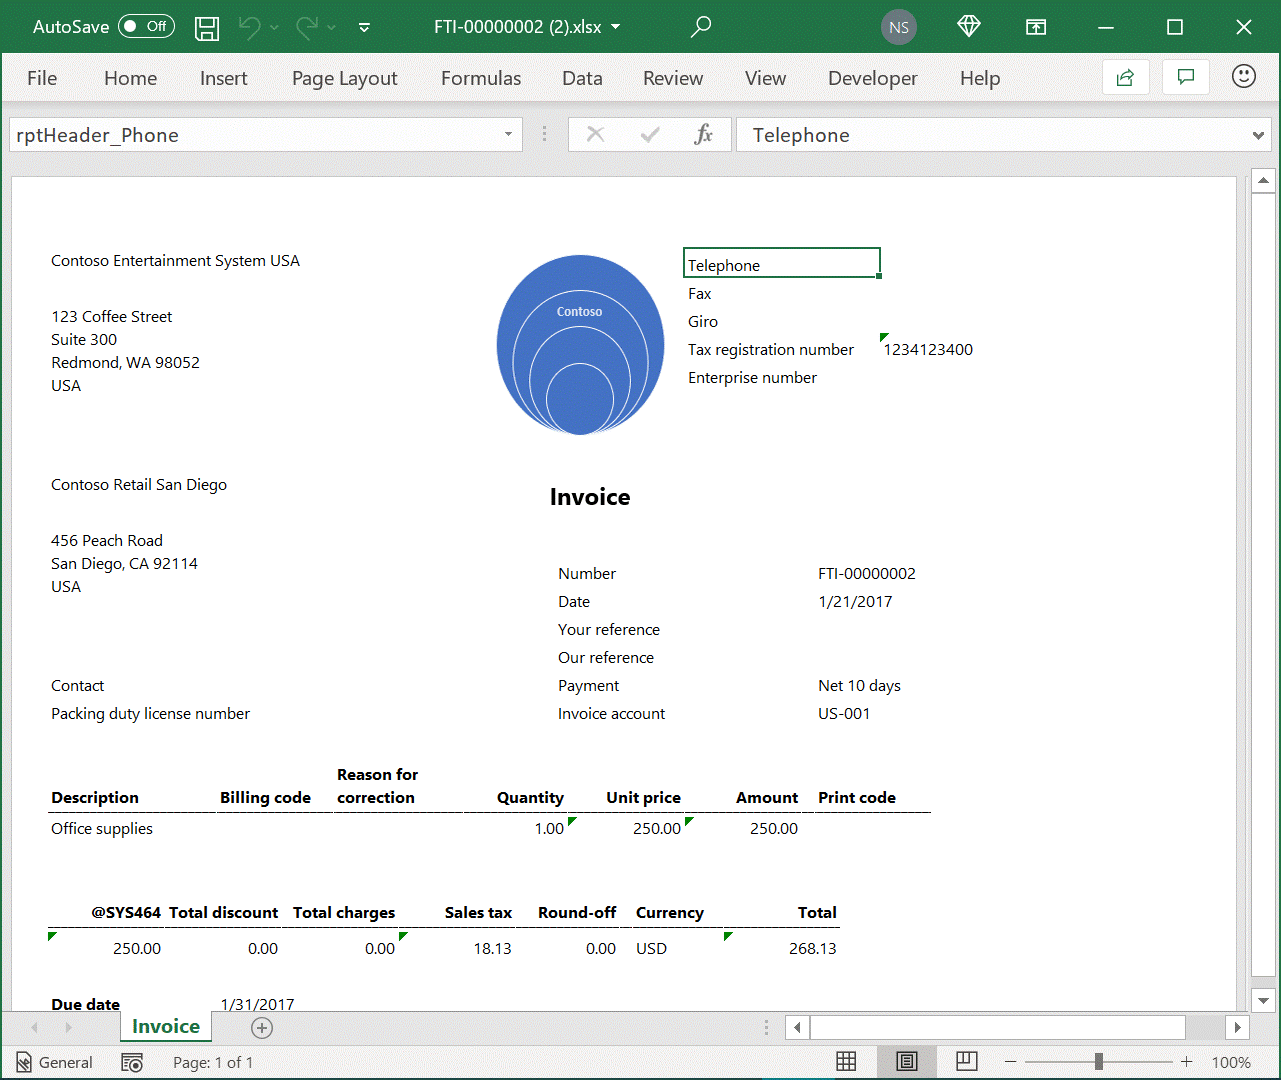
Generate a printable FTI document, and review the footer of the generated document.
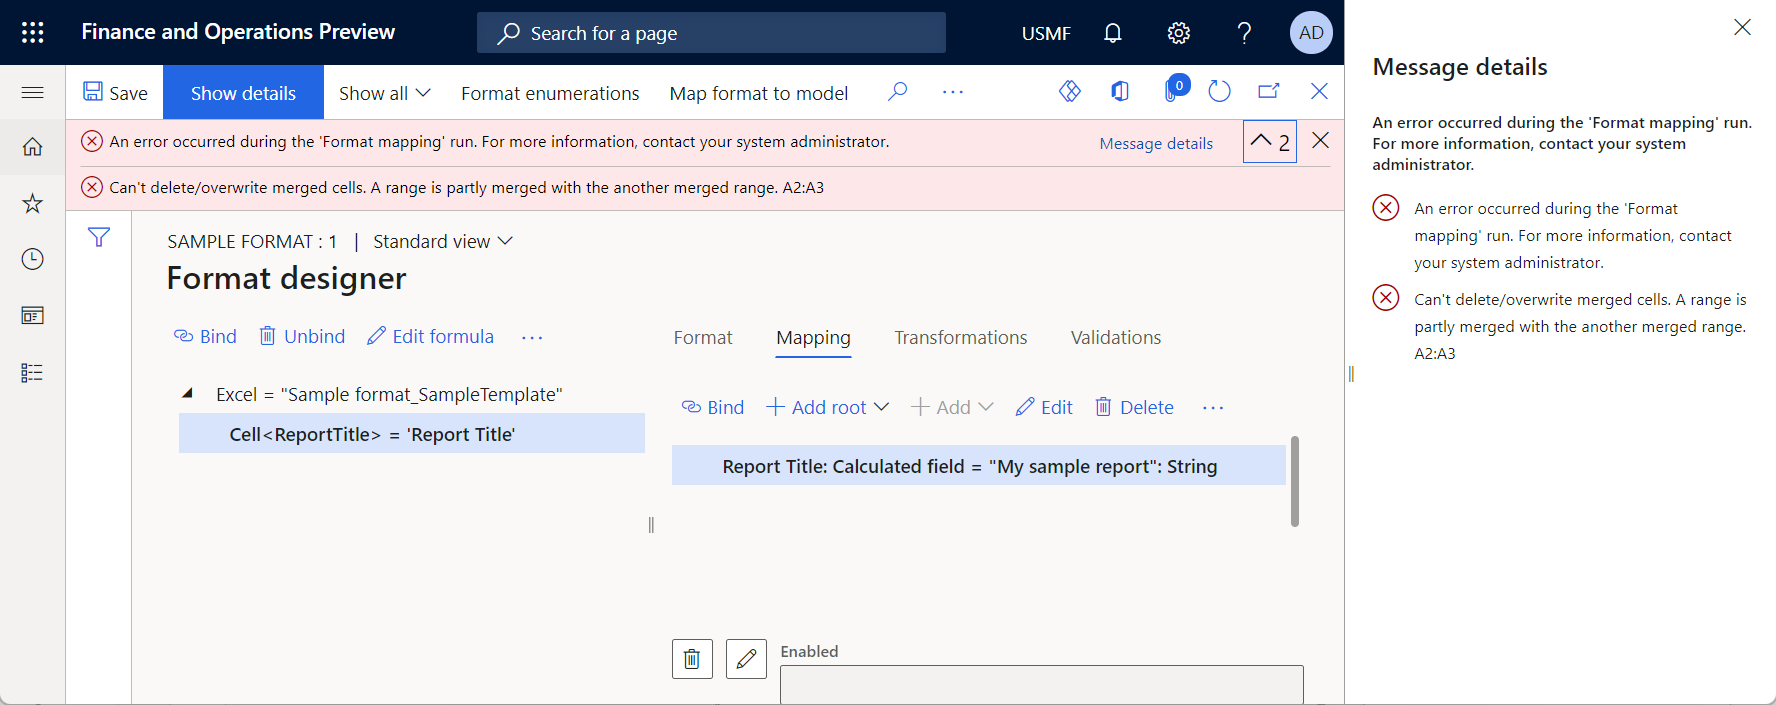
Example 2: Fixing the merged cells EPPlus issue
You can run an ER format to generate an outbound document in an Excel workbook format. When the Enable usage of EPPlus library in Electronic reporting framework feature is enabled in the Feature management workspace, the EPPlus library is used to make Excel output. However, because of known Excel behavior and a limitation of the EPPlus library, you might encounter the following exception: «Can’t delete/overwrite merged cells. A range is partly merged with the another merged range.» To learn what kind of Excel templates might cause this exception and how you can fix the issue, complete the following example.
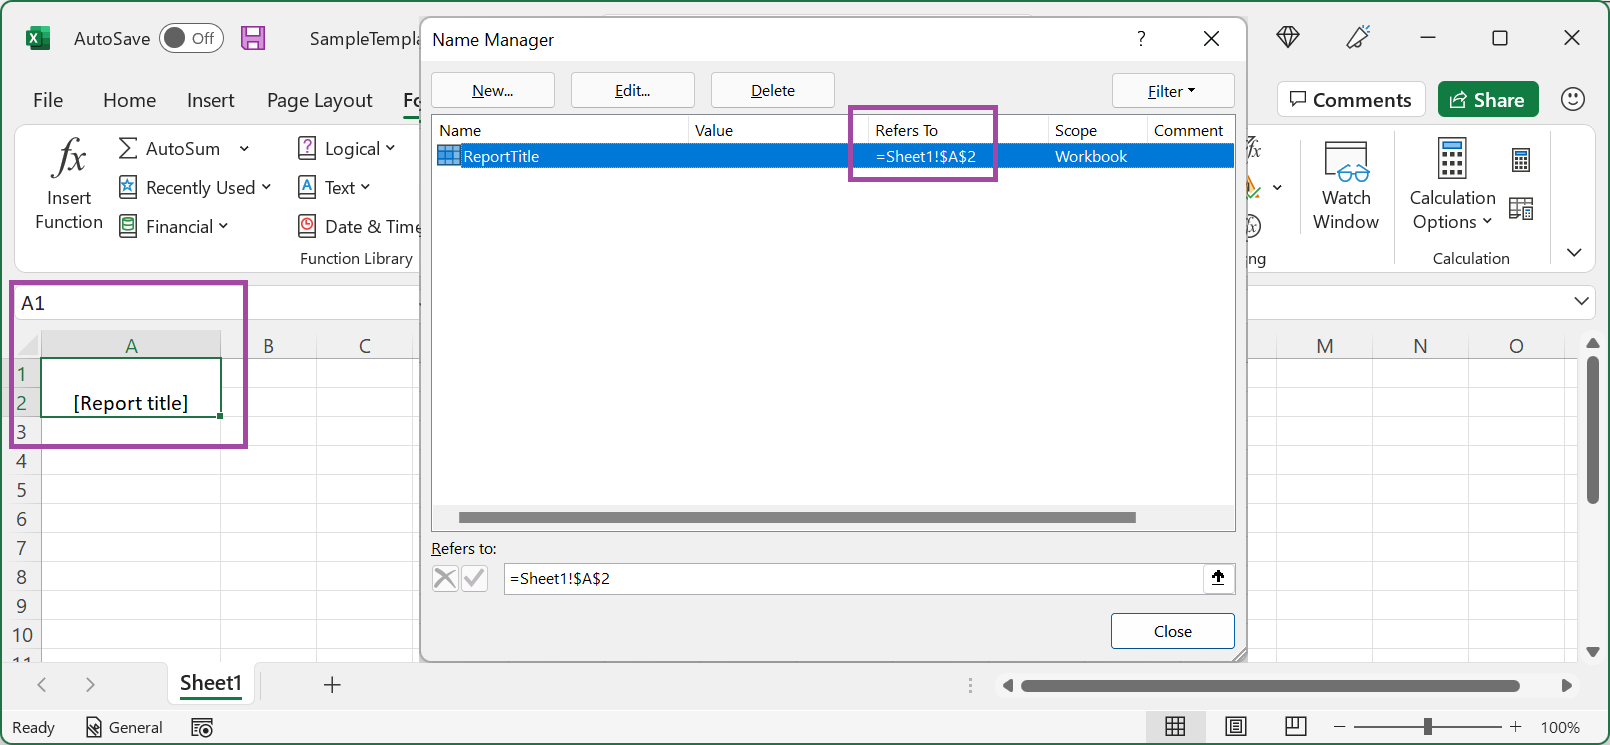
In the Excel desktop application, create a new Excel workbook.
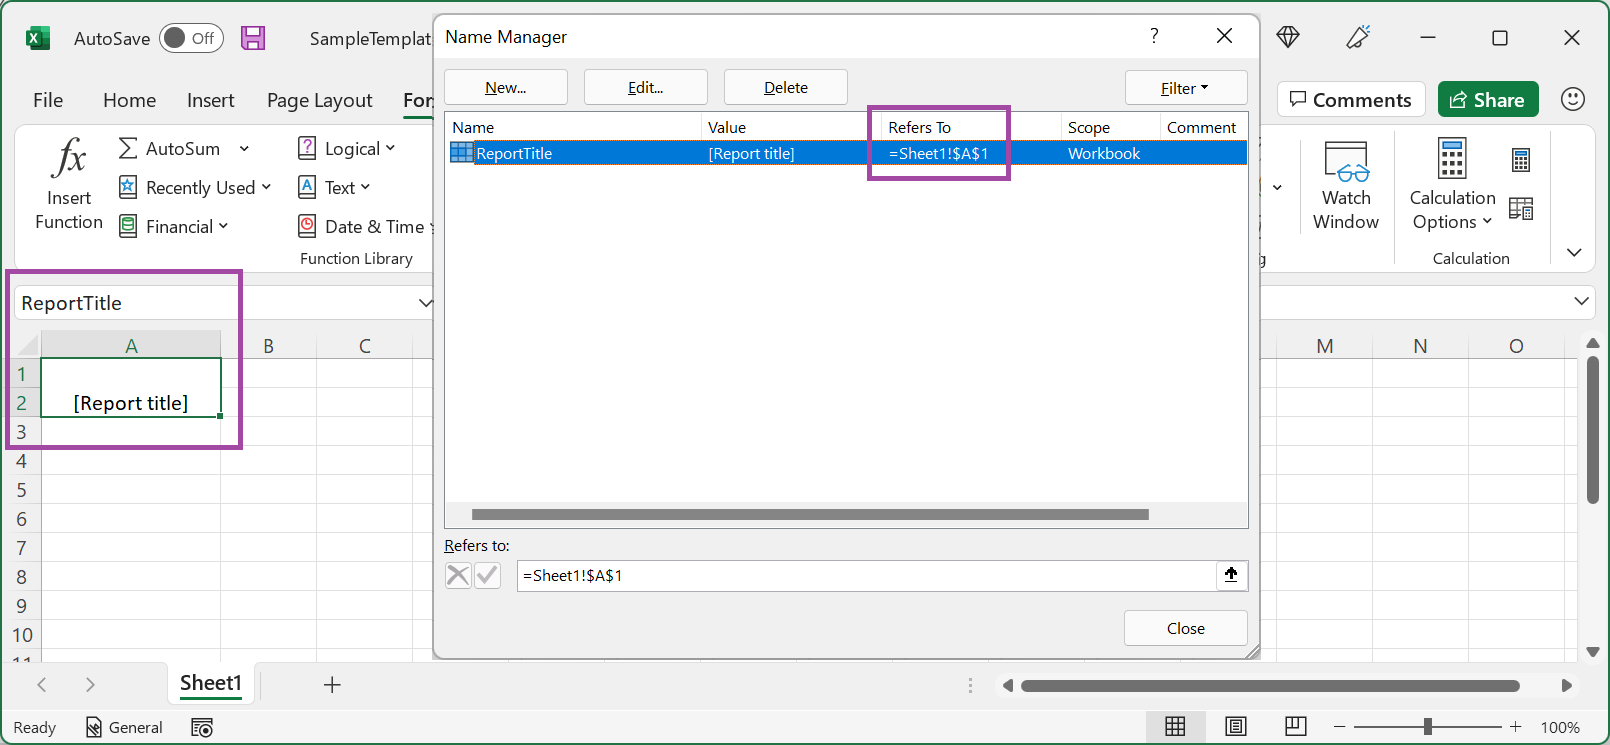
On worksheet Sheet1, add the ReportTitle name for cell A2.
Merge cells A1 and A2.
On the Configurations page, add a new ER format to generate an outbound document in an Excel workbook format.
On the Format designer page, import the designed Excel workbook into the added ER format as a new template for outbound documents.
On the Mapping tab, configure the binding for the ReportTitle component of the Cell type.
Run the configured ER format. Notice that the following exception is thrown: «Can’t delete/overwrite merged cells. A range is partly merged with the another merged range.»
You can fix the issue in either of the following ways:
Easier but not recommended: In the Feature management workspace, turn off the Enable usage of EPPlus library in Electronic reporting framework feature. Although this approach is easier, you might experience other issues if you use it, because some ER functionality is supported only when the Enable usage of EPPlus library in Electronic reporting framework feature is enabled.
Recommended: Follow these steps:
In the Excel desktop application, modify the Excel workbook in one of the following ways:
- On worksheet Sheet1, unmerge cells A1 and A2.
- Change the reference for the ReportTitle name from =Sheet1!$A$2 to =Sheet1!$A$1.
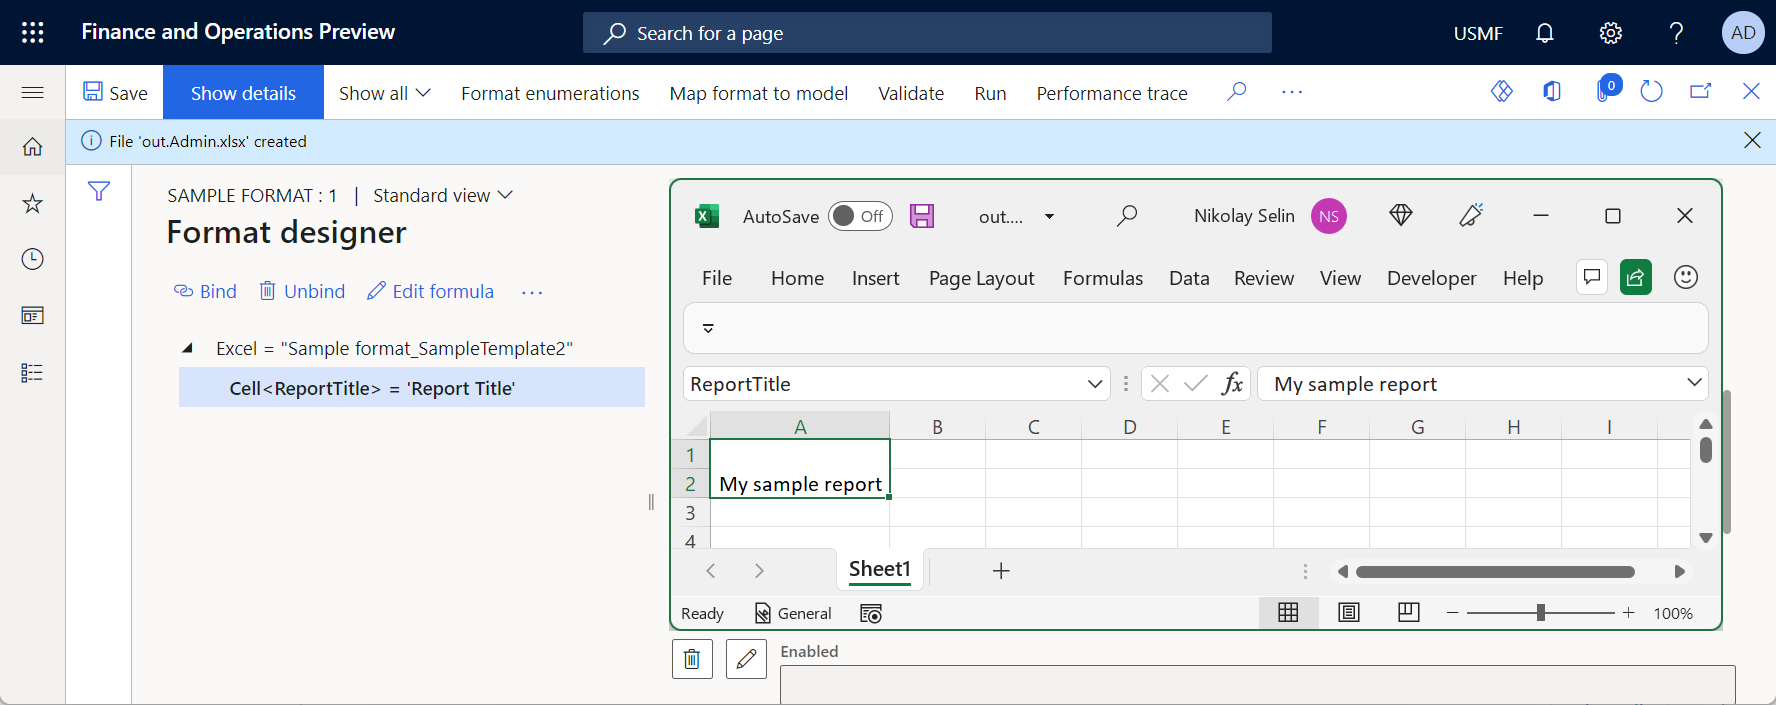
On the Format designer page, import the modified Excel workbook into the editable ER format to update the existing template.
Run the modified ER format.
Limitations
Known EPPlus library limitations
External data sources
If one of your templates contains a PivotTable that is based on a PowerPivot model that refers to an external data source, and the Enable usage of EPPlus library in Electronic reporting framework feature is enabled, you receive the following error message when you run an ER format that uses that template to generate an outbound document in Excel format: «The cachesource is not a worksheet.» To fix this issue, you have the following options:
Recommended: Redesign the Excel solution that you’re using:
- Isolate the part that contains pivots in a separate Excel workbook (workbook A).
- Use ER to generate a second Excel workbook (workbook B) from Finance that has the required details.
- Refer to workbook B in workbook A as soon as workbook B is generated.
Turn off the feature, Enable usage of EPPlus library in Electronic reporting framework to use an option other than EPPlus.
Источник
Уровень сложности
Средний
Время на прочтение
8 мин
Количество просмотров 4.5K

Я часто пользуюсь конфигурацией при написании VBA макросов в Excel. Иногда она нужна в формах для сохранения настроек, иногда для сохранения каких-то получаемых в процессе выполнения макроса данных.
Долгое время я искал информацию о том как работать с конфигом в VBA.
Есть множество различных вариантов, от хранения конфигурации в коде, до выноса ее в отдельный файл.
Сегодня я хотел бы пошагово рассказать о том как я храню и обрабатываю конфигурацию макроса в книге Excel.
Создаем лист ConfigSheet
У меня под рукой был Excel 2010, но в данном случае версия не имеет значения.
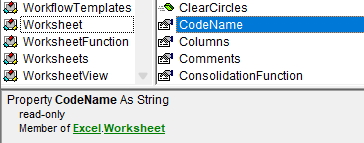
Для начала создаем отдельный лист. Я назвал его config, но это не принципиально. Что же действительно принципиально, так это CodeName листа:

Если вы вдруг не знали, листы документа Excel в VBA – это, ни что иное, как объект класса Worksheet. Обращаемся к справке и видим у объекта Worksheet необходимое свойство (перезаписать его программно, несмотря на Read-only, можно, но об этом в другой раз):
Чтобы было проще обращаться к нашему Config листу, меняем ему значение поля (Name) в свойствах (если у вас их нет, нажмите F4 или View -> Properties Window, а если у вас нет структуры с проектом, нажмите Ctrl+R или View -> Project Explorer).
Таким образом, мы дополнительно защищаемся от ошибки в случае изменения обычного имени листа, а так же получаем автокомплит.

Кстати, так как лист – это объект, мы можем обращаться так же к его методам, полям и свойствам через точку, как обычно:

Этим мы и воспользуемся, но об этом чуть позже.
Создаем ListObject
Итак, как вы уже догадались, всю информацию мы будем сохранять в таблицу, а именно в объект ListObject.
Для этого на нашем листе создаем пустую таблицу с двумя столбцами Key и Value:

Теперь осталось в Конструкторе задать нашей таблице имя, и основа для хранения готова:

Получаем объект таблицы
Переходим к самому интересному. Писать код будем в модуле листа ConfigSheet.
Для начала создадим необходимые гетеры:

Public Property Get Table() As ListObject
    ' Свойство Read-Only для объекта таблицы.
    Set Table = Me.ListObjects("configTable")
End Property

Public Property Get Keys() As Range
    ' Свойство Read-Only для столбца ключей.
    Set Keys = Me.Table.ListColumns(KeyColumn).DataBodyRange
End Property

Public Property Get Values() As Range
    ' Свойство Read-Only для столбца значений.
    Set Values = Me.Table.ListColumns(ValueColumn).DataBodyRange
End Property
В свойство Table помещаем нашу таблицу, в Keys – столбец ключей, в Values – столбец значений.
Для удобства обращения к столбцам (и чтобы не хардкодить), прописываем Enum на уровне модуля:

Private Enum EConfigColumns
    KeyColumn = 1
    ValueColumn
End Enum
Сказал «не хардкодить» и захардкодил название таблицы 😀. Исправляюсь:
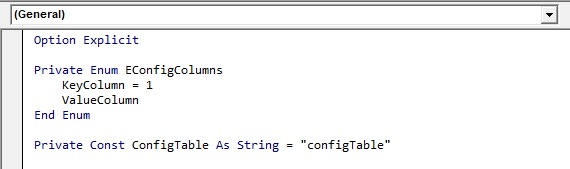
Option Explicit

Private Enum EConfigColumns
    KeyColumn = 1
    ValueColumn
End Enum

Private Const ConfigTable As String = "configTable"
Прописываем свойство Get Config
Осталось создать свойство Config, через которое будем записывать, получать и обновлять значения в таблице.
Для начала прописываем получение значения по ключу:

Public Property Get Config(ByVal Key As Variant) As Variant
    Dim i As Long
    For i = 1 To Me.Keys.Rows.Count
        If Key <> Me.Keys(i).Value Then GoTo NextKey
        Config = Me.Values(i).Value: Exit Property
NextKey:
    Next
End Property
Здесь все довольно просто – пробегаем циклом по ключам и сравниваем их с параметром Key, передаваемым пользователем. Как только находим нужный ключ, возвращаем соответствующее значение.
Так как мы работаем напрямую с объектом Range, это уже несколько замедляет работу макроса. Плюс ко всему, во время цикла макрос будет постоянно вызывать свойства Keys и Values чтобы получить их значения, что еще сильнее замедлит скорость выполнения.
Чтобы немного ускорить процесс и избежать постоянное обращение, можно создать переменные и передавать в них свойства:
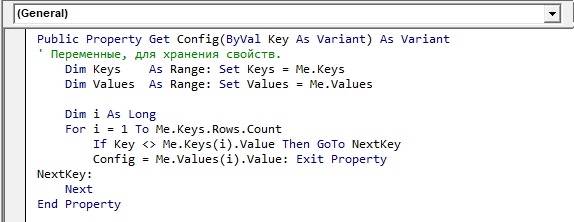
Public Property Get Config(ByVal Key As Variant) As Variant
' Переменные, для хранения свойств.
    Dim Keys   As Range: Set Keys = Me.Keys
    Dim Values As Range: Set Values = Me.Values

    Dim i As Long
    For i = 1 To Me.Keys.Rows.Count
        If Key <> Me.Keys(i).Value Then GoTo NextKey
        Config = Me.Values(i).Value: Exit Property
NextKey:
    Next
End Property
Но это несколько загромождает код (а ведь у нас еще будет свойство Let), поэтому воспользуемся UDT (user defined type) и процедурой, которая будет его инициализировать.
Создаем тип TConfig в который помещаем все наши ранее созданные свойства (кроме, собственно, Config), а так же создаем приватную переменную This на уровне модуля:

Option Explicit

Private Enum EConfigColumns
    KeyColumn = 1
    ValueColumn
End Enum

Private Const ConfigTable As String = "configTable"

Private Type TConfig
    Table  As ListObject
    Keys   As Range
    Values As Range
End Type

Private This As TConfig
Очень важно чтобы и Type TConfig и переменная This были приватными, иначе на этапе компиляции возникнет ошибка.
Далее, прописываем небольшую процедуру InitThis, для присваивания значений нашему типу:

Public Sub InitThis()
    Set This.Table = Me.Table
    Set This.Keys = Me.Keys
    Set This.Values = Me.Values
End Sub
Теперь поправим свойство Config:
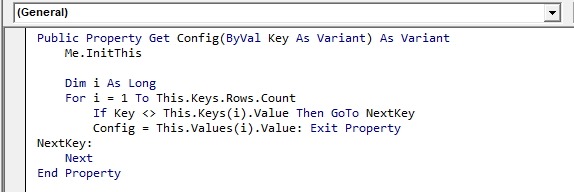
Public Property Get Config(ByVal Key As Variant) As Variant
    Me.InitThis

    Dim i As Long
    For i = 1 To This.Keys.Rows.Count
        If Key <> This.Keys(i).Value Then GoTo NextKey
        Config = This.Values(i).Value: Exit Property
NextKey:
    Next
End Property
Лаконично, не так ли?
Прописываем свойство Let Config
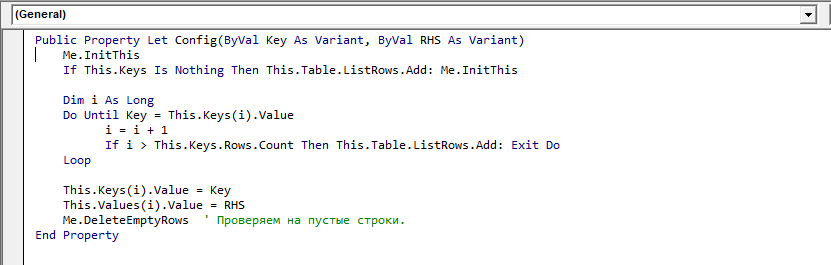
С установлением значений чуть иначе:

Public Property Let Config(ByVal Key As Variant, ByVal RHS As Variant)
    Me.InitThis
    If This.Keys Is Nothing Then This.Table.ListRows.Add: Me.InitThis

    Dim i As Long
    Do Until Key = This.Keys(i).Value
         i = i + 1
         If i > This.Keys.Rows.Count Then This.Table.ListRows.Add: Exit Do
    Loop

    This.Keys(i).Value = Key
    This.Values(i).Value = RHS
End Property
В параметры принимаем Key и RHS (Right Hand Side – по правую руку), для того чтобы можно было прописывать такую конструкцию:
ConfigSheet.Config("Key") = "Value"
В самом начале проверяем This.Keys на Nothing, т.к. если в таблице еще совсем нет значений, при попытке пробежаться циклом по столбцам выскочит ошибка.
Чтобы этого избежать, после проверки добавляем в таблицу пустую строку и заново инициализировать This. Только после этого можно будет свободно проходить по столбцам циклом.
Подобную проверку добавляем и в Get, но вместо добавления строки просто возвращаем сообщение «Нет данных в таблице конфигурации»:

Public Property Get Config(ByVal Key As Variant) As Variant
    Me.InitThis
    If This.Keys Is Nothing Then Config = "Нет данных в таблице конфигурации": Exit Property

    Dim i As Long
    For i = 1 To This.Keys.Rows.Count
        If Key <> This.Keys(i).Value Then GoTo NextKey
        Config = This.Values(i).Value: Exit Property
NextKey:
    Next
End Property
Далее, так же как и в Get части, циклом, только теперь Do Until, пробегаем по ключам конфига. При достижении максимального индекса – добавляем в конце новую строку и выходим из цикла. В конце присваиваем ключ и значение в соответствующие ячейки.
Удаляем пустые строки
При первом обращении к таблице у нас появится пустая строка. Чтобы ее убрать (и вообще, на всякий случай, каждый раз проверять, нет ли пустых строк в таблице), пропишем небольшую процедуру:

Public Sub DeleteEmptyRows()
    Me.InitThis

    Dim i As Long
    For i = This.Keys.Count To 1 Step -1
         If (IsEmpty(This.Keys(i).Value) And IsEmpty(This.Values(i).Value)) _
         Or (This.Keys(i).Value = vbNullString And This.Values(i).Value = vbNullString) Then This.Table.ListRows(i).Delete
    Next
End Sub
и добавим ее в уже написанную Let часть:
Public Property Let Config(ByVal Key As Variant, ByVal RHS As Variant)
    Me.InitThis
    If This.Keys Is Nothing Then This.Table.ListRows.Add: Me.InitThis

    Dim i As Long
    Do Until Key = This.Keys(i).Value
         i = i + 1
         If i > This.Keys.Rows.Count Then This.Table.ListRows.Add: Exit Do
    Loop

    This.Keys(i).Value = Key
    This.Values(i).Value = RHS
    Me.DeleteEmptyRows ' Проверяем на пустые строки.
End Property
Итоговый код
Исправил запись в Property Get Config, спасибо за наводку @qyix7z.

Option Explicit

Private Enum EConfigColumns
    KeyColumn = 1
    ValueColumn
End Enum

Private Const ConfigTable As String = "configTable"

Private Type TConfig
    Table  As ListObject
    Keys   As Range
    Values As Range
End Type

Private This As TConfig

Public Sub InitThis()
    Set This.Table = Me.Table
    Set This.Keys = Me.Keys
    Set This.Values = Me.Values
End Sub

Public Property Get Table() As ListObject
    ' Свойство Read-Only для объекта таблицы.
    Set Table = Me.ListObjects(ConfigTable)
End Property

Public Property Get Keys() As Range
    ' Свойство Read-Only для столбца ключей.
    Set Keys = Me.Table.ListColumns(KeyColumn).DataBodyRange
End Property

Public Property Get Values() As Range
    ' Свойство Read-Only для столбца значений.
    Set Values = Me.Table.ListColumns(ValueColumn).DataBodyRange
End Property

Public Property Get Config(ByVal Key As Variant) As Variant
    Me.InitThis
    If This.Keys Is Nothing Then Config = "Нет данных в таблице конфигурации": Exit Property

    Dim i As Long
    For i = 1 To This.Keys.Rows.Count
        If Key = This.Keys(i).Value Then Config = This.Values(i).Value: Exit Property
    Next
End Property

Public Property Let Config(ByVal Key As Variant, ByVal RHS As Variant)
    Me.InitThis
    If This.Keys Is Nothing Then This.Table.ListRows.Add: Me.InitThis

    Dim i As Long
    Do Until Key = This.Keys(i).Value
         i = i + 1
         If i > This.Keys.Rows.Count Then This.Table.ListRows.Add: Exit Do
    Loop

    This.Keys(i).Value = Key
    This.Values(i).Value = RHS
    Me.DeleteEmptyRows ' Проверяем на пустые строки.
End Property

Public Sub DeleteEmptyRows()
    Me.InitThis

    Dim i As Long
    For i = This.Keys.Count To 1 Step -1
         If (IsEmpty(This.Keys(i).Value) And IsEmpty(This.Values(i).Value)) _
         Or (This.Keys(i).Value = vbNullString And This.Values(i).Value = vbNullString) Then This.Table.ListRows(i).Delete
    Next
End Sub
Проверяем результат
Ну и наконец проверяем получившийся результат.
Записываем значение в конфиг:
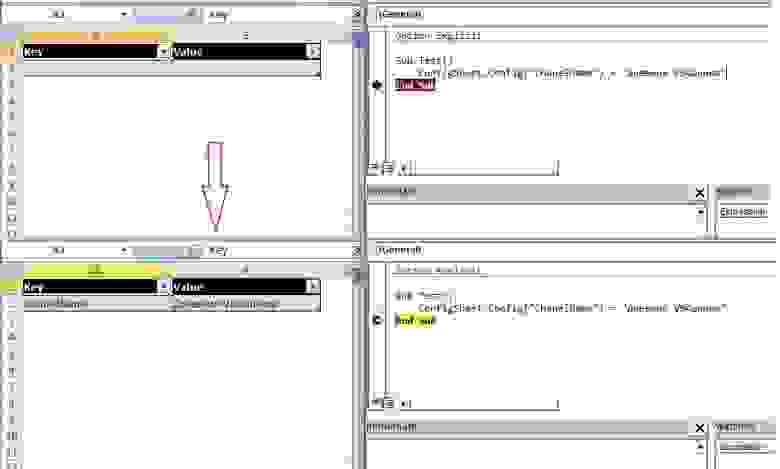
Sub Test()
    ' Значение "Дневник VBAшника" записано в таблицу с ключом "ChanelName"
    ConfigSheet.Config("ChanelName") = "Дневник VBAшника"
End Sub
Считываем значение:

Sub Test()
    ' Распечатает: "Дневник VBAшника"
    Debug.Print ConfigSheet.Config("ChanelName")
End Sub
Меняем и считываем еще раз:

Sub Test()
    ConfigSheet.Config("ChanelName") = "https://t.me/VBAn_Diary"
    ' Распечатает: "https://t.me/VBAn_Diary"
    Debug.Print ConfigSheet.Config("ChanelName")
End Sub
Ну а дальше этот лист можно спрятать от глаз пользователей, защитить книгу и структуру, и спокойно работать с конфигом.
Уверен, что можно изменить подход и написать код иначе. Возможно у вас есть предложения или дополнения по статье. Буду рад любому отзыву. 🙂

I often use configuration when writing VBA macros in Excel. Sometimes it is needed in forms to save settings, sometimes to save some data received during the macro execution.
For a long time I was looking for information on how to work with config in VBA.
There are many different options, from storing the configuration in code, to putting it in a separate file.
Today I would like to talk step by step about how I store and process the macro configuration in an Excel workbook.
Create a ConfigSheet
I had Excel 2010 handy, but in this case the version doesn’t matter.
First, let’s create a separate sheet. I called him config, but this is not essential. What is really important is CodeName sheet:

If you suddenly didn’t know, Excel document sheets in VBA are nothing more than an object class Worksheet. We turn to the help and see the object Worksheet necessary property (you can overwrite it programmatically, despite Read-only, but more on that another time):

To make it easier to refer to our Config sheet, change the field value to it (Name) in properties (if you don’t have them, click F4 or View -> Properties Windowand if you don’t have a structure with a project, click ctrl+r or View -> Project Explorer).
Thus, we additionally protect ourselves from an error in case of a change in the usual sheet name, and also get an autocomplete.

By the way, since the leaf is an objectwe can also refer to its methods, fields and properties through a dot, as usual:

We will use this, but more on that later.
Create a ListObject
So, as you may have guessed, we will store all the information in a table, namely in an object ListObject.
To do this, on our sheet we create an empty table with two columns Key and Value:

Now it remains to give our table a name in the Constructor, and the basis for storage is ready:

Get the table object
Let’s move on to the most interesting. We will write the code in the sheet module ConfigSheet.
First, let’s create the necessary getters:

Public Property Get Table() As ListObject
    ' Свойство Read-Only для объекта таблицы.
    Set Table = Me.ListObjects("configTable")
End Property

Public Property Get Keys() As Range
    ' Свойство Read-Only для столбца ключей.
    Set Keys = Me.Table.ListColumns(KeyColumn).DataBodyRange
End Property

Public Property Get Values() As Range
    ' Свойство Read-Only для столбца значений.
    Set Values = Me.Table.ListColumns(ValueColumn).DataBodyRange
End Property
To property Table put our table in Keys – a column of keys, in Values – column of values.
For the convenience of referring to columns (and not to hardcode), write Enum at the module level:

Private Enum EConfigColumns
    KeyColumn = 1
    ValueColumn
End Enum
Said “don’t hardcode” and zahardkodil table name 😀. Correcting:

Option Explicit

Private Enum EConfigColumns
    KeyColumn = 1
    ValueColumn
End Enum

Private Const ConfigTable As String = "configTable"
We register the Get Config property
It remains to create a property Configthrough which we will write, receive and update values in the table.
First, let’s get the value by the key:

Public Property Get Config(ByVal Key As Variant) As Variant
    Dim i As Long
    For i = 1 To Me.Keys.Rows.Count
        If Key <> Me.Keys(i).Value Then GoTo NextKey
        Config = Me.Values(i).Value: Exit Property
NextKey:
    Next
End Property
Everything is quite simple here – we loop through the keys and compare them with the parameter Keypassed by the user. As soon as we find the desired key, we return the corresponding value.
Since we work directly with the object Range, this already somewhat slows down the macro. Plus, during the loop, the macro will constantly call properties Keys and Values to get their values, which will further slow down the execution speed.
To speed up the process a little and avoid constant access, you can create variables and pass properties into them:

Public Property Get Config(ByVal Key As Variant) As Variant
' Переменные, для хранения свойств.
    Dim Keys   As Range: Set Keys = Me.Keys
    Dim Values As Range: Set Values = Me.Values

    Dim i As Long
    For i = 1 To Me.Keys.Rows.Count
        If Key <> Me.Keys(i).Value Then GoTo NextKey
        Config = Me.Values(i).Value: Exit Property
NextKey:
    Next
End Property
But this somewhat clutters up the code (and we will still have the property Let), so we use UDT (user defined type) and a procedure that will initialize it.
Create a type TConfig in which we place all our previously created properties (except, in fact, Config) and also create private variable This at the module level:

Option Explicit

Private Enum EConfigColumns
    KeyColumn = 1
    ValueColumn
End Enum

Private Const ConfigTable As String = "configTable"

Private Type TConfig
    Table  As ListObject
    Keys   As Range
    Values As Range
End Type

Private This As TConfig
It is very important that and Type TConfig and variable This were private, otherwise a compile-time error will occur.
Next, we write a small procedure InitThisto assign values to our type:

Public Sub InitThis()
    Set This.Table = Me.Table
    Set This.Keys = Me.Keys
    Set This.Values = Me.Values
End Sub
Now let’s fix the property Config:

Public Property Get Config(ByVal Key As Variant) As Variant
    Me.InitThis

    Dim i As Long
    For i = 1 To This.Keys.Rows.Count
        If Key <> This.Keys(i).Value Then GoTo NextKey
        Config = This.Values(i).Value: Exit Property
NextKey:
    Next
End Property
Laconic, isn’t it?
We register the property Let Config
With setting values a little differently:

Public Property Let Config(ByVal Key As Variant, ByVal RHS As Variant)
    Me.InitThis
    If This.Keys Is Nothing Then This.Table.ListRows.Add: Me.InitThis

    Dim i As Long
    Do Until Key = This.Keys(i).Value
         i = i + 1
         If i > This.Keys.Rows.Count Then This.Table.ListRows.Add: Exit Do
    Loop

    This.Keys(i).Value = Key
    This.Values(i).Value = RHS
End Property
We accept as parameters Key and RHS (right hand side – on the right hand), in order to be able to prescribe such a construction:
ConfigSheet.Config("Key") = "Value"
At the very beginning we check This.Keys on the Nothing, because if there are no values in the table yet, an error will pop up when trying to loop through the columns.
To avoid this, after checking, add an empty string to the table and re-initialize This. Only after that it will be possible to freely cycle through the columns.
We add a similar check to Getbut instead of adding a row, we simply return the message “No data in the configuration table”:

Public Property Get Config(ByVal Key As Variant) As Variant
    Me.InitThis
    If This.Keys Is Nothing Then Config = "Нет данных в таблице конфигурации": Exit Property

    Dim i As Long
    For i = 1 To This.Keys.Rows.Count
        If Key <> This.Keys(i).Value Then GoTo NextKey
        Config = This.Values(i).Value: Exit Property
NextKey:
    Next
End Property
Further, as in Get parts, cycle, only now Do Until, run through the config keys. When the maximum index is reached, we add a new line at the end and exit the loop. At the end, we assign the key and value to the corresponding cells.
Removing empty lines
The first time we access the table, we will have an empty row. To remove it (and in general, just in case, check every time if there are empty rows in the table), we write a small procedure:

Public Sub DeleteEmptyRows()
    Me.InitThis

    Dim i As Long
    For i = This.Keys.Count To 1 Step -1
         If (IsEmpty(This.Keys(i).Value) And IsEmpty(This.Values(i).Value)) _
         Or (This.Keys(i).Value = vbNullString And This.Values(i).Value = vbNullString) Then This.Table.ListRows(i).Delete
    Next
End Sub
and add it to the already written Let part:

Public Property Let Config(ByVal Key As Variant, ByVal RHS As Variant)
    Me.InitThis
    If This.Keys Is Nothing Then This.Table.ListRows.Add: Me.InitThis

    Dim i As Long
    Do Until Key = This.Keys(i).Value
         i = i + 1
         If i > This.Keys.Rows.Count Then This.Table.ListRows.Add: Exit Do
    Loop

    This.Keys(i).Value = Key
    This.Values(i).Value = RHS
    Me.DeleteEmptyRows ' Проверяем на пустые строки.
End Property
Final code

Option Explicit

Private Enum EConfigColumns
    KeyColumn = 1
    ValueColumn
End Enum

Private Const ConfigTable As String = "configTable"

Private Type TConfig
    Table  As ListObject
    Keys   As Range
    Values As Range
End Type

Private This As TConfig

Public Sub InitThis()
    Set This.Table = Me.Table
    Set This.Keys = Me.Keys
    Set This.Values = Me.Values
End Sub

Public Property Get Table() As ListObject
    ' Свойство Read-Only для объекта таблицы.
    Set Table = Me.ListObjects(ConfigTable)
End Property

Public Property Get Keys() As Range
    ' Свойство Read-Only для столбца ключей.
    Set Keys = Me.Table.ListColumns(KeyColumn).DataBodyRange
End Property

Public Property Get Values() As Range
    ' Свойство Read-Only для столбца значений.
    Set Values = Me.Table.ListColumns(ValueColumn).DataBodyRange
End Property

Public Property Get Config(ByVal Key As Variant) As Variant
    Me.InitThis
    If This.Keys Is Nothing Then Config = "Нет данных в таблице конфигурации": Exit Property

    Dim i As Long
    For i = 1 To This.Keys.Rows.Count
        If Key <> This.Keys(i).Value Then GoTo NextKey
        Config = This.Values(i).Value: Exit Property
NextKey:
    Next
End Property

Public Property Let Config(ByVal Key As Variant, ByVal RHS As Variant)
    Me.InitThis
    If This.Keys Is Nothing Then This.Table.ListRows.Add: Me.InitThis

    Dim i As Long
    Do Until Key = This.Keys(i).Value
         i = i + 1
         If i > This.Keys.Rows.Count Then This.Table.ListRows.Add: Exit Do
    Loop

    This.Keys(i).Value = Key
    This.Values(i).Value = RHS
    Me.DeleteEmptyRows ' Проверяем на пустые строки.
End Property

Public Sub DeleteEmptyRows()
    Me.InitThis

    Dim i As Long
    For i = This.Keys.Count To 1 Step -1
         If (IsEmpty(This.Keys(i).Value) And IsEmpty(This.Values(i).Value)) _
         Or (This.Keys(i).Value = vbNullString And This.Values(i).Value = vbNullString) Then This.Table.ListRows(i).Delete
    Next
End Sub
Checking the result
And finally, we check the result.
Write the value to the config:

Sub Test()
    ' Значение "Дневник VBAшника" записано в таблицу с ключом "ChanelName"
    ConfigSheet.Config("ChanelName") = "Дневник VBAшника"
End Sub
Reading the value:

Sub Test()
    ' Распечатает: "Дневник VBAшника"
    Debug.Print ConfigSheet.Config("ChanelName")
End Sub
Change and read again:

Sub Test()
    ConfigSheet.Config("ChanelName") = "https://t.me/VBAn_Diary"
    ' Распечатает: "https://t.me/VBAn_Diary"
    Debug.Print ConfigSheet.Config("ChanelName")
End Sub
Well, then this sheet can be hidden from the eyes of users, protect the book and structure, and work calmly with the config.
I am sure that you can change the approach and write the code differently. Perhaps you have suggestions or additions to the article. I will be glad to any feedback. 🙂
Nothing like a good old fashioned configuration file to make you feel like you’re programming in 1995. But you know what? Sometimes you just need to do it. And it still amazes me how many off-the-shelf applications still rely on INI files to store their settings (I’m looking at you, LotusNotes!).
Personally, I like INI files. I find them easy to work with and easy to deploy. And, of course, it doesn’t hurt that you can read and write to them using VBA.
If you Google reading or writing to INI files using VBA, you’ll get a bunch of different results, all pointing you in the same basic direction. Specifically, you need to use two different Windows APIs in order to do this “GetPrivateProfileString”, and “WritePrivateProfileString”. One reads from an INI file, the other writes to it. I’m going to assume you can figure out which is which.
Invariably, the examples you uncover on Google show that these routines are always separate. One routine fo reading, one for writing.
I hate that.
I like my code as concise as possible while still being as modular as possible. What do I mean by that? I mean that I want a routine (or function in this case) that I can call from another point in the code and choose whether I’m reading or writing to the configuration file. And I want the routine portable enough so I can drop it into any application I want and not have to worry about customizing it too terribly much.
And so, I give you the code below, commented for your pleasure:
'*******************************************************************************
' Declaration for Reading and Wrting to an INI file.
'*******************************************************************************

'++++++++++++++++++++++++++++++++++++++++++++++++++++
' API Functions for Reading and Writing to INI File
'++++++++++++++++++++++++++++++++++++++++++++++++++++

' Declare for reading INI files.
Private Declare Function GetPrivateProfileString Lib "kernel32" _
    Alias "GetPrivateProfileStringA" (ByVal lpApplicationName As String, _
                                      ByVal lpKeyName As Any, _
                                      ByVal lpDefault As String, _
                                      ByVal lpReturnedString As String, _
                                      ByVal nSize As Long, _
                                      ByVal lpFileName As String)As Long

' Declare for writing INI files.
Private Declare Function WritePrivateProfileString Lib "kernel32" _
    Alias "WritePrivateProfileStringA" (ByVal lpApplicationName As String, _
                                        ByVal lpKeyName As Any, _
                                        ByVal lpString As Any, _
                                        ByVal lpFileName As String)As Long


'++++++++++++++++++++++++++++++++++++++++++++++++++++
' Enumeration for sManageSectionEntry funtion
'++++++++++++++++++++++++++++++++++++++++++++++++++++

Enum iniAction
    iniRead = 1
    iniWrite = 2
End Enum
'*******************************************************************************
' End INI file declaratin Section.
'*******************************************************************************

Function sManageSectionEntry(inAction As iniAction, _
                             sSection As String, _
                             sKey As String, _
                             sIniFile As String, _
                             Optional sValue As String)As String
'*******************************************************************************
' Description:  This reads an INI file section/key combination and
'               returns the read value as a string.
'
' Author:       Scott Lyerly
' Contact:      scott.c.lyerly@gmail.com
'
' Notes:        Requires "Private Declare Function GetPrivateProfileString" and
'               "WritePrivateProfileString" to be added in the declarations
'               at the top of the module.
'
' Name:                 Date:           Init:   Modification:
' sManageSectionEntry   26-Nov-2013     SCL     Original development
'
' Arguments:    inAction    The action to take in teh funciton, reading or writing to
'                           to the INI file. Uses the enumeration iniAction in the
'                           declarations section.
'               sSection    The seciton of the INI file to search
'               sKey        The key of the INI from which to retrieve a value
'               sIniFile    The name and directory location of the INI file
'               sValue      The value to be written to the INI file (if writing - optional)
'
' Returns:      string      The return string is one of three things:
'                           1) The value being sought from the INI file.
'                           2) The value being written to the INI file (should match
'                              the sValue parameter).
'                           3) The word "Error". This can be changed to whatever makes
'                              the most sense to the programmer using it.
'*******************************************************************************

On Error GoTo Err_ManageSectionEntry

    ' Variable declarations.
    Dim sRetBuf         As String
Dim iLenBuf         As Integer
Dim sFileName       As String
Dim sReturnValue    As String
Dim lRetVal         As Long

    ' Based on the inAction parameter, take action.
    If inAction = iniRead Then  ' If reading from the INI file.

        ' Set the return buffer to by 256 spaces. This should be enough to
        ' hold the value being returned from the INI file, but if not,
        ' increase the value.
        sRetBuf = Space(256)

        ' Get the size of the return buffer.
        iLenBuf = Len(sRetBuf)

        ' Read the INI Section/Key value into the return variable.
        sReturnValue = GetPrivateProfileString(sSection, _
                                               sKey, _
                                               "", _
                                               sRetBuf, _
                                               iLenBuf, _
                                               sIniFile)

        ' Trim the excess garbage that comes through with the variable.
        sReturnValue = Trim(Left(sRetBuf, sReturnValue))

        ' If we get a value returned, pass it back as the argument.
        ' Else pass "False".
        If Len(sReturnValue) > 0 Then
            sManageSectionEntry = sReturnValue
        Else
            sManageSectionEntry = "Error"
        End If
ElseIf inAction = iniWrite Then ' If writing to the INI file.

        ' Check to see if a value was passed in the sValue parameter.
        If Len(sValue) = 0 Then
            sManageSectionEntry = "Error"

        Else

            ' Write to the INI file and capture the value returned
            ' in the API function.
            lRetVal = WritePrivateProfileString(sSection, _
                                               sKey, _
                                               sValue, _
                                               sIniFile)

            ' Check to see if we had an error wrting to the INI file.
            If lRetVal = 0 Then sManageSectionEntry = "Error"

        End If
End If

Exit_Clean:
    Exit Function

Err_ManageSectionEntry:
    MsgBox Err.Number & ": " & Err.Description
    Resume Exit_Clean

End Function
Some thoughts on what’s going on here:
I’ve taken the two APIs that you would call to read and write to a configuration file and put them into a single function. I’m choosing which action to take based on the inbound inAction parameter.
That parameter, inAction, you may have noticed is an enumeration set up at the top of this module. I like the enumeration in this case because it lets me be very specific in my choice of action to take with regard to the INI file. Yes, I could have saved four lines of code by using a boolean instead. I could have set the function to “read” if TRUE and “write” if FALSE. Except I hate that option. I like enumerations for explicitly spelling out what my options are for value for a specific parameter. That way there’s no confusion.
So what does the implementation of this function look like? Glad you asked! I’ve included a sample routine below that you easily use to test this function out.
Sub SampleINIFunctionImplementaion()

    Const sINI_FILE As String = "C:UsersscottDesktopfruits & veggies.ini"

    Dim sReturn As String

    ' Read the ini file
    sReturn = sManageSectionEntry(iniRead, "Produce", "Fruit", sINI_FILE)
    MsgBox sReturn
    sReturn = sManageSectionEntry(iniRead, "Produce", "Vegetable", sINI_FILE)
    MsgBox sReturn

    ' Write to the ini file
    sReturn = sManageSectionEntry(iniWrite, "Produce", "Fruit", sINI_FILE, "banana")
    sReturn = sManageSectionEntry(iniWrite, "Produce", "Vegetable", sINI_FILE, "squash")

 End Sub
That’s about it. Feel free to copy and paste and use for your own Excel applications.
(Fine print: use at your own risk, blah blah blah…)
![]()
Written by Allen Wyatt (last updated April 2, 2022)
This tip applies to Excel 2007, 2010, 2013, 2016, 2019, Excel in Microsoft 365, and 2021
Vicki has made quite a few changes to the configuration options in Excel, visible in the various tabs of the Excel Options dialog box. She wonders if there is a way to save these settings, as she’s modified them, so that they can be loaded into another system or backed up.
There is no single place that Excel configuration settings are stored, so the answer to this question is not as simple as one might hope. Some of the settings are stored in the XLB file maintained by the system. Where this file is stored depends on the version of Excel you are using and the way your system is set up. Here, for instance, is where it may be stored on a system:
c:Users<username>AppDataRoamingMicrosoftExcel
You can easily—within Windows—do a search for files ending in XLB and back them up.
Other configuration options are stored with individual workbooks, and still others are modified on-the-fly based on the first workbook you open within Excel. Backing up workbooks is easy, but you’ll need to do some figuring out to see which ones you want to save based solely on the configuration settings they may affect.
Of course, you may be able to locate third-party add-ons for Excel that you can use to gather and save all of the configuration settings; a bit of time spent with your favorite search engine may turn up some good candidates.
ExcelTips is your source for cost-effective Microsoft Excel training.
This tip (13414) applies to Microsoft Excel 2007, 2010, 2013, 2016, 2019, Excel in Microsoft 365, and 2021.
Author Bio
With more than 50 non-fiction books and numerous magazine articles to his credit, Allen Wyatt is an internationally recognized author. He is president of Sharon Parq Associates, a computer and publishing services company. Learn more about Allen…
MORE FROM ALLEN
Sorting Tabular Tables
Some people like to format simple tables using tabs instead of using Word’s table editor. When it comes time to sort such …
Discover More
Relative References within Named Ranges
Excel is usually more flexible in what you can reference in formulas than is immediately apparent. This tip examines some …
Discover More
Dealing with Large Numbers of Seconds
When adding values to a time to calculate a new time, you may naturally choose to use the TIME function. This can cause …
Discover More
More ExcelTips (ribbon)
Choosing Direction after Enter On a Workbook Basis
Excel lets you specify how it should behave when you press Enter. If you change this behavior, Excel assumes you want it …
Discover More
Stopping Screen Shifting
When your screen doesn’t behave as you expect, it could be because of the Scroll Lock on your system. Here’s what to check.
Discover More
Setting the AutoRecover Directory
Excel, by default, periodically writes information to AutoRecover files that can help protect your data in case Excel is …
Discover More