
Document themes make it easy to coordinate colors, fonts, and graphic formatting effects across your Word, Excel, and PowerPoint documents and update them quickly. This video show you how-to change the entire theme, read below to just customize theme fonts, colors, or effects.

I want to
-
Choose a standard color theme
-
Create my own color theme
-
Change theme fonts
-
Change theme effects
-
Switch or remove a theme
-
Save a custom theme for reuse
-
Make my changes the new default theme
-
Learn more about themes
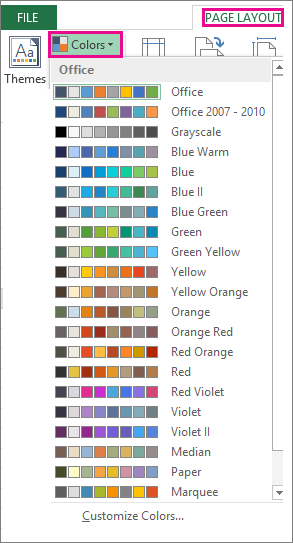
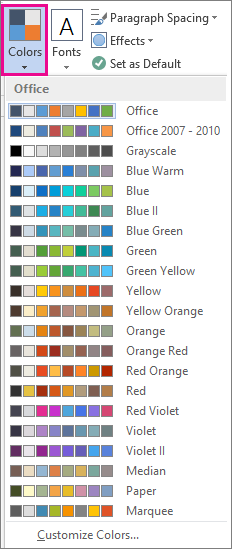
Choose a standard color theme
-
On the Page Layout tab in Excel or the Design tab in Word, click Colors, and pick the color set you want.
Excel

Word
Tip: The first group of colors are the colors in the current theme.
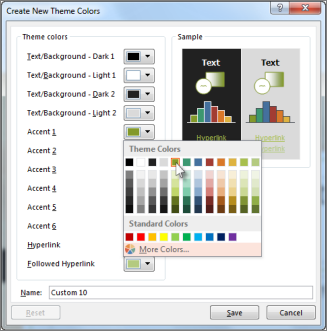
Create my own color theme
-
On the Page Layout tab in Excel or the Design tab in Word, click Colors, and then click Customize Colors.
-
Click the button next to the theme color you want to change (for example, Accent 1 or Hyperlink), and then pick a color under Theme Colors.
To create your own color, click More Colors, and then pick a color on the Standard tab, or enter numbers or select a color on the Custom tab.
-
In the Sample pane, preview the changes that you made.
-
Repeat this for all the colors you want to change.
-
In the Name box, type a name for the new theme colors, and click Save.
Tip: To return to the original theme colors, click Reset before you click Save.
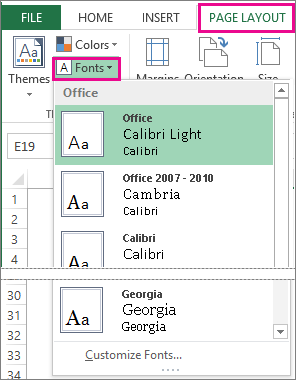
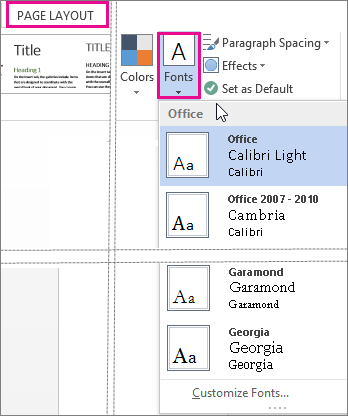
Change theme fonts
-
On the Page Layout tab in Excel or the Design tab in Word, click Fonts, and pick the font set you want.
Excel
Word
Tip: The top fonts are the fonts in the current theme.
-
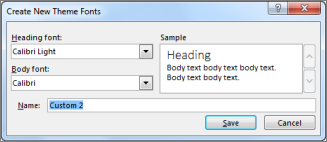
To create your own set of fonts, click Customize Fonts.
-
In the Create New Theme Fonts box, under the Heading font and Body font boxes, pick the fonts you want.
-
In the Name box, enter a name, and click Save.
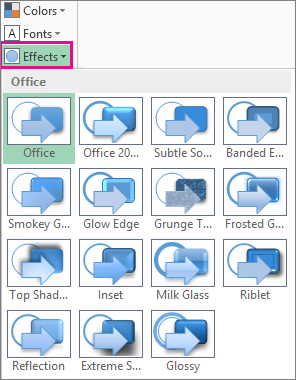
Change theme effects
Theme effects include shadows, reflections, lines, fills, and more. While you cannot create your own set of theme effects, you can choose a set of effects that work for your document.
-
On the Page Layout tab in Excel or the Design tab in Word, click Effects.
. -
Select the set of effects that you want to use.
 .
.
Switch or remove a theme
-
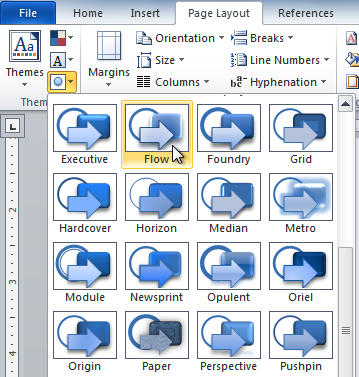
To change themes, simply pick a different theme from the Themes menu. To return to the default theme, choose the Office theme.
-
To remove theme formatting from just a portion of your document, select the portion you want to change and change any formatting you like, such as font style, font size, color, etc.
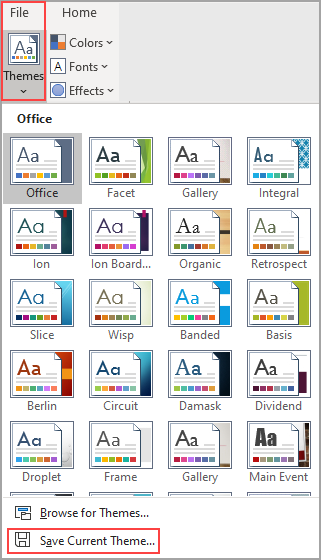
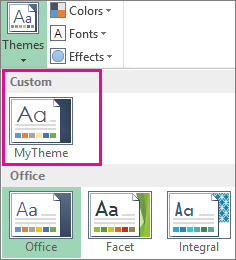
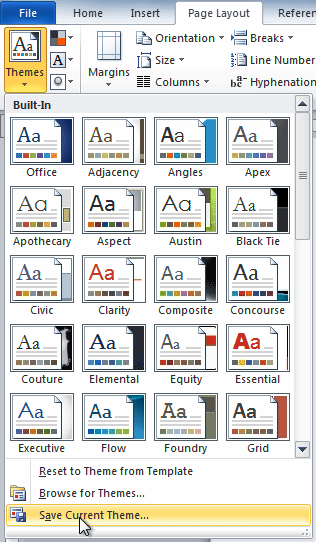
Save a custom theme for reuse
Once you’ve made changes to your theme, you can save it to use again. Or you can make it the default for new documents.
-
On the Page Layout tab in Excel or the Design tab in Word, click Themes > Save Current Theme.
-
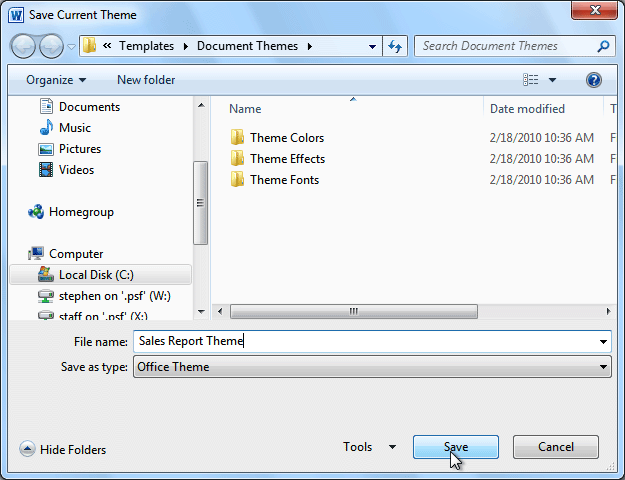
In the File name box, enter a name for the theme, and click Save.
Note: The theme is saved as a .thmx file in the Document Themes folder on your local drive and is automatically added to the list of custom themes that appear when you click Themes.
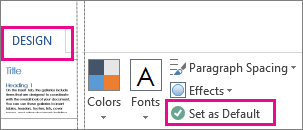
Make my changes the new default theme
After saving your theme, you can set it so it’s used for all new documents.
Excel
Apply your custom theme to a blank workbook and then save it as a template named Book.xltx.
Word
-
On the Design tab, click Set as Default.
More about themes
A document theme is a unique set of colors, fonts, and effects. Themes are shared across Office programs so that all your Office documents can have the same, uniform look.
You can also change the Office theme. The Office theme is the color scheme for your entire Office program, while document themes are more specific (they show up in individual Word documents or Excel spreadsheets).

In addition, you can add a pattern to your Office program, by changing the Office Background.
See Also
-
Change the font size in Word, Excel or PowerPoint
-
Change the line spacing in Word
-
Insert subscript or superscript text in Word
-
Add or remove a sheet background in Excel
-
Create your own theme in PowerPoint
-
Customize and save a theme in Word 2016 for Mac
Cards
| Term is another word for document properties | Definition Metadata |
|---|---|
| Term With more than _______ predefined color schemes, Word provides a simple way to select colors that work well together. | Definition 20 |
| Term To move to the right one word press the __________ keys | Definition CTRL + RIGHT ARROW |
Contents
- 1 What is the default color scheme called in Word?
- 2 In which of the following circumstances should you press the Enter key?
- 3 What list is a series of paragraphs each beginning with a dot character?
- 4 How do you change the background Colour on word?
- 5 How do I change the color of my resume in Word?
- 6 When words flags can be spelled?
- 7 When you first create a table it is left aligned?
- 8 Under which circumstances should press the Enter key when working in a Word document?
- 9 What are the built in or predefined styles used for formatting text called?
- 10 What is the amount of space that appears between paragraphs called?
- 11 What are the dots or dashes between tabs called?
- 12 Can you make Word black?
- 13 Why is Microsoft Word black?
- 14 Why is Word background black?
- 15 Is it unprofessional to have color in your resume?
- 16 How do I change my resume design in Word?
- 17 How do I add color to my resume?
- 18 How do I move one word to the left in Word keyboard?
- 19 What do you press to enter a blank line into a document?
- 20 What character indicates that the Enter key has been pressed?
What is the default color scheme called in Word?
Every document in Office 2010 that you create with Word, Excel or PowerPoint has a theme inside it — even blank, new documents. The default theme is Office Theme, with a white background and dark, subtle colors.
In which of the following circumstances should you press the Enter key?
As you enter text in the Word document window, you must press the ENTER key when the insertion point reaches the right margin.
What list is a series of paragraphs each beginning with a dot character?
Word Lesson 4 Flashcards
| A | B |
|---|---|
| Which of the following refers to how the left and right edges of a paragraph align on a page? | Alignment |
| What is a series of paragraphs, each beginning with a bullet character, called? | Bulleted list |
How do you change the background Colour on word?
Add or change the background color
- Go to Design > Page Color.
- Choose the color you want under Theme Colors or Standard Colors. If you don’t see the color you want, select More Colors, and then choose a color from the Colors box.
How do I change the color of my resume in Word?
1. Right-click the Footer and right-click the border, you will see like the picture below. 2. Choose the color you want.
When words flags can be spelled?
If we typed a word not in the dictionary (misspelled or proper name), a wavy red line appears. Word flags a possible error and changes the Status icon to a red X.
When you first create a table it is left aligned?
When you first create a table it is left-aligned; that is, flush with the left margin. In a business letter, the complimentary close displays two lines below the last line of the message.
Under which circumstances should press the Enter key when working in a Word document?
As you enter text in the Word document window, you must press the ENTER key when the insertion point reaches the right margin. Word provides an Undo button that can be used to cancel the most recent command or action.
What are the built in or predefined styles used for formatting text called?
Word Lesson 3 Flashcards
| A | B |
|---|---|
| What are the built-in or predefined styles used for formatting text called? | Quick Styles |
| Which of the following terms defines the appearance and shape of the letters, numbers, and special characters in a document? | Font |
What is the amount of space that appears between paragraphs called?
Line spacing is the space between each line in a paragraph. Word allows you to customize the line spacing to be single spaced (one line high), double spaced (two lines high), or any other amount you want.Line spacing is also known as leading (pronounced to rhyme with wedding).
What are the dots or dashes between tabs called?
A tab leader in Word produces a row of dots, dashes, or underscores between two sets of text, separated with the Tab key. They are useful for creating tabular lists without using tables, as shown in the above image. For example, maybe you’re including a price list in your document, but you don’t want to use a table.
Can you make Word black?
While in Word, click File and go to Options. On the General tab, under Personalize your copy of Microsoft Office, you can change the Office Theme to Black.
Why is Microsoft Word black?
Do you know what is going on? This is the new Dark Mode in Office. If you have enabled the Black Office theme, you will have a Switch Modes button on the View tab of the Ribbon. For more, see https://insider.office.com/it-it/blog/try-dark-mode-in-word.
Why is Word background black?
Open up the options menu by clicking File, then Options at the bottom. The Options menu starts in the General tab. In this General tab navigate to the Personalize section. Next to the Office Theme selector is a check box for Disable dark mode.
Is it unprofessional to have color in your resume?
Using black, white, and a third color (such as blue or green) is a safe resume color scheme.It is generally best to avoid using bright colors as they can be distracting and look unprofessional. The color on your resume should compliment it, not take the focus away from the content.
How do I change my resume design in Word?
Edit templates
- Click File > Open.
- Double-click This PC. (In Word 2013, double-click Computer).
- Browse to the Custom Office Templates folder that’s under My Documents.
- Click your template, and click Open.
- Make the changes you want, then save and close the template.
How do I add color to my resume?
To add color without compromising readability, you need to know two color theory principles: contrast and hierarchy. High contrast between the background and the letters makes reading easy. Black and white create the highest contrast possible, so it is considered one of the best color schemes to use on a resume.
How do I move one word to the left in Word keyboard?
You can use the keyboard to move the insertion point and scroll document.
- Home – move to the beginning of a line.
- End – move to the end of a line.
- Ctrl+Right arrow key – move one word to the right.
- Ctrl+Left arrow key – move one word to the left.
- Ctrl+Up arrow key – move to the beginning of the current paragraph.
What do you press to enter a blank line into a document?
Press the “Enter” key. This drops the cursor to a new line, but doesn’t create a space. Press the “Enter” key once more and a blank line is inserted onto the page.
What character indicates that the Enter key has been pressed?
A raised dot (·) shows where the ENTER key was pressed.
Every document in Office 2010 that you create with Word, Excel or PowerPoint has a theme inside it — even blank, new documents. The default theme is Office Theme, with a white background and dark, subtle colors.
What are the basic color schemes?
The seven major color schemes are monochromatic, analogous, complementary, split complementary, triadic, square, and rectange (or tetradic).
What are the types of Colour schemes?
The 6 types of color schemes
- Monochromatic color scheme.
- Analogous color scheme.
- Complementary color scheme.
- Triadic color scheme.
- Split-complementary color scheme.
- Tetradic color scheme.
How do I change the default color in Word?
Go to Format > Font > Font. + D to open the Font dialog box. Select the arrow next to Font color, and then choose a color. Select Default and then select Yes to apply the change to all new documents based on the template.
How do I change the default theme in Word?
Or you can make it the default for new documents. On the Page Layout tab in Excel or the Design tab in Word, click Themes > Save Current Theme. In the File name box, enter a name for the theme, and click Save.
What are two color schemes?
Two-Color Combinations
- Yellow and Blue: Playful and Authoritative.
- Navy and Teal: Soothing or Striking.
- Black and Orange: Lively and Powerful.
- Maroon and Peach: Elegant and Tranquil.
- Deep Purple and Blue: Serene and Dependable.
- Navy and Orange: Entertaining yet Credible.
What are the five color schemes?
Our Top 5 Color Combinations
- Red and yellow. Red and yellow are a classic, bold color combo.
- Pink and purple. Pink and purple are warm, playful colors.
- Yellow and black. Yellow and black can be lighthearted (think of the classic smiley face) or more serious.
- Purple and Orange.
- Green and Blue.
How do I change my font color automatically?
How do you change your text color?
How do you change the color of your text messages on Android? Choose “Settings,” and select the “Advanced” tab. Touch “Appearance Settings,” and then select “Conversation Customization” from the conversation section. Select “Incoming Background Color” or “Outgoing Background Color” to change bubble colors.
How do I change the default theme?
On the Design tab, click the arrow under Themes, point to the theme you want to set as default, and then Ctrl+click. Click Set as Default Theme. The next time that you open a new presentation, it will open with the theme that you set as the default.
How do I change my theme to normal?
Turn dark theme on or off
- Open the Voice app .
- At the top left, tap Menu. Settings.
- Under Display Options, tap Theme.
- Select the theme for this device: Light—White background with dark text. Dark—Black background with light text. System default—Uses the Android device’s setting.
Which Colour is pure and bright?
This describes the relative brightness of colors. As well as differentiating colors by their hues, we can express them as brighter or darker. Bright yellow is a pure bright color. Clear blue, though pure, is a darker color.

For the last lesson in this Geek School series, we’re going to show you how to use Styles, Style Sets, and Themes to save a lot of time when formatting your documents by creating reusable settings that can be applied to all of your documents.
Up until now, you’ve been learning about how to create documents and implement formatting bit by bit. In other words, you create a document and changes you make are typically localized. In this lesson, we step back a bit and show you how styles can take the work out of creating a consistent look and feel that you can control from a central location rather than having to needlessly apply changes to each and every part.
Styles are very useful for generating a table of contents but that is but only one use for them.
The main function for styles is to allow you to quickly set titles, subheadings, section headings apart from one another by giving them unique fonts, font characteristics, and sizes. By grouping these characteristics into styles, you can create documents that have a consistent look without having to manually format each section header. Instead you set the style and you can control every heading set as that style from central location.
With styles you can:
- Apply a consistent look across the whole document instead of having to format each section individually.
- Automatically number section headers.
- Apply same font to the entire text body.
- Apply the same font to header sections.
- Use a consistent paragraph spacing.
- Pick a default color scheme for SmartArt, charts, and shapes.
- Pick from a number of pre-designed styles use them as your own and modify them.
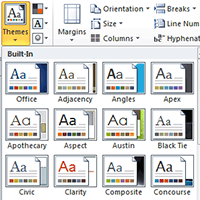
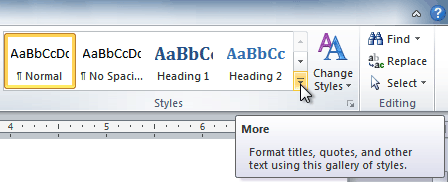
Let’s go over some examples to give you a better idea of what some of these mean. First, note the “Styles” section on the “Home” tab.

It expands to reveal more:
Click on the small arrow in the lower right corner for a floating “Styles” panel.
This windows stays visible so you can use it as you work through your documents. You can move it outside the application window, and also dock it right or left side of it.
The style dialog box like format shape floats independent of Microsoft Word. That means you can move it outside the document to make more room or even more it to a second monitor if you are using dual monitors.
Click “options” and you can select how the styles pane is shown and sorted:
Each style can be applied differently and you can hover over the symbol to the right to see exactly how it is applied.
If you click on that symbol, you are presented with a dropdown options menu, which gives you further control over the styles in your current document.
You can modify a selected style, which will apply to all instances of that style throughout the document. In this case, there are 109 of them. Here you can also select or clear all instances of that style, and remove it completely from the “style gallery.”
Along the bottom of the pane are three buttons, which have some pretty important functions.
New Style
If you click “new style” the resulting dialog box will let you create a new style using existing formatting. As you apply new characteristics to the style, you can see how it will look in the preview.
You can dig into the nitty-gritty specifics of the style including the format, such as if you want it to have bullets, borders, fonts, text effects, and so on. From there, you can add the style to just that document, or you can add it to the template so every document has that style from there on.
Style Inspector
Use the style inspector to “inspect” styles throughout your document. This feature is useful for stripping formatting or further changing it.
You can also click each style for a drop-down options menu, allowing you to modify and build a new style, select all instances of that style in the document or completely clear them.
Click the bottom-left button to show the “reveal formatting” pane to see how your document is formatted. This is somewhat similar to or at least hearkens back to “Reveal Codes” in WordPerfect.
Manage Styles
The “manage styles” button allows you to quickly edit styles such as to modify their appearance, reorder their recommended order of appearance, restrict which ones are available, and set new defaults to current styles.
It’s useful to know how to take control of your styles because used well and wisely, they can give you a lot of power with your documents.
Style Sets
The “Design” tab brings all of the formatting options you can apply to a document in one place.
“Document Formatting” section shows you how the heading and text would look if you pick one of the combinations there. Each of these combinations is called a “Style Set.” If you briefly hover over each style set, the formatting of your document will change to preview how it would look. If you click on the style set, it will be applied to your current document. This is non-destructive, so if you don’t like the new style, you can just as easily change it.
Similar to other sections throughout Word, if you click the scrollbar on the right edge, it will expand to a full menu. Further options at the bottom allow you to reset your style set to the default or save your current style as a new set.
The right side of the document formatting section contains functions for changing your colors, fonts, paragraph spacing, add effects, and set your changes as the default style set.
Changing the colors simply means that shapes, SmartArt, charts, and text will affected.
There are plenty of built-in color schemes to choose from, however, if none these strike your fancy, or you have specific colors you want to use, you can click “Customize Color” at the bottom. Here you’ll have virtually limitless choices, and you can save your new custom color set and use it later.
The “Fonts” menu contains predefined schemes that you can select based on the old Office theme, or a font family.
Select “Customize Fonts” at the bottom of the menu to quickly create a new custom set based on your personal favorite font family. In the screenshot below, we see you can assign a “heading font” and “body font” and then give it a name, save it, and then apply it to your current and future documents (“set as default”).
If you choose a new font style, you can see it reflected in the font section of the “Home” tab.
“Paragraph Spacing” contains a variety of built-in styles, which should please all but the most picky. Again, to see how your document is affected by these, you can hover over each one and the changes will be previewed in your document.
Note the “Custom Paragraph Spacing” option at the bottom of this menu.
The effects menu allows you to quickly change the effect of design elements such as shapes, SmartArt, and charts.
If you want to preserve any changes to your style set permanently as the default, then you can click “set as default.” A dialog box will appear asking you to confirm.
Finally, if you want to use a custom style set in the future, but you do not want to apply it as the default. You can save it as a template file. Right-click on the style set and then “Save.”
Note, we’ll cover templates shortly. Here you should simply know that if you want to use your new custom template in the future, you would only need to double-click on the *.dotx file or open it from Word.
Note the option “Add Gallery to Quick Access Toolbar” simply means that if you want quick access to the document formatting gallery, it can be accessed from the QAT at the top of the Word window.
Modifying Styles
Suppose we only want to modify Heading 2.
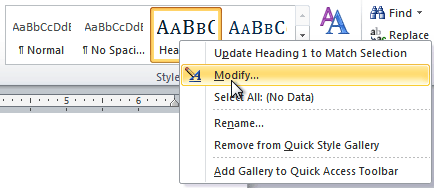
For example, let’s say we want to center, bold, and italicize it. The quickest way to do this would be to change the selected style, then right-click on that style in the “Styles” section on the “Home” tab, in this case Heading 2, and select “Update Heading 2 to Match Selection.” All instances of Heading 2 will now reflect your changes throughout the document.
Themes
The style set you are greeted with when you click on the “Design” tab comprises the “Office” theme. Other themes can be accessed by clicking on the “Themes” button on the left of the “Design” tab.
A theme comprises a whole new bunch of style sets, each with its own fonts, color, spacing and anything else previously discussed.
Note at the bottom, there are further options to rest the theme to the template, browse for custom themes on your computer, as well as save the current theme, assuming you’ve altered or customized it, as a new theme. This is different from saving a style set. Remember, a style set saves as a template file (.dotx). A theme is saved as a theme file (.thmx) and each theme file:
Themes are remarkably simple and a very effective way to apply a complete look and feel to your documents in a matter of seconds.
Conclusion
And that’s it for the How-To Geek School’s Guide to Word Formatting. It’s been fun, we’ve learned a lot, and hope you did too! If you missed any part of this series, or simply want to review something again, you can easily do so by clicking any of the links in the table of contents at the beginning of the article.
READ NEXT
- › How to Get a Refund on the PlayStation Store
- › The New Winamp Is Here, but It’s Not What You’d Expect
- › Save Hundreds on Elegoo’s New PHECDA Laser Engraver Through Kickstarter
- › Five Types of Phone Damage That Aren’t Covered by Your Free Warranty
- › Spotify Is Shutting Down Its Free Online Game
- › Android’s Nearby Share Has (Unofficially) Arrived on Mac
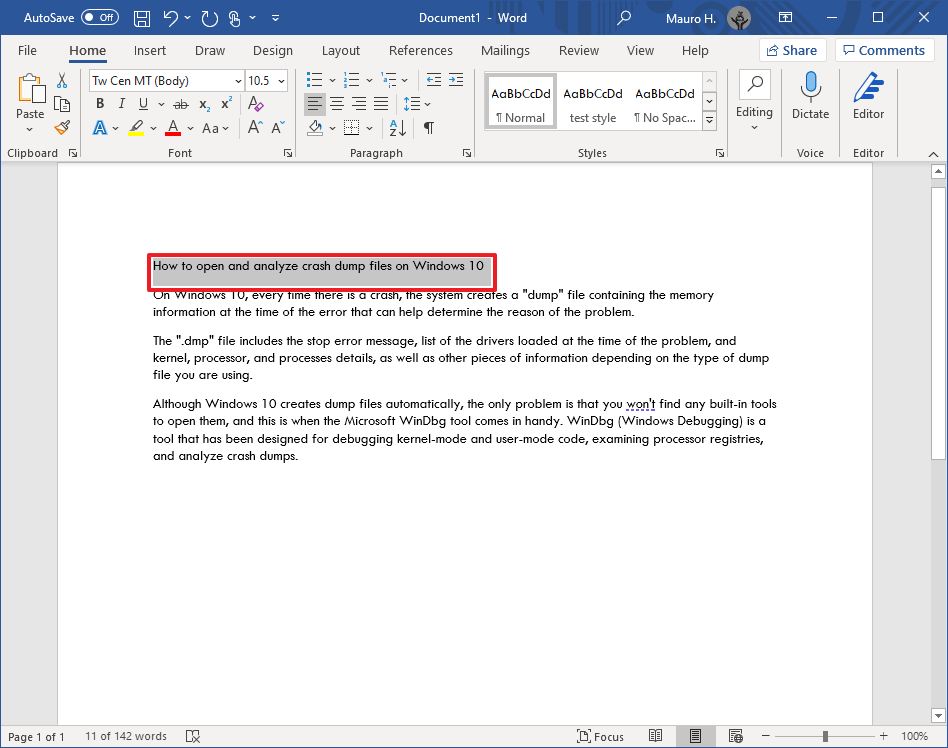
(Image credit: Windows Central )
Although you can style every part of a Microsoft Word document individually with unique fonts and colors, it is not a convenient approach since you have to repeat the steps many times, consuming more time and increasing the chances of mistakes, and this is when styles and themes can come in handy.
In the Office apps, styles are collections of fonts, text sizes, and colors that you can apply to different parts of the document (titles, subheadings, quotation, etc.). On the other hand, themes are collections of styles that you can use to format the entire document quickly.
When you use styles and themes, you will still be using a few steps, but it is a more organized way to format a document on Windows 10, and you will really see the benefit when you need to make changes since updating the format can be as easy as selecting a new theme or style.
In this Windows 10 guide, we will walk you through the steps to change the look and feel of Word documents using the style and themes settings whether you use Office from Microsoft 365 or Office 2019.
- How to use styles in Word
- How to use themes in Word
How to use styles in Word
To change the overall look of a Word document, use these steps:
- Open the Word app.
- Under the «New» section, click the Blank document option (or open an existing document).
- Create the document’s content.
- Select with the mouse the text you want to apply a different format – for example, the title.
- In the «Home» tab, under the «Styles» section, select the content type to style.Quick note: When selecting a style, make sure to apply it to the correct formating. For example, if you choose the title, then the style should be «Title.» For the subtitle, select the «Subtitle» style and the rest of the headings using «Heading» 1 through 9 accordingly. And don’t worry about the colors. You will customize these when applying a theme. Also, to view all the available elements, click the More button in Styles’s bottom-right corner.

- Continue applying the styling for subtitles, headings, quotes, and anything else you want to format.Quick tip: You can always click and hold the Ctrl key and use the mouse pointer to select the same parts of the document, including the same stying, for instance, all the subtitles (headings).
Once you complete the steps, the document will be formatted with the styling you selected, and when you make changes to the style, the formatting will change automatically for all the same parts of the document.
In addition to selecting from the predefined settings, you can also create new or modify existing elements to style documents with custom settings.
Create new style element
To create a custom style element in Microsoft Word, use these steps:
- Open the Word app.
- Click the Open option.
- In the «Home» tab, under the «Styles» section, click the More (down-arrow button) menu.
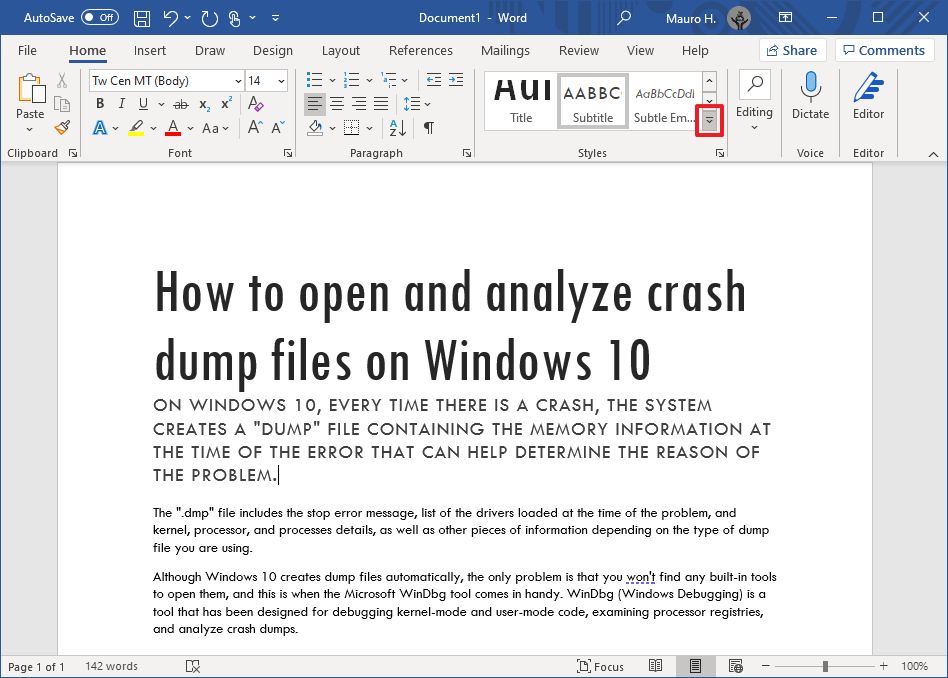
- Click the Create a style option.
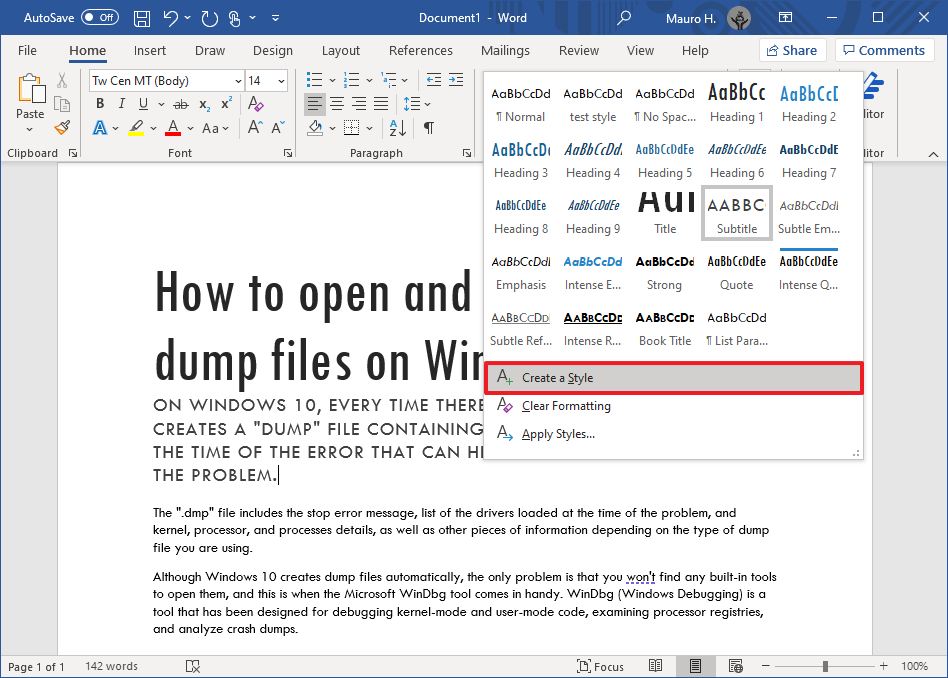
- Specify a name for the style.
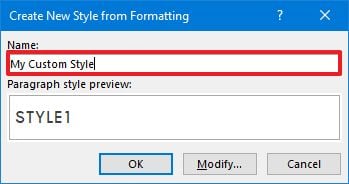
- Click OK button.
After you complete the steps, the new element will appear in the Styles menu.
Modify style elements
To modify a new or existing style element, use these steps:
- Open the Word app.
- Click the Open option.
- In the «Home» tab, under the «Styles» section, right-click the style and select the Modify Option.
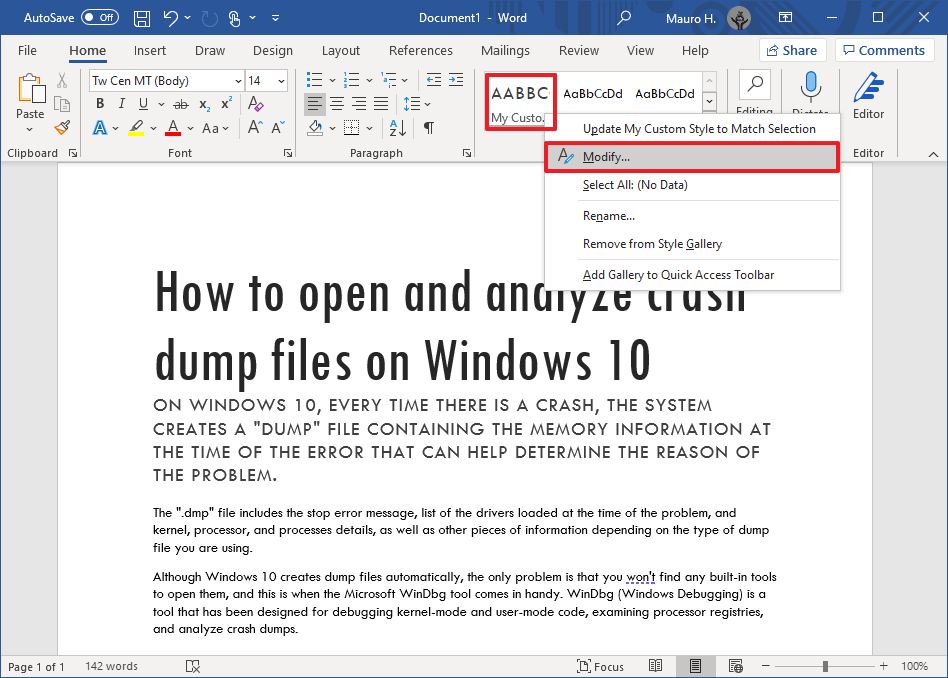
- Customize the style name and formatting settings (for example, font, size, color, aligment, etc.) as necessary.
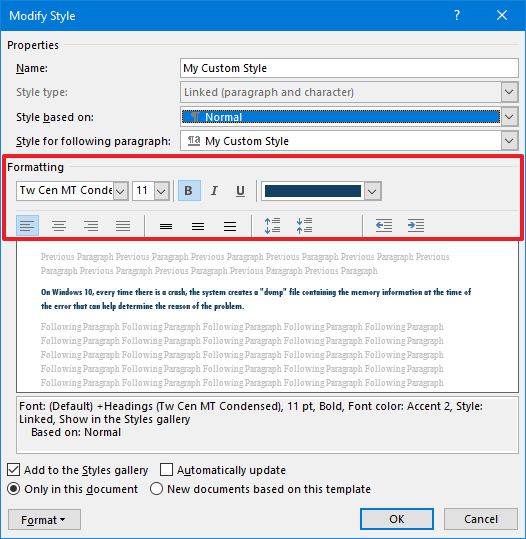
- Click the OK button.
Once you complete the steps, the new styling changes will apply to the element.
 Get subscribed
Microsoft 365 gives you full access to all the Office apps and perks, such as 1TB OneDrive storage and Skype minutes. You can also install Word, Excel, PowerPoint, Outlook, and other apps on up to five devices, and depending on the subscription, you can share the account with up to five people.
How to use themes in Word
After applying the style, you can use themes to give the document a different look and feel with colors and a combination of fonts.
To apply a theme to a Microsoft Word document, use these steps:
- Open the Word app.
- Click the Open option.
- Select the document you already styled to open it.
- Click the Design tab.
- Click the Themes button.
- Roll the mouse pointer over the themes to see a live preview of each available theme.
- Click the theme you want for the document.
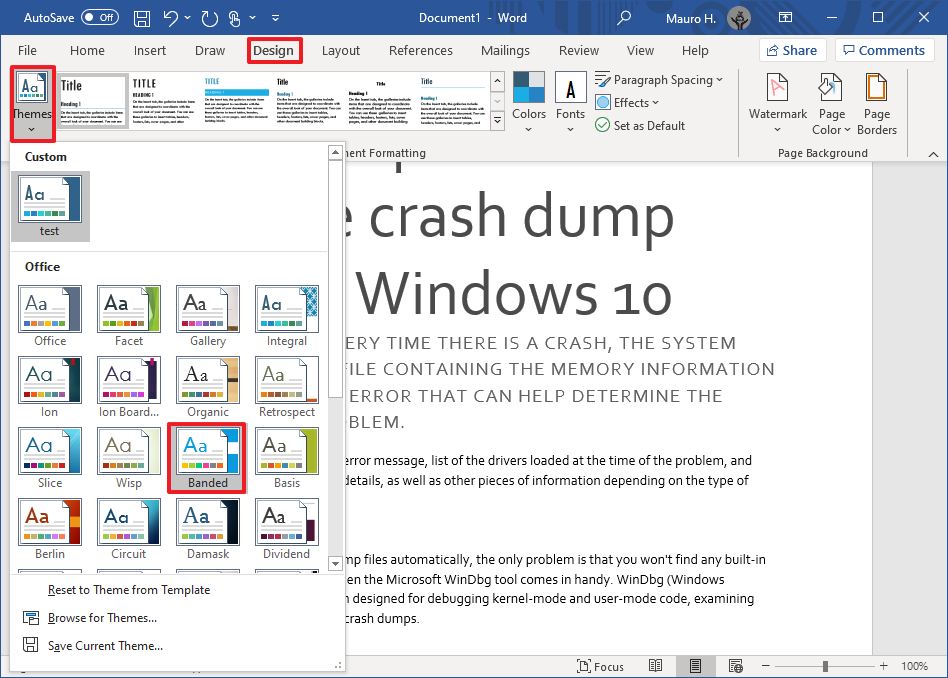
- (Optional) Use the «Document Formatting» section to select another version of the theme with different combinations of fonts and colors.
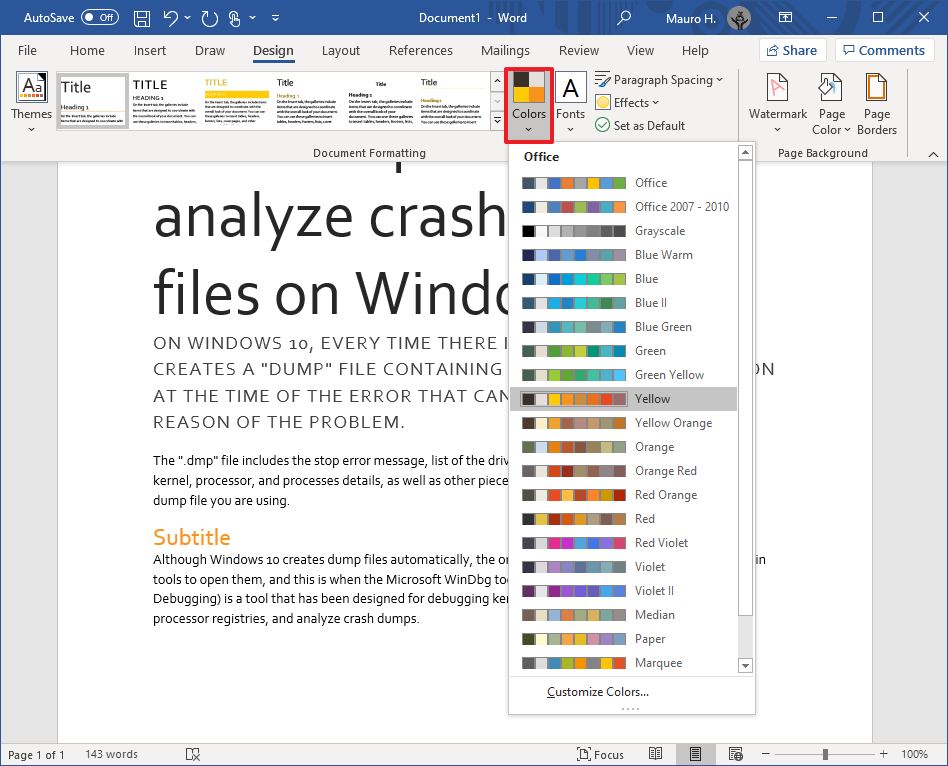
- (Optional) Click the «Colors» menu to select a different color scheme.
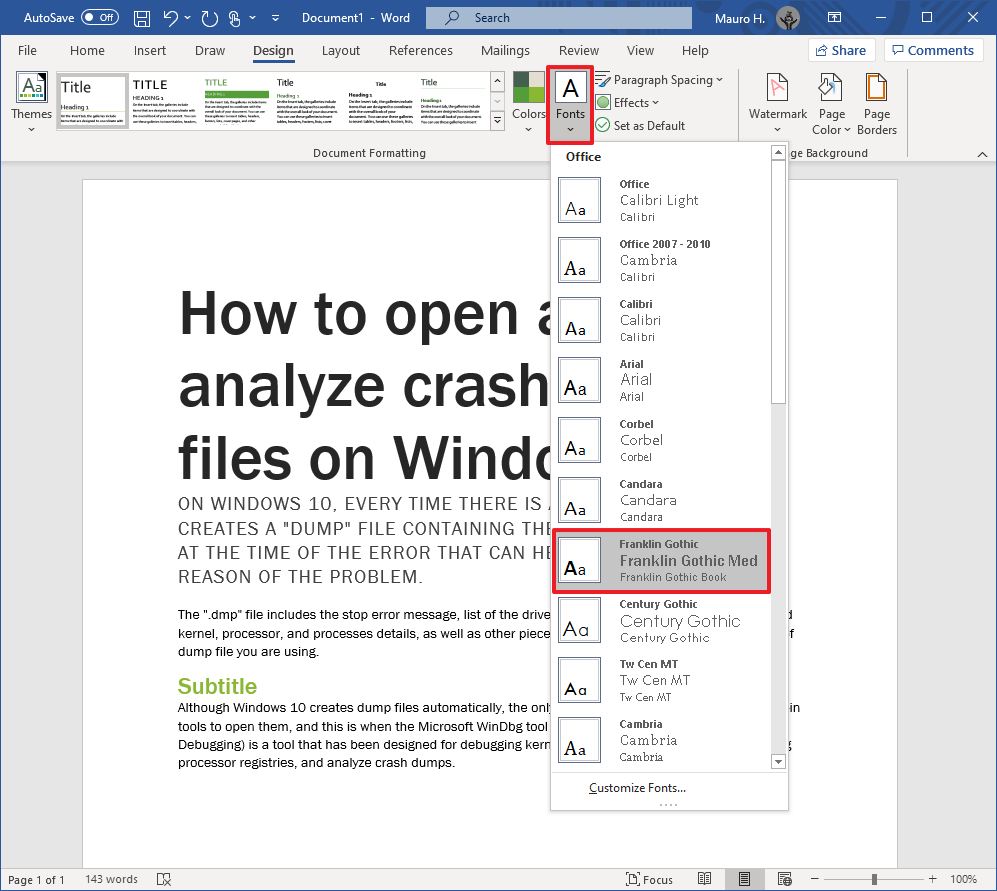
- (Optional) Click the «Fonts» menu to select a different combination of fonts.Quick note: As you open the menu, the top font is one for the title, the one in the middle is for the subheadings, and the one at the bottom is for the content.
After you complete the steps, the content will incorporate the new colors and fonts available through the theme you selected.
Set theme as the default
To set a theme as the default for Word, use these steps:
- Open the Word app.
- Click the Open option.
- Select the document you already styled to open it.
- Click the Design tab.
- Customize the formatting of the document with colors, fonts, spacing, and effects.
- Click the Set as Default button.
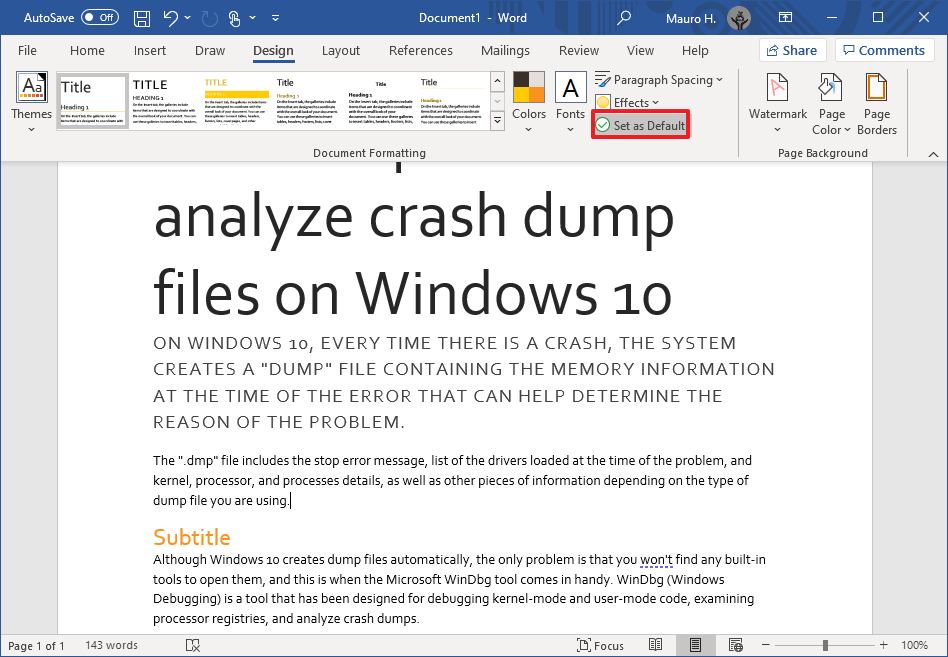
- Click the OK button.
Once you complete the steps, the theme will be available as the default for every new document. However, it won’t apply to the document automatically. Instead, it will be the default theme in the «Style» section, in the «Home» tab.
Create a new theme template
To create a new theme for Microsoft Word documents, use these steps:
- Open the Word app.
- Click the Open option.
- Select the document you already styled to open it.
- Click the Design tab.
- Use the «Document Formatting» section to select a format.
- Click the «Colors» menu to select a color scheme.
- Click the «Fonts» menu to select a combination of fonts.
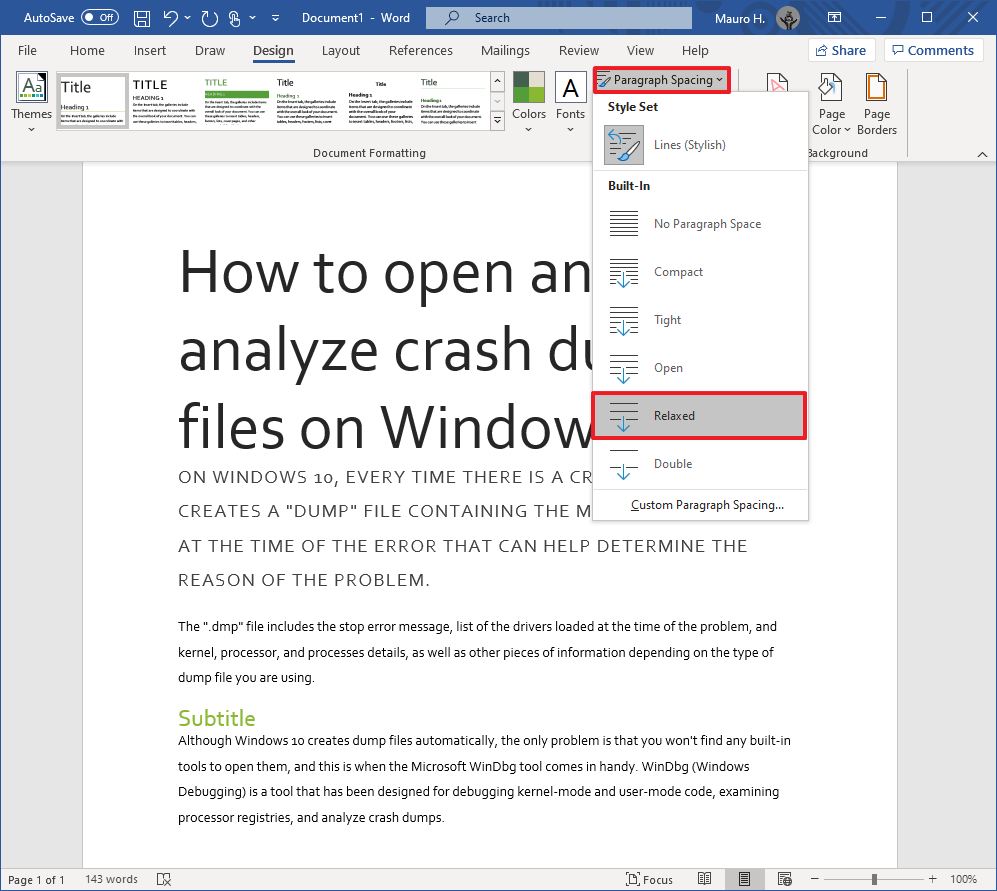
- Click the «Paragraph Spacing» menu and select one of the predefined options.Quick tip: You can also click the Custom Paragraph Spacing option to create a new style.
- (Optional) Click the «Effects» menu and select the effect you want to use when inserting objects.
- Click the «Themes» menu and choose the Save Current Theme option.
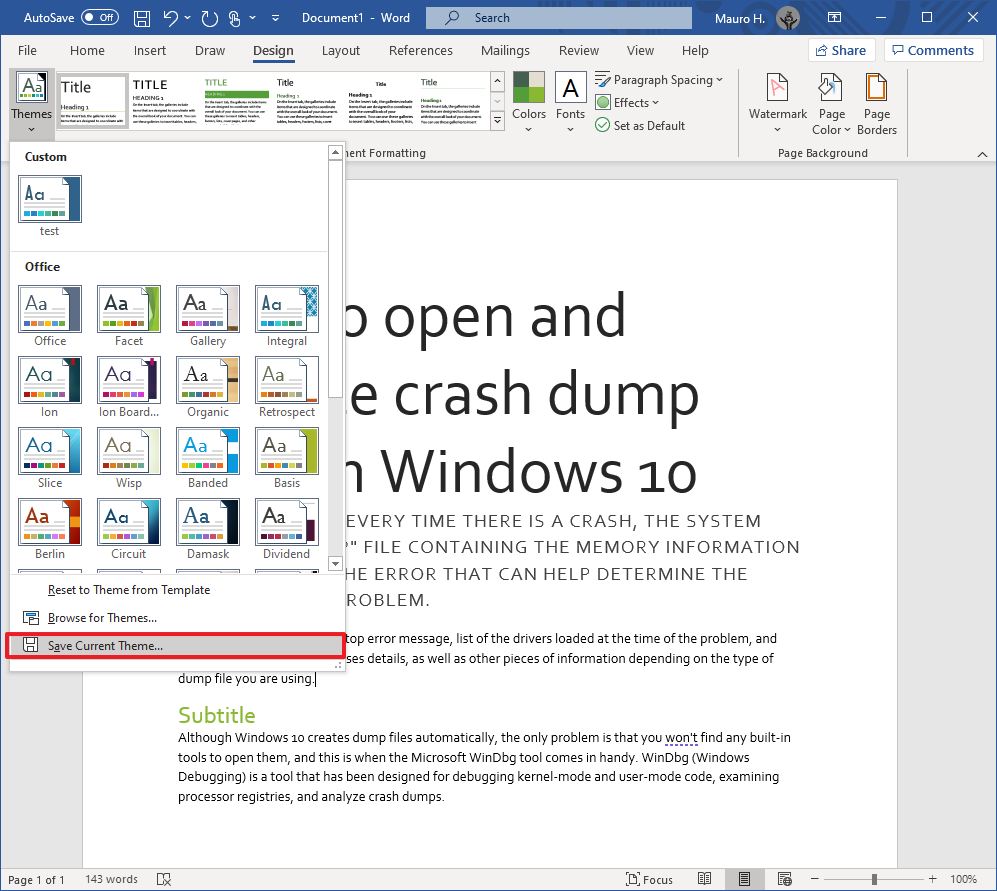
- Confirm a name for the theme.
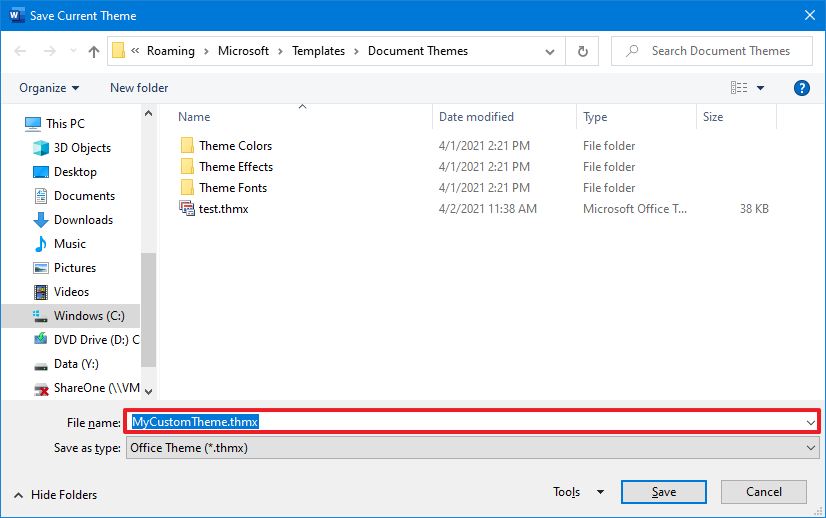
- Click the Save button.
After you complete the steps, the new theme will be available from the «Themes» menu in the «Custom» section.
More Windows 10 resources
For more helpful articles, coverage, and answers to common questions about Windows 10, visit the following resources:
- Windows 10 on Windows Central – All you need to know
- Windows 10 help, tips, and tricks
- Windows 10 forums on Windows Central
All the latest news, reviews, and guides for Windows and Xbox diehards.
Mauro Huculak is technical writer for WindowsCentral.com. His primary focus is to write comprehensive how-tos to help users get the most out of Windows 10 and its many related technologies. He has an IT background with professional certifications from Microsoft, Cisco, and CompTIA, and he’s a recognized member of the Microsoft MVP community.
Lesson 18: Styles and Themes
/en/word2010/formatting-pictures/content/
Introduction
Styles and themes are powerful tools in Word that can help you easily create professional-looking documents. A style is a predefined combination of font style, color, and size of text that can be applied to selected text. A theme is a set of formatting choices that can be applied to an entire document and includes theme colors, fonts, and effects.
In this lesson, you will learn how to apply, modify, and create a style; use style sets; apply a document theme; and create a custom theme.
Using styles and themes
Word’s large selection of styles and themes allows you to quickly improve the appearance of your document. Styles can give your document a more sophisticated look, while themes are a great way to change the tone of your entire document quickly and easily. To use styles and themes effectively, you’ll need to know how to apply, modify, and create a style; use style sets; apply a document theme; and create a custom theme.
Optional: You can download this example for extra practice.
To select a style:
- Select the text you want to format.
Selecting text
- In the Style group on the Home tab, hover over each style to see a live preview in the document. Click the More drop-down arrow to see additional styles.
Viewing the Text Styles
- Select the style you want. The selected text appears formatted in the style.
Selecting a Style

You can also use styles to create a table of contents for your document. To learn how, review our article on How to Create a Table of Contents in Microsoft Word.
To apply a style set:
Style sets include a combination of title, heading, and paragraph styles. Style sets allow you to format all of the elements of your document at once, rather than formatting your title and headings separately.
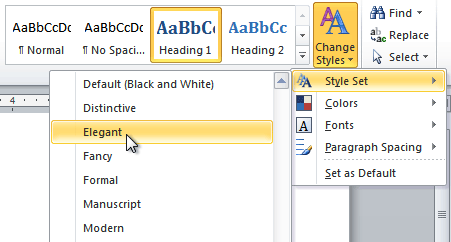
- Click the Change Styles command on the Ribbon. A drop-down menu will appear.
- From the drop-down menu, select Style Set.
Selecting a Style Set
- Select the Style Set you want, and the change will be reflected in the entire document.
Elegant Style Set Formal Style Set


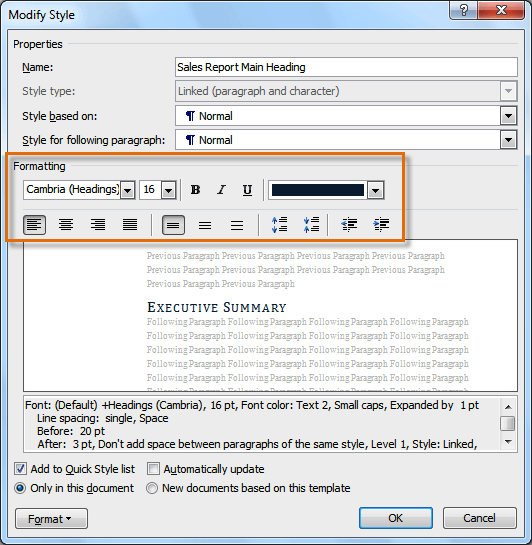
To modify a style:
- Locate the style you want to change in the Styles group.
- Right-click the style. A drop-down menu will appear.
- Click Modify, and the Modify Style dialog box appears.
Modifying a Style
- Make the desired changes to the formatting. If you want, you can also change the name of the style.
The Formatting options for the Style
- Click OK to apply the modifications to the style.
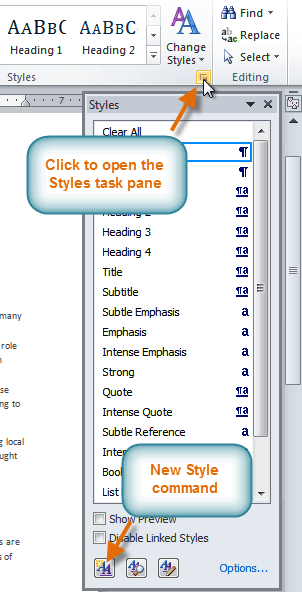
To create a new style:
- Click the arrow in the bottom-right corner of the Styles group. This opens the Styles task pane.
The Styles task pane
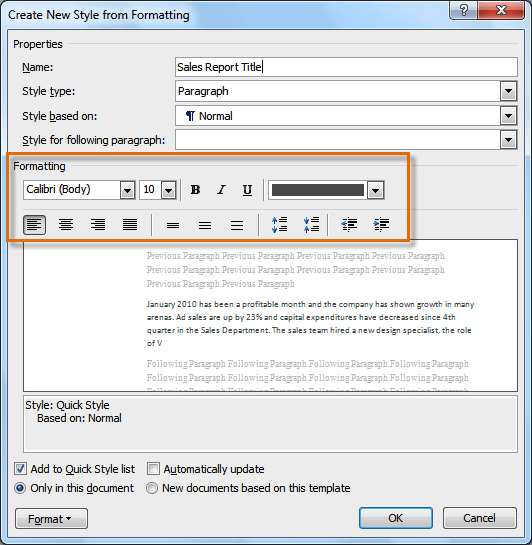
- Select the New Style button at the bottom. A dialog box will appear.
- Enter a name for the style, and set the text formatting the way you want.
Formatting options for the new Style
- Click OK, and the new style will appear in the task pane.
Using themes
A theme is a set of colors, fonts, and effects that determines the overall look of your document. Themes are a great way to change the tone of your entire document quickly and easily.
What is a theme?
All documents in Word 2010 use a theme. You’ve already been using a theme, even if you didn’t know it: the default Office theme. Every theme, including the Office theme, has its own theme elements:
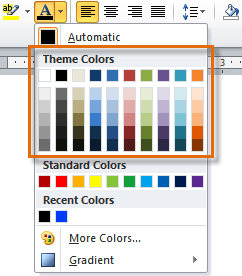
- Theme colors (available in every Color menu)
Theme Colors
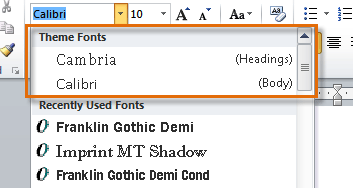
- Theme fonts (available in the Font menu)
Theme Fonts
- Shape styles (available in the Format tab when you click a shape)
Shape Styles

Why should you use theme elements?
If you’re using theme elements, you’ll probably find that your document looks pretty good and that all of the colors work well together, which means you don’t have to spend as much time tweaking the document. But there’s another great reason to use theme elements: When you switch to a different theme, all of these elements will update to reflect the new theme. You can drastically change the look of the document in a few clicks, and it will usually still look good.
 Oriel Theme
 Tradeshow Theme
Remember, the colors and fonts will only update if you’re using theme fonts or theme colors. If you choose one of the standard colors or any of the fonts that are not theme fonts, your text will not change when you change the theme. This can be useful if you’re creating a logo or title that always needs to look the same.
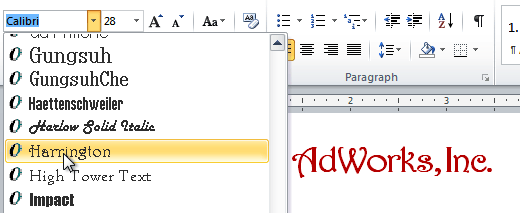 Selecting a non-theme font
If you’re using built-in styles, you may notice that the fonts for these styles change when you select a different theme. This is because all of the built-in styles are based on the theme fonts. If you don’t want the styles to change, you’ll need to create custom styles.
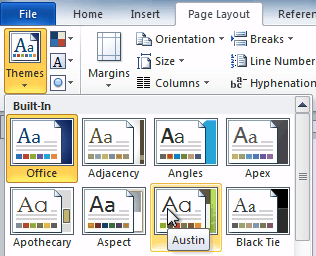
To change the theme:
- Select the Page Layout tab.
- Click the Themes command. A drop-down menu will appear.
Selecting a Theme
- Hover the mouse over a theme to see a live preview of it.
- Select the desired theme.
Customizing a theme
Let’s say you really like the fonts from one theme, but you want to experiment with different color schemes. Luckily, you can mix and match the colors, fonts, and effects from different themes to create a unique look for your document. If it still doesn’t look exactly right, you can customize the theme colors and theme fonts.
To change theme colors:
- From the Page Layout tab, click the Theme Colors command. A drop-down menu will appear.
Changing the Theme Colors
- Hover your mouse over the different sets of theme colors to see a live preview.
- Select the set of theme colors you want, or select Create New Theme Colors to customize each color individually.

When setting theme colors, try to find a part of your document that uses several colors so you get the best idea of what the color scheme looks like.
To change theme fonts:
- From the Page Layout tab, click the Theme Fonts command. A drop-down menu will appear.
Changing the Theme Fonts
- Hover your mouse over the different sets of theme fonts to see a live preview.
- Select the set of theme fonts you want, or select Create New Theme Fonts to customize each font individually.

To change theme effects:
- From the Page Layout tab, click the Theme Effects command. A drop-down menu will appear.
Changing the Theme Effects
- Hover your mouse over the different sets of theme effects to see a live preview.
- Select the set of theme effects you want.
Some themes can add a picture fill to shapes, depending on which shape styles are used. For example, the Paper theme can add a paper-like texture to shapes. Try exploring some of the different shape styles after changing the theme.
To save your theme:
Once you’ve found settings you like, you may want to save the theme so you can use it in other documents.
- From the Page Layout tab, click the Themes command. A drop-down menu will appear.
Saving the current Theme
- Select Save Current Theme.
The Save dialog box
- Type a file name for your theme, then click Save.
Challenge!
- Open an existing Word document. If you want, you can use this example.
- Apply several different styles to different parts of your document.
- Apply a style set to your entire document.
- Modify an existing style.
- Apply a theme.
/en/word2010/working-with-headers-and-footers/content/
Introduction
In common with many other applications, Word used to have rather limited colour palettes, but the situation was
improved in Word 2000 and has, until 2007, remained relatively stable. From Word 2000, with a couple of exceptions,
any component of a Word Document which could be coloured, could be given any of the 16 million or so colours
available in the so called RGB colour space. Components of documents could take their colour from one specified
in a Style or be given a colour directly; some direct colour formatting could also be applied with an early
incarnation of a Themes feature.
Whatever the source of a colour, it was specified at that source by picking from a glittering dialogue or by
explicitly specifying the amount of red, green, and blue which made it up. However specified, once chosen it was
fixed as an RGB value, and stored, both in Word’s workspace and in the Document, as a number representing
that RGB value. The only way to change a colour was to change that specific number, either by letting Word do it
based on selections through the UI or directly in VBA (or other) code.
Word 2007 has a new colour model, which forms part of the new Themes feature. A colour can still be specified as
an absolute (RGB) colour but it can also be specified as a colour, or as an adjustment to a colour, belonging to a
colour scheme, itself part of a Theme. If a change is made to the colour scheme, that change is reflected immediately
in anything coloured with reference to it. The inclusion of this feature has some effects in the User Interface but
has a bigger impact on VBA (or other code) solutions that work with Word documents.
This monologue details some aspects of the use of colour in Word Documents, particularly in VBA code. The 2007
Themes feature is common to Word 2007, Excel 2007, and PowerPoint 2007 and, consequently, much of what is written
here will also apply to Excel and PowerPoint. Previously, however, the three applications had rather different
implementations of colour (Excel had a limited palette, for example, and PowerPoint had a simpler colour scheme
system) so this similarity is limited. When I have time and inclination I may expand the scope to include backward
compatibility issues with Excel and/or PowerPoint, but currently this is limited to Word.
Themes and Schemes
It must be hard to find terminology for new features that does not clash with existing terminology and yet still
conveys some meaning. It is equally hard to find terminology to explain the new features so please accept my
apologies in advance if you find what follows to be rather strangely worded; it is just my best attempt at avoiding
confusion whilst trying to maintain accuracy.
A Theme is a collection of formatting characteristics, some or all of which can be used in place of absolute
formatting, whether applied directly or as part of a Style. The concept of a Theme is open ended but the implementation
in Word 2007 consists of just three (fairly wide ranging) components: colours, fonts, and effects. Of interest at
the moment are colours, and the colours that belong to a Theme are grouped together as a Colour Scheme.
A Colour Scheme consists of twelve base colours: two background colours, two text colours, six complementary
‘Accent’ colours, and two hyperlink colours. Despite their names there is no restriction on usage of any of them
and, for example text can be coloured with any of the Accent colours or a background colour. As well as just the
base colours, it is possible to apply a lightness or darkness to anything coloured with a scheme colour by
specifying a percentage lighter or darker than any of the base colours. In this way, a range of co-ordinated
colours can be used in a document and, by a change of Colour Scheme within a Theme, or complete change of Theme,
they can all be changed at once.
UI Considerations
As it is essentially background reading, details of how Word handled colour in versions prior to Word 2007 has
been removed from this page and given its own home. If you are not familiar with earlier releases you may like to
read it:
 Colours in Word 2003 (and earlier versions)
⇒ Colours in Word 2003 (and earlier versions) [link to 2003.php on this site]
Conceptually, Word 2007 is much the same as earlier versions of Word, in that it still has a series of progressive
dialogues for changing colours (and the same exceptions). Where it differs is in the first dialogue, which no
longer has the fixed 40-colour palette; it does have a limited palette of ten, what it calls, standard colours but
they are supplementary to the main palette of ten groups of Theme colours:

The Word 2007 Font Color Dropdown
The Theme Colors at the top are presented in two blocks. The first row contains
ten of the twelve colours in the current colour scheme, the two missing colours being the hyperlink and followed
hyperlink colours, which, as far as I can tell, can not be used anywhere in the User Interface, even on their
intended targets. It should be noted that, in Word 2007, all documents have a Theme and, thus, a Color Scheme;
if one is not specifically assigned, a default one is used.
The second block presents variations on each of the scheme colours – lighter or darker by what is indicated
as a percentage. The actual numbers used for the percentages are, to some extent, irrelevant in the UI but it is
as well to understand that they are actually percentages of available lightness (or darkness) rather than
percentages of the lightness of the base colour itself; 100% lighter means 100% light (i.e. white) and 100% darker
means 100% dark (i.e. black). Although it is possible to set a colour to any percentage darker or lighter up to 100%,
the UI only supports a small subset – a few shades darker for the Background 1 and Background 2 colours, a
few shades lighter for the Text 1 colour, and three lighter and two darker options for the Text 2 and all the
Accent colours.
The so-called Standard Colors are standard only in as much as they are the same
in Word, Excel, and PowerPoint. They are not standard by any other definition I know; they are not Windows colours,
they are not basic colours (red, green, blue, etc.), they are not the same as any group of colours ever presented
in an Office UI in the past, or ever grouped together in any way in VBA or the object model, and only two of them
are considered standard enough to be included in the 88 standard colours in the full colour dialogue. They are
built into the User Interface and they cannot be changed in any way; perhaps that’s what makes them standard.
The Recent Colors towards the bottom are as they ever were, and only shown when
there is at least one recently used non-Theme, non-standard colour to show, and the More
Colors… choice gives the same expanded colour selection dialogue that was in earlier versions of Word.
Some of the dropdowns, Shading, for example, have a No Color option instead of
the Automatic one. It is also possible to have custom colours in a Theme
(PowerPoint MVP, Echo Swinford, shows how to set them up, herePowerPoint MVP, Echo Swinford, shows how to set them up, here [link to Echo’s site at http://www.echosvoice.com/2007/customcolors1.htm]) and, if you have any, they will appear on some of
the dropdowns, but there doesn’t appear to be any rationale for which ones show them and which don’t. The options
vary from dropdown to dropdown, but the basic format is always like the Font Color one shown.
When a colour has been chosen, Word 2007 stores it, in its workspace, as selected; that is, if a fixed colour is
chosen Word stores the number representing that fixed colour. If, however, a Colour Scheme colour is chosen Word
will store a different number referencing that Colour Scheme and any adjustments to its brightness; it will not
store the RGB value itself. If the document is later saved in Word 2007 format (.docx or .dotm) then the same
values will be stored in the document. If, on the other hand, the document is saved in Word 97-2003 format (.doc)
all the scheme colour values will be converted to absolute RGB values for the colours in the scheme active at that
moment; this degradation in colour is not picked up by the Compatibility Checker and no warning about it is given.
To summarise, Scheme colours are always available and maintained in Word 2007, even when working in compatibility
mode, and are always silently removed when saving in Word 97-2003 format. There are a couple of potential issues.
The first, a relatively minor one, is that if people are working on a document both in Word 2007 and an earlier
version they will not be working with a consistent colour palette, but perhaps the bigger problem is the potential
loss of Scheme colours that may have been carefully and unwittingly chosen.
Before leaving the UI behind it is worth noting that Themes are more than just a different colours dialogue; they
are integrated into the Word environment. For example the various Table Styles presented on the
Table Tools > Design Contextual tab reflect the Accent colours in the current
Colour Scheme.

The Word 2007 Table Tools > Design Contextual Tab showing Themes in Action
Less immediately obvious is that Styles can be and, by default, are based on Theme elements and that the Theme is
reflected in the Ribbon. Go to the Page Layout tab on the Ribbon, open the Themes
Gallery (from the leftmost icon on the Ribbon), and change your current Theme; for this example, I chose the one
called Verve. You will immediately see the effect in that the Themes icons
themselves change colour. If you then return to the Home tab of the Ribbon you will see that the Styles previewed
there now reflect your chosen Theme.

The Word 2007 Ribbon Home Tab showing the Verve Theme
VBA: Where The Fun Begins!
ColorFormat Objects
There have been amendments and improvements to ColorFormat
objects in Word 2007. But it isn’t entirely straightforward to work with them. More details coming …..
With the introduction of the new colour model in Word 2007, ColorFormat objects
have gained an ObjectThemeColor property (I assume that this, which really refers
to a scheme colour, had to called a theme colour because the name SchemeColor was
already taken). This does work, and it works with the existing TintAndShade property
to allow full access from VBA to the new colour settings. (but see above)
Color Properties
Document elements that do not have a ColorFormat object have had no changes made in
their object model but there have been some changes made to the range of allowable values in their Color properties. Enumeration constants are not provided for the new values so, in order to work
with these colours, it becomes necessary to understand how they are held. The first thing to know is that, where
there is no new interface, Word (in effect, although I cannot be certain of the reality) uses a single storage
area for both the old-style RGB values and the newer scheme references; one
or other value only, not both at the same time, is stored in the same place. Any setting or checking of the stored
value must be able to correctly determine and/or interpret the value and there doesn’t appear to be any
documentation. What follows is based solely on my own observations.
Although one will need to be somewhat technical to fully understand it, I have tried to explain in some detail so
please persevere if you can. One point to note is that I have deliberately used the term ‘significant’ when
describing the positions of bits and bytes to avoid any confusion; if you don’t understand the possible source of
the confusion, and indeed for most practical purposes, you can consider more significant to mean more to the left.
All colours in Word are stored as 32-bit values, made available to VBA via the object model
as Long data types, which can be considered as four separate bytes. Exactly what is
stored can vary but there are two types of value:
-
Absolute colours, stored as 24-bit RGB values, with the most significant byte (or, more
specifically, the most significant bit) set to zero, equating to positive numbers (or zero) when interpreted
as Long values. Each of the primary components of the colour uses one byte:
red, green, and blue in order from least significant to most significant. There are Word enumeration constants,
for example wdColorBlue or wdColorPink, available
for all of the 40 colours in the (pre-2007) basic palette with several extra shades of grey thrown in for good
measure.
A representation of an RGB colour (White in this case) as stored by WordThere is a special RGB value that can be returned to VBA, but
cannot be set through VBA, and which is never held by Word with any special meaning.
This is the colour with the code equating to decimal number 9999999, red 127, green 150, blue 152, a
nondescript sort of grey, which indicates that elements being queried do not all have the same colour. -
Special, referential or relative, values indicating that colours stored, or determined, somewhere else are to
be used. These may be in several different formats but they all have the most significant bit set to one,
equating to negative numbers when interpreted as Long values. The special
values are:-
In all versions of Word, a value of 0xFF000000 (decimal -16777216) means to use an Automatic (normally
contrasting) colour. There is a Word enumeration constant, wdColorAutomatic,
set to this value to facilitate working with it.The «0x» is a techie prefix for a hexadecimal (or just plain hex) number, a number with digits from 0 to 15,
represented by the usual 0 to 9 and then the letters A to F for the values 10 to 15. Hexadecimal notation
is often used as a short way to represent binary numbers, each hexadecimal digit corresponding to a 4-digit
binary number. Relevant here is the hex-digit F which is the same as the binary number 0b1111 (where «0b»
is the techie prefix for a binary number).Each byte in the code for the colour is represented by two hexadecimal digits, corresponding to 8 binary
digits (or bits). Here the most significant has a value of 0xFF and each of
the others has a value of 0x00.
A representation of Word’s storage of the code for Automatic Colour -
In ActiveX controls in documents, and in VBA (for UserForm controls, for example)
special values for system colours (for some reason lost in the mists of time these are also called
OLE Colors) ranging from 0x80000000 to 0x80000018.
There are VBA enumeration constants, for example
vbTitleBarText or vbButtonFace, available for all of these.
A representation of Word’s storage of the code for a system colour (this is the Window Background) -
In Word 2007 — at last, the interesting bit — in Word 2007, new values representing scheme
colours.-
The most significant byte of these can be considered in two halves – sometimes, rather horribly,
called nybbles. The more significant half is set to 0b1101 (0xD or decimal 208) and the less significant
half to a different value (from 0b0100 (0x4) to 0b1111 (0xF)) for each of the scheme colours.The second most significant byte is always set to zero
The remaining two bytes hold two numbers from 255 (0xFF), meaning unchanged, to 0 (0x0), meaning 100%,
representing percentages darker (more significant byte) and lighter (less significant byte). The darker
and lighter percentages cannot both be specified – the percentage darker is ignored if the percentage
lighter is other than 0xFF (lightness unchanged).
A representation of Word 2007’s storage of the code for a Theme Colour (Accent 1)There is a new Enumeration in Word, wdThemeColorIndex, with constants for
each of the scheme colours, with values as per the less significant half of the first byte. This enumeration
also contains constants for the values 0 to 3, called Dark1, Light1, Dark2, and
Light2, which values appear to produce the same colours as
Text1, Background1, Text2, and Background2
respectively. There is also a new Enumeration in Office, msoThemeColorIndex,
again with constants for each of the scheme colours, and again with extra constants for
Dark1, Light1, Dark2, and Light2. The values
of the constants in this enumeration, however, are each 1 greater than the less significant half of the
first byte and the corresponding Word constant.The Word and Office constants serve the same purpose but are for use in different circumstances —
please don’t ask why. Although not their intended purpose, you will see shortly how the Word enumeration
constants can also be used to help in working with Color properties. For reference a complete list is
presented here.A complete list of Word and Office ThemeColorIndex Enumeration Constants
Colour Scheme Element Word Enumeration:
wdThemeColorIndexOffice Enumeration:
msoThemeColorIndexName Number Constant Name Value Constant Name Value Dark 1 0 wdThemeColorMainDark1 0 msoThemeColorDark1 1 Light 1 1 wdThemeColorMainLight1 1 msoThemeColorLight1 2 Dark 2 2 wdThemeColorMainDark2 2 msoThemeColorDark2 3 Light 2 3 wdThemeColorMainLight2 3 msoThemeColorLight2 4 Accent 1 4 wdThemeColorAccent1 4 msoThemeColorAccent1 5 Accent 2 5 wdThemeColorAccent2 5 msoThemeColorAccent2 6 Accent 3 6 wdThemeColorAccent3 6 msoThemeColorAccent3 7 Accent 4 7 wdThemeColorAccent4 7 msoThemeColorAccent4 8 Accent 5 8 wdThemeColorAccent5 8 msoThemeColorAccent5 9 Accent 6 9 wdThemeColorAccent6 9 msoThemeColorAccent6 10 Hyperlink 10 wdThemeColorHyperlink 10 msoThemeColorHyperlink 11 Followed Hyperlink 11 wdThemeColorFollowedHyperlink 11 msoThemeColorFollowedHyperlink 12 Background 1 12 wdThemeColorBackground1 12 msoThemeColorBackground1 14 Text 1 13 wdThemeColorText1 13 msoThemeColorText1 13 Background 2 14 wdThemeColorBackground2 14 msoThemeColorBackground2 16 Text 2 15 wdThemeColorText2 15 msoThemeColorText2 15 wdNotThemeColor -1 msoNotThemeColor 0 msoThemeColorMixed -2 -
-


Setting Color Properties
To set a color property of a font, for example, to an encoded value representing a new Theme colour, you must
somehow calculate the value. I have written a fairly detailed description of how to build code to do this,
more-or-less from scratch but, in order that this page does not become excessively long, I present it on a
separate page. If you are comfortable with the code below, then please continue to read here; if not, then I
recommend a detour via the link below the code:
Sub Colours1()
    Selection.Font.Color = GetThemeColor(ThemeColorIndex:=wdThemeColorAccent2, _
                                         TintAndShade:=0.4)
End Sub


Function GetThemeColor(ThemeColorIndex As wdThemeColorIndex, _
                       TintAndShade As Double) _
         As Long
    Const HexadecimalPrefix As String = "&H"
    Const UseThemeColor     As String = "D"
    Const UnusedZeroByte    As String = "00"
    Const Unchanged         As String = "FF"

    Dim ThemeColor          As String
    Dim LightnessOrDarkness As String

    ThemeColor = Hex$(ThemeColorIndex)

    If TintAndShade >= 0 Then
        LightnessOrDarkness = Unchanged & Right$("0" & Hex$((1 - TintAndShade) * &HFF), 2)
    Else
        LightnessOrDarkness = Right$("0" & Hex$((1 + TintAndShade) * &HFF), 2) & Unchanged
    End If

    GetThemeColor = CLng(HexadecimalPrefix & _
                         UseThemeColor & _
                         ThemeColor & _
                         UnusedZeroByte & _
                         LightnessOrDarkness)
End Function
Code to set the colour of a Font to a Theme colour
 How the code was built
⇒ How the code was built [link to a full explanation of the code on page 2007BuildSet.php on this site]
Querying Color Properties
You should now be able to set colours to any variation on a theme you care to choose, but that is only part of
the picture. Suppose you have set a colour to a variation not shown in the UI, how can you
find out what it is? It is possible to work directly with the numeric values of Color
properties as Long data types but it involves some none-too-obvious calculations.
It is probably easier, and certainly more understandable, to extract the separate hexadecimal values, those used
to set colours in the code above.
As with the code to set a theme colour, the code to do this, to query a colour, the reverse of the code above, is
simply presented here and a detailed description of it is presented on a separate page. The whole process of querying
is more involved than the process of setting, and the code here just extracts, and reports, the numeric codes
relating to the theme, codes which can then be used to obtain more information.
Option Explicit

Enum ColourType
    ColourTypeRGB        = &H0
    ColourTypeAutomatic  = &HFF
    ColourTypeSystem     = &H80
    ColourTypeThemeLow   = &HD0
    ColourTypeThemeHigh  = &HDF
End Enum
Type ColourDetails
    ColourType      As ColourType
    ThemeColorIndex As WdThemeColorIndex
    TintAndShade    As Double
End Type


Sub Colours2()

    With QueryColour(Selection.Cells(1).Shading.BackgroundPatternColor)

        Select Case .ColourType

            Case ColourTypeRGB
                MsgBox "The background of the cell is a standard RGB value"
            Case ColourTypeAutomatic
                MsgBox "The background of the cell is set to Automatic"
            Case ColourTypeSystem
                MsgBox "The background of the cell is set to a Windows system colour"
            Case ColourTypeThemeLow
                MsgBox "The background of the cell is set to Theme colour " & _
                       .ThemeColorIndex & ", with tinting or shading " & .TintAndShade
            Case Else
                MsgBox "The background of the cell is not in a recognised format"

        End Select

    End With

End Sub


Function QueryColour(ColourToTest As Long) _
         As ColourDetails

    Dim ColourToTestHex  As String
    Dim ColourTypeByte   As Byte

    ColourToTestHex = Right$(String$(7, "0") & Hex$(ColourToTest), 8)
    ColourTypeByte = CByte("&H" & Left$(ColourToTestHex, 2))

    Select Case ColourTypeByte

        Case ColourTypeRGB
            QueryColour.ColourType = ColourTypeRGB

        Case ColourTypeAutomatic
            QueryColour.ColourType = ColourTypeAutomatic

        Case ColourTypeSystem
            QueryColour.ColourType = ColourTypeSystem

        Case ColourTypeThemeLow To ColourTypeThemeHigh
            QueryColour = QueryThemeColor(ColourTypeByte, ColourToTestHex)

        Case Else
            QueryColour.ColourType = ColourTypeByte

    End Select

End Function


Function QueryThemeColor(ColourTypeByte As Byte, _
                         ColourToTestHex As String) _
         As ColourDetails

    Const Unchanged      As Byte = &HFF

    Dim LightnessByte    As Byte
    Dim DarknessByte     As Byte

    LightnessByte = CByte("&H" & Mid$(ColourToTestHex, 7, 2))
    DarknessByte = CByte("&H" & Mid$(ColourToTestHex, 5, 2))

    QueryThemeColor.ColourType = ColourTypeByte And &HF0
    QueryThemeColor.ThemeColorIndex = ColourTypeByte And &HF

    If DarknessByte <> Unchanged Then
        QueryThemeColor.TintAndShade = Round(-1 + DarknessByte / &HFF, 2)
    End If

    If LightnessByte <> Unchanged Then
        QueryThemeColor.TintAndShade = Round(1 - LightnessByte / &HFF, 2)
    End If

End Function
Code to query the colour of a Table Cell background set to a Theme colour
How the code was built
⇒ How the code was built [link to a full explanation of the code on page 2007BuildQuery1.php on this site]
I like numbers, but it’s possible that you prefer words; should that be your preference, you might like to see how
the numbers returned by the code above can be made more meaningful. As this is not really an essential part of the
process being presented here, it is all presented on a separate page, which, should you wish, you can see from the
link below. Naturally I encourage you to take a look, but the choice is yours.
How to translate theme colour indexes to words
⇒ How to translate theme colour indexes to words [link to 2007BuildQuery2.php on this site]
Determining the RGB value of a Scheme Colour
Having a code number, or even a name, for a Theme colour is all very well but it would be much better to have the
real, RGB, colour. Themes work by keeping the actual colour details within the Theme and having, as you have seen,
references to them in the colour properties of various objects. It’s now time to look at the Themes themselves.
Every Document edited in Word 2007 has exactly one Theme. If you are working on older documents in compatibility
mode and saving them in Word 97-2003 format, that Theme won’t be saved with the document but it will exist while
the document is being edited. The Theme details in the Document are provided in the
DocumentTheme Object (note that there is also an ActiveTheme property but
it has nothing to do do with Office 2007 Themes) and this is where the fun continues.
The DocumentTheme Object has a ThemeColorScheme
Property that takes a single argument to specify the particular theme colour you want details of. This argument
is of type msoThemeColorSchemeIndex, an enumeration that differs from both the Word,
and the Office, ThemeColorIndex enumerations you have so far seen. Although there
are similarities between the enumerations, there is no logical correlation between them and the only way to
translate one into the other is with some hard code, an example of which can be seen below the table.
| Word Enumeration: wdThemeColorIndex |
Office Enumeration: msoThemeColorSchemeIndex |
||
|---|---|---|---|
| Constant Name | Value | Constant Name | Value |
| wdThemeColorMainDark1* | 0 | msoThemeDark1* | 1 |
| wdThemeColorMainLight1* | 1 | msoThemeLight1* | 2 |
| wdThemeColorMainDark2* | 2 | msoThemeDark2* | 3 |
| wdThemeColorMainLight2* | 3 | msoThemeLight2* | 4 |
| wdThemeColorAccent1 | 4 | msoThemeAccent1 | 5 |
| wdThemeColorAccent2 | 5 | msoThemeAccent2 | 6 |
| wdThemeColorAccent3 | 6 | msoThemeAccent3 | 7 |
| wdThemeColorAccent4 | 7 | msoThemeAccent4 | 8 |
| wdThemeColorAccent5 | 8 | msoThemeAccent5 | 9 |
| wdThemeColorAccent6 | 9 | msoThemeAccent6 | 10 |
| wdThemeColorHyperlink | 10 | msoThemeHyperlink | 11 |
| wdThemeColorFollowedHyperlink | 11 | msoThemeFollowedHyperlink | 12 |
| wdThemeColorBackground1 | 12 | msoThemeLight1 | 2 |
| wdThemeColorText1 | 13 | msoThemeDark1 | 1 |
| wdThemeColorBackground2 | 14 | msoThemeLight2 | 4 |
| wdThemeColorText2 | 15 | msoThemeDark2 | 3 |
You can see from the above table that to find details of the Background1 colour,
for example, you would look at the Light1 colour scheme in the Theme. In Word,
however, although not, as far as I can tell, in any of the other Office applications, this is not guaranteed to
be correct. The actual mapping from the codes used in documents to the theme scheme colours is buried deep in
the VBA behind the document and there is no access to it from either the User interface
or the Word Object Model. Interested readers may care to look at the clrSchemeMapping
element in the Settings Part of the WordProcessingML
Schema, but, as there is nothing you can do about it in code and as it is unlikely ever to be set to anything
other than the default in practice, the possibility will not be considered further here. It is just worth noting
that the mappings that can be set do not include the first four, marked with asterisks above: these mappings
are hard-wired in Word, and are guaranteed.
Armed with the translation you can now write a simple procedure to return the code you need to gain access to the
theme details:
Function ThemeColorSchemeIndex(ThemeColorIndex As WdThemeColorIndex) _
         As MsoThemeColorSchemeIndex

    Select Case ThemeColorIndex
        Case wdThemeColorMainDark1:         ThemeColorSchemeIndex = msoThemeDark1
        Case wdThemeColorMainLight1:        ThemeColorSchemeIndex = msoThemeLight1
        Case wdThemeColorMainDark2:         ThemeColorSchemeIndex = msoThemeDark2
        Case wdThemeColorMainLight2:        ThemeColorSchemeIndex = msoThemeLight2
        Case wdThemeColorAccent1:           ThemeColorSchemeIndex = msoThemeAccent1
        Case wdThemeColorAccent2:           ThemeColorSchemeIndex = msoThemeAccent2
        Case wdThemeColorAccent3:           ThemeColorSchemeIndex = msoThemeAccent3
        Case wdThemeColorAccent4:           ThemeColorSchemeIndex = msoThemeAccent4
        Case wdThemeColorAccent5:           ThemeColorSchemeIndex = msoThemeAccent5
        Case wdThemeColorAccent6:           ThemeColorSchemeIndex = msoThemeAccent6
        Case wdThemeColorHyperlink:         ThemeColorSchemeIndex = msoThemeHyperlink
        Case wdThemeColorHyperlinkFollowed: ThemeColorSchemeIndex = msoThemeFollowedHyperlink
        Case wdThemeColorBackground1:       ThemeColorSchemeIndex = msoThemeLight1
        Case wdThemeColorText1:             ThemeColorSchemeIndex = msoThemeDark1
        Case wdThemeColorBackground2:       ThemeColorSchemeIndex = msoThemeLight2
        Case wdThemeColorText2:             ThemeColorSchemeIndex = msoThemeDark2
        Case Else:
    End Select

End Function
Once you have this color scheme index, the (base) RGB value is directly accessible and all
that remains is to apply the specified tinting or shading. As you probably expect by now, this isn’t an entirely
straightforward operation, and it requires you to take a walk in colour space and use the HSL (Hue, Saturation, Luminance) colour model. Once again, full details of this are on a separate page:
Code to convert to and from HSL and apply tinting or shading
⇒ Code to convert to and from HSL and apply tinting or shading [link to ColourSpace.php on this site]
You have now seen all the elements necessary to determine the red, green, and blue components of a colour applied
via a theme. The complete code, built up in pieces over the course of this rather long and rambling monologue, and
with a couple of final amendments, is presented below. I am working on providing a downloadable sample document,
which should be available soon; please check back in a day or two.
Option Explicit

Private Enum ColourType
    ColourTypeRGB = &H0
    ColourTypeAutomatic = &HFF
    ColourTypeSystem = &H80
    ColourTypeThemeLow = &HD0
    ColourTypeThemeHigh = &HDF
End Enum
Private Type ColourDetails
    ColourType      As ColourType
    ThemeColorIndex As WdThemeColorIndex
    TintAndShade    As Double
    RGB             As Long
End Type

Private Type HSL
    H As Double     S As Double     L As Double End Type


Sub Colours2()

    Dim ResultRGB As Long
    Dim ResultHex As String

    With QueryColour(Selection.Cells(1).Shading.BackgroundPatternColor)

        Select Case .ColourType

            Case ColourTypeRGB
                MsgBox "The background of the cell is a standard RGB value"
            Case ColourTypeAutomatic
                MsgBox "The background of the cell is set to Automatic"
            Case ColourTypeSystem
                MsgBox "The background of the cell is set to a Windows system colour"
            Case ColourTypeThemeLow
                MsgBox "The background of the cell is set to: " & _
                       ThemeColorName(.ThemeColorIndex) & _
                       TintAndShadeText(.TintAndShade) & vbNewLine & _
                       "The actual colour is: RGB(" & (.RGB And &HFF&) & _
                                     ", " & (.RGB And &HFF00&) / &H100& & _
                                     ", " & (.RGB And &HFF0000) / &H10000 & ")"
            Case Else
                MsgBox "The background of the cell is not in a recognised format"

        End Select

    End With

End Sub


Private Function QueryColour(ColourToTest As Long) _
                 As ColourDetails

    Dim ColourToTestHex  As String
    Dim ColourTypeByte   As Byte

    ColourToTestHex = Right$(String$(7, "0") & Hex$(ColourToTest), 8)
    ColourTypeByte = CByte("&H" & Left$(ColourToTestHex, 2))

    Select Case ColourTypeByte

        Case ColourTypeRGB
            QueryColour.ColourType = ColourTypeRGB

        Case ColourTypeAutomatic
            QueryColour.ColourType = ColourTypeAutomatic

        Case ColourTypeSystem
            QueryColour.ColourType = ColourTypeSystem

        Case ColourTypeThemeLow To ColourTypeThemeHigh
            QueryColour = QueryThemeColor(ColourTypeByte, ColourToTestHex)

        Case Else
            QueryColour.ColourType = ColourTypeByte

    End Select

End Function


Private Function QueryThemeColor(ColourTypeByte As Byte, _
                                 ColourToTestHex As String) _
                 As ColourDetails

    Const Unchanged      As Byte = &HFF

    Dim LightnessByte    As Byte
    Dim DarknessByte     As Byte

    LightnessByte = CByte("&H" & Mid$(ColourToTestHex, 7, 2))
    DarknessByte = CByte("&H" & Mid$(ColourToTestHex, 5, 2))

    QueryThemeColor.ColourType = ColourTypeByte And &HF0
    QueryThemeColor.ThemeColorIndex = ColourTypeByte And &HF

    If DarknessByte <> Unchanged Then
        QueryThemeColor.TintAndShade = Round(-1 + DarknessByte / &HFF, 2)
    End If

    If LightnessByte <> Unchanged Then
        QueryThemeColor.TintAndShade = Round(1 - LightnessByte / &HFF, 2)
    End If

    QueryThemeColor.RGB = GetRGB(QueryThemeColor.ThemeColorIndex, _
                                 QueryThemeColor.TintAndShade)

End Function


Private Function GetRGB(ThemeColorIndex As WdThemeColorIndex, _
                        TintAndShade As Double) _
                 As String

    Dim ColorSchemeIndex    As MsoThemeColorSchemeIndex
    Dim ColorSchemeRGB      As Long
    Dim ColorSchemeHSL      As HSL
    Dim TintedAndShadedRGB  As Long

    ColorSchemeIndex = ThemeColorSchemeIndex(ThemeColorIndex)
    ColorSchemeRGB = ActiveDocument.DocumentTheme. _
                         ThemeColorScheme(ColorSchemeIndex).RGB

    ColorSchemeHSL = RGBtoHSL(ColorSchemeRGB)
    ColorSchemeHSL.L = (ColorSchemeHSL.L * (Abs(TintAndShade))) + _
                       (Abs(TintAndShade > 0) * (1 - TintAndShade))

    TintedAndShadedRGB = HSLtoRGB(ColorSchemeHSL)

    GetRGB = TintedAndShadedRGB

End Function


Private Function ThemeColorSchemeIndex(ThemeColorIndex As WdThemeColorIndex) _
                 As MsoThemeColorSchemeIndex

    Select Case ThemeColorIndex
        Case wdThemeColorMainDark1:         ThemeColorSchemeIndex = msoThemeDark1
        Case wdThemeColorMainLight1:        ThemeColorSchemeIndex = msoThemeLight1
        Case wdThemeColorMainDark2:         ThemeColorSchemeIndex = msoThemeDark2
        Case wdThemeColorMainLight2:        ThemeColorSchemeIndex = msoThemeLight2
        Case wdThemeColorAccent1:           ThemeColorSchemeIndex = msoThemeAccent1
        Case wdThemeColorAccent2:           ThemeColorSchemeIndex = msoThemeAccent2
        Case wdThemeColorAccent3:           ThemeColorSchemeIndex = msoThemeAccent3
        Case wdThemeColorAccent4:           ThemeColorSchemeIndex = msoThemeAccent4
        Case wdThemeColorAccent5:           ThemeColorSchemeIndex = msoThemeAccent5
        Case wdThemeColorAccent6:           ThemeColorSchemeIndex = msoThemeAccent6
        Case wdThemeColorHyperlink:         ThemeColorSchemeIndex = msoThemeHyperlink
        Case wdThemeColorHyperlinkFollowed: ThemeColorSchemeIndex = msoThemeFollowedHyperlink
        Case wdThemeColorBackground1:       ThemeColorSchemeIndex = msoThemeLight1
        Case wdThemeColorText1:             ThemeColorSchemeIndex = msoThemeDark1
        Case wdThemeColorBackground2:       ThemeColorSchemeIndex = msoThemeLight2
        Case wdThemeColorText2:             ThemeColorSchemeIndex = msoThemeDark2
        Case Else:
    End Select

End Function


Private Function RGBtoHSL(RGB As Long) As HSL

    Dim R As Double     Dim G As Double     Dim B As Double
    Dim RGB_Max  As Double
    Dim RGB_Min  As Double
    Dim RGB_Diff As Double

    Dim HexString As String

    HexString = Right$(String$(7, "0") & Hex$(RGB), 8)
    R = CDbl("&H" & Mid$(HexString, 7, 2)) / 255
    G = CDbl("&H" & Mid$(HexString, 5, 2)) / 255
    B = CDbl("&H" & Mid$(HexString, 3, 2)) / 255

    RGB_Max = R
    If G > RGB_Max Then RGB_Max = G
    If B > RGB_Max Then RGB_Max = B

    RGB_Min = R
    If G < RGB_Min Then RGB_Min = G
    If B < RGB_Min Then RGB_Min = B

    RGB_Diff = RGB_Max - RGB_Min

    With RGBtoHSL

        .L = (RGB_Max + RGB_Min) / 2

        If RGB_Diff = 0 Then

            .S = 0
            .H = 0

        Else

            Select Case RGB_Max
                Case R: .H = (1 / 6) * (G - B) / RGB_Diff - (B > G)
                Case G: .H = (1 / 6) * (B - R) / RGB_Diff + (1 / 3)
                Case B: .H = (1 / 6) * (R - G) / RGB_Diff + (2 / 3)
            End Select

            Select Case .L
                Case Is < 0.5: .S = RGB_Diff / (2 * .L)
                Case Else:     .S = RGB_Diff / (2 - (2 * .L))
            End Select

        End If

    End With

End Function


Private Function HSLtoRGB(HSL As HSL) As Long

    Dim R As Double
    Dim G As Double
    Dim B As Double

    Dim X As Double
    Dim Y As Double

    With HSL

        If .S = 0 Then

            R = .L
            G = .L
            B = .L

        Else

            Select Case .L
                Case Is < 0.5: X = .L * (1 + .S)
                Case Else:     X = .L + .S - (.L * .S)
            End Select

            Y = 2 * .L - X

            R = H2C(X, Y, IIf(.H > 2 / 3, .H - 2 / 3, .H + 1 / 3))
            G = H2C(X, Y, .H)
            B = H2C(X, Y, IIf(.H < 1 / 3, .H + 2 / 3, .H - 1 / 3))

        End If

    End With

    HSLtoRGB = CLng("&H00" & _
                    Right$("0" & Hex$(Round(B * 255)), 2) & _
                    Right$("0" & Hex$(Round(G * 255)), 2) & _
                    Right$("0" & Hex$(Round(R * 255)), 2))

End Function


Private Function H2C(X As Double, Y As Double, HC As Double) As Double

    Select Case HC
        Case Is < 1 / 6: H2C = Y + ((X - Y) * 6 * HC)
        Case Is < 1 / 2: H2C = X
        Case Is < 2 / 3: H2C = Y + ((X - Y) * ((2 / 3) - HC) * 6)
        Case Else:       H2C = Y
    End Select

End Function


Function ThemeColorName(ThemeColorIndex As WdThemeColorIndex, _
                        Optional LanguageId As MsoLanguageID) _
         As String

    If LanguageId = 0 Then
        LanguageId = LanguageSettings.LanguageId(msoLanguageIDUI)
    End If

    Select Case LanguageId

        Case msoLanguageIDDutch

            Select Case ThemeColorIndex
                Case wdThemeColorMainDark1:         ThemeColorName = "Donker 1"
                Case wdThemeColorMainLight1:        ThemeColorName = "Licht 1"
                Case wdThemeColorMainDark2:         ThemeColorName = "Donker 2"
                Case wdThemeColorMainLight2:        ThemeColorName = "Licht 2"
                Case wdThemeColorAccent1:           ThemeColorName = "Accent 1"
                Case wdThemeColorAccent2:           ThemeColorName = "Accent 2"
                Case wdThemeColorAccent3:           ThemeColorName = "Accent 3"
                Case wdThemeColorAccent4:           ThemeColorName = "Accent 4"
                Case wdThemeColorAccent5:           ThemeColorName = "Accent 5"
                Case wdThemeColorAccent6:           ThemeColorName = "Accent 6"
                Case wdThemeColorHyperlink:         ThemeColorName = "Hyperlink"
                Case wdThemeColorHyperlinkFollowed: ThemeColorName = "Gevolgde Hyperlink"
                Case wdThemeColorBackground1:       ThemeColorName = "Achtergrond 1"
                Case wdThemeColorText1:             ThemeColorName = "Tekst 1"
                Case wdThemeColorBackground2:       ThemeColorName = "Achtergrond 2"
                Case wdThemeColorText2:             ThemeColorName = "Tekst 2"
                Case Else:                          ThemeColorName = "Onbekent " & ThemeColorIndex
            End Select

        Case msoLanguageIDFrench

            Select Case ThemeColorIndex
                Case wdThemeColorMainDark1:         ThemeColorName = "Sombre 1"
                Case wdThemeColorMainLight1:        ThemeColorName = "Clair 1"
                Case wdThemeColorMainDark2:         ThemeColorName = "Sombre 2"
                Case wdThemeColorMainLight2:        ThemeColorName = "Clair 2"
                Case wdThemeColorAccent1:           ThemeColorName = "Accentuation 1"
                Case wdThemeColorAccent2:           ThemeColorName = "Accentuation 2"
                Case wdThemeColorAccent3:           ThemeColorName = "Accentuation 3"
                Case wdThemeColorAccent4:           ThemeColorName = "Accentuation 4"
                Case wdThemeColorAccent5:           ThemeColorName = "Accentuation 5"
                Case wdThemeColorAccent6:           ThemeColorName = "Accentuation 6"
                Case wdThemeColorHyperlink:         ThemeColorName = "Lien hypertexte"
                Case wdThemeColorHyperlinkFollowed: ThemeColorName = "Lien hypertexte visit�"
                Case wdThemeColorBackground1:       ThemeColorName = "Arri�re-plan 1"
                Case wdThemeColorText1:             ThemeColorName = "Texte 1"
                Case wdThemeColorBackground2:       ThemeColorName = "Arri�re-plan 2"
                Case wdThemeColorText2:             ThemeColorName = "Texte 2"
                Case Else:                          ThemeColorName = "Inconnu " & ThemeColorIndex
            End Select

        Case Else
            Select Case ThemeColorIndex
                Case wdThemeColorMainDark1:         ThemeColorName = "Dark 1"
                Case wdThemeColorMainLight1:        ThemeColorName = "Light 1"
                Case wdThemeColorMainDark2:         ThemeColorName = "Dark 2"
                Case wdThemeColorMainLight2:        ThemeColorName = "Light 2"
                Case wdThemeColorAccent1:           ThemeColorName = "Accent 1"
                Case wdThemeColorAccent2:           ThemeColorName = "Accent 2"
                Case wdThemeColorAccent3:           ThemeColorName = "Accent 3"
                Case wdThemeColorAccent4:           ThemeColorName = "Accent 4"
                Case wdThemeColorAccent5:           ThemeColorName = "Accent 5"
                Case wdThemeColorAccent6:           ThemeColorName = "Accent 6"
                Case wdThemeColorHyperlink:         ThemeColorName = "Hyperlink"
                Case wdThemeColorHyperlinkFollowed: ThemeColorName = "Followed Hyperlink"
                Case wdThemeColorBackground1:       ThemeColorName = "Background 1"
                Case wdThemeColorText1:             ThemeColorName = "Text 1"
                Case wdThemeColorBackground2:       ThemeColorName = "Background 2"
                Case wdThemeColorText2:             ThemeColorName = "Text 2"
                Case Else:                          ThemeColorName = "Unknown " & ThemeColorIndex
            End Select

    End Select

End Function


Function TintAndShadeText(TintAndShade As Double, _
                          Optional LanguageId As MsoLanguageID) _
         As String

    If LanguageId = 0 Then
        LanguageId = LanguageSettings.LanguageId(msoLanguageIDUI)
    End If

    Select Case TintAndShade

        Case 0

            TintAndShadeText = ""

        Case Is > 0

            Select Case LanguageId
                Case msoLanguageIDDutch
                    TintAndShadeText = ", lichter "
                Case msoLanguageIDFrench
                    TintAndShadeText = ", plus clair "
                Case Else
                    TintAndShadeText = ", lighter "
            End Select

            TintAndShadeText = TintAndShadeText & TintAndShade * 100 & "%"

        Case Is < 0

            Select Case LanguageId
                Case msoLanguageIDDutch
                    TintAndShadeText = ", donkerder "
                Case msoLanguageIDFrench
                    TintAndShadeText = ", plus sombre "
                Case Else
                    TintAndShadeText = ", darker "
            End Select

            TintAndShadeText = TintAndShadeText & TintAndShade * -100 & "%"

    End Select

End Function
At last, The End!
When you’re using your computer, tablet or mobile phone, you probably customize it to reflect your preferences and your unique personality. You use certain colors that you like or hues that reflect your mood. However, do you know that you can also customize MS Office color schemes?
All Microsoft Office apps have color schemes that you can apply to documents, spreadsheets, and presentations. However, these aren’t just for the text. These built-in color schemes are also applied to many elements within your Office program. These elements include the shapes, tables, fonts, etc. The preset color schemes, however, may not be exactly what you want. One or two or even more colors in the scheme may not exactly be what you want. With this tutorial, we can show you how you can change these and fully customize your color scheme in Microsoft Office.
Customize Your Office Color Scheme
To customize your Microsoft Office programs by changing its color scheme, you can start by just opening any Microsoft Office app. In this tutorial, we’ll use MS Word.
Open a Word document and go to the Design tab in the Ribbon. Here, there’s a Colors button with a drop-down menu. Once you click on the arrow, you’ll see a list of color scheme options that you can choose from. Choose the color scheme you like best from this list, even if it has a couple of off colors that you don’t like.
Once you’ve chosen the color scheme, it will automatically be applied to your document. Then, open the same Colors list again, and this time, select the Customize Colors option at the end of the list. This option will open a new window, showing your current color scheme and how you can customize it.
Choose Your Own Colors for Microsoft Office
This new window, called Create New Theme Colors, will show you how each of the colors in the color scheme is used in various elements of the document. The window shows two columns, one for the Theme colors that you have selected or will select, and the other column shows the sample.
Under Theme Colors, you can see the color scheme you have chosen and their description. This is where you can change up your preset color scheme so it can be exactly how you want it to be. You can play around with all the colors and immediately see how the color combinations will look in the ‘Sample’ section.
Once you’re done choosing your colors, you can then go to the bottom of the window and name your very own color scheme. Then, click on the Save button.
Now, your customized color scheme will take in effect automatically. You can further change your color scheme or create new ones anytime following the same process. You can also apply the same process in other Office applications, such as Excel and PowerPoint.

In Microsoft Office Word, there are 3 defaults color scheme – Blue, Silver and Black. You can switch to these colors from the Word Options under the General tab. You can open the Word Options from Tab > Options.

Blue Color Scheme.

Silver Color Scheme.

Black Color Scheme.

word color scheme
You May Also Like