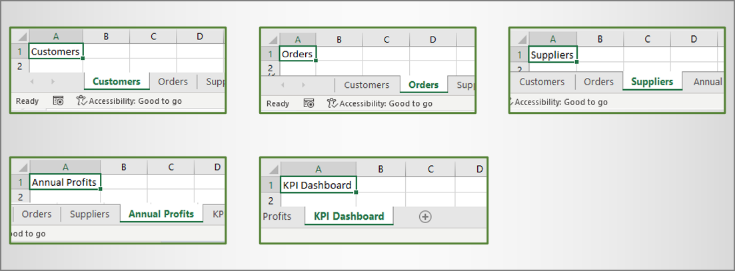
“I’m not a builder of buildings, I’m a builder of collections” – Leonard Lauder
A Quick Guide to Collections
| Task | Examples |
|---|---|
| Declare | Dim coll As Collection |
| Create at run time | Set coll = New Collection |
| Declare and Create | Dim coll As New Collection |
| Add item | coll.Add «Apple» |
| Access item | coll(1) or coll(2) |
| Access item added first | coll(1) |
| Access item added last | coll(coll.Count) |
| Get number of items | coll.Count |
| Access all items(For) | Dim i As Long For i = 1 To coll.Count Debug.Print coll(i) Next i |
| Access all items(For Each) | Dim fruit As Variant For Each fruit In coll Debug.Print fruit Next fruit |
| Remove item | coll.Remove(1) |
| Remove all Items | Set coll = New Collection |
Introduction
Collections are a very important part of VBA. If you have used the language for any length of time then you will have used Collections. The most common ones are the Workbooks, Worksheets, Range and Cells collections.
The following code shows some examples of using the VBA Workbooks collection:
    ' Workbooks is a collection of all open workbooks

    ' Count is the number of workbooks in the collection
    Debug.Print Workbooks.Count

    ' Print the full name of the workbook called Example.xlsm
    Debug.Print Workbooks("Example.xlsm").FullName

    ' Print the full name of the workbook that was opened second
    Debug.Print Workbooks(2).FullName
Collections are similar to arrays so it is important to understand what they are and how the differ to arrays.
Download the Code
Collections Webinar
If you are a member of the website, click on the image below to view the webinar.
(Note: Website members have access to the full webinar archive.)
What is a Collection?
Collections and arrays are both used to group variables. They both store a set of similar items e.g. a list of student marks or country names. Using a collection or array allows you to quickly and easily manipulate a large number of items.
In my post on arrays, I explained in simple terms what arrays are and why they are so useful. I will briefly recap this information here.
If you were storing the marks of one student then you can easily do this using a single variable
    Dim mark As Long
    mark = sheetMarks.Range("A1")
However most of the time you will have more than one student to deal with. Imagine you want to store the marks of 100 students. If you didn’t use collections or arrays you would need to create a hundred variables – one variable to store the mark for each student.
Another problem is that you have to use these variables individually. If you want to store 100 marks then you need a line of code each time you want to store a value to a variable.
    ' Declare a variable for each mark
    Dim mark1 As Long
    Dim mark2 As Long
    .
    .
    .
    Dim mark100 As Long

    ' Store the marks from the worksheet in a variable
    mark1 = sheetMarks.Range("A1")
    mark2 = sheetMarks.Range("A2")
    .
    .
    .
    mark100 = sheetMarks.Range("A100")
As you can see in the above example, writing code like this would mean hundreds of lines of repetitive code. When you use a collection or array you only need to declare one variable. Using a loop with a collection or with arrays means you only need one line for add or reading values.
If we rewrite the above example using a collection then we only need a few lines of code:
    ' Create collection
    Dim collMarks As New Collection

    ' Read 100 values to collection
    Dim c As Range
    For Each c In Sheet1.Range("A1:A100")
        ' This line is used to add all the values
        collMarks.Add c.Value
    Next
Collections Vs Arrays?
We have looked at what collections and arrays have in common. So what is the difference and why use one over the other?
The main difference is that with an array you normally set the size once. This means that you know the size before you start adding elements. Let me explain this with an example.
Example: Where an Array is Better
Imagine you have a worksheet of student marks with one student per row:
Student Marks
You want to store information about each student. In this example, you can easily count the number of rows to get the number of students. In other words, you know the number of items in advance.
In the example code you can see that we get the number of students by counting the rows. We can then use this to create an array of the correct size:
    ' Get last row - this is the number of students
    Dim lStudentCount As Long
    lStudentCount = Sheet1.Range("A" & Rows.Count).End(xlUp).Row

    ' Create array of correct size
    Dim arr() As Long
    ReDim arr(1 To lStudentCount)
Let us now look at a second example where we don’t know the number of items in advance
Example Where a Collection is Better
In this example we have the same student worksheet but this time we only want students with a given criteria. For example, only the students from the USA or England that study Maths or History. In other words, you will not know how to select a student until you read their details from the worksheet.
Imagine also that students can be added or removed from the list as the application runs.
So in this example the number of students is not fixed and changes a lot. Here you do not know the number of students in advance. Therefore you do not know what size array to create.
You could create an array of the biggest possible size. The problem is you would have a lot of empty slots and would have to add code to deal with these. If you read 50 students from a max of 1000 then you would have 950 unused array slots.
You could also resize the array for each item as it is added. This is very inefficient and quite messy to do.
So for this example using a collection would be better.
    ' Declare
    Dim coll As New Collection

    ' Add item - VBA looks after resizing
    coll.Add "Apple"
    coll.Add "Pear"

    ' remove item - VBA looks after resizing
    coll.Remove 1
When you add or remove an item to a collection VBA does all the resizing for you. You don’t have to specify the size or allocate new spaces. VBA does it under the hood. All you have to do is add an item or remove it.
Another Advantage of Collections
Collections are much easier to use than arrays especially if you are new to programming. Most of the time you do three things with collections:
- Create the collection
- Add some items
- Read through the items
So if you are not dealing with a larger number of items then using a Collection can be much neater to use.
A Disadvantage of Collections
Basic data types(i.e. variables like string, date, long, currency etc.) in a Collections are read-only.You can add or remove an item but you cannot change the value of the item. If you are going to be changing the values in a group of items then you will need to use an array.
If you are storing an object in a Collection then you can change the value as the Collection stores a reference rather than the actual object.
Now that we know when and why to use a collection let’s look at how to use one.
You can learn more about Collection vs Arrays in this video…
How to Create a Collection
You can declare and create in one line as the following code does
    ' Declare and create
    Dim coll As New Collection
As you can see you don’t need to specify the size. Once your collection has been created you can easily add items to it.
You can also declare and then create the collection if and when you need it.
' Declare
Dim coll As Collection

' Create Collection
Set coll = New Collection
Minor Difference Between These Methods
The difference between these methods is that for the first one the collection is always created. For the second method the collection is only created when the Set line is reached. So you could set the code to only create the collection if a certain condition was met
    ' Declare
    Dim coll As Collection

    ' Create Collection if a file is found
    If filefound = True Then
        Set coll = New Collection
    Endif
The advantage to using this method is minimal. Allocating memory was important back in the 1990’s when computer memory was limited. Unless you are creating a huge number of collections on a slow PC you will never notice any benefit.
Use Set means the collection will behave differently than when you set the collection to nothing. The next section explains this.
Check out the video below to learn more about Collections…
Removing All items from a Collection
The Collection does not have a RemoveAll function. However to remove all items from a collection you can simply set it to a new collection:
Set Coll = New Collection.
VBA will delete the collection because we are no longer referencing it. When we remove all items we generally want to use the collection again so we are effectively killing two birds with one stone by using this method:
' https://excelmacromastery.com/
Sub DeleteCollection()

    Dim coll1 As New Collection

    coll1.Add "apple"
    coll1.Add "pear"

    ' The original collection is deleted
    Set coll1 = New Collection

End Sub
One subtle thing to keep in mind is that if we have two or more variables which reference the same collection then it will not be deleted(see cleaning up memory in VBA).
In the example below the original collection items are not deleted because it is still referenced by coll2
' https://excelmacromastery.com/
Sub CollectionNotDeleted()

    Dim coll1 As New Collection, coll2 As Collection

    coll1.Add "apple"
    coll1.Add "pear"

    ' Coll1 and Coll2 both reference the collection
    Set coll2 = coll1

    ' Coll1 now references a new collection
    Set coll1 = New Collection

    ' Coll2 refers to the original collection - prints apple
    Debug.Print coll2(1)

End Sub
Adding items to a Collection
It is simple to add items to a collection. You use the add property followed by the value you wish to add
    collFruit.Add "Apple"
    collFruit.Add "Pear"
You can have any basic type in a collection such as a Double
   collTotals.Add 45.67
   collTotals.Add 34.67
When you add items in this manner they are added to the next available index. In the fruit example, Apple is added to position 1 and Pear to position 2.
Before and After
You can use the Before or After parameters to specify where you want to place the item in the collection. Note you cannot use both of these arguments at the same time.
    collFruit.Add "Apple"
    collFruit.Add "Pear"
    ' Add lemon before first item
    collFruit.Add "Lemon", Before:=1
After this code the collection is in the order:
1. Lemon
2. Apple
3. Pear
    collFruit.Add "Apple"
    collFruit.Add "Pear"
    ' Add lemon after first item
    collFruit.Add "Lemon", After:=1
After this code the collection is in the order:
1. Apple
2. Lemon
3. Pear
Accessing Items of a Collection
To Access the items of a collection you simply use the index. As we saw the index is the position of the item in the collection based on the order they were added.
The order can also be set using the Before or After parameter.
' https://excelmacromastery.com/
Sub access()

    Dim coll As New Collection

    coll.Add "Apple"
    coll.Add "Pear"

    ' Will print Apple
    Debug.Print coll(1)

    ' Add orange first
    coll.Add "Orange", Before:=1

    ' Will print Orange
    Debug.Print coll(1)

    ' Will print Apple as it is now in position 2
    Debug.Print coll(2)

End Sub
You can also use the Item Property to access an item in the collection. It is the default method of the collection so the following lines of code are equivalent:
    Debug.Print coll(1)
    Debug.Print coll.Item(1)
Are Items in a Collection Read-Only?
This is a very important point. When a basic data type is stored in a Collection it is read-only. A basic data type is a string, date, integer, long etc.
If you try to update a Collection item you will get an error. The following code produces an “object required” error:
' https://excelmacromastery.com/
Sub WriteValue()

    Dim coll As New Collection

    coll.Add "Apple"

    ' This line causes an ERRROR
    coll(1) = "Pear"

End Sub
However you can change the class object that is stored in a Collection:
' Demonstrates that a class object can be updated in a collection.
' https://excelmacromastery.com/excel-vba-collections/
Sub ChangeObject()

    Dim coll As New Collection
    Dim o As New Class1

    ' set value of fruit member of the class
    o.fruit = "Apple"

    ' Add object to collection
    coll.Add o

    ' Prints Apple
    Debug.Print "Object fruit is " & coll(1).fruit

    ' Change the fruit part of class1 object
    coll(1).fruit = "Pear"

    ' Prints pear
    Debug.Print "Object fruit is " & coll(1).fruit

End Sub
This may seem like contradictory behaviour, but there is a good reason. Any item that is added to a Collection is read-only. However, when you add an object to a Collection, the object is not added as the item. A variable with the memory address of the object is added as the item.
This happens seamlessly so that you don’t notice it. The item variable is actually read-only but the object it points to is not.
All you need to remember is that basic data types in a Collection are read-only. Objects in a Collection can be changed.
You can read more about objects in memory here.
Adding different types
You can also add different types of items to a collection.
    collFruit.Add "Apple"
    collFruit.Add 45
    collFruit.Add #12/12/2017#
This is seldom needed. In VBA the Sheets collections contains sheets of type Worksheet and of type Chart. (To create a Chart sheet simple right click on any Chart, select Move and select the radio button for New sheet).
The following code displays the type and name of all the sheets in the current workbook. Note to access different type you need the For Each variable to be a variant or you will get an error:
' https://excelmacromastery.com/
Sub ListSheets()

    Dim sh As Variant
    For Each sh In ThisWorkbook.Sheets
        ' Display type and name of sheet
        Debug.Print TypeName(sh), sh.Name
    Next

End Sub
When you access different items the For Each variable must be a variant. If it’s not you will get an error when you access a different type than you declared. If we declared sh as a worksheet in the above example it would give an error when we try to access a sheet of type Chart.
It is rare that you would need a collection of different types but as you can see sometimes it can be useful.
Adding Items Using a Key
You can also add items using a key as the next example shows:
collMark.Add Item:=45, Key:="Bill"

Debug.Print "Bill's Marks are: ",collMark("Bill")
I included the parameter names to make the above example clear. However you don’t need to do this. Just remember the key is the second parameter and must be a unique string.
The following code shows a second example of using keys:
' https://excelmacromastery.com/
Sub UseKey()

    Dim collMark As New Collection

    collMark.Add 45, "Bill"
    collMark.Add 67, "Hank"
    collMark.Add 12, "Laura"
    collMark.Add 89, "Betty"

    ' Print Betty's marks
    Debug.Print collMark("Betty")

    ' Print Bill's marks
    Debug.Print collMark("Bill")

End Sub
Using keys is has three advantages:
- If the order changes your code will still access the correct item
- You can directly access the item without reading through the entire collection
- It can make you code more readable
In the VBA Workbooks collection it is much better to access the workbook by the key(name) than by the index. The order is dependent on the order they were opened and so is quite random:
' https://excelmacromastery.com/
Sub UseAWorkbook()

    Debug.Print Workbooks("Example.xlsm").Name

    Debug.Print Workbooks(1).Name

End Sub
When to Use Keys
An example of when to use keys is as follows: Imagine you have a collection of IDs for a 10,000 students along with their marks.
You also have a number of worksheet reports that have lists of student IDs. For each of these worksheets you need to print the mark for each student.
You could do this by adding the 10,000 students to a collection using their student id as they key. When you read an ID from the worksheet you can directly access this student’s marks.
If you didn’t use a key you would have to search through 10,000 IDs for each ID on the report.
The Shortcoming of Using Keys in Collections
There are two shortcomings of keys in Collections
- You cannot check if the Key exists.
- You cannot update the value stored at the Key unless it is an object.
The first issue is easy to get around. The following code checks if a key exists
' https://excelmacromastery.com/
Function Exists(coll As Collection, key As String) As Boolean

    On Error Goto EH

    IsObject (coll.Item(key))

    Exists = True
EH:
End Function
You can use it like this:
' https://excelmacromastery.com/
Sub TestExists()

    Dim coll As New Collection
    coll.Add Item:=5, key:="Apple"
    coll.Add Item:=8, key:="Pear"

    ' Prints true
    Debug.Print Exists(coll, "Apple")
    ' Prints false
    Debug.Print Exists(coll, "Orange")
    ' Prints true
    Debug.Print Exists(coll, "Pear")

End Sub
The second issue is that it is not possible to update a value in a Collection. However, we can update an object and the reason for this is that the collection doesn’t actually store the object. It stores the address of the object.
If you need to update a basic value like a long, string etc. then it’s not possible. You have to remove the item and add a new one.
If you wish to use keys there is an alternative to the Collection. You can use the Dictionary. The Dictionary provides more functionality to work with keys. You can check if keys exist, update the values at keys, get a list of the keys and so on.
Check out this video to see more about Dictionary vs Collection…
Check if an item exists in a Collection
There is no built-in function for checking if an item exists in the collection. One way to do it is to read through all the items in a collection and check them individually. This is very inefficient particularly if you’re dealing with a large dataset:
' This method is slow but works if multiple items
Function Exists(coll As Collection, checkItem As String) As Boolean
    Dim item As Variant
    For Each item In coll
        If item = checkItem Then
            Exists = True
            Exit For
        End If
    Next item
End Function
If the values in the collection are unique then we can add the item as a key and use the function below to see if the key exists:
' https://excelmacromastery.com/
Function Exists(coll As Collection, key As String) As Boolean

    On Error Goto EH

    IsObject (coll.Item(key))

    Exists = True
EH:
End Function
Sub TestExists()

    Dim coll As New Collection

    ' Add items using parameter names to make it clearer
    coll.Add Item:="Apple", key:="Apple"
    ' Works the same without the parameter names
    coll.Add "Orange", "Orange"

    Debug.Print "Apple exists is " & Exists(coll, "Apple")
    Debug.Print "Pear exists is " & Exists(coll, "Pear")

End Sub
Accessing all items in a Collection
To access all the items in a collection you can use a For loop or a For Each loop. Let’s look at these individually.
Using the For Loop
With a normal For Loop, you use the index to access each item. The following example prints the name of all the open workbooks
' https://excelmacromastery.com/
Sub AllWorkbook()

    Dim i As Long
    For i = 1 To Workbooks.Count
        Debug.Print Workbooks(i).Name
    Next i

End Sub
You can see that we use the range of 1 to Workbooks.Count. The first item is always in position one and the last item is always in the position specified by the Count property of the collection.
The next example prints out all the items in a user-created collection:
' https://excelmacromastery.com/
Sub UserCollection()

    ' Declare and Create collection
    Dim collFruit As New Collection

    ' Add items
    collFruit.Add "Apple"
    collFruit.Add "Pear"
    collFruit.Add "Plum"

    ' Print all items
    Dim i As Long
    For i = 1 To collFruit.Count
        Debug.Print collFruit(i)
    Next i

End Sub
Using the For Each
The For Each loop that is a specialised loop the is used for Collections. It doesn’t use the index and the format is shown in the following example:
' https://excelmacromastery.com/
Sub AllWorkbookForEach()

    Dim book As Variant
    For Each book In Workbooks
        Debug.Print book.Name
    Next

End Sub
The format of the For loop is:
For i = 1 To Coll.Count
Next
where i is a long and Coll is a collection.
The format of the For Each Loop is:
For Each var In Coll
Next
where var is a variant and Coll is a collection.
To access each the item
For: Coll(i)
For Each: Var
The following example shows the loops side by side for the above user collection example:
' https://excelmacromastery.com/
Sub UseBothLoops()

    ' Declare and Create collection
    Dim collFruit As New Collection

    ' Add items
    collFruit.Add "Apple"
    collFruit.Add "Pear"
    collFruit.Add "Plum"

    ' Print all items using For
    Dim i As Long
    For i = 1 To collFruit.Count
        Debug.Print collFruit(i)
    Next i

    ' Print all items using For Each
    Dim fruit As Variant
    For Each fruit In collFruit
        Debug.Print fruit
    Next fruit

End Sub
For Each Versus For
It is important to understand the difference between the two loops.
The For Each Loop
- is faster
- is neater to write
- has one order only – low index to high
The For Loop
- is slower
- is less neater to write
- can access in different order
Let’s compare the loops under each of these attributes
Speed
The For Each is considered faster than the For Loop. Nowadays this is only an issue if you have a large collection and/or a slow PC/Network.
Neater
The For Each loop is neater to write especially if you are using nested loops. Compare the following loops. Both print the names of all the worksheets in open workbooks.
' https://excelmacromastery.com/
Sub PrintNamesFor()

    ' Print worksheets names from all open workbooks
    Dim i As Long, j As Long
    For i = 1 To Workbooks.Count
        For j = 1 To Workbooks(i).Worksheets.Count
            Debug.Print Workbooks(i).Name, Workbooks(i).Worksheets(j).Name
        Next j
    Next i

End Sub

Sub PrintNamesForEach()

    ' Print worksheets names from all open workbooks
    Dim bk As Workbook, sh As Worksheet
    For Each bk In Workbooks
        For Each sh In bk.Worksheets
            Debug.Print bk.Name, sh.Name
        Next sh
    Next bk

End Sub
The For Each loop is much neater to write and less likely to have errors.
Order
The order of the For Each loop is always from the lowest index to the highest. If you want to get a different order then you need to use the For Loop. The order of the For Loop can be changed. You can read the items in reverse. You can read a section of the items or you can read every second item:
' Read through the worksheets in different orders
' Note: You need a least 3 worksheets in the workbook or
' you will get an error.
' https://excelmacromastery.com/excel-vba-collections/
Sub ReadRightToLeft()

    ' Go through sheets from right to left
    Debug.Print vbNewLine & "Sheets in reverse"
    Dim i As Long
    For i = ThisWorkbook.Worksheets.Count To 1 Step -1
        Debug.Print ThisWorkbook.Worksheets(i).Name
    Next i

    ' Read the names of the first 2 sheets
    Debug.Print vbNewLine & "First two sheets "
    For i = 1 To 2
        Debug.Print ThisWorkbook.Worksheets(i).Name
    Next i

    ' Go through every second sheet
    Debug.Print vbNewLine & "Every second sheet"
    For i = 1 To ThisWorkbook.Worksheets.Count Step 2
        Debug.Print ThisWorkbook.Worksheets(i).Name
    Next i

End Sub
The For loop gives more flexibility here but the reality is that most of the time the basic order is all you need.
You can find more about For Loops in the below video…
Sorting a Collection
There is no built-in sort for the VBA collection. However we can use this QuickSort
' https://excelmacromastery.com/
Sub QuickSort(coll As Collection, first As Long, last As Long)

  Dim vCentreVal As Variant, vTemp As Variant

  Dim lTempLow As Long
  Dim lTempHi As Long
  lTempLow = first
  lTempHi = last

  vCentreVal = coll((first + last)  2)
  Do While lTempLow <= lTempHi

    Do While coll(lTempLow) < vCentreVal And lTempLow < last
      lTempLow = lTempLow + 1
    Loop

    Do While vCentreVal < coll(lTempHi) And lTempHi > first
      lTempHi = lTempHi - 1
    Loop

    If lTempLow <= lTempHi Then

      ' Swap values
      vTemp = coll(lTempLow)

      coll.Add coll(lTempHi), After:=lTempLow
      coll.Remove lTempLow

      coll.Add vTemp, Before:=lTempHi
      coll.Remove lTempHi + 1

      ' Move to next positions
      lTempLow = lTempLow + 1
      lTempHi = lTempHi - 1

    End If

  Loop

  If first < lTempHi Then QuickSort coll, first, lTempHi
  If lTempLow < last Then QuickSort coll, lTempLow, last

End Sub
You can use it like this:
' https://excelmacromastery.com/
Sub TestSort()

    Dim coll As New Collection
    coll.Add "USA"
    coll.Add "Spain"
    coll.Add "Belguim"
    coll.Add "Ireland"

    QuickSort coll, 1, coll.Count

    Dim v As Variant
    For Each v In coll
        Debug.Print v
    Next

End Sub
Using Collections with Functions and Subs
Using a Collection as a parameter or return value is very easy to do. We will look at them in turn.
Passing a Collection to a Sub/Function
It is simple to pass a collection to a function or sub. It is passed like any parameter as the following code example shows:
' https://excelmacromastery.com/
Sub UseColl()

    ' Create collection
    Dim coll As New Collection

    ' Add items
    coll.Add "Apple"
    coll.Add "Orange"

    ' Pass to sub
    PrintColl coll

End Sub

' Sub takes collection as argument
Sub PrintColl(ByRef coll As Collection)

    Dim item As Variant
    For Each item In coll
        Debug.Print item
    Next

End Sub
You can see how useful the sub PrintColl is in the example. It will print all the elements of ANY collection. The size or type of element does not matter. This shows how flexible collections are to use.
Passing ByVal versus ByRef
One subtle point to keep in mind here is passing by value(By Val) and passing by reference(ByRef) differ slightly.
For a simple variable passing by value means a copy is created. This means if the Function/Sub changes the value will not be changed when you return to the calling procedure.
In the following example, we pass total using both ByVal and ByRef. You can see that after we pass using ByRef the value has changed in the calling procedure:
' https://excelmacromastery.com/
Sub PassType()

    Dim total As Long
    total = 100

    PassByValue total
    ' Prints 100
    Debug.Print total

    PassByReference total
    ' Prints 555
    Debug.Print total

End Sub

Sub PassByValue(ByVal total As Long)
    ' value changed only in this sub
    total = 555
End Sub

Sub PassByReference(ByRef total As Long)
    ' value also changed outside this sub
    total = 555
End Sub
Using ByVal and ByRef with a Collection is a bit different. If you add or remove item then the collection in the original caller will also be changed. So the Subs in the following example will both remove the first item of the original collection:
' https://excelmacromastery.com/
Sub RemoveByRef(ByRef coll As Collection)
    coll.Remove 1
End Sub

Sub RemoveByVal(ByVal coll As Collection)
    coll.Remove 1
End Sub
The reason for this is that a Collection variable contains a pointer. This means it contains the address of the collection rather than the actual collection. So when you add or remove an item you are changing what the pointer is pointing at and not the pointer itself. However if you change the pointer it will be changed outside of the sub.
You don’t need to worry about pointers. All you need to know is how this affects the behaviour of passing a parameter. If you set a collection parameter to nothing then the behaviour depends on if you used ByRef or ByVal:
- Using ByRef will reset the original collection
- Using ByVal will not change the original collection
' https://excelmacromastery.com/
' Will empty original collection
Sub PassByRef(ByRef coll As Collection)
    Set coll = Nothing
End Sub

' Will NOT empty original collection
Sub PassByVal(ByVal coll As Collection)
    Set coll = Nothing
End Sub
Returning a Collection From a Function
Returning a collection from a Function is the same as returning any object. You need to use the Set keyword. In the following example you can see how to return a collection
' https://excelmacromastery.com/
Sub FruitReport()
    ' NOTE: We do not use New keyword here to create the collection.
    ' The collection is created in the CreateCollection function.
    Dim coll As Collection

    ' receive coll from the CreateCollection function
    Set coll = CreateCollection

    ' do something with coll here

End Sub

Function CreateCollection() As Collection

    Dim coll As New Collection

    coll.Add "Plum"
    coll.Add "Pear"

    ' Return collection
    Set CreateCollection = coll

End Function
Note: that you don’t use the New keyword when declaring the collection in the sub FruitReport(). This is because the collection is created in CreateCollection(). When you return the collection you are simple assigning the collection variable to point to this collection.
Example – Reading from a worksheet
Let’s have a look at an example of using the Collection with a worksheet.
We use this data:
Student Marks
The user selects the subject in cell B2:
In this example we read through the list of students. Any student, that is taking the subject listed in cell B2, is added to the collection.
We then write the results to the worksheet from cell F5 onwards.
You can download this example below as part of the source code for this post.
The code is here:
' The user selects a subject.
' Read through the students and add the ones with that subject
' to the collection.
' Then write out the collection to the worksheet.

' https://excelmacromastery.com/excel-vba-collections/
Public Sub CreateReport()

    ' Get the range from the table
    Dim rg As Range
    Set rg = shStudents.ListObjects("tbStudents").DataBodyRange

    Dim coll As New Collection

    ' Read through the students
    Dim i As Long
    For i = 1 To rg.Rows.Count
        ' If the student has the selected 'subject' then add to the collection
        If rg.Cells(i, 3).Value = shStudents.Range("B2").Value Then
            coll.Add rg.Cells(i, 1).Value
        End If
    Next i

    ' clear existing data below the header
    shStudents.Range("F4").CurrentRegion.Offset(1).ClearContents

    ' Write the collection to the worksheet
    Dim item As Variant, currentRow As Long
    currentRow = 5
    For Each item In coll
        ' Write the item to the worksheet
        shStudents.Cells(currentRow, 6).Value = item

        ' Move to the next row
        currentRow = currentRow + 1

    Next item

End Sub
You can watch the video below to see more about reading between Collections and Worksheets…
Conclusion
Collections are a very useful part of VBA. There are much easier to use than Arrays and are very useful when you are doing a lot of adding and removing items. They have only four properties: Add, Remove, Count and Item. This makes them very easy to master.
The main points of this post are:
- Collections are a way of storing a group of items together.
- VBA has its own collections such as Workbooks, Worksheets and Cells.
- The items do not have to be of the same type but they normally are. The VBA Sheets collection can contain both worksheets and chart sheets.
- A collection makes it easy to perform the same task on multiple items e.g. print all the values.
- Collections are similar to arrays as they both store groups of similar items.
- Collections are better when adding and removing lots of items.
- Collections are simpler to use than arrays.
- Arrays are more useful when the number of items is fixed.
- Arrays are more efficient when reading and writing to or from cells.
- Basic data types(i.e. non-objects) in a Collection are read-only whereas arrays are read/write.
- You can create a collection using Dim only or Dim with Set
- You can delete an entire collection by setting it to Nothing. What this does depends on how it was created(see last point).
- You can add items to a specific position in the collection using Before and After arguments with the collection Add function.
- You can use Keys with a collection to access an item directly. Collections do not have good support for keys so you are usually better to use the Dictionary collection when you need to use Keys.
- You can use the For and For Each loops to access all items in a collection. The For Each loop is more efficient but only allows you to go through the collection in one order.
- You can easily pass a collection as an argument to a Function or Sub.
- You can easily return a collection from a Function.
What’s Next?
Free VBA Tutorial If you are new to VBA or you want to sharpen your existing VBA skills then why not try out the The Ultimate VBA Tutorial.
Related Training: Get full access to the Excel VBA training webinars and all the tutorials.
(NOTE: Planning to build or manage a VBA Application? Learn how to build 10 Excel VBA applications from scratch.).
In this Article
- What is a Collection in VBA?
- Collections Versus Arrays
- Scope of a Collection Object
- Create a Collection, Add Items, and Access Items
- Loop Through Collection
- Add Item to Collection
- Remove an Item from Collection
- Count the Number of Items in a Collection
- Test Collection for a Specific Value
- Pass a Collection to a Sub / Function
- Return a Collection from a Function
- Convert a Collection to an Array
- Convert an Array into a Collection
This tutorial will demonstrate how to use collections in VBA.
What is a Collection in VBA?
A collection is an object that holds a number of similar items that can easily be accessed and manipulated, even if there are a large number of items within the collection.
You can create your own collections, but VBA also comes with built in collections such as the Sheets Collection, which stores every sheet in the workbook. By using a For Each loop, you can iterate through each worksheet in the Sheets Collection.
Sub TestWorksheets()
Dim Sh As Worksheet
For Each Sh In Sheets
    MsgBox Sh.Name
    MsgBox Sh.Visible
Next Sh
End Sub
You can also address a specific worksheet in the collection using the index value (it’s position in the collection), or the actual name of the worksheet:
MsgBox Sheets(1).Name
MsgBox Sheets("Sheet1").Name
As worksheets are added or deleted so the Sheets collection grows or shrinks in size.
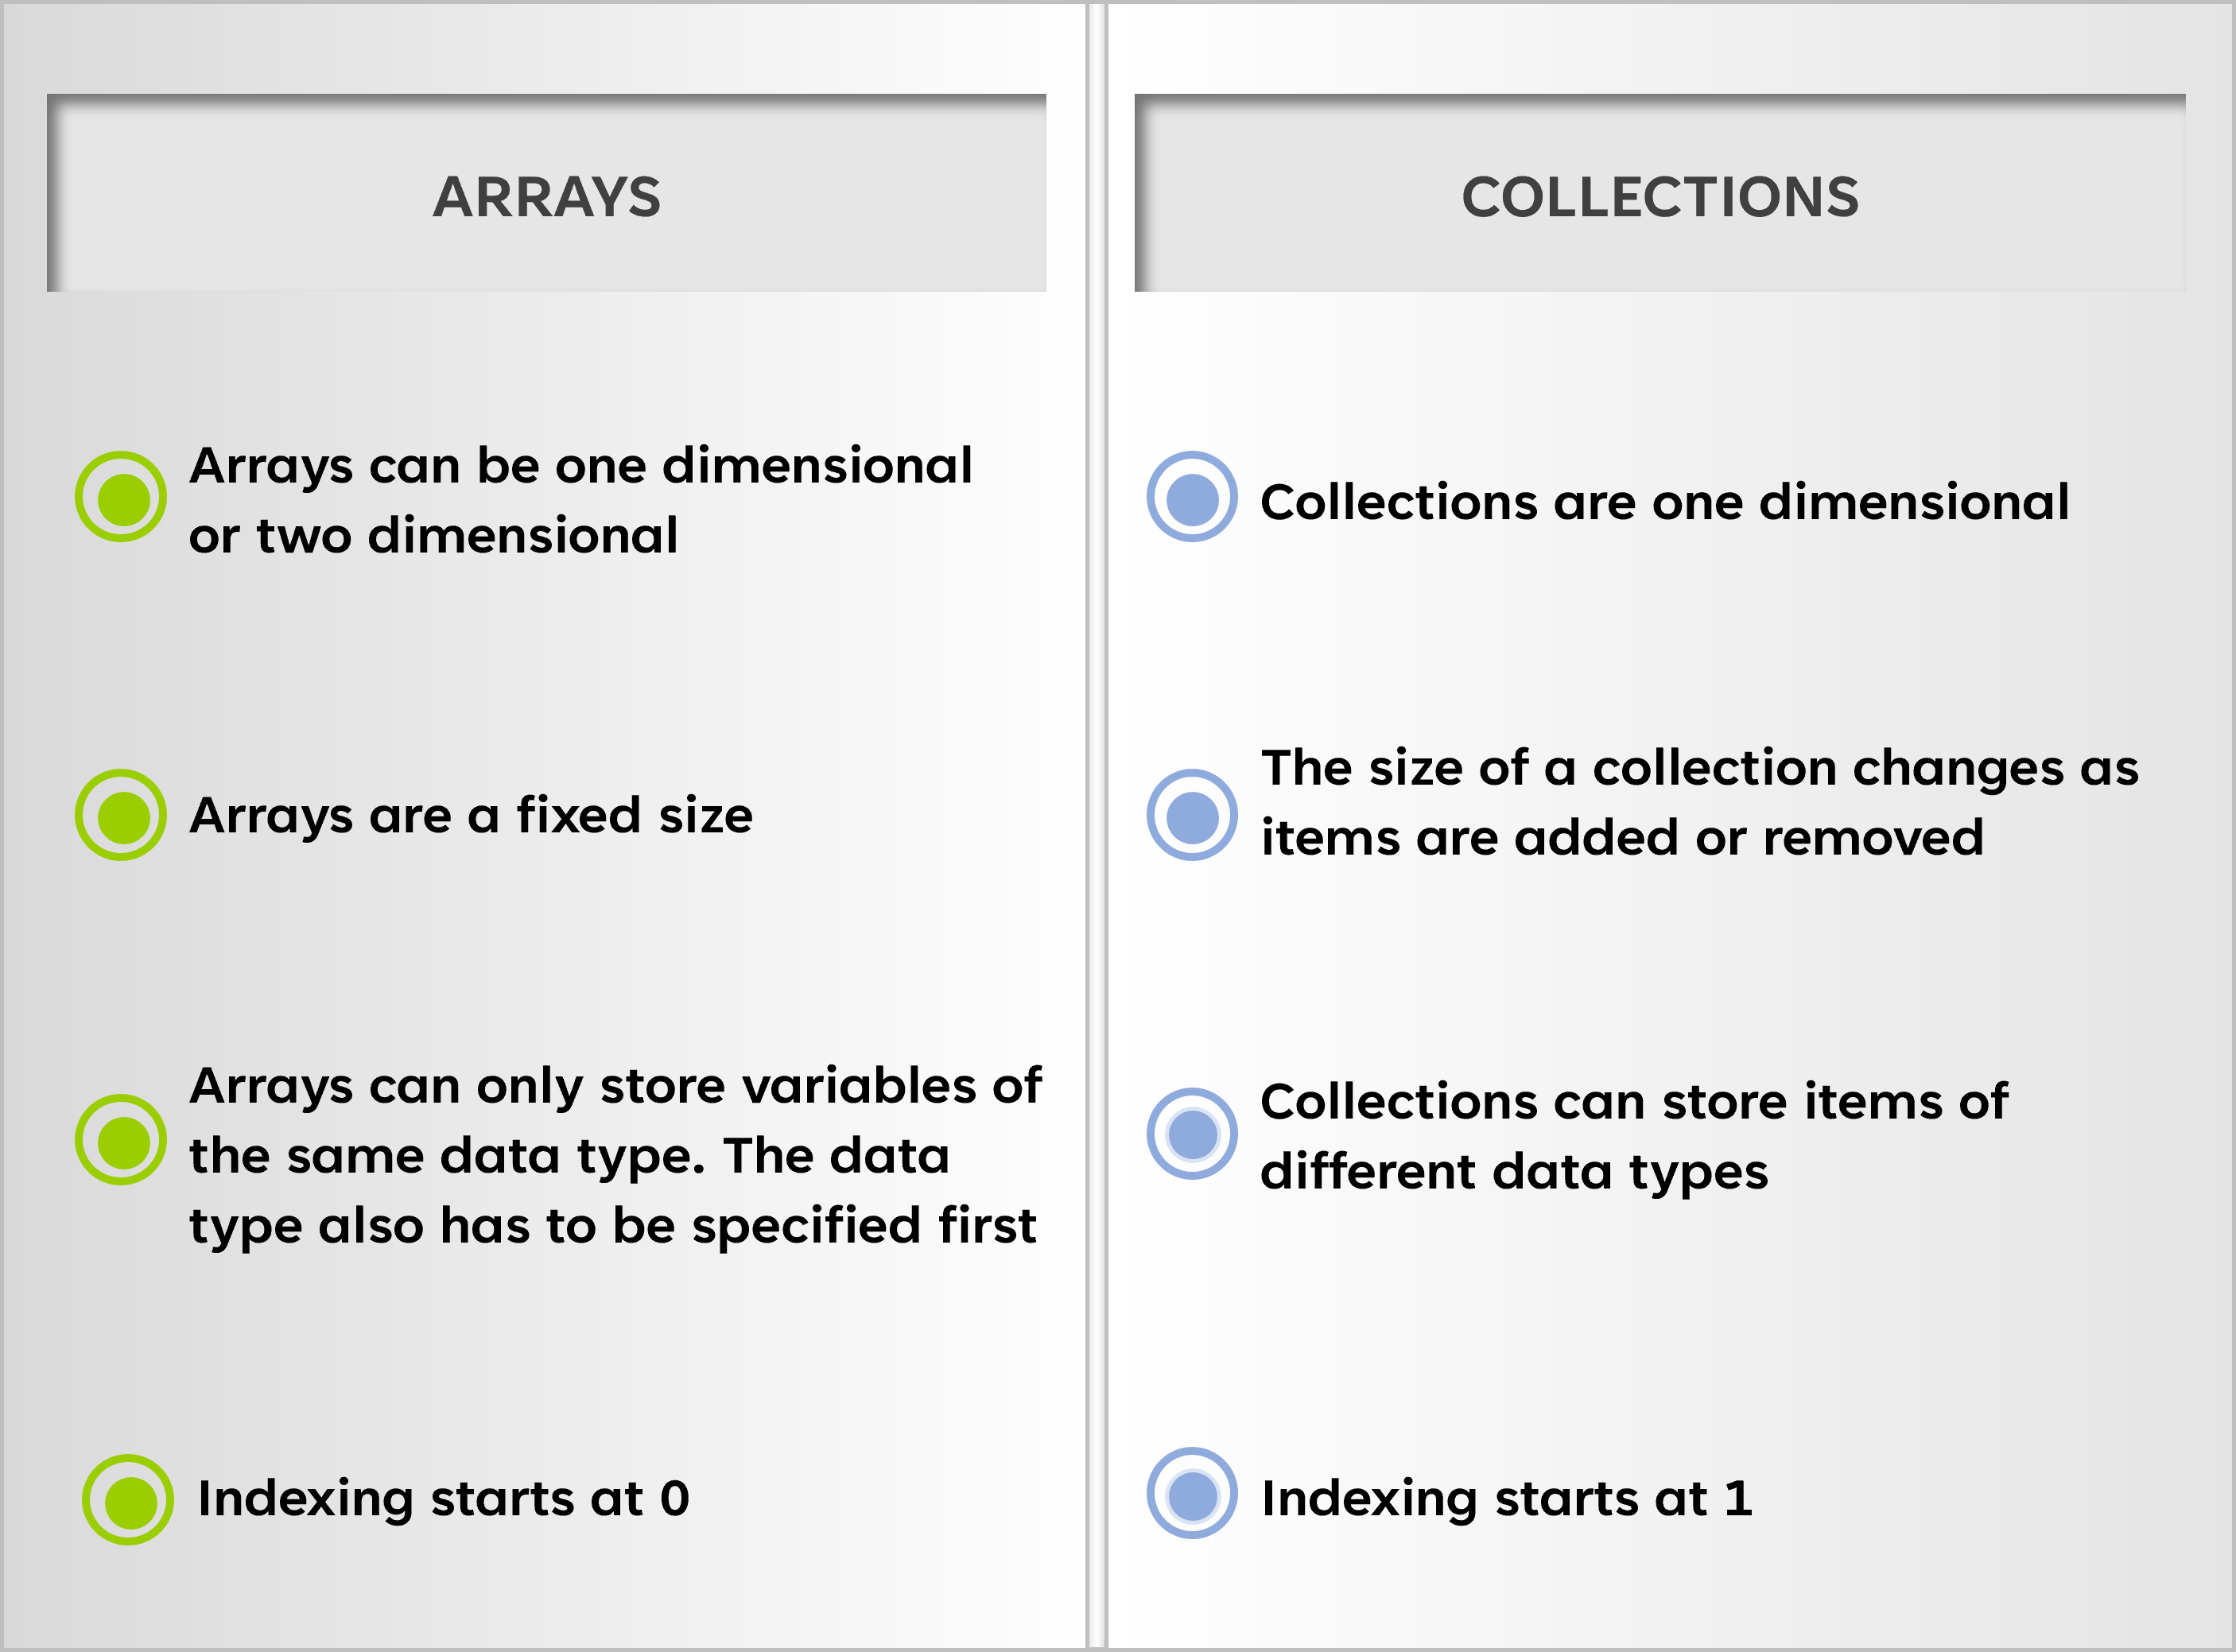
Note that with VBA collections the index number begins with 1 not with 0.
Collections Versus Arrays
Arrays and Collections can both store data, however they have several notable differences:
- Arrays are multidimensional whereas collections are only single dimension. You can dimension an array with several dimensions e.g.
Dim MyArray(10, 2) As StringThis creates an array of 10 rows with 2 columns, almost like a worksheet. A collection is effectively a single column.
- When you populate your array, you need a separate line of code to put a value into each element of the array. If you had a two-dimensional array you would actually need 2 lines of code – one line to address the first column and one line to address the second column. With the Collection object, you simply use the Add method so that the new item is just added into the collection and the index value is automatically adjusted to suit.
- If you need to delete an item of data then it is more complicated in the array. You can set the values of an element to a blank value, but the element itself still exists within the array. If you are using a For Next loop to iterate through the array, the loop will return a blank value, which will need coding to make sure that the blank value is ignored. In a collection you use the Add or Remove methods, and all the indexing and re-sizing is automatically taken care of. The item that has been removed disappears completely. Arrays are useful for a fixed size of data, but collections are better for where the quantity of data is liable to change.
- Collections are Read Only whereas array values can be changed using VBA. With a collection, you would have to remove the value to be changed first and then add in the new changed value.
- In an array, you can only use a single data type for the elements which is set when you dimension the array. However, in the array you can use custom data types that you have designed yourself. You could have a very complicated array structure using a custom data type which in turn has several custom data types below it. In a collection, you can add use data types of data for each item. You could have a numeric value, a date, or a string – the collection object will take any data type. If you tried to put a string value in an array that was dimensioned as numeric, it would produce an error message.
- Collections are generally easier to use than arrays. In coding terms, when you create a collection object, it only has two methods (Add and Remove) and two properties (Count and Item), so the object is by no means complicated to program.
- Collections can use keys to locate data. Arrays do not have this function and require looping code to iterate through the array to find specific values.
- The size of an array needs to be defined when it is first created. You need to have an idea of how much data it is going to store. If you need to increase the size of the array you can use ‘ReDim’ to re-size it, but you need to use the keyword ‘Preserve’ if you do not want to lose the data already held in the array. A collection size does not need to be defined. It just grows and shrinks automatically as items are added or removed.
Scope of a Collection Object
In terms of scope, the collection object is only available whilst the workbook is open. It does not get saved when the workbook is saved. If the workbook is re-opened then the collection needs to be re-created using VBA code.
If you want your collection to be available to all the code in your code module, then you need to declare the collection object in the Declare section at the top of the module window.
This will ensure that all your code within that module can access the collection. If you want any module within your workbook to access the collection, then define it as a global object.
Global MyCollection As New CollectionCreate a Collection, Add Items, and Access Items
A simple collection object can be created in VBA using the following code:
Sub CreateCollection()
'Create Collection
Dim MyCollection As New Collection

'Add Items to Collection
MyCollection.Add "Item1"
MyCollection.Add "Item2"
MyCollection.Add "Item3"
End Sub
The code creates a new object called ‘MyCollection’ and then the following lines of code use the Add method to add in 3 new values.
Loop Through Collection
You can then use code to iterate through each item in your collection:
For Each Item In MyCollection
    MsgBox Item
Next Item
Or this code will get the size of the collection with .Count and loop through each index number:
For n = 1 To MyCollection.Count
    MsgBox MyCollection(n)
Next n
The first For Each Loop is faster than the second For Next loop but it only works in one direction (low index to high). The For Next Loop has the advantage that you can use a different direction (high index to low) and you can also use the Step method to change the increment. This is useful when you want to delete several items since you will need to run the deletion from the end of the collection to the start as the index will change as the deletions take place.
Add Item to Collection
The Add method in a collection has 3 optional parameters – Key, Before, and After.
You can use the ‘Before’ and ‘After’ parameters to define the position of your new item relative to the others already in the collection.
This is done by specifying the index number that you want your new item to be relative to.
Sub CreateCollection()
Dim MyCollection As New Collection
MyCollection.Add "Item1"
MyCollection.Add "Item2", , 1
MyCollection.Add "Item3"

End Sub
In this example ‘Item2’ has been specified to be added before the first indexed item in the collection (which is ‘Item1’). When you iterate through this collection ‘Item2’ will appear first of all, followed by ‘Item1’ and ‘Item3’.
When you specify a ‘Before’ or ‘After’ parameter, the index value is automatically adjusted within the collection so that ‘Item2’ becomes index value of 1 and ‘Item1’ gets moved to an index value of 2.
You can also use the ‘Key’ parameter to add a reference value that you can use to identify the collection item. Note that a key value must be a string and must be unique within the collection.
Sub CreateCollection()
Dim MyCollection As New Collection
MyCollection.Add "Item1"
MyCollection.Add "Item2", "MyKey"
MyCollection.Add "Item3"

MsgBox MyCollection("MyKey")
End Sub
‘Item2’ has been given a ‘Key’ value of ‘MyKey’ so that you can refer to that item using the value of ‘MyKey’ instead of the index number (2).
Note that the ‘Key’ value has to be a string value. It cannot be any other data type. Note that the collection is Read Only, and you cannot update the key value once it has been set. Also, you cannot check if a key value exists for a specific item in the collection or view the key value which is a bit of a drawback.
The ‘Key’ parameter has the added advantage of making your code more readable, especially if it is being handed over to a colleague to support, and you do not have to iterate through the entire collection to find that value. Imagine if you had a collection of 10,000 items how difficult it would be to reference one specific item!
VBA Coding Made Easy
Stop searching for VBA code online. Learn more about AutoMacro — A VBA Code Builder that allows beginners to code procedures from scratch with minimal coding knowledge and with many time-saving features for all users!
Learn More
Remove an Item from Collection
You can use the ‘Remove’ method to delete items from your collection.
MyCollection.Remove (2)Unfortunately, it is not easy if the collection has a large number of items to work out the index of the item that you want to delete. This is where the ‘Key’ parameter comes in handy when the collection is being created.
MyCollection.Remove (“MyKey”)When an item is removed from a collection the index values are automatically reset all the way through the collection. This is where the ‘Key’ parameter is so useful when you are deleting several items at once. For example, you could delete item index 105, and instantly item index 106 becomes index 105, and everything above this item has its index value moved down. If you use the Key parameter, there is no need to worry about which index value needs to be removed.
To delete all the collection items and create a new collection, you use the Dim statement again which creates an empty collection.
Dim MyCollection As New CollectionTo remove the actual collection object completely, you can set the object to nothing.
Set MyCollection = NothingThis is useful if the collection is no longer required by your code. Setting the collection object to nothing removes all reference to it and releases the memory that it was using. This can have important implications on speed of execution of your code, if a large object is sitting in memory that is no longer required.
Count the Number of Items in a Collection
You can easily find out the number of items in your collection by using the ‘Count’ property.
MsgBox MyCollection.CountYou would use this property if you were using a For Next Loop to iterate through the collection as it will provide you with the upper limit for the index number.
Test Collection for a Specific Value
You can iterate through a collection to search for a specific value for an item using a For Each Loop.
Sub SearchCollection()
Dim MyCollection as New Collection

MyCollection.Add "Item1"
MyCollection.Add "Item2"
MyCollection.Add "Item3"

For Each Item In MyCollection
        If Item = "Item2" Then
            MsgBox Item & " Found"
        End If
Next
End Sub
The code creates a small collection, and then iterates through it looking for an item called ‘item2”. If found it displays a message box that it has found the specific item.
One of the drawbacks with this methodology is that you cannot access the index value or the key value.
If you use a For Next Loop instead, you can use the For Next counter to get the index value, although you still cannot get the ‘Key’ value.
Sub SearchCollection()
Dim MyCollection As New Collection
MyCollection.Add "Item1"
MyCollection.Add "Item2"
MyCollection.Add "Item3"

For n = 1 To MyCollection.Count
        If MyCollection.Item(n) = "Item2" Then
            MsgBox MyCollection.Item(n) & " found at index position " & n
        End If
Next n
End Sub
The For Next counter (n) will provide the index position.
Sort Collection
There is no built-in functionality to sort a collection, but using some ‘out of the box’ thinking, code can be written to do a sort, utilizing Excel’s worksheet sorting function. This code uses a blank worksheet called ‘SortSheet’ to do the actual sorting.
Sub SortCollection()
Dim MyCollection As New Collection
Dim Counter As Long

'Build collection with random order items
MyCollection.Add "Item5"
MyCollection.Add "Item2"
MyCollection.Add "Item4"
MyCollection.Add "Item1"
MyCollection.Add "Item3"

'Capture number of items in collection for future use
Counter = MyCollection.Count

'Iterate through the collection copying each item to a consecutive cell on ‘SortSheet’ (column A)
For n = 1 To MyCollection.Count
    Sheets("SortSheet").Cells(n, 1) = MyCollection(n)

Next n
'Activate the sortsheet and use the Excel sort routine to sort the data into ascending order
Sheets("SortSheet").Activate
Range("A1:A" & MyCollection.Count).Select
    ActiveWorkbook.Worksheets("SortSheet").Sort.SortFields.Clear
    ActiveWorkbook.Worksheets("SortSheet"). Sort.SortFields.Add2 Key:=Range( _
        "A1:A5"), SortOn:=xlSortOnValues, Order:=xlAscending, DataOption:= _
        xlSortNormal
    With ActiveWorkbook.Worksheets("SortSheet").Sort
        .SetRange Range("A1:A5")
        .Header = xlGuess
        .MatchCase = False
        .Orientation = xlTopToBottom
        .SortMethod = xlPinYin
        .Apply
    End With
'Delete all the items in the collection – note that this For Next Loop runs in reverse order
For n = MyCollection.Count To 1 Step -1
     MyCollection.Remove (n)
Next n

'Copy the cell values back into the empty collection object using the stored value (Counter) for the ‘loop
For n = 1 To Counter
    MyCollection.Add Sheets("SortSheet").Cells(n, 1).Value

Next n

'Iterate through the collection to prove out the order that the items are now in
For Each Item In MyCollection
    MsgBox Item

Next Item

'Clear the worksheet (sortsheet) – if necessary, delete it as well
Sheets("SortSheet").Range(Cells(1, 1), Cells(Counter, 1)).Clear
End Sub
This code first creates a collection with the items added in a random order. It then copies them into the first column on a worksheet (SortSheet).
The code then uses the Excel sort tool to sort the data in the column into ascending order. The code could also be modified to sort into descending order.
The collection is then emptied of data using a For Next Loop. Note that the step option is used so that it clears from the end of the collection to the start. This is because as it clears, the index values are reset, if it cleared from the start, it would not clear correctly (index 2 would become index 1)
Finally, using another For Next Loop, the item values are transferred back into the empty collection
A further For Each Loop proves out that the collection is now in good ascending order.
Unfortunately, this does not deal with any Key values that may have been entered originally, since the Key values cannot be read
VBA Programming | Code Generator does work for you!
Pass a Collection to a Sub / Function
A collection can be passed to a Sub or a Function in the same way as any other parameter
Function MyFunction(ByRef MyCollection as Collection)It is important to pass the collection using ‘ByRef’. This means that the original collection is used. If the collection is passed using ‘ByVal’ then this creates a copy of the collection which can have unfortunate repercussions.
If a copy is created using ‘ByVal’ then anything that changes the collection within the function only happens on the copy and not on the original. For example, if within the function, a new item is added to the collection, this will not appear in the original collection, which will create a bug in your code.
Return a Collection from a Function
You can return a collection from a function in the same way as returning any object. You must use the Set keyword.
Sub ReturnFromFunction()
Dim MyCollection As Collection
Set MyCollection = PopulateCollection
MsgBox MyCollection.Count
End Sub
This code creates a sub routine which creates an object called ‘MyCollection’ and then uses the ‘Set’ keyword to effectively call the function to populate that collection. Once this is done then it displays a message box to show the count of 2 items.
Function PopulateCollection() As Collection
Dim MyCollection As New Collection
MyCollection.Add "Item1"
MyCollection.Add "Item2"

Set PopulateCollection = MyCollection
End Function
The function PopulateCollection creates a new collection object and populates it with 2 items. It then passes this object back to the collection object created in the original sub routine.
Convert a Collection to an Array
You may wish to convert your collection into an array. You may want to store the data where it can be changed and manipulated. This code creates a small collection and then transfers it into an array
Notice that the collection index starts at 1 whereas the array index starts at 0. Whereas the collection has 3 items, the array only needs to be dimensioned to 2 because there is an element 0
Sub ConvertCollectionToArray()
Dim MyCollection As New Collection
Dim MyArray(2) As String

MyCollection.Add "Item1"
MyCollection.Add "Item2"
MyCollection.Add "Item3"

For n = 1 To MyCollection.Count
    MyArray(n - 1) = MyCollection(n)

Next n

For n = 0 To 2
    MsgBox MyArray(n)
Next n
End Sub
Convert an Array into a Collection
You may want to convert an array into a collection. For example, you may wish to access the data in a faster and more elegant manner that using code to get an array element.
Bear in mind that this will only work for a single dimension of the array because the collection has only one dimension.
Sub ConvertArrayIntoCollection()
Dim MyCollection As New Collection
Dim MyArray(2) As String
MyArray(0) = "item1"
MyArray(1) = "Item2"
MyArray(2) = "Item3"

For n = 0 To 2
    MyCollection.Add MyArray(n)

Next n
For Each Item In MyCollection
    MsgBox Item
Next Item
End Sub
If you did wish to use a multi-dimensional array, you could concatenate the array values together for each row within the array using a delimiter character between the array dimensions, so that when reading the collection value, you could programmatically use the delimiter character to separate the values out.
You could also move the data into the collection on the basis that the first-dimension value is added (index 1), and then the next dimension value is added (index 2) and so on.
If the array had, say, 4 dimensions, every fourth value in the collection would be a new set of values.
You could also add array values to use as keys (providing that they are unique) which would add an easy way of locating specific data.
Создание объекта Collection с помощью кода VBA Excel. Методы коллекции и синтаксис выражений с ними. Свойство Count и примеры кода.
Collection – это объект, представляющий из себя упорядоченный набор данных (коллекцию), на который можно ссылаться как на одно целое. Элементы коллекции никак между собой не связаны и могут иметь разные типы данных.
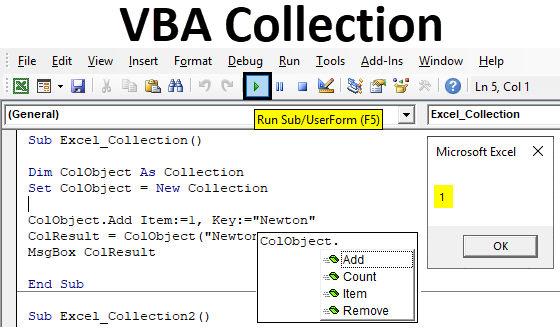
Создать новый экземпляр Collection в коде VBA Excel можно двумя строками:
|
Dim myColl As Object Set myColl = New Collection |
или одной строкой:
|
Dim myColl As New Collection |
Лист автоматической вставки объектов, методов и свойств (лист подсказок) предоставит при написании кода VBA Excel простой доступ к методам Add, Item, Remove и свойству Count объекта Collection:
Лист подсказок отображается автоматически после ввода точки или, в иных случаях, вызывается сочетанием клавиш «Ctrl+Пробел».
Методы и свойство коллекции
Метод Add
Метод Add добавляет новый элемент в объект Collection.
Синтаксис метода Add:
|
Collection.Add Элемент, [Ключ], [До], [После] |
Компоненты метода Add:
- Collection – обязательный компонент, представляющий выражение (переменную), возвращающее объект Collection.
- Элемент (item) – обязательный аргумент, представляющий выражение любого типа, возвращающее элемент, который необходимо добавить в коллекцию.
- Ключ (key) – необязательный аргумент, представляющий строковое выражение, задающее уникальный ключ, который может использоваться вместо индекса позиции для доступа к элементу коллекции.
- До* (before) – необязательный аргумент, указывающий на позицию существующего элемента в коллекции, перед которым будет добавлен новый элемент.
- После* (after) – необязательный аргумент, указывающий на позицию существующего элемента в коллекции, после которого будет добавлен новый элемент.
* Аргументы «До» и «После» не могут применяться одновременно. Если аргументу «До» или «После» присвоено числовое значение, оно должно быть в пределах диапазона от 1 до значения свойства Collection.Count. Если это строка, она должна соответствовать одному из ключей существующих в коллекции элементов.
Метод Item
Метод Item возвращает элемент объекта Collection по индексу позиции или по ключу.
Синтаксис метода Item объекта Collection:
Компоненты метода Item:
- Collection – обязательный компонент, представляющий выражение (переменную), возвращающее объект Collection.
- Index – обязательный аргумент, представляющий выражение, возвращающее номер (индекс) позиции элемента коллекции или его уникальный ключ.
Метод Remove
Метод Remove удаляет элемент из объекта Collection по индексу позиции или по ключу.
Синтаксис метода Remove объекта Collection:
|
Collection.Remove (Index) |
Компоненты метода Remove:
- Collection – обязательный компонент, представляющий выражение (переменную), возвращающее объект Collection.
- Index – обязательный аргумент, представляющий выражение, возвращающее номер (индекс) позиции элемента коллекции или его уникальный ключ.
Свойство Collection.Count
Свойство Count объекта Collection возвращает количество элементов в коллекции.
Примеры кода с объектом Collection
Пример 1
Создание нового экземпляра объекта Collection, добавление в коллекцию трех элементов, определение количества элементов в коллекции, извлечение одного и того же элемента по индексу и по ключу:
|
1 2 3 4 5 6 7 8 9 10 11 12 13 14 15 16 17 |
Sub Primer1() ‘Создаем новый экземпляр ‘объекта Collection Dim myColl As New Collection ‘Добавляем три элемента myColl.Add «Первый элемент» myColl.Add «Второй элемент», «Ключ 2» myColl.Add «Третий элемент» ‘Определение количества элементов MsgBox myColl.Count ‘Извлечение одного и того же элемента ‘коллекции по индексу и по ключу MsgBox myColl.Item(2) & _ » (извлечен по индексу)» MsgBox myColl.Item(«Ключ 2») & _ » (извлечен по ключу)» End Sub |
Пример 2
Добавление элементов в коллекцию с использованием аргументов «До» и «После»:
|
Sub Primer2() Dim myColl As New Collection ‘Добавляем три первых элемента myColl.Add «Второй элемент» myColl.Add «Третий элемент» myColl.Add «Пятый элемент» ‘Следующий элемент вставляем перед первым myColl.Add «Первый элемент», , 1 ‘Следующий элемент вставляем после третьего ‘с учетом добавленного предыдущей строкой myColl.Add «Четвертый элемент», , , 3 ‘Извлекаем первый и четвертый элементы MsgBox myColl.Item(1) MsgBox myColl.Item(4) End Sub |
Пример 3
Генерация ошибки при добавлении в коллекцию нового элемента с неуникальным ключом:
|
Sub Primer3() Dim myColl As New Collection On Error GoTo Instr myColl.Add «Первый элемент», «Ключ» myColl.Add «Второй элемент», «Ключ» Exit Sub Instr: MsgBox «Произошла ошибка: « & Err.Description End Sub |
Эта особенность объекта Collection используется для отбора уникальных значений из списка элементов.
The VBA Collection is a simple native data structure available in VBA to store (collect as you wish) objects. As Microsoft documentation explains Collections are objects containing an orders set of items. They are more flexible than VBA Arrays as they are not limited in their size at any point in time and don’t require manual re-sizing. Collections are also useful when you don’t want to leverage there more complex (but quite similar) Data Structures like the VBA ArrayList or even a VBA Dictionary.
Adding items to a VBA Collection
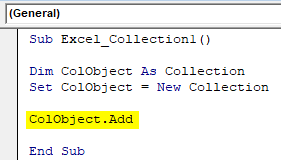
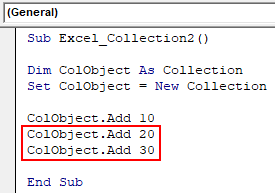
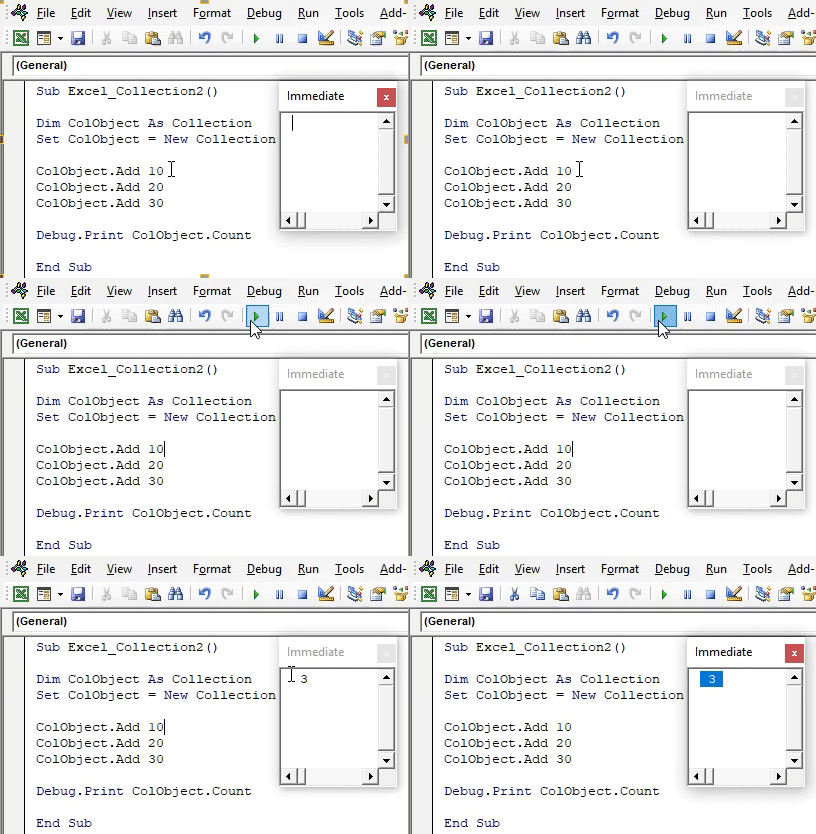
Let’s start by creating a New VBA Collection and adding some items to it.
Dim myCol As Collection

'Create New Collection
Set myCol = New Collection

'Add items to Collection
myCol.Add 10 'Items: 10
myCol.Add 20 'Items: 10, 20
myCol.Add 30 'Items: 10, 20, 30
Notice that the Collection is not typed in any way as we didn’t have to declare what types of objects it stores. This is because a Collection stores object of type Variant.
By default the Add procedure will push items to the end of the VBA Collection. However, you can also choose to insert items before or after any index in the Collection like so:
Before:
myCol.Add 10 'Items: 10
myCol.Add 20 'Items: 10, 20

myCol.Add 30, Before:= 1 'Items: 30, 10, 20
After:
myCol.Add 10 'Items: 10
myCol.Add 20 'Items: 10, 20

myCol.Add 30, After:= 1 'Items: 10, 30, 20
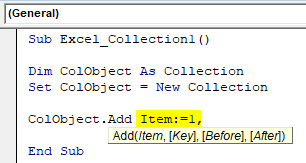
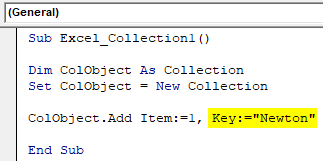
If you want to be able to reference a particular item in your VBA Collection by a certain string/name you can also define a key for object added to your VBA Collection like so:
myCol.Add 10, "Key10"
Debug.Print myCol("Key10") 'Returns 10
Removing items from a Collection
Removing items from a VBA Collection is equally easy. However, items are removed by specifying their index.
'Remove selected items from Collection
'Before Items: 10, 20, 30
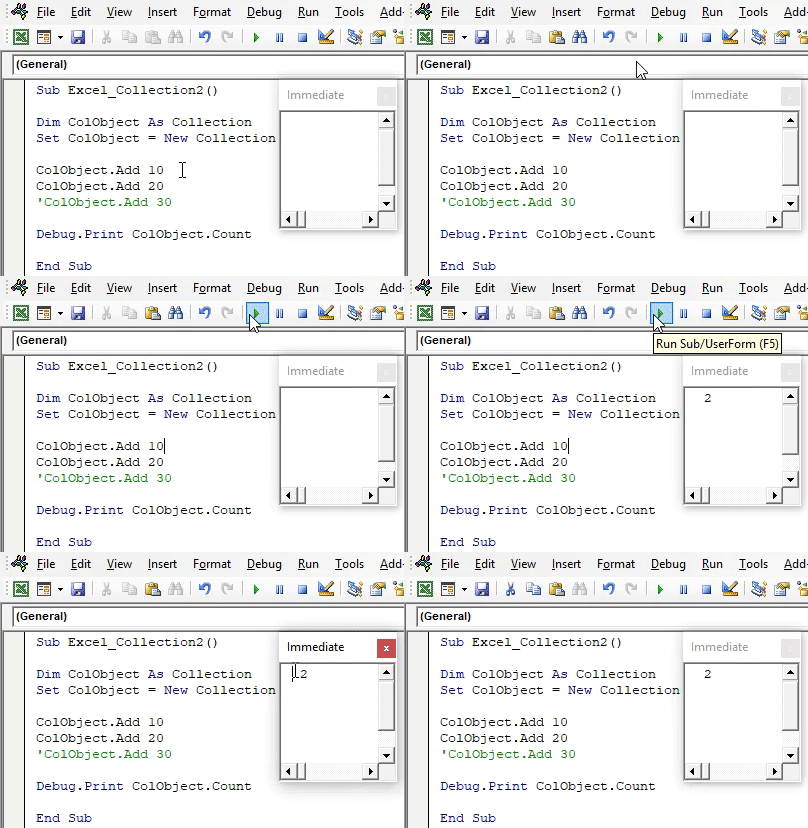
myCol.Remove (2) 'Items: 10, 30
myCol.Remove (2) 'Items: 10
Be careful when removing items from a VBA Collection – items start indexing at 1 (not 0 as in most common programming languages.
When removing items in a loop do remember that the index of the remaining items in the VBA Collection will decrease by 1.
Clearing a Collection
To Clear all items (remove them) from a VBA Collection use the Clear function.
Dim myCol as Collection
Set myCol = New Collection
'...
myCol.Clear
Clearing all items from a Collection is similar to recreating a VBA Collection:
myCol.Clear
'...is similar to...
Set myCol = New Collection
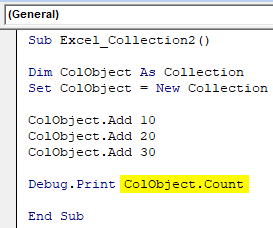
Counting items in a Collection
Similarly as with other VBA Data Structures the VBA Collection facilitates the Count function which returns the amount of items currently stored.
Dim myCol As Collection: Set myCol = New Collection

'Add 3 items to Collection
myCol.Add 10 'Items: 10
myCol.Add 20 'Items: 10, 20
myCol.Add 30 'Items: 10, 20, 30

Debug.Print myCol.Count '3
Getting items in a Collection
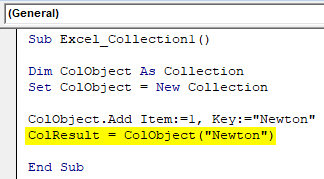
To get a specific item in your VBA Collection you need to either specify it’s index or optionally it’s key (if it was defined).
Dim myCol As Collection
Set myCol = New Collection

'Add items to Collection
myCol.Add 10
myCol.Add 20, Key:="MyAge"
myCol.Add 30

'Get item at index 1
Debug.Print myCol(1) '20

'Get item with the specified key
Debug.Print myCol("MyAge") '20
Traversing a VBA Collection
As with VBA Arrays you can similarly traverse a VBA Collection using loops such as For, While etc. by indexing it’s items, or by traversing its items using the For Each loop (preferred).
Dim myCol As Collection: Set myCol = New Collection
myCol.Add 10: myCol.Add 20: myCol.Add 30

'Print items in Collection
Dim it As Variant
For Each it In myCol
  Debug.Print it '10, 20, 30
Next it

'Print items in Collection
Dim i As Long
For i = 1 To myCol.Count
  Debug.Print myCol(i) '10, 20, 30
Next i
Check if Collection contains item
Unfortunately, the VBA Collection object does not facilitate a Contains function. We can however easily write a simple Function that will extend this functionality. Feel free to use the Function below:
Function CollectionContains(myCol As Collection, checkVal As Variant) As Boolean
    On Error Resume Next
    CollectionContains = False
    Dim it As Variant
    For Each it In myCol
        If it = checkVal Then
            CollectionContains = True
            Exit Function
        End If
    Next
End Function
Usage example:
Dim myCol as Collection: Set myCol = New Collection
myColl.Add 10: myColl.Add 20: myColl.Add 30

Debug.Print CollectionContains(myCol, 20) 'True
Debug.Print CollectionContains(myCol, 40) 'False
Convert Collection to VBA Array
In some case you may want to convert your VBA Collection to a VBA Array e.g. if you would want to paste items from your Collection to a VBA Range. The Code below does that exactly that:
Function CollectionToArray(col As Collection) As Variant()
    Dim arr() As Variant, index As Long, it As Variant
    ReDim arr(col.Count - 1) As Variant
    For Each it In col
        arr(index) = it
        index = index + 1
    Next it
    CollectionToArray = arr
End Function
Below a test of how it works:
Sub TestCollectionToArray()
    Dim myCol As Collection, arr() as Variant
    Set myCol = New Collection
    myCol.Add 1
    myCol.Add 2
    myCol.Add 3
    arr = CollectionToArray(myCol)
End Sub
Summary
The VBA Collection is an extremely useful data type in VBA. It is more versatile than the VBA Array allowing you to add and remove items more freely. The Key-Value store works also similarly as for the VBA Dictionary making it a useful alternative.
As an exercise – next time you will consider using a VBA Array consider replacing it with the Collection object. Hopefully it will guest in your VBA Code more often.
На чтение 24 мин. Просмотров 33.7k.

Леонард Лаудер
Я не строитель зданий, я строитель коллекций
Содержание
- Краткое руководство по коллекциям
- Введение
- Что такое коллекция?
- Коллекции против Массивов
- Как создать коллекцию
- Удаление всех элементов из коллекции
- Добавление предметов в коллекцию
- Доступ к элементам коллекции
- Добавление разных типов
- Добавление элементов с помощью ключа
- Доступ ко всем элементам в коллекции
- Сортировка коллекции
- Использование коллекций с функциями и подпрограммами
- Заключение
Краткое руководство по коллекциям
| Задача | Пример |
| Объявить | Dim coll As Collection |
| Создать во время выполнения | Set coll = New Collection |
| Объявить и создать | Dim coll As New Collection |
| Добавить элемент | coll.Add «Яблоко» |
| Доступ к элементу | coll(1) or coll(2) |
| Элемент доступа добавлен в первый раз |
coll(1) |
| Доступ к элементу добавлен в последний раз |
coll(coll.Count) |
| Получить количество предметов | coll.Count |
| Доступ ко всем предметам | Dim i As Long For i = 1 To coll.Count Debug.Print coll(i) Next i |
| Доступ ко всем предметам (For Each) |
Dim fruit As Variant For Each fruit In coll Debug.Print fruit Next fruit |
| Удалить элемент | coll.Remove(1) |
| Удалить все элементы | Set coll = New Collection |
Введение
Коллекции являются очень важной частью VBA. Если вы пользовались VBA какое-то время, вы будете использовать Коллекции. Наиболее распространенными из них являются
Workbooks, Worksheets, коллекции Range и Cells.
В следующем коде показаны некоторые примеры использования коллекции Workbooks VBA.
' Workbooks это коллекция всех открытых рабочих книг

    ' Count - это количество книг в коллекции.
    Debug.Print Workbooks.Count

    ' Напечатайте полное имя книги с именем Пример.xlsm
    Debug.Print Workbooks("Пример.xlsm").FullName

    ' Напечатайте полное название книги, которая была открыта второй
    Debug.Print Workbooks(2).FullName
Коллекции похожи на массивы, поэтому важно понимать, что они из себя представляют и чем они отличаются от массивов.
Что такое коллекция?
Коллекции и массивы используются для группировки переменных. Они оба хранят набор похожих предметов, например список студенческих оценок или названий стран. Использование коллекции или массива позволяет быстро и легко манипулировать большим количеством предметов.
В своей статье о массивах я объяснил простым языком, что такое массивы и почему они так полезны. Я кратко изложу эту информацию здесь.
Если вы сохраняете оценки одного ученика, вы можете легко сделать это, используя одну переменную.
 Dim mark As Long
    mark = sheetMarks.Range("A1")
Однако в большинстве случаев вам придется иметь дело с несколькими студентами. Представьте, что вы хотите хранить оценки 100 учеников. Если вы не использовали коллекции или массивы, вам нужно было бы создать сотню переменных — одну переменную для хранения оценки для каждого учащегося.
Другая проблема заключается в том, что вы должны использовать эти переменные по отдельности. Если вы хотите сохранить 100 отметок, вам понадобится строка кода каждый раз, когда вы хотите сохранить значение в переменной.
' Объявите переменную для каждой оценки
    Dim mark1 As Long
    Dim mark2 As Long
    .
    .
    .
    Dim mark100 As Long

    ' Сохраните отметки на листе в переменной
    mark1 = sheetMarks.Range("A1")
    mark2 = sheetMarks.Range("A2")
    .
    .
    .
    mark100 = sheetMarks.Range("A100")
Как вы можете видеть в приведенном выше примере, написание такого кода означало бы сотни строк повторяющегося кода. Когда вы используете коллекцию или массив, вам нужно только объявить одну переменную. Использование цикла с коллекцией или массивами означает, что вам нужна только одна строка для добавления или чтения значений.
Если мы переписываем приведенный выше пример с использованием коллекции, нам нужно всего несколько строк кода
 ' Создать коллекцию
    Dim collMarks As New Collection

    ' Прочитайте 100 значений в коллекцию
    Dim c As Range
    For Each c In Sheet1.Range("A1:A100")
        ' Эта строка используется для добавления всех значений
        collMarks.Add c.Value
    Next
Коллекции против Массивов
Мы рассмотрели, что общего у коллекций и массивов. Так в чем же разница и зачем использовать один вместо другого?
Основное отличие состоит в том, что с массивом вы обычно устанавливаете размер один раз. Это означает, что вы знаете размер до того, как начнете добавлять элементы. Позвольте мне объяснить это на примере.
Пример: когда Массив лучше
Представьте, что у вас есть лист оценок учеников с одним учеником на строку:
Вы хотите хранить информацию о каждом ученике. В этом примере вы можете легко посчитать количество строк, чтобы получить количество студентов. Другими словами, вы знаете количество предметов заранее.
 ' Получить последнюю строку - это количество студентов
    Dim lStudentCount As Long
    lStudentCount = Sheet1.Range("A" & Rows.Count).End(xlUp).Row

    ' Создать массив правильного размера
    Dim arr() As Long
    ReDim arr(1 To lStudentCount)
В примере кода, как видите, мы получаем количество студентов путем подсчета строк. Затем мы можем использовать это для создания массива правильного размера.
Массивы используются, когда размер фиксирован.
Давайте теперь посмотрим на второй пример, где мы не знаем количество предметов заранее.
Пример: когда Коллекция лучше
В этом примере у нас есть один и тот же рабочий лист студента, но на этот раз нам нужны только студенты с заданными критериями. Например, только студенты из Твери или Москвы, которые изучают математику или историю. Другими словами, вы не будете знать, как выбрать ученика, пока не прочитаете его данные на рабочем листе.
Представьте также, что студенты могут быть добавлены или удалены из списка во время работы приложения.
Таким образом, в этом примере количество студентов не является фиксированным и сильно меняется. Здесь вы не знаете количество студентов заранее. Поэтому вы не знаете, какой размер массива создать.
Вы можете создать массив максимально возможного размера. Проблема в том, что у вас будет много пустых слотов, и вам придется добавить код, чтобы справиться с ними. Если вы прочитаете 50 учеников с максимумом 1000, то у вас будет 950 неиспользуемых слотов массива.
Вы также можете изменить размер массива для каждого элемента по мере его добавления. Это очень неэффективно и довольно грязно.
Так что для этого примера лучше использовать коллекцию.
 ' Объявить
    Dim coll As New Collection

    ' Добавить элемент - VBA следит за изменением размера
    coll.Add "Яблоко"
    coll.Add "Слива"

    ' удалить элемент - VBA следит за изменением размера
    coll.Remove 1
Когда вы добавляете или удаляете элемент в коллекцию, VBA выполняет все изменения размера за вас. Вам не нужно указывать размер или выделять новые пробелы. VBA делает это самостоятельно. Все, что вам нужно сделать, это добавить элемент или удалить его.
Коллекция используется, когда размер часто изменяется.
Еще одно преимущество коллекций
Коллекции гораздо проще использовать, чем массивы, особенно если вы новичок в программировании. Большую часть времени вы делаете три вещи с коллекциями:
- Создать коллекцию
- Добавьте несколько предметов
- Прочитайте предмет
Так что, если вы не имеете дело с большим количеством предметов, тогда использование Коллекции может быть намного удобнее в использовании.
Недостаток коллекций
Основные типы данных (т.е. переменные, такие как string, date, long, currency и т.д.) в коллекциях доступны только для чтения. Вы можете добавить или удалить элемент, но не можете изменить его значение. Если вы собираетесь изменять значения в группе элементов, вам нужно будет использовать массив.
Если вы храните объект в коллекции, вы можете изменить значение, так как коллекция хранит ссылку, а не фактический объект.
Коллекция только для чтения
Теперь, когда мы знаем, когда и зачем использовать коллекцию, давайте посмотрим, как ее использовать.
Как создать коллекцию
Вы можете объявить и создать в одной строке, как это делает следующий код:
   ' Объявить и создать
    Dim coll As New Collection
Как видите, вам не нужно указывать размер. После того, как ваша коллекция создана, вы можете легко добавлять в нее элементы.
Вы также можете объявить и затем создать коллекцию, если и когда вам это нужно.
' Объявить
Dim coll As Collection

' Создать Коллекцию
Set coll = New Collection
Незначительная разница между этими методами
Разница между этими методами заключается в том, что для первого всегда создается коллекция. Для второго метода коллекция создается только при достижении строки Set. Таким образом, вы можете установить код для создания коллекции только при соблюдении определенного условия.
' Объявить
    Dim coll As Collection

    ' Создать коллекцию, если файл найден
    If filefound = True Then
        Set coll = New Collection
    Endif
Преимущество использования этого метода минимально. Выделение памяти было важно еще в 1990-х годах, когда память компьютера была ограничена. Если вы не создаете огромное количество коллекций на медленном ПК, вы никогда не заметите никакой выгоды.
Использование Set означает, что коллекция будет вести себя иначе, чем когда вы устанавливаете коллекцию в ничто. Следующий раздел объясняет это.
Удаление всех элементов из коллекции
Коллекция не имеет функции RemoveAll. Однако, чтобы удалить все элементы из коллекции, вы можете просто установить ее в новую коллекцию.
Set Coll = New Collection.
VBA удалит коллекцию, потому что мы больше не ссылаемся на нее. Когда мы удаляем все предметы, мы обычно хотим использовать коллекцию снова, поэтому мы эффективно убиваем двух зайцев одним выстрелом, используя этот метод.
Sub UdalitKollekciyu()

    Dim coll1 As New Collection

    coll1.Add "яблоко"
    coll1.Add "слива"

    ' Оригинальная коллекция удалена
    Set coll1 = New Collection

End Sub
Следует помнить одну тонкую вещь: если у нас есть две или более переменных, которые ссылаются на одну и ту же коллекцию, она не будет удалена (см. Очистка памяти в VBA).
В приведенном ниже примере исходные элементы коллекции не удаляются, так как он все еще является ссылкой по coll2.
Sub KollekciyaNeUdalyaetsya()

    Dim coll1 As New Collection, coll2 As Collection

    coll1.Add "яблоко"
    coll1.Add "слива"

    ' Coll1 и Coll2 оба ссылаются на коллекцию
    Set coll2 = coll1

    ' Coll1 теперь ссылается на новую коллекцию
    Set coll1 = New Collection

    ' Coll2 относится к оригинальной коллекции - печатает яблоко
    Debug.Print coll2(1)

End Sub
Добавление предметов в коллекцию
Добавить предметы в коллекцию просто. Вы используете свойство add, за которым следует значение, которое вы хотите добавить.
 collFruit.Add "Яблоко"
 collFruit.Add "Слива"
Вы можете иметь любой базовый тип в коллекции, например, Double
collTotals.Add 45.67
collTotals.Add 34.67
Когда вы добавляете элементы таким способом, они добавляются в следующий доступный индекс. В примере с фруктами яблоко добавляется в положение 1, а слива — в положение 2.
Before и After
Вы можете использовать параметры «Before» или «After», чтобы указать, где вы хотите разместить элемент в коллекции. Обратите внимание, что вы не можете использовать оба этих аргумента одновременно.
collFruit.Add "Яблоко"
collFruit.Add "Слива"
' Добавить лимон перед первым пунктом
collFruit.Add "Лимон", Before:=1
После этого кода порядок коллекции выглядит так:
- Лимон
- Яблоко
- Слива
collFruit.Add "Яблоко"
collFruit.Add "Слива"
' Добавьте лимон после первого пункта
collFruit.Add "Лимон", After:=1
После этого кода порядок коллекции выглядит так:
- Яблоко
- Лимон
- Слива
Доступ к элементам коллекции
Для доступа к элементам коллекции вы просто используете индекс. Как мы увидели, индекс — это позиция элемента в коллекции на основе порядка, в котором они были добавлены.
Порядок также можно установить с помощью параметра «Before» или «After».
Sub dostup()

    Dim coll As New Collection

    coll.Add "Яблоко"
    coll.Add "Слива"

    ' Будет напечатано Яблоко
    Debug.Print coll(1)

    ' добавьте апельсин в начало
    coll.Add "Апельсин", Before:=1

    ' будет напечатан Апельсин
    Debug.Print coll(1)

    ' Будет печатать Яблоко, так как оно сейчас в положении 2
    Debug.Print coll(2)

End Sub
Вы также можете использовать свойство элемента для доступа к элементу в коллекции. Это метод по умолчанию для коллекции, поэтому следующие строки кода эквивалентны.
  Debug.Print coll(1)
  Debug.Print coll.Item(1)
Элементы в коллекции доступны только для чтения?
Это очень важный момент. Когда базовый тип данных хранится в коллекции, он доступен только для чтения. Базовый тип данных — это строка, дата, целое число, длина и т.д.
Если вы попытаетесь обновить элемент коллекции, вы получите сообщение об ошибке. Следующий код выдает ошибку «Требуется объект».
Sub NapisatZnachenie()

    Dim coll As New Collection

    coll.Add "Яблоко"

    ' Эта строка вызывает ОШИБКУ
    coll(1) = "Слива"

End Sub
Вы можете изменить объект, который хранится в коллекции
Sub IzmenitObekt()

    Dim coll As New Collection
    Dim o As New Class1

    ' Добавить объект в коллекцию
    o.fruit = "Яблоко"
    coll.Add o

    ' Изменить фруктовую часть Class1
    coll(1).fruit = "Слива"

    ' Печатает Слива
    Debug.Print coll(1).fruit

End Sub
Это может показаться противоречивым поведением, но тому есть веская причина. Любой элемент, добавленный в коллекцию, доступен только для чтения. Однако при добавлении объекта в коллекцию объект не добавляется как элемент. Переменная с адресом памяти объекта добавляется в качестве элемента.
Это происходит незаметно, чтобы вы этого не заметили. Переменная item на самом деле доступна только для чтения, но объект, на который она указывает, — нет.
Все, что вам нужно помнить, это то, что базовые типы данных в коллекции доступны только для чтения. Объекты в коллекции могут быть изменены.
Вы можете прочитать больше об объектах в памяти здесь.
Добавление разных типов
Вы также можете добавлять различные типы предметов в коллекцию.
 collFruit.Add "Яблоко"
 collFruit.Add 45
 collFruit.Add #12/12/2019#
Это редко нужно. В VBA коллекции Sheets содержат листы типа Worksheet и типа Chart. (Чтобы создать лист с диаграммой, просто щелкните правой кнопкой мыши любую диаграмму, выберите «Переместить» и установите переключатель «Новый лист»).
Следующий код отображает тип и имя всех листов в текущей книге. Обратите внимание, что для доступа к другому типу необходимо, чтобы переменная For Each была вариантом, иначе вы получите ошибку.
Sub listi()

    Dim sh As Variant
    For Each sh In ThisWorkbook.Sheets
        ' Тип отображения и название листа
        Debug.Print TypeName(sh), sh.Name
    Next

End Sub
При доступе к различным элементам переменная For Each должна быть вариантом. Если это не так, вы получите ошибку при доступе к другому типу, который вы объявили. Если мы объявим sh в качестве рабочего листа в приведенном выше примере, это приведет к ошибке при попытке доступа к листу типа Chart.
Редко вам понадобится коллекция разных типов, но, как видите, иногда это может быть полезно.
Добавление элементов с помощью ключа
Вы также можете добавить элементы, используя ключ, как показано в следующем примере:
collMark.Add Item:=45, Key:="Петр"

Debug.Print "Оценки Петра: ",collMark("Петр")
Я включил имена параметров, чтобы сделать приведенный выше пример понятным. Однако вам не нужно этого делать. Просто помните, что ключ является вторым параметром и должен быть уникальной строкой.
Следующий код показывает второй пример использования ключей.
Sub IspolzovanieKlyuchei()

    Dim collMark As New Collection

    collMark.Add 45, "Петр"
    collMark.Add 67, "Юрий"
    collMark.Add 12, "Ольга"
    collMark.Add 89, "Елена"

    ' Печатать оценку Елены
    Debug.Print collMark("Елена")

    ' Печатать оценку Петра
    Debug.Print collMark("Петр")

End Sub
Использование ключей имеет три преимущества:
- Если заказ изменится, ваш код все равно получит доступ к нужному товару
- Вы можете напрямую получить доступ к элементу, не читая всю коллекцию
- Это может сделать ваш код более читабельны
В коллекции Workbooks VBA доступ к рабочей книге гораздо лучше по ключу (имени), чем по индексу. Порядок зависит от порядка, в котором они были открыты, и поэтому является довольно случайным.
Sub IspolzovanieWorkbook()

    Debug.Print Workbooks("Пример.xlsm").Name

    Debug.Print Workbooks(1).Name

End Sub
Когда использовать ключи
Пример использования ключей: представьте, что у вас есть набор идентификаторов для 10 000 учащихся вместе с их оценками.
У вас также есть несколько отчетов на листе, которые содержат списки идентификаторов студентов. Для каждого из этих рабочих листов вам необходимо распечатать отметку для каждого учащегося.
Вы можете сделать это, добавив 10 000 студентов в коллекцию, используя их идентификатор в качестве ключа. Когда вы читаете удостоверение личности с листа, вы можете получить прямой доступ к оценкам этого студента.
Если вы не используете ключ, вам придется искать по 10 000 идентификаторов для каждого идентификатора в отчете.
Недостаток использования ключей в коллекциях
В коллекциях есть два недостатка ключей
- Вы не можете проверить, существует ли Ключ.
- Вы не можете обновить значение, хранящееся в ключе
Первый вопрос легко обойти. Следующий код проверяет, существует ли ключ.
Function Exists(coll As Collection, key As String) As Boolean

    On Error Goto EH

    coll.Item key

    Exists = True
EH:
End Function
Вы можете использовать это так:
Sub TestExists()

    Dim coll As New Collection
    coll.Add Item:=5, key:="Яблоко"
    coll.Add Item:=8, key:="Слива"

    ' Печатает истина
    Debug.Print Exists(coll, "Яблоко")
    ' Печатает ложь
    Debug.Print Exists(coll, "Апельсин")
    ' Печатает истина
    Debug.Print Exists(coll, "Слива")

End Sub
Второй вопрос не так легко обойти, если у вас нет хороших знаний в программировании.
Если вы хотите использовать ключи, есть альтернатива Коллекции. Вы можете использовать словарь. Словарь предоставляет больше возможностей для работы с клавишами. Вы можете проверить, существуют ли ключи, обновить значения в ключах, получить список ключей и так далее.
Доступ ко всем элементам в коллекции
Для доступа ко всем элементам в коллекции вы можете использовать цикл For или цикл For Each. Давайте рассмотри каждый из них.
Использование цикла For
В обычном цикле For вы используете индекс для доступа к каждому элементу. В следующем примере выводится имя всех открытых рабочих книг.
Sub VseWorkbook()

    Dim i As Long
    For i = 1 To Workbooks.Count
        Debug.Print Workbooks(i).Name
    Next i

End Sub
Вы можете видеть, что мы используем диапазон от 1 до Workbooks.Count. Первый элемент всегда находится в первом положении, а последний элемент всегда находится в положении, указанном свойством Count коллекции.
В следующем примере распечатываются все элементы в пользовательской коллекции.
Sub IspolzovanieKollekcii()

    ' Объявить и создать коллекцию
    Dim collFruit As New Collection

    ' Добавить элементы
    collFruit.Add "Яблоко"
    collFruit.Add "Слива"
    collFruit.Add "Груша"

    ' Печать всех элементов
    Dim i As Long
    For i = 1 To collFruit.Count
        Debug.Print collFruit(i)
    Next i

End Sub
Использование цикла For Each
Цикл For Each, который является специализированным циклом, используется для коллекций. Он не использует индекс, а формат показан в следующем примере.
Sub VseWorkbookForEach()

    Dim book As Variant
    For Each book In Workbooks
        Debug.Print book.Name
    Next

End Sub
Формат цикла For:
For i = 1 To Coll.Count
Next
где i — long, Coll — коллекция
Формат цикла For Each:
For Each var In Coll
Next
где var — вариант, а Coll — коллекция
Чтобы получить доступ к каждому элементу:
For: Coll(i)
For Each: Var
В следующем примере показаны циклы для приведенного выше примера пользовательской коллекции.
Sub IspolzovanieOboihCiklov()

    ' Объявить и создать коллекцию
    Dim collFruit As New Collection

    ' Добавить элементы
    collFruit.Add "Яблоко"
    collFruit.Add "Слива"
    collFruit.Add "Груша"

    ' Печать всех элементов, используя For
    Dim i As Long
    For i = 1 To collFruit.Count
        Debug.Print collFruit(i)
    Next i

    ' Печать всех элементов, используя For Each
    Dim fruit As Variant
    For Each fruit In collFruit
        Debug.Print fruit
    Next fruit

End Sub
For Each против For
Важно понимать разницу между двумя циклами.
Цикл For Each
- быстрее
- аккуратнее писать
- имеет только один заказ — от низкого индекса до высокого
Цикл For
- медленнее
- не так аккуратен
- можно получить доступ в другом порядке
Давайте сравним циклы по каждому из этих атрибутов
Скорость
For Each считается быстрее, чем цикл For. В настоящее время это проблема, только если у вас большая коллекция и / или медленный компьютер/сеть.
Аккуратнее
Цикл For Each аккуратнее писать, особенно если вы используете вложенные циклы. Сравните следующие циклы. Оба печатают названия всех рабочих листов в открытых рабочих книгах.
Sub PechatatNazvaniyaFor()

    ' Напечатайте названия рабочих листов из всех открытых рабочих книг
    Dim i As Long, j As Long
    For i = 1 To Workbooks.Count
        For j = 1 To Workbooks(i).Worksheets.Count
            Debug.Print Workbooks(i).Name, Workbooks(i).Worksheets(j).Name
        Next j
    Next i

End Sub

Sub PechatatNazvaniyaForEach()

    ' Напечатайте названия рабочих листов из всех открытых рабочих книг
    Dim bk As Workbook, sh As Worksheet
    For Each bk In Workbooks
        For Each sh In bk.Worksheets
            Debug.Print bk.Name, sh.Name
        Next sh
    Next bk

End Sub
Цикл For Each гораздо удобнее для написания и менее подвержен ошибкам.
Порядок
Порядок цикла For Each всегда от самого низкого индекса до самого высокого. Если вы хотите получить другой заказ, вам нужно использовать цикл For. Порядок цикла For можно изменить. Вы можете прочитать предметы в обратном порядке. Вы можете прочитать раздел предметов или вы можете прочитать каждый второй элемент.
Sub ChitatSpravaNalevo()

' Просмотрите листы справа налево
Dim i As Long
For i = ThisWorkbook.Worksheets.Count To 1 Step -1
Debug.Print ThisWorkbook.Worksheets(i).Name
Next i

' Пройдите первые 3 листа
For i = 1 To 3
Debug.Print ThisWorkbook.Worksheets(i).Name
Next i

' Пройдите каждый второй лист
For i = 1 To ThisWorkbook.Worksheets.Count Step 2
Debug.Print ThisWorkbook.Worksheets(i).Name
Next i

End Sub
Цикл For дает больше гибкости, но реальность такова, что большую часть времени базовый порядок — это все, что вам нужно.
Сортировка коллекции
Для коллекции VBA нет встроенной сортировки. Однако мы можем использовать QuickSort.
Sub QuickSort(coll As Collection, first As Long, last As Long)

  Dim vCentreVal As Variant, vTemp As Variant

  Dim lTempLow As Long
  Dim lTempHi As Long
  lTempLow = first
  lTempHi = last

  vCentreVal = coll((first + last)  2)
  Do While lTempLow <= lTempHi

    Do While coll(lTempLow) < vCentreVal And lTempLow < last
      lTempLow = lTempLow + 1
    Loop

    Do While vCentreVal < coll(lTempHi) And lTempHi > first
      lTempHi = lTempHi - 1
    Loop

    If lTempLow <= lTempHi Then

      ' Поменять значения
      vTemp = coll(lTempLow)

      coll.Add coll(lTempHi), After:=lTempLow
      coll.Remove lTempLow

      coll.Add vTemp, Before:=lTempHi
      coll.Remove lTempHi + 1

      ' Перейти к следующим позициям
      lTempLow = lTempLow + 1
      lTempHi = lTempHi - 1

    End If

  Loop

  If first < lTempHi Then QuickSort coll, first, lTempHi
  If lTempLow < last Then QuickSort coll, lTempLow, last

End Sub
Вы можете использовать это так:
Sub TestSort()

    Dim coll As New Collection
    coll.Add "Москва"
    coll.Add "Тверь"
    coll.Add "Пенза"
    coll.Add "Новосибирск"

    QuickSort coll, 1, coll.Count

    Dim v As Variant
    For Each v In coll
        Debug.Print v
    Next

End Sub
Использование коллекций с функциями и подпрограммами
Использовать коллекцию в качестве параметра или возвращаемого значения очень легко. Мы рассмотрим их по очереди.
Передача Коллекции в Sub / Function
Это просто передать коллекцию в функцию или подпункт. Она передается как любой параметр, как показано в следующем примере кода.
Sub IspolzovatColl()

    ' Создать коллекцию
    Dim coll As New Collection

    ' Добавить элементы
    coll.Add "Яблоко"
    coll.Add "Апельсин"

    ' Перейти на sub
    PrintColl coll

End Sub

' Sub принимает коллекцию в качестве аргумента
Sub PrintColl(ByRef coll As Collection)

    Dim item As Variant
    For Each item In coll
        Debug.Print item
    Next

End Sub
Вы можете увидеть, насколько полезен вспомогательный PrintColl в примере. На нем будут напечатаны все элементы ЛЮБОЙ коллекции. Размер или тип элемента не имеет значения. Это показывает, насколько гибкими должны быть коллекции.
Передача ByVal против ByRef
Здесь следует помнить одну тонкую вещь: передача по значению (By Val) и передача по ссылке (ByRef) немного отличаются.
Для простой передачи переменной значение означает, что копия создана. Это означает, что если функция / подчиненный элемент изменится, значение не изменится, когда вы вернетесь к вызывающей процедуре.
В следующем примере мы передаем итоговое значение, используя ByVal и ByRef. Вы увидите, что после того, как мы передаем использование ByRef, значение изменилось в вызывающей процедуре.
Sub TipiPeredachi()

    Dim total As Long
    total = 100

    PassByValue total
    ' Печатает 100
    Debug.Print total

    PassByReference total
    ' Печатает 555
    Debug.Print total

End Sub

Sub PassByValue(ByVal total As Long)
    ' значение изменилось только в этом sub
    total = 555
End Sub

Sub PassByReference(ByRef total As Long)
    ' значение также изменилось за пределами этого sub
    total = 555
End Sub
Использование ByVal и ByRef с коллекцией немного отличается. Если вы добавляете или удаляете элемент, коллекция в исходном вызывающем абоненте также будет изменена. Таким образом, Subs в следующем примере удалят первый элемент из исходной коллекции.
Sub UdalitByRef(ByRef coll As Collection)
    coll.Remove 1
End Sub

Sub RemoveByVal(ByVal coll As Collection)
    coll.Remove 1
End Sub
Причина этого заключается в том, что переменная Collection содержит указатель. Это означает, что он содержит адрес коллекции, а не фактическую коллекцию. Поэтому, когда вы добавляете или удаляете элемент, вы меняете то, на что указывает указатель, а не сам указатель. Однако, если вы измените указатель, он будет изменен за пределами подпрограммы.
Вам не нужно беспокоиться об указателях. Все, что вам нужно знать, это то, как это влияет на поведение передачи параметра. Если для параметра коллекции ничего не задано, поведение зависит от того, использовали ли вы ByRef или ByVal.
- Использование ByRef сбросит исходную коллекцию
- Использование ByVal не изменит оригинальную коллекцию
' Очистит исходную коллекцию
Sub PassByRef(ByRef coll As Collection)
    Set coll = Nothing
End Sub

' Не изменит исходную коллекцию
Sub PassByVal(ByVal coll As Collection)
    Set coll = Nothing
End Sub
Возврат коллекции из функции
Возврат коллекции из функции — это то же самое, что вернуть любой объект. Вам нужно использовать ключевое слово Set. В следующем примере вы увидите, как вернуть коллекцию.
Sub OtchetOFruktah()
    ' ПРИМЕЧАНИЕ. Мы не используем ключевое слово New для создания 'коллекции.
    ' Коллекция создается в функции CreateCollection.
    Dim coll As Collection

    ' получить coll от функции CreateCollection
    Set coll = CreateCollection

    ' сделать что-то с coll здесь

End Sub

Function CreateCollection() As Collection

    Dim coll As New Collection

    coll.Add "Слива"
    coll.Add "Груша"

    ' Возврат коллекции
    Set CreateCollection = coll

End Function
Примечание: вы не используете ключевое слово New при объявлении коллекции в подпункте OtchetOFruktah(). Потому что коллекция создается в CreateCollection (). Когда вы возвращаете коллекцию, вы просто назначаете переменную коллекции, указывающую на эту коллекцию.
Заключение
Коллекции — очень полезная часть VBA. Их гораздо проще использовать, чем массивы, и они очень полезны, когда вы много добавляете и удаляете элементы. У них есть только четыре свойства:
Add, Remove, Count и Item . Поэтому они очень просты в освоении.
Основные пункты этой статьи:
- Коллекции — это способ хранения группы элементов вместе.
- VBA имеет свои собственные коллекции, такие как
Workbooks, Worksheets и Cells . - Элементы не обязательно должны быть одного типа, но обычно одного. Коллекция VBA Sheets может содержать как листы, так и листы диаграмм.
- Коллекция позволяет легко выполнять одну и ту же задачу для нескольких элементов, например, распечатать все значения.
- Коллекции похожи на массивы, поскольку в них хранятся группы похожих элементов.
- Коллекции лучше при добавлении и удалении большого количества элементов.
- Коллекции проще в использовании, чем массивы.
- Массивы более полезны, когда количество элементов фиксировано.
- Массивы более эффективны при чтении и записи в ячейки или из них.
- Базовые типы данных (т.е. не-объекты) в коллекции доступны только для чтения, а массивы — для чтения / записи.
- Вы можете создать коллекцию, используя только Dim или Dim с помощью Set.
- Вы можете удалить всю коллекцию, установив для нее значение Nothing. Но зависит от того, как она была создана.
- Вы можете добавлять элементы в определенную позицию в коллекции, используя аргументы «Before» и «After» с помощью функции Add.
- Вы можете использовать ключи с коллекцией для прямого доступа к элементу. Коллекции не имеют хорошей поддержки ключей, поэтому обычно лучше использовать коллекцию Dictionary, когда вам нужно использовать ключи.
- Вы можете использовать циклы For и For Each для доступа ко всем элементам в коллекции. Цикл For Each более эффективен, но позволяет просматривать коллекцию только в одном порядке.
- Вы можете легко передать коллекцию в качестве аргумента в функцию или подпрограмму.
- Вы можете легко вернуть коллекцию из функции.
Содержание
- Collection object
- Remarks
- Example
- See also
- Support and feedback
- Объект Collection
- Замечания
- Пример
- См. также
- Поддержка и обратная связь
- Excel VBA Collections
- What is a Collection in VBA?
- Collections Versus Arrays
- Scope of a Collection Object
- Create a Collection, Add Items, and Access Items
- Loop Through Collection
- Add Item to Collection
- VBA Coding Made Easy
- Remove an Item from Collection
- Count the Number of Items in a Collection
- Test Collection for a Specific Value
- Pass a Collection to a Sub / Function
- Return a Collection from a Function
- Convert a Collection to an Array
- Convert an Array into a Collection
- VBA Code Examples Add-in
Collection object
A Collection object is an ordered set of items that can be referred to as a unit.
The Collection object provides a convenient way to refer to a related group of items as a single object. The items, or members, in a collection need only be related by the fact that they exist in the collection. Members of a collection don’t have to share the same data type.
A collection can be created the same way other objects are created. For example:
After a collection is created, members can be added by using the Add method and removed by using the Remove method. Specific members can be returned from the collection by using the Item method, while the entire collection can be iterated by using the For Each. Next statement.
Example
This example creates a Collection object ( MyClasses ), and then creates a dialog box in which users can add objects to the collection.
To see how this works, choose the Class Module command from the Insert menu and declare a public variable called InstanceName at the module level of Class1 (type Public InstanceName ) to hold the names of each instance. Leave the default name as Class1. Copy and paste the following code into the General section of another module, and then start it with the statement ClassNamer in another procedure.
(This example only works with host applications that support classes.)
See also
Support and feedback
Have questions or feedback about Office VBA or this documentation? Please see Office VBA support and feedback for guidance about the ways you can receive support and provide feedback.
Источник
Объект Collection
Объект Collection — это упорядоченный набор элементов, который может называться блоком.
Замечания
Объект Collection предоставляет удобный способ ссылки на связанную группу элементов как на один объект. Элементы или элементы в коллекции должны быть только связаны тем фактом, что они входят в коллекцию. Элементы коллекции могут иметь разные типы данных.
Коллекция может создаваться таким же способом, как и другие объекты. Например:
После создания коллекции члены можно добавить с помощью метода Add и удалить с помощью метода Remove . Определенные элементы можно вернуть из коллекции с помощью метода Item , а всю коллекцию можно выполнить итерацию с помощью параметра For Each. Следующая инструкция.
Пример
В этом примере создается объект Collection ( MyClasses ), а затем создается диалоговое окно, в котором пользователи могут добавлять объекты в коллекцию.
Чтобы узнать, как это работает, выберите команду Class Module в меню Вставка и объявите общедоступную переменную с именем InstanceName на уровне модуля Class1 (тип Public InstanceName ) для хранения имен каждого экземпляра. Оставьте Class1 в качестве имени по умолчанию. Скопируйте и вставьте следующий код в раздел Общие другого модуля, а затем запустите его с оператора ClassNamer в другой процедуре.
(Этот пример работает только с ведущими приложениями, которые поддерживают классы.)
См. также
Поддержка и обратная связь
Есть вопросы или отзывы, касающиеся Office VBA или этой статьи? Руководство по другим способам получения поддержки и отправки отзывов см. в статье Поддержка Office VBA и обратная связь.
Источник
Excel VBA Collections
In this Article
This tutorial will demonstrate how to use collections in VBA.
What is a Collection in VBA?
A collection is an object that holds a number of similar items that can easily be accessed and manipulated, even if there are a large number of items within the collection.
You can create your own collections, but VBA also comes with built in collections such as the Sheets Collection, which stores every sheet in the workbook. By using a For Each loop, you can iterate through each worksheet in the Sheets Collection.
You can also address a specific worksheet in the collection using the index value (it’s position in the collection), or the actual name of the worksheet:
As worksheets are added or deleted so the Sheets collection grows or shrinks in size.
Note that with VBA collections the index number begins with 1 not with 0.
Collections Versus Arrays
Arrays and Collections can both store data, however they have several notable differences:
- Arrays are multidimensional whereas collections are only single dimension. You can dimension an array with several dimensions e.g.
This creates an array of 10 rows with 2 columns, almost like a worksheet. A collection is effectively a single column.
- When you populate your array, you need a separate line of code to put a value into each element of the array. If you had a two-dimensional array you would actually need 2 lines of code – one line to address the first column and one line to address the second column. With the Collection object, you simply use the Add method so that the new item is just added into the collection and the index value is automatically adjusted to suit.
- If you need to delete an item of data then it is more complicated in the array. You can set the values of an element to a blank value, but the element itself still exists within the array. If you are using a For Next loop to iterate through the array, the loop will return a blank value, which will need coding to make sure that the blank value is ignored. In a collection you use the Add or Remove methods, and all the indexing and re-sizing is automatically taken care of. The item that has been removed disappears completely. Arrays are useful for a fixed size of data, but collections are better for where the quantity of data is liable to change.
- Collections are Read Only whereas array values can be changed using VBA. With a collection, you would have to remove the value to be changed first and then add in the new changed value.
- In an array, you can only use a single data type for the elements which is set when you dimension the array. However, in the array you can use custom data types that you have designed yourself. You could have a very complicated array structure using a custom data type which in turn has several custom data types below it. In a collection, you can add use data types of data for each item. You could have a numeric value, a date, or a string – the collection object will take any data type. If you tried to put a string value in an array that was dimensioned as numeric, it would produce an error message.
- Collections are generally easier to use than arrays. In coding terms, when you create a collection object, it only has two methods (Add and Remove) and two properties (Count and Item), so the object is by no means complicated to program.
- Collections can use keys to locate data. Arrays do not have this function and require looping code to iterate through the array to find specific values.
- The size of an array needs to be defined when it is first created. You need to have an idea of how much data it is going to store. If you need to increase the size of the array you can use ‘ReDim’ to re-size it, but you need to use the keyword ‘Preserve’ if you do not want to lose the data already held in the array. A collection size does not need to be defined. It just grows and shrinks automatically as items are added or removed.
Scope of a Collection Object
In terms of scope, the collection object is only available whilst the workbook is open. It does not get saved when the workbook is saved. If the workbook is re-opened then the collection needs to be re-created using VBA code.
If you want your collection to be available to all the code in your code module, then you need to declare the collection object in the Declare section at the top of the module window.
This will ensure that all your code within that module can access the collection. If you want any module within your workbook to access the collection, then define it as a global object.
Create a Collection, Add Items, and Access Items
A simple collection object can be created in VBA using the following code:
The code creates a new object called ‘MyCollection’ and then the following lines of code use the Add method to add in 3 new values.
Loop Through Collection
You can then use code to iterate through each item in your collection:
Or this code will get the size of the collection with .Count and loop through each index number:
The first For Each Loop is faster than the second For Next loop but it only works in one direction (low index to high). The For Next Loop has the advantage that you can use a different direction (high index to low) and you can also use the Step method to change the increment. This is useful when you want to delete several items since you will need to run the deletion from the end of the collection to the start as the index will change as the deletions take place.
Add Item to Collection
The Add method in a collection has 3 optional parameters – Key, Before, and After.
You can use the ‘Before’ and ‘After’ parameters to define the position of your new item relative to the others already in the collection.
This is done by specifying the index number that you want your new item to be relative to.
In this example ‘Item2’ has been specified to be added before the first indexed item in the collection (which is ‘Item1’). When you iterate through this collection ‘Item2’ will appear first of all, followed by ‘Item1’ and ‘Item3’.
When you specify a ‘Before’ or ‘After’ parameter, the index value is automatically adjusted within the collection so that ‘Item2’ becomes index value of 1 and ‘Item1’ gets moved to an index value of 2.
You can also use the ‘Key’ parameter to add a reference value that you can use to identify the collection item. Note that a key value must be a string and must be unique within the collection.
‘Item2’ has been given a ‘Key’ value of ‘MyKey’ so that you can refer to that item using the value of ‘MyKey’ instead of the index number (2).
Note that the ‘Key’ value has to be a string value. It cannot be any other data type. Note that the collection is Read Only, and you cannot update the key value once it has been set. Also, you cannot check if a key value exists for a specific item in the collection or view the key value which is a bit of a drawback.
The ‘Key’ parameter has the added advantage of making your code more readable, especially if it is being handed over to a colleague to support, and you do not have to iterate through the entire collection to find that value. Imagine if you had a collection of 10,000 items how difficult it would be to reference one specific item!
VBA Coding Made Easy
Stop searching for VBA code online. Learn more about AutoMacro — A VBA Code Builder that allows beginners to code procedures from scratch with minimal coding knowledge and with many time-saving features for all users!
Remove an Item from Collection
You can use the ‘Remove’ method to delete items from your collection.
Unfortunately, it is not easy if the collection has a large number of items to work out the index of the item that you want to delete. This is where the ‘Key’ parameter comes in handy when the collection is being created.
When an item is removed from a collection the index values are automatically reset all the way through the collection. This is where the ‘Key’ parameter is so useful when you are deleting several items at once. For example, you could delete item index 105, and instantly item index 106 becomes index 105, and everything above this item has its index value moved down. If you use the Key parameter, there is no need to worry about which index value needs to be removed.
To delete all the collection items and create a new collection, you use the Dim statement again which creates an empty collection.
To remove the actual collection object completely, you can set the object to nothing.
This is useful if the collection is no longer required by your code. Setting the collection object to nothing removes all reference to it and releases the memory that it was using. This can have important implications on speed of execution of your code, if a large object is sitting in memory that is no longer required.
Count the Number of Items in a Collection
You can easily find out the number of items in your collection by using the ‘Count’ property.
You would use this property if you were using a For Next Loop to iterate through the collection as it will provide you with the upper limit for the index number.
Test Collection for a Specific Value
You can iterate through a collection to search for a specific value for an item using a For Each Loop.
The code creates a small collection, and then iterates through it looking for an item called ‘item2”. If found it displays a message box that it has found the specific item.
One of the drawbacks with this methodology is that you cannot access the index value or the key value.
If you use a For Next Loop instead, you can use the For Next counter to get the index value, although you still cannot get the ‘Key’ value.
The For Next counter (n) will provide the index position.
Sort Collection
There is no built-in functionality to sort a collection, but using some ‘out of the box’ thinking, code can be written to do a sort, utilizing Excel’s worksheet sorting function. This code uses a blank worksheet called ‘SortSheet’ to do the actual sorting.
This code first creates a collection with the items added in a random order. It then copies them into the first column on a worksheet (SortSheet).
The code then uses the Excel sort tool to sort the data in the column into ascending order. The code could also be modified to sort into descending order.
The collection is then emptied of data using a For Next Loop. Note that the step option is used so that it clears from the end of the collection to the start. This is because as it clears, the index values are reset, if it cleared from the start, it would not clear correctly (index 2 would become index 1)
Finally, using another For Next Loop, the item values are transferred back into the empty collection
A further For Each Loop proves out that the collection is now in good ascending order.
Unfortunately, this does not deal with any Key values that may have been entered originally, since the Key values cannot be read
Pass a Collection to a Sub / Function
A collection can be passed to a Sub or a Function in the same way as any other parameter
It is important to pass the collection using ‘ByRef’. This means that the original collection is used. If the collection is passed using ‘ByVal’ then this creates a copy of the collection which can have unfortunate repercussions.
If a copy is created using ‘ByVal’ then anything that changes the collection within the function only happens on the copy and not on the original. For example, if within the function, a new item is added to the collection, this will not appear in the original collection, which will create a bug in your code.
Return a Collection from a Function
You can return a collection from a function in the same way as returning any object. You must use the Set keyword.
This code creates a sub routine which creates an object called ‘MyCollection’ and then uses the ‘Set’ keyword to effectively call the function to populate that collection. Once this is done then it displays a message box to show the count of 2 items.
The function PopulateCollection creates a new collection object and populates it with 2 items. It then passes this object back to the collection object created in the original sub routine.
Convert a Collection to an Array
You may wish to convert your collection into an array. You may want to store the data where it can be changed and manipulated. This code creates a small collection and then transfers it into an array
Notice that the collection index starts at 1 whereas the array index starts at 0. Whereas the collection has 3 items, the array only needs to be dimensioned to 2 because there is an element 0
Convert an Array into a Collection
You may want to convert an array into a collection. For example, you may wish to access the data in a faster and more elegant manner that using code to get an array element.
Bear in mind that this will only work for a single dimension of the array because the collection has only one dimension.
If you did wish to use a multi-dimensional array, you could concatenate the array values together for each row within the array using a delimiter character between the array dimensions, so that when reading the collection value, you could programmatically use the delimiter character to separate the values out.
You could also move the data into the collection on the basis that the first-dimension value is added (index 1), and then the next dimension value is added (index 2) and so on.
If the array had, say, 4 dimensions, every fourth value in the collection would be a new set of values.
You could also add array values to use as keys (providing that they are unique) which would add an easy way of locating specific data.
VBA Code Examples Add-in
Easily access all of the code examples found on our site.
Simply navigate to the menu, click, and the code will be inserted directly into your module. .xlam add-in.
Источник
Excel VBA Collection Object
We have seen the VBA Dictionary and VBA Array both have a similar connection with VBA Collection. In VBA Collection, we can create our own collection of group and provide the item and key to get the value stored under it. Whereas in VBA Dictionary we used to create the dictionary itself in VBA, which create our own dictionary which has word and value definition as normal dictionary has. And same in VBA Array also, where we used to create a collection object with limited size.
The advantage of VBA Collection is that we don’t need to extend the size of any object which we define here. Whatever object is created in VBA Collection does not have any limitations. And we don’t have to change the size of any object as if we think it requires.
Along with the creation of Add Collection object, we can use Count, Item and Remove collection objects as well.
How to Create Collection Object in Excel VBA?
Below are the different examples to create collection object in excel using VBA code.
You can download this VBA Collection Excel Template here – VBA Collection Excel Template
Excel VBA Collection – Example #1
In this example, we will see how to create an Object Collection in VBA. For this, follow the below steps:
Step 1: Go to the VBA window, under the Insert menu tab select Module as shown below.
Step 2: Write the subcategory of VBA Collection in the same name or we can choose any other name as per our convenience.
Code:
Sub Excel_Collection1()

End Sub
Step 3: Now define a variable as Collection in any name as shown below.
Code:
Sub Excel_Collection1()

Dim ColObject As Collection

End Sub
We can choose any word, text or name of defining a variable, but it is recommended to define that in the process of performing function first.
Step 4: Set the defined variable as New Collection. This will help in activating and setting the already defined object as Collection to New Collection.
Code:
Sub Excel_Collection1()

Dim ColObject As Collection
Set ColObject = New Collection

End Sub
Step 5: We have seen in the description of different collection objects as Add, Item, Count and Remove. Now we will use all of these objects for storing new content. First, to add, we will assign the ADD to defined variable ColObject.
Code:
Sub Excel_Collection1()

Dim ColObject As Collection
Set ColObject = New Collection

ColObject.Add

End Sub
Step 6: Now under ITEM, we will choose a sequence number that can be anything. Here, we are selecting it as 1.
Code:
Sub Excel_Collection1()

Dim ColObject As Collection
Set ColObject = New Collection

ColObject.Add Item:=1,

End Sub
Step 7: In the Syntax of VBA Collection, we need to enter the KEY for which we can assign the ITEM. Here also we can choose anything to be added in VBA repository. We have considered the word Newton here.
Code:
Sub Excel_Collection1()

Dim ColObject As Collection
Set ColObject = New Collection

ColObject.Add Item:=1, Key:="Newton"

End Sub
Step 8: We can skip the Before and After portion of Syntax. Now after that, we will assign the Key to a Collection object variable.
Code:
Sub Excel_Collection1()

Dim ColObject As Collection
Set ColObject = New Collection

ColObject.Add Item:=1, Key:="Newton"
ColResult = ColObject("Newton")

End Sub
Step 9: Use a message box to see the value stored in the Collection object variable.
Code:
Sub Excel_Collection1()

Dim ColObject As Collection
Set ColObject = New Collection

ColObject.Add Item:=1, Key:="Newton"
ColResult = ColObject("Newton")
MsgBox ColResult

End Sub
Step 10: Now compile the code and run it by clicking on the Play button located below the menu bar.
We will get the message as 1. This means that for key Newton, the Item is located at 1st position.
Excel VBA Collection- Example #2
There is another method or way by which we can see what item number is assigned to what Key. We can also count the number of keys filled in VBA Collection object. This process is quite similar to the process we have seen in example-1. For this, follow the below steps:
Step 1: Write the subcategory of VBA Collection as shown below.
Code:
Sub Excel_Collection2()

End Sub
Step 2: Consider the same variable which we have seen in example-1 as Collection and set it as New Collection as ColObject.
Code:
Sub Excel_Collection2()

Dim ColObject As Collection
Set ColObject = New Collection

End Sub
ColObject is the only variable here in this example by that help we will be seeing the count or sequence of define Item and Key.
Step 3: Now to the defined Collection object assign the ADD function and choose any value as per your choice. Here we are selecting 10.
Code:
Sub Excel_Collection2()

Dim ColObject As Collection
Set ColObject = New Collection

ColObject.Add 10

End Sub
Step 4: Similarly, add 2 or 3 more Collection Objects as shown below.
Code:
Sub Excel_Collection2()

Dim ColObject As Collection
Set ColObject = New Collection

ColObject.Add 10
ColObject.Add 20
ColObject.Add 30

End Sub
Step 5: To know the count of items used in Collection Object, we will use Debug print.
Code:
Sub Excel_Collection2()

Dim ColObject As Collection
Set ColObject = New Collection

ColObject.Add 10
ColObject.Add 20
ColObject.Add 30

Debug.Print

End Sub
Major plus point of using Debug print here instead of the Message box is that we would be able to get the count along with the error if there is any. For any error we will get an output as Zero and whereas for the correct process we will get the actual value.
Step 6: To get the count of variable ColObject, we will use Count function which is the part of an inbuilt function in the list.
Code:
Sub Excel_Collection2()

Dim ColObject As Collection
Set ColObject = New Collection

ColObject.Add 10
ColObject.Add 20
ColObject.Add 30

Debug.Print ColObject.Count

End Sub
Step 7: From the View menu option, select the Immediate window as shown below. Or we can use a short cut key as Ctrl + G to get this window.
This is the place where we will be seeing the output using Debug print.
Step 8: Now compile the code and run it by clicking on the Play button located below the menu bar. We will see, in the immediate window, the count of total object collections is coming as 3.
Now to test, whether the obtained count is correct or not, we will delete one row of collection object or convert that into text by placing apostrophe ( ‘ ) and again run the code.
We will get the updated count as 2 which is the count of collection object 10 and 20 Item number. And we can notice that 3rd line of collection object is colored as Green and this is the sign of getting code converted into text.
Pros of Excel VBA Collection
- We don’t need to resize the object we defined.
- We can use different Collection objects which are inbuilt in excel VBA Collection. These objects are not seen in other function such as VBA Dictionary or VBA Array.
- By VBA Collection, we can any type of customer or product database as well.
Things to Remember
- It is recommended to use Debug print instead of Message Box. By this, we would be able to see the error and rectify it.
- By VBA Collection, we can various types of objects and add any size of data.
- In Item object function, we can define any number as per our choice. It can be product code, sequence or price which we want to see.
- Saving the file in Macro enable excel will allow us to retain the code further.
Recommended Articles
This is a guide to VBA Collection. Here we discuss how to create a Collection object in Excel using VBA code along with practical examples and downloadable excel template. You can also go through our other suggested articles –
- VBA Array Length
- VBA RGB
- VBA Cells
- VBA XML
In this tutorial, we will provide a comprehensive overview of Excel VBA Collections. You will frequently need to work with Collections in your VBA code.
If you would like to learn more about VBA, then please consider joining our top-rated course.
What is a Collection?
We have already gone over what an object is, in previous tutorials. The workbook object and the worksheet object are examples of built-in Excel objects. Excel also allows you to create custom objects.
A quick reminder: If you’d like to go over some of the basics first, then please visit the following tutorials.
- Our Introduction to Macros article will get you up to speed with how to add the Developer Tab to the Ribbon. You will learn all about how to create simple macros in Excel, using the Macro Recorder. In addition, you will learn how to assign shortcut keys to macros and how to assign macros to buttons.
- Our Introduction to VBA article covers the VBA object model in Excel, and goes over what objects, properties and methods are. You will also learn about how to access the Visual Basic Editor. You will discover how to change the properties of objects.
- In our Mastering VBA Special Cells In Excel tutorial, we go over the Special Cells method in VBA, as well as the Activate, Select and Copy methods. This post will help you to get comfortable with using methods in your code. We also introduce you to Error Handling.
- The How to Use the COUNTA Function in Your VBA Code tutorial, covers the WorksheetFunction object. You will learn how to use the worksheet COUNTA Function and other built-in Excel worksheet functions in your VBA code.
- In our VBA Class Modules: A Step By Step Guide article, we go over what the difference between a normal module and a class module, is. You will also learn how to create your own custom object in a simple way.
We are now in the Intermediate section of our VBA learning journey.
Now, an Excel VBA Collection is a group of similar items. You can use built-in collections such as the Workbooks collection, which is a collection of all the open workbooks, in your VBA code.
The Worksheets Collection, on the other hand contains all the worksheets in your workbook.
Additionally, you can create your own collections.
Working with A Standard Built-In Excel VBA Collection
Excel VBA Collections have associated methods and properties. So, we can take advantage of this when working with standard built-in VBA collections.
Let’s say we wanted to count all the worksheets in a certain workbook.
We would use the Worksheets.Count property to do this.
Note: You maybe wondering what the difference is between the Worksheets collection and the Sheets collection.
The Worksheets collection refers to all the worksheets in a workbook. The Sheets collection refers to all the worksheets and chart sheets in a workbook.
Counting All the Worksheets in a Workbook
In our source example, we have a hypothetical VBA programmer working for a software development firm.
The programmer would like the user, to click on an image and then the user will be prompted for input about whether they would like to see the number of worksheets in the workbook.
If they type Yes, then the number of worksheets in the workbook will appear in a designated cell.
Additionally, the programmer would like to design the spreadsheet of interest, in a visually engaging manner.
Step 1:
Open a workbook, in Excel that contains multiple worksheets. Now, press ALT-F11 on your keyboard in order to access the Visual Basic Editor.
Step 2:
Go to the Insert Tab and select Module.
Step 3:
Enter the following code in the module we just created.
Sub countthenumberofWorksheets()
‘We start by ensuring that any existing data in cell H2 is cleared
Range(“H2”).Clear
‘We declare a variable called theAnswer and specify that the data type is string
Dim theAnswer As String
‘We now get input from the user by using an Input Box and specify that theAnswer will hold this value
theAnswer = InputBox(“Would you like to know the number of worksheets in this workbook?”, “Count Worksheets”)
‘Then we introduce conditional logic with the If statement
If theAnswer = “Yes” Then
‘In this line it specifies that if the user typed Yes,in the Input Box, then cell H2’s value
‘should show the number of worksheets in the workbook
Range(“H2”).Value = “There are” & ” ” & ThisWorkbook.Worksheets.Count & ” ” & “worksheets in this workbook”
Else
‘If the user enters any other value other than Yes in the Input Box, then we are specifying
‘in this line, that a message box will pop up instructing the user to enter the appropriate value
MsgBox “Please enter the appropriate value”
End If
End Sub
Now let’s look at the code in greater detail. The first thing we do is clear the existing contents of cell H2. This is the cell that will display the number of sheets in the workbook. We are using the Clear method of the Range object, to do this.
We then declare a variable of the string data type. The Input Box is used to get input from the user. The variable will store this input.
The conditional logic section has a simple If statement, that specifies if the user entered Yes in the Input Box, then cell H2, displays the number of worksheets in the workbook.
We are using the Worksheets.Count property of the Worksheets collection object to do this.
If the user entered any value other than Yes in the Input Box, then the user will see a message box asking them to enter the appropriate value.
For a detailed explanation on conditional logic, please consider joining our Excel VBA course. Our expert Excel VBA trainer goes over all the aspects of conditional logic during the course.
Step 4:
Now select any sheet in the workbook and do the following.
Go to the Insert Tab and in the Illustrations Group, choose Pictures. Select Stock Images…
Select the Cutout People Tab. This category contains images of people in various poses with the background removed.
Type explaining in the Search box to see all the images that are related to this term for this category.
We will select the following image.
Click the Insert button.
Move the image as needed and resize the image to make it slightly smaller, ensure that no part of the image overlaps column H.
Now right-click the image and choose Format Picture…
Using the Format Picture Dialog Box, select Picture and expand the Picture Transparency section. Change the transparency to 9% as shown.
By doing this, in addition to making the image more transparent, the colours will also appear less intense.
Now close the Format Picture Dialog Box.
Step 5:
Right-click the image and select Assign Macro…
Using the Assign Macro Dialog Box, select the countthenumberofWorksheets macro that we just created and click Ok.
Step 6:
Ensure the picture is not selected.
Go to the View Tab, and in the Show Group, uncheck the Gridlines, Formula Bar and Headings options.
Click on the picture to run the macro.
You should see the following.
Type Yes in the Input Box and click Ok.
You should see the following.
Looping through all the items in a Built-In Excel VBA Collection
The ability to loop through all the items in a collection, and apply a process to each of those items is a great timesaver. This is an excellent way of automating time-consuming manual processes.
When looping through the items in a collection, we will use a specific loop structure called the For Each Loop.
Let’s consider the following scenario. We have five worksheets in our workbook as shown below.
We would like to write some code that tells Excel to loop through each worksheet in the Worksheets Collection.
The heading in cell A1, on each sheet should reflect the name of the sheet.
The heading in cell A1, on the Customers sheet will be Customers, and the heading in cell A1 on the Orders sheet will be Orders and so on.
We want the columns in each worksheet to be autofit. This means that cell A1 , in each worksheet will accommodate the length of the specific text, of the heading.
This is the entirety of the process that we would like to apply to each sheet.
Step 1:
Press ALT-F11 on your keyboard in order to access the Visual Basic Editor.
Step 2:
Go to the Insert Tab and select Module.
Step 3:
Sub loopingthroughalltheWorksheets()
‘We declare a worksheet object using the Dim keyword
Dim ws As Worksheet
‘We start the looping structure with the For Each line and this line says
‘that for every Worksheet in the Workbook
For Each ws In ThisWorkbook.Worksheets
‘This line states that the value in cell A1 of each of the respective sheets, should reflect the sheet name
ws.Range(“A1”).Value = ws.Name
‘This line states that all the columns in each worksheet, should be Autofit
‘This is a way to ensure that Cell A1, will accommodate the length of the heading
ws.Cells.EntireColumn.AutoFit
Next ws
End Sub
Now let’s look at the code in greater detail. We start off by declaring a worksheet object using the Dim keyword. We now start with a For Each Loop structure, that will allow us to loop through all the worksheets in the workbook.
You can use the For Each Loop, in any situation where you need to loop through each item in a collection and perform the same action on each of those items.
We then specify that we would like all the columns in each of the worksheets to be Autofit. So, this means cell A1 will accommodate the needed text length.
Step 4:
With the cursor positioned in the sub procedure. Press F5 to run the code. You should see the following.
How To Create A Collection – Simple Example
We will now look, at how to create a collection using VBA. A hypothetical technician working at a Gadget store, wants to create a collection for the store’s top selling items.
Step 1:
Press ALT-F11 on your keyboard in order to access the Visual Basic Editor.
Step 2:
Go to the Insert Tab and select Module.
Step 3:
Enter the following code.
Sub creatingaCollection()
‘We start by declaring our variable as a collection object
Dim topsellingItems as new Collection
End Sub
It’s as simple as that.
Adding And Removing Items From A Collection – Simple Example
Adding Items to a Collection
To add the required items to our collection. We would use the following code.
Sub creatingaCollection()
‘We start by declaring our variable as a collection object
Dim topsellingItems As New Collection
‘We will add six items to our collection using the Add method
topsellingItems.Add “Smartwatches”
topsellingItems.Add “Bluetooth speakers”
topsellingItems.Add “Electric scooters”
topsellingItems.Add “Noise-cancelling headphones”
topsellingItems.Add “VR headsets”
topsellingItems.Add “3D Printing pens”
End Sub
Removing an Item from a Collection
To refer to a specific item in a collection, to remove it, you could use the Index number of that item. The following code would remove Bluetooth speakers. This would be index number 2.
topsellingItems.Remove (2)
Note: When working with VBA collections it is important to remember that items start indexing at 1 and not 0.
Looping Through the Created Collection
As in the above example, we can use the For Each Loop structure to loop through the items in our collection.
We would like to loop through all the items in our collection and have Excel read the name of each item out loud.
So we would use the following code to do this.
Sub creatingaCollection()
‘We start by declaring our variable as a collection object
Dim topsellingItems As New Collection
‘We declare a variable of data type variant which refers to an item in the collection
Dim nameOfItem As Variant
‘We will add six items to our collection using the Add method
topsellingItems.Add “Smartwatches”
topsellingItems.Add “Bluetooth speakers”
topsellingItems.Add “Electric scooters”
topsellingItems.Add “Noise-cancelling headphones”
topsellingItems.Add “VR headsets”
topsellingItems.Add “3D Printing pens”
‘We use the For Each loop to access each item in the collection
For Each nameOfItem In topsellingItems
‘In this line we are specifying that Excel speak out loud, the name of each item in the collection
Application.Speech.Speak nameOfItem
Next nameOfItem
End Sub
To run the code insert your cursor anywhere in the sub procedure and press the F5 key on your keyboard.
You should hear Excel saying the name of each of the items, in the collection.
The Differences Between Collections and Arrays
You can use an Excel VBA array variable to store a list of items, of the same data type. There are some key differences between arrays and collections which we will review below.
Let’s review some of the additional advantages and disadvantages of using custom Excel Collections in your code.
It is very simple to create a custom collection and add items. Additionally, the concept of collections is easy to understand. You can also return a collection from a function or even convert a collection to an array, if needed.
However, there are some disadvantages associated with a custom collection. One is that you cannot change the items in the collection directly. Also when working with a list of a fixed size, it is not always advisable to use a collection due to efficiency concerns.
Learning Objectives
You now know how to:
- Use Built-In Excel VBA Collections
- Use the For Each Loop to Apply a process to each Item in a Collection
- Create your own custom Collection
- Add and Remove Items from the Collection
Additionally you have an understanding of:
- What the differences are between arrays and collections
Conclusion
Excel VBA Collections provide an efficient way, to work with multiple items. It is advisable, to learn how to use them in your VBA code.
Knowledge of how to use collections in VBA, is very useful for both intermediate and advanced level programmers.
Looking for more Excel tips? Check out The RANDARRAY Function – Mastering Excel Array Tools article here!
Special thank you to Taryn Nefdt for collaborating on this article!


