
Here’s the basics of Styles in Word for paragraph, character or both (Linked) plus Tables and Lists. I know talking about styles in Word makes eyes glaze over but they are a really useful part of Word (plus Excel, PowerPoint and Outlook).
Today I watched an ‘experienced’ Word user reformatting a document. He laboriously worked through the document, selecting paragraphs, phrases and even individual words then clicking on the ribbon to change the look. It took 10 minutes or more. With styles it would have taken a few seconds.
Styles have been around for all of Word’s history. They have changed and expanded over the years but the fundamentals are the same.
In this article we’ll explain the different types of styles including at least one that sneaked in without many people noticing. From just one type in the early days of Word, there’s five different style types in modern Microsoft Word.
What is a Style?
A style is just a collection of formatting settings under a single name.
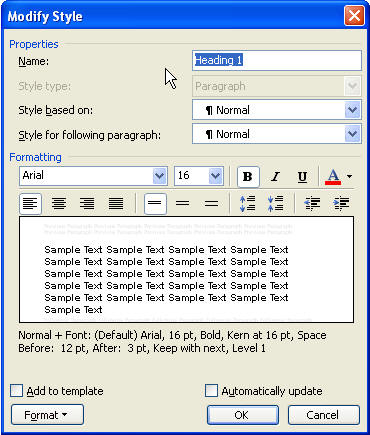
For example ‘Heading 1’ has these default values in Word (choose Heading 1 style, right-click and choose ‘Modify Style’.
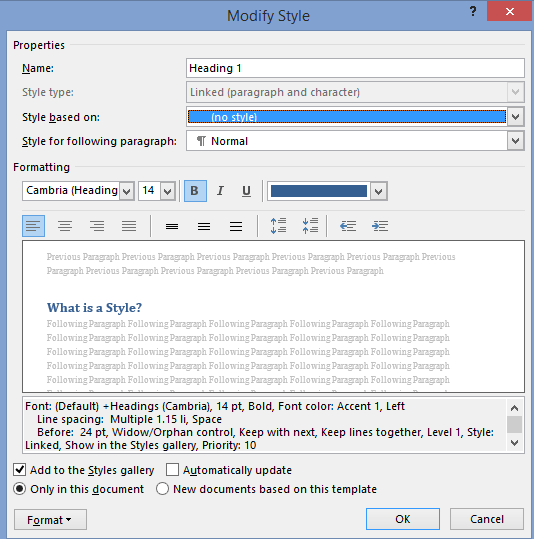
So ‘Heading 1’ means Cambria font, 14pt, Bold with a color setting, Left justified, 1.15 line spacing and 24pt line space before the text, plus other settings.
Instead of having to apply all those separate formatting options for each main heading, just apply the ‘Heading 1’ style.
Even better, if you decide to change the look of the headings, change the ‘Heading 1’ settings and all the headings with that style will be changed automatically.
Paragraph and Character styles
There are different types of style that can be applied to different parts of a document. Originally there were only Paragraph styles – styles you could apply to an entire paragraph.
That was OK but no help if you wanted consistent formatting for words in a paragraph like a product name Office-Watch.com or just emphasis.
So Microsoft added character styles. These are styles that can be applied to a word or even a single letter. A character style could be called ‘Product Name’ to ensure all references to a product or service look consistent.
Character styles have all the attributes of paragraph styles that are applicable to individual characters. Things like font, size, color, bold, italic etc are in both character and paragraph styles. Line spacing, Left/Right/Center/Justify etc. can only apply to entire paragraphs.
Linked styles
Adding character styles created a new problem. Microsoft discovered that users sometimes had two styles with the same name – one as a paragraph style, the other as a character style. Or people would have two styles such as ‘QuoteP’ and QuoteC’ with the same settings, one for paragraphs and another for word/characters.
So Word 2007 introduced ‘Linked Styles‘ which act as both a paragraph style and character style, depending on the situation.
A linked style acts like a paragraph style when a paragraph/s is selected and the style applied.
It acts like a character style when less than a paragraph (a character/word/phrase) is selected and the style applied.
Gone is the need for ‘twin’ styles – now you can have a single style that can applied to any text in a document.
The best example of a linked style is already in Word 2007 and later. All the Heading styles were changed to linked styles. Here’s an example of ‘Heading 1’ style used as both a paragraph and character style at the same time.

Both the paragraph and words were changed to the same style by selecting them and pressing the ‘Heading 1’ shortcut Ctrl + Alt + 1 . The Style Gallery or styles list could have been used to do the same thing.
In the Modify Style dialog you’ll see the style type just under the name.

‘Linked’ isn’t the best choice of terms for this type of style. Most styles are already ‘linked’ to others through style inheritance. ‘Merged’ or ‘Combined’ might have been clearer to most people – but we’re stuck with ‘Linked’.
Which is which?
On the styles list, the three types of style have their own markers.
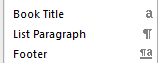
The lower case ‘a’ next to a character style.
The ‘backwards P’ or Pilcrow is used as an end of paragraph mark in Word and also serves to denote a Paragraph style.
The combined pilcrow and a is, unsurprisingly, for a linked style.
Alas, the Style Gallery on the ribbon isn’t as clear. Among various (ignored) complaints about the Style Gallery is the inconsistent marking.
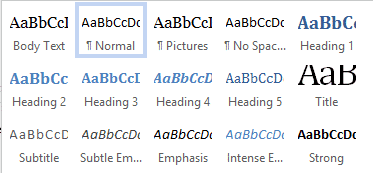
Paragraph styles (e.g. Normal, Pictures etc.) have the pilcrow next to the style name.
Linked paragraphs (Heading styles etc.) have no marking next to the name.
But neither do the character styles! In the above image there’s no way to know that ‘Subtle Emphasis’ is a character style.
Inheritance
A brief mention of style inheritance.
Styles are normally based on an existing style so only changes from the inherited style need to be made. This lets you apply broader changes to a document a lot faster.
For example, here’s settings for Heading 2

Heading 2 is based on the Heading 1 style, so all the settings for Heading 1 are used for Heading 2 as a starting point.
The settings like ’13pt, Not Bold …’ etc. are only the differences between Heading 1 and what’s been changed to the look for Heading 2.
If the font for Heading 1 is changed then the font for Heading 2 will also change due to style inheritance.
In a standard Word document, styles can usually be traced back to some base Word styles like Normal and Default Paragraph Font (paragraph and character styles respectively). However you can create a style ‘from scratch’ with no inheritance. Here’s the same Heading 2 style with the ‘Style based on’ removed.

Now you can see all the formatting attributes in detail.
Unlinking styles might seem like a good idea that makes things simpler, but experienced Word users almost never do it. Style inheritance can be a nuisance at times, but its more helpful than a hindrance.
What’s going on?
Sometimes the formatting can get confusing. What’s a paragraph setting, what’s a character style and what is directly applied with no style? WordPerfect had a ‘Reveal Codes’ feature which Microsoft resisted copying but finally added to Word.
There’s two options for exposing what Word is up to. The Style Inspector (Word 2007 and later) and Reveal Formatting. Here’s both in action side-by-side.
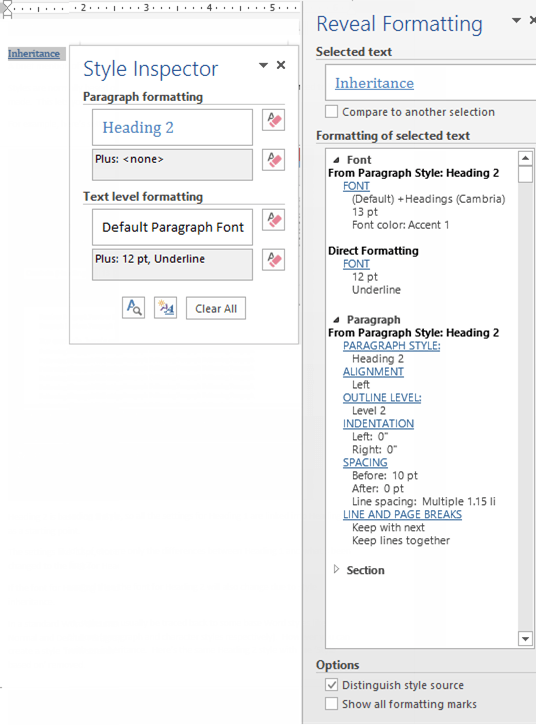
As you can see the Style Inspector is a small box that can be dragged around the screen. Open the Style Inspector from the button at the bottom of the Styles pane:

Reveal Formatting has a lot more detail and sits in the right-hand pane. There’s a button for Reveal Formatting on the Style Inspector box.
The Shift + F1 shortcut will open the Reveal Formatting pane. This shortcut has worked since Word 2002 (XP).
Table and List styles
Added in Word 2007 were two more styles.
Table styles, let you group together all the many formatting options for tables.
Similarly, all the options for list formatting were a nightmare until Word 2007 when List Styles were introduced. Now all the, sometimes complex, choices for lists (numbering, indenting at each level) can be more easily and consistently applied.
Fix your Word Style Gallery
Word style renaming and alias tricks
Show a Word style marked ‘Hide until used’.
What does Word style ‘Automatically update’ really mean?
Change Word style to match current paragraph
What are Styles? Built-in styles are combinations of formatting characteristics that you can apply to text to quickly change its appearance. For example, applying the Heading 1 style might make text bold, Arial, and 16 point, and applying the Heading 2 style makes text bold, italic, Arial, and 14 point.
Contents
- 1 What are styles?
- 2 What do I use styles for?
- 3 Where is style in MS Word?
- 4 What is style based on in Word?
- 5 How do you use styles in Word?
- 6 What is style and its types?
- 7 How do you apply styles in a document?
- 8 What is style group in MS Word?
- 9 What is a style class 10?
- 10 What are paragraph styles?
- 11 What is the difference between styles and templates?
- 12 What is the difference between paragraph and character styles?
- 13 What are the two types of style?
- 14 What are the 5 Elements of style?
- 15 What are the 5 types of writing styles?
- 16 How do you change styles in Word?
- 17 How many types of styles are there in MS Word?
- 18 What are styles Class 9?
- 19 What are styles quizlet?
- 20 What are page styles?
A style is a set of formatting attributes that define the appearance of an element in the document. For example, a character style will contain font or font face attributes, while a paragraph style will contain paragraph alignment and line spacing attributes.
What do I use styles for?
Styles allow you to easily apply consistent formatting to documents, as well as to quickly change existing formatting. In addition, the use of styles provides a structure to your document that can be discerned by a screen reader.
Where is style in MS Word?
On the Home tab, click the Styles Dialog Box Launcher, and then click Options. Under Select styles to show, click All styles. All styles are displayed in the Styles task pane. Select text in your document and then click the style in the Styles task pane.
What is style based on in Word?
If a style is based on another style, it takes on the formatting of its parent, unless you specify otherwise. Microsoft Word uses styles to control formatting.There are several kinds of styles in Word. The most commonly used are paragraph styles and character styles.
How do you use styles in Word?
To apply a style:
- Select the text you want to format, or place your cursor at the beginning of the line.
- In the Styles group on the Home tab, click the More drop-down arrow.
- Select the desired style from the drop-down menu.
- The text will appear in the selected style.
What is style and its types?
There are four main types of writing: expository, descriptive, persuasive, and narrative. Each of these writing styles is used for a specific purpose. A single text may include more than one writing style.
How do you apply styles in a document?
Styles give your document a consistent, professional look.
- Select the text you want to format. Tip: If you place your cursor in a paragraph, the style is applied to the whole paragraph.
- On the Home tab, point to a style to preview it. If you don’t see a style you want, click the More button.
- Select a style.
What is style group in MS Word?
The Styles group is located on the Home tab and contains a set of Quick Styles. Applying Styles. To Apply a Style: 1) Select the words, paragraph, list, or table you want to format. 2) Click the style you want to apply from the Styles group.
What is a style class 10?
A style is a set of formats that you can apply to selected pages, text, frames, and other elements in your document to quickly change their appearance. When you apply a style, you apply a whole group of formats at the same time.
What are paragraph styles?
A paragraph style is a set of attributes—like a font size and color—that determines how the text in a paragraph looks. You can use paragraph styles in your document to:Generate a table of contents: Pages automatically creates a table of contents (TOC) based on paragraph styles applied to your paragraphs.
What is the difference between styles and templates?
Styles keep your formatting consistent within a document. Themes keep your look and feel consistent across multiple documents. Templates allow you to re-use text, and keep your look and feel consistent across multiple documents.
What is the difference between paragraph and character styles?
A character style is a collection of character formatting attributes that can be applied to text in a single step. A paragraph style includes both character and paragraph formatting attributes, and can be applied to a paragraph or range of paragraphs.
What are the two types of style?
Answer: There are two basic types of styles in Microsoft Word; character and paragraph. Paragraph styles are used more frequently than character styles, and they are easier to create.
What are the 5 Elements of style?
Features of style include the following: diction (word choice) • sentence structure and syntax • nature of figurative language • rhythm and component sounds • rhetorical patterns (e.g. narration, description, comparison-contrast, etc.)
What are the 5 types of writing styles?
Here are the five most common types of writing styles, a quick exploration of each and some new strategies for teaching them.
- Narrative Writing.
- Analytical Writing.
- Expository Writing.
- Persuasive Writing.
- Argumentative Writing.
How do you change styles in Word?
Applying a Style Set
- Click the Home tab in the Ribbon.
- Click Change Styles in the Styles group. A drop-down menu will appear.
- From the drop-down menu, select Style Set.
- Select the Style Set you want to apply. The entire document will change (as long as you have applied styles in your document).
How many types of styles are there in MS Word?
There are two basic types of styles in Microsoft Word; character and paragraph. Paragraph styles are used more frequently than character styles, and they are easier to create. It’s important to understand both, however. Linked styles (Word 2007 and later) are a blending of these two that I avoid.
What are styles Class 9?
Answer: Style is a collection of formatting instructions. You use styles to format the paragraphs in your document.
What are styles quizlet?
A style is a named set of formats. Describe the differences between body text and headings. Body text are the main paragraphs in a document. Headings are titles that are often bold and in. a larger and different font than body text.
What are page styles?
In Writer, page styles define the basic layout of pages, including page size, margins, headers and footers, borders and backgrounds, number of columns, and so on.You can have one or many page styles in a single document. All pages in a Writer document are based on styles.
Welcome to Part 3 of the Harnessing the Power of Microsoft Word series. In the last post, I covered how to create and access templates. Today’s post will walk you through paragraph and character styles. Although you can use these concepts at the document level, defining styles in your templates will make them available to anyone creating a document based on your templates.
Before explaining what paragraph and character styles are and how they can help you, take a few minutes to ask yourself the following questions:
Have you ever found yourself scrolling through a document and applying the same formatting over and over again?
Have you ever had a page break roll onto a new page creating a largely blank page in the middle of your document? Then had to go through the document deleting and re-inserting page breaks?
Have you ever tried to indent a single list item and had the entire list move? Then found yourself fighting with Word to get your indentation just the way you want it?
Have you ever noticed extra space at the top of a page and weren’t really sure why it was there?
Have you ever received a document from another writer and found formatting that wasn’t consistent with your house styles? Or worse, formatting that was inconsistent within the document?
If you answered yes to any of these questions, you’ll be happy to hear that there is a way to eliminate these issues and the frustration that goes along with them. The solution, paragraph and character styles. They can be a huge time saver, reduce your frustration, and ensure consistent formatting throughout your documents.
Paragraph and character styles are pre-configured formatting rules that you can apply to paragraphs or selected text. These styles provide several benefits including:
- Much faster formatting—simply select the items to be formatted and click the applicable style;
- Ability to mass update—change all paragraphs of a specific style at once by modifying the style attributes;
- Numbering control—numbering controlled by styles will not misbehave;
- Indentation control—indentation controlled by styles will not misbehave either;
- Pagination control—avoid orphaned bullets or text by using the keep-with-next paragraph attributes;
- Paragraph spacing control; and
- Consistency in the look of all content throughout the document.
The rest of this post will show you how to:
- Plan for style creation based on your formatting needs
- Create paragraph and character styles
- Modify paragraph and character styles
- Display, configure, and use the Styles pane
- Apply the styles to your content
Consider Your Style Needs
Before I get into the mechanics of creating and using styles, I’d like to suggest taking a little time to think about the formatting elements and the content types you need in your documents so that you can figure out what styles you will need to create. Here are some questions to consider and the implications of various choices:
Do you want your headings to appear at the left edge of your documents to maximize page real estate or do you want each heading to be indented to show hierarchy?
Indenting headings will require more styles because you will need content styles that align with the indentation of each heading level. For example, if all headings are left-justified with no indentation, you need only one or two styles for body text; if your headings are indented, then you will need a body text style that aligns with each level of indentation that your headings use. You will also need multiple levels of styles for bullets, numbered items, etc. As you can see, this approach can lead to a very long list of styles, making it a little harder to work with your styles list.
Also, indentation can eat up a lot of page real estate. If you have an 8.5” page with 1” margins, your usable real estate is 6.5”. If you indent each heading .5”, content under a Heading 5 will have only 4.5” of real estate. This may not be an issue if your documents are mostly text, but if they contain illustrations, you may want access to as much real estate as possible.
Do you want numbered or unnumbered headings?
Numbered headings will help to communicate hierarchy so you don’t need to indent subheadings.
Do you want captions on your figures and tables? And do you want them before or after the figure or table?
Captions allow you to cross-reference a figure or table from elsewhere in the document and they can be used to generate a list of figures or a list of tables.
If you want captions, you’ll need a style to hold an inline figure or table and a style for the caption. These styles will automatically set the position of the figure or table and its caption. For example, if you want your figures left justified but indented a .5” you can create a style called Figure with these properties. When you insert a figure into a paragraph that uses the Figure style, it will automatically appear left-justified with the appropriate indentation.
In a style, you can tell Word what style to apply to the next paragraph, which comes into play in this example. Say you want your captions to appear above your figures or tables. You would create a style for the caption, something like “Figure_Caption,” and set it to return the Figure style as the next paragraph. When you’re working, you will insert your dynamically-numbered caption (discussed in a later post), apply the Figure_Caption style and then press Enter. The new paragraph will automatically be set to Figure so you can quickly insert your graphic with no additional style-application steps or positioning required.
Finally, notice the example naming convention Figure and Figure_Caption. These styles denote their purpose making them intuitive to other authors in your organization and they will appear right next to each other in your styles list so you don’t have to scroll around the styles list when you applying these styles to existing graphics and captions.
What elements do you want to keep together on a page?
Word offers a keep-with-next property that you can use to control pagination so you don’t have to insert page breaks and deal with the issues that can arise from using page breaks, such as, half-empty pages in the middle of your document and time spent on removing and reapplying page breaks.
Likely you will want to keep a figure and its caption together on a page. Continuing the figure example, if you set the Figure_Caption style to keep-with-next, the caption and figure will always remain together.
You may also want bulleted lists to stay together on a page. You can achieve this by creating two styles, such as Bullet1_KWN (KWN denotes keep-with next) and Bullet1_Last ( _Last denotes that it should be applied to the last bullet in the list).
If you also want to keep the sentence that introduces the list with the list, you could create a Body_KWN style.
How many levels of bullets do you want? And do you need different spacing options?
If you need three levels of nesting with your bullets, you’ll need at least three styles—one for each level of nesting. For example:
- Bullet1
- Bullet2
- Bullet3
- Bullet2
If you want the option of controlling whether the list can break across pages, you’ll need two styles per list level—one KWN style and one _Last style for each level of bullets.
If you want various spacing options, you’ll need additional styles. For instance, you may want one style for short-item lists that has no space between the list items and another style for long-item lists (i.e., items that span lines) with space between for easier readability.
I like to keep list items together on a page so readers do not have to flip back and forth or scroll up and down to see the entire list. I use three styles for each level of nesting:
- Bullet1_KWN (for long-item lists, produces 8 points of white space after each item)
- Bullet1_Comp_KWN (for short-item lists, produces no space between items—Comp is short for compressed)
- Bullet1_Last (for the last item in any Bullet1 list, does not keep-with-next, and produces 8 points of white space after to return to the standard paragraph spacing after the list)
I replicate this pattern for each level of nesting required.
Do you need any auto-labelled styles?
You can use auto-numbering to create automatic labels. For example, you may want a style for notes that automatically produces the word “Note:” in bold text, while the text you type into the note is not bold and has a hanging indent that aligns the text next to the label, as shown below:
You can use this approach for all sorts of things, such as question and answer pairs, where the auto-number produces the appropriate “Question:” or “Answer:” label. I’ll get into the specifics of how to accomplish this in a later post. For now, it’s important for you to know the option exists and to identify whether you need this type of element in your styles list.
What are your formatting conventions for selected text?
You may want to consider some standard formatting conventions for selected text to ensure consistency. For example, you may want authors to italicize or bold a term that is being defined in a given sentence or, if you are writing a user’s guide, you may want screen names, menu items, and buttons to appear with specific formatting. These conventions take the guesswork out of formatting for you and your authors and they help your readers consume content more quickly.
Think through the situations in which you use the controls in the Font group of the Home ribbon and then try to establish rules for when you would apply a given type of formatting.
Once you have the rules figured out, then you can create a character style for each rule. Continuing with the user’s guide example, you might create a character style for screen names, buttons, menu items, definitions, emphasis, etc.
When you name your character styles, select names that are indicative of the style’s purpose, rather than its attributes. This will help your authors know what each style is used for and it will allow you to change attributes without affecting the meaning of the style’s name. I also recommend applying a prefix to your character style names so that they will be grouped in the styles list and easily differentiated from the paragraph styles. For example, I prefix my character styles with c-.
In addition to quick formatting, character styles provide mass update capability, just like paragraph styles. That is, changing the attributes of a character style will update all instances bearing that style. So, if you wanted to convert screen names from bold text to underlined text, you could do so in just a couple of clicks.
Do you want to minimize the learning curve for your template users?
Your organization may use a variety of document types and the formatting of each document may vary; however, the style names can be the same across all templates to minimize the learning curve for your authors. This also supports content reuse.
For example, say you have a product description that is used in a marketing document and in a user’s guide, but the fonts and colors are completely different for these two documents. If your templates use the same style names, you can apply the applicable template to the document containing the content and voila! Or you can copy the content into the applicable document using the Merge Formatting paste option and it will automatically reformat the content to match the style definitions in the destination document.
Now that you’ve given some thought to the formatting and layout elements in your document, you can begin creating styles.
Create Styles
To create a new paragraph or character style:
1. Open the Styles pane by clicking the launcher in the Styles area of the Home ribbon.
2. At the bottom of the Styles pane, click the New Style button.
3. On the Create New Style from Formatting dialog:
a. Complete the fields on this screen. See the field definitions following the screenshot.
b. Use the Format drop-down to access additional attributes, such as font, paragraph, tabs, borders, numbering, and more.
c. When you are done formatting, click OK.
There are a lot of options on this screen, some of which may be intuitive and others not so much. The following expandable table defines each field or control on this screen and provides some useful tips that can help you avoid some of the pitfalls that I’ve encountered when building styles.
Although there are several free alternatives to Word, Microsoft’s word processing program continues to be the most widely used in the world. One of the most important features of Word is the styles feature. By using styles, you can set text formatting uniformly across a document, ensuring a document’s fonts, font colour, and line spacing are all the same.
Many styles are already preset in Microsoft Word. But how can they be optimally used and adapted when necessary? And how to create new styles? These questions will be answered in the following sections.
Contents
- The various types of Word styles
- Paragraph styles
- Character styles
- Table styles
- List styles
- What are the advantages of Word styles when formatting a text?
- Where can I find preset Word styles?
- How can I create new Word styles?
- Creating a table of contents through a style in Word
- Adapting the layout for a table of contents
- Customise text in a table of contents
- Creating a table of contents through a style in Word
- How can I customise existing Word styles?
- Matching the current formatting
- Manually customising existing styles
The various types of Word styles
To ensure that a document looks uniform and professional, Microsoft offers four types of styles in Word:
- Paragraph styles
- Character styles
- Table styles
- List styles
Paragraph styles
These styles determine the appearance of a text in terms of whole paragraph sections, and allow you to format large sections of text. A paragraph style may contain format settings for character style, however it also determines the overall design of a paragraph. In a new Word document, the paragraph style Standard is usually preset for the entire text. Paragraph styles format the following attributes:
- Indents and spacings
- Line and page breaks
- Borders and shading
- Lists
- Tabs
- All character attributes
In Word, paragraph styles are marked by the ¶ sign in the styles menu (This can be found by clicking the lower most right arrow in the styles gallery on the start tab.)
Character styles
Character styles determine the appearance of text in terms of individual characters, and are mainly used to format smaller sections of text, e. g. highlighting words. Character styles do not format the features of the entire paragraph, but rather format the following attributes:
- Font
- Font size
- Font colour
- Bold, italic, or underlined markings
Character styles are marked by the a-sign in the styles menu.
Table styles
Table styles in Word format the following attributes for tables:
- Header row
- Grid lines
- Accent colour
List styles
List styles in Word format the following attributes for lists:
- The format of bulleted lists
- The format of numbered lists
- Indents
What are the advantages of Word styles when formatting a text?
Preset as well as custom styles make it easier to work on a text document. This is particularly noticeable when editing complex documents, such as final papers or manuscripts. Initially, manual formatting may seem to be easier and quicker, but for longer texts it’s more efficient to use Word styles instead of repeatedly formatting sections of text separately. The following six reasons outline the advantages of using styles in Word:
- Continuity: Format results in a consistent document layout.
- Efficiency: Once the style has been created, it can be applied to any section of the document without having to be changed.
- Adaptability: If only one style is used consistently within a document, then only this style needs to be adjusted when necessary to edit the whole document.
- Navigation: The navigation function makes it possible to switch quickly between sections of the document. To use this function, go to the view tab and select navigation pane. The section of the document which you are looking at will be highlighted here.
- Automatic table of contents: When using Word styles for headings consistently within one document, it’s possible to automatically create a table of contents which you can customise in just a few clicks.
- Outline: It’s possible to gain an overview of the document using the outline view function in Microsoft Word, which can be found in the view tab. In the outline view it’s possible to move individual sections of a document clearly and with full control. In this view, the headings are arranged hierarchically – if there’s a plus sign on the left side of a heading, it means that it has another text level below it, while a minus sign is followed by continuous text only.
The default outline view displays all levels of the document. For a better overview, it’s possible to display only two levels, for example. This view is also suitable for making corrections to the structure of a text and moving text sections around within the document swiftly and with ease. If the corresponding levels are marked with a style, they can be quickly and conveniently moved to the desired position using the outline view tools.
Note
In the outline view, text selection is important. If only the heading is selected, but the entire body text is displayed, Word assumes that only the heading is to be moved. If the text is hidden, however, the entire section will be moved.
Where can I find preset Word styles?
Preset styles in Word can be found under the style gallery, on the start tab. To apply a style to a section of text from the style gallery, highlight the relevant text and then click on the style you wish to select. The style in use will be marked by a light blue border.

To display additional Word styles, use the down arrow on the right side of the style gallery, or open the style gallery by clicking on the menu arrow.

Alternatively, you can also assign the styles for headings using a shortcut. To do this, use the key combination «alt» and the respective level of the heading, for example:
Heading 1:»Alt» + «1».
Heading 2:»Alt» + «2».
Note
When assigning paragraph styles, the cursor must either be in the paragraph with no characters highlighted, or you must highlight the entire paragraph. If you highlight one section, only that section will be formatted, and not the entire paragraph. This is different when assigning character styles: you must select all relevant characters, as just hovering the cursor over a relevant word will not be enough.
How can I create new Word styles?
If you want formatting options that are not available in the preset Word styles, you can easily create them yourself and add them to the style gallery:
- Under the start tab, click on the arrow in the lower right corner of the styles gallery.
- Select the create a style icon in the style side menu – at the bottom on the left.

- Name the style
- Specify the style type: either paragraph, character, linked (paragraph and character), table and list. If you want the style to be based on an existing one, you can specify this under style based on.
- Should you want to set a style for the following paragraph, you can specify an appropriate one for it.
- Set the font, font size, and other possible formatting options.
- As soon as you confirm the style by clicking “OK”, you’ll be able to find your new creation in the style gallery.
Alternatively, it’s possible to create a style by highlighting text:
- Right click on the highlighted text
- Select styles on the right-hand side in the mini-menu
- Select create a style from the style menu that appears
- Select modify.
Creating a table of contents through a style in Word
A key advantage in using styles in Word is that it allows you to automatically create a table of contents. To create a table of contents using a style, go to the references tab, and select a style for the table in the table of contents menu. If you change the text structure later, you can update the table of contents by clicking the update table of contents option.
Adapting the layout for a table of contents
You can also customise the layout and text formatting of a Word style for tables of contents:
- On the references tab, open the table of contents menu and click the custom table of contents option.
- In the table of contents dialog box, make any changes you want to the display of page numbers and fillers.

- To adjust the overall appearance, select format under general and click on the desired format
- If you want to change the number of levels displayed in the table of contents, click on show levels
- Check the result in the print preview and web preview panes
- Confirm with «OK»
Customise text in a table of contents
The presentation of the text in the table of contents can also be adapted using a Word template:
- Open the table of contents dialog box as described above
- Click on modify and change the formats to from template

- In the styles list, select the level you want to customize and click modify.

- Make the formatting changes as described above
- If you select add to quick styles gallery, you’ll find the created style in the gallery
- Confirm with «OK»
How can I customise existing Word styles?
In Word, you can also change existing styles from the quick style gallery. The adjustment is possible in two ways:
- Update a style by customising it to match the current formatting in a document
- Manual customisation in the dialog box
Matching the current formatting
If a Word style has already been applied to the text, you can customise it and include it in the quick Styles gallery:
- Select the text, e. g. with «heading 2», to which you have applied the Word style. You can see which style was used in the quick styles gallery – the corresponding style will be marked with a light blue border.
- Format the text and adjust features such as font, font size, and colour.

- In the styles gallery, right-click the style that you want to customise and confirm with update [style name].

Note
Adapting the styles automatically adapts all text parts which are assigned to this style.
Manually customising existing styles
A Word style from the styles gallery can also be changed manually. This process is possible regardless of the text in the document:
- Right-click on a Word style in the styles gallery and select modify
- Make the desired adjustments, such as font size or colour, in the modify style menu

- Select add to styles gallery at the bottom of the menu to access the style later.
HiDrive Cloud Storage with IONOS!
Based in Germany, HiDrive secures your data in the cloud so you can easily access it from any device!
![]() Highly secure
Highly secure
![]() Shared access
Shared access
![]() Available anywhere
Available anywhere

Word documents: how to save as a PDF file
If you want to send a Word document or prepare it for printing, it’s recommended you know how to save it as a PDF file. This way, you can be sure that the formatting of your document won’t change and that others will not be able to edit it without permission. For simple conversion tasks, the save function in Word is often sufficient. However, there are some dedicated tools which offer a wider…
Word documents: how to save as a PDF file

How to recover unsaved Word documents
If either Word or your PC crashes while working on a Word document, don’t panic! Recovering unsaved Word documents is easy to do; even damaged or deleted files are not always lost. Microsoft has numerous tools built into its popular text program which allow you to retrieve the edited or in-progress file. And if these tools don’t work, Windows and special repair and recovery tools offer plenty of…
How to recover unsaved Word documents

How to create a table of contents in Word
Microsoft Word makes it easy to create smart text documents with its diverse template styles. This includes pre-formatted table of contents templates. With our illustrated, step-by-step guide, we’ll show you how to find the templates and how to customise the design.
How to create a table of contents in Word

How to insert a watermark in Word
Sometimes you need to clearly label your document with words like “Sample,” “Draft,” “Example” or “Confidential”. In Microsoft Word, you can use watermarks to do this. This practical design tool allows you to display barely visible but impressive text or graphics that sit behind the actual text. In this tutorial, we will teach you how to insert a watermark in Word.
How to insert a watermark in Word
How to remove a watermark in Word
Watermarks are a handy way to label documents in Microsoft Word. You can insert a watermark so that your text or your company logo sits discreetly in the background of the page. However, sometimes you might not be happy with how the watermark looks, or you don’t need the watermark at all anymore. We’ll show you two ways to remove a watermark in Word.
How to remove a watermark in Word
From The Document Foundation Wiki
- Wiki Home
- Development
- Design
- QA
- Events
- Documentation
- Website
- Localization
- Accessibility
- Marketing
- Diversity
- Wiki Help
Foreword
The video shows how «Character styles» can be used in Writer and links to this page here, which provides further information and details.
Styles of the type Character styles are used to format the font for letters, individual words or groups of words within paragraphs of a document uniformly differently.
You will learn how to optimally format paragraphs with Character styles.
With the use of Character styles, the formatting of your documents will be easy for you.
Link to the video
Link to the video (in German [DE]):
Zeichenvorlagen in Writer
Writer has powerful style management
Overview of the types of Styles available in Writer
Different types of Styles are already integrated in LibreOffice.
- Paragraph styles
- Character styles
- Frame styles
- Page styles
- List styles
- Table styles
Most Styles can be changed or created.
Table Styles are an exception.
LibreOffice already comes with Styles of every type of format that can be used.
Paragraph Styles
Paragraphs are formatted with Paragraph Styles.
You may use your own Paragraph Styles or Document templates for your Paragraphs, in which you have created customized Paragraph Styles.
Character Styles
Character Styles (CS’s) general
The Character Styles can have changed attributes compared to Paragraph Styles.
You can only assign one Paragraph Style to a paragraph.
If you want to have something different within a paragraph, such as font, size, color, background, and so on, use Character Styles.
-

Styles / Character Styles in the Sidebar
-

to have something different
-

Examples of Character Styles
|
Note: |
The manually entered attributes in Character Styles are applied with priority over the attributes of Paragraph Styles.
Example with a derived Character style (CS)
What is meant by derived Character style?
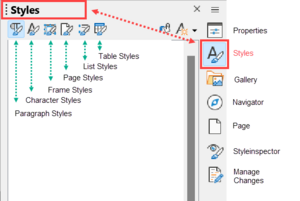
Open the sidebar from the ▸ menu ( Ctrl + F5 ).
For Character Styles, click the Character Styles icon ![]() .
.
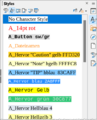
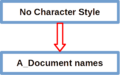
Right-click on the Character Style (CS) «No Character Style» Style and select .
The dialog opens with an «Untitled1» Character Style.
Enter a meaningful name for the Character Style.
All attributes (values) in the new Character Style are taken from the «No Character Style» Character Style.
You can now change the attributes you need and click OK, see «Derived Character Style simple — Scheme».
-

Derived Character Style simple — Scheme
You can create as many different CS’s as you need.
Example of a derived Character style
Enter «A_Light Purple 3» for the name in the new CS.
Change the attributes as shown in the this figure.
Click on OK.
The CS «A_Light Purple 3» now has all changed attributes and all others like the CS «No Character Style».
To add letters, words or word groups to the new Character style, select them and double-click on the Character style «A_Light Purple 3».
The CS «A_Light Purple 3» can be used as required.
|
Note: |
Example hierarchically derived Character styles
Schematic representation of hierarchically derived Character styles, see «Derived Character style Hirarchical — Scheme».
-

Derived Character style Hirarchical — Scheme

Create Hierarchically Character Styles
If you need more than one CS’s, which for example should have changed the same font and each of these CS’s should also have changed a different attribute, you can proceed as follows, see this figure.
Right-click on the Character style (CS) «No Character Style» and select .
The dialog opens with a «Untitled1» Character style.
Give the CS a meaningful name, e.g. «A_Default Bold».
All attributes (values) in the new CS are taken from the CS «No Character Style».
Set the font as «Liberation Sans» and the font style to «Bold».
Now click on OK.
Now derive two more CS’s from «A_Default Bold» ( «A_Emphasis» and «A_Menu» ) and change the attributes in the respective CS according to this representation.
|
Note: |
Hierarchical representation of the CS’s
You can set a hierarchical display in the sidebar at the bottom under «□ Show Previews», see Displayed Hierarchically Character Styles.
-

Displayed Hierarchically Character Styles

Undo formatting of CS’s
Don‘t use Direct formatting
If you want to undo the formatting for a text that has been formatted with a CS, you should never do this manually using the Formatting toolbar.
Do not perform formatting directly.
This can lead to major problems in further text editing.
To remove formatting of Character styles from the text
Open the Sidebar ( ) and click the Character styles icon.
Select the text for which you want to remove formatting.
In the window, double-click the «No Character Style» Character style.
-

«No Character Style» Sidebar
Use the button Reset
(German original text by Robert Grosskopf)
Like Paragraph styles, Character styles can always be undone in certain areas (tabs).
In the tab «Organiser» you can see the definitions of the respective Style.
For this Style the selection of Small caps + Green would have been sufficient.
Western text: Liberation Sans + normal should therefore be removed.
![]()
|
Note: |
In the tab «Font» only the properties displayed under this tab are reset by clicking the button Reset.
|
Note: |
Since the basic font was different here, the dialog now shows the default font «Times New Roman» instead.
But this is a bit deceptive, because the font is no longer specified by the Character style.
The font from the Paragraph style is passed through again.
The font color as well as the setting of Small caps has been left.
The Character style now only shows the conditions that should really be defined:
Small caps + Green.
![]()
Use the Button Reset to Parent
Values in this tab are set to the corresponding values of the style specified in «Inherit from» in Organiser.
In all cases, also when «Inherit from» is «None», the current tab values specified in «Contains» are removed.
Further information
Working files
Template Examples CharacterStyles in Wiki EN+DE.odt
CS + ZV Values in Table EN+DE.ods
Character Styles in Writer V6-4.odt
Professional text composition with Writer
Styles in Writer
Inheritance in Paragraph styles in Writer
Document templates Letter template in Writer
Documentation / Manuals
Here you will find the Documentation / Manuals:
Documentation / Manuals
Any questions?
For questions on this topic go to:
Ask.LibreOffice
Get Involved
Join us today and help us to make it even better!
Get Involved
Donate
LibreOffice is Free Software and is made available free of charge.
Your donation, which is purely optional, supports our worldwide community.
If you like the software, please consider a Donation.
Whether you’re a one-person business operating out of your kitchen, or a billion-dollar company on Wall Street, the expectation is the same. Your business documents must be the paragon of professionalism and competence.


This expectation shouldn’t be a cause for worry. With applications like Microsoft Word you can create professional-looking documents with your own computer. Through the years, Word has become more powerful, yet more intuitive. Anyone with basic computer skills can use Word to create well-designed documents.
In this article, you’ll learn how to format text in Word to make your business documents easier to read and understand. You’ll also pick up tips on how to make sure your formatting doesn’t look amateurish—even if you’re getting started with Word.
Formatting Text in Word
Formatting text in Microsoft Word refers to controlling how text appears in your document. This includes the size, color, and font of the text. It also covers text alignment, spacing, and letter case.
Microsoft Word styles make it easy to change and apply styles throughout a document. A “style” is a set of formatting settings applied to a specific kind of text.
For example, you can set up a style for headings that’s bold, 14 points, aligned left, and uses the Tahoma font. This means all text in your document with the heading style will be formatted the same way. You don’t have to manually format each heading in your document.
In this post, you’ll see how to use MS Word styles.
How to Format Text in Word
To show you how to format text in Word, we’ll walk through formatting a completely unformatted business document file.
This is what my marketing report looks like without any formatting in Word:


As you can see, it’s plain and boring. Nobody would be inspired to read it, let alone act on the findings of the report!
Some basic Word text formatting can fix that.
1. How to Apply Typographic Emphasis
1. For starters, let’s use typographic emphasis (bold, italic, underline) to make the report title stand out.
To do this, select the text you want to emphasize. Click on the bold button on the Microsoft Word ribbon.


Note that the ribbon also has the buttons to apply italic, underline, strikethrough, and other formatting effects for text. Follow the same steps to apply those effects.
2. Now, let’s change the font, font size, and color of the title.
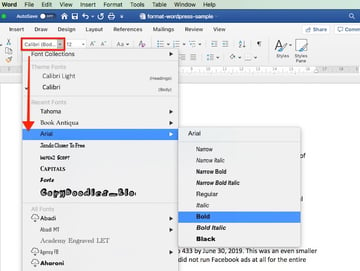
Again, select the text. Click the drop-down arrow on the font section of the ribbon, then select the font you want to apply. In this case, I’m using Arial bold.


3. To change the font size, highlight the text. Click the drop-down arrow on the font size indicator on the ribbon. Click on the font size of your choice.


Or, after highlighting the text, you can type the font size into the font size indicator on the ribbon. This is especially useful when the font size you want isn’t available in the font size selector.


4. You can also use the Increase Font Size or Decrease Font Size buttons on the ribbon to quickly change the font size.


5. We can easily change the font color as well.
Highlight the text, then click the down arrow beside the Font Color selector. Click on the color of your choice.


Choose More Colors… if you wish to apply a custom color.
2. How to Change Capitalization in Word
Microsoft Word also allows you to easily and quickly change the capitalization of your text. For example, if we want to make the title all uppercase, we don’t have to retype it.
Highlight the title, then click the Change Case button on the ribbon.


Or, highlight the text, go to Format > Change Case…


… then click on the radio button for the case you want to apply. Click OK.


Now the title is looking much better. It’s the most prominent part of the document and commands the reader’s attention. However, we can still improve its readability.
3. How to Format Paragraphs
One way to make your document easier to read is by increasing white space around lines and paragraphs.
1. To adjust the line spacing, select the text. Click on the arrow on the Line and Paragraph Spacing button. Select the line spacing you wish to apply.


2. To change the spacing around a paragraph, select the paragraph. Click on the arrow on the Line and Paragraph Spacing button > Line Spacing Options…. Then, type the amount of spacing before and after the paragraph. (Tip: You can adjust other settings from this dialog box as well.)
For the title, I’ll add a generous amount of space after the paragraph, to set it apart from the rest of the document.


3. Finally, let’s change the alignment of the title. Select the text, click on either the Align Left, Center Text, Align Right, or Justify button on the ribbon. Since this is a title, let’s use Center Text.


These simple formatting effects make the title stand out from the rest of the document.
4. How to Work With MS Word Styles
As much as Word makes it easy to format text, if you need to apply formatting effects on the entire document, the process becomes tedious.
Word solves that through styles. MS Word Styles allow you to define a set of formatting commands and apply them automatically to every item in the document with that style.
Let’s look at a specific example:
1. How to Modify a Paragraph Style
Let’s follow the steps above to define a style for the main headings of the report with the following characteristics:
- Font: Arial
- Size: 14 points
- Color: Blue-grey
- Typographic Emphasis: Bold
- Case: Capitalize each word
- Alignment: Left
- Line spacing: Single
- Paragraph spacing: 6 pts before paragraph, 0 pts after paragraph
It would look like this:


One way to apply this exact formatting on every main heading is to modify the existing Heading 1 style in our document. Place your cursor anywhere in the main heading. Go to Styles, right-click on Heading 1, then choose Update Heading 1 to Match Selection.


You can also modify any style by going to Format > Style…. The Style dialog box opens.


Select the style you want to modify from the Style list. This gives you a preview of the paragraph and character, as well as a description of the current style settings of the selected style.
Click Modify…. The Modify Style dialog box pops up.


Change the text and paragraph format settings. You can control the font, font size, font color, typographic emphasis, alignment, and spacing. When you’re done, click OK.
2. How to Apply a Paragraph Style
Now, go to each main heading in the document and apply the Heading 1 style to it. Place the cursor on a heading, go to Styles > Heading 1.


The selected text instantly takes on the formatting of Heading 1.


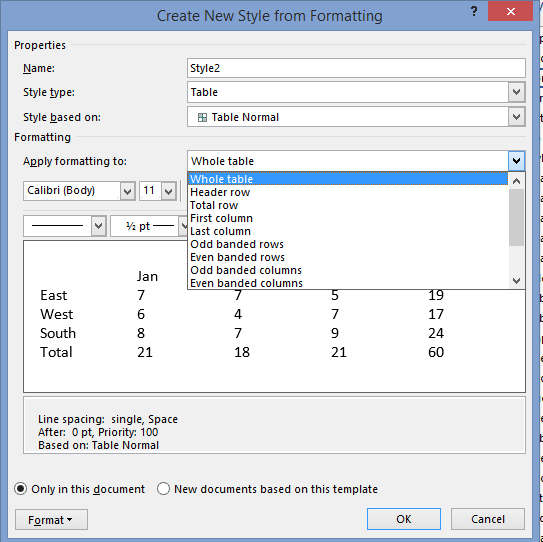
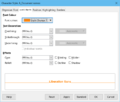
3. How to Create a List Paragraph Style
You can also create a new paragraph style from scratch, instead of modifying an existing one. To demonstrate, let’s create a list-type paragraph style.
1. Go to Format > Style…. Fill in the Properties section of the dialog box that opens. For Style based on, you may wish to use one of the pre-existing list styles as a starting point.


2. Next, change the formatting options. The box below gives you a preview of what the list paragraph would look like with those settings. There’s also a summary of the formatting properties you’ve specified.


You also have the option to do the following for this style:
- Add to template. Adds the style you’re creating to the document template.
- Add to Quick Style list. Shows the new style to the Quick Style list, making it quickly accessible from the ribbon.
- Automatically update. Automatically updates the style when you manually format a paragraph with that style.
When you’re happy with the settings you’ve made, click OK. Notice how the new Bullet style you created is now included in the Quick Style popup.


Once the bullet style is applied, our list now looks like this:


4. How to Use Character Styles in Microsoft Word
You can also define a style to an individual word or a block of text, rather than a paragraph. In the next example, I’d like to apply a character style for every URL in the document.
1. Select the text. Then, go to Format > Styles…. From the Style dialog, click New…. The Create New Style from Formatting dialog opens.


2. Give the new character style a name. For Style type, choose Character. Then, make the formatting settings you want to apply to this character. Note that you can’t change alignment and spacing for a character style. The preview box shows you a sneak peek of the text based on the settings you specified.


3. When you’re done, click OK.


To apply the character style, place your cursor in a word or select a set of words. Go to Format > Style…. Find the character style you wish to apply. Click Apply.


Tip: To quickly find the MS Word styles you’ve created, for List, choose User-defined styles.
5. How to Use Table Styles in Word
We can also define a table style to provide a consistent look to the tables in our document.
1. Create the table. Go to Insert > Table…, then indicate the number of columns and rows you need in your table (you can always add or remove these later). Click OK.


2. Add your text to the table. If necessary, click and drag any of the borderlines to adjust the width or a column, or the height of a row.
3. To apply a table style, click anywhere on the table, then go to Table Design. The Table Design ribbon appears.


4. Click on the down-arrow for table styles to display the table styles gallery.


5. Click on any style to apply it to your table.


Expand the table styles gallery again to change the existing style, clear the style you applied, or create your own table style.
Discover Great Microsoft Word Templates for 2020
Some experts say it’s a good idea to set up your formatting styles in Word first before typing or copying the text into the document. One quick way to do this is by starting with a Microsoft Word template. Templates come pre-formatted by professional designers to look current and impressive.
You can find thousands of Word templates for all kinds of business documents in Envato Elements.


For a small monthly subscription fee, you get unlimited downloads of all the templates at Elements. You also have unlimited access to everything else in the Elements catalog:
- presentation templates
- web templates
- fonts
- photos
- graphics
- other digital assets
Use as many of these assets as you want, as often as you want, without paying more. This makes Elements a terrific source for all the creative assets you need to create remarkable marketing and communication materials.
You can also pay as you go at GraphicRiver. This marketplace also offers a huge library of templates for Microsoft Word and other digital assets for all your marketing and communication needs. The difference is, you only pay each time you use an item. This can be a very economical option.
Below are some of the best print templates for Word available on Envato Elements and GraphicRiver:
After downloading any of these Microsoft Word templates, you can apply what you’ve learned about formatting text in Word. This way, you can personalize the template so that it aligns with your visual branding and preferences. You now know how to take any Word template and make it your own!
5 Top FAQs on Formatting Text in Microsoft Word
Below are some of the questions that come up as people format text in Word.
1. How Do You Make a Word Document Easier for the Reader to Scan?
Your primary goal when formatting text in Word is to make it easy for people to scan, read, and understand the content of the document. The different formatting options in Word help you achieve this:
- Use typographic emphasis like bold, italics, and underline to emphasize specific text and add variety to your document.
- Break up the document into sections with headings and sub-headings to help the reader scan and navigate their way through it.
- Use either bulleted or numbered lists where appropriate to shorten paragraphs and make lists easier to comprehend.
- Set up line and paragraph spacing so that there’s plenty of white spaces throughout the document.
2. How Many Fonts Should I Use in a Word Document?
It’s easy—and fun—to apply different fonts in Word. Too easy, in fact, that you could end up overwhelming your reader and making your document look like someone played with the formatting.
Avoid this by sticking to a maximum of two different fonts in a single document. For instance, you could choose a sans serif font for your title and headings, and a serif font for all other text. You could even use one font for the entire document, relying on typographical emphasis and color to distinguish different types of text from each other.
3. Why Should I Use Microsoft Word Text Styles?
Use Microsoft Word text styles because they let you apply formatting settings globally throughout your document. This is important in long documents, where formatting each line or paragraph is too onerous. With text styles, you only need to determine what style you want for each piece of text. Word will do the rest.
4. How Can I Make My Document Formatting Consistent?
Using MS Word styles, as you’ve learned in this article, is an easy way to make your document formatting consistent. You decide and set how you want each type of text to be formatted. Then you can apply those styles consistently through your entire document.
Beyond Microsoft Word styles, also make sure that the recurring parts of your document are consistent as well. These include your headers and footers, for example. You must also be consistent with the placement of images: Do they have borders? Are they always within the document’s margins or do they bleed to the edge of the page?
When you use a Word template, these design decisions are already made for you. So, if you want a consistent design without all the hard work, then starting with a template for Word is the way to go.
5. How do You Copy text into Word without also copying junk code?
When you copy text from one application and paste it into Word, you run the risk of also copying the underlying formatting code for it. This code or set of formatting commands is invisible so you won’t know you’re copying it inadvertently. This can mess up your formatting in Word. Soon, you’ll be pulling your hair wondering why Word won’t “follow” your commands.
To avoid this grief, make sure you strip all formatting when you copy and paste the text into Word. Here’s how: Copy the text. In Word, click Edit > Paste and Match Style.


That’s all there is to it!
Using Microsoft Word, Style Your Business Document for Maximum Impact
You’ve learned how to format a document in Word to make it easier to scan and read. Good formatting is also essential to make sure the final document represents you and your business in a favorable light.
You’ve seen how doable formatting is, even if you’re starting from scratch with completely unformatted text. You’ve also discovered that you can rely on professional designers to make the formatting decisions for you by starting with a template for Word.
For unlimited downloads of print templates for Word at a fixed subscription fee, look to Envato Elements. Here, you can also have your fill of fonts, icons, photos, and other design assets you’ll need without having to pay more. Or, get your premium Word templates from GraphicRiver on a pay-per-use basis. You also get a wide range of choices without having to commit to a subscription.
With Microsoft Word styles and formatting tools, there’s no more excuse to have poorly designed business documents. Make your next business document one you’ll be proud of.
To use styles, I believe it’s helpful for one to understand their purpose,
which is to provide standardization of formatting through a document or a group
of documents. There are other benefits to using styles in Microsoft Word,
though, and you’ll learn about them here.
If you already understand styles and would like to visit our extreme
tutorial,
click
here.
What is a Style?
A style is nothing more than a specific set of formats that are saved «as a
set», which is called a «Style». For instance, when you read a paperback book,
virtually every chapter’s title looks the same. Perhaps it is Times New Roman,
Bold, 18-pt, and centered. When you read a textbook, each Tip may have the same
border around it, and each exercise may have the same red font used as its
heading. Styles help us do this. They’re so easy to use, but not quite as easy
to understand.
Gotchas
One of the biggest problems with using styles is that people create this
gorgeous template with styles, and then copy information from the web or other
external documents, and now there are 20 more styles in your document. It’s
difficult to restrict this from happening, particularly if you’re not the only
user of the template. See
this article
for more information.
Another problem is often caused because we use the default Heading 1 style
and alter it to suit us. Then someone else comes along who isn’t aware of
styles, and they decide to italicize it. Rather than changing the style, they
manually italicize each Heading 1. Someone who knows what they’re doing comes
along and doesn’t get the same result when they apply the Heading 1 style. Doh!
When and if you create styles in a template, do a final review to ensure
absolutely that all the styles have been properly created and/or changed.
Outline numbered styles can be tricky. See
this article for more information.
Styles have a setting to Automatically update. I wish they didn’t. See
this article
for more information.
What Styles to Use?
I prefer to use the built-in styles whenever possible. Using, for instance,
the Body Text style, I can alter it. This does not affect all documents, it only
affects the active document or-documents from this template. However, you can create your own
custom styles. See this article.
Typical Styles
When I develop a template for a manual, I generally include the following
styles:
- Headings 1, 2, and 3 (sometimes 4 and 5, but more than 5 is a bit
ridiculous and should be used only for the most technical of manuals) - Body Text
- List Bullet and List Bullet 2 (for 2 different levels of bullets)
- List Number and List Number 2 (for 2 different levels of numbering)
- Note (or Tip; I usually put a border on this)
- Graphic (provides great spacing)
- Caption
- Header and Footer styles and page number styles are auto-created when you
use headers and footers, and I don’t usually alter them. - TOC styles are auto-created when you insert a Table of Contents and I
often add spacing before the TOC1 style.
Components of a Style
There are two types of styles: Paragraph and Character.
Paragraph Styles
A paragraph style has
more format possibilities than a character style. For instance, a paragraph style could be bold and also
double-spaced.
Above we show the dialog for modifying the Heading 1 style.
-
We have the Name, which I hope is self-explanatory. The
Style type in this case is Paragraph. -
Style based on tell us that Heading 1 is based on the
Normal style. Now, suppose we change the Normal Style to be red? Since you can
see that the Heading 1 style has no special font color designated, it would
indeed take on the red font we apply to the Normal style. I prefer to base my
styles on No Style, which is a choice in the drop-down. This way, each of my
styles is independent. While I may understand that styles are based on other
styles, other users of my templates may not (and it happens to be rare that I
personally use a template I have created). -
Style for the following paragraph denotes what style a
new paragraph defaults to when you hit Enter while you’re in a paragraph that
uses Heading 1. For Heading styles, I will generally make the Style for
following paragraph be Body Text. However, if you’re using outline numbered
styles, you might want it to default to Heading 2. Alternative, when I create
my Graphic style, I like the following paragraph to default to be the Caption
style because I always put Figure titles below my graphics.
For List Bullet and List Number, the likely following
paragraph would be another List Bullet or List Number, so I leave them to be
the same style.
-
I rarely use Add to template unless I am working on a
document that was created from a template, and realize I forgot to italicize
the font or something, but this does add the style to the template as well as
the document on which you are working. If your document is not based on a
template, you’ll want to avoid this setting. -
I rarely use Automatically update. The only styles I
use that have this checked are the Table of Contents (TOC) styles. If you
change a paragraph to which TOC1 is applied to become italicized, all
paragraphs with TOC1 applied to them will become italicized when this option
is checked.
Character Styles
A character style might be any text that is bolded. For
instance, suppose we always want our company name to appear in bold red font,
regardless of the formatting of the paragraph in which that text resides. We
can create a character style for it. I’ve called it MyCharStyle in the graphic
below.
Unfortunately, when I apply the MyCharStyle style to some of the words in a
paragraph where the style is already bold, it unbolds it, as you can see below,
so be careful what font attributes you choose when creating your own character
style.
The following attributes cannot be built into Character styles: Tabs, paragraph
spacing, paragraph alignment, paragraph indents, bullets, numbering.