
Create a booklet or book
- Go to Layout > Margins > Custom Margins.
- Change the setting for Multiple pages to Book fold.
- To reserve space on the inside fold for binding, increase the width of the Gutter.
- You can add many embellishments to your booklet’s appearance.
- Select OK.
Contents
- 1 What is the format of a book?
- 2 How do I use book templates in Word?
- 3 How do you layout a book for printing?
- 4 How do you layout a book?
- 5 How do you write a book format?
- 6 Does Word have a book template?
- 7 How do you cite a book?
- 8 How do I convert a Kindle book to a Word document?
- 9 In what format are books printed?
- 10 How do you make a book visually appealing?
- 11 How do you make a book look good?
- 12 How do you start an outline for a book?
- 13 Do authors use Microsoft Word?
- 14 How do you reference a Book in a paper?
- 15 How do you cite a Book in APA in-text?
- 16 How do I cite an online Book?
- 17 What is Amazon Kindle book format?
- 18 How do you format a kindle?
- 19 How do I convert a Kindle book to PDF?
- 20 What is the most popular book format?
What is the format of a book?
Formatting is how your manuscript looks and reads. Things like font size, page color, word count, page number, line spacing, paragraph breaks–everything that goes into the visual appearance. This means manuscript format is the proper way your manuscript should look when you send it in for editing.
How do I use book templates in Word?
Go to File > New. Type booklet in the search box and select the search icon. When you find the template you want to use, select it and choose Create. Click File > Save a copy to save your booklet.
How do you layout a book for printing?
Your book should always start on page one on the right-hand side page and will leave all blank pages throughout the book with no page numbers on. The style of the page numbers should be in line with the main body of your book. They are normally in a small font and centred at the bottom of the page.
How do you layout a book?
Book Layout: 9 Easy Steps for Designing the Perfect Layout
- SIZE. First, you need to understand what type of project you’re working with.
- BINDING. Another important consideration for your book is what type of durable soft-cover binding you will be utilizing.
- OUTLINE.
- MARGINS & BLEEDS.
- TYPOGRAPHY.
- BODY COPY.
- IMAGES.
- NAVIGATION.
How do you write a book format?
How To Format Your Book: Tips for Nailing Your Book Format
- Use black, 12-point, Times New Roman as the font.
- Use the U.S. standard page size of 8.5×11 inches and set your margins to 1 inch on all sides.
- Set alignment to left justified.
- Use a single space after periods.
- Use double-spaced line spacing.
Does Word have a book template?
Yes, Microsoft Word offers several templates within the application, including book templates to choose from. Different sizes and formats are offered, depending on the type of book you are writing.
How do you cite a book?
The basic form for a book citation is: Last Name, First Name. Title of Book. City of Publication, Publisher, Publication Date.
How do I convert a Kindle book to a Word document?
How to Format Your Book for Kindle Using Microsoft Word in 6 Easy…
- Step 1: Type it clean. Use the default settings in Microsoft Word.
- Step 2: Insert page breaks.
- Step 3: Apply styles.
- Step 4: Create your Table of Contents (TOC)
- Step 5: Convert to MOBI.
- Step 6: Upload!
- The Kindle dilemma.
- About the Author.
In what format are books printed?
PDF for Print Books
Portable Document Format (PDF) is the standard format for creating a print book and documents.
How do you make a book visually appealing?
The most eye-catching books tend to sell better, so here is how to make sure your hardcover book is as visually appealing as possible.
- Using Headbands.
- Selecting Three Piece Boards.
- Foil Stamping a Hardcover Book.
- Choosing Ribbon Inserts.
- Advantage Book Binding Can Help You Create The Printed Book You’ve Always Wanted!
How do you make a book look good?
Use large images – When using images in your text or on your cover, make sure they are a large picture file with a high pixel count – pixelated images don’t look professional. Feature professional endorsements – Definitely get endorsements for your book cover and title pages before it is published.
How do you start an outline for a book?
How to Create a Novel Outline
- Craft your premise. This is the underlying idea for your story.
- Determine your setting. In a novel, the setting (time, place) can be just as important as the characters.
- Get to know your characters. Write character profiles.
- Construct your plot. Construct a timeline of events.
- Write your scenes.
Absolutely, many (most) authors use Microsoft Word, if not while writing the book, then in the editing process. Every editor I’ve ever worked with has sent me a Word file back with Track Changes and Comments for me to work on. I usually write in Word, too, but recently I started using Scrivener to write and outline in.
How do you reference a Book in a paper?
Author’s Last Name, First Name Middle Name or Initial. “Title of Chapter or Article.” Title of Book: Subtitle of Book, other contributors, edition, Publisher, Date of print Publication, Pages.
How do you cite a Book in APA in-text?
When using APA format, follow the author-date method of in-text citation. This means that the author’s last name and the year of publication for the source should appear in the text, like, for example, (Jones, 1998). One complete reference for each source should appear in the reference list at the end of the paper.
How do I cite an online Book?
Author (Last name, first name). Title of Book. Edition (if available), Publisher (if available), Year of online publication. Name of Website or Database, URL (without the http:// or https://) or DOI number.
What is Amazon Kindle book format?
azw that can be downloaded and read on devices like smartphones, tablets, computers, or e-readers that have Amazon’s Kindle app.
Kindle File Format.
| Filename extension | .azw, .azw3, kfx |
|---|---|
| Developed by | Amazon.com |
| Initial release | 2007 |
| Latest release | 10 (11 August 2015) |
| Type of format | e-book file format |
How do you format a kindle?
Factory Reset Your Kindle E-Reader
- From the home screen, swipe down to open the Quick Actions or select Menu.
- Select Settings or All Settings.
- Go to Device Options or select Menu.
- Select Reset. For older devices, select Reset Device again.
- When prompted, select Yes to confirm.
How do I convert a Kindle book to PDF?
Follow the steps below to convert to PDF:
- Download and Install Kindle Converter.
- Select Add Files or Add Folders or you can drag-drop the file.
- Navigate to the Kindle file you want to convert.
- Select it and click Ok to add it.
- Click on Output Format and select PDF from the drop-down menu.
- Select an Output folder.
What is the most popular book format?
Preferred book formats in the U.S. 2020
Print has always been the most popular book format in the U.S. and figures on increased media consumption during the pandemic showed that even Gen Z, a generation famed for loving digital, were the.
Last Updated: February 20, 2022 | Author: Diana Compton
In Microsoft Word, you can create a book format by setting specific page margins. … This creates a wide margin on the top and side for a book binding. On each page, the inside margins are the same width and the outside margins are the same width. This creates a mirror image of the margins on the left page and right page.
How do you make a book in Word?
What is Book fold printing?
When you select Book fold for your page setup, Microsoft Word prints two pages on one side of the paper. When you fold the paper, it opens like a book. This option is intended for documents that have more than two pages.
What is AutoFormat as you type?
The AutoFormat As You Type tab provides options for formatting that occurs automatically based on what you type. Using this feature can minimize the need to apply changes from the Ribbon.
Can you write a book on word?
Microsoft Word comes with pre-built page settings for creating books. Whether you’re creating a memoir or event guide, these settings let you create a beautiful book or booklet, from start to finish.
Where is AutoFormat as you type?
In the Word Options dialog, select the Proofing tab and click the AutoCorrect Options… button. In the ensuing dialog, select the AutoFormat As You Type tab (note that there is also an AutoFormat tab, which has a different purpose).
Where is auto format on word?
Click the “Files” tab on the Ribbon and then click the “Options”. It will bring up Word Options dialog, from left sidebar click “Quick Access Toolbar” and from the right pane select the “Commands nor in the Ribbon” from the drop-down menu and then scroll down to find the “AutoFormat” item in the dialog.
How do I turn on auto format in word?
Turn on or off automatic bullets or numbering
- Go to File > Options > Proofing.
- Select AutoCorrect Options, and then select the AutoFormat As You Type tab.
- Select or clear Automatic bulleted lists or Automatic numbered lists.
- Select OK.
What does AutoCorrect mean?
Definition of autocorrect
: a computer feature that attempts to correct the spelling of a word as the user types it The iPad boasts an autocorrect system that will try to figure out what you mean to type even when you don’t quite tap the right keys.—
When I email my Word document the format changes?
Chances are that your document is set to update styles from the template upon opening. You need to change this setting. Go to the Developer tab and click on Add-Ins. If “Automatically update document styles” is checked, uncheck it.
What is computer thesaurus?
The Thesaurus is a software tool that is used in the Microsoft Word document to look up (find) synonyms (words with the same meaning) and antonyms (words with the opposite meaning) for the selected word.
Is AutoCorrect one word?
Autocorrect is now a generic term, derived from the original programming which is spelled as AutoCorrect. AutoCorrect was invented by Dean Hachamovitch, working for Microsoft in the 1990s. When referring to a feature of Microsoft programs the correct spelling is AutoCorrect, using two capital letters.
What is the best format to send a document by email?
A good idea when sending important documents such as a resume via email attachment or a link is to send them as PDFs. The PDF is a great format for professional correspondence because it’s universal, versatile and accessible.
How do I email a Word document without losing formatting?
Click “File” and select the “Save As” option. Click the “Save as type” drop-down menu and select “Web Page (. htm; . html).” The Web Page option converts the document into an HTML file that preserves its formatting.
What is proper email format?
How to Format an Email Message. Your email message should be formatted like a typical business letter, with spaces between paragraphs and with no typos or grammatical errors. Don’t mistake length for quality—keep your email brief and to the point. Avoid overly complicated or long sentences.
What is the difference between a PDF and a Word document?
Microsoft Word is used for making and editing DOC files while Adobe Acrobat is for creation of PDF files. … Documents created using Word and saved in PDF can be edited using Word while PDFs made using Acrobat can be edited through third-party developers. 4. ‘DOC’ is proprietary while ‘PDF’ is open source.
Is DOCX same as PDF?
docx formats are also good options for distributing documents. They’re reasonably compact, and unlike PDF, files can be easily edited by recipients.
Is DOCX a Word document?
Any file with the DOCX extension is a Microsoft Word Open XML Formate Document. These files are used for reports, resumes, letters, documentation, note-taking, newsletters, presentations and more. … In short, DOCX files are smaller, easier to store and support due to the format being an XML.
Create a booklet or book
-
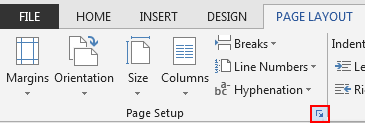
Go to Layout and select the Page Setup dialog launch icon at the bottom-right corner.

-
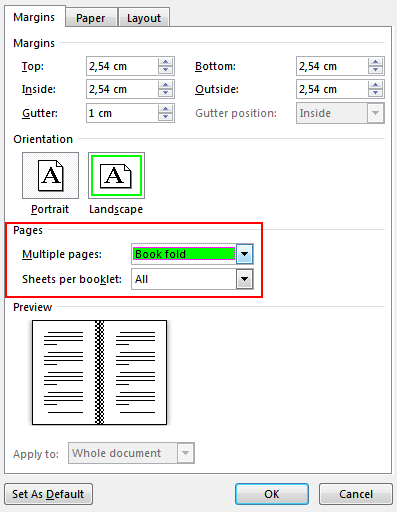
On the Margins tab, change the setting for Multiple pages to Book fold. The orientation automatically changes to Landscape.
Tip: If you have a long document, you might want to split it into multiple booklets, which you can then bind into one book. Under Sheets per booklet, choose how many pages to print per booklet.
-
Select and increase the value of Gutter to reserve space on the inside fold for binding.
-
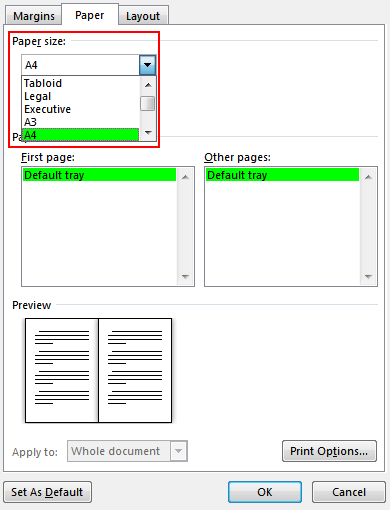
Go to the Paper tab and select the Paper size. The final size of the booklet is one half width of the paper size.
Tip: You can add many embellishments to your booklet’s appearance. For example, to add borders to every page, on the Layout tab of the Page Setup window, click Borders.
-
Click OK. If your document already has content, the text is formatted automatically, but you might need to adjust objects like images and tables manually.
Print settings for booklets
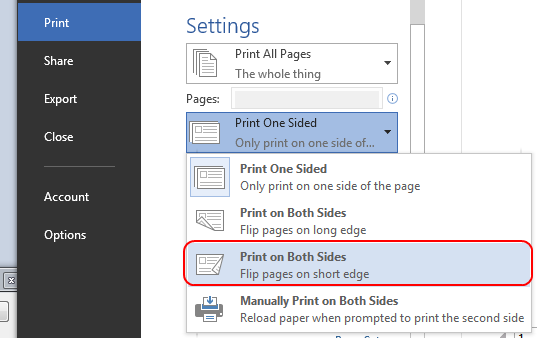
When you print the booklet, check the print settings to make sure you print on both sides of the paper and flip the papers correctly for the printing to work as intended.
-
Go to File > Print.
-
If your printer supports automatic printing on both sides, change Print One Sidedto Print on Both Sides. Choose the option Flip pages on short edge to avoid printing the second side of each sheet upside down.
-
If your printer doesn’t support automatic printing on both sides, select Manually Print on Both Sides, and feed the pages back to the printer when prompted. To avoid pages from printing upside down, flip the sheets on the short edge of the paper according to your printer’s instructions.
Tip: For a professional touch, consider adding page numbers in the header or the footer. For more info, see Add page numbers.
See Also
Create a booklet using a Word template
Booklet: Page numbering tips.
Create different headers or footers for odd and even pages
Get Microsoft publishing templates
Create a booklet or book
-
Go to Layout > Margins > Custom Margins.
-
Change the setting for Multiple pages to Book fold. The orientation automatically changes to Landscape.
Tip: If you have a long document, you might want to split it into multiple booklets, which you can then bind into one book. Under Sheets per booklet, choose how many pages to print per booklet.
-
To reserve space on the inside fold for binding, increase the width of the Gutter.
-
You can add many embellishments to your booklet’s appearance. For example, to add borders to every page, on the Layout tab of the Custom Margins window, select Borders.
-
Select OK.
If your document already has content, the text is formatted automatically, but you might need to adjust objects like images and tables manually.
-
Go to File > Page Setup and check the paper size. Keep in mind that the final size of the booklet is one half of the paper size. Make sure your printer is stocked with paper of the right size.
Print settings for booklets
When you print the booklet, check the print settings to make sure you print on both sides of the paper and flip the papers correctly for the printing to work as intended. If your printer supports automatic printing on both sides, follow these steps.
-
Click File > Print.
-
Under Two-sided, select Booklet.
Tip: For a professional touch, consider adding page numbers in the header or the footer. For more info, see Add page numbers.
Note: If your printer doesn’t support automatic printing on both sides, you’ll need to print each page manually.
See Also
Create a booklet using a Word template
Booklet: Page numbering tips.
Create different headers or footers for odd and even pages
Get Microsoft publishing templates
Many new writers will reach this common barrier when it comes to publishing their first book. That barrier is formatting.
Once you have written your wonderful book, had it edited and proofread, you may be wondering, right… how do I turn this into an actual book?
Before the final stage of submitting to your chosen self-publishing platform, you will need to format your book. This can be done on various book formatting programs or you could hire a freelancer to do it for you.
But if you want to learn how to do this yourself, and do so inexpensively, then you may want to consider formatting your book in Microsoft Word. Which, I suppose you already have — hence, you reading this post!
Chances are you already have Microsoft Word installed on your PC, making it an easily accessible and free option for your book formatting needs. It is also quite a straight forward solution — especially if you have written a Novel or largely text-based book.
Illustrated books, however, are a little different — but you can learn about that here if you wish.
In addition to the pre-created book and booklet formats, Microsoft Word provides parametrized layouts that can be used to create a beautiful book, whether you’ve written a memoir or sharing your romance novel for the world to read.

You Should Read This Next 👇

Table Of Contents
- Creating Your Book In Word
- Margins
- Gutter
- Other Things To Consider When Formatting Your Book In Microsoft Word
- Free Pre-Edited Downloadable Microsoft Word Formatted Documents
- Hiring A Freelancer To Edit And Format Your Book
Creating Your Book In Word

First, start by opening Word. It’s recommended that you adjust the following settings before writing your content so that you won’t run into issues with formatting later.
Margins
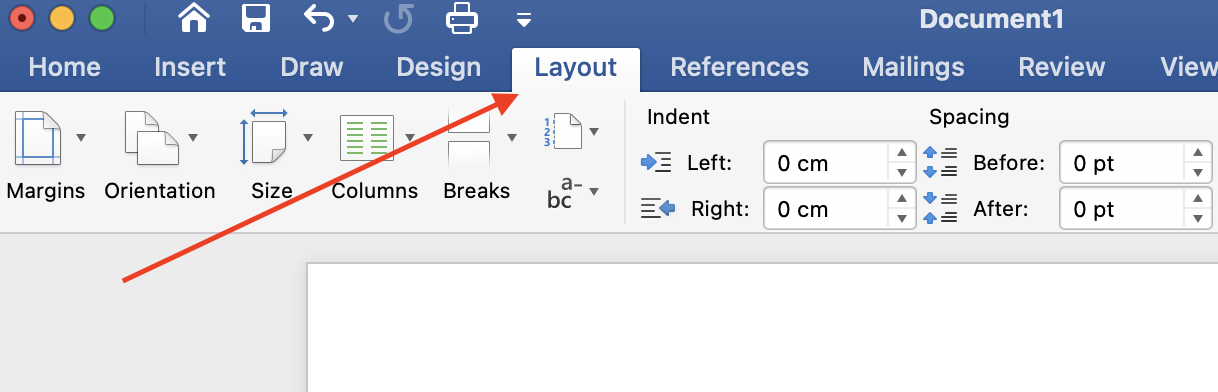
Once you’re in Word, head over to the “Layout” tab and look for the “Margins” icon
From the “Margins” section, you’re able to adjust the parameters for the margins of your book page. These values should reflect your chosen book size and page amount. You may use a book margin calculator or use your book submission platform for reference.
Gutter
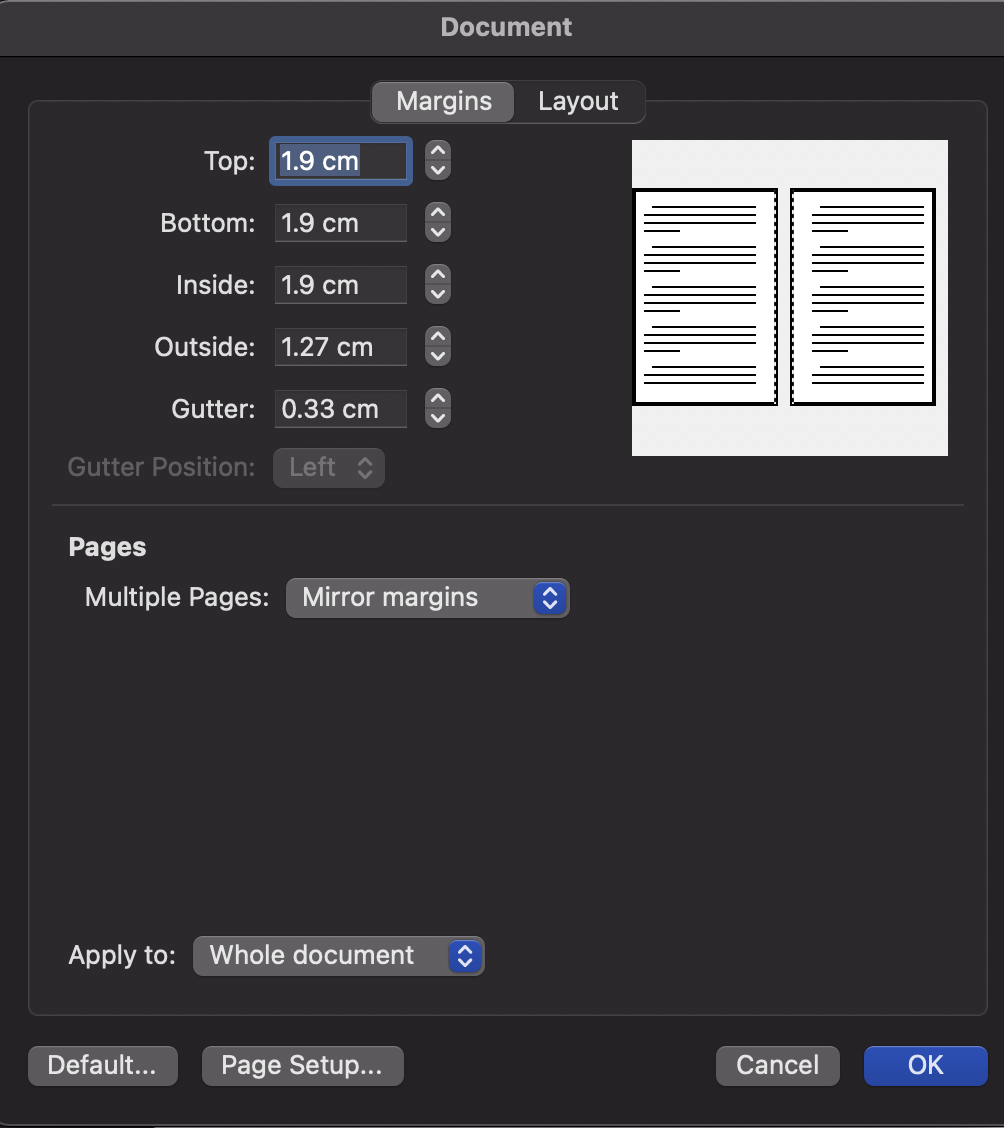
By default, the “Gutter” margin is set to 0. This is likely to cause problems down the line, as the gutter margin is the total space between the content of your book and the fold where the pages of the book will be bound together.

You Should Read This Next 👇
You should either set this to a 1” margin, or whatever you have been advised to set it to based on your chosen book size (the platform you are submitting your book on will provide guidance on this). This will ensure the content of your book doesn’t get cut off by the fold.
Now, select the “Multiple Pages” drop-down, and then select “Mirror Margins”. Then, click “OK.”
This is just a basic set-up guide to show you how to adjust margins and format your book for print or ebook distribution. However, there are a tonne of things you can do through word, such as add page numbers on each page or alternate pages. Add a table of contents for easier navigation etc. So be sure to explore all of your options and play around with the in-built book formatting features in Microsoft Word.
Other Things To Consider When Formatting Your Book In Microsoft Word
- Microsoft Word documents may be difficult to export when they contain complicated formatting (e.g. tables, text sidebars, and insets).
- Do not adjust the margin lengths in your ebook as many platforms convert it to content that is re-flowable and can be viewed with various font sizes.
- Try not to insert empty lines of text to produce blank pages.
- Rather than copying and pasting, add your images straight into your document.
- Insert page breaks when you can at the end of chapters.
Free Pre-Edited Downloadable Microsoft Word Formatted Documents
So, now that you know how to edit your margins yourself, it might be a good time to mention that there are also pre-adjusted documents that you can also download for free.

You Should Read This Next 👇
They are word documents and are already set up for specific book sizes;
| Page size without bleed | Page size with bleed |
|---|---|
| 5″ x 8″ (12.7 x 20.32 cm) | 5.125″ x 8.25″ (13 x 20.92 cm) |
| 5.06″ x 7.91″ (12.85 x19.84 cm) | 5.185″ x 8.16″ (13.15 x 20.44 cm) |
| 5.25″ x 8″ (13.34 x 20.32 cm) | 5.375″ x 8.25″ (13.64 x 20.92 cm) |
| 5.5″ x 8.5″ (13.97 x 21.59 cm) | 5.626″ x 8.75″ (14.27 x 22.19 cm) |
| 6″ x 9″ (15.24 x 22.86 cm) | 6.125″ x 9.25″ (15.54 x 23.46 cm) |
| 6.14″ x 9.21″ (15.6 x 23.39 cm) | 6.265″ x 9.46″ (15.9 x 23.99 cm) |
| 6.69″ x 9.61″ (16.99 x 24.4 cm) | 6.815″ x 9.86″ (17.29 x 25 cm) |
| 7″ x 10″ (17.78 x 25.4 cm) | 7.125″ x 10.25″ (18.08 x 26 cm) |
| 7.44″ x 9.69″ (18.9 x 24.61 cm) | 7.565″ x 9.94″ (19.2 x 25.21 cm) |
| 7.5″ x 9.25″ (19.05 x 23.5 cm) | 7.625″ x 9.5″ (19.35 x 24.1 cm) |
| 8″ x 10″ (20.32 x 25.4 cm) | 8.125″ x 10.25″ (20.52 x 26 cm) |
| 8.5″ x 11″ (21.59 x 27.94 cm) | 8.625″ x 11.25″ (21.89 x 28.54 cm) |
| 8.25″ x 6″ (20.96 x 15.24 cm) | 8.375″ x 6.25″ (21.26 x 15.84 cm) |
| 8.25″ x 8.25″ (20.96 x 20.96 cm) | 8.375″ x 8.5″ (21.26 x 21.56 cm) |
| 8.27″ x 11.69″ (21 x 29.7 cm) | 8.395″ x 11.94″ (21.3 x 30.3 cm) |
| 8.5″ x 8.5″ (21.59 x 21.59 cm) | 8.625″ x 8.75″ (21.89 x 22.19 cm) |
You can download those for free, here.
Likewise, you can use Kindle’s free formatting tool, Kindle Create to compile very professional books with all the trimmings!
Hiring A Freelancer To Edit And Format Your Book
As an author, I am always looking for ways to improve my book before hitting publish. I want to make sure that it is free of any typos or grammatical errors. I also want to ensure that the pacing is good and that the storyline flows smoothly. To do this, I use Grammarly to go through my books with a fine-toothed comb.

You Should Read This Next 👇
I also hire a freelancer on Fiverr as a second set of eyes in the editing process and to format the book according to the publishing platform’s guidelines. This extra step in the editing process has really helped me to improve the quality of my books. I’ve shared some recommended editing services below 👇
Likewise, manuscript formatting and book cover design can be outsourced just as easily; choose a trusted seller and your book is as good as sold (cheesy, I know — and not really, you still need to build a winning marketing plan!)
Use our box below to find a freelancer for any and all of your book publishing needs:
We will start with a blank document and set our page size and margins. Word can offer you various templates to use but you ideally want to start with a blank document and format your book to your own specification.

Microsoft Word – Pages Size
After we have chosen our blank document it is time to choose the page size. There are plenty of sizes to choose from and it is something that will need a lot of thinking. Today we will format a B-Format book at 198mm high x 129mm wide. This is a standard size for a novel. If you are struggling to find a page size that you think is suitable for your book, then head over to our other post for more information – Hardback and Paperback Book Sizes.
To change the page size, we go to Layout > Size > More Paper Sizes…

This will bring up another window where we can input our own custom size.
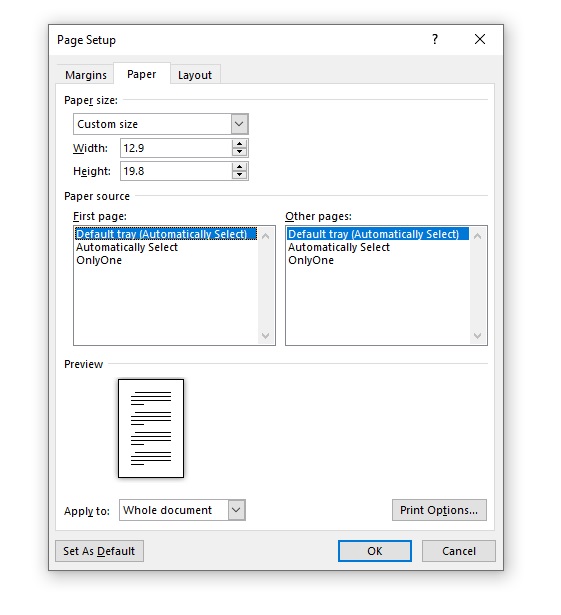
Under paper size, you want to click the drop-down box and select custom size and then fill out the width and height of the finished paper size you want. In our case, we want a book 198mm high x 129mm wide. As my word document measurements are in cm’s we will fill this out accordingly. You will need to check if your document is in mm’s, cm’s, inches etc. The paper source we will leave as default for now.
After we have filled out the height of 19.8 cm’s and the width of 12.9 cm’s and selected to apply to the whole document, it is time to move on to the next part, the margins.
Microsoft Word – Page Margin
As standard Word will set the margins to 1″ / 2.54cm. The margin size you will want will depend on a few different factors;
- The final page length of your book
- Finished size of your book
- Fiction or non-fiction
- Your book’s genre
There are a few other factors to consider but the best advice we have given our customers is to have a look at other books which are like yours and simply measure the margins. You will find that many books will be different, you just need to choose the right size for your book.
We are going to choose margin sizes of 18mm for the left and right and 15mm for the top and bottom. When we set this up in Microsoft Word it will be 1.8cm left and right and 1.5cm top and bottom.
Microsoft Word – Gutter Size
We then have the option of setting the gutter and the gutter position. This is a term used in the printing industry which describes the side on which a book will be bound. For a normal book printed and bound in the UK, Europe, USA and many other countries, this will be on the left-hand side. The gutter measurement allows us to set extra space on the bound side. This means you have equal margin space on the left and right sides of your document, plus extra space for when all the pages get bound together so you don’t have to ‘break’ the spine of the book.
The gutter measurement will depend on how many pages your book will be. For a small number of pages in the range of 20 to 50, a gutter size of 5mm may be sufficient. However, if you have a large number of pages, 300+ you may want to increase the gutter size to 10mm. Again, this is something that if you are unfamiliar with, you will want to have a look at some books in the same genre and decide.
For our book, we are going to use a gutter size of 5mm and set it to the left-hand side, the orientation set to portrait and the multiple pages option set to mirror margins.

We now have a document that is starting to look like a traditional book but we are far from finished. You should have something which looks like the image below.

Formatting a book in Microsoft Word is very similar to Adobe InDesign and other typesetting software. We are now going to work on the paragraph styles. You can bring up the paragraph options under the layout tab and click the little arrow underneath. For our novel, we are going to use a basic style which is common in most fiction novels.
The alignment will be set to justify and the outline level will be body text. The indentation will be set to 0cm but under special we will set the first-line indentation. For our book, we are going to have a 5mm first-line indent. Again, have a look at other books and make a decision based on what you feel would look right for your book. The spacing of the paragraphs will be set to 0pt before and after and the line spacing set to single.

You will now have a book that looks like the one below. You will notice that in this paragraph style we have set indents for every first line of every paragraph. Now with our book, we don’t want to have the first line of the first paragraph indented. We will have to manually adjust this setting by clicking on the first line of the first paragraph and adjusting the margins using the step above.

Microsoft Word – Chapter Titles
The next step will be to start amending our chapter titles. The chapter titles should be in a larger font than the rest of the text with some additional spacing between the top of the page and the main body of the text. For our book, we are going to use the same font as the main body but in 16pt. The spacing is a personal preference, use what you think is best for your book.
This is how the first page of the main body of our book looks. We are starting to get a nice clean layout that resembles a standard novel.

Now we will start to look into the fonts for our book. This part could be a whole post all to itself as there are many different variables. For more of an understanding of fonts you could check out some of the following posts; How to Choose the Right Font for Your Book, How to Choose the Right Font for your Design and What Font Should You Use for Your Book.
To change the font of your book you will need to click on the home tab at the top of the document. You will then be able to see all the standard options to edit your book. Select what font you will like from the drop-down and the font size. Remember if you have already set your chapter size if you change the font size with all the text selected it will apply that font size setting to everything.

Our book is going to be set in Garamond at 12pt. This is a popular font type used in novels. Some other popular fonts are Palatino and Minion Pro but there are thousands of fonts to choose from so make sure you have a good look around before you decide.

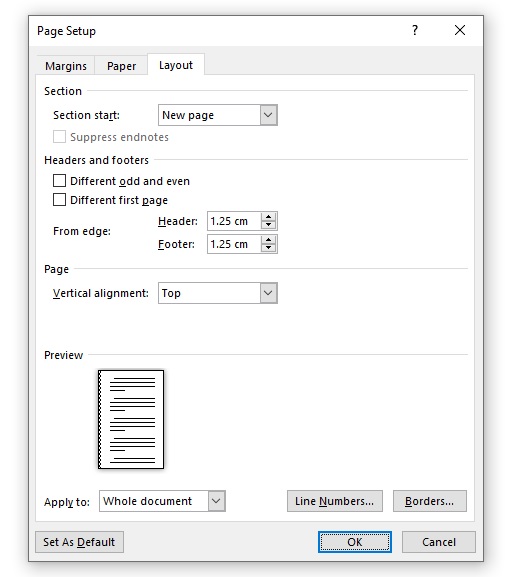
We are now going to add page numbers to our book. To do this you want to go to, Insert > Page Number > Bottom of Page and then select a style that has the page number in the middle of the page.

You will then have page numbers added to every page of your document. The page numbers will need spacing in the footer. Our book is going to have a spacing of 1.25cm Header from Top and 0.3cm Footer from the Bottom.
This is how our book now looks.
We have a completed book that has been formatted in Microsoft Word which when exported as a PDF will be press-ready. There are a few little extras that can make your book look more professional but unfortunately, Microsoft Word doesn’t provide those options. Formatting a book in Word is not able to replace professional typesetting software such as InDesign but it can do a very good job of providing you with a press-ready PDF file that looks fantastic and will be suitable for 90% of books.
If you need helping to format your book to print we recommend the services of Book Design UK.