
Word for Microsoft 365 Outlook for Microsoft 365 Word 2021 Outlook 2021 Word 2019 Outlook 2019 Word 2016 Outlook 2016 Word 2013 Outlook 2013 Word 2010 Outlook 2010 Word 2007 Outlook 2007 More…Less
You can use the Quick Part Gallery to create, store, and reuse pieces of content, including AutoText, document properties (such as title and author), and fields. These reusable blocks of content are also called building blocks. AutoText is a common type of building block that stores text and graphics. You can use the Building Blocks Organizer to find or edit a building block.
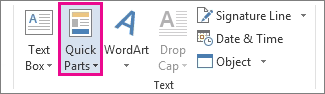
To open the Quick Part Gallery, on the Insert tab, in the Text group, click Quick Parts.
What do you want to do?
-
Select the phrase, sentence, or other portion of your document that you want to save to the gallery.
-
On the Insert tab, in the Text group, click Quick Parts, and then click Save Selection to Quick Part Gallery, change the name and add a description if you like, and click OK.
Note: To save a selection as AutoText, on the Insert tab, in the Text group, click Quick Parts > AutoText > Save Selection to AutoText Gallery.
-
Place your cursor where you want to insert a selection from the Quick Parts Gallery.
-
On the Insert tab, in the Text group, click Quick Parts, and then click the sentence, phrase, or other saved selection you want to reuse.
Note: If you saved the item as AutoText, click Insert > Quick Parts > AutoText to find and click the selection.
You can change a Quick Part by replacing the building block. You insert the building block, make the changes that you want, and then save the building block with the same name.
Important: To replace the original entry in the gallery, the name, category, and gallery must be the same as the original.
-
Click where you want to insert the building block.
-
On the Insert tab, in the Text group, click Quick Parts, and then click Building Blocks Organizer. If you know the name of the building block, click Name to sort by name.
-
Click Insert.
-
Make your changes to the building block
-
Select the revised text.
To store paragraph formatting—including indentation, alignment, line spacing, and pagination—with the entry, include the paragraph mark ( ¶ ) in the selection.
Note: To view paragraph marks, on the Home tab, in the Paragraph group, click Show/Hide.
-
On the Insert tab, in the Text group, click Quick Parts, and then click Save Selection to Quick Part Gallery.
-
In the Create New Building Block dialog box, type the original name, category, and gallery for the building block entry, and then click OK.
-
When asked whether you want to redefine the building block entry, click Yes.
-
On the Insert tab, in the Text group, click Quick Parts, and then click Building Blocks Organizer.
-
Click the name of the building block that you want to rename, and then click Edit Properties.
-
In the Modify Building Block dialog box, type a new name for the entry, and then click OK.
-
When asked whether you want to redefine the building block entry, click Yes.
-
Open a document that contains the Quick Part that you want to delete.
-
On the Insert tab, in the Text group, click Quick Parts, and then click Building Blocks Organizer. If you know the name of the building block, click Name to sort by name.
-
Select the entry, and then click Delete.
-
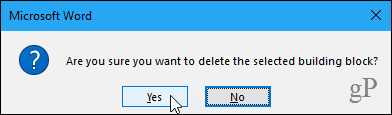
When asked whether you are sure you want to delete the building block entry, click Yes.
The building block that you deleted is no longer available in galleries, although the content might still appear in the document.
See also
Quick Parts
Automatically insert text
Need more help?
При работе в Word в редактируемые текстовые документы нередко приходится вставлять «дежурные» фразы, адреса, наборы терминов, имена и тому подобные блоки текста. Вводить их каждый раз вручную — значит терять драгоценное время, вставлять из заранее подготовленного файла стандартными методом копировать/вставить — это уже лучше, но опять же нужно этот файл открыть, найти в нём нужный элемент, скопировать его, вернуться в Word и только потом вставить.
В общем, опять всё сводится к потере времени.
К счастью, в Word есть функция, позволяющая вставлять в документ блоки текста быстро и без лишних хлопот. Называется она Автотекст. Суть её работы заключается в следующем. Выделенные в Word фрагменты текста сохраняются в специальный файл Normal.dotm, служащий шаблоном, к которому в случае необходимости вставки текста обращается пользователь нажатием всего лишь одной кнопки. А теперь представим, что у вас есть некий текст и его нужно добавить в шаблон Автотекста.
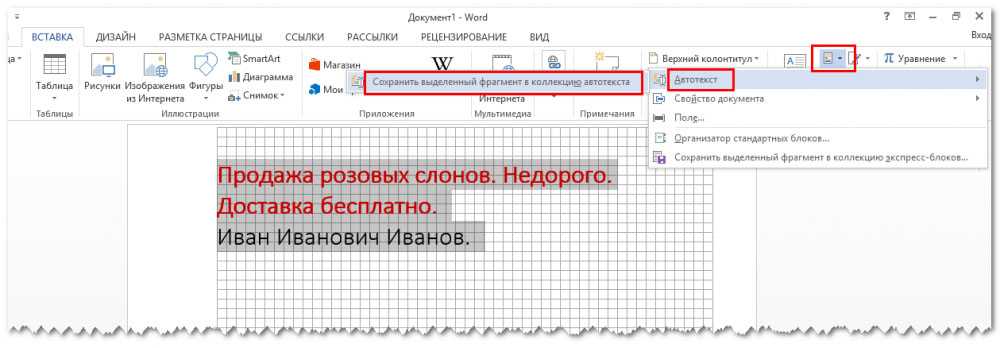
Выделите в документе нужный участок текста, переключитесь на вкладку «Вставка» и в блоке «Текст» кликните по верхней средней иконке «Экспресс блоки». В открывшемся меню выберите «Автотекст» -> «Сохранить выделенный фрагмент в коллекцию автотекста».
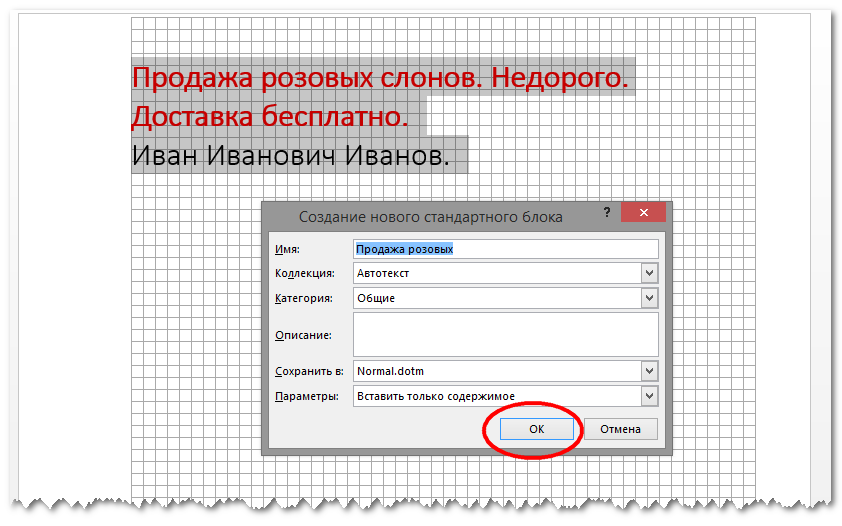
В появившемся диалоговом окошке «Создание нового текстового блока» присвойте ему (если хотите) подходящее имя и сохраните его нажатием «ok». Прочие параметры менять не нужно.
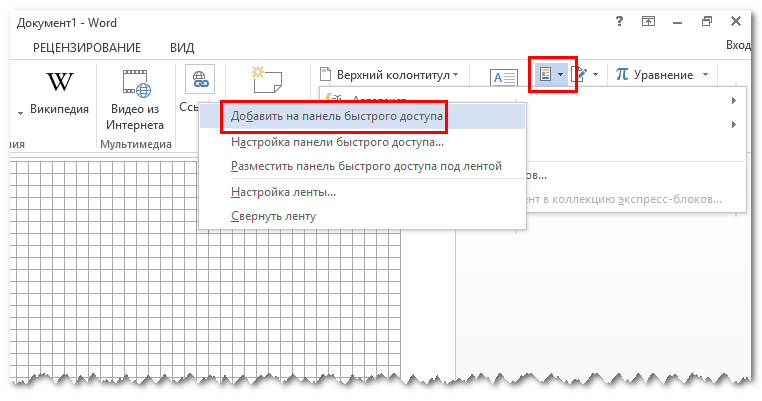
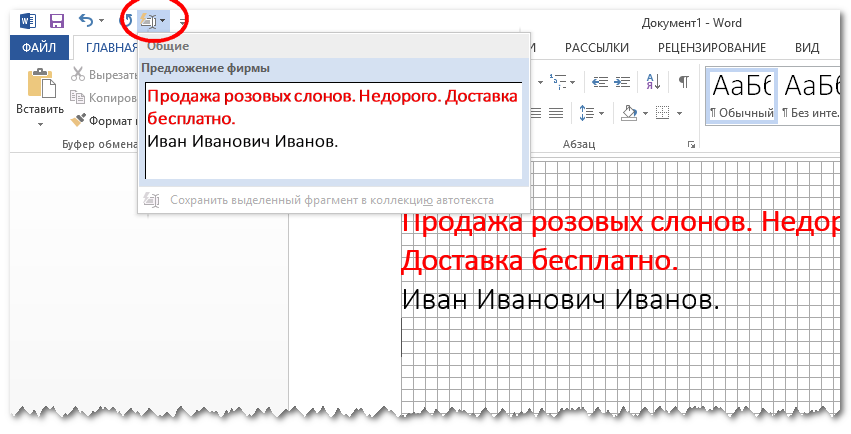
Теперь вы можете вставлять сохранённый текст из «Автотекста» в документы в каком угодно месте, при этом исходное форматирование шаблона будет сохранено. А чтобы избавить себя от необходимости каждый раз переключаться на вкладку «Вид» и вызывать «Автотекст», добавьте его на панель быстрого доступа Word для чего кликните по элементу меню «Автотекст» правой кнопкой мыши и выберите в контекстном меню соответствующую опцию.
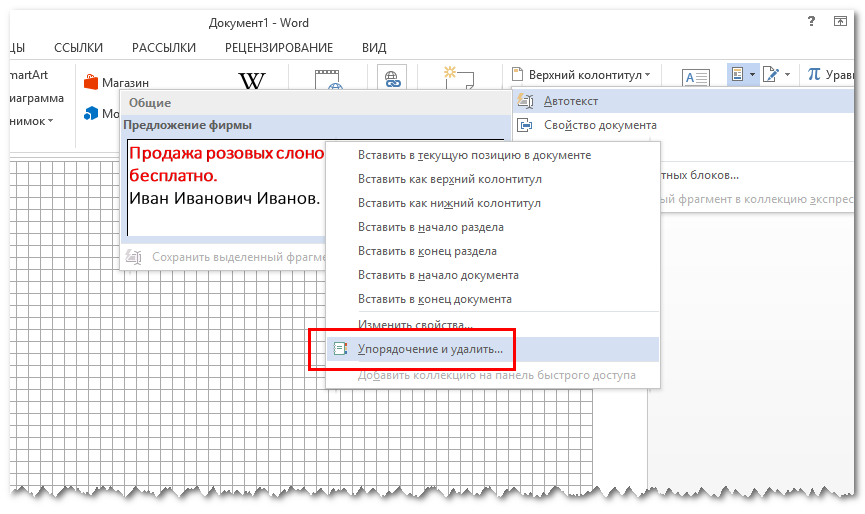
Вполне вероятно, что со временем у вас накопится много текстовых заготовок и вы захотите удалить ненужные. Делается это также очень просто. Вызовите шаблон из «Автотекста», кликните по ненужной более записи правой кнопкой мыши и выберите в меню пункт «Упорядочение и удалить…».
При этом откроется окно организатора стандартных блоков.
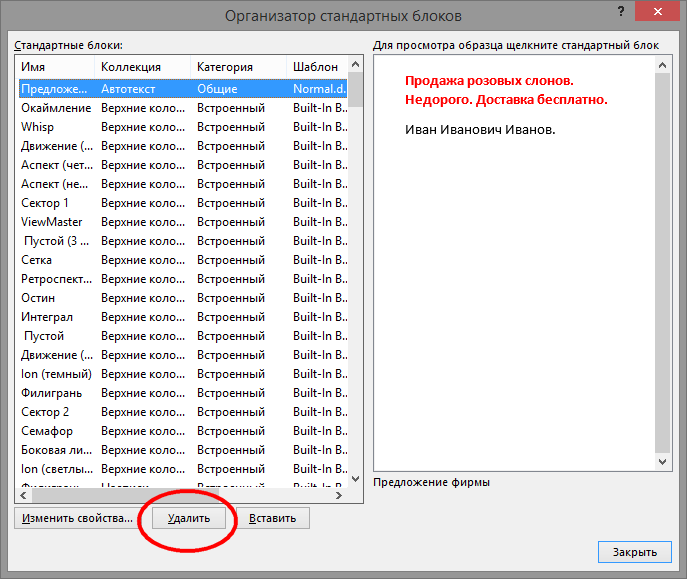
Нажмите в нём кнопку «Удалить» и запись будет удалена из файла-шаблона Normal.dotm.
![]() Загрузка…
Загрузка…
Author:
Peter Berry
Date Of Creation:
13 February 2021
Update Date:
12 April 2023
AutoText is a way to store parts of a Worddocument for re-use. You can, for example, create a library ofboilerplate paragraphs for business letters, or keep a handyselection of headers and footers. An AutoText entry canstore anything a Word document can contain, such asformatted text, pictures, and fields.

Content
- how do I use AutoText in Word?
- how do you remove AutoText in Word?
- how do I AutoFill words in Word?
- How do you automatically change words in Word?
Respectively, how do I use AutoText in Word?
How to Use Word’s Existing AutoText Entries
- Select the Insert tab.
- In the Text section of the ribbon, click Quick Parts >Autotext.
- Select one of the predefined AutoText entries to add it to yourdocument.
- To add a dateline, go to Insert > Date and Time and chooseone of the offered templates.
Similar To, how do you remove AutoText in Word?
To remove AutoText entries, follow these steps:
- Display the Insert tab of the ribbon.
- Click the Quick Parts tool in the Text group.
- Choose Building Blocks Organizer.
- Select the name of your AutoText entry from the name list.
- Click on the Delete button and your entry vanishes after youconfirm you want to delete it.
Above, how do I AutoFill words in Word?
Using AutoComplete Tips
- Select AutoCorrect Options from the Tools menu.
- Click your mouse on the AutoText tab.
- Depending on your version of Word, select either the ShowAutoComplete Tip for AutoText and Dates option or the ShowAutoComplete Suggestions option to enable this feature, or deselectthe option if you no longer want it.
- Click on OK.
Regarding This, How do you automatically change words in Word?
Go to File > Options > Proofing, and selectAutoCorrect Options. On the AutoCorrect tab, select the Replacetext as you type check box, if it’s not already checked. UnderReplace, type the characters that you want to trigger the automatic text.

Are you tired of typing the same blocks of text repeatedly in Word? Save yourself time with AutoText entries in Word. Store common blocks of text you type repeatedly.
Are you tired of typing the same blocks of text repeatedly in Word? If you type things often like your company name and address or paragraphs of text common to many types of documents you create, AutoText in Word is your friend.
You can store blocks of text in AutoText entries and insert them into any Word document in several easy ways. Today, we’ll show you how to create, edit, and delete AutoText entries and several ways to insert them into any Word document easily.
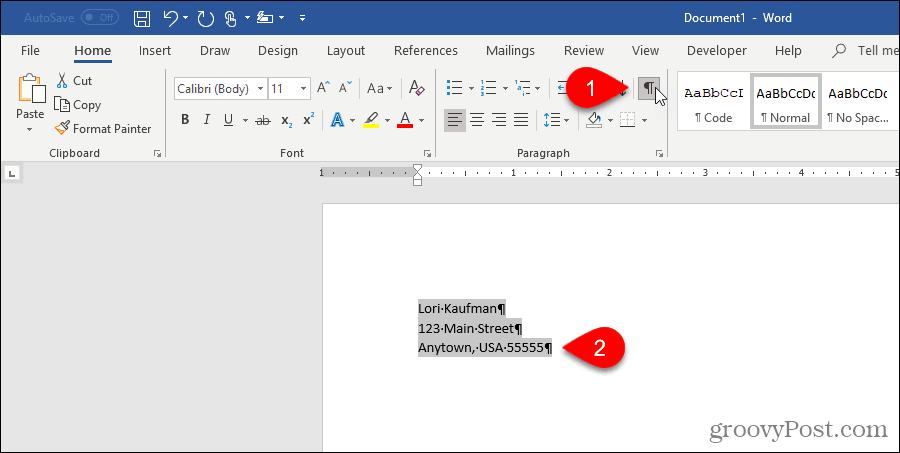
Show Paragraph Marks in Your Document
If you want the formatting for all paragraphs, including the last one, stored with the text in the AutoText entry, select the last paragraph mark. The paragraph mark at the end of each paragraph stores the formatting for that paragraph. If you applied any character formatting, like bold or italic, it’s automatically stored in the AutoText entry.
If you don’t see the paragraph marks in your document, click the Home tab. In the Paragraph section, click the paragraph symbol. Now you can see the last paragraph mark and select it.
Create a New AutoText Entry
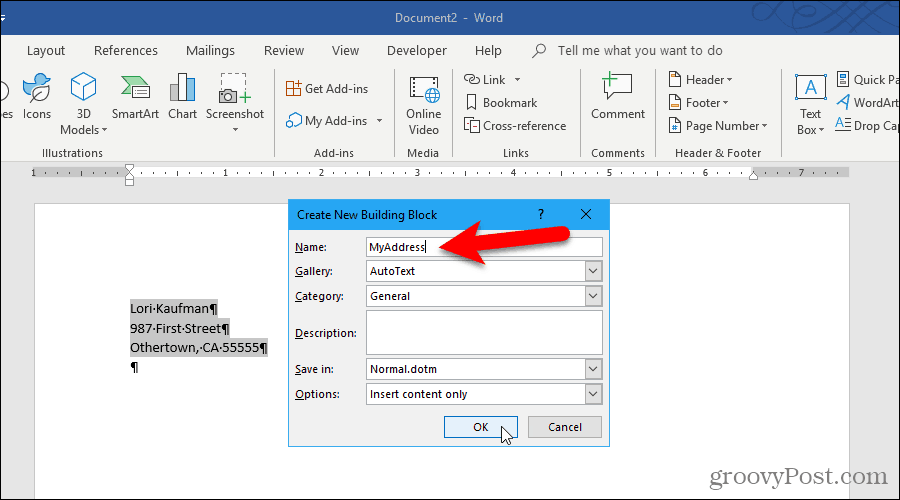
To create a new AutoText entry, select the text you want to add to your collection of AutoText entries. Or, if you don’t have the text available, type the text into a document and then select it.
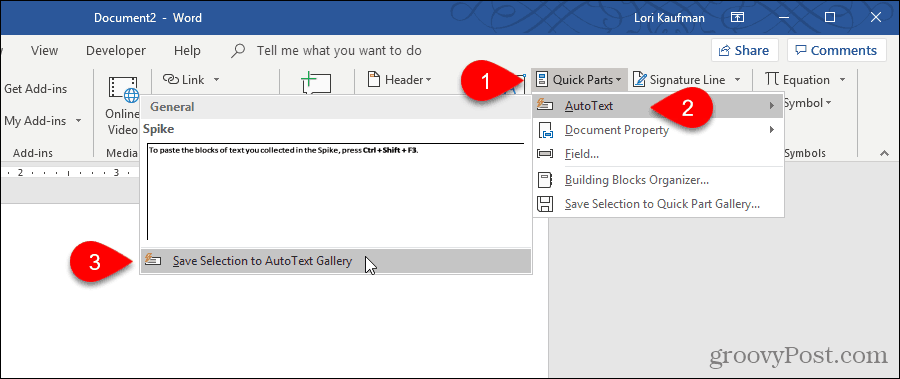
On the Insert tab, click Quick Parts in the Text section. Then, move your mouse over AutoText and select Save Selection to AutoText Gallery from the submenu.
You may see other items on the AutoText gallery, like items you copied to the Spike.
Note: You may also notice the Save Selection to Quick Part Gallery option available at the bottom of the Quick Parts menu. This option adds the selected text as a Quick Parts entry, not an AutoText entry. Quick Parts and AutoText entries are both building blocks, and both store text for later use. You could store the entry as a Quick Part, but we’re going to work with AutoText entries in this article.
Because AutoText entries are building blocks, the Create New Building Block dialog box displays.
Enter a unique Name for the AutoText entry. Later in this article, we’ll show you how to enter an AutoText entry into your document just by typing a few characters. To do this, you must make the beginning of your AutoText entry name different from other AutoText entries. If it’s like the names of other entries, you’ll have to type more characters so Word knows which entry you want to insert.
Make sure AutoText is selected in the Gallery drop-down list. It should be by default.
General is selected by default in the Category drop-down list. Initially, it’s the only choice, and we’re going to select the General category for our example. But you can create a custom category by selecting Create New Category from the Category drop-down list. Enter a name for your custom category on the Create New Category dialog box and click OK. The new category is added and selected automatically in the Category drop-down list.
You can enter a Description for the AutoText entry if it helps to clarify what the entry is for. If the entry is self-explanatory, you don’t have to enter a description.
AutoText entries are saved in templates, not in documents. That way, they’re available in any document based on the template they’re saved in. The Normal template is the default selection in the Save in the drop-down list. You can save AutoText entries in custom templates, but we’re going to accept the default to save our new entry in the “Normal.dotm” template.
Note: To save an AutoText entry in a custom template, that template must be open to be available in the Save in drop-down list.
Finally, there are a few Options to choose from:
- To insert the AutoText entry on its own page in a document, select Insert content in its own page. This will set the text from the AutoText entry off from the rest of your document with page breaks.
- To insert the AutoText entry into its own paragraph, even if your cursor is in the middle of a paragraph, select Insert content in its own paragraph.
- For all other content, select Insert content only.
Click OK.

When you close the last open Word document, the following document may display if you have the option enabled to prompt you to save the Normal template.
Click Save to save the “Normal.dotm” template with your added AutoText entry.
Note: If Word doesn’t prompt you to save the Normal template when you change it, see below to turn on the option.
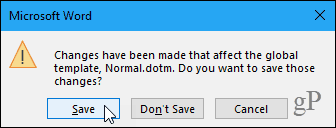
If you don’t get the above dialog box and want to be asked to save the Normal template when you change it, go to File > Options > Advanced. In the Save section on the right, check the Prompt before saving Normal template box. Click OK.

Insert an AutoText Entry from the Insert Tab
There are several easy ways to insert an AutoText entry into a Word document. One way is using the Quick Parts button.
In the Text section on the Insert tab, click Quick Parts.
Move your mouse over AutoText on the menu and click the AutoText entry you want to insert from the submenu.

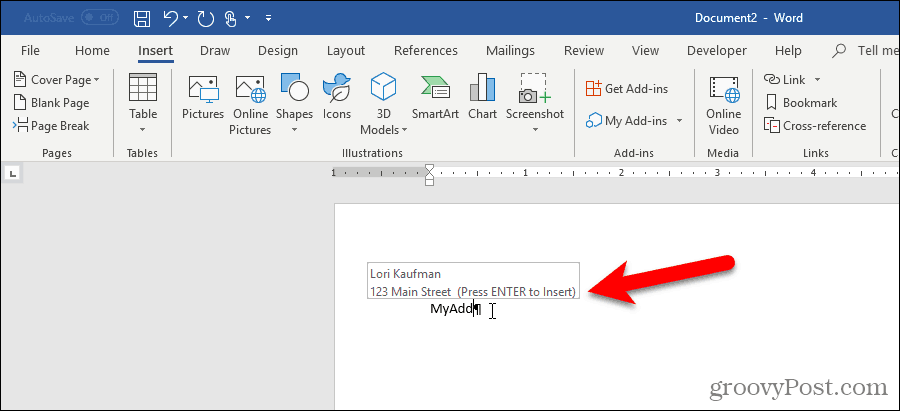
Insert an AutoText Entry Using AutoComplete
Another way to insert an AutoText entry is to start typing the name of the AutoText entry. A small popup displays showing part of the matching AutoText entry and instructing you to press Enter to insert. Press Enter to insert the entry into your document at the cursor. You can also press F3 to insert the matching entry.
The contents of the AutoText entry are inserted into your document, including the original formatting and line breaks.
If you don’t see the AutoComplete suggestion when you start typing the name of your AutoText entry, the Show AutoComplete suggestions option is not enabled.
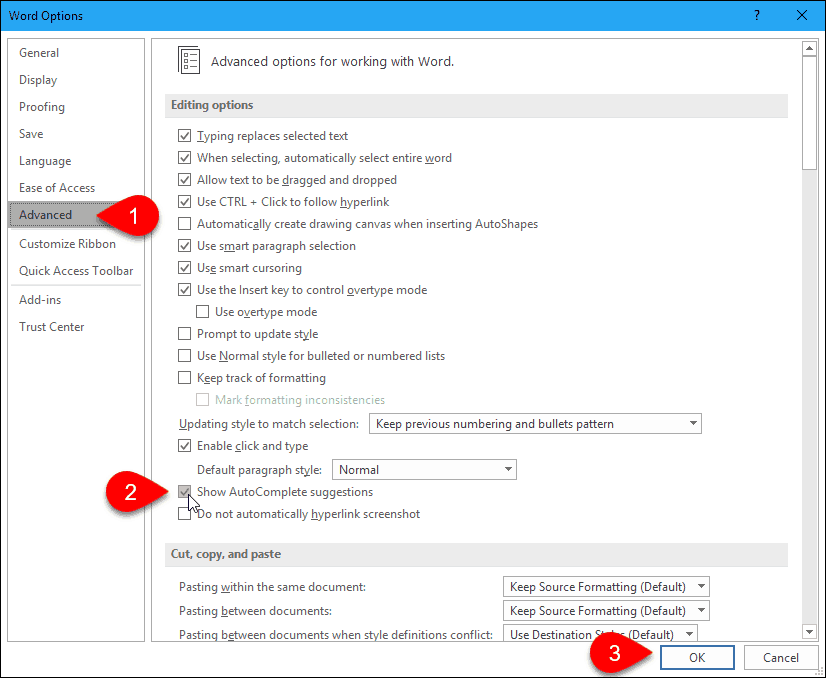
To enable the option, go to File > Options > Advanced.
In the Editing Options section, check the Show AutoComplete suggestions box.
Click OK.
Now, you should see your AutoText entry pop up when you start typing its name. Press Enter to insert it.
Add AutoText to the Quick Access Toolbar
You can make it quicker and easier to insert AutoText entries by adding the AutoText button to the Quick Access Toolbar.
Click the down arrow on the Quick Access Toolbar and select More Commands.

The Quick Access Toolbar screen displays on the Word Options dialog box.
Select All Commands from the Choose commands from drop-down list.
Then, select AutoText in the list on the left and click Add to add the AutoText button to the list on the right.
Click OK.

To insert an AutoText entry, click the AutoText button on the Quick Access Toolbar and click an entry on the menu.

Create a Shortcut for an AutoText Entry
If you prefer using the keyboard, you can add a keyboard shortcut for the AutoText entry you created.
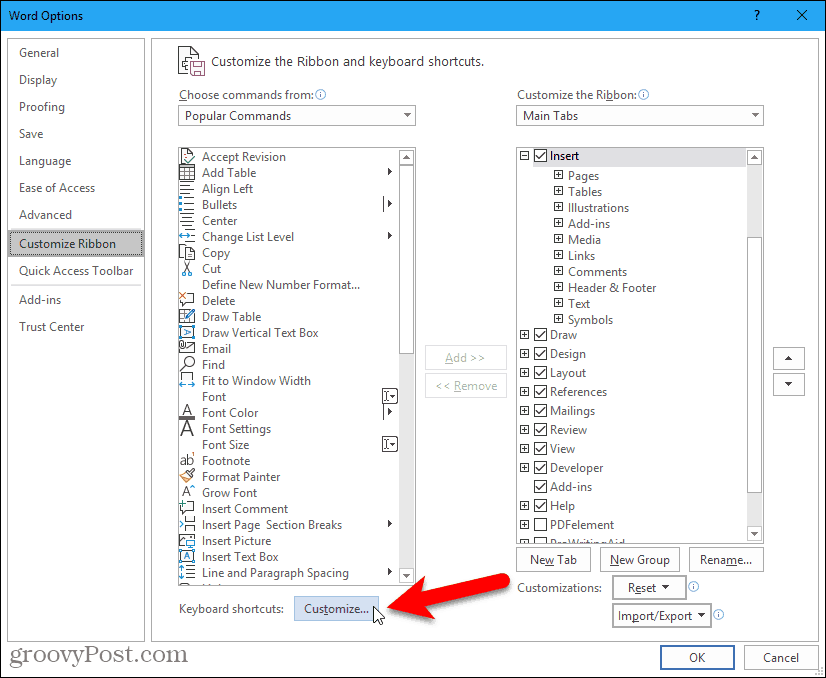
Right-click on the ribbon and select Customize the Ribbon.

The Customize Ribbon screen on the Word Options dialog box displays.
At the bottom of the list of commands on the left, click Customize next to Keyboard shortcuts.
In the Categories box on the Customize Keyboard dialog box, select Building Blocks.
Then select your AutoText entry in the Building Blocks box on the right. For example, we select our AutoText entry MyAddress.
Put your cursor in the Press new shortcut key box and press the keyboard shortcut you want to use.
Click Assign.
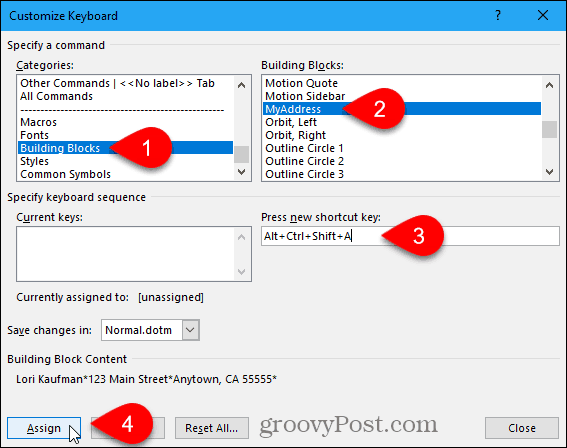
Your shortcut is added to the Current Keys box.
Click Close.

Click OK on the Word Options dialog box to close it.
Now you can use your new keyboard shortcut to insert your AutoText entry.

Change the Content of an AutoText Entry
What if you need to change an AutoText entry you created? Maybe you moved, and you need to change your address AutoText entry.
First, type the entire changed entry in a new or existing Word document. Then, select it with the last paragraph mark if you want to keep the formatting.
On the Insert tab, click Quick Parts in the Text section. Then, move your mouse over AutoText and select Save Selection to AutoText Gallery from the bottom of the submenu.

On the Create New Building Block dialog box, enter the same name in the Name box as the existing AutoText you want to change.
Click OK.
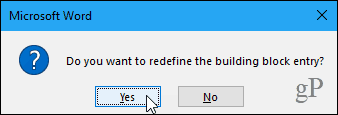
Click Yes when asked if you want to redefine the building block entry.
Now, you can insert the updated AutoText entry into any new or existing Word document.
Note: Changing an AutoText entry does NOT change the contents of that entry where you already inserted it. The changed AutoText entry is only used any time you insert it after changing it.
Edit the Properties of an Existing AutoText Entry
In addition to changing the contents of an AutoText entry, you can also change an AutoText entry’s properties, like its category and description and which template it’s saved in.
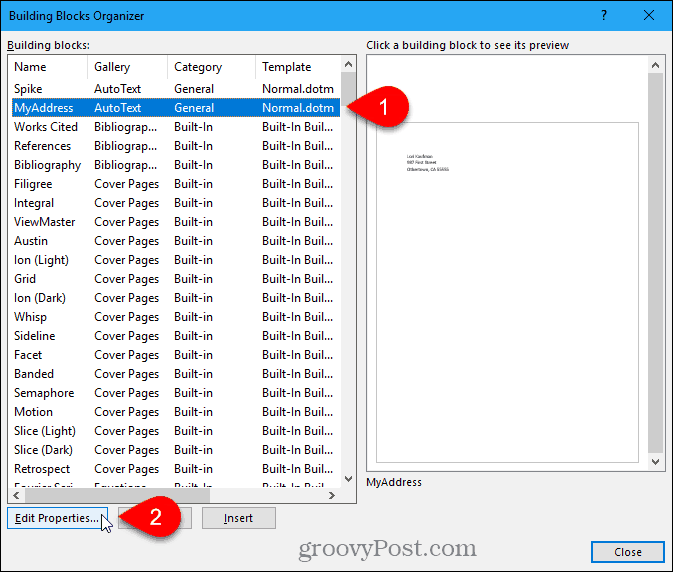
To edit the properties of an AutoText entry, click Quick Parts in the Text section on the Insert tab and select Building Blocks Organizer.

On the Building Blocks Organizer dialog box, you’ll see the full list of all available building blocks with the Name of each, and which Gallery, Category, and Template each is in. They’re listed in alphabetical order by Gallery, which defines the type of each building block.
At the top of the list, you’ll find the AutoText entries. Select the one you want to change the properties of and then click Edit Properties.
The Modify Building Block dialog box displays the same options as the Create New Building Block dialog box you used to create the AutoText entry.
Make any changes you want to the Gallery, Category, Description, Save in, and Options fields. See the Create a New AutoText Entry section at the beginning of this article for more information about these fields.
Click OK.

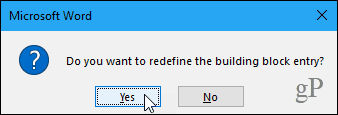
Click Yes on the confirmation dialog box displays to save your changes and redefine the AutoText entry.
Delete an AutoText Entry
If you decide you don’t need or want an AutoText entry anymore, you can delete it.
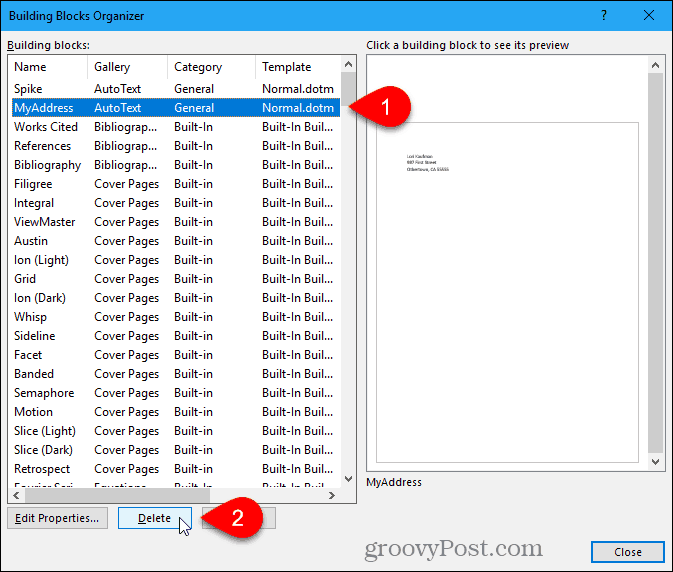
To delete an AutoText entry from the list of building blocks, click Quick Parts in the Text section on the Insert tab and then select Building Blocks Organizer.

Select the AutoText entry you want to delete in the Building blocks list.
Then, click Delete.
Click Yes on the confirmation dialog box to delete the entry and remove it from the list of Building blocks.
Click Close on the Building Blocks Organizer dialog box to return to your document.
Save Yourself Time and Reduce Errors with AutoText
AutoText entries are a great way to save yourself time and reduce errors when typing in Word. You can also automate tasks in Word using macros to save time and increase your productivity.
![]()
При наборе текста часто приходится заново набирать большие фрагменты текста. Например, название компании с реквизитами или подпись делового письма: фамилия, имя, номер мобильного телефона, адрес электронной почты. Можно, конечно, воспользоваться буфером обмена, то есть скопировать фрагмент текста в буфер обмена и потом вставлять в нужном месте, но это срабатывает только при непрерывном сеансе работы и при условии не переполнения буфера обмена. И здесь нам на помощь придёт такая замечательная функция, как «Автотекст».
По окончании этого урока вы сможете:
- Занести текст в коллекцию «Автотекст»
- Настроить кнопку вызова коллекции «Автотектст» на Панель быстрого доступа
- Удалить стандартный блок из коллекции «Автотекст»
1. Основа для фрагмента текста
Шаг 1. Набираем собственный текст, который по вашему плану будет повторяться не только в одном документе:

Шаг 2. Форматируем текст, как можно красиво, чтобы произвести впечатление:

Я изменила гарнитуру шрифта, начертание, добавила линию интервал после абзаца, сделала абзационный отступ 7,75 см и вместо слов «телефон» и «адрес» применила значки-пиктограммы.
Маленькое лирическое отступление. Горизонтальные линии, применённые к месту, очень украшают документ. И очень часто пользователи просто берут автофигуру «Линия» из коллекции автофигур. А это приводит к нежелательным последствиям. Например, линия может убежать за пределы страницы. Лучше воспользоваться инструментом «Границы» (выделяем абзац, который будет дополнен горизонтальной линией) → лента Главная → группа команд Абзац → команда Граница → команда Граница и заливка из выпадающего меню):

Появляется диалоговое окно «Граница и заливка»:

- Можно выбрать тип линии
- Можно задать цвет линии
- Можно задать толщину линии
- Можно выбрать расположение линии (в нашем случае выбираем сверху)
- Применить обязательно к абзацу и ОК
Обратите внимание: линия в точности повторяет ширину абзаца.

Если мы подведём курсор к линии, то курсор примет вид двойной стрелки. Перетягиванием курсора мы можем увеличить или уменьшить зазор между первой строчкой абзаца и линией. По сути, эта линия представляет собой осколок таблицы. А для нас главное, что линия намертво привязана к абзацу.
Возвращаемся к теме урока.
Шаг 3. Выделяем текст
Шаг 4. Заносим текст в коллекцию «Автотекст» (лента Вставка → группа команд Текст → команда Экспресс-блоки → команда Автотекст → команда Сохранить выделенный фрагмент текста в коллекцию «Автотекст» )

Шаг 5. Вносим данные нашего фрагмента в диалоговое окно «Создание нового стандартного блока»:

В данном случае оставляем все, как есть, но обращаем внимание, что сохраняется наш стандартный блок текста в шаблоне Normal. А это значит, что этот блок текста будет доступен для любого документа на вашем компьютере.
2. Кнопка вызова коллекции «Автотекст»
Шаг 1. Устанавливаем кнопку вызова коллекции «Автотекст» на Панель быстрого доступа (лента Вставка → группа команд Текст → команда Экспресс-блоки → ПМ на команде Автотекст → команда Добавить на панель быстрого доступа):

Шаг 2. Корректируем порядок расположения кнопок на Панели быстрого доступа (Урок 18 и Урок 19)
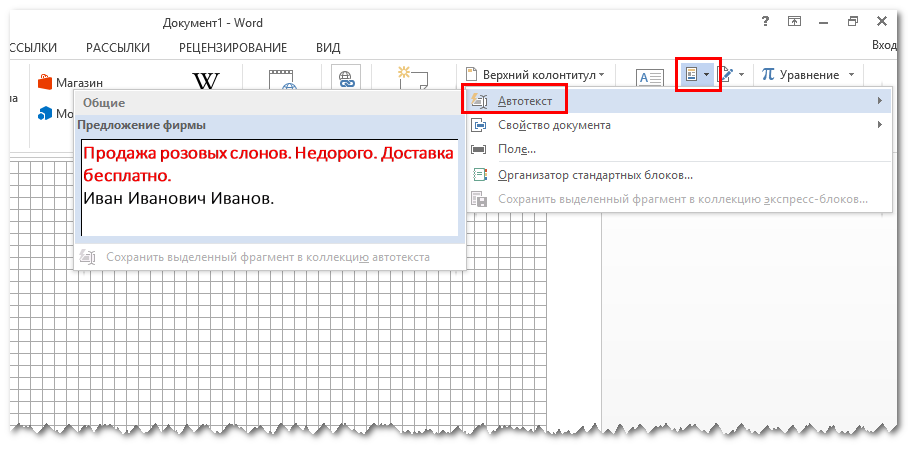
Шаг 3. Открываем любой документ, в котором необходимо применить наш новый стандартный блок текста и …:

Как видите, полностью сохранено форматирование фрагмента текста. Вставленный фрагмент никак не влияет на имеющиеся стили текста, чего не скажешь о буфере обмена.
Шаг 4. Я открыла другой документ, вошла режим колонтитулов и сохранила таблицу в коллекцию «Автотекст» (Пользуюсь только кнопкой на Панели быстрого доступа):

Шаг 5. И теперь применяю новый стандартный блок по мере необходимости:

3. Удаление стандартного блока из коллекции автотекст
Шаг 1. Команда «Автотекст» с панели быстрого доступа → выбор блока, который следует удалить → ПМ → из контекстного меню выбираем команду Упорядочение и удалить:

Шаг 2. После команд Удалить и Закрыть появляется рабочее окно, которое требует подтверждения «Удалить выделенный стандартный блок?»:

ОК.
Стандартные блоки очень помогают в создании унифицированных документов. Я создала собственную коллекцию различного оформления номеров страниц и титульных листов
Теперь вы сможете:
- Занести текст в коллекцию «Автотекст»
- Настроить кнопку вызова коллекции «Автотектст» на Панель быстрого доступа
- Удалить стандартный блок из коллекции «Автотекст»
А попутно потренировались в украшении абзаца линиями.