
AutoSave is a new feature available in Excel, Word, and PowerPoint for Microsoft 365 subscribers that saves your file automatically, every few seconds, as you work.
AutoSave is enabled by default in Microsoft 365 when a file is stored on OneDrive, OneDrive for Business, or SharePoint Online.
Important: Do you use File > Save As after making changes to an original document or template? If so, we recommend using File > Save a Copy before making your changes. That way AutoSave won’t overwrite the original file with the changes. If AutoSave did overwrite the file with your changes, see the section below, «I didn’t want my changes saved, how do I go back?»
On Windows, AutoSave is available in Excel, Word, and PowerPoint for Microsoft 365 subscribers. Here are some frequently asked questions about it.
You can restore a previous version of the file using Version History.
|
|
At the top of the window, click the filename, and then click Version History. Review the dates and times to find the version that you want to restore, and then click Open version. A second window will open showing that version of the file. To roll back to this version, click the Restore button. For more information on version history, see View historical versions of Office files. |

When you open a file and make your first changes, AutoSave saves those changes and a new version of the file is added to the version history. After that even though AutoSave is regularly saving your changes to the file, new versions are only added to the version history periodically (about every 10 minutes) for the remainder of your editing session.
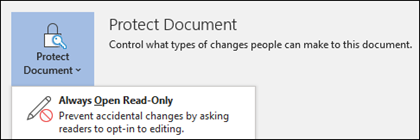
If you’re the owner of the file, you can set the file to always open read-only. When people open a file with this setting, they won’t be able to save edits to the file, unless they specifically enable editing. To turn this setting on for a file, go to File > Info > Protect Document > Always Open Read-Only. To turn it off again later, just repeat that process.
There are other ways to help protect the file from being edited. If the file is on OneDrive, you can change permissions for the file. If the file is on SharePoint, you can set up a library to require check-out.
|
|
Save As isn’t on the File menu when you open a document from OneDrive, OneDrive for Business or SharePoint Online. In these cases, the Save a Copy command appears on the File menu instead. |
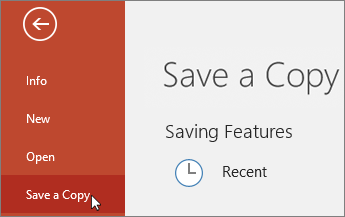
Do you use Save As a lot? Many people are used to working on a file, and then using File > Save As to keep the changes in the copy and not the original. However, when AutoSave is on, your changes are continually saved to the original. So we recommend using File > Save a Copy before you make any changes if you want your changes to apply to the copy and not the original.
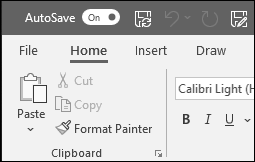
AutoSave appears in the upper-left corner, on the title bar, if you are an Microsoft 365 subscriber, and you have the latest versions of Excel, Word, and PowerPoint for Windows installed. Please note that if you have a work or school account, your administrator may control which version of Office you can install, and it may not be the latest version. See When do I get the newest features in Microsoft 365?
If you’re not a subscriber, don’t worry. There’s still AutoRecover. AutoRecover helps protect files in case of a crash. If you reopen the file after a crash, a version of the file with your latest changes appears in a Document Recovery pane. For more information on how to turn it on, see Help protect your files in case of a crash.
And, of course, you can always save manually the way you always have, by either pressing CTRL+S, clicking the Save button, or going to File > Save.
AutoSave is enabled when working on a file that is saved to OneDrive, OneDrive for Business, or SharePoint Online. If the file is saved to another location (or if it hasn’t been saved at all, yet), then AutoSave is disabled. This will happen if your file is on a SharePoint on premises site, a file server, some other cloud storage service, or saved to a local path like C:.
There are other reasons AutoSave could be disabled as well. Here are some common reasons for it to be disabled:
-
Your file is in an older format like .xls, .ppt, or .doc.
-
Your file is in a local OneDrive folder and OneDrive synchronization is paused.
-
Your file is being synced by an older version of the OneDrive sync app. For more information on updating OneDrive, see Sync files with OneDrive in Windows.
-
Your file is embedded inside another Office file.
-
Your presentation is in slide show mode.
If you are using Excel, and tried the above, you may have a file that contains features that are not supported by AutoSave. Do one or more of the following to enable it:
-
Turn off the Shared Workbook feature. This feature is an older method of sharing. It has many limitations, and has been replaced by co-authoring.
-
If possible, remove password encryption from the file: Go to File > Info > Protect Workbook. Then delete the password and click OK.
-
If possible, remove restricted access: Go to File > Info > Protect Workbook > Restrict Access and click Unrestricted Access.
-
If you are opening a workbook snapshot from SharePoint, choose to open the file instead of the snapshot.
-
Turn off the Refresh data when opening file setting on all tables and PivotTables in the file. Select the table or PivotTable, then go to Table Tools Design > Refresh > Connection Properties. Then uncheck Refresh data when opening file.
-
Inactivate an add-in that’s causing AutoSave to be disabled. Select File > Options > Add-Ins > Excel Add-ins > Go and then clear the check box for the add-in.
The easy way is to turn the AutoSave switch off before you make your changes. If the changes are meant to be temporary and not saved, close the file. Then click No when you are asked to save. If you decide you do want to save the changes, just turn AutoSave back on.
If you don’t want to save continually and you don’t want to show others your changes, you can turn AutoSave off. Then, when you’re ready, click Save (or press CTRL+S) to save and show your changes to any other people working on the file. (Or, you can also turn the AutoSave switch back on to save and share your changes.)
The default for AutoSave is to always be On for files that are on the Microsoft Cloud. However, if you turn AutoSave Off for an individual file, the program will remember and will keep it off every time you reopen that file. If you switch it back On for a file, it will remember to keep in on for that file.
When AutoSave is off, AutoRecover still works in the event of a system crash while your file is open.
If you turn AutoSave Off for an individual file the program will remember to keep it off every time you reopen that file. If you switch it back On for an individual file, it will remember to keep in on for that file.
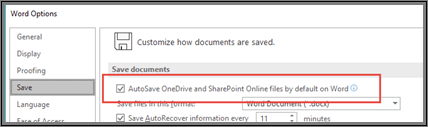
If you want to turn AutoSave off, by default, for all files, go to File > Options > Save and uncheck the box next to AutoSave OneDrive and SharePoint Online files by default on <application>.
Restart Word (or whichever application you’re in) and the change will take effect.
Notes:
-
If you want AutoSave off by default for all your Office applications, such as PowerPoint and Excel too, you’ll need to repeat these steps for each of those programs.
-
If you want individual files to still be AutoSaved you can open those files and manually turn AutoSave back on for those files.
On the Mac, AutoSave is available in Excel, Word, and PowerPoint for Microsoft 365 subscribers. Here are some frequently asked questions about it.
You can restore a previous version of the file. This will establish that older version as the current version. Click File > Browse Version History. In the Version History pane, review the dates and times to find the version that you want to restore, and then click Open Version. A second window will open. To roll back to this version, click the Restore button.
Save As isn’t on the File menu when you open a document from OneDrive, OneDrive for Business or SharePoint Online. In these cases, the Save a Copy command appears on the File menu instead.
Do you use Save As a lot? Many people are used to working on a file, and then using File > Save As to keep the changes in the copy and not the original. However, when AutoSave is on, your changes are continually saved to the original. So we recommend using File > Save a Copy right away if you want your changes to apply to the copy and not the original.
AutoSave appears in the upper-left corner if you are an Microsoft 365 subscriber, and you have the latest version of Excel, Word, and PowerPoint for Microsoft 365 installed. Please note that if you have a work or school account, your administrator may control which version of Office you can install, and it may not be the latest version. See When do I get the newest features for Microsoft 365? for more information.
If you’re not a subscriber, don’t worry. There’s still AutoRecover. AutoRecover helps protect files in case of a crash. If you reopen the file after a crash, a version of the file with your latest changes appears in a Document Recovery pane. For more information on how to turn it on, see Recover files in Office for Mac.
AutoSave is enabled when working on a file that is saved to OneDrive, OneDrive for Business, or SharePoint Online. If the file is saved to another location (or hasn’t been saved at all, yet) then AutoSave is disabled. This will happen if your file is on a SharePoint On Premises site, a file server, or saved to a local folder on your computer.
Additionally, you must open your file from the File menu within Word, Excel, or PowerPoint in order for AutoSave to be activated.
Note: If your File > Open looks like the image below you must click the Online Locations button, then select your OneDrive or SharePoint file from there, in order for AutoSave to work.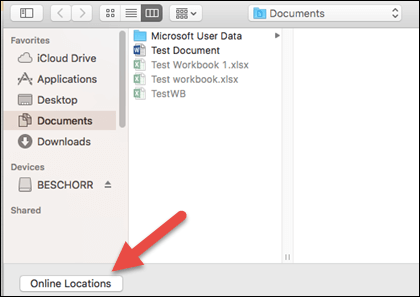
There are other reasons AutoSave could be disabled as well. Here is a list of common reasons for it to be disabled:
-
Your file is in an older format like .xls, .ppt, or .doc.
-
Your file is in a local OneDrive folder and OneDrive synchronization is paused.
-
Your file is embedded inside another Office file.
-
Your presentation is in slide show mode.
If you are using Excel, and tried the above, you may have a file that contains features that are not supported by AutoSave. Do one or more of the following to enable it:
-
Turn off the Shared Workbook feature. This feature is an older method of sharing. It has many limitations, and has been replaced by co-authoring.
-
If possible, remove password encryption from the file: On the Review tab, click Protect Workbook. Then delete the password and click OK.
-
If possible, remove restricted access: Go to File > Restrict Permissions > No Restrictions.
-
If you are opening a workbook snapshot from SharePoint, choose to open the file instead of the snapshot.
-
Turn off the Refresh data when opening file setting on all tables and PivotTables in the file. Select the table or PivotTable, then go to the Table tab. Click Refresh > Connection Properties, and uncheck Refresh data when opening file.
-
Inactivate an add-in that’s causing AutoSave to be disabled. Select Tools > Excel Add-ins and clear the check box for the add-in.
The easy way is to turn the AutoSave switch off before you make your changes. If you decide to save the changes, just turn AutoSave back on. If you don’t want to save the changes, close the file. Then click No when you are asked to save.
If you don’t want to save continually and you don’t want to show others your changes, you can turn AutoSave off. Then, when you’re ready, click Save to show your changes to the other people working on the file. (Or, you can also turn the AutoSave switch back on to save and share your changes.)
The default for AutoSave is to always be On for files that are on the cloud. However, if you turn AutoSave Off for a file, the program will remember and will keep it off every time you reopen that file. If you switch it back On for a file, it will remember to keep in on for that file.
When AutoSave is off, AutoRecover still works in the event of a system crash while your file is open.
If you turn AutoSave Off for an individual file the program will remember to keep it off every time you reopen that file. If you switch it back On for an individual file, it will remember to keep in on for that file.
If you want to turn AutoSave off, by default, for all files, go to Preferences > Save, and uncheck the box next to Turn on AutoSave by default.
No. However, you can turn AutoSave Off for a file, and the program will remember to keep it off every time you reopen that file. If you switch it back On for a file, it will remember to keep in on for that file.
Learn more
How do I turn on AutoSave?
How do I turn on AutoSave?
Excel for Microsoft 365 Word for Microsoft 365 PowerPoint for Microsoft 365 Excel for Microsoft 365 for Mac Word for Microsoft 365 for Mac PowerPoint for Microsoft 365 for Mac OneDrive (home or personal) OneDrive for Mac OneDrive for Windows More…Less
AutoSave is available when a file is saved to Microsoft OneDrive or SharePoint in Microsoft 365, but you need to save or open the file from within Excel, PowerPoint or Word to switch it on. You also need an active Microsoft 365 subscription.
Switch AutoSave on
To turn AutoSave on, save your file to your OneDrive or SharePoint folder from within your Microsoft 365 app.
-
Go to File then Save As.
-
Select your
 OneDrive personal, work or school account.
 -
Choose your sub-folder from the list that appears.
-
Enter a file name and select Save.
Tips:
-
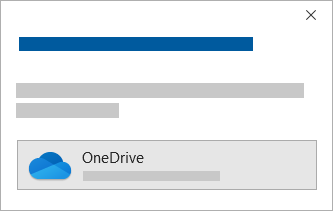
If you don’t see your OneDrive
in the list, select Sign in. If you don’t see your family, work or school OneDrive listed, select Add a Place. Learn more about how to add OneDrive as a service. -
Selecting an existing file will enable AutoSave for that file.
-
 OneDrive personal, work or school account.
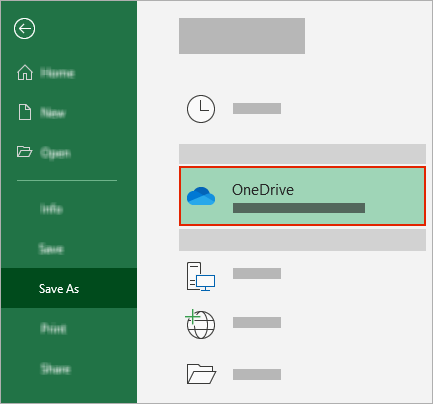
Enable AutoSave when you open a file
To ensure AutoSave is on as soon as you start editing, open your file by navigating to your OneDrive or SharePoint folder from within your Microsoft 365 app.
-
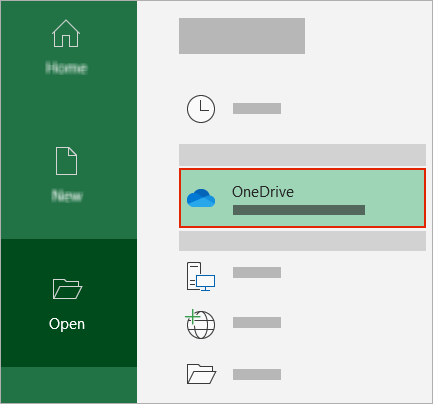
Go to File then Open.
-
Select your
OneDrive personal, work or school account. -
Choose your sub-folder location from the list that appears.
-
Select a file to open it.
Tips:
-
If you don’t see your OneDrive
in the list, select Sign in. If you don’t see your family, work or school OneDrive listed, select Add a Place. Learn more about how to add OneDrive as a service. -
Once opened, you don’t need to keep saving your file — every change is saved automatically.
-
What to do if you see a «Just upload the file» prompt
If you select the AutoSave toggle and see a prompt which says, «Just upload the file», follow these steps:
-
To keep working on the original file, select the X to close the window. Then follow the steps above To switch AutoSave on.
-
To create a copy of your file, don’t close the Save window. Select OneDrive from the list of locations and enter a name for the copy.
Caution: If you open the original file you will not see any later edits.
Tip: Select the file name at the top of the app to see its location and version history.
If you can’t turn on AutoSave
If you open an Office file from File Explorer or Finder, you will need to open the file as described above to enable AutoSave.
Close and re-open the file from the Microsoft 365 app, not File Explorer or Finder.
If you open an Office file from your recent files list via the Taskbar or the Office app, you will need to open the file as described above to enable AutoSave.
To check, hover your mouse over the recent list: Files that begin C:Users in their path will not open with AutoSave, but files with https:// will.
Close and re-open the file from within the Microsoft 365 app, not the recent file list.
If you open an Office file from File Explorer, Finder or your recent files list via the Taskbar, you may need to Save or Open the file as described above to enable AutoSave.
Close and re-open the file from within the Microsoft 365 app, not the recent file list.
AutoSave settings may be disabled for some files, especially large files, or files stored on SharePoint.
-
Go to File > Options > Save.
-
Check that the AutoSave box is ticked.
AutoSave settings may be disabled for some files, especially large files, or files stored on SharePoint.
-
Go to File > Options > Save
-
Check that the AutoSave box is ticked.
There are other reasons AutoSave could be disabled as well. Here is a list of common reasons for it to be disabled:
-
AutoSave is only available if you have an active Microsoft 365 subscription. Don’t have a subscription? Get the most from Office with Office 365.
-
Your file is in an older format like .xls, .ppt, or .doc.
-
OneDrive synchronization is paused.
-
Your file is embedded inside another Microsoft 365 file.
-
Your presentation is in slide show mode.
Can I AutoSave to my computer?
AutoSave only applies to Microsoft 365 files stored in OneDrive, but the Microsoft 365 AutoRecover feature is on by default and saves your work every 10 minutes.
To view or change the AutoRecover settings, open an Microsoft 365 app, and select File > Options > Save.
How to turn off AutoSave
To turn off AutoSave, toggle the AutoSave switch on the top left of the app header.

Got feedback?
Please send us your feedback to help us prioritize new features in future updates. See How do I give feedback on Microsoft Office for more information.
Need more help?
What is AutoSave?
Need more help?
It would be a horrendous situation when you are writing something in word and your system power suddenly goes off. All your effort will go in vain in a moment. Or, you are facing issues with autosave related problems.
If you do so, then you are in the right place then.
As a Microsoft Word user on both windows and Mac devices, I’ve also faced problems with the Autosave option while writing. After researching for hours, finally, I was able to deal with this issue. Don’t worry, I will guide you on this issue.
Don’t skip any part and keep reading to enable or disable Autosave in word.
Also, check out our separate post on how to make only one page landscape in Word.
What is an Autosave Option in Word?
I think you are familiar with Microsoft 365. It is also known as the Microsoft office. Microsoft 365 was launched in 2017 by the Microsoft community and it will provide the same services as Microsoft Word, Excel and Powerpoint.
Autosave is an important feature introduced in Microsoft 365. It will save your file modification automatically at every possible second. This feature is found in Microsoft 365 only.
Before introducing Autosave Word in Microsoft 365, you have to save your work file on Word, Excel or Powerpoint either manually or by enabling the autosave option. There is no needed something like this in Microsoft 365. Autosave is on always by default in this new version.
Check out the easiest way to enable equation editor in Microsoft Word.
Enabling Autosave in Word
If you don’t know the process of enabling the Autosave in word, you have to follow the next part.
Enabling Autosave in Word [Windows]
Here are the steps to enable autosave in word [windows]:
- When you open MS office, you will see the Office button menu located in the upper left corner.
- Click here and you will find the Word option. You will see the Toolbar clicking on that option.
- You will find the Save option here and
- From the save option you have to select the Autosave option and enable it.
Check out the Microsoft Refund policy to get absolutely full refunds to your products.
Enabling Autosave in Word [MAC]
OKay, MAC users, don’t feel left alone. I have solution for you guys too.
Here are the steps to enable autosave in word [Mac]:
- You have to open your MAC device in the first step.
- You have to go up and you will see the File menu item.
- Click on the File menu item and you will find the Preferences option.
- From this point, you have to go to the Save option.
- You must check the Save Auto recover info option,
Quickly check out our epic guide on how to enable word wrap in notepad.
Disabling Autosave in Word
If you don’t know the process of disabling the Autosave in Word, you have to follow the next part.
Disabling Autosave in Word [Windows]
Here are the steps to disable autosave in word [windows]:
- When you open MS office, you will see the Office button menu located in the upper left corner.
- Click here and you will find the Word option. You will see the Toolbar clicking on that option.
- You will find the Save option here and
- From the save option you have to disable the Autosave option and enable it.
Have some time to spare? Quickly check out our epic guide on why can’t I copy paste in Microsoft Word.
Disabling Autosave in Word [MAC]
Here are the steps to disable autosave in word [Mac]:
- You have to open your MAC device in the first step.
- You have to go up and you will see the File menu item.
- Click on the File menu item and you will find the Preferences option.
- From this point, you have to go to the Save option.
- You must uncheck the Save Auto recover info option.
But before that, go through our epic guide on do Microsoft points still work.
Advantages of Enabling Autosave Word Option
Nobody does anything in the world without benefit. You will also find the following advantages of enabling Autosave Word.
Suppose you are working for hours in Microsoft word but you haven’t saved your work yet. Suddenly, your system power is off, or your electricity is gone, or your system gets crashed. You will be furious and sad. You have to do the same work again. If you enable the Autosave option, you won’t have to face this type of risk.
For keeping important backups of files if the electricity goes frequently, you must enable the Autosave Word option.
It is so fast that it can save your files according to the passing of seconds. These are the advantages you can get from enabling the Autosave Word option.
Quickly check out our epic guide on Lock and Unlock Cells in Excel
Disadvantages of Enabling Autosave Word Option
You hardly find any disadvantages of enabling the Autosave Word option. But there is one problem I have found out.
In case you are doing office work and your boss is monitoring your work. You are doing something wrong which you found later. Suddenly your electricity goes off your system crashed. You may think you shouldn’t have enabled the Autosave Word option.
Moreover, from the above discussions, I can assure you to enable the Autosave Word option as the advantages are more compared to the disadvantages.
Autosave Button not Showing in Word
There might be a situation where you don’t find the autosave icon. For this, you have to change the setting and enable Autosave again if you want it. For enabling the Autosave word again, you have to follow the below process.
Here are the steps to solve autosave button not showing in word:
- When you open MS office, you will see the Office button menu located in the upper left corner.
- Click here and you will find the Word option. You will see the Toolbar clicking on that option.
- You will find the Save option here and
- From the save option you have to select the Autosave option and enable it.
How to Make the Default not to Autosave
Sometimes, you may feel that you don’t want to save the file on which you are working in Word, Powerpoint or Excel. You are practising something and you don’t want to save until you finalize your work or you are not getting satisfactory results due to some faulty issues.
You can do it. You can turn the autosave word option off for that particular file. After finishing your work, you can enable autosave again.
As the autosave word option is enabled by default in Microsoft 365, you have to follow the above instructions to make the autosave word option stop working.
What has happened to the SAVE AS option?
If you are using Microsoft Office Word, Powerpoint or Excel for a long period, you will be familiar with the Save As option. For the subscriber of Microsoft 365, there is no such option.
Everything is saved automatically here no matter you are working on Word, Excel or Powerpoint.
But you may feel that you want to keep the multiple changes and you don’t want to mix it with the original one. You can go with Save the copy option and keep multiple changes.
Conclusion
In this article, I have tried to show you the way so that you can enable or disable the Autosave Word option step by step. I believe you can do it all by yourself if you followed the above instructions. I have also shown the advantages and disadvantages of doing it. So that, you can take your decision whether you want to enable it or disable it and when.
Read the articles carefully before going for the setup process.
Read carefully to understand and if you have any questions about this topic, you can ask in the comment section. Our experts will try to solve your problem as soon as possible.
Содержание
- Автосохранение в Ворде
- Вариант 1: Настройка автосохранения
- Вариант 2: Постоянное сохранение в фоне
- Заключение
- Вопросы и ответы
Автосохранение в Microsoft Word — это полезная функция, позволяющая создавать резервные копии документа, над которым вы работаете в настоящий момент, через заданный промежуток времени, а также сохранять его оригинальную версию. Именно благодаря ее корректной работе вы можете не беспокоиться о возможной потери набранного текста (по крайней мере, если говорить о больших объемах данных) в случае возникновения сбоев, ошибок или экстренного завершения работы. Сегодня расскажем о том, как работает автоматическое сохранение файлов и как его лучше настроить.
Читайте также: Как сохранить документ, если завис Ворд
Автосохранение в Ворде
Рассматриваемая нами сегодня функция Word по умолчанию активирована (если только никто не изменял стандартные настройки программы без вашего ведома), вот только промежуток времени, через которое создаются резервные копии, слишком велик — это 10 и более минут. Согласитесь, за этот период можно проделать немалую часть работы, достаточную для того, чтобы ее потеря стала критической. К счастью активных пользователей тестового редактора от Microsoft, автосохранение можно настроить под свои нужды. Кроме того, в ряде случаев о необходимости сохранения файлов можно и вовсе забыть. Но обо всем по порядку.
Читайте также: Как восстановить несохраненный документ Майкрософт Ворд
Вариант 1: Настройка автосохранения
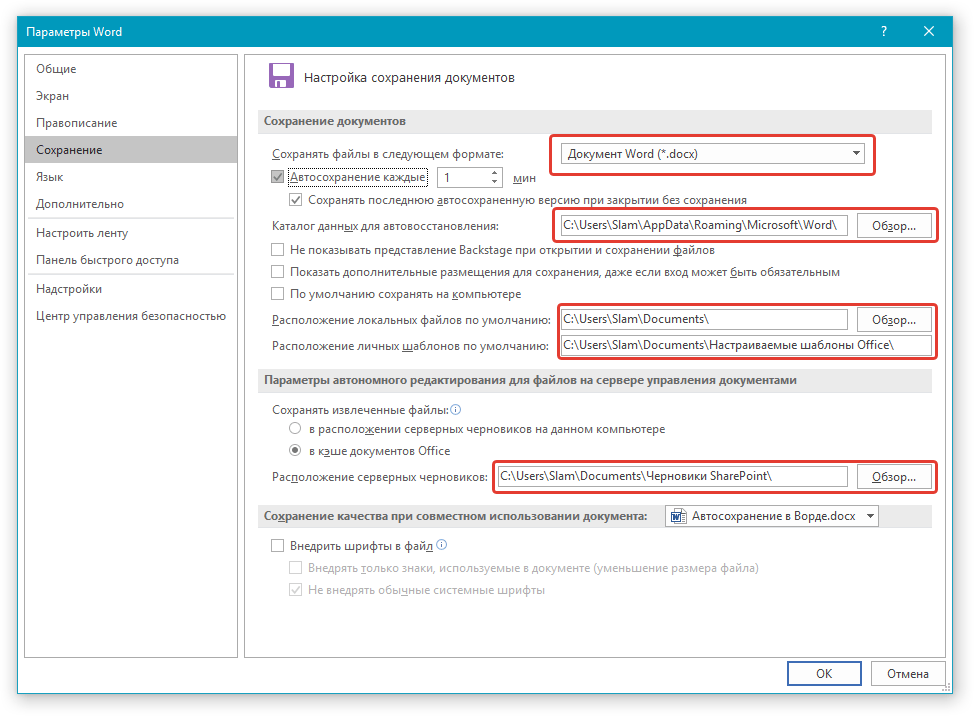
Как мы уже сказали выше, стандартный 10-минутный интервал автоматического сохранения текстовых документов и их резервных копий можно и нужно уменьшить. Для того чтобы это сделать, нам с вами потребуется обратиться к настройкам программы.
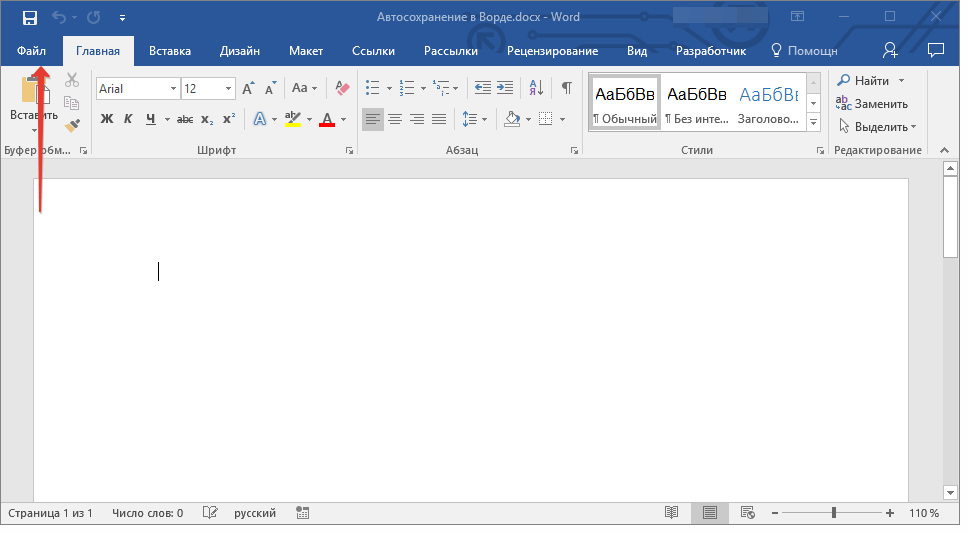
- Открыв любой документа Microsoft Word, кликните по вкладке «Файл» (если вы используете версию программы 2007 года и младше, нажмите кнопку «MS Office») на ленте,

и перейдите в меню программы в раздел «Параметры» (ранее назывался «Параметры Word»).
- Выберите на боковой панели в подраздел «Сохранение».
- Убедитесь в том, что напротив пункта «Автосохранение» установлена галочка. Если по каким-то причинам она там отсутствует, обязательно установите ее. Далее задайте минимальный период сохранения (1 минута) и нажмите «ОК», чтобы сохранить внесенные изменения и закрыть окно «Параметры».
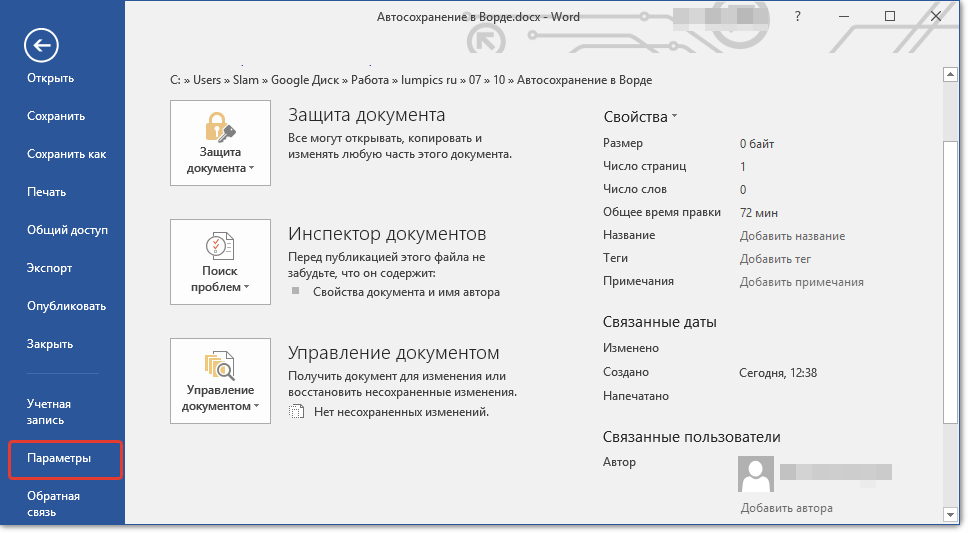

Примечание: В разделе параметров «Сохранение» вы можете также выбрать формат файла, в котором будет сохраняться резервная копия документа, и указать место, в которое он будет помещен. Дополнительно имеется возможность указания расположения для сохранения шаблонов, черновиков и временных данных.
Теперь, если в процессе работы с текстовым документом программа зависнет, случайно закроется или, к примеру, произойдет спонтанное выключение компьютера, вы можете не беспокоиться о сохранности содержимого. Сразу после того, как вы откроете Ворд, вам будет предложено просмотреть и повторно сохранить созданную им резервную копию.
Читайте также: Где хранятся временные файлы Word
Совет: Для подстраховки вы также можете сохранять документ в любое удобное для вас время, нажимая на кнопку «Сохранение», расположенную в верхнем левом углу программы, либо воспользовавшись комбинацией клавиш «CTRL+S».

Читайте также: Горячие клавиши в Ворд
Вариант 2: Постоянное сохранение в фоне
Рассмотренное выше решение существенно упрощает жизнь тем, кто часто и довольно активно работает с текстовыми документами. И все же идеальным его назвать нельзя – даже за одну минуту, которая является минимальным интервалом для автосохранения, можно написать немалый фрагмент текста и, если произойдет сбой, ошибка, аварийное закрытие или отключение питания, потерять его. К счастью, современные версии Microsoft Office позволяет навсегда забыть о такой функции, как сохранение документов, в любом из приложений, входящих в состав этого пакета.
Работает это и с Word, главное, авторизоваться в своей учетной записи Microsoft и перед началом работы с документом сохранить его в любую удобную папку в облачном хранилище OneDrive.
Примечание: Данный способ работает на лицензионных версиях приложений из пакета Офис, использование которых само собой подразумевает наличие учетной записи Майкрософт, обеспечивает и гарантирует синхронизацию между программами, документами и облачным хранилищем.
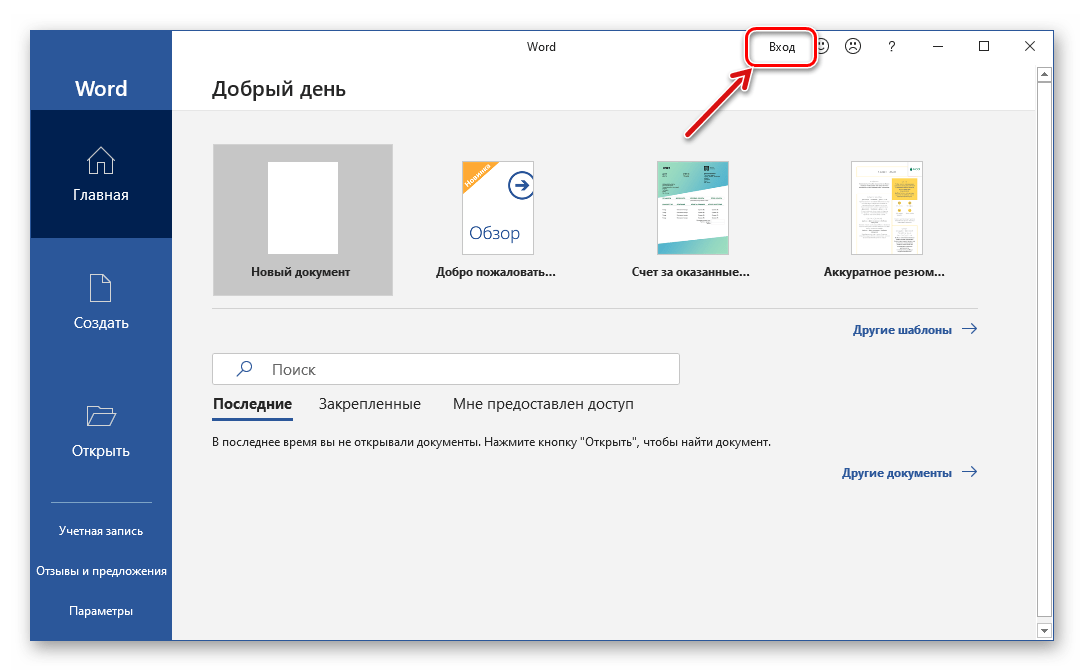
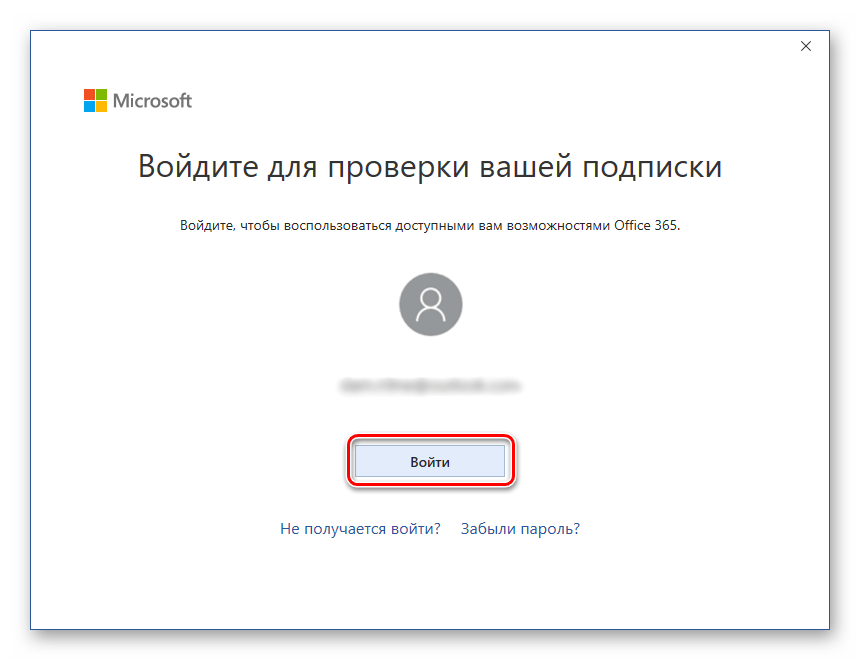
- Запустите Microsoft Word и кликните по надписи «Вход», расположенной на его верхней панели.
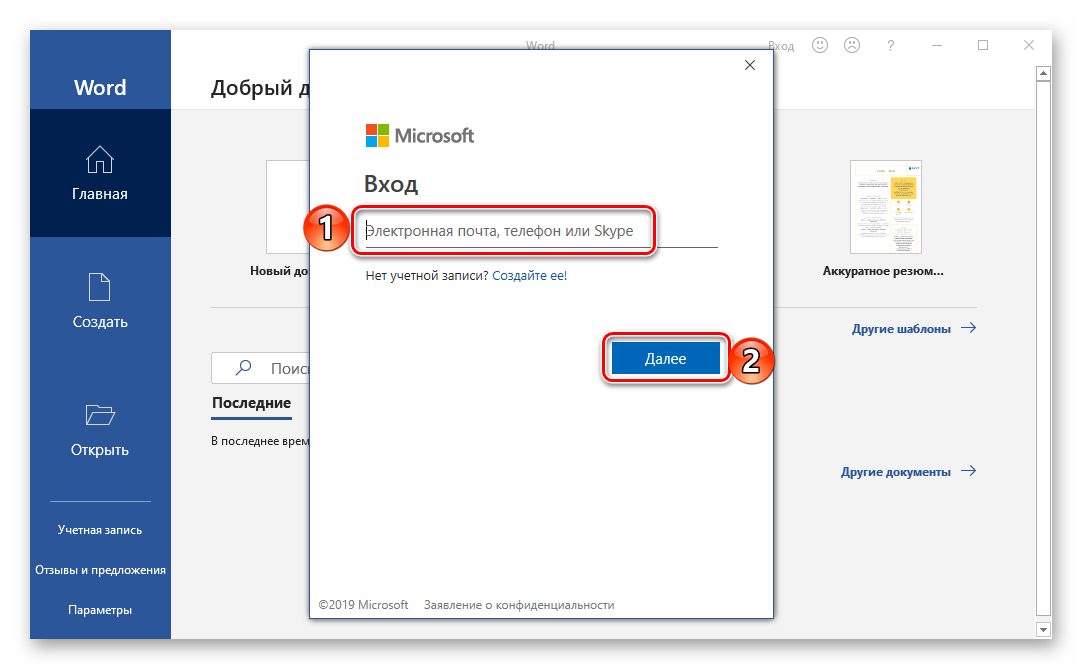
- Введите свою электронную почту, к которой привязана учетная запись Microsoft, и нажмите «Далее».

Если в Windows вы работаете под этим же аккаунтом и/или используете OneDrive, ввод пароля не потребуется. Но если окно с запросом появится, укажите его и нажмите «Вход». - В открывшемся пустом документе Ворд потребуется выполнить вход еще раз, чтобы подтвердить то, что именно вы являетесь владельцем лицензии или подписки на Office 365 или 2019. Для этого нажмите по кнопке «Войти», расположенной в конце уведомления,

а затем по еще одной, но уже в появившемся всплывающем окне.

С этого момента Microsoft Word, как и все приложения офисного пакета, будет готов к нормальной работе и автоматическому, а точнее, постоянному (фоновому) сохранению документов в облако. Но данный процесс нужно настроить, а сделать это можно одним из двух способов.
Так, если вы хотите, чтобы все документы, с которыми вы работаете, сохранялись в стандартную папку «Документы» на OneDrive, выполните следующее:
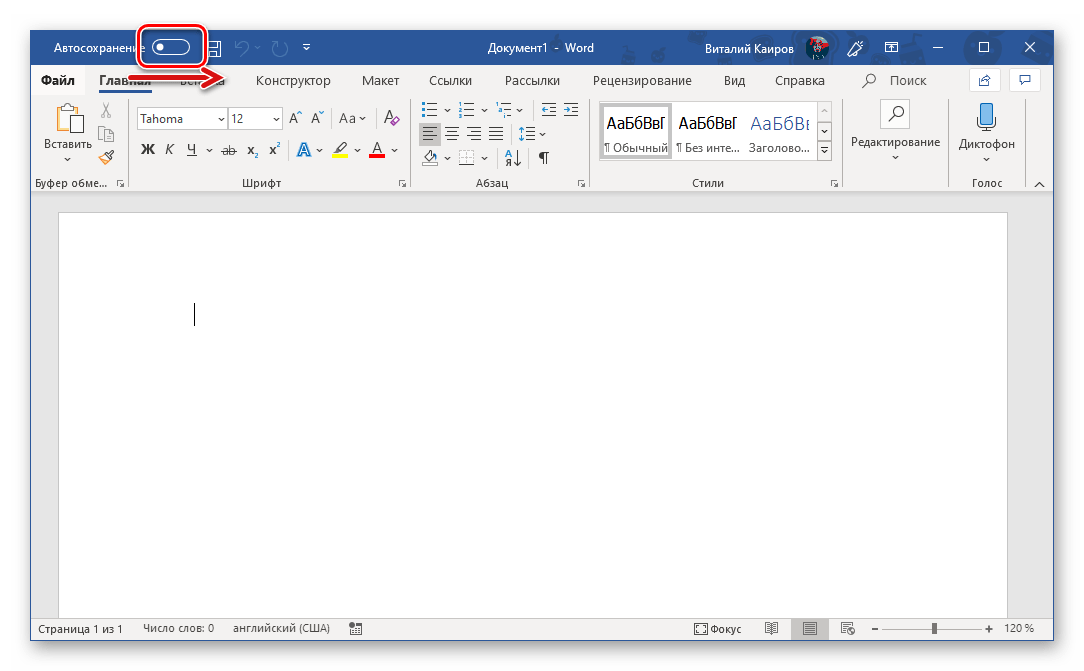
- Переведите в активное положение переключатель, расположенный на верхней панели между кнопкой сохранения и надписью «Автосохранение».
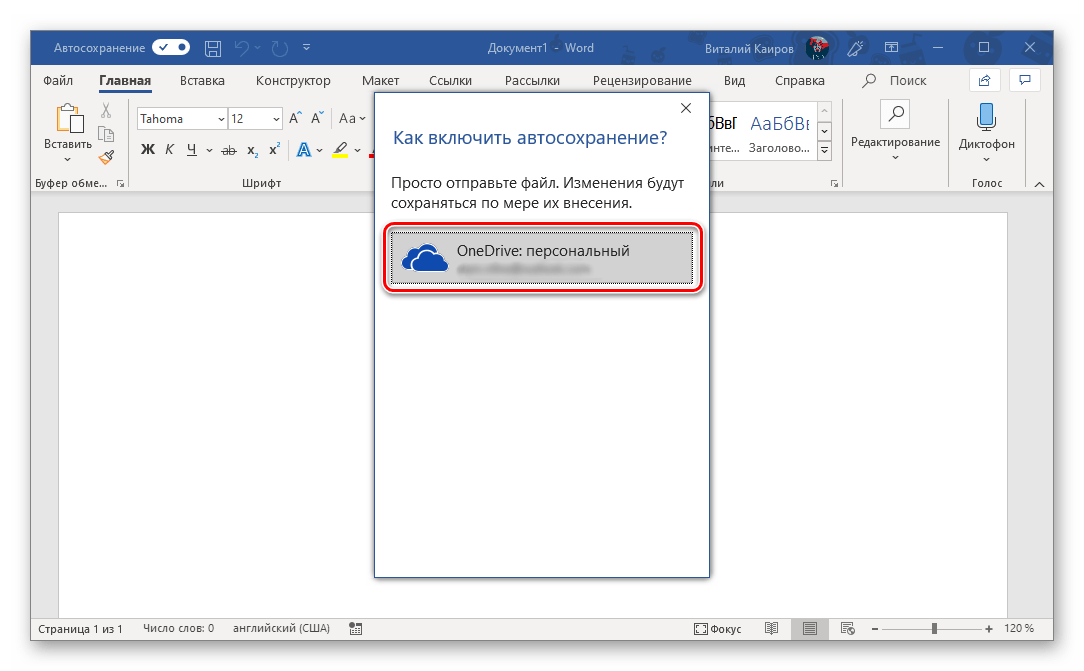
- Во всплывающем окне выберите свой «OneDrive: Персональный» (ориентируйтесь на адрес электронной почты).
- Задайте имя документу и нажмите «ОК».
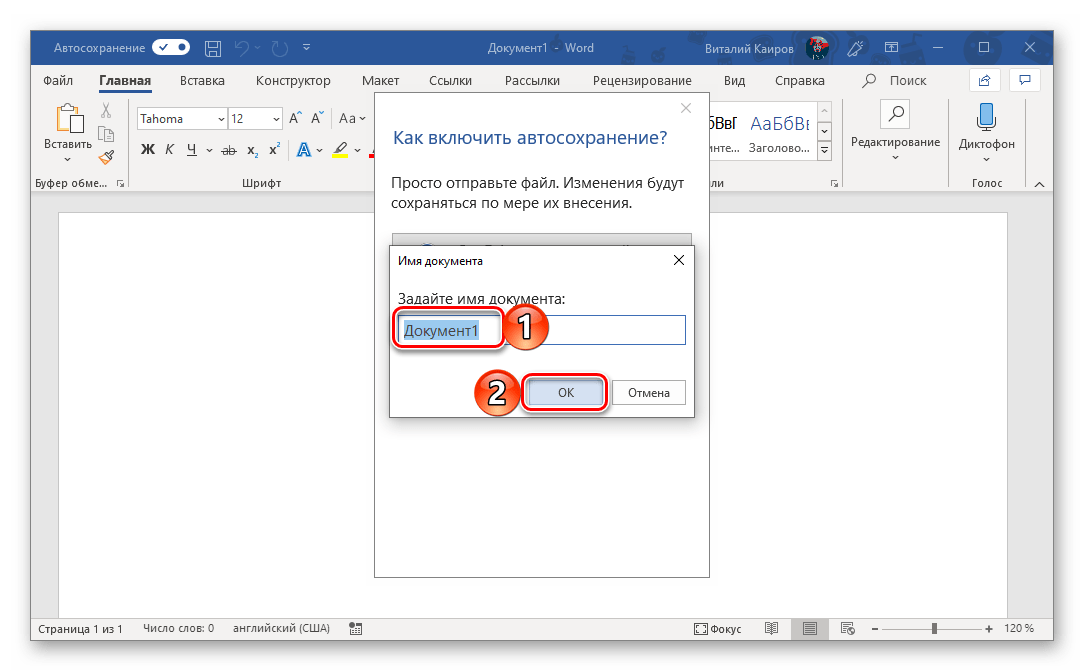
Это же потребуется делать с каждым последующим файлом. То есть для того, чтобы непрерывное сохранение осуществлялось в фоновом режиме, необходимо его включить, назвать документ и подтвердить это.
В случае если вы хотите хранить текстовые документы в папках, отличных от стандартной, но все же в пределах своего облачного хранилища OneDrive, действовать необходимо немного иначе.
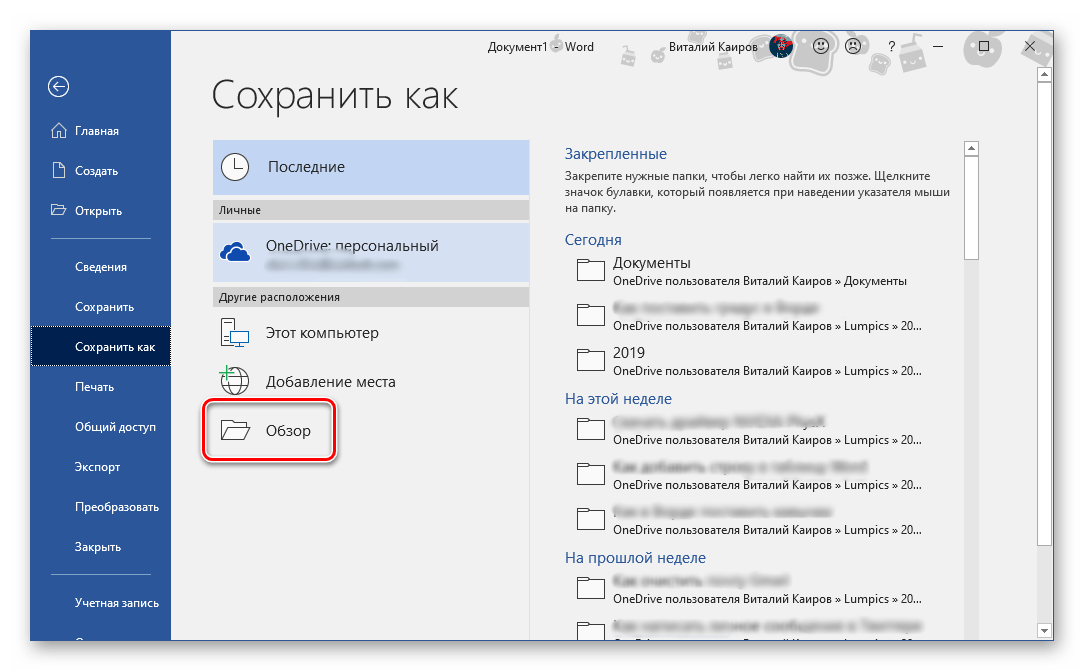
- Перейдите в меню «Файл» и выберите на боковой панели пункт «Сохранить как».
- Далее вы можете указать любое место на диске своего ПК, нажав для начала по кнопке «Обзор», либо воспользоваться возможностью «Добавления места», которая позволяет подключить к Microsoft Office стороннее облачное хранилище.
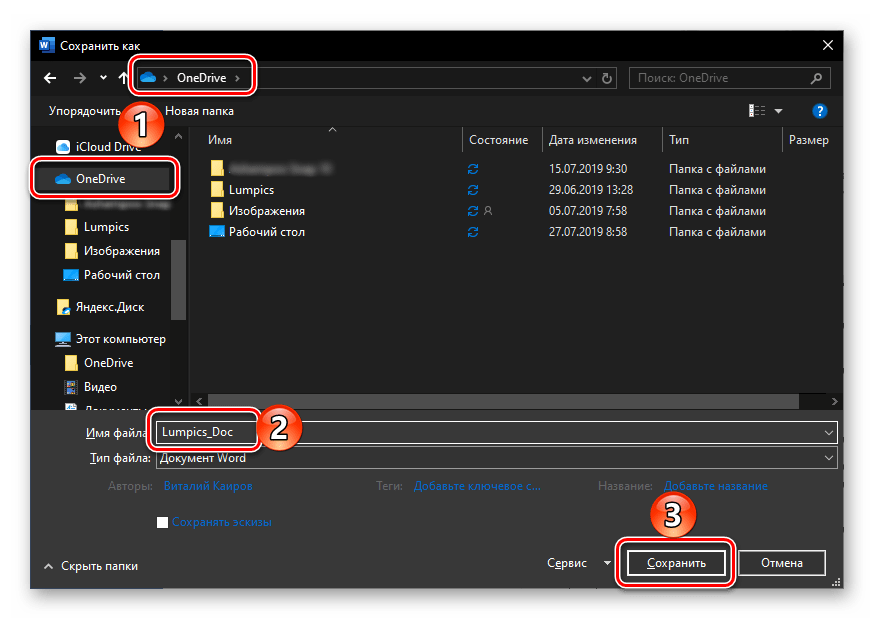
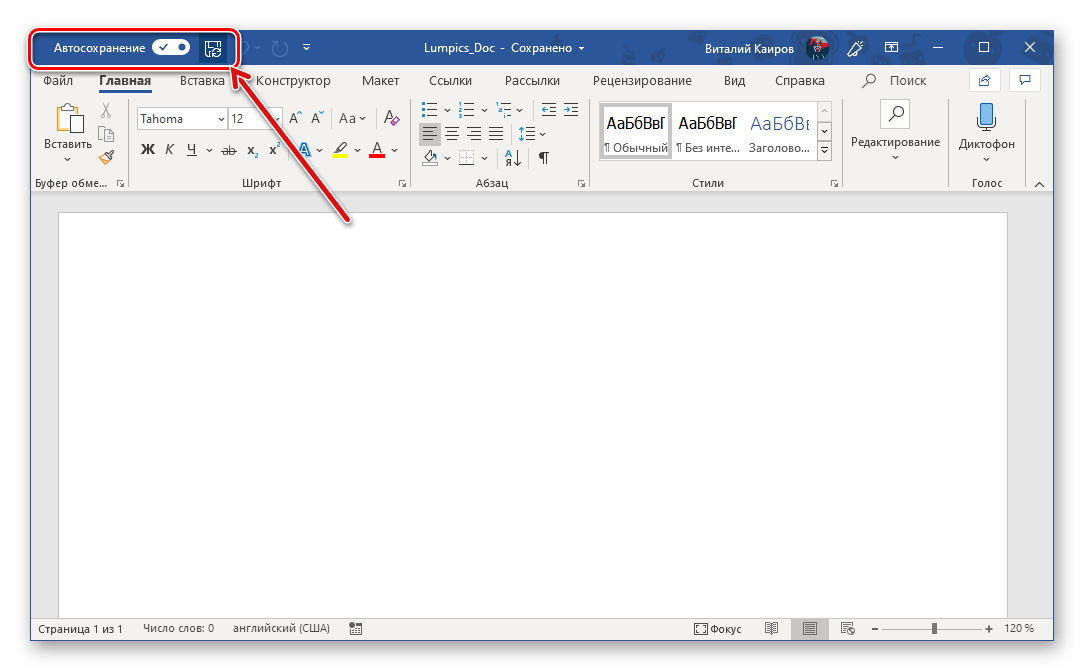
Для примера выберем первый вариант. «Обзор» открывает системный «Проводник», в котором нужно просто указать место для сохранения текстового документа. Но, так как нас интересует его постоянное сохранение в фоне, это должна быть папка в OneDrive. Определившись с расположением, задайте файлу желаемое имя и нажмите по кнопке «Сохранить». - Вы будете возвращены к документу Ворд. Обратите внимание на левую часть верхней панели программы – переключатель около пункта «Автосохранение» теперь активен, а на кнопке сохранения есть значок, сигнализирующий об активной синхронизации данных. Теперь вы можете свободно работать с текстом (как и с любыми другими данными, поддерживаемыми редактором от Майкрософт).

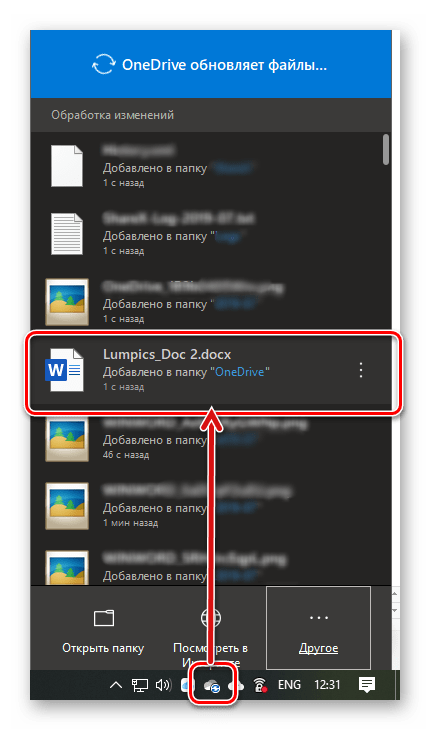
Убедиться в том, что файл сохраняется, можно не только по значкам на ленте, но и по меню, вызываемом нажатием на иконку облачного хранилища OneDrive в системном трее – там вы увидите и текстовый документ, и время его последней синхронизации.
Этот же документ можно найти в указанной вами папке облачного хранилища,
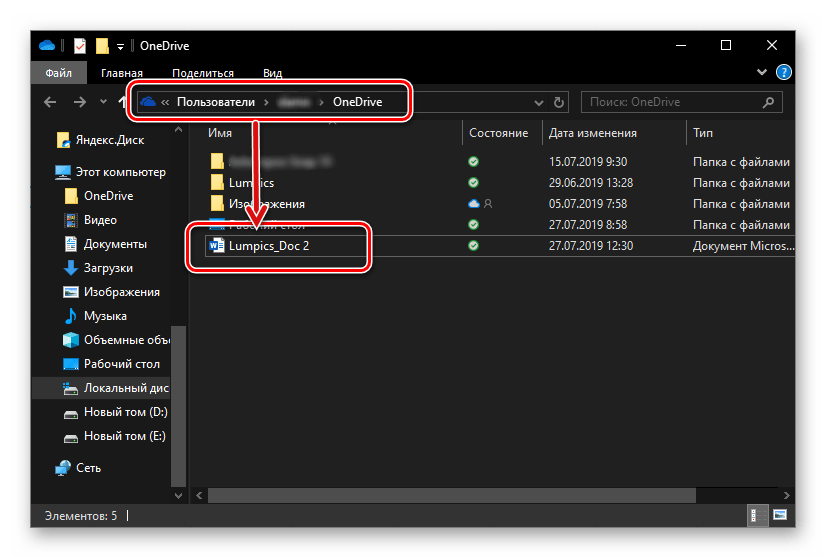
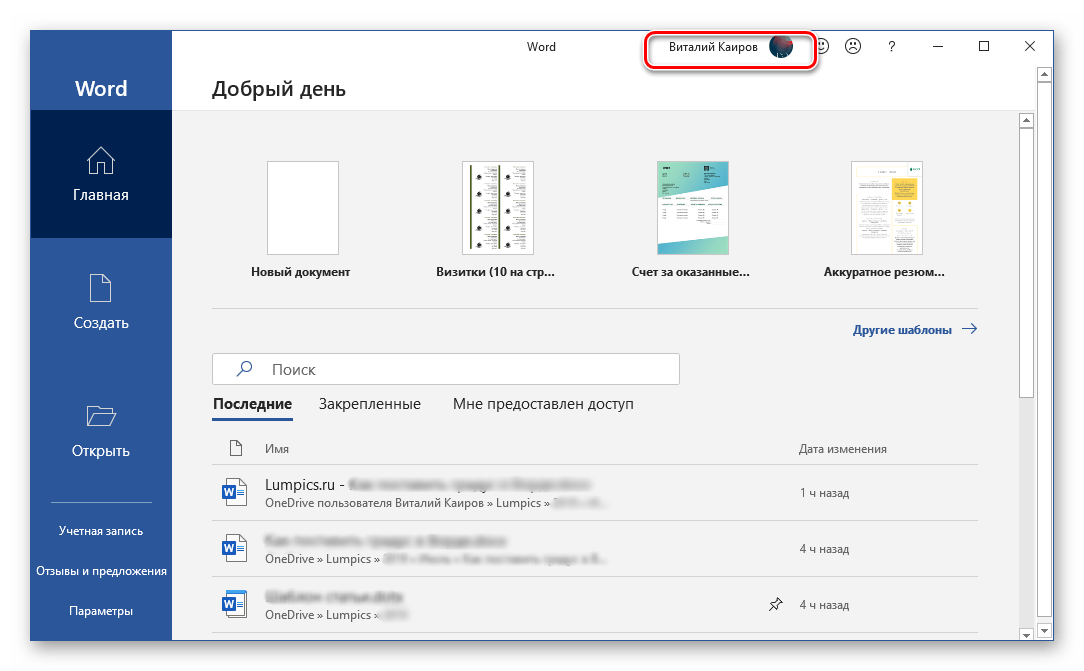
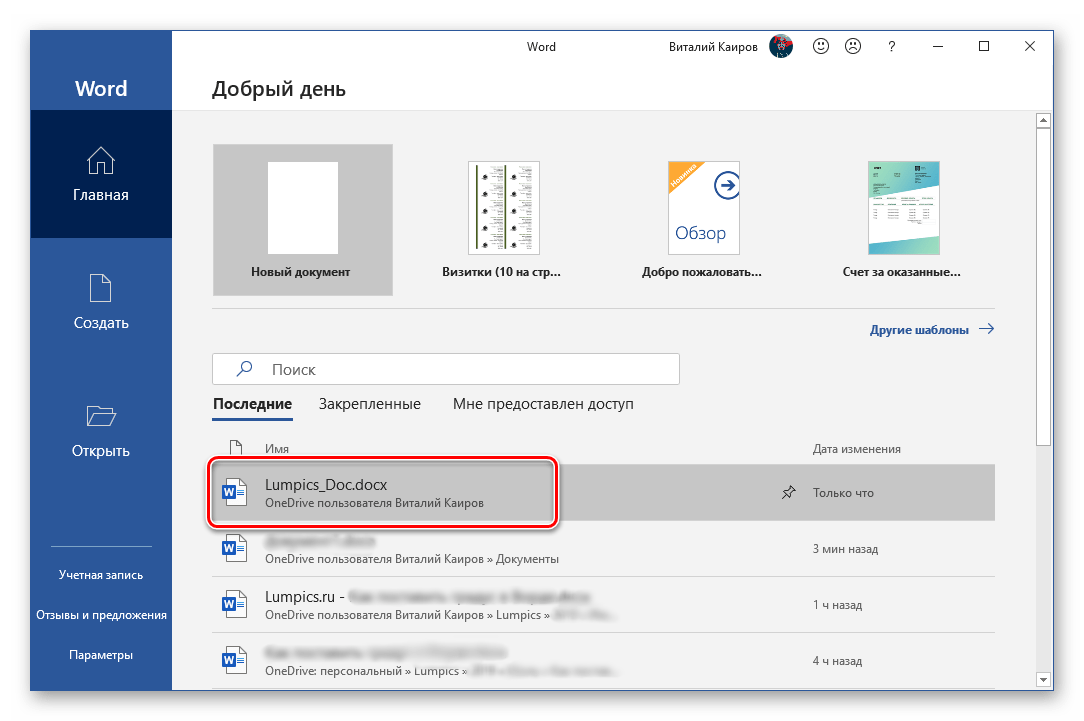
а также в списке «Последние», который встречает вас при каждом запуске Microsoft Word.
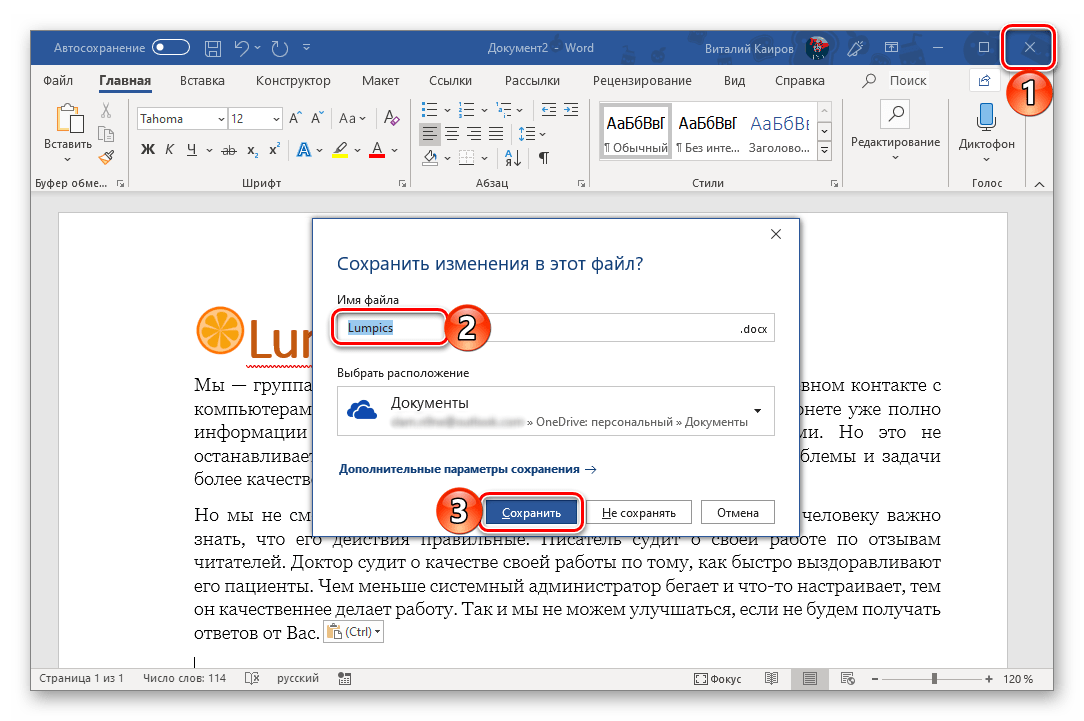
Примечание: Если начав работать с текстовым документом, вы забудете указать место для его сохранения, а затем решите закрыть его, программа сама предложит сохранить изменения. Просто задайте имя файла и укажите место в облаке или на диске.
Синхронизация документов Ворд с облачным хранилищем ВанДрайв посредством учетной записи Майкрософт – это оптимальное решение для всех тех пользователей, кто не готов потерять ни малейшей части проделанной работы. И даже если в процессе набора текста у вас пропадет интернет, вы всегда сможете сохранить документ вручную, а при восстановлении подключения к сети он будет синхронизирован автоматически.
Заключение
Мы рассмотрели то, что представляет собой функция автосохранения в Microsoft Word и то, как благодаря правильной настройке ее работы можно минимизировать риск потери данных. Если же вы используете лицензионную версию Microsoft Office в связке с облачным хранилищем OneDrive, о необходимости сохранения текстовых документов можно вообще забыть.
There was a time when losing your work was a reality if you forgot to press save. However, today, using cloud-based Office 365 and OneDrive, ‘AutoSave‘ prevents you from losing work.
AutoSave has another helpful function, ‘Version History‘. Version history takes you back to a previously saved version in Word, Excel or even an image file.
Watch this handy step by step video explaining:
- What is AutoSave and how does it work?
- How to revert to a previously saved version in Word, using Version History
- How to restore a previously saved image, using Version History
What is AutoSave and how does it work?
If you are subscribed to Office 365, then your Word or Excel files will save using ‘AutoSave’ by default. This means that when you make changes to your document, it saves automatically — constantly saving to OneDrive in the cloud. Gone are the days of working on a file for an hour, forgetting to save, and losing that work if something goes wrong.
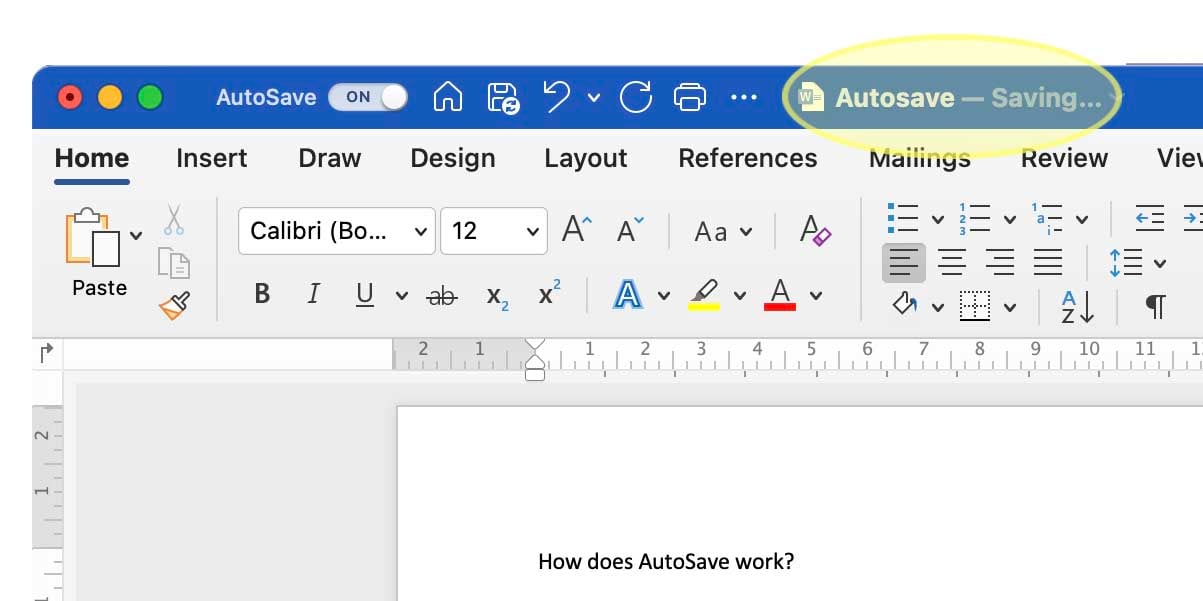
As long as AutoSave is switched on, you don’t need to press save. It means that you can make changes, close the document and those changes will have been automatically saved. You can see if AutoSave is switched on by looking at the top left hand-side of your file.
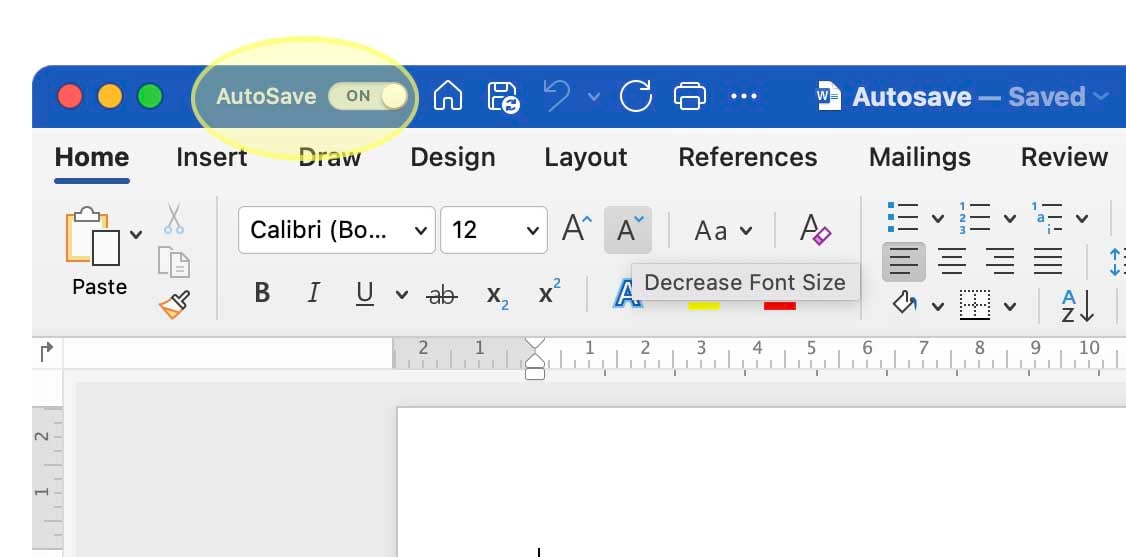
You can see that your document is constantly saving. While you type, it displays ‘saving’ at the top centre of the file, indicating that the file is saving as the changes are being made.
reverting back to a previously saved version in Word, using Version History
It is possible to see previously saved document versions for most file types while using Office 365. This is helpful if you accidentally delete sections of work, want to revert back to a previous version or see the history of a document for auditing purposes. First, here’s how to access version history:
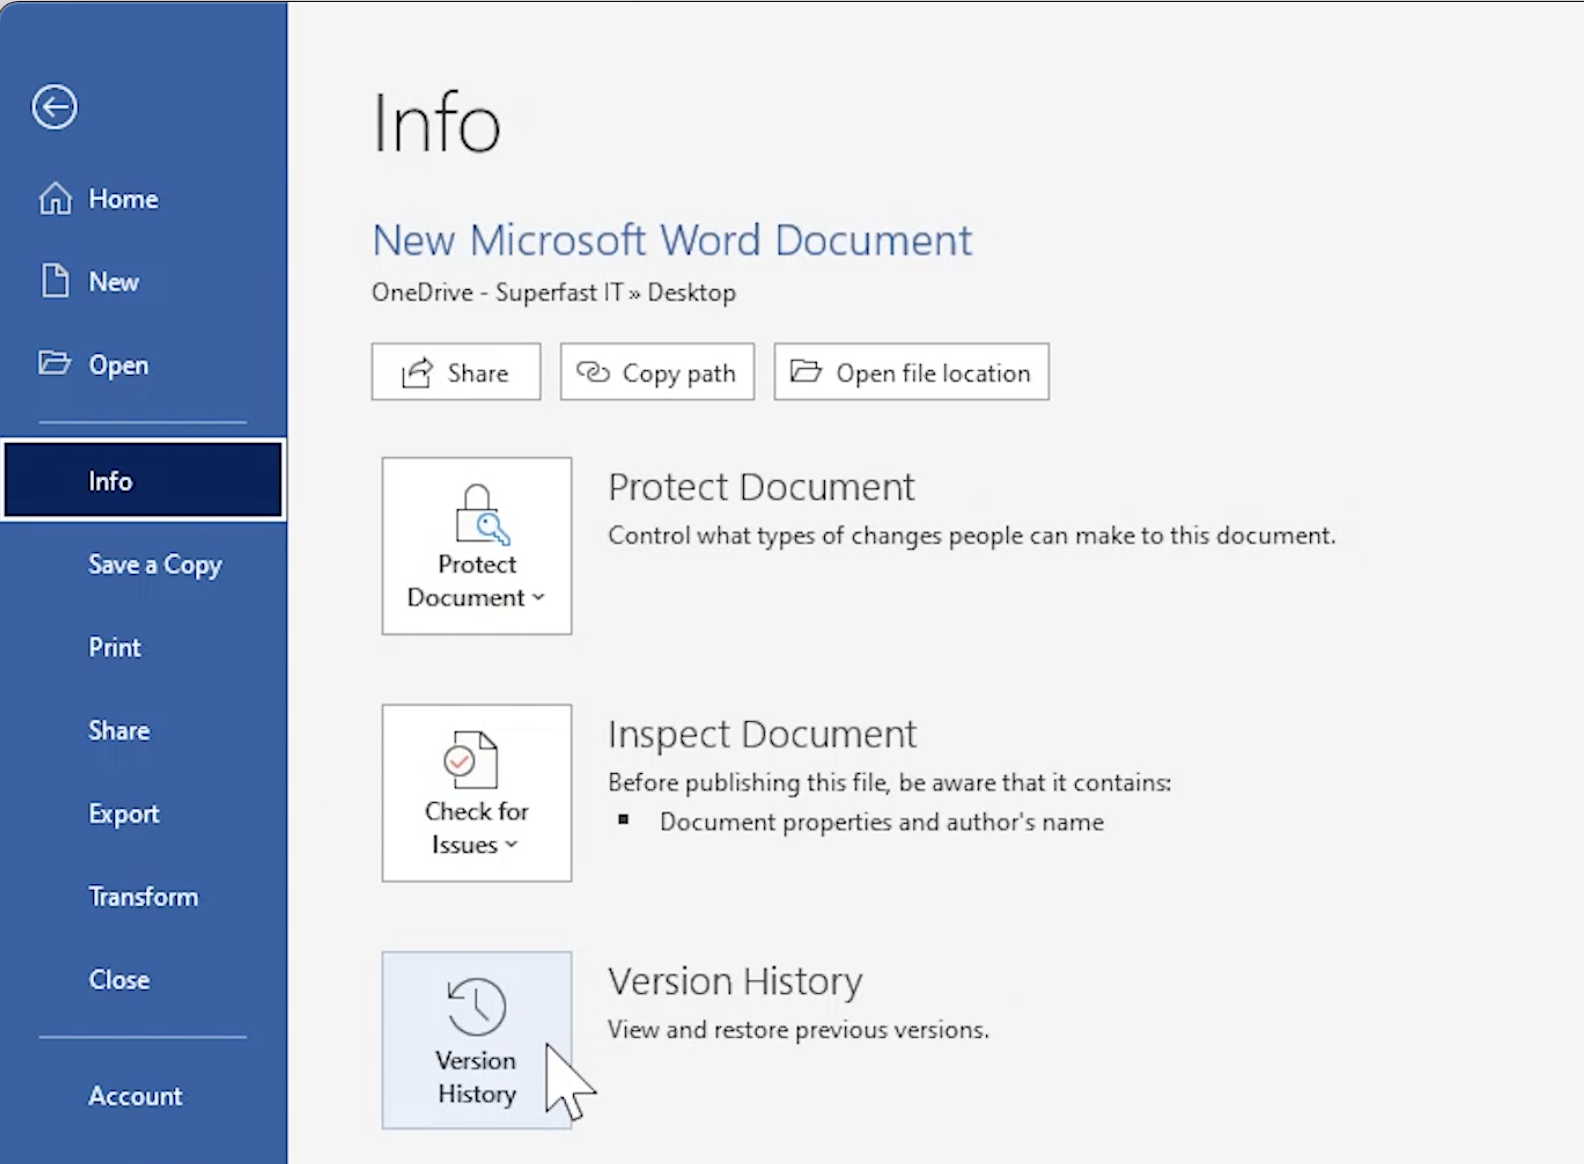
How to access Version History on PCs
- Open the Word or Excel file
- Click ‘File‘
- Select ‘Info‘
- Click on ‘Version History‘
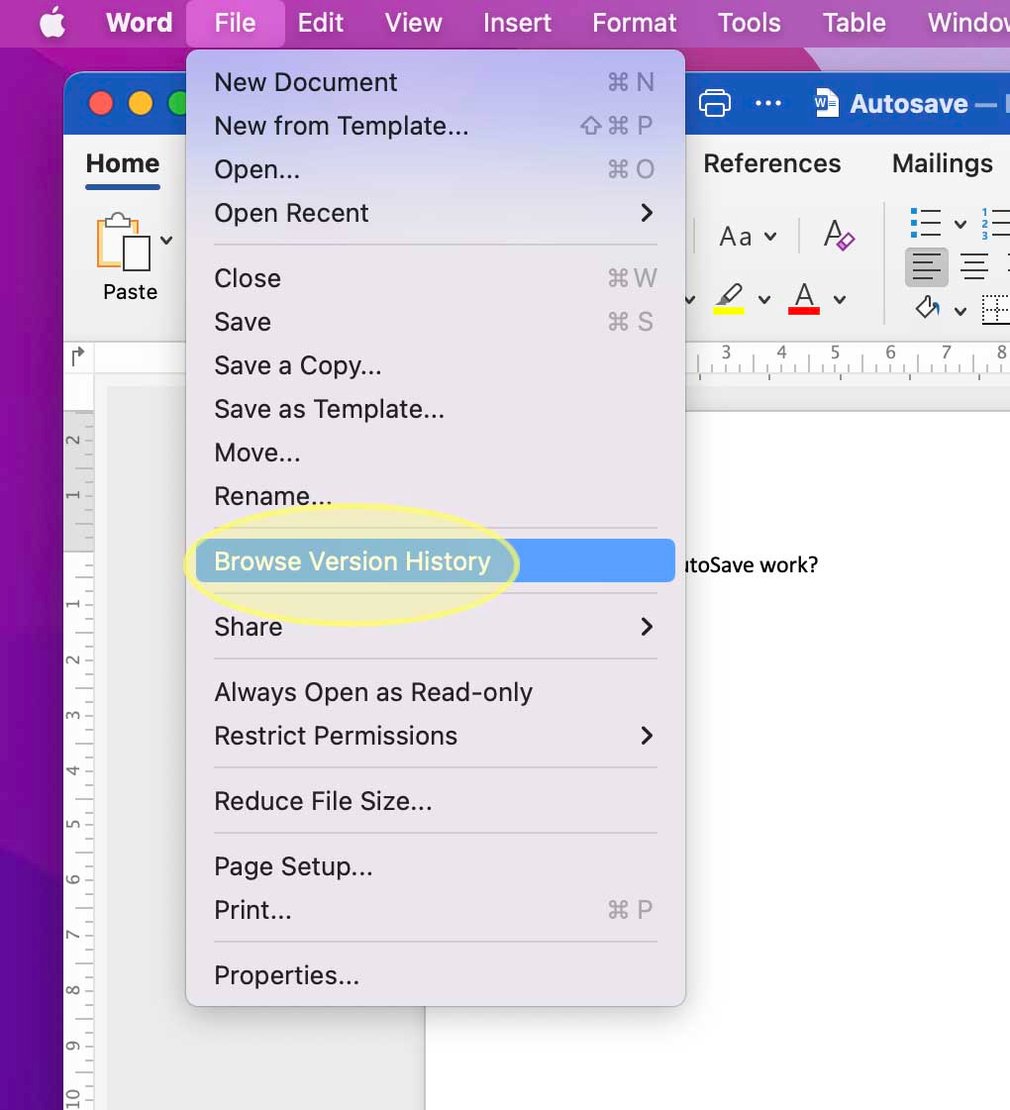
How to access Version History on Mac
- Open the Word or Excel file
- Click ‘File‘
- Click ‘Browse Version History‘
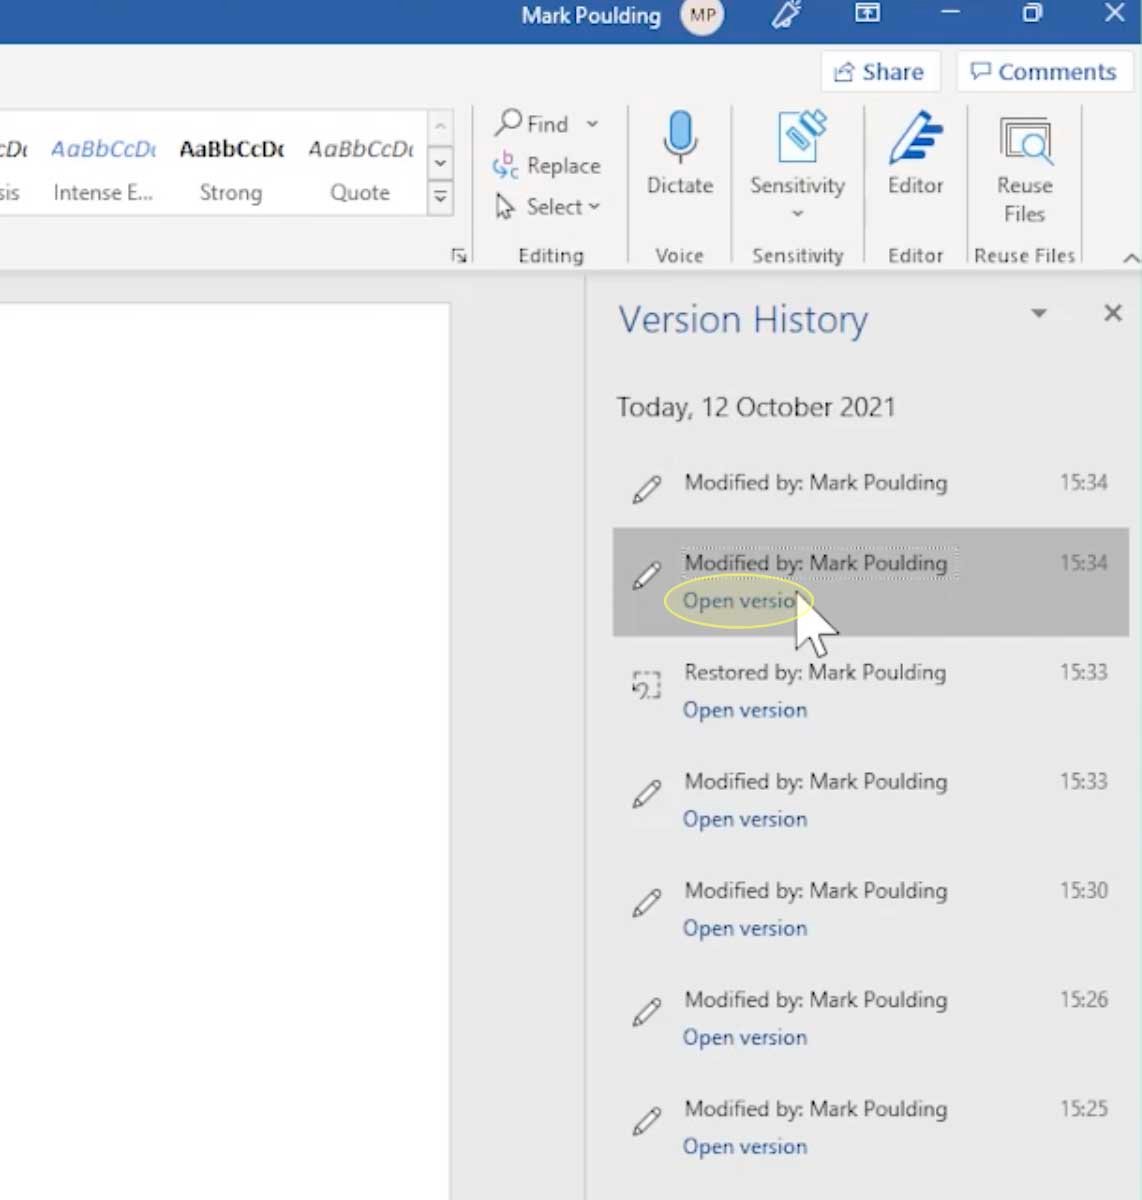
Next, you will see the version history panel open on the right-hand side of the document. All of the previous versions of the document will be listed.
By clicking ‘Open Version‘, you can restore a previous version of the document. It also details who made the change, as well as the date and time. If you are curious to know who had made changes to a document, this feature is useful for auditing:
Version History to restore a previously saved image
Version History also works for non-Word and Excel documents, such as images.
How to access image Version History
- Right-click on the file as it sits on your desktop.
- Click ‘Version History‘.
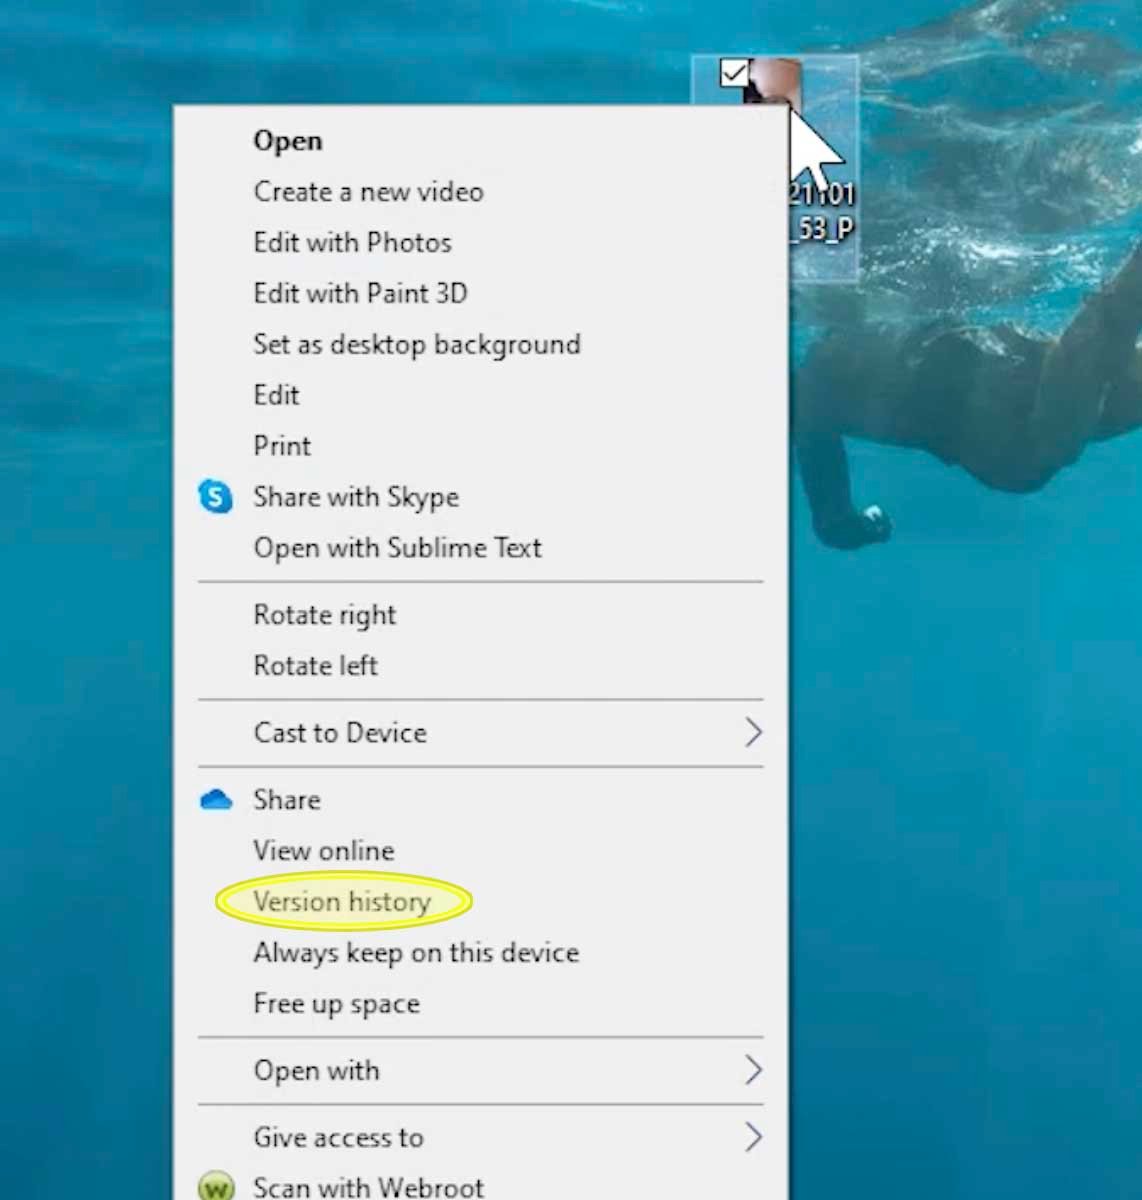
This opens a box with the history of the file. Just like in the Word file, you can revert back to any of the previously saved versions. Click on the three dots […] next to the version you wish to restore and then click ‘restore‘.
Restoring an image is not instantaneous, but after around 30 seconds the file will restore.
Looking to outsource IT?
I hope that this guide has been useful. If you are considering outsourcing your business’ IT, then take a look at our IT support packages and get in touch to find out more.
IT Support packages
contact us
Newsletter subscription
For more IT tips, subscribe to our monthly email newsletter
Subscribe