
Microsoft Excel makes it easy to import Extensible Markup Language (XML) data that is created from other databases and applications, to map XML elements from an XML schema to worksheet cells, and to export revised XML data for interaction with other databases and applications. Think of these XML features as turning Office Excel into an XML data file generator with a familiar user interface.
In this article
-
Why use XML in Excel?
-
XML data and schema files
-
Key XML and Excel scenarios
-
-
The basic process of using XML data in Excel
-
Working with XML maps
-
Using the XML Source task pane
-
Element types and their icons
-
Working with single-mapped cells
-
Working with repeating cells in XML tables
-
XML map security considerations
-
Importing XML data
-
Working with an inferred schema
-
Exporting XML data
-
Using the Excel macro-enabled Office Open XML Format file
-
Why use XML in Excel?
XML is a technology that is designed for managing and sharing structured data in a human-readable text file. XML follows industry-standard guidelines and can be processed by a variety of databases and applications. Using XML, application designers can create their own customized tags, data structures, and schemas. In short, XML greatly eases the definition, transmission, validation, and interpretation of data between databases, applications, and organizations.
XML data and schema files
Excel works primarily with two types of XML files:
-
XML data files (.xml), which contain the custom tags and structured data.
-
Schema files (.xsd), which contain schema tags that enforce rules, such as data type and validation.
The XML standard also defines Extensible Stylesheet Language Transformation (XSLT) (.xslt) files, which are used to apply styles and transform XML data into different presentation formats. You can apply these transforms before you import XML files into Excel and after you export XML files from Excel. If XSLT files are linked to XML data files that you import into Excel, you do have the option to apply or not apply the formatting before the data is added to the worksheet, but only when you open an XML file by using the Open command from within Excel. Choose the XML Files (*.xml) file type before you click the Open button to see the XML files in the folder.
Key XML and Excel scenarios
By using XML and Excel, you can manage workbooks and data in ways that were previously impossible or very difficult. By using XML maps, you can easily add, identify, and extract specific pieces of business data from Excel documents. For example, an invoice that contains the name and address of a customer or a report that contains last quarter’s financial results are no longer just static reports. You can easily import this information from databases and applications, revise it, and export it to the same or other databases and applications.
The following are key scenarios that the XML features are designed to address:
-
Extend the functionality of existing Excel templates by mapping XML elements onto existing cells. This makes it easier to get XML data into and out of your templates without having to redesign them.
-
Use XML data as input to your existing calculation models by mapping XML elements onto existing worksheets.
-
Import XML data files into a new workbook.
-
Import XML data from a Web service into your Excel worksheet.
-
Export data in mapped cells to XML data files independent from other data in the workbook.
Top of Page
The basic process of using XML data in Excel
The following diagram shows how the different files and operations work together when you use XML with Excel. Essentially, there are five phases to the process:
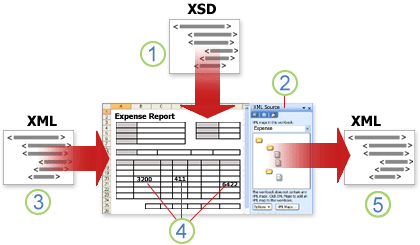
 Adding an XML schema file (.xsd) to a workbook
 Mapping XML schema elements to individual cells or XML tables
 Importing an XML data file (.xml) and binding the XML elements to mapped cells
 Entering data, moving mapped cells, and leveraging Excel functionality, while preserving XML structure and definitions
 Exporting revised data from mapped cells to an XML data file
Working with XML maps
You can create or open a workbook in Excel, attach an XML schema file (.xsd) to the workbook, and then use the XML Source task pane to map XML elements of the schema to individual cells or tables. After you map the XML elements to your worksheet, you can import and export XML data into and out of the mapped cells.
When you add an XML schema file (.xsd) to your workbook, you create an XML map. In general, XML maps are used to create mapped cells and to manage the relationship between mapped cells and individual elements in the XML schema. In addition, these XML maps are used to bind the contents of mapped cells to elements in the schema when you import or export XML data files (.xml).
There are two kinds of mapped cells that you can create: single-mapped cells and repeating cells (which appear as XML tables). To make designing your worksheet more flexible, you can drag the mapped cells anywhere on a worksheet and into any order — even one different from the XML schema. You can also choose which elements to map and not map.
The following rules about using XML maps are important to know:
-
A workbook can contain one or more XML maps.
-
You can only map one element to one location in a workbook at a time.
-
Each XML map is an independent entity, even if multiple XML maps in the same workbook refer to the same schema.
-
An XML map can only contain one root element. If you add a schema that defines more than one root element, you are prompted to choose the root element to use for the new XML map.
Using the XML Source task pane
You use the XML Source task pane to manage XML maps. To open it, on the Developer tab, in the XML group, click Source. The following diagram shows the main features of this task pane.
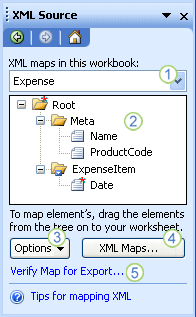
1. Lists XML maps that were added to the workbook
2. Displays a hierarchical list of XML elements in the currently listed XML map
3. Sets options when working with the XML Source task pane and the XML data, such as how to preview the data and control headings
4. Opens the XML Maps dialog box, which you can use to add, delete, or rename XML maps
5. Verifies whether you can export XML data through the current XML map
Top of Page
Element types and their icons
The following table summarizes each type of XML element that Excel can work with and the icon that is used to represent each type of element.
|
Element type |
Icon |
|---|---|
|
Parent element |
|
|
Required parent element |
|
|
Repeating parent element |
|
|
Required repeating parent element |
|
|
Child element |
|
|
Required child element |
|
|
Repeating child element |
|
|
Required repeating child element |
|
|
Attribute |
|
|
Required attribute |
|
|
Simple content in a complex structure |
|
|
Required simple content in a complex structure |
|


Top of Page
Working with single-mapped cells
A single-mapped cell is a cell that has been mapped to a nonrepeating XML element. You create a single-mapped cell by dragging a nonrepeating XML element from the XML Source task pane onto a single cell in your worksheet.
When you drag a nonrepeating XML element onto the worksheet, you can use a smart tag to choose to include the XML element name as a heading above or just to the left of the single-mapped cell, or you can use an existing cell value as a heading.
You can also use a formula in a single-mapped cell, if the cell is mapped to an XML element with an XML Schema Definition (XSD) data type that Excel interprets as a number, date, or time.
Top of Page
Working with repeating cells in XML tables
XML tables are similar in appearance and functionality to Excel tables. An XML table is an Excel table that has been mapped to one or more XML repeating elements. Each column in the XML table represents an XML element.
An XML table is created when you:
-
Use the Import command (in the XML group on the Developer tab) to import an XML data file.
-
Use the Open command from within Excel to open an XML data file — and then select As an XML table in the Open XML dialog box.
-
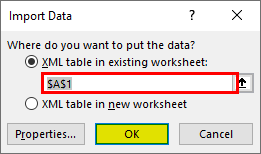
Use the From XML Data Import command (from the From Other Sources command button, in the Get External Data group, on the Data tab) to import an XML data file — and then select XML table in existing worksheet or New worksheet in the Import Data dialog box.
-
Drag one or more repeating elements from the XML Source task pane to a worksheet.
When you create an XML table, the XML element names are automatically used as column headings. You can change these to any column headings that you want. However, the original XML element names are always used when you export data from the mapped cells.
Two options under the Options button in the XML Source task pane are useful when you work with XML tables:
-
Automatically Merge Elements When Mapping
When selected, Excel creates one XML table from multiple fields as they are dropped onto the worksheet. This option works as long as the multiple fields are dropped on the same row, one adjacent to the other. When this option is cleared, each element appears as its own XML table. -
My Data Has Headings
When selected, existing heading data is used as column headings for repeating elements that you map to your worksheet. When this option is cleared, the XML element names are used as column headings.
Using XML tables, you can easily import, export, sort, filter, and print data based on an XML data source. However, XML tables do have some limitations regarding how they can be arranged on the worksheet.
-
XML tables are row-based, meaning that they grow from the header row down. You cannot add new entries above existing rows.
-
You cannot transpose an XML table so that new entries will be added to the right.
You can use formulas in columns that are mapped to XML elements with an XML Schema Definition (XSD) data type that Excel interprets as a number, date, or time. Just as in an Excel table, formulas in an XML table are filled down the column when new rows are added to the table.
XML map security considerations
An XML map and its data source information are saved with the Excel workbook, not a specific worksheet. A malicious user can view this map information by using a Microsoft Visual Basic for Applications (VBA) macro. Furthermore, if you save your workbook as a macro-enabled Excel Office Open XML Format File, this map information can be viewed through Microsoft Notepad or through another text-editing program.
If you want to keep using the map information but remove the potentially sensitive data source information, you can delete the data source definition of the XML schema from the workbook, but still export the XML data, by clearing the Save data source definition in workbook check box in the XML Map Properties dialog box, which is available from the Map Properties command in the XML group on the Developer tab.
If you delete a worksheet before you delete a map, the map information about the data sources, and possibly other sensitive information, is still saved in the workbook. If you are updating the workbook to remove sensitive information, make sure that you delete the XML map before you delete the worksheet, so that the map information is permanently removed from the workbook.
Top of Page
Importing XML data
You can import XML data into an existing XML map in your workbook. When you import data, you bind the data from the file to an XML map that is stored in your workbook. This means that each data element in the XML data file has a corresponding element, in the XML schema, that you mapped from an XML Schema file or inferred schema. Each XML map can only have one XML data binding, and an XML data binding is bound to all of the mappings that were created from a single XML map.
You can display the XML Map Properties dialog box (Click Map Properties in the XML group on the Developer tab.), which has three options, all selected by default, that you can set or clear to control the behavior of an XML data binding:
-
Validate data against schema for import and export Specifies whether Excel validates data against the XML map when importing data. Click this option when you want to ensure that the XML data that you import conforms to the XML schema.
-
Overwrite existing data with new data Specifies whether data is overwritten when you import data. Click this option when you want to replace the current data with new data, for example, when up-to-date data is contained in the new XML data file.
-
Append new data to existing XML tables Specifies whether the contents of the data source are appended to the existing data on the worksheet. Click this option, for example, when you are consolidating data from several similar XML data files into an XML table, or you do not want to overwrite the contents of a cell that contains a function.
When you import XML data, you may want to overwrite some mapped cells but not others. For example, some mapped cells may contain formulas and you don’t want to overwrite the formula when you import an XML file. There are two approaches that you can take:
-
Unmap the elements that you don’t want overwritten, before you import the XML data. After you import the XML data, you can remap the XML element to the cells containing the formulas, so that you can export the results of the formulas to the XML data file.
-
Create two XML maps from the same XML schema. Use one XML map for importing the XML data. In this «Import» XML map, don’t map elements to the cells that contain formulas or other data that you don’t want overwritten. Use another XML map for exporting the data. In this «Export» XML map, map the elements that you want to export to an XML file.
Note: The ability to import XML data from a Web service by using a Data Retrieval Service Connection (.uxdc) file to connect to a data source is no longer supported in versions later than Excel 2003 through the user interface. If you open a workbook that was created in Excel 2003, you can still view the data, but you cannot edit or refresh the source data.
Working with an inferred schema
If you import XML data without first adding a corresponding XML schema to create an XML map, Excel tries to infer a schema for you based on the tags that are defined in the XML data file. The inferred schema is stored with the workbook, and the inferred schema allows you to work with XML data if an XML schema file isn’t associated with the workbook.
When you work with imported XML data that has an inferred schema, you can also customize the XML Source task pane. Select the Preview Data in Task Pane option from the Options button to display the first row of data as sample data in the element list, if you imported XML data associated with the XML map in the current session of Excel.
You cannot export the Excel inferred schema as a separate XML schema data file (.xsd). Although there are XML schema editors and other methods for creating an XML schema file, you may not have convenient access to them or know how to use them. As an alternative, you can use the Excel 2003 XML Tools Add-in Version 1.1, which can create a schema file from an XML map. For more information, see Using the Excel 2003 XML Tools Add-in Version 1.1.
Exporting XML data
You export XML data by exporting the contents of mapped cells on the worksheet. When you export data, Excel applies the following rules to determine what data to save and how to save it:
-
Empty items are not created when blank cells exist for an optional element, but empty items are created when blank cells exist for a required element.
-
Unicode Transformation Format-8 (UTF-8) encoding is used to write the data.
-
All namespaces are defined in the Root XML element.
-
Excel overwrites existing namespace prefixes. The default namespace is assigned a prefix of ns0. Successive namespaces are designated ns1, ns2 to ns<count> where <count> is the number of namespaces written to the XML file.
-
Comment nodes are not preserved.
You can display the XML Map Properties dialog box (Click Map Properties in the XML group on the Developer tab.) and then use the Validate data against schema for import and export option (active by default) to specify whether Excel validates data against the XML map when exporting data. Click this option when you want to ensure that the XML data you export conforms to the XML schema.
Using the Excel Macro-enabled Office Open XML Format File
You can save an Excel workbook in a variety of file formats, including the Excel macro-enabled Office Open XML Format File (.xlsm). Excel has a defined XML schema that defines the contents of an Excel workbook, including XML tags that store all workbook information, such as data and properties, and define the overall structure of the workbook. Custom applications can use this Excel macro-enabled Office XML Format File. For example, developers may want to create a custom application to search for data in multiple workbooks that are saved in the this format and create a reporting system based on the data found.
Top of Page
Need more help?
You can always ask an expert in the Excel Tech Community or get support in the Answers community.
See Also
Import XML data
Map XML elements to cells in an XML Map
Export XML data
Append or overwrite mapped XML data
What Is Excel Open XML File?
With Excel data, we can convert the data into XML format.
Data is the most important part of making decisions but it is important to know how we can import data from different sources. The source file varies from one situation to another.
We are familiar with common file extensions: “Text file and Excel file.” But several other sources are also available. This article will show us how to open Excel data into XML format and import XML data into Excel with neat formatting.
Table of contents
- What Is Excel Open XML File?
- What Is XML File?
- Example Of Converting Excel Data To XML File Format
- Import XML Data Into Excel
- Important Things To Note
- Frequently Asked Questions (FAQs)
- Recommended Articles
- XML stands for eXtensible Markup Language. It is a language that can be read only by computers.
- The XML files follow a certain script, so we need to follow a mandatory line of codes.
- When we open our XML file, it will open with TEXT File only, but remember, the format will be in XML Schema.
- We need to create at least two schema examples to apply the same logic to the whole data and export it as an XML file.
What Is XML File?
EXtensible Markup Language of storing data in the XML format. Like all the other external database rules, XML, too, has its own standard set of actions.
The following are the rules of the XML file:
- The first line of the data should always include the below line of code.
<?xml version="1.0" encoding="UTF-8" standalone="yes"?>
- XML format has the head and tail of the table name.
<TableName>

          Column1<Value>Column1

          Column2<Value>Column2

<TableName>

<TableName>

          Column1<Value>Column1

          Column2<Value>Column2

<TableName>
Like this, we can create an XML table to convert the excel data into an XML table format. Now we will see how to open excel data into XML format.
Example Of Converting Excel Data To XML File Format
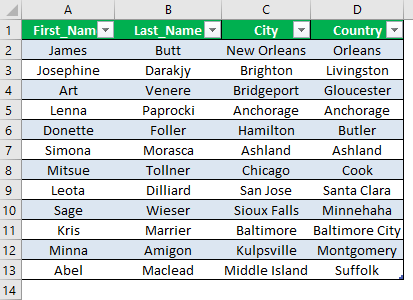
For example, look at the below data in the Excel worksheet.
| First_Name | Last_Name | City | Country |
|---|---|---|---|
| James | Butt | New Orleans | Orleans |
| Josephine | Darakjy | Brighton | Livingston |
| Art | Venere | Bridgeport | Gloucester |
| Lenna | Paprocki | Anchorage | Anchorage |
| Donette | Foller | Hamilton | Butler |
| Simona | Morasca | Ashland | Ashland |
| Mitsue | Tollner | Chicago | Cook |
| Loeta | Dilliard | San Jose | Santa Clara |
| Sage | Wieser | Sioux Falls | Minnehaha |
| Kris | Marrier | Baltimore | Baltimore City |
| Minna | Amigon | Kulpsville | Montgomery |
| Abel | Maclead | Middle Island | Suffolk |
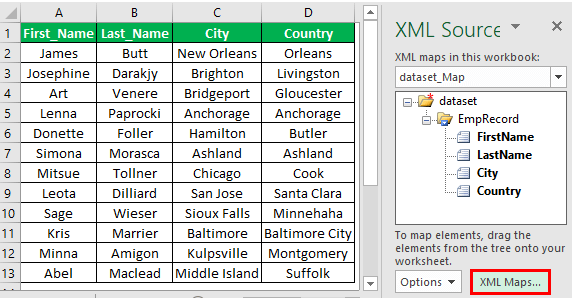
We need to convert this into an XML excel formatExcel has made it very easy for us to import the data in XML to excel in the form of tables or databases. XML is basically an external data and it can be imported to excel from the data tab under the «get external data tab from data from other sources» section.read more like the below one.

Here, we need to create two sample lines formatting for our data. As we have discussed, our rules for creating a mandatory line of code are below.
<?xml version=”1.0″ encoding=”UTF-8″?>
<dataset>
Next, we need to enter the table name as per our wish, and the table name is <EmpRecord>
After the table name, we need to enter the column header name, <FirstName> next; we need to include the name and end this with the column header again.
Like this, we need to prepare a schema of XML data. For the above data, we have created the schema. Then, we can copy and paste the schema.
<?xml version="1.0" encoding="UTF-8"?>

<dataset>

         <EmpRecord>

<FirstName>James</FirstName>

<LastName>Butt</LastName>

<City>New Orleans</City>

<Country>Orleans</Country>

         </EmpRecord>

         <EmpRecord>

<FirstName>Josephine</FirstName>

<LastName>Darakjy</LastName>

<City>Brighton</City>

<Country>Livingston</Country>

        </EmpRecord>

</dataset>
We have created two samples. So, by using this, we can apply the same schema to our Excel file and extract data in the same format (XML) as provided above.
We must copy the above code to a text file and save the file as “XML.”
We must follow the below steps to open the Excel data into XML format.
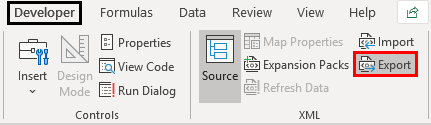
- Step 1: In the data workbook, we must go to the “Developer” tab and click on “Source.”
- Step 2: This will open up below the “XML Source” window to the right of the worksheet, and click on “XML Maps.”
- Step 3: This will open up the “XML Maps” window, then click on the “Add” button to choose the XML schema file.
- Step 4: Now, choose the already saved XML file with the schema.
- Step 5: Click on “Open.” It will ask for our confirmation.
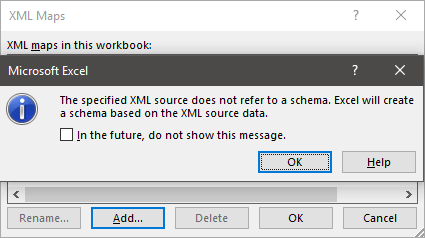
- Step 6: We need to click on “OK” two more times to get the schema headers to the left.
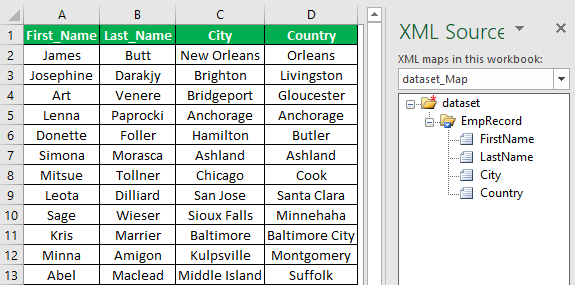
- Step 7: Now, drag and drop the first column header “FirstName” from the XML source to the actual table in the worksheet.
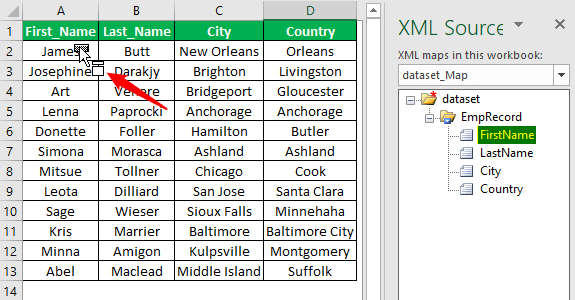
As a result, this will apply the “FirstName” column schema to the data table column.
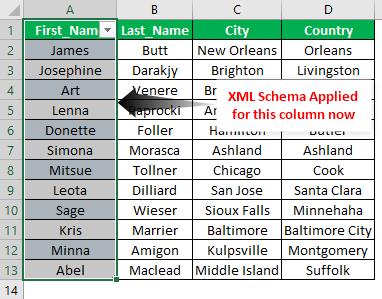
Now, we must repeat the same for the remaining columns. Drag and drop respective schema columns to individual columns of the data table.
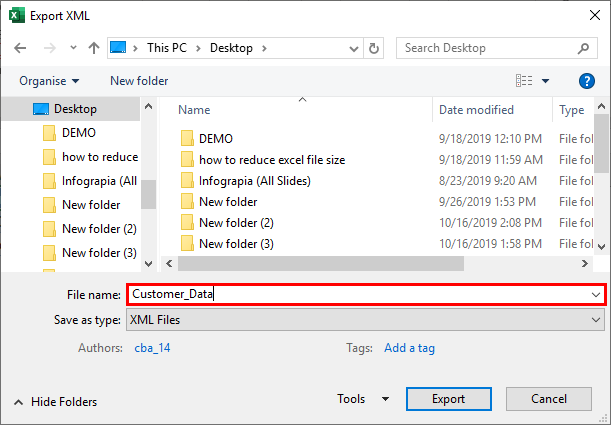
So, all the XML schema columns are applied. Then, under the “Developer” tab excelEnabling the developer tab in excel can help the user perform various functions for VBA, Macros and Add-ins like importing and exporting XML, designing forms, etc. This tab is disabled by default on excel; thus, the user needs to enable it first from the options menu.read more, click on the “Export” option.
It will ask us to save the file in the desired folder. We must give it a name and save it.
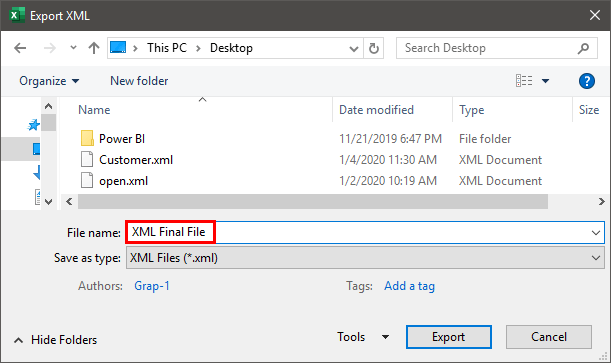
After choosing the folder, we must click on “Export.” The data will be extracted as the “XML Data” file.
Now open the file, and all the rows are in the XML format.
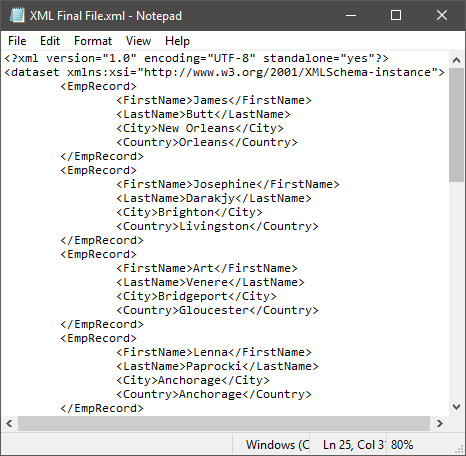
Like this, we can extract or open the Excel data to the XML file.
Import XML Data Into Excel
IImporting an XML file to Excel requires following certain steps. First, follow the below steps to import data from an XML file.
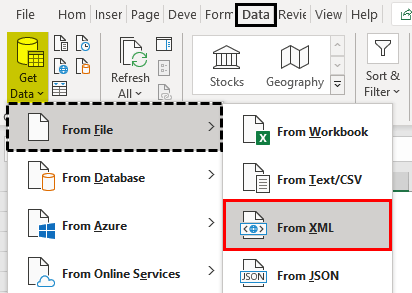
- Firstly, under the “Data” tab, we must click on “Get Data” → “From File” and choose “From XML.”

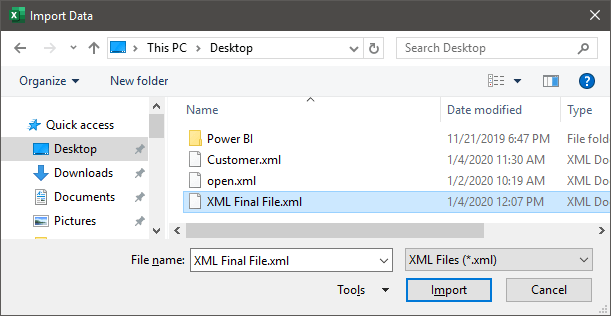
- Consequently, this will ask to choose the file from the stored location. Therefore, we need to select the file.

- Click on “Import.” It will import the data to an Excel file.

Like this, we can work with “XML files” in Excel.

Important Things To Note
- XML language is a computer language but it is not read by humans.
- XML stands for eXtensible Markup Language.
- We can import XML files in excel using the Import option under the Data tab.
Frequently Asked Questions (FAQs)
1. What is XML file?
XML, eXtensible Markup Language is a language read by computer to define text. XML is just like HTML. We can import XML files in excel.
2. How to import XML file in excel?
We can easily open XML file in excel using the below steps:
• Step 1: Go to Data → Get Data → From File → From XML
• Step 2: The Import Data window opens.
• Step 3: Select the file and click Import.
The XML file will be imported.
3. What are some important points to remember while using XML in excel?
While using XML in excel, it is important to know that
• XML has mandatory code lines.
• Whenever we import XML file, it will open with TEXT File only, but the format is in XML Schema.
Recommended Articles
This article has been a guide to Excel Open XML File. Here, we discuss exporting Excel data into XML format and importing XML data into Excel. You may learn more about Excel from the following articles: –
- MS Excel Uses
- Connections in Power BI
- Repair in Excel
- ENVIRON in VBA
The XML file format is quite commonly used on the web, and there is a possibility that sometimes you may have to work with the data in the XML file.
Now you can’t use the XML file directly, as it’s not meant to be read by humans (but machines).
In such a case, it would help to know how to convert the XML file to Excel so you can easily work with the data and analyze it.
In this tutorial, I will show you two really simple ways to import an XML file into Excel using Power Query.
What is an XML File?
XML stands for Extensible Markup Language. An XML file can hold data in a format that can easily be read by apps and systems.
But it’s not as easy to read for humans, which is why we may have to transform it into a format that’s easier to use.
If it contains a lot of text data, then you can use a text editor to read the XML file, and if it contains data, then you can import that XML file into Excel and then work with the data.
XML is quite widely accepted as a file format to store and transmit data over the web.
A lot of popular file formats, such as Microsoft Office Open XML, LibreOffice, OpenDocument, XHTML, and SVG, also use the XML file format.
Most popular websites on the Internet have their sitemap in an XML format.
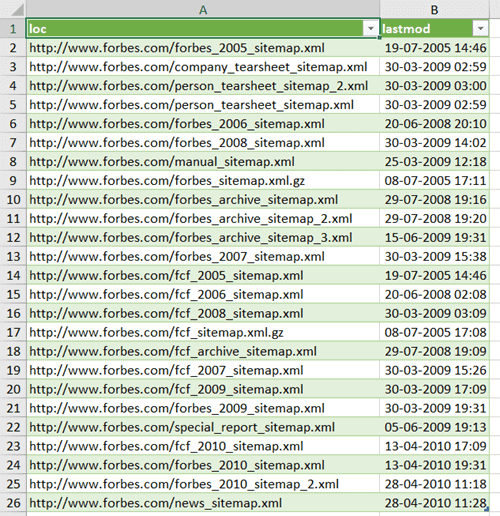
This is a file that contains the details of all the important pages and categories on a website. Here is an example of the sitemap from Forbes.
Now let’s see how to convert an XML file to Excel using Power Query.
Import XML File to Excel
If you already have an XML file (either downloaded on your system or a link to it on the web), you can easily convert it into data in an Excel file.
Thanks to Power Query (now called ‘Get & Transform’)
Import XML File that is Saved On your System
For the purpose of this tutorial, I’ll use an XML file that contains the sitemap for Forbes. You can download the file by going to this link, then right-click and save the file.
Once you have the XML file on your system, follow the below steps to get the XML file data into Excel:
- Open the Excel file where you want to get the data from the XML file
- Click the Data tab

- In the ‘Get & Transform’ data group, click on the ‘Get Data’ option

- Go to the ‘From file’ option
- Click on ‘From XML’

- In the input data dialog box that opens up, locate the XML file that you want to import and select it
- Click Import. This will import the XML file into power query and open the Navigator dialog box
- Select the data from the XML file that you want to import. In this case, I would click on ‘sitemap’ in the left pane

- [Optional] Click on the Transform Data button, if you want to transform the data before loading it into Excel (such as change the column names or remove some columns)
- Click on Load


The above steps would insert a new worksheet in the Excel file, and load all the data from the XML file into the new worksheet.
The great thing about using Power Query to fetch the data from an XML file into Excel is that in case the XML file updates and there are new records in it, you don’t have to repeat the same process.
You can simply right-click on any cell in the table and refresh the query.

Import XML File into Excel using the web URL
In the above example, we first downloaded the XML file on the system and then imported the data into Excel.
In case you have a web URL that contains the XML file (such as this one – https://www.forbes.com/sitemap_index.xml), you don’t even need to download the file. you can connect Power Query to that URL and extract the XML data into Excel.
Below are the steps to connect power query do a web URL that contains the XML data and import that data into Excel:
- Open the Excel file where you want to import the data
- Click the Data tab
- In the Get & Transform group, click on the ‘Get Data’ option
- Go to the ‘From Other Sources’ option
- Click on ‘From Web’

- In the ‘From Web’ dialog box, copy and paste the URL that has the XML data

- Click OK. This will open the Navigator dialog box where you can choose which XML data to import
- Click on ‘sitemap’, which is the XML data that I want in Excel

- [Optional] Click on the Transform Data button, if you want to transform the data before loading it into Excel (such as change the column names or remove some columns)
- Click on Load


The above steps would insert a new worksheet in the Excel file, and load all the data from the XML file into the new worksheet.
And again, in case the data updates in this URL, simply refresh the query to get the new data in Excel.
So these are two simple ways that you can use to convert an XML file into Excel.
If you have the XML file on your system, you can import the data easily using Power Query. And if you have a web URL of the XML file, then you can also fetch that data into Excel.
I hope you found this tutorial useful.
Other Excel tutorials you may also like:
- 8 Ways to Reduce Excel File Size (that actually work)
- How to Automatically Open Specific Excel File on Startup
- How to Recover Unsaved Excel Files [All Options + Precautions]
- Microsoft Excel Won’t Open – How to Fix it! (6 Possible Solutions)
- How to Convert Excel to PDF Using VBA
- Split Each Excel Sheet Into Separate Files (Step-by-Step)
- Combine Data from Multiple Workbooks in Excel (using Power Query)
From Wikipedia, the free encyclopedia
| Filename extension | .XML (XML document) |
|---|---|
| Developed by | Microsoft |
| Type of format | Document file format |
| Extended from | XML, DOC |
| Filename extension | .VDX (XML Drawing),.VSX (XML Stencil),.VTX (XML Template) |
|---|---|
| Developed by | Microsoft |
| Type of format | Diagramming vector graphics |
| Extended from | XML, VSD, VSS, VST |
| Filename extension | .XML (XML Spreadsheet) |
|---|---|
| Developed by | Microsoft |
| Type of format | Spreadsheet |
| Extended from | XML, XLS |
The Microsoft Office XML formats are XML-based document formats (or XML schemas) introduced in versions of Microsoft Office prior to Office 2007. Microsoft Office XP introduced a new XML format for storing Excel spreadsheets and Office 2003 added an XML-based format for Word documents.
These formats were succeeded by Office Open XML (ECMA-376) in Microsoft Office 2007.
File formats[edit]
- Microsoft Office Word 2003 XML Format — WordProcessingML or WordML (.XML)
- Microsoft Office Excel 2002 and Excel 2003 XML Format — SpreadsheetML (.XML)
- Microsoft Office Visio 2003 XML Format — DataDiagramingML (.VDX, .VSX, .VTX)
- Microsoft Office InfoPath 2003 XML Format — XML FormTemplate (.XSN) (Compressed XML templates in a Cabinet file)
- Microsoft Office InfoPath 2003 XML Format — XMLS FormTemplate (.XSN) (Compressed XML templates in a Cabinet file)
Limitations and differences with Office Open XML[edit]
Besides differences in the schema, there are several other differences between the earlier Office XML schema formats and Office Open XML.
- Whereas the data in Office Open XML documents is stored in multiple parts and compressed in a ZIP file conforming to the Open Packaging Conventions, Microsoft Office XML formats are stored as plain single monolithic XML files (making them quite large, compared to OOXML and the Microsoft Office legacy binary formats). Also, embedded items like pictures are stored as binary encoded blocks within the XML. In case of Office Open XML, the header, footer, comments of a document etc. are all stored separately.
- XML Spreadsheet documents cannot store Visual Basic for Applications macros, auditing tracer arrows, chart and other graphic objects, custom views, drawing object layers, outlining, scenarios, shared workbook information and user-defined function categories.[1] In contrast, the newer Office Open XML formats support full document fidelity.
- Poor backward compatibility with the version of Word/Excel prior to the one in which they were introduced. For example, Word 2002 cannot open Word 2003 XML files unless a third-party converter add-in is installed.[2] Microsoft has released a Word 2003 XML Viewer which allows WordProcessingML files saved by Word 2003 to be viewed as HTML from within Internet Explorer.[3] For Office Open XML, Microsoft provides converters for Office 2003, Office XP and Office 2000.
- Office Open XML formats are also defined for PowerPoint 2007, equation editing (Office MathML), vector drawing, charts and text art (DrawingML).
Word XML format example[edit]
<?xml version="1.0" encoding="utf-8" standalone="yes"?>
<?mso-application progid="Word.Document"?>
<w:wordDocument
   xmlns:w="http://schemas.microsoft.com/office/word/2003/wordml"
   xmlns:wx="http://schemas.microsoft.com/office/word/2003/auxHint"
   xmlns:o="urn:schemas-microsoft-com:office:office"
   w:macrosPresent="no"
   w:embeddedObjPresent="no"
   w:ocxPresent="no"
   xml:space="preserve">
  <o:DocumentProperties>
    <o:Title>This is the title</o:Title>
    <o:Author>Darl McBride</o:Author>
    <o:LastAuthor>Bill Gates</o:LastAuthor>
    <o:Revision>1</o:Revision>
    <o:TotalTime>0</o:TotalTime>
    <o:Created>2007-03-15T23:05:00Z</o:Created>
    <o:LastSaved>2007-03-15T23:05:00Z</o:LastSaved>
    <o:Pages>1</o:Pages>
    <o:Words>6</o:Words>
    <o:Characters>40</o:Characters>
    <o:Company>SCO Group, Inc.</o:Company>
    <o:Lines>1</o:Lines>
    <o:Paragraphs>1</o:Paragraphs>
    <o:CharactersWithSpaces>45</o:CharactersWithSpaces>
    <o:Version>11.6359</o:Version>
  </o:DocumentProperties>
  <w:fonts>
    <w:defaultFonts
       w:ascii="Times New Roman"
       w:fareast="Times New Roman"
       w:h-ansi="Times New Roman"
       w:cs="Times New Roman" />
  </w:fonts>

  <w:styles>
    <w:versionOfBuiltInStylenames w:val="4" />
    <w:latentStyles w:defLockedState="off" w:latentStyleCount="156" />
    <w:style w:type="paragraph" w:default="on" w:styleId="Normal">
      <w:name w:val="Normal" />
      <w:rPr>
        <wx:font wx:val="Times New Roman" />
        <w:sz w:val="24" />
        <w:sz-cs w:val="24" />
        <w:lang w:val="EN-US" w:fareast="EN-US" w:bidi="AR-SA" />
      </w:rPr>
    </w:style>
    <w:style w:type="paragraph" w:styleId="Heading1">
      <w:name w:val="heading 1" />
      <wx:uiName wx:val="Heading 1" />
      <w:basedOn w:val="Normal" />
      <w:next w:val="Normal" />
      <w:rsid w:val="00D93B94" />
      <w:pPr>
        <w:pStyle w:val="Heading1" />
        <w:keepNext />
        <w:spacing w:before="240" w:after="60" />
        <w:outlineLvl w:val="0" />
      </w:pPr>
      <w:rPr>
        <w:rFonts w:ascii="Arial" w:h-ansi="Arial" w:cs="Arial" />
        <wx:font wx:val="Arial" />
        <w:b />
        <w:b-cs />
        <w:kern w:val="32" />
        <w:sz w:val="32" />
        <w:sz-cs w:val="32" />
      </w:rPr>
    </w:style>
    <w:style w:type="character" w:default="on" w:styleId="DefaultParagraphFont">
      <w:name w:val="Default Paragraph Font" />
      <w:semiHidden />
    </w:style>
    <w:style w:type="table" w:default="on" w:styleId="TableNormal">
      <w:name w:val="Normal Table" />
      <wx:uiName wx:val="Table Normal" />
      <w:semiHidden />
      <w:rPr>
        <wx:font wx:val="Times New Roman" />
      </w:rPr>
      <w:tblPr>
        <w:tblInd w:w="0" w:type="dxa" />
        <w:tblCellMar>
          <w:top w:w="0" w:type="dxa" />
          <w:left w:w="108" w:type="dxa" />
          <w:bottom w:w="0" w:type="dxa" />
          <w:right w:w="108" w:type="dxa" />
        </w:tblCellMar>
      </w:tblPr>
    </w:style>
    <w:style w:type="list" w:default="on" w:styleId="NoList">
      <w:name w:val="No List" />
      <w:semiHidden />
    </w:style>
  </w:styles>
  <w:docPr>
    <w:view w:val="print" />
    <w:zoom w:percent="100" />
    <w:doNotEmbedSystemFonts />
    <w:proofState w:spelling="clean" w:grammar="clean" />
    <w:attachedTemplate w:val="" />
    <w:defaultTabStop w:val="720" />
    <w:punctuationKerning />
    <w:characterSpacingControl w:val="DontCompress" />
    <w:optimizeForBrowser />
    <w:validateAgainstSchema />
    <w:saveInvalidXML w:val="off" />
    <w:ignoreMixedContent w:val="off" />
    <w:alwaysShowPlaceholderText w:val="off" />
    <w:compat>
      <w:breakWrappedTables />
      <w:snapToGridInCell />
      <w:wrapTextWithPunct />
      <w:useAsianBreakRules />
      <w:dontGrowAutofit />
    </w:compat>
  </w:docPr>
  <w:body>
    <wx:sect>
      <w:p>
        <w:r>
          <w:t>This is the first paragraph</w:t>
        </w:r>
      </w:p>
      <wx:sub-section>
        <w:p>
          <w:pPr>
            <w:pStyle w:val="Heading1" />
          </w:pPr>
          <w:r>
            <w:t>This is a heading</w:t>
          </w:r>
        </w:p>
        <w:sectPr>
          <w:pgSz w:w="12240" w:h="15840" />
          <w:pgMar w:top="1440"
		   w:right="1800"
		   w:bottom="1440"
		   w:left="1800"
		   w:header="720"
		   w:footer="720"
		   w:gutter="0" />
          <w:cols w:space="720" />
          <w:docGrid w:line-pitch="360" />
        </w:sectPr>
      </wx:sub-section>
    </wx:sect>
  </w:body>
</w:wordDocument>
Excel XML spreadsheet example[edit]
<?xml version="1.0" encoding="UTF-8"?>
<?mso-application progid="Excel.Sheet"?>
<Workbook xmlns="urn:schemas-microsoft-com:office:spreadsheet" xmlns:x="urn:schemas-microsoft-com:office:excel" xmlns:ss="urn:schemas-microsoft-com:office:spreadsheet" xmlns:html="https://www.w3.org/TR/html401/">
<Worksheet ss:Name="CognaLearn+Intedashboard">
<Table>
<Column ss:Index="1" ss:AutoFitWidth="0" ss:Width="110"/>
<Row>
<Cell><Data ss:Type="String">ID</Data></Cell>
<Cell><Data ss:Type="String">Project</Data></Cell>
<Cell><Data ss:Type="String">Reporter</Data></Cell>
<Cell><Data ss:Type="String">Assigned To</Data></Cell>
<Cell><Data ss:Type="String">Priority</Data></Cell>
<Cell><Data ss:Type="String">Severity</Data></Cell>
<Cell><Data ss:Type="String">Reproducibility</Data></Cell>
<Cell><Data ss:Type="String">Product Version</Data></Cell>
<Cell><Data ss:Type="String">Category</Data></Cell>
<Cell><Data ss:Type="String">Date Submitted</Data></Cell>
<Cell><Data ss:Type="String">OS</Data></Cell>
<Cell><Data ss:Type="String">OS Version</Data></Cell>
<Cell><Data ss:Type="String">Platform</Data></Cell>
<Cell><Data ss:Type="String">View Status</Data></Cell>
<Cell><Data ss:Type="String">Updated</Data></Cell>
<Cell><Data ss:Type="String">Summary</Data></Cell>
<Cell><Data ss:Type="String">Status</Data></Cell>
<Cell><Data ss:Type="String">Resolution</Data></Cell>
<Cell><Data ss:Type="String">Fixed in Version</Data></Cell>
</Row>
<Row>
<Cell><Data ss:Type="Number">0000033</Data></Cell>
<Cell><Data ss:Type="String">CognaLearn Intedashboard</Data></Cell>
<Cell><Data ss:Type="String">janardhana.l</Data></Cell>
<Cell><Data ss:Type="String"></Data></Cell>
<Cell><Data ss:Type="String">normal</Data></Cell>
<Cell><Data ss:Type="String">text</Data></Cell>
<Cell><Data ss:Type="String">always</Data></Cell>
<Cell><Data ss:Type="String"></Data></Cell>
<Cell><Data ss:Type="String">GUI</Data></Cell>
<Cell><Data ss:Type="String">2016-10-14</Data></Cell>
<Cell><Data ss:Type="String"></Data></Cell>
<Cell><Data ss:Type="String"></Data></Cell>
<Cell><Data ss:Type="String"></Data></Cell>
<Cell><Data ss:Type="String">public</Data></Cell>
<Cell><Data ss:Type="String">2016-10-14</Data></Cell>
<Cell><Data ss:Type="String">IE8 browser_Modules screen tool tip text is shown twice</Data></Cell>
<Cell><Data ss:Type="String">new</Data></Cell>
<Cell><Data ss:Type="String">open</Data></Cell>
<Cell><Data ss:Type="String"></Data></Cell>
</Row>
</Table>
</Worksheet>
</Workbook>
See also[edit]
- List of document markup languages
- Comparison of document markup languages
References[edit]
- ^ «Features and limitations of XML Spreadsheet format (broken)». Archived from the original on 2007-10-09. Retrieved 2007-11-01.
- ^ «Polar WordML add-in (broken)». Archived from the original on 2009-04-11. Retrieved 2007-11-01.
- ^ Word 2003 XML Viewer
- Overview of Office 2003 Developer Technologies
- Office 2003 XML. ISBN 0-596-00538-5
External links[edit]
- MSDN: XML Spreadsheet Reference
- MSDN: Word 2003 XML Reference
- Lawsuit about XML patent
XML in Excel (Table of Contents)
- Definition of XML & XSD
- How to Import XML File in Excel?
Introduction to Extensible Markup Language (.XML)
Designed for storing and transporting data. It is a markup language similar to HTML. XML File appears as below mentioned, where it is a note to John from Craig.
XML File type & structure appears as below mentioned:
<note>
<to> John</to>
<from> Craig</from>
<heading>Reminder</heading>
<body>Don’t forget me this weekend!</body>
</note>
- XML is just a piece of information wrapped in tags, just like the above-mentioned note.
- Usually, most of the XML applications work as expected even if you add new data (or it is removed).
- XML Simplifies tasks like data transport, data sharing, data availability & platform changes.
- The XML standard is a flexible & easy way to create information formats.
- XML helps out in electronically sharing structured data via the public Internet or through a corporate network.
- XML is a hierarchical structure.
Definition of XML & XSD
- XML Schema language is also referred to as XML Schema Definition (XSD).
- XSD defines the structure of the XML file, which needs to be created and also it indicates where the columns need to be mapped in the tabular excel data.
- It is also referred to as Extensible Stylesheet Language Transformation (XSLT) or (.xslt file).
- XSD implement data type and validation to file.
- XSD allows you to create elements, Data relationships & Data validation is defined in XML.
- XML data files (.xml), which contains custom tags and structured data.
How to Import XML File in Excel?
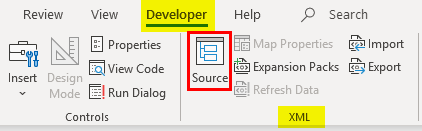
You can import the XML file in Excel from the source option in the Developer tab. If the Developer tab is not available in the Ribbon, you need to add the developer tab with the mentioned steps or procedure.
Go to “File” and select “Options.” and select “Customize the Ribbon”, or you can right-click on the Home tab and select “Customize Ribbon”, as shown below.
In Excel Options –
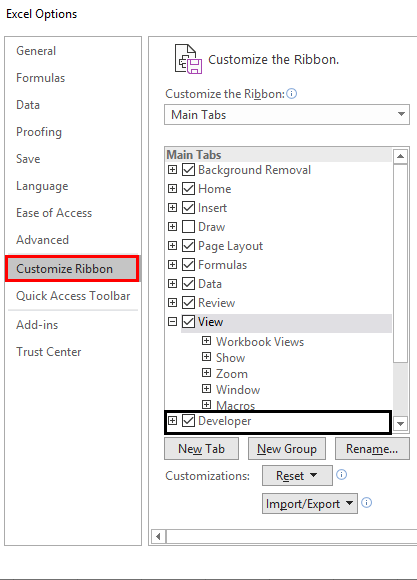
When you return to the main Excel page, you will see the Developer tab next to the view tab at the top. In that, if you need to select the source tool to map elements in your XML to your spreadsheet.
Let’s check out the steps available to convert an excel file to an XML data file & vice versa.
Step 1 – To Convert your Spreadsheet into XML, you need a Markup Schema
This markup schema defines each field that you’ll use in your XML file, i.e. the structure of the XML file. We have to do this outside Excel, in the other filetype.
In the below-mentioned spreadsheet, I have four types of column & information, i.e. Car makes, Car model, its year of manufacture, and at last, Car cost or value. So, in our Excel schema will have four different tags, and we need to create them.
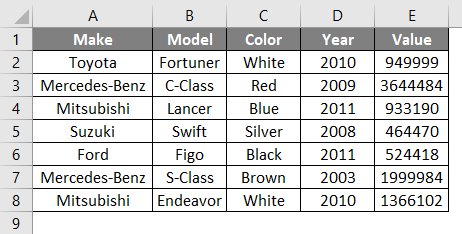
In the above spreadsheet, it contains four columns, each of which will become an element. The car data in the above cells of excel are not independent. For example, I have four cells in a row; all that row data is related to each other, it provides details about a car type and its information, i.e., the brand name, model name, and year of purchase it is cost or value at present.
Open Notepad and add the following two lines; they are the standard pieces of information that XML files need at the beginning. (Note: It is optional ).
<?xml version="1.0" encoding="UTF-8" standalone="yes"?>

<data-set xmlns:xsi="http://www.w3.org/2001/XMLSchema-instance">
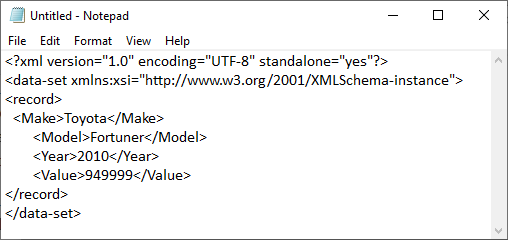
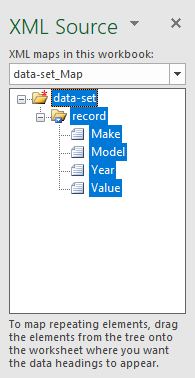
The element is declared from line three onwards. The record tags, i.e. < >, defines a single record described in our spreadsheet. Whereas other tags define the relevant pieces of information under that for that record. i.e.
<record>
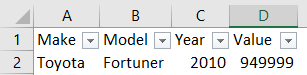
<Make>Toyota</Make>
<Model>Fortuner</Model>
<Year>2010</Year>
<Value>949999</Value>
</record>
Finally, add the closing </record> tag at the end of the file in the note pad.
NOTE: The tags (< >) in the above notepad under the record refers to the column names; you have an option to give them any name you want apart from the original name mentioned in the excel tabular data! For example, instead of ‘’Value”, you can use “Cost”.
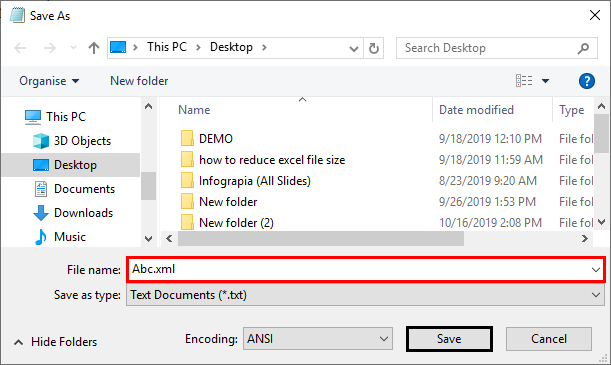
I just added the first-row data for the explanation purpose. You can add as many rows, based on your choice. Again, you can start with <record>, after the </record> tag. Once you entered the data in the notepad, you can save it as test.xml in the file name and save it on the desktop.
Later, you can create a new excel file with filename XML.xlsx
As you have noticed, we entered one car detail (one record) in the XML file (NOTEPAD). Now, you have created a markup schema and saved it on your desktop.
Step 2 – How to Add this Markup Schema to New Excel File
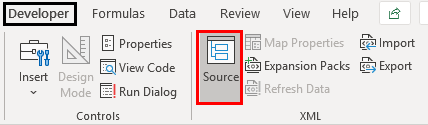
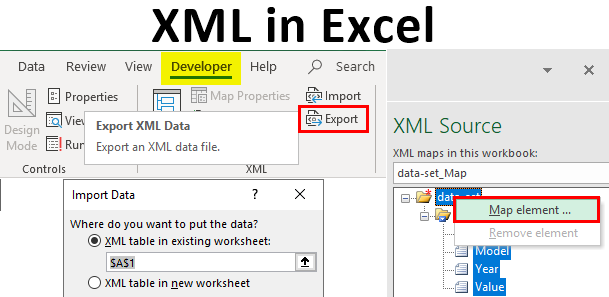
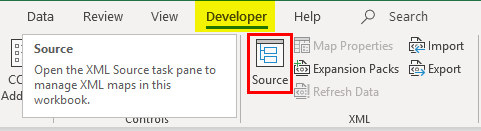
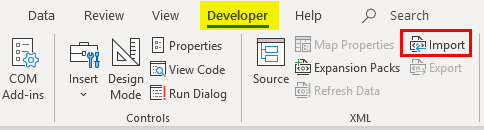
In the Developer tab, click on Source in the XML section.
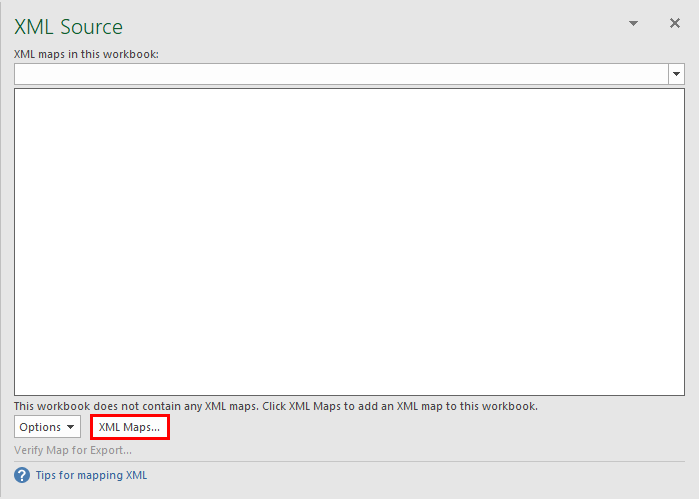
XML window pane appears; click on XML Maps.
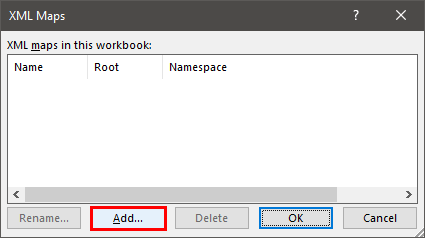
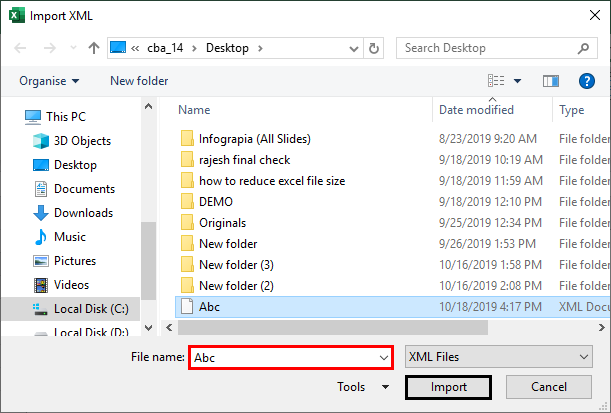
XML Maps window appears; in that, Click Add in the resulting window.
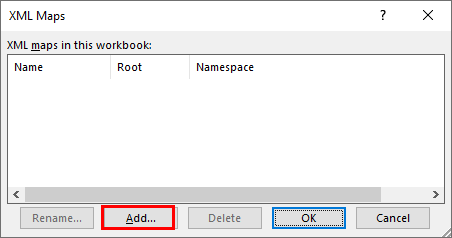
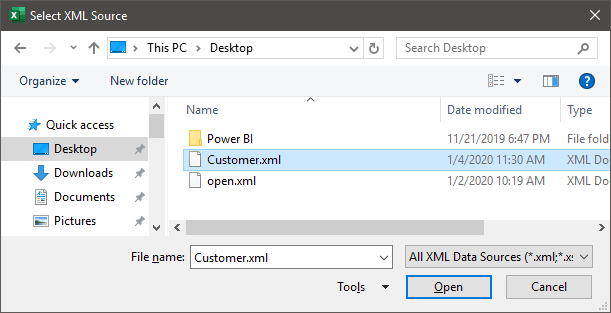
Then you can navigate to your XML file on the desktop, which you saved as Abc.xml, and you can select it.
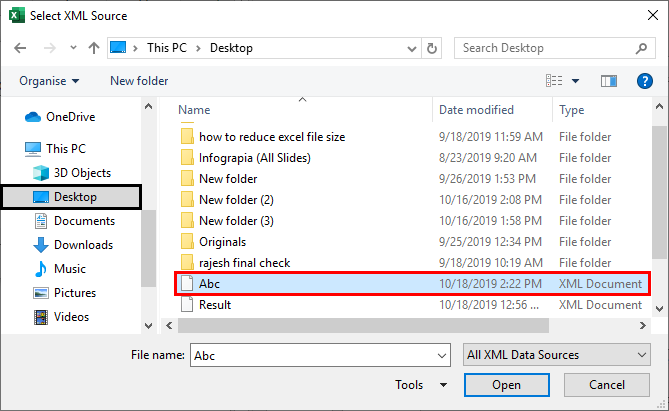
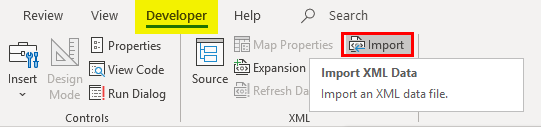
Due to excel version issues in my system, I am uploading other .xml file with another option. The other option in the developer tab is to select Import in the Home tab.
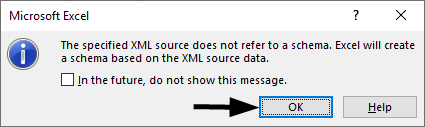
Once you select a .xml file on the desktop, a popup appears; click Ok.
Now to import this excel data, right-click on the XML file name and select the MAP Element option.
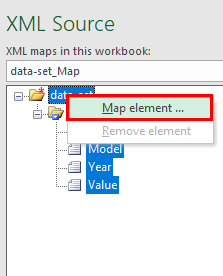
Then you will see the following popup, select the location to where you want your data.
Then you will see the table headers in your excel sheet.

Now under the developer tab, click on Import.
It will open a window to select the file.
Output:
Another popup appears asking for cell reference, where you want the data to be placed.
The import .xml file type appears as shown earlier. Similarly, the Export feature in the developer option will be available in your spreadsheet contains XML file data; otherwise, an export option will be greyed out.
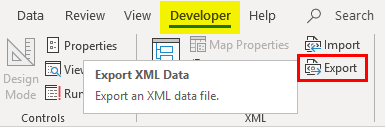
Here, I opened an excel file containing XML file data; I can export it and save it as a .xml file type anywhere with an export option in the Developer tab.
Things to Remember About XML in Excel
- Every bit of data you enter has to start and end with an identical tag, i.e. start with < Record> Data </Record> (End with).
- Tag names are case sensitive, i.e. capitalization in the end tag should be the same as the beginning tag.
- The XML file should always begin and end with a root tag. There can only be one root tag in a file. In the example above, the root tag is <Record>.
- You can have an empty tag, i.e. you can mention or put the slash at the end of the tag instead of the beginning: <Record> </Record>.
Recommended Articles
This is a guide to XML in Excel. Here we discuss How to Import & Export XML Data files along with practical examples and downloadable excel template. You can also go through our other suggested articles –
- Database Function in Excel
- Excel Hacks
- Excel Import Data
- Power Query in Excel