
 By using forms and the many controls and objects that you can add to them, you can make data entry on your worksheets easier and improve the way your worksheets look. You can also do this yourself with little or no need for Microsoft Visual Basic for Applications (VBA) code.
A worksheet form is not the same thing as an Excel template. A template is a pre-formatted file that can get you started creating a workbook that looks the way you want. A form contains controls, such as boxes or dropdown lists, that can make it easier for people who use your worksheet to enter or edit data. To find out more about templates you can download, see Excel templates.
What is a form?
A form, whether printed or online, is a document designed with a standard structure and format that makes it easier to capture, organize, and edit information.
-
Printed forms contain instructions, formatting, labels, and blank spaces for writing or typing data. You can use Excel and Excel templates to create printed forms.
-
Online forms contain the same features as printed forms. In addition, online forms contain controls. Controls are objects that display data or make it easier for users to enter or edit data, perform an action, or make a selection. In general, controls make the form easier to use. Examples of common controls include list boxes, option buttons, and command buttons. Controls can also run assigned macros and respond to events, such as mouse clicks, by running Visual Basic for Applications (VBA) code.
You can use Excel in several ways to create printed and online forms.
Types of Excel forms
There are several types of forms that you can create in Excel: data forms, worksheets that contain Form and ActiveX controls, and VBA UserForms. You can use each type of form by itself, or you can combine them in different ways to create a solution that’s right for you.
Data form
A data form provides a convenient way to enter or display one complete row of information in a range or table without scrolling horizontally. You may find that using a data form can make data entry easier than moving from column to column when you have more columns of data than can be viewed on the screen. Use a data form when a simple form of text boxes that list the column headings as labels is sufficient and you don’t need sophisticated or custom form features, such as a list box or spin button.
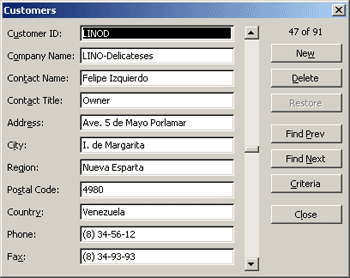 Excel can automatically generate a built-in data form for your range or table. The data form displays all column headers as labels in a single dialog box. Each label has an adjacent blank text box in which you can enter data for each column, up to a maximum of 32 columns. In a data form, you can enter new rows, find rows by navigating, or (based on cell contents) update rows and delete rows . If a cell contains a formula, the formula result is displayed in the data form, but you cannot change the formula by using the data form.
Worksheet with Form and ActiveX controls
A worksheet is a type of form that enables you to enter and view data on the grid, and there are several control-like features already built-in to Excel worksheets, such as comments and data validation. Cells resemble text boxes in that you can enter and format them in a variety of ways. Cells are often used as labels, and by adjusting cell height and width and merging cells, you can make a worksheet behave like a simple data entry form. Other control-like features, such as cell comments, hyperlinks, background images, data validation, conditional formatting, embedded charts, and AutoFilter can make a worksheet behave like an advanced form.
For added flexibility, you can add controls and other drawing objects to the drawing canvas of a worksheet, and combine and coordinate them with worksheet cells. For example, you can use a list box control to make it easier for a user to select from a list of items. Or, you can use a spin button control to make it easier for a user to enter a number.
Because controls and objects are stored on the drawing canvas, you can display or view controls and objects alongside associated text that is independent of row and column boundaries without changing the layout of a grid or table of data on your worksheet. Most of the time, many of these controls can also be linked to cells on the worksheet and do not require VBA code to make them work. You can set properties that determine whether a control floats freely or moves and resizes together with a cell. For example, you might have a check box that you want to move together with its underlying cell when the range is sorted. However, if you have a list box that you want to keep in a specific location at all times, you probably do not want it to move together with its underlying cell.
Excel has two types of controls: Form controls and ActiveX Controls. In addition to these sets of controls, you can also add objects from the Drawing tools, such as a AutoShapes, WordArt, SmartArt graphic, or text boxes.
The following sections describe these controls and drawing objects, and also explain how to work with these controls and objects in more detail.
Form controls
Form controls are the original controls that are compatible with earlier versions of Excel, starting with Excel version 5.0. Form controls are also designed for use on XLM macro sheets.
You use Form controls when you want to easily reference and interact with cell data without using VBA code, and when you want to add controls to chart sheets. For example, after you add a list box control to a worksheet and linking it to a cell, you can return a numeric value for the current position of the selected item in the control. You can then use that numeric value in conjunction with the INDEX function to select different items from the list.
You can also run macros by using Form controls. You can attach an existing macro to a control, or write or record a new macro. When a user of the form clicks the control, the control runs the macro.
However, these controls cannot be added to UserForms, used to control events, or modified to run Web scripts on Web pages.
Summary of form controls
|
Button Name |
Example |
Description |
|
|---|---|---|---|
|
|
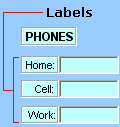
Label |
|
Identifies the purpose of a cell or text box, or displays descriptive text (such as titles, captions, pictures) or brief instructions. |
|
|
Group box |
|
Groups related controls into one visual unit in a rectangle with an optional label. Typically, option buttons, check boxes, or closely related contents are grouped. |
|
|
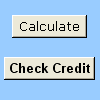
Button |
|
Runs a macro that performs an action when a user clicks it. A button is also referred to as a push button. |
|
|
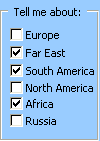
Check box |
|
Turns on or off a value that indicates an opposite and unambiguous choice. You can select more than one check box on a worksheet or in a group box. A check box can have one of three states: selected (turned on), cleared (turned off), and mixed, meaning a combination of on and off states (as in a multiple selection). |
|
|
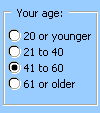
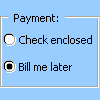
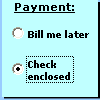
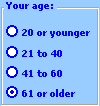
Option button |
|
Allows a single choice within a limited set of mutually exclusive choices; an option button is usually contained in a group box or a frame. An option button can have one of three states: selected (turned on), cleared (turned off), and mixed, meaning a combination of on and off states (as in a multiple selection). An option button is also referred to as a radio button. |
|
|
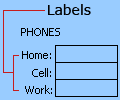
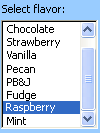
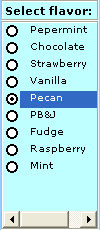
List box |
|
Displays a list of one or more items of text from which a user can choose. Use a list box for displaying large numbers of choices that vary in number or content. There are three types of list boxes:
|
|
|
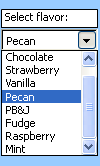
Combo box |
|
Combines a text box with a list box to create a drop-down list box. A combo box is more compact than a list box but requires the user to click the down arrow to display the list of items. Use a combo box to enable a user to either type an entry or choose only one item from the list. The control displays the current value in the text box, regardless of how that value is entered. |
|
|
Scroll bar |
|
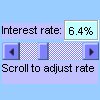
Scrolls through a range of values when you click the scroll arrows or drag the scroll box. In addition, you can move through a page (a preset interval) of values by clicking the area between the scroll box and either of the scroll arrows. Typically, a user can also type a text value directly into an associated cell or text box. |
|
|
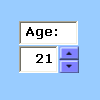
Spin button |
|
Increases or decreases a value, such as a number increment, time, or date. To increase the value, click the up arrow; to decrease the value, click the down arrow. Typically, a user can also type a text value directly into an associated cell or text box. |


Note: The following controls are unavailable in Office Excel 2007 workbooks. These controls can be used in Excel version 5.0 dialog sheets only.
|
Button Name |
|---|
|
|
|
|
|
|
|
|


ActiveX controls
ActiveX controls can be used on worksheet forms, with or without the use of VBA code, and on VBA UserForms. In general, use ActiveX controls when you need more flexible design requirements than those provided by Form controls. ActiveX controls have extensive properties that you can use to customize their appearance, behavior, fonts, and other characteristics.
You can also control different events that occur when an ActiveX control is interacted with. For example, you can perform different actions, depending on which choice a user selects from a list box control, or you can query a database to refill a combo box with items when a user clicks a button. You can also write macros that respond to events associated with ActiveX controls. When a user of the form interacts with the control, your VBA code then runs to process any events that occur for that control.
Your computer also contains many ActiveX controls that were installed by Excel and other programs, such as Calendar Control 12.0 and Windows Media Player.
Important: Not all ActiveX controls can be used directly on worksheets; some can be used only on Visual Basic for Applications (VBA) UserForms. If you try to add any one of these particular ActiveX controls to a worksheet, Excel displays the message «Cannot insert object.»
However, ActiveX controls cannot be added to chart sheets from the user interface or to XLM macro sheets. You also cannot assign a macro to run directly from an ActiveX control the same way you can from a Form control.
Summary of ActiveX controls
|
Button Name |
Example |
Description |
|
|---|---|---|---|
|
|
Check box |
|
Turns on or off a value that indicates an opposite and unambiguous choice. You can select more than one check box at a time on a worksheet or in a group box. A check box can have one of three states: selected (turned on), cleared (turned off), and mixed, meaning a combination of on and off states (as in a multiple selection). |
|
|
Text box |
|
Enables you to, in a rectangular box, view, type, or edit text or data that is bound to a cell. A text box can also be a static text field that presents read-only information. |
|
|
Command button |
|
Runs a macro that performs an action when a user clicks it. A command button is also referred to as a push button. |
|
|
Option button |
|
Allows a single choice within a limited set of mutually exclusive choices usually contained in a group box or frame. An option button can have one of three states: selected (turned on), cleared (turned off), and mixed, meaning a combination of on and off states (as in a multiple selection). An option button is also referred to as a radio button. |
|
|
List box |
|
Displays a list of one or more items of text from which a user can choose. Use a list box for displaying large numbers of choices that vary in number or content. There are three types of list boxes:
|
|
|
Combo box |
|
Combines a text box with a list box to create a drop-down list box. A combo box is more compact than a list box, but requires the user to click the down arrow to display the list of items. Use to allow a user to either type an entry or choose only one item from the list. The control displays the current value in the text box, regardless of how that value is entered. |
|
|
Toggle button |
|
Indicates a state, such as Yes/No, or a mode, such as On/Off. The button alternates between an enabled and disabled state when it is clicked. |
|
|
Spin button |
|
Increases or decreases a value, such as a number increment, time, or date. To increase the value, click the up arrow; to decrease the value, click the down arrow. Typically, a user can also type a text value into an associated cell or text box. |
|
|
Scroll bar |
|
Scrolls through a range of values when you click the scroll arrows or drag the scroll box. In addition, you can move through a page (a preset interval) of values by clicking the area between the scroll box and either of the scroll arrows. Typically, a user can also type a text value directly into an associated cell or text box. |
|
|
Label |
|
Identifies the purpose of a cell or text box, displays descriptive text (such as titles, captions, pictures), or provides brief instructions. |
|
|
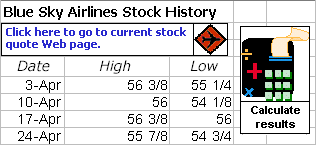
Image |
|
Embeds a picture, such as a bitmap, JPEG, or GIF. |
|
Frame control |
|
A rectangular object with an optional label that groups related controls into one visual unit. Typically, option buttons, check boxes, or closely related contents are grouped in a frame control. Note: The ActiveX frame control is not available in the ActiveX Controls section of the Insert command. However, you can add the control from the More Controls dialog box by selecting Microsoft Forms 2.0 Frame. |
|
|
|
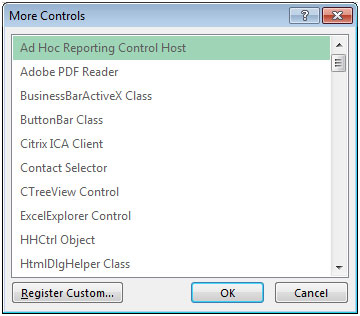
More Controls |
Displays a list of additional ActiveX controls available on your computer that you can add to a custom form, such as Calendar Control 12.0 and Windows Media Player. You can also register a custom control in this dialog box. |


Drawing Tool objects
 You may also want to include SmartArt graphics, Shapes, WordArt, and text boxes on your form. You can resize, rotate, flip, color, and combine these objects to create even more complex shapes. When you type text directly in a Shape or text box object, the text becomes part of that object — if you rotate or flip the object, the text rotates or flips with it. Unlike ActiveX controls, you can assign different attributes, such as font size and font style, to individual words and characters in the object. You can also assign macros and add hyperlinks to these objects. You can even link text in a Shape or text box object to a worksheet cell and dynamically display updated values in those objects.
Working with controls and objects on the worksheet form
After adding forms and ActiveX to a worksheet form, you usually want to fine-tune and rearrange the controls in a variety of ways to create a well-designed, user friendly form. Common tasks include the following:
-
Controlling the display of gridlines while you work with the controls, and deciding whether to display the gridlines to the user on the final worksheet form.
-
Selecting and deselecting controls so that you can specify properties or make additional adjustments.
-
Editing text in a control, such as the caption or label.
-
Grouping, copying, moving, and aligning controls to organize the layout of the worksheet form.
-
Resizing and formatting controls to obtain the appearance that you want.
-
Positioning or sizing a control with a cell.
-
Protecting controls and linked cells according to your specific data protection needs.
-
Enabling or disabling the printing of controls when the worksheet form is printed.
-
Deleting unused controls.
You can design a worksheet form with or without cell gridlines in the background. For example, you might want to turn off cell gridlines and then format all the cells with the same color or pattern, or even use a picture as a sheet background. To hide or show the gridlines, on the View tab, in the Show/Hide group, clear or select the Gridlines check box.
Determining the type of control that is on your worksheet
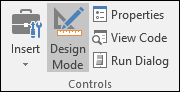
Because there are three different types of controls and objects that you can modify uniquely, you might not know for sure which type of control it is just by looking at it. To determine the type of control (Form or ActiveX), select and right-click the control, and then display the shortcut menu:
-
If the shortcut menu contains the command Properties, the control is an ActiveX control, and you are in design mode.
-
If the shortcut menu contains the command Assign Macro, the control is a Form control.
Tip: To display the correct shortcut menu for the group box Form control, make sure that you select the perimeter instead of the interior of the group box.
-
If the shortcut menu contains the command Edit Text, the object is a Drawing object.
VBA UserForms
For maximum flexibility, you can create UserForms, which are custom dialog boxes, that usually include one or more ActiveX controls. You make UserForms available from VBA code that you create in the Visual Basic Editor. The high-level steps for creating a UserForm are as follows:
-
Insert a UserForm into your workbook’s VBAProject. You access a workbook’s VBAProject by first displaying the Visual Basic Editor (press ALT+F11) and then, on the Insert menu, clicking UserForm.
-
Write a procedure to display the UserForm.
-
Add ActiveX controls.
-
Modify properties for the ActiveX controls.
-
Write event-handler procedures for the ActiveX controls.
By using UserForms, you can also utilize advanced form functionality,. For example, you can programmatically add a separate option button for each letter of the alphabet or you can add a check box for each item in a large list of dates and numbers.
Before creating a UserForm, consider using built-in dialog boxes available from Excel that might fit your needs. These built-in dialog boxes include the VBA InputBox and MsgBox functions, the Excel InputBox method, GetOpenFilename method, GetSaveAsFilename method, and the Dialogs object of the Application object, which contains all the built-in Excel dialog boxes.
For more information, explore the Microsoft Office Excel Developer Center.
Top of Page
ActiveX controls can be used on worksheet forms, with or without the use of VBA code, and on VBA UserForms. ActiveX controls provide more flexible design requirements than those provided by Form controls.With ActiveX Controls, you can control different events that occur when an ActiveX control is initiated.
Contents
- 1 What is ActiveX used for?
- 2 How do I use ActiveX in Excel?
- 3 Do I need ActiveX?
- 4 What is the difference between ActiveX and form control in Excel?
- 5 Is ActiveX installed on my computer?
- 6 What can I use instead of ActiveX?
- 7 How do I create a fillable form in Excel?
- 8 How do I enable ActiveX in Windows 10?
- 9 How do I create an ActiveX control?
- 10 Can Chrome use ActiveX?
- 11 How do I find ActiveX controls on my computer?
- 12 What is PC Matic ActiveX?
- 13 How do I use ActiveX controls in Excel VBA?
- 14 How do I assign a macro to an ActiveX command button?
- 15 How do I remove an ActiveX control in Excel?
- 16 How do I remove ActiveX from Windows 10?
- 17 Where is ActiveX installed?
- 18 How do I turn off ActiveX?
- 19 Does ActiveX work in Edge?
- 20 Does edge use ActiveX?
What is ActiveX used for?
What are ActiveX controls? ActiveX controls are small programs, sometimes also called “add-ons,” used on the Internet. They can make browsing more enjoyable by allowing animation or they can help with tasks such as installing security updates at Windows Update.
How do I use ActiveX in Excel?
Add an ActiveX control
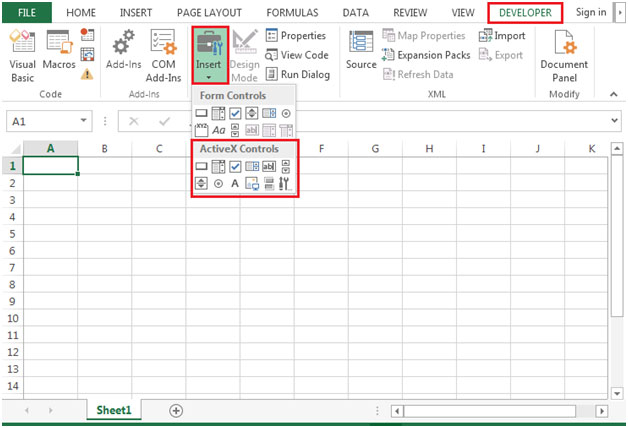
- On the Developer tab, in the Controls group, click Insert, and then under ActiveX Controls, select a control, or click More Controls to view all the available ActiveX controls, and then select a control.
- Click the worksheet location where you want the ActiveX control to appear.
Do I need ActiveX?
In summary, ActiveX controls are dangerous and you should only install them if you need to do so and trust the source. Sure, install the Flash Player ActiveX control — but if you’re browsing the web an a website wants to install an ActiveX control, you should probably decline the offer.
What is the difference between ActiveX and form control in Excel?
As Hans Passant said, Form controls are built in to Excel whereas ActiveX controls are loaded separately. Generally you’ll use Forms controls, they’re simpler. ActiveX controls allow for more flexible design and should be used when the job just can’t be done with a basic Forms control.
Is ActiveX installed on my computer?
To verify if ActiveX is enabled:
Go to http://www.cyscape.com/showbrow.aspx (Note that this is an external site not affiliated with Webex). Results of Test: If you see the current date and time displayed, ActiveX and scripting are working properly.
What can I use instead of ActiveX?
The need for ActiveX controls has been significantly reduced by HTML5-era capabilities, which also produces interoperable code across browsers. Microsoft Edge will support native PDF rendering and Adobe Flash as built-in features rather than external add-ons.
How do I create a fillable form in Excel?
1. Create Form in Excel
- STEP 1: Convert your Column names into a Table, go to Insert> Table.
- STEP 2:Let us add the Form Creation functionality to understand how to make a fillable form in Excel.
- STEP 3:Go to Customize Ribbon.
- STEP 4:Under the New Tab, select New Group, and click Add.
How do I enable ActiveX in Windows 10?
To change ActiveX settings
In Internet Explorer, select the Tools button , and then select Internet options. On the Security tab, select Custom level, and then under ActiveX controls and plug-ins, do one the following: Allow Automatic prompting for ActiveX controls by selecting Enable.
How do I create an ActiveX control?
- Step 1: Create A Test Container. Start the Control Creation Edition, highlight Standard EXE, and click Open as shown below.
- Step 2: Add A Blank ActiveX Control Project.
- Step 3: Draw The Visual Interface For The Control.
- Step 4: Write Event Driven Code.
- Step 5: Use And Test The Control.
Can Chrome use ActiveX?
How to Enable ActiveX on Google Chrome.By default, ActiveX only works on applications that were also made by Microsoft – that includes Internet Explorer, PowerPoint, Excel, Word, etc. However, you can now enable ActiveX on both Google Chrome and Mozilla Firefox, even though this wasn’t possible initially.
How do I find ActiveX controls on my computer?
Click Tools > Internet Options. Click the Security tab > Custom Level. Scroll down to ActiveX controls and plugins and click Enable for: Run ActiveX controls and plugins.
What is PC Matic ActiveX?
PC Matic Active X Test
This page tests whether you have your browser properly configured to download, authenticate, install, and display ActiveX controls, and manipulate them with JavaScript.(If you see a date and time but it isn’t the right time, your PC’s clock is set wrong!
How do I use ActiveX controls in Excel VBA?
How to use ActiveX control in VBA
- Step 1) In this step, click the option “insert button” from the Active X Control.
- Step 2) To insert “clickcommandbutton1” drag the mouse cursor to Excel sheet.
- Step 3) Then right click on the command button and select option “View Code”.
- Step 4) Check you are on the right sheet.
How do I assign a macro to an ActiveX command button?
Assign a Macro to an ActiveX Control Button
- Click on the Developer tab.
- In the Control group, click on Insert.
- In the options that appear, in the ActiveX Controls options, click on the Command Button option.
- Click anywhere on the worksheet.
How do I remove an ActiveX control in Excel?
Delete controls on a worksheet
- If one or more controls is an ActiveX control, do the following: Make sure that you are in design mode.
- Select the control or controls that you want to delete. For more information, see Select or deselect controls on a worksheet.
- Press DELETE.
How do I remove ActiveX from Windows 10?
Go to Programs and Features. Look for “NetDocuments Document Activation.” If it is there, uninstall it.
Where is ActiveX installed?
ActiveX controls are typically installed as shared files in the Windows System folder. Within InstallMate, this folder is available as WindowsSystem (32-bit) on the Files and folders project page.
How do I turn off ActiveX?
How to Disable ActiveX Controls in Internet Explorer
- Open Internet Explorer.
- From the Tools button menu, choose Manage Add-Ons.
- From the Show drop-down menu, ensure that All Add-Ons is chosen.
- Click an add-on in a list.
- Disable the ActiveX control by clicking the Disable button.
Does ActiveX work in Edge?
No, Microsoft Edge doesn’t support ActiveX controls and Browser Helper Objects (BHOs) like Silverlight or Java. If you’re running web apps that use ActiveX controls, x-ua-compatible headers, or legacy document modes, you need to keep running them in Internet Explorer 11.
Does edge use ActiveX?
No. Microsoft Edge doesn’t support ActiveX controls or Browser Help Objects (BHOs) like Silverlight or Java. However, if you’re running web apps that use ActiveX controls, BHOs, or legacy document modes on Internet Explorer 11, you can configure them to run in IE mode on the new Microsoft Edge.
Содержание
- Add or register an ActiveX control
- Need more help?
- Using ActiveX Controls on Sheets
- Adding Controls with Visual Basic
- Using Control Properties with Visual Basic
- Using Control Names with the Shapes and OLEObjects Collections
- Support and feedback
- Обзор форм, элементов управления формы и ActiveX элементов управления на сайте
- Общие сведения о формах
- Типы форм Excel
- Форма данных
- Лист с формой и элементами ActiveX
- Элементы управления формы
Add or register an ActiveX control
In addition to the various Form controls, your computer contains many ActiveX controls installed by Excel and other programs, such as Calendar Control 12.0, and Windows Media Player. When you install new ActiveX controls, the Setup program for the controls usually registers each control on your computer, which makes it available to use from Excel. If the control doesn’t appear in the list, you must register it manually.
Not all ActiveX controls can be used directly on worksheets; some can be used only on Microsoft Visual Basic for Applications (VBA) UserForms. When you work with these controls, Excel displays the message Cannot insert object if you try to add them to a worksheet.
You will need to enable the Developer tab on the ribbon before you can work with ActiveX controls. For more information, see Show the Developer tab.
On the Developer tab, in the Controls group, click Insert, and then under ActiveX Controls, select a control, or click More Controls to view all the available ActiveX controls, and then select a control.

Click the worksheet location where you want the ActiveX control to appear.
To edit the control, make sure that you are in design mode. On the Developer tab, in the Controls group, turn on Design Mode.
To specify the control properties, on the Developer tab, in the Controls group, click Properties .
Tip: You can also right-click the control, and then click Properties.
The Properties dialog box appears. For detailed information about each property, select the property, and then press F1 to display a Visual Basic Help topic. You can also type the property name in the Visual Basic Help Search box.
Click the ActiveX control that you want to register.
Make sure that you are in design mode. On the Developer tab, in the Controls group, turn on Design Mode  .
.
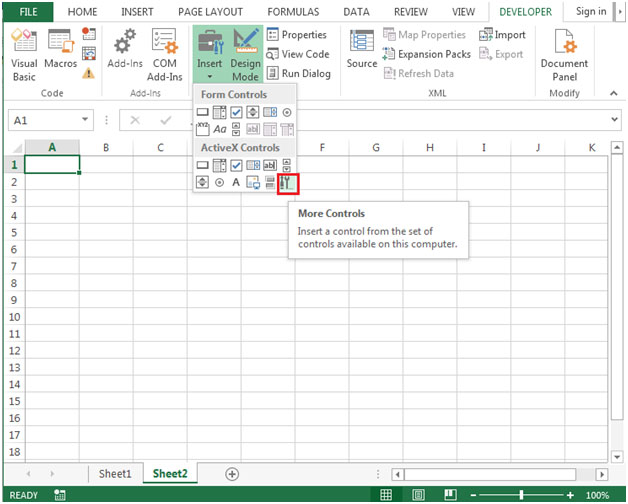
On the Developer tab, in the Controls group, click Insert, and then under ActiveX Controls, click More Controls.
At the bottom of the More Controls dialog box, click Register Custom.
In the Register Custom Control dialog box, locate the folder that contains the control file (.ocx file name extension) or dynamic link library file (.dll file name extension) for the control that you want to register.
Select the file for your control, and then click Open.
Need more help?
You can always ask an expert in the Excel Tech Community or get support in the Answers community.
Источник
Using ActiveX Controls on Sheets
This topic covers specific information about using ActiveX controls on worksheets and chart sheets. For general information on adding and working with controls, see Using ActiveX Controls on a Document and Creating a Custom Dialog Box.
Keep the following points in mind when you are working with controls on sheets:
In addition to the standard properties available for ActiveX controls, the following properties can be used with ActiveX controls in Microsoft Excel: BottomRightCell, LinkedCell, ListFillRange, Placement, PrintObject, TopLeftCell, and ZOrder.
These properties can be set and returned using the ActiveX control name. The following example scrolls the workbook window so CommandButton1 is in the upper-left corner.
Some Microsoft Excel Visual Basic methods and properties are disabled when an ActiveX control is activated. For example, the Sort method cannot be used when a control is active, so the following code fails in a button click event procedure (because the control is still active after the user clicks it).
You can work around this problem by activating some other element on the sheet before you use the property or method that failed. For example, the following code sorts the range:
Controls on a Microsoft Excel workbook embedded in a document in another application will not work if the user double-clicks the workbook to edit it. The controls will work if the user right-clicks the workbook and selects the Open command from the shortcut menu.
When a Microsoft Excel workbook is saved using the Microsoft Excel 5.0/95 Workbook file format, ActiveX control information is lost.
The Me keyword in an event procedure for an ActiveX control on a sheet refers to the sheet, not to the control.
Adding Controls with Visual Basic
In Microsoft Excel, ActiveX controls are represented by OLEObject objects in the OLEObjects collection (all OLEObject objects are also in the Shapes collection). To programmatically add an ActiveX control to a sheet, use the Add method of the OLEObjects collection. The following example adds a command button to worksheet 1.
Using Control Properties with Visual Basic
Most often, your Visual Basic code will refer to ActiveX controls by name. The following example changes the caption on the control named «CommandButton1.»
Note that when you use a control name outside the class module for the sheet containing the control, you must qualify the control name with the sheet name.
To change the control name you use in Visual Basic code, select the control and set the (Name) property in the Properties window.
Because ActiveX controls are also represented by OLEObject objects in the OLEObjects collection, you can set control properties using the objects in the collection. The following example sets the left position of the control named «CommandButton1.»
Control properties that are not shown as properties of the OLEObject object can be set by returning the actual control object using the Object property. The following example sets the caption for CommandButton1.
Because all OLE objects are also members of the Shapes collection, you can use the collection to set properties for several controls. The following example aligns the left edge of all controls on worksheet 1.
Using Control Names with the Shapes and OLEObjects Collections
An ActiveX control on a sheet has two names: the name of the shape that contains the control, which you can see in the Name box when you view the sheet, and the code name for the control, which you can see in the cell to the right of (Name) in the Properties window. When you first add a control to a sheet, the shape name and code name match. However, if you change either the shape name or code name, the other is not automatically changed to match.
You use the code name of a control in the names of its event procedures. However, when you return a control from the Shapes or OLEObjects collection for a sheet, you must use the shape name, not the code name, to refer to the control by name. For example, assume that you add a check box to a sheet and that both the default shape name and the default code name are CheckBox1. If you then change the control code name by typing chkFinished next to (Name) in the Properties window, you must use chkFinished in event procedure names, but you still have to use CheckBox1 to return the control from the Shapes or OLEObject collection, as shown in the following example.
Support and feedback
Have questions or feedback about Office VBA or this documentation? Please see Office VBA support and feedback for guidance about the ways you can receive support and provide feedback.
Источник
Обзор форм, элементов управления формы и ActiveX элементов управления на сайте
Важно: Это средство недоступно в Office на компьютерах под управлением Windows RT. Хотите узнать, какую версию Office используете?
 Благодаря формам, а также многочисленным элементам управления и объектам, которые можно в них добавить, значительно упрощается ввод данных в листы и улучшается их внешний вид. Вы также можете делать это самостоятельно, и вам почти или совсем не потребуется код Microsoft Visual Basic для приложений (VBA).
Форма листа и шаблон Excel — это не одно и то же. Шаблон — это предварительно отформатированный файл, который служит отправной точкой для создания книги с требуемым оформлением. Форма содержит элементы управления, такие как поля и раскрывающиеся списки, упрощающие ввод и изменение данных для использующих ваш лист. Дополнительные информацию о шаблонах, которые можно скачать, см. в Excel шаблонов.
Общие сведения о формах
Форма (печатная или веб-версия) — это документ со стандартной структурой и форматированием, который упрощает сбор, у упорядочение и редактирование сведений.
Печатаемая форма содержит инструкции, форматирование, наклейки и пустые пробелы для ввода и ввода данных. Для создания печатных Excel и Excel шаблонов.
Веб-формы содержат те же функции, что и печатные формы. Кроме того, веб-формы содержат элементы управления. Элементы управления — это объекты, которые отображают данные или упрощают ввод или изменение данных, выполнение действия или выбор данных. Как правило, элементы управления упрощают работу с формой. Примерами часто используемых элементов управления являются списки, переключатели и кнопки. Элементы управления также могут запускать назначенные им макросы и реагировать на события, например щелчки мышью, путем выполнения кода Visual Basic для приложений (VBA).
Создавать печатные Excel веб-формы можно несколькими способами.
Типы форм Excel
В Excel можно создавать формы нескольких типов: формы данных, листы с элементами управления формы и ActiveX, а также пользовательские формы VBA. Каждый из этих типов формы можно использовать по отдельности или сочетать с другими типами для создания нужного решения.
Форма данных
форма данных предоставляет удобный способ ввода или отображения одной строки данных из диапазона или таблицы, не требующий применения горизонтальной прокрутки. Использовать форму данных может быть проще, чем перемещаться между столбцами, которых слишком много для одновременного отображения на экране. Форму данных можно применять тогда, когда достаточно простой формы с текстовыми полями, в качестве подписей которых используются заголовки столбцов, и когда не требуются сложные или пользовательские возможности, например списки и счетчики.
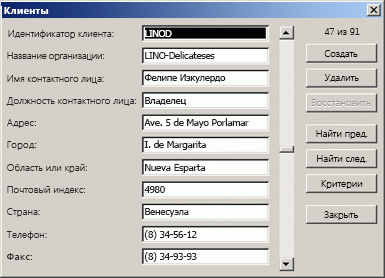 Excel может автоматически создать встроенную форму данных для диапазон или таблица. Такая форма представляет собой диалоговое окно, в котором все заголовки столбцов отображаются в виде подписей. Каждой подписи соответствует текстовое поле, в которое можно вводить данные для столбца (максимальное количество столбцов — 32). В форме данных можно вводить новые строки, находить строки путем навигации или (на основе содержимого ячейки) обновлять строки и удалять их. Если ячейка содержит формула, ее результат отображается в форме данных, но саму формулу в форме данных изменить нельзя.
Лист с формой и элементами ActiveX
Этот тип формы позволяет вводить и просматривать данные в сетке. Кроме того, на Excel уже встроены некоторые функции, похожие на элементы управления, такие как приметки и проверка данных. Ячейки напоминают текстовые поля, которые можно вводить и форматированием различными способами. Ячейки часто используются в качестве подписей, и благодаря регулировке высоты и ширины ячеек, а также объединению ячеек можно настроить поведение таблицы как простую форму для ввода данных. Другие функции управления, такие как приметки к ячейкам, гиперссылки, фоновые изображения, проверка данных, условное форматирование, внедренные диаграммы и автофайл, могут привести к работе с таблицами как к расширенным формам.
Для большей гибкости вы можете добавлять элементы управления и другие объекты-рисунки полотно на полотно, а также объединять и координировать их с ячейками. Например, с помощью списка можно упростить выбор элементов в списке. Кроме того, можно упростить ввод номера с помощью счетчика.
Элементы управления и объекты хранятся на полотне, и поэтому их можно отображать и просматривать одновременно со связанным текстом, не зависящим от границ строк и столбцов, без изменения макета сетки или таблицы данных на листе. В большинстве случаев многие из этих элементов управления можно также связать с ячейками на листе, а для их нормальной работы не требуется создавать код VBA. Можно задать свойства, определяющие, является ли элемент управления свободно перемещаемым или перемещается и изменяет размеры вместе с ячейкой. Например, может потребоваться, чтобы флажок перемещался вместе со связанной ячейкой при сортировке диапазона. С другой стороны, если нужно, чтобы список всегда отображался в одном и том же месте, нежелательно, чтобы он перемещался вместе с ячейкой.
В Excel поддерживаются два типа элементов управления: элементы управления форм и элементы ActiveX. Кроме этих наборов элементов управления, вы также можете добавлять объекты из средств рисования, такие как автофигуры, объект WordArt, графические элементы SmartArt или текстовые поля.
В следующих разделах более подробно описываются элементы управления и средства рисования, а также работа с ними.
Элементы управления формы
Элементы управления формы появились в Excel раньше всего и поддерживаются в предыдущих выпусках Excel (начиная с версии 5.0). Их также можно использовать на листах макросов XLM.
Элементы управления формы используются, если вы хотите легко ссылаться на данные ячеок и взаимодействовать с ними, не используя код VBA, а также добавлять их на листы диаграмм. Например, после добавления элемента управления «список» на лист и связывания его с ячейкой можно вернуть числовые значения для текущего положения выбранного элемента управления. Затем можно использовать это число в сочетании с функцией ИНДЕКС для выбора различных элементов в списке.
С помощью элементов управления формы можно также выполнять макросы. Можно назначить элементу управления существующий макрос либо создать или записать новый. Когда пользователь формы щелкает элемент управления, запускается макрос.
Однако эти элементы управления невозможно добавить в пользовательские формы, использовать для управления событиями или изменить для запуска веб-сценариев на веб-страницах.
Источник
When we are automating an excel sheet with VBA at that time when the user has a requirement for a more flexible design then it’s better to use ActiveX Controller. In Excel user has to add the ActiveX Controller manually and ActiveX Controls are used as objects in codes. There are the following types of ActiveX Controls that are important:
- Text Box
- List Box
- Combo Box
- Check Box
How to Create ActiveX Control in Excel VBA?
To do some changes in the excel sheet using ActiveX control we need to use the Command-click button for that we have to follow further steps
Step 1: Select the developer tab and click Insert drop-down list from the control box.

Step 2: Choose the command button from ActiveX Controls Box.

Step 3: Draw the command button in the excel sheet.

Step 4: Right-click on the command button and select view code to write the VBA code.

Step 5: When the user will click on Command Button they should get their respective values in the cell. So for that, we have to write codes in VBA.

In the VBA code, we can write codes in different ways to get the action done by VBA on clicking the command button which we have discussed in the following
Text Box
It is a type of ActiveX Controls which is used to fill the empty field with text which is useful for us to get the details of the input from the user such as name, year, department, date of birth, etc by the text of the box
Step 1: Select the Text Box from the ActiveX Controls box.

Step 2: Draw the Text Box in the excel sheet and then right-click on the box to select view code.

Step 3: Write a code in VBA to create a Text Box with a name so that it can be used to access the inputs given by a user.

List Box
It helps us to fill a box with a list of values so that we can users can select any value from it for that we have to follow further steps.
Step 1: Select the List Box from the ActiveX Controls box.

Step 2: Draw the List Box in the excel sheet and then right-click on the box to select view code.

Step 3: Write a code in VBA to add items to the list box.

Combo Box
It is used to make a drop-down list where the user can select an item from the drop-down list for that we have to follow further steps.
Step 1: Select the Combo Box from the ActiveX Controls box.

Step 2: Draw the Combo Box in the excel sheet and then right-click on the box to select the view code.

Step 3: Write a code in VBA to add items to the combo box.

Check Box
It is used to create a check box where a list of values is stored which gets visible upon selecting the check box for that we have to follow further steps.
Step 1: Select the Check Box from the ActiveX Controls box.

Step 2: Draw the Check Box in the excel sheet and then right-click on the box to select view code.

Step 3: Write a code to display the value when a check box is marked.

ActiveX controls can be used on worksheet forms, with or without the use of VBA code, and on VBA UserForms.
ActiveX controls provide more flexible design requirements than those provided by Form controls. We can use ActiveX controls to customize their appearance, fonts, behavior and many other characteristics because of their extensive properties.
With ActiveX Controls, you can control different events that occur when an ActiveX control is initiated. You can perform various actions, depending on the user selection from the list box control, a combo box with items when a user clicks a button.
You can also write macros that respond to events associated with ActiveX controls. When a user of the form interacts with the control, VBA code then runs to process any events that occur for that control.
You will find ActiveX Controls under Developer ribbon
- Click on Developer ribbon
- Click on Insert & then select ActiveX Control of your choice
- We can click on them & draw them.

There are 11 ActiveX Controls available:
1. Command Button: Command buttons are also referred to as push buttons. You can assign a command button to automate the macro or some calculation of formulas.
2. Combo Box:Combo Box control is used to display a drop-down list of items. You can add items to the list of your choice & create drop down lists by using the ComboBox control.This control allows the user to select an item either by typing text into the combo box or by selecting it from the list. Combo box is appropriate when there is a list of options. A combo box contains an edit field; options that are not in the list can be manually entered. Combo box will take less space as full list is not displayed until the user clicks the down arrow.
3. Check Box:The check box control displays a check mark when it is selected. Generally, Check Box is used to show a Yes/No or True/False selection to the user. User can select one or more than one options at the same time.
4. List Box:A list box control shows a list of items from which the user can select one or more at the same time. With list boxes, user can select an item from the list. By default, the choices are displayed vertically in a single column. User can set up multiple columns as well. A list box is appropriate when you want to limit input to what is on the list.
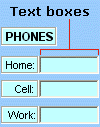
5. Text Box:The text box control is used to display information entered by the user at run time, or assigned to the Text property at design time. The text box control should be used for editable text. You can make it read-only, by setting its Locked property to True. In Text boxes, you can enter multiple lines.
6. Scroll Bar: Scroll bars provide easy navigation with a large list of items by scrolling either horizontally or vertically.When you click the scroll arrows or up/down or sideways or drag the scroll bar, you can move through a page by clicking the scroll arrow. User can also manually enter a text value directly in the referenced cell.
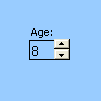
7. Spin Button:A spin button can be used to increase or decrease a number in a cell. Spin button is useful for showing the minimum & maximum value of the set range.
8. Option Button:‘Option Button’ can be used to select one option at a time. The important function of ‘Option Button’ starts when you select an option button, the other option button controls are unavailable. In cases where you have more than one option buttons, only one option button can be selected.
9. Label:Labels identify a control and its purpose.Labels provide a description of what will a control do if click. They are used to label controls that don’t have their own Caption properties.
10. Image:The image control is used to display graphics. Image controls can be displayed inbitmap, JPEG or GIF files formats.
11. Toggle Button:Toggle button is used for hiding/unhiding a range of rows
- There are many more ActiveX Controls that can be accessed as shown in below picture.
- You will be able to see the list of ActiveX Control to choose from
- You can change the name & caption of the controls in the properties window
We will use each ActiveX Control to know how it works
1) Creating Command Buttons
- Enter some random numbers in column B
- Draw the Command button
- Right click on Command button & click on View Code& make sure the Design Mode is activated
- The VB Editor screen will appear & enter the code to change the text from regular to bold by selection & then click on Command Button
- Enter the following code
Private Sub CommandButton1_Click()
Selection.Font.Bold = True
End Sub
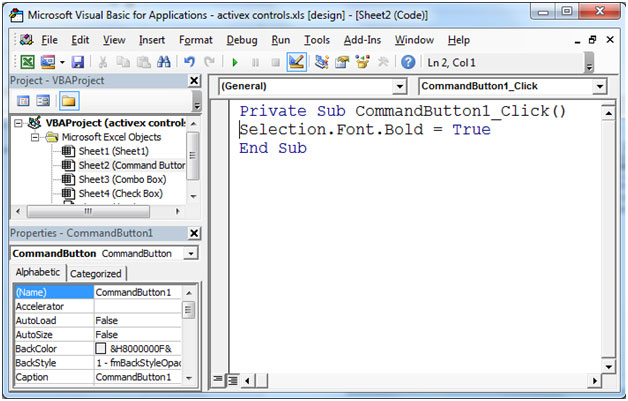
- Select the range B2:B4 & click on Command Button (make sure Design Tab should not be active) to execute the code.

- Font will be changed from regular to bold.

1) Creating Combo Box
- Drag a Combo Box on the worksheet

- Right Click on Combo Box& click on View Code & make sure the Design Mode is activated
- Enter the following code
Private Sub ComboBox1_Change()
With Sheet3.ComboBox1
    .AddItem "Excel"
   .AddItem "Word"
   .AddItem "Access"
End With
End Sub

- Combo Box will add the item in the drop down list.
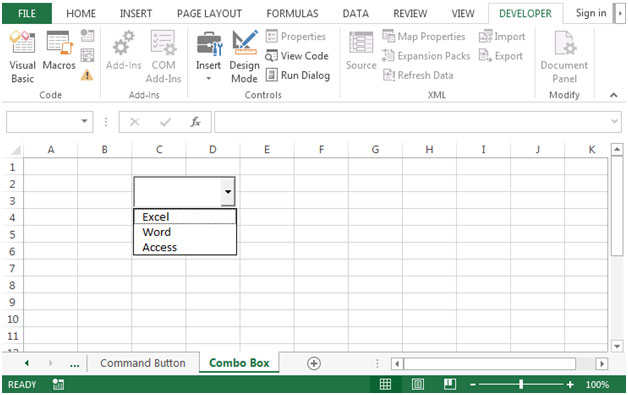
- From Combo Box, we can select only one option at a time.
2) Creating Check Box
- Draw the Check Box
- Right click on Check Box & click on View Code& make sure the Design Mode is activated

- The VB Editor screen will appear & enter the code to show the value in cell G2 is either TRUE or FALSE
- Enter the following code
Private Sub CheckBox1_Click()
If CheckBox1.Value = True Then Range("G2").Value = True
If CheckBox1.Value = False Then Range("G2").Value = False
End Sub

- When we click on the Check Box, the code will get executed &will return TRUE or FALSE


- Check Box is very useful in Forms.
3) Creating List Box
- Draw the List Box
- Right click on List Box & click on View Code & make sure the Design Mode is activated

- The VB Editor screen will appear & enter the code to show a list of options
- Enter the following code
Private Sub ListBox1_Click()
With Sheet5.ListBox1
    .AddItem "Excel"
    .AddItem "Word"
    .AddItem "Access"
End With
End Sub

- List box will be available with the following options.
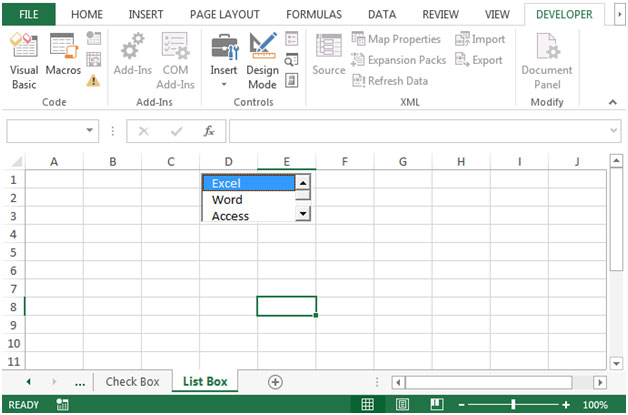
- To link the data in List Box, click on Properties & enter the cell where you want the output to appear.

- List Box is very usefulin Forms.
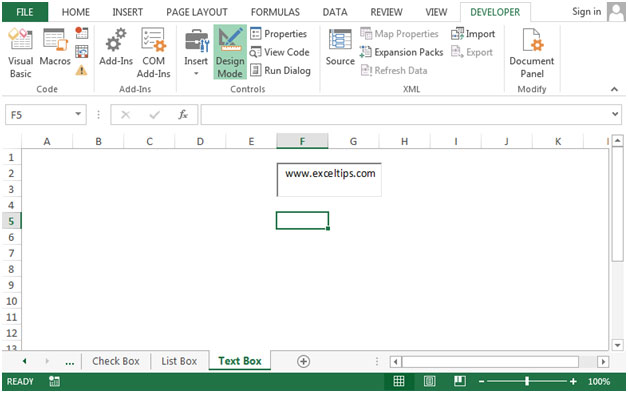
4) Creating Text Box
- Draw the Text Box
- Right click on Text Box & click on View Code & make sure the Design Mode is activated

- The VB Editor screen will appear
- Enter the following code
Private Sub TextBox1_Change()
TextBox1.Text = "www.exceltips.com"
End Sub
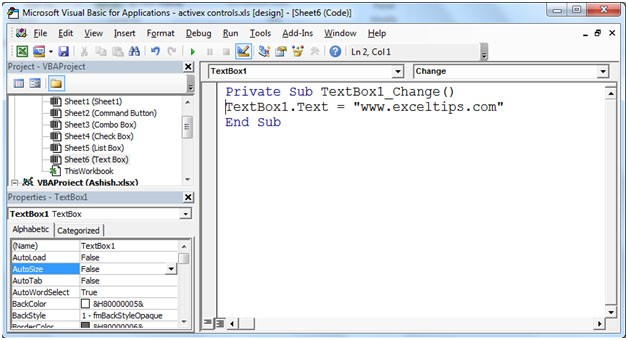
- After execution of code, the text in Text box will get displayed.
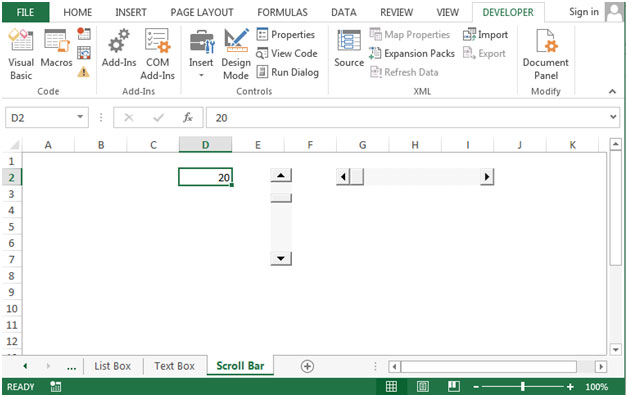
5) Creating Scroll Bar
- Draw the Scroll bar
- Scroll bar can be made horizontally or vertically depending on the requirement.
- Right click on Scroll bar& click on View Code & make sure the Design Mode is activated

- The VB Editor screen will appear.
- In Properties window, link the cell to D2. In Small Change option, give an interval value say you have given interval of 5 then value will start like 5,10,15,20….100

- The Value in the properties window is showing the current value.
6) Creating Spin Button
- Draw the Spin Button
- Spin Button can be made horizontally or vertically depending on the requirement.
- Right click on Spin Button & click on View Code & make sure the Design Mode is activated
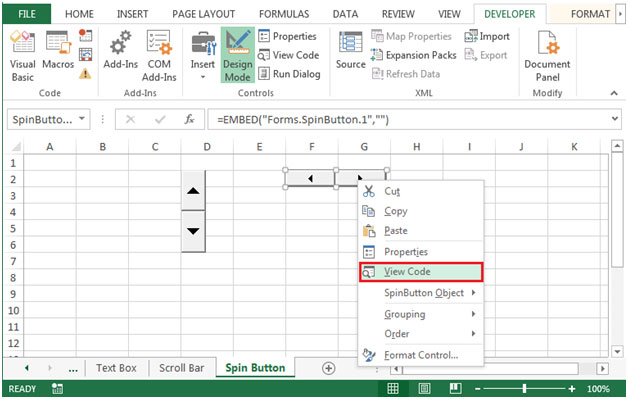
- The VB Editor screen will appear.
- Enter the following code
Private Sub SpinButton1_Change()
SpinButton1.Max = 100
SpinButton1.Min = 0
End Sub

- In Properties window, link the cell to E2. In Small Change option, give an interval value say you have given interval of 1 then value will start like 1,2,3,….100
- The Value in the properties window is showing the current value.

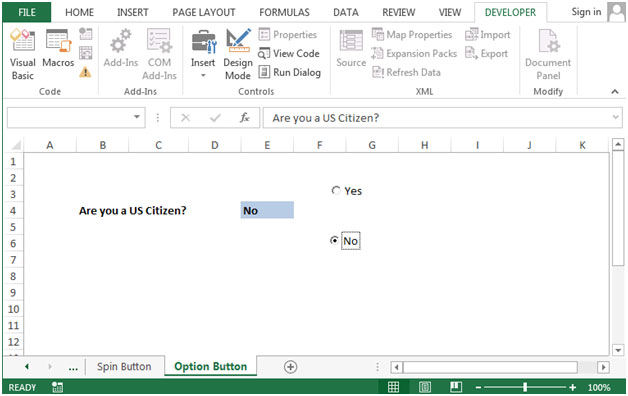
7) Creating Option Button
- Draw the Option Button
- Right click on Option Button & click on View Code & make sure the Design Mode is activated

- The VB Editor screen will appear
- Enter the following code
Private Sub OptionButton1_Click()
If OptionButton1.Value = True Then Range("E4").Value = "Yes"
End Sub
Private Sub OptionButton2_Click()
If OptionButton2.Value = True Then Range("E4").Value = "No"
End Sub

- After execution of code, you will see Yes or No in the highlighted section

 Creating Label
- Draw the Label
- Right click on Label& click on View Code & make sure the Design Mode is activated

- The VB Editor screen will appear
- You can change the name of the Label to your choice by going to Properties window & change the text in Caption
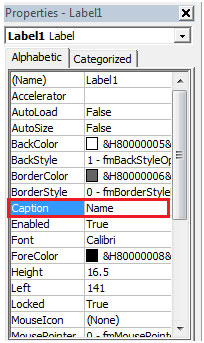
- You will see the name from Label1 gets changed to “Name”

9) Creating Image
- Draw the Image
- Right click on Image & click on View Code & make sure the Design Mode is activated

- The VB Editor screen will appear
- You can change the name of the Image to your choice by going to Properties window &click on the picture
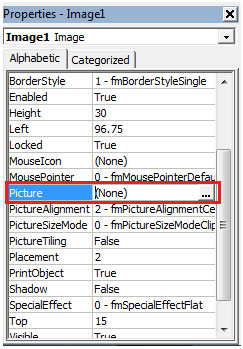
- Picture dialog box will appear for selection of picture

- Select any picture & click on Open

- You can use Image control to link the picture &assign the Macro.