
Excel for Microsoft 365 Excel 2021 Excel 2019 Excel 2016 Excel 2013 Excel 2010 More…Less
If someone’s entering data inaccurately, or you think a coworker may be confused about how to enter data, add a label. A simple name, such as «Phone,» lets others know what to put in a cell, and your labels can also provide more complex instructions.
You can add labels to forms and ActiveX controls.
Add a label (Form control)
-
Click Developer, click Insert, and then click Label
 .
.
-
Click the worksheet location where you want the upper-left corner of the label to appear.
-
To specify the control properties, right-click the control, and then click Format Control.
 .
.
-
Click Developer and then click Insert, and under ActiveX Controls, click Label
.
-
Click the worksheet location where you want the upper-left corner of the label to appear.
-
Click Design Mode
. -
Click the worksheet location where you want the upper-left corner of the label to appear.
-
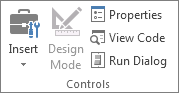
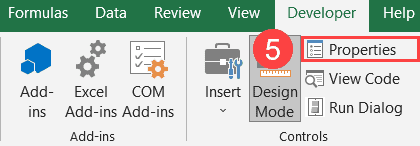
To specify the control properties, click Properties
.Tip: You can also right-click the label, and then click Properties.
The Properties dialog box appears. For detailed information about each property, select the property, and then press F1 to display a Visual Basic Help topic. You can also type the property name in the Visual Basic Help Search box. This table summarizes the properties.
Summary of label properties by functional category
 .
. .
. .
.|
If you want to specify |
Use this property |
|
General: |
|
|
Whether the control is loaded when the workbook is opened. (Ignored for ActiveX controls.) |
AutoLoad (Excel) |
|
Whether the control can receive the focus and respond to user-generated events. |
Enabled (Form) |
|
Whether the control can be edited. |
Locked (Form) |
|
The name of the control. |
Name (Form) |
|
The way the control is attached to the cells below it (free floating, move but do not size, or move and size). |
Placement (Excel) |
|
Whether the control can be printed. |
PrintObject (Excel) |
|
Whether the control is visible or hidden. |
Visible (Form) |
|
Text: |
|
|
Font attributes (bold, italic, size, strikethrough, underline, and weight). |
Bold, Italic, Size, StrikeThrough, Underline, Weight (Form) |
|
Descriptive text on the control that identifies or describes it. |
Caption (Form) |
|
How text is aligned in the control (left, center, or right). |
TextAlign (Form) |
|
Whether the contents of the control automatically wrap at the end of a line. |
WordWrap (Form) |
|
Size and position: |
|
|
Whether the size of the control automatically adjusts to display all contents. |
AutoSize (Form) |
|
The height or width in points. |
Height, Width (Form) |
|
The distance between the control and the left or top edge of the worksheet. |
Left, Top (Form) |
|
Formatting: |
|
|
The background color. |
BackColor (Form) |
|
The background style (transparent or opaque). |
BackStyle (Form) |
|
The color of the border. |
BorderColor (Form) |
|
The type of border (none or single-line). |
BorderStyle (Form) |
|
The foreground color. |
ForeColor (Form) |
|
Whether the control has a shadow. |
Shadow (Excel) |
|
The visual appearance of the border (flat, raised, sunken, etched, or bump). |
SpecialEffect (Form) |
|
Image: |
|
|
The bitmap to display in the control. |
Picture (Form) |
|
The location of the picture relative to its caption (left, top, right, and so on). |
PicturePosition (Form) |
|
Keyboard and mouse: |
|
|
The shortcut key for the control. |
Accelerator (Form) |
|
A custom mouse icon. |
MouseIcon (Form) |
|
The type of pointer that is displayed when the user positions the mouse over a particular object (for example, standard, arrow, or I-beam). |
MousePointer (Form) |
-
Click Developer and then click Insert, and under ActiveX Controls, click Text Box
.
-
Click the worksheet location where you want the upper-left corner of the text box to appear.
-
To edit the ActiveX control, click Design Mode
. -
To specify the control properties, click Properties
.Tip: You can also right-click the text box, and then click Properties.
The Properties dialog box appears. For detailed information about each property, select the property, and then press F1 to display a Visual Basic Help topic. You can also type the property name in the Visual Basic Help Search box. The following section summarizes the properties that are available.
Summary of text box properties by functional category
 .
.|
If you want to specify |
Use this property |
|
General: |
|
|
Whether the control is loaded when the workbook is opened. (Ignored for ActiveX controls.) |
AutoLoad (Excel) |
|
Whether the control can receive the focus and respond to user-generated events. |
Enabled (Form) |
|
Whether the control can be edited. |
Locked (Form) |
|
The name of the control. |
Name (Form) |
|
The way the control is attached to the cells below it (free floating, move but do not size, or move and size). |
Placement (Excel) |
|
Whether the control can be printed. |
PrintObject (Excel) |
|
Whether the control is visible or hidden. |
Visible (Form) |
|
Text: |
|
|
Whether a word or a character is the basic unit used to extend a selection. |
AutoWordSelect (Form) |
|
Font attributes (bold, italic, size, strikethrough, underline, and weight). |
Bold, Italic, Size, StrikeThrough, Underline, Weight (Form) |
|
Whether selected text remains highlighted when the control does not have the focus. |
HideSelection (Form) |
|
The default run time mode of the Input Method Editor (IME). |
IMEMode (Form) |
|
Whether the size of the control adjusts to display full or partial lines of text. |
IntegralHeight (Form) |
|
The maximum number of characters a user can enter. |
MaxLength (Form) |
|
Whether the control supports multiple lines of text. |
MultiLine (Form) |
|
Placeholder characters, such as an asterisk (*), to be displayed instead of actual characters. |
PasswordChar (Form) |
|
Whether the user can select a line of text by clicking to the left of the text. |
SelectionMargin (Form) |
|
The text in the control. |
Text (Form) |
|
How text is aligned in the control (left, center, or right). |
TextAlign (Form) |
|
Whether the contents of the control automatically wrap at the end of a line. |
WordWrap (Form) |
|
Data and binding: |
|
|
The range that is linked to the control’s value. |
LinkedCell (Excel) |
|
The content or state of the control. |
Value (Form) |
|
Size and position: |
|
|
Whether the size of the control automatically adjusts to display all the contents. |
AutoSize (Form) |
|
The height or width in points. |
Height, Width (Form) |
|
The distance between the control and the left or top edge of the worksheet. |
Left, Top (Form) |
|
Formatting: |
|
|
The background color. |
BackColor (Form) |
|
The background style (transparent or opaque). |
BackStyle (Form) |
|
The color of the border. |
BorderColor (Form) |
|
The type of border (none or a single-line). |
BorderStyle (Form) |
|
The foreground color. |
ForeColor (Form) |
|
Whether the control has a shadow. |
Shadow (Excel) |
|
The visual appearance of the border (flat, raised, sunken, etched, or bump). |
SpecialEffect (Form) |
|
Whether an automatic tab occurs when a user enters the maximum allowable characters into the control. |
AutoTab (Form) |
|
Keyboard and mouse: |
|
|
Whether drag-and-drop is enabled. |
DragBehavior (Form) |
|
The selection behavior when entering the control (select all or do not select). |
EnterFieldBehavior (Form) |
|
The effect of pressing ENTER (create a new line or move focus). |
EnterKeyBehavior (Form) |
|
A custom mouse icon. |
MouseIcon (Form) |
|
The type of pointer that is displayed when the user positions the mouse over a particular object (for example, standard, arrow, or I-beam). |
MousePointer (Form) |
|
Whether tabs are allowed in the edit region. |
TabKeyBehavior (Form) |
|
Specific to Text Box: |
|
|
Whether the control has vertical scroll bars, horizontal scroll bars, or both. |
ScrollBars (Form) |
-
Click File, click Options, and then click Customize Ribbon.
-
Under Main Tabs , select the Developer check box, and then click OK.
A label identifies the purpose of a cell or text box, displays brief instructions, or provides a title or caption. A label can also display a descriptive picture. Use a label for flexible placement of instructions, to emphasize text, and when merged cells or a specific cell location is not a practical solution.
A text box is a rectangular box in which you can view, enter, or edit text or data in a cell. A text box can also be a static, and display data users can only read. Use a text box as an alternative to entering text in a cell, when you want to display an object that floats freely. You can also use a text box to display or view text that is independent of row and column boundaries, preserving the layout of a grid or table of data on the worksheet.
Label on a form control:
An ActiveX control label:
An ActiveX text box control:
Notes:
-
To create a text box with a set of placeholder characters that accepts a password, use the PasswordChar property. Make sure that you protect the linked cell or other location in which the text is stored. Use strong passwords that combine uppercase and lowercase letters, numbers, and symbols, such as Y6dh!et5, not House27. Passwords should be 8 or more characters;14 is better.
And don’t forget your password. If you do, we can’t help you retrieve it. Office doesn’t have a master key to unlock anything. Store passwords in a secure place away from the information they help protect.
-
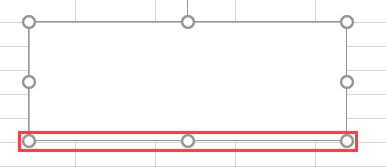
To create a scrolling, multiple-line text box with horizontal and vertical scroll bars, set MultiLine to True, AutoSize and WordWrap to False, ScrollBars to 3, and LinkedCell to the cell address (such as D1) that you want to contain the text. To enter a new line, the user must press either CTRL+ENTER or SHIFT+ENTER, which generates a special character that is stored in the linked cell.
Need more help?
Want more options?
Explore subscription benefits, browse training courses, learn how to secure your device, and more.
Communities help you ask and answer questions, give feedback, and hear from experts with rich knowledge.
Text boxes (also known as input boxes) are handy containers for text values that allow you to draw attention to certain data and/or provide more context around some elements in your worksheet.
Sounds pretty straightforward, right?
But what if this seemingly simple feature has so much more to bring to the table?
In this ultimate beginner’s guide, you will learn how to add, edit, and remove a text box in all versions of Excel: 2003, 2007, 2010, 2013, 2016, and 2019, as well as discover tons of useful tips and tricks very few people know about.
Use the table of contents to jump straight to the section you’re looking for.
4 Ways to Create a Text Box in Excel
Most users know how to add and delete a sheet in Excel, but text boxes are a lot trickier.
Let’s start with the basics and gradually move on to more complex matters. In Excel, there are always multiple ways to do the same thing, and it’s useful to master them to be able to adjust your approach depending on the task at hand.
Simply put, there are four common ways you can go about crafting a text box.
Let’s briefly cover all of them.
Using the Text Box Tool
The Text Box tool is placed in the Ribbon and has been the go-to technique for quickly adding a text box to a worksheet.
1. Click on any worksheet cell.
2. Go to the Insert tab.
3. Hit the “Text” button.
4. Select “Text Box” from the menu that appears.
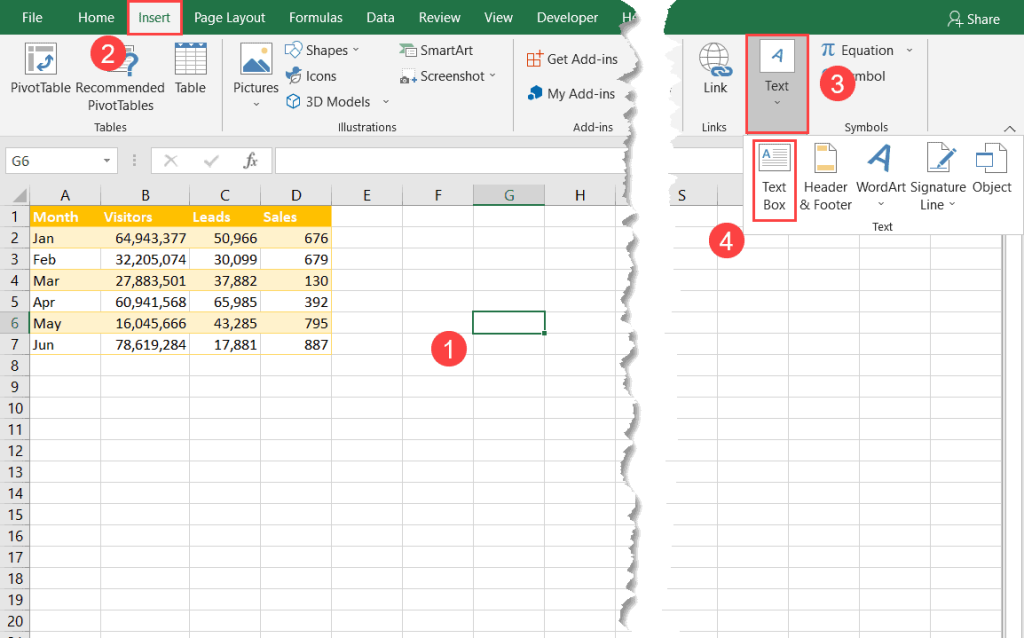
5. Draw your text box wherever you want.
Using the Shortcut
Short on time? We’ve got you covered. The shortcut you’re about to learn allows you to create a text box by pressing just three keys.
To pull it off, press the following keys in sequence (without holding down any of the keys), then click and drag to draw your text box as usual:
- For PC users: Alt + N + X
- For Mac users: Option + N + X
Using the VBA
For those looking to flex their Excel muscles, here’s how to set up a text box using the almighty VBA.
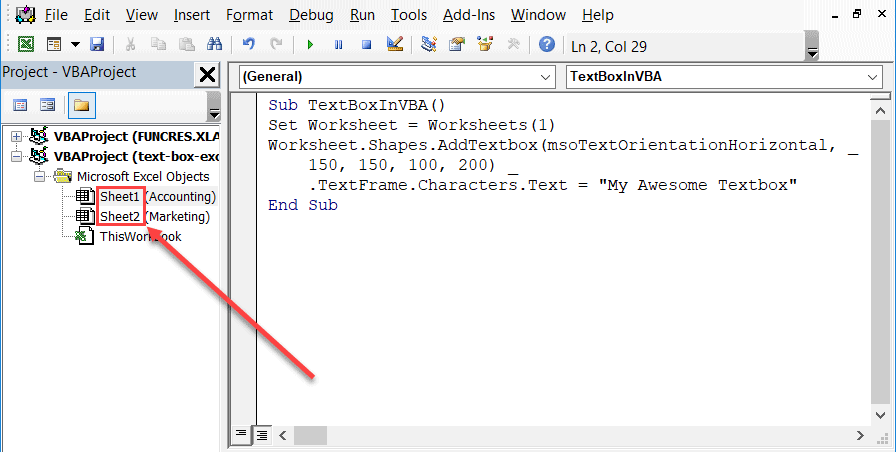
Once you have opened the VBA editor (Developer > Visual Basic), create a new module (Insert > Module), insert the following code, and click “Run:”
Sub TextBoxInVBA()
Set Worksheet = Worksheets(1)
Worksheet.Shapes.AddTextbox(msoTextOrientationHorizontal, _
    150, 150, 100, 200) _
    .TextFrame.Characters.Text = "My Awesome Textbox"
End Sub
There might be a few things you want to tweak, so let’s break down the VBA code in greater detail.
1. Set Worksheet = Worksheets(1) – This line of code locates the worksheet you want the VBA to work in.
The code shown above picks the first worksheet in your workbook, but you can change that by modifying the “Worksheets(1)” value to “Worksheets(2)” or whatever number reflects the location of your worksheet.
But how do you know where to find this value? Use this screenshot to find out where your worksheet is placed.
2. Worksheet.Shapes.AddTextbox(msoTextOrientationHorizontal, _ 150, 150, 100, 200) _ – This determines the place of the text box in the worksheet as well as its size.
- Left (150) and top (150): These two values characterize the position (in points) of where to place the text box relative to the top of the worksheet.
- Width (100): This value defines the width of your text box.
- Height (200): This value specifies the height of your text box.
3. .TextFrame.Characters.Text = “My Awesome Textbox” – Finally, this is where you should enter the text you want to insert into your input box. Replace “My Awesome Textbox” with the text you want to use.
Using ActiveX Controls
If you need to unlock advanced customization options (for instance, to add a scrollbar to your text box), opt for this method.
1. Navigate to the Developer tab.
2. In the Controls group, select the “Insert” tab.
3. Under ActiveX Controls, click “Text Box (ActiveX Control).”

4. Draw your text box, and you’re good to go.
How to Edit a Text Box
Excel provides many built-in customization tools, allowing you to spruce up your text box.
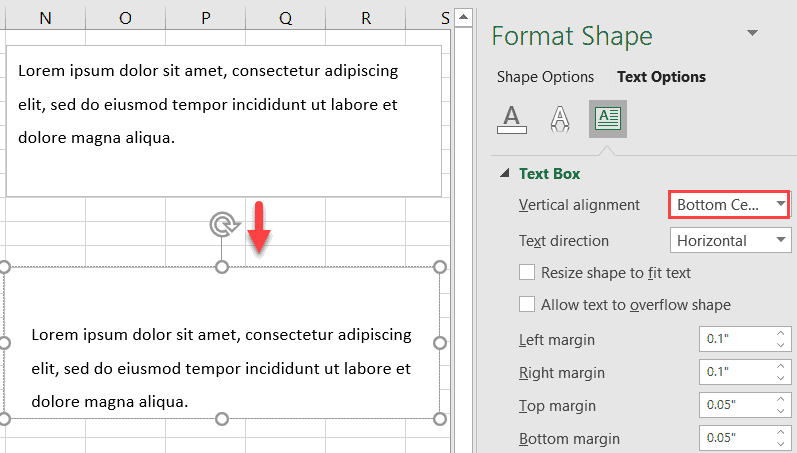
In this part of the tutorial, we will walk you through how you can use the Text Box section (Format Shape > Size & Properties > Text Box) to make your input boxes more visually appealing.
Vertical Alignment
This setting allows you to align the text inside your input box. There are multiple ways you can go about that:
- Top
- Middle
- Bottom
- Top Centered
- Middle Centered
- Bottom Centered
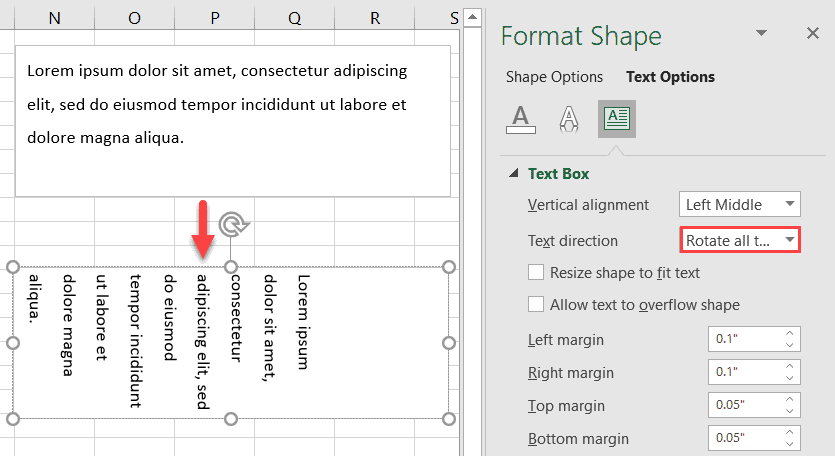
Text Direction
This setting gives you the option to change the orientation of the text in your text box. The customization options go as follows:
- Horizontal
- Rotate all text 90°
- Rotate all text 270°
- Stacked
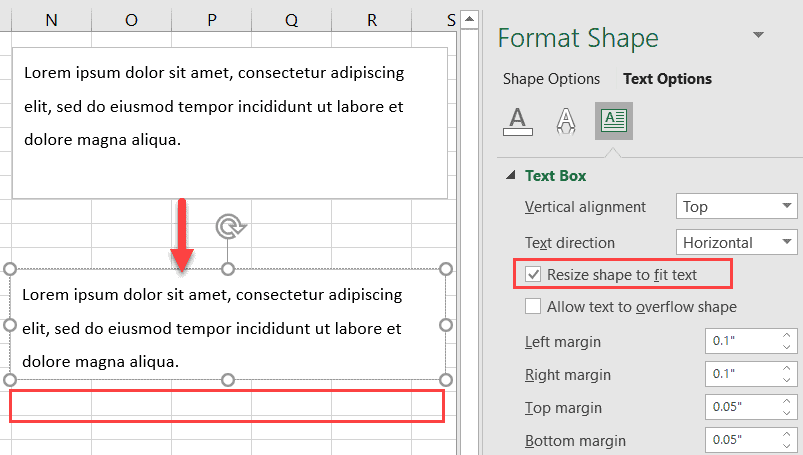
Resize Shape to Fix Text
Checking this box will adjust the size of the text box based on the amount of text in it, removing any unnecessary empty space.
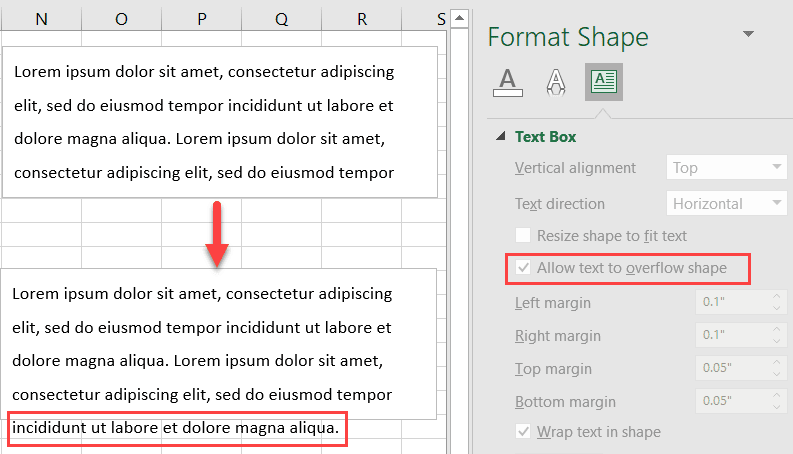
Allow Text to Overflow Shape
By checking this box, you allow the content of the text box to overflow into other cells if the text can’t fit into the space within the text box.
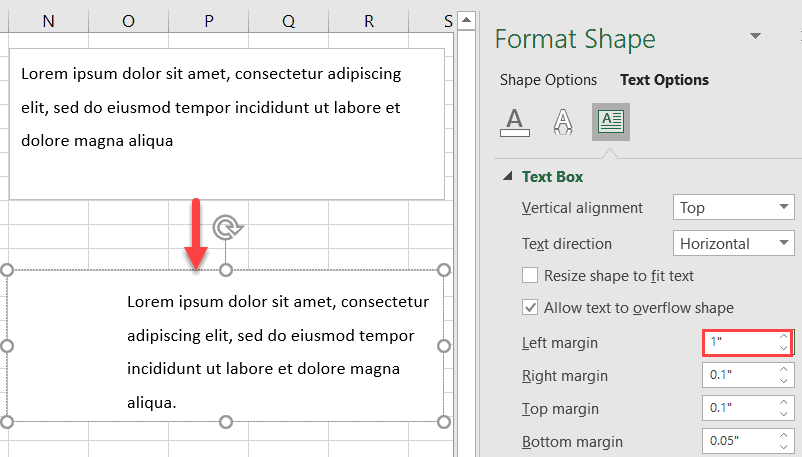
Left, Right, Top, Bottom Margin
Tweak these values to change the margin for each side of your text box.
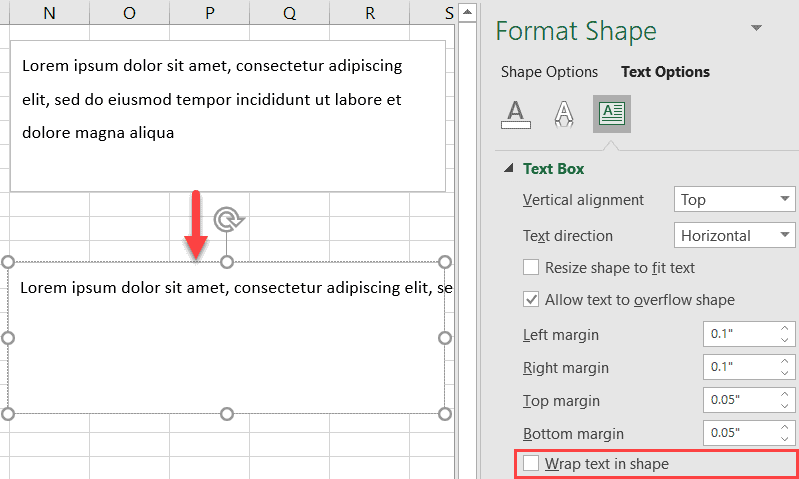
Wrap Text in Shape
Uncheck this box to stop text wrapping within the text box.
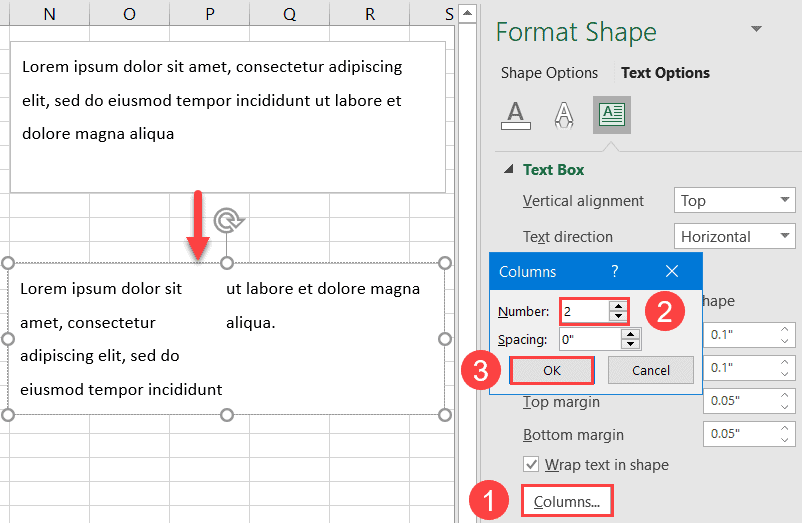
Columns
This setting allows you to split your text box into multiple columns. To do that, follow these steps:
1. Select the “Columns” button.
2. Set the “Number” value to “2.”
3. Click “OK.”
How to Delete a Text Box
To remove a text box, click on the edge of the text box you want to remove and hit the Delete key.
If you want to erase multiple text boxes at once, select the border of every text box you want to remove while holding down the Shift key and hit the Delete key.
10 FAQs: How to Use Text Boxes in Excel
Now that the essentials have been covered, we have prepared a list of the most common issues Excel users encounter when using text boxes. Below you will find detailed, step-by-step instructions on how you can tackle them with ease.
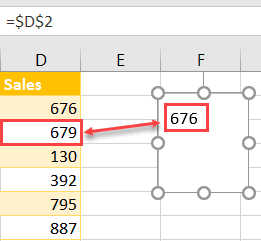
1. How to Insert a Formula or a Worksheet Cell into a Text Box
If you’re looking to set up a dynamic text box linked to a formula or even a worksheet cell, here’s how to do that:
1. Select your text box.
2. Enter “=” into the Formula bar.
3. Select the value or type the formula you want to insert into your text box.
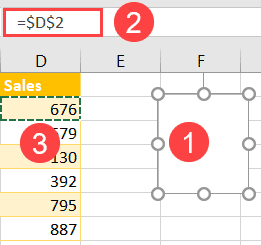
And that’s it! You have successfully linked a worksheet cell or formula to your text box, which will adjust automatically to any changes you make.
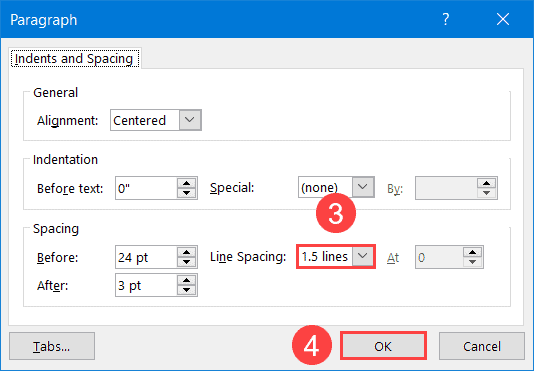
2. How to Change Line Spacing
To change the line spacing in Excel within a text box, follow these four simple steps:
1. Highlight all the text in your input box and right-click on it.
2. In the contextual menu that appears, select “Paragraph.”
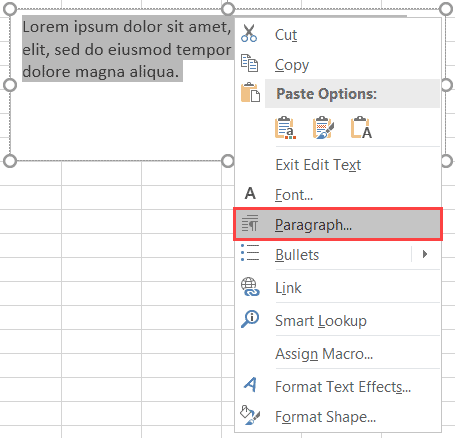
3. In the Spacing section, set the “Line Spacing” value to “1.5 lines.”’
4. Click “OK.”
3. How to Move a Text Box Around
Though a seemingly simple task, many people don’t know how to change the position of a text box. Here’s how you do it:
1. Hover the mouse over the border of your text box—it will change from an arrow to a cross.
2. Click the text box and drag it to a new location within your worksheet.
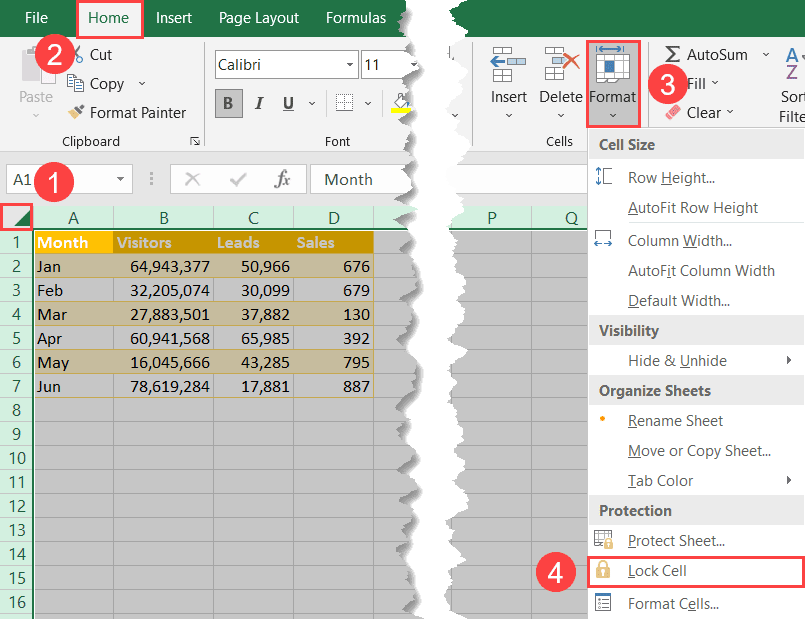
4. How to Lock/Freeze a Text Box
If you’re looking to lock the position of your text box within your worksheet, follow the quick and easy instructions outlined below:
1. Highlight all cells on your worksheet by clicking the “Select All” button in the upper left corner of the worksheet.
2. Go to the Home tab.
3. In the Cells group, select “Format.”
4. Under “Protection,” click “Lock Cell.”
5. After you have done that, navigate to the same Format dropdown menu and pick “Protect Sheet.”
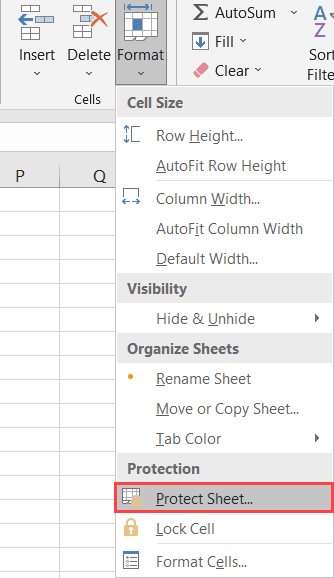
6. In the Protect Sheet dialog box, check all the boxes except for “Edit objects” so that you can continue to work in Excel as usual.
7. Click “OK” to close out of the dialog box.
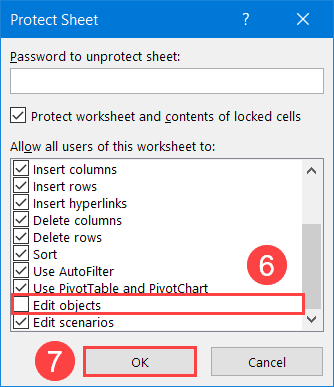
Ta-da – you’re all set. You can’t select, move, or edit the text box while still being able to work with the rest of the worksheet as usual.
For for customization options, check out our guide covering how to lock cells in Excel.
5. How to Remove the Border of a Text Box
Removing the border comes in handy when you’re building Excel dashboards and want your text box to fit in. To quickly delete the default grey borders, do the following:
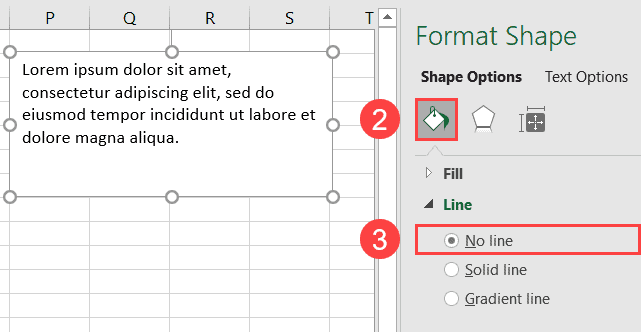
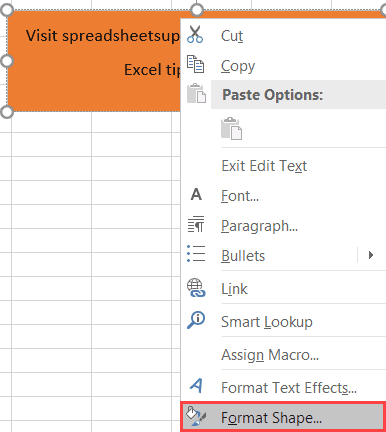
1. Right-click on the text box and select “Format Shape.”

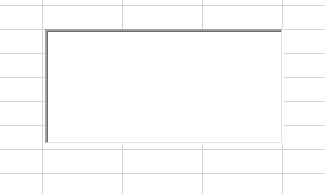
2. In the task pane that appears, click the “Fill & Line” button.
3. Under “Line,” select “No line.”
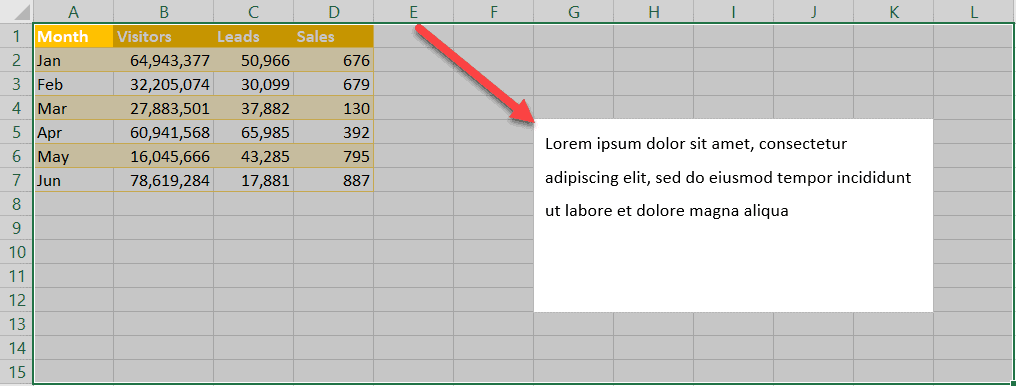
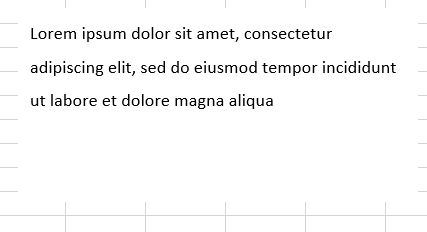
At this point, your text box should look like this:
6. How to Make a Text Box Larger
To change the size of your text box, select it and drag any selection handle to resize the element however you want.

7. How to Add Hyperlinks to a Text Box
Excel even makes it possible for you to add links to your text box which opens a whole new layer of customization options. Here’s how you can easily pull it off:
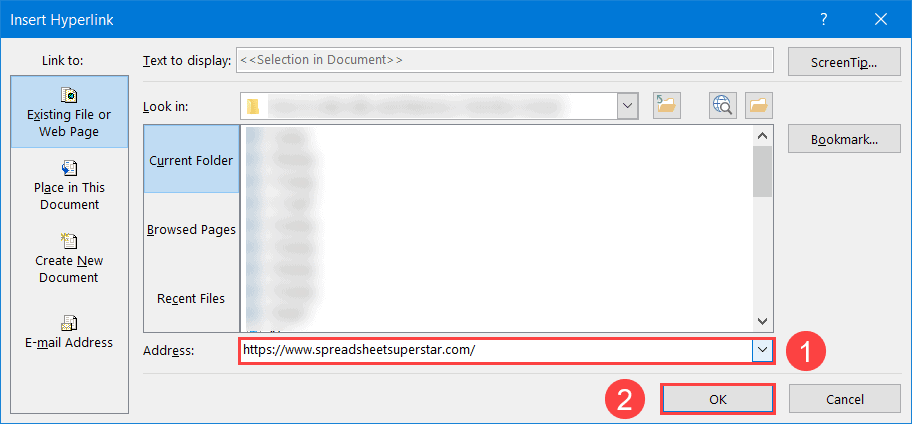
1. Right-click on your text box and choose “Link.”
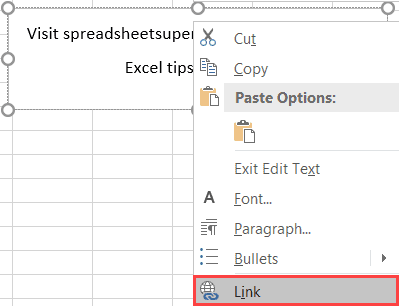
2. In the “Address” field, enter the URL you want to link to.
3. Click “OK.”
8. How to Make a Text Box Transparent
To change the opacity of your text box, simply tweak the “Opacity” value in the Format Shape task pane.
1. Right-click on your text box and choose “Format Shape.”
2. Switch to the Fill & Line tab.
3. Change the “Transparency” value from “0%” to “60%.”
![]()
9. Create a Text Box with a Scrollbar
With a bit of Excel magic, you can even make your text box scrollable! And the funny thing is how easily you can make that happen.
1. Go to the Developer tab.
2. Hit the “Insert” button.
3. Choose “Text Box (ActiveX Control).”

4. Draw your text box.
5. In the Developer tab, choose “Properties.”
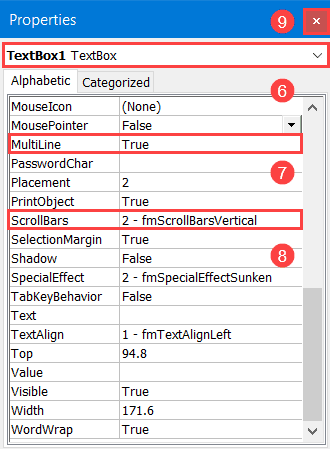
6. Click the drop-down menu and select “TextBox1 TextBox.”
7. Set the “Multiline” value to “True.”
8. Set the “ScrollBars” value to “2 – fmScrollBarsVertical.”
9. Close out of the dialog box.
10. Click the “Design Mode” button to exit the design mode.
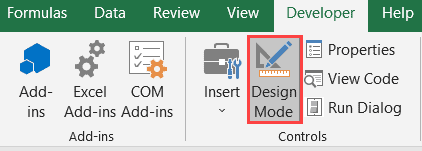
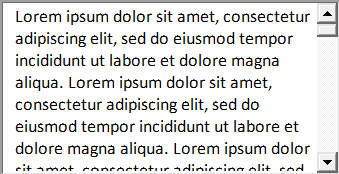
You have just added a scrollbar to your text box.
10. How to Apply Conditional Formatting to a Text Box
This technique relies on VBA to change the style of a text box based on its actual value. Use this trick to blow your friends and colleagues away.
1. Go to the Developer tab.
2. Click “Insert.”
3. Choose “Text Box (ActiveX Control).”
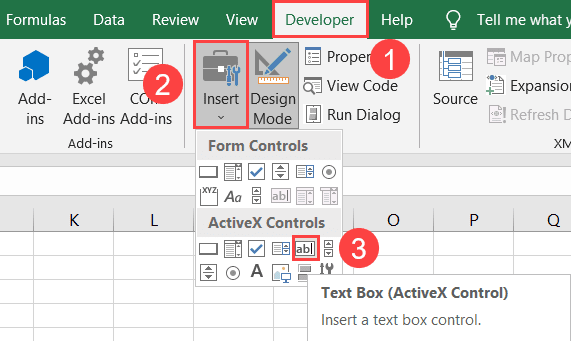
4. Draw your text box.
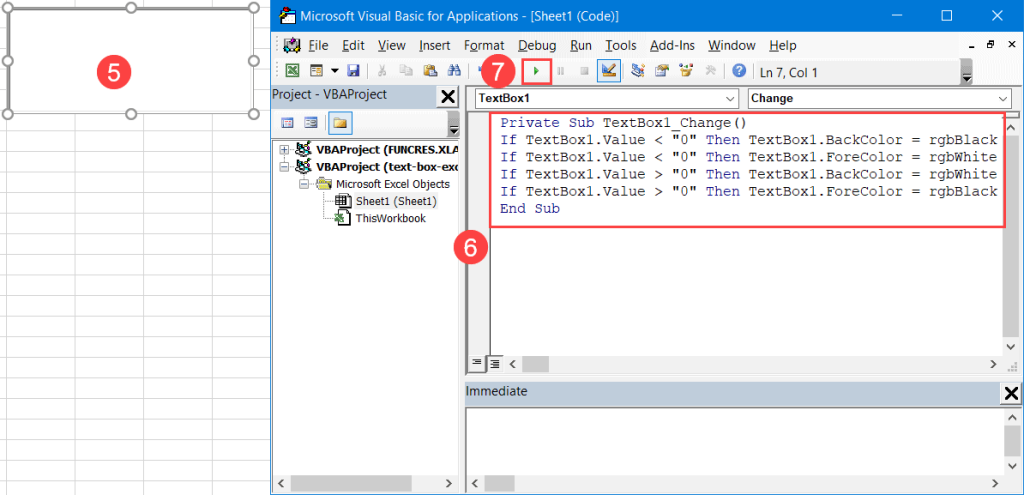
5. Double-click on the text box to open the VBA editor.
6. Enter the following code into the editor:
Private Sub TextBox1_Change()
If TextBox1.Value < "0" Then TextBox1.BackColor = rgbBlack
If TextBox1.Value < "0" Then TextBox1.ForeColor = rgbWhite
If TextBox1.Value > "0" Then TextBox1.BackColor = rgbWhite
If TextBox1.Value > "0" Then TextBox1.ForeColor = rgbBlack
End Sub
Let’s break down the code for you to easily adapt it:
- TextBox1.Value < “0” – This variable lays the foundation for each of the IF statements. In plain English, if you analyze the second line of code, you tell Excel that if the text box value equals less than “0,” then the text box should be formatted in a way specified in the second part of the IF statement.
- TextBox1.BackColor = rgbBlack – This variable is responsible for changing the background color of your text box. Change “rgbBlack” to “rgbPink” to color the background in pink.
- TextBox1.ForeColor = rgbWhite – This variable changes the font color within your text box. Modify the “rgbWhite” value to apply conditional formatting based on the way the first part of the IF statement is set up.
7. Click “Run Sub/UserForm.”
And there you go! You have now applied conditional formatting to your text box.
Table of Contents
- INTRODUCTION
- WHAT IS A TEXT BOX IN EXCEL ?
- WHEN TO USE A TEXT BOX IN EXCEL ?
- WHERE IS BUTTON LOCATION FOR INSERTION OF TEXT BOX IN EXCEL ?
- HOW TO INSERT TEXTBOX IN EXCEL?
INTRODUCTION
All of us have entered text in a cell by selecting the cell and simply typing the text in it. This is character-level typing and will be taken in parallel with other numbers entered in the cell.
Now, think of a scenario, where you want to insert a totally separate space for some custom text, which can be a comment or any other information which you want to put in a space where it is not possible while using the cells of the sheet.
The textBox is the solution to these issues.
In this case, we can make use of the text box function.
“TEXTBOX” is drawn anywhere in the sheet we need to put the text. It can be drawn anywhere in the sheet. Although text can be put in the cells also but putting the text in box gives us the privilege of making the text have more styles and options.
WHAT IS A TEXT BOX IN EXCEL ?
A text box can be understood simply as
A SEPARATE SPACE FOR TEXT WHICH CAN BE PUT AT ANY PLACE IN THE SHEET, CAN BE ROTATED, GIVEN COLOR, CHANGED FONT AND BEHAVE AS A COMPLETE SEPARATE ENTITY FROM THE SHEET.
A sample text box is shown below in the picture.

You can see in the picture above where a small text box has been placed, with a pictorial background, text written in it, and rotated.
The same sheet can be printed easily whenever needed.
WHEN TO USE A TEXT BOX IN EXCEL ?
We should use a text box in excel when we
- Need to enter a separate text and place it at a place other than inside a cell.
- Need a text which you want to move easily. We can move the text box anywhere without bothering to cut, paste or delete and re enter the text anywhere.
WHERE IS BUTTON LOCATION FOR INSERTION OF TEXT BOX IN EXCEL ?
The button or option location for inserting a text box is present under the INSERT TAB under the TEXT SECTION as shown in the picture below.


STEPS TO INSERT A TEXT BOX IN EXCEL :
- Go to INSERT TAB >TEXT SECTION and click TEXTBOX.
- Click anywhere on the sheet , press left click and drag the mouse and a rectangle will appear.
- Release the click when you get the size you want.
- The animated picture below shows the process.
So, in the picture above, we can see that a text box has been created.
To insert a text box, click the Insert ribbon and click the Text Box icon on the far right. Then use the mouse to draw the text box above the sheet grid. To link a text box to a cell, have the text box selected, click in the Formula Bar and press = and then click the cell to link to and press Enter – see Figure 02.
Contents
- 1 How do I insert a text box in Excel?
- 2 How do I create a fillable text box in Excel?
- 3 What is VBA in Excel?
- 4 How do I create a VBA form in Excel?
- 5 How do I create a fill in the blank form in Excel?
- 6 How do I install VBA in Excel?
- 7 How do I start VBA code?
- 8 Is Excel VBA free?
- 9 How do you automate data in Excel?
- 10 How do I create a login form in VBA and Excel?
- 11 How create UserForm in Excel without VBA?
- 12 How do I create a fillable form?
- 13 What is the blank boxes on a spreadsheet?
- 14 What is macro and VBA in Excel?
- 15 How do I enable VBA in Excel?
- 16 How do I install VBA in Excel Windows 10?
- 17 Where do I put VBA code in Excel?
- 18 Where do I find VBA code in Excel?
- 19 Is VBA difficult to learn?
- 20 When should I use VBA?
How do I insert a text box in Excel?
- On the Insert tab, in the Text group, click Text Box.
- Click in the worksheet, and then drag to draw the text box the size that you want.
- To add text to a text box, click inside the text box, and then type or paste text. Notes: To format text in the text box, use the formatting options in the Font group on the Home tab.
How do I create a fillable text box in Excel?
Follow the steps below:
- STEP 1: Convert your Column names into a Table, go to Insert> Table.
- STEP 2:Let us add the Form Creation functionality to understand how to make a fillable form in Excel.
- STEP 3:Go to Customize Ribbon.
- STEP 4:Under the New Tab, select New Group, and click Add.
What is VBA in Excel?
VBA stands for Visual Basic for Applications. Excel VBA is Microsoft’s programming language for Excel.and all the other Microsoft Office programs, like Word and PowerPoint. The Office suite programs all share a common programming language.
How do I create a VBA form in Excel?
VBA – User Forms
- Step 1 − Navigate to VBA Window by pressing Alt+F11 and Navigate to “Insert” Menu and select “User Form”.
- Step 2 − Design the forms using the given controls.
- Step 3 − After adding each control, the controls have to be named.
How do I create a fill in the blank form in Excel?
Creating a New Entry
- Select any cell in the Excel Table.
- Click on the Form icon in the Quick Access Toolbar.
- Enter the data in the form fields.
- Hit the Enter key (or click the New button) to enter the record in the table and get a blank form for next record.
How do I install VBA in Excel?
Click on the Excel File tab at the top left corner of Excel application and select Options at the bottom leftto show the Excel Options dialog box.
Adding Developer Toolbar to Excel.
- Select the Customize Ribbon option.
- In the right list box, check the Developer tab.
- Click OK to close the Excel Options dialog box.
How do I start VBA code?
When you choose the Macro button on the Developer tab, it opens the Macros dialog box, which gives you access to VBA subroutines or macros that you can access from a particular document or application. The Visual Basic button opens the Visual Basic Editor, where you create and edit VBA code.
Is Excel VBA free?
This is a free beginners programming course, and assumes that you have no experience with coding. In this course you’ll learn how to create your own macros, so that you can bring your Excel skills to the next level, and put yourself ahead of the competition. What is Excel VBA?
How do you automate data in Excel?
To automate a repetitive task, you can record a macro with the Macro Recorder in Microsoft Excel. Imagine you have dates in random formats and you want to apply a single format to all of them. A macro can do that for you. You can record a macro applying the format you want, and then replay the macro whenever needed.
How do I create a login form in VBA and Excel?
The following figure shows the simple login form in Excel VBA.
- To place a command button on your worksheet and assign a macro: On the Developer tab click Insert.
- Add Controls. Add the controls listed in the table below.
- Test the user form using the following.
How create UserForm in Excel without VBA?
Step 1: Adding the data entry form to the Quick Access Toolbar.
- From the Choose commands drop down list select Commands Not in the Ribbon.
- Scroll down until you see Form… and select it.
- Press the Add button.
- You should see the Form… appear in the right most box.
- Press the OK button.
How do I create a fillable form?
How to create fillable PDF files:
- Open Acrobat: Click on the “Tools” tab and select “Prepare Form.”
- Select a file or scan a document: Acrobat will automatically analyze your document and add form fields.
- Add new form fields: Use the top toolbar and adjust the layout using tools in the right pane.
- Save your fillable PDF:
What is the blank boxes on a spreadsheet?
The cell. An Excel worksheet is made up of columns and rows. Where these columns and rows intersect, they form little boxes called cells.
What is macro and VBA in Excel?
VBA (Visual Basic for Applications) is the programming language of Excel and other Office programs. 1 Create a Macro: With Excel VBA you can automate tasks in Excel by writing so called macros.2 MsgBox: The MsgBox is a dialog box in Excel VBA you can use to inform the users of your program.
How do I enable VBA in Excel?
To enable or disable access to Visual Basic projects
- Click the File tab.
- Click Options.
- Click Trust Center, and then click Trust Center Settings.
- In the Trust Center, click Macro Settings.
- Check or uncheck Trust access to the VBA project object model to enable or disable access to Visual Basic Projects.
- Click OK.
How do I install VBA in Excel Windows 10?
Installing VBA component
- Go to Control Panel-> Programs-> Programs and Features through the Start menu;
- Find Microsoft Office 2010 in the list of programs, right-click it and choose Change;
- In the window that opens, choose Add or Remove Features.
Where do I put VBA code in Excel?
To write VBA code in Excel open up the VBA Editor (ALT + F11). Type “Sub HelloWorld”, Press Enter, and you’ve created a Macro! OR Copy and paste one of the procedures listed on this page into the code window.
Where do I find VBA code in Excel?
Select the Developer tab from the toolbar at the top of the screen. Then click on the Visual Basic option in the Code group. Now the Microsoft Visual Basic editor should appear and you can view your VBA code.
Is VBA difficult to learn?
With the right training, learning Microsoft VBA is easy. The Microsoft VBA Introduction course makes it easy to learn VBA primarily for Excel. There’s also an Advanced VBA training course if you’re looking for a higher difficulty level.
When should I use VBA?
VBA is used to automate tasks and perform several other functions beyond creating and organizing spreadsheets. For example, users require to automate some aspects of Excel, such as repetitive tasks, frequent tasks, generating reports, etc.
Элемент управления пользовательской формы TextBox в VBA Excel. Использование текстового поля для ввода и вывода информации, основные свойства, примеры. Привязка текстового поля к ячейке.
UserForm.TextBox – это элемент управления пользовательской формы, предназначенный для ввода, редактирования и вывода информации в текстовом формате.

Текстовое поле незаменимо, когда необходимо заполнить пользовательскую форму новой информацией. Например, это может быть ФИО нового сотрудника и его паспортные данные, сумма выручки за день, новый электронный адрес и многое-многое другое.
Если с помощью текстового поля требуется вводить заранее известную информацию, элементы которой можно сгруппировать в список, то в этом случае удобнее вместо элемента управления TextBox использовать ListBox или ComboBox.
Вводить информацию в TextBox на открытой форме можно не только с помощью клавиатуры, но и вставкой текста из буфера обмена. Когда текстовое поле применяется для ввода пароля, есть возможность отобразить все его знаки замещающим символом, например, звездочкой.
Иногда, если на пользовательской форме используется только одно текстовое поле и кнопка «OK» (или кнопки «OK» и «Отмена»), для ввода информации такую форму можно заменить функцией InputBox, а для вывода информации, когда не требуется редактирование отображаемого текста, – функцией MsgBox.
Свойства текстового поля
| Свойство | Описание |
|---|---|
| AutoSize* | Автоподбор размера текстового поля. True – размер автоматически подстраивается под длину размещаемой строки. False – размер элемента управления определяется свойствами Width и Height. |
| AutoTab | Включение автоматической табуляции – передачи фокуса следующему элементу управления при достижении максимального числа символов при значениях свойства MaxLenght > 0. True – автоматическая табуляция включена, False – выключена. |
| ControlSource | Ссылка на источник данных для поля TextBox. |
| ControlTipText | Текст всплывающей подсказки при наведении курсора на TextBox. |
| Enabled | Возможность ввода, редактирования, копирования, вставки, удаления текста. True – все перечисленные опции включены, False – выключены (цвет текста в поле становится серым). |
| Font | Шрифт, начертание и размер текста в поле. |
| Height | Высота текстового поля. |
| Left | Расстояние от левого края внутренней границы пользовательской формы до левого края текстового поля. |
| Locked | Запрет ввода, редактирования, удаления текста. True – перечисленные опции запрещены (разрешено выделение и копирование текста), False – перечисленные опции разрешены. |
| MaxLenght | Максимальная длина строки. По умолчанию – 0, что означает – ограничений нет. |
| Multiline | Устанавливает многострочный (True) или однострочный (False) режим ввода-вывода текста. |
| PasswordChar | Задает символ, который будет отображаться при вводе знаков пароля. |
| TabIndex | Определяет позицию элемента управления в очереди на получение фокуса при табуляции, вызываемой свойством AutoTab или нажатием клавиш «Tab», «Enter». Отсчет начинается с 0. |
| Text** | Текстовое содержимое (значение) поля (=Value). |
| TextAlign | Выравнивание текста: 1 (fmTextAlignLeft) – по левому краю, 2 (fmTextAlignCenter) – по центру, 3 (fmTextAlignRight) – по правому краю. |
| Top | Расстояние от верхнего края внутренней границы пользовательской формы до верхнего края текстового поля. |
| Value** | Текстовое содержимое (значение) поля (=Text). |
| Visible | Видимость текстового поля. True – TextBox отображается на пользовательской форме, False – TextBox скрыт. |
| Width | Ширина текстового поля. |
| WordWrap | Актуально при Multiline = True. Переход на новую строку при достижении границы текстового поля. True – переход включен, False – переход выключен. |
* При использовании свойства AutoSize в значении True следует учитывать, что автоматическое изменение размеров поля при вводе текста может нарушить дизайн пользовательской формы.
** Text и Value — это два обозначения одного и того же свойства. Если в окне Properties элемента управления TextBox в поле свойства Text начать ввод строки, в поле Value ввод будет дублироваться. И наоборот, при вводе текста в поле свойства Value, дублирование произойдет в поле Text.
В таблице перечислены только основные, часто используемые свойства текстового поля. Все доступные свойства отображены в окне Properties элемента управления TextBox.
Свойства BackColor, BackStyle, BorderColor, BorderStyle отвечают за внешнее оформление текстового поля и его границ. Попробуйте выбирать доступные значения этих свойств в окне Properties, наблюдая за изменениями внешнего вида элемента управления TextBox на проекте пользовательской формы.
Привязка текстового поля к ячейке
Привязать элемент управления TextBox к ячейке на рабочем листе можно двумя способами.
1. В окне Properties элемента управления TextBox в поле свойства ControlSource необходимо указать адрес ячейки:

2. Присвоить свойству ControlSource адрес ячейки в коде VBA Excel:
|
UserForm1.TextBox1.ControlSource = «C5» |
Теперь ячейка C5 активного листа будет привязана к элементу управления TextBox1. При открытии формы текстовое поле будет заполнено значением ячейки C5.
Чтобы наглядно ознакомиться с взаимозависимостью значения ячейки C5 и содержимого текстового поля, разместите на пользовательской форме еще какой-нибудь элемент управления и откройте ее в немодальном* окне:
|
Sub Test() UserForm1.TextBox1.ControlSource = «C5» UserForm1.Show 0 End Sub |
Измените значение ячейки C5 и нажмите клавишу «Tab» или «Enter» – изменения будут продублированы в текстовом поле на форме. Измените содержимое поля TextBox1, нажмите клавишу «Tab» или «Enter», передав фокус другому элементу управления, – изменения продублируются в ячейке C5.
Чтобы привязать текстовое поле к ячейке неактивного листа, необходимо в адресе указать имя листа по ярлыку с разделителем «!»:
|
UserForm1.TextBox1.ControlSource = «Лист2!A3» |
Если имя листа содержит пробел, заключите его в одинарные кавычки:
|
UserForm1.TextBox1.ControlSource = «‘Мой лист’!B6» |
Точно также адрес ячейки конкретного листа можно указать непосредственно в окне Properties элемента управления TextBox в поле свойства ControlSource (без парных кавычек).
* Отображение пользовательской формы в немодальном окне позволяет редактировать ячейки на рабочем листе Excel, не закрывая форму.
Примеры использования TextBox
Пример 1
Обмен содержимым между текстовым полем, переменной и ячейкой на рабочем листе:
|
‘Присвоение текстовому полю значения ‘ячейки A2 и переменной a1 UserForm1.TextBox1.Text = Range(«A2») UserForm1.TextBox1.Text = a1 ‘Присвоение ячейке B3 и переменной a2 ‘значения текстового поля Cells(3, 2) = UserForm1.TextBox1.Text a2 = UserForm1.TextBox1.Value ‘Свойства Text и Value элемента ‘управления TextBox равнозначны |
Пример 2
Программное создание элемента управления TextBox, размещение его по центру пользовательской формы, добавление всплывающей подсказки и текста по умолчанию.
Предположим, что текстовое поле предназначено для ввода даты, поэтому добавляем соответствующую подсказку, а в качестве текста по умолчанию – текущую дату.
Создаем новую пользовательскую форму с именем UserForm2. Если у вас другое имя формы, это не имеет значения, так как обращаться к ней будем с помощью ключевого слова «Me». Открываем модуль созданной формы и вставляем в него следующий код VBA Excel:
|
1 2 3 4 5 6 7 8 9 10 11 12 13 14 15 16 17 18 19 20 21 22 23 24 25 |
Private Sub UserForm_Initialize() Dim myTextBox As Control ‘Создаем новый TextBox и присваиваем его переменной Set myTextBox = Me.Controls.Add(«Forms.TextBox.1») ‘Задаем размеры и заголовок пользовательской формы With Me .Height = 100 .Width = 220 .Caption = «Форма №2» End With ‘Присваиваем значения свойствам текстового поля With myTextBox .Width = 100 .Height = 20 ‘Left и Top рассчитаны для Excel 2016* .Left = 60 — 5 .Top = 40 — 15 ‘Добавляем всплывающую подсказку .ControlTipText = «Введите дату подписания договора» ‘Вставляем в поле текущую дату .Text = Format(Now, «DD.MM.YYYY») ‘Выравниваем текст по центру .TextAlign = 2 End With End Sub |
В результате выполнения кода откроется следующая форма с всплывающей подсказкой при наведении на TextBox курсора:

* Значения свойств Left и Top рассчитаны для Excel 2016. Вычитаемые числа зависят от толщины границ пользовательской формы, которые в других версиях Excel могут отличаться.