
If you frequently create a certain type of document, such as a monthly report, a sales forecast, or a presentation with a company logo, save it as a template so you can use that as your starting point instead of recreating the file from scratch each time you need it. Start with a document that you already created, a document you downloaded, or a new Microsoft template you customized.
Save a template
-
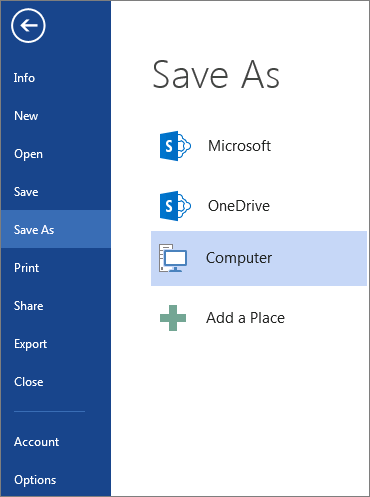
To save a file as a template, click File > Save As.
-
Double-click Computer or, in Office 2016 programs, double-click This PC.

-
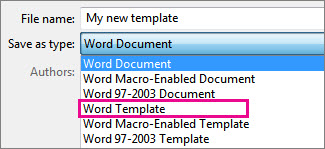
Type a name for your template in the File name box.
-
For a basic template, click the template item in the Save as type list. In Word for example, click Word Template.
If your document contains macros, click Word Macro-Enabled Template.
Office automatically goes to the Custom Office Templates folder.
-
Click Save.
Tip: To change where your application automatically saves your templates, click File > Options > Save and type the folder and path you want to use in the Default personal templates location box. Any new templates you save will be stored in that folder, and when you click File > New > Personal, you’ll see the templates in that folder.
Edit your template
To update your template, open the file, make the changes you want, and then save the template.
-
Click File > Open.
-
Double-click Computer or This PC.
-
Browse to the Custom Office Templates folder that’s under My Documents.
-
Click your template, and click Open.
-
Make the changes you want, then save and close the template.
Use your template to make a new document
To start a new file based on your template, click File > New > Custom, and click your template.
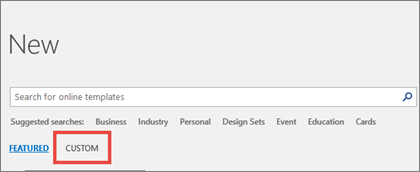
Note: If you’re using Office 2013, this button may say Personal instead of Custom.
Use your templates from earlier versions of Office
If you made templates in an earlier version of Office, you can still use them in Office 2013 and 2016. The first step is to move them into the Custom Office Templates folder so your application can find them. To move your templates quickly, use the Fix it tool.
Word
-
Open the Word document that you want to save as a template.
-
On the File menu, click Save as Template.
-
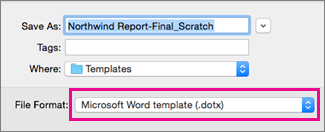
In the Save As box, type the name that you want to use for the new template.
-
(Optional) In the Where box, choose a location where the template will be saved.
-
Next to File Format, click Microsoft Word template (.dotx), or, if your document contains macros, click Microsoft Word Macro-Enabled template (.dotm).
-
Click Save.
Unless you select a different location, the template is saved in /Users/username/Library/Group Containers/UBF8T346G9.Office/User Content/Templates.
To change where Word automatically saves your templates, on the Word menu, click Preferences, and then under Personal Settings, click File Locations. Under File Locations, select User templates from the list, and then click Modify. Type the new folder and path you want to use, and Word will save any new templates in that folder.
You can customize an existing template to make it even more useful. Add static information to the existing template, and then save the file again (as a template).
-
On the File menu, click New from Template.
-
Click a template that is similar to the one you want to create, and then click Create.
Note: If you can’t find a template, you can search for it based on keywords in the Search All Templates box.
-
Add, delete, or change any text, graphics, or formatting, and make any other changes that you want to appear in all new documents that you base on the template.
-
On the File menu, click Save as Template.
-
In the Save As box, type the name that you want to use for the new template.
-
(Optional) In the Where box, choose a location where the template will be saved.
-
Next to File Format, click Microsoft Word template (.dotx), or, if your template contains macros, click Microsoft Word Macro-Enabled template.
-
Click Save.
Unless you select a different location, the template is saved in /Users/username/Library/Group Containers/UBF8T346G9.Office/User Content/Templates.
To change where Word automatically saves your templates, on the Word menu, click Preferences, and then under Personal Settings, click File Locations. Under File Locations, select User templates from the list, and then click Modify. Type the new folder and path you want to use, and Word will save any new templates in that folder.
To start a new document based on your template, on the File menu, click New from Template, and then select the template you want to use.
-
In the Finder, open /Users/username/Library/Group Containers/UBF8T346G9.Office/User Content/Templates.
-
Drag the templates that you want to delete to the Trash.
PowerPoint
-
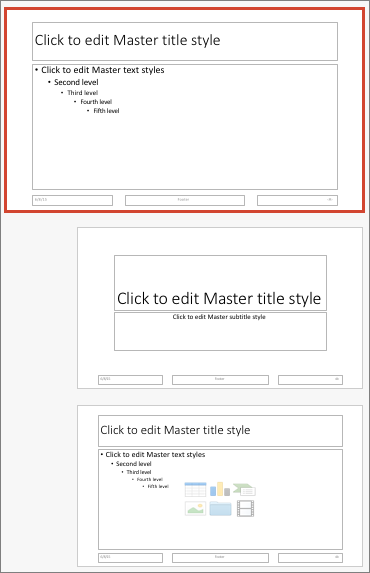
Open a blank presentation, and then on the View tab, click Slide Master.
The slide master is the largest slide image at the top of the slide thumbnail list. Associated layouts are positioned beneath it.
-
To make changes to the slide master or layouts, on the Slide Master tab, do any of these:
-
To add a colorful theme with special fonts, and effects, click Themes, and pick a theme.
-
To change the background, click Background Styles, and pick a background.
-
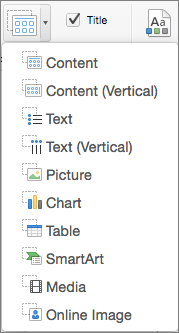
To add a placeholder for text, picture, chart, and other objects, in the thumbnail pane, click the slide layout that you want to hold the placeholder. From Insert Placeholder, pick the type of placeholder you want to add, and drag to draw the placeholder size.
-

-
Open the presentation that you want to save as a template.
-
On the File tab, click Save as Template.
-
In the Save As box, type the name that you want to use for the new template.
-
(Optional) In the Where box, choose a location where the template will be saved.
-
Next to File Format, click PowerPoint Template (.potx), or, if your presentation contains macros, click PowerPoint Macro-Enabled Template (.potm).
-
Click Save.
Unless you select a different location, the template is saved in /Users/username/Library/Group Containers/UBF8T346G9.Office/User Content/Templates.
You can customize an existing template to make it even more useful. Add static information to the existing template, and then save the file again (as a template).
-
On the File menu, click New from Template.
-
Click a template that is similar to the one you want to create, and then click Create.
Note: If you can’t find a template, you can search for it based on keywords in the Search All Templates box.
-
Add, delete, or change any text, graphics, or formatting, and make any other changes that you want to appear in all new presentations that you base on the template.
-
On the File menu, click Save as Template.
-
In the Save As box, type the name that you want to use for the new template.
-
(Optional) In the Where box, choose a location where the template will be saved.
-
Next to File Format, click PowerPoint Template (.potx), or, if your template contains macros, click PowerPoint Macro-Enabled Template (.potm).
-
Click Save.
Unless you select a different location, the template is saved in /Users/username/Library/Group Containers/UBF8T346G9.Office/User Content/Templates.
To start a new presentation based on a template, on the File menu, click New from Template, and then select the template you want to use.
-
In the Finder, open /Users/username/Library/Group Containers/UBF8T346G9.Office/User Content/Templates.
-
Drag the templates that you want to delete to the Trash.
Excel
-
Open the workbook that you want to save as a template.
-
On the File menu, click Save as Template.
-
In the Save As box, type the name that you want to use for the new template.
-
(Optional) In the Where box, choose a location where the template will be saved.
-
Next to File Format, click Excel Template (.xltx), or, if your workbook contains macros, click Excel Macro-Enabled Template (.xltm).
-
Click Save.
Unless you select a different location, the template is saved in /Users/username/Library/Group Containers/UBF8T346G9.Office/User Content/Templates.
You can customize an existing template to make it even more useful. Add static information to the existing template, and then save the file again (as a template).
-
On the File menu, click New from Template.
-
Click a template that is similar to the one you want to create, and then click Create.
Note: If you can’t find a template, you can search for it based on keywords in the Search All Templates box.
-
Add, delete, or change any content, graphics, or formatting, and make any other changes that you want to appear in all new workbooks that you base on the template.
-
On the File menu, click Save as Template.
-
In the Save As box, type the name that you want to use for the new template.
-
(Optional) In the Where box, choose a location where the template will be saved.
-
Next to File Format, click Excel Template (.xltx), or, if your template contains macros, click Excel Macro-Enabled Template (.xltm).
-
Click Save.
Unless you select a different location, the template is saved in /Users/username/Library/Group Containers/UBF8T346G9.Office/User Content/Templates.
To start a new workbook based on a template, on the File menu, click New from Template, and then select the template you want to use.
-
In the Finder, open /Users/username/Library/Group Containers/UBF8T346G9.Office/User Content/Templates.
-
Drag the templates that you want to delete to the Trash.
See also
Differences between templates, themes, and Word styles
Word
-
Open the document.
-
Add, delete, or change any text, graphics, or formatting, and make any other changes that you want to appear in all new documents that you base on the template.
-
On the File menu, click Save As.
-
On the Format pop-up menu, click Word Template (.dotx).
-
In the Save As box, type the name that you want to use for the new template, and then click Save.
Unless you select a different location, the template is saved in /Users/username/Library/Application Support/Microsoft/Office/User Templates/My Templates.
-
On the File menu, click Close.
To organize templates, use the Finder to create a new folder in /Users/username/Library/Application Support/Microsoft/Office/User Templates/My Templates, and then save your template in the new folder.
Note: If you are using Mac OS X 7 (Lion), the Library folder is hidden by default. To show the Library folder, in the Finder, click the Go menu, and then hold down OPTION.
You can customize an existing template to make it even more useful. Add static information to the existing template, and then save the file again (as a template).
-
On the Standard toolbar, click New from template
. -
In the left navigation pane, under TEMPLATES, click All.
Note: If you can’t find a template, you can search for it based on keywords in the Search box.
-
Click a template that is similar to the one that you want to create, and then click Choose.
-
Add, delete, or change any text, graphics, or formatting, and make any other changes that you want to appear in all new documents that you base on the template.
-
On the File menu, click Save As.
-
On the Format pop-up menu, click Word Template (.dotx).
-
In the Save As box, type the name that you want to use for the new template, and then click Save.
Unless you select a different location, the template is saved in /Users/username/Library/Application Support/Microsoft/Office/User Templates/My Templates.
To organize templates, use the Finder to create a new folder in /Users/username/Library/Application Support/Microsoft/Office/User Templates/My Templates, and then save your template in the new folder.
Note: If you are using Mac OS X 7 (Lion), the Library folder is hidden by default. To show the Library folder, in the Finder, click the Go menu, and then hold down OPTION.
 .
.-
On the Standard toolbar, click New from template
. -
In the left navigation pane, under TEMPLATES, click My Templates.
Note: If you created folders to organize your templates, the folders are displayed under My Templates. You need to click the folder to see the templates.
-
Click the template that you created, and then click Choose.
-
In the Finder, open /Users/username/Library/Application Support/Microsoft/Office/User Templates/My Templates.
Note: If you are using Mac OS X 7 (Lion), the Library folder is hidden by default. To show the Library folder, in the Finder, click the Go menu, and then hold down OPTION .
-
Drag the templates that you want to delete to the Trash.
PowerPoint
-
Open the presentation that you want to create the new template from.
-
Add, delete, or change any text, graphics, or formatting, and make any other changes that you want to appear in all new presentations that you base on the template.
-
On the File menu, click Save As.
-
On the Format pop-up menu, click PowerPoint Template (.potx).
-
In the Save As box, type the name that you want to use for the new template, and then click Save.
Unless you select a different location, the template is saved in /Users/username/Library/Application Support/Microsoft/Office/User Templates/My Templates.
To organize templates, use the Finder to create a new folder in /Users/username/Library/Application Support/Microsoft/Office/User Templates/My Templates, and then save your template in the new folder.
Note: If you are using Mac OS X 7 (Lion), the Library folder is hidden by default. To show the Library folder, in the Finder, click the Go menu, and then hold down OPTION.
You can customize an existing template to make it even more useful. Add static information to the existing template, and then save the file again (as a template).
-
On the Standard toolbar, click New from template
. -
In the left navigation pane, under TEMPLATES, click All.
Note: If you can’t find a template, you can search for a template based on keywords in the Search box.
-
Click a template that is similar to the one that you want to create, and then click Choose.
-
Add, delete, or change any text, graphics, or formatting, and make any other changes that you want to appear in all new documents that you base on the template.
If you want to make one change to replicate it in several slide layouts, rather than changing each layout or slide individually, you can edit slide masters.
-
On the File menu, click Save As.
-
On the Format pop-up menu, click PowerPoint Template (.potx).
-
In the Save As box, type the name that you want to use for the new template, and then click Save.
Unless you select a different location, the template is saved in /Users/username/Library/Application Support/Microsoft/Office/User Templates/My Templates.
To organize templates, use the Finder to create a new folder in /Users/username/Library/Application Support/Microsoft/Office/User Templates/My Templates, and then save your template in the new folder.
Note: If you are using Mac OS X 7 (Lion), the Library folder is hidden by default. To show the Library folder, in the Finder, click the Go menu, and then hold down OPTION.
-
On the Standard toolbar, click New from template
. -
In the left navigation pane, under TEMPLATES, click My Templates.
Note: If you created folders to organize your templates, the folders are displayed under My Templates. You need to click the folder to see the templates.
-
In the right navigation pane, you can select the colors, font, and slide size for the template.
-
Click the template that you created, and then click Choose.
-
In the Finder, open /Users/username/Library/Application Support/Microsoft/Office/User Templates/My Templates.
Note: If you are using Mac OS X 7 (Lion), the Library folder is hidden by default. To show the Library folder, in the Finder, click the Go menu, and then hold down OPTION .
-
Drag the templates that you want to delete to the Trash.
Excel
-
Open the workbook that you want to create the new template from.
-
Add, delete, or change any text, graphics, or formatting, and make any other changes that you want to appear in all new documents that you base on the template.
-
On the File menu, click Save As.
-
On the Format pop-up menu, click Excel Template (.xltx).
-
In the Save As box, type the name that you want to use for the new template, and then click Save.
Unless you select a different location, the template is saved in /Users/username/Library/Application Support/Microsoft/Office/User Templates/My Templates.
To organize templates, use the Finder to create a new folder in /Users/username/Library/Application Support/Microsoft/Office/User Templates/My Templates, and then save your template in the new folder.
Note: If you are using Mac OS X 7 (Lion), the Library folder is hidden by default. To show the Library folder, in the Finder, click the Go menu, and then hold down OPTION.
You can customize an existing template to make it even more useful. Add static information to the existing template, and then save the file again (as a template).
-
On the Standard toolbar, click New from template
. -
In the left navigation pane, under TEMPLATES, click All.
Note: If you can’t find a template, you can search for a template based on keywords in the Search box.
-
Click a template that is similar to the one that you want to create, and then click Choose.
-
Add, delete, or change any text, graphics, or formatting, and make any other changes that you want to appear in all new documents that you base on the template.
-
On the File menu, click Save As.
-
On the Format pop-up menu, click Excel Template (.xltx).
-
In the Save As box, type the name that you want to use for the new template, and then click Save.
Unless you select a different location, the template is saved in /Users/username/Library/Application Support/Microsoft/Office/User Templates/My Templates.
To organize templates, use the Finder to create a new folder in /Users/username/Library/Application Support/Microsoft/Office/User Templates/My Templates, and then save your template in the new folder.
Note: If you are using Mac OS X 7 (Lion), the Library folder is hidden by default. To show the Library folder, in the Finder, click the Go menu, and then hold down OPTION.
-
On the Standard toolbar, click New from template
. -
In the left navigation pane, under TEMPLATES, click My Templates.
Note: If you created folders to organize your templates, the folders are displayed under My Templates. You need to click the folder to see the templates.
-
Click the template that you created, and then click Choose.
-
In the Finder, open /Users/username/Library/Application Support/Microsoft/Office/User Templates/My Templates.
Note: If you are using Mac OS X 7 (Lion), the Library folder is hidden by default. To show the Library folder, in the Finder, click the Go menu, and then hold down OPTION .
-
Drag the templates that you want to delete to the Trash.
See also
Modify a slide master
Customize how Excel starts in Excel for Mac
Differences between templates, themes, and Word styles
If you think of your current document as a template, you can save it with a different name to create a new document that’s based on the current one. Whenever you want to create a document like that, you’ll open your document in Word for the web, go to File > Save As, and create a document that’s a copy of the one you started with.
On the other hand, if you’re thinking of the kind of templates you see by going to File > New, then no: you can’t create those in Word for the web.
Instead, do this:
If you have the Word desktop application, use the Open in Word command in Word for the web to open the document in Word on your desktop.

From there, create a template. When you go to File > New in the Word desktop application, you’ll be able to use your template for new documents. And if you store the documents online, you can edit them in Word for the web.
See Also
Microsoft Templates and Themes
Download free, pre-built templates
Free background templates for PowerPoint
Edit templates
To find and apply a template in Word, do the following:
- On the File tab, click New.
- Under Available Templates, do one of the following: To use one of the built-in templates, click Sample Templates, click the template that you want, and then click Create.
Contents
- 1 How do I open a Word template?
- 2 How do I edit a Word template?
- 3 How do I use a template in Word 365?
- 4 What is the purpose of a template?
- 5 Where do I find Microsoft Word templates?
- 6 How do templates work?
- 7 How do I open a template File in Windows?
- 8 Why can’t I edit a Word template?
- 9 What are templates in MS Word?
- 10 How do I open a template in Office 365?
- 11 How do I use a template?
- 12 What is the advantage of using a template?
- 13 What is difference between template and style?
- 14 Are Microsoft Word templates free?
- 15 How do I download Word templates?
- 16 How do I download Microsoft templates?
- 17 How do I read a template file?
- 18 How do I open a template in Outlook?
- 19 How do I change a picture in a Word template?
- 20 How do I make a non editable Word document editable?
How do I open a Word template?
Opening a Word template so that you can modify it
- On the File tab, choose Open. You see the Open window.
- Click This PC.
- Click the Browse button.
- In the Open dialog box, go to the Templates folder where you store templates.
- Select the template.
- Click the Open button. The template opens in the Word window.
How do I edit a Word template?
Edit templates
- Click File > Open.
- Double-click This PC. (In Word 2013, double-click Computer).
- Browse to the Custom Office Templates folder that’s under My Documents.
- Click your template, and click Open.
- Make the changes you want, then save and close the template.
How do I use a template in Word 365?
Method 1: Start a new document based on your template (Word 365 way)
- Open Word 365.
- Go to File > New.
- Click Personal (or Custom).
- Click the template you want to use.
What is the purpose of a template?
A template is a predesigned document you can use to create documents quickly without having to think about formatting. With a template, many of the larger document design decisions such as margin size, font style and size, and spacing are predetermined.
Where do I find Microsoft Word templates?
The template options are available when you click the Microsoft Office Button, and then click New in Office 2007, or from New under the File menu in Office 2010. There are more templates available in the Microsoft Office Online area.
How do templates work?
Follow these steps:
- Open the document that needs a new template attached.
- Click the File tab.
- On the File screen, choose the Options command.
- Choose Add-Ins from the left side of the Word Options dialog box.
- Choose Templates from the Manage drop-down list.
- Click the Go button.
- Click the Attach button.
How do I open a template File in Windows?
Choose Open from the File menu, or click on the Open tool on the toolbar. You will see the Open File dialog box. At the bottom of the dialog box you can specify the type of files you want Word to list. Using the Files of Type drop-down list, select Document Templates.
Why can’t I edit a Word template?
If you receive or open a document and can’t make any changes, it might be Open for viewing only in Protected View. Follow these steps to edit:Select Protect document. Select Enable Editing.
What are templates in MS Word?
In Microsoft Word, templates are pre-designed documents that you or someone else (such as Microsoft) creates to use as a pattern for a project. The template could be for a business card, brochure, resume, presentation…the list goes on.
How do I open a template in Office 365?
Edit your template
- Click File > Open.
- Double-click This PC.
- Browse to the Custom Office Templates folder that’s under My Documents.
- Click your template, and click Open.
- Make the changes you want, then save and close the template.
How do I use a template?
To find and apply a template in Word, do the following: On the File tab, click New. Under Available Templates, do one of the following: To use one of the built-in templates, click Sample Templates, click the template that you want, and then click Create.
What is the advantage of using a template?
Templates simplify the creation of documents. Templates can ease our workload and make us feel less stressed, and, at the same time, they increase efficiency. Templates increase the attention of the audience. They help in saving time and money.
What is difference between template and style?
Styles keep your formatting consistent within a document. Themes keep your look and feel consistent across multiple documents. Templates allow you to re-use text, and keep your look and feel consistent across multiple documents.
Microsoft offers a wide variety of Word templates for free and premium Word templates for subscribers of Microsoft 365.Microsoft Word templates are ready to use if you’re short on time and just need a fillable outline for a flyer, calendar, or brochure.
How do I download Word templates?
Load templates or add-ins
- In Word 2010, 2013, or 2016, select File > Options > Add-Ins.
- In the Manage list, select Word Add-ins, and then click Go.
- Click the Templates tab.
- Under Global templates and add-ins, select the check box next to the template or add-in that you want to load.
How do I download Microsoft templates?
You can download free, pre-built document templates with useful and creative themes from Office when you click File > New in your Office app. Templates can include calendars, business cards, letters, cards, brochures, newsletters, resumes, and much more.
How do I read a template file?
The Four Best Ways to Open TEMPLATE Files
- Pick the Right Program. Start by choosing the right program to open your TEMPLATE file.
- Note the File Type. Other programs may be able to open your TEMPLATE file, depending on the type of file it is.
- Ask the Developer.
- Use a Universal File Viewer.
- Recommended Download.
How do I open a template in Outlook?
To use an email message template, use the following steps:
- Select New Items > More Items > Choose Form.
- In the Choose Form dialog box, in Look In, click User Templates in File System.
- The default templates folder is opened.
- Select the template, and then click Open.
How do I change a picture in a Word template?
Replace a picture
- Click the picture you want to replace.
- Under Picture Tools, on the Format tab, in the Adjust group, click Change Picture.
- Locate a new picture, and then double-click it.
How do I make a non editable Word document editable?
How to convert DOCX to DOC
- Upload docx-file(s) Select files from Computer, Google Drive, Dropbox, URL or by dragging it on the page.
- Choose “to doc” Choose doc or any other format you need as a result (more than 200 formats supported)
- Download your doc.
How to Create and Use Microsoft Word Templates
Make your word processing tasks easier with this handy feature
Updated on January 28, 2021
What to Know
- First, open a Microsoft-provided template. Select File > New, then choose a template style and select Create.
- Then, after you open a template, replace the placeholder text and images with your own.
- Create a custom template: Go to File > New > Blank document, format the document, then save it as a Word Template (*.dotx).
This article explains how to create and use Microsoft Word templates. Instructions apply to Word for Microsoft 365, Word 2019, Word 2016, and Word 2013.
How to Open a Word Template
Word offers hundreds of free templates for you to use, or you can create your own.
-
Open Word. Go to the ribbon, select File, then select New.
-
Select a template style.
-
In the template preview screen, select Create.
-
If you don’t like any of the options shown on the main screen, choose one of the categories at the top of the screen, or use the search bar to perform a search.
-
After you open a template, replace the placeholder text with your own or start from scratch in blank areas. You can also add pictures to replace the image placeholders.
To replace existing text, select it and type your own text. To replace an image, right-click the image and select Change Picture.
-
Save the file with a descriptive name.
What Are Microsoft Word Templates?
A template is a Microsoft Word document that has some formatting in place, such as fonts, logos, and line spacing. Templates exist for many types of documents, for example, party invitations, flyers, and resumes. They can be used as a starting point when you want to create a specific type of document without starting from scratch.
How to Create a Word Template
You can also create your own custom Word template. Here’s how:
-
Open Word, then go to the ribbon and select File.
-
Select New > Blank document.
-
Add any elements you like, such as a business name and address, a logo, and other elements. You can also choose specific fonts, font sizes, and font colors.
-
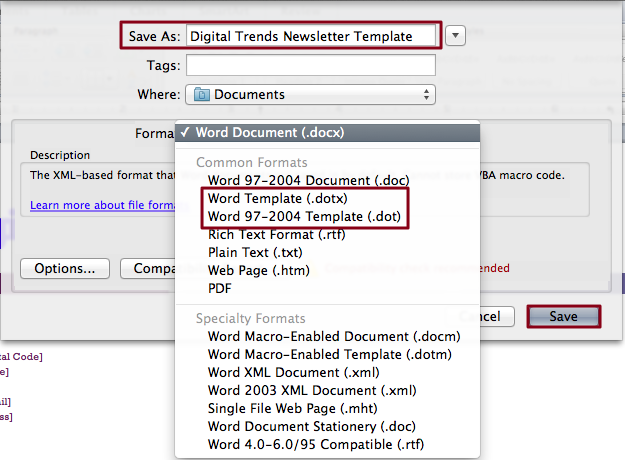
Once you have the document formatted the way you want it, go to the ribbon and select File > Save As.
-
Enter a descriptive name for the template, select the File Type drop-down arrow and choose Word Template (*.dotx), then select Save.
-
To create a new document based on the template, open the template, give it a new name, and edit the document to include the new information.
Thanks for letting us know!
Get the Latest Tech News Delivered Every Day
Subscribe
In Microsoft Word, templates are pre-designed documents that you or someone else (such as Microsoft) creates to use as a pattern for a project. The template could be for a business card, brochure, resume, presentation…the list goes on. Regardless of the purpose, templates provide the design consistency that any organization (or individual) needs to look professional. (You can also find templates for Excel, PowerPoint, and other applications, but in this article we’re focusing on Microsoft Word.)
The template contains a specific layout, style, design and, sometimes, fields and text that are common to every use of that template. Some templates are so complete (such as business cards), you only have to change the individual’s name, phone number, and email address. Others, such as business reports or brochures, could require that everything is changed except the layout and design.
Once you create a template, you can use it over and over. Remember that while you open a template to start a project, you save the project as another file type, such as the basic .docx Word format, for editing, sharing, printing, and more. The template file stays the same, unless or until you want to change it (more on that later).
This is a sample template in Microsoft Word.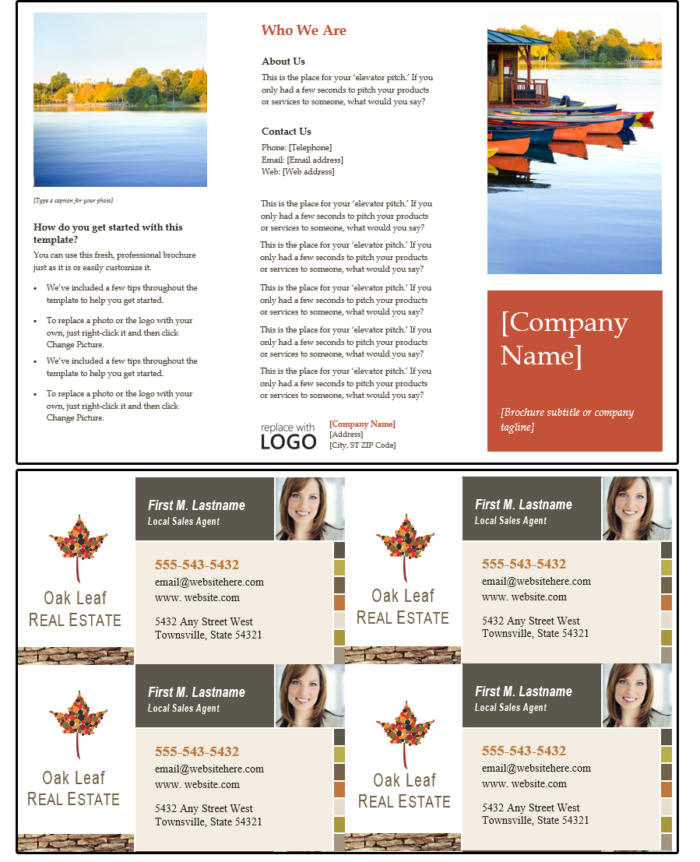 JD Sartain / IDG Worldwide
How to access Microsoft Word’s stock templates
Fortunately for us, Microsoft provides many hundreds of templates for all of its programs. Note that most of Microsoft’s templates are online, which means you cannot access them unless you’re connected to the Internet.
To open one of the system-provided templates in Word:
1. Open Microsoft Word and select New.
2. Peruse the Suggested Search categories: Business, Personal, Industry, Design Sets, Events, Education, or Letters. For this exercise, select Business.
3. Word displays a message that says, “Searching thousands of online templates.”
4. Word displays template search results on-screen, plus a comprehensive list of categories in a scrolling panel on the right.
5. Scroll down the page or choose a different category, then select a template that fits your current project.
Select a template from a category, then start filling in your own data and images. 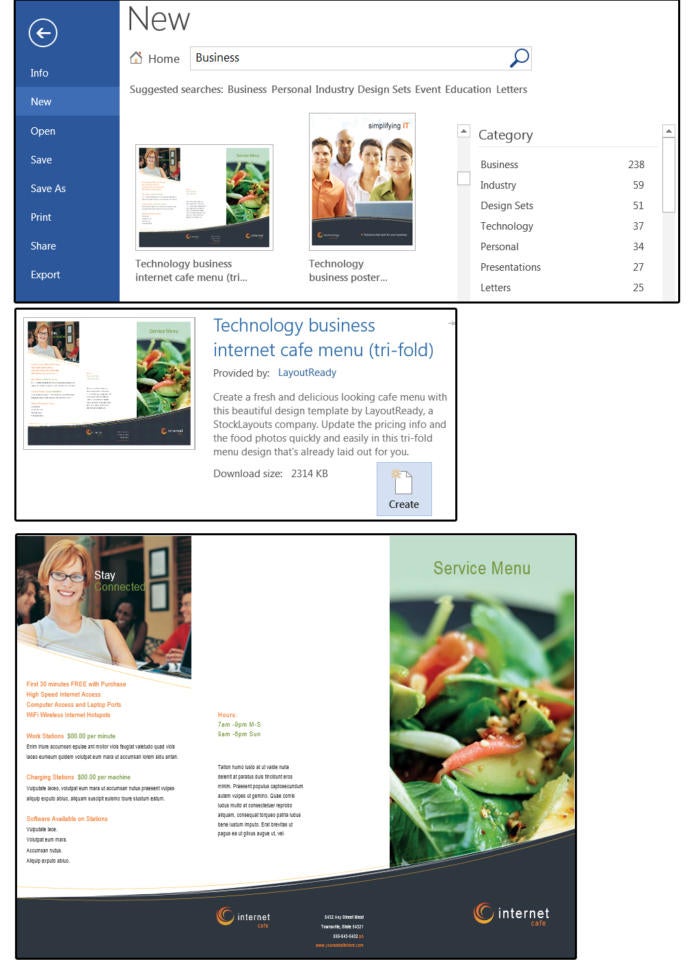 JD Sartain / IDG Worldwide
We selected the Internet Café template. Notice the photos, graphics, and main information, such as hours, are already created in the template. You only have to type over the existing data with your company’s data, and the brochure is complete.
How to modify a Microsoft Word template
You can change the colors, font, photos, logo, and anything else on this template. If you have not selected the Internet Café brochure, please do so now. Before you make any changes, go ahead and save this template with a new filename.
1. If you follow normal document-saving procedures (and you can here), you select File > Save As > Computer > Browse. Then navigate to the applicable folder and give the template a new name.
2. Remember that once you click the down arrow beside the Save As Type in the input box and select Word Template (*.dotx) from the list (and change the name, of course, in the File Name input box), Microsoft automatically puts the file in its own template folder.
3. Once saved as a template, close the file.
4. Now open it again. Note that it is not in the folder you specified. Don’t panic. Navigate to C:UsersownerDocumentsCustom Office Templates and your custom templates are there. Select the one you just saved from the list and open it.
Save the document as a template. JD Sartain / IDG Worldwide
5. Change the sections on the new template that will be on every brochure, such as the logo, or contact information. Then save it as a template again by pressing Ctrl+ S. It will save in the same location.
6. Next, fill in all the other information and save it—this time, as a document, so you can print it out or share it with others.
Whenever you’re ready to create a new brochure, just open the template, enter the new data, and save the completed brochure as a document.
This Internet Café template has been modified and saved as a document brochure. JD Sartain / IDG Worldwide
Custom templates can be as simple or complex as needed. For example, you might create a template for your company’s newsletter, posters for a seminar, or invitations for corporate events. You can also create interactive templates to load on the Intranet, so others can fill in the blanks to print their own envelopes and letterhead, for instance.
First, create a document—design and format it, add graphics and photos. If it’s interactive, select Controls from the Developer tab and create custom input fields for user interaction.
For this exercise, create an announcement flyer for a Meet & Greet conference including lunch, cocktails, and dinner for the company’s senior management and its new interns.
1. Start with a blank document.
2. Create two columns: The left is 4.5 inches and the right is 2.5 inches, and the space between the columns is about 3/8 of an inch. These measurements are only suggestions. Adjust as necessary for your project and the images and graphics you choose.
3. Add a title.
4. Choose a font (we’re choosing Century Gothic), style (sans serif), and color (white), for that title.
5. Repeat this process for a subtitle. In our example, we’re changing the font color to dark teal.
6. Create some graphic boxes for the title (dark teal) and the subtitle (light teal). Select Insert > Shapes and choose a rectangle from the icon list.
7. Insert an applicable photo in both columns. Choose Insert > Pictures and select photos from your Pictures Library. Adding images gives you an opportunity to eyeball image sizes and column widths and adjust them as needed.
8. Enter the schedule and agenda in column one. Use Century Gothic 14 (in black) for the body text and Century Gothic 18 (in dark teal) for the headers.
9. Enter the time and place plus the conference hosts in column two, with the same fonts and colors for the body text and headers.
Create a custom event template. JD Sartain / IDG Worldwide
10. Once satisfied with the final product, click Save As > Meet+Greet.docx (a regular Word document), so you can share or print.
11. Before you exit, also save this document as a template. Click Save As > Save As Type, choose Word Template [*.dotx] from the list, and save as Meet+Greet.dotx. Next conference, the template is ready to get you started.
Once you have some custom templates in your Custom Office Templates folder, when you open Word and select New, Word provides a new category on the backstage menu called Personal. Click this category to see and open your saved templates.
Open your custom template under New > Personal. JD Sartain / IDG Worldwide
How to add an interactive component to a template
Some templates use interactive controls for user input. For example, imagine that once a month, the branch managers, assistant managers, and loan originators of a large banking institution have a meeting at one of the 12 branches. It’s your assistant’s job to email the date, time, location, speakers, topics, and agenda to each attendee. Rather than have that person retype the data in a regular template, you can create a template where options can be chosen from a list. For example:
1. First, create the template, then decide which fields (date, time, etc.) can be selected from a list.
2. Click the Developer tab.
3. Position your cursor on the template where the date goes.
4. Select Insert > Text > Quick Parts > Field, then choose Date from the Categories panel and select a date format from the Properties panel. Click OK. Now the date will update automatically.
Insert a date field that automatically updates.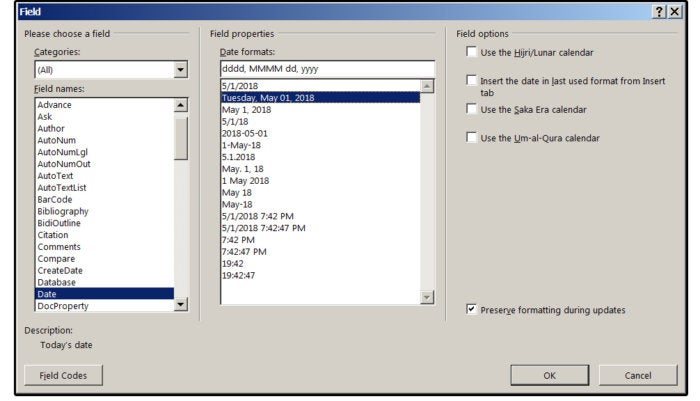 JD Sartain / IDG Worldwide
5. Next, position your cursor on the template where the location goes.
6. Select Developer > Controls > Combo Box Content Control. Word places this item on your template.
7. With the Developer tab still selected, click Controls > Properties, and the Content Control Properties dialog window opens.
8. Click the Add button, enter a branch name in the Add Choice dialog box, then click OK. Repeat this process until all the branch locations are entered, then click OK again to close this dialog window.
Create a Combo Box Control so users can select options from a list.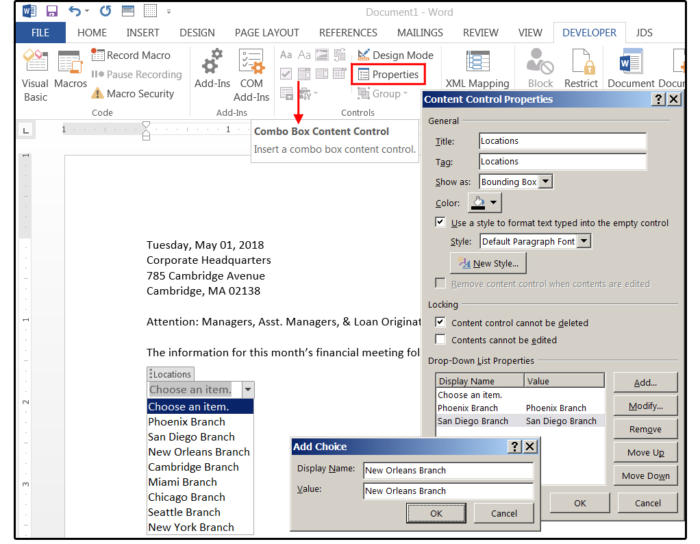 JD Sartain / IDG Worldwide
9. If you want to modify, remove, or move an entry up or down, highlight the entry, then click the appropriate button.
10. You can change the color of the Combo Box frame and change or create a custom style (fonts, color, attributes, etc.) for the typeface used inside the Combo Box.
11. Repeat steps 5 through 8 above to create Combo Box Content Controls for the remaining fields: meeting date and time, speakers, and topics.
12. When finished, save the document as a Word Template (*.dotx).
Template tips: how to create custom stylesheets
The default stylesheet in MS Word is called normal.dotx. It’s not a good idea to alter this stylesheet because, later on, it could result in some unwanted effects. It’s best to create custom stylesheets for each custom template. For example, the normal.dotx font is Calibri, paragraphs are left aligned, spacing is 1.15, etc. Heading 1 is Cambria 16 point, etc. You can change these settings manually throughout your document without saving them to the normal stylesheet, and before you save the document as a template.
Once satisfied, use those custom settings for your new stylesheet, which could be named something similar to the template name. For example, if you’re creating a custom brochure template, you might name it and the stylesheet Brochure1. Then future brochures will be much easier to design.
1. Choose the Home tab, then click the small arrow in the bottom right corner of the group called Styles. From the drop-down menu, click the New Styles button (bottom left).
2. In the popup dialog Create New Style from Formatting, enter the name of the style, such as Brochure1.
3. Next select Paragraph from the Style Type field list, which affects the entire paragraph, as opposed to a Character style, that affects only the characters inside a paragraph.
4. You can choose to make the style based on another style, such as the Normal style, one of the Header styles, or No style. If you plan to use most of the formatting features in the Normal style except a few differences, then base it on the Normal style. If the custom style will be completely different, then choose the No style option.
5. Under Formatting, select a Font and Size, then choose a Font Color such as Brown, Alignment such as Justify, Spacing such as 1.15, and Indents. Notice that the box in the center of the dialog window shows how the paragraph looks with the format options you select.
How to create a custom stylesheet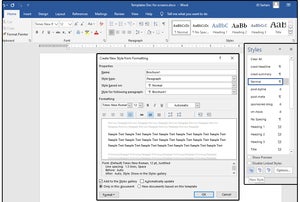 JD Sartain / IDG
6. In the bottom left corner, click the Format button. Notice the nine options in the drop-down list. In the Font dialog, you can further customize the font options such as font style (bold, italic, etc,), underline style; Sub- and Superscript, Small Caps, etc.
7. In the Paragraph dialog, you can customize the Indents & Spacing and the Line & Page Breaks. Use the Tabs dialog to customize the alignment and the leader of your tabs, such as the dots between the chapter name and chapter page number on a table of contents.
8. The Borders & Shading dialog provides Border options such as Box, Shadow, 3D, etc.; and Shading options include colors and patterns. The Language feature is, of course, the language of the paragraph such as French or Italian. Note that if you want only specific words in another language, such as c’est la vie in the middle of a paragraph, then create a character style called French.
9. The Frame option is actually the Text Wrap feature, which includes how the text wraps around a graphic in a paragraph, the spacing around the graphic, and how it’s positioned on the page. Choose Numbering to define how you want the numbers to appear such as the standard Arabic numbers, Roman Numerals, or Characters; how they are spaced; and delineated such as with a period after or parentheses, etc. Bullets are also defined under this list choice, which provides standard and custom bullets.
10. Next is the Shortcut Key options, which lets you choose a custom Shortcut key for your Paragraph or Character style, such as Ctrl+B for bold (which is a Word default), or define your own. Last on the list is Text Effects, which lets you define the color, gradient, pattern, outline, and transparency of a paragraph such as the title on the title page of a book or manual. Additional Text Effects include Shadow, Reflection, Glow, Soft Edges, and 3D Format.
How to format a custom stylesheet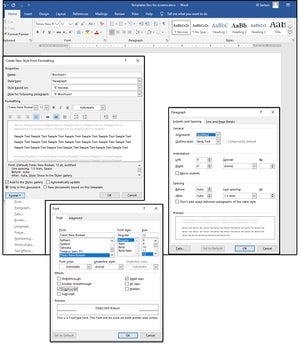 JD Sartain / IDG
Where to find the template files on your computer
The custom templates that you create or modify from one of Microsoft’s stock templates are stored at C:UsersOwnerDocumentsCustom Office Templates, where <Owner> is your login name. When you open the Users folder, you’ll see your login name on the list of folders. If not there, it should be in the folder that’s actually called Owner.
Where the personal custom templates and the stock templates are located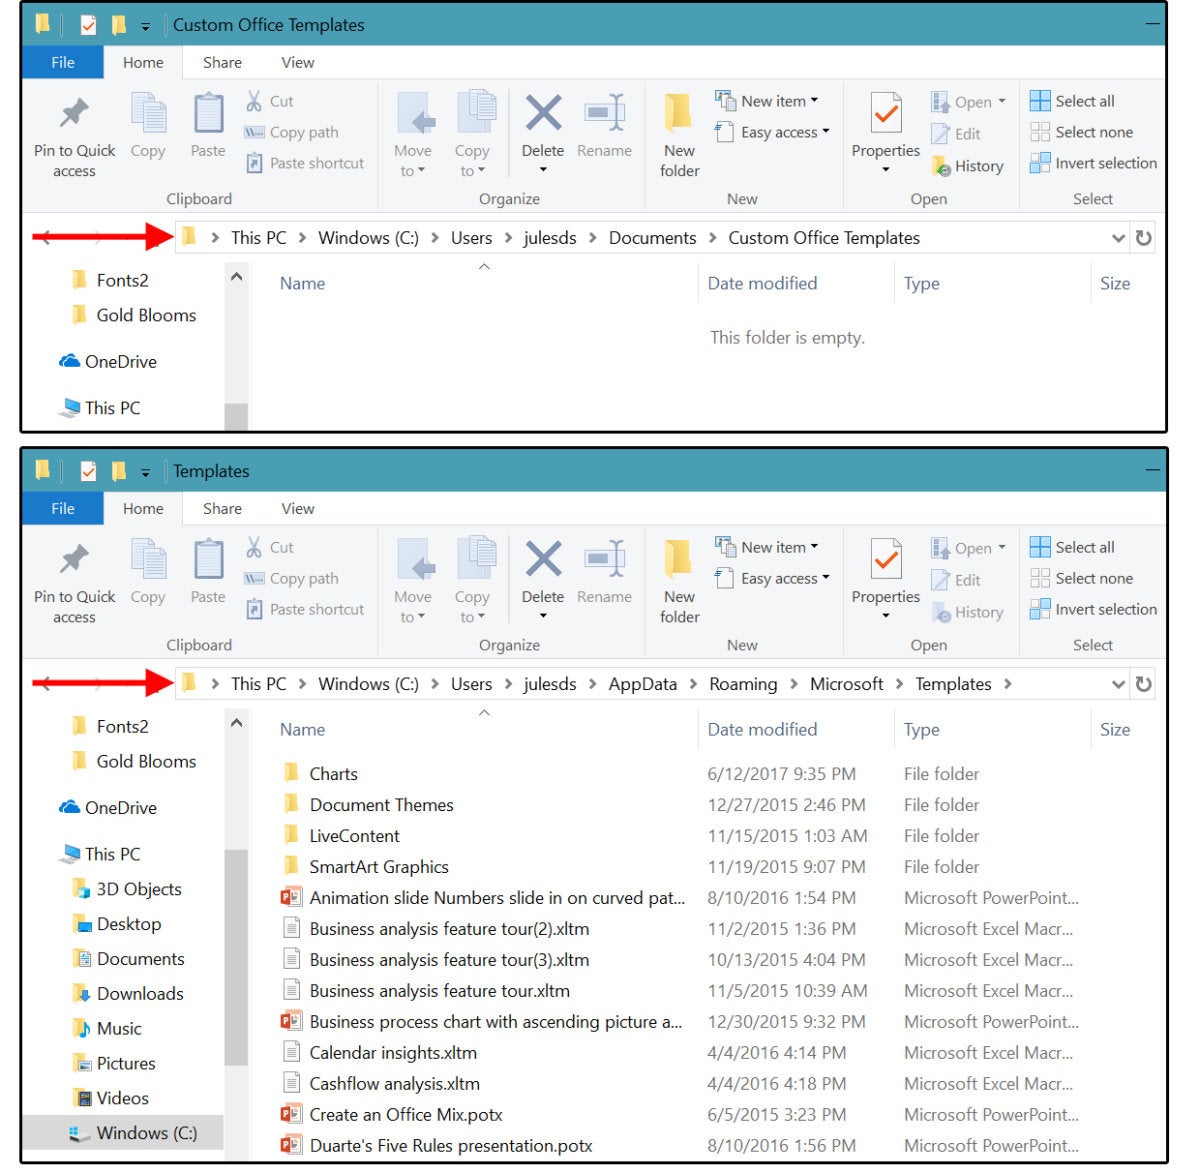 JD Sartain / IDG Worldwide
Microsoft stores its templates at:
C:Users<your login name>AppDataRoamingMicrosoftTemplates
Again, if you failed to create a unique login name, this folder may be called <Owner>. If you can’t find it, the AppData folder and all of its files and subfolders are hidden.
Show Hidden Files and Folders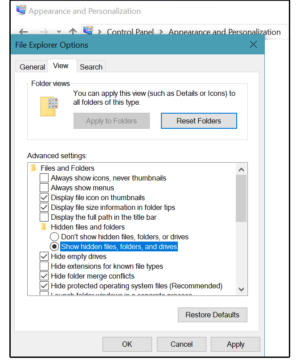 JD Sartain / IDG Worldwide
To view the Hidden files:
- Select the Start/Windows button > Control Panel > Appearance and Personalization
- Select File Explorer Options/Folder Options > Show hidden files and folders
- On the next screen, check the tick mark beside Show hidden files, folders, and drives, then click Apply and OK.
Two more ways to locate the stock templates folder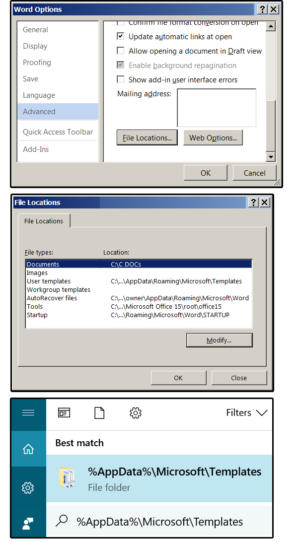 JD Sartain / IDG Worldwide
To discover the actual name of the Templates folder:
- Select File > Options > Advanced
- Scroll about two-thirds of the way down the screen.
- Click the File Locations button, and the File Locations window appears.
- Word displays the locations and paths to all the template-related files.
You can also click the Start button, then copy and paste this: %appdata%MicrosoftTemplates in the Search box and press Enter. The Templates folder appears in the Start box. Double-click to go straight to the stock templates folder.
Create, Save, Edit and Use Templates in Microsoft Word
by Avantix Learning Team | Updated February 14, 2021
Applies to: Microsoft® Word® 2013, 2016, 2019 or 365 (Windows)
You can create, save, use and edit templates in Microsoft Word for frequently-used documents such as letters, reports, proposals and manuals. Templates include basic character, paragraph and page formatting and may include text, custom styles, tables, images, macros, sections, headers and footers. If you save a document as a custom template, you can create a new document based on that template.
Recommended article: How to Check Word Count in Microsoft Word (4 Ways)
Do you want to learn more about Microsoft Word? Check out our virtual classroom or live classroom Word courses >
A document can be saved as a Word Template (dotx file) or a Word Macro-Enabled Template (dotm file).
In this article, we’ll take a look at 3 types of templates in Microsoft Word:
- Normal template (the default global template)
- Custom user templates
- Microsoft ready-made templates
Understanding the Normal template
Unless you select a different template, Word bases new documents on the Normal template by default. The Normal template is named Normal.dotm and its default style is the Normal style. It also includes built-in heading styles such as Heading 1, Heading 2 and so on.
Specifying a location for custom user templates
In Word 2013 and later versions, if you want to create your own custom user templates, you will need to specify a location for the templates so you can easily access them.
Custom user templates are typically stored in the following location (in 2013 and later versions):
C:Users[UserName]DocumentsCustom Office Templates
You will need to specify a path to the Custom Office Templates folder (which should be created automatically when you install Microsoft Office) in your Documents folder as the default storage location. If you want, you can select a different folder but this folder is easy to find and use.
To specify the default storage location for your custom user templates in Word 2013 and later versions:
- Create a folder in your Documents folder called Custom Office Templates if it does not already exist (assuming you are going to use this folder as the default personal templates location).
- In Word, click the File tab in the Ribbon.
- Click Options.
- In the left panel, click Save.
- Enter a path for the Default Personal Templates location (see the Options dialog box below).
- Click OK.
For example,
C:UsersNancyDocumentsCustom Office Templates
Note the path for the Default Personal Templates in the Options dialog box:

Some users may prefer to set the default personal templates location as the Templates or User Templates folder in the Appdata folder.
Creating a custom user template in Word
You can create your own custom user template by creating a document and then saving it as a template. If you have created a document based on an existing template, you can modify it and save it as a new template.
To save an existing document as a custom user template in the Custom Office Templates folder:
- In Word, click the File tab in the Ribbon.
- Select Save As.
- Enter a name for the template.
- Double-click This PC or Computer and then navigate to the Custom Office Templates folder (or the folder you specified as the default personal templates location).
- Select Word Template in the Save as type list. You can select Word Macro-Enabled Template if you have created macros in the file.
- Click Save.
Creating a new document based on a custom user template
If you have saved a template in the Custom Office Templates folder, you can easily create a new document based on that template.
To create a new document based on a custom user template you have created and saved in the Custom Office Templates folder:
- In Word, click the File tab in the Ribbon and then click New.
- In Word 2013 and later versions, click Personal. You must have set the file path in the Options dialog box first.
- If necessary double-click the Custom Office Templates folder.
- Double-click the desired template. Word creates a new document based on the template that you can modify.
Understanding the relationship between a Word document and its template
Every Microsoft Word document is based on a template. If you create a new, blank document, Word uses the Normal template.
When a Word document is created, it includes three elements from its template:
- Styles such as Normal, Heading 1, Heading 2 and so on
- Content such as text, tables and images
- Page settings such as margins, page breaks, section breaks, headers and footers
Once a document is created, it is no longer connected to its template so the styles, content and page settings can be modified or deleted.
A template also makes the following available in the document:
- Building Blocks such as QuickParts
- User interface customizations (including Ribbon customizations)
- Keyboard shortcuts
- Macros (if created) and the template was saved as a Macro-Enabled Template
Editing a custom user template
To edit a custom user template:
- In Word, click the File tab in the Ribbon and then click Open.
- Double-click This PC or Computer and navigate to the Custom Office Templates folder.
- Double-click the template you want to edit.
- Make changes to the template.
- Close and save the template.
Creating a document based on a Microsoft ready-made template
You can create new documents based on hundreds of Microsoft ready-made templates. These templates are normally accessed online so you must be connected to the internet to use them. There are templates for all kinds of documents including letters, brochures, flyers, reports and proposals. Templates may differ depending on your version of Microsoft Word.
To create a new document based on one of Microsoft’s ready-made templates:
- In Word, click the File tab in the Ribbon and click New.
- In the Office area, click the suggested searches or enter search criteria in the Search box and press Enter.
- Scroll through the templates.
- Double-click the template you want to use. Word creates a new document based on the template that you can modify.
In the following example, we selected New and then Business in the suggested searches (using Word 365):

Templates can be a huge timesaver, particularly if you are working on long documents like reports and proposals.
Subscribe to get more articles like this one
Did you find this article helpful? If you would like to receive new articles, join our email list.
More resources
How to Insert a Check Mark in Word (5 Ways)
How to View Word Count in Microsoft Word (4 Ways)
How to Keep a Microsoft Word Table Together on One Page
How to Insert or Type an Em Dash in Word (4 Ways with Shortcuts)
10+ Great Microsoft Word Navigation Shortcuts for Moving Around Quickly in Your Documents
Related courses
Microsoft Word: Intermediate / Advanced
Microsoft Excel: Intermediate / Advanced
Microsoft PowerPoint: Intermediate / Advanced
Microsoft Word: Long Documents Master Class
Microsoft Word: Styles, Templates and Tables of Contents
Microsoft Word: Designing Dynamic Word Documents Using Fields
VIEW MORE COURSES >
Our instructor-led courses are delivered in virtual classroom format or at our downtown Toronto location at 18 King Street East, Suite 1400, Toronto, Ontario, Canada (some in-person classroom courses may also be delivered at an alternate downtown Toronto location). Contact us at info@avantixlearning.ca if you’d like to arrange custom instructor-led virtual classroom or onsite training on a date that’s convenient for you.
Copyright 2023 Avantix® Learning
Microsoft, the Microsoft logo, Microsoft Office and related Microsoft applications and logos are registered trademarks of Microsoft Corporation in Canada, US and other countries. All other trademarks are the property of the registered owners.
Avantix Learning |18 King Street East, Suite 1400, Toronto, Ontario, Canada M5C 1C4 | Contact us at info@avantixlearning.ca
![]()
Download Article
![]()
Download Article
This wikiHow teaches you how to select or create a template in Microsoft Word for Windows and Mac. Templates are pre-formatted documents designed for specific purposes, such as invoices, calendars, or résumés.
-
1
Open Microsoft Word. Double-click the Word icon, which resembles a white «W» on a dark-blue background.
-
2
Search for a template. Scroll through the Microsoft Word home page to find a template you like, or type word into the search bar at the top of the page to search for matching templates.
- For example, if you wanted to find budget-related templates, you would type «budget» into the search bar.
- You must be connected to the Internet in order to search for templates.
Advertisement
-
3
Select a template. Click a template that you want to use. This will open it in a window where you can take a closer look at the template.
-
4
Click Create. It’s to the right of the template preview. Doing so opens the template in a new Word document.
-
5
Edit the template. Most templates have sample text; you can replace this text by deleting it and typing in your own.
- You can also edit most templates’ formatting (e.g., font, color, and text size) without ruining the template itself.
-
6
Save your document. Click File in the upper-left side of the page, click Save As, double-click a save location, enter your document’s name, and click Save.
- You can re-open this document by going to the folder where you saved it and double-clicking it.


Advertisement
-
1
Open Microsoft word. Double-click the Word icon, which resembles a white «W» on a dark-blue background. Depending on your Word settings, this will either open a new document or bring up the Word home page.
- If the Word home page opens, skip to the «search for a template» step.
-
2
Click File. It’s a menu item in the top-left side of the screen. A drop-down menu will appear.
-
3
Click New from Template. You’ll find this option near the top of the File drop-down menu. Clicking it opens the template gallery.
-
4
Search for a template. Scroll through the available templates to see pre-set options, or type a search term into the search bar in the top-right side of the page.
- For example, to find invoice-related templates, you might type «invoice» into the search bar.
- You must be connected to the Internet in order to search for templates.
-
5
Select a template. Click a template to open a preview window with the template displayed.
-
6
Click Open. It’s in the preview window. This will open the template as a new document.
-
7
Edit the template. Most templates have sample text; you can replace this text by deleting it and typing in your own.
- You can also edit most templates’ formatting (e.g., font, color, and text size) without ruining the template itself.
-
8
Save your document. Click the File menu item, click Save As, enter a name for your document, and click Save.


Advertisement
-
1
Open your Microsoft Word document. Double-click the document to which you want to apply your template.
- This will only work for recently-opened templates. If you haven’t recently opened the template you want to use, open the template and then close it before continuing.
-
2
Click File. It’s in the upper-left side of the page.
-
3
Click Options. You’ll find this in the bottom-left side of the «File» page.
-
4
Click the Add-ins tab. It’s on the left side of the Options window.
-
5
Click the «Manage» drop-down box. This box is at the bottom of the Add-Ins page. A drop-down menu will appear.
-
6
Click Templates. It’s near the middle of the drop-down menu.
-
7
Click Go…. This button is to the right of the «Manage» drop-down box.
-
8
Click Attach…. It’s in the upper-right side of the page.
-
9
Select a template. Click a template that you want to use.
-
10
Click Open. It’s at the bottom of the Template window. This will open your template.
-
11
Check the «Automatically update document styles» box. You’ll find this box below the template’s name near the top of the page.
-
12
Click OK. It’s at the bottom of the window. Doing so will apply your template’s formatting to the document.
-
13
Save your document. Click File in the upper-left side of the page, click Save As, double-click a save location, enter your document’s name, and click Save.


Advertisement
-
1
Open your Microsoft Word document. Double-click the document you want to open.
- This will only work for recently-opened templates. If you haven’t recently opened the template you want to use, open the template and then close it before continuing.
-
2
Click Tools. This menu item is on the left side of the Mac’s menu bar. Clicking it prompts a drop-down menu.
- If you don’t see Tools, click your Microsoft Word window to make it appear.
-
3
Click Templates & Add-Ins…. It’s an option near the bottom of the drop-down menu. Doing so opens a window.
-
4
Click Attach. You’ll find this in the Templates & Add-Ins window.
-
5
Select a template. Click a template that you want to apply to your document.
-
6
Click Open. Doing so will apply the template’s formatting to your document.
-
7
Save your document. Click the File menu item, click Save As, enter a name for your document, and click Save.


Advertisement
-
1
Open Microsoft Word. Double-click the Word icon, which resembles a white «W» on a dark-blue background.
- If you want to create a template from an existing document, double-click the document itself and skip to the «edit your document» step.
-
2
Click the «Blank document» template. It’s in the upper-left side of the Word window.
-
3
Edit your document. Any formatting changes you make (e.g., spacing, text size, font) will be parts of your template.
- If you’re creating a template from an existing document, you might not need to edit anything.
-
4
Click File. It’s a tab in the upper-left side of the page.
-
5
Click Save As. This option is near the top of the File pop-out window.
-
6
Select a save location. Double-click a save folder or location here to set it as the template’s storage spot.
-
7
Enter a name for your template. Type in the name you want to use for your template.
-
8
Click the «Save as type» drop-down box. It’s below the file name text box. A drop-down menu will appear.
-
9
Click Word Template. This option is near the top of the drop-down menu.
- You can also click Word Macro-Enabled Template here if you put macros in your document.
-
10
Click Save. It’s in the bottom-right side of the window. Doing so saves your template.
- You’ll be able to apply the template to other documents if you want to.


Advertisement
-
1
Open Microsoft Word. Double-click the Word icon, which resembles a white «W» on a dark-blue background.
- If you want to create a template from an existing document, double-click the document itself and skip to the «edit your document» step.
-
2
Click the New tab. It’s in the upper-left side of the home page.
- If there isn’t a home page, click the File tab and then click New from Template first.
-
3
Click the «Blank Document» template. It’s a white box. This will create a new Word document.
-
4
Edit your document. Any formatting changes you make (e.g., spacing, text size, font) will be parts of your template.
- If you’re creating a template from an existing document, you might not need to edit anything.
-
5
Click File. It’s a menu item in the top-left side of the page.
-
6
Click Save As Template. You’ll see this option in the File drop-down menu.
-
7
Enter a name for your template. Type in the name you want to use for your template.
-
8
Click the «File Format» drop-down box. It’s near the bottom of the window. A drop-down menu will appear.
-
9
Click Microsoft Word template. This option is in the drop-down menu, and has the «.dotx» extension next to it.
- You can also select Microsoft Word Macro-Enabled template if you put macros in your document.
-
10
Click Save. It’s the blue button at the bottom of the window. Doing so will save your template.
- You’ll be able to apply the template to other documents if you want to.


Advertisement
Add New Question
-
Question
How do I save an edited template as a default template in Word?

You can open HTML window in editor and you can place your code there. It will work if your editor has an edit HTML option.
-
Question
How can I use a template in Outlook?
Prepare your template and save it as .oft (Outlook template). Next time you need it, go to the Home tab and select New Items / More Items / Choose Form / Look in: User Templates in File System and select your template.
-
Question
How do I add lines inside the text box?
Draw them using the line tool in the box. On updated computers, go to insert>illustrations>shapes. On non-updated computers, go to insert>shape. You can also underline text by highlighting it, then going to home>underline text.
See more answers
Ask a Question
200 characters left
Include your email address to get a message when this question is answered.
Submit
Advertisement
-
Templates are extraordinarily helpful when invoicing or creating pamphlets.
Thanks for submitting a tip for review!
Advertisement
-
You shouldn’t have to pay for templates.
Advertisement
About This Article
Thanks to all authors for creating a page that has been read 331,457 times.
Is this article up to date?
-
Home
- Computing
- Guides

Once is often more than enough, particularly when creating a lengthy or comprehensive template. Each template, though differing in format and layout, is essentially a pre-constructed document in which users can input their own information in lieu of repeatedly designing the page themselves. They’re incredibly convenient and time-saving — likely the reason why most versions of Microsoft Word come pre-loaded with a venerable swath of the framed documents — while delivering robust layout options for all manners of copy, whether you’re looking to create that knockout resume, hefty business brochure or real tearjerker of a card reserved for that special someone in your life. Thankfully, the American tech giant has made implementing Word templates a simple, three-click process (though the same can’t always be said for creating and saving them for later use in Word).
Here’s our straightforward guide on how to use document templates in Microsoft Word, regardless of whether you’re simply opening a preexisting document or looking to create your own from scratch. Also, check out our top picks for the best Microsoft Office alternatives if you’re looking for a non-Microsoft workaround. There’s also our guide on how to convert a PDF file to Word if you need a simple means of converting PDF files to a more accessible format on either Windows or Mac OS X.
Skip ahead to creating a Microsoft Word template.
Opening and using a Microsoft Word template
Step 1: Launch Microsoft Word — Open Word from the dock or main Applications folder in Mac OS X or launch the software using the main Taskbar or Start menu in Windows. Alternatively, search and launch the program using either operating system’s search utility, dubbed Spotlight and Windows Search, respectively.

Step 2: Select a template — Depending on which version of Microsoft Word you’re using, you may be presented with a pop-up window presenting the various template choices available at your disposal. If using Mac OS X, click the File menu in the application Taskbar, select New from Template near the top of the resulting drop-down menu, and select your desired template from the resulting list of options prior to clicking the gray Choose button in the bottom-right corner of the window. If using Windows, click the File menu in the application toolbar, select the New panel on the left-hand side and double-click your desire template from the resulting list of options. Regardless of your OS, each version of Word should present a healthy selection of template options culled from assorted categories including Calendars, Stationary, Newsletters, Resumes, Proposals, and the like.

Step 3: Input your own copy — Each individual template serves a different purpose, but almost each one operates as a blank slate within a specified framework. Whether you previously chose a simple resume template, a more elaborate brochure template or a different option entirely, you’ll have the option to edit the content within. Change the images, font, colors, or any other facet of the template, and replace the default placeholder text or instructions with information of your own. Keep in mind the changes will not affect the original template, and when done, name and save the file as you would any other blank Word document.

Creating a Microsoft Word template
Step 1: Launch Microsoft Word — Open Word from the dock or main Applications folder in Mac OS X or launch the software using the main Taskbar or Start menu in Windows. Alternatively, search and launch the program using either operating system’s innate search utility, dubbed Spotlight and Windows Search, respectively.

Step 2: Open a blank document — Open a blank document once Word launches. If using Mac OS X, click the File menu in the application taskbar, select New Blank Document at the top of the resulting drop-down menu. If using Windows, click the File menu in the application toolbar, select the New panel on the left-hand side and double-click Blank document near the top of the resulting section, directly above the slew of available templates.

Step 3: Create the template — There’s no one way to create a Word template. Like the Microsoft-culled templates already available within the software, each template you create will likely serve a different purpose and fit your individual aesthetics. However, whether you’re creating a business newsletter or resume, it’s important you initially format the document so you’ll be able to quickly alter its content for whatever occasion it may warrant. A template should be specifically designed to be void of specifics, while keeping it as generic and clear as possible so you can later add the tailored content in the appropriate spot. For instance, avoid inserting specific dates and addresses as they may frequently change. Instead, stick with something like “[Date]” and “[Street Address],” while incorporating placeholder text to better visualize the template’s overall appearance without delving into the specifics. Remember, it’s intended to be bare bones.

Step 4: Save the template — If using Mac OS X, click the File menu in the application Taskbar and select Save As near the middle of the resulting drop-down menu. If using Windows, click the File menu in the application toolbar and select Save As from the left-hand column. Afterward, appropriately name the file, chose a save location, and select the template format suited best for your particular software suite. Word Template (.dotx) will suffice in most cases, but you may want to consider saving the template as either a Word 97-2003 Document (.dot) or Word 97-2004 Document (.doc) if you plan on utilizing the template on an older system. When finished, click the Save button in the bottom-right corner of the window. The newly-minted template will be available in either the My Templates or Personal sections depending on which incarnation of Word you’re using to open the new document from a template.
What do you think of our simple guide on how to use document templates in Microsoft Word? Still perplexed by any one facet of our article? Let us know in the comments below.
Editors’ Recommendations
-
How to factory reset Windows 10 or Windows 11
-
How to use Bing Image Creator to generate AI images for free
-
Microsoft’s Bing Chat waitlist is gone — how to sign up now
-
Microsoft continues its unabashed embrace of ChatGPT and AI
-
Microsoft Word vs. Google Docs
-
Deals
Best Microsoft Office deals for January 2023

Mircosoft Office is so ubiquitous these days that it’s practically a necessity for anyone who writes, manages spreadsheets or gives presentations for a living. Surely you’ve heard of Microsoft Office, even if you’ve never had the pleasure (if you’d call it that) of using it yourself. The Office suite has a lot more to offer than just Word, Excel, and PowerPoint, though, so if you need help finding the right package for your needs, our roundup of the best Microsoft Office deals can make things a bit easier — and hopefully save you some cash.
Today’s best Microsoft Office deals
Microsoft 365 Personal (1-year) — $59, was $70
This license includes a 12-month subscription to Microsoft 365 Personal for a single user, allowing access to the entire Office Suite, including Word, Excel, PowerPoint, Outlook, and more. You’ll also get up to 1TB of OneDrive cloud storage space — so you can move files seamlessly between your local devices and the cloud. It’s compatible with both PC and Mac. It is a great option for students, professionals working from home, and anyone that needs access to the Microsoft Office Suite from a personal computer.
Read more
-
Computing
Microsoft might put ChatGPT into Outlook, Word, and PowerPoint

Microsoft is currently testing the GPT AI language that was developed by the technology brand OpenAI to potentially be used in its Office suite of products, including Word, Outlook, and PowerPoint.
OpenAI’s intuitive technology products, including ChatGPT and Dall-E 2, have become internet sensations for their text- and image-generating prowess. Many have speculated about how ChatGPT can practically and morally be used. However, Microsoft is looking to use the company’s AI models in a more functional manner. The company has already implemented a version of the OpenAI GPT text-generator model as an update to its autocomplete feature, according to The Information.
Read more
-
Deals
Microsoft Word Free Trial: Get a month of service for free

Windows may be a staple Microsoft product, but even as a software company it delivers far more than the popular operating system. Microsoft also dominates the enterprise software space with its Office app suite, which is relied on by millions of professionals, students, and average folks around the world every single day. One of the more renowned Office apps is Microsoft Word, a versatile and capable word processor that’s essential for typing and editing written documents, among other things (and there’s a lot of things you probably didn’t know you could do in Microsoft Word). Microsoft Office is paid software, however, Word included, and for some, the cost may seem high even with some of the best Microsoft Office deals floating around. So, if you’re wondering if there’s a Microsoft Word free trial or any other way to get it for free, read on to find out.
Is there a Microsoft Word free trial?
Microsoft Word is actually part of the company’s wider Office app suite. Now known simply as Microsoft 365 (formerly Microsoft Office), Microsoft’s enterprise software is available in a number of different packages that are now subscription-based; the company has retired the older bundles that were available for a one-time payment. That means if you want a Microsoft Word free trial, you’ll need to sign up for the Microsoft 365 trial, which includes the Word app along with Excel, PowerPoint, Outlook, Teams, OneDrive, and Editor.
Read more
Работа приложения Microsoft Word с настройками по умолчанию начинается с чистого листа – как в прямом, так и в переносном смысле. Начать работу с текстовым редактором не с чистого листа при желании можно, взяв за основу шаблон Word – готовый документ с примененным форматированием, определенными параметрами листа и содержимым. Для приложений пакета Microsoft Office предусмотрен огромнейший перечень шаблонов из различных сфер: производственные и учебные бланки, образцы деловой переписки, объявления, резюме, календари, буклеты, брошюры, плакаты, листовки и т.п. Шаблоны призваны облегчить работу пользователей, сориентировать или вдохновить их, а также наглядно продемонстрировать возможности самого текстового редактора. Шаблоны для Word можно посмотреть и скачать на специальном сайте Microsoft. Но более удобным местом презентации и получения шаблонов является само приложение Microsoft Word, в него интегрирован доступ к базе шаблонов в Интернете. Открыв меню «Файл» — «Создать», можем просмотреть шаблоны в имеющихся тематических подборках или поискать образцы на другие тематики при помощи внутрибазового поисковика.

При нажатии кнопки создания документа с выбранным шаблоном он тотчас же будет скачан с Интернета и открыт в окне Word.
Образцы в Интернете – это хорошо, но как создать свои шаблоны, хоть на базе предлагаемых Microsoft, хоть сформированных самостоятельно, и упростить работу с ними в приложении Word? Ниже рассмотрим, как изменить шаблон по умолчанию, запускаемый вместе с Word, а также сформировать коллекцию личных шаблонов.
1. Изменение шаблона по умолчанию Normal.dotm
Шаблон, запускаемый вместе с Microsoft Word – это файл Normal.dotm. С настройками по умолчанию он являет собой обычный чистый лист А4 с определенным шрифтом, интервалом и предустановленной коллекцией стилей форматирования. Любые изменения, проделанные с документом на базе шаблона по умолчанию, будут сохранены только для конкретного документа – файла с расширением «.docx» (или «.doc»). Чтобы каждый раз при запуске Microsoft Word появлялся не чистый лист, а лист с данными (например, бланк предприятия) или тот же чистый лист, но с другими предустановками инструментов документа, необходимо изменить содержимое шаблона Normal.dotm. В версиях Microsoft Word 2007, 2010, 2013 и 2016 это делается следующим образом.
В первую очередь подготавливаем шаблон: берем любой из имеющихся документов Word или создаем новый. Настраиваем его под себя – выбираем макет листа, шрифт, интервал, добавляем подложку, колонтитулы, текст или таблицу, формируем свою коллекцию стилей и т.п.

По итогу сохраняем документ под именем «Normal», а в качестве типа файла указываем «Шаблон Word с поддержкой макросов». Сохраняем в любом удобном месте на диске.

Закрываем приложение Microsoft Word. Только что созданный файл Normal.dotm открываем в окне проводника, вырезаем или копируем его.

Далее жмем клавиши Win+R и запускаем команду:
appdata

Откроется системная папка «AppData». Здесь проходим путь:
Roaming — Microsoft — Templates (или Шаблоны)
Удаляем исходный файл Normal.dotm, а вместо него вставляем из буфера отредактированный Normal.dotm.

2. Создание коллекции личных шаблонов
Кроме редактирования основного шаблона Normal.dotm, упростить работу с большим документопотоком можно, создав коллекцию личных шаблонов. Тогда как Normal.dotm будет шаблоном для документов, с которыми работа проводится преимущественно, в коллекцию личных шаблонов могут войти образцы документов, используемых реже. Для хранения коллекции личных шаблонов пользователей приложения Microsoft Office при установке создают специальную папку «Настраиваемые шаблоны Office» внутри папки «Документы» пользовательского профиля. Изначально она пустая, заполнить ее можно, сохранив в эту папку любой отредактированный документ Word в формате шаблона. Для этого при сохранении документа необходимо выбрать тип файла «Шаблон Word» или «Шаблон Word с поддержкой макросов».

Коллекция личных шаблонов доступна внутри приложения Microsoft Word. Чтобы задействовать любой из своих шаблонов, при создании нового документа необходимо переключиться на вкладку «Личные».

3. Как не потерять свои шаблоны при сбое работы Windows
Шаблоны – и Normal.dotm, и коллекция личных – хранятся на диске системы С, не самом надежном месте компьютера. При критическом сбое работы Windows и, как следствие, ее переустановки, со всеми своими наработками можно распрощаться навсегда. Чтобы не потерять свои шаблоны, необходимо обеспечить хранение их копий на несистемном разделе, съемном носителе или в «облаке». Хранение копии – это единственный вариант уберечь шаблон Normal.dotm, поскольку его местонахождением должен быть рассмотренный выше путь внутри папки «AppData». А вот коллекцию личных шаблонов на несистемном диске можно хранить постоянно, указав приложению Microsoft Word новый путь хранения. Как это сделать?
Перемещаем папку «Настраиваемые шаблоны Office» из папки «Документы» на другой диск, в нашем случае D. Запускаем приложение Word, жмем «Файл» — «Параметры». В окне параметров переключаемся на вкладку «Сохранение» и ищем графу «Расположение личных шаблонов по умолчанию». В этой графе нужно указать новый путь хранения личных шаблонов. Поскольку кнопка обзора для этой настройки не предусмотрена, новый путь прописываем вручную (или копируем его в проводнике и вставляем).

Отличного Вам дня!