
A list in Microsoft Word is a series of items preceded by a bullet or number. You can apply bullets or numbers to a list, as well as modify the bullet type or numbering format to suit the requirements of the document.
Contents
- 1 How do I write a list in Word?
- 2 What is LIST level Word?
- 3 What is LIST paragraph in Word?
- 4 What are the two types of list in MS Word?
- 5 How do I view a list in Word?
- 6 How do you type a list?
- 7 What is a list used for?
- 8 How do I create a numbered list in Word?
- 9 How do I promote a list in Word?
- 10 How do you write a list in a paragraph?
- 11 How do you make a 1.1 List in Word?
- 12 How do I make a paragraph in a list in Word?
- 13 How do you create a list in Word explain with example?
- 14 How many types of list are there?
- 15 How do I make a list in Microsoft Office?
- 16 How do I separate a list in Word?
- 17 How do you separate a list in Word?
- 18 What is a list format?
- 19 How do you write a list in a sentence?
- 20 How do you write a list in a sentence example?
How do I write a list in Word?
Type * (asterisk) to start a bulleted list or 1. to start a numbered list, and then press Spacebar or the Tab key. Type some text. Press Enter to add the next list item.
In Microsoft Word, you can edit the list levels to organize your numbered/bulleted lists and outlines. You can even custom-build a multilevel list by formatting each list level to meet your preferences.
What is LIST paragraph in Word?
3. When you create a list using the Bullets and Numbering commands, Word uses a style called List Paragraph to format the text.
What are the two types of list in MS Word?
There are two types of common lists you can create in Word: bulleted lists and numbered lists. You can switch between the type types by using the techniques described in this tip. Word makes it easy to add both numbered lists and bulleted lists to your document.
How do I view a list in Word?
Select the list items. Word can also control the alignment of a few selected items. Go to Home > Paragraph. Click the dropdown arrow on Numbered list button.
How do you type a list?
Bulleted and numbered lists can be used in your documents to outline, arrange, and emphasize text. In this lesson, you will learn how to modify existing bullets, insert new bulleted and numbered lists, select symbols as bullets, and format multilevel lists. Optional: Download our practice document.
What is a list used for?
Lists are often used in works of fiction and creative nonfiction (including essays) to evoke a sense of place or character. Lists are commonly used in business writing and technical writing to convey factual information succinctly.
How do I create a numbered list in Word?
To start a numbered list, type 1, a period (.), a space, and some text. Then press Enter. Word will automatically start a numbered list for you. Type* and a space before your text, and Word will make a bulleted list.
How do I promote a list in Word?
- Promote a list item. Shift + Tab OR Alt + Shift + Left Arrow.
- Demote a list item. Tab OR Alt + Shift + Right Arrow.
- Demote to body text. Ctrl + Shift + N.
- Select list item above. Alt + Shift + Up Arrow.
- Select list item below. Alt + Shift + Down Arrow.
How do you write a list in a paragraph?
Series. If you are including a simple, relatively short list of three to five items within a paragraph —also known as a series—the proper formatting is to: (a) precede the list with a comma, (b) label each item with a lowercase letter enclosed in parentheses, and (c) separate each item with commas or semicolons.
How do you make a 1.1 List in Word?
You can number headings so that top-level headings (Heading 1) are numbered 1, 2, 3, for example, and second-level headings (Heading 2) are numbered 1.1, 1.2, 1.3. Open your document that uses built-in heading styles, and select the first Heading 1. On the Home tab, in the Paragraph group, choose Multilevel List.
How do I make a paragraph in a list in Word?
Click on the layout tab > Data group > Convert to Text button (it is right on the end of the ribbon), From the displayed dialog, select “Separate with paragraph marks” option then click on OK. Now you have a bunch of paragraphs with the text in them, then do the find/replace I described above.
How do you create a list in Word explain with example?
If you want to create a list with existing text: · Select the text you want to make a list. Note: Above is an example of a bulleted list. Click on the ‘Home’ tab and go to the ‘Paragraph’ tab. Select either the bulleted or numbered list button, whichever you need, as pictured below.
How many types of list are there?
There are three types of lists: unordered list — a set of related items in no particular order. ordered list — a set of related items in a specific order.
How do I make a list in Microsoft Office?
From Microsoft 365:
- Select App launcher > All apps > Lists. Tip: If you don’t see the Lists app here, use the Search box to search for Lists.
- Select New list.
- Choose how you want to create the list:
- Choose the options for your list, then Create.
- To add items, select New, fill in the form, and select Save.
How do I separate a list in Word?
Type out your bulleted list, pressing “Enter” after each entry. If you want to separate your lists using empty lines or headings, use the Bullets icon to disable and enable the automatic formatting as required.
How do you separate a list in Word?
Click the arrow with the Multi-level list button (grouped under Paragraph, 3rd from left). From the context menu it has, pick Change list level and pick the second level. Repeat it with the other sub-items in you list.
What is a list format?
A list style is a style that contains various levels of formatting. When you apply a list style the formatting that is applied depends on its level. The level of a paragraph is determined by the value of the left indent. The default bullet and numbering buttons apply a list style.
How do you write a list in a sentence?
The easiest way to make a list into a sentence is to add a subject and verb at the beginning. Remember that the structure should stay parallel. Also, remember to use commas between the items in the list, unless it would be confusing, in which case, you need to use semi-colons.
How do you write a list in a sentence example?
For example, if I told you I have a cat, a dog, and a bird as pets, I just created a list within the natural flow of the sentence. If you are listing simple items, as above, separate each item with a comma. You should use “and” or “or” just before the last item to indicate the conclusion of the list.
But this is a program that over time has not stopped evolving and growing. Thus, it has been receiving new updates and functions in order to meet the expectations and needs of its millions of users. Therefore and due to all this, at the moment we can find a multitude of functions, more or less useful or extended, but which try to cover all environments. At the same time we must bear in mind that here we are not only going to work with texts , but also that the application supports all kinds of additional elements. Here we find graphics, tables, images , videos, etc; many of them from the Insert menu.

To all that we have mentioned so far, another very interesting element as well as useful that we can add, are those called lists. In fact, in these we are going to focus on these same lines , a type of object as used and versatile as lists.
Surely, over the years, many of you have used these elements to add a plus to your documents. Well, that is why here we are going to focus on showing you in detail what these objects can offer us. We will also see the types of lists that we can use in Word , as well as the utility that they will offer us separately.
What is a Word list and what is it for?
First of all and as its own name lets us glimpse, the Word lists function allows us to carry out an accumulation of similar elements, and ordered properly. Thus, what we achieve is to generate our own personal lists that in the end will come in handy to show a set of elements, but in a structured way.
Of course, we must bear in mind that the advanced program of the Redmond , presents us with several ways, both to create those lists, and formats for them. For example, initially we have the possibility of accessing this type of elements directly from the Start menu option of Word itself. Thus, at the top of the section called Paragraph, we see the formats of the same that we can access and use below.

As we mentioned, a program of the potential of this Microsoft , presents us with several alternatives to choose from when dealing with its additional elements. Here come into play, as it could not be otherwise, the lists that concern us in these lines. That is why below we are going to talk about each of the types of lists that we are going to find here and that we can use. Each will be best suited for a type of use, or work environment.
Numbered lists
It is evident that the numbered lists are perhaps one of the most common ones that are often used when the time comes to make use of these elements. They could be considered as the most basic of the exposed formats, but perhaps they are also the most useful. These are represented, in the section discussed above, by a button with a series of numbers vertically. Therefore, to see what this format offers us, we will only have to click on it.
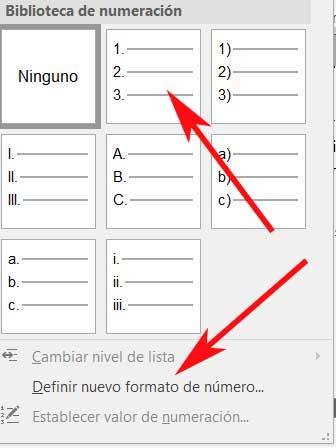
It is worth mentioning that despite being called Numbering Lists, here we can use other elements in the form of separators for the elements of the same. We will see these on the screen by clicking on the drop-down list to the right of the mentioned button. In this way, we can opt to use simple numbers , upper or lower case letters, numbers with a separator, etc. Say that when you click on the button directly, the list will begin to be classified by simple numbers.
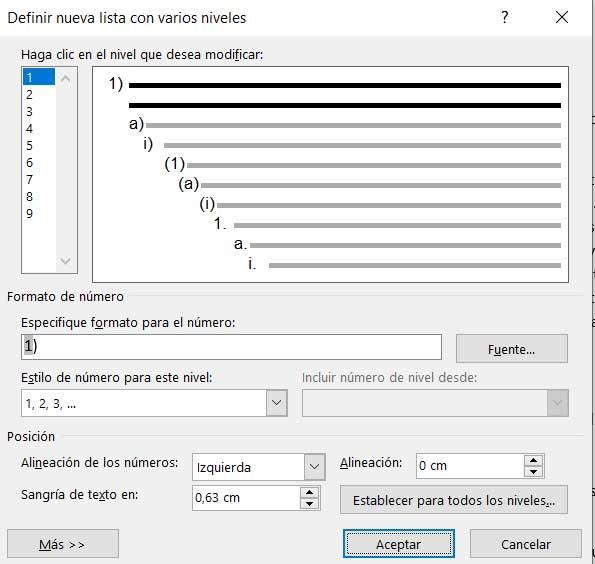
But that’s not all, but at the same time we can specify our own custom classifier, all through the link Define new number format.
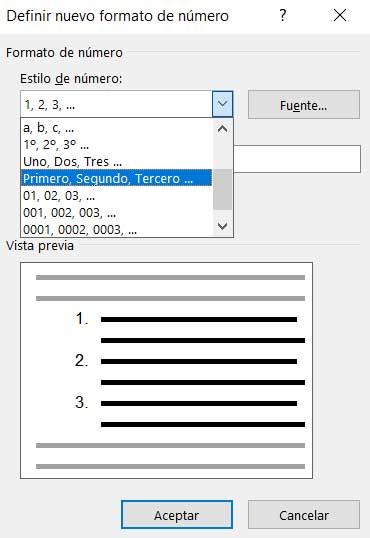
Here the program itself proposes a wide range of formats that will serve as classification elements for the list that we will create. Similarly, we will have the possibility to create a custom one by adding characters to the Number format field. Say that in this same window we have a preview to visualize how the numerical list that we are going to create will look like. As you can imagine, this function opens up a wide range of possibilities when creating basic and original lists in Word.
Before we finish this type, we will tell you that a shortcut to creating numerical lists here is, for example, writing a 1 followed by a -. Thus, when pressing the space bar, Word will directly create a list of this type for us to fill in and customize.
Bullet lists
On the other hand, a little more original than those previously reviewed, we find the Bullet lists. These we will find in the same section of the main interface of the program that we discussed earlier. But in this case, if we choose to use this specific format, say that it is represented by a button with a series of small squares. As in the previous case, when you click on the small arrow on the right of it, the corresponding drop-down list appears.
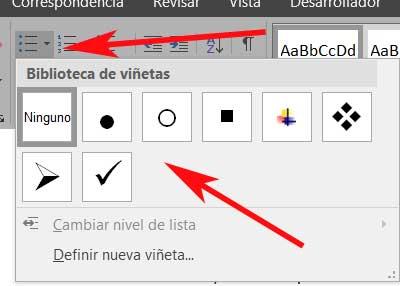
Here, as before, we are going to find a series of slightly more graphic elements or objects that will serve as cataloguers or separators for this new list. In this section, what we are going to find are a series of elements in the form of symbols that can act as separators for the elements of the new list. Thus, we find circles, squares, arrows, etc. But of course, as in the previous case, we can also define new ones. For this we click on Define new bullet from the mentioned drop-down list.
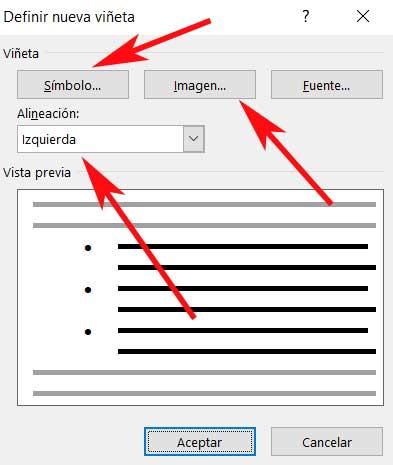
The most interesting thing about this is that here we can specify that we want to use some of the multiple symbols that we usually use throughout the operating system. But that is not all, we will also have the possibility to select an image that we have stored in the disk drives . Of course, we should be a little cautious, since this image will be repeated over and over again for each item on the list.
As in the previous case, we also have the possibility to shorten the process of creating a custom list. For this, it is enough that we write an asterisk on a new line, so that the bullet list starts automatically by pressing the space bar .
Multilevel lists
So far we have been able to see the main objective and how we can create both numerical and bulleted lists. Each format can serve us in an environment or type of independent use, we can also create both lists made up of generic classifiers, as well as more personalized and therefore original.
However, it is also worth taking a look at the so-called Multilevel lists. We will find these in the same section of the Word interface of the previous two. Of course, in this case they are represented by the levels of which they will be composed, in miniature. So, to start we will tell you these Multilevel are elements of this same type that we have seen, but they allow you to create a list within another. It is evident that for this the container must already exist, so within the primary list, we can create others. Say that these will keep the indentations that we added initially, as well as the numbering indicated in their design.

That is why it could be said that the use of these elements is like taking the use of the simple lists previously reviewed, one step further. In fact, if we deploy the corresponding drop-down menu on its button , we find designs similar to those we saw in the previous formats, but in this case, nested. In the same way we can create the design of our new multilevel list from the link Define new list style.
At the same time, we find another link in the same window that allows us to define a new, multilevel, personalized list. Here we will have the opportunity to specify various parameters of this nested list element. Among these we find the possibility of customizing the types of separators of the different lists, including the level number, the alignment of the elements, the distance of the indentation , etc.
How to sort a Word list
First, it must be clear that in order to sort the components of a Word list, we must first create an element of this type. For this we can use any of the types that we talked about previously, to later mark the list in its entirety.
Well, once we have marked it with the mouse, we return to look at the Paragraph section, but in this case we opted for the button called Order. This is represented by the letters A and Z with an arrow, where we can directly click. There are no drop-down lists here, as before. But of course, by clicking on the mentioned button that we discussed, we find a new window that will give us the opportunity to customize the order to use in the marked list, depending on the needs of each case.
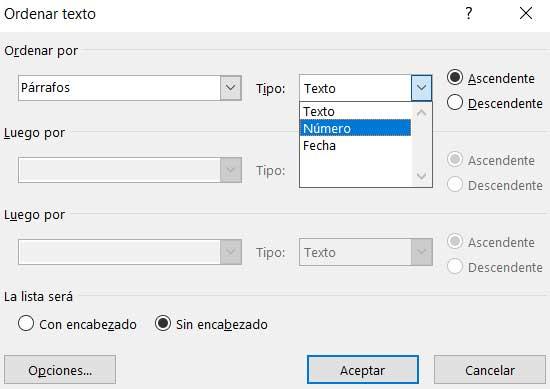
In this way, the program offers us the possibility of sorting the lists marked by paragraphs or titles on the one hand. When it comes to placing the elements that are part of it, Word offers us to order them by alphabetical, numerical order, or by date. Thus, if we are a little tricky and create the source lists in a structured way, this function will allow us to order their elements in a few seconds. And it is that the correct use of these elements will help to better understand our created documents.

Today’s Geek School lesson in this Word Formatting series will help you finally understand how to format your paragraphs and make them look the way you want, and create bulleted or numbered lists with confidence.
Yesterday, we spent the first lesson discussing Word’s Ribbon, page layout, and how to set up various page marks like tabs and margins. We also showed you what the deal is between typefaces and fonts, as well as how to change fonts, i.e. the way they appear in your documents. Then we wrapped it up with a brief discussion of templates.
Today, we’re going to stay in the same area of documenting formatting, namely the “Home” tab, but move over to the “Paragraph” section, so we can cover how to play around with the way type appears and behaves on the page. We’ll also briefly discuss shading and borders but the primary focus of the end of Lesson 2 will be lists: bulleted, numbered, and multilevel.
We’ll first spend some time discussing paragraph controls, such as justification, line spacing, and we’ll conclude the lesson with how to control and format various list and list styles in Word 2013.
You can control paragraph behavior and appearance using the “Paragraph” tab. This tab has several notable features including increase/decrease indent, line spacing, borders, and more. There are many more options than are first apparent. To access that click on the icon at the bottom corner of the paragraph tab.

The “Paragraph” dialog will give you further, more fine-grained control. You can affect indenting, line spacing, as well as line and page breaks.
Alignment
Alignment, also known as justification, determines how the documents text aligns with margins.
Left — line up the text or an image along the left margin. The right-hand side of the paragraph is free to float.
Center — When you center-justify, it means that the entire block of text will be aligned to the center, between the margins.
Right — line up the text on the right hand side (or move the graphic to the right margin).
Full — this means the left and right-hand sides of the paragraph and lined up. Word does this by adjusting spacing between words. This can often lead to awkward looking paragraphs with large holes in middle when working in narrow spaces.
In most cases, you will use left-justification for almost everything you write. Center is, of course, useful for centering titles and headlines. Full-justification is typically used in newspapers and many printed books because it creates nice square blocks of text.
Indentation
We covered indents in the first lesson so you already know how to create a hanging indent if you want to affect the first line of a paragraph, but what if you want to indent an entire block of text. The increase and decrease indent buttons allow you to affect changes to a whole paragraph, such as if you want to block off a quote.
Alternatively, you can select the entire block of text you want to affect and tab until you have it where you want it.
Line Spacing
“Line spacing” is used to set the horizontal spacing between lines.
Here you can see the results of various line spacing schemes, note you’re probably never going to want to space your line more than two, unless you want to produce really long documents!
You can tweak line spacing using the options:
· “Exactly” indicate line spacing in points. A point is the smallest unit of measurement for lines or fonts.
· “Multiple” lets you pick a number greater than double or something in between. You can also set line spacing using the menu option.
Shading and Borders
You should have no trouble getting the hang of shadows and borders, but for the sake of simplicity, check out the following screenshot for a quick run-down on the difference between shadowing text and highlighting it.
Borders, on the other hand, might be a little tricky. There’s a whole trick to borders that can at first seem a little frustrating. The borders button gives you some rudimentary control over how borders appear, but you really need to dig into the “Borders and Shading” dialog to get the full appreciation for what you can do.
First, there are two tabs for borders, the one we’re immediately concerned with is the first one, simple titled “Borders.” Let’s say you have a block of text and you want to draw a 1-point border around the whole thing, while having a ½-point dotted border between line breaks.
How is this accomplished? Normally you could simply select the border option from the dropdown menu on the “Paragraph” section.
However, you still need to add dashed lines. For that kind of overall control, you need to open up the “Borders and Shading” dialog and apply the style you want.
Once you choose a border style, simply click on each part of the “Preview” you want to affect. In the above screenshot, note how the outside border is a solid line, but between lines we were able to add our dashed line.
You probably won’t spend your days and nights formatting your documents with borders and shading, but for those times you do, it’s nice to know exactly what you want, and how to go about accomplishing it.
Lists
Lists! Lists! Lists! One of the things you will do a lot in Microsoft Word 2013 is create lists. Lists are crucial to organizing text whether it be an unordered list using bullets, or an ordered numbered list, or even a multilevel list, such as what you’d end up with an outline.
Lists can be affected using the lists functions on the “Paragraph” section.
A Quick Note on AutoCorrect
Word will also automatically start a list for you if it thinks it detects that you’re trying to create one.
For example, let’s say you type something “1. Don’t Mess with Texas!” and then you hit “return.” Word will automatically indent that statement as soon as you press the space button after the “1.”
- Don’t Mess with Texas!
- We have the best BBQ!
When you hit return, it will automatically indent the line and number it (2., 3., 4., etc.).
Some people might find this behavior annoying and may simply want to create lists using the provided buttons. In such a case, you can turn off automatic lists in the options. Go to the “Options” on the “File” tab and choose “Proofing.”
Then click “AutoCorrect Options” and choose the “AutoFormat as You Go.” You can see that there’s a number of different stuff you can disable. In this case, you can turn off number lists and/or bulleted ones.
While you’re in the “AutoCorrect” options, you’d be well to check out the “AutoFormat” options. Feel free to turn stuff off if it bugs you.
As you use Word, you’re going to find it does a lot of things for you, like changing 1/2 to ½ automatically, or changing — (two hyphens) to – (a dash). Check these options because you’re likely to find the fix there (many of these same options can also be found on the “AutoFormat As You Type” tab as well) In fact, you’d do well to check out the whole “AutoCorrect” dialog to understand what formatting tricks Word is applying to your documents.
Let’s now move on to the business of actually building and formatting lists.
Bulleted lists
You can quickly create bulleted lists by selecting the text you want clicking the “Bullets” button. Bullets will be placed at the head of each line after a line break.
From the “Bullet Library” you can select a different bullet scheme. Below you can see which bullets are being used in the document.
Finally, you can define a new bullet scheme from a symbol, picture, or font.
So the end result, is the ability to create lists that adhere to a particular style, like a Pi symbols for a nerdy list:
π Run for Chess Club president
π Buy new Magic cards
π Clean heat sink in desktop
π Dr. Who marathon!
π Play EVE Online
Or you could create a food-themed list with its own special bullet:
Bacon
The point is, you’re not limited in the stock bullets that come with Word 2013, so feel free to express yourself and use them to your advantage!
Numbered lists
When you want to create a numbered list, you can usually begin a line with a number and Word will automatically start formatting it as such. You can still create a list and apply numbers to it though by clicking the “Numbering” button.
Similarly to the bullets window, you can choose a new numbering scheme from a “Numbering Library” and see which numbering schemes are employed in the current document.
You can also define new numbering formats (font, style, and format).
Calling them “Numbered Lists” is something of a misnomer. They’re really more ordered lists because you can order them by any scheme that basically counts up.
So, you can have a numbered list (1, 2, 3, 4 …), or you can use letters (A, B, C, D …), or Roman Numerals (I, II, III, IV …). It’s really up to you, once again showing the power of Word’s formatting skills!
Multilevel lists
Finally, a multilevel list, such as you’d typically used to create outlines, can be applied by selecting your text and clicking the “Multilevel List” button.
You can quickly manipulate levels in your outline by placing the pointer at the front of new line and using “Tab” and “Shift + Tab” to increase and decrease them, respectively.
You can also create a new list if the current selections don’t meet your needs. In this dialog, you can select each level you want to modify and apply formats, styles, positions, and so on.
Similarly, you can define a new list style. Here you see we can name our new style, define levels and indenting, whether it’s bulleted, numbered, as well as choose symbols or pictures. Note, this dialog originates from the “Multilevel List” options but it applies to all types of aforementioned list styles.
In most cases, you’re going to want to use bulleted and numbered lists most often while multilevel lists are useful for creating outlines. Nevertheless, you have a huge amount of flexibility with all three. Whether you’re just making a simple bulleted list with checkboxes for your children’s chores, or outlining an epic 1000+ page novel with multiple chapters and sub-chapters, Word allows you grab control of your creation process and produce winning content!
Coming up Next…
So there ends today’s lesson, we hope you are on firmer ground when it comes to paragraph formatting, shading and borders, as well as the myriad of options you have when it comes to lists. Don’t forget, you can always go back and read Lesson 1 if you missed anything we previously covered.
In tomorrow’s lesson, we’re going to cover tables as well a whole host of formatting controls such as headers and footers, working with symbols, and quite a bit more!
READ NEXT
- › Spotify Is Shutting Down Its Free Online Game
- › How to Get a Refund on the PlayStation Store
- › The New Winamp Is Here, but It’s Not What You’d Expect
- › Android’s Nearby Share Has (Unofficially) Arrived on Mac
- › Save Hundreds on Elegoo’s New PHECDA Laser Engraver Through Kickstarter
- › Five Types of Phone Damage That Aren’t Covered by Your Free Warranty
Word has an odd behavior where it applies the List Paragraph style to a Normal styled paragraph that you apply bullets to using the Bullets button in the Paragraph group on the Home tab. I’m not sure if this is what is causing your confusion.
When setting up styles with numbering and bullets in Word, the first thing you want to do is plan out what you will be needing and create styles accordingly. You can create as many of these styles as you need. I find it easier and less confusing in the long run to create styles I need based off a Normal styled paragraph and modify the style to have the formatting I need instead of trying to direct format the paragraph, but that is up to you.
For example, if I needed bullets with two different level indents, I would create a style named Bullet 1 based off of a Normal styled paragraph, and another style named Bullet 2 also based off a Normal styled paragraph, then modify the styles accordingly.
For numbering, determine if you are using outline numbering (the type that repeats) or not. If no, use regular Numbering. If yes, use a Multilevel List.
You can tell Word to start from any number you prefer, restart numbering from 1, or continue numbering.
On the Home tab, in the Paragraph group, click Numbering or from the popup menu
(for more details see Creating numbered
lists) and then choose Set Numbering Value…:

When you open the box while the list is selected, these option buttons are enabled and one is selected:

- Start new list: Starts the numbering sequence over from 1. You might use this to place two
numbered lists one after the other. Word will want to continue the second list with the next number
in sequence from the previous list; this option tells it not to. - Continue from previous list: Tells Word you want to begin your list where the last one left
off. For instance, you may want to create a very long procedural description, with paragraphs of
unnumbered text within the list. This allows you to create lots of individual numbered lists, but
link them all together. - Set value to: You can start or continue list this any value that you want.
Another way to use these commands is to right-click on the first entry in the list and select from the
pop-up menu Restart at 1 or Continue Numbering:

Note: More details are available
in the Numbered lists section
in the Work with bulleted, numbered and multi-level lists lesson
of the Create basic documents free course.
See also this tip in French:
Comment créer une liste en redémarrant et en continuant la numérotation.
Please, disable AdBlock and reload the page to continue
Today, 30% of our visitors use Ad-Block to block ads.We understand your pain with ads, but without ads, we won’t be able to provide you with free content soon. If you need our content for work or study, please support our efforts and disable AdBlock for our site. As you will see, we have a lot of helpful information to share.