
A combo box is a text box with a list box attached. This type of control enables users to select a predefined value in a list or type their own value in the text box portion of the control.
Contents
- 1 What is a combo box used for?
- 2 What is the difference between a combo box and a drop-down list?
- 3 What is difference between combo box and list box?
- 4 What is a combo box windows?
- 5 How do I add a combobox to a Word document?
- 6 What are the types of combo box?
- 7 When should I use dropdown?
- 8 How do you create a multiple choice box in Word?
- 9 Which has similar features as combo box?
- 10 What is list box example?
- 11 How do you code a combo box in Visual Basic?
- 12 How do you use a combo box in Winforms?
- 13 What is ComboBox in Java?
- 14 What can I use instead of a dropdown?
- 15 Why are dropdowns bad?
- 16 How will you design a drop-down menu?
- 17 What is dropdown list in forms?
- 18 How many types of combo box controls are there?
- 19 Which one is combines the features of the text box and list box?
- 20 What are the properties of combo box?
What is a combo box used for?
Combo box The combo box control provides a more compact way to present a list of choices; the list is hidden until you click the drop-down arrow. A combo box also gives you the ability to enter a value that is not in the list. In this way, the combo box control combines the features of a text box and a list box.
What is the difference between a combo box and a drop-down list?
A drop-down list is a list in which the selected item is always visible, and the others are visible on demand by clicking a drop-down button. A combo box is a combination of a standard list box or a drop-down list and an editable text box, thus allowing users to enter a value that isn’t in the list.
What is difference between combo box and list box?
The List box displays all the items at once in a text area, whereas the combo box displays only one item at a time.The Combo box is a combination of a text box in which the user enters an item and a drop-down list from which the user selects an item.
What is a combo box windows?
A ComboBox displays a text box combined with a ListBox, which enables the user to select items from the list or enter a new value. The DropDownStyle property specifies whether the list is always displayed or whether the list is displayed in a drop-down.
How do I add a combobox to a Word document?
Select the combobox and then click Properties (available within the group Controls. The Content Control Properties dialog box appears. In the dialog box, under the section General, enter a Title of the combobox. In the dialog box, under the section Drop-down List Properties, click the Add button.
What are the types of combo box?
Combo Box Types and Styles
| Combo box type | Style constant | Description |
|---|---|---|
| Drop-down | CBS_DROPDOWN | Displays the list when the icon is clicked, and shows the selected item in an edit control. |
| Drop-down list (drop list) | CBS_DROPDOWNLIST | Displays the list when the icon is clicked, and shows the selected item in a static control. |
When should I use dropdown?
Dropdowns do have their advantages. First, they conserve screen space. Because they are a standard widget (even if an unpleasant one), users know how to deal with them. And, when used in forms and for attribute selection, dropdown boxes prevent users from entering erroneous data, since they only show legal choices.
How do you create a multiple choice box in Word?
Place the cursor in the form where you want the multi-selection list and then go to the Controls Task Pane (View > Design Tasks > Controls). Under the Repeating and Optional section, click Multiple-Selection List Box. Configure the multi-select list box as you would a standard List Box.
Which has similar features as combo box?
A ListBox is similar to a combo box, but is not collapsible/does not have a compact state.
What is list box example?
A list box is a graphical control element that allows the user to select one or more items from a list contained within a static, multiple line text box. The user clicks inside the box on an item to select it, sometimes in combination with the ⇧ Shift or Ctrl in order to make multiple selections.
How do you code a combo box in Visual Basic?
To add items to a ComboBox, select the ComboBox control and go to the properties window for the properties of this control. Click the ellipses (…) button next to the Items property. This opens the String Collection Editor dialog box, where you can enter the values one at a line.
How do you use a combo box in Winforms?
Using ComboBox In Windows Forms
- STEP 1 – Create a new project. Let’s create a new project using Visual Studio 2017.
- STEP 2 – Drag and Drop Control. Let’s add a ComboBox control to the form by dragging it from Toolbox and dropping it to the form.
- STEP 3 – Coding for Button Click Event.
- STEP 4 – Compile and Run.
What is ComboBox in Java?
In Java, you can create combo boxes. A combo box is a combination of a text field and a drop-down list from which the user can choose a value. If the text-field portion of the control is editable, the user can enter a value in the field or edit a value retrieved from the drop-down list.Creating a combo box is easy.
What can I use instead of a dropdown?
Radio buttons can be used to replace a dropdown in most cases. The advantage of using them over dropdowns is that the options are easily scannable without forcing user interaction to view the available options.
Why are dropdowns bad?
However, our large-scale usability testing reveals that using drop-down menus for the “wrong” input types can lead to slower checkout completion times, field validation errors, and unnecessary user attention being devoted to optional fields, all of which increase the likelihood of checkout abandonments.
10 Drop Down Menu Best Practices You Should Follow
- Keep menus under two levels deep.
- Create a clear and well-structured drop-down menus.
- Add hover or selection effects to stand out menu items.
- Use icons or images to enrich your drop-down menus.
- Keep menu styles consistent.
- Grey out unavailable menu items.
What is dropdown list in forms?
A select box also called drop-down box provides an option to list down various options in the form of drop-down list, from where a user can select one or more options. The
But this is a program that over time has not stopped evolving and growing. Thus, it has been receiving new updates and functions in order to meet the expectations and needs of its millions of users. Therefore and due to all this, at the moment we can find a multitude of functions, more or less useful or extended, but which try to cover all environments. At the same time we must bear in mind that here we are not only going to work with texts , but also that the application supports all kinds of additional elements. Here we find graphics, tables, images , videos, etc; many of them from the Insert menu.

To all that we have mentioned so far, another very interesting element as well as useful that we can add, are those called lists. In fact, in these we are going to focus on these same lines , a type of object as used and versatile as lists.
Surely, over the years, many of you have used these elements to add a plus to your documents. Well, that is why here we are going to focus on showing you in detail what these objects can offer us. We will also see the types of lists that we can use in Word , as well as the utility that they will offer us separately.
What is a Word list and what is it for?
First of all and as its own name lets us glimpse, the Word lists function allows us to carry out an accumulation of similar elements, and ordered properly. Thus, what we achieve is to generate our own personal lists that in the end will come in handy to show a set of elements, but in a structured way.
Of course, we must bear in mind that the advanced program of the Redmond , presents us with several ways, both to create those lists, and formats for them. For example, initially we have the possibility of accessing this type of elements directly from the Start menu option of Word itself. Thus, at the top of the section called Paragraph, we see the formats of the same that we can access and use below.

As we mentioned, a program of the potential of this Microsoft , presents us with several alternatives to choose from when dealing with its additional elements. Here come into play, as it could not be otherwise, the lists that concern us in these lines. That is why below we are going to talk about each of the types of lists that we are going to find here and that we can use. Each will be best suited for a type of use, or work environment.
Numbered lists
It is evident that the numbered lists are perhaps one of the most common ones that are often used when the time comes to make use of these elements. They could be considered as the most basic of the exposed formats, but perhaps they are also the most useful. These are represented, in the section discussed above, by a button with a series of numbers vertically. Therefore, to see what this format offers us, we will only have to click on it.
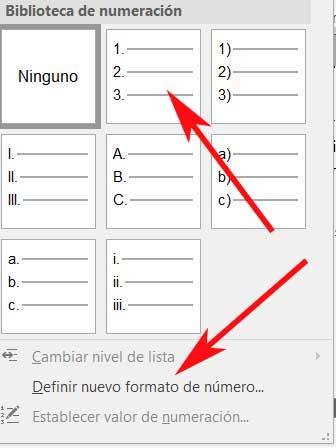
It is worth mentioning that despite being called Numbering Lists, here we can use other elements in the form of separators for the elements of the same. We will see these on the screen by clicking on the drop-down list to the right of the mentioned button. In this way, we can opt to use simple numbers , upper or lower case letters, numbers with a separator, etc. Say that when you click on the button directly, the list will begin to be classified by simple numbers.
But that’s not all, but at the same time we can specify our own custom classifier, all through the link Define new number format.
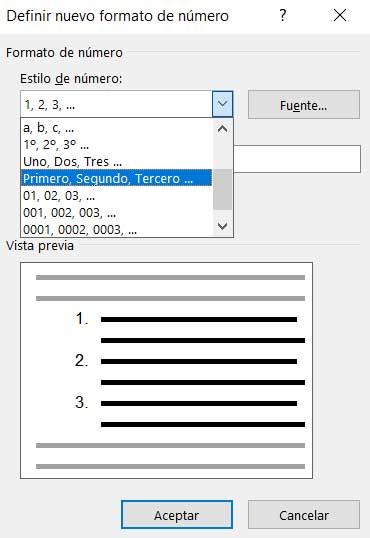
Here the program itself proposes a wide range of formats that will serve as classification elements for the list that we will create. Similarly, we will have the possibility to create a custom one by adding characters to the Number format field. Say that in this same window we have a preview to visualize how the numerical list that we are going to create will look like. As you can imagine, this function opens up a wide range of possibilities when creating basic and original lists in Word.
Before we finish this type, we will tell you that a shortcut to creating numerical lists here is, for example, writing a 1 followed by a -. Thus, when pressing the space bar, Word will directly create a list of this type for us to fill in and customize.
Bullet lists
On the other hand, a little more original than those previously reviewed, we find the Bullet lists. These we will find in the same section of the main interface of the program that we discussed earlier. But in this case, if we choose to use this specific format, say that it is represented by a button with a series of small squares. As in the previous case, when you click on the small arrow on the right of it, the corresponding drop-down list appears.
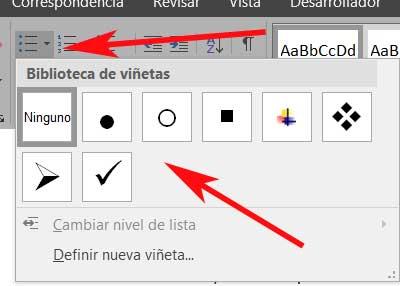
Here, as before, we are going to find a series of slightly more graphic elements or objects that will serve as cataloguers or separators for this new list. In this section, what we are going to find are a series of elements in the form of symbols that can act as separators for the elements of the new list. Thus, we find circles, squares, arrows, etc. But of course, as in the previous case, we can also define new ones. For this we click on Define new bullet from the mentioned drop-down list.
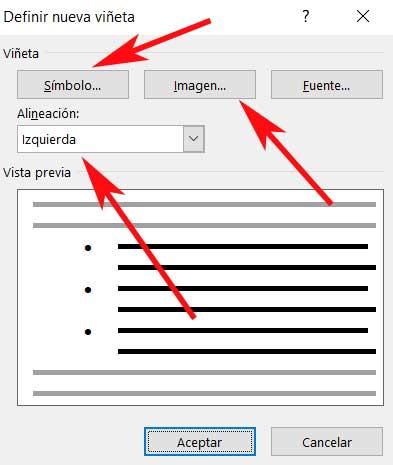
The most interesting thing about this is that here we can specify that we want to use some of the multiple symbols that we usually use throughout the operating system. But that is not all, we will also have the possibility to select an image that we have stored in the disk drives . Of course, we should be a little cautious, since this image will be repeated over and over again for each item on the list.
As in the previous case, we also have the possibility to shorten the process of creating a custom list. For this, it is enough that we write an asterisk on a new line, so that the bullet list starts automatically by pressing the space bar .
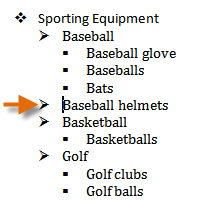
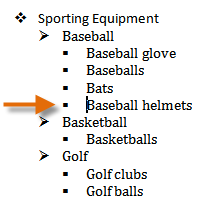
Multilevel lists
So far we have been able to see the main objective and how we can create both numerical and bulleted lists. Each format can serve us in an environment or type of independent use, we can also create both lists made up of generic classifiers, as well as more personalized and therefore original.
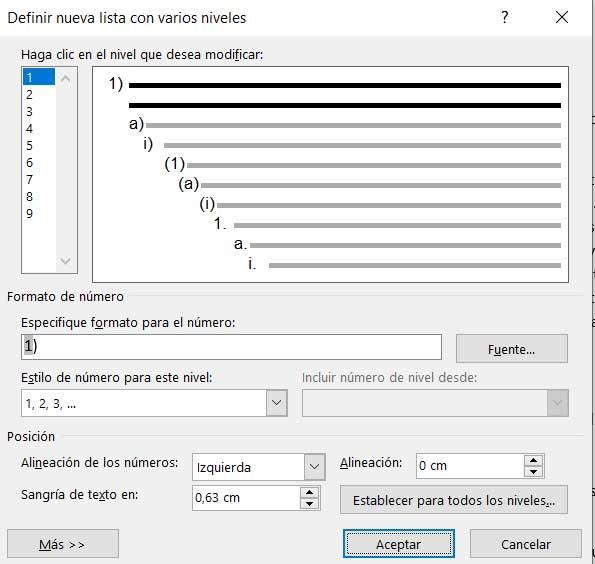
However, it is also worth taking a look at the so-called Multilevel lists. We will find these in the same section of the Word interface of the previous two. Of course, in this case they are represented by the levels of which they will be composed, in miniature. So, to start we will tell you these Multilevel are elements of this same type that we have seen, but they allow you to create a list within another. It is evident that for this the container must already exist, so within the primary list, we can create others. Say that these will keep the indentations that we added initially, as well as the numbering indicated in their design.

That is why it could be said that the use of these elements is like taking the use of the simple lists previously reviewed, one step further. In fact, if we deploy the corresponding drop-down menu on its button , we find designs similar to those we saw in the previous formats, but in this case, nested. In the same way we can create the design of our new multilevel list from the link Define new list style.
At the same time, we find another link in the same window that allows us to define a new, multilevel, personalized list. Here we will have the opportunity to specify various parameters of this nested list element. Among these we find the possibility of customizing the types of separators of the different lists, including the level number, the alignment of the elements, the distance of the indentation , etc.
How to sort a Word list
First, it must be clear that in order to sort the components of a Word list, we must first create an element of this type. For this we can use any of the types that we talked about previously, to later mark the list in its entirety.
Well, once we have marked it with the mouse, we return to look at the Paragraph section, but in this case we opted for the button called Order. This is represented by the letters A and Z with an arrow, where we can directly click. There are no drop-down lists here, as before. But of course, by clicking on the mentioned button that we discussed, we find a new window that will give us the opportunity to customize the order to use in the marked list, depending on the needs of each case.
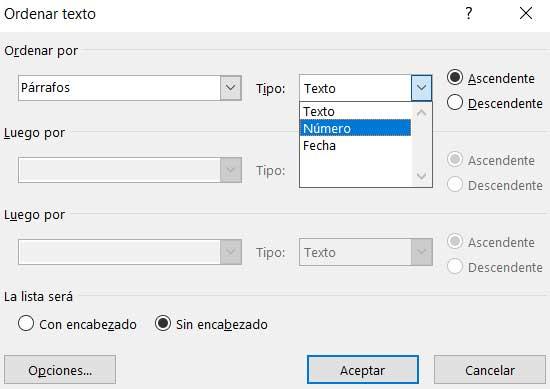
In this way, the program offers us the possibility of sorting the lists marked by paragraphs or titles on the one hand. When it comes to placing the elements that are part of it, Word offers us to order them by alphabetical, numerical order, or by date. Thus, if we are a little tricky and create the source lists in a structured way, this function will allow us to order their elements in a few seconds. And it is that the correct use of these elements will help to better understand our created documents.
Replace bullets or numbers with check marks or check boxes
-
Select the entire list; the bullets or numbers won’t look selected.
-
Choose Home, and then choose the Bullets list.

-
Do one of the following:
-
If you see the check mark or check box you want in the Bullet Library, select it.
-
If you don’t see the check mark or check box you want, go to the next step.
-
-
Choose Define New Bullet, and the Define New Bullet dialog box opens.
-
Choose Symbol, and then choose a symbol from the table of symbols.
Tip: For more choices, in the Font box, choose a symbol font, such as Wingdings.
-
Scroll through the list of symbols and choose the symbol—such as an open box (
) or a three-dimensional box ( )—you want to use. -
Choose OK, and then choose OK again in the Define New Bullet dialog box.
 ) or a three-dimensional box (
  )—you want to use.
The symbol you chose will be added to the Bullet Library so it’ll be handy if you want to use it again.
Make a checklist you can check off in Word
There are four steps involved in creating a list with check boxes that you can check off in Word. This type of list requires a Check Box Content Control, found in the Developer tab.
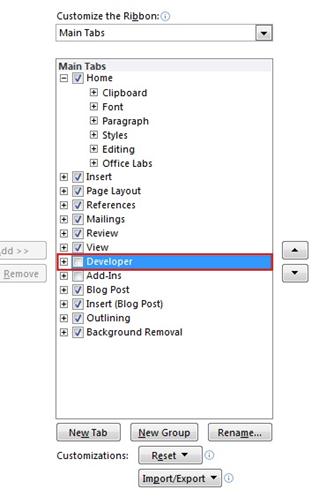
Step 1: Show the Developer tab
-
On the File tab, choose Options > Customize Ribbon.
-
In the Customize the Ribbon list, choose Main Tabs.
-
In the Main Tabs list, select the Developer check box, and then choose OK.
Step 2: Make your list
-
On the Developer tab, in the Controls group,. choose the Check Box Content Control button to insert a check box (
) in front of an item in an existing list or to create a new list. -
Press the Right Arrow key twice, type the first item in your list, and then press Enter.
-
Select the check box control that you just created, and press Ctrl+C to make a copy of the control.
-
On the new line, press Ctrl+V to paste the item, and then rename the item.
-
Repeat steps 6 and 7 as needed until your list is complete.
-
If you want to put an X in the check box, click inside the box.
More about the Check Box Content Control
You can use something other than the default check box and X.
-
Select a Check Box Content Control, and in the Controls group, choose Properties.
-
In the Content Control Properties dialog box, under Check Box Properties, choose Change next to Checked symbol and/or Unchecked symbol.
-
In the Symbol dialog box, choose a new symbol, and then choose OK to save your choice.
Step 3: Refine the layout
If some items in your list are more than one line long, you can use hanging indents to align them.
-
Select the list.
Note: Bullets or numbers won’t look selected.
-
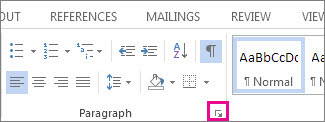
On the Home tab, in the Paragraph group, click the Paragraph dialog box launcher.
-
Under Indentation, in the Left box, type 0.25.
-
Under Special, choose Hanging.
-
Click OK when finished.
Step 4: Lock the text and controls
When you’re satisfied with the list, group it to lock the controls and listed items in place. That way, people can check off items on the list without changing the items themselves.
-
Select the list (the check box controls and the listed items).
-
On the Developer tab, in the Controls group, choose Group > Group.
Note: If you need to change something later, select the list again and choose Group > Ungroup.
See Also
Make changes to check boxes
Create a fillable form
Keyboard shortcuts for Microsoft Word 2016 for Windows
Make a checklist to print
If you just need a checklist that you can print, you can make a list where each item has a check box that you can check off on paper. You can also create a list of check boxes and check off items electronically by opening the document in Word.
Note: If you can’t check off an item electronically, it might be formatted for printing only or the document might be locked.
The way that you create the list depends on whether your document already contains bulleted lists with different kinds of bullets.
-
If your document does not already contain several different kinds of bullets, you can make a bulleted list by using a custom bullet format.
-
If your document already contains several bullet formats, you can prevent altering the existing bullets by placing the new list in a table.
Create a bulleted list with custom bullets
-
Type your list of items.
-
Select the list.
-
On the Home tab, in the Paragraph group, click the arrow next to Bullets.
-
Click Define New Bullet.
-
Click Symbol.
-
In the Font box, click a symbol font that is installed on your computer, such as Wingdings.
-
Scroll through the list of available symbols, and then double-click the box symbol that you want to use, such as an open box (
) or a three-dimensional box ( ).

Create a table to prevent altering the existing bullets
Step 1: Create a table
-
On the Insert tab, in the Tables group, click Table.
-
Click Insert Table.
-
In the Number of columns box, enter 2.
-
In the Number of rows box, enter the number of rows that you want. You need one row for each item in your list.
-
Click OK.

Step 2: Insert the check boxes and text
-
Click the top left cell.
-
On the Insert tab, in the Symbols group, click Symbol, and then click More Symbols.
-
Click the Symbols tab.
-
In the Font box, click a symbol font that is installed on your computer, such as Wingdings.
-
Scroll through the list of available symbols, and then double-click the box symbol that you want to use, such as an open box (
) or a three-dimensional box ( ). -
Click Close.
-
Click the next cell where you want to insert a box, and then press CTRL+Y to insert another box.
-
After you insert a box for each item that you want, click the top-right cell and type the text for the first item. Repeat this step for each item in the list.

Step 3: Refine the layout
Although you are using the table to lay out the list, you probably want to adjust the spacing so that the column that contains the check boxes isn’t too wide, and the text is lined up close to the check boxes. You probably don’t want the border lines that Word usually includes with the table. To make these adjustments, do the following:
-
Right-click the table, point to AutoFit, and then click AutoFit to Contents.
-
Right-click the table, click Table Properties, and then click the Table tab.
-
Click Options, and in the Left and Right boxes, enter a number that will provide a little bit of space between the check box and the text, such as .02 inches, and then click OK.
-
On the Table tab, click Borders and Shading, and then click the Borders tab.
-
Under Setting, click None, and then click OK.
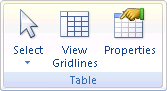
Note: After you remove the border lines, you may still see gray border lines. These are the table gridlines, and they do not show when the document is printed. If you don’t want to see them at all, you can hide them by clicking View Gridlines in the Table group on the Layout tab under Table Tools.
Make a checklist that you can check off in Word
To use check boxes that you can check off in Word, you insert the check box form field into your document. This looks best if you use a table to align the check boxes with the text, so your first step is to create a table. After you create the table, you can insert the check boxes in one column and the text in the other column, and then you can refine the layout. To check off the items, you lock the form.
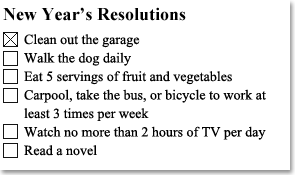
The result looks like the following illustration.
Step 1: Create a table
-
On the Insert tab, in the Tables group, click Table.
-
In the Number of columns box, enter 2.
-
In the Number of rows box, enter the number of rows that you want. You need one row for each item in your list.
Don’t worry about the size of the columns or the border lines in the table. You will fix those later.
Step 2: Insert the check boxes and text
To add the boxes that you will be able to check, you need to use the Developer tab.
Show Developer tab
-
Click the Microsoft Office Button
, and then click Word Options. -
Click Popular.
-
Select the Show Developer tab in the Ribbon check box.
Note: The Ribbon is a component of the Microsoft Office Fluent user interface.
 , and then click Word Options.
Add check boxes
-
Click the top left cell in the table that you inserted.
-
On the Developer tab, in the Controls group, click Legacy Tools.
-
Under Legacy Forms, click Check Box Form Field
.Note: If the check box has a gray background, click Legacy Tools in the Controls group, and then click Form Field Shading
to remove the gray shading. -
Click the next cell where you want to insert a check box, and then press Ctrl+Y to insert another check box.
-
After you insert a check box for each item that you want, click the top right cell and type the text for the first item. Repeat this step for each item in the list.

 .
. to remove the gray shading.
Step 3: Refine the layout
Although you’re using the table to lay out the list, you probably want to adjust the spacing so that the column that contains the check boxes isn’t too wide, and the text is lined up close to the check boxes. You probably don’t want the border lines that Word usually includes with the table. To make these adjustments, do the following:
-
Right-click the table, point to AutoFit, and then click AutoFit to Contents.
-
Right-click the table, click Table Properties, and then click the Table tab.
-
Click Options, and in the Left and Right boxes, enter a number that will provide a little bit of space between the check box and the text, such as .02 inches, and then click OK.
-
On the Table tab, click Borders and Shading, and then click the Borders tab.
-
Under Setting, click None, and then click OK.
Note: After you remove the border lines, you may still see gray lines. These are the table gridlines, and they do not show when the document is printed. To hide the table gridlines on the screen, click the Layout tab under Table Tools, and in the Table group, click View Gridlines.
Step 4: Lock the form
To check off the items by clicking in the check boxes, you need to lock the form. However, when the form is locked, you will not be able to make changes to the text or layout, so be sure to do this step last.
Note: If you want to check the spelling in your list, you must run spell check on the document before you lock the form.
When you want to edit the document, you can easily unlock the form. Just remember to lock it again so that you will be able to click the check boxes.
Lock the form
-
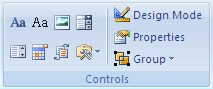
Make sure that you are not in design mode by clicking Design Mode in the Controls group on the Developer tab.
-
On the Developer tab, in the Protect group, click Protect Document, and then click Restrict Formatting and Editing.
-
In the Protect Document task pane, under Editing restrictions, select the Allow only this type of editing in the document check box.
-
In the list of editing restrictions, select Filling in forms.
-
Under Start enforcement, click Yes, Start Enforcing Protection.
-
To assign a password to the document so that only reviewers who know the password can remove the protection, type a password in the Enter new password (optional) box, and then confirm the password.
Important: If you choose not to use a password, all reviewers can change your editing restrictions.
Unlock the form
-
On the Developer tab, in the Protect group, click Protect Document, and then click Restrict Formatting and Editing.
-
In the Protect Document task pane, click Stop Protection.
Note: If you used a password to add protection to the document, you need to type the password before you can stop the protection.
Lesson 10: Working with Lists
/en/word2010/line-and-paragraph-spacing/content/
Introduction
Bulleted and numbered lists can be used in your documents to format, arrange, and emphasize text. In this lesson, you will learn how to modify existing bullets, insert new bulleted and numbered lists, select symbols as bullets, and format multilevel lists.
Using bulleted and numbered lists
When you want to organize lists in Word, you can format them as either bulleted or numbered lists. Word offers a variety of bullet options that allow you to customize your lists to suit your needs.
Optional: You can download this example for extra practice.
To create a list:
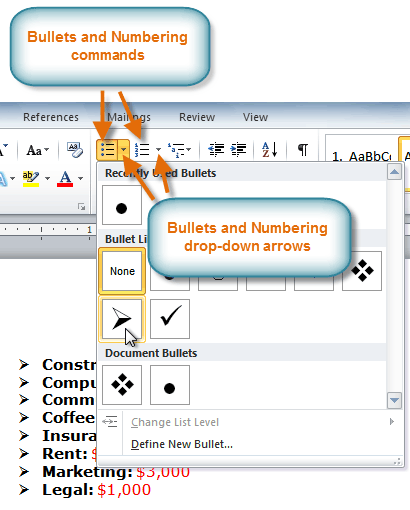
- Select the text you want to format as a list.
- Click the Bullets or Numbering drop-down arrow on the Home tab.
The Bullets and Numbering commands and drop-down arrows
- Select the bullet or numbering style you want to use, and it will appear in the document.
- To remove numbers or bullets from a list, select the list, then click the Bullets or Numbering commands.
When you’re editing a list, you can press Enter to start a new line, and the new line will automatically have a bullet or number. When you’ve reached the end of your list, press Enter twice to return to normal formatting.
Bullet options
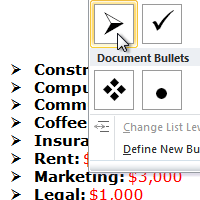
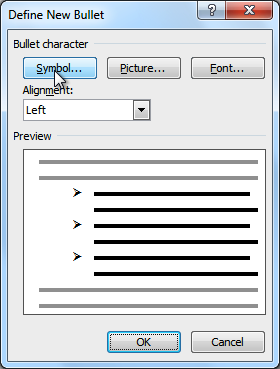
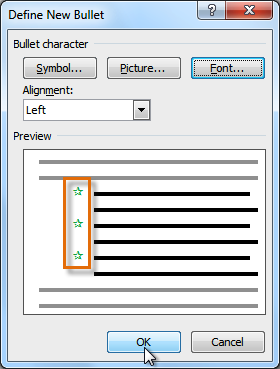
To use a symbol as a bullet:
- Select an existing list.
- Click the Bullets drop-down arrow.
- Select Define New Bullet from the drop-down menu. The Define New Bullet dialog box appears.
The Define New Bullet dialog box
- Click the Symbol button. The Symbol dialog box appears.
- Click the Font drop-down box, and select a font. The Wingdings and Symbol fonts are good choices because they have a large number of useful symbols.
Choosing a symbol
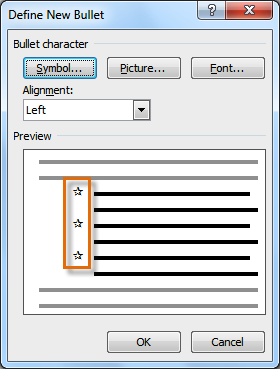
- Select the desired symbol.
- Click OK. The symbol will now appear in the Preview section of the Define New Bullet dialog box.
Preview of the new bullets
- Click OK to apply the symbol to the list in the document.

You can use a picture as a bullet. Click the Picture button in the Define New Bullet dialog box, then locate the image file on your computer.
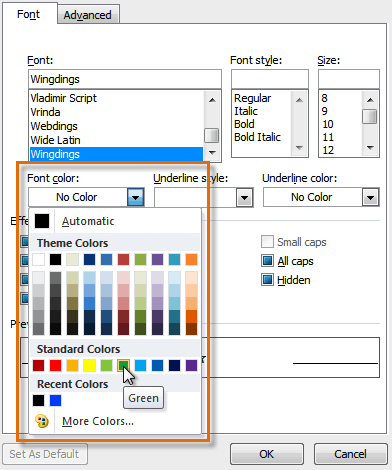
To change the bullet color:
- Select an existing list.
- Click the Bullets drop-down arrow.
- Select Define New Bullet from the list. The Define New Bullet dialog box appears.
- Click the Font button. The Font dialog box appears.
- Click the Font Color drop-down box.
Choosing a bullet color
- Click the desired color to select it.
- Click OK. The bullet color will now appear in the Preview section of the Define New Bullet dialog box.
Preview of the new bullet color
- Click OK to apply the bullet color to the list in the document.
The finished bullets
Multilevel lists
Multilevel lists allow you to create an outline with multiple levels. In fact, you can turn any bulleted or numbered list into a multilevel list by placing the insertion point at the beginning of a line and pressing the Tab key to change the level for that line. You can then use the Multilevel List command to choose the types of bullets or numbering that are used.
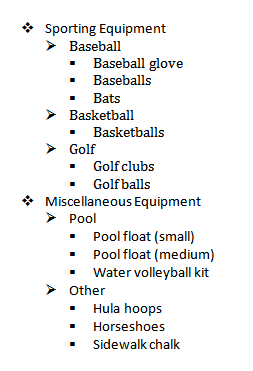 A multilevel list
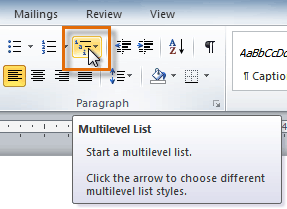
To create a multilevel list:
- Select the text you want to format as a multilevel list.
- Click the Multilevel List command on the Home tab.
The Multilevel List command
- Click the bullet or numbering style you want to use. It will appear in the document.
- Position your cursor at the end of a list item, then press the Enter key to add an item to the list.
To remove numbers or bullets from a list, select the list, then click the Bullets or Numbering commands.
To change the level of a line:
- Place the insertion point at the beginning of the line.
Placing the insertion point at the beginning of a line
- Press the Tab key to increase the level.
Pressing the Tab key to increase the level of a line
- Hold Shift and press Tab to decrease the level.
Challenge!
- Open an existing Word document. If you want, you can use this example.
- Format some text as a bulleted or numbered list. If you’re using the example, use the list of New Clients on page 2.
- Insert a new numbered list into the document.
- Modify the color of a bullet.
- Use the Tab key to change the levels of some of the lines.
/en/word2010/adding-breaks/content/

Learn how to easily create a checklist in Microsoft Word. We’ll show you how to make both a printable and a fillable checklist.
If there’s one thing that can help you get multiple tasks done it’s a checklist. And if you prefer to use digital tools rather than a physical pen and paper, consider Microsoft Word for this job.
You can create two types of checklists in Word depending on your needs. First, is a list with empty boxes that you can print and mark off items as you go. Second, is a list with boxes that you can fill in Word itself as you complete your tasks.
Both types of checklists have their purpose and show we’ll show you how to create each one.
If you want to print your checklist you can pop empty boxes or circles next to your list items. Then, put the list on the fridge for your family’s chores, hand copies out to your students for your class, or take it with you to the supermarket.
There are various ways you can create a printable checklist, so we’ll show you one of the fastest methods.
- Open a blank word document.
- Move to the first line where you want to add a list item.
- Go to the Home tab, click the drop-down list for Bullets, and choose the empty circle for the bullet type.

- When the circle displays, type your first list item. Each time you hit Enter or Return after a list item, a new empty circle appears, ready for your next list item.
- You can make the circles bigger so they’re easier to mark with checkmarks or X’s. Select one of the circles which will highlight them all. Then use the size drop-down box in the Font section of the ribbon on the Home. If you choose a larger size for the circles, this will not affect the size for the rest of your text.


Pick Different Symbols
If you want to make your checklist more fun and or just use something besides circles, you can make a custom bullet list.
- Go to the Home tab, click the drop-down list for Bullets, and choose Define New Bullet.

- Click Symbol.
- In the pop-up window, choose a different Font style such as Wingdings which offers a variety of basic and funky symbols.
- Pick the symbol you want to use, click OK, and then OK once more.


You can then start a new bullet list using the symbol or if you already had the circles as described above, they’ll transform to the symbol you chose.

You can then print your checklist as you would any other Word document with File > Print.
Create a Fillable Checklist in Microsoft Word
If you want to keep your checklist on your computer and mark the items off there, you can use a Word form control check box. This lets you just click the box to mark your items.
- Open a blank Word document.
- Before you add a list item, go to the Developer tab and click the Check Box in the Controls section of the ribbon. (If you don’t see this tab, head to our tutorial for how to add the Developer tab in Office.)

- When your check box appears, move your cursor outside of it to the right and enter your list item.
- Hit Enter to go to the next row and do the same thing: Add a Check Box, move to the right of it, and enter your item.


Save your checklist with File > Save or Save As. When you’re ready to use your checklist, just click the check box and an X will be placed in it.

Make Your List and Check it Twice
If you enjoy creating things like this in Word, then this tutorial should get you off to a great start! Whether you want a printable checklist or a fillable one, it’s easy enough to create a checklist in Microsoft Word and worth it when it’s time to use it. Also, check out how to sort lists in Word alphabetically.
![]()