
Change font style, size, color, or apply effects
Click Home and:
-
For a different font style, click the arrow next to the default font Calibri and pick the style you want.
-
To increase or decrease the font size, click the arrow next to the default size 11 and pick another text size.

-
To change the font color, click Font Color and pick a color.
-
To add a background color, click Fill Color next to Font Color.
-
To apply strikethrough, superscript, or subscript formatting, click the Dialog Box Launcher, and select an option under Effects.
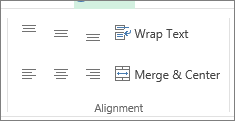
Change the text alignment
You can position the text within a cell so that it is centered, aligned left or right. If it’s a long line of text, you can apply Wrap Text so that all the text is visible.
Select the text that you want to align, and on the Home tab, pick the alignment option you want.
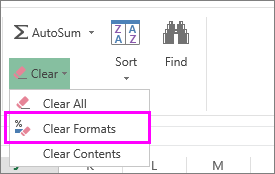
Clear formatting
If you change your mind after applying any formatting, to undo it, select the text, and on the Home tab, click Clear > Clear Formats.
Change font style, size, color, or apply effects
Click Home and:
-
For a different font style, click the arrow next to the default font Calibri and pick the style you want.
-
To increase or decrease the font size, click the arrow next to the default size 11 and pick another text size.
-
To change the font color, click Font Color and pick a color.
-
To add a background color, click Fill Color next to Font Color.
-
For boldface, italics, underline, double underline, and strikethrough, select the appropriate option under Font.
Change the text alignment
You can position the text within a cell so that it is centered, aligned left or right. If it’s a long line of text, you can apply Wrap Text so that all the text is visible.
Select the text that you want to align, and on the Home tab, pick the alignment option you want.
Clear formatting
If you change your mind after applying any formatting, to undo it, select the text, and on the Home tab, click Clear > Clear Formats.
In This Article
- Click the File tab and then click Options. The Excel Options dialog box appears.
- In the General category, click the Use This Font drop-down arrow.
- Select the desired font from the list.
- Click the Font Size drop-down arrow and select a font size from the list.
- Click OK to close the dialog box.
Contents
- 1 How do I change the default font in Excel?
- 2 How do I lock font in Excel?
- 3 Why can’t I change the font in Excel?
- 4 Which font is best for Excel?
- 5 How do I change the default font in Excel 365?
- 6 How do I make Excel beautiful?
- 7 How do I make Excel attractive?
- 8 How many fonts are there in Excel?
- 9 How do I set default font in Microsoft Office?
- 10 How do I change the font in Office 365?
- 11 How do I change the default font in Windows 10?
- 12 What are the 7 things you can use Excel for?
- 13 What are dashboards in Excel?
- 14 How do you make cool tables in Excel?
- 15 How do you make a table visually appealing?
- 16 How do I design in Excel?
- 17 How do I make Excel look like a form?
- 18 Where is font style excel?
- 19 How do I change the font on all sheets in Excel?
- 20 How do you change fonts?
How do I change the default font in Excel?
Changing the Default Font using Excel Options
- Click on the Excel File tab.
- Select ‘Options’ from the sidebar on the left.
- This will open the Excel Options dialog box.
- Under the ‘When creating new workbooks’ section, select the type of font you want from the drop-down menu next to ‘Use this as the default font’.
How do I lock font in Excel?
Just follow these steps:
- Select all the cells in the worksheet.
- Choose Cells from the Format menu.
- Make sure the Protection tab is displayed.
- Clear the Locked checkbox.
- Click on OK to close the dialog box.
- Choose Protection from the Tools menu, and then choose Protect Sheet from the submenu.
Why can’t I change the font in Excel?
right click on the selected cell, go to format cells, make sure you’re not locked your document and uncheck “normal font” in the Font column. Hope it will work!
Which font is best for Excel?
Here is a quick tip, fonts of the sans-serif group are the best for your Excel spreadsheet if readability is your goal. Calibri, Helvetica, Arial or Playfair are few examples. If used with the right alignment, spacing, and color, they can bring out the best in your Excel presentation.
How do I change the default font in Excel 365?
Excel – Change Default Font
- Open Excel.
- Click File.
- Choose Options.
- Select the General tab.
- Click Use this as the default font and choose a font.
- Click OK.
How do I make Excel beautiful?
13 Ways to Make your Excel Formatting Look More Pro
- Don’t use column A or row 1.
- Use charts, but avoid 3D charts.
- Images are important.
- Resize rows and columns.
- Don’t use many colors.
- Turn off gridlines and headers, and chart borders.
- Avoid using more than 2 fonts.
- Table of contents.
How do I make Excel attractive?
Excel for Architects – 9 Steps to Beautiful Spreadsheets
- Choose a good font.
- Align your data.
- Give your data some space.
- Define your headers.
- Choose your colors carefully.
- Shade alternate rows for readability.
- Use Grids Sparingly.
- Create cell styles for consistency.
How many fonts are there in Excel?
For example, Microsoft Office Professional & Professional Plus have about 216 fonts, and Microsoft Home & Student and Home & Business have around 68.
How do I set default font in Microsoft Office?
Go to Format > Font > Font. + D to open the Font dialog box. Select the font and size you want to use. Select Default, and then select Yes.
How do I change the font in Office 365?
Set the default font
- Go to File > Options > Mail > Stationery and Fonts…
- Select the font you want to change.
- Select the options that you want to apply to the default font, such as font style and font size.
- Select OK all the way back out to save your changes.
How do I change the default font in Windows 10?
Open the “Start” menu, search for “Settings,” then click the first result. You can also press Windows+i to quickly open the Settings window. In Settings, click “Personalization,” then select “Fonts” in the left sidebar. On the right pane, find the font that you want to set as the default and click the font name.
What are the 7 things you can use Excel for?
More Than a Spreadsheet: 7 Things You Can Do with Microsoft Excel
- Accounting. Excel has long been a trusted accounting tool.
- Data Entry, Storage, and Verification. At its core, Excel is data-entry software.
- Data Visualisation.
- Data Forecasting.
- Inventory Tracking.
- Project Management.
- Creating Forms.
What are dashboards in Excel?
A dashboard is a visual representation of key metrics that allow you to quickly view and analyze your data in one place. Dashboards not only provide consolidated data views, but a self-service business intelligence opportunity, where users are able to filter the data to display just what’s important to them.
How do you make cool tables in Excel?
Creating a Table within Excel
- Open the Excel spreadsheet.
- Use your mouse to select the cells that contain the information for the table.
- Click the “Insert” tab > Locate the “Tables” group.
- Click “Table”.
- If you have column headings, check the box “My table has headers”.
- Verify that the range is correct > Click [OK].
How do you make a table visually appealing?
The easiest thing is to make the text or number bold or use a different color. However, to make it visually more attractive, I’d suggest other ways of highlighting: make the table cell dark and the text white. This way the whole cell will stand out.
How do I design in Excel?
Get Design Mode in Excel 2010/2013/2016/2019 Ribbon if you do not have Classic Menu for Office
- Click the File tab;
- Click the Options at the left to enter into Excel Option window;
- Click the Customize Ribbon at the left;
- At the right, select the Main Tabs from Customize The Ribbon drop down box;
- Check the Developer item;
How do I make Excel look like a form?
Click and hold the left-most column header, then drag your mouse right to the right-most column header. You can then release your mouse button. Click the “Form” button. It’s the box-shaped icon in the upper-left side of the Excel window, just right of the right-facing “Redo” button.
Where is font style excel?
Open your new workbook and go to the File menu in the ribbon. Click on Options (it’s in the bottom, left-hand corner). Select the General option tab on the left. In the Creating New Workbooks section, select the font type and size for your default.
How do I change the font on all sheets in Excel?
Method 1: Select all worksheets and set the font
- Select all worksheets by clicking on the leftmost tab, holding down the Shift key and clicking on the rightmost tab.
- On any of the worksheets, select all cells: Either press Ctrl + A on the keyboard (maybe you have to do it twice if not all is selected),
- Change the font.
How do you change fonts?
Change the font for all text using styles
- Click Format > Text Styles.
- In the Item to Change list, click All, then select the font, size, or color you want for all text in the current view.
- Repeat this process for other views.
Format Fonts
You can format fonts in four different ways: color, font name, size and other characteristics.
Font Color
The default color for fonts is black.
Colors are applied to fonts by using the «Font color» function.
How to apply colors to fonts
- Select cell
- Select font color
- Type text
The font color goes for both numbers and text.
The Font color command remembers the color used last time.
Note: Custom colors are applied in the same way for both cells and fonts. You can read more about it in the Apply colors to cells chapter.
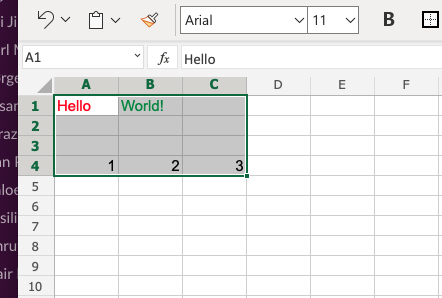
Lets try an example, step by step:
- Select standard font color Red
- Type A1(Hello)
- Hit enter
- Select standard font color Green
- Type B1(World!)
- Hit enter
Font Name
The default font in Excel is Calibri.
The font name can be changed for both numbers and text.
Why change the font name in Excel?
- Make the data easier to read
- Make the presentation more appealing
How to change the font name:
- Select a range
- Click the font name drop down menu
- Select a font
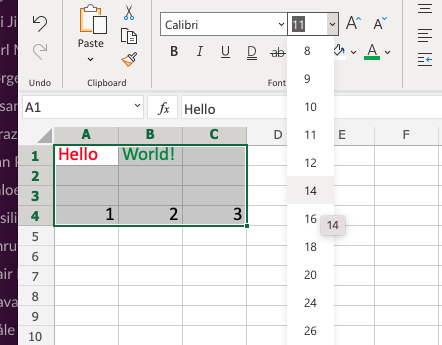
Let’s have a look at an example.
- Select
A1:C4 - Click the font name drop down menu
- Select Arial
The example has both text (A1:B1) and numbers (A4:C4)
Good job! You have successfully changed the fonts from Calibri to Arial for the range A1:C4.
Font Size
To change the font size of the font, just click on the font size drop down menu:
Font Characteristics
You can apply different characteristics to fonts such as:
- Bold
- Italic
- Underlined
- Strike though
The commands can be found below the font name drop down menu:

Bold is applied by either clicking the Bold (B) icon in the Ribbon or using the keyboard shortcut CTRL + B or Command + B
Italic is applied by either clicking the Italic (I) icon or using the keyboard shortcut CTRL + I or Command + I
Underline is applied by either clicking the Underline (U) icon or using the keyboard shortcut CTRL + U or Command + U
Strikethrough is applied by either clicking the Strikethrough (ab) icon or using the keyboard shortcut CTRL + 5 or Command + Shift + X
Chapter Summary
Fonts can be changed in four different ways: color, font name, size and other characteristics. The fonts are changed to make the spreadsheet more readable and delicate.
Home / Advanced Excel / Default Font in Excel (Change Style, Size, and Color)
Calibri is the default font style in Excel with a font size of 11 and black font color. And if you are using Mac, it’s Calibri with a font size of 11 also.
But there’s an option in Excel, to change the default font style if you want. You can change it for the current workbook, or you can change the default font for the entire application.

In this tutorial, you will learn to change the default font.
Change Default Font from Excel Options
- First, click on the “File” tab.

- After that, click on “Excel Options.

- Now, from the ‘general” options, go to “When creating new workbooks”.

- From there, select the font from the “Use this as a default font”.

- Next, change the size from the “Font size”.

- In the end, click OK to save the settings and Excel will tell you to close and restart your Excel application.


And once you restart the Excel application, you will get the new default font with each new workbook you create.

This change in settings will not make any changes to the existing file which are already saved.
Use Font Themes for Multiple Default Fonts
If you want to have multiple default fonts, you can create a font theme that can help you to change the default font whenever you want.
- First, go to the Page Layout ⇢ Theme ⇢ Fonts.

- Now, click on the Fonts drop-down and click on “Customize Fonts”.

- From the “Create New Theme Fonts”, specify the body font that you want to use.

- In the end, enter a name for the theme and click on the “Save” button to save the font theme.


You can create multiple themes and change the default font with a single click.

Create a Template with the Default Font
If you need to change the default font while creating some specific workbooks, you can change the font and save it as a template. And, whenever you need to have that one specific font as default, you can create a new workbook using that template.
- First, change the default font by using the steps we have discussed above.
- Next, go to the “File” tab and use the Save As option.

- After that, from the “Save as type”, select “Template”.

- Now, when you select “Excel Template” it will take to you to the location where you can save the Custom Office Templates.

- In the end, give a name to the template and click on the save button.


Now, whenever you need to use it, simply open it, and save it again as a new file. You don’t need to make changes to the font style and size at all.
You have finished working on your Excel file and it basically looks fine. Most of the texts and numbers are in Calibri Font. But what, if you want (or need to…) change it? In the whole workbook? Here are some tips and tricks of how to change the fonts in the entire Excel file.
Method 1: Select all worksheets and set the font
This is one of the fastest method: Change the style in all cells – no matter if they have values or not – simultaneously.
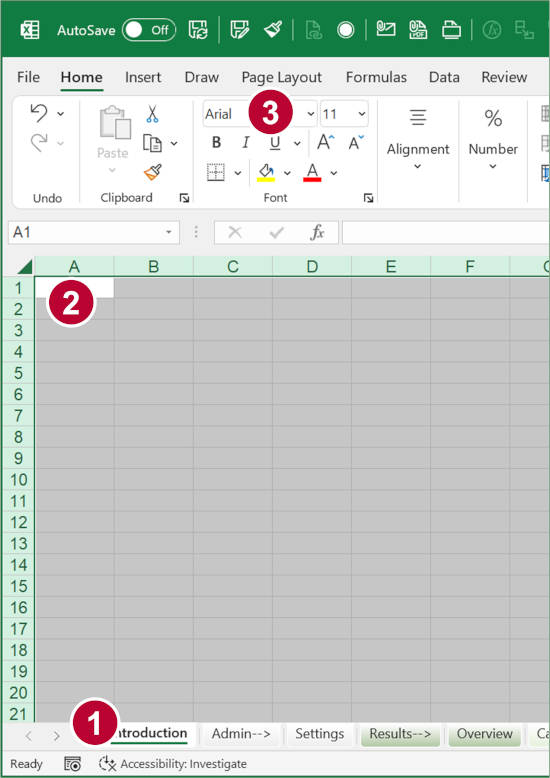
- Select all worksheets by clicking on the leftmost tab, holding down the Shift key and clicking on the rightmost tab.
- On any of the worksheets, select all cells:
- Either press Ctrl + A on the keyboard (maybe you have to do it twice if not all is selected),
- or click on the small arrow on the top-left corner of all cells.
- Change the font. Excel applies the changes now to all sheets.
One word of caution: This method might increase the file size because it formats all cells on all worksheets. I have listed this method because it’s very fast any easy, but please consider using one of the following methods instead.
Method 2: Change the font within the Excel theme settings
This might be worth a try: Change the font style in the Office / Excel theme settings.
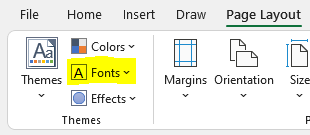
- Go to the Page Layout ribbon.
- Click on “Fonts” in the Themes section (on the left).
- Select your desired Font.
Please note: This only works if you have not manually changed Fonts before.
Method 3: Use the cell styles
First: This only works if your Excel file is consequently formatted using the built-in cell styles. From my own experience: Usually, it’s not…
Anyway, here is how it works:
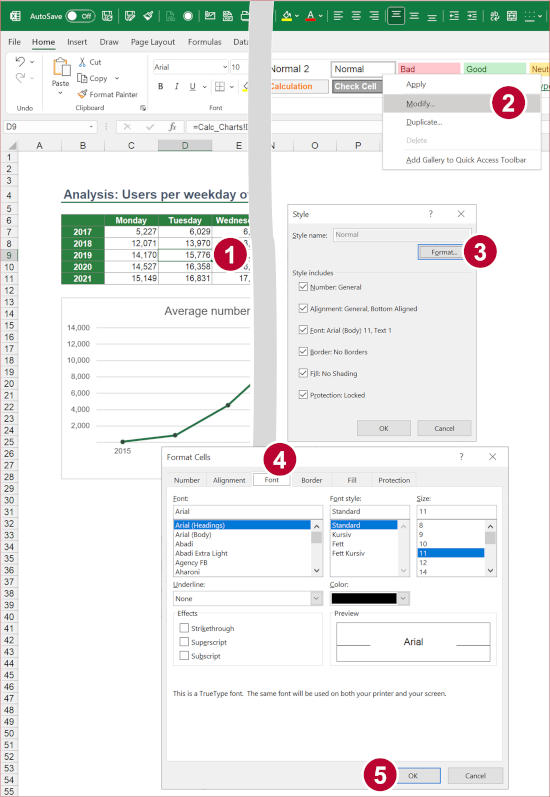
- Select a cell with content. Here: A cell with the style “Normal” is selected.
- Right-click on the style on the Home ribbon. Then, click on “Modify”.
- In the style window, click on the “Change” button.
- Go to the Font tab and select a new style.
- Click on OK.
If necessary, you have to repeat it with other cell styles (for example headings).
Method 4: VBA Macro to change the font style
Our next method involves a short VBA macro. Copy and paste the following code into a new VBA module and click on Start. Click here to learn the steps to insert a new module and paste code in a short, dedicated article.
Here is the code:
Sub changeFontEntireWorkbook()
    For Each Worksheet In Worksheets
        Worksheet.Activate
        ActiveSheet.UsedRange.Select
        Selection.Font.Name = "Arial"
    Next
End Sub
Replace “Arial” with your desired style name (make sure, you spell it correctly…).
Method 5: Professor Excel Tools
To keep it as simple and convenient as possible, we have included a Font feature in our Excel add-in “Professor Excel Tools“. The add-in extends Excel with powerful functions without cluttering your Excel.
Here is, how it works:
- Click on “Font” on the Professor Excel ribbon.
- Select the style and the scope (in this case, the entire workbook).

This function is included in our Excel Add-In ‘Professor Excel Tools’
(No sign-up, download starts directly)
Additional tip: Change the default font before you start working in Excel
Besides changing a style after your file is set up, you can also set a default font. That way, all new files use this standard text type. It’s quite simple:
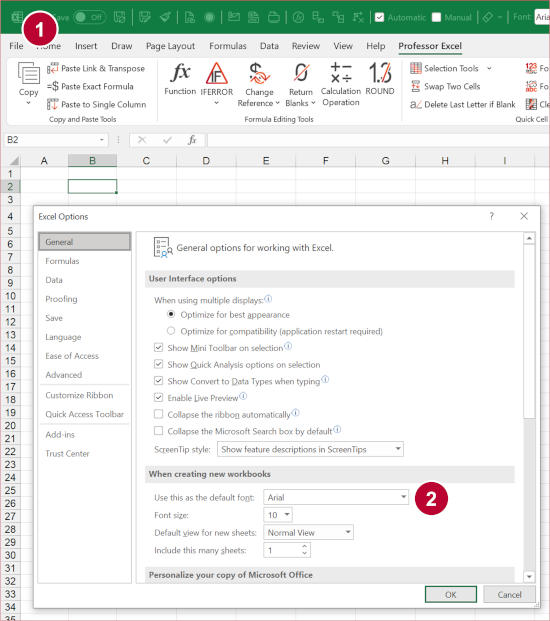
- In Excel, go to “File” and click on “Options” (in the left bottom corner of the screen).
- On the General tab, set your default style at “Use this as the default font”.
Image by Nile from Pixabay

Henrik Schiffner is a freelance business consultant and software developer. He lives and works in Hamburg, Germany. Besides being an Excel enthusiast he loves photography and sports.
Содержание
- Format text in cells
- Change font style, size, color, or apply effects
- Change the text alignment
- Clear formatting
- Change font style, size, color, or apply effects
- Change the text alignment
- Clear formatting
- Свойство Font.Color (Excel)
- Синтаксис
- Примечания
- Пример
- Поддержка и обратная связь
- Change the color of text
- Change the text color for a cell or range of cells
- Apply a custom color
- Format the color of a worksheet tab
- What is font color in excel
- Question
- Answers
- Excel Format Fonts
- Format Fonts
- Font Color
- Font Name
- Font Size
- Font Characteristics
- Chapter Summary
Format text in cells
Formatting text or numbers can make them appear more visible especially when you have a large worksheet. Changing default formats includes things like changing the font color, style, size, text alignment in a cell, or apply formatting effects. This article shows you how you can apply different formats and also undo them.
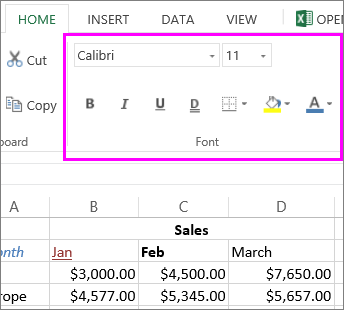
If you want text or numbers in a cell to appear bold, italic, or have a single or double underline, select the cell and on the Home tab, pick the format you want:
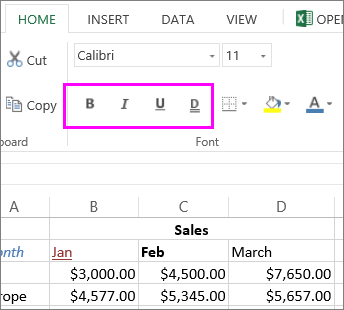
Change font style, size, color, or apply effects
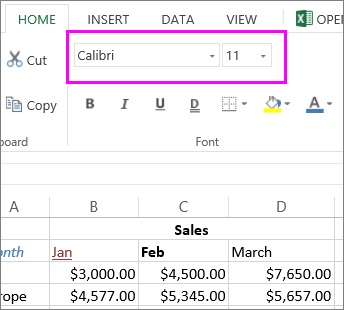
For a different font style, click the arrow next to the default font Calibri and pick the style you want.
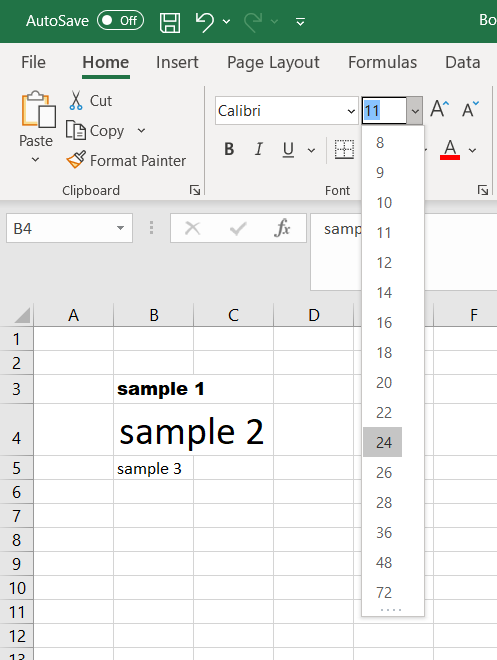
To increase or decrease the font size, click the arrow next to the default size 11 and pick another text size.
To change the font color, click Font Color and pick a color.
To add a background color, click Fill Color next to Font Color .
To apply strikethrough, superscript, or subscript formatting, click the Dialog Box Launcher, and select an option under Effects.
Change the text alignment
You can position the text within a cell so that it is centered, aligned left or right. If it’s a long line of text, you can apply Wrap Text so that all the text is visible.
Select the text that you want to align, and on the Home tab, pick the alignment option you want.
Clear formatting
If you change your mind after applying any formatting, to undo it, select the text, and on the Home tab, click Clear > Clear Formats.
Change font style, size, color, or apply effects
For a different font style, click the arrow next to the default font Calibri and pick the style you want.
To increase or decrease the font size, click the arrow next to the default size 11 and pick another text size.
To change the font color, click Font Color and pick a color.
To add a background color, click Fill Color next to Font Color .
For boldface, italics, underline, double underline, and strikethrough, select the appropriate option under Font.

Change the text alignment
You can position the text within a cell so that it is centered, aligned left or right. If it’s a long line of text, you can apply Wrap Text so that all the text is visible.
Select the text that you want to align, and on the Home tab, pick the alignment option you want.
Clear formatting
If you change your mind after applying any formatting, to undo it, select the text, and on the Home tab, click Clear > Clear Formats.
Источник
Свойство Font.Color (Excel)
Возвращает или задает основной цвет объекта, как показано в таблице в разделе примечаний. Используйте функцию RGB для создания значения цвета. Для чтения и записи, Variant.
Синтаксис
expression. Цвет
Выражение Выражение, возвращающее объект Font .
Примечания
| Object | Цвет |
|---|---|
| Border | Цвет границы. |
| Borders | Цвет всех четырех границ диапазона. Если они не совпадают по цвету, функция Color возвращает значение 0 (ноль). |
| Font | Цвет шрифта. |
| Interior | Цвет заливки ячейки или цвет заливки объекта рисунка. |
| Вкладка | Цвет вкладки. |
Пример
В этом примере задается цвет меток галочки на оси значений на диаграмме Chart1.
Поддержка и обратная связь
Есть вопросы или отзывы, касающиеся Office VBA или этой статьи? Руководство по другим способам получения поддержки и отправки отзывов см. в статье Поддержка Office VBA и обратная связь.
Источник
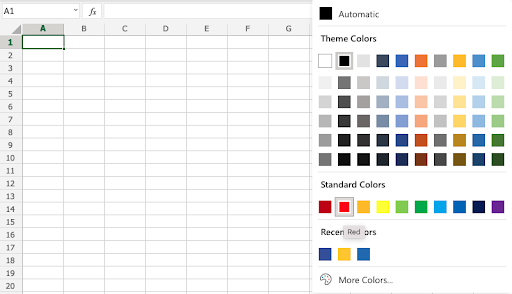
Change the color of text
You can make the data on your worksheets more visible by changing the font color of cells or a range of cells, formatting the color of worksheet tabs, or changing the color of formulas.
For information on changing the background color of cells, or applying patterns or fill colors, see Add or change the background color of cells.
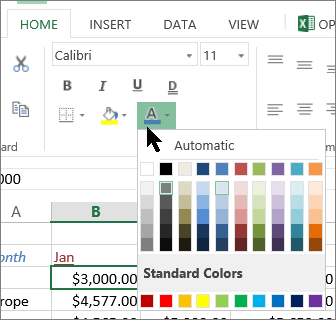
Change the text color for a cell or range of cells
Select the cell or range of cells that has the data you want to format. You can also select just a portion of the text within a cell.
On the Home tab, choose the arrow next to Font Color  .
.
Under Theme Colors or Standard Colors, choose a color.
Tip: To apply the most recently selected text color, on the Home tab, choose Font Color.
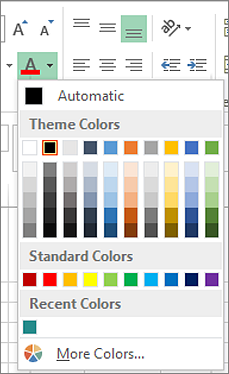
Apply a custom color
If you want a specific font color, here’s how you can blend your custom color:
Click Home > Font Color arrow > More Colors.
On the Custom tab, in the Colors box, select the color you want.
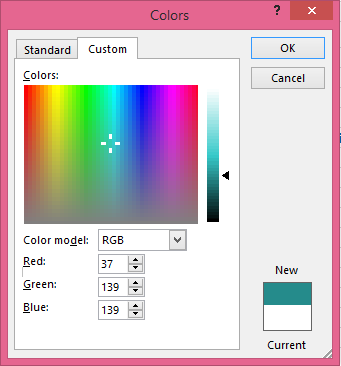
If you know the color numbers of a specific color, pick RGB (Red, Green, Blue) or HSL (Hue, Sat, Lum) in the Color model box, and then enter the numbers to match the exact color shade you want.
Tip: To quickly copy a font color you used to other cells, select a cell with that font color, and double-click Format Painter  . Then click the cells you want to format. When you’re done, click Format Painter again to turn it off.
Format the color of a worksheet tab
Right-click the worksheet tab whose color you want to change.
Choose Tab Color, and then select the color you want.
The color of the tab changes, but not the color of the font. When you choose a dark tab color, the font switches to white, and when you choose a light color for the tab, the font switches to black.
Источник
What is font color in excel
![]()
Question
![]()
![]()
First off, 18.8.22 font (Font) I think has a type/bad subclause. For the child element color it has «color (Data Bar Color)» which reference specifying a color in a chart.
Now on to my question — if a cell’s style is applying a font and the color is not set in the font, then what color is the font? I think it’s auto, but I’m not sure.
I say this because TextColorAutoOnVariousBackgrounds.xlsx has the cells set to auto, and I don’t see that explicitly set anywhere in the XLSX file.
Also, why does auto text stay black on a black background?
Answers
![]()
![]()
Thank you for raising your questions regarding the default font color in Excel, and the issue why Text with the font color defined as Autocolor in a cell with a black background color has a black font color.
To answer your first question. A cell with a font definition without a color defined will default to Auto. In Excel, that means the font color will be black.
To answer your second question, the reason that the cell text remains black when a black background is applied is due to the implement of autocolor in Excel, which uses an OS defined system color which is commonly black.
Sincerely,
Will Gregg | open specifications
Источник
Excel Format Fonts
Format Fonts
You can format fonts in four different ways: color, font name, size and other characteristics.
Font Color
The default color for fonts is black.
Colors are applied to fonts by using the «Font color» function.
How to apply colors to fonts
- Select cell
- Select font color
- Type text
The font color goes for both numbers and text.
The Font color command remembers the color used last time.
Note: Custom colors are applied in the same way for both cells and fonts. You can read more about it in the Apply colors to cells chapter.
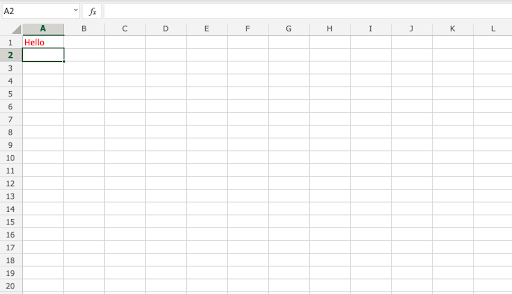
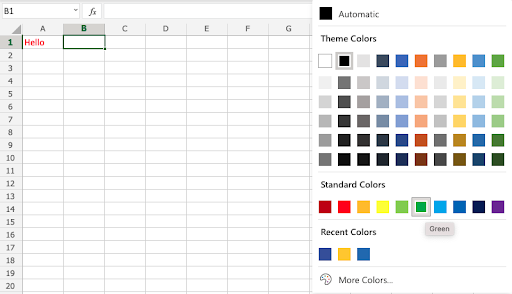
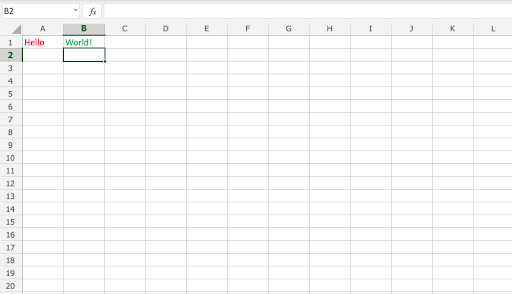
Lets try an example, step by step:
- Select standard font color Red
- Type A1(Hello)
- Hit enter
- Select standard font color Green
- Type B1(World!)
- Hit enter
Font Name
The default font in Excel is Calibri.
The font name can be changed for both numbers and text.
Why change the font name in Excel?
- Make the data easier to read
- Make the presentation more appealing
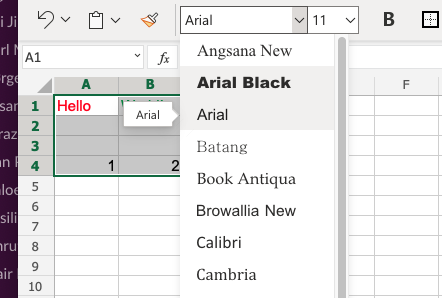
How to change the font name:
- Select a range
- Click the font name drop down menu
- Select a font
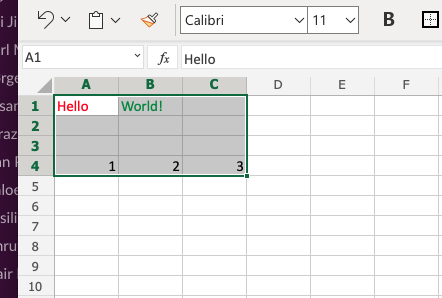
Let’s have a look at an example.
- Select A1:C4
- Click the font name drop down menu
- Select Arial
The example has both text ( A1:B1 ) and numbers ( A4:C4 )
Good job! You have successfully changed the fonts from Calibri to Arial for the range A1:C4 .
Font Size
To change the font size of the font, just click on the font size drop down menu:
Font Characteristics
You can apply different characteristics to fonts such as:
- Bold
- Italic
- Underlined
- Strike though
The commands can be found below the font name drop down menu:
Bold is applied by either clicking the Bold (B) icon in the Ribbon or using the keyboard shortcut CTRL + B or Command + B
Italic is applied by either clicking the Italic (I) icon or using the keyboard shortcut CTRL + I or Command + I
Underline is applied by either clicking the Underline (U) icon or using the keyboard shortcut CTRL + U or Command + U
Strikethrough is applied by either clicking the Strikethrough (ab) icon or using the keyboard shortcut CTRL + 5 or Command + Shift + X
Chapter Summary
Fonts can be changed in four different ways: color, font name, size and other characteristics. The fonts are changed to make the spreadsheet more readable and delicate.
Источник
Start a new search
To find content from modules and lessons
There are two ways to change the default font in MS Excel. One is to go to «File» and «Options», then select the «General» tab. The other way is to right click the text and select «Font».
Serif fonts are the most common and widely used type of font. They have small lines at the end of each letter that creates a more traditional feel to the font. Sans serif fonts are similar to serifs but without any of the small lines at the end of each letter. Decorative fonts are usually used for headings or titles in order to add an extra element to the text. Monospaced fonts have all letters taking up equal space on a line making it easier for programmers to read code with these types of fonts.
There are many different fonts available in Excel. All these fonts can be accessed by clicking on the Font group in the Home tab of a selected cell:
- #1: Times New Roman
- #2: Arial
- #3: Comic Sans MS
- #4: Courier New
In MS Excel, there are two ways to change the font. You can either use the Format Cells dialog box or the Font tab of the Home ribbon.
The default fonts in MS Excel are Calibri and Cambria.
Learner’s Ratings
Reviews
Y
Yash kalra
I dont understood the quiz part the quiz is totally different from the video
S
Sunny kumar
This is a best learning app
K
Kajal Londhe
Best knowledge improve thank you so much
B
Brijesh Yadav
Really thankful to you to explain in such a lucent language
R
RESHMI KUMARI
its very useful for us
S
SHIVAM TIWARI
Formula wala pura uper ja rha
N
Navjeet Kaur
The theory is really good, but practice sheets must also be provided so that we can practice hand to hand. Excel is all about practice more than theory.
A
Aman kesarwani
Hi.
Please mujhe free mai certificate dedo please 😭😥🙏🙏
D
DABLOO Kumar
good and very suficient course
Show More
Форматирование текста в ячейке при помощи кода VBA Excel. Объект Font и его основные свойства. Примеры изменения начертания строк в заданном диапазоне.
В этой статье рассмотрены свойства шрифта (объекта Font), определяющие внешнее оформление (начертание) видимого значения ячейки. Это касается не только текста (строк), но и визуального начертания отображаемых дат и числовых значений.
Формат отображаемого значения
Когда мы из кода VBA Excel записываем в ячейку текстовое или другое значение, оно отображается в формате, присвоенном данной ячейке. Это может быть формат:
- рабочего листа по умолчанию;
- установленный для диапазона пользователем;
- примененный к диапазону из кода VBA Excel.
Если ячейка содержит текстовое значение, его начертание можно форматировать по отдельным частям (подстрокам). Такое форматирование доступно как в ручном режиме на рабочем листе, так и из кода VBA Excel.
У объекта Range есть свойство Font (шрифт), которое отвечает за форматирование (начертание) визуально отображаемого текста в ячейках рабочего листа. Его применение вызывает объект Font, который в свою очередь обладает собственным набором свойств, отвечающих за конкретный стиль начертания отображаемого значения.
| Свойство | Описание | Значения |
|---|---|---|
| Name | наименование шрифта | «Arial», «Calibri», «Courier New», «Times New Roman» и т.д. |
| Size | размер шрифта | от 1 до 409 пунктов |
| Bold | полужирное начертание | True, False |
| Italic | курсивное начертание | True, False |
| FontStyle | заменяет Bold и Italic | «обычный», «полужирный», «курсив», «полужирный курсив» |
| Superscript | надстрочный текст | True, False |
| Subscript | подстрочный текст | True, False |
| Underline | подчеркнутый текст | True, False |
| Color* | цвет текста | от 0 до 16777215 |
*Color — это не единственное свойство, отвечающее за цвет отображаемого текста в ячейке. Оно также может принимать и другие значения, кроме указанных в таблице. Смотрите подробности в статьях Цвет текста (шрифта) в ячейке и Цвет ячейки (заливка, фон).
Примеры форматирования текста
Пример 1
В этом примере ячейкам диапазона «A1:A3» присвоим шрифты разных наименований:
|
Sub Primer1() Range(«A1»).Font.Name = «Courier» Range(«A1») = «Шрифт «Courier»» Range(«A2»).Font.Name = «Verdana» Range(«A2») = «Шрифт «Verdana»» Range(«A3»).Font.Name = «Times New Roman» Range(«A3») = «Шрифт «Times New Roman»» End Sub |
Пример 2
В этом примере рассмотрим применение одного свойства объекта Font к одной ячейке:
|
Sub Primer2() Range(«A5»).Font.Bold = True Range(«A5») = «Полужирное начертание» Range(«A6»).Font.FontStyle = «полужирный курсив» Range(«A6») = «Полужирный курсив» Range(«A7»).Font.Superscript = True Range(«A7») = «Надстрочное начертание» End Sub |
Пример 3
Форматирование диапазона из нескольких ячеек:
|
Sub Primer3() With Range(«A9:C11») .Value = «Форматируем диапазон» .Font.Underline = True .Font.Color = 75962 End With End Sub |
Пример 4
Пример форматирования шрифта в разных ячейках по одному свойству:
|
1 2 3 4 5 6 7 8 9 10 11 12 13 14 15 16 17 18 19 20 21 22 |
Sub Primer4() Cells(1, 1) = «Свойство шрифта Bold = True» Cells(1, 1).Font.Bold = True Cells(2, 1) = «Свойство шрифта Color = xlGreen» Cells(2, 1).Font.Color = xlGreen Cells(3, 1) = «Свойство шрифта ColorIndex = 32» Cells(3, 1).Font.ColorIndex = 32 Cells(4, 1) = «Свойство шрифта FontStyle = ««Bold Italic»«» Cells(4, 1).Font.FontStyle = «Bold Italic» Cells(5, 1) = «Свойство шрифта Italic = True» Cells(5, 1).Font.Italic = True Cells(6, 1) = «Свойство шрифта Name = ««Courier New»«» Cells(6, 1).Font.Name = «Courier New» Cells(7, 1) = «Свойство шрифта Size = 14» Cells(7, 1).Font.Size = 14 Cells(8, 1) = «Свойство шрифта Subscript = True» Cells(8, 1).Font.Subscript = True Cells(9, 1) = «Свойство шрифта Superscript = True» Cells(9, 1).Font.Superscript = True Cells(10, 1) = «Свойство шрифта Underline = True» Cells(10, 1).Font.Underline = True End Sub |

Changing the appearance of the text in a spreadsheet can make it easier to read. But how do you adjust the font, size and colour of the text? And how do you apply effects? In this article, we provide a quick guide to formatting text in Microsoft Excel.
How to Adjust Fonts in Excel
To change the font used in a cell in Microsoft Excel, you will need to:
- Select all of the cells that you wish to format with the cursor.
- Go to the Home tab on the main ribbon.
- Click the fonts dropdown (i.e. the menu with the name of the current font in it).
- Select the font you want to use from the list.
This will automatically change the typeface for any text already in the selected cell(s), plus any text later typed into the formatted cell(s).
Changing the Font Size in Excel
To change the font size in Microsoft Excel, all you need to do is:
- Select the cell(s) you want to format with the cursor.
- Click the font size dropdown on the Home tab of the ribbon (i.e. the dropdown next to the main font menu).
- Select a value from the list to adjust the size of the text in the selected cell(s).
You can also increase or decrease the font size by one step via the capital ‘A’ buttons with up and down arrows next to this dropdown.
Changing the Font Colour in Excel
To change the font colour in Microsoft Excel:
- Select the cell(s) you want to format.
- Click the font colour button on the Home tab (see below).
- Select a colour from the options available (or click More Colors… at the bottom of this menu to open a new pop-up with custom colours).
You can also change the background colour of a cell by using the Fill Color option to the left of the font colour menu (i.e. the paint bucket icon).
How to Apply Effects in Excel
In Excel, you can also apply italics, bold, and underlining to text. These effects can all be found next to each other in the font group of the Home tab.
Find this useful?
Subscribe to our newsletter and get writing tips from our editors straight to your inbox.
To apply your preferred style(s), select the cell(s) you wish to change, and then click on the B for bold, I for italics or U for underlining.
You also add strikethrough, subscript or superscript to text in Excel.
To do this, click the arrow in the bottom right of the font group to open the Format Cells pop-up. Make sure the Font tab is selected, then select your required formatting from the options in the Effects section of the window.
You can make changes to the font, font size and font colour from this pop-up window too, if required, though it is usually quicker to do it via the Home tab.
Formatting Part of a Cell
Finally, what if you want to format a specific part of the text within a cell rather than all the text in a cell? Here’s how you do this:
- Select the cell with the text you want to format.
- In the formula bar, select the specific text you would like to change.
- Choose your preferred formatting using the options set out above.
The change will then be applied in the selected cell, but not in the formula bar.
Expert Spreadsheet Proofreading
Hopefully, this post has explained some of the basics of formatting text in Excel. But you’ll also want the text in your spreadsheets to be error-free. Why not send in a document today and have it checked by our spreadsheet experts?
Lesson 14: Applying Font, Color, and Borders to Cells
/en/excelxp/formatting-numbers/content/
Introduction
By the end of this lesson, you should be able to:
- Apply fonts
- Apply a font color
- Apply borders
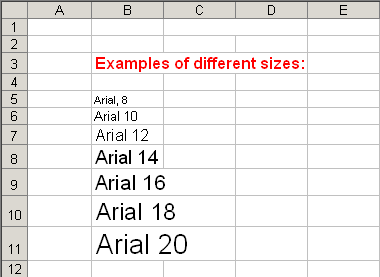
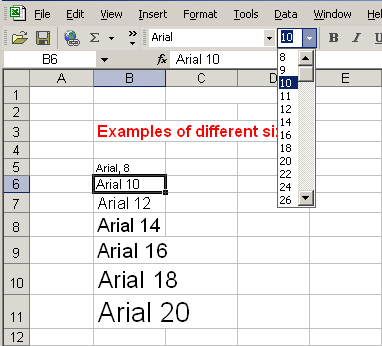
Changing font type, size, and color
In Excel XP, a font consists of three elements: typeface, or the style of the letter; size of the letter; and color of the letter. The default font in a spreadsheet is Arial 10 points, but the typeface and size can be changed easily.
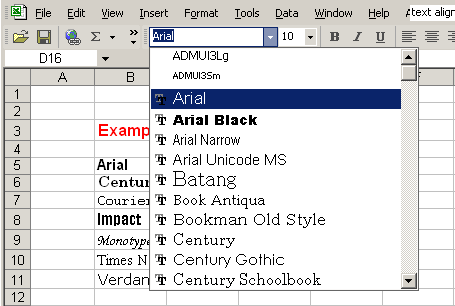
Selecting a font typeface
The amount of typefaces available for use varies depending on the software installed on your computer.
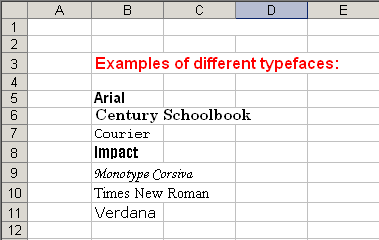
To apply a typeface to information in a cell:
- Select a cell or range of cells.
- Click the down arrow to the right of the Font Name list box on the Formatting toolbar.
- A drop-down list of available fonts appears.
- Click the typeface of your choice.
- The selection list closes, and the new font is applied to the selected cells.

Changing font type, size, and color
To apply a font size to information in a cell:
The font size list varies from typeface to typeface. The Arial font sizes, for example, are 8, 9, 10, 11, 12, 14, 16, 18, 20, 22, 24, 26, 28, 36, 48, and 72.
- Select a cell or range of cells.
- Click the down arrow to the right of the font size list box on the Formatting toolbar.
- A drop-down list of available font sizes appears.
- Click the font size of your choice.
- The selection list closes, and the new font size is applied to the selected cells.

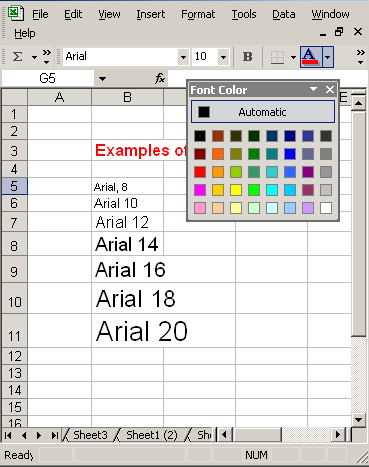
Changing font type, size, and color
To apply color to information in cells:
- Select a cell or range of cells.
- Click the down arrow to the right of the font color list box.
- A drop-down list of available colors appears.
- Click the color of your choice.
- The selection list closes, and the new font color is applied to the selected cells.

Using underline, italics, and bold
In addition to the typeface, size and color, you can apply bold, italics, and/or underline font style attributes to any text or numbers in cells.
To select a font style:
- Select a cell or range of cells.
- Click any of the following options on the Formatting toolbar:
- Bold (Ctrl+B)
- Italics (Ctrl+I)
- Underline (Ctrl+U)
- The attribute(s) selected are applied to the font.

 The bold, italics, and underline buttons on the Formatting toolbar are like toggle switches: Click once to turn one on, and click again to turn it off.
Designing and applying styles
Styles can save a lot of time when formatting a spreadsheet. A style is a unique collection of font attributes that include number, alignment, font, border, patterns, and protection. Many different styles can be created in a spreadsheet, each with different attributes and names. When applied to a cell, information in it resembles the attributes defined for that style.
To apply a style:
- Select the cell or range of cells.
- Choose Format
 Style from the menu bar.
- Select a style from the Style name drop-down list.
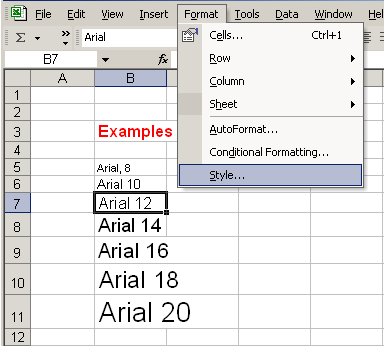
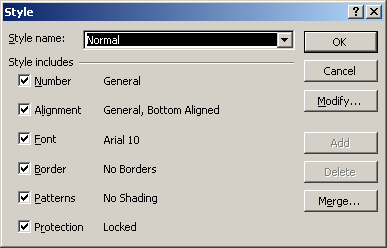
You can change the style attributes for any style name.
You can create new styles by clicking the Add button in the Style dialog box.
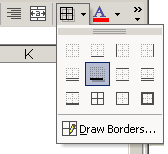
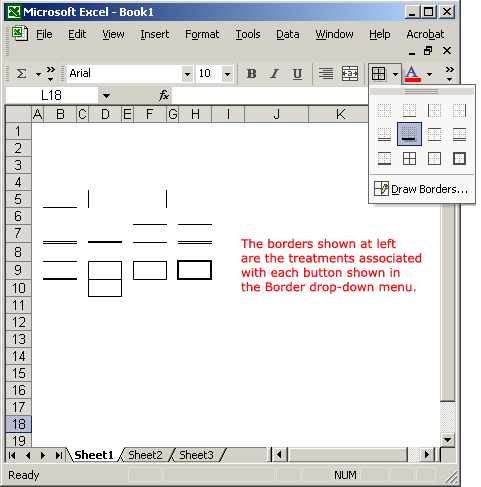
Adding a border to cells
Borders can be applied to cells in your worksheet to emphasize important data or assign names to columns or rows.
To add a border to a cell or cell range:
- Select a cell or range of cells.
- Click the down arrow next to the Borders button.
- The Border drop-down menu appears.
- Choose a border line style from the Border drop-down menu.
- The selected cells display the chosen border.
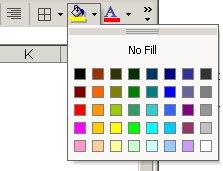
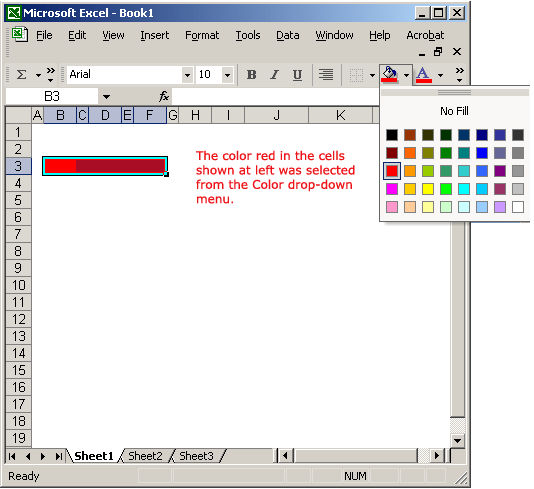
Adding color to cells
Colors can be applied to cells in your worksheet to emphasize important data or assign names to columns or rows.
To add color to a cell:
- Select a cell or range of cells.
- Click the down arrow next to the font color button. A font color drop-down menu displays.
- Choose a color from the font color drop-down menu.
- The selected cells display the color.
Challenge!
- Type the label Learning about fonts in Excel in cell B2.
- Change the font in cell B2 to have a typeface of Times New Roman, a size of 16, and a color of red.
- Type the word Underline in cell B3 and apply an underline treatment to it.
- Type the word Italics in cell B4 and apply an italics treatment to it.
- Type the word Bold in cell B3 and apply a bold treatment to it.
- Select a cell range that includes cells B2, B3, B4, and B5.
- Add a border around the cell range.
- Define a color of yellow around the cell range.
/en/excelxp/creating-a-chart/content/