

In this article, we will learn How to Get filename in Excel.
Scenario:
Working with excel file information using excel formula is easy, convenient and common use. For example extracting the file name in excel
Formula to get file name
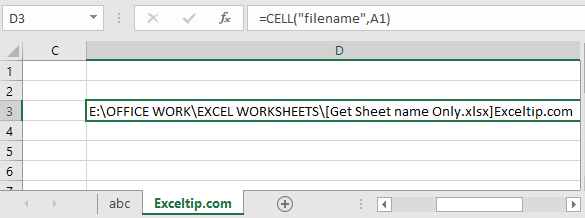
Cell function in Excel gets you the information regarding worksheets like col, contents, filename, ..etc.
Formula Syntax
“filename” : gets the full name of the sheet of the reference cell
A1 : Sheet’s cell reference
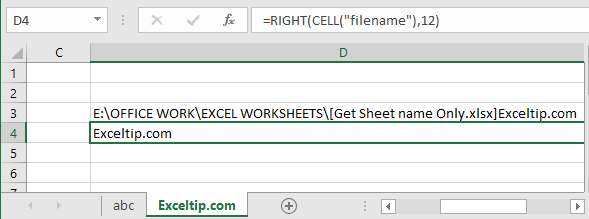
But we need to extract just the sheet name. Basically the last name.
As you can see the sheet name starts after ] (closed big bracket sign). For that we just need its position in the text and then we will extract the sheet name.
Here I counted the characters from the last of the result which was 12. But we cannot do this every time.
So for extracting the sheet name from the full name, we need to find the position of the ] (closed big bracket sign)
Use the formula to find ]
=FIND(«]«,CELL(«filename»,A1))
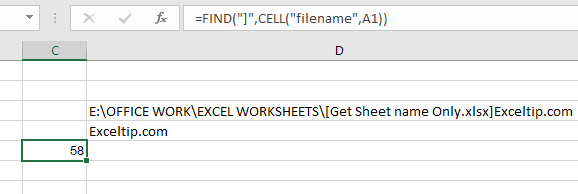
58 is the position of ] .
Now we our formula is completed now
=MID(CELL(«filename»,A1),FIND(«]»,CELL(«filename»,A1))+1,255)
Explanation:
CELL(«filename»,A1) : Gets you the full name of the worksheet
FIND(«]»,CELL(«filename»,A1))+1 : this function gets you the position of ] and add +1 because we need the position of the first char of only the sheet name.
255 : Max word limit of sheet name by Excel.
MID : MID function extracts the specific substring from the text using the position from start to end.
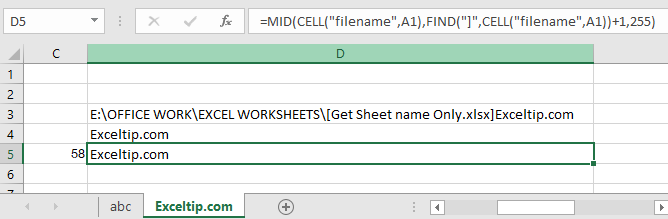
Here we extracted the filename using the formula.
Now we have one more formula, instead of using MID function. Use the RIGHT function.
RIGHT function extracts the specific substring from the last of the text.
Use the formula:
=RIGHT(CELL(«filename»,A2),LEN(CELL(«filename»,A2))-FIND(«]», CELL(«filename»,A2)))
Explanation:
FIND(«]», CELL(«filename»,A2)) : Extracts the position of sheet name char.
LEN(CELL(«filename»,A2)) : gets the length of the text(filename)
RIGHT : RIGHT function extracts the string from the text using its position.
As you can see, this function works fine too. Yesss…Now we have 2 different formula with logic used to extract only the sheet name. Learn How to get only the sheet name using VBA in Excel here.
VBA example
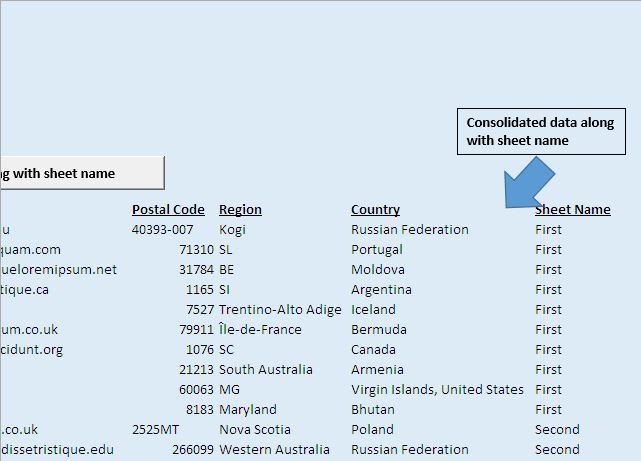
We have data in three sheets and we want to consolidate data from all of them to the main sheet. Data from each sheet should have a sheet name at the end.
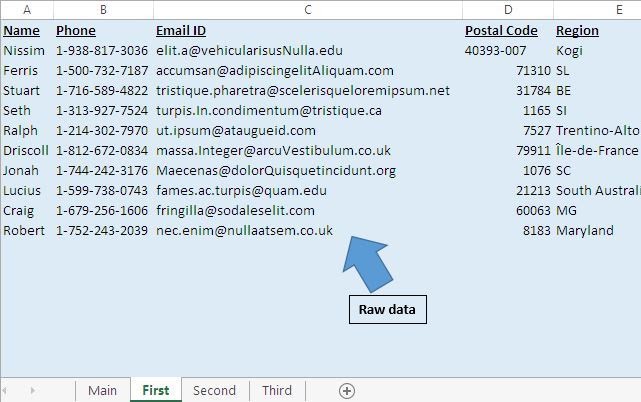

On clicking the “Consolidate data along with sheet name” button, data will be consolidated on the main sheet.
Code explanation
SheetCount = Application.Worksheets.Count
The above code is used to get the count of worksheet within the workbook.
LastRow = ActiveCell.SpecialCells(xlLastCell).Row
The above code is used to get the row number of the last cell.
Range(«A2:F» & LastRow).Select
The above code is used to select all the data starting from cell A2.
Selection.Copy
The above code is used to copy the selected data.
Range(Selection, Cells(LastRow, 7)).Value = Sheets(Counter).Name
The above code is used to assign the sheet name to the selected cell.
Please use the below code
Option Explicit

Sub ConsolidateDataWithSheetName()

'Declaring variables
Dim Counter As Integer
Dim SheetCount As Integer
Dim LastRow As Long

'Disabling screen updates
Application.ScreenUpdating = False


'Getting the count of worksheets in the workbook
SheetCount = Application.Worksheets.Count

For Counter = 2 To SheetCount

        Sheets(Counter).Activate

        Range("A2").Select

        'Getting the row number of the last cell
        LastRow = ActiveCell.SpecialCells(xlLastCell).Row

        'Selecting all the data in the workbook
        Range("A2:F" & LastRow).Select

        'Copying the selected data
        Selection.Copy

        Sheets("Main").Activate

        Range("A2").Select
        LastRow = ActiveCell.SpecialCells(xlLastCell).Row
        LastRow = LastRow + 1

        'Pasting the copied data to last row on the Main sheet
        Cells(LastRow, 1).Select
        ActiveSheet.Paste

        Cells(LastRow, 7).Select
        LastRow = ActiveCell.SpecialCells(xlLastCell).Row

        'Adding the sheet name along with the data
        Range(Selection, Cells(LastRow, 7)).Value = Sheets(Counter).Name

Next

End Sub
Here are all the observational notes using the formula in Excel
Notes :
Hope this article about How to Get filename from path in Excel is explanatory. Find more articles on calculating values and related Excel formulas here. If you liked our blogs, share it with your friends on Facebook. And also you can follow us on Twitter and Facebook. We would love to hear from you, do let us know how we can improve, complement or innovate our work and make it better for you. Write to us at info@exceltip.com.
Related Articles :
Delete drop down list in Excel : The dropdown list is used to restrict the user to input data and gives the option to select from the list. We need to delete or remove the Dropdown list as the user will be able to input any data instead of choosing from a list.
How do I Insert a Checkmark in Excel 2016 : To insert a checkmark in Excel Cell we use the symbols in Excel. Set the fonts to wingdings and use the formula Char(252) to get the symbol of a check mark.
How to disable Scroll Lock in Excel : Arrow keys in excel that move sheet cell up, down, Left & Right. But this feature is only applicable when Scroll Lock in Excel is disabled. Scroll Lock in Excel is used to scroll up, down, left & right your worksheet not the cell. So this article will help you how to check scroll lock status and how to disable it?
How to Delete only Filtered Rows without the Hidden Rows in Excel : Many of you are asking how to delete the selected rows without disturbing the other rows. We will use the Find & Select option in Excel.
Popular Articles :
50 Excel Shortcuts to Increase Your Productivity : Get faster at your tasks in Excel. These shortcuts will help you increase your work efficiency in Excel.
How to use the VLOOKUP Function in Excel : This is one of the most used and popular functions of excel that is used to lookup value from different ranges and sheets.
How to use the IF Function in Excel : The IF statement in Excel checks the condition and returns a specific value if the condition is TRUE or returns another specific value if FALSE.
How to use the SUMIF Function in Excel : This is another dashboard essential function. This helps you sum up values on specific conditions.
How to use the COUNTIF Function in Excel : Count values with conditions using this amazing function. You don’t need to filter your data to count specific values. Countif function is essential to prepare your dashboard.
Excel for Microsoft 365 Excel 2021 Excel 2019 Excel 2016 Excel 2013 Excel 2010 More…Less
Let’s say you want to add information to a spreadsheet report that confirms the location of a workbook and worksheet so you can quickly track and identify it. There are several ways you can do this task.
Insert the current file name, its full path, and the name of the active worksheet
Type or paste the following formula in the cell in which you want to display the current file name with its full path and the name of the current worksheet:
=CELL(«filename»)
Insert the current file name and the name of the active worksheet
Type or paste the following formula as an array formula to display the current file name and active worksheet name:
=RIGHT(CELL(«filename»),LEN(CELL(«filename»))- MAX(IF(NOT(ISERR(SEARCH(«»,CELL(«filename»), ROW(1:255)))),SEARCH(«»,CELL(«filename»),ROW(1:255)))))
Notes:
-
To enter a formula as an array formula, press CTRL+SHIFT+ENTER.
-
The formula returns the name of the worksheet as long as the worksheet has been saved at least once. If you use this formula on an unsaved worksheet, the formula cell will remain blank until you save the worksheet.
Insert the current file name only
Type or paste the following formula to insert the name of the current file in a cell:
=MID(CELL(«filename»),SEARCH(«[«,CELL(«filename»))+1, SEARCH(«]»,CELL(«filename»))-SEARCH(«[«,CELL(«filename»))-1)
Note: If you use this formula in an unsaved worksheet, you will see the error #VALUE! in the cell. When you save the worksheet, the error is replaced by the file name.
Need more help?
You can always ask an expert in the Excel Tech Community or get support in the Answers community.
Need more help?
There are many cases, in which you want to show the sheet name or file name in an Excel cell. Don’t worry, you don’t have to use VBA and create a macro. Excel provides a (rough) formula for returning all the information you need. The bad news: In most cases it takes some complex modifications. The good news: Usually you can just copy and paste the formula you need.
Introduction: Get all the names you need
Fortunately, you don’t have to use VBA. There are formulas for each variation of the sheet name, file name and path. The main part of the formula is the =CELL() formula.
The CELL formula looks something like this: =CELL(“filename”,A1). That means that the CELL formula we have to use has two parts:
- The first part just says “filename”. It is important to add the quotation marks.
- The second part is optional and can link to any cell or workbook. If you leave it blank the current cell and workbook will be used.
The basic version of the CELL formula (=CELL(“filename”,A1) ) returns the full path, file name and sheet name. You can use this formula and cut it into the parts you need. Therefore you use string formulas like LEFT, LEN and so on. We won’t go into detail now as those formulas are highly specific and complex but rather provide the formulas for you to copy.
Note: We’ve published an article about three methods of how to get the sheet name. Maybe this one is interesting for you as well.
The formulas for sheet name, file name, path etc.
The formulas for inserting file names, sheet names or the path (with and without the extension) are very different. This table gives you an overview. If you want to copy the formulas, you can find them underneath again.
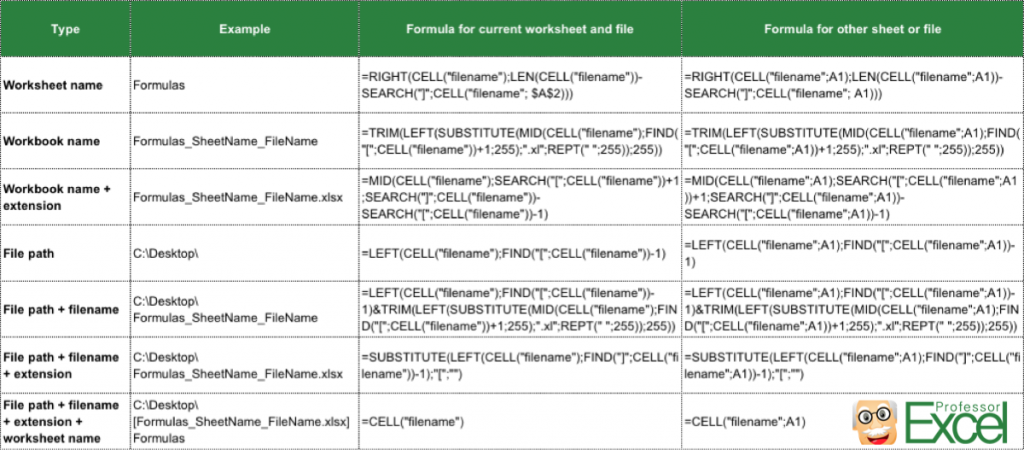
Copy these formulas for the current cell or sheet:
- Worksheet name (example: “Formulas”):
=RIGHT(CELL(“filename”),LEN(CELL(“filename”))-SEARCH(“]”,CELL(“filename”, $A$2))) - Workbook name (example: “Formulas_SheetName_FileName”):
=TRIM(LEFT(SUBSTITUTE(MID(CELL(“filename”),FIND(“[“,CELL(“filename”))+1,255),”.xl”,REPT(” “,255)),255)) - Workbook name + extension (example: “Formulas_SheetName_FileName.xlsx”):
=MID(CELL(“filename”),SEARCH(“[“,CELL(“filename”))+1,SEARCH(“]”,CELL(“filename”))-SEARCH(“[“,CELL(“filename”))-1) - File path (example: “C:Desktop”):
=LEFT(CELL(“filename”),FIND(“[“,CELL(“filename”))-1) - File path + filename (example: “C:DesktopFormulas_SheetName_FileName”):
=LEFT(CELL(“filename”),FIND(“[“,CELL(“filename”))-1)&TRIM(LEFT(SUBSTITUTE(MID(CELL(“filename”),FIND(“[“,CELL(“filename”))+1,255),”.xl”,REPT(” “,255)),255)) - File path + filename + extension (example: “C:DesktopFormulas_SheetName_FileName.xlsx”):
=SUBSTITUTE(LEFT(CELL(“filename”),FIND(“]”,CELL(“filename”))-1),”[“,””) - File path + filename + extension + worksheet name (example: “C:Desktop[Formulas_SheetName_FileName]Formulas”):
=CELL(“filename”) - Folder name (example: “Desktop”):
=TRIM(RIGHT(SUBSTITUTE(LEFT(CELL(“filename”),FIND(“[“,CELL(“filename”),1)-2),””,REPT(” “,100)),100))
Copy these formulas for any linked cell or sheet:
If you want to get the file name, sheet name or path from another cell or workbook, you can use one of the following formulas. Instead of “A1” you insert your cell reference.
- Worksheet name (example: “Formulas”):
=RIGHT(CELL(“filename”,A1),LEN(CELL(“filename”,A1))-SEARCH(“]”,CELL(“filename”, A1))) - Workbook name (example: “Formulas_SheetName_FileName”):
=TRIM(LEFT(SUBSTITUTE(MID(CELL(“filename”,A1),FIND(“[“,CELL(“filename”,A1))+1,255),”.xl”,REPT(” “,255)),255)) - Workbook name + extension (example: “Formulas_SheetName_FileName.xlsx”):
=MID(CELL(“filename”,A1),SEARCH(“[“,CELL(“filename”,A1))+1,SEARCH(“]”,CELL(“filename”,A1))-SEARCH(“[“,CELL(“filename”,A1))-1) - File path (example: “C:Desktop”):
=LEFT(CELL(“filename”,A1),FIND(“[“,CELL(“filename”,A1))-1) - File path + filename (example: “C:DesktopFormulas_SheetName_FileName”):
=LEFT(CELL(“filename”,A1),FIND(“[“,CELL(“filename”,A1))-1)&TRIM(LEFT(SUBSTITUTE(MID(CELL(“filename”,A1),FIND(“[“,CELL(“filename”,A1))+1,255),”.xl”,REPT(” “,255)),255)) - File path + filename + extension (example: “C:DesktopFormulas_SheetName_FileName.xlsx”):
=SUBSTITUTE(LEFT(CELL(“filename”,A1),FIND(“]”,CELL(“filename”,A1))-1),”[“,””) - File path + filename + extension + worksheet name (example: “C:Desktop[Formulas_SheetName_FileName]Formulas”):
=CELL(“filename”,A1) - Folder name (example: “Desktop”):
=TRIM(RIGHT(SUBSTITUTE(LEFT(CELL(“filename”,A1),FIND(“[“,CELL(“filename”,A1),1)-2),””,REPT(” “,100)),100))
Please note:
- The formulas are different for each language and regional settings. So you have to make sure to adapt it to your Excel version. Please check out the download below, it’s probably the easiest option for adapting the formulas to your settings.
- In order to insert the filename or path, you have to save your workbook first. It doesn’t work with a newly created Excel file.
Download an Excel file with all the formulas
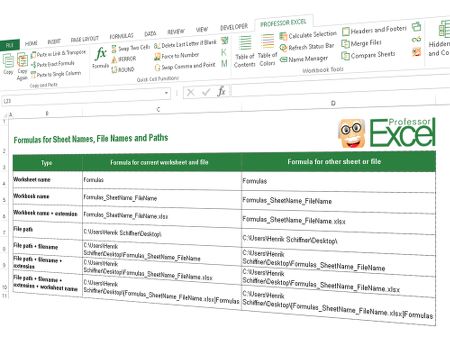
In order to avoid any problems with language and regional settings, you can download all the above formulas with an Excel file.
Just open it and copy the complete cell to your desired location. The download starts instantly (no sign-up or any other annoyances…).
- Download link: Click here.
- File name: Formulas_SheetName_FileName.xlsx
- Size: 35 KB
- File type: XLSX
Anything missing? Suggestions for improvements? Please let us know and leave a comment.

Henrik Schiffner is a freelance business consultant and software developer. He lives and works in Hamburg, Germany. Besides being an Excel enthusiast he loves photography and sports.
Return to Excel Formulas List
Download Example Workbook
Download the example workbook
This tutorial will demonstrate how to get the path and file name using a formula in Excel.
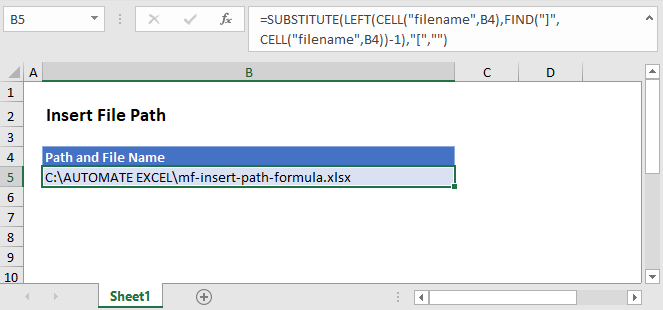
Get Path and File Name
In Excel there isn’t a function to get the path and file name directly, but the CELL Function will return the file path, name, and sheet. Using the text functions FIND, LEFT, and SUBSTITUTE, we can isolate the path and file name.
=SUBSTITUTE(LEFT(CELL("filename",B2),FIND("]",CELL("filename",B2))-1),"[","")
Let’s step through the formula.
File Name, Path, and Worksheet
We use the CELL Function to return the file path, name, and sheet by entering “filename” as the info type.
=CELL(“filename”,B2)
FIND the File Name Position
As shown above, the CELL Function returns the file path, name, and worksheet. We don’t need the worksheet or the square brackets, so we use the FIND function to determine the position of the last character (i.e. the one before “]”) of the file name.
=FIND("]",B3)-1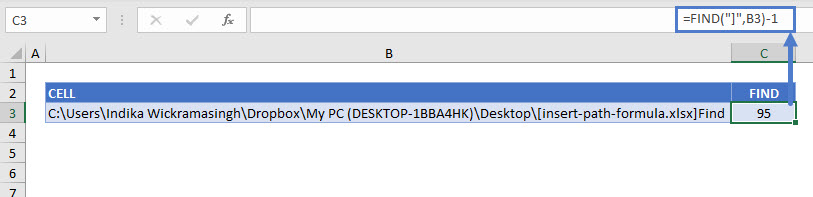
Remove the Worksheet Name
Once we have the position of the file name’s last character, we use the LEFT Function to remove the name of the worksheet.
=LEFT(B3,C3)
SUBSTITUTE Function
You can see above that there is still an open square bracket between the path and file names. Use the SUBSTITUTE function to replace the “[“ with an empty string.
=SUBSTITUTE(D3,"[","")
Combining these steps into a single formula gives us:
=SUBSTITUTE(LEFT(CELL("filename",B2),FIND("]",CELL("filename",B2))-1),"[","")Get Path Only
You might want to show the path only, without the file name. For this, we can stop at the LEFT Function with a little tweak. There’s no need to SUBSTITUTE since there won’t be any mid-string characters to delete. To return just the path, we find the position of the first character of the file name (“[“), instead of the last, and the path name is everything to the left.
=LEFT(CELL("filename",B2),FIND("[",CELL("filename",B2))-1)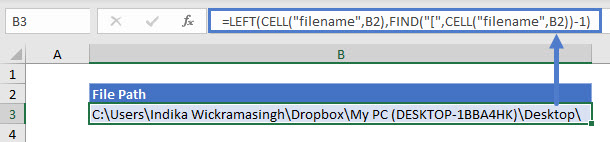
Many a time, it is good to Display the location of the file in Excel.
Not just the file name, but the entire path of the file. It is a good reference to make sure you are working on the correct file and is also good if you print out the Excel. With this option, the file path always gets printed on paper..
How to Write a Formula that will Display the File Path in Excel, automatically.
One useful formula that can assist us is the CELL formula. I bet you didn’t know about this in-built Excel Function…
The CELL function can help us to display the address, colour, format, type or width of any cell.
The CELL Function takes a maximum of 2 arguments, and only the first one is mandatory.
=CELL(info_type, [reference])
So, if you write =CELL(“filename”) in any cell, you will get the Full Pathname of this Excel file, along with the Sheet Name.
For example, I got the filename displayed as below:
| D:[email-blasting-migration.xlsx]Sheet1 |
According to the Excel Help, the CELL function has the following arguments:
- info_type Required. A text value that specifies what type of cell information you want to return. The following list shows some of the possible values of the info_type argument and the corresponding results.
info_type Returns “address” Reference of the first cell in reference, as text. “col” Column number of the cell in reference. “color” The value 1 if the cell is formatted in color for negative values; otherwise returns 0 (zero). “contents” Value of the upper-left cell in reference; not a formula. “filename” Filename (including full path) of the file that contains reference, as text. Returns empty text (“”) if the worksheet that contains reference has not yet been saved. “format” Text value corresponding to the number format of the cell. The text values for the various formats are shown in the following table. Returns “-” at the end of the text value if the cell is formatted in color for negative values. Returns “()” at the end of the text value if the cell is formatted with parentheses for positive or all values.
Display only the Excel File Name, without the Sheet Name
To only print the File name, you can use this long formula:
=MID(CELL("filename"),SEARCH("[",CELL("filename"))+1, SEARCH("]",CELL("filename"))-SEARCH("[",CELL("filename"))-1)
Keep in mind that the file should be saved somewhere. If you just open a new workbook, and try these formulas, you will get a #VALUE ERROR. This error will disappear automatically once the file is saved, and the error will be replaced with the correct full file path name, and file name.
This formula to display the filename in Excel also works on the Mac. Any Excel for Mac version, including Excel X for Mac, to Excel 2004, 2008, 2011 for Mac also work fine in displaying the filename.
For example, for a file on Mac with the path HD:Users:local:Desktop, the formula returns
HD:Users:local:Desktop:(filename)Sheet1
Displaying the FilePath only
While writing macros in Excel, you may need the file’s path only, to pick up other files, or for any other reason. Just use this to get only the file’s path in Excel
=LEFT(CELL(“filename”,A1),FIND(“[“,CELL(“filename”,A1),1)-1)
In this formula, we remove the Sheet Name, which starts with the [ character.
How To Display Filename & File Path in Excel Worksheet Header or Footer
If you wish to display the file name and/or file path in the Excel sheet’s header or footer, then it is extremely simple. Simply go to the Ribbon. Choose Insert > Header & Footer

All you need to do is click on the File Path, File Name icons.
Alternatively, if you want to type it yourself, simply type the following in the header or the footer in Excel:
&[Path]&[File]
Use &[Path] for only the File Path, and &[File] for only the File’s name.
Hope it helps you in your life with Excel.
Now you can confidently display the filename and the file path in Excel
With the File Name of Excel files visible in the header, with the File Path, you won’t lose a file in the wrong location & find what you are looking for easily!
Do let me know if you need any other functions in Excel, or if you are facing a problem in Excel. We can help you to solve everyday issues in Excel easily at ExcelChamp.Net.
And subscribe to the Excel Tips Newsletter for more such tips to improve productivity in Excel.
Cheers,
Vinai Prakash
Vinai is the founder and principal trainer for Microsoft Excel Tips and Techniques seminars all over the world. To book Vinai to conduct an Excel training at your office for your company, do email to vinai@excelchamp.net.

Returning The File Or Folder Name Of A Worksheet To A Cell
This page describes formulas for returning file and folder names in Excel cells.

It may come as a surprise that Excel doesn’t provide built-in functions for getting the name of
the current workbook or worksheet. Such functions would be a welcome improvement to Excel’s arsenal. Excel does provide one function, CELL,
from which can be extracted the file name, folder name, sheet name, and file extension. The basic formula is
=CELL("FileName",A1)
In this formula, you use the text FileName exactly as show; you do not substitute the actual file name. The
reference to A1 can refer to any cell on the worksheet. If that parameter is omitted,
the result of the function may be incorrect. The CELL function returns a string in the following
format: C:Test[WorkbookName.xlsm]SheetName. The sheet name returned in the string is the name
of the sheet on which the cell in the second parameter resides. If this second parameter is omitted, the function returns the name
of the active sheet, which is not necessarily the sheet on which the formula resides. The CELL function
looks at the second parameter to get the file and sheet name. If this parameter is omitted, the active workbook and active worksheet
at the time of calculation are used. So, for example, if a cell on Sheet1 contains the formula
=CELL(«FileName») and Sheet2 is the active sheet when Excel calculates
the workbook, the formula on Sheet1 will return the name of Sheet2 because
Sheet2 was active when the formula was calculated. This can lead to errors in other formulas and general
confusion. The second parameter to the CELL function locks the function to the appropriate worksheet.
NOTE: The formulas below will work only if the workbook has been saved to disk. They will not work on a new,
unsaved file since that file does not have a folder path.
You can use the following formula to get the full file name of the workbook.
=SUBSTITUTE( LEFT(CELL("filename",A1),FIND("]",CELL("filename",A1))-1),"[","")
If you prefer a VBA function, use the following:
Function WorkbookFullName(R As Range) As String
    WorkbookFullName = R.Worksheet.Parent.FullName
End Function
You can get just the file name, without the folder path information, with the following formula:
=MID(CELL("filename",A1),FIND("[",CELL("filename",A1))+1,FIND("]",
CELL("filename",A1))-FIND("[",CELL("filename",A1))-1)
If you prefer a VBA functions, use the following:
Function FileName(R As Range) As String
    FileName = R.Worksheet.Parent.Name
End Function
You can get the worksheet name with the following formula:
=MID(CELL("filename",A1),FIND("]",CELL("filename",A1))+1,99)
If you prefer a VBA function, use the following:
Function SheetName(R As Range) As String
    SheetName = R.Worksheet.Name
End Function
You can get the folder name with the following formula:
=LEFT(CELL("Filename",A1),FIND("[",CELL("Filename",A1))-2)
If you prefer a VBA function, use the following:
Function PathName(R As Range) As String
    PathName = R.Worksheet.Parent.Path
End Function
You can get the file extension of the workbook file with the following formula:
=MID(CELL("Filename",A1),FIND(".",CELL("Filename",A1),FIND("[",CELL("Filename",A1)))+1,FIND("]",
CELL("Filename",A1),1)-FIND(".",CELL("Filename",A1),FIND("[",CELL("Filename",A1)))-1)
If you prefer a VBA function, use the following:
Function Extension(R As Range) As String
    Extension = Mid(R.Worksheet.Parent.FullName, _
        InStrRev(R.Worksheet.Parent.FullName, ".") + 1)
End Function
 |
This page last updated: 6-June-2011. |
-
— By
Sumit Bansal
On my first day in my job in a small consulting firm, I was staffed on a short project for three days.
The work was simple.
There were many folders on the network drive and each folder had hundreds of files in it.
I had to follow these three steps:
- Select the file and copy its name.
- Paste that name in a cell in Excel and hit Enter.
- Move to the next file and repeat step 1 & 2.
Sounds simple right?
It was – Simple and a huge waste of time.
What took me three days could have been done in a few minutes if I knew the right techniques.
In this tutorial, I will show you different ways to make this entire process super fast and super easy (with and without VBA).
Limitations of the methods shown in this tutorial: With the techniques shown below, you will only be able to get the names of the files within the main folder. You will not get the names of the files in the sub-folders within the main folder. Here is a way to get names of files from folders and sub-folders using Power Query
Using FILES Function to Get a List of File Names from a Folder
Heard of FILES function before?
Don’t worry if you haven’t.
It is from the childhood days of Excel spreadsheets (a version 4 formula).
While this formula does not work in the worksheet cells, it still works in named ranges. We will use this fact to get the list of file names from a specified folder.
Now, suppose you have a folder with the name – ‘Test Folder‘ on the desktop, and you want to get a list of file names for all the files in this folder.
Here are the steps that will give you the file names from this folder:
- In cell A1, enter the folder complete address followed by an asterisk sign (*)
- For example, if your folder in the C drive, then the address would look like
C:UsersSumitDesktopTest Folder*
- If you are not sure how to get the folder address, use the following method:
-
- In the folder from which you want to get the file names, either create a new Excel Workbook or open an existing workbook in the folder and use the below formula in any cell. This formula will give you the folder address and adds an asterisks sign (*) at the end. Now you can copy-paste (paste as value) this address in any cell (A1 in this example) in the workbook in which you want the file names.
=REPLACE(CELL("filename"),FIND("[",CELL("filename")),LEN(CELL("filename")),"*")[If you have created a new workbook in the folder to use the above formula and get the folder address, you may want to delete it so that it doesn’t feature in the list of files in that folder]
- In the folder from which you want to get the file names, either create a new Excel Workbook or open an existing workbook in the folder and use the below formula in any cell. This formula will give you the folder address and adds an asterisks sign (*) at the end. Now you can copy-paste (paste as value) this address in any cell (A1 in this example) in the workbook in which you want the file names.
-
- For example, if your folder in the C drive, then the address would look like
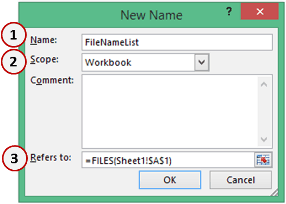
- Go to the ‘Formulas’ tab and click on the ‘Define Name’ option.

- In the New Name dialogue box, use the following details
- Name: FileNameList (feel free to choose whatever name you like)
- Scope: Workbook
- Refers to: =FILES(Sheet1!$A$1)

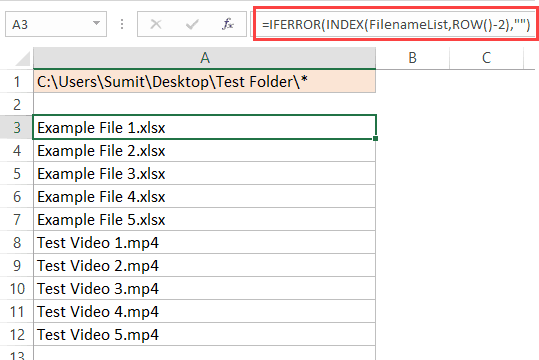
- Now to get the list of files, we will use the named range within an INDEX function. Go to cell A3 (or any cell where you want the list of names to start) and enter the following formula:
=IFERROR(INDEX(FileNameList,ROW()-2),"") - Drag this down and it will give you a list of all the file names in the folder


Want to Extract Files with a Specific Extension??
If you want to get all the files with a particular extension, just change the asterisk with that file extension. For example, if you want only excel files, you can use *xls* instead of *
So the folder address that you need to use would be C:UsersSumitDesktopTest Folder*xls*
Similarly, for word document files, use *doc*
How does this work?
FILES formula retrieves the names of all the files of the specified extension in the specified folder.
In the INDEX formula, we have given the file names as the array and we return the 1st, 2nd, 3rd file names and so on using the ROW function.
Note that I have used ROW()-2, as we started from the third row onwards. So ROW()-2 would be 1 for the first instance, 2 for the second instance when the row number is 4, and so on and so forth.
Watch Video – Get List of File Names from a Folder in Excel
Using VBA Get a List of All the File Names from a Folder
Now, I must say that the above method is a bit complex (with a number of steps).
It’s, however, a lot better than doing this manually.
But if you’re comfortable with using VBA (or if you’re good at following exact steps that I am going to list below), you can create a custom function (UDF) that can easily get you the names of all the files.
The benefit of using a User Defined Function (UDF) is that you can save the function in a personal macro workbook and reuse it easily without repeating the steps again and again. You can also create an add-in and share this function with others.
Now let me first give you the VBA code that will create a function to get the list of all the file names from a folder in Excel.
Function GetFileNames(ByVal FolderPath As String) As Variant
Dim Result As Variant
Dim i As Integer
Dim MyFile As Object
Dim MyFSO As Object
Dim MyFolder As Object
Dim MyFiles As Object
Set MyFSO = CreateObject("Scripting.FileSystemObject")
Set MyFolder = MyFSO.GetFolder(FolderPath)
Set MyFiles = MyFolder.Files
ReDim Result(1 To MyFiles.Count)
i = 1
For Each MyFile In MyFiles
Result(i) = MyFile.Name
i = i + 1
Next MyFile
GetFileNames = Result
End Function
The above code will create a function GetFileNames that can be used in the worksheets (just like regular functions).
Where to put this code?
Follow the steps below to copy this code in the VB Editor.
How to Use this Function?
Below are the steps to use this function in a worksheet:
- In any cell, enter the folder address of the folder from which you want to list the file names.
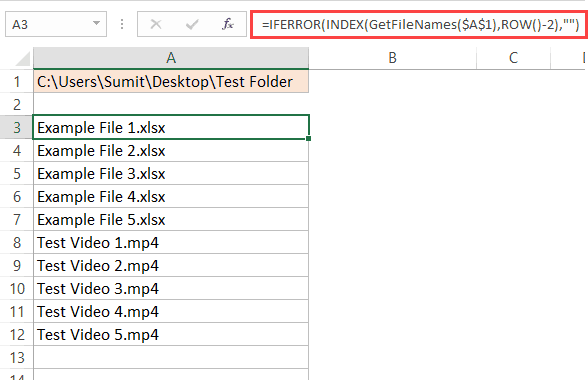
- In the cell where you want the list, enter the following formula (I am entering it in cell A3):
=IFERROR(INDEX(GetFileNames($A$1),ROW()-2),"") - Copy and paste the formula in the cells below to get a list of all the files.
Note that I entered the folder location in a cell and then used that cell in the GetFileNames formula. You can also hard code the folder address in the formula as shown below:
=IFERROR(INDEX(GetFileNames("C:UsersSumitDesktopTest Folder"),ROW()-2),"")
In the above formula, we have used ROW()-2 and we started from the third row onwards. This made sure that as I copy the formula in the cells below, it will get incremented by 1. In case you’re entering the formula in the first row of a column, you can simply use ROW().
How does this formula work?
The GetFileNames formula returns an array that holds the names of all the files in the folder.
The INDEX function is used to list one file name per cell, starting from the first one.
IFERROR function is used to return blank instead of the #REF! error which is shown when a formula is copied in a cell but there are no more file names to list.
Using VBA Get a List of All the File Names with a Specific Extension
The above formula works great when you want to get a list of all the file names from a folder in Excel.
But what if you want to get the names of only the video files, or only the Excel files, or only the file names that contain a specific keyword.
In that case, you can use a slightly different function.
Below is the code that will allow you get all the file names with a specific keyword in it (or of a specific extension).
Function GetFileNamesbyExt(ByVal FolderPath As String, FileExt As String) As Variant
Dim Result As Variant
Dim i As Integer
Dim MyFile As Object
Dim MyFSO As Object
Dim MyFolder As Object
Dim MyFiles As Object
Set MyFSO = CreateObject("Scripting.FileSystemObject")
Set MyFolder = MyFSO.GetFolder(FolderPath)
Set MyFiles = MyFolder.Files
ReDim Result(1 To MyFiles.Count)
i = 1
For Each MyFile In MyFiles
If InStr(1, MyFile.Name, FileExt) <> 0 Then
Result(i) = MyFile.Name
i = i + 1
End If
Next MyFile
ReDim Preserve Result(1 To i - 1)
GetFileNamesbyExt = Result
End Function
The above code will create a function ‘GetFileNamesbyExt‘ that can be used in the worksheets (just like regular functions).
This function takes two arguments – the folder location and the extension keyword. It returns an array of file names that match the given extension. If no extension or keyword is specified, it will return all the file names in the specified folder.
Syntax: =GetFileNamesbyExt(“Folder Location”,”Extension”)
Where to put this code?
Follow the steps below to copy this code in the VB Editor.
- Go to the Developer tab.
- Click on the Visual Basic button. This will open the VB Editor.
- In the VB Editor, right-click on any of the objects of the workbook you’re working in, go to Insert and click on Module. If you don’t see the Project Explorer, use the keyboard shortcut Control + R (hold the control key and press the ‘R’ key).
- Double click on the Module object and copy and paste the above code into the module code window.
How to Use this Function?
Below are the steps to use this function in a worksheet:
- In any cell, enter the folder address of the folder from which you want to list the file names. I have entered this in cell A1.
- In a cell, enter the extension (or the keyword), for which you want all the file names. I have entered this in cell B1.
- In the cell where you want the list, enter the following formula (I am entering it in cell A3):
=IFERROR(INDEX(GetFileNamesbyExt($A$1,$B$1),ROW()-2),"")
- Copy and paste the formula in the cells below to get a list of all the files.
How about you? Any Excel tricks that you use to make life easy. I would love to learn from you. Share it in the comment section!
You May Also Like the Following Excel Tutorials:
- Filter cells with bold font format.
- How to Combine Multiple Excel Files into One Excel Workbook.
- Creating a Drop Down Filter to Extract Data Based on Selection.
- Using VBA FileSystemObject (FSO) in Excel.

Get 51 Excel Tips Ebook to skyrocket your productivity and get work done faster
121 thoughts on “Get the List of File Names from a Folder in Excel (with and without VBA)”
-
Awesome, Thanks. really helpful….Though i guess this works only for local drive folders. Is there a way to get the sever location work? As, if there are huge amounts of data it’s not wise to copy paste on my local drive and then do this. There should be a way to get the files names from the severs connected. Could you please help me out with that?
-
Fantastic, thanks many tonnes.
-
1. select file in folder
2. hold shit and right click
3. select “copy as path”
4. paste in excel
5. Use find/replace to find “folder path” and replace with ” “ -
Amazing solutions both with/without VBA.
It works in my PC but I would like to know why is doesn’t work if the folder is in Onedrive?
I´m using in cell A1 =REPLACE(CELL(“filename”),FIND(“[“,CELL(“filename”)),LEN(CELL(“filename”)),”MyFolder/”)
to obtain the folderpath that is in One drive and in B1=INDEX(GetFileNames(A1,1),””) -
This is awesome!! Thanks
-
Super bro! worked out correctly for me (using the Excel formula). Many thanks for sharing your knowledge.
-
Very well. I like the code of vba. But i think you have some issue with ReDim Result(1 To MyFiles.Count) and with the ReDim Preserve Result(1 To i – 1). Because i run the code and 1 of files i can’t see.
I think the best to change
ReDim Result(0 To MyFiles.Count)
ReDim Preserve Result(0 To i – 1).
And after this all works.
Thanks for great job. -
i have more sub folder in one folder in need formula to get all folder name in excl
-
Awesome!!! Thanks a lot, man! Got it done, what I needed to, following your video. Kudos to you!
-
Is there a way to select file names based on their created date or last modified date? For example, I want files created in the last 24 hrs, 36 hrs, and 5 days?
-
Hi, this is great, but I need a list of the file names without their extension.. how to do this in one step?
-
You can use below formula
=IFERROR(LEFT(INDEX(FileNameList,ROW()-2),FIND(“.”,INDEX(FileNameList,ROW()-2))-1),””)
-
-
is that any way to update excel list when one of the file in the folder delete ?
-
if one of the file in the folder delete this program can not update that and old file name remain in the list
-
I find it faster to stick the folder path into a browser and then copy and paste into excel.
But yes, even better when excel is set up to extract the data with a click of the button. -
Great!
Why doesn’t it work? -
Hi, what i like to know is….
i have a cell A1 in sheet1, and i like to output the highest file number of a folder in that cell.
So when the folder name = userinvoice and the file name in pdf and xlsm is for example 20190001.pdf range 20190199 and 20190001.xlsm to 20190199 i like to display the value of the highest number in that folder to cell A1 in sheet1. In this example it would be 20190199.pdf and 20190199.xlsmThank you very much for you effort.
-
Thanks very much. Saved me hours of manual entry!
-
hi
thankyou for the post
I need a macro which can automate the work of renaming the pdf with amount within the pdf, instead of depending on a software
-
I want to see Respective File Name with Save Time & Date…
Please help for the Macro Code for the same. -
Thank you for this wonderful post !!!
-
I see the method for only listing specific extensions but is there a way to exclude extensions?
-
Thanks a lot for your tip. it’s helped me a lot.. 🙂 ..
-
Thanks for the tip – worked like a charm!
-
I need to get at the place to make a file name and go where I took pictures at yesterday
-
Nice work
it made our work very easy with our macro
-
oh
-
-
Amazing ! i’m mind blown here,
I knew of to do it with marco but with a simple formula! wonderful! -
DEVE
-
hoping someone could help, hoping I could automate my excel list using VBA or other procedure,
For A, the idea is I have a PDF file, let say rev. 1,2,3,4 etc, and I will put it in one folder, what I need is I need to capture the latest revision with hyperlink using formula.
For B, the idea is almost same as above except for one revision, let say rev. 01 and I will put it in one folder (same folder as formula A), what I need is I need to capture the exact revision with hyperlink using formula.
I get this this formula but i don’t know how it will work- thanks in advance.
A) Formula for latest “rev number” column
=IF(Bfile(“Z:3 M+ MWC3.1 M+_RSSM+ (CC_2015_3A_022)3_DrawingsUSBM+ WS4_Drawings”&MIDB($A50,11,3)&”PDF”&MIDB($A50,1,35)&”-“&LOOKUP(1,0/($K50:$DF50” “),$K50:$DF50)&”.PDF”),HYPERLINK(“Z:3 M+ MWC3.1 M+_RSSM+ (CC_2015_3A_022)3_DrawingsUSBM+ WS4_Drawings”&MIDB($A50,11,3)&”PDF”&MIDB($A50,1,35)&”-“&LOOKUP(1,0/($K50:$DF50” “),$K50:$DF50)&”.PDF”,LOOKUP(1,0/($K50:$DF50″ “),$K50:$DF50)),”*”&LOOKUP(1,0/($K50:$DF50” “),$K50:$DF50))
B) Formula for latest “rev number individual” column
=IF(Bfile(“Z:3 M+ MWC3.1 M+_RSSM+ (CC_2015_3A_022)3_DrawingsUSBM+ WS4_Drawings”&MIDB($A52,11,3)&”PDF”&MIDB($A52,1,35)&”-00.PDF”),HYPERLINK(“Z:3 M+ MWC3.1 M+_RSSM+ (CC_2015_3A_022)3_DrawingsUSBM+ WS4_Drawings”&MIDB($A52,11,3)&”PDF”&MIDB($A52,1,35)&”-00.PDF”,”00″),”*00″)
-
I only tried the first method and it works perfectly for me… thank you so much for saving me days of boring inputing!!
-
How to get the file name list in Date Modified order in this excel workbook ??
-
Umm its not working on MAC 🙁
The formula you’ve provided (in column A) gives me this:
/Volumes/Data/Reports/*So the INDEX formula (in column B) gives #N/A
🙁-
Remove the first “/” (the one before Volumes) and change the rest of the slashes to colons.
-
-
I used the code above to obtain a list of files. The files names are as below:
Diesel___1234567___NIR_cuvette___20180912_234811.0
Diesel___1234567___NIR_cuvette___20180912_235510.0
The code only pulls the first file for each sample and fails to list the second (or third file). Is there a way to correct for this? Thanks. -
Hey,
I have a ecxel sheet which have some product names, and also have a folder which have some pdf files named same as in cell data, like if cell A2 value is apple1, Pdf file name is apple1.pdf, i want to know which name file is missing, can we get that in excel somwhow.. -
Hi Sumit,
I want to list the names and duration of all videos in a folder and its subfolders using Excel VBA. From the code below I can get the duration of video files, but I can’t exclude all other files. This gives me a list of all the file names, which I don’t need. Also I am failing to loop through subfolders.
What I want to achieve is for the macro to loop through all subfolders in the the given root folder and list only video names and duration in columns A and B.
Some help with this is truly appreciated.
Option ExplicitDim i As Long, SourceFldr
Dim c As Range, rng As Range
Dim sFile As Variant
Dim oWSHShell As Object
Dim WS As Worksheet
Dim lRow As LongSub GetDuration()
Dim fldr As FileDialog
Set fldr = Application.FileDialog(msoFileDialogFolderPicker)
Set oWSHShell = CreateObject(“WScript.Shell”)With fldr
.Title = “Select a Source Folder”
.AllowMultiSelect = False
.InitialFileName = oWSHShell.SpecialFolders(“Desktop”)
If .Show -1 Then GoTo NextCode
SourceFldr = .SelectedItems(1)
NextCode:
End WithDim oShell: Set oShell = CreateObject(“Shell.Application”)
Dim oDir: Set oDir = oShell.Namespace(SourceFldr)i = ActiveSheet.Range(“A” & Rows.Count).End(xlUp).Row + 1
For Each sFile In oDir.Items
Cells(i, 1).Value = oDir.GetDetailsOf(sFile, 0) ‘File Name
Cells(i, 2).Value = oDir.GetDetailsOf(sFile, 27) ‘File Lenght
i = i + 1
Next sFileSet oDir = Nothing
Set oShell = NothingEnd Sub
-
-
-
Wow! That’s ingenious and too much for free 😀 May Allah bless you brother. Thanks a lot.
-
Hey! Sumit Bansal right? As a matter of fact you are my excel HERO. I’ve been following your blog for quite a while now and everything you thought was amazing. Even though I’m still a student, I know one day this knowledge is going to save me a lot of time. I thought I was an excel expert with my one semester training So I created a blog to publish my skills on (http://excel-programming.com). But upon discovering your skills and experience I think I still have a a long way to go. Thank you very much for this blog.
-
You are doing wonderful work Sumit to educate Excel users. God bless you.
Please try the Excel Addin called ASAP Utilities by downloading it. There is a free (Home&Student) and paid version. File listing in Excel sheet of any directory and nested sub directories, with many properties of the files is so easy with many menu driven options (Menu-File & System-Item 24) This is just one of more than 300 utilities. It will be very useful for all Excel users and saves tons of time and effort. Current version is 7.4 and the link to the site is http://www.asap-utilities.com/ . I do not have any pesronel intrest in the product except to make it known to many Excel users to benifit in their work. It was developed by Bastien Mensink from Netherlands way back in 1999. I am using it since that time. Feed back on your experience is appreciated. -
Sumit this one deserves a kudos!!
Some time back i was working on its VBA and m non VBA guy……….
-
I was also wondering if there is a way to extract additional properties information at the same time
ie
“File Name”
“Created”
“Owner”
“Author”
“Title”
“Comments”
“Tags”-
This would be fabulous.
-
-
nice. really interesting. thanks a lot
-
Hmm, nowadays I would go with a Power Query ( Get and Transform) solution. Read from folder, and delete all columns except file name. Save and load to table. No macro, no formula involved.
-
Thank you for this repost. Is there a way to list folders in a directory?
-
I just saw a post below that this function does not work with folders. Too bad 🙁
-
-
Since it has not been corrected I assume that it has not been reported yet. The first version of this formula: =IFERROR(INDEX(FileNameList,ROW()-2,””) should actually be: =IFERROR(INDEX(FileNameList,ROW()-2),””). The trick won’t work until the right formula is used.
-
Thanks for pointing out Charles.. have corrected it!
-
-
Hi Sumit, Great trick. Thanks a lot. However I was wondering if there is a way to extract the file path as well along with the file name
-
I copied everything exactly but my cells are blank in the B column and it doesn’t populate the file names. any reason why? Also I’m using office 2010.
-
I figured out the issue, i didn’t have a slash before the asterisk * at the end. But I have one more question. Can this be used to get a value from a cell in these docs as well? e.g. I get a list of all docs in a given folder, can I then get a value from a cell in each of those docs if its all the same cell in each doc?
-
-
Hi
Was wondering if there is a way to extract properties information at the same time
ie
“File Name”
“Created”
“Owner”
“Author”
“Title”
“Comments”
“Tags”Much appreciated
-
Hi Sumit, great tutorial. I used this because files are constantly being added to a specific folder. This allows for the names of those new folders to show. Since I do not know the names of the new files that will be created I was hoping to then use the results of this in an external reference formula. Do you know if this is possible?
-
-
One method I have used before uses the command prompt. Navigate to the folder you want to extract file names from. Type (dir /b > “sample.txt”) minus the parenthesis. This will create a text file in the same directory that you can then open in Excel for further processing.
-
how to have excel list all the file in one row instead of using multiple rows
-
dear sir,
how can i Get a List of File Names from a Folder in Excel without extension like . jpg, .pdf -
Amazing! Thanks for this Great Trick!!!
Question: When the New File Names come in, they Start Over from the Top-Shifting File Names Down, how can I get them to come in at the bottom of the list (based on date/time modified)?
Make File Name Hyperlink? If I Select the Column with your Formula, Insert Hyperlink and Add Folder Location, this links them to the folder, but how can I make it open the file directly? Also If you can Help: I have a Folder Filled with Email Messages (.msg Files) that I am keeping a Running List of in Excel and have to manually enter data from each Email such as Name (Email Address before @) + Company (Email Address after @), Date Received etc. – Is there a way to Auto Populate this information into Excel from the .msg File following the Automated File Name you have created here?
-
I have a single folder with multiple sub-folders each with multiple files, can I extract at the highest folder level?
-
Hi, Is there a way i can get the time the file is created in addition to the file name?
-
Hei Sumit. I got Folder name in A1. But INDEX will not work properly, I get only #N/A, (I define A1 as “NM”)
Can you plz look at screenshot and give me some guide lines that where i do wrong?
And my required folder is on Sharepoint. -
Amazingly quick response. I will re-check. Thank you.
-
I tried Getting a List of File Names from a Folder in Excel. Why did I get #NAME? instead of the name of the first file? I like your video lesson. Thank you.
Husen Kabeer, myaquadome@yahoo.comc:This PCDocumentsHusen Data Files – 2014Word*
=INDEX(FileNameList,1)
#NAME?-
Hello Husen.. Check the named range reference. It seems your named range is not referring to the cell that has the folder path.
-
-
Thank you very much. This is amazing ..:)
-
Thanks for commenting.. Glad you liked it 🙂
-
-
Sumit, is there a way for this formula to look within a series of sub-folders for the same results.
-
Thanks for commenting David.. With this method, you can only get file names from a specified folder
-
-
Hi, Sumit
Googled for a few minutes just now. I love your work. As a newbie you’ve helped me so much but for the life of me I just couldn’t get this working. Found an alternative method that actually lists the file names as hyperlinks. Thought I’d share the link here, in case you or your other fans/followers were interested –http://www.extendoffice.com/documents/excel/627-excel-list-files.html
-
if this done with a folder that gets updated a lot, will this auto update with the new file names or will you have to start all over
-
It would automatically update if you open the workbook or you press F9 (to force a calculation), or even if you make any change in the worksheet.
-
Thanks, its working just the way that i was wanting it to
-
Hello Sumit, thank you for your post. Made my life easier. Never the less I still have a problem with the update. It does not update automatically. I have to drag the formula again each time I open the document, or either double click the cell to updated itself. Do you know what I might do wrong? For your information I used your formula in combination with other formulas as bellow :
=LEFT($B$3;LEN($B$3)-1)&IFERROR(INDEX(FileList0916;ROWS($B$4:B33));””)
-
-
-
Hi. I have been here for more than an hour and for some reason I can’t get this to work. Know I’m going to love it and use it a lot, once I can get the first one working. Any chance you can take a look at mine and tell me what I’m doing wrong? I would so much appreciate it!
https://www.dropbox.com/s/ex6rtxpgr2twyne/Excel%20Index.xlsx?dl=0
-
Hello Brenda. You have created a named range with the name “ExcelList”, while the formula uses “FileNameList”. Change the formula to =IFERROR(INDEX(ExcelList,ROWS($B$1:B1)),””)
-
-
Are you using the formula to get the folder address. Use this formula =REPLACE(CELL(“filename”),FIND(“[“,CELL(“filename”)),LEN(CELL(“filename”)),”*”)
It shouldn’t look something as shown in your spreadsheet. Also, make sure the excel file (in which you are extracting the file names) is saved in the same folder.
-
Morning,
At it again this am. Losing my mind. Want this so bad and I just can’t get it to work. Tried everything. Must be something really small and stupid hanging me up. Heading to work. Little bit OCD – lol. I will get back at it when I get home but not too optimistic.
-
-
-
-
-
hi sumit! i followed the instructions but all i got was a blank cell..
-
Hi
The function of FILES does not exist in my version of excel 2010! May be it originated from some Add-Ins? -
That is an awesome way. Thanks a lot!!…
Also, is there a way to get the list of all the folders,subfolders and filenames along with file size and modification date columns.-
Thanks for commenting.. Using this method, you can only get file names from a specified folder
-
-
Another way to get the directory.
Portuguese version of formula =INFORMAÇÃO(“DIRECTÓRIO”)
I guess in English will be =INFO(“DIRECTORY”)
Even easier! -
Hi Sumit, thanks a lot for that.. is there any way I can also get the tabs within each excel file that I am looking up in a drive to populate in the columns next to file names? Please let me know it will be really helpful
-
Hi Bharat. You won’t be able to get tab names using the FILES function. For that, you would need to resort to a VBA code
-
HI Sumit, thanks for the quick response. is there anyway you can help with that code? I have been trying to search for it online but nothing seems to pop up.
-
-
-
Never seen this trick before. Great stuff.
i think this formula should also work for retrieving the file path, looks shorter 🙂
=LEFT(CELL(“filename”),FIND(“[“,CELL(“filename”))-1)&”*”-
Thanks for sharing the formula Victor.. Yours is much better 🙂
-
-
I was able to follow your instructions, but when i save it and go back it isnt there it just has name#. I am not familiar with Macros and it ask me to save Macros-Free and when I do my list isnt there. how can I save it. apologize in advance.
-
Hi Elisa.. Thanks for commenting. Try and save your file as a macro-enabled workbook (with .xlsm extension) and it would work. Since FILES is an old macro formula, it requires the workbook to be saved in .XLSM format. And don’t worry about not knowing macros, it would still work
-
-
Awesome solution thank you! However I could only register 256 files (rows). After that I get #¡REF!. Do you know a way to make it work for larger number of files. I need it for 2.000 files aprox. Thank you again. Jacobo
-
Thanks for commenting.. Could you share the sample file you are using. Since FILES is an old formula it may have some limitations, need to check on it.
-
-
Once I wanted to do the same so I wrote an Excel Add-in for doing that.
It can get filenames, folders, file extensions and other information regarding files.
This tool can write up to excel limit number of rows in just a few minutes.
In a stress test I did, I got more than 1,000,000 file names in just about 3 minutes.
Here is a link to try:
http://excel.gegprifti.com
-
Dear Sumit,
Suppose i want to do same for folder name than how we can do?-
Hi, I am waiting for your revert.
-
Hi Narayandatta.. FILES can not be used to get the folder names within in folder. It only works for files that have an extension
-
-
-
This was a great time saver Sumit, thanks. ? is there a way to make them a hyperlink without going through every single one?
Thanks -
fantastic
-
A formula that only works in named range?!!..this is great find.
-
-
That is really useful, thanks very much!
-
Thanks for commenting.. Glad you found this useful 🙂
-
-
Interesting.
Before dragging down, we may use
=COUNTA(FileNameList)
to get a sense of how far we need to go down.
btw, another approach in getting the directory for consideration.
=REPLACE(CELL(“filename”),FIND(“[“,CELL(“filename”)),LEN(CELL(“filename”)),”*”)
-
Thanks for commenting.. Your formula is much better 🙂
-
-
Thanks this will be useful
We can also do the same thing with Power Query -
Wow, this is great. Easier than the VBA code I wrote to do the same thing!
-
Yeah.. this old macro4 formula does makes it quite easy to do this
-
-
you save my life.
thnx a lot for such a great trick.
-
Thanks for the comment. Glad you liked it 🙂
-
Dear Sumit,
Is “Files” function is valid only Excel 2013.
I am trying to make it in Excel 2010 but could not find the Turkish of “Files” in Excel?
Do you have an idea?
-
Dear Sumit,
I am dying here to try above trick but still waiting your reply about the function FILES ?
🙁-
Hey.. this formula is valid for all versions of Excel. However, I could not find its equivalent for Turkish Excel. Since it’s an old function, even the help is not available for it now.
-
Dear Sumit,
Thnx for your reply.
I made it but unfortunately when I drag down, it gives only the first file name ?
Do you have any idea?
-
It seems the second argument of INDEX is not changing. Can you try changing it to see if it work. Also, would be great if you could share the file (a link to dropbox or onedrive)
-
-
I think I got the issue.. Replace the function ROW with ROWS, and it should work for you. Hope this helps.
-
omg!
how dumb! I am…
Thnx a lot and sorry for wasting your time! -
Glad it worked 🙂
-
I need those macros in Polish, and find this way:
In VBA I write and run simple macro like:
Sub Makro1()
ActiveWorkbook.Names.Add Name:=”Test”, RefersToR1C1:=”=FILES(Sheet1!R2C1)”
End SubThen in Name Menager I have 4.0 Macro Function name in my Excel language (for my it’s Polish)
-
-
-
-
Comments are closed.
If you are coding in VBScript, Excel and you need to extract the filename that a user uses when saving a file, the GetSaveAsFilename() method can be useful for you.
This can be quite helpful when you want the end-user to select a file from their required file location using a GUI like a Save as dialog box.
In this tutorial, we will demonstrate with a few coding examples how to use the Application.Getsaveasfilename method in Excel.
What does the GetSaveAsFilename Method do in Excel?
The GetSaveAsFilename() method in Excel does two things:
- Displays a customized Save As dialog box
- Extracts the filename the user specifies in the ‘Filename’ input field of the dialog box.
It does not, however, actually save the file even when the user presses the Save button. You will need to use a separate function if you want the file to be saved.
Now what do we mean by a ‘customized Save As dialog box’ ?
This means you can specify what title you want in the Save As dialog box, as well as specify an initial filename (that the user can change according to his/ her requirement).
You can also specify filters for the types of files the user will be allowed to save as. For example, you might want to give the user options to save as only text (.txt) and Excel (.xlsx) files.
It is important to note here that the GetSaveAsFilename() method may change the current drive or folder.
Syntax for the GetSaveAsFilename Method in Excel
The syntax for the GetSaveAsFilename() method is as follows:
expression.GetSaveAsFilename (InitialFilename, FileFilter, FilterIndex, Title)
Here, expression is an application object variable.
The arguments of this function are all optional. Here’s what they represent:
- InitialFilename is the default filename that appears in the ‘Filename’ input field when the dialog box appears. It is usually used to provide the user with a suggested file name. If this argument is omitted, Microsoft Excel uses the name of the active workbook.

- FileFilter is a string with which you can specify the file filtering criteria, like which types of files the user will be allowed to save the file with. This string can have a maximum of 255 characters.
- FilterIndex is the number of file filters that you want to use.
- Title is the title you want to be displayed in the title bar of the Save As dialog box. If this argument is omitted, the default title ‘Save As’ is used.

Example VBA Codes Using GetSaveAsFilename in Excel
Let us take a look at some example codes to understand how the GetSaveAsFilename method is used and applied.
VBA Code to Get Filename with Path from a Save As Dialog Box
The first sample code lets you extract the file name specified by the user in the ‘Filename’ field of the Save As dialog box and then use it to display the name of the file in a message box.
Sub Example1()
Dim varResult As Variant
ResultVar = Application.GetSaveAsFilename()
If ResultVar <> False Then
MsgBox "Filename entered: " & ResultVar
End If
End Sub
When you run the above code, you should see a Save As dialog box that will let you enter a filename.

When you click Save, you should see a message box with the filename you entered along with the entire file path displayed.

Note that this code will only cause the Save As dialog box to be displayed. Pressing the Save button will not actually save the file.
Explanation of the Code
Let us understand the above code (Example1) line by line:
Line 1: This line declares a variable varResult of type Variant. The Variant data type can be used to define variables that contain any type of data.
Dim varResult As Variant
Line 2: This line displays the Save As dialog box.
ResultVar = Application.GetSaveAsFilename()
Line 3: This line first checks if the user has entered a filename and there are no errors. If so, then it takes the entire path of the file, along with the filename the user specified, and displays it in a message box.
If ResultVar <> False Then
MsgBox "Filename entered: " & ResultVar
End If
VBA Code to Display Save As Dialog Box with File Filters
This sample code lets you specify a specific file filter, so that the user is only allowed to save a file of the specified file type.
Let’s say you want to only give the user the option to save their file as a text file. Here’s the code, you will need for that:
Sub Example2()
Dim varResult As Variant
ResultVar = Application.GetSaveAsFilename(FileFilter:="Text Files (*.txt), *.txt")
If ResultVar <> False Then
ActiveWorkbook.SaveAs ResultVar
End If
End Sub
When you run this code you will see the Save As dialog box displaying just one option in the ‘Save as type’ dropdown list – ‘Text Files’, and when you subsequently save the file, you will get the file saved as a ‘.txt’ file.

Explanation of the Code
Let us understand the above code (Example2) line by line:
Line 1: This line declares a variable varResult of type Variant.
Dim varResult As Variant
Line 2: This line displays the Save As dialog box, providing the user the option to save the file as a text file only. The string ‘Text files’ will be displayed in the drop down list for the ‘Save as type’ field and the filename specified by the user will be appended with the extension ‘.txt’.
ResultVar = Application.GetSaveAsFilename(FileFilter:="Text Files (*.txt), *.txt")
Line 3: This line first checks if the user has entered a filename and there are no errors. If so, then it saves the active workbook with the file name specified by the user as a text file.
The SaveAs() method is what actually saves the file when the ‘Save’ button is pressed.
Without this line, only the Save As dialog box would be displayed but nothing would get saved when the user presses the Save button.
If ResultVar <> False Then
ActiveWorkbook.SaveAs ResultVar
End If
You can also use the GetSaveAsFilename method to specify multiple filters.
For example, say you want to give the user the option to save their file as either a text file (*.txt) or an Excel file (*.xlsx). In that case, you can replace line 2 in the above code with the following line:
ResultVar = Application.GetSaveAsFilename(FileFilter:="Text Files (*.txt), *.txt, Excel Files (*.xlsx), *.xlsx")
Here’s what the dialog box would then look like:

VBA Code to Display Save As Dialog box from a Specified Start Location
This last sample code lets you specify a particular location, drive or directory from where you want the Save As dialog box to start. Let’s say you want the dialog box to start from the D: drive. Here’s the code, you will need for that:
Sub Example3()
Dim varResult As Variant
ResultVar = Application.GetSaveAsFilename(InitialFileName:="D:")
If ResultVar <> False Then
MsgBox "Filename entered: " & ResultVar
End If
End Sub
Note that the InitialFileName argument just provides the location from which the Save As dialog box starts.
The user will have the option to change this location, drive or directory as needed.

In this tutorial we demonstrated, with the help of a few sample VBScript codes, how to use the GetSaveAsFilename() method.
This method allows the user to enter the name and location of a file using the Save As dialog box. We hope you found this helpful.
Other articles you may also like:
- Using Application.EnableEvents in VBA in Excel (Explained with Examples)
- Why does Excel Open on Startup (and How to Stop it)
- How to Start Excel in Safe Mode (3 Easy Ways)
- SetFocus in Excel VBA – How to Use it?
- How to Open Excel Files Using VBA
- Subscript Out of Range Error in VBA – How to Fix!
 Please Note:
This article is written for users of the following Microsoft Excel versions: 97, 2000, 2002, and 2003. If you are using a later version (Excel 2007 or later), this tip may not work for you. For a version of this tip written specifically for later versions of Excel, click here: Adding a File Path and Filename.
![]()
Written by Allen Wyatt (last updated November 7, 2020)
This tip applies to Excel 97, 2000, 2002, and 2003
Margo wants to insert a file path and filename in an Excel worksheet. She wants to be able to insert the information in either a cell or into the header/footer. This is rather easy to do in Excel.
To insert the file path and filename into a cell, you use the CELL worksheet function in the following manner:
=CELL("filename")
This formula returns the entire path, filename, and tab name of the current worksheet, like this:
E:My DataExcel[Budget.xls]Sheet1
If you want to strip out the brackets and the sheet name, you can use the following variation on the formula:
=SUBSTITUTE(LEFT(CELL("filename"),FIND("]",CELL("filename"))-1),"[","")
The LEFT function gets rid of everything from the right bracket to the end of the string, while the SUBSTITUTE function gets rid of the left bracket.
Putting a path and filename into a header or footer is easy:
- Select the worksheet whose header or footer you want to change.
- Choose the Page Setup option from the File menu. Excel displays the Page Setup dialog box.
- Click on either the Custom Header or Custom Footer buttons, as desired. Word displays either the Header or Footer dialog box. (See Figure 1.)
- Position the insertion point in the Left Section, Center Section, or Right Section boxes, as desired.
- Click on the File button. (It looks like a file folder with a piece of paper sticking out.) Excel inserts the following code at the insertion point:
- Click on OK two times to close both dialog boxes.
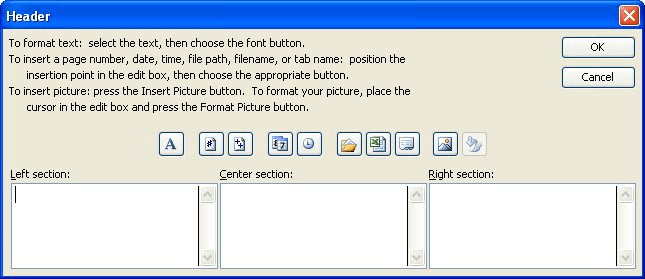
Figure 1. The Header dialog box.
&[Path]&[File]
When you print the worksheet, Excel replaces the codes in step 5 with the path name and the file name of the workbook, respectively.
If you are using Excel 97 or Excel 2000, then the above steps won’t work. Instead, you need to use a macro to insert the path and filename:
Sub DoFullPath()
    ActiveSheet.PageSetup.CenterFooter = _
      ActiveWorkbook.FullName
End Sub
This macro will also work in later versions of Excel. To specify a different place for the path and filename, simply change CenterFooter to another location (such as LeftFooter, RightFooter, LeftHeader, CenterHeader, or RightHeader). If you decide to use the macro approach, you will need to remember to run it every time that you change either the workbook’s filename (you use Save As), or you change the place where the workbook is stored on your disk.
If you would like to know how to use the macros described on this page (or on any other page on the ExcelTips sites), I’ve prepared a special page that includes helpful information. Click here to open that special page in a new browser tab.
ExcelTips is your source for cost-effective Microsoft Excel training.
This tip (2875) applies to Microsoft Excel 97, 2000, 2002, and 2003. You can find a version of this tip for the ribbon interface of Excel (Excel 2007 and later) here: Adding a File Path and Filename.
Author Bio
With more than 50 non-fiction books and numerous magazine articles to his credit, Allen Wyatt is an internationally recognized author. He is president of Sharon Parq Associates, a computer and publishing services company. Learn more about Allen…
MORE FROM ALLEN
Message about a Problem with the Clipboard
Imagine this: You are working along just fine in Excel, then you try to make an edit to your workbook that causes a …
Discover More
Adding an Ellipsis to the Beginning of Some Paragraphs
The Find and Replace feature of Word is very powerful. You can even use it to add a unique character to the beginning of …
Discover More
Adding an Ellipsis to the Beginning of Some Paragraphs
The Find and Replace feature of Word is very powerful. You can even use it to add a unique character to the beginning of …
Discover More