
Word for Microsoft 365 Word 2021 Word 2019 Word 2016 Word 2013 Word 2010 Word 2007 More…Less
To go to a page or a heading in a Word document without scrolling, use the Navigation pane.
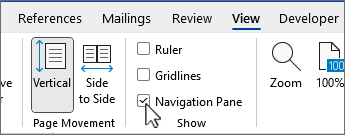
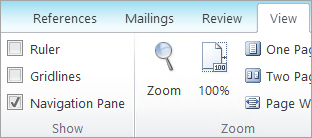
To open the Navigation pane, press Ctrl+F, or select the View tab and choose Navigation Pane.
Browse by headings
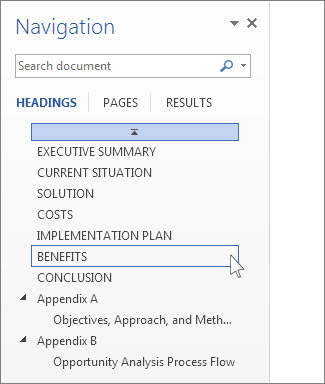
If you’ve applied heading styles to the headings in the body of your document, those headings appear in the Navigation pane. The Navigation pane doesn’t display headings that are in tables, text boxes, or headers or footers.
-
In the Navigation pane, select the Headings tab.
-
To go to a heading in your document, click that heading in the Navigation pane.
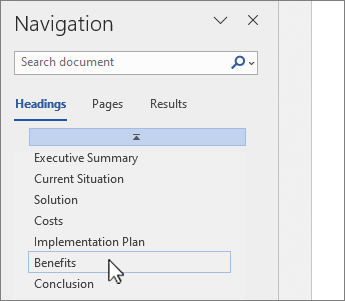
Tip: To show or hide the subheadings under a heading, click the arrow next to the heading.
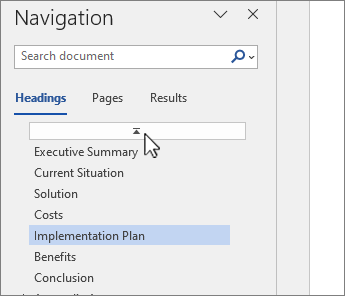
If you scroll through your document, Word highlights the heading in the Navigation pane to show you where you are. To go back to the top, select Jump to the beginning.
Browse by page
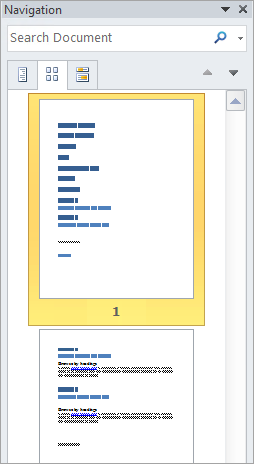
Select Pages. Then choose a thumbnail image to go to that page.
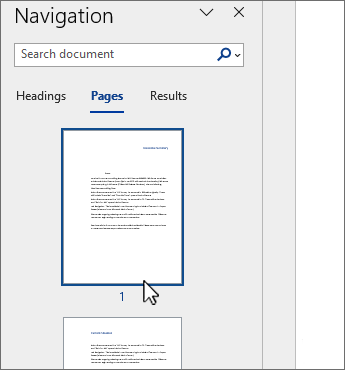
When you do scroll through your document, Word highlights the page you’re on in the Navigation pane to show you where you are.
Search in your document
-
In the search box at the top of the Navigation pane, type the text that you want to find.
-
Select a result to see it in your document, or browse through all the results by clicking the up and down arrows.
Reorganize your document
You can move parts of your document around by moving them in the Navigation pane. You can also change the level of headings, and you can add new headings.
-
In the Navigation pane, select the Headings tab.
-
Do any of the following:
-
To move part of the document, select the heading and drag it to a new location.

-
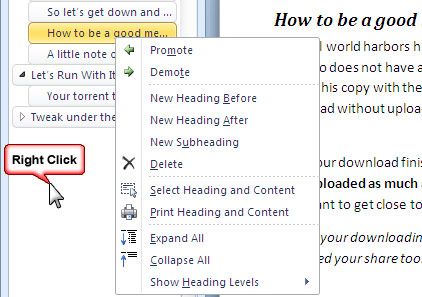
To change the heading’s level or add a heading, right-click the heading, and then choose the action you want.
Note: If a document contains regions that are protected, you might be unable to drag a section beyond the last protected region.
-

To open the Navigation pane, press Ctrl+F, or click View > Navigation Pane.
Browse by headings
If you’ve applied heading styles to the headings in the body of your document, those headings appear in the Navigation pane. The Navigation pane doesn’t display headings that are in tables, text boxes, or headers or footers.
-
In the Navigation pane, click the Browse the headings in your document tab.
-
To go to a heading in your document, click that heading in the Navigation pane.

Tip: To show or hide the subheadings under a heading, click the arrow next to the heading.
If you scroll through your document, Word highlights the heading in the Navigation pane to show you where you are.
Browse by page
Click the Browse the pages in your document tab. Then click a thumbnail image to go to that page.
When you do scroll through your document, Word highlights the page you’re on in the Navigation pane to show you where you are.
Search in your document
-
In the search box at the top of the Navigation pane, type the text that you want to find.
-
Click a result to see it in your document, or browse through all the results by clicking the Next Search Result and Previous Search Result arrows.
Reorganize your document
You can move parts of your document around by moving them in the Navigation pane. You can also change the level of headings, and you can add new headings.
-
In the Navigation pane, click the Browse the headings in your document tab.
-
Do any of the following:
-
To move part of the document, click the heading and drag it to a new location.
-
To change the heading to a higher or lower heading level, right-click the heading, and then click Promote or Demote.
-
To add a heading, click New Heading Before or New Heading After.
Note: If a document contains regions that are protected, you might be unable to drag a section beyond the last protected region.
-
Important:
Office 2007 is no longer supported. Upgrade to Microsoft 365 to work anywhere from any device and continue to receive support.
Upgrade now
The Navigation pane in Word 2007 is called the Document Map.
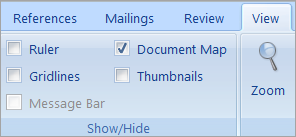
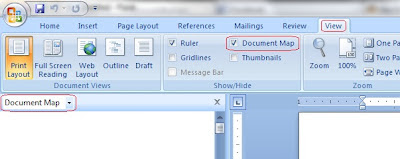
To open the Document Map, click View > Document Map.
Browse by headings
If you’ve applied heading styles to the headings in the body of your document, those headings appear in the Document Map. The Document Map doesn’t display headings that are in tables, text boxes, or headers or footers.
-
In the Document Map, click the a heading to jump to that location in your document.
Tip: To show or hide the subheadings under a heading, click the plus or minus sign next to the heading.
If you scroll through your document, Word highlights the heading in the Document Map to show you where you are.
Browse by page
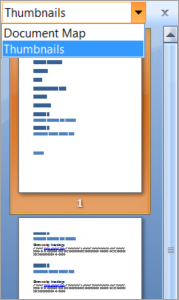
Click the arrow next to Document Map, and then click Thumbnails. Then click a thumbnail image to go to that page.
When you do scroll through your document, Word highlights the page you’re on in the Document Map to show you where you are.
Need more help?
What is a document map?
Document Map comes handy browsing large documents in Word. The feature creates a list of all headings and sub headings and displays in a separate pane.
How does Document Map help you?
You can quickly jump from one heading/subheading to another. Saves you from tireless browsing to get to a specific section.
How does Document Map work?
Word creates Document Map based on the heading styles applied in the document. Therefore, use built-in heading styles.
Note: To know how to apply built-in heading styles in your Word document, read the following article:
https://wordknowhow.wordpress.com/2013/05/20/how-to-fix-multilevel-list-in-word/
When you click an entity from the Map, Word brings up the corresponding section of the document to the top.
How can you view Document Map?
From the Word Ribbon, click tab menu View.
From the group Show/Hide, click select check box Document Map. Word displays the Document Map pane on the left.

You can expand a heading level in Document Map to view its sub headings or collapse to hide all. Right-click anywhere in the Document Map pane, select a heading level. Document Map pane displays headings till that level only, e.g. if you select heading level 5, Document Map pane will display heading 1 through heading 5.

How will you fix Document Map to remove unwanted entries?
Click the unwanted entry from the document map. Word places the cursor at the beginning of the corresponding heading/body text in the document.
Now, select the heading/body text and then right-click.
From the right-click menu, click Paragraph. The Paragraph dialog box appears.
On the Paragraph dialog box, under the tab Indent and Spacing and within section General, view the field Outline Level with a drop-down list.
Now, select the outline level as Body Text from the drop-down list. The content will no more be part of Document Map.

About wordknowhowhttp://wordknowhow.comThis blog site was started to help people with Microsoft Word. I use Word a lot at work, and I understand that some features are difficult to use. There were no simplified instructions online to help me use these features. It is for this reason that this site exists; to make your life easier with Word.
Feel free to post your comments, queries, suggestions, etc. I will do my best to help you!
The Document Map is an easy navigation pane on the left-hand side of the MS Word document that helps us to navigate to a page or a heading in a lengthy Word document without scrolling. This article demonstrates how to use the document map and generate a table of content automatically.
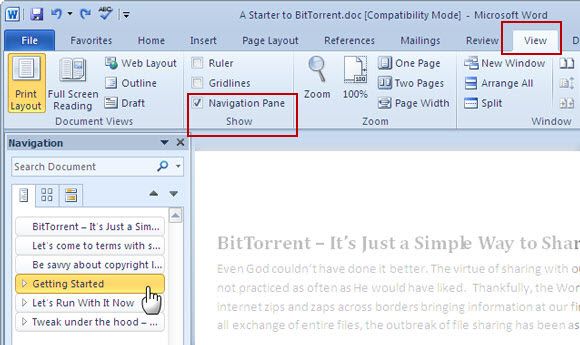
Step 1: Click on the ‘View’ tab, find ‘Navigation Pane‘ in the ‘Show’ group.

Step 2: Check the box adjacent to the ‘Navigation Pane’ under the ‘View’ tab, and now Navigation pane is displayed on the left side of the Word document.

If you have many headings and subheadings in your lengthy Word document, you need to use the ‘Styles‘ option under the ‘Home’ Tab.

Step 3: Select main or section headings in your document [I’m selecting ‘Molecules of life’ as a section heading in my Word document] and on the ‘Home’ tab, find ‘Styles’ and click Heading 1. Now, the main heading displayed in left-sided Navigation Pane.

Step 4: Select subheadings in your document [I’m selecting ‘Carbohydrates’ as a subheading in my document as this comes under main heading ‘Molecules of life’] and on the ‘Home’ tab, find ‘Styles’ and click Heading 2. Now, subheading displayed in left-sided Navigation Pane.

Step 5: Like this, you need to select your main headings and different levels of subheadings and assign respective ‘Styles’ accordingly. Now your document map is ready where you can navigate where ever you want easily without scrolling in the lengthy Word document.

Now we’re going to learn how to generate a ‘Table of Contents’ automatically in a lengthy Word document. Microsoft Word has a handy tool where you can create the Table of Contents automatically provided if you are using Document Map.
Step 6: First, you need to decide where you want to insert ‘Table of Contents’ and then click on that page of the Word document.

Step 7: Click on the ‘References’ tab, then find the ‘Table of Contents’ and click on it.

Step 8: Select any desired built-in automatic ‘Table of Contents’ style. That’s it; you have generated a Table of Contents to your Word documents with page numbers automatically.

Step 9: If you make any changes in the Word documents, you need to update the Table of Contents. Click anywhere on the Table; the entire ‘Table of Contents’ is going to be highlighted and find ‘Update Table’ on the left top of the Table.

Step 10: Click on ‘Update Table’ and click ‘Update entire table’. Now, whatever changes in the documents, including page numbers updated in the Table of Contents.

Please watch the below-embedded video where I have demonstrated the use of document maps and the generation of a table of contents automatically.

The Document Map in Word 2007 provides easy navigation in long documents. You can jump around your document by headings or pages. It also provides a bird’s-eye view of your document’s structure.
Recently, we showed you how to use the navigation pane in Word 2010. It is similar to the Document Map in Word 2007. Several features were added to the Navigation Pane in Word 2010, such as a Find tab and the ability to reorganize your document by dragging and dropping headings.
However, the Document Map in Word 2007 is still useful. This article shows you how to use it to navigate your document and to view your document’s structure and how you can change the style of the Document Map outline.
NOTE: To make full use of the Document Map, you must format the headings in your document using the built-in headings styles. The document outline on the Document Map is generated using the built-in headings in your document.
To view the Document Map, click the View tab on the ribbon and select the Document Map check box in the Show/Hide group.

A pane displays on the left side of the Word window. By default, the Document Map displays. Click on any heading in the outline to quickly jump to that section of your document.
You can also view a collection of thumbnails of all the pages in your document. To do this, select Thumbnails from the drop-down list at the top of the Document Map pane.
A collection of thumbnails representing all the pages in your document displays in the Document Map pane. Click on a page to quickly jump to that page.
You can select which heading level you want to display by right-clicking on the Document Map pane and selecting a Show Heading option. For example, if you select Show Heading 2, then all Heading 1 items display expanded to only show Heading 2 items. Any headings under Heading 2 are collapsed and do not show.
NOTE: You can also expand or collapse the headings using the plus and minus signs to the left of the headings.
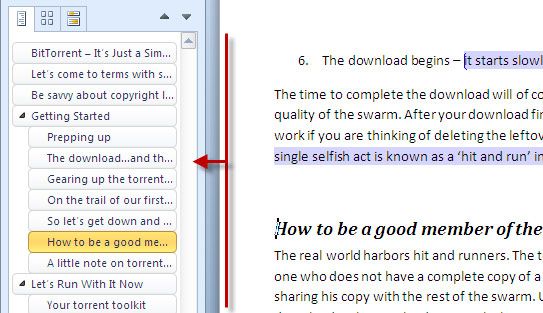
You can resize the Document Map pane by moving your cursor over the border between the pane and your document until it looks like the cursor in the image below and says Resize. Click and hold on the border and drag it to the left or right to make the pane narrower or wider.
Unfortunately, the Document Map context menu does not provide a way to change the formatting of the Document Map outline. However, you can change this formatting by changing the Document Map style. To do this, click the Styles dialog box launcher button in the Styles group on the Home tab. You can also press Alt + Ctrl + Shift + S.
The Styles window displays. Click the Manage Styles button at the bottom of the Styles window.
On the Edit tab, on the Manage Styles dialog box, scroll in the Select a style to edit box until you find the Document Map style. Select it and click Modify.
Select the desired formatting options on the Modify Style dialog box. Use the Format button to access more options to set. Click OK when you are finished changing the formatting. You are returned to the Manage Styles dialog box. Click OK to close it.
To close the Styles window, click the X button in the upper, right corner of the window.
NOTE: In Word 2007, the Document Map sometimes displays the outline of the headings in tiny, unreadable type. This is a known bug. However, there is a workaround. The solution is to switch to Outline View and then back again. To do this, click Outline in the Document Views group on the View tab. Then, click Close Outline View on the Outlining tab.
Besides allowing you easy navigation within your document, the Document Map also tells you where you are in your document. As you scroll through your document using the scroll bar or the Page Up and Page Down keys, the Document Map highlights the current heading.
End.
READ NEXT
- › Save Hundreds on Elegoo’s New PHECDA Laser Engraver Through Kickstarter
- › Spotify Is Shutting Down Its Free Online Game
- › Android’s Nearby Share Has (Unofficially) Arrived on Mac
- › The New Winamp Is Here, but It’s Not What You’d Expect
- › How to Get a Refund on the PlayStation Store
- › Five Types of Phone Damage That Aren’t Covered by Your Free Warranty
How-To Geek is where you turn when you want experts to explain technology. Since we launched in 2006, our articles have been read billions of times. Want to know more?
Document Map is a setting in Word that lets you navigate around a document quickly, and view the layout of a document at a glance. This is especially useful when dealing with a long document like a novel manuscript. Now that I know how to use this feature properly, I have no idea how I worked on writing without it.
Most of the Project Mayhem authors probably already know about it, but when I learned about the Document Map recently, and then shared about it on Facebook, I was amazed how many writers I know didn’t know about it.
So, I’m going to write this post based on Microsoft Word 2007, which is what I own, and what I write in, but my understanding is that the feature exists in everything since Office XP (Word 2003), and is even better in Word 2010. Enabling and using the feature might be a little different in the different versions, but I’m sure you can Google the settings for whichever version you use.
For MS Word 2007, here is a screenshot of how you enable the function:
So that’s VIEW on the banner, then click the box next to «Document Map,» to place a check mark in it, and then the Document Map pane will appear to the left of the document itself (that dropdown menu can also show thumbnails).
When you’re ready to create your first heading (in a novel this might be the title), which is like the highest level in the tree directory of an outline, you need to switch back to HOME on the banner. That will allow you to select style, as seen here:

The default format is probably not how you want it to look in a novel, but we’ll get to customizing it in a moment. For now, light blue 14-point Cambria works fine when creating an example outline. I’ll show you what this does to the Document Map pane in a second.
For now, you’ll need at least one sub-heading to create a directory tree. This is what that looks like:

Keep in mind, that these styles only appear with these default settings when you open a new document. I have found that when trying to add these setting to a manuscript I first started years ago, the styles are all kinds of wonky. You can edit them manually, but I’ve found it much easier to create a new document, build the headings exactly how you want, and then paste the rest of your text in.
So, now that you know how to enable Document Map, and how to create the first two headings, this is what an example outline looks like, with four levels of headings, and then what that does to the document map pane on the left:

That’s a little blurry, so here’s a closeup of the map pane:
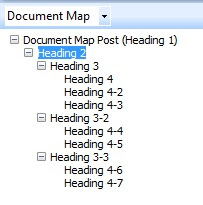
Isn’t that convenient? Imagine a manuscript with 3 sections, and 34 chapters. It is so much faster to be able to jump around the document using this feature, expanding and contracting your headings on the left, and then clicking on whatever section you need to jump to. This feature is amazing during revisions. I have a friend, Adam Heine (who also actually taught me this feature), who even uses a level 5 heading for each scene within his chapters. I haven’t found this necessary yet, but the fact that the option is there is pretty nice.
Now, you probably don’t like light blue 14-point Cambria to show up in your novel manuscript, so how do you edit the formatting of these headings, so that it fits the style of your writing? There is apparently a way to do it by right clicking the text and then clicking on the paragraph settings, but I’ve found it much easier to right click the style, and the «modify,» like this:

Which will bring up this window, that allows you to customize how you want the style (heading) to look:
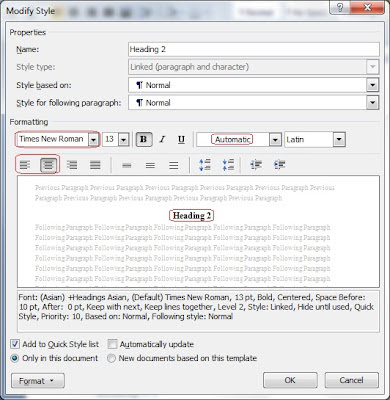
Note the outlined font color of «Automatic,» (which is basically black), the outlined centering of the paragraph, rather than «aligned left,» and the font changed to «Times New Roman,» which is the default in the majority of the publishing industry, rather than «Cambria.» Now, I didn’t change the font from 13-point to 12-point for this example image, but in a novel manuscript, even for a chapter title/heading, you probably should. Some agents and editors may ask for something different, and you can certainly Google, «default manuscript formatting,» for better expert opinions than mine, but I keep the entire text of my manuscripts in 12-point Times New Roman, automatic color.
You might not want to center your chapter headings, and that’s certainly fine if you don’t, but the point is that this window is how you control those formatting options for every single piece of text that uses that style (heading). Modifying Heading 2, for example, will change the formatting for every piece of text that you assigned the style «Heading 2,» to.
Does that all make sense? I certainly hope so, because I’m pretty new to this, and am definitely no expert. If you have any questions, please be sure to ask them in the comments, and if I don’t know the answer, I’ll try to find it for you.
If you are not a power user on MS Word, I am assuming that you haven’t heard about the Document Map. The Document Map is one of those little features tucked away in MS Word. The Document Map helps you navigate through a long Word document and access different parts of it.

If you are not a power user on MS Word, I am assuming that you haven’t heard about the Document Map. The Document Map is one of those little features tucked away in MS Word. For our examination into the Document Map and how we can use it for better document management, we take it up on MS Word 2010.
The Document Map is a separate display (in the form of a left-sided pane) that helps you navigate through a long Word document and access different parts of it. Think of it as a jumping off point for reaching different sections in your document. It is almost a control center for moderating different parts of document.
Let’s put the definitions aside and look at how it can help us become better office workers and writers.
How Does The Document Map Help Us?
The Document Map does not help us to write better. But it does help us a lot when it comes to format our writing quickly by applying different visual styles easily. More than that, the Document Map really comes into its own when you have a long document and you need a ‘navigational guide’ to move around it. It is the map of your document. It is not a table of contents list though.
The Microsoft Definition Of The Document Map
Here’s how The Document Map is described by the guys at Microsoft Office.
The Document Map is a separate pane that displays a list of headings in the document. Use the Document Map to quickly navigate through the document and keep track of your location in it.
Switch On The Document Map
Getting to the Document Map is a simple as clicking on the View – Navigation Pane in MS Word 2010. In Word 2007 and earlier versions, you can click on View – Document Map. Alternatively, you can use the shortcut of Alt – V –D.
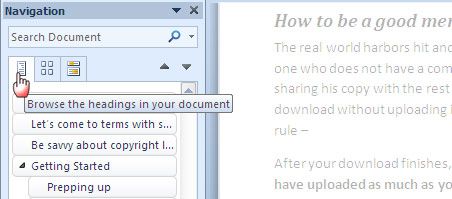
As in the screen above, it is the small icon that says – Browse the headings in your document. Strangely, it’s not called the Document Map in Word 2010, but we will keep using that.
Uses Of The Document Map
Now, that we have nailed down the location of the Document Map, let’s also peg down a few uses we can put it to.
Display All Headings
If you have applied the heading styles to your documents (by using the Styles in the Home tab), the Document Map lists all document headings in the navigation pane. Subordinate heading levels are displayed in a hierarchical manner.
Jump From One Heading To The Other
For particularly large documents, using the navigation pane is a time-saver as you can hop from one heading to the other with a click.
See Where You Are
It’s easy to lose track of exactly where you are in a large document. With the navigation pane/Document Map open, you can see that the section is highlighted in orange as you move from one part to the next.
Quickly Change The Heading Levels
Changing the structure of your document is easy as a right-click with the document map. With the headings displayed, you can click on Heading Level 2 and promote it to a Heading Level 1. That is you can change the hierarchy of the paragraphs quickly. You can just as easily demote one section of text under a heading level and bring it under another.
Drag Headings Around To Rearrange Your Document
Like to re-organize your document in jiffy. Simply select the paragraph (i.e. the heading level) and drag it to another location. All heading levels and paragraphs nested under it (i.e. at a lower-level to it) will move along with it.
A Few More Document Organization Aids
As you can see in the right-click menu of the navigation pane, you can select a section of a document and print the heading and the content. The Document Map is also a quick way to outline your document by adding new heading levels and filling them up with content.
Document Map is a great tool to exploit if you like working with multi-page Word files and document styles. You can go and re-organize your old MS Word documents using the Document Map and the Navigation pane. With it, you don’t need to scroll down, but simply glance through the hierarchical list of headings to find the important tidbit of information. It lets you see how the whole document pans out.
Do you use the Document Map and the Navigation Pane? Were you aware of this MS Office and MS Word productivity tip?
Show All
About the Document Map
The Document Map is a separate pane that displays a list of headings in the document. Use the Document Map to quickly navigate through the document and keep track of your location in it.
 Document Map pane
 Document
When you click a heading in the Document Map, Microsoft Word jumps to the corresponding heading in the document, displays it at the top of the window, and highlights the heading in the Document Map.
You can choose the level of detail to display in the Document Map. For example, you can display all headings or only top-level headings, or show or hide detail for individual headings. You can also set the font and size of the headings in the Document Map and change the highlight color of the active heading.
The Document Map is different from a table of contents frames page for a Web page. Create a table of contents frames page when you need to publish a document for others to view in a Web browser or in Word.
 When you are working with large documents in Microsoft Word, it can sometimes be hard to keep track of where you are. Navigating your way around these documents is confusing and can be time consuming. Where you are having to constantly move back and forth between sections of a document, the document map can help you to do this easily.
So what is the document map?
The document map is quite simply what it sounds like, a map of you document, listing all of the different sections and linking to them so that you can quickly jump from one section to another. In order to do this, you need to make sure that your document is formatted correctly with style headings. This is something you should get into the habit of doing with all of your documents. It promotes consistency and avoids many of the annoying little formatting issues that you might otherwise encounter. We covered style headings in a previous article, if you’re not familiar with using them, check it out here.
Viewing document map and setting the number of outline levels
Open the document map by clicking on the ‘view‘ tab. Depending upon your version of Word, you will either see the document map here, or under the ‘show‘ group check the ‘navigation pane‘ box. Alternatively you can use the keyboard shortcut Alt+V+D and the document map will be displayed on the left of your screen.

There are three different views in this navigation pane, which you can switch easily between using the icon tabs at the top of the panel. Choose to view document by headings, pages or search the document using the search bar. You can also use the small up and down arrows to easily scroll through the headings or pages one at a time.

If you have lots of headings and sub-headings, you can choose how many headings outline levels to display. To set this, right-click on one of the headings in the Document Map, and choose “show heading levels“. You can then choose how many levels you want to display. At any time you can expand or collapse individual headings by clicking on the plus and minus signs or the small expansion triangles next to the headings.

Three useful ways to use the document map
- To navigate your document. Simply click on a heading in the list, and your cursor will automatically jump to that section of your document – easy, hey? In a large document, where it’s easy to get ‘lost’ this is a great feature. Which leads to the next point…
- To keep track of where you are in the document. If you are typing up a very large manuscript, and aren’t sure quite which section you are in, the document map will help you out. As you scroll through you will see in the map that the section you are looking at will be highlighted, so you always know just where you are and you won’t get ‘lost’!
- To check that your formatting is consistent and all of your headings are correct. Whilst this isn’t necessarily a main purpose of the document map, it is a good way of checking that your document is formatted right. You can alter the number of outline levels to display in document map, so for example, you can choose to just showing main headings and sub-headings. Since it will only display the headings that you want to see, this can be an easy way to check that all of your headings and subheadings are formatted correctly. If they aren’t showing in the document map, then you have not formatted them correctly somewhere along the way.
The document area is the area where the user types the text in a Word document. It is a blank section of a word processor. It allows the user to create content. It is basically a blank word document having a white page as a document area.
Contents
- 1 Where is the document area in Microsoft Word?
- 2 What is a documentation area?
- 3 Where is the document window document area?
- 4 What is the document pane in Word?
- 5 Is an area where you type and edit a document?
- 6 Is the area where you type the text?
- 7 What is document and documentation?
- 8 What are the 4 types of documentation?
- 9 What is documentation and example?
- 10 What are the parts of a word document?
- 11 What are the parts of the word window?
- 12 How do I use document Map in Word?
- 13 What is document view in MS Word?
- 14 What are the three main areas in the Navigation pane?
- 15 Is a white area to type text?
- 16 What is area type?
- 17 What is the document area quizlet?
- 18 What are documents in computer?
- 19 Is documents the same as documentation?
- 20 What are 3 types of documents?
The document area is the blank section of a Word processor or other document program that allows the user to create content. Below is an example of a blank Microsoft Word document with the white page being the document area.
What is a documentation area?
Definition. Document areas are the highest layer in content models and form the context for document processing. In an application where documents are important, different application areas can be separated from each other by document areas.
Where is the document window document area?
The Document Window is the area where all pages are created and shapes can be positioned. During both the editing and play modes, the Document Window consists of two distinct panels vertically aligned, with the upper large panel being the area for the currently displayed page.
What is the document pane in Word?
Word allows you to divide a document window into two panes that allow you to view two different parts of the same document.Each pane is an independent view of your document. This means that you can use different Views in each pane—for instance, Normal view in the top pane and Page Layout in the bottom.
Is an area where you type and edit a document?
Its called a page.
Is the area where you type the text?
Answer: workarea is the area where you type your text.
What is document and documentation?
Document: a piece of written, printed, or electronic matter that provides information or evidence or that serves as an official record. ( Oxford Dictionaries Online) Documentation: Material that provides official information or evidence or that serves as a record.
What are the 4 types of documentation?
The four kinds of documentation are:
- learning-oriented tutorials.
- goal-oriented how-to guides.
- understanding-oriented discussions.
- information-oriented reference material.
What is documentation and example?
Documentation is defined as paperwork giving information, instructions or references. An example of documentation is a marriage certificate. noun. 22.
What are the parts of a word document?
- The Title Bar. At the very top of the screen is the title bar.
- Menu Bar. When you first start Word, the menus and toolbars display basic commands and buttons.
- Toolbars. The Standard Toolbar.
- The Horizontal Ruler.
- The Vertical Ruler.
- Vertical Scroll Bar.
- Horizontal Scroll Bar.
- The Status Bar.
What are the parts of the word window?
The basics of the Word window
- Title bar. This displays the document name followed by a program name.
- Menu bar. This contains a list of options to manage and customize documents.
- Standard toolbar.
- Formatting toolbar.
- Ruler.
- Insertion point.
- End-of-document marker.
- Help.
How do I use document Map in Word?
Word: Map a Document
- Under the “View” tab, check the “Document Map” checkbox. A side panel will appear with a list of links to the document’s major sections.
- Click on a section link to instantly navigate to that section in the document.
- Click the plus sign [+] or minus sign [-] to expand or collapse a section.
What is document view in MS Word?
Microsoft Word gives you five different views of a document, and each has its own advantages over the others. They are Print Layout, Full Screen Reading, Web Layout, Outline and Draft and you can guess what purpose some of them serve just by their names.
What are the three main areas in the Navigation pane?
Notice that there are three headings in the navigation panel: Headings, Pages and Results. Sometimes when you open this panel, a different heading will show but it’s the Results one you need.
Is a white area to type text?
Text area is a large white space to type text. Explanation: It use for MS word,Notepad or Wordpad.
What is area type?
Point Type and Area Type. Type in Photoshop is either point type or area type. Point type is added to a document at a specific location (or point) in the image. In contrast, area type (also called paragraph type) fills a portion (or area) of the image.
What is the document area quizlet?
Document Area. Is the area where typed text appears on the screen. Status Bar. Contains useful information such as page and word number, as well as viewing options.
What are documents in computer?
A computer document is a file created by a software application. While the term “document” originally referred specifically to word processor documents, it is now used to refer to all types of saved files. Therefore, documents may contain text, images, audio, video, and other types of data.
Is documents the same as documentation?
Document is a form of information that means record,or a capture of things and events so information will not be lost. But the process of to save, to improve and make essential is documentation. In IT especially we tend to use documentation as a plural for document.
What are 3 types of documents?
Common Types of Documents
- Emails.
- Business Letters.
- Business Reports.
- Transactional Documents.
- Financial Reports and Documents.