
Содержание
- VBA – Dialog Box
- Message Box
- Syntax
- Simple Message Box
- YesNo Message Box
- Adding a Title
- Input Box
- VBA Coding Made Easy
- VBA Code Examples Add-in
- Dialog Boxes in Excel
- What is the use of dialog boxes?
- Types of Dialog boxes
- The Dialog Box and Dialog Box Launcher in Excel
- Find the Dialog Box Launcher
- Access Function Dialog Boxes
- Work With Non-Dialog Box Options
- Overview of forms, Form controls, and ActiveX controls on a worksheet
- What is a form?
- Types of Excel forms
- Data form
- Worksheet with Form and ActiveX controls
- Form controls
- MessageBox in Excel VBA
- Message Box
- Creating a Basic Message Box in VBA
- Buttons in MessageBox
- Different Icons in Excel VBA
- Values returned by Buttons
- Editing Title in a Msg Box
VBA – Dialog Box
In this Article
This article will demonstrate how to use Dialog Boxes in VBA.
Dialog Boxes are used to return information to the user. The most common dialog box that is used is the Message Box, but we can also use the Input Box.
Message Box
Syntax
The syntax of the Message Box is as follows:

Argument
Explanation Prompt
Message returned to the user – required
Visual Basic buttons – defaults to OK if omitted
Title of Message box – optional
Simple Message Box
A simple message box just requires the prompt – the message you are returning to your user. The OK button will automatically be displayed.

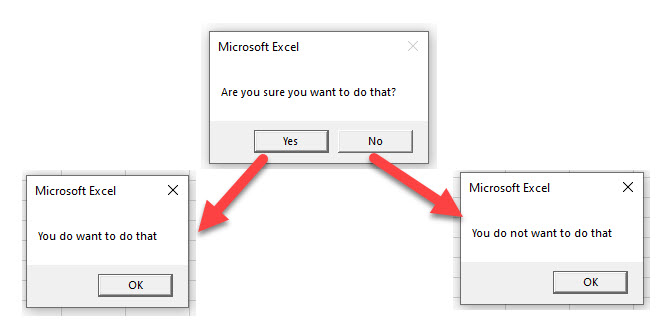
YesNo Message Box
Adding in buttons can make you message box more flexible.
We can select the type of box from a drop down list of VB constants.
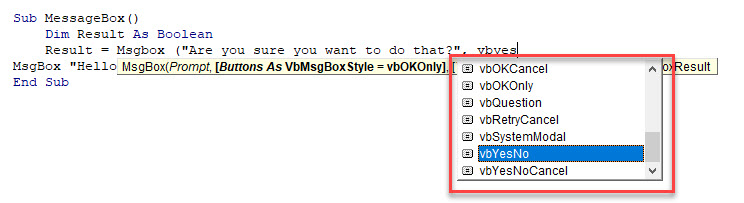
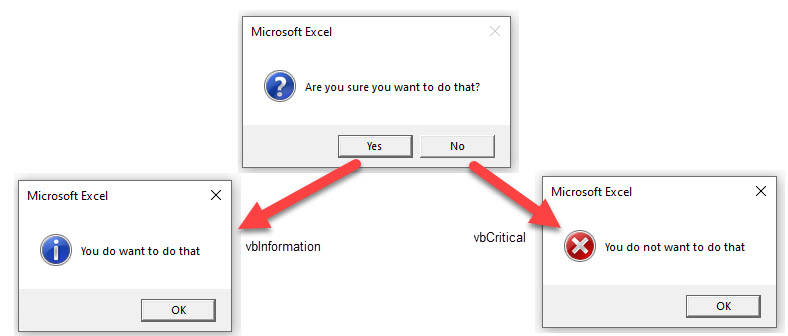
As well as the Yes/No button, we can icons to display in our message box to indicate to the user what type of message is being displayed.
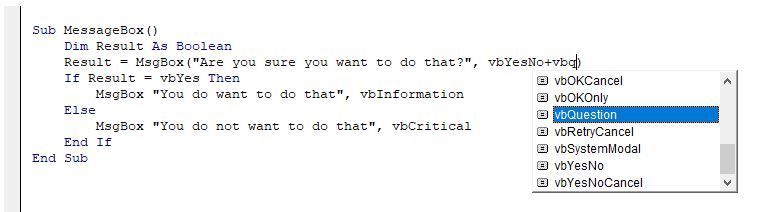
NOTE: if you do not select a button constant, but do select an information constant, you need to omit the brackets from around the message box arguments.
Adding a Title
We can also fill in the title argument.

For a more detailed article about Message Boxes, click here.
Input Box
An input box is a Dialog Box that asks the user a question, and returns a result.
For a more detailed article about Input Boxes, click here.
VBA Coding Made Easy
Stop searching for VBA code online. Learn more about AutoMacro — A VBA Code Builder that allows beginners to code procedures from scratch with minimal coding knowledge and with many time-saving features for all users! 

VBA Code Examples Add-in
Easily access all of the code examples found on our site.
Simply navigate to the menu, click, and the code will be inserted directly into your module. .xlam add-in.
Источник
Dialog Boxes in Excel
In this post, you will learn more about Dialog Boxes in Excel and how to use them with-in your Excel spread she
What is the use of dialog boxes?
A dialog box is a temporary window, where an application creates to retrieve user input. An application typically uses dialog boxes to prompt the user for additional information for menu items.
The following are the ways to use the dialog boxes.
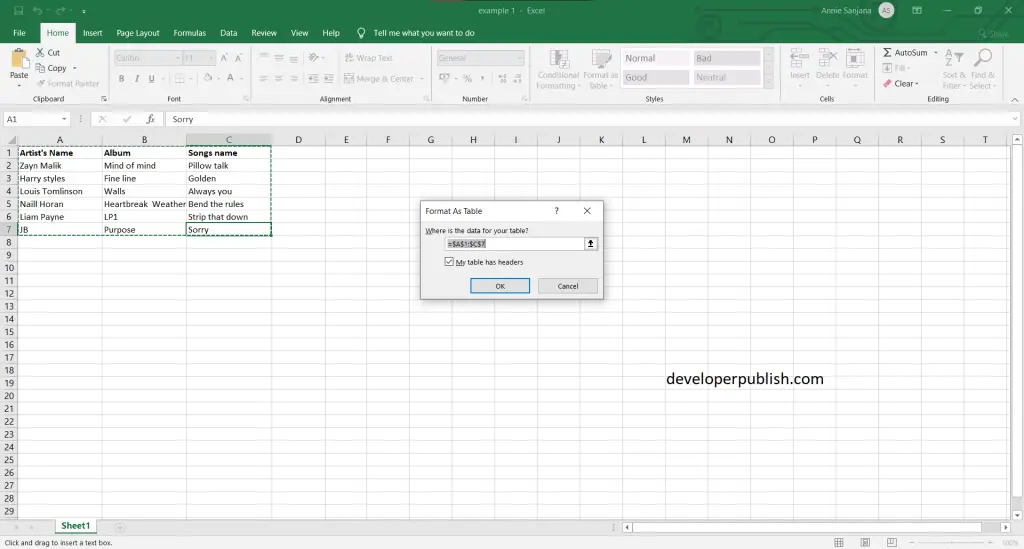
- First, prepare an excel sheet with the required details in it.

Types of Dialog boxes
- When a Typical dialog box displays on the screen, it will remain until the user dismisses it. By clicking on the ok button, the task selected from the dialog box will be performed, and by clicking on the Cancel button, the dialog box will close without taking any action.
- The image below is an example for Typical dialog box.
- Navigating dialog boxes is very easy, click the command that you want to use. Although dialog boxes were designed for mouse users, you can also use the keyboard. Every dialog box button has also a text name on the button.
- The image below is an example for Navigating Dialog Boxes.
- Several Excel dialog boxes are tabbed dialog boxes. When you select a tab, a panel with relevant commands is visible. Tabbed dialog boxes are highly convenient because you can make several changes in a single dialog box. After you have made all your setting changes, click OK.

We will hope that this article was useful and understandable.
Источник
The Dialog Box and Dialog Box Launcher in Excel
Input information and make choices about Excel worksheet features
:max_bytes(150000):strip_icc()/laptop-with-alarm-clock-and-mug-103891309-5bdf473cc9e77c00511bae8e.jpg)
A dialog box in Excel is a screen where you input information and make choices about different aspects of the current worksheet or its content, such as data, charts, and graphic images.
The information in this article applies to Excel versions 2019, 2016, 2013, 2010, and Excel for Mac.
Find the Dialog Box Launcher
One way to open dialog boxes is to use the dialog box launcher. The launcher is a small downward-pointing arrow located in the bottom right corner of individual groups or boxes on the ribbon.
Examples of groups with a dialog box launcher include:
- The Font and Number groups on the Home tab
- The Charts group on the Insert tab
- The Page Setup and Sheet Options groups on the Page Layout tab
Access Function Dialog Boxes
Not all dialog box launchers in Excel are found in the corner of ribbon groups. Some, such as those found under the Formulas tab, are associated with individual icons on the ribbon.
The dialog box makes it easy to enter information related to the function’s arguments, such as the location of data and other input options.
The Formulas tab in Excel contains groups of functions that have similar purposes in the Function Library. Each group name has a dialog box launcher associated with it. When you select these down arrows, a drop-down menu opens and displays individual function names. Selecting a function’s name in the list opens its dialog box.
Work With Non-Dialog Box Options
It is not always necessary to access features and options in Excel through a dialog box. For example, many of the formatting features found on the Home tab of the ribbon, such as the bold feature, are found on single choice icons. Select these icons once to activate the feature and select a second time to turn the feature off.
Источник
Overview of forms, Form controls, and ActiveX controls on a worksheet
Important: This feature isn’t available in Office on a Windows RT PC. Want to see what version of Office you’re using?
 By using forms and the many controls and objects that you can add to them, you can make data entry on your worksheets easier and improve the way your worksheets look. You can also do this yourself with little or no need for Microsoft Visual Basic for Applications (VBA) code.
A worksheet form is not the same thing as an Excel template. A template is a pre-formatted file that can get you started creating a workbook that looks the way you want. A form contains controls, such as boxes or dropdown lists, that can make it easier for people who use your worksheet to enter or edit data. To find out more about templates you can download, see Excel templates.
What is a form?
A form, whether printed or online, is a document designed with a standard structure and format that makes it easier to capture, organize, and edit information.
Printed forms contain instructions, formatting, labels, and blank spaces for writing or typing data. You can use Excel and Excel templates to create printed forms.
Online forms contain the same features as printed forms. In addition, online forms contain controls. Controls are objects that display data or make it easier for users to enter or edit data, perform an action, or make a selection. In general, controls make the form easier to use. Examples of common controls include list boxes, option buttons, and command buttons. Controls can also run assigned macros and respond to events, such as mouse clicks, by running Visual Basic for Applications (VBA) code.
You can use Excel in several ways to create printed and online forms.
Types of Excel forms
There are several types of forms that you can create in Excel: data forms, worksheets that contain Form and ActiveX controls, and VBA UserForms. You can use each type of form by itself, or you can combine them in different ways to create a solution that’s right for you.
Data form
A data form provides a convenient way to enter or display one complete row of information in a range or table without scrolling horizontally. You may find that using a data form can make data entry easier than moving from column to column when you have more columns of data than can be viewed on the screen. Use a data form when a simple form of text boxes that list the column headings as labels is sufficient and you don’t need sophisticated or custom form features, such as a list box or spin button.
 Excel can automatically generate a built-in data form for your range or table. The data form displays all column headers as labels in a single dialog box. Each label has an adjacent blank text box in which you can enter data for each column, up to a maximum of 32 columns. In a data form, you can enter new rows, find rows by navigating, or (based on cell contents) update rows and delete rows . If a cell contains a formula, the formula result is displayed in the data form, but you cannot change the formula by using the data form.
Worksheet with Form and ActiveX controls
A worksheet is a type of form that enables you to enter and view data on the grid, and there are several control-like features already built-in to Excel worksheets, such as comments and data validation. Cells resemble text boxes in that you can enter and format them in a variety of ways. Cells are often used as labels, and by adjusting cell height and width and merging cells, you can make a worksheet behave like a simple data entry form. Other control-like features, such as cell comments, hyperlinks, background images, data validation, conditional formatting, embedded charts, and AutoFilter can make a worksheet behave like an advanced form.
For added flexibility, you can add controls and other drawing objects to the drawing canvas of a worksheet, and combine and coordinate them with worksheet cells. For example, you can use a list box control to make it easier for a user to select from a list of items. Or, you can use a spin button control to make it easier for a user to enter a number.
Because controls and objects are stored on the drawing canvas, you can display or view controls and objects alongside associated text that is independent of row and column boundaries without changing the layout of a grid or table of data on your worksheet. Most of the time, many of these controls can also be linked to cells on the worksheet and do not require VBA code to make them work. You can set properties that determine whether a control floats freely or moves and resizes together with a cell. For example, you might have a check box that you want to move together with its underlying cell when the range is sorted. However, if you have a list box that you want to keep in a specific location at all times, you probably do not want it to move together with its underlying cell.
Excel has two types of controls: Form controls and ActiveX Controls. In addition to these sets of controls, you can also add objects from the Drawing tools, such as a AutoShapes, WordArt, SmartArt graphic, or text boxes.
The following sections describe these controls and drawing objects, and also explain how to work with these controls and objects in more detail.
Form controls
Form controls are the original controls that are compatible with earlier versions of Excel, starting with Excel version 5.0. Form controls are also designed for use on XLM macro sheets.
You use Form controls when you want to easily reference and interact with cell data without using VBA code, and when you want to add controls to chart sheets. For example, after you add a list box control to a worksheet and linking it to a cell, you can return a numeric value for the current position of the selected item in the control. You can then use that numeric value in conjunction with the INDEX function to select different items from the list.
You can also run macros by using Form controls. You can attach an existing macro to a control, or write or record a new macro. When a user of the form clicks the control, the control runs the macro.
However, these controls cannot be added to UserForms, used to control events, or modified to run Web scripts on Web pages.
Источник
MessageBox in Excel VBA
Message Box is one of the most frequently used functions in VBA Macro. The message box is a dialogue box that appears on the screen as an extra window. The dialogue box that appeared asks input from the user and returns a constant/code/number accordingly or it can use to display messages. In this article, we will learn how to create different types of message boxes in VBA Macro.
Message Box
A message box is a dialogue box that displays information that can be text, date, number, etc. like as shown in the below image. In Excel, we can easily create a message box using VBA.

Parts of a message box:
1. Title: The title of a message box specifies what properties or functions will this dialogue box performs. While writing a message box in VBA macro it is not mandatory to write a title. A title does not have multiple lines. If a title is not mentioned then by default the title becomes Microsoft Excel.

2. Prompt: The prompt is the heart of the message box. It specifies the work to be done or the information provided in a detailed manner. While writing a message box function it is mandatory to write a prompt statement. You can also display tables, dates, and numbers in the prompt. You can also add multiple lines in the prompt area.

3. Buttons: While working with basic Excel, you might have configured the different buttons that appear in a dialogue box. For example, Yes/No, Retry, Help, Abort/Retry/Ignore, etc. You can create and use any of the buttons, according to your requirement. While writing a message box function it is not mandatory to specify the buttons. By default, Ok appears.

Creating a Basic Message Box in VBA
In Excel, we can easily create a message box with the help of the MsgBox function.
Syntax:
Msgbox “prompt(mandatory)”, buttons(temporary), “title(temporary)”, “helpfile(temporary)”, “context(temporary)”
- Prompt: Prompt is the detailed information of the MsgBox. It is mandatory to add a prompt while writing the MsgBox function. You can also add multiple lines to the prompt.
- Buttons: It is the temporary argument that you wish to add. By default, it shows only the Ok button. To add custom buttons, you have the code for each button. For example, vbRetryCancel, vbOkOnly.
- Title: It is the temporary argument of the MsgBox function. You cannot add multiple titles to a message box.
- HelpFile: This is a very rare argument that is passed on while creating a MsgBox. This argument is only provided when you are using a help button. When you are passing the help file, you have to use context arguments also.
- Context: It is only used with the help file and help button. You need to have a numeric help context number to the appropriate help topic.
Follow the below steps:
Step 1: The MsgBox keyword is used to create a message box is MsgBox. So write MsgBox. Start with a double quote and write the prompt you want to display. Press Enter.

Step 2: Click on the Run button.

Step 3: The Message Box appears. Here, the VBA code has stopped running and will not get executed until we select any of the buttons in the message box. Click Ok.

Step 4: The VBA code resumes.

Buttons in MessageBox
When you have typed a prompt in the MsgBox function. The next argument is separated with a comma(,). Now, the VBA editor gives us a list of buttons that can be added to the MsgBox function. You can select and add the button according to your requirements.

The types of buttons in the MsgBox.
1. vbOkOnly(Default): This is the default button that appears. To create this button follow the following steps:
Step 1: Write the code. vbOkOnly is the code that helps create only the Ok button.

Step 2: The MsgBox contains only the Ok button.

2. vbOkCancel: vbOkCancel code tells the VBA compiler to show Ok and cancel buttons while displaying the MsgBox. To create this button follow the following steps:
Step 1: Write the code. vbOkCancel is the code that helps create the Ok and Cancel buttons.

Step 2: The MsgBox contains both Ok and Cancel.

3. vbAbortRetryIgnore: This code displays Abort, Retry and Ignore buttons in the message box. To create this button follow the following steps:
Step 1: Write the code. vbAbortRetryIgnore is the code that helps create the Abort, Retry, and Ignore buttons.

Step 2: The MsgBox contains all three Abort, Retry and Ignore.

4. vbYesNoCancel: vbYesNoCancel code displays Yes, No, and Cancel buttons in the message box. To create this button follow the following steps:
Step 1: Write the code. vbYesNoCancel is the code that helps create the Yes, No, and Cancel.

Step 2: The MsgBox contains all three Yes, No, and Cancel.

5. vbYesNo: vbYesNo code displays Yes and No buttons in the message box. To create this button follow the following steps:
Step 1: Write the code. vbYesNo is the code that helps create the Yes and No.

Step 2: The MsgBox contains both Yes and No.

6. vbRetryCancel: vbRetryCancel code displays Retry and Cancel buttons in the message box. To create this button follow the following steps:
Step 1: Write the code. vbRetryCancel is the code that helps create the Retry and Cancel.

Step 2: The MsgBox contains both Retry and Cancel.

7. vbDefaultButton2: You can use any of the default buttons. There are four types of default buttons. vbDefaultButton1, vbDefaultButton2, vbDefaultButton3, vbDefaultButton4. Here, vbDefaultButton2 is the button that is selected by default when a Msgbox appears. If you press Enter, then it automatically gets selected. To create this button follow the following steps:
Step 1: Write the code. Using vbAbortRetryIgnore creates three-button Abort, Retry and Ignore. vbDefaultButton2 is the code that helps us select the second default button i.e. Retry.

Step 2: The MsgBox appears and the default is Retry.

Different Icons in Excel VBA
While working with basic excel. You have come across different warnings and information. These all are represented with symbols. For example, a yellow exclamation for warning, a blue color question marks for information, etc. Here, we have discussed some of the icons that can appear in a message box.
1. vbCritical: This icon is a red cross. This red cross is used to display a critical message. To create this icon follow the following steps:
Step 1: Write the code. vbCritical creates a red cross.

Step 2: The message box with a critical icon appears.

2. vbQuestion: This icon is a blue question mark. This blue question mark is used to display when you forgot something to choose in a procedure. To create this icon follow the following steps:
Step 1: Write the code. vbQuestion creates a blue Question Mark.

Step 2: The message box with a Question icon appears.

3. vbExclamation: This icon is a yellow exclamation mark. It is used to represent an error when the entered data doesn’t match with the already present data. To create this icon follow the following steps:
Step 1: Write the code. vbExclamation creates a yellow exclamation mark.

Step 2: The message box with a ! (exclamation) icon appears.

4. vbInformation: This icon is a blue I mark that represents information. To create this icon follow the following steps:
Step 1: Write the code. vbInformation creates a blue I information mark.

Step 2: The message box with an i(information) icon appears.

Values returned by Buttons
Till now, you have studied how to create a message box and the different buttons associated with it. Now, we will learn how you can create nested message boxes and also with some conditions that are more practical in the real designing of a dialogue box. A message box returns a code or a constant according to the buttons applied. Some of the most commonly used constants and their return value are given in the table below.
| Constant | Value |
|---|---|
| vbOKOnly | 0 |
| vbOKCancel | 1 |
| vbAbortRetryIgnore | 2 |
| vbYesNoCancel | 3 |
| vbYesNo | 4 |
| vbRetryCancel | 5 |
Note: You can use values as well as constant interchangeably while comparing the boolean expressions.
For example, given Yes, No, and Cancel buttons. Display a message box accordingly. So to do this task follow the following steps:
Step 1: Write the code. The initial MsgBox will return a value and it will get stored in a variable name ans. If you click yes, then it will go inside the if condition else it will output the other one. Click on the Run button.

Step 2: A dialogue box appears. Click on Yes.

Step 3: A dialogue box appears. Click Ok.

Editing Title in a Msg Box
You can edit the title in a message box. By default, it shows Microsoft Excel as the title. In the MsgBox, function the third argument is for writing your custom title. It is a temporary argument. Follow are the following steps:
Step 1: Write the code. The third argument is your custom title.

Step 2: A dialogue box with the title “Be a geek” appears.
Источник
In this post, you will learn more about Dialog Boxes in Excel and how to use them with-in your Excel spread she
What is the use of dialog boxes?
A dialog box is a temporary window, where an application creates to retrieve user input. An application typically uses dialog boxes to prompt the user for additional information for menu items.
The following are the ways to use the dialog boxes.
- First, prepare an excel sheet with the required details in it.
Types of Dialog boxes
- When a Typical dialog box displays on the screen, it will remain until the user dismisses it. By clicking on the ok button, the task selected from the dialog box will be performed, and by clicking on the Cancel button, the dialog box will close without taking any action.
- The image below is an example for Typical dialog box.
- Navigating dialog boxes is very easy, click the command that you want to use. Although dialog boxes were designed for mouse users, you can also use the keyboard. Every dialog box button has also a text name on the button.
- The image below is an example for Navigating Dialog Boxes.
- Several Excel dialog boxes are tabbed dialog boxes. When you select a tab, a panel with relevant commands is visible. Tabbed dialog boxes are highly convenient because you can make several changes in a single dialog box. After you have made all your setting changes, click OK.
We will hope that this article was useful and understandable.
All of Microsoft Excel’s settings are accessible in the one dialog box, Excel Options. You can access this dialog box by clicking on the File tab and clicking on Options. The Excel Options dialog box provides a list of setting categories (down the left-hand side) that you can click on to access the related settings.
Contents
- 1 Where is the Options menu in Excel?
- 2 Where is the Excel Options dialog box on Mac?
- 3 What is the Excel dialog box?
- 4 Where is the hidden dialog box in Excel?
- 5 How do I set options in Excel?
- 6 Where is Excel Advanced Options on Mac?
- 7 How do I open the dialog box in Excel on a Mac?
- 8 How do I open cell Format dialog box in Excel for Mac?
- 9 Where is the dialog box launcher located?
- 10 Where are advanced options in Excel?
- 11 How do you show a dialog box?
- 12 How do I find a lost dialog box?
- 13 How do I close a dialog box in Excel?
- 14 How do I add answer options in Excel?
- 15 How do I add options to a column in Excel?
- 16 How do you make pre selected options in Excel?
- 17 What is the shortcut key for Find dialog box?
- 18 What is the shortcut key to open the Open dialog box *?
- 19 How do you open the Open dialog box?
- 20 How do I open a series dialog box in Excel?
Click the Tools drop down menu under Menus tab; Then you will view the Excel Options item. Click it, and you will enter into Excel Options window.
Where is the Excel Options dialog box on Mac?
I am trying to find “Options” so I can access the Add-Ins dialogue box, as well as locate a personal worksheet that I have a Macro in. I am using version 16, 365 on a Mac. Any ideas?
What is the Excel dialog box?
A dialog box in Excel is a screen where you input information and make choices about different aspects of the current worksheet or its content, such as data, charts, and graphic images.
Where is the hidden dialog box in Excel?
Hover your mouse over the application on the tool bar. It should bring up one or more thumbnails of instances/documents open for that application. Hover your mouse over the thumbnail of the instance/document with the hidden dialog box.
How do I set options in Excel?
Create a drop-down list
- Select the cells that you want to contain the lists.
- On the ribbon, click DATA > Data Validation.
- In the dialog, set Allow to List.
- Click in Source, type the text or numbers (separated by commas, for a comma-delimited list) that you want in your drop-down list, and click OK.
Where is Excel Advanced Options on Mac?
On a Mac, Preferences is the approximate equivalent of Options on a PC. The listing normally is found in the Application Menu. You’ll find what you’re looking for if you go to Excel> Preferences> View – Show in Workbook.
How do I open the dialog box in Excel on a Mac?
We can use the Ctrl and G or the F5 button in Windows to open the ‘Go To’ dialog box. In Mac, we can use the ^ and G or the Fn and F5 button to open the box.
How do I open cell Format dialog box in Excel for Mac?
To open the Format Cells dialog box, do one of the following.
- Select the cell you want to format. PC users: right-click the cell. Mac users: press Control and click the cell. From the shortcut menu, click Format Cells.
- On the Home tab, in the Number group, click the arrow .
Where is the dialog box launcher located?
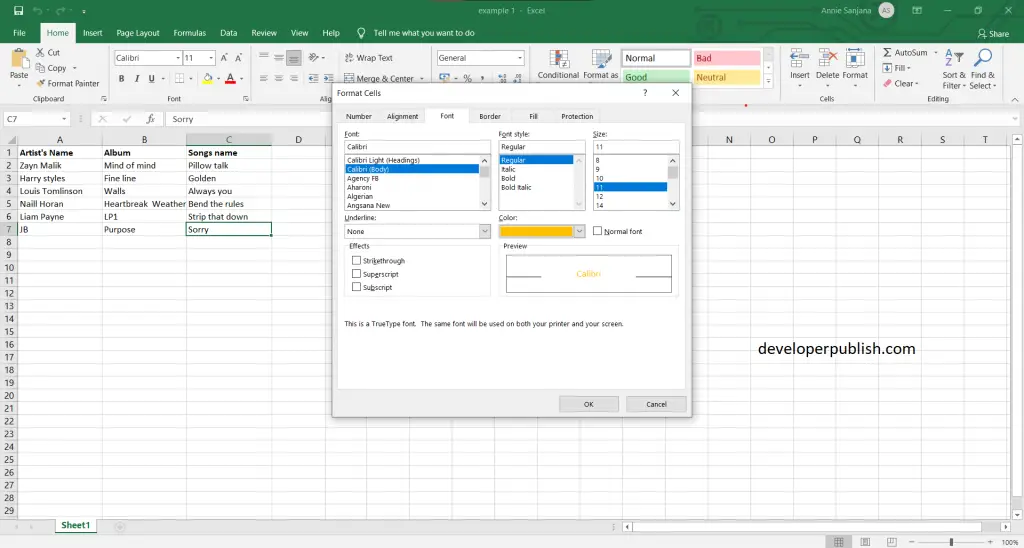
Click the Home tab. In the Fonts group, click the dialog box launcher button. The button is found in the lower-right corner of the Font group. Use the Dialog box launcher to open the Font dialog box.
Where are advanced options in Excel?
Click the File tab and then choose Options. In the left pane, select Advanced.
How do you show a dialog box?
To display a dialog box
- Navigate to the event handler with which you want to open the dialog box. This can happen when a menu command is selected, when a button is clicked, or when any other event occurs.
- In the event handler, add code to open the dialog box.
How do I find a lost dialog box?
Hold down the WINDOW and SHIFT keys and press the LEFT or RIGHT arrow keys on the keyboard to navigate the missing dialog box into view.
- Execute a command to activate the dialog box.
- Press ALT+SPACEBAR on the keyboard.
- Press M (MOVE) on the keyboard.
How do I close a dialog box in Excel?
To do this, you need to press ( ESC ) key and it will close the dialog box.
How do I add answer options in Excel?
Follow the steps in the video above, or:
- From the DATA tab, select Data Validation.
- Click Data Validation in the drop-down list.
- In the dialog box, select List from the Allow drop-down menu.
- In the source field, type the choices you’d like your drop down menu to include, separated by commas.
- Click OK.
How do I add options to a column in Excel?
To insert a single column: Right-click the whole column to the right of where you want to add the new column, and then select Insert Columns. To insert multiple columns: Select the same number of columns to the right of where you want to add new ones. Right-click the selection, and then select Insert Columns.
How do you make pre selected options in Excel?
Set default value (preselected value) for drop down list with formula
- Create a drop down list.
- Then in the Data Validation dialog, under Settings tab, select List from Allow list, and then select the value you want to show in the drop down list to Source textbox.
What is the shortcut key for Find dialog box?
Ctrl+Shift+F is the shortcut key to open find dialog box.
What is the shortcut key to open the Open dialog box *?
CTRL + F12 help to open dialogue box.
How do you open the Open dialog box?
Open an application and then press Ctrl-O, or click the Open icon, to display the Open dialog box. Right-click any of the files or folders displayed in that dialog and you’ll see a context menu pop open. This is the same context menu you’ll find in Explorer windows.
How do I open a series dialog box in Excel?
In the Editing section of the Home tab, click “Fill” and then select “Series”. On the Series dialog box, the Series in option is automatically selected to match the set of cells you selected.
Home / Excel Basics / How to Open Dialog Box in Excel
In Excel, to get to more options of any option category you can open the dialog box and use those options directly from the dialog box. Apart from this, there are a few options that need to be used directly from a dialog box.

In this tutorial, we will look at how to open and use a dialog box use an option.
Open a Dialog Boxes from the Ribbon
- Go to the Tab from where you want to open the option.
- Move to the options group.
- Hover your cursor on the small arrow at the bottom right.
- Click on it to open the options dialog box.

The moment you click on it, Excel will open the dialog box for that option. And, when you click on the arrow from the font group, it opens the format dialog box and opens the font tab from there.

On the ribbon, you have multiple tabs, but not all the tabs have that down arrows in the options groups to open the dialog box.
Dialog Box Options
As I said, there are a few options that you need to use directly from a dialog box. For example, the find and replace option. When press the keyboard shortcut (Ctrl + F) it gives you a dialog box where you need to enter the value that you want to find.

Excel Options Dialog Box
Excel Options also have a dialog box. When you open the options, File ⇢ More ⇢ Options. You will get a large dialog box with all the options that you can make a change to in your Excel environment.

Worksheets and Workbooks
View
Row and Column Selection
Ribbon Control
Pivot Tables
Operating within a Cell
Navigating and Selecting Cells
Help and Menus
Group Selection
General Excel
General Cell Control
Formulas and Functions
Formatting Text and Numbers
Dialog Boxes
In Excel, a dialog box is a form that can help you add information and make decisions about different aspects of your current worksheet and its content such as data, charts, or graphic images. Shortcuts in this section will help you both open and work within these dialog boxes like a pro.
Borders
Advanced Selection
Adding Content to Cells
Get more Reference tips and tricks
Subscribe to our email updates and get Reference tips direct to your inbox.
In This Chapter
Finding out when to use custom dialog boxes Understanding UserForm objects Displaying a custom dialog box
Creating a custom dialog box that works with a useful macro custom dialog box is useful if your VBA macro needs to get information from a user. For example, your macro may have some options that can be specified in a custom dialog box. If only a few pieces of information are required (for example, a Yes/No answer or a text string), the techniques I describe in Chapter 15 may do the job. But if you need to obtain more information, you must create a custom dialog box. In this chapter, you find out what essential skills you need to create and work with custom dialog boxes.
Knowing When to Use a Custom Dialog Box (Also Known as UserForm)
This section describes a situation in which a custom dialog box is useful. The following macro changes the text in each cell in the selection to uppercase letters. It does this by using the VBA built-in UCase function.

You can make this macro even more useful. For example, it would be nice if the macro could also change the text in the cells to either lowercase or proper case (capitalizing the first letter in each word). One approach is to create two additional macros (one for lowercase and one for proper case). Another approach is to modify the macro to handle the other options. Regardless of the approach, you need some method of asking the user which type of change to make to the cells.
The solution is to display a dialog box like the one shown in Figure 16-1. You create this dialog box on a UserForm in the VBE and display it using a VBA macro. In the next section, I provide step-by-step instructions for creating this dialog box. But before I get into that, I set the stage with some introductory material.

Figure 16-1:
You can get information from the user by displaying a custom dialog box.
In Excel, the official name for a custom dialog box is a UserForm. But a UserForm is really an object that contains what’s commonly known as a dialog box. This distinction isn’t important, so I tend to use these terms interchangeably.
Creating Custom Dialog Boxes: An Overview
To create a custom dialog box, you usually take the following general steps:
1. Determine how the dialog box will be used and where it will be displayed in your VBA macro.
2. Press Alt+F11 to activate the VBE and insert a new UserForm object.
A UserForm object holds a single custom dialog box.
3. Add controls to the UserForm.
Controls include items such as text boxes, buttons, check boxes, and list boxes.
4. Use the Properties window to modify the properties for the controls or for the UserForm itself.
5. Write event-handler procedures for the controls (for example, a macro that executes when the user clicks a button in the dialog box).
These procedures are stored in the Code window for the UserForm object.
6. Write a procedure (stored in a VBA module) that displays the dialog box to the user.
Don’t worry if some of these steps seem foreign. I provide more details in the following sections, along with step-by-step instructions for creating a custom dialog box.
Working with UserForms
Each custom dialog box that you create is stored in its own UserForm object — one dialog box per UserForm. You create and access these UserForms in the Visual Basic Editor.
Inserting a new UserForm
Insert a UserForm object with the following steps:
1. Activate the VBE by pressing Alt+F11.
2. Select the workbook in the Project window.
3. Choose InsertOUserForm.
The VBE inserts a new UserForm object, which contains an empty dialog box.
Figure 16-2 shows a UserForm — an empty dialog box.

Figure 16-2:
A new UserForm object.
Adding controls to a UserForm
When you activate a UserForm, the VBE displays the Toolbox in a floating window, as shown in Figure 16-3. You use the tools in the Toolbox to add controls to your custom dialog box. Just click the desired control in the Toolbox and drag it into the dialog box to create the control. After you add a control, you can move and resize it using standard techniques.

Figure 16-3:
You use the tools in the Toolbox to add controls to a UserForm.
Table 16-1 indicates the various tools, as well as their capabilities. To determine which tool is which, hover your mouse button over the control and read the small pop-up description.
| Table 16-1 | Toolbox Controls |
| Control | What It Does |
| Label | Stores text |
| TextBox | Allows the user to enter text |
| ComboBox | A drop-down list |
| ListBox | A list of items |
| CheckBox | Useful for on/off or yes/no options |
| OptionButton | Used in groups, allows the user to select one of sev- |
| eral options | |
| ToggleButton | A button that is either on or off |
| Frame | Contains other controls |
| CommandButton | A clickable button |
| TabStrip | Displays tabs |
| MultiPage | Tabbed container for other objects |
| ScrollBar | Draggable bar |
| SpinButton | Clickable button often used for changing a value |
| Image | Contains an image |
| RefEdit | Allows the user to select a range |
Changing properties for a UserForm control
Every control you add to a UserForm has a number of properties that determine how the dialog box looks or behaves. You can change these properties with the Properties window, shown in Figure 16-4. The Properties window appears when you press F4, and the properties shown in this window depend on what is selected. If you select a different control, the properties change to those appropriate for that control. To hide the Properties window, click the close button in its title bar.

Figure 16-4:
Use the Properties windows to change the properties of UserForm controls.
Properties for controls include the following:
Name
Width
Height
Value
Caption
Each control has its own set of properties (although many controls have many common properties). The next chapter tells you everything you need to know about working with dialog box controls.
If you select the UserForm itself (not a control on the UserForm), you can use the Properties window to adjust UserForm properties.
Viewing the UserForm Code window
Every UserForm object has a Code window that holds the VBA code (the event-handler procedures) executed when the user works with the dialog box. To view the Code window, press F7. The Code window is empty until you add some procedures. Press Shift+F7 to return to the dialog box.
Another way to switch between the Code window and the UserForm display: Use the View Code and View Object buttons in the Project window’s title bar. You find out more about the Code window in Chapter 17.
Displaying a custom dialog box
You can display a custom dialog box by using the UserForm’s Show method in a VBA procedure.
The macro that displays the dialog box must be in a VBA module — not in the Code window for the UserForm.
The following procedure displays the dialog box named UserForm1:

When Excel displays the dialog box, the macro halts until the user closes the dialog box. Then VBA executes any remaining statements in the procedure. Most of the time, you won’t have any more code in the procedure. As you later see, you can put your macro code in the Code window for the UserForm.
Using information from a custom dialog box
The VBE provides a name for each control you add to a UserForm. The control’s name corresponds to its Name property. Use this name to refer to a particular control in your code. For example, if you add a CheckBox control to a UserForm named UserForml, the CheckBox control is named CheckBoxl by default. The following statement makes this control appear with a check mark:
![]()
Your VBA code can also check various properties of the controls and take appropriate actions. The following statement executes a macro named PrintReport if the check box (named CheckBoxl) is checked:
![]()
I discuss this topic in detail in the next chapter.
A Custom Dialog Box Example
This section’s UserForm example is an enhanced version of the ChangeCase macro from the beginning of the chapter. Recall that the original version of this macro changes the text in the selected cells to uppercase. This modified version uses a custom dialog box to ask the user which type of change to make: uppercase, lowercase, or proper case.
This dialog box needs to obtain one piece of information from the user: the type of change to make to the text. Because the user has three choices, your best bet is a custom dialog box with three OptionButton controls. The dialog box also needs two more buttons: an OK button and a Cancel button. Clicking the OK button runs the code that does the work. Clicking the Cancel button causes the macro to halt without doing anything.
This workbook is available at the topic’s Web site. However, you get more out of this exercise if you follow the steps provided here and create it yourself.
Creating the custom dialog box
These steps create the custom dialog box. Start with an empty workbook.
1. Press Alt+F11 to activate the VBE.
2. If multiple projects are in the Project window, select the project that corresponds to the workbook you’re using.
3. Choose InsertOUserForm.
The VBE inserts a new UserForm object with an empty dialog box.
4. Press F4 to display the Properties window.
5. In the Properties window, change the dialog box’s Caption property
to Change Case.
6. The dialog box is a bit too large, so you may want to click it and use the handles to make it smaller.
Step 6 can also be done after you position all the controls in the dialog box.
Adding the CommandButtons
Ready to add two CommandButtons — OK and Cancel — to the dialog box? Follow along:
1. Make sure the toolbox is displayed. If it isn’t, choose ViewOToolbox.
2. If the Properties window isn’t visible, press F4 to display it.
3. In the toolbox, drag a CommandButton into the dialog box to create a button.
As you see in the Properties box, the button has a default name and caption: CommandButtonl.
4. Make sure the CommandButton is selected. Then activate the Properties window and change the following properties:
Property Change To
Name OKButton
Caption OK
Default True
5. Add a second CommandButton object to the UserForm and change the following properties:
Property Change To
Name CancelButton
Caption Cancel
Cancel True
6. Adjust the size and position of the controls so your dialog box looks something like Figure 16-5.

Figure 16-5:
The UserForm with two Command-Button controls.
Adding the OptionButtons
In this section, you add three OptionButtons to the dialog box. Before adding the OptionButtons, you add a Frame object that contains the OptionButtons. The Frame isn’t necessary, but it makes the dialog box look better.
1. In the toolbox, click the Frame tool and drag in the dialog box.
This creates a frame to hold the options buttons.
2. Use the Properties window to change the frame’s caption to Options.
3. In the Toolbox, click the OptionButton tool and drag in the dialog box (within the Frame).
This creates an OptionButton control.
4. Select the OptionButton and use the Properties window to change the following properties:
Property Change To
Name OptionUpper
Caption Upper Case
Accelerator U
Value True
Setting the Value property to True makes this OptionButton the default.
5. Add another OptionButton and use the Properties window to change the following properties:
Property Change To
Name OptionLower
Caption Lower Case
Accelerator L
6. Add a third OptionButton and use the Properties window to change the following properties:
Property Change To
Name OptionProper
Caption Proper Case
Accelerator P
7. Adjust the size and position of the OptionButtons, Frame, and dialog box.
Your UserForm should look something like Figure 16-6.
The Accelerator property determines which letter in the caption is underlined. For example, you can select the Lower Case option by pressing Alt+L because the L is underlined.

Figure 16-6:
This is the UserForm after adding three Option Button controls inside a Frame control.
You may wonder why the OptionButtons have accelerator keys but the CommandButtons go without. Generally, OK and Cancel buttons never have accelerator keys because they can be accessed from the keyboard. Pressing Enter is equivalent to clicking OK because the control’s Default property is True. Pressing Esc is equivalent to clicking Cancel, because the control’s Cancel property is True.
Adding event-handler procedures
Here’s how to add an event-handler procedure for the Cancel and OK buttons:
1. Double-click the Cancel button.
VBE activates the Code window for the UserForm and inserts an empty procedure:
![]()
The procedure named CancelButton_Click is executed when the Cancel button is clicked, but only when the dialog box is displayed. In other words, clicking the Cancel button when you’re designing the dialog box won’t execute the procedure. Because the Cancel button’s Cancel property is set to True, pressing Esc also triggers the CancelButton_Click procedure.
2. Insert the following statement inside the procedure (before the End Sub statement):
![]()
This statement simply closes the UserForm when the Cancel button is clicked.
3. Press Shift+F7 to return to the UserForm.
4. Double-click the OK button.
VBE activates the code window for the UserForm and inserts an empty Sub procedure called
![]()
Clicking OK executes this procedure. Because this button has its Default property set to True, pressing Enter also executes the OKButton_Click procedure.
5. Enter the following code inside the procedure:

The preceding code is an enhanced version of the original ChangeCase macro that I presented at the beginning of the chapter. The macro consists of three separate blocks of code. This code uses three If-Then structures; each one has a For Each loop. Only one block is executed, according to which OptionButton the user selects. The last statement unloads (closes) the dialog box after the work is finished.
Notice that VBA has a UCase function and an LCase function, but not a function to convert text to proper case. Therefore, I use Excel’s PROPER worksheet function (preceded by Application.WorksheetFunction) to do the actual
conversion. Another option is to use the VBA StrConv function. (See the Help system for details.) The StrConv function is not available in all Excel versions, so I used the PROPER worksheet function instead.
Creating a macro to display the dialog box
The only thing missing is a way to display the dialog box. Follow these steps to make the procedure that makes the dialog box appear:
1. In the VBE window, choose Insert Module.
The VBE adds an empty VBA module (named Modulel) to the project.
2. Enter the following code:

This procedure is simple. It checks to make sure that a range is selected. If not, the macro ends with no action. If a range is selected, the dialog box is displayed (using the Show method). The user then interacts with the dialog box and the code stored in the UserForm’s Code pane is executed.
Making the macro available
At this point, everything should be working properly. But you still need an easy way to execute the macro. Assign a shortcut key (Ctrl+Shift+C) that executes the ChangeCase macro:
1. Activate the Excel window via Alt+F11.
2. Choose Tools Macro Macros or press Alt+F8.
3. In the Macros dialog box, select the ChangeCase macro.
4. Click the Options button.
Excel displays its Macro Options dialog box.
5. Enter an uppercase C for the Shortcut key.
See Figure 16-7.
6. Enter a description of the macro in the Description field.
7. Click OK.
8. Click Cancel when you return to the Macro dialog box.

Figure 16-7:
Assign a shortcut key to execute the Change-Case macro.
After you perform this operation, pressing Ctrl+Shift+C executes the ChangeCase macro, which displays the custom dialog box if a range is selected.
Testing the macro
Finally, you need to test the macro and dialog box to make sure they work properly:
1. Activate a worksheet (any worksheet in any workbook).
2. Select some cells that contain text.
3. Press Ctrl+Shift+C.
The custom dialog box appears. Figure 16-8 shows how it should look.
4. Make your choice and click OK.
If you did everything correctly, the macro makes the specified change to the text in the selected cells.
Figure 16-9 shows the worksheet after converting the text to uppercase.
As long as the workbook is open, you can execute the macro from any other workbook. If you close the workbook that contains your macro, Ctrl+Shift+C no longer has any function.
If the macro doesn’t work properly, double-check the preceding steps to locate and correct the error. Don’t be alarmed; debugging is a normal part of developing macros. As a last resort, download the completed workbook from this topic’s Web site.

Figure 16-8:
The custom dialog box is in action.

Figure 16-9:
The text has been converted to uppercase.
Хитрости »
19 Октябрь 2014 101510 просмотров
Работа с диалогами
Несомненно каждый разработчик делает работу простого пользователя хоть немного, но проще. И конечно, порой просто необходима обратная связь от пользователя при выполнении некоторых программ. О ней и хочу сегодня рассказать.
Что я имею ввиду: есть ситуации, когда необходимо:
- сообщить пользователю о выполнении кода;
- получить от пользователя подтверждение на выполнение того или иного действия;
- запросить какие-то данные(число, текст для поиска, диапазон поиска и т.п.).
Простейшие запросы и подтверждения можно сделать при помощи уже встроенных диалоговых окон.
Из основных можно выделить три типа:
MsgBox — окно информирования пользователя с возможностью запроса действия (Да, Нет, Отмена и т.п.);
InputBox — окно запроса текстовой информации от пользователя (текст для поиска, дата, число и т.п.);
Application.InputBox — чуть более расширенная версия InputBox с возможностью указания не только текста и чисел, но и выделения диапазона ячеек (например для указания ячеек, в которых осуществлять поиск значения или которые необходимо закрасить).
- Информационный диалог MsgBox
- MsgBox, автоматически закрываемый по истечении указанного времени
- Диалог ввода информации пользователем InputBox
- Диалог выбора диапазона Application.InputBox

Самый простой тип. Используется для информирования пользователя. Как правило применяется по окончании выполнения кода:
MsgBox Promt, [Buttons], [Title], [HelpFile], [Context]
Обязательным к указанию является только первый параметр —
Promt
, в котором указывается непосредственно сообщение для вывода:
MsgBox "Обработка завершена"
Все остальные параметры указывать не обязательно, но их использование несколько расширяет возможности данного диалогового окна.
Buttons — указывается тип выводимых кнопок и стиль окна. По умолчанию применяется vbOKOnly — одна только кнопка Ок:
'показываем окно с кнопкой по умолчанию и типом важного сообщения
MsgBox "Обработка завершена", vbCritical
Доступны значения:
| Значение | Числовая константа | Описание |
|---|---|---|
| vbOKOnly | 0 | Отображает только кнопку OK |
| vbOKCancel | 1 | Отображает кнопки ОК и Отмена |
| vbAbortRetryIgnore | 2 | Отображает кнопки Прервать, Повтор и Пропустить |
| vbYesNoCancel | 3 | Отображает кнопки Да, Нет и Отмена |
| vbYesNo | 4 | Отображает кнопки Да и Нет |
| vbRetryCancel | 5 | Отображает кнопки Повтор и Отмена |
| vbCritical | 16 | Отображает значок важного сообщения |
| vbQuestion | 32 | Отображает значок важного запроса |
| vbExclamation | 48 | Отображает значок предупреждающего сообщения |
| vbInformation | 64 | Отображает значок информационного сообщения |
| vbDefaultButton1 | 0 | По умолчанию выделена первая кнопка |
| vbDefaultButton2 | 256 | По умолчанию выделена вторая кнопка |
| vbDefaultButton3 | 512 | По умолчанию выделена третья кнопка |
| vbDefaultButton4 | 768 | По умолчанию выделена четвертая кнопка |
| vbApplicationModal | 4098 | Все приложения приостанавливают свою работу до момента, пока пользователь ответит на запрос в окне сообщения (работает не во всех случаях) |
| vbMsgBoxHelpButton | 16384 | Показываются кнопки Ок и Help |
Константы Buttons могут быть объединены между собой. Ниже приведен код, который показывает диалоговое окно с возможностью выбора одного из трех вариантов — Прервать, Повтор, Пропустить:
'---------------------------------------------------------------------------------------
' Procedure : test
' DateTime  : 19.10.2014 19:24
' Author    : The_Prist(Щербаков Дмитрий)
'             WebMoney - R298726502453; Яндекс.Деньги - 41001332272872
'             http://www.excel-vba.ru
' Purpose   : Процедура показывает диалоговое окно с возможностью выбора одного из трех вариантов:
'             Прервать, Повтор, Пропустить
'             По умолчанию выделена кнопка Прервать, т.к. иное не указано
'---------------------------------------------------------------------------------------
Sub test()
    Dim lRetVal As Long 'для получения выбранного значения
Retry_:
    lRetVal = MsgBox("Обработка завершена", vbAbortRetryIgnore + vbQuestion)
    Select Case lRetVal
    Case vbAbort    '3/Прервать/Abort
        Exit Sub    'выходим из процедуры
    Case vbRetry    '4/Повтор/Retry
        GoTo Retry_ 'переход на метку Retry_
    Case vbIgnore   '5/Пропустить/Ignore
    End Select
End Sub
Следующий код показывает то же окно, но по умолчанию выделяет кнопку Пропустить
'---------------------------------------------------------------------------------------
' Procedure : test
' DateTime  : 19.10.2014 19:24
' Author    : The_Prist(Щербаков Дмитрий)
'             WebMoney - R298726502453; Яндекс.Деньги - 41001332272872
'             http://www.excel-vba.ru
' Purpose   : Процедура показывает диалоговое окно с возможностью выбора одного из трех вариантов:
'             Прервать, Повтор, Пропустить
'             По умолчанию выделена кнопка Пропустить(3-я по счету - значит vbDefaultButton3)
'---------------------------------------------------------------------------------------
Sub test()
    Dim lRetVal As Long 'для получения выбранного значения
Retry_:
    lRetVal = MsgBox("Обработка завершена", vbAbortRetryIgnore + vbQuestion + vbDefaultButton3)
    Select Case lRetVal
    Case vbAbort    '3/Прервать/Abort
        Exit Sub    'выходим из процедуры
    Case vbRetry    '4/Повтор/Retry
        GoTo Retry_ 'переход на метку Retry_
    Case vbIgnore   '5/Пропустить/Ignore
    End Select
End Sub
Вместо текстового представления констант можно применить их числовые значения:
Sub test()
    Dim lRetVal As Long 'для получения выбранного значения
Retry_:
    lRetVal = MsgBox("Обработка завершена", 2 + 32 + 512)
    Select Case lRetVal
    Case 3    'vbAbort
        Exit Sub    'выходим из процедуры
    Case 4    'vbRetry
        GoTo Retry_ 'переход на метку Retry_
    Case 5   'vbIgnore
    End Select
End Sub
Нетрудно после этого предположить, что можно указать просто сумму данных чисел:
MsgBox "Обработка завершена", 546
Доступные константы значений возврата:
| Константа | Значение | Нажатая кнопка |
|---|---|---|
| vboK | 1 | ОК |
| vbCancel | 2 | Отмена |
| vbAbort | 3 | Прервать |
| vbRetry | 4 | Повтор |
| vblgnore | 5 | Пропустить |
| vbYes | 6 | Да |
| vbNo | 7 | Нет |
Title — указывается текст заголовка окна. Например, можно указать либо что это ошибка, либо имя своего приложения:
MsgBox "Обработка завершена", vbOKOnly, "Мое приложение"
HelpFile — указывается имя файла-справки в формате HLP. Применяется, если параметр Buttons указан как vbMsgBoxHelpButton. Файл справки должен существовать.
Context — целое число. Указывается индекс страницы файла-справки, которую необходимо открыть. Указывается только если указан параметр HelpFile.
Небольшой практический пример применения простого диалогового окна MsgBox.
Цель процедуры(макроса): очистить все ячейки листа.
Согласитесь, что неплохо бы перед этим запросить у пользователя решение — он согласен с этим и это является обдуманным решением или случайностью?
'---------------------------------------------------------------------------------------
' Procedure : ClearRange
' DateTime  : 19.10.2014 20:06
' Author    : The_Prist(Щербаков Дмитрий)
'             WebMoney - R298726502453; Яндекс.Деньги - 41001332272872
'             http://www.excel-vba.ru
' Purpose   :
'---------------------------------------------------------------------------------------
Sub ClearRange()
    Dim lRetVal As Long 'для получения выбранного значения
    lRetVal = MsgBox("Все данные выделенных ячеек будут удалены." & _
        Chr(10) & "Действительно хотите продолжить?", _
        vbYesNo + vbQuestion, "Запрос на выполнение")
    If lRetVal = vbNo Then
        Exit Sub 'выходим из процедуры без выполнения
    End If
    Selection.Clear
End Sub
Так же на странице Полезные программы для Excel и VBA можно найти программу MsgBox Generator, которая просто и наглядно формирует коды показа MsgBox.
Диалог MsgBox удобен, если надо проинформировать пользователя о каких-то событиях или предоставить ему выбор Да или Нет. Но в тоже время есть один недостаток: этот диалог не закроется, пока пользователь не нажмет хоть какую-то кнопку. Но бывает необходимо просто проинформировать и закрыть окно независимо от реакции пользователя. Показали окно, подождали секунд 5-7 и даже если пользователь ничего не нажал — закрыли окно и продолжили выполнение кода. Стандартно такой опции в MsgBox нет. Однако можно использовать функции API(это встроенные в ОС Windows функции, которые можно вызывать из любого языка программирования).
Код такого диалога:
Declare Function MessageBoxTimeOut Lib "User32" Alias "MessageBoxTimeoutA" _
                        (ByVal hwnd As Long, ByVal lpText As String, _
                         ByVal lpCaption As String, ByVal uType As VbMsgBoxStyle, _
                         ByVal wLanguageId As Long, ByVal dwMilliseconds As Long) As Long
Sub AutoCloseMsgBox()
    Const lSeconds As Long = 5
    MessageBoxTimeOut 0, "Отчет сформирован. Это окно закроется автоматически через 5 секунд", "www.excel-vba.ru", _
                         vbInformation + vbOKOnly, 0&, lSeconds * 1000
End Sub
Основную роль здесь играет строка:
Declare Function MessageBoxTimeOut Lib "User32" Alias "MessageBoxTimeoutA" _
                        (ByVal hwnd As Long, ByVal lpText As String, _
                         ByVal lpCaption As String, ByVal uType As VbMsgBoxStyle, _
                         ByVal wLanguageId As Long, ByVal dwMilliseconds As Long) As Long
это и есть сама функция, создающая MsgBox.
Главное: эта строка должна располагаться в самом верху стандартного модуля(в области объявлений, перед всеми процедурами и функциями).
Так же следует помнить, что это функция API и в некоторых версиях Excel именно в таком виде может не работать — вся строка будет подсвечена красным. Если проявился такой эффект, то можно просто добавить ключевое слово PtrSafe, отвечающее за совместимость функции с 64-битными ОС:
Declare PtrSafe Function MessageBoxTimeOut Lib "User32" Alias "MessageBoxTimeoutA" _
                        (ByVal hwnd As Long, ByVal lpText As String, _
                         ByVal lpCaption As String, ByVal uType As VbMsgBoxStyle, _
                         ByVal wLanguageId As Long, ByVal dwMilliseconds As Long) As Long
Помимо очевидного текста сообщения и заголовка, который можно заменить на свой, главное внимание уделим константе lSeconds. Она отвечает за количество секунд показа сообщения. В примере выше сообщение будет показано на 5 секунд, после чего закроется само собой, если ранее не была нажата кнопка Ок.
Если необходимо показать сообщение на 10 секунд, то надо лишь заменить 5 на 10:
Const lSeconds As Long = 10
Параметр uType работает точно так же, как параметр Buttons у стандартного MsgBox. Т.е. можно комбинировать различные виды кнопок и использовать этот MsgBox как стандартный, но при этом закрыть его автоматически, если пользователь случайно «уснул» или ему лень/некогда что-то нажимать:
Sub AutoCloseMsgBox()
    Const lSeconds As Long = 10
    Dim retval
    retval = MessageBoxTimeOut(0, "Файлы обработаны. Вывести список?" & vbNewLine & _
                                  "Если действие не будет выбрано окно закроется через 10 секунд", "www.excel-vba.ru", _
                                  vbInformation + vbYesNo, 0&, lSeconds * 1000)
    If retval = 6 Then 'была нажата кнопка Да(Yes)
        'выводим отчет
    Else 'была нажата кнопка Нет(No) или окно закрылось само
        'другое действие
    End If
End Sub
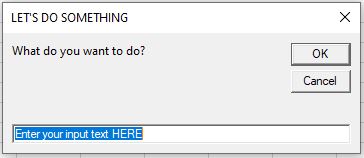
InputBox
позволяет запросить от пользователя любую текстовую информацию.
InputBox Promt, [Title], [DefaultValue], [XPos], [YPos], [HelpFile], [Context]
Так же как и с MsgBox обязательным аргументом для указания является только
Promt
— это тот текст, который будет расположен непосредственно на самой форме диалога. Как правило это пояснение, что должен ввести пользователь.
Dim vRetVal 'для получения выбранного значения
vRetVal = InputBox("Укажите значение для поиска:", "Запрос данных", "")
If vRetVal = "" Then Exit Sub 'завершаем процедуру, если строка пуста
Title — текст, отображаемый в заголовке окна. В приведенном выше примере это «Запрос данных».
DefaultValue — значение, которое будет показано в поле ввода до указания значения пользователем. Как правило оно указывается в случаях, когда требуемое значение изменяется редко по запросу пользователя, но возможность такую оставить все же требуется.
Пример: необходимо по нажатию кнопки удалять всегда столбец 5. Но иногда столбец в отчете смещается и требуется запрашивать у пользователя реальный номер столбца:
Sub DelCols()
    Dim vRetVal 'для получения выбранного значения
    vRetVal = InputBox("Укажите номер столбца для удаления(целое число):", "Запрос данных", 5)
    'используем Val для преобразования текста vRetVal в число
    'Val() преобразует число как текст в число.
    'Если указан текст(например "третий") - он будет преобразован в 0
    vRetVal = Val(vRetVal)
    If Val(vRetVal) = 0 Then
        MsgBox "Номер столбца должен быть целым числом больше нуля!", vbCritical, "DelCols"
        Exit Sub
    End If
    Columns(vRetVal).Delete
End Sub
Важно знать: InputBox всегда возвращает только текст. Даже если указать — 5 — он вернет «5». В некоторых случаях это может привести к ошибке типов данных, поэтому я привел выше один из примеров преобразования типов данных к нужному.
Так же по прошествии какого-то времени появится вопрос, как отследить нажатие кнопки Отмена. Ведь ориентир на vRetVal = «» не всегда верен, иногда надо принять пустое значение(в случаях, скажем, замены значений) и отследить именно нажатие Отмена. Сделать это можно так:
vRetVal = InputBox("Укажите номер столбца для удаления(целое число):", "Запрос данных", "")

If StrPtr(vRetVal) = 0 Then
    MsgBox "Нажата кнопка Отмена. Процедура прервана", vbCritical, "DelCols"
    Exit Sub
End If
Больше всего вопросов здесь явно вызовет StrPtr. Эта специальная функция VBA, которая указывает, что переданы некие строковые данные. Если никаких данных не передавалось(а в случае с нажатием кнопки Отмена так и есть) указатель вернет 0. Если какие-то данные были переданы или нажата кнопка Ок(автоматом будет передана строка нулевой длины) — указатель StrPtr вернет значение отличное от нуля.
XPos — положение окна InputBox в твипах по горизонтали относительно левого края экрана. Следует учитывать, что именно относительно экрана, а не окна Excel.
YPos — положение окна InputBox в твипах по вертикали относительно верхнего края экрана.
HelpFile — указывается имя файла-справки в формате HLP. В отличие от MsgBox указание файла допускается при любых значениях. При этом к уже имеющимся в InputBox кнопкам добавляется еще одна — Help, которая и отвечает за вызов справки.
Context — целое число. Указывается индекс страницы файла-справки, которую необходимо открыть при нажатии кнопки Help. Указывается только если указан параметр HelpFile.
В дополнение приведу классический пример применения InputBox — выполнение процедуры только после введения пароля:
Sub ClearAllCells()
Dim vRetVal
vRetVal = InputBox("Введите пароль:", "Авторизация", "")

If StrPtr(vRetVal) = 0 Then 'Нажата кнопка Отмена
    Exit Sub
End If

'если пароль неверный - завершаем процедуру без выполнения действий
If vRetVal <> "1234" Then
    MsgBox "Введенный пароль неверный", vbCritical, "ClearAllCells"
    Exit Sub
End If
'будет выполнено только если введен правильный пароль - 1234
'полная очистка всех ячеек активного листа
ActiveSheet.Cells.Clear
End Sub
А вот еще один пример применения — запрос имени пользователя и запись его в лист LOG, чтобы можно было отследить кто и когда открывал файл. При этом если пользователь нажал Отмена, то книга закроется, а если не укажет имя пользователя — появится сообщение и заново запрос. И так до тех пор, пока имя пользователя не будет введено или не будет нажата кнопка Отмена:
Private Sub Workbook_Open()
    'ThisWorkbook - Обращение к книге с кодом
    'Но из модуля самой книги можно обращаться и проще - Me
    ThisWorkbook.Visible = False
    Dim user As String, lastrow As Long
    'цикл, пока не будут указаны данные пользователя
    Do While user = ""
        user = InputBox("Введите имя пользователя:", "Авторизация", "")
        If StrPtr(user) = 0 Then
            MsgBox "Приложение будет закрыто", vbCritical, "Авторизация"
            ThisWorkbook.Close
            Exit Sub
        End If
        If user = "" Then
            MsgBox "Не указано имя пользователя!", vbCritical, "Авторизация"
        End If
    Loop
    With ThisWorkbook.Worksheets("LOG")
        'получаем последнюю заполненную ячейку на листе "LOG"
        lastrow = .Cells(.Rows.Count, 1).End(xlUp).Row
        'записываем имя пользователя
        .Cells(lastrow + 1, 1) = user
        'записываем время входа
        .Cells(lastrow + 1, 2) = Now
    End With
End Sub
Что важно: этот код записывается в модуль ЭтаКнига(ThisWorkbook) и тогда при любом открытии книги будет появляться запрос на имя пользователя.
Так же некоторые примеры применения InputBox можно найти в статьях на сайте. Например:
Как удалить строки по условию?
Как массово изменить гиперссылки?
ДИАЛОГ ВВОДА ИНФОРМАЦИИ ПОЛЬЗОВАТЕЛЕМ — APPLICATION.INPUTBOX

В общем-то данный диалог мало отличается от обычного InputBox, за исключением типов возвращаемых данных. У данного диалога намного богаче функционал определения типов данных.
InputBox Promt, [Title], [DefaultValue], [Left], [Top], [HelpFile], [HelpContextID], [Type]
почти все параметры аналогичны таким же параметрам в InputBox.
Promt — текст, отображаемый на самой форме. Иначе говоря — сама суть показа диалога.
Title — текст, отображаемый в заголовке окна. В приведенном выше примере это «Запрос данных».
DefaultValue — значение, которое будет показано в поле ввода до указания значения пользователем.
Left — положение окна InputBox в поинтах по горизонтали относительно левого края экрана. В отличие от простого InputBox положение определяется на основании расположения самого окна Excel, а не экрана.
Top — положение окна InputBox в твипах по вертикали относительно верхнего края экрана.
HelpFile — указывается имя файла-справки в формате HLP. В отличие от MsgBox указание файла допускается при любых значениях. При этом к уже имеющимся в InputBox кнопкам добавляется еще одна — Help, которая и отвечает за вызов справки. Сам вызов справки осуществляется путем нажатия на иконку со знаком вопроса в заголовке диалога.
HelpContextID — целое число. Указывается индекс страницы файла-справки, которую необходимо открыть при нажатии кнопки Help. Указывается только если указан параметр HelpFile.
Type — целое число. Указывается одно из предустановленных значений, указывающих диалогу Application.InputBox тип данных, которые предполагается получить от пользователя. Ниже приведен листинг кода, демонстрирующий запрос данных всех типов с описанием ограничений и нюансов.
    Dim vRetVal 'для получения выбранного значения
    'запрос формулы - Type:=0
    'возвращает либо произвольный текст, указанный в поле или ссылку на указанную ячейку в стиле R1C1
    vRetVal = Application.InputBox("Укажите формулу:", "Запрос данных", "", Type:=0)
    'запрос числа - Type:=1
    'возвращает число. Не даст ввести текст, выдав сообщение об ошибке
    vRetVal = Application.InputBox("Укажите любое число:", "Запрос данных", "", Type:=1)
    'запрос текст - Type:=2
    'возвращает указанный текст. При указании числа оно будет в виде текста: 1="1"
    vRetVal = Application.InputBox("Укажите любой текст:", "Запрос данных", "", Type:=2)
    'запрос логического значения True или False - Type:=4
    'значение указывает в текущей локализации офиса
    'для русской это ИСТИНА или ЛОЖЬ
    'так же можно указать универсальные числовые константы - 1 или 0. 1 - ИСТИНА; 0 - ЛОЖЬ
    'Не даст ввести иные значения, выдав сообщение об ошибке
    'возвращает указанное логическое значение в английской локализации
    vRetVal = Application.InputBox("Укажите ИСТИНА или ЛОЖЬ:", "Запрос данных", "", Type:=4)
    'запрос диапазона - Type:=8
    'возвращает ссылку на диапазон
    'При получении такого значения обязательно следует использовать оператор Set
    'В противном случае вернет значение массива(Array), содержащего значения указанных ячеек
    'при указании через Set и нажатии Отмена будет ошибка VBA
    Set vRetVal = Application.InputBox("Укажите диапазон для очистки ячеек:", "Запрос данных", "", Type:=8)
    'запрос значения ошибки #Н/Д - Type:=16
    'всегда возвращает значение ошибки #Н/Д независимо от введенного значения
    vRetVal = Application.InputBox("Укажите диапазон для очистки ячеек:", "Запрос данных", "", Type:=16)
    'запрос диапазона ячеек для создания массива - Type:=64
    'возвращает массив ячеек с границами начала от 1(Option Base 1)
    'если указать всего одну ячейку vRetVal будет содержать значение этой ячейки, а не массив
    vRetVal = Application.InputBox("Укажите диапазон для создания массива:", "Запрос данных", "", Type:=64)
Конечно, чаще всего используют Type:=8, т.к. это избавляет от необходимости рисования своих форм и прочих заморочек для запроса указания диапазона от пользователя. Еще раз обращаю внимание, что для Type:=8 необходим ключевой оператор присвоения Set, т.к. в результате необходимо получить именно диапазон(т.е. объект). Ниже приведена процедура, которая запрашивает диапазон для очистки и корректно обрабатывает ситуацию при нажатии кнопки Отмена(т.е. не показывает никаких ошибок пользователю, а просто не выполняется). Стандартно при нажатии Отмена процедура завершается с ошибкой VBA вида Type Mismatch, что не очень грамотно с точки зрения взаимодействия с пользователем — он не должен видеть внутренние ошибки:
'---------------------------------------------------------------------------------------
' Procedure : ClearCells
' DateTime  : 19.10.2014 22:53
' Author    : The_Prist(Щербаков Дмитрий)
'             WebMoney - R298726502453; Яндекс.Деньги - 41001332272872
'             http://www.excel-vba.ru
' Purpose   :
'             Запрашиваем диапазон ячеек для очистки.
'             По умолчанию заносится диапазон выделенных на момент запуска ячеек
'---------------------------------------------------------------------------------------
Sub ClearCells()
    Dim vRetVal 'для получения выбранного значения

    On Error Resume Next
    Set vRetVal = Application.InputBox("Укажите диапазон для очистки ячеек:", "Запрос данных", Selection.Address, Type:=8)
    If vRetVal Is Nothing Then 'нажата кнопка Отмена - диапазон не выбран
        MsgBox "Отмена выполнения", vbCritical, "Нет данных"
        Exit Sub 'завершаем процедуру, т.к. ячейки не выбраны
    End If
    'диапазон выбран - очищаем ячейки
    vRetVal.Clear
End Sub
Статья помогла? Поделись ссылкой с друзьями!
![]() Видеоуроки
Видеоуроки
Поиск по меткам
Access
apple watch
Multex
Power Query и Power BI
VBA управление кодами
Бесплатные надстройки
Дата и время
Записки
ИП
Надстройки
Печать
Политика Конфиденциальности
Почта
Программы
Работа с приложениями
Разработка приложений
Росстат
Тренинги и вебинары
Финансовые
Форматирование
Функции Excel
акции MulTEx
ссылки
статистика