
AutoFill in Excel (Table of Contents)
- What is Autofill in Excel
- Autofill in Excel for Text
- Autofill in Excel for Dates
- Autofill in Excel with Alphabets
What is AutoFill in Excel
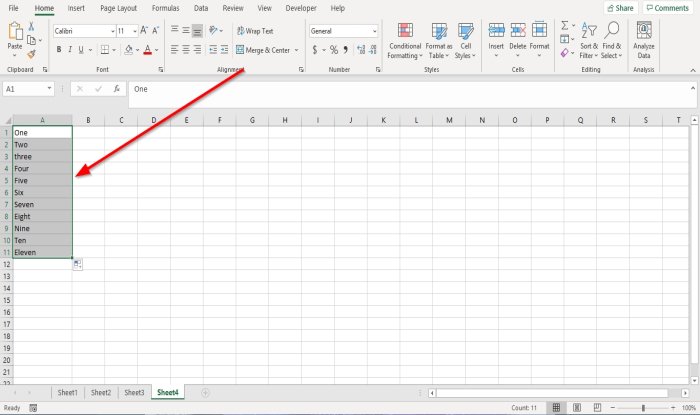
AutoFill in Excel is quite a time-saving command which automatically fills the value to all selected cells. To use autofill, first select the data which we need to fill down below and then drag the pointer, which is there at the bottom right corner, to all subsequent cells. For example, if we have three numbers like 1, 2, and 3 and we want to fill the rest of the values automatically, select the number and then drag these using Small Square located at the bottom right corner. We will see the rest of the numbers followed by currentlnumbers chosenrs in order.
Autofill in Excel is the feature that will help you to input data automatically for a few cases. Let’s see the examples.
When we want to enter multiple years continuously in a spreadsheet, we don’t need to input them manually. We need to input the first two years; later, you can drag until the required number of years.
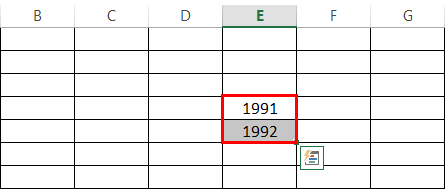
Then drag the selection until the required number of cells. The next subsequent years will fill in that dragged cells.
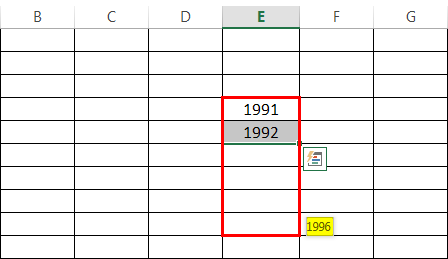
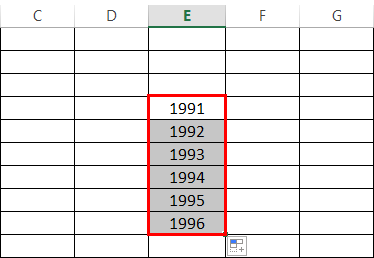
We can observe I dragged about 4 cells down, and the dragging is showing 1996, which is the value that will fill in the last cell. Once you release the mouse, the data will fill. Below is the picture after releasing the mouse.
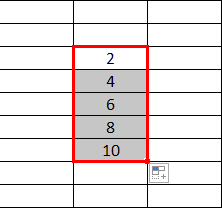
It is not limited to the sequence of numbers, but you can use this auto-fill feature dragging of even or odd numbers like below. We can observe we have 2 and 4 in the spreadsheet; when we drag three cells, it shows value 10.
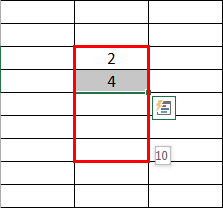
Once we leave the mouse after dragging, the results will be like below.
As shown above, we can perform for odd numbers.
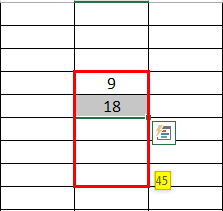
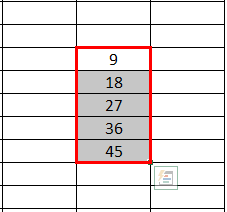
Suppose we want to know the values of the 9th table. Fill 9 and 18, then drag until the required number of cells; it will give us the values of the 9th table.
So, autofill in excel will apply for something of a similar pattern.
AutoFill in Excel for Text
This autofill feature is not only for the number but also for pattern texts like months and days.
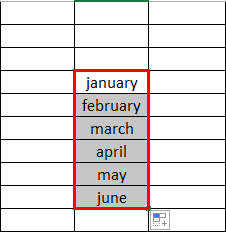
Input January in one cell,
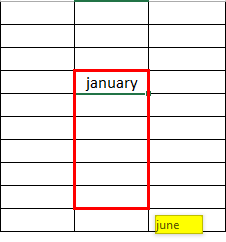
And drag until the required length; it will automatically fill the next months once we release the mouse.
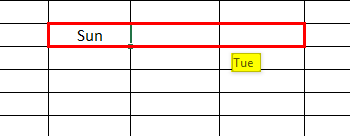
Similarly, try applying for a day.
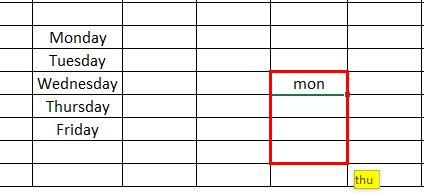
Input Monday and drag until the required length; it will fill the next days.
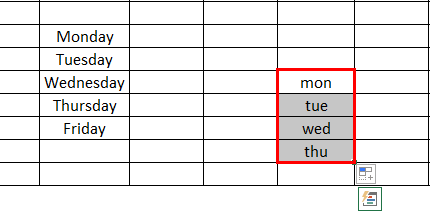
Suppose you are not good at spelling and lazy to enter an entire month or day; just input the short form and drag. Still, the Autofill feature will work. We have seen when I just input ‘Mon’; it still gives ‘Thu’.
It will not only apply in a Vertical way but can use this feature horizontally also.
Below is an example of days.
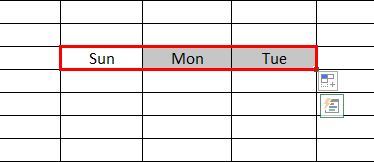
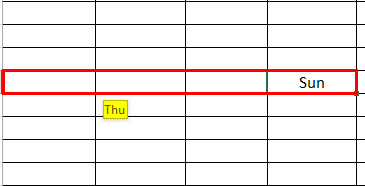
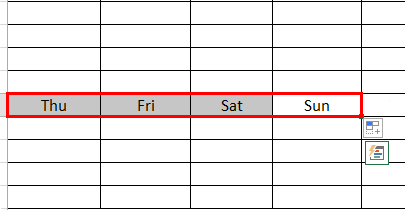
In the above example, I dragged to my right; hence, it shows as ‘Tue’; if I drag to my left, it will show as per that. We can find the below example, which dragged from right to left. While dragging, you will not find the “+” sign cursor in the left corner; it will be in the right corner only; we just need to click on the right corner and drag it to our left side. Below is an example for reference.
AutoFill in Excel for Dates
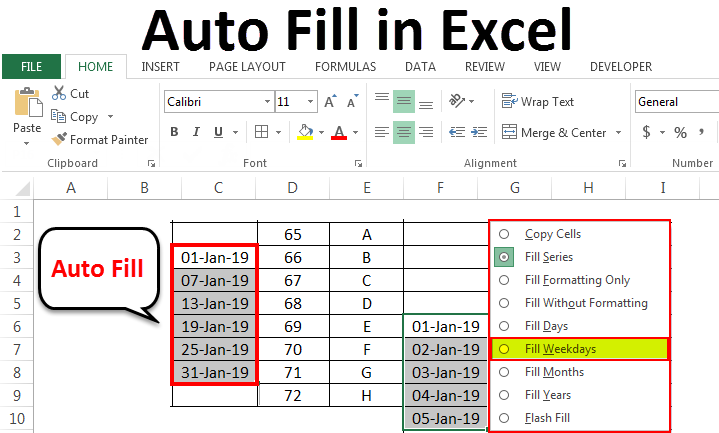
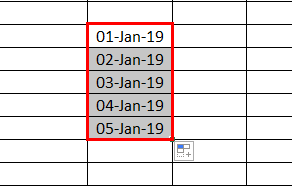
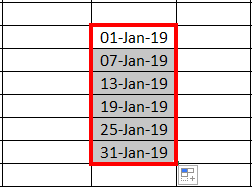
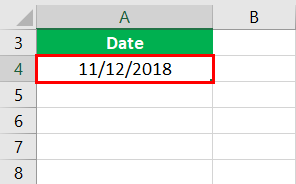
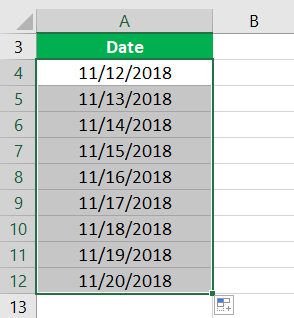
Now we will see how we can use this autofill in excel for dates. First, we will see how to automate dates, months, and years. Input the required date from where you want subsequent dates. Suppose we need the dates from 1st Jan 2019, just input and drag as usual. See, we have input 1-Jan-19
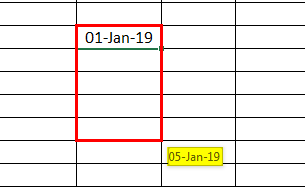
and dragged for 4 cells, it is showing 5-Jan-2019.
I hope you have understood the concept of autofill in excel. Now we will see how to work with working days (Except Saturday and Sunday).
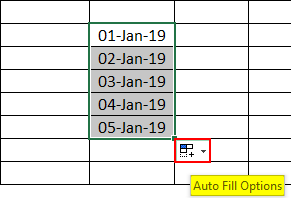
To fill only working days, drag as usual and click on the smart tag marked in red color as shown in the below picture.
Once you click on the smart tag, a drop-down will come asking for the choice fill days, months, years and weeks, etc.
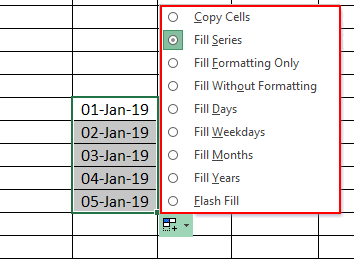
From the drop-down, select the required option; now, we want only weekdays select weekdays option.
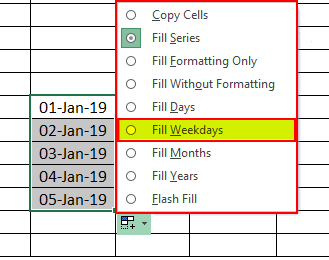
It will fill all the working days, avoiding Saturday and Sunday.
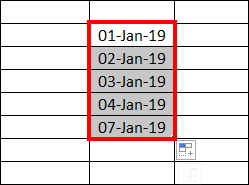
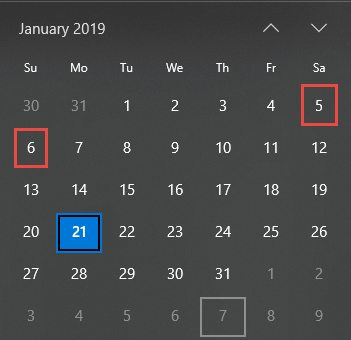
If you observe in the below example, 5-Jan-19 is Saturday, and 6-Jan-19 is Sunday.
Similarly, we can autofill in excel the years and months also by selecting a respective option. In addition to these, if we want to fill dates of required sequence, like input every 5th day or 7th day, we can simply perform this with the help of auto-fill in excel. In this case, we need to auto-fill in excel two days as per the required sequence, then select both and drag until the required range.
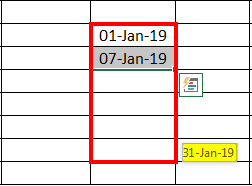
The above example will give the below sequence.
AutoFill in Excel with Alphabets
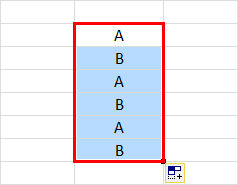
This feature of autofill in excel will not work with Alphabets. Try to fill A and B in the two cells subsequently, select them and try to drag; it will not fill the next letters, but it will only fill the same A and B in the next cells also.
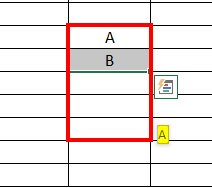
If you observe the below picture, it repeats the same A and B pattern. If you give three letters, It will repeat that pattern.
Solution:
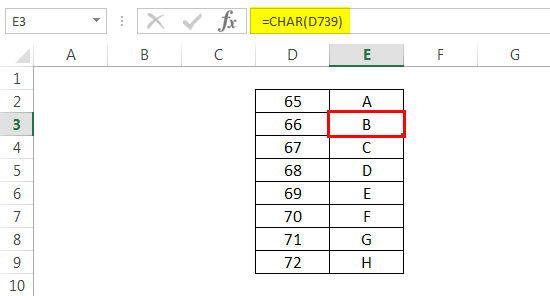
If you really want to fill Alphabets, you can apply this. First, input 65 and 66 and drag them, then input a formula CHAR(Number) which will convert the number to the alphabet as per ASCII code. This is not a part of autofill, but I usually encounter this problem while working on Excel and get this solution from Google.
In this way, we can fill the alphabet in excel. Once you reach Z, the letters will change; hence you need to stop at Z and select the entire A to Z range and drag the autofill feature.
Features
Allows users to quickly fill a range of cells with sequential values (such as numbers, dates, or text), by dragging the Autofill handle across the range. It can also be used to create simple formulas in an Excel worksheet that automatically perform calculations and display results. With autofill, you can quickly populate a range of cells with data based on patterns already present in other cells.)
To use the Autofill feature in Excel, you can follow these steps:
- Enter the first item in the series in the cell where you want the series to start.
- Click and drag the fill handle (the small square in the bottom right corner of the cell) over the cells where you want the series to be filled.
- Release the mouse button when you have selected all the cells you want to fill.
- Excel will automatically fill the cells with the appropriate pattern or sequence based on the initial item you entered.
Things to Remember
- AutoFill in Excel is one of the features that are available in Excel. It helps to fill subsequent data automatically when we drag the selected cell corners.
- We can use autofill in excel for numbers, sides (East, West, North, and South), years, dates, months, and other data types. Smart tag helps to fill the sequence, format, months, etc.
- Because of this feature, we can save time while working on a large amount of data. This AutoFill in Excel is not capable of filling alphabets; this is one of the drawbacks of this.
Recommended Articles
This has been a guide to AutoFill in Excel. Here we discuss AutoFill in Excel and how to use AutoFill in Excel, along with practical examples and a downloadable excel template. You can also go through our other suggested articles.
- VBA AutoFill
- Excel AutoCorrect
- Excel Auto Numbering
- Excel Autosave
Watch this video for a quick introduction to AutoFill and Flash Fill, two helpful time savers that we’ll cover in more detail in this course.
Want more?
Fill data automatically in worksheet cells
Split a column of data based on what you type
Change the case of text
Sometimes you need to enter a lot of repetitive information in Excel, such as dates, and it can be really tedious.
If you think there might be an easier, automated way to do this, you’d be right.
Type the first date in the series.
Put the mouse pointer over the bottom right-hand corner of the cell until it’s a black plus sign.
Click and hold the left mouse button, and drag the plus sign over the cells you want to fill.
And the series is filled in for you automatically using the AutoFill feature.
Or, say you have information in Excel that isn’t formatted the way you need it to be, such as this list of names.
Going through the entire list manually to correct them is daunting.
You’d think there’d be an easier automated way to do this, too, and you’d be right again.
Type the first name the way you want it.
Start to type the next name, and, as if by magic, Excel provides a preview of the names formatted the way you want.
Press Enter, and the names are all filled in for you using the Flash Fill feature, which is new in Excel 2013.
AutoFill and Flash Fill are tremendous time savers, and they can do much more than we have covered in this introduction.
In the next videos, we’ll cover them in more detail.
What is AutoFill in Excel?
AutoFill in excel can fill a range in a specific direction by using the fill handle. The range is filled with values (numerical, textual or a mix) which are either copied from the initially selected cell or based on the pattern of the selected cells. The range can be filled downwards, upwards, rightwards or leftwards. A fill handle is a small square appearing at the bottom-right corner of a selected cell or range.
For example, type “abc” (without the double quotation marks) in cell E8. Select cell E8 and a fill handleThe fill handle in Excel allows you to avoid copying and pasting each value into cells and instead use patterns to fill out the information. This tiny cross is a versatile tool in the Excel suite that can be used for data entry, data transformation, and many other applications.read more appears at the bottom-right corner. Drag the fill handle in the following directions and the given output is displayed (without the double quotation marks):
- Downwards (till cell E12)–The text “abc” appears in the range E9:E12.
- Upwards (till cell E4)–The text “abc” appears in the range E4:E7.
- Rightwards (till cell I8)–The text “abc” appears in the range F8:I8.
- Leftwards (till cell A8)–The text “abc” appears in the range A8:D8.
Likewise, one can fill a range with a series of numbers. The number of the selected cell is copied in the different ranges, horizontally and vertically. It is also possible to fill the range with consecutive numbers (like 1-10).
A fill handle is an essential part of the AutoFill feature of Excel. On dragging or hovering the mouse over the fill handle, it changes from a square to a black plus sign. It must be noted that one can drag the fill handle in only one direction at one time. Moreover, the fill handle cannot be dragged diagonally.
Let us go through some examples to understand the working of the AutoFill feature in Excel.
Table of contents
- What is AutoFill in Excel?
- #1–AutoFill Excel Options Explained
- Example #1
- #2–AutoFill in Excel Using Two Starting Values
- Example #2
- Example #3
- #3–AutoFill Date and Time Values
- Example #4
- Example #5
- #4–AutoFill Series Recognized by Excel
- Example #6
- #5–AutoFill Values of Custom Lists in Excel
- Example #7
- Frequently Asked Questions
- Recommended Articles
- #1–AutoFill Excel Options Explained
You can download this AutoFill Excel Template here – AutoFill Excel Template
#1–AutoFill Excel Options Explained
Example #1
The following image shows a number in cell A1. We want to perform the following tasks:
- Copy the number of cell A1 to the range A2:A7 by using the AutoFill feature of Excel.
- Show and explain the different alternatives of the AutoFill options box.
The steps to perform the given tasks are listed as follows:
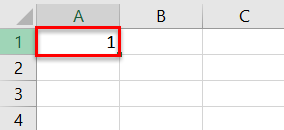
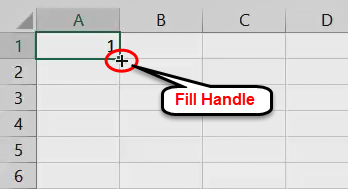
Step 1: Select cell A1. Hover the mouse over the lower-right corner of cell A1. A black plus sign appears, as shown in the following image. This plus sign (shown within the red circle) is the changed form of the fill handle, which appears as the cursor is placed on it.
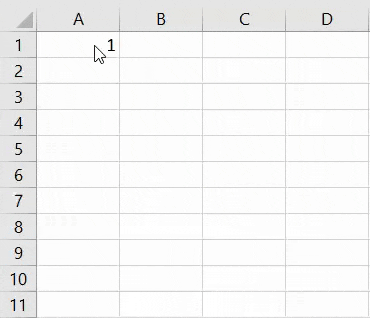
Step 2: Drag the fill handle till cell A7. The range A2:A7 is filled with the number 1, as shown in the following image.
Hence, Excel has copied the value of the initially selected cell (cell A1) to a series of cells (A2:A7).
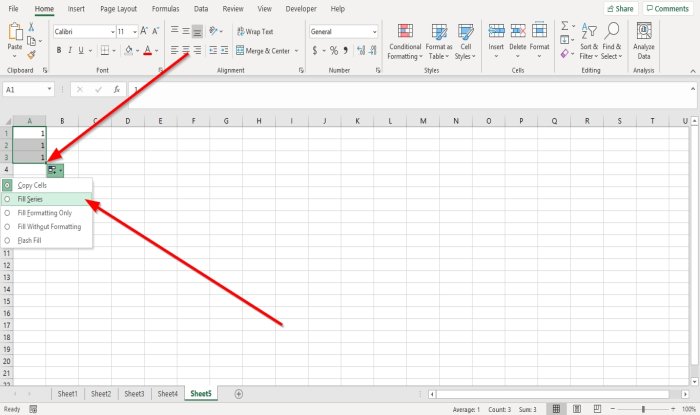
In the following pointers (step 2a to step 2g), the AutoFill options box is shown and its alternatives are explained.
Step 2a: The AutoFill options box is displayed immediately below the last cell, till which the fill handle is dragged (in step 2). The same is shown in the following image.

Step 2b: Click on the AutoFill options box. It displays various options. These options suggest the way the range (to which the fill handle is dragged) will be filled.
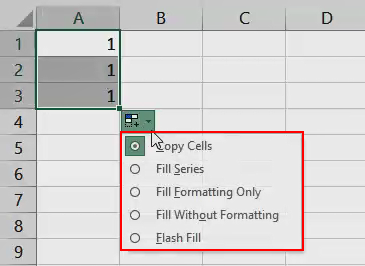
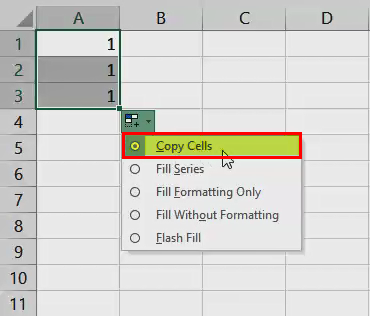
Step 2c: The first option is “copy cells,” as shown in the following image. This option copies the value of the initially selected cell to the entire selected range.
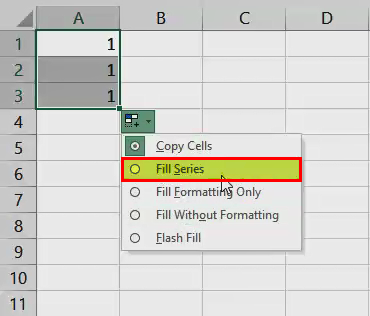
Step 2d: The second option is “fill series.” This option works with numerical values or a mix of numerical and textual values. It fills the range with a series of values based on the sequence detected. Excel identifies a sequence when more than one data cell is selected.
For instance, cells A1, A2, and A3 contain 1, 2, and 3. Select these cells and drag the fill handle downwards. The range is filled with a series of values incrementing by 1. This implies the following:
- Drag the fill handle downwards or rightwards and select the “fill series” option. It fills the range with an increasing order of numbers (like 4, 5, 6).
- Drag the fill handle upwards or leftwards and select the “fill series” option. It fills the range with a decreasing order of numbers (like 0, -1, -2).
Note: Remember that if Excel does not identify a sequence with the selection of two or more cells, one should select “fill series” from the AutoFill options box. With this selection, the default values that have been filled in the range are overwritten with sequential numbers.
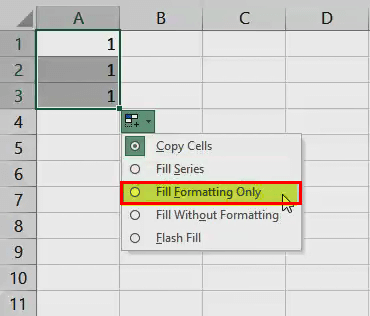
Step 2e: The next option is “fill formatting only,” as shown in the following image. This option applies the formatting of the initially selected cell to the selected range. No values are entered in the selected range.
Note: The “fill formatting only” option is helpful in situations when formatting (of the initially selected cell) needs to be copied but values need to be entered manually.
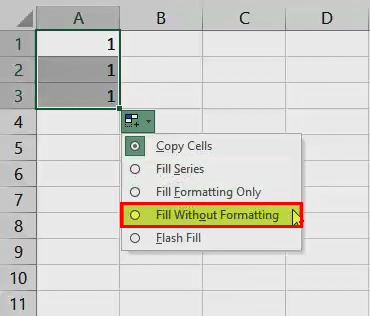
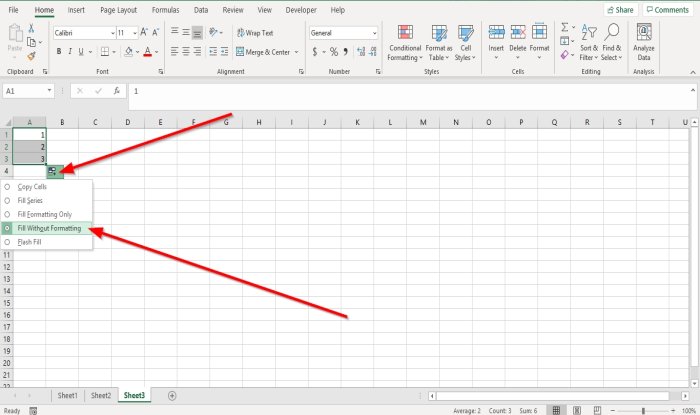
Step 2f: The fourth option is “fill without formatting,” as shown in the following image.
With this option, the value of the initially selected cell is copied to the selected range. If more than one cell is selected initially, this option fills the range based on a pattern. However, the formatting of the selected cell (or cells) is not copied.
Step 2g: The fifth option is “flash fill.” This option fills the selected range automatically on the basis of the pattern detected. It is usually used to extract values from a data cell or combine the values of different data cells.
For instance, with flash fill, one can extract the middle name from the first, middle, and last name contained in a cell. Likewise, one can combine the first and last names contained in different cells.
For flash fill to work, one must enter the correct value (as desired) in the initial cell. As one begins typing the entry in the subsequent cell, Excel senses a pattern and fills the remaining range. Ensure that the output column (in which the desired value is entered) is adjacent to the source column.
Flash fill works for both numerical and textual values. It also works for a combination of numerical and textual values.
Note 1: The difference between “fill series” and “flash fill” is that the former identifies a sequence of numbers while the latter identifies a pattern of the selected values.
Note 2: The flash fill feature is available in Excel 2013 and the subsequent versions.

#2–AutoFill in Excel Using Two Starting Values
Example #2
The following image shows two numbers in cells A3 and A4. Use the AutoFill excel feature to fill the range A5:A14 in the sequence of the listed numbers.
The steps to fill the range A5:A14 in the given sequence are stated as follows:
Step 1: Select cells A3 and A4.
Step 2: Drag the fill handle till cell A14, as shown in the following image. Excel senses a sequence and fills the range A5:A14 with numbers increasing by 10.
Likewise, if cells A3 and A4 contain 90 and 80 respectively, select them and drag the fill handle downwards. Excel fills the range A5:A14 with numbers decreasing by 10. In this way, the range can be filled in either increments or decrements of numbers.
Example #3
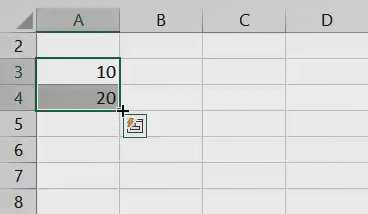
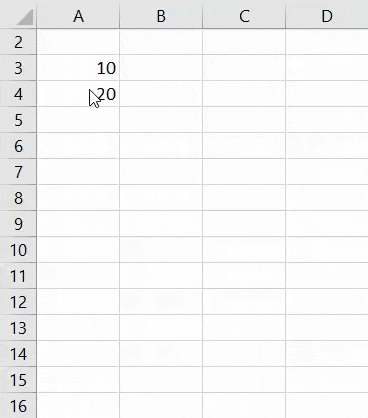
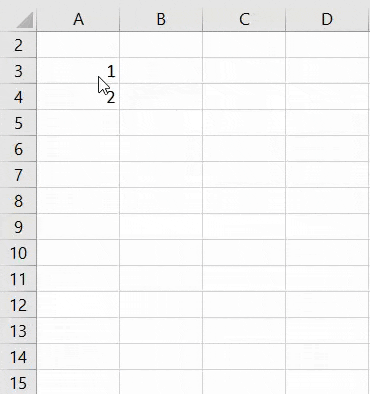
The following image shows two consecutive numbers in cells A3 and A4. Fill the range A5:A12 with the listed numbers appearing alternately.
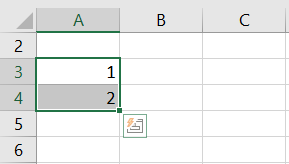
The steps to perform the given task are listed as follows:
Step 1: Select cells A3 and A4.
Step 2: Drag the fill handle till cell A12, as shown in the following image. Click the AutoFill options box and select “copy cells.”
Excel fills the range A5:A12 with numbers 1 and 2 appearing one after the other repeatedly.
#3–AutoFill Date and Time Values
Example #4
The following image shows a date in cell A4. Perform the following tasks:
- Fill the range A5:A12 with a series of dates by using the AutoFill feature of Excel. The difference between two consecutive dates should be equal to a day.
- Show and explain the additional alternatives (which were not covered in example #1) of the AutoFill options box.
The steps to perform the given tasks are listed as follows:
Step 1: Select cell A4. Drag the fill handle till cell A12. The same is shown in the following image.

Step 2: The output is shown in the following image. Excel fills the range A5:A12 with a series of dates. Each succeeding date is obtained by adding a day to the preceding date.
In the following pointers (step 2a to step 2e), the additional alternatives of the AutoFill options box have been showed and explained.
Step 2a: Click the AutoFill options box. The different options of this box are shown in the following image.

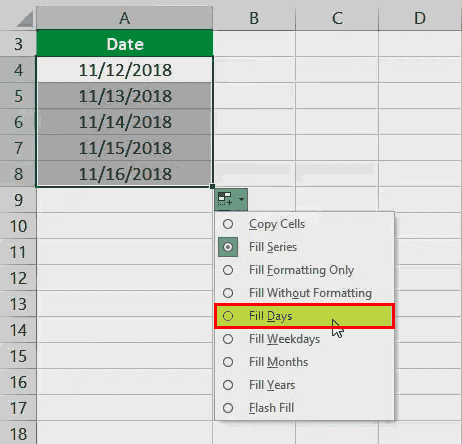
Step 2b: The “fill days” option (shown in the succeeding image) fills the selected range with a series of dates based on a pattern.
For instance, the cells A4 and A5 contain 11/12/2018 and 14/12/2018. Select these cells and drag the fill handle. Select “fill days” from the AutoFill excel options box. The range is filled with dates incrementing by 3 (like 17/12/2018, 20/12/2018, 23/12/2018).
Note: The “fill days” option observes the pattern in the days entered in the selected cells.
Step 2c: The “fill weekdays” option observes the pattern in days but fills the selected range with weekdays only. The weekends (Saturday and Sunday) are excluded from the series.
For instance, the cells A4 and A5 contain 10/12/2018 and 13/12/2018. Select these cells and drag the fill handle downwards. Select “fill weekdays” from the AutoFill excel options box. The series obtained are 17/12/2018, 20/12/2018, 24/12/2018, 27/12/2018, and so on. Hence, only the weekdays are returned as the output.

Step 2d: The “fill months” option (shown in the succeeding image) observes the pattern in the month entered in the selected cells.
For instance, enter 10/12/2018 and 13/12/2018 in cells A4 and A5. Select these cells and drag the fill handle. Select “fill months” from the AutoFill excel options box. The output is 10/1/2019, 13/1/2019, 10/2/2019, 13/2/2019, and so on.

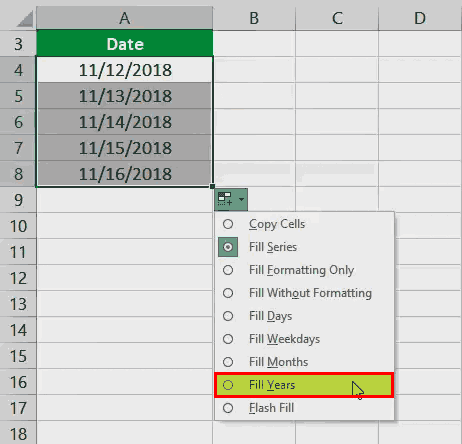
Step 2e: The “fill years” option observes the pattern in the year entered in the selected cells. This option is shown in the succeeding image.
For instance, cells A4 and A5 contain 11/12/2018 and 12/12/2018 respectively. After selecting these cells and dragging the fill handle, select the “fill years” option. The series obtained are 11/12/2019, 12/12/2019, 11/12/2020, 12/12/2020, and so on.
Example #5
The following image shows a time value in cell A25. Fill the range A26:A34 with a series of time values incrementing by one hour. Use the “fill series” option of the AutoFill feature in excel.
Step 1: Select cell A25.
Step 2: Drag the fill handle till cell A34. Excel has filled the range A26:A34 with the different time values, as shown in the succeeding image.
Hence, the difference between two consecutive time values is one hour.

Step 3: Click the AutoFill options box. It shows that Excel has used the “fill series” option in this case. The same is shown in the following image.

#4–AutoFill Series Recognized by Excel
Example #6
In the following four images, one cell is filled with a value. We want to fill the range (immediately following the cell with value) downwards with a series of values. Use the AutoFill feature of Excel.
For simplicity, every image is preceded by an image number, title, and the steps to be performed.
Image 1–Days of a Week as the Series
- Select cell B3 which contains “Mon.”
- Drag the fill handle till cell B9.
Excel fills the range B4:B9 with the successive days of a week.
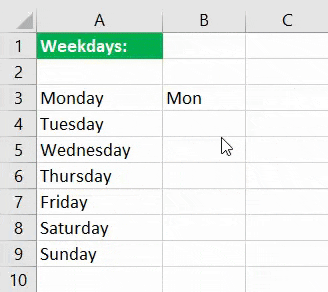
Image 2–Months in a Year as the Series
- Select cell B14 which contains “Jan.”
- Drag the fill handle till cell B20.
Excel fills the range B15:B20 with the successive months of a year.
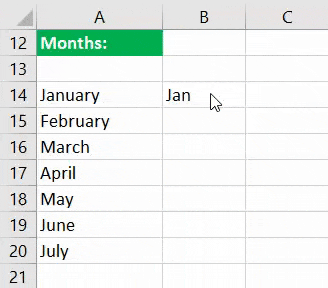
Image 3–Rank as the Series
- Select cell A25 which consists of “1st.”
- Drag the fill handle till cell A31.
Excel fills the range A26:A31 with the consecutive ranks.
![]()
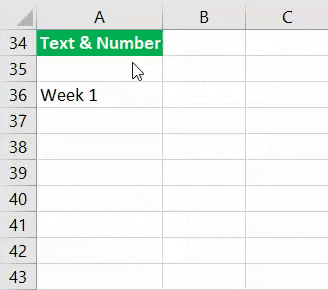
Image 4–Mix of Textual and Numerical Values as the Series
- Select cell A36 which consists of the string “week 1.”
- Drag the fill handle till cell A42.
Excel fills the range A37:A42 with the same text (week) but an increasing number (2 to 7).
The four preceding images show the working of the “fill series” option of the AutoFill feature when only one cell is selected initially. However, one need not specifically select the “fill series” option as this is the default working of Excel in the given cases.
In other words, Excel recognizes certain values (entered in the initially selected cell) as a part of a series. Accordingly, it fills the selected range.
#5–AutoFill Values of Custom Lists in Excel
With a custom list, the different values (entries) of a series can be pre-defined in Excel. From these entries of the custom listCustom lists in excel is used to sort data based on the user’s choice and is especially useful when you need to perform multiple tasks on the same data on a repetitive basis.read more, type one or more values in Excel. Excel fills the selected range with the entire series of the custom list.
Example #7
Create a custom list consisting of the names “Ian Smith,” “Patrick Henderson,” and “Samuel Samson.” Use the AutoFill feature of Excel to show the working of this list.
The steps to create a custom list in Excel are listed as follows:
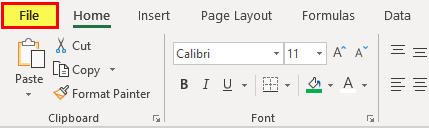
Step 1: Go to the File tab.
Step 2: Click “options.”
Step 3: The “Excel options” dialog box opens. From the pane on the left, click “advanced.” The same is shown in the following image.
Step 4: The “advanced options for working with Excel” are displayed on the right side. From the “general” section, click “edit custom lists.”
Step 5: The “custom lists” dialog box opens, as shown in the following image.
Step 6: Under “custom lists” (to the left), there are some lists defined by the system. The user-defined custom lists work the same way the system-defined lists work.
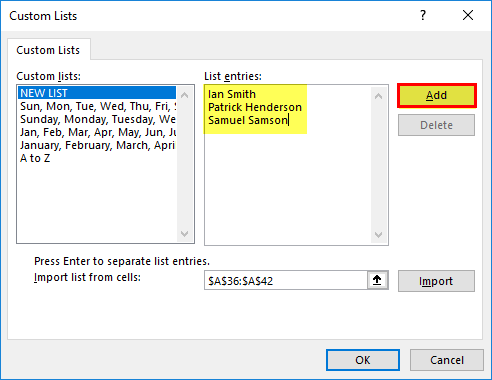
In the “custom lists” window, perform the following tasks:
a. Click “new list” under “custom lists.” Under “list entries,” type the names “Ian Smith,” “Patrick Henderson,” and “Samuel Samson.” These names are the different values (entries) of our custom list.
b. Press the “Enter” key after typing each entry (in “list entries”). Once all entries have been entered, click “add.”
c. Click “Ok” twice and exit from the “Excel options” dialog box.
The different list entries are shown in the following image.
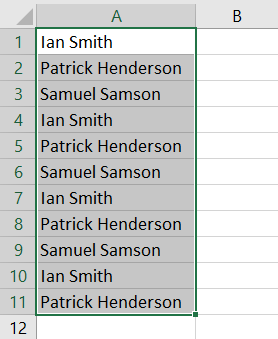
Step 7: To check whether the user-defined custom list works or not, type the name “Ian Smith” in cell A1. Drag the fill handle till cell A11, as shown in the following image.
Note: One can enter any name of the user-created custom list. It need not necessarily be the first name of this list.
Step 8: The output is shown in the following image. Excel fills the range A2:A11 with the entries of the user-created custom list.
It must be noted that the sequence of the names in column A is the same as the “list entries” entered in step 6. Moreover, the names appear repeatedly in this column.
Frequently Asked Questions
1. What is the AutoFill feature and where is it in Excel?
The AutoFill excel feature fills a range by using the fill handle in the required direction (down, up, right or left). The range is filled with a series of numerical or textual values. These values are either copied from the initially selected cell or based on the pattern of the selected cells.
For instance, type 5 in cell F8. Select this cell and drag the fill handle downwards. The range F9:F14 is filled with the number 5. This process can be repeated for the other directions as well.
The AutoFill options box is displayed immediately below the last cell to which the fill handle is dragged. The range is filled according to the option selected from this box.
2. How is the AutoFill feature used in Excel?
The steps of using the AutoFill feature in excel are listed as follows:
a. Select a cell which contains a value (numerical, textual or a mix).
b. Drag the fill handle (displayed at the bottom-right corner of the selected cell) till the last cell in which a value is required.
Excel fills the range (to which the fill handle was dragged) with values. To change the default output, select the required alternative from the AutoFill options box (shown at the bottom of the filled range).
Note 1: One can select more than one cell in pointer “a.” This helps Excel to identify the pattern of the selected cells. Hence, this is done in cases where a sequential pattern is required as the output.
Note 2: The output of the AutoFill feature in excel depends on the initially selected cell (or cells) and the alternative selected from the AutoFill options box.
3. How to AutoFill in Excel without dragging the fill handle?
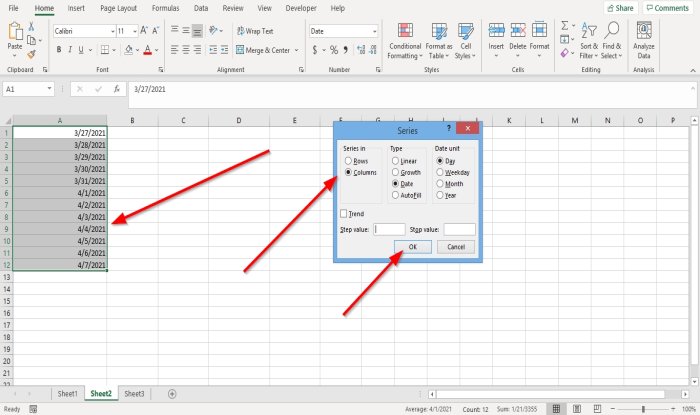
Let us AutoFill even numbers beginning from 10 to 20 in the range A1:A6. The steps to AutoFill without dragging the fill handle are listed as follows:
a. Enter 10 in cell A1. Select this cell.
b. From the Home tab, click the “fill” drop-down (in the “editing” group) appearing below the sigma button. Select “series.”
c. The “series” dialog box opens. In this box, perform the following tasks:
• Select “columns” under “series in.”
• Select “linear” under “type.”
• Enter the “step value” as 2. This is because the difference between two consecutive numbers should be 2. In other words, every second number (beginning from 10 in this case) is an even number.
• Enter the “stop value” as 20. This is because we want to fill the range till the number 20.
• Click “Ok.”
Excel fills the range A2:A6 with the numbers 12, 14, 16, 18, and 20.
Note: To fill a range with consecutive numbers (having a difference of 1), enter the first number (of the range) in the initial cell. In “step value,” enter 1. Enter the last number of the range as the “stop value.” The remaining steps stay the same as the preceding pointers.
Recommended Articles
This has been a guide to AutoFill in Excel. Here we discuss the working of the AutoFill option in Excel along with examples and downloadable Excel templates. You may also look at these useful functions of Excel–
- Excel Flash FillAutomatic fillers in the cells of an excel table are known as flash fills. When you type certain characters in the adjacent cells, the suggested data appears automatically. It can be found under the data tab’s data tools section or by pressing CTRL + E on the keyboard.read more
- Column Sort in ExcelIn excel, to sort data in the column, select data, choose the option of the sort from the toolbar, go to options, click on the sort by option given in the drop-down list, apply required changes and click on the ok button.read more
- Sort by Color in ExcelWhen a column or a data range in excel is formatted with colors either by using the conditional formatting or manually, when we use filter on the data excel provides us with an option to sort the data by color, there is also an option for advanced sort where user can enter different levels of color for sorting.read more
- Formula Errors in ExcelWhen we insert a formula and forget to include some required input, we get an error in Excel. Some of the most common errors in Excel formulas are #NAME?, #DIV/0!, #REF!, #NULL!, #N/A, ######, #VALUE! and #NUM!.read more
Every day in business or any other field lots of information are there that are required to store for future use. For anyone, it is very difficult to remember that information for a long time. Earlier data and information are stored in a form of a registrar, file, or by paperwork but finding it may be difficult for us. It takes a lot of time. To resolve this issue Microsoft brings a software called MS Excel.
Microsoft Excel is a software that allows users to store or analyze the data in a proper systematic manner. It uses spreadsheets to organize numbers and data with formulas and functions. MS Excel has a collection of columns and rows that form a table. Generally, alphabetical letters are assigned to columns, and numbers are usually assigned to rows. The point where a column and a row meet is called a cell. Generally, it is used to keep records, data in various fields of business.
Features of MS Excel:
- Auto calculate: This helps you to calculate a group of data and it automatically shows the result in the status area. You can also create your own formulas.
- Shared: You can share your data file over a network.
- Templates: It gives us a variety of elegantly designed templates for your home or business purpose.
- Excel Charts: Excel charts help to convey your information in a very easy way. If you choose charts wisely and formatting them cleanly, you can deliver a lot of information to them.
- Conditional Formatting: It helps users to focus quickly on important topics of data or to highlighted errors and to identify important patterns in data.
- Sorting and Filtering: It is used to sort or filter data according to your need. You can also reorder the data. It saves your time a lot.
- Toolbars: It has a Collection of buttons that provide one-click access to commonly used commands such as Save, undo, and many more.
- Ribbon: It has commands and controls organized tasks in Tabs and groups.
What is AutoFill Handle feature in MS Excel?
Microsoft Excel has a special feature call Fill Handle which files the data automatically with a specific pattern. Basically, The Fill Handle tool completes the incomplete entries of data by recognizing the pattern. It is an inbuilt excel feature that is enabled by default settings. You can extend a series of dates, times, numbers, and text combinations to the desired number of cells by just writing the first two entries.
Some images of the fill handle are:


Using Fill Handles in MS Excel?
Follow the below steps to use the AutoFill feature in Excel:
Step 1: First Enter the first two entries of your data in the first two cells. For example, entered 1 and 2 in cells A1 and A2.

Step 2: Next select both the cells as shown in figure 5.

Step 3: Now hover the mouse over the bottom-right edge of the rectangle window. You will notice that the cursor will immediately change to a plus (+) icon as shown in figure 6.

Step 4: Next drag the cross (+) icon down below 20 or according to your need.

As you can see in the below figure, the Fill handle feature will automatically identify the pattern type and fill the entries for you.

You can also copy same the data in the adjacent column using ” + “ icon as shown in figure 9.

Step 5: Drag the ” + ” icon sidewise as shown in figure 10.

All data will be copied automatically to the adjacent row.

Step 6: To open the AutoFill Option, click on the highlighted small button as shown below:

Step 7: After clicking the highlighted button a dialog box will open where you can select different auto-fill options.
Step 8: Check the option as per your need.

- Copy Cell: This feature helps you to copy and paste the selected dragged cells.
- Fill Series: It is the default option. It auto-fills the dates based on their pattern.
- Fill Without Formatting: This features auto-fills the cells by identifying the pattern type and it does not copy the cell’s formatting.
- Fill Days: This feature auto-fills the cells with days.
- Fill Weekdays: This option auto-fills the cells with weekdays only and eliminates the weekends.
- Fill Months: This feature fills the cells with incrementing months.
- Fill Years: Fill Years option fills the cells with the incrementing years. Therefore the day number and month number will be the same for all the cells.
Examples of Using Fill Handle in Excel:
Example 1: Autofill Month Names
Follow the below steps to autofill the name of the month in excel:
Step 1: In the first cell Enter the full month name i.e. ” January “ as shown in the below figure:

Step 2: Now select the first cell and hover the move over the bottom-right edge of the rectangle window. You will note the cursor will change to plus (+) icon sign.

Step 3: Drag the “+” icon down.

As you see in the below image, Month names are automatically displayed in the cells.

Example 2: Autofill Dates and Days
Follow the below steps to autofill dates and days in Excel:
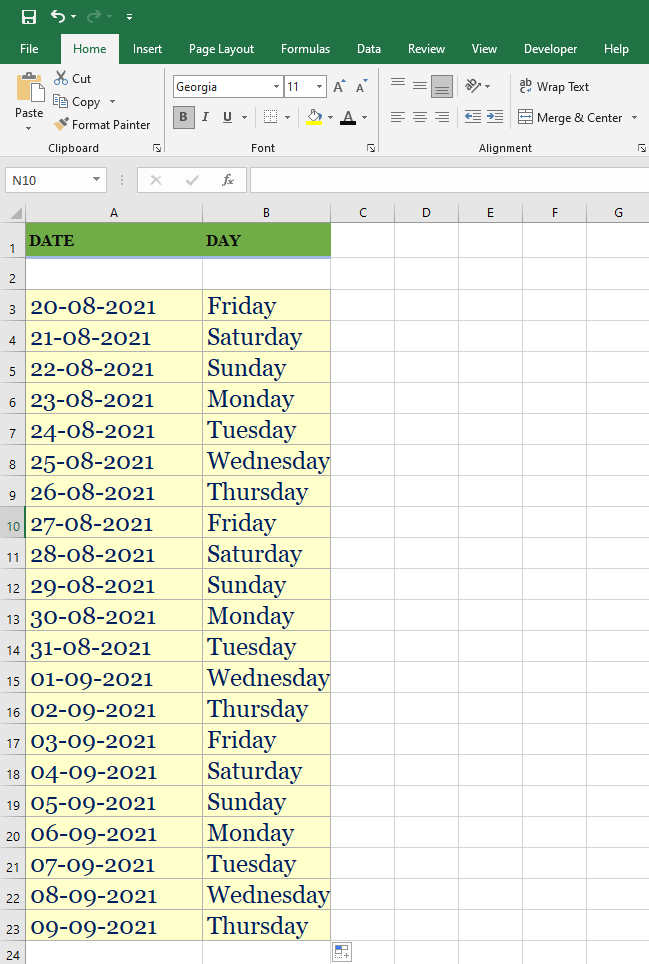
Step 1: In the first cell Enter the date and weekday i.e. ” 20 – 08 – 2021 ” and ” Friday ” as shown below:

Step 2: Now select the cell (A3 and B3 ) and hover the move over the bottom-right edge of the rectangle window. You will note the cursor will change to plus (+) icon sign.

Step 3: Drag the “+” icon down.

As you see in the below image, dates and days are automatically display in the cells.
These are some features of Autofill in MS Excel.
Sometimes an individual will type dates, numbers, and days into the worksheet, and it can get tiresome to type constantly, but in Excel, there is a feature that can make it easier; this feature is called AutoFill. In Microsoft Excel, AutoFill fills data series automatically in which saves the user some time. AutoFill creates a string of numbers, dates, and days to apply formatting from one cell to adjacent cells.
AutoFill is a feature that fills cells with data that follows a sequence or is based on data in other cells. In this tutorial, we will explain:
- How to fill a simple numeric, date, and day series.
- How to fill a particular date or day series.
- How to fill a formatted numeric series.
- How to set advanced options for a numeric date and day series.
- How to prohibit formatting when filling a series.
- How to create a custom fill series.
- How correct a repeated sequence.
1] How to fill a simple numeric, date, and day series

To create a numeric series, type number one into the cell and type two into the second cell.
Select both numbers one and two and drag the fill handle down or to the right to create an increasing series.
Drag both the fill handle up to create a decreasing series.
To create a date or day series, click the cell that contains the date or day and drag the fill handle down.
2] How to fill a particular date or day series
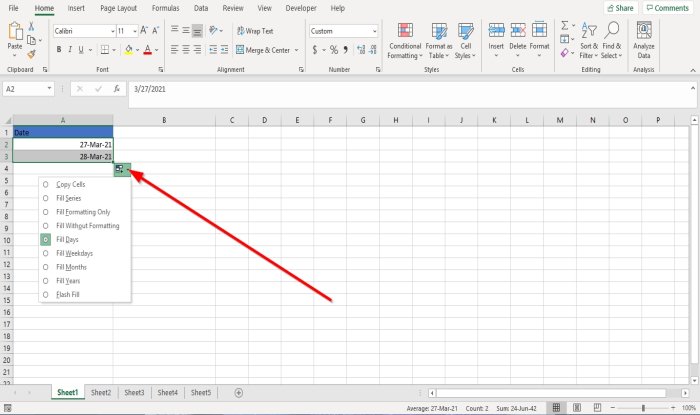
If the user wants to change the date or day in a cell automatically, drag the selected cell’s fill handle. An AutoFill Options button will appear on the bottom right of the cell.
Click the AutoFill Options button, then click either Fill Days, Fill Weekdays, Fill Months or Fill Years.
The selection of each will determine how the sequence of the pattern will go.
3] How to fill a formatted numeric series
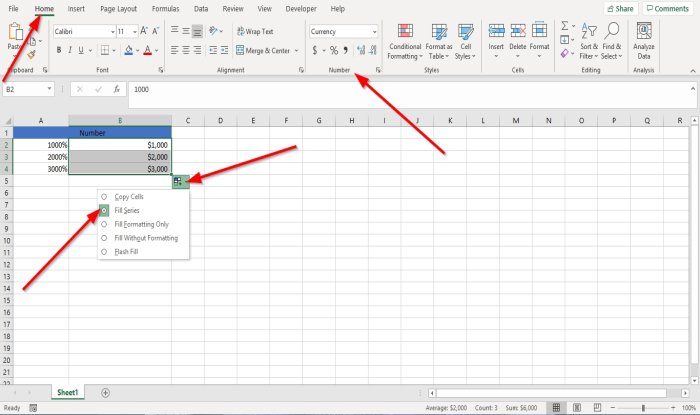
Enter an amount into the cell.
Go to the Home tab in the Number group to format the amount, namely Percentage, Currency, Fraction, etc.
Select the cells and drag the fill handle down.
Click the AutoFill Options button.
In the AutoFill Options menu, click Fill Series.
4] How to set advanced options for a numeric, date, and day series
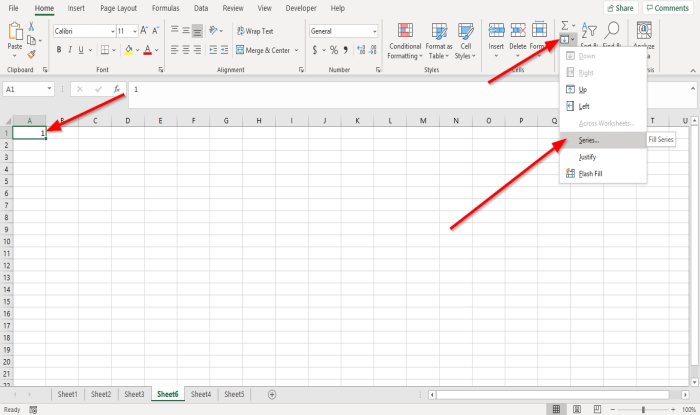
Enter a number or date into the cell.
Go to the Home tab and click the Fill button in the Editing group.
In the drop-down list, click Series.
A Series dialog box will appear.
Inside the Series dialog box, choose your options.

In this tutorial, we will explain the process of using the series box for the numeric series.
In the Series dialog box, in the section Series in, you can choose between Rows or Columns where you want your series to be.
In the Step Value section, enter the number into the box where you want the series to start from, for instance, one.
In the Stop Value, enter the number where you want the series to stop, for example, ten.
Then, click OK.
For the date or day series, highlight the column or row you want the series to be.
Then go to the Fill button in the Editing group on the Home tab.
The Series dialog box will pop up.
Inside the dialog box, ensure that the Date in the Type section and the Day in the Day Unit section checkboxes or checked, then click OK.
The Dates and Days will appear in the worksheet as a series.
5] How to prohibit formatting when filling a series
If you want to stop the auto-fill while filling your series.
Drag the fill handle down; when the Auto Fill Options button pops up, click it.
In the AutoFill Options menu, select Fill Without Formatting.
You will notice that the number, date, or day you recently fill disappears.
6] How to create a custom fill series
In Microsoft Excel, there is a feature where you can create your custom series if the data does not match the series type or unit provided by Excel.

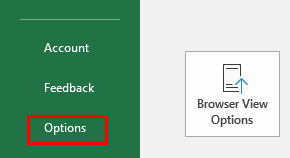
On the Backstage View, click Options.
An Excel Options dialog box will appear.
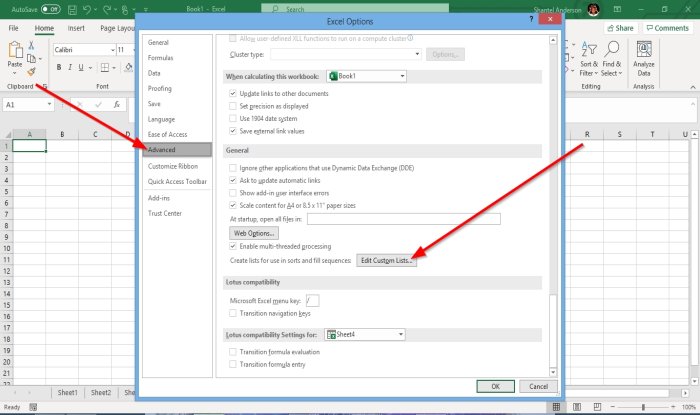
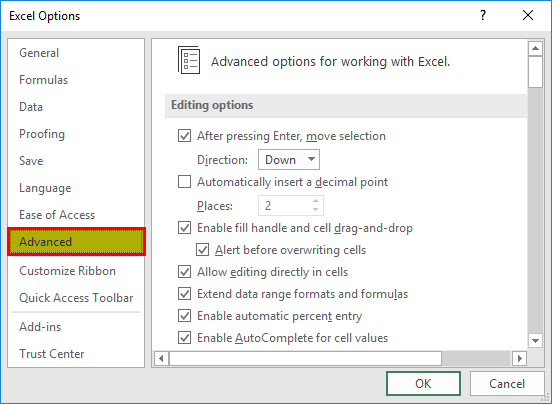
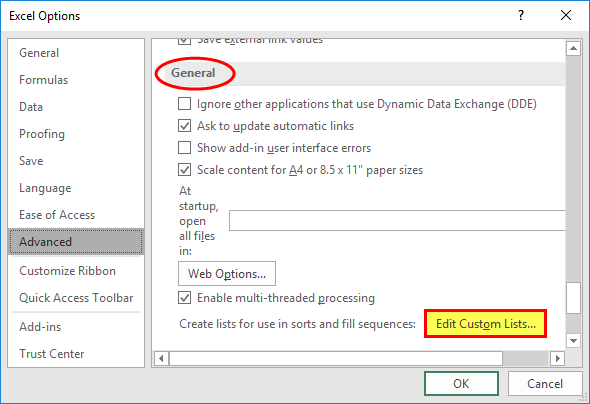
Inside the Excel Options dialog box, click the Advance page.
On the Advanced page, in the General section, click the Edit Custom Lists button.
This button creates lists for use in sorts and fills sequences.
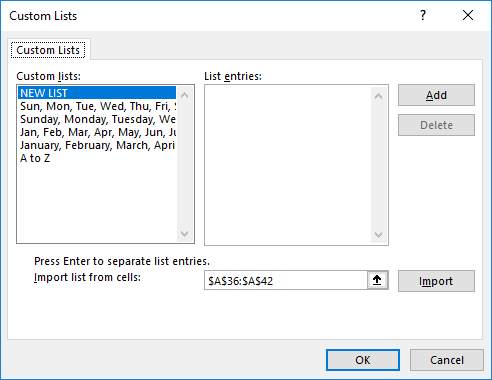
Once the Edit List button is clicked, a Custom List dialog box will open.
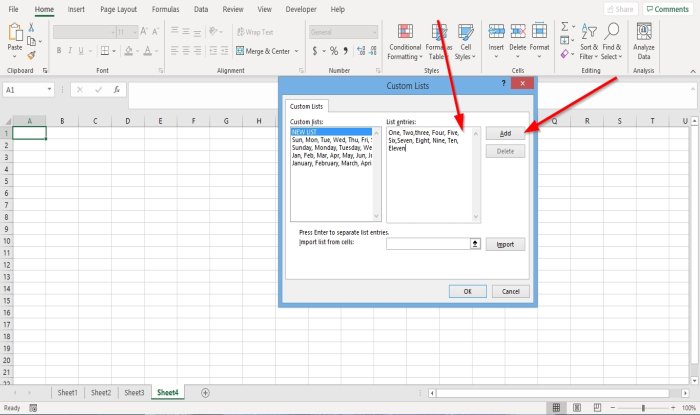
Inside the Custom List dialog box, in the section, list entities, type the lists you want, for example, One, Two Three or Summer, Winter, Autumn, Spring.

Then click Add, you will see your list is displayed in the Custom List section.
Click Ok.
The Excel Options dialog box will pop up click OK.
On the worksheet, type one of the data from your custom list into a cell.
Drag the cell down with the fill handle.
You will see all the data you have entered in the custom list you have created.
Read: How to use Geography Data Type in Excel.
7] How correct a repeated sequence
If the user use drags the fill handle down but only seeing a repeated sequence, this can be corrected by; clicking the AutoFill Options button.
In the menu, select Fill Series.
Now, we have a sequence.
I hope this helps; if you have questions, please comment below.