
Word for Microsoft 365 Word 2021 Word 2019 Word 2016 Word 2013 More…Less
The Office Clipboard stores text and graphics that you copy or cut from anywhere, and it lets you paste the stored items into any other Office file. Here’s how it works in Word 2013 or 2016.
Cut and paste items from the Clipboard
-
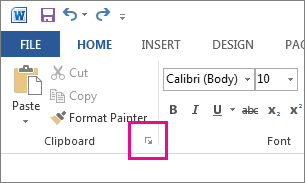
If you’re not already there, click Home, then click the launcher in the lower-right corner of the Clipboard group.

-
Select the text or graphics you want to copy, and press Ctrl+C.
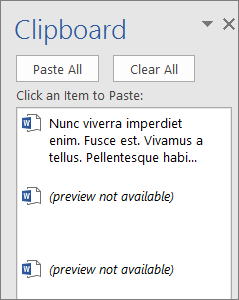
Each selection appears in the Clipboard, with the latest at the top.
-
Optionally, repeat step 2 until you’ve copied all the items you want to use.
Tip: After you open the Clipboard, it stores content that you copy or cut from anywhere. The same thing happens when you set the Clipboard to store content but remain closed, as long as you have an Office program running. For more about that, see Set options for the Clipboard below.
-
In your document, click where you want to paste the item.
-
Do one of the following in the Clipboard:
-
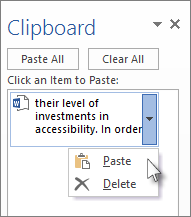
Click the down arrow next to the item you want to paste, and click Paste.
-
To paste everything in the Clipboard to the selected area in your document, click Paste All.
-
Other things you can do with the Clipboard
-
Delete items from the Clipboard
-
Close the Clipboard
-
Set options for the Clipboard
Delete items from the Clipboard
Do any of the following:
-
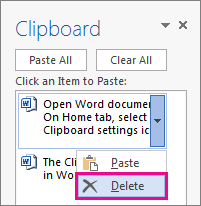
Click the arrow on the right side of the item, and click Delete.
-
Right-click the item you want to delete, and click Delete.
-
Click Clear All to clear everything out of the Clipboard.
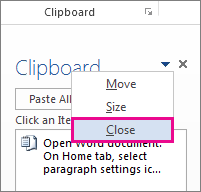
Close the Clipboard
Click the X in the upper-right corner of the Clipboard pane.
Set options for the Clipboard
The options control a variety of Clipboard functions, such as when the Clipboard appears.
With the Clipboard open, click Options at the bottom of the pane.
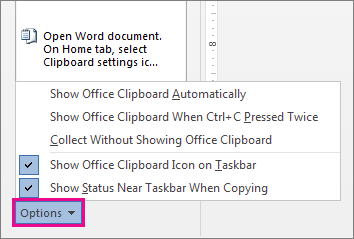
Here’s what each option does:
|
Option |
Description |
|---|---|
|
Show Office Clipboard Automatically |
Displays the Office Clipboard when you copy more than one item. |
|
Show Office Clipboard When CTRL+C Pressed Twice |
Displays the Office Clipboard when you press Ctrl+C twice. |
|
Collect Without Showing Office Clipboard |
Automatically copies items to the Office Clipboard without displaying the Clipboard task pane. When you select this option, the Clipboard will store content copied or cut from anywhere. |
|
Show Office Clipboard Icon on Taskbar |
Displays the Clipboard icon in the notification area of your Windows taskbar when the Clipboard is active. This option is on by default. |
|
Show Status Near Taskbar When Copying |
Shows the number of items you’ve collected in the bottom-right corner of the Word window. This option is on by default. |
Need more help?
Want more options?
Explore subscription benefits, browse training courses, learn how to secure your device, and more.
Communities help you ask and answer questions, give feedback, and hear from experts with rich knowledge.
 We recently covered the basics of cutting, copying, and pasting in Microsoft Word. Today, we’re going to expand on that topic by looking at how to use the Clipboard in Microsoft Word.
Specifically, we will copy, paste, and delete content in the Clipboard. Plus, we will customize the options and turn off the Clipboard.
Quick Links:
- How to Copy Content into the Clipboard
- How to Paste Content from the Clipboard
- How to Delete Content in the Clipboard
- How to Customize the Clipboard Options
- How to Turn Off the Clipboard
First, let’s answer an important question…
What Is the Difference between Basic Copying and Pasting and Using the Clipboard?
Your PC has two clipboards: the Windows Clipboard and the Office Clipboard.
The basic copy and paste methods use the Windows Clipboard, which lets you copy one piece of content at a time—as soon as you copy a new piece of content, the old piece is deleted.
In contrast, the Office Clipboard in Microsoft Word is divided into slots where you can copy up to twenty-four different pieces of content and then paste them individually or all at once.
It’s important to note that the content in the top slot in the Office Clipboard is the same as the content in the Windows Clipboard.

For simplicity, all references to the “Clipboard” in the steps below refer to the Office Clipboard, not the Windows Clipboard.
Pro Tip: The Office Clipboard is accessible to all your Office apps. So, if you copy content to the Clipboard in Word and then open the Clipboard in PowerPoint, you will have access to the same copied content in each of the twenty-four slots.
This tutorial is also available as a YouTube video showing all the steps in real time.
Watch more than 100 other writing-related software tutorials on my YouTube channel.
The images below are from Word for Microsoft 365. These steps also apply to Word 2019, Word 2016, and Word 2013. These steps don’t apply to Word for Mac or Word for the Web.
How to Copy Content into the Clipboard
- Select the Home tab in the ribbon.

- Select the dialog box launcher in the Clipboard group.

The Clipboard pane will open on the left side of your screen.

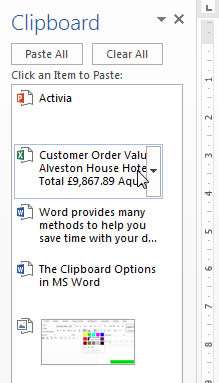
- Select the content you want to copy and then use the Copy button in the ribbon or press Ctrl + C on your keyboard. You can copy text, images, tables, figures, or even embedded videos.

The content you copied will appear in the Clipboard.

- Continue to copy content as necessary. Each time you copy new content, it will be placed in the top slot in the Clipboard.

How to Paste Content from the Clipboard
- Place your cursor where you want to paste the content.
- Select an individual item in the Clipboard. Alternatively, hover over it to select the menu arrow and then select Paste from the drop-down menu.

- (Alternative Step) Select the Paste All button to paste all the content. The content will be inserted in the order you copied it, so the top item in the Clipboard will be the last item pasted into your document.

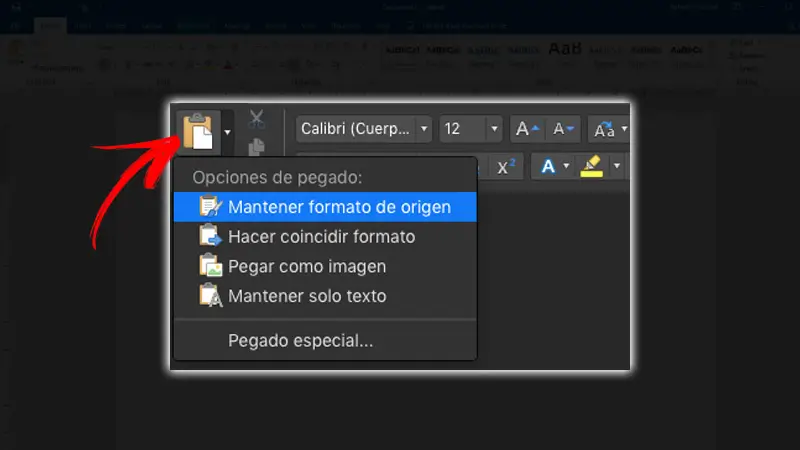
- (Optional) Select the Paste Options button that appears after you paste your content.

- Select an option from the shortcut menu. These options primarily apply to text rather than images or other visuals.
A. Keep Source Formatting maintains the formatting (e.g., font, size, color, etc.) of the pasted text.
B. Merge Formatting changes the formatting of the pasted text to match the formatting of the new location without removing existing emphasis formatting (i.e., boldness, italics, or underlining) from the pasted text.
C. Use Destination Style maintains the current style type but matches it to the equivalent style type in the new location. So, if you copy text with a default Heading 3 style and then paste it into document with a custom Heading 3 style, the pasted text will still be a Heading 3, but will take on the new custom style.
You may notice that when the Clipboard is turned off, Paste as Picture appears instead of Use Destination Style in the Paste Options menu in Word for Microsoft 365.
D. Keep Text Only removes the formatting of the pasted text and adds the formatting of the new location.
Please see “What Is the Difference between Merge Formatting and Keep Text Only?” for more information about these options.

Your pasted text should change formatting according to your selection.
Important Note: You must use the Paste Options button immediately after pasting your text because it will disappear when you perform another action such as typing or pressing the Enter key.
How to Delete Content in the Clipboard
- To delete all the content from the clipboard, select the Clear All button.

- To delete individual items, hover your cursor over the content, select the menu arrow, and then select Delete from the drop-down menu.

How to Customize the Clipboard Options
- Select the Options button at the bottom of the Clipboard.

- Check or uncheck options in the menu:
-
- Show Office Clipboard Automatically opens the Clipboard every time you copy content.
- Show Office Clipboard When Ctrl + C Pressed Twice opens the Clipboard when you press Ctrl + C on your keyboard twice.
- Collect Without Showing Office Clipboard lets you copy content into the Clipboard without opening it. (However, you can still open it by pressing the dialog box launcher in the Clipboard group, as shown in figure 3.)
- Show Office Clipboard Icon on Taskbar places the Clipboard icon (a tiny clipboard) in the Taskbar at the bottom of your screen. The icon may be placed in the Hidden Icons menu accessible through the up arrow near the Wi-Fi, sound, and battery icons.
- Show Status Near Taskbar When Copying reveals a small message in the bottom right-hand corner of your screen when you copy new content. The message will tell you the number of slots that have been filled (e.g., 3 of 24).

How to Turn Off the Clipboard
The Clipboard will turn off when you close all your Office apps (e.g., Word, Excel, PowerPoint).
However, you may want to turn it off before closing your apps. Unfortunately, the close button (X) doesn’t turn off the Clipboard; it just closes the Clipboard pane. The Clipboard will continue to collect copied content even when the pane is closed.
To turn off the Clipboard and return to the basic copying and pasting method, use the icon in the Taskbar.
- Right-click the Clipboard icon in the Taskbar. (Friendly reminder: it may be stored in the Hidden Icons menu behind the up arrow.)
![]()
- Select Stop Collecting from the menu.
![]()
The Clipboard icon should be removed from your Taskbar after a few moments.
Related Resources
How to Cut, Copy, and Paste in Word for Mac
Three Ways to Insert Tables in Microsoft Word
How to Create and Customize Charts in Microsoft Word
The Office Clipboard allows you to copy up to 24 items from Office documents or other programs and paste them into another Office document.By using the Office Clipboard, you can arrange the copied items the way that you want in the document.
Contents
- 1 What is Clipboard in Microsoft Office?
- 2 Where is the Office Clipboard?
- 3 What is a clipboard and where is it?
- 4 How do I view the clipboard?
- 5 What is clipboard how it is useful?
- 6 How do I turn off office clipboard?
- 7 What happens when you click on an item on the Office clipboard?
- 8 How do I find clipboard on keyboard?
- 9 What does it mean copy to clipboard?
- 10 What is clipboard in computer class 10?
- 11 What is clipboard short answer?
- 12 How do I find clipboard in Word?
- 13 How do I view my clipboard in Chrome?
- 14 Why do I need a clipboard manager?
- 15 How do I use the clipboard tool?
- 16 How do I recover clipboard history?
- 17 Where is clipboard on Samsung s10?
- 18 Where is Gmail clipboard?
- 19 Why is there a problem with my clipboard?
- 20 How do I get rid of the Clipboard icon in Excel?
What is Clipboard in Microsoft Office?
The Office Clipboard stores text and graphics that you copy or cut from anywhere, and it lets you paste the stored items into any other Office file.
Where is the Office Clipboard?
To open the Office clipboard and access the items you copied or cut, make sure the Home tab is active, and then click the “Clipboard” button in the lower-right corner of the Clipboard section. By default, the Clipboard pane is anchored to the left side of the Office program window.
What is a clipboard and where is it?
The clipboard, also known as pasteboard, is a special location on computer, phone, and tablet memory that temporarily stores cut or copied text or other data. Once something is stored in the clipboard, it can be pasted to a new location.
How do I view the clipboard?
Press “Ctrl-C” twice to display the Clipboard pane.
What is clipboard how it is useful?
A clipboard is a temporary storage area for data that the user wants to copy from one place to another. In a word processor application, for example, the user might want to cut text from one part of a document and paste it in another part of the document or somewhere else.
How do I turn off office clipboard?
How to disable office clipboard
- Open Word or Excel.
- Create a new document or spreadsheet.
- Click the ↘ symbol at the Clipboard group on the Home tab.
- Click the Options button at the bottom.
- Uncheck all items.
What happens when you click on an item on the Office clipboard?
What happens when you click an item on the Office Clipboard? The item is pasted in the document at the location of the insertion point.
How do I find clipboard on keyboard?
In order to open the clipboard, tap the plus icon at the top-left corner of the keyboard and select the Clipboard icon, that looks like a paper clip, from the options.
What does it mean copy to clipboard?
Android can cut, copy and paste text, and like a computer, the operating system transfers the data to the clipboard. Unless you use an app or extension like Clipper or aNdClip to retain your clipboard history, however, once you copy new data to the clipboard, the old information is lost.
What is clipboard in computer class 10?
The clipboard is a special location in your computer’s memory that temporarily stores data that has been cut or copied from a document. This data can then be pasted to a new location.
What is clipboard short answer?
The clipboard is a buffer that some operating systems provide for short-term storage and transfer within and between application programs. The clipboard is usually temporary and unnamed, and its contents reside in the computer’s RAM.
How do I find clipboard in Word?
Open the Office Clipboard task pane
To open the Clipboard task pane, click Home, and then click the Clipboard dialog box launcher. Double-click the image or text you want to paste.
How do I view my clipboard in Chrome?
This hidden feature is available as a flag. To find it, open a new tab, paste chrome://flags into Chrome’s Omnibox and then press the Enter key. Search for “Clipboard” in the search box.
Why do I need a clipboard manager?
Why Use a Clipboard Manager? A clipboard manager is helpful to add and clear multiple items from the clipboard. Usually, your clipboard only has limited storage. When the allotted space becomes full, the old items automatically get deleted, providing space to add new items.
How do I use the clipboard tool?
Using the Windows 10 Clipboard History tool is easy: Press Win+V, and you’ll see a small pop-up prompting you to turn on the feature. From that point onward, you can press Win+V to view a running list of the last 25 text snippets or images that you’ve copied.
How do I recover clipboard history?
1. Using Google Keyboard (Gboard)
- Step 1: While typing with Gboard, tap the clipboard icon next to the Google logo.
- Step 2: To recover a particular text/clip from the clipboard, simply tap on it to paste in the text box.
- Caveat: By default, clips/texts in the Gboard clipboard manager are deleted after an hour.
Where is clipboard on Samsung s10?
Look for a clipboard icon in the top toolbar. This will open the clipboard, and you’ll see the recently copied item at the front of the list. Simply tap any of the options in the clipboard to paste it into the text field. Android does not save items to the clipboard forever.
Where is Gmail clipboard?
The clipboard is available (on the keyboard) when the cursor is placed on the subject line for Gmail, but not available (on the keyboard) when the cursor is placed in the body of the email.
Why is there a problem with my clipboard?
The message is apparently caused if you try to use Ctrl+C, Ctrl+X, the Format Painter tool, or a drag-and-drop operation and Excel detects that the Clipboard is locked by a non-Office application or, in some cases, simply accessed a non-Office application.
How do I get rid of the Clipboard icon in Excel?
Click the File tab, then click Options. , and then click Excel Options or Word Options. In the Advanced category, under Cut, copy, and paste, clear or select the Show Paste Options button when content is pasted check box to hide or display the Show Paste Options button.

UPDATED ✅ Do you want to learn how to use the Microsoft Word clipboard like an expert? ⭐ ENTER HERE ⭐ and find out everything about it RIGHT NOW!
Learn to work with Microsoft Word is something that will bring a lot of benefits to you, because this program allows you do all kinds of jobs, documents and much more. It should be noted that it includes countless functions that you may not yet know or do not know how to handle correctly.
Specifically in this post, we want to explain everything related to word clipboardWhat is it, how does it work and what is it for? That way, you’ll be able to get the most out of it and save a lot of your time working inside Word.
Pay close attention and become an expert in handling the clipboard of Word! It will really help you to streamline projects and move information from one document to another.
What is the Word clipboard and what is this tool for?

Word clipboard is understood as a tool included in this program to temporarily store any type of informationthis means that both texts and images or other types of files can be copied to the clipboard.
Usually, the content that is temporarily kept on the clipboard is obtained through the function of copy or cut and can be retrieved using the function paste or move.
The way to lose the information that is inside the tool is by copying another element or restarting the system. It is certainly very useful in case you want to paste the same file in different applications, without the need to copy the content again.
In summary, it can be said that the clipboard is used to store any type of content for a certain time by using the copy or cut commands and they are recovered using the paste or move.
Steps to use the Word clipboard to get the most out of it
The simplest way to use Word’s clipboard is to locate the item you want to use, copy or cut it, and then paste or move it into Word.
However, we show you below in more detail how to do it on Windows and Mac devices:
windows devices
- Go to Wordand click on Start.
- Then click on the selector located in the lower right corner of the clipboard group.
- Copy the texts or graphics you want to use by pressing Ctrl + C. You should know that each selection will appear on the clipboard and the most recent item will be the one on top.
- Inside the Word document, click on the where you are going to paste the element.
- Once located, you can perform different actions such as: simply paste with Ctrl + V, open the clipboard box and click on the down arrow icon next to the item you are going to paste and click on “paste”.
- Apart from that, you can also paste everything that is registered in the clipboard. The way to do it is by clicking “Paste everything”.
Mac devices

On the other hand, if you have a Mac computer, you should know that it is not possible to see or delete the clipboard, so the way to use it on these computers is as follows:
- Select all items which you want to copy.
- On the Word toolbar, click Copy.
- Locate yourself in the area where you are going to paste the elements.
- Again in the toolbar click on the icon Paste.
To customize the paste options, just select the down arrow next to the paste icon. “Paste”. Paste options will be displayed such as: keep the original format, paste as image, paste special, among others.
How much information can be stored on the Word clipboard at one time?

Specifically within Word, the clipboard has a record of the last thing that was copied or pasted within the tool. But sometimes the question arises How much information can be stored at the same time inside the Word clipboard?.
The answer varies depending on the team you are going to work with. In the windows caseyou can copy up to 24 elements and in the mac word clipboard you will have a record only of the last item you copied.
If you want to keep track of many more copied files on your Mac, we recommend using the computer’s native clipboard.
Software
В статье «Что такое буфер обмена?» я рассказал что такое буфер обмена и для чего он применяется. В данной статье я покажу как им пользоваться.
Итак, еще раз – буфер обмена – это объем компьютерной
памяти, куда вы копируете информацию и, по мере необходимости, вставляете ее в
нужные места в документе.
Возможности буфера
обмена
Для того, чтобы понять, как работает буфер обмена нужно
открыть текстовый документ и скопировать в буфер обмена часть текста.
Кстати, сделать это вы можете несколькими способами: как копировать в Word.
Скопированную информацию вы можете вставлять много раз.
Буфер обмена, который вы используйте един для практически
всех программ на вашем компьютере, то есть скопированный текст вы можете без
проблем вставить в любой другой программный продукт Microsoft (Exel, Visio) или в другие программы, которые не относятся к Microsoft Office (например, в Paint).
Буфер обмена может вмещать в себя 24 фрагмента, то есть тут
не важен вид информации и ее объем – сохранить в буфере обмена вы можете до 24 фрагментов:
одно копирование – один фрагмент.
Давайте воспользуемся этим.
- Перейдите во вкладку «Главная» — «Буфер обмена» — кнопка группы «Буфер обмена».

Откроется
диалоговое окно Буфера обмена.
- Выберите команду «Параметры» и установите галочки согласно иллюстрации:

«Собирать данные без отображения буфера обмена Office»
Теперь данные в
количестве 24 фрагмента будут собираться в буфере обмена вне зависимости от
того, открыто ли окно Буфера обмена или нет.
В случае, если
вы скопируете больше, чем 24 элемента, то перезаписываться на новые будут
первые элементы, которые вы копировали.

Кстати, если вы
будете копировать информацию в других неофисных программах, то все равно эта
информация будет попадать в данный буфер обмена до 24 элементов, тогда как в
программе, в которой вы работаете в настоящий момент был бы доступен только
последний скопированный элемент.
После того, как
вы включите функцию «Собирать данные без отображения буфера обмена Office» на панели задач Windows появится
значок буфера обмена.

При копировании
очередного элемента на панели задач будет всплывать диалоговое окно:

Иногда
случается, что объект невозможно поместить в буфер обмена и тогда появляется
следующее окно:

Итак, если вы
настроили буфер обмена на размещение 24 элементов, то при закрытии программы
заново вам его настраивать не нужно, так как программа сохранит ваши настройки.
Вставка элементов из буфера обмена
Итак, вы
работаете с текстом, несколько раз копировали различные элементы и вставляли их
и вам понадобилось вставить один из элементов, который вы достаточно давно
отправляли в буфер обмена. Что делать?
Нужно зайти в
окно буфера обмена и выбрать нужный вам элемент из списка.

Обратите
внимание: в выпадающем окне появляется две операции – вставить и удалить, то
есть вы можете не только вставить элемент, но и удалить его из памяти Буфера
обмена, если он вам больше не понадобится.
Информация, которую вы скопировали хранится в памяти Буфера обмена до тех пор, пока вы не перезагрузите или выключите компьютер.
Специальная вставка Буфера обмена
Когда вы
копируете информацию из одного документа в другой появляется проблема –
появление новых стилей или изменение старых, заданных в конечном документе, так
как вместе с текстом мы копируем не только содержание, но и характеристики
абзаца первого документа.
Чтобы такого не
происходило нам помогает Специальная
вставка буфера обмена.
Чтобы понять для чего нужна каждая из вставок скопируйте любую часть текста из одного документа и в другом документе кликните, куда хотите вставить текст, перейдите в «Главная» — «Буфер обмена» — «Вставить» и увидите различные «Параметры вставки».

У вас появляется
четыре кнопки в параметрах вставки. Разберем каждую из них.
- «Использовать конечную тему (И)» — в данном случае вы вставите текст со всеми стилями первого документа – этого делать не стоит.
- «Сохранить исходное форматирование (И)» — сохраняет оформление скопированного текста, но не добавляет новых стилей в набор стилей в ваш новый документ.
- «Объединить форматирование (О)» — объединяет стили первого и второго документа, что может не очень хорошо сказаться на оформлении документа целиком. Тут есть риск получить в список стилей Встроенный стиль.
- «Сохранить только текст (С)» — позволяет вставить в документ только текст, однако, если у вас в скопированной информации были какие-то нумерованные списки, то такая вставка превратит их в обычный текст.
Я бы отдал
предпочтение последнему варианту вставки, так как в данном случае не появляются
новые стили и оформление документа не страдает.
Что же касается превращения в текст нумерованных стилей, то их всегда можно поправить различными командами, например командой «Заменить».
Буфер
обмена позволяет копировать информацию
из активного документа, другого документа
Word, другой программы, браузера –
практически из любого приложения,
предоставляющего возможность копирования
данных.
Буфер
обмена – это общее для всех программ
место для временного хранения информации.
Благодаря буферу обмена можно вырезать,
копировать и вставлять элементы в рамках
одного или нескольких документов. Буфер
обмена Office в MS Word позволяет скопировать
или вырезать до 24-х элементов из различных
приложений без потери данных. Буфер
обмена можно вызвать командой Главная
→ Буфер обмена Office (Кнопка запуска окна
диалога).
Следует
различать системный буфер обмена и
буфер обмена Office.
Наиболее
важные моменты:
—
последний из элементов, скопированных
в буфер обмена Office, хранится в системном
буфере;
—
очищение буфера обмена Office приводит к
очищению буфера системы;
—
при щелчке по кнопке Главная → Вставить
в документ вставляется содержимое
системного буфера обмена (т.е. по умолчанию
последний элемент, скопированный в
буфер обмена Office)
Для
того, чтобы добавить информацию в буфер
обмена ее необходимо выделить и выполнить
команду Главная → Копировать.
Для
того, чтобы вставить информацию из
буфера обмена необходимо выделить и
выполнить команду Главная → Вставить
(второй вариант: необходимо вызвать
буфер обмена, выбрать вставляемый объект
и щелкнуть по нему левой кнопкой мыши).
буфер
обмена Microsoft Office «позволяет накапливать
текстовые и графические элементы из
любого числа документов Microsoft Office или
других приложений, а затем вставлять
их в любые документы Microsoft Office» (цитата
из Справки).
Тем
не менее, буфер обмена Microsoft Office ограничен
24 единицами хранения. Если попытаться
скопировать еще одну единицу информации,
то произойдет замещение самого первого
скопированного фрагмента.
Чтобы
начать работать с буфером обмена в Word,
нужно зайти в меню Правка
(Edit) и выбрать команду Буфер
обмена Office
(Office Clipboard). В левой части окна появится
одноименная область задач, в которой
будут отображаться все копируемые вами
фрагменты.
Можно скрыть область задач
и продолжить собирать данные. Для этого
следует щелкнуть по кнопке Параметры
(Options) в нижней части области задач и
поставить галочку на опции Собирать
данные без отображения буфера обмена
Office
(Collect Without Showing Office Clipboard).
Но
для вставки данных нужно обязательно
иметь открытой эту область задач.
Отобразить ее снова можно через сочетание
клавиш: двойное нажатие CTRL
+ C.
Данные
вставляются простым щелчком мыши по
нужному фрагменту в области задач.
29. Вкладки «Шрифт» и «Абзац» ms Word
В
Microsoft Word, начиная с первой версии и до
недавнего времени стандартным был шрифт
Times New Roman. Впервые он появился в 1932 году
в газете The Times, откуда и произошло его
название. Основную работу по его созданию
выполнил Виктор Лардент под руководством
Стэнли Моррисона, создание легенды
заняло почти три года. Результат превзошёл
все ожидания, шрифт создавал впечатление
изысканности, утончённости, принадлежности
к высшему сословию, при этом он обладал
великолепной читаемостью.
Неудивительно,
что авторы MS Word использовали именно
этот шрифт в качестве стандартного
столь долгое время. На данный момент
библиотека шрифтов MS Word насчитывает
сотни различных шрифтов.
Дефолтный
шрифт в MS Word зависит от версии. Так, до
версии Office 2007 стандартным был известный
Times New Roman 12 pt, в новых версиях программы
дефолтным стал Calibri. Это изменение
направлено, в первую очередь, на улучшение
восприятия информации.
Предпосылкой
для разработки нового типа шрифта стало
резкое увеличение потребления цифрового
контента. Разработчики исходили из
того, что благодаря повальной
компьютеризации, большинство документов
никогда не будет напечатано. Это ставило
основное условие новому шрифту –
удобочитаемость с экрана. С этой целью
Microsoft взялась за разработку технологии
ClearType, для которой было создано целое
семейство шрифтов.
Одновременно
с этим, компания хотела придать более
современный вид документу, созданному
новым текстовым редактором. Смена
традиционного шрифта на новый как нельзя
лучше отвечала поставленным требованиям.
Дизайн Calibri разработал Лукас де Гроот
специально для того, чтобы подчеркнуть
преимущества технологии ClearType.
Используемые
шрифты можно классифицировать по
нескольким признакам:
С
засечками и без них
Пропорциональные
и моноширинные (буквы одинаковы по
ширине).
Растровые,
представляют собой набор точек, выводимых
на экран и векторные, состоящие из точек
и линий.
Главное
преимущество векторных шрифтов –
отличная масштабируемость с сохранением
чёткости.
Microsoft
Word использует системные шрифты, поэтому
для добавления недостающего, файл нужно
просто вставить в папку с шрифтами
Windows. Необходимая папка находится в
панели управления. В результате этих
действий добавленный шрифт станет
доступен в самом текстовом редакторе.
При
разработке документа удачно выбранный
тип шрифта не менее важен, чем само
содержание. Стиль начертания текста
должен соответствовать смыслу документа
и подчёркивать мысль автора. Помимо
простого донесения информации и
удобочитаемости, документ должен ещё
и формировать у адресата ощущение
завершённости, самодостаточности.
Именно эту функцию и выполняет правильно
подобранный шрифт.
Абзацы
с отступами.
Отступ
определяет расстояние между вертикальной
границей абзаца и левым или правым
полем. Можно увеличить или уменьшить
отступ для одного абзаца или группы
абзацев. Кроме того, отступ абзаца может
быть отрицательным (такой отступ абзаца
называется также выступом). В этом случае
абзац выступает за край текста в сторону
левого поля. Создание выступа для первой
строки позволяет задать отступ для всех
строк абзаца, за исключением первой.
Увеличение
или уменьшение левого отступа для всех
строк абзаца
1.
Выделите абзац, который требуется
изменить.
2.
На вкладке Разметка страницы в группе
Абзац при помощи стрелок рядом с полем
Отступ слева увеличьте или уменьшите
левый отступ для всего абзаца.
Увеличение
или уменьшение правого отступа для всех
строк абзаца
1.
Выделите абзац, который требуется
изменить.
2.
На вкладке Разметка страницы в группе
Абзац при помощи стрелок рядом с полем
Отступ справа увеличьте или уменьшите
правый отступ для всего абзаца.
Установка
отступов с помощью клавиши TAB
1.
Нажмите кнопку Microsoft Office , а затем выберите
пункт Параметры Word.
2.
Нажмите кнопку Правописание.
3.
В разделе Параметры автозамены нажмите
кнопку Параметры автозамены, а затем
перейдите на вкладку Автоформат при
вводе.
4.
Установите флажок устанавливать отступы
клавишами.
5.
Чтобы задать отступ для первой строки
абзаца, щелкните перед этой строкой.
Чтобы задать отступ для всего абзаца,
щелкните перед любой его строкой, кроме
первой.
6.
Нажмите клавишу TAB.
Соседние файлы в папке ответы на экзамен
- #
- #
A post from our Video Tutorials blog

Written by Jordan James
Word provides many methods to help you save time with your document creation. One of the little used options is the fact that the Clipboard is capable of storing and reusing 24 separate bits of information not necessarily from Word either. It can store copied data from any of your office applications such as Excel, Word, and PowerPoint.
[ Video tutorial produced by Activia Training and purchased by ZandaX ]
Here we see data that has been copied from PowerPoint, Excel and Word. Click on the drop down arrow and use the Paste option to insert it into your new document.
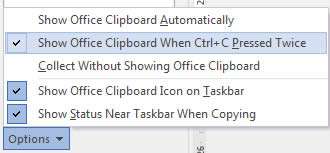
You can also set the clipboard pane to open up when you press Control + C twice by clicking on the options menu at the bottom of the Clipboard Pane and selecting from the options detailed below:
Having the ability to store multiple pieces of data in clipboard memory is really useful especially across multiple applications such as Word, Excel and PowerPoint so then we can get data across any of the popular platforms for reports, charts etc.
You may well have your numeric data in Excel then you create the Bar Chart using this data and set it up how you need. Then you have a document nicely formatted in Word and a Table that you previously created in a PowerPoint slide along with your logo and company details on a graphic.
Setting up a new Word document you can then pull together all these elements into the report, even adding some copied data from an Email message or two as well.
MS Office is a great system and with each upgrade the products are able to communicate better. You could even throw in a copy of your company structure from a Visio diagram and a Gantt chart from MS Project.
Learn to work with Microsoft Word is something that will bring you many benefits, as this program allows you to do all kinds of work , documents and more. It should be noted that it includes an infinity of functions that you may not yet know or do not know how to handle them properly.
Specifically in this article we want to explain everything related to the press — Word papers , what it is, how it works and what it is for. In this way, you can get the most out of it and save a lot of working time in Word.
Be very careful and become an expert in managing the clipboard Become! It will really help you streamline projects and move information from one document to another.

The Word clipboard is understood as a tool that integrates this program to temporarily store any type of information , this means that texts, images or other files can be copied to the clipboard.
Content that is temporarily kept in the clipboard is usually obtained via the function copy or cut and can be retrieved using the function paste or move .
The way to lose the information in the tool is to copy another item or restart the system. Without a doubt, this is very useful in case you want to paste the same file into different applications, without having to copy the content again.
In summary, it can be said that the clipboard is used to store any kind of content for some time using copy or cut commands and that they are recovered using paste or move.
Steps to Use Word Clipboard to Get the Most Out of It
The easiest way to use the Word Clipboard is to locate the item you want to use, copy or cut it, and then paste or move it in Word.
«UPDATE ✅ Do you want to learn how to use Microsoft Word Clipboard like an expert?» ⭐ ENTER HERE ⭐ and find out straight away! «
However, we will show you below in more detail how to do it on Windows and Mac devices:
Windows devices
- Go to Word And click Start .
- Then click on the selector located in the lower right corner of the clipboard group.
- Copy from texts to graphics that you wish to use in pressing Ctrl + C . You should know that every selection will appear on the clipboard and the most recent item will be the one at the top.
- In the Word document, click the where you will paste the element .
- Once located, you can perform different actions such as: just paste with Ctrl + V, open the clipboard box and click on the down arrow icon next to the item you are going to paste and click on «to stick on».
- Apart from that, you can also paste whatever is saved to the clipboard. To do this, click on «Paste all» .
Mac devices
On the other hand, if you have a Mac computer, be aware that it is not possible to see or delete the clipboard, so the way to use it on these computers is as follows:
- Select all the items you you want to copy.
- On the Word toolbar, click Copier .
- Locate yourself in the area where you are going to paste the elements.
- Again in the toolbar, click on the icon Coller .
To customize the options of collage , simply select the down arrow next to the icon «Paste» . Paste options will be displayed such as: keep source format, paste as image, paste special, among others.
How much information can be stored in the Word clipboard at a time?
Specifically in Word, the clipboard contains a record of the last thing that was copied or pasted into the tool. But sometimes the question arises of know how much information can be stored at the same time in word clipboard? .
The answer varies depending on the team you are working with. In the windows case , you can copy up to 24 elements and in the mac word clipboard, you will have a recording of last item you copied .
If you want to keep track of many other files copied to your Mac, we recommend that you use the native clipboard on your computer.
If you have any questions, please leave them in the comments, we will get back to you as soon as possible, and it will be a great help for more community members as well. Thank you!

Буфер обмена
На уроке 15 мы говорили о причине появления лишних стилей. И одна из причин появления лишних стилей – это неумение правильно пользоваться таким явлением, как буфер обмена и, в частности, такой возможностью, как специальная вставка из буфера обмена.
По окончании урока вы сможете:
- Рассказать, что такое буфер обмена
- Применить специальную вставку из буфера обмена
Буфер обмена – это часть памяти компьютера, в которой можно сохранить информацию, которую вы скопировали. По мере необходимости скопированную информацию можно извлекать из буфера обмена и вставлять в выбранное нами место.
1. Буфер обмена. Возможности буфера обмена
Скачайте документ тут. Откройте документ.
- Выделяем текст (см. Урок 2. Выделяем текстовую информацию в документе)

- Копируем текст в буфер обмена. Выбирайте, каким способом вы это сделаете:

- Разыскать место, куда вы будете вставлять скопированный текст. Это может быть другое место в документе или новый документ, в который вы собираете информацию из разных источников.
- Вставить текстовую информацию из буфера обмена. Выбирайте, каким способом вы это сделаете:
| Запомните! | Использование клавиатурных сочетаний значительно увеличивает производительность труда |
Скопированную информацию можно вставлять много раз.
Буфер обмена един для всех программ, установленных на компьютере. Вы можете скопированный текст вставить в графический редактор Visio или CorelDraw. Скопированная информация храниться в буфере обмена, до тех пор, пока вы не скопируете что-нибудь новое. Новое затирает старое.
Но у офисных программ есть замечательная особенность: сохранение в буфере обмена до 24 (!) фрагментов. Причём, не важно каких: размер, вид, объём – всё это не важно. Одно копирование – один фрагмент. Воспользуемся этой особенностью.
- Лента Главная → группа команд Буфер обмена → кнопка группы.
 Откроется окно Буфера обмена.
 - Выберите команду Параметры → Установите галочки:


- Собирать данные без отображения буфера обмена Office
Данные в количестве до 24 фрагментов будут собираться в буфере обмена вне зависимости открыто окно Буфера обмена или нет. Если вы скопировали больше 24 раз, то информация, скопированная первой, исчезнет, и так по кругу.
Интересная особенность: если вы копируете информацию в другой неофисной программе (например, вы работаете в графическом редакторе), то эта информация в количестве до 24 фрагментов будут собираться в буфере обмена Office. Тогда как в программе, в которой вы работаете в настоящий момент, будет доступен только последний скопированный фрагмент.
Если бы вы знали, как часто меня выручала информация, собранная в буфере обмена Office!

- Показать значок буфера обмена Office на панели задач
 Ваша картинка может отличаться от моей (операционная система другой версии, другие цвета)
Буфер обмена настраивается один раз. Если вы закроете окно Буфера обмена, то настройки сохраняться. Закрывается Буфер обмена повторным щелчком ЛМ по кнопке группы (Лента Главная → группа команд Буфер обмена → кнопка группы): Если вам необходимо вставить фрагмент, скопированный ранее, то откройте окно Буфера обмена (вы уже знаете, как это делается). Далее из списка скопированный фрагментов выберите нужный вам фрагмент и щёлкните на нём ЛМ – фрагмент вставиться из буфера обмена.
Обратите внимание: на выбранном вами фрагменте появляется кнопка выпадающего меню. Щёлкните ЛМ по кнопке выпадающего меню и вы увидите две команды на выбор: Вставить и Удалить. Командой Удалить вы удаляете этот фрагмент из буфера обмена:
| Запомните! | Скопированная информация хранится в буфере обмена до тех пор, пока вы не перезагрузите или выключите компьютер. |
2. Буфер обмена. Специальная вставка
Очень часто нам бывает нужна операция «Скопировать из документа – вставить в новый документ». Даже очень часто. Но эта операция является причиной появления лишних стилей в документе (см. Урок 15. Лишние стили текста). Ведь вместе с текстом мы копируем символ конца абзаца, а именно он заключает в себе всю характеристику абзаца (Стиль абзаца).
Если нам нужно вставить один абзац, то можно, перетаскивая мышку, выделить текст без символа конца абзаца, скопировать и вставить в новый документ, что мы и делали на Уроке 15. А если нам нужно скопировать несколько абзацев? Ведь в этом случае мы поневоле копируем символы конца абзаца, а с ними тащим в наш новенький чистенький документ кучу ненужных нам стилей, в чём мы уже с вами убедились на прошлом уроке. В этом случае нас выручит специальная вставка буфера обмена.
Скачайте документ тут
Вы открыли Учебный файл_Специальная вставка?
- Выделите весь текст (см. Урок 2. Я предпочитаю тройной щелчок ЛМ по полосе выделения)
- Скопируйте весь текст любым известным вам способом (я предпочитаю сочетание клавиш Ctrl+C).
- Создайте новый документ (я уже не напоминаю, что режим «Непечатаемые символы» и рабочее окно Стили должны быть заданы всегда).
- Лента Главная → группа команд Буфер обмена → кнопка Вставить → чёрный треугольник выпадающего меню.
Раскроется меню Параметры вставки:

Пройдитесь курсором по четырём кнопкам в раскрывшемся окне параметры вставки.
Первая кнопка ![]()
В этом случае мы притащим в новый документ все стили текста, которые только есть в старом документе. Оно нам надо?
Вторая кнопка ![]() даёт такую картину:
даёт такую картину: Третья кнопка
 ![]() даёт такую картину:
даёт такую картину:
Как видите, есть риск получить в список стилей Встроенный стиль.
Четвёртая кнопка ![]() даёт такую картину:
даёт такую картину:
Как видите:
- Новые стили в области задач Стили не появились,
- Автоматическая нумерация списков превратилась в обычный текст.
Выбирайте, какой кнопкой специальной вставки Буфера обмена вы будете пользоваться.
Я предпочитаю кнопку ![]()
На мой взгляд, она самая безопасная в смысле «недопущения» в новый документ ненужных мне стилей.
Вы можете возразить: А как же превращённая в текст автоматическая нумерация? С этим явлением мне помогает справиться моя любимая команда Заменить. Возможности этой команды очень велики и, честно, до конца мной не изучены. Я сомневаюсь, что за один урок расскажу вам о возможностях команды Заменить.
Теперь вы сможете:
- Рассказать, что такое буфер обмена
- Применить специальную вставку из буфера обмена