
Excel for Microsoft 365 Excel 2021 Excel 2019 Excel 2016 Excel 2013 Excel 2010 More…Less
In Excel, there are several types of option buttons and colored triangles that can appear in or next to a cell. These buttons and triangles provide useful commands and information about the contents of the cell, and they appear at the moment you need them. This article describes what each of these buttons and triangles mean and how you can work with them.
Buttons that you might see on your worksheet
The seven buttons that can appear next to a cell are as follows: AutoCorrect Options, Paste Options, Auto Fill Options, Trace Error, Insert Options, and Apply formatting rule to.
AutoCorrect Options
The AutoCorrect Options  button might appear when you rest the mouse pointer on the small blue box under text that was automatically corrected. For example, if you type a hyperlink or an e-mail address in a cell, the Autocorrect Options button might appear. If you find text that you do not want to be corrected, you can either undo a correction or turn AutoCorrect options on or off. To turn AutoCorrect options on or off, click the AutoCorrect Options button, and then make a selection from the list.
For more information, see Choose AutoCorrect options for capitalization, spelling, and symbols .
Paste Options
The Paste Options  button appears just below your pasted selection after you paste text or data. When you click the button, a list appears that lets you determine how to paste the information into your worksheet.
The available options depend on the type of content that you are pasting, the program that you are pasting from, and the format of the text where you are pasting.
For more information, see Move or copy cells and cell contents.
Auto Fill Options
The Auto Fill Options  button might appear just below your filled selection after you fill text or data in a worksheet. For example, if you type a date in a cell and then drag the cell down to fill the cells below it, the Auto Fill Options button might appear. When you click the button, a list of options for how to fill the text or data appears.
The available options in the list depend on the content that you are filling, the program that you are filling from, and the format of the text or data that you are filling.
For more information, see Fill data automatically in worksheet cells.
Trace Error
The Trace Error  button appears next to the cell in which a formula error occurs, and a green triangle appears in the upper-left corner of the cell.
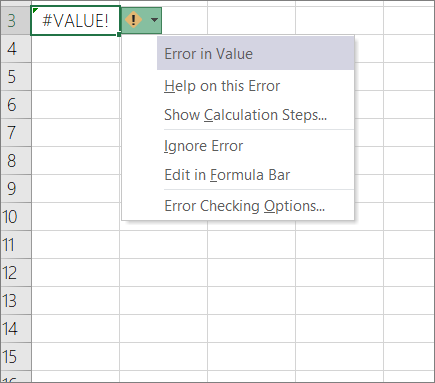
When you click the arrow next to the button, a list of options for error checking appears.
For more information, see Detect errors in formulas.
Insert Options
The Insert Options  button might appear next to inserted cells, rows, or columns.
When you click the arrow next to the button, a list of formatting options appears.
Note: If you do not want this button to be displayed every time that you insert formatted cells, rows, or columns, you can turn this option off in File > Options > Advanced > Under cut, copy, and paste > remove the checkbox next to Show Insert Options buttons .
Apply formatting rule to
The Apply formatting rule to  button is used to change the scoping method for conditional formatting data in a PivotTable report.
When you click the arrow next to the button, a list of scoping options appears.
Colored triangles that you might see in your worksheet
The two colored triangles that can appear in a cell are green (formula error), and red (comment).
Green triangle
|
|
A green triangle in the upper-left corner of a cell indicates an error in the formula in the cell. If you select the cell, the Trace Error
For more information, see Detect errors in formulas. |
Red triangle
|
|
A red triangle in the upper-right corner of a cell indicates that a note is in the cell. If you rest the mouse pointer over the triangle, you can view the text of the note. |
Need more help?
You can always ask an expert in the Excel Tech Community or get support in the Answers community.
Need more help?
When we mention buttons in Excel, anyone who is not a consistent user will wonder what that means. Yes, Microsoft Excel does have Macros buttons which are the most advanced level of Excel. These buttons are commands initiated by a single click. It is easy to add buttons to excel. A user can simplify and save the time that they will take to navigate between different cells looking for specific information. In short, the buttons are inserted to perform specific tasks for us. The three different types of buttons you can place in a worksheet include;
- Shapes
- Form Control Buttons
This article shows how to add a button in Excel and how to assign Macros to them. With those buttons, navigating through your spreadsheet won’t be a nightmare anymore.
Method 1: Using shapes to create Macro buttons to open a particular sheet
You can create a macros button by using shapes. You can easily create a rounded rectangle; add a hyperlink to it for your worksheet. Here is what you can do;
1. On the main menu ribbon, click on the Insert tab.

2. Go to Shapes, click the drop-down arrow, and select the Rounded Rectangle icon.

3. Draw a rounded rectangle on your worksheet.

5. Format the shape by typing text into it-Right-click on the form and select edit text. Or double-click the shape.

6. To Hyperlink the shape, right-click on it and select Hyperlink from the menu. Right-clicking will display an Insert Hyperlink dialogue box.
- Under the ‘Link to’ section, select ‘Place in This Document.
- Under the ‘Type the cell reference’ section, type in the destination cell address.
- Under the ‘Or select a place in this document box, click to choose the particular sheet name. Click the OK button when done.
When you click the rounded rectangle, it will skip to the specified cell of a specified sheet.

7. To assign the macro, right-click on the table and select Assign Macro. Under the ‘Macros in’ drop-down arrow, select ‘This Workbook’. Here, select the macro from the list of macros in This Workbook.

8. Press OK. When you point your mouse on this shape, it will turn to the hand pointer cursor, and clicking the form will run the macro. Remember to set your shape not to resize with cell changes by right-clicking on it and selecting ‘Size and Properties.’
Method 2: Using Developers Form Control Buttons to create buttons in Excel
1. On the main ribbon, click on the Developer tab.
2. Go to the Insert button and click the drop-down arrow.

3. Under Form Control, select the first option called button. Draw a button on your worksheet

4. Next, in the Assign Macro dialogue box, type or select a name for the macro.

5. Click OK when done. You can click on this button to run the macro.

Using ActiveX Controls
Since running a macro in Excel can prove tedious, you can assign a macro to a button to run it faster. In this case, you can follow these steps to add a button in Excel using ActiveX controls easily.
1. Right-click anywhere on the Home ribbon and select Customize the Ribbon option from the pop-up menu.
2. Once the Customize the Ribbon window is open, go to the Main Tabs section and select the Developer option.
3. Click OK. However, if you already have the Developer Tab added to your ribbon, then proceed as follows.
4. Go to the Developer Tab and click on Insert.

5. Next, click on your preferred button under the ActiveX Controls.

You can now drag it anywhere in the Excel worksheet to create a button.
6. Right-click on the newly created button and select the View Code option from the drop-down menu.

7. You can now type this code, which sets the value of cell A6 to Hello:
Range(“A6”).Value = “Hello”

8. If you want to test setting the cell value, ensure the Design Mode option is deselected. You can also click on the button, and the Hello text will be displayed on your screen.

You can further use VBA codes to assign a different task for various operations such as double-clicking, single-clicking, right-clicking, and many more. When you right-click on the button, you can also select the Format Control option. However, the only downside is that the size of the buttons changes every time you make changes on the worksheet or share it.
Adding Macros To Quick Access Toolbar
Adding macros to Quick Access Toolbar also allows you to create buttons in Excel and use them on any sheet in your present workbook. To do this, follow these steps:
1. Right-click on the arrow below the ribbon of the Excel workbook.

2. When the Customize Quick Access Toolbar screen opens, navigate and select More Commands at the bottom.

3. Select Macros in the Choose commands from the section. You can click on the down-facing arrow in the Popular Commands box.

4. Select the HighlightMaxValue option and click on the Add button.

5. You can now click on Modify to customize the symbol of the macro.

6. Select your preferred symbol from the provided list and hit the OK button.

7. Finish by clicking OK to add a button to your Excel workbook. If you want to run the HighlightMaxValue macro, simply click on the icon.
Conclusion
When working with adding buttons to Excel, it is best to keep it easy and straightforward. The above methods portray these as the steps are short and easy to follow. They are not only easy to set up, but they also give you different options for formatting.
The Buttons in Excel Ribbon are of different types and they behave differently. The command buttons in Excel Ribbon can be classified into following types.
If you keep the cursor over a Ribbon Button, a small popup box will be shown. The popup box contains a brief description about the command.
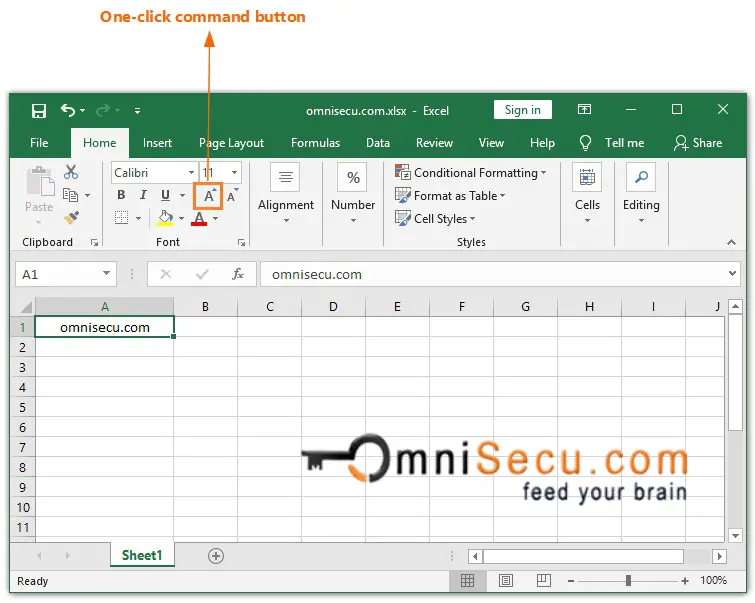
One-click Command Buttons
One-click Command Button is a normal button type in Excel Ribbon, which executes the command everytime when it is clicked.
Example : «Increase Font Size» Button (Home tab > Font). When you click on «Increase Font Size» Command button everytime, it executes the command and the size of the font is increased.
Toggle Buttons
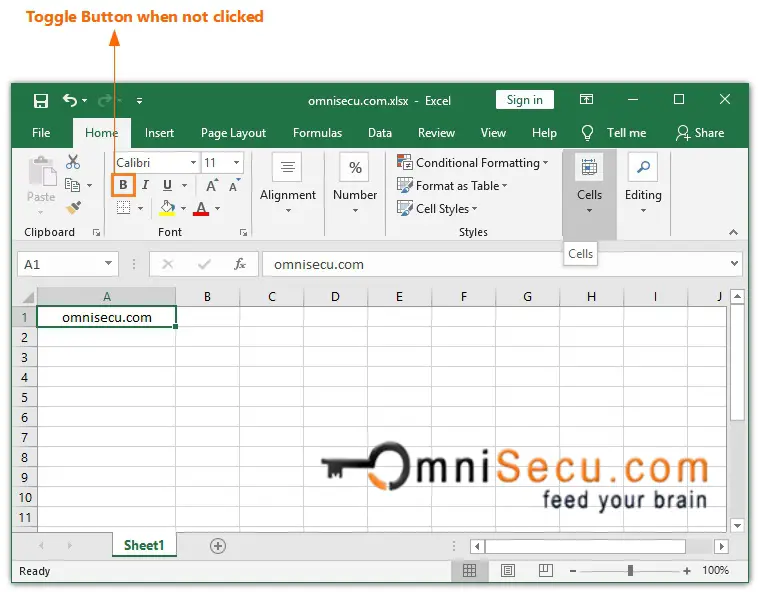
Toggle button is another type of Excel Ribbon Button. An Excel Ribbon Toggle button can stay in two states. Excel Ribbon Toggle button allows the user to change a setting between two states.
Toggle button is desgined in such a way that when clicked on a Toggle button, it’s color is changed to let you know that the state of the Toggle button is changed.
Example : Bold button (Home tab > Font).
Below image shows «Bold» Toggle button, when not clicked. You can see the Active Cell is A1. The text omnisecu.com is not Bold.
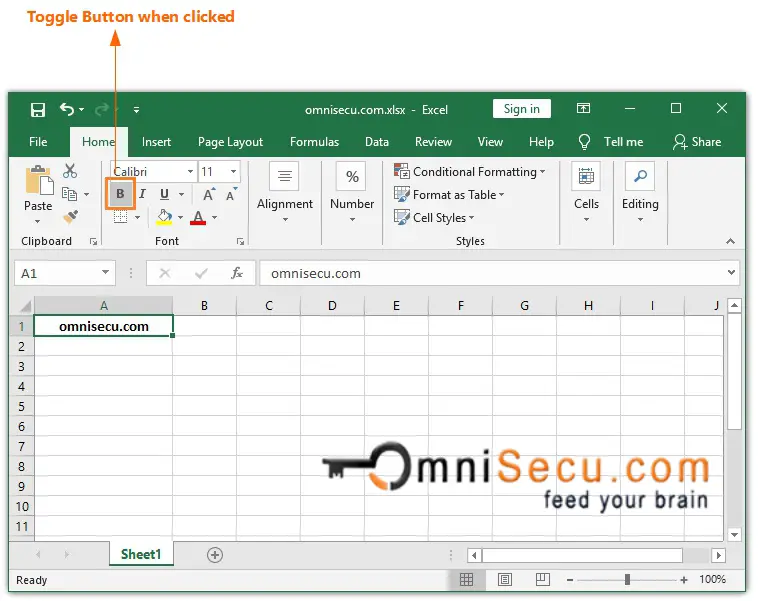
Below image shows the same «Bold» Toggle button in Excel Ribbon, when clicked on it. The color of «Bold» Toggle button is changed now. The text omnisecu.com is now changed to Bold.
Split Buttons
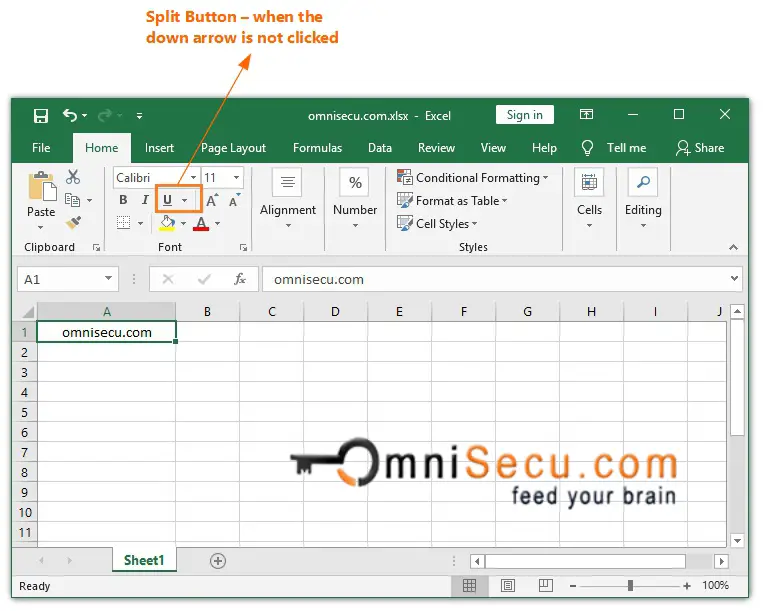
Split buttons are another type of buttons with a Drop-down menu in Excel Ribbon. Split Buttons have a small down arrow at its end. Excel Ribbon Split button has a Button part and a Menu part. When clicked on the button part, it acts like a regular button and execute the command. When clicked on the menu part, Drop-down list of related commands are displayed.
Example : Underline Split Button (Home tab > Font).
Below image shows Underline Split Button when not clicked.
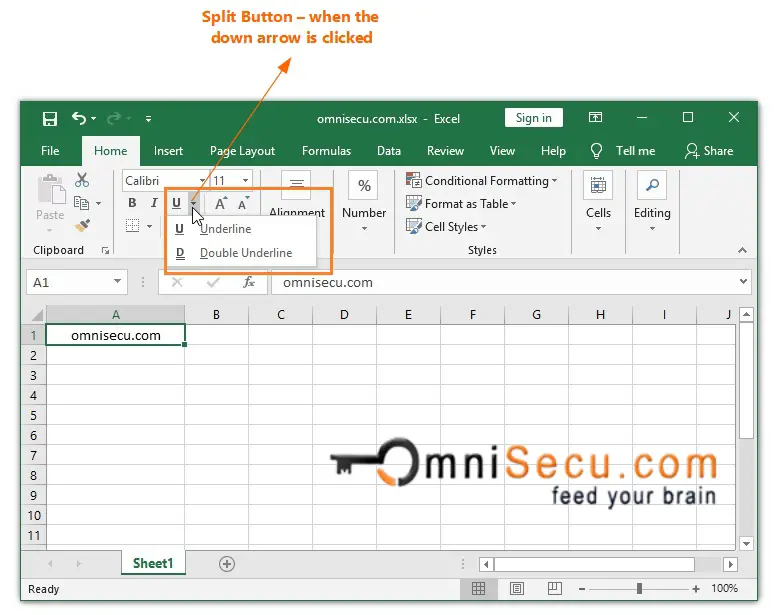
Below image shows when the down arrow in Excel Ribbon Split button is clicked.
Drop-down menu buttons
Excel Ribbon Drop-down menu buttons also buttons, with a Drop-down menu. Drop-down Menu Buttons also have a small down arrow at its end. Drop-down menu buttons drop down a menu when clicked. Drop-down Menu buttons don’t run a command directly, but they just display a Drop-down menu. Unlike Split button, when you click on the button, no command will be run. It will just display a menu with more options.
Example : «Conditional Formatting» Drop-down Menu Button. (Home tab > Styles)
Below image shows «Conditional Formatting» Drop-down Menu button.
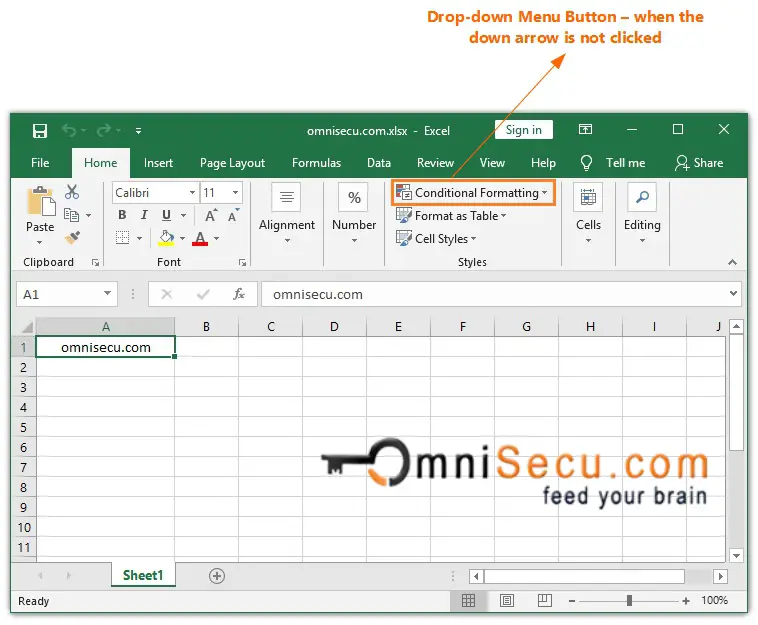
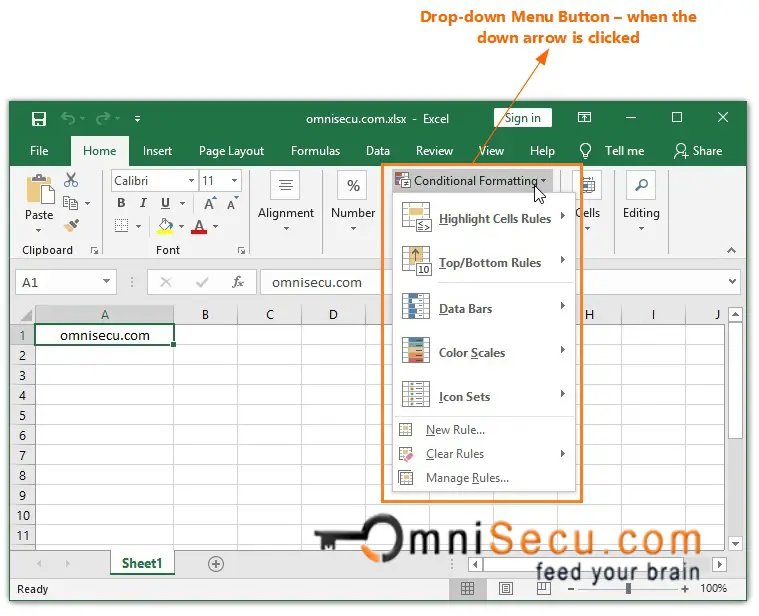
Drop-down Menu button looks same as Split button. But when you click on it no command is run, but will display a menu list of related commands. You need to click on the menu item to perform the task.
Below image shows «Conditional Formatting» Drop-down Menu button, when clicked on the down arrow.
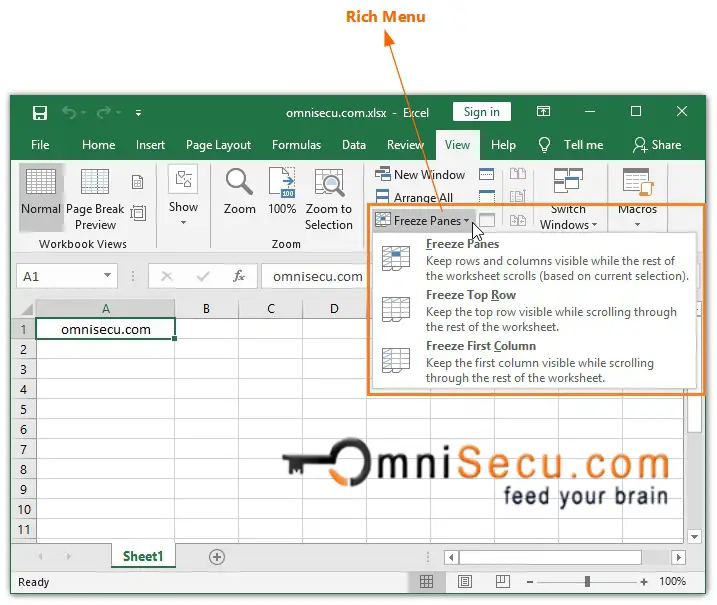
Rich menu
The Rich menu in Excel Ribbon is a type of Drop-down button with more information about the menu item. These additional help information explain more clearly what is the purpose of each menu item.
Example : «Freeze Panes» Menu Button. (Vew tab > Window)
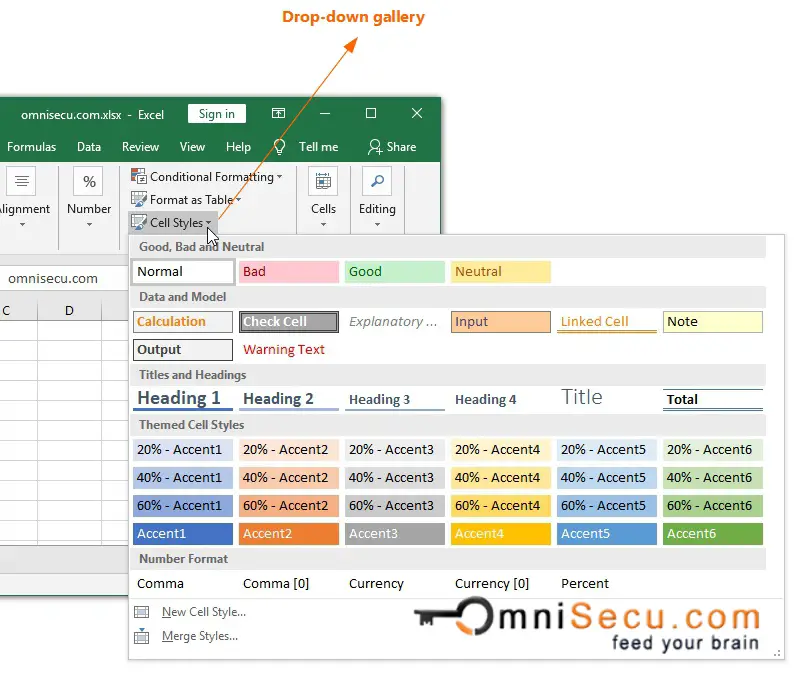
Drop-down gallery
A Drop-down gallery in Excel Ribbon has more options than a normal Drop-down menu. The items inside Drop-down gallery can visually demonstrate the effect of menu items inside Drop-down gallery.
When mouse hover an item in Drop-down gallery, the related style is applied on Excel Worksheet, so that you can view the effect of the item on Excel Worksheet without applying it.
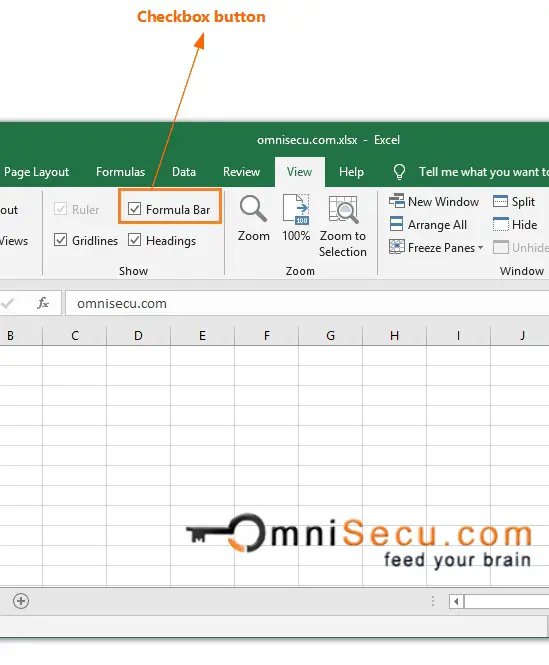
Check box buttons
An Excel Ribbon Check box button can stay in two states. Excel Ribbon Check box buttons are used for settings possible in two states, either «on» or «off».
Example : «Formula Bar» Check box in View tab, which can be used to make the Formula bar visible or hidden.
This tutorial is a detailed guide to creating interesting actionable buttons in Excel. If you want to learn to automate your Excel sheets by adding interactive buttons to your records, then this tutorial is made for you. Once we have created macros, we will learn to edit them in Excel.
Wait, what? You don’t know what macros are? Go ahead and read this article -> How to Record Macros in Excel?
If you’re still reading, I assume that you know what macros are and how to record them. So, let’s get started with this fun guide to creating some actionable buttons that you can use in your sheets to automate your data.
The best part is, you don’t have to be a VBA guru to create actionable buttons in Excel because this tutorial requires you to have zero knowledge in VBA to get started! Here are the steps to create actionable buttons without VBA in Excel.
Steps to create interactive buttons in Excel
This button will allow you to store the values from a user form to the database in the backend, refresh the table, or do whatever you want them to do for you. Isn’t it cool? You can get the experience of turning your spreadsheets into professional software.
To get started, let’s take an example of a user data entry form with a non-interactive button illustration below it.
 3")
You need to create two worksheets, one with the user form and the other with the database table where the user form data will be stored.
 4")
We will first record a macro in which we manually execute the action that is going to be done by the Submit button.
Here’s how to create interactive buttons in MS Excel 2016.
Here are the steps to create buttons in MS Excel 2019. Please follow the steps carefully. I have used a simpler example to help you understand better.
 5")
- Fill in random user details in the form.
- Go to the View tab.
- Pull down on Macros.
- Click Record Macro.
- Give your macro a name.
 6")
- Click OK. Now that the macro recording has started, follow these steps carefully without clicking anywhere else.
- After clicking OK, copy the random user data you just filled in.
- Go to the Database worksheet.
- Right-click on the first empty cell in the table.
- Pull right on Paste Special.
- Choose the Transpose icon.
- Don’t click anywhere yet!
 7")
Now that the first user entry is pasted horizontally, follow these final steps before ending the recording.
- Go to the Home tab.
- In the Cells group, pull down on Insert.
- Click on Insert sheet rows.
- Lastly, click on the first empty cell of the table again.
- Don’t click anywhere yet!
 8")
- Navigate back to the user form sheet.
- Delete the random entries you created from the cells.
- Click on an empty cell in the sheet.
- Stop recording the macro from the ribbon below, use your custom shortcut key, or choose Stop Recording from Macros in the View tab.
Woohoo, our macro is ready to be assigned to the Submit button!
 9")
 10")
- Right-click on the submit button.
- Click Assign macro.
- Choose This workbook from the Macros in option below.
- Choose the macro you just created.
- Click OK.
Yay! It’s time to test your interactive button!
- Clear all entries from the database sheet.
- Fill in random user data in the form and click on the Submit button.
- Navigate to the database sheet to check if the data is stored correctly.
- Check with multiple user data to ensure everything working smoothly.
Conclusion
This tutorial was a detailed guide to creating interactive and actionable buttons in Excel without VBA. With this tutorial, you can easily automate any dataset and transform your works into smart and manageable records. Stay tuned at QuickExcel to learn more about smart Excel automation!
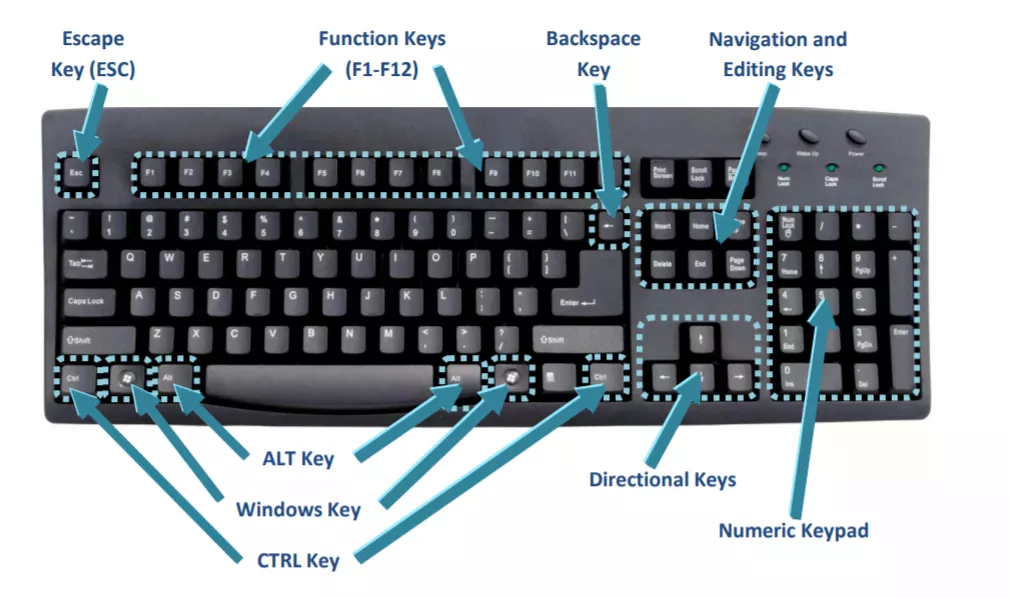
An explanation of what the F (Function Keys) are and what they do. Everything you wanted to know about the Function keys (F1, F2, F3.. F12) and how to use them in the computer.
What Do the F Keys on a Computer Do?
F1 to F12 and their functions.
What are the F1 through F12 keys?
F1
F2
Enter CMOS Setup.
F3
F4
F5
F6
F7
F8
F9
F10
Increase laptop screen brightness (on some laptops)
F11
F12
Computer Shortcut Keys and their Functions
Scholarships for African Students » Undergraduate Scholarships » African Women Scholarships & Grants » Developing Countries Scholarships » Erasmus Mundus Scholarships for Developing Countries » Fellowship Programs » Funding Grants for NGOs » Government Scholarships » LLM Scholarships » MBA Scholarships » PhD and Masters by Research Scholarships » Public Health Scholarships — MPH » Refugees Scholarships » Research Grants » Scholarships