
Примечание: Служба SkyDrive теперь называется OneDrive, а приложение SkyDrive Pro — OneDrive для бизнеса. Дополнительные сведения об этих изменениях можно найти в статье От SkyDrive к OneDrive.
Word 2013 обеспечивает дополнительные возможности работы с документами. Вставлять видео из Интернета, открывать PDF-файлы и редактировать их содержимое, а также выравнивать изображения и схемы стало намного проще. Новый режим чтения стал удобнее и не отвлекает ваше внимание, а также отлично работает на планшетах. Кроме того, улучшены функции совместной работы: добавлены прямые соединения с веб-хранилищами и упрощены функции рецензирования, в частности исправления и добавление примечаний.
Совет: Чтобы приступить к созданию своего первого документа Word, ознакомьтесь со статьей Основные задачи в Word 2013.
Удобство чтения
Благодаря новому режиму чтения просмотр документов Word с экрана стал намного удобнее.
Новый режим чтения
Просматривать документы можно в удобных для чтения колонках на экране.
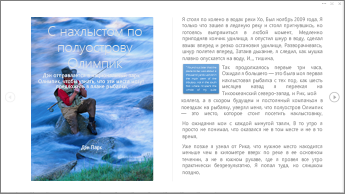
Инструменты редактирования, которые могут отвлекать ваше внимание, скрыты, но остается доступ к средствам, удобным при чтении, таким как Определение, Перевод и Поиск в Интернете.
Масштабирование объектов
Дважды коснитесь экрана или дважды щелкните мышью, чтобы увеличить таблицу, диаграмму или изображение в документе на весь экран. Просмотрите необходимые сведения, а затем коснитесь экрана или щелкните мышью вне объекта еще раз, чтобы уменьшить масштаб и продолжить чтение.
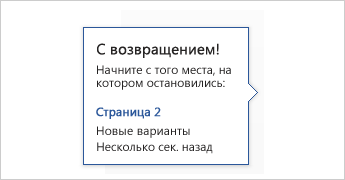
Возобновление просмотра
Открыв документ, вы можете продолжить его просмотр с места, на котором остановились. Word запоминает эту позицию, даже если перед этим документ был открыт на другом компьютере.
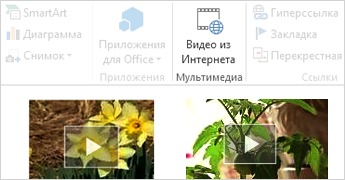
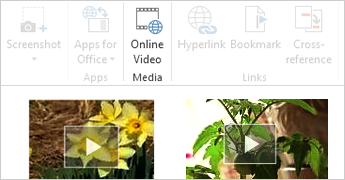
Видео из Интернета
Видео из Интернета можно просматривать непосредственно в приложении Word, продолжая при этом работу с документом и не отвлекаясь от его содержимого.
Развертывание и свертывание
Разворачивать и сворачивать части документа можно простым касанием или щелчком. Кроме того, к заголовкам можно добавлять описания, помогающие читателю понять, будет ли ему интересен данный раздел.

К началу страницы
Совместная работа
Работайте сообща с другими пользователями с помощью оптимизированных средств совместной работы.
Сохранение файлов и обмен ими в облаке
Облачное хранилище доступно в любое время при наличии подключения к Интернету. Теперь можно легко предоставить доступ к документу другим пользователям с помощью среды SharePoint или службы OneDrive, позволяющих работать с документами Word, электронными таблицами Excel и другими файлами Office. Можно даже работать над файлом одновременно с коллегами.
Исправления
В новом представлении Исправления работать с документами стало еще удобнее. Кроме того, здесь, как и прежде, отображаются отслеживаемые изменения.

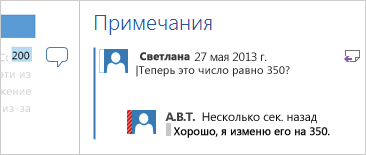
Ответы на примечания и отметки выполнения
К примечаниям теперь добавлена кнопка ответа. С ее помощью можно проводить обсуждения и легко отслеживать примечания прямо возле соответствующего текста. Если примечание уже принято к сведению и не заслуживает внимания, его можно отметить как выполненное. Примечание будет затемнено, но беседа будет сохранена на случай будущей необходимости.
К началу страницы
Придание профессионального вида
С помощью Word 2013 вы можете создавать более красивые и привлекательные документы и работать с новыми типами мультимедиа, такими как видео и изображения из Интернета. Можно даже открывать PDF-файлы.
Использование шаблона в качестве основы
При открытии Word 2013 можно выбрать один из новых отличных шаблонов, помогающих начать работу, а также воспользоваться списком недавно просмотренных документов, чтобы быстро вернуться к тому, на котором вы остановились.
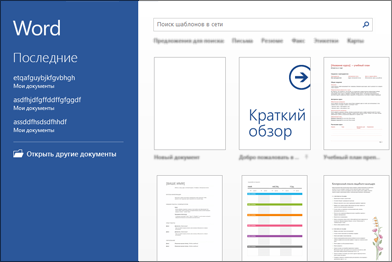
Если использовать шаблон не требуется, просто выберите пункт Новый документ.
Открытие и редактирование PDF-файлов
В Word добавлена возможность открывать PDF-файлы и править их содержимое, например абзацы, списки и таблицы, как в обычных документах Word. Теперь вы можете легко внести в такой файл необходимые изменения.
Вставка изображений и видео из Интернета
В документы можно добавлять видео из Интернета, которое читатели смогут просматривать непосредственно в Word. Также можно добавлять изображения из веб-служб для хранения фотографий без необходимости сохранять их на компьютере.
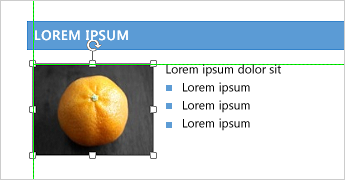
Динамические направляющие разметки и выравнивания
При изменении размеров и перемещении изображений и фигур доступен предварительный просмотр. Новые направляющие упрощают выравнивание диаграмм, фотографий и схем с текстом.
К началу страницы
Нужна дополнительная помощь?

Note: SkyDrive is now OneDrive, and SkyDrive Pro is now OneDrive for Business. Read more about this change at From SkyDrive to OneDrive.
Do more with your docs: Pop in an online video, open a PDF and edit the content, align pictures and diagrams with minimal fuss. The new Read Mode is clean and distraction-free—and it works great on tablets. Teaming-up is better too, with direct connections to your online spaces and streamlined review features like Simple Markup and comments.
Enjoy the read
Get absorbed in Word documents right from your screen with a new clean, comfortable reading view.
New Read Mode
Enjoy reading with a view that displays your documents in easy-to-read columns on the screen.
Editing tools are removed to minimize distractions, but you still have access to the tools that are always handy for reading such as Define, Translate, and Search on Web.
Object zoom
Double-tap with your finger or double-click with your mouse to zoom in and make tables, charts and images in your document fill the screen. Focus on and take in the information, then tap or click again outside the object to zoom out and continue reading.
Resume reading
Reopen a document and keep reading right where you left off. Word remembers where you were—even when you reopen an online document from a different computer!

Online video
Insert online videos you can watch right in Word, without having to leave the document, so you can stay focused on the content.
Expand and collapse
Collapse or expand parts of a document with just a tap or click. Put summaries in headings and leave it to readers to open the section and read the details if they want.

Top of Page
Work together
Work with others with streamlined collaboration tools.
Save and share files in the cloud
The cloud is like file storage in the sky. You can get to it anytime you’re online. Now it’s easy to share a document using SharePoint or OneDrive. From there you can access and share your Word docs, Excel spreadsheets, and other Office files. You can even work together with your colleagues on the same file at the same time.
Simple markup
A new revision view, Simple Markup, provides a clean, uncomplicated view of your document, but you still see indicators where tracked changes have been made.

Reply to comments and mark them as done
Comments now have a reply button. You can debate and easily track comments right next to the relevant text. And when a comment is addressed and no longer requires attention, you can mark it as done. It will be greyed out to keep out of your way, but the conversation will still be there if you need to revisit it later.

Top of Page
Add polish and style
With Word 2013 you can create more beautiful and engaging documents, and you can work with more media types—like online videos and pictures. You can even open PDFs.
Start with a template
When you open Word 2013, you’re offered a choice of great new templates to help get you started along with a list your recently viewed documents so you can get back to where you left off in no time.
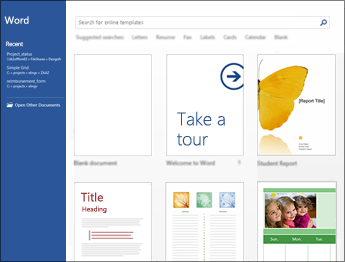
If you’d rather not use a template, click the Blank document.
Open and edit PDFs
Open PDFs and edit the content in Word. Edit paragraphs, lists, and tables just like familiar Word documents. Take the content and make it look great.
Insert online pictures and video
Add online videos directly to your documents that readers can watch right in Word. Add your pictures from online photo services without having to save them first to your computer.
Live layout and alignment guides
Get a live preview as you resize and move photos and shapes in your document. The new alignment guides make it easy to line up charts, photos, and diagrams with your text.

Top of Page
Need more help?
Want more options?
Explore subscription benefits, browse training courses, learn how to secure your device, and more.
Communities help you ask and answer questions, give feedback, and hear from experts with rich knowledge.
Learn to find your way around Word 2013 and get the most out of its features.
Contributing Editor,
Computerworld |
IDG / Microsoft 
Show More
The buzz today may be all about Office 2016 for Windows, which is due to be released this fall, but many business users are still getting acquainted with Office 2013 and will continue to use it for some time. Use this Word 2013 cheat sheet to help take advantage of all it has to offer.
Your copy of Word 2013 may have been purchased as standalone software or as part of an Office 365 subscription. For the purposes of this story, that doesn’t matter; all tips herein apply to whatever version of Word 2013 you’re using.
Note that this cheat sheet focuses on what’s new in Word 2013, rather than what has stayed the same from previous versions. If you’re looking for help getting up to speed on the basics, such as how to work with the Ribbon interface, check out our Word 2010 cheat sheet.
Get around Word 2013
The most obvious change in Word 2013 is its overall look. Even though Word is a traditional desktop app, Word 2013’s style follows the basic guidelines that Microsoft has set for its so-called Windows apps (formerly called Metro or Modern apps) that debuted with Windows 8. The Ribbon is now flat instead of three-dimensional, as are all dialog boxes and screens.
Word 2013 has a flatter look than previous versions of Word. (Click image to enlarge.) IDG
IDG
Beyond the basic look, though, the Ribbon behaves as it did in Word 2010, with a couple of enhancements that we’ll get to later.
A touch-friendly interface
Word 2013 can be optimized for either the mouse or touch. IDG
IDG
If you’re using a touch-based device, you can change Word’s interface slightly to make it easier to use. On your touch-based device, click or tap the small icon of a hand with an upright index finger that’s on the top left of the screen and you’ll be able to choose between a mouse-based or touch-based interface.
The mouse-based interface is the default. In the touch-based interface, the icons on the Ribbon are enlarged and there is more space between them, making it easier to tap the one you want without accidentally tapping another.
On top is what the Ribbon looks like using the traditional mouse-based interface. On the bottom is the Ribbon in the touch-based interface — notice the larger icons and more space between them. (Click image to enlarge.)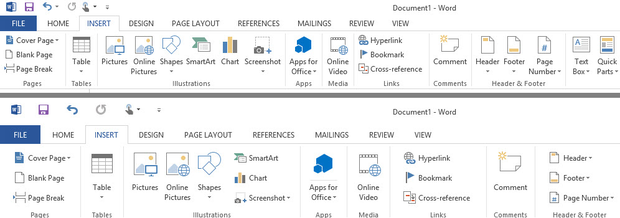 IDG
IDG
The Start screen
Like Windows 8 and 8.1, Word 2013 shows a Start screen when you launch it. It’s simple and straightforward to use. The left-hand side of the screen is given over to a list of the most recent documents you’ve worked on. Click any to open them. To open a different document, click «Open Other Documents» down at the bottom left of the screen.
Word 2013’s new Start screen lists documents you’ve recently opened, and shows thumbnails of templates you might want to use when creating a new document. (Click image to enlarge.) IDG
IDG
The main part of the screen, on the right, is taken up by more than two dozen templates for creating new documents — everything from simple, straightforward, single-spaced basic documents to flyers, party invitations, brochures and business cards. Click any and you’ll come to a screen with a basic description of the template, along with its average user rating. Click Create to use the template.
Click a template’s thumbnail to see more information about it. (Click image to enlarge.) IDG
IDG
Not happy with the templates you see? Microsoft has a sizable template repository with plenty more. Up at the top of the screen, type in what you’re looking for — for example, «letters,» «resume» and so on. You’ll come to a list of templates that match your search. Click one and you’ll see the same kind of screen that you do when you use a template from the Start screen. As with those templates, click Create to use it.
Note that the templates — both those listed on the Start screen and those you search for — aren’t on your local machine. They’re on a Microsoft template repository. So when you choose one, you’ll first download the template before you use it. The download size is listed on the template’s description screen.
Incidentally, if you hate the Start screen, you can easily get rid of it. Just choose File —> Options, and in the «Start up options» section of the default General screen, uncheck the box marked «Show the start screen when this application starts.»
The Design tab
The Ribbon has largely stayed the same from earlier versions of Word, but there’s a very nice new addition to the right of the Insert tab: the Design tab. This tab gives you, in one location, access to the most important ways you can change a document’s design.
You can choose from a variety of pre-designed templates with different title and heading sizes, paragraph formatting and so on. There’s also a new set of themes you can apply to your document that include different font styles, sizes and colors. From the Design tab you can also customize colors and fonts, adjust paragraph spacing, add watermarks, change the page color and page borders, and more.
Each theme and template has a thumbnail, so you have a good sense what you’ll be getting before you make your choice. When you click a thumbnail, the changes are immediately applied to your document. In this way it’s simple to click through many of them until you find the one you want.
Word 2013’s new Design tab lets you easily set the styles for your document. (Click image to enlarge.) IDG
IDG
Note that if you’re working on a .doc file rather than a .docx file, you won’t be able to select themes. It’s simple to convert a .doc file to a .docx one, though. Just select File —> Convert.
Use Read Mode
You use Word not just to create documents, but to read them as well. And to make that more pleasurable both on traditional computers and tablets, Word 2013 introduces Read Mode, which displays documents and eliminates distractions, including most of the Ribbon. In Read Mode, you’ve got a largely clutter-free screen — although as you’ll see, there are a few tools that have been put within easy reach. You can’t edit documents in Read Mode; as the name implies, you can only read.
To put Word into Read Mode, select View —> Read Mode. The Ribbon vanishes and your document is put into a two-column view. Arrows appear on each side of your screen. Click or tap them to move through the document in either direction. If you’ve got a touchscreen, you can also swipe in either direction.
In Word 2013’s Read Mode, you can focus on reading your documents, with distractions such as the Ribbon put away. (Click image to enlarge.) IDG
IDG
Upper-left menu
Not all menus and controls vanish with Read Mode, however. On the upper-left of the screen, there’s the File menu, the Tools menu and the View menu. Select File to go to Word’s usual File menu. Tools lets you search within the document or do a Bing search. To search using Bing, highlight a word or phrase and select Tools —> Search with Bing; you’ll launch Bing in your browser with search results for the phrase. The Tools menu also lets you undo changes you’ve made in a document.
The View menu gives you several options, including putting the document back into normal Edit Mode, changing the layout of the screen (you can switch between two columns and one column), changing the column width and page color, displaying comments if someone has commented on the document, and turning on (and then off) Word’s navigation pane.
Upper-right menu
On the upper-right of the screen are the usual icons for minimizing and maximizing windows, as well as for closing Word. But there’s a new one as well, the leftmost one, which looks like a rectangle with a bracket at each corner. Click it and the File, Tools and View menus disappear, and so does Word’s usual toolbar across the bottom of the screen, which controls making text larger and smaller, changing the layout view and so on.
In essence, it’s Read Mode on steroids — no controls and menus at all. To get the menus and controls back, click the three dotted lines that appear when you put Read Mode into this look-Mom-no-menus mode.
Zoom Mode
Read Mode includes a handy zoom feature. Right-click a table, chart or graphic, and you can zoom in on it — even all the way so that it fills the entire screen. I’ve found it quite useful for examining detailed information in a table.
Sync with OneDrive
In Office 2013, Microsoft finally got around to integrating the Office applications to its SkyDrive cloud-based storage service, which it has since renamed OneDrive. No longer will you have to fiddle to get them working together properly. Right on installation, everything works.
In case you’re not already a OneDrive user, here’s a bit of background: It’s a cloud-based storage service that automatically syncs files between your local devices and the cloud. Locally, files are saved in the C:Users<Your Name>OneDrive folder, where <Your Name> is your account name. (Note that if you installed SkyDrive before it was renamed to OneDrive, there’s a possibility that it still might be called SkyDrive in your folder structure.)
You work on a file locally, save it locally and from there it syncs to your cloud-based OneDrive account. That cloud-based account then syncs the files to any other devices on which you have OneDrive installed. So when you save a file to your local OneDrive folder, it ends up syncing to them all.
You can also open files directly from OneDrive, even on computers that don’t have OneDrive installed, by going to OneDrive on the Web. When you make changes to documents this way, it also syncs to any devices on which OneDrive is installed.
Using OneDrive with Word 2013 is straightforward. The local OneDrive folder is like any other folder on your PC, except that it syncs to the cloud, of course. So you can create folders, subfolders and so on underneath it, and those will get saved locally and to OneDrive in the cloud as well. Open files as you would any other, by heading to the folder. You can also click the File tab, click Open, highlight «<Your Name> OneDrive,» then click the Browse button and browse to your file from there.
Saving files to your OneDrive folder syncs them to the cloud. (Click image to enlarge.) IDG
IDG
That’s not to say that you won’t get confused by OneDrive, because you well might. One issue is that, depending on your version of Windows, you might have an existing folder structure that often defaults to something likeC:Users<Your Name>LibrariesDocumentsMy Documents or C:Users<Your Name>Documents or something similar. That means you may end up storing some files in your OneDrive folders and others in your normal Documents or My Documents folders, which can be immensely confusing. Only the files in the OneDrive folders will sync.
What to do? You can simply copy over all your existing files and folders to the OneDrive folder, and at that point, you’ll have only one folder structure and everything will sync.
There’s another solution as well. Open File Explorer (called Windows Explorer in versions of Windows prior to Windows 8). Right-click the OneDrive folder and select «Include in library» and then choose the library in which you want your OneDrive to appear — for example, Documents. You can also choose to create a new library, and have it appear in that new library.
Integrating OneDrive with your Documents folder. (Click image to enlarge.) IDG
IDG
From now on, when you open that library, OneDrive will appear underneath it. Note that OneDrive and its files actually stay in its original location, and it continues to sync as always. In essence, by telling OneDrive to show up in Documents, you’ve created a shortcut to it there.
Use markup and comment enhancements
Those who use Word’s markup tools for working with others will be quite pleased at some extremely useful changes to the way that you can collaborate with others on a document using Word’s markup features.
Here’s where you can lock a document into Track Changes mode.![]() IDG
IDG
I particularly welcome a feature that lets you lock Track Changes mode, so that once you’ve put a document in that mode it can’t be taken out of it unless someone has a password that you’ve created. Using it is simple: On the Review tab, after you’ve selected Track Changes —> Track Changes to put the document in tracking mode, select Track Changes —> Lock Tracking and type a password in the box that appears. From that point on, only someone with that password can turn off Track Changes.
There are other useful changes to commenting and tracking as well, aimed at simplifying the commenting and editing process. One of the more confusing things about comments in previous versions of Word is that it can be extremely confusing to follow a series of related comments, because there’s no single thread to follow. Rather than seeing a history of the comments, laid out neatly, you see individual comments that don’t necessarily seem to be related to one another.
Threading in comments makes conversations easier to follow (even when the commenter is talking to himself). IDG
IDG
In Word 2013, you can reply to a comment directly inside the original comment itself. That way, it’s easy to see the thread of comments, making the conversation much easier to follow. In addition, you can mark comments as Done. The comments will still exist, so you can revisit them if you want, but they’ll be grayed out, so that you know they no longer require attention. To make comments to comments, and to mark them as done, right-click a comment and make your selection.
Finally, there’s a new view when doing revisions called Simple Markup. When you turn on Simple Markup, you’ll see a vertical line in the margin where any revisions were made, but you won’t see the revision markup. That makes it easy to read a revised document — you know where edits have happened without having to see all the markups. To see the edits, click the line.
Posted on November 26, 2012
Good News! Check out our How-to Word website for free Word 2013 video tutorials here. You can also have a look at out our other How-to sites for free Office 2013 tutorials here (more How-to sites coming soon!).
Having worked for Microsoft for over a decade I have some insight into the very complex process of application development, the millions of rows of code that need to be written, reviewed and tested. Even so, reading the Office blog, and hearing from the various teams about the work they have put into the new version of Office, I’m reminded of how much effort there is behind every little detail that we as users take for granted. Last week I wrote about the benefits of Microsoft PowerPoint 2013, this week I wanted to share with you the benefits of Microsoft Word 2013. There is a long list of new and enhanced features in Word 2013, but here I just want to focus on what improvements I see as most beneficial from a productivity standpoint.
1. A more comfortable reading environment
According to Doug Thomas in the Word 2013 Preview Webinar, two-thirds of all Word documents that are opened are only read – not edited. People open up Word to read reports, brochures, product guides, proposals – all type of documents. Considering the many new tablet devices with touch screens that are coming out in the market with Windows 8, the Word team have put a lot of emphasis on improving the reading experience on these new type of devices.
When you open a read-only document in Word 2013 it opens up in the “Read Mode” by default. If you have opened up the document before Word remembers where you left off and a nice pop up asks you if you want to continue reading from that point. The read-layout optimizes the size of the font and the width of the rows so that is easier to digest. You can change the background color to a light brown called Sepia, which is supposed to be more comfortable for reading, or you can invert the text making the background black and the text white. This would be a good option if you are reading in bed at night and you don’t want to disturb your spouse with a bright screen …

Read Mode in Word 2013
When reading a document you quite often come across a word you don’t know the meaning of. It’s easy to get side-tracked if you decide to look up the word on the Internet. In Word 2013 you can just right-click the word and select “Define”. A little text box with the definition and a link to an audio file with the pronunciation of the word pops up on your screen, without changing your read-layout.

2. PDF’s no longer read-only
I don’t know about you, but quite often I have tried to copy and paste text from a pdf document to Word only to end up with a bunch of randomly scattered words. Or, I have a presentation that has been sent to me in a PDF file format that I need to edit. In Word 2013 Microsoft has introduced something called “PDF Reflow”, this enables you to open up PDF documents in Word and edit them. When you are done editing you can save the document back to a PDF file format, or you can choose to save the document in a Word format.

3. No more pulling your hair when adding images
I can’t tell you how often I have pulled my hair in frustration when adding images to my blog articles in Word. All of a sudden the image disappears and I find it at the beginning of the document. It wasn’t until I read the blog post about images in Word 2013 that I understood why. In Word 2013 working with images in documents is greatly improved. You can now decide if you want the image to move with the text (so that the image moves if you move the text), or if you want the image to be locked to the page. Whenever you move images around you also get a live preview of what the layout would look like (called Live Layout). There are also new alignment guides, colored lines that help you align the image with other objects or text in your document.

4. Rich new ways to present documents
Imagine that you and your colleagues have worked on a customer proposal for weeks. You really want this proposal to grab the customer’s attention and you want it to stand out from the crowd. Your organization has two great videos that you want to share with the customer, one of a customer testimonial and one of a product demonstration. Instead of inserting these videos as links in the document, in Word 2013 you can insert the video into the document. A thumbnail image with a play button appears in your document. Your customer can click the video in the document to see it play.

The customer is thrilled about your proposal and would like to go through some of the sections with you in more detail. You can then propose to present the document to the customer online.

This way you can step through the document together over the Internet. The customer doesn’t have to have Word 2013 installed – he or she can follow along using a web browser. The customer can browse the document independently, or follow along as you step them through the paragraphs of the proposal. If you (the presenter of the document) notice a spelling mistake in the proposal you can quickly edit it on the spot.

5. Improved experience doing what you’ve always done
Word 2013 comes with a lot of improvements that help you do the things you’ve always done in Word a little bit quicker and a little bit easier. One example is adding rows or columns to a table, you can now easily do it by just clicking on the “+” sign that appears when you have a table marked. Another example is when reviewing a document. Now the layout is much cleaner and you can reply and mark comments as completed. It’s easier to get started with a document by selecting from the wide selection of new templates, and you can swiftly change the look and feel of your document by applying one of the many themes in Word 2013.
A lot of work behind the scenes
As I mentioned in the introduction there is a long list of enhancements in Word 2013 that work behind the scenes to give you a better experience using Word. One of the challenges the product team faces is to introduce new capabilities and leverage new hardware functionality without breaking backward compatibility. Even though Word 2013 doesn’t seem like a major update, there are a lot of enhancements that you will immediately appreciate – the improved speed, the way the cursor moves on the screen, the live previews that help you make decisions before you commit to them, and so on. I will surely enjoy writing my blog posts more now that I’m using Word 2013!
(If you have difficulties reading this article, you can access the full article in pdf here)
Lesson 4: Getting to Know Word
/en/word2013/understanding-office-365/content/
Introduction
Word 2013 is a word processing application that allows you to create a variety of documents like letters, flyers, and reports. With the introduction of several enhanced features—including the ability to create and collaborate on documents online—Word 2013 gives you the ability to do more with your word processing projects.
Getting to know Word 2013
Word 2013 is similar to Word 2010. If you’ve previously used Word 2010, then Word 2013 should feel familiar. But if you are new to Word or have more experience with older versions, you should first take some time to become familiar with the Word 2013 interface.
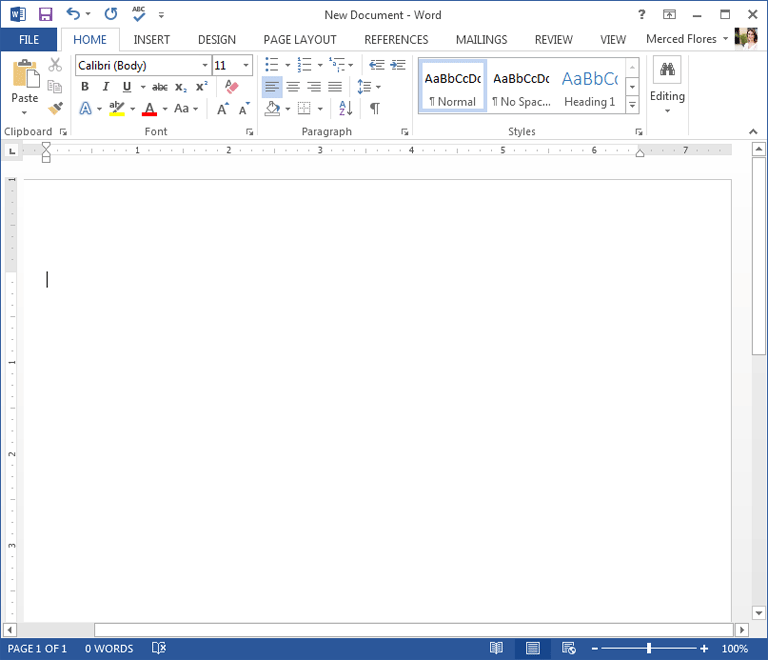
The Word interface
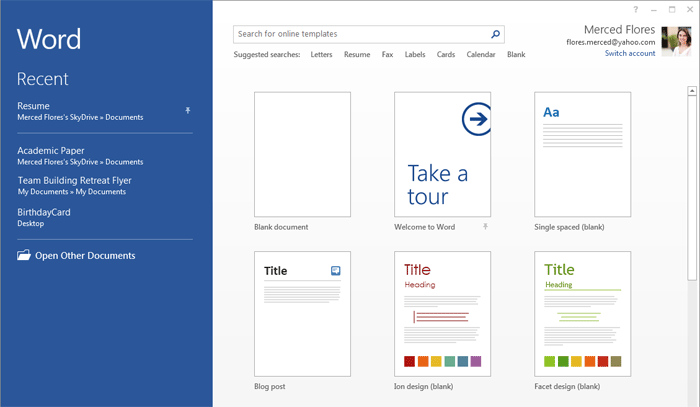
When you open Word 2013 for the first time, the Word Start Screen will appear. From here, you’ll be able to create a new document, choose a template, or access your recently edited documents.
- From the Word Start Screen, locate and select Blank document to access the Word interface.
 The Word Start Screen
Click the buttons in the interactive below to become familiar with the Word 2013 interface.
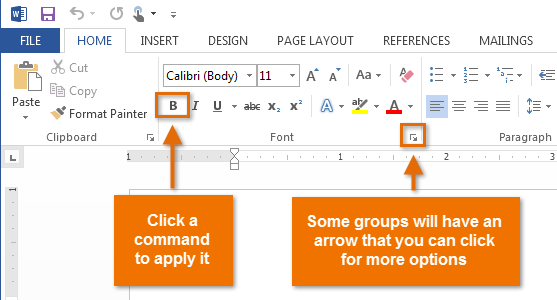
Command Group
Each group contains a series of different commands. Simply click any command to apply it. Some groups also have an arrow in the bottom-right corner, which you can click to see even more commands.
Quick Access Toolbar
The Quick Access toolbar lets you access common commands no matter which tab is selected.
By default, it includes the Save, Undo, and Redo commands. You can add other commands depending on your preference.
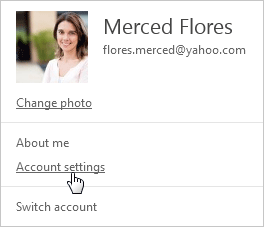
Account Access
From here, you can access your Microsoft account information, view your profile, and switch accounts.
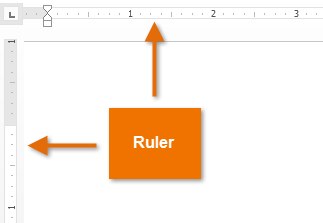
Ruler
The Ruler is located at the top and to the left of your document. It makes it easier to make alignment and spacing adjustments.
Zoom Control
Click, hold, and drag the slider to use the zoom control. The number to the right of the slider bar reflects the zoom percentage.

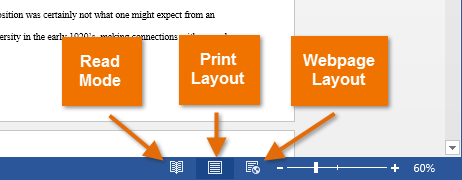
Document Views
There are three ways to view a document. Simply click to select the desired view:
• Read Mode displays your document in full-screen mode.
• Print Layout is selected by default. It shows the document as it would appear if it were printed.
• Webpage Layout shows how your document would look as a webpage.
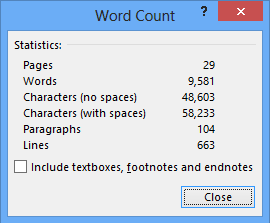
Word Count
Word Count displays the number of words in your document.
Click Word Count to open the Word Count dialog box. Here, you can quickly view your document’s statistics, like the number of pages, paragraphs, and lines.
Page Number Indicator
The page number indicator helps you keep track of the number of pages your document contains.
Click the page number indicator to open the document navigation pane. Here, you can search your document by headings or scroll quickly through its pages.
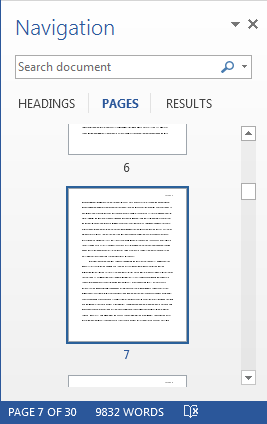
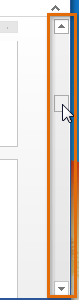
Scroll Bar
Click, hold, and drag the scroll bar to scroll up and down through the pages of your document.
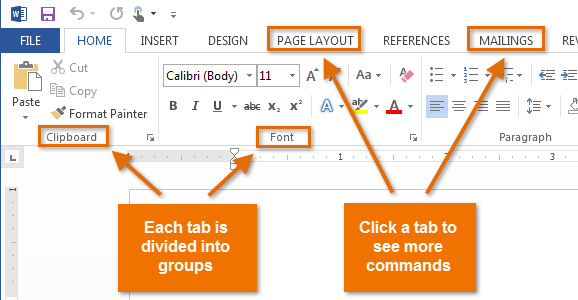
The Ribbon
The Ribbon contains all of the commands you will need to perform common tasks in Word. It has multiple tabs, each with several groups of commands.
Working with the Word environment
If you’ve previously used Word 2010 or 2007, then Word 2013 should feel familiar. It continues to use features like the Ribbon and the Quick Access toolbar—where you will find commands to perform common tasks in Word—as well as Backstage view.
The Ribbon
Word 2013 uses a tabbed Ribbon system instead of traditional menus. The Ribbon contains multiple tabs, each with several groups of commands. You will use these tabs to perform the most common tasks in Word.
Click the arrows in the slideshow below to learn more about the different commands available within each tab on the Ribbon.

The Home tab gives you access to some of the most commonly used commands for working with Word 2013, including copying and pasting, formatting, aligning paragraphs, and choosing document styles. The Home tab is selected by default whenever you open Word.
-
The Insert tab allows you to insert pictures, charts, tables, shapes, cover pages, and more to your document, which can help you communicate information visually and add style to your document.
-
The Design tab gives you access to a variety of design tools, including document formatting, effects, and page borders, which can give your document a polished look.
-
The Page Layout tab allows you to change the print formatting of your document, including margin width, page orientation, and page breaks. These commands will be especially helpful when preparing to print a document.
-
The References tab allows you add annotations to your document, such as footnotes and citations. From here, you can also add a table of contents, captions, and a bibliography. These commands are especially helpful when composing academic papers.
-
You can use the mail merge feature in the Mailings tab to quickly compose letters, address envelopes, and create labels. This is especially useful when you need to send a letter to several recipients.
-
You can use the Review tab to access Word’s powerful editing features, including adding comments and tracking changes. These features make it easy to share and collaborate on documents.
-
The View tab allows you to switch between different views for your document and split the screen to view two parts of your document at once. These commands will also be helpful when preparing to print a document.
-
Contextual tabs will appear on the Ribbon when you’re working with certain items, such as tables and pictures. These tabs contain special command groups that can help you format these items as needed.


Certain programs, such as Adobe Acrobat Reader, may install additional tabs to the Ribbon. These tabs are called add-ins.
To minimize and maximize the Ribbon:
The Ribbon is designed to respond to your current task, but you can choose to minimize the Ribbon if you find that it takes up too much screen space.
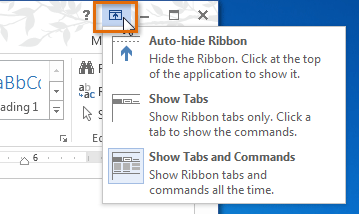
- Click the Ribbon Display Options arrow in the upper-right corner of the Ribbon.
 Ribbon Display options
 - Select the desired minimizing option from the drop-down menu:
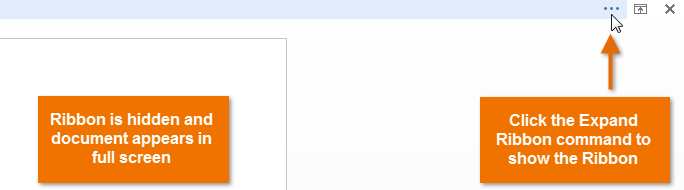
- Auto-hide Ribbon: Auto-hide displays your document in full-screen mode and completely hides the Ribbon from view. To show the Ribbon, click the Expand Ribbon command at the top of screen.
 Auto-hiding the Ribbon
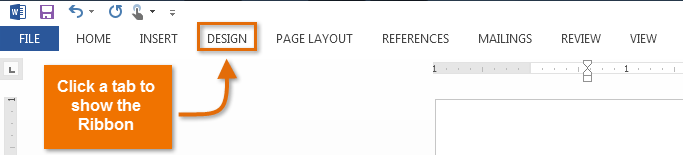
 - Show tabs: This option hides all command groups when not in use, but tabs will remain visible. To show the Ribbon, simply click a tab.
 Showing only Ribbon tabs
 - Show tabs and commands: This option maximizes the Ribbon. All of the tabs and commands will be visible. This option is selected by default when you open Word for the first time.
- Auto-hide Ribbon: Auto-hide displays your document in full-screen mode and completely hides the Ribbon from view. To show the Ribbon, click the Expand Ribbon command at the top of screen.
To learn how to add custom tabs and commands to the Ribbon, review our Extra on Customizing the Ribbon.
To learn how to use the Ribbon with touch-screen devices, review our Extra on Enabling Touch Mode.
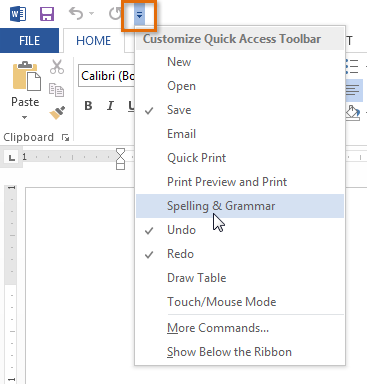
The Quick Access toolbar
Located just above the Ribbon, the Quick Access toolbar lets you access common commands no matter which tab is selected. By default, it shows the Save, Undo, and Repeat commands. You can add other commands depending on your preference.
To add commands to the Quick Access toolbar:
- Click the drop-down arrow to the right of the Quick Access toolbar.
- Select the command you want to add from the drop-down menu. To choose from more commands, select More Commands.
 Adding a command to the Quick Access toolbar
 - The command will be added to the Quick Access toolbar.
 The added command

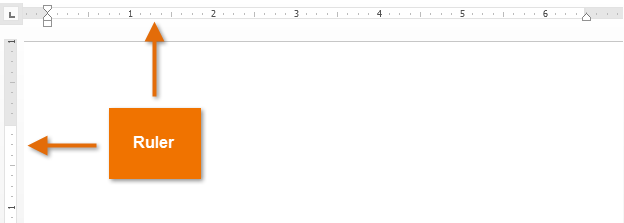
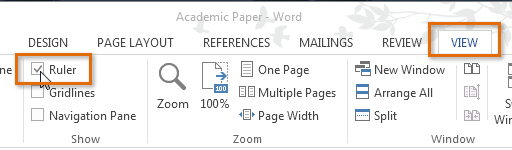
The Ruler
The Ruler is located at the top and to the left of your document. It makes it easier to adjust your document with precision. If you want, you can hide the Ruler to create more screen space.
 The Ruler
To show or hide the Ruler:
- Click the View tab.
- Click the checkbox next to Ruler to show
 or hide the ruler.
 Hiding the Ruler
 or hide
  the ruler.
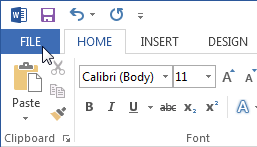
Backstage view
Backstage view gives you various options for saving, opening a file, printing, and sharing your document.
To access Backstage view:
- Click the File tab on the Ribbon. Backstage view will appear.
 Clicking the File tab
Click the buttons in the interactive below to learn more about using Backstage view.
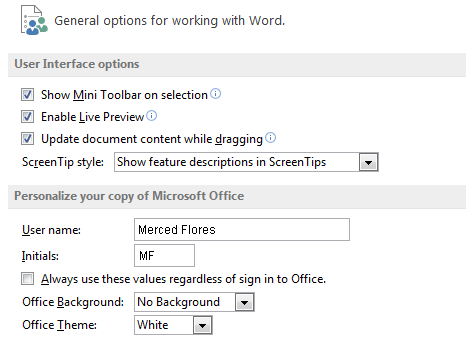
Options
Here, you can change various Word options. For example, you can control the spelling and grammar check settings, AutoRecover settings, and Language preferences.
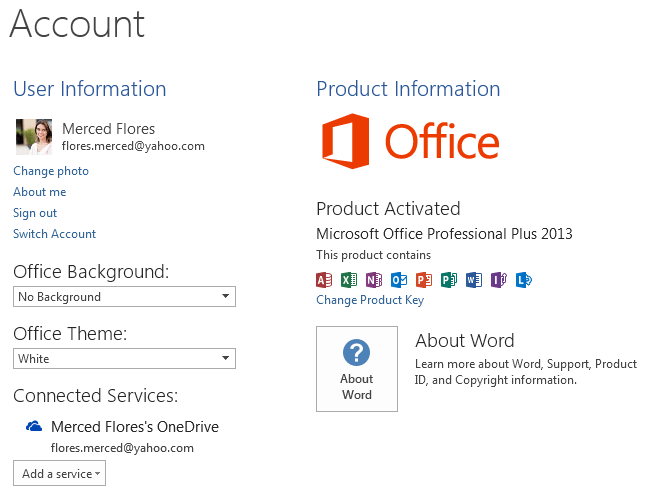
Account
From the Account pane, you can access your Microsoft account information, modify your theme and background, and sign out of your account.
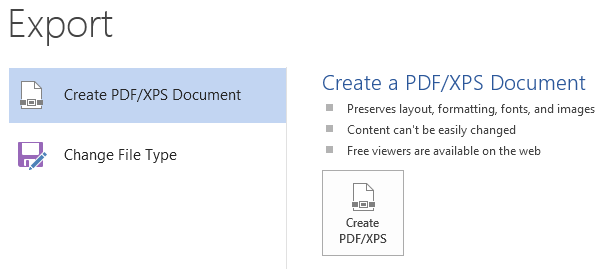
Export
You can choose to export your document in another format, such as PDF/XPS.
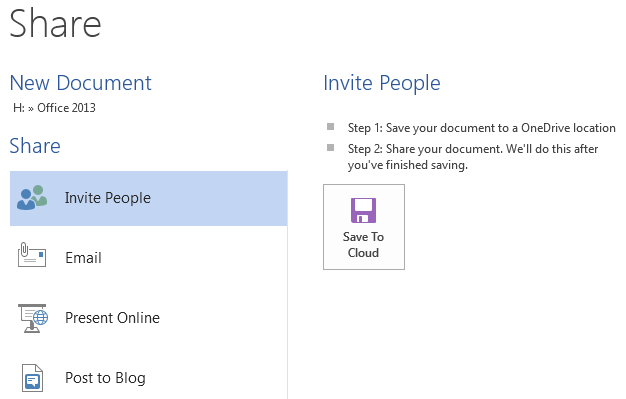
Share
From here, you can invite people connected to OneDrive to view and collaborate on your document. You can also share your document by emailing it, presenting it online, or posting it to your blog.
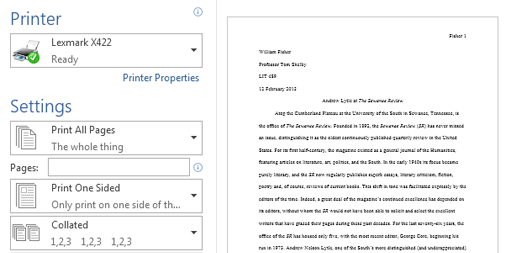
From the Print pane, you can change the print settings and print your document. You can also see a preview of your document.
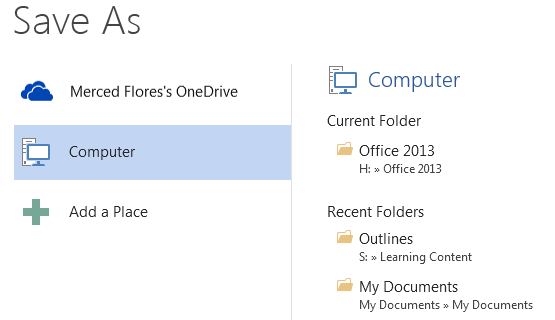
Save and Save As
Use Save and Save As to save your document to your computer or to your OneDrive.
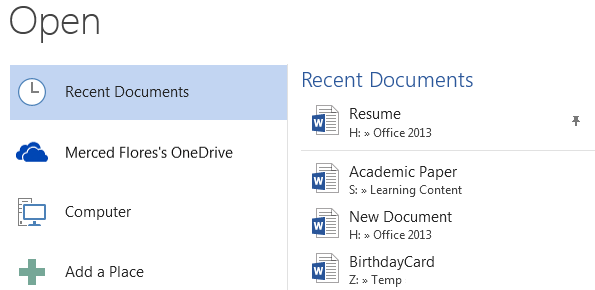
Open
From here, you can open recent documents, as well as documents saved to your OneDrive or on your computer.
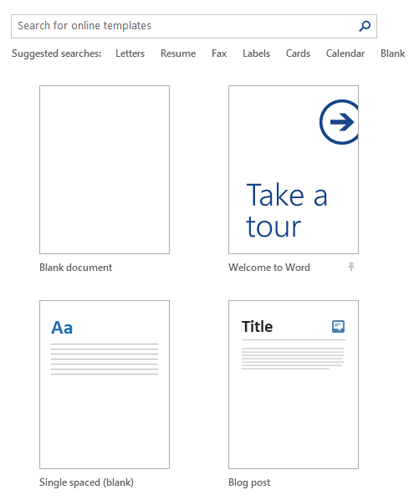
New
From here, you can create a new blank document, or you can choose from a large selection of templates.
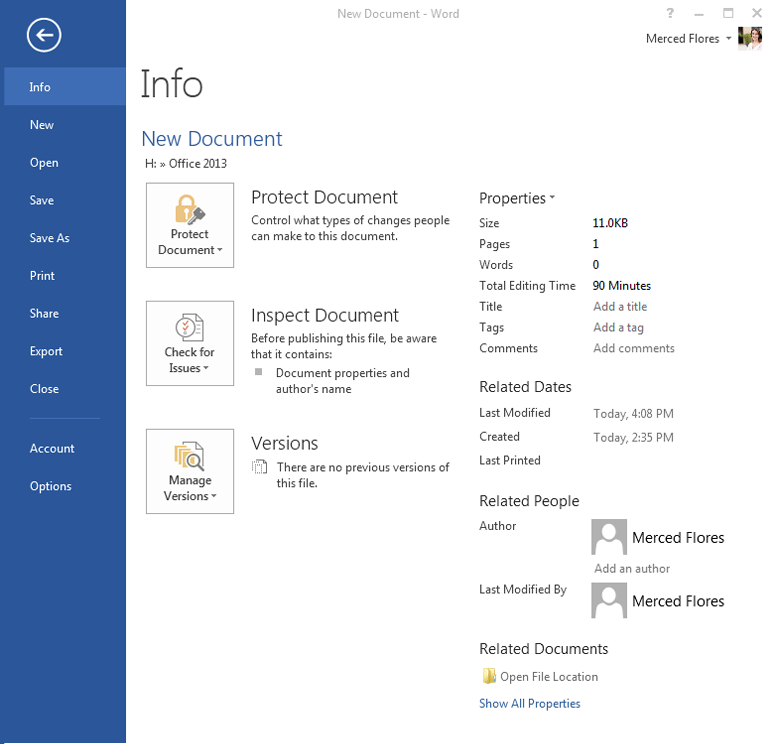
Info
The information pane will appear whenever you access Backstage view.
It contains information on the current document. You can also inspect the document and set protection controls.
Return to Word
You can use the arrow to close Backstage view and return to Word.
Close
Click here to close the current document.
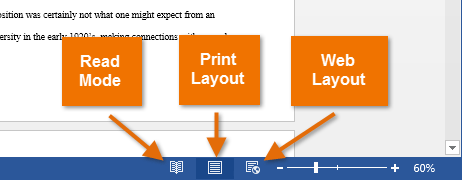
Document views
Word 2013 has a variety of viewing options that change how your document is displayed. You can choose to view your document in Read Mode, Print Layout, or Web Layout. These views can be useful for various tasks, especially if you’re planning to print the document.
- To change document views, locate and select the desired document view command in the bottom-right corner of the Word window.
 Document view options
Click the arrows in the slideshow below to review the different document view options.

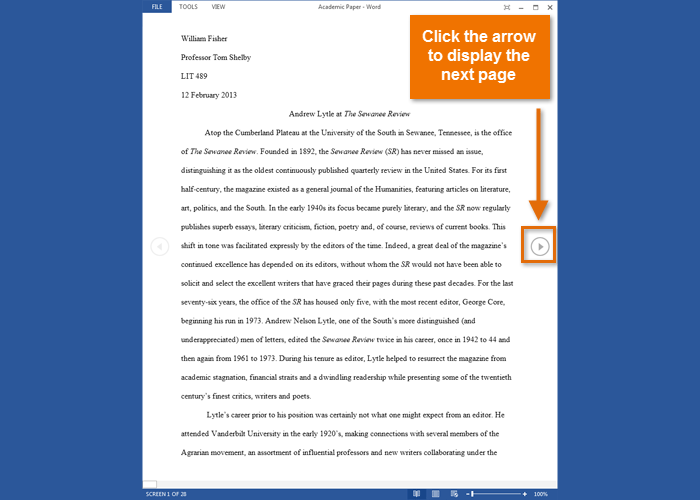
Read Mode: In this view, all of the editing commands are hidden so your document fills the screen. Arrows appear on the left and right side of the screen so you can toggle through the pages of your document.
-
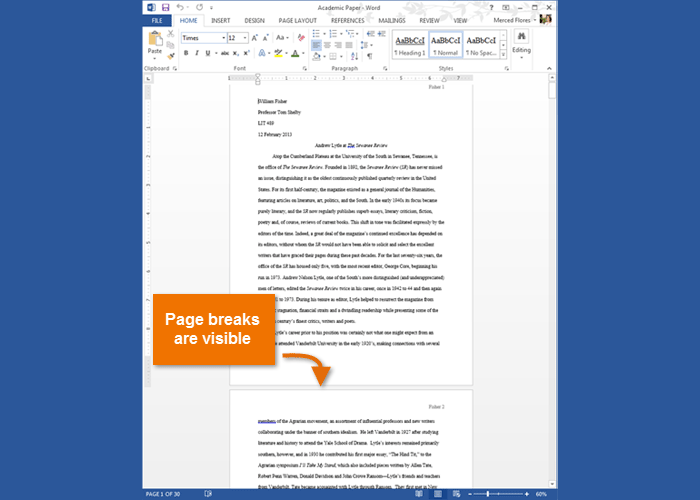
Print Mode: This is the default view, where you create and edit your document. There are page breaks in between each page, indicating how your document will look when printed.
-
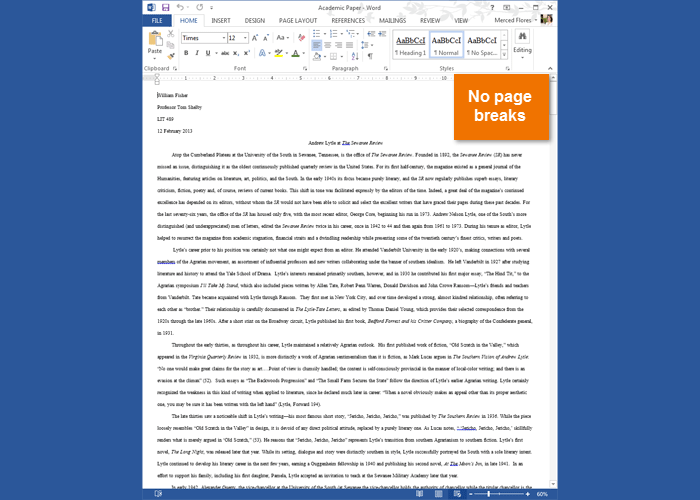
Web Layout: This view removes page breaks. It can help you visualize how your document will display as a webpage.
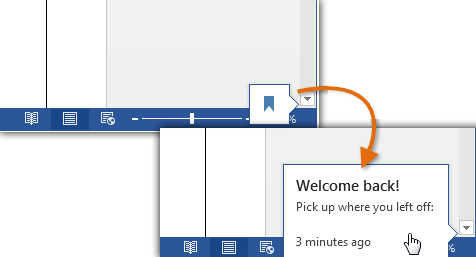
If your document has many pages, Word 2013 has a handy new feature called Resume Reading that allows you to open your document to the last page you were viewing. When opening a saved document, look for the bookmark icon to appear on the screen. Hover the mouse over the bookmark, and Word will ask if you want to pick up where you left off.
 Resume Reading
Challenge!
- Open or navigate to the Word 2013 interface.
- Click through all of the tabs, and review the commands on the Ribbon.
- Try minimizing and maximizing the Ribbon.
- Add a command to the Quick Access toolbar.
- Hide and show the Ruler.
- Navigate to Backstage view, and open your Account settings.
- Try switching document views.
- Close Word (you do not have to save the document).
/en/word2013/creating-and-opening-documents/content/