
Форматы документов Microsoft Word — от старого DOC до нового DOCX
Документ Microsoft Word представляет собой файл с расширением doc или docx. До 90-х годов XX века расширение doc использовалось для текстовых файлов, которые не содержат разметки. И сейчас можно убедиться, что файл такого типа легко создать с помощью, например, программы «Блокнот». Правда, он не будет иметь богатого форматирования, но легко открывается программой Ворд, в которой набранному в блокноте тексту можно придать более оформленный вид. Когда корпорация Майкрософт выпустила программу Ворд, разработчики решили использовать в ней расширение doc. К настоящему времени этот текстовый редактор является самым популярным в мире, поэтому файл с расширением doc ассоциируют с этим программным продуктом и называют просто «вордовский формат».
Что такое формат?

Старый формат DOC отличался сложным содержанием, и нормально читался только в MS Office
В отличие от других текстовых форматов этого же производителя, например, RTF (Rich Text Format File), внутреннее содержание doc более сложное и запутанное. В формате Word сохраняется не только символьная информация, но и различные объекты (например, схемы, диаграммы, формулы, сценарии). Разработчики используют закрытый код, в котором посторонний разобраться не сможет. Чтобы увидеть «внутренности», файл можно открыть, например, в блокноте. В RTF любопытствующий увидит стройные ряды данных, похожие на содержание кода интернет-страниц. Во втором случае — пугающую кашу из знаков самого разнообразного происхождения и вида. В отличие от зашифрованного документа Word, файл RTF не содержит непечатных бинарных символов, легко открывается во всех текстовых и даже графических редакторах. В то же время практически ни одна программа (кроме соответствующего продукта от компании Майкрософт) не обладает способностью адекватно открыть для просмотра и редактирования документ Word. Сейчас офисный пакет этой компании очень широко распространен и доступен любому пользователю.
Современные форматы «вордовских» документов

Даже бесплатные современные редакторы документов умеют корректно работать с DOCX
Кроме того, сложности могут возникнуть даже при использовании разных версий офисного пакета Майкрософт. Дело в том, что начиная с версии Word 2007 года документ по умолчанию сохраняется с расширением не doc, а docx. Поэтому если установлен пакет офиса, выпущенный ранее, то необходима конвертация для устаревших версий. Конверторы для обеспечения совместимости предлагаются самой компанией Майкрософт (Microsoft Office Compatibility Pack), так что обычно при открытии docx, например, в версии Ворд 2003, сложностей не возникает, но при этом может потеряться часть данных форматирования и возможностей редактирования.
Компания Майкрософт была вынуждена пойти на изменение формата Word под давлением международных организаций, которые требовали подвести его под какие-либо стандарты. Был выбран вариант, основанный на языке разметки XML, который часто используется в документах интернет. Документ с расширением docx имеет некоторые преимущества перед устаревшим форматом, в частности, меньший вес, что имеет значение при передаче документа через интернет. Поэтому при ограниченных скоростях передачи данных пользователям имеет смысл использовать более современный формат Word.
Отблагодари меня, поделись ссылкой с друзьями в социальных сетях:
Читайте также
Оставить комментарий ВКонтакте
What is text format in Word?
Formatting Text in Word Formatting text in Microsoft Word refers to controlling how text appears in your document. This includes the size, color, and font of the text. It also covers text alignment, spacing, and letter case. Microsoft Word styles make it easy to change and apply styles throughout a document.
What do you mean by text style?
A text style is a resource that specifies text attributes, including the font, size, line spacing, font style, text alignment, and text and background colors. A text style can also be part of a class definition, so that all items in that class have the same style.
What are the three basic text styles?
Basic Text Styles: Bold, Italic and More Documentation.
Which is the font style?
In a web browser, font style is a CSS (custom style sheet) property used in HTML and ASP.NET programming, defining the font style for text. There are four possible options for font style. If font style is not specified, “normal” is the default option.
What are the 4 types of font?
Most typefaces can be classified into one of four basic groups: those with serifs, those without serifs, scripts and decorative styles.
What are the 5 main types of fonts?
5 Types of Fonts & How to Use Them In Graphic Design [2021]
- Some of the most popular types of fonts include serif, sans serif, slab serif, script and decorative.
- In this guide, we’re going to analyze some of the most prominent font types as well as explain how you can use them in your designs.
- Let’s get into it.
- Serif fonts are the oldest, most basic fonts in the book.
Is there an app that can identify fonts?
WhatTheFont is a Shazam for fonts — a designer’s dream. The app is a mobile version of the website previously developed by MyFonts, and recognizes any font you point at with your camera, including a variation of similar fonts to go with it.
How do I install fonts?
Installing a Font on Windows
- Download the font from Google Fonts, or another font website.
- Unzip the font by double-clicking on the .
- Open the font folder, which will show the font or fonts you downloaded.
- Open the folder, then right-click on each font file and select Install.
- Your font should now be installed!
How do I add font to Word?
Add a font
- Download the font files.
- If the font files are zipped, unzip them by right-clicking the .zip folder and then clicking Extract.
- Right-click the fonts you want, and click Install.
- If you’re prompted to allow the program to make changes to your computer, and if you trust the source of the font, click Yes.
What is the default font for Windows 10?
Segoe UI
How do I change my text font?
Go to Settings > Display > Font Size and Style. Your newly installed font should appear on the list. Tap on the new font to use it as the system font. The font is applied immediately.
How do you type in color text?
You can change the color of text in your Word document.
- Select the text that you want to change.
- On the Home tab, in the Font group, choose the arrow next to Font Color, and then select a color. You can also use the formatting options on the Mini toolbar to quickly format text.
How do I change font size and text in Word?
To change the font size of selected text in desktop Excel, PowerPoint, or Word:
- Select the text or cells with text you want to change. To select all text in a Word document, press Ctrl + A.
- On the Home tab, click the font size in the Font Size box. You can also type in any size you want, within the following limits:
Why would you format text before you start typing?
Good formatting distinguishes different parts of your text and helps your readers take in your message. You can apply formatting to just about every element of your document, from a single character to entire paragraphs. Body text needs to be readable and easy on the eyes.
How do I permanently change the font in Word?
Go to Format > Font > Font. + D to open the Font dialog box. Select the font and size you want to use. Select Default, and then select Yes.
How do I make text thicker in Word?
Adjusting the Width of Characters
- Select the characters you want to scale.
- Press Ctrl+D to display the Font dialog box.
- Make sure the Character Spacing tab (Word 2007) or the Advanced tab (Word 2010, Word 2013, and Word 2016) is selected.
- Use the Scale drop-down list to specify the scaling you want applied to the characters.
- Click on OK.
How do I make my text thicker?
Adding A Line. Adding a line to your font is the easiest way to add width to a font that doesn’t offer a bold option. By adding a line, you will be able to achieve a bold look for both print, and cut. You can also use the adding a line method to cut out your thicker lettering.
How do I darken text in Word?
Select (highlight) the text you wish to change and right click the text box. Open the ‘Font Color’ drop window and choose’Fill Effects’ Choose a Base color and left click the Tint/Shade frames to adjust Tint. Click to see full answer.
How do you change text height in Word?
Changing the Height of a Font
- Select the text you want to affect.
- Enlarge the font size to 15 points. (12 times 1.25 is 15.)
- Display the Advanced tab of the Font dialog box. (On the Home tab of the ribbon, click the small icon at the bottom-right of the Font group, then click the Advanced tab.)
- Using the Scale control, specify a scaling of 80%.
ITGuides.ru
Вопросы и ответы в сфере it технологий и настройке ПК
Форматы документов Microsoft Word — от старого DOC до нового DOCX
Документ Microsoft Word представляет собой файл с расширением doc или docx. До 90-х годов XX века расширение doc использовалось для текстовых файлов, которые не содержат разметки. И сейчас можно убедиться, что файл такого типа легко создать с помощью, например, программы «Блокнот». Правда, он не будет иметь богатого форматирования, но легко открывается программой Ворд, в которой набранному в блокноте тексту можно придать более оформленный вид. Когда корпорация Майкрософт выпустила программу Ворд, разработчики решили использовать в ней расширение doc. К настоящему времени этот текстовый редактор является самым популярным в мире, поэтому файл с расширением doc ассоциируют с этим программным продуктом и называют просто «вордовский формат».
Что такое формат?

Старый формат DOC отличался сложным содержанием, и нормально читался только в MS Office
В отличие от других текстовых форматов этого же производителя, например, RTF (Rich Text Format File), внутреннее содержание doc более сложное и запутанное. В формате Word сохраняется не только символьная информация, но и различные объекты (например, схемы, диаграммы, формулы, сценарии). Разработчики используют закрытый код, в котором посторонний разобраться не сможет. Чтобы увидеть «внутренности», файл можно открыть, например, в блокноте. В RTF любопытствующий увидит стройные ряды данных, похожие на содержание кода интернет-страниц. Во втором случае — пугающую кашу из знаков самого разнообразного происхождения и вида. В отличие от зашифрованного документа Word, файл RTF не содержит непечатных бинарных символов, легко открывается во всех текстовых и даже графических редакторах. В то же время практически ни одна программа (кроме соответствующего продукта от компании Майкрософт) не обладает способностью адекватно открыть для просмотра и редактирования документ Word. Сейчас офисный пакет этой компании очень широко распространен и доступен любому пользователю.
Современные форматы «вордовских» документов

Даже бесплатные современные редакторы документов умеют корректно работать с DOCX
Кроме того, сложности могут возникнуть даже при использовании разных версий офисного пакета Майкрософт. Дело в том, что начиная с версии Word 2007 года документ по умолчанию сохраняется с расширением не doc, а docx. Поэтому если установлен пакет офиса, выпущенный ранее, то необходима конвертация для устаревших версий. Конверторы для обеспечения совместимости предлагаются самой компанией Майкрософт (Microsoft Office Compatibility Pack), так что обычно при открытии docx, например, в версии Ворд 2003, сложностей не возникает, но при этом может потеряться часть данных форматирования и возможностей редактирования.
Компания Майкрософт была вынуждена пойти на изменение формата Word под давлением международных организаций, которые требовали подвести его под какие-либо стандарты. Был выбран вариант, основанный на языке разметки XML, который часто используется в документах интернет. Документ с расширением docx имеет некоторые преимущества перед устаревшим форматом, в частности, меньший вес, что имеет значение при передаче документа через интернет. Поэтому при ограниченных скоростях передачи данных пользователям имеет смысл использовать более современный формат Word.
Отблагодари меня, поделись ссылкой с друзьями в социальных сетях:
Написание письма с помощью текстового редактора Word
1. Откройте меню Файл.
2. Щелкните левой кнопкой мыши на строке Создать. При этом пользоваться кнопкой Создать на панели инструментов нельзя.
3. В диалоговом окне щелкните левой кнопкой мыши на заголовке вкладки Письма и факсы.
4. Щелкните левой кнопкой мыши на названии Мастер писем. На экране появится Помощник (анимационная фигурка), который предложит два варианта писем. Если планируете написать только одно письмо, то щелкните левой кнопкой мыши переключатели Создать одно письмо и переходите к разделу Создание одного письма. Если нужно отправить несколько однотипных писем, которые будут отличаться друг от друга адресами и именами получателей, то щелкните левой кнопкой мыши на переключателе Создать письма для слияния и перейдите к разделу Создание нескольких писем.
Рассмотрим подробнее последовательность создания одного письма.
1. На вкладке Формат письма выберите в полях со списками формат даты, затем шаблон и стиль письма.
2. Если письмо будет отпечатано на готовом бланке, то установите флажок Использовать бумагу с готовой шапкой и укажите, где находится шапка и какой ее размер.
3. Щелкните левой кнопкой мыши на кнопке Далее или на заголовке вкладки Получатель.
4. Заполните текстом поля Имя получателя и Адрес доставки.
5. Для приветствия выберите один из вариантов в поле со списком или выберите соответствующий переключатель.
6. Щелкните левой кнопкой мыши на кнопке Далее или на заголовке вкладки Другое,
7. Определите дополнительные элементы письма. Чтобы увидеть возможные варианты, установите флажки и откройте поля со списками. Если дополнительные элементы не нужны, снимите флажки.
8. Заполните текстом поля на вкладке Отправитель и щелкните левой кнопкой мыши на кнопке Готово.
9. В заготовке письма замените текст, созданный Мастером писем, вашим текстом.
10. Проверьте правильность написания, сохраните и распечатайте письмо.
Попробуем составить деловое письмо средствами Word. Прежде всего необходимо создать новый файл, в котором будет храниться этот документ. Выполните эту операцию с помощью команды Создать меню Файл. В диалоговом окне Создать оставить Нормальный шаблон и нажмите на кнопку ОК. Если Word не был загружен, запустите его, и у вас будет Документ с Нормальным шаблоном по умолчанию.
Создайте файл с помощью команды Сохранить как в меню Файл, где установите его имя, например Letter.doc и место на диске, куда его необходимо записать.
Теперь наберите текст письма, периодически сохраняя его при помощи команды Сохранить или комбинации клавиш Ctrl + S. Можно также активировать режим Автосохранения. Для этого в диалоговом окне команды Сохранить как. нажмите на кнопку Опции. В открывающемся диалоговом окне включите флажок напротив нужной команды. Установите с помощью клавиатуры временной интервал, например, 10 или 5 мин. Теперь программа будет автоматически сохранять файл через каждые 10 (5) минут.
Если вы впервые работаете с Word, необходимо выяснить ряд простых, но важных вещей.
При наборе текста в Word не надо отдельно уделять время выравниванию правого края и перехода на новую строку, в отличие от пишущей машинки. Средства выравнивания и перехода на новую строку Word установленные делать это автоматически.
Специальные напечатанные символы — это знаки, отражающие различные режимы размещения документа и не выводятся при печати документа на бумагу (например, абзацные отметки, знаки табуляции или метки конца строки). При активированном режиме отображения специальных непечатаемых символов все обозначения абзацев и других элементов форматирования выводятся на экран и устраняются из него с помощью кнопки Непечатаемые знаки. После окончания набора текст письма будет иметь примерно такой вид:
О поставке изделия № 9
Директору АОЗТ «Аваль» п. Иваненко И.П.
01002, Украина, Киев, ул. Хрещатик, 22
Уважаемый Иван Петрович!
Мы с удовольствием получили Вашего письма соответственно до поставки изделия № 9, за который Ваша фирма рассчиталась 28.11.96. Мы были очень удивлены, что Вы были вынуждены вторично обратиться к нам. Ни один предыдущий письмо на наш адрес не дошел, что объясняется неудовлетворительной работой почтового отделения.
Однако такой вариант нужно еще дорабатывать. В тексте нет отделений, некоторые строки необходимо расположить по центру или возле правого поля и т.д. Для этого будем выделять необходимые слова или строки с помощью мыши и применять к ним соответствующие команды.
Начнем с реквизитов адресата (получателя). Директору АОЗТ «Аваль» п. Иваненко ИЛ. 01002, Украина, Киев ул. Хрещатик, 22. Сделаем их полужирным начертанием. Выделяем все четыре строки мышью и используем команду Шрифт меню Формат, список Стиль: Полужирный. Проще выполнить с помощью кнопки на панели форматирования.
Теперь необходимо отцентрировать обращение к получателю. Выделяем: Уважаемый Иван Петрович! и нажимаем кнопку этой самой панели Выровнять по центру, а после этого — еще кнопки Полужирный и Курсива чтобы выделить обращение полужирным курсивом. Повторное нажатие кнопки отменяет примененные функции. Теперь текст письма удовлетворяет общепринятые требования.
Иногда шрифт текста нужно изменить.
Чтобы изменить шрифт всего текста, выполните следующие действия:
1. Примените команду Выделить в меню Правка.
2. Выполните команду Шрифт в меню Формат.
3. В диалоговом окне Шрифт выберите в списке нужный, например Aсal Суг. Стиль при необходимости выберите из списка: Обычный, Курсив, Полужирный, Полужирный курсив. Размер: установите, выбрав из списка или введя с клавиатуры нужный кегль 10 (пунктов).
Шрифт всего документа изменится. Все выделения в тексте, если не было внесено поправок в списке Стиль, сохранились. Осталось выровнять правый край текста. Для этого выделите ту часть, в которой это необходимо применить, — в нашем случае это текст письма без реквизитов адресата (получателя) и обращение к нему — и нажмите кнопку Выровнять по ширине на панели инструментов Форматирование.
С помощью описанных ниже операций быстро можно предоставить любому текстовые наилучшего вида:
1. Выполните команду Автоформат в меню Формат. Откроется диалоговое окно Автоформат с уведомлением о готовности редактора отформатировать документ.
2. Нажмите кнопку Опции. Появится диалоговое окно, с помощью которого вы можете контролировать процесс форматирования.
При автоматическом форматировании, в зависимости от установленных вами в диалоговом окне Опции переключателей и флажков, до каждого заголовка и абзаца будет применен определенный стиль. Так, редактор удалит лишние интервалы, отступы и маркеры абзацев, а также заменит некоторые специальные символы, например, символы С, R и ТМ на символы ©, ® и ™ соответствующего шрифта.
Включая или выключая флажки в диалоговом окне Опции, можно установить правила, по которым будет автоматически форматироваться текст. Но в нашем примере никакие ограничения не нужны, ведь мы оставили все флажки включены.
3. Нажмите кнопку ОК в диалоговом окне Опции и затем в окне Автоформат. Word автоматически отформатирует документ. Затем на экране снова появится диалоговое окно Автоформат., но с другим содержанием.
4. Теперь можно просмотреть все изменения форматов, нажимая кнопку Просмотр изменений, принять, не принять или изменить. Желательно сделать это позже, поскольку сначала, чтобы доработать внесенные изменения, нажмите кнопку Таблица стилей.
5. На экране появится диалоговое окно Таблица стилей. Выбирая определенные шаблоны из списка окна Шаблон, можно
изменить внешний вид документа. Изменения во внешнем виде документа демонстрируются в окне Просмотр. В нашем примере, когда речь идет о деловом письме, выбираем шаблон LЕТТЕR-2 — Современное письмо и нажимаем кнопку ОК.
Если внешний вид отформатированного документа устраивает, нажмите кнопку ОК.
6. Снова появится диалоговое окно Автоформат. Теперь нажмите кнопку Принять или еще раз просмотрите все внесенные изменения с помощью кнопки Просмотр изменений. После нажатия этой кнопки появится диалоговое окно Просмотр изменений автоформата, с помощью которого можно контролировать все изменения, примененные к абзацев и символов стиле.
Теперь документ готов: для него сделано форматирование, установлено отступы, выделения. По желанию можно внести еще некоторые элементы оформления символов с помощью команды Шрифт меню Формат, использование которой детально описано в начале подраздела 4.2.
После выполнения всех операций письмо будет достаточно убедительным. Обратите внимание, что отступы между абзацами были установлены с помощью форматирования, а не абзацных знаков.
В такой способ можно придавать документам другое форматирование с помощью стандартных шаблонов, перечисленных в списке Шаблон диалогового окна Таблица стилей. Например, если письмо необходимо отправить по факсу, то следует выбрать шаблон Классический титульный лист факса или Современный титульный лист факса.
в Дальнейшем формат текста документа можно изменять. Для этого удобно пользоваться командой Таблица стилей в меню Формат. Она выводит на экран то же диалоговое окно Таблица стилей.
Для просмотра или изменения стиля выделенного текста (абзаца), а также создания нового стиля необходимо использовать команду Стиль в меню Формат. Так, чтобы применить новый стиль к фрагменту текста, необходимо сделать следующее:
1. Выделите текст, к которому нужно применить другой стиль.
2. Выполните команду Стиль в меню Формат.
3. Откроется диалоговое окно Стиль. В списке Стили этого окна выберите нужное имя стиля. Обратите внимание, что стили абзацев в списке выделены жирным шрифтом, а стили символов — прямым. Образец форматирования абзацев и символов, которое предусматривает выбранный стиль, демонстрируется в окне Просмотр.
4. Нажмите кнопку Применить. Стиль приведенного текста изменился.
5. Если возникла необходимость создать новый стиль или внести изменения в любой из имеющихся стандартных, то прежде чем нажать Применить, следует нажать кнопку Создать или Изменить в диалоговом окне Стиль. Далее задайте имя нового стиля и его характеристики. Затем нажмите ОК. Новый стиль создан с именем, которое вы ему дали.
6. Закончив работу с письмом, его необходимо сохранить в конечном варианте и, если необходимо, распечатать с помощью команды Печать в меню Файл. Перед печатью желательно ознакомиться с видом документа с помощью команды Просмотр в этом самом меню.
Справочник по форматам файлов Word, Excel и PowerPoint
Область применения: Приложения Microsoft 365 для предприятий, Office 2019 и Office 2016
Поддерживаемые форматы файлов и их расширения указаны в следующих таблицах для Word, Excel и PowerPoint.
Форматы файлов, поддерживаемые в Word
В следующей таблице перечислены форматы файлов, поддерживаемые в Word, с сортировкой по расширению.
Файлы в формате PDF можно сохранять и открывать с помощью Word 2019, Word 2016 и Word 2013.
Форматы файлов, поддерживаемые в Excel
В следующих таблицах описываются форматы файлов, поддерживаемые в Excel.
| Расширение | Имя формата файлов | Описание |
|---|---|---|
| CSV | CSV (разделители — запятые) | Сохраняет книгу в виде текстового файла с разделителями-запятыми для использования в другой операционной системе Windows и гарантирует правильное распознавание знаков табуляции, разрывов строки и других знаков. Сохраняет только активный лист. |
| CSV | CSV (Macintosh) | Сохраняет книгу в виде текстового файла с разделителями-запятыми для использования в операционной системе Macintosh и гарантирует правильное распознавание знаков табуляции, разрывов строки и других знаков. Сохраняет только активный лист. |
| CSV | CSV (MS-DOS) | Сохраняет книгу в виде текстового файла с разделителями-запятыми для использования в операционной системе MS-DOS и гарантирует правильное распознавание знаков табуляции, разрывов строки и других знаков. Сохраняет только активный лист. |
| DBF | DBF 3, DBF 4 | dBase III и IV. Пользователи могут открывать файлы этих форматов в Excel 2019, Excel 2016 и Excel 2013, но не могут сохранять файлы Excel в формате dBase. |
| DIF | DIF (Data Interchange Format) | Сохраняет только активный лист. |
| HTM, HTML | Веб-страница | Веб-страница, которая сохраняется в виде папки, содержащей файл HTM и все вспомогательные файлы, такие как изображения, звуковые файлы, сценарии и другие. |
| MHT, MHTML | Веб-страница в одном файле | Веб-страница, которая сохраняется в виде одного файла, содержащего файл HTM и все вспомогательные файлы, такие как изображения, звуковые файлы, каскадные таблицы стилей, сценарии и другие. |
| ODS | Электронная таблица OpenDocument | Формат файлов для сохранения файлов Excel 2019, Excel 2016 и Excel 2013, чтобы их можно было открывать в приложениях для работы с электронными таблицами, использующих формат электронной таблицы OpenDocument, таких как «Документы Google» и OpenOffice.org Calc. Пользователи также могут открыть электронные таблицы формата ODS в Excel 2019, Excel 2016 и Excel 2013. После сохранения и открытия файлов ODS форматирование может быть потеряно. |
| Формат PDF сохраняет форматирование документов и позволяет обмениваться файлами с другими пользователями. При просмотре PDF-файла в Интернете и выводе на печать сохраняется его исходное оформление. Изменение данных в таком файле требует усилий и навыков. Формат PDF также полезен для документов, предназначенных для промышленной печати. | ||
| PRN | Форматированный текст (разделители — пробелы) | Формат Lotus с разделителями-пробелами. Сохраняет только активный лист. |
| SLK | SYLK (формат символьной ссылки) | Сохраняет только активный лист. |
| TXT | Текст (разделитель — табуляция) | Сохраняет книгу в виде текстового файла с разделителями в виде табуляции для использования в другой операционной системе Windows и гарантирует правильное распознавание знаков табуляции, разрывов строки и других знаков. Сохраняет только активный лист. |
| TXT | Текст (Macintosh) | Сохраняет книгу в виде текстового файла с разделителями в виде табуляции для использования в операционной системе Macintosh и гарантирует правильное распознавание знаков табуляции, разрывов строки и других знаков. Сохраняет только активный лист. |
| TXT | Текст (MS-DOS) | Сохраняет книгу в виде текстового файла с разделителями в виде табуляции для использования в операционной системе MS-DOS и гарантирует правильное распознавание знаков табуляции, разрывов строки и других знаков. Сохраняет только активный лист. |
| TXT | Текст в кодировке Unicode | Сохраняет книгу в виде текста Юникода, это стандарт кодировки, разработанный компанией Unicode Consortium. Сохраняет только активный лист. |
| XLA | Надстройка Excel 97–2003 | Надстройка Excel 97–2003 — вспомогательная программа, выполняющая дополнительный код и поддерживающая проекты VBA. |
| XLAM | Надстройка Microsoft Excel | Формат надстроек на основе XML с поддержкой макросов для Excel 2019, Excel 2016, Excel 2013, и Office Excel 2007. Надстройка — это вспомогательная программа, выполняющая дополнительный код. Она поддерживает проекты VBA и листы макросов Excel 4.0 (XLM). |
| XLS | Книга Excel 97–2003 | Формат двоичных файлов Excel 97– Excel 2003. |
| XLS | Книга Microsoft Excel 5.0/95 | Формат двоичных файлов Excel 5.0/95. |
| XLSB | Двоичная книга Excel | Двоичный формат файлов Excel 2019, Excel 2016, Excel 2013 и Excel 2010 и Office Excel 2007. Этот формат файлов, обеспечивающий быструю загрузку и быстрое сохранение, подходит пользователям, которым требуется добиться наибольшей скорости загрузки файла данных. Этот формат поддерживает проекты VBA, листы макросов Excel 4.0 и все новые функции Excel. Но это не формат файлов XML, поэтому он неоптимален для доступа к содержимому и управления им без использования Excel 2019, Excel 2016, Excel 2013, Excel 2010 или Excel 2007 и объектной модели. |
| XLSM | Книга Excel с поддержкой макросов | Формат файлов на основе XML с поддержкой макросов для Excel 2019, Excel 2016, Excel 2013, Excel 2010 и Office Excel 2007. Сохраняет макрокод VBA или листы макросов Excel 4.0 (XLM). |
| XLSX | Книга Excel | Формат файлов по умолчанию на основе XML для Excel 2019, Excel 2016, Excel 2013, Excel 2010 и Office Excel 2007. Не позволяет сохранять макрокод VBA и листы макросов Microsoft Excel 4.0 (XLM). |
| XLSX | Книга Strict Open XML | Версия ISO Strict формата файла книги Excel (XLSX). |
| XLT | Шаблон Excel 97–2003 | Формат двоичных файлов Excel 97—Excel 2003 для шаблонов Excel. |
| XLTM | Шаблон Excel с поддержкой макросов | Формат файлов шаблонов с поддержкой макросов для Excel 2019, Excel 2016, Excel 2013, Excel 2010 и Office Excel 2007. Сохраняет макрокод VBA и листы макросов Excel 4.0 (XLM). |
| XLTX | Шаблон Excel | Формат файлов шаблонов по умолчанию для Excel 2019, Excel 2016, Excel 2013, Excel 2010 и Office Excel 2007. Не сохраняет макрокод VBA и листы макросов Excel 4.0 (XLM). |
| XLW | Книга Excel 4.0 | Формат файлов Excel 4.0, в котором сохраняются только листы, листы диаграмм и листы макросов. Пользователи могут открывать книги в этом формате в Excel 2019, Excel 2016 и Excel 2013. При этом пользователи не смогут сохранять файлы Excel в этом формате. |
| XML | Таблица XML 2003 | Формат файлов таблицы XML 2003. |
| XML | Данные XML | Формат данных XML. |
| XPS | Документ XPS | XPS (XML Paper Specification) — формат файлов, который сохраняет форматирование документа и обеспечивает совместное использование файлов. При просмотре XPS-файла через Интернет или при его печати сохраняется именно тот формат, который задумывал пользователь, а изменение данных в файле требует усилий и навыков. |
Форматы файлов, поддерживаемые в PowerPoint
В следующих таблицах описываются форматы файлов, поддерживаемые в PowerPoint.
Форматы файлов, которые не поддерживаются в Office
Приложения Office не поддерживают форматы файлов, описанные в следующей таблице:
| Приложение | Неподдерживаемый формат файлов |
|---|---|
| Excel | — Диаграмма Excel (форматы файлов Excel 2.0, 3.0 и 2.x) (XLC) — Форматы файлов Lotus 1-2-3 (все версии) (WK1, WK2, WK3, WK4, WKS) — Microsoft Works (все версии) (WKS) — Формат файлов DBASE II (DBF) — Формат файлов Quattro Pro для MS-DOS (WQ1) — Quattro Pro 5.0 и 7.0 для Windows (WB1, WB3) |
| PowerPoint | — Открытие форматов файлов PowerPoint 95 (или более ранних версий) или сохранение в эти форматы — Файлы мастера упаковки (PPZ) — Файлы веб-страниц (HTM, HTML) |
Дополнительная информация о форматах файлов
В этом разделе описываются дополнительные форматы файлов с указанием того, поддерживаются ли они в приложениях Office.
Форматы файлов буфера обмена Microsoft Office
Пользователи могут вставлять данные из буфера обмена Office в Word, Excel и PowerPoint, если данные буфера обмена Office имеют один из форматов, указанных в следующей таблице.
Открытие и просмотр неподдерживаемых форматов файлов
Если необходимый пользователю формат файлов не поддерживается, он может попробовать открыть файл указанным ниже способом.
Найдите в Интернете компанию, разрабатывающую конвертеры форматов файлов, не поддерживаемых в этом приложении.
Сохраните файл в формате, который поддерживается другой программой. Например, пользователям может понадобиться импортировать файл Word, Excel или PowerPoint в другую программу, которая не поддерживает собственный формат файлов этих приложений. При этом другая программа может поддерживать импорт файлов в другом поддерживаемом формате, например, в текстовом формате. В этом случае пользователи могут сохранить свою работу в формате текстового файла, а затем импортировать этот текстовый файл в другую программу.
![]()
Download Article
Learn the basics of formatting a Microsoft Word document
![]()
Download Article
- Formatting the Layout
- Formatting Text
- Adding Pictures, Graphs, & Tables
- Using a Formatted Template
- Saving in Other Formats
- Q&A
|
|
|
|
|
Microsoft Word is the world’s most popular word processing app. Depending on what kind of legal, formal, or personal paper you’re writing, each has its own formatting guidelines. Fortunately, Microsoft Word makes it easy to format the layout, text, and other objects in your document. If you’re new to using Microsoft Word, don’t worry. You can be formatting your document like a pro in no time. This wikiHow guide will teach you simple ways to format a Word document on your PC or Mac computer.
Things You Should Know
- You can find most of the formatting tools you’ll need in the Ribbon menu at the top of your document.
- If you don’t want to do all the formatting from scratch, try using one of Word’s premade templates.
- Save your document in different file formats using the Save a Copy or Save As menu.
-

1
Explore the Word user interface. You can access most of Word’s formatting tools from the Menu Bar or the Ribbon at the top of the window. You can modify which tools are visible using the View menu.
- The Menu Bar is the area at the top of the screen where you will find File, Edit, View, and other important menu commands.
- The Ribbon is at the top of your workspace and contains icons, menus, and shortcuts to common tasks.
-
2
Align your document. Different types of documents call for different text alignments. You can choose whether to align your entire document to the left, right, or at the center on the Home tab by clicking the Alignment buttons in the «Paragraph» section.
- These are the buttons that look like a small version of a document, with small black lines arranged according to their button’s alignment function.
- You can also adjust alignment by selecting the text and objects you want to align, right-clicking the selection, and choosing Paragraph. Select your preferred alignment from the Alignment menu under the General header.
- You can either set the alignment for the whole document or just a selected piece of text.
Advertisement
-
3
Set the line spacing of your document. Need to change your document to single or double-space? You can adjust the spacing of your entire document, or for selected text.
- If you haven’t begun typing or adding content to your Word document, click the Home tab, click the «Line and Paragraph Spacing» icon (a row of lines with vertical arrows to the left of the lines pointing up and down, and select an option.
- If your document already has text or other content, press Ctrl + A (PC) or Cmd + A (Mac) to select everything in the document, right-click the selection, and choose Paragraph. You can then choose your desired spacing from the «Line Spacing» menu.
- For a single-spaced document, choose 1.0. For double-spacing, choose 2.0.
- Many professional documents, like college essays and cover letters, should be double-spaced.
-
4
Adjust the page orientation. If you need to write the document in a different orientation, click the Layout tab at the top of Word, select Orientation, and choose either Portrait or Landscape.
-
5
Change the size of the paper. If you need to print the document on a specific paper size, click the Layout tab, click Size, and then select your desired size from the drop-down list.
- This will change the virtual size of the document you’re writing as well as the actual size of the printout.
-
6
Adjust the headers and footers. A header contains details that will appear on every page of the paper, such as page numbers, your name, or the document title.
- To set the header of your document, double-click on the topmost part of the page, and the header field will appear. You can also click the Insert tab and select Header.
- Footers are just like headers. All text in the footer will appear at the bottom of each page of your document. To set the footer, double-click on the bottommost part of the page, and the footer field will appear. You can also use the Footer button on the Insert tab.
- You can also format your headers and footers by selecting the View tab and clicking Header and Footer on the list. This action will open the headers and footers on your page and allow you to edit them.
-
7
Insert page or section breaks with the Breaks menu. Go to the Layout tab in the and click Breaks if you want to start a new page or section in your document. You can choose from a variety of types of breaks, including Page, Column, and Section. This is a very useful tool if you need to format different sections of your document in different ways.[1]
- For example, you can use section or page breaks to help you format your page numbers so that the numbering restarts with each new section.
-
8
Adjust the margin size with the Margins tool. Click the Margins button in the Layout tab and select a margin from the pre-defined margin settings listed on the drop-down list.
- If you want to use your own margin measurements, click Custom Margins at the very bottom of the drop-down list to set your own.
-
9
Add columns to split your text vertically on the page. If you need to create a newspaper-like document, you can do so by adjusting the format of the document to columns. Click the Layout tab, select the Columns option, and choose the number and alignment of columns from the drop-down list.
- The Columns button looks like a rectangle with two vertical columns of blue lines on it.
- If you want to create one, two, or three columns, you can do so from the preset options. If you’d like to create more, you’ll need to choose More Columns from the bottom of the dropdown menu.
- Note that this column option is different from the columns you get when you insert items like tables on your document.
-
10
Add bullets and numbers to make lists. Highlight the text that you would like to be numbered or bulleted and click the Numbering or Bullets button on the Home tab of the Ribbon.
- These buttons can be found side by side on the Ribbon, near the alignment buttons. The Numbering button displays three small lines with numbers to the left of the lines and the Bullets button displays three small lines with bullet points to the left of the lines.
- There’s also a third button that allows you to create more elaborate multi-level list styles, which is useful for formatting outlines.
-
11
Experiment with document styles. All documents have standard built-in styles (for example, Normal, Title, Heading 1). The default style for text is Normal. The template that a document is based on (for example, Normal.dotx) determines which styles appear on the Ribbon and on the Styles tab. You can see the current style presets for your document in the Home tab of the Ribbon.
- Before you apply a style, you can see all of the available styles and preview how they will appear when applied.
- On the Home tab, click a style to apply it to selected text.
- Click the Styles Pane button (the arrow pointing down and to the right) to view and select from advanced Style options.
- By default, Word applies a paragraph style (for example, Heading 1) to the entire paragraph. To apply a paragraph style to part of a paragraph, select only the specific part that you wish to modify.
-
12
Reveal hidden formatting symbols if you’re having trouble. Word documents often contain hidden code that can cause frustrating problems when you’re trying to modify your formatting. For instance, an invisible extra paragraph mark or section break can create unwanted spaces between paragraphs or lines of text. To see formatting symbols that are normally hidden so you can delete or modify them, you can click the ¶ button in the Home tab, or try one of the following:[2]
- On Windows, open File, select Options, and click Display. Tick the box next to Show all formatting marks.
- In Word for Mac, open the Word menu, then Preferences, then View. Check the box next to All in the Show Non-Printing Characters section of the View menu.
-
13
Use the View menu to change your view of the document. The View menu can let you change how your document looks in Word without actually making changes to the format. For example, Print Layout will show approximately what your document will look like when it’s printed out, while Web Layout will display the whole document in one long chunk without any page breaks.
- The View menu also lets you zoom in and out on your document.
- You can also change your view with the buttons and zoom slider at the bottom right side of the document pane, or with the View tab in the Ribbon.


Advertisement
-
1
Change the font face. On the Home tab, you will a drop-down menu containing a list of fonts to choose from. Use your mouse to select the text you want to change, then choose a font from the list.
-
2
Change font size and color. Also on the Home tab, you can change the size, color, and highlighting for your font. Select the text you want to format, then choose your options.
- By default, they will be set to the size and font associated with your document’s current Style settings. For example, if you’re using Word’s default template, the Normal style will use Calibri as the default font and 12 pt. as the default text size.
- Always consider the formatting guidelines of the document you are writing when choosing the font style and size.
- The standard font for most college and professional papers is Times New Roman font, text size 12.
-
3
Make text bold, underlined, or italicized. Besides setting the font style and size, you can also adjust the emphasis of words and lines in your document. Near the font and text size menus, you will see the Bold, Italics, and Underline buttons.
- Just click the buttons to make your text bold, underlined, or italicized.
- In this section, you can also find special text formatting options such as Strikethrough, Subscript, and Superscript.
-
4
Highlight text on the page. If you would like to change the background color behind selected text, similar to using a highlighter on a printed page, click the Text Highlight icon, which is a pen above a colored line.
- You can also add special text effects with the Text Effects button, which looks like a capital A with a glowing blue border.


Advertisement
-
1
Drag an image into your document. This is a quick way to add a picture to your Word document. Simply select an image on your desktop and drag and drop it into the document window. Make sure your image is placed exactly where you want it before you drop it.
- You can also insert an image by going to the Insert tab, then clicking Pictures. Select one of the options to browse for images on your computer, the web, or Word’s gallery of stock photos.
- You can also insert graphics or other media (such as video or audio clips) using the Shapes, Icons, or 3D Models, and Media buttons.
-
2
Enable text wrapping. Text wrapping changes the layout of your document, allowing the text to flow around the image no matter where it is placed. To turn on text wrapping:
- Right-click (or ctrl-click, on a Mac) on the image and hover over Wrap Text. Select the alignment that best suits your document. You will see a preview as you hover over each option.
- To change the location of the image in the document, select the image and then hold the Ctrl key. While holding the key, use the arrow keys to move the picture around the document.
- When you right-click or ctrl-click your image, you’ll also see an option in the context menu to add a caption under your image.
-
3
Edit your image in the Picture Format tab. Once you insert your image, you can select it to open a new Picture Format tab in the ribbon. From there, you can choose from a variety of tools, such as:
- Making corrections or adding artistic filters to the image
- Adding style effects, such as a drop shadow or frame, to the picture
- Entering alt text
- Tweaking the position of your image or changing the text-wrap settings
-
4
Add a graph or chart in the Insert tab. Click the Insert tab on the Ribbon, and then click the Chart option. Choose your preferred type of graph, such as a pie or bar chart, from the dropdown menu.
- Depending on the type of chart or graph you choose, Word may automatically launch Excel and create a new spreadsheet, where you can enter data for your chart.
-
5
Modify your graph. When you choose a graph type, a new tab will appear in the Ribbon menu called Chart Design. Navigate to that tab with the chart selected to make changes to the look of your graph or chart, or choose the Edit in Excel button to make changes to the data in your chart.
-
6
Use the Table tool to insert a table. If you want to add a table to your document, head over to the Insert tab and click the Table button. A menu will pop open where you can either scroll over a grid of squares to select your number of rows and columns, or select an option like Insert Table or Draw Table.
- Insert Table opens a pop-up menu where you can specify parameters like the number of rows and columns and whether or not the contents of the table autofit your document window.
- The Draw Table tool allows you to draw the table with your mouse directly in the document.
- Once you start creating a table, you’ll see several new table editing tools in the Layout tab.


Advertisement
-
1
Choose a template from the New Documents pane. Templates are a great way to create a nice-looking document without having to do all the formatting from scratch. To use one, open Word and select New from the side menu to create a new document, or select New from Template from the File menu. Click one of the templates on the screen to select it.[3]
- If you don’t see a template you like, use the Search bar at the top of the window to find one that fits your needs. For instance, use keywords like “flyer,” “resume,” or “research paper” to find different styles of templates.
-
2
Click Create to open the template. The template will open as a new document.
-
3
Select text within the template to modify it. Word templates are simply preformatted documents with text, graphics, and other elements already in place. To add your own text, select text anywhere on the document and type in your own. The new text will have the same format as whatever text you selected and replaced. You can also click on a blank area of the document and start typing to add new text.
- To select a single word, double-click it. You can select longer pieces of text by clicking and dragging your mouse, or positioning your cursor at the start of the selection and holding down Shift while pressing the Right Arrow key.
- You can also select and move, delete, or replace other elements in the template, such as images, graphs, or tables.
-
4
Modify your template with the Styles pane. Templates use styles to create their distinctive looks. If you want to change the look of the template, click the Styles button in the Home tab of the ribbon toolbar. Click the down arrow next to any of the style elements and select Modify Style… to make changes.
- You can also make any other types of changes you like using the rest of the tools in the ribbon menu or Format menu.
-
5
Save your modified template as a document. When you’ve made the changes you want to the template, save it the same way you would any other Microsoft Word document.


Advertisement
-
1
Click the file menu and select Save a Copy…. If you want to save a document as a file type other than .DOCX, you can do so with the Save a Copy function.
- If it’s a brand-new document that you haven’t already saved, select Save As… instead.
-
2
Open the File Format dropdown menu. You’ll see this menu at the bottom of the Save a Copy or Save As window.
-
3
Select the format you want from the menu. In addition to common formats like .DOC, .DOCX, .TXT and .RTF, you can also save your document as a PDF, an XML file, or a macro-enabled Word file.
- Check out the list of file formats that are supported in word here.


Advertisement
Add New Question
-
Question
What is Microsoft publishing?

UK_Gamer05
Community Answer
Publisher is a tool for making posters, leaflets, booklet,s etc. It’s for when you need to create something that isn’t a standard document.
-
Question
How do I move from page one to page two of a Word document?
UK_Gamer05
Community Answer
In Word 2016, on the insert tab, either select insert new page or page break.
Ask a Question
200 characters left
Include your email address to get a message when this question is answered.
Submit
Advertisement
Thanks for submitting a tip for review!
Tip
- Unless free-handedly writing your paper, consult the guidelines of your document first before adjusting its format.
- Besides the header, footer, and page layout formats (which affect the entire document), all the other formatting tools can be applied only on specific parts of the document.
About This Article
Thanks to all authors for creating a page that has been read 309,741 times.
Is this article up to date?
Rich Text Format (RTF) is a file format that lets you exchange text files between different word processors in different operating systems.rtf” file name suffix), and send it to someone who uses WordPerfect 6.0 on Windows 3.1 and they will be able to open the file and read it.
Contents
- 1 What is the difference between Microsoft Word document and Rich Text Format?
- 2 What is RTF format used for?
- 3 Is Rich Text the same as txt?
- 4 Is Rich Text Format still used?
- 5 What is Rich Text value?
- 6 What does rich text format look like?
- 7 What is the difference between RTF and DOCX?
- 8 What is meant by TXT and RTF file format?
- 9 What is a rich document?
- 10 How do I convert RTF to word?
- 11 Can an RTF file contained a virus?
- 12 How do I edit rich text format?
- 13 What is the difference between HTML and rich text format?
- 14 What are rich texts?
- 15 What is Rich Text format in Outlook?
- 16 Should I use RTF?
- 17 What is TXT format?
- 18 What is Rich Text content control?
- 19 How do I convert rich text to DOCX?
- 20 How do I open a rich text file in Windows 10?
What is the difference between Microsoft Word document and Rich Text Format?
Although Microsoft Word is able to handle a variety of file formats, DOC is the default. RTF is an older file format that was also developed by Microsoft for Word but has since fallen at the wayside.RTF files are encoded as text files that contain extra keywords for the formatting.
What is RTF format used for?
RTF stands for Rich Text Format and is a universal document file format and is easily read by many of the word-processing packages. It is particularly useful to those using a different word-processing package from those used on campus.
Is Rich Text the same as txt?
RTF and TXT are two file formats used to store simple documents which have fallen to the wayside in favor of other popular formats like DOC. The main difference between RTF and TXT is their feature list. RTF is a lot more powerful than the very simplistic TXT format.TXT files cannot retain any sort of formatting.
Is Rich Text Format still used?
It’s also widely used in other types of apps, such as email clients. Microsoft discontinued the development of RTF in 2008, but it’s still widely supported by apps on almost every operating system.
RichTextValue. A stylized text string used to represent cell text. Substrings of the text can have different text styles. A run is the longest unbroken substring having the same text style.
What does rich text format look like?
Rich text is more exciting than plain text. It supports text formatting, such as bold, italics, and underlining, as well as different fonts, font sizes, and colored text. Rich text documents can also include page formatting options, such as custom page margins, line spacing, and tab widths.
What is the difference between RTF and DOCX?
DOCX is the newest incarnation of the DOC. Comparing with DOC format, RTF has less formatting than DOC. RTF can only support formats like italics, font sizes, types, and boldface. RTF can’t store such large data like DOC.
What is meant by TXT and RTF file format?
Key difference: TXT stands for plain text. Plain text is text that has no formatting, including any bold, italics or different font sizes.RTF stands for Rich text format. Rich text files can contain text attributes such as bold, italics and different fonts and colored text.
What is a rich document?
The Rich Text Format (often abbreviated RTF) is a proprietary document file format with published specification developed by Microsoft Corporation from 1987 until 2008 for cross-platform document interchange with Microsoft products.Most word processors are able to read and write some versions of RTF.
How do I convert RTF to word?
How to Convert RTF to DOC
- Launch Microsoft Word from its main desktop or Start menu shortcut.
- Click the “File” menu, followed by “Open.” Browse for the RTF file you wish to convert using the dialog box, and then double-click to open it.
- Click the “File” menu once again, and then select the “Save As” option.
Can an RTF file contained a virus?
RTF (Rich Text Format) files aren’t designed to carry any computer code that can be run to start a virus infection. So they would seem to be ‘safe’ from virus infection. Sadly, that doesn’t stop hackers using RTF’s maliciously. RTF documents can still be used to compromise a computer.
How do I edit rich text format?
- Open Microsoft Works Word Processor.
- Click “File,” then “Open.” Select “Rich Text Format” from the “Files of Type” menu. Browse through your files to select an RTF file.
- Select the text you want to edit.
- Select the text for which you want to change the formatting.
- Click “File,” then “Save” to preserve your changes.
What is the difference between HTML and rich text format?
HTML, or Hypertext Markup Language, is the primary formatting for web pages, that are used on the internet.Rich Text lacks certain features that are related to internet use, such as linking to files, other web pages, and other protocols like emails.
What are rich texts?
R. (1) Text that includes formatting commands for page layout such as fonts, bold, underline, italic, etc. It may also refer to a multimedia document that can include images, audio and video. See rich media, multimedia and HTML email.
What is Rich Text format in Outlook?
RTF: Rich text formatting (RTF), Outlook’s proprietary message format, is somewhat of a middle ground. It supports text formatting, including bullets, alignment, and linked objects. You can use it when sending to other Outlook and Exchange users, but Microsoft recommends sending in HTML regardless.
Should I use RTF?
There are several reasons why you may want to save files in Rich Text Format (RTF): RTF is readable across many programs and platforms. Although many applications can import Microsoft Word® DOC files, older programs may not be able to import or convert newer versions of Word.
What is TXT format?
TXT is a file extension for a text file, used by a variety of text editors.There is no standard definition of a text file, though there are several common formats, including ASCII (a cross-platform format), and ANSI (used on DOS and Windows platforms). TXT stands for TeXT. MIME type : text/plain. Learn more about .
What is Rich Text content control?
A rich text control can contain custom formatted text or other items, such as tables, pictures, or other content controls.Prohibits users from inserting any other Word objects or any text. Combo Box. Contains a drop-down selection of list entries that users can select and text box that user can edit directly.
How do I convert rich text to DOCX?
How to convert RTF to DOCX
- Upload rtf-file(s) Select files from Computer, Google Drive, Dropbox, URL or by dragging it on the page.
- Choose “to docx” Choose docx or any other format you need as a result (more than 200 formats supported)
- Download your docx.
How do I open a rich text file in Windows 10?
Right-click a blank area in File Explorer or Windows 10 desktop, select New -> Rich Text Format, and then press ENTER. You just created a blank . rtf file. If you have an existing document that’s currently associated with Word, but you prefer to open it in WordPad, you can skip this step and go to the next step 2.
Whether you’re a one-person business operating out of your kitchen, or a billion-dollar company on Wall Street, the expectation is the same. Your business documents must be the paragon of professionalism and competence.


This expectation shouldn’t be a cause for worry. With applications like Microsoft Word you can create professional-looking documents with your own computer. Through the years, Word has become more powerful, yet more intuitive. Anyone with basic computer skills can use Word to create well-designed documents.
In this article, you’ll learn how to format text in Word to make your business documents easier to read and understand. You’ll also pick up tips on how to make sure your formatting doesn’t look amateurish—even if you’re getting started with Word.
Formatting Text in Word
Formatting text in Microsoft Word refers to controlling how text appears in your document. This includes the size, color, and font of the text. It also covers text alignment, spacing, and letter case.
Microsoft Word styles make it easy to change and apply styles throughout a document. A “style” is a set of formatting settings applied to a specific kind of text.
For example, you can set up a style for headings that’s bold, 14 points, aligned left, and uses the Tahoma font. This means all text in your document with the heading style will be formatted the same way. You don’t have to manually format each heading in your document.
In this post, you’ll see how to use MS Word styles.
How to Format Text in Word
To show you how to format text in Word, we’ll walk through formatting a completely unformatted business document file.
This is what my marketing report looks like without any formatting in Word:


As you can see, it’s plain and boring. Nobody would be inspired to read it, let alone act on the findings of the report!
Some basic Word text formatting can fix that.
1. How to Apply Typographic Emphasis
1. For starters, let’s use typographic emphasis (bold, italic, underline) to make the report title stand out.
To do this, select the text you want to emphasize. Click on the bold button on the Microsoft Word ribbon.


Note that the ribbon also has the buttons to apply italic, underline, strikethrough, and other formatting effects for text. Follow the same steps to apply those effects.
2. Now, let’s change the font, font size, and color of the title.
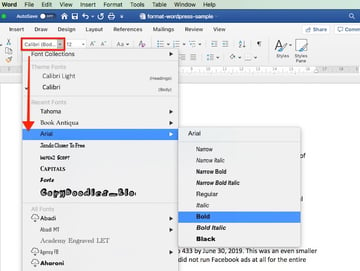
Again, select the text. Click the drop-down arrow on the font section of the ribbon, then select the font you want to apply. In this case, I’m using Arial bold.


3. To change the font size, highlight the text. Click the drop-down arrow on the font size indicator on the ribbon. Click on the font size of your choice.


Or, after highlighting the text, you can type the font size into the font size indicator on the ribbon. This is especially useful when the font size you want isn’t available in the font size selector.


4. You can also use the Increase Font Size or Decrease Font Size buttons on the ribbon to quickly change the font size.


5. We can easily change the font color as well.
Highlight the text, then click the down arrow beside the Font Color selector. Click on the color of your choice.


Choose More Colors… if you wish to apply a custom color.
2. How to Change Capitalization in Word
Microsoft Word also allows you to easily and quickly change the capitalization of your text. For example, if we want to make the title all uppercase, we don’t have to retype it.
Highlight the title, then click the Change Case button on the ribbon.


Or, highlight the text, go to Format > Change Case…


… then click on the radio button for the case you want to apply. Click OK.


Now the title is looking much better. It’s the most prominent part of the document and commands the reader’s attention. However, we can still improve its readability.
3. How to Format Paragraphs
One way to make your document easier to read is by increasing white space around lines and paragraphs.
1. To adjust the line spacing, select the text. Click on the arrow on the Line and Paragraph Spacing button. Select the line spacing you wish to apply.


2. To change the spacing around a paragraph, select the paragraph. Click on the arrow on the Line and Paragraph Spacing button > Line Spacing Options…. Then, type the amount of spacing before and after the paragraph. (Tip: You can adjust other settings from this dialog box as well.)
For the title, I’ll add a generous amount of space after the paragraph, to set it apart from the rest of the document.


3. Finally, let’s change the alignment of the title. Select the text, click on either the Align Left, Center Text, Align Right, or Justify button on the ribbon. Since this is a title, let’s use Center Text.


These simple formatting effects make the title stand out from the rest of the document.
4. How to Work With MS Word Styles
As much as Word makes it easy to format text, if you need to apply formatting effects on the entire document, the process becomes tedious.
Word solves that through styles. MS Word Styles allow you to define a set of formatting commands and apply them automatically to every item in the document with that style.
Let’s look at a specific example:
1. How to Modify a Paragraph Style
Let’s follow the steps above to define a style for the main headings of the report with the following characteristics:
- Font: Arial
- Size: 14 points
- Color: Blue-grey
- Typographic Emphasis: Bold
- Case: Capitalize each word
- Alignment: Left
- Line spacing: Single
- Paragraph spacing: 6 pts before paragraph, 0 pts after paragraph
It would look like this:


One way to apply this exact formatting on every main heading is to modify the existing Heading 1 style in our document. Place your cursor anywhere in the main heading. Go to Styles, right-click on Heading 1, then choose Update Heading 1 to Match Selection.


You can also modify any style by going to Format > Style…. The Style dialog box opens.


Select the style you want to modify from the Style list. This gives you a preview of the paragraph and character, as well as a description of the current style settings of the selected style.
Click Modify…. The Modify Style dialog box pops up.


Change the text and paragraph format settings. You can control the font, font size, font color, typographic emphasis, alignment, and spacing. When you’re done, click OK.
2. How to Apply a Paragraph Style
Now, go to each main heading in the document and apply the Heading 1 style to it. Place the cursor on a heading, go to Styles > Heading 1.


The selected text instantly takes on the formatting of Heading 1.


3. How to Create a List Paragraph Style
You can also create a new paragraph style from scratch, instead of modifying an existing one. To demonstrate, let’s create a list-type paragraph style.
1. Go to Format > Style…. Fill in the Properties section of the dialog box that opens. For Style based on, you may wish to use one of the pre-existing list styles as a starting point.


2. Next, change the formatting options. The box below gives you a preview of what the list paragraph would look like with those settings. There’s also a summary of the formatting properties you’ve specified.


You also have the option to do the following for this style:
- Add to template. Adds the style you’re creating to the document template.
- Add to Quick Style list. Shows the new style to the Quick Style list, making it quickly accessible from the ribbon.
- Automatically update. Automatically updates the style when you manually format a paragraph with that style.
When you’re happy with the settings you’ve made, click OK. Notice how the new Bullet style you created is now included in the Quick Style popup.


Once the bullet style is applied, our list now looks like this:


4. How to Use Character Styles in Microsoft Word
You can also define a style to an individual word or a block of text, rather than a paragraph. In the next example, I’d like to apply a character style for every URL in the document.
1. Select the text. Then, go to Format > Styles…. From the Style dialog, click New…. The Create New Style from Formatting dialog opens.


2. Give the new character style a name. For Style type, choose Character. Then, make the formatting settings you want to apply to this character. Note that you can’t change alignment and spacing for a character style. The preview box shows you a sneak peek of the text based on the settings you specified.


3. When you’re done, click OK.


To apply the character style, place your cursor in a word or select a set of words. Go to Format > Style…. Find the character style you wish to apply. Click Apply.


Tip: To quickly find the MS Word styles you’ve created, for List, choose User-defined styles.
5. How to Use Table Styles in Word
We can also define a table style to provide a consistent look to the tables in our document.
1. Create the table. Go to Insert > Table…, then indicate the number of columns and rows you need in your table (you can always add or remove these later). Click OK.


2. Add your text to the table. If necessary, click and drag any of the borderlines to adjust the width or a column, or the height of a row.
3. To apply a table style, click anywhere on the table, then go to Table Design. The Table Design ribbon appears.


4. Click on the down-arrow for table styles to display the table styles gallery.


5. Click on any style to apply it to your table.


Expand the table styles gallery again to change the existing style, clear the style you applied, or create your own table style.
Discover Great Microsoft Word Templates for 2020
Some experts say it’s a good idea to set up your formatting styles in Word first before typing or copying the text into the document. One quick way to do this is by starting with a Microsoft Word template. Templates come pre-formatted by professional designers to look current and impressive.
You can find thousands of Word templates for all kinds of business documents in Envato Elements.


For a small monthly subscription fee, you get unlimited downloads of all the templates at Elements. You also have unlimited access to everything else in the Elements catalog:
- presentation templates
- web templates
- fonts
- photos
- graphics
- other digital assets
Use as many of these assets as you want, as often as you want, without paying more. This makes Elements a terrific source for all the creative assets you need to create remarkable marketing and communication materials.
You can also pay as you go at GraphicRiver. This marketplace also offers a huge library of templates for Microsoft Word and other digital assets for all your marketing and communication needs. The difference is, you only pay each time you use an item. This can be a very economical option.
Below are some of the best print templates for Word available on Envato Elements and GraphicRiver:
After downloading any of these Microsoft Word templates, you can apply what you’ve learned about formatting text in Word. This way, you can personalize the template so that it aligns with your visual branding and preferences. You now know how to take any Word template and make it your own!
5 Top FAQs on Formatting Text in Microsoft Word
Below are some of the questions that come up as people format text in Word.
1. How Do You Make a Word Document Easier for the Reader to Scan?
Your primary goal when formatting text in Word is to make it easy for people to scan, read, and understand the content of the document. The different formatting options in Word help you achieve this:
- Use typographic emphasis like bold, italics, and underline to emphasize specific text and add variety to your document.
- Break up the document into sections with headings and sub-headings to help the reader scan and navigate their way through it.
- Use either bulleted or numbered lists where appropriate to shorten paragraphs and make lists easier to comprehend.
- Set up line and paragraph spacing so that there’s plenty of white spaces throughout the document.
2. How Many Fonts Should I Use in a Word Document?
It’s easy—and fun—to apply different fonts in Word. Too easy, in fact, that you could end up overwhelming your reader and making your document look like someone played with the formatting.
Avoid this by sticking to a maximum of two different fonts in a single document. For instance, you could choose a sans serif font for your title and headings, and a serif font for all other text. You could even use one font for the entire document, relying on typographical emphasis and color to distinguish different types of text from each other.
3. Why Should I Use Microsoft Word Text Styles?
Use Microsoft Word text styles because they let you apply formatting settings globally throughout your document. This is important in long documents, where formatting each line or paragraph is too onerous. With text styles, you only need to determine what style you want for each piece of text. Word will do the rest.
4. How Can I Make My Document Formatting Consistent?
Using MS Word styles, as you’ve learned in this article, is an easy way to make your document formatting consistent. You decide and set how you want each type of text to be formatted. Then you can apply those styles consistently through your entire document.
Beyond Microsoft Word styles, also make sure that the recurring parts of your document are consistent as well. These include your headers and footers, for example. You must also be consistent with the placement of images: Do they have borders? Are they always within the document’s margins or do they bleed to the edge of the page?
When you use a Word template, these design decisions are already made for you. So, if you want a consistent design without all the hard work, then starting with a template for Word is the way to go.
5. How do You Copy text into Word without also copying junk code?
When you copy text from one application and paste it into Word, you run the risk of also copying the underlying formatting code for it. This code or set of formatting commands is invisible so you won’t know you’re copying it inadvertently. This can mess up your formatting in Word. Soon, you’ll be pulling your hair wondering why Word won’t “follow” your commands.
To avoid this grief, make sure you strip all formatting when you copy and paste the text into Word. Here’s how: Copy the text. In Word, click Edit > Paste and Match Style.


That’s all there is to it!
Using Microsoft Word, Style Your Business Document for Maximum Impact
You’ve learned how to format a document in Word to make it easier to scan and read. Good formatting is also essential to make sure the final document represents you and your business in a favorable light.
You’ve seen how doable formatting is, even if you’re starting from scratch with completely unformatted text. You’ve also discovered that you can rely on professional designers to make the formatting decisions for you by starting with a template for Word.
For unlimited downloads of print templates for Word at a fixed subscription fee, look to Envato Elements. Here, you can also have your fill of fonts, icons, photos, and other design assets you’ll need without having to pay more. Or, get your premium Word templates from GraphicRiver on a pay-per-use basis. You also get a wide range of choices without having to commit to a subscription.
With Microsoft Word styles and formatting tools, there’s no more excuse to have poorly designed business documents. Make your next business document one you’ll be proud of.
Документ Microsoft Word представляет собой файл с расширением doc или docx. До 90-х годов XX века расширение doc использовалось для текстовых файлов, которые не содержат разметки. И сейчас можно убедиться, что файл такого типа легко создать с помощью, например, программы «Блокнот». Правда, он не будет иметь богатого форматирования, но легко открывается программой Ворд, в которой набранному в блокноте тексту можно придать более оформленный вид. Когда корпорация Майкрософт выпустила программу Ворд, разработчики решили использовать в ней расширение doc. К настоящему времени этот текстовый редактор является самым популярным в мире, поэтому файл с расширением doc ассоциируют с этим программным продуктом и называют просто «вордовский формат».
Почему Ворд не сохраняет документ? Возможно, Вы сталкивались с проблемой, когда Word отказывается сохранять отредактированный документ. Этому есть различные объяснения начнем с программного.
Документ защищен командой «Ограничить редактирование»
Сообщение выскакивает, когда на документ установлена защита. Чтобы снять ограничение следует, следует знать пароль и тогда:
- В главном меню выбрать пункт «Рецензирование».
- Кликнуть на иконку «Защита».
- В открывшемся меню найти кнопку «Отключить защиту».
- В новом окне ввести пароль и нажать «Ок». После этого Ваш документ будет доступен для редактирования и сохранения.
Файл снабжен атрибутом «Только для чтения»
Чтобы избавится от проблемы следует:
- Закрыть редактируемый документ.
- Найти его в сохраненной папке и кликнуть правой кнопкой мыши.
- В открывшемся окне команд найти «Свойства».
- В открывшемся окне «Свойства» перейти во вкладку «Общие».
- Снять галочку с команды «Атрибуты» «Только чтение».
Word отказывается сохранять файлы
Что делать если ворд не сохранил документ? По какой причине? Да, просто, не хочет сохранять. Может сбой системный, может еще что то.
В этом случае, самый банальный способ, это выделить текст документа и нажать «Ctrl+C», другими словами копировать.
Далее, создаем новый вордовский документ и нажимаем «Ctrl+V», тобишь вставить.
В 90% случаев, данный способ поможет в вашей беде.
Чем открыть формат doc (docx) на айфоне
На айфон нужно установить приложение, которое будет открывать форматы doc и docx. Одно из приложений — это Office reader. Скачать на айфон его можете с магазина АппСторе.
Нужно найти приложение через поиск и нажать «Установить». Когда программа будет установлена, запустите ее на айфоне. Затем, найдите в программе документы с форматами doc или docx (скрин 3).

Кликните по найденным форматам, и документ откроется для просмотра.
Вместе с тем, можно установить другие приложения на айфон:
- Смарт Офис;
- Все документы;
- и другие приложения.
Перечисленные программы работают без проблем, пользоваться ими можно бесплатно.
Открытие документов
Для того, чтобы открыть документ в Word необходимо перейти на вкладку Файл — Открыть.

- Последние — список последних открытых вами документов.
- OneDrive — доступно при подключении учетной записи Microsoft. Позволяет открыть документы, сохраненные в облаке.
- Этот компьютер — открытие документов, расположенных на вашем компьютере.
- Добавление места — позволяет добавить облачные службы хранения данных.
- Обзор — отобразит классическое окно для поиска и открытия файлов.
Для первоначального сохранения документа Word необходимо в меню выбрать: Файл — Сохранить как

В левой части открывшегося окна необходимо выбрать место сохранения файла: по умолчанию файл сохраняется в папку, которая назначена в настройках, но можно сохранить документ на OneDrive либо в любом другом месте на компьютере.
В право части окна можно указать название файла и его формат.
Для выбора необходимой папки нажимаем Обзор или Дополнительные параметры, выбираем нужную папку и нажимаем Сохранить.
Для сохранения документа Word, которые был создан ранее, можно использовать описанный выше алгоритм либо в меню выбрать: Файл — Сохранить. Документ будет сохранен в ту же папку, из которой он был открыт.
Форматы файлов
Word 2021 позволяет открывать и сохранять файлы в следующих форматах:
| .docx | Стандартный формат, используется по умолчанию. |
| .doc | Устаревший формат. Использовался в версиях Word 1997-2004 гг. Имеет ограниченную функциональность в сравнении с форматов .docx |
| .dotx | Формат, используемый для сохранения шаблонов Word. |
| .dot | Устаревший формат. Использовался для сохранения шаблонов в версиях Word 1997-2004 гг. |
| .docm | Формат, поддерживающий работу с макросами. |
| .dotm | Формат, поддерживающий работу с макросами в шаблонах. |
| Сторонний формат. | |
| .xps | Текстовый формат, разработанный Microsoft. Функциональность ограничена. |
| .mht | Формат, предназначенный для просмотра документа в Интернете. |
| .mhtml | |
| .htm | |
| .html | |
| .rtf | Сторонний формат, поддерживаемый различными разработчиками текстовых редакторов. Функциональность ограничена по сравнению с форматами Word. |
| .txt | Только текст без форматирования. |
| .xml | Универсальный язык, поддерживающий разметку документов. |
| .odt | Формат OpenOffice |
Работа с PDF в Word
Word 2021 позволяет редактировать файлы формата .pdf
Из Word откройте pdf-файл:
Файл — Открыть
После внесения изменений файл можно сохранить как в pdf, так и в формате word:
Файл — Сохранить как
Чем открыть файлы doc (docx) в онлайн
В Интернете есть специальные сервисы, которые открывают документы форматов doc или docx. Перечислим популярные ресурсы:
- Гугл документы онлайн;
- Яндекс диск открывает для просмотра и скачивания документов;
- Гугл диск;
- online-reader.com;
- groupdocs.app/viewer/docx;
- com/Welcome/
- и другие ресурсы.
Разберем, как открыть doc формат в сервисе «onlinedocumentviewer.com/Welcome/». Сначала откройте сервис в браузере. Далее нажмите кнопку «UPLOAD File» (скрин 4).

После чего кликните по кнопке «Обзор», чтобы выбрать и загрузить документ doc с компьютера (скрин 5).

На других сервисах, документы в формате doc и docx, открываются по похожему принципу.
Формат docx что это такое? Формат doc — в чем разница, история
Здравствуйте, друзья! Начинающие пользователи программы Ворд иногда задают вопрос, что такое Docx или Doc. Сегодня мы поговорим об этих форматах подробно.
Итак, формат docx что это такое? Это файловый формат документа, предназначенный для хранения, создания и обработки текстов в Ворде. Он входит в линейку форматов Office Open XML (расширяемый язык разметки). Данный документ был создан компанией Майкрософт Офис Ворд в 2008 году, на базе офисного пакета Ворд 2007. Этот формат может сохранять в себе стили разных документов, форматирование, картинки, видео, ссылки, объекты документа и другие данные (скрин 1).

Что такое формат Doc? Это расширение, которое обозначает текстовый файл документа Ворд. То есть, формат для хранения текстовых документов, как и docx. Формат был создан в 1985 году, и постоянно обновлялся до 2007 года Данный формат документов так же используется в текстовом редакторе Word.
В чем разница между Docx и Doc форматами? Первое отличие формата docx от doc – это работа с версиями Ворда. То есть, документ в формате docx используются в программе Ворд 2007 и более новыми. Формат doc работает с более старыми версиями программы Ворд.
Второе отличие форматов – сжатие. Файл документа Docx использует сжатие данных. Он позволяет сжимать документы без потери качества в килобайтах. В то время, как формат doc этого сделать не сможет.
Последнее отличие – несовместимость форматов. К примеру, формат doc не совместим со многими программами. А формат docx отлично работает на компьютере и других устройствах.
Если у вас возникла проблема с открытием форматов docx или doc, далее в статье мы разберем, как их можно открыть.
Максимальный размер файла для документов Microsoft Word
Максимальный размер файла для документов Microsoft Word, содержащих только текст, составляет 32 МБ. Это верно для документов, созданных в Microsoft Word 2007 и более поздних версиях.
Это много места для текста, но не так много для видео или изображений.
Если вы добавите изображения или видео в документ, максимальный размер, который может иметь файл, увеличится до гораздо более просторных 512 МБ — по крайней мере, теоретически. Это абсолютный максимальный размер, но мы рекомендуем соблюдать осторожность, если ваши файлы Word начинают приближаться к этому размеру.
Документы Word размером в половину гигабайта будут чрезвычайно сложными для работы, особенно если большая часть файла содержит изображения или видео. Однако многое зависит от ваших системных ресурсов и от того, способен ли ваш компьютер работать с такими большими файлами.
Это также зависит от самого Word. Хотя программа обычно стабильно для общего использования, может оказаться, что при работе с файлами значительно большего размера, чем обычно, Word не так стабилен и проворен.
То же самое верно, когда вы открываете файл, размер которого больше обычного.
Что делать, если забыл сохранить документ
Ни для кого не секрет, что человеку свойственно ошибаться, а компьютер просто машина, поэтому возникают ситуации, когда документ закрывается без сохранения.
Завис компьютер, произошел сбой и Word закрылся, скакнуло напряжение и компьютер выключился, закрыл ворд не сохранил текст документа, подобных случаев можно перечислить очень много, но факт остается фактом, документ, над которым работали очень долго, не сохранился.
Или наоборот, заработался, часть документа удалил и случайно нажал «Сохранить» и теперь надо вернуть более раннюю версию.
Избежать подобных ситуаций, поможет встроенная функция автосохранения документа. Эта функция будет сохранять документ через определенное количество минут автоматически.
И все же, бывают случаи, часто от невнимательности или усталости, когда при закрытии документа, машинально нажал «Не сохранять». Конечно же, все последние изменения будут потеряны, но частично, файл удастся спасти..
Давайте рассмотрим, что следует делать, если вышли без сохранения или в результате программного сбоя закрылся текстовый редактор WS Word или отключили свет и компьютер выключился.
- Войдите в меню «Файл».
- Выберите команду «Параметры».
- Кликните на строку «Сохранение».
- Скопируйте адрес папки из ячейки «Каталог данных для автовосстановления».

- Откройте «Проводник» и вставьте в адресную строку скопированную информацию.
- В открывшемся окне найдите последний сохраненный файл. Время сохранения найдете в колонке «Дата сохранения».
- Откройте файл и увидите, что это потерянный Вами документ сохраненный последним автосохранением.
- Откройте через редактор Word этот файл и, воспользовавшись командой «Сохранить как», присвойте интересующее имя и укажите папку для сохранения.

Как найти последний сохраненный документ
Не опытные пользователи текстового редактора, зачастую не обращают внимания в какую папку сохраняют свой документ, а затем не могут его найти. Ситуация распространенная и решается в два клика.
Найти последний сохраненный документ поможет следующий алгоритм:
- Открыть меню «Файл».
- Выбрать строку с командой «Последние» и кликнуть по ней мышкой.
- В открывшемся окне Вы увидите две колонки: в первой колонке будет последний закрытый документ; во второй, папка, где он сохранен.
как сохранить картинку из ворда?
Допустим у нас есть вордовский файл и мы узрели на одной из страниц этого документа приятную картинку и у нас возникло безумное желание сохранить ее как отдельное изображение. Как же поступить.
- Можно сфоткать на камеру телефона)
- Можно увеличить размер окна ворда до размеров, пока картинка не станет максимально видна без прокрутки. Далее сделать скриншот окна (либо через клавишу print screen, либо через специальную программу). И затем обрезать получившееся изображение, избавившись от всего лишнего.
Это конечно хорошо, но вопрос вот в чем: а можно ли вытянуть исходный файл изображения, который вставили в ворд? Нажимаем правой кнопкой по картинке и жмем копировать. Далее открываем paint и жмем ctrl+v — сохраняем.
Сохраните в закладки или поделитесь с друзьями