
In Word, you can automate frequently used tasks by creating and running macros. A macro is a series of commands and instructions that you group together as a single command to accomplish a task automatically.
Contents
- 1 How do you use macros in Word?
- 2 What is a macro and how is it used?
- 3 Why we use macro in MS Word?
- 4 Where do I find macros in Word?
- 5 How do you write macros?
- 6 Can macros have numbers?
- 7 Why macros are useful?
- 8 What is macros in MS Word PDF?
- 9 What is macros and how do you count them?
- 10 Can macro names contain spaces?
- 11 How do I remove macros from a Word document?
- 12 Why do my Word macros keep disappearing?
- 13 What is a macro in Word 2010?
- 14 What is an example of a macro?
- 15 How do I make a macro on my computer?
- 16 What are the steps to run a macro?
- 17 What is macro in C Tutorialspoint?
- 18 Can macros contain viruses?
- 19 How long can macro names be?
- 20 What are the disadvantages of macros?
How do you use macros in Word?
When you have a repetitive series of tasks to perform, you can record those tasks as a macro.
- Place the cursor where you want to start recording the macro.
- Click the Record Macro button.
- Give the macro a name.
- Click the Keyboard button.
- Press the keyboard shortcut keys that you want to use.
- Click Assign.
- Click Close.
What is a macro and how is it used?
A macro is used to automate a task that you perform repeatedly or on a regular basis. It is a series of commands and actions that can be stored and run whenever you need to perform the task. You can record or build a macro and then run it to automatically repeat that series of steps or actions.
Why we use macro in MS Word?
Macros – a little known tool in Microsoft Word – allow you to automate frequently used formatting settings. Macros are especially useful when you find yourself making the same formatting changes over and over again to multiple documents.
Where do I find macros in Word?
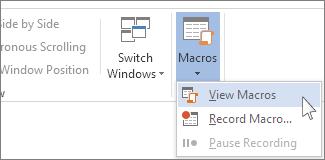
Here’s how you can find macros and VBA modules in your document: In Word or Excel, click View > Macro > View Macros. In PowerPoint, click View > Macro.
How do you write macros?
Record a macro
On the Developer tab, click Record Macro. Optionally, enter a name for the macro in the Macro name box, enter a shortcut key in the Shortcut key box, and a description in the Description box, and then click OK to start recording.
Can macros have numbers?
Macro names should only consist of alphanumeric characters and underscores, i.e. ‘a-z’ , ‘A-Z’ , ‘0-9‘ , and ‘_’ , and the first character should not be a digit.
Why macros are useful?
Macros automate common and repetitive keystrokes that you use in Excel to create and edit spreadsheets. By reducing the number of keystrokes required to perform common commands, macros speed up your production and reduce the time you have to spend staring at an electronic spreadsheet each day.
What is macros in MS Word PDF?
Macros enable you to automate routine operations and tasks in Microsoft programs. A macro is a small program that records the actions you take to complete a specific task, for example, adjusting the page layout to a specific format. You then run the macro to apply all of the recorded actions in just a single click!
What is macros and how do you count them?
Macros—short for macronutrients—include carbs, proteins, and fats. Simply put, counting macros involves tallying up how many grams of each macronutrient type you consume each day, aiming for specific targets. The method is a key component of eating plans like the keto diet.
Can macro names contain spaces?
Macro names must begin with a letter and cannot contain spaces, symbols, or punctuation marks. After the first letter, you can use more letters, numbers, or the underscore character, but the maximum length is 80 characters.
How do I remove macros from a Word document?
To delete a macro, follow these steps:
- Press Alt+F8. Word displays the Macros dialog box.
- From the list of macros, select the macro you want to delete. The Delete button becomes available.
- Click on Delete.
- Repeat steps 2 and 3 for each macro you want to delete.
- Click on Close when finished.
Why do my Word macros keep disappearing?
That could happen if the original file was moved or renamed, so that there was no file with that exact name, and then Word was started. If you have a backup of that file or of the whole drive, restore it to replace the current copy.
What is a macro in Word 2010?
A macro is a teensy program you can write in Word 2010 that automates things, such as repetitive keystrokes or tasks. You start making a macro by recording it.
What is an example of a macro?
Macro is defined as something that covers a large amount, or is large in size. An example of macro is the study of the key driving aspects of an economy; macro economics. An example of macro is a very close up photograph of an ant; a macro photograph.
How do I make a macro on my computer?
How do I create macros?
- Using the mouse that you want to configure, start Microsoft Mouse and Keyboard Center.
- In the list under the button that you want to reassign, select Macro.
- Click Create a new Macro.
- In the Name box, type the name of the new macro.
- Click in Editor, and enter your macro.
What are the steps to run a macro?
Right-click the macro in the Navigation Pane, and then click Design View. On the Design tab, in the Tools group, click Single Step. Click Run. If the macro is a new or edited macro, you will be prompted to save the macro before you can run it.
What is macro in C Tutorialspoint?
CServer Side ProgrammingProgramming. Macro substitution is a mechanism that provides a string substitution. It can be achieved through “#deifne”. It is used to replace the first part with the second part of the macro definition, before the execution of the program.
Can macros contain viruses?
A macro virus is a computer virus written in the same macro language as the software it infects — common victims include Microsoft Excel and Word. Because they target software rather than systems, macro viruses can infect any operating system. So a macro virus can infect a PC or Mac.
How long can macro names be?
The maximum length of a macro name is hard-coded at 20 characters and cannot be changed with compile-time definitions. If you declare a macro name that (not counting the curly braces) is longer than 20 characters, the following error will be printed and the excess characters will become the value of an undefined name.
What are the disadvantages of macros?
The disadvantage of the macro is the size of the program. The reason is, the pre-processor will replace all the macros in the program by its real definition prior to the compilation process of the program.
The Microsoft Office suite is one of the most popular office solutions. From Word and Excel to PowerPoint – the practical applications for writing, calculating, and presenting have been proving their worth for years. But many users are not even aware of the range of features that they provide. For instance, MS Office programs include a function that allows you to create, save, and execute macros in order to automate certain tasks and processes. Especially for regularly recurring workflows, this feature lets you save valuable time and effort.
But what role do macros play in Word and how do these command sequences work exactly? Also find out how to create macros in Word and integrate them into your documents.
Contents
- What is a Word macro?
- How Do Macros Work in Word?
- Creating Macros in Word: How it Works
- Recording Word Macros Executed by Button
- Creating Word Macros Executed via Key Combination
- Executing Word Macros
- Adding macro buttons to a Word tab ribbon
- Importing Existing Macros in Word
- Word Macros: Examples of Useful Command Sequences
- Word Macro for Automatically Determining the Average Sentence Length
- Word Macro Example: Correcting Transposed Letters
- Macro Code for Removing All Hyperlinks
What is a Word macro?
Macros are considered a standard feature in programming as well as the use of computer programs. They are basically subprograms that developers and users can create to save sequences of commands or operating instructions, which can then be started with a simple action. When faced with many regularly recurring tasks, Microsoft Word is typically an application that benefits from the option to automate work steps.
For this reason, the Editor (as well as Access, Excel or PowerPoint, for example) include an integrated tool for recording and executing custom Word macros. The script language Visual Basic for Applications (VBA), likewise developed by Microsoft, serves as the recording language here.
Note
The event-driven programming language VBA replaced the mutually incompatible macro languages of the various Microsoft Office programs in the mid-1990s. Thanks to this standardized solution, cross-program command chains can also be created and run to transfer data from a Word document into an Excel table with a single click, for example.
How Do Macros Work in Word?
Creating macros in Word may sound like a task for experienced programmers at first. After all, writing new program code in a special programming language is not often among the core skills of the average Word user. However, the fact that creating and using Word macros is possiblewithout any programming knowledge at all is thanks to the integrated macro tool. Known as a macro recorder, this tool makes writing code completely unnecessary. To create a new macro, all the user has to do is start recording, perform the desired operating steps and commands, and then stop the recording again when the sequence is finished. The VBA code for Word macros is generated automatically; no further action is required on the part of the user.
Note
With the Visual Basic Editor, the Microsoft Office tools have integrated their own VBA development environment that allows the code of recorded macros to be viewed and edited.
You can also assign each new macro in Word with a unique key combination or button that allows the corresponding command sequence to be run at any time. In the case of buttons, these can be added to the toolbar for quick access, enabling you to start a macro with a single click. If the Word macro created is to be available in all documents, save it in the template file Normal.dotm, which is used by Word as the general template for all new text projects.
Creating Macros in Word: How it Works
If you would like to configure your own automated sequences for your Word documents, but lack the technical knowledge in the programming language VBA, you should use the option to create macros in Word using the recorder. You can find the macro tools as standard under the “Macros” section in the “View” tab. In order to make it easier to create and manage Word macros, however, it is advisable to activate the developer tools which provide you access to the Visual Basic Editor, among other features. This optional toolbox can be unlocked as follows:
- Open the “File” tab.
- Click on “Options”.
- Switch to the “Customize the Ribbon” section and place a checkmark in the “Developer” box (under “Main Tabs”).

As soon as you have activated the “Developer” tools in the Word options, the tabunder the same name will automatically be added to the user interface. When you click on it, you will see the section for creating and managing macros in the far left of the toolbar. Find out in the following step-by-step guide how to create your own macros in Word using this quick-access menu and how you can run them at a later time.
Recording Word Macros Executed by Button
The typical solution for a new macro in Word is one that can be run by clicking a button. If you would like to create such a macro using the developer tools, first click on the “Developer” tab and then select the option “Record Macro”:

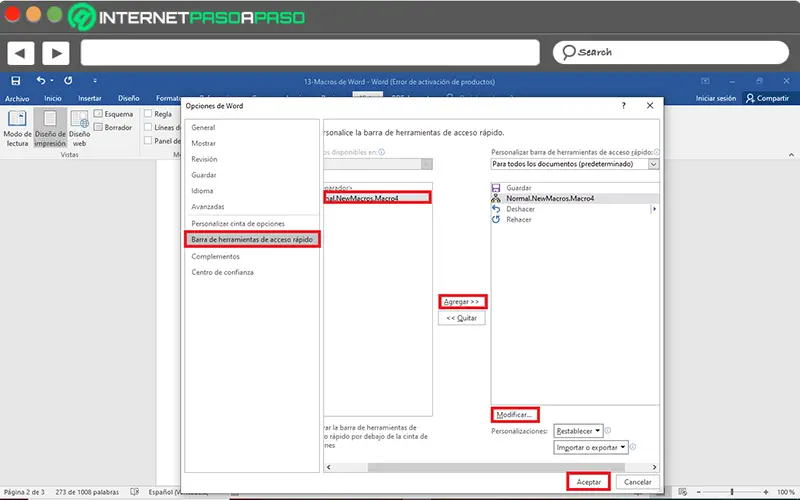
Now enter a name for the macro and select the document you wish to create the macro for under “Store macro in:”. If you would like to create a cross-program macro, simply select the option “All Documents (Normal.dotm)”. To enable the macro to be executed in Word using a button, finally click on “Button”:

Select the macro you wish to create in the left window and click on “Add”, making it also selectable in the right window. Click on it here again and then press the “Change” button. You can now assign your new Word macro any icon you wish:

Confirm your desired button by clicking on “OK” twice. Now perform the actions you want to save in the macro. Word will record your mouse clicks as well as key strokes. However, the recorder will not save any movements or highlighting with the mouse. So if you want to select some text, for example, you will need to use the keyboard (hold down the [Shift] key and use the arrow keys).
Once you have finished the sequence for the macro, you can stop the recording via “Stop Recording”:

The key for the new Word macro will automatically be added to the toolbar for quick access:

Creating Word Macros Executed via Key Combination
You can create a Word macro that can be started using a unique key combination in essentially the same way as for macro buttons: Start the process using the “Record Macro” button in the macro menu under “Developer”, enter a suitable name, and decide whether you want to make the macro available in all documents or only in a certain project. In the final step before beginning the recording, you should choose the “Keyboard” option in order to open the menu for new hotkeys:

In the “Customize Keyboard” menu that then appears, select the macro under “Commands”. Next, click on the “Press new shortcut key” field with the left mouse button and press your desired key combination. Here it is important to press these keys simultaneously. In the following Word macro example, we used the [Ctrl], [Shift], and [#] keys.

Under “Save changes in”, you can define whether the key combination should be valid universally (“Normal”) or only for a certain Word document; to confirm your choice, click on the “Assign” button. As soon as you close the menu, the macro recording will start.
Executing Word Macros
Once you have created a macro, you can start it at any time using the defined execution option. You only need to use the define key combination or click on the corresponding button in the quick-access menu (in the top left). You can also run your Word macros using the macro list by following the steps below:
- Click on the “Macros” button under the “Developer” tab or alternatively on “Macros” in the menu under the “View” tab, and then on “View Macros”.
- Select the desired macro from the list using a left mouse click.
- Now press “Run”.

Adding macro buttons to a Word tab ribbon
If the macro icon is too small for you in the quick-access toolbar or if you would like to add a button for a macro executable via key combination, you can also integrate a macro button into the ribbon of any tab. To do so, simply create a user-defined group for the tab and add the desired macro to it. You can do both in the “Customize Ribbon” menu in the Word options (accessibly via “File” -> “Options”).
Creating a user-defined group:
In the right window under “Customize Ribbon”, select the tab in which you wish to create the new group and then click on the “New Group” button. In addition to the standard groups here, the entry “New Group (User-Defined)” will now appear. Click on this and then press “Rename” to give the group a suitable name as well as an icon:

Integrating a Word macro into a user-defined group:
After creating a user-defined group for a tab’s ribbon, you can now add any number of Word macros to this group. First click on the “Macros” option in the left menu section under “Choose commands from:” and then on the Word macro you wish to integrate. In the right menu window, now click on the user-defined group before finally pressing the “Add” button:

Close the Word options and open the tab you added the macro button to. You should now see this in the group you created in the ribbon:

Importing Existing Macros in Word
You may also find yourself in the situation in which you already have VBA macros, but they are not available in your Word installation. This could be the case, for instance, if you created these macros on another device or received them from another person. Plus, there are various online sources where you can find a wide range of macros. Microsoft Word offers you the option to import ready-made command chains for use in your program. The tool for this is the Visual Basic Editor mentioned earlier. It can be opened via the key combination [Alt] + [F11] or alternatively using the “Developer” tab.
The next steps depend on whether you are importing a finished macro file or pure macro code.
Importing ready-made macro files (.frm, .bas, .cls):
If you have a complete macro as a file, you can import it into your Word installation in just a few steps. First, select the document you want to add the macro to in the Project Explorer. If you can’t find the explorer in the code editor, you can open it by selecting the “View” tab and pressing the “Project Explorer” menu item. In the file manager, now click on your current or another Word project if the macro should only be applied to one document. If you select the project “Normal”, the Word macro will be imported for all documents:

To import the macro, click on “File” and then “Import File”. Specify the storage location for the macro file and press “Open” to start the import process.

Importing macro code:
If you only have the code for a certain macro, other steps have to be taken for importing. Here too, you start by selecting the document you wish to add the automatic command sequence to. Open the explorer and double-click on the entry “ThisDocument” (in the subfolder “Microsoft Word Objects”) for the respective document or under “Normal” (to save the macro in the universal template):

In the code window that appears next, copy the macro code and then click on the “Save” button. If you selected a specific Word document in the previous step, you will be notified that you will have to save it as a “Word document with macros”. Then click on “No” and select the corresponding entry under the “File Type” list. Finally, click on “Save” to generate the new file format:

Word Macros: Examples of Useful Command Sequences
Now that you know what a Word macro is and how to use macros in Word (creating, running, and importing macros), we can explain the purpose of these command chains for automation in Microsoft’s text editor using a number of specific Word macro examples.
Word Macro for Automatically Determining the Average Sentence Length
There are various web tools you can use to analyze your texts – such as to ascertain the average length of your sentences. Using the right macro, you can also find this out directly in Word. The following code automatically looks at all the sentences in your document and divides the total word count by the number of sentences. The macro then displays the average length in a text popup (“Average Words Per Sentence:”):
Sub CountWords()
Dim s As Range
Dim numWords As Integer
Dim numSentences As Integer
numSentences = 0
numWords = 0
For Each s In ActiveDocument.Sentences
numSentences = numSentences + 1
numWords = numWords + s.Words.Count
Next
MsgBox "Average Words Per Sentence: " + Str(Int(numWords / numSentences))
End Sub
Word Macro Example: Correcting Transposed Letters
Anyone who regularly types texts on a computer will know just how quickly typos like transposed letters occur. But these errors can be quickly corrected. Using the following macro, you only need to place the marker in front of the erroneous pair of letters. Running the macro via key combination or button then allows the letters to be swapped around automatically:
Sub TransposeCharacters()
Selection.MoveRight Unit:=wdCharacter, Count:=1, Extend:=wdExtend
Selection.Cut
Selection.MoveRight Unit:=wdCharacter, Count:=1
Selection.Paste
End Sub
Macro Code for Removing All Hyperlinks
Whenever you include website addresses in your texts, Word will automatically change them into clickable hyperlinks to the corresponding sites. But if you don’t want your document to contain these hyperlinks, you usually have to delete the links individually. The following Word macro example saves you a whole lot of work by automatically removing the first hyperlink found in the document. You can therefore run the macro as often as necessary until all the hyperlinks are gone:
Sub RemoveHyperlinks()
'On Error Resume Next
Dim x As Variant
For Each x In ActiveDocument.Hyperlinks
Selection.WholeStory
Selection.Range.Hyperlinks(1).Delete
Next x
End Sub
Click here for important legal disclaimers.
Word for Microsoft 365 Word for the web Word 2021 Word 2019 Word 2016 Word 2013 Word 2010 Word 2007 More…Less
In Word, you can automate frequently used tasks by creating and running macros. A macro is a series of commands and instructions that you group together as a single command to accomplish a task automatically.
To save time on tasks you do often, bundle the steps into a macro. First, you record the macro. Then you can run the macro by clicking a button on the Quick Access Toolbar or pressing a combination of keys. It depends on how you set it up.
-
Click View > Macros > Record Macro.

-
Type a name for the macro.
-
To use this macro in any new documents you make, be sure the Store macro in box says All Documents (Normal.dotm).
-
To run your macro when you click a button, click Button.
-
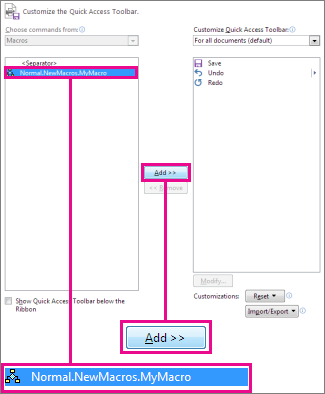
Click the new macro (it’s named something like Normal.NewMacros.<your macro name>), and click Add.
-
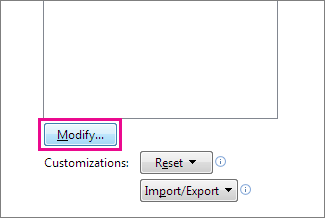
Click Modify.
-
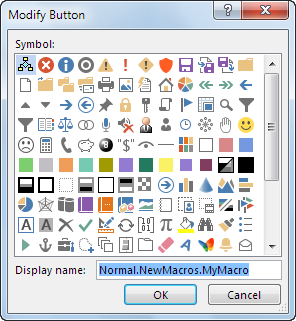
Choose a button image, type the name you want, and click OK twice.
-
Now it’s time to record the steps. Click the commands or press the keys for each step in the task. Word records your clicks and keystrokes.
Note: Use the keyboard to select text while you’re recording your macro. Macros don’t record selections made with a mouse.
-
To stop recording, click View > Macros > Stop Recording.
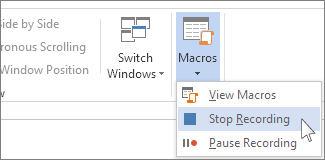
The button for your macro appears on the Quick Access Toolbar.

To run the macro, click the button.
-
Click View > Macros > Record Macro.
-
Type a name for the macro.
-
To use this macro in any new documents you make, be sure the Store macro in box says All Documents (Normal.dotm).
-
To run your macro when you press a keyboard shortcut, click Keyboard.
-
Type a combination of keys in the Press new shortcut key box.
-
Check to see whether that combination’s already assigned to something else. If it’s already assigned, try a different combination.
-
To use this keyboard shortcut in any new documents you make, be sure the Save changes in box says Normal.dotm.
-
Click Assign.
-
Now it’s time to record the steps. Click the commands or press the keys for each step in the task. Word records your clicks and keystrokes.
Note: Use the keyboard to select text while you’re recording your macro. Macros don’t record selections made with a mouse.
-
To stop recording, click View > Macros > Stop Recording.
To run the macro, press the keyboard shortcut keys.
To run a macro, click the button on the Quick Access Toolbar, press the keyboard shortcut, or you can run the macro from the Macros list.
-
Click View > Macros > View Macros.
-
In the list under Macro name, click the macro you want to run.
-
Click Run.
To make a macro from one document available in all new documents, add it to the Normal.dotm template.
-
Open the document that contains the macro.
-
Click View > Macros > View Macros.
-
Click Organizer.
-
Click the macro you want to add to the Normal.dotm template, and click Copy.

-
Click File > Options > Customize Ribbon.
-
Under Choose commands from, click Macros.
-
Click the macro you want.
-
Under Customize the ribbon, click the tab and custom group where you want to add the macro.
If you don’t have a custom group, click New Group. Then click Rename and type a name for your custom group.
-
Click Add.
-
Click Rename to choose an image for the macro and type the name you want.
-
Click OK twice.
-
On the Developer tab, in the Code group, click Macros.
-
In the Macro name box, type a name for the macro.
Note: If you give a new macro the same name as a built-in macro in Word, the new macro actions will replace the built-in macro. To view a list of built-in macros, click Word Commands in the Macros in list.
-
In the Macros in list, click the template or document in which you want to store the macro.
To make your macro available in all documents, be sure to click Normal.dotm.
-
Click Create to open the Visual Basic Editor.
After you open the Visual Basic Editor, you may want more information about working with Visual Basic for Applications. For more information, click Microsoft Visual Basic Help on the Help menu or press F1.
You can record a sequence of actions, or you can write a macro from scratch by entering Visual Basic for Applications code in the Visual Basic Editor.
Note: To work with macros in Office Word 2007, you need to show the Developer tab.
-
Click the Microsoft Office Button
, and then click Word Options. -
Click Popular.
-
Under Top options for working with Word, select the Show Developer tab in the Ribbon check box.
Note: The Ribbon is a component of the Microsoft Office Fluent user interface.
 , and then click Word Options.
-
On the Developer tab, in the Code group, click Record Macro.
-
In the Macro name box, type a name for the macro.
Note: If you give a new macro the same name as a built-in macro in Office Word 2007, the new macro actions will replace the built-in macro. To view a list of built-in macros, on the Developer tab, in the Code group, click Macros. In the Macros in list, click Word Commands.
-
In the Store macro in box, click the template or document in which you want to store the macro.
Important: To make your macro available in all documents, be sure to click Normal.dotm.
-
In the Description box, type a description of the macro.
-
Do one of the following:
-
Begin recording To begin recording the macro without assigning it to a button on the Quick Access Toolbar or to a shortcut key, click OK.
-
Create a button To assign the macro to a button on the Quick Access Toolbar, do the following:
-
Click Button.
-
Under Customize Quick Access Toolbar, select the document (or all documents) for which you want to add the macro to the Quick Access Toolbar.
Important: To make your macro available in all documents, be sure to click Normal.dotm.
-
Under Choose commands from dialog box, click the macro that you are recording, and then click Add.
-
To customize the button, click Modify.
-
Under Symbol, click the symbol that you want to use for your button.
-
In the Display name box, type the macro name that you want to display.
-
Click OK twice to begin recording the macro.
The symbol that you choose is displayed in the Quick Access Toolbar. The name that you type is displayed when you point to the symbol.
-
-
Assign a keyboard shortcut To assign the macro to a keyboard shortcut, do the following:
-
Click Keyboard.
-
In the Commands box, click the macro that you are recording.
-
In the Press new shortcut key box, type the key sequence that you want, and then click Assign.
-
Click Close to begin recording the macro.
-
-
-
Perform the actions that you want to include in the macro.
Note: When you record a macro, you can use the mouse to click commands and options, but not to select text. You must use the keyboard to select text. For more information about selecting text by using the keyboard, see Select text.
-
To stop recording your actions, click Stop Recording in the Code group.
Change the keyboard shortcut for a macro
-
Click the Microsoft Office Button
, and then click Word Options. -
Click Customize.
-
Next to Keyboard shortcuts, click Customize.
-
In the Categories list, click Macros.
-
In the Macros list, click the macro that you want to change.
-
In the Press new shortcut key box, type the key combination that you want to choose.
-
Check the Current keys box to make sure that you aren’t assigning a key combination that you already use to perform a different task.
-
In the Save changes in list, click the option that matches where you want to run your macro.
Important: To make your macro available in all documents, be sure to click Normal.dotm.
-
Click Close.
-
On the Developer tab, in the Code group, click Macros.
-
In the list under Macro name, click the macro that you want to run.
-
Click Run.
-
On the Developer tab, in the Code group, click Macros.
-
In the Macro name box, type a name for the macro.
Note: If you give a new macro the same name as a built-in macro in Office Word 2007, the new macro actions will replace the built-in macro. To view a list of built-in macros, click Word Commands in the Macros in list.
-
In the Macros in list, click the template or document in which you want to store the macro.
To make your macro available in all documents, be sure to click Normal.dotm.
-
Click Create to open the Visual Basic Editor.
After you open the Visual Basic Editor, you may want more information about working with Visual Basic for Applications. For more information, click Microsoft Visual Basic Help on the Help menu or press F1.
To make quick work of tasks that you do often, in the desktop version of Word you can bundle the steps into macros that run with a single click. In Word for the web, you have to step through such tasks manually.
If you have Word, first click Open in Word to open your document in Word.

Then follow the instructions for the desktop version of Word.
When you run the macro in Word and save the document, you’ll see the results of the macro when you reopen your doc in Word for the web.
Need more help?
Want more options?
Explore subscription benefits, browse training courses, learn how to secure your device, and more.
Communities help you ask and answer questions, give feedback, and hear from experts with rich knowledge.
Today, Microsoft Word It is cataloged as the main word processor in the world. Since, it is a very complete tool for create, edit, customize and manage any digital document.
That is why many students and professionals rely on this program to create digital texts of any kind. So that, constantly, they must execute a series of tasks that are repeated in all their writings and for this, they have been created word macros.
Thus, in order to automate your most common tasks in Word, you can make use of this functionality. Therefore, it is effective to know what are macros for, what are their advantages and typeslike the process to follow to enable and execute them.
What is a Macro in Microsoft Word and what is this tool for?
Basically a macro is a series of commands, patterns, and instructions that are grouped together as a single prompt that has the ability to complete a task automatically. In other words, said series of instructions specify a specific input sequence to launch several actions simultaneously, once they are sent to the program.
Thus, it is a functionality that used to automate a sequence of repetitive mouse movements or a set of keystrokes, with which it is possible to mechanize several tasks that will be executed one after another in order. With this, users you will get much more productivity when editing or managing your documents in Microsoft Word.
What are the benefits of using Macros in Microsoft Word?

Since Word macros have the ability to automate a set of actions from a series of commands or instructions, they are of course considered helpful elements in the program, thanks to the great utility they offer.
Reason for which, they guarantee several advantages that it is important to take into account and, Next, we mention each of them:
- Allow save time around all those frequently executed tasks in Word. Since, they do not require a set of keystrokes or a sequence of routine mouse movements.
- Macros are instructions very easy to run and intuitive to usebecause they only require a combination of keys (keyboard shortcut) or the use of a single button.
- Also increase the usefulness of the program, given that macros offer the possibility of developing new functions, which they can create as they need. In addition to that, they allow you to customize the quick access bar.
- In most cases, this functionality manages to reduce the rate of errors in digital documents because macros have the peculiarity of always working perfectly, as long as their creation process has been correct. On the other hand, if you carry out the tasks manually, the probability of making mistakes will increase.
Types of macros in Word What are all the ones that can be recorded and executed?
Although it is true, there are several types of macros that can be recorded and executed in Microsoft Word. But, what are these typologies? Next, we name and detail the main classes of macros that are distinguished in this word processor:
- application macro: Are those scripts that have a follow-up chronologically and they are used to economize tasks, basically. Therefore, they only allow one set of instructions to be executed and, in general, are stored in a special location in the software.
- Macro in programming: These are the macros that allow define an abbreviation to represent a portion of a program and with it, the programmer can avoid repeating identical parts of a software constantly. Since, it has the use of said abbreviation as many times as required.
Learn how to enable and run macros in your Microsoft Word quickly and easily
If you want to use this effective functionality in Word, in order to automate certain tasks that you must carry out repetitively or routinelyit is essential to know each of the steps to follow in order to create or enable a macro in said program, just like to run it.
Thus, here we detail each procedure:
Enable
In general, the macros that are created in Word are assigned to a button or a combination of keys to automatically execute the series of established instructions. To start, we teach you how to record a macro with a single buttontaking into account that, instead of the mouse, you have to use the keyboard to select some text while the macro is being created:
- Initially, proceed to search and access any Word documentto locate you in the ribbon of options of the program and click on the “View” tab.
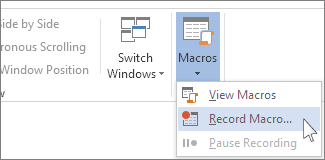
- After that, go to the Macros group and press the down arrow of that option, and then click where it says “Record macro…”.
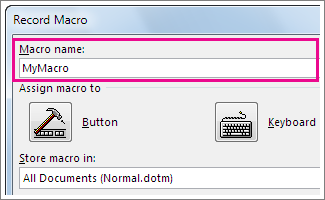
- Now, you have to enter the name you want for that macroin the indicated bar.
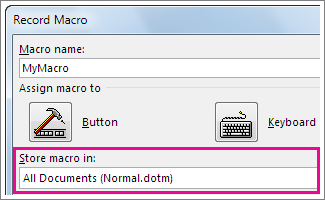
- In the section of “Save macro to:”make sure you select the option “All Documents (Normal.dotm)” to be able to use that sequence in other subsequent files.
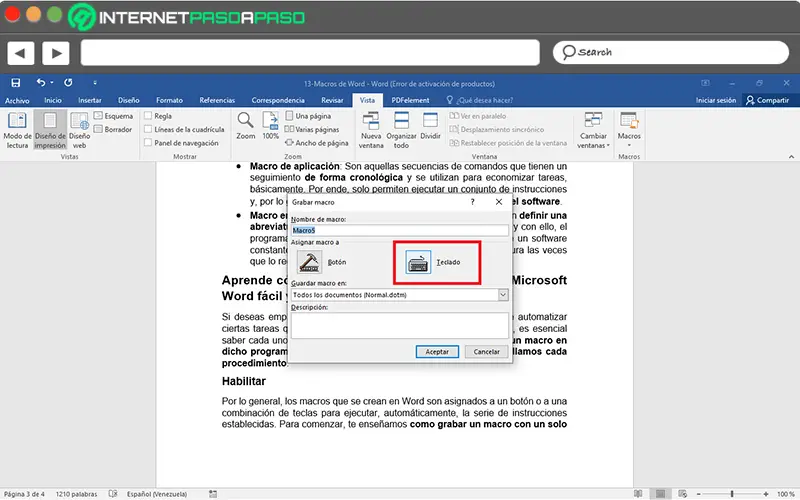
- In the part of “Assign macro to:”Choose “Button”.

- Next, on the Quick Access Toolbar, click on the new macro and press add. After, Click on “Modify…” and there you have to choose an image for the button adding the name you want. done that, click OK twice.

- Now click the commands or press the keys for each step of the task, during the process of recording the steps.
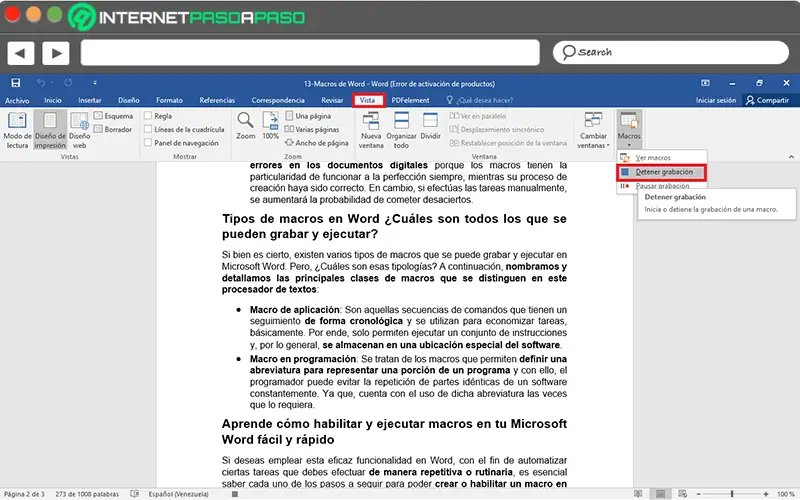
- When you finish the above, come back to Access the “View” tab, select “Macros” and click on “Stop recording”.

- Lastly, the new macro button will be displayed in the Quick Access Toolbar of the program.
Secondly, To record a Word macro with a keyboard shortcut, the process to follow is as follows:
- Located in the Word document, Click on the “View” tab and select the “Macros” option to click on “Record macro…”.
- After the above, enter the name you prefer for that macro, choose “All Documents (Normal.dotm)” in the part of “Save macro to:” and in this case, in “Assign macro to:”, click on “Keyboard”.

- Later, in the Commands box, choose the macro in question and under “New shortcut key”, type a keyboard shortcut or key combination. As usual, “Ctrl + key” is used forks It is important that you check that this shortcut is not assigned to another default function in the program.
- Also, choose the “Normal.dotm” option in the box “Save changes to:” and done all of the above, click the “Assign” button.

- Now, it’s time to record the steps and for that, click commands or press keys for each step of the action.
- Finally, click “Stop recording”within the menu of “Macro” belonging to tab “View”.
Run

Basically, to run a macro in Word, you have to use the button located on the quick access toolbar, use the key combination assigned for a certain action or access the list of macros in the program.
.Next, We explain each of the steps to follow to carry out this last mentioned execution:
- Locate yourself in the indicated Word document and proceed to select the “View” tab, to now click on “Macros”.
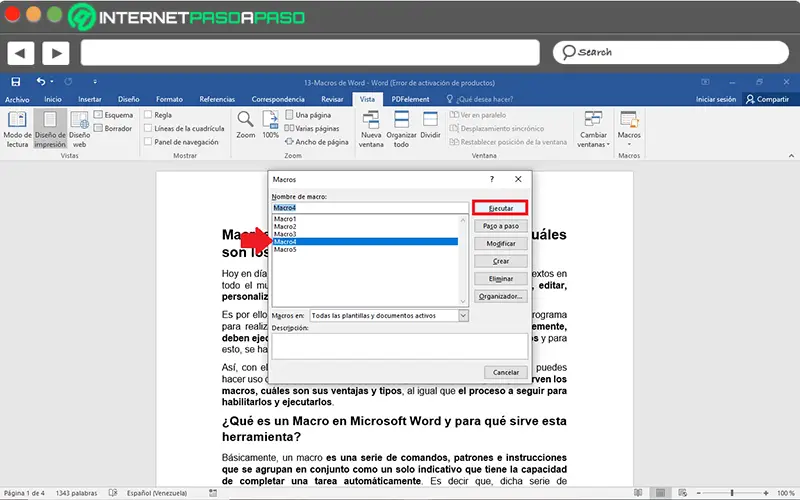
- Now, among the available options, Click on “See macros”which is the one located in the first position.
- After that, they will show you a list with all the macros you have created and these, of course, will be identified with the name that you assigned to them during their recording.
- Finally, find the macro you want to use, click on it and press the “Run” button. Immediately, all the instructions established at the beginning will be carried out.
Macro Security How safe is it to use them on documents of unknown origin?
Although this added functionality in Office is very useful and reveals remarkable benefits for users, unfortunately, it can be considered as a powerful threat. Since some macros in Word contain viruses, it is considered an ideal tool for run and spread malware in your documents.
Thus, many years ago, the distribution of dangerous computer viruses through macros in documents of unknown origin, was notably accentuated and managed to extend for an entire era. In particular, since it is the unique cross-platform threats between Windows and Macintosh computers.
But, starting in the year 2006, Microsoft designed some security patches for Word and thus, managed to eliminate the risks caused by these macros. Consequently, currently the risk of infecting a computer or file with macro viruses has been almost completely reduced and they are becoming less common, since the same program manages to regulate whether a macro of uncertain origin can be executed or not; but, in the same way, We recommend that you pay attention to it..
A macro is a series of commands that is recorded so it can be played back (executed) at a later time. Macros are great for reducing the amount of work you have to do on a series of steps that you perform frequently. Here’s how to create and test a macro in Microsoft Word.
Instructions in this article apply to Word for Microsoft 365, Word 2019, Word 2016, Word 2013, and Word 2010.
Why Use a Macro
With a macro, you can get the same results by clicking a command instead of going through all the steps. Some ways to use macros to increase your productivity include:
- Insert your company logo and name in a particular typeface.
- Insert a table that you need to create regularly.
- Format a document with certain characteristics, such as page numbering and double-spaced paragraphs.
Creating and using macros is a learned skill but the resulting efficiency is well worth the effort.
Create a Macro
There are more than 950 commands in Word, most of which are on menus and toolbars and have shortcut keys assigned to them. Some of these commands, however, are not assigned to menus or toolbars by default. Before you create your own Word macro, check to see if it exists and can be assigned to a toolbar.
To see the commands available in Word, follow these steps:
-
Select the View tab.
-
Choose Macros.
-
Select View Macros.
Or, press the Alt+F8 shortcut key to access the Macros dialog box.
-
Select the Macros in drop-down arrow and choose Word Commands.
-
In the alphabetical list of command names, highlight a name to display a description of the command at the bottom of the Macros dialog box under the Description label.
If the command you wish to create exists, don’t duplicate it with your own Word macro. If it doesn’t exist, proceed with creating your Word macro.
Plan for Effective Word Macros
The most important step in creating effective Word macros is careful planning. This planning includes having a clear idea of what you want the Word macro to perform, how it will make your future work easier, and the circumstances under which you intend to use it.
Once you have these things in mind, plan the actual steps. This is important because the recorder will remember everything you do and include it in the macro. For example, if you type something and then delete it, every time you run that macro, Word will make the same entry and then delete it, making a sloppy and inefficient macro.
When you plan your macros, here are some things to consider:
- Plan the commands and the order in which you want the macro to perform the commands.
- Know the shortcut keys for the commands you plan to use. This is particularly important for navigation as you aren’t able to use the mouse for navigation within the document area when you run the recorder. Further, you will create a leaner macro if you use a shortcut key rather than the arrow keys.
- Plan for messages that Word might display and that will stop the macro.
- Use as few steps as possible to keep the macro efficient.
- Do at least one test run before you start recording.
After you’ve planned your Word macro and done a run-through, you’re ready to record it. If you’ve planned your macro carefully, recording it for later use will be the easiest part of the process. The only difference between creating a macro and working on the document is that you have to press a few extra buttons and make a couple of selections in dialog boxes.
Record the Macro
When you start recording a macro, the mouse pointer has a small icon that looks like a cassette tape beside it, indicating that Word is recording your actions. You can then follow the steps you laid out in the planning stage. Once you are done, press the Stop button (it is the blue square on the left). Once you press the Stop button, your Word macro is ready to use.
Here’s how to record a macro.
-
Go to the View tab, select Macros, then choose Record Macro to open the Record Macro dialog box.
-
In the Macro Name text box, type a unique name.
Names can contain up to 80 letters or numbers (no symbols or spaces) and must begin with a letter. The name should be unique so that you can determine what it does without having to refer to the description.
-
In the Description text box, enter a description of the actions the macro performs.
-
Select whether you want the macro to be available in all documents or only in the current document. If you choose to limit the availability of the command, highlight the document name in the Store Macro in drop-down menu.
By default, Word makes the macro available to all your documents, and you will probably find that this makes the most sense.
-
When you have entered the information for the macro, select OK. The Record Macro Toolbar appears in the upper-left corner of the screen.
To pause the recording, select the Pause Recording/Resume Recorder button (it is the one on the right). To resume recording, select it again.
Test the Macro
The purpose behind creating macros in Word is to speed up your work by putting repetitive tasks and complex sequences of commands at your fingertips. Make sure your macro runs as intended by testing the macro.
-
To run the macro, press the Alt+F8 shortcut key to display the Macros dialog box.
-
Highlight the macro in the list, then select Run.
If you don’t see your macro, make sure the correct location is in the Macros in box.
Create Keyboard Shortcuts for Macros
If you created several macros, searching through the Macros dialog box takes time. If you assign macros a shortcut key, you can bypass the dialog box and access your macro directly from the keyboard in the same way you use shortcut keys to access other commands in Word.
-
Select File, then choose Options.
-
In the Word Options dialog box, go to the left pane and select Custom Ribbon.
-
Select Customize.
-
In the Categories list, scroll down to Macros and select the macro for which you want to create a new shortcut.
If the macro currently has a shortcut key assigned to it, the shortcut will appear in the box below the Current keys label.
-
If no shortcut key has been assigned to the macro, or if you want to create a second shortcut key for the macro, select the Press new shortcut key text box.
-
Enter the shortcut key you want to use to access your macro.
If the shortcut key is assigned to a command, a message says Currently assigned to followed by the name of the command. Either reassign the shortcut key by continuing, or select a new shortcut key.
-
Select the Save changes in drop-down arrow and choose Normal to apply the change to all documents created in Word.
To use the shortcut key only in the current document, select the document name from the list.
-
Select Assign.
-
Select Close to save your changes.
Thanks for letting us know!
Get the Latest Tech News Delivered Every Day
Subscribe
Today, Microsoft Word is the world’s first word processor. Since then, it has been a very complete tool for create, edit, customize and manage any digital document .
This is why many students and professionals rely on this program to produce digital texts of all kinds. Therefore , they must constantly perform a series of tasks that are repeated throughout their writing and that’s why, Word macros were created .
So, in order to automate your most common tasks in Word, you can use this feature. Therefore, it is effective to know to what are macros used for, what are their advantages and types and the process for activating and running them .
What is a macro in Microsoft Word and what is this tool for?
Basically a macro is a series of commands, templates and instructions grouped together as a single call sign capable of performing a task automatically . In other words, said series of instructions specifies a specific input sequence to start several actions simultaneously, once they are sent to the program.
In this way, it is a feature that automates a sequence of repetitive mouse movements or a set of keystrokes , with which it is possible to mechanize several tasks that will be performed one after the other in order. With this, users will get much more productivity when editing or managing their documents in Microsoft Word.

Since Word macros have the ability to automate a set of actions based on a series of commands or instructions, they are of course considered to be very useful elements in the program, thanks to the great utility they offer .
Reason for which, they guarantee several advantages which it is important to take into account and, then we mention each of them:
- They save time on all frequently performed tasks in Word . Since, they don’t require a set of keystrokes or a sequence of routine mouse movements.
- Macros are very easy to run and intuitive to use because they only require a combination of keys (keyboard shortcut) or the use of a single button.
- They increase also the usefulness of the program , since macros offer the possibility of developing new functions, which they can create according to their needs. In addition to that, they allow you to customize the quick access bar.
- In most cases, this feature manages to reduce error rate in digital documents because macros have the particularity of always working perfectly, as long as their creation process has been correct. On the other hand, if you perform the tasks manually, the probability of making mistakes will be increased.
Types of macros in Word Which ones can be saved and played?
While this is true, there are several types of macros that can be recorded and run in Microsoft Word. But what are these typologies? Then, we name and detail the main macro classes that stand out in this word processor :
- Application macro : these are the scripts that are tracked chronologically and are used to save tasks, essentially. Therefore, they only allow you to execute a set of instructions and are usually stored in a special location in the software .
- Macro in programming : These are macros that allow you to define an abbreviation to represent part of a program and thus, the programmer can avoid constantly repeating identical parts of software. Since then, he has used this abbreviation as many times as necessary.
Find out how to activate and run macros in your Microsoft Word quickly and easily
If you want to use this efficient feature in Word, in order to automate some tasks that you need to perform in such a way repetitive or routine , it is essential to know each of the steps to follow to create or activate a macro in this program, as well as to launch it .
As a result, we detail here each procedure :
Enable
Typically, macros created in Word are assigned to a button or key combination to automatically execute the set of instructions. To start, we show you how to record macro with one button , taking into account that instead of the mouse, you must use the keyboard to select a text when creating the macro:
- First of all, find and navigate to any Word document , to locate you in the program ribbon and click on the «Display» tab .
- After that, go to the Macros group and press the down arrow of that option, then click where it is says «Record a macro …» .
- Now, you must enter the name you want for this macro , in the indicated bar.
- In the section «Save macro in:» , be sure to select the option «All documents (Normal.dotm)» to be able to use this sequence in the following files.
- In the game «Assign macro to:» , select «Button» .

- Then, in the quick access toolbar, click on the new macro and click Add . Then, click on «Modify …» and there you have to choose an image for the button by adding the name you want. Once done, click OK twice .
«UPDATE ✅ Do you want to know more about Microsoft Word macros and all their benefits? ⭐ ENTER HERE ⭐ and learn all about SCRATCH! ”
- Now click on the commands or press the keys for each step of the task, during the step recording process .
- When you have completed the above, return to the «View» tab, select «Macros» and click «Stop recording» .
- Finally, the button for the new macro will be displayed in the program’s quick access toolbar .
However, To record a Word macro with a keyboard shortcut, the procedure is as follows:
- Located in the Word document, click on the «View» tab and select the «Macros» option to click on «Record macro …» .
- After the above, enter the name you prefer for this macro, choose «All documents (Normal.dotm)» in the part of «Save macro in:» and in this case, in «Assign a macro to:» , click on «Keyboard» .
- Later, in the Commands area, choose the macro in question and in «New shortcut key» , type a keyboard shortcut or a combination of keys. In general, «Ctrl + key» is used and it is important to check that this shortcut is not assigned to another default function in the program.
- Also, choose the option «Normal.dotm» in the case «Save changes in:» and do all of the above, click on the button «Assign» .

- Now it’s time to record the steps and for that, click on the controls or press the keys for each step of the action .
- Last but not least, click on «Stop recording» , in the menu «Macros» belonging to the tab «Display» .
Run
Basically, to run a macro in Word, you have to use the button on the Quick Access Toolbar, use the key combination assigned to a certain action, or go to the list of macros in the program.
Then, we explain each of the steps to follow to perform this last mentioned execution :
- Locate in the specified Word document and proceed to the select the «View» tab, then click «Macros» .
- Now, among the options available, click on «View macros» , which is the one that is in first position.
- After that they will show you a list with all the macros you have created and these, of course, will be identified with the name you gave them when registering.
- Finally, find the macro you want to use, click on it and press the «Run» button . All instructions established at the beginning will be carried out immediately.
Macro Security How safe is it to use it on documents of unknown origin?
Although this added feature in Office is very useful and reveals notable benefits for users , it can unfortunately be seen as a powerful threat . Since, some macros in Word contain viruses, so it is considered an ideal tool for execute and propagate malware in your documents .
So, many years ago, the spread of dangerous computer viruses via macros in documents of unknown origin, has become noticeably accentuated and has succeeded in spreading through an era . Especially since it is about only cross-platform threats between Windows and Macintosh computers.
But, starting in 2006, Microsoft has designed security fixes for Word and thus has succeeded in eliminating the risks generated by these macros . Therefore, currently, the risk of infecting a computer or file with macro viruses has been almost completely reduced and they are less and less common, since the same program manages to regulate whether a macro of uncertain origin can be executed or not; but, in the same way, we recommend that you pay attention .
If you have any questions, please leave them in the comments, we will get back to you as soon as possible, and it will be a great help for more community members as well. Thank you!
Содержание
- Что такое включенные макросы в Ворд?
- Что такое макросы в Ворде и как с ними работать?
- Что такое макрос в ворде 2007? Формула из Excel таблицы
Приветствую на Fast-Wolker.ru!! В сегодняшнем выпуске продолжим знакомство с созданием макросов уже в приложении Microsoft Office Word. Все знакомы с ним; многим приходится набирать документы в этой программе.
Документы чаще всего имеют одну и ту же структуру — мы берем шаблон правим его так как нам надо в одних и тех же местах — меняем даты, имена, форматируем текст.
То есть мы каждый раз делаем одни и те же операции с текстом, и чтобы их не делать каждый раз — можно заставить компьютер совершать их автоматически. Для этого в МS Word можно применять макрокоманды (или макросы) которые вы самостоятельно записываете в виде программы на языке VBA, который встроен в Word.
Что такое включенные макросы в Ворд?
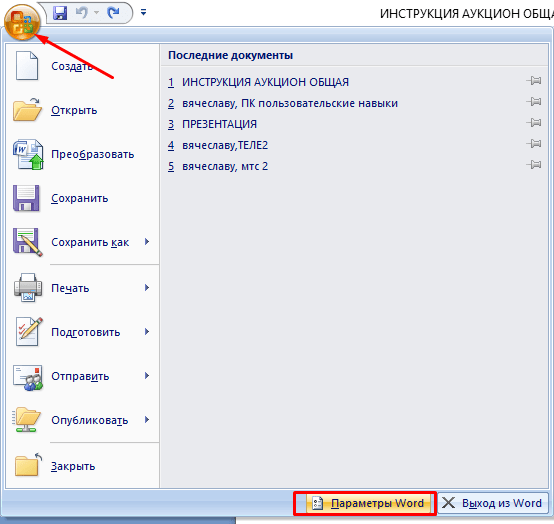
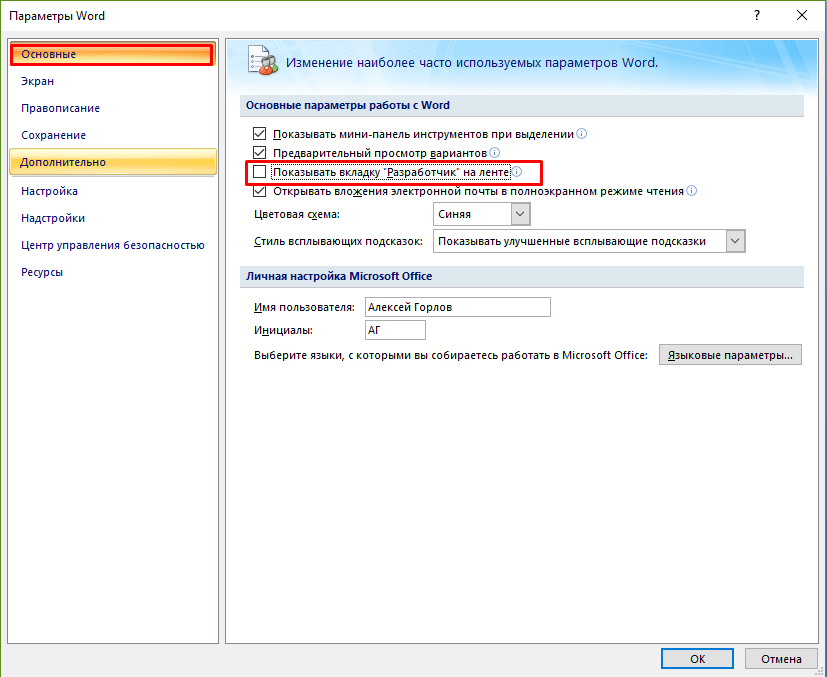
А сейчас разберемся подробно, что за «макросы», как их включать. Начнем изучение на примере Office Word 2007, так как для многих он по прежнему остается самым привычным пакетом. Включать макросы нужно через меню «Файл» -«Параметры Word».
Дело в том, что настройки макросов в программе по умолчанию выключены, либо заданы такие настройки безопасности, что работать с полноценно с макрокомандами Вы не сможете. Когда Вы создаете макросы, Вы по сути становитесь программистом.
Можно не только самому их писать, но и находить уже готовые. Среда VBA позволяет работать не только в пределах MS OFFICE. Можно создавать полноценные программы, которые получают доступ системным файлам на компьютере, можно нанести вред. Этим пользуются злоумышленники.
Включаем первую настройку на ленте. Она сделает видимой вкладку «Разработчик» и позволит работать с макрокомандами и запускать редактор VBA:
Следующая настройка отвечает за безопасность. Здесь же, переходим в «Центр управления безопасностью»..

…»Парамеры центра» отвечает за запуск наших будущих программ. Вы можете настроить так как нужно вам. Настройка «Доверять доступ к объектной модели VBA» позволит пользоваться уже готовыми проектами VBA, например скачанными из Интернет.

Сторонние макрокоманды и проекты VBA перед запуском всегда проверяйте на вирусы!
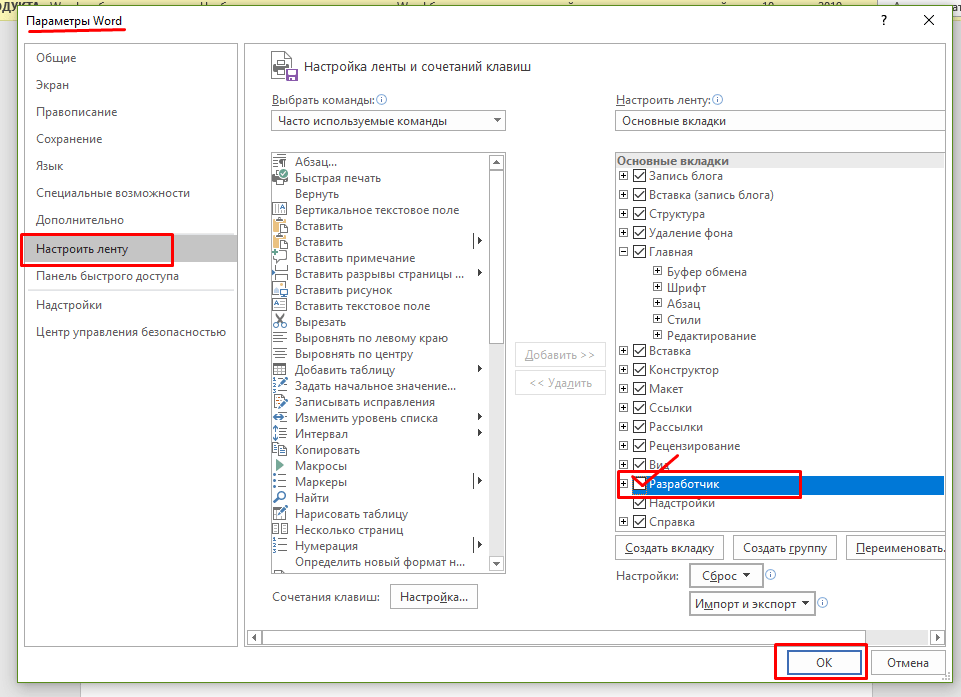
Стабильный MS Office 2007 морально устарел и поддержка его прекращена. Нужно уметь включать режим разработчика и в поздних версиях. Они более функциональны и для серьезной работы лучше использовать их. В Word 2016 включаем вкладку «Разработчик». Для этого так же в меню «Файл» переходим в «Параметры» и затем «Настройки Ленты»:
Не забываем сделать настройки безопасности так как делали до этого. Теперь, когда все настройки сделаны можно работать далее.
Что такое макросы в Ворде и как с ними работать?
По факту вы просто включаете запись ваших действий с текстом. Все выполняемые Вами действия записываются. В нужный момент вы останавливаете запись и сохраняете макрос, а когда это необходимо — снова запускаете. Таким образом, вам на первых этапах не нужно знать язык программирования, чтобы справится с простой задачей.

Но Вы получаете возможность изучать язык, если вас это дело увлечет. Создание макросов — это введение в программирование. VBA позволяет создавать для себя мощные инструменты при работе с текстовыми и табличными документами для решения многих задач в привычном виде .
Тем, кто после прочтения статьи заинтересуется и захочет начать изучать язык VBA самостоятельно в помощь книга.
В качестве примера расскажу об одной такой полезной программе для Word. Иногда появляется желание распечатать полезную книгу на принтере, потому что не все любят читать с экрана. Это может быть большая инструкция, или же полноценное художественное произведение в виде документа Ворд.
Чтобы понравившийся документ после распечатывания стал полноценной привычной брошюрой — нужен макрос. А точнее написанный в VBA программный код, он вам и позволит распечатать ваш документ в виде брошюры, в которой будет правильное расположение текста и нумерация страниц.
Эту программу для ознакомления качаем тут. Вам останется распечатать и сшить брошюру и вот у вас книга готова 🙂
Но чаще всего мы используем макросы на работе при составлении документов. Нужно форматировать текст, менять его размер, менять даты, имена на другие. Это ответственно и занимает время. И здесь наши знания могут очень пригодится.
Для начала покажу демонстрационный пример — как работает макрос. У нас есть шаблон договора, который нужно подготовить для заполнения. Задача: открыть документ, убрать ненужные нам элементы из текста автоматически:

Согласитесь, убирать вручную каждый раз пустые поля (выделено желтым) на нескольких страницах утомительно, поэтому мы для примера прибегнем к помощи макроса. Итак, запускаю Ворд 2016, начинаю записывать макрос:
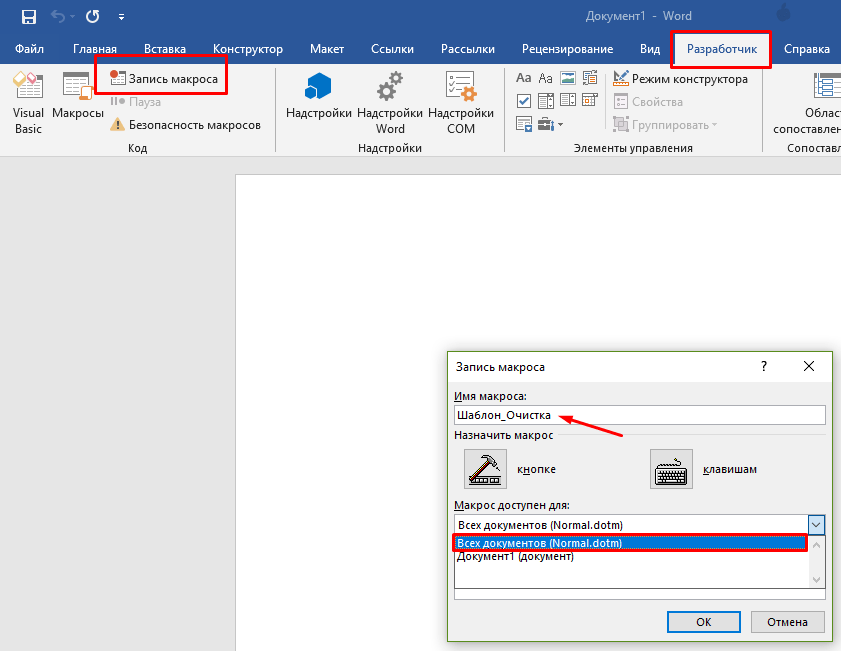
Указываем имя нашего макроса (без пробелов), доступ делаю из шаблона Normal.doth. Такой выбор позволит запускать выполнение нашей макрокоманды из любого документа Word.
Назначать макрос можно кнопке на панели инструментов или вызвать нажатием сочетания определенный клавиш, но мы этого делать пока не будем. Просто нажмем на «OK» и начнется запись наших действий. Предлагаю посмотреть на видео, что получилось, это будет нагляднее.
Мы сделали самую простую операцию — замену текста во всем документе. Но, поизучав язык можно пойти и далее — отформатировать текст, сделать форму, в которой указываются все необходимые данные договора (даты, номер, ФИО директора, должности, наименование организации, реквизиты и т .д.).
При выполнении макроса все эти данные заполнялись бы автоматически после указания в форме в нужных местах. По опыту знаю ошибок будет меньше при таком заполнении и времени уходит меньше.
Что такое макрос в ворде 2007? Формула из Excel таблицы
Многие интересуются — как вставить формулы Excel в таблицу Word? Excel хорош при вычислениях но не удобен для работы с текстом, а таблицы Word не так привычны после работы с Excel.
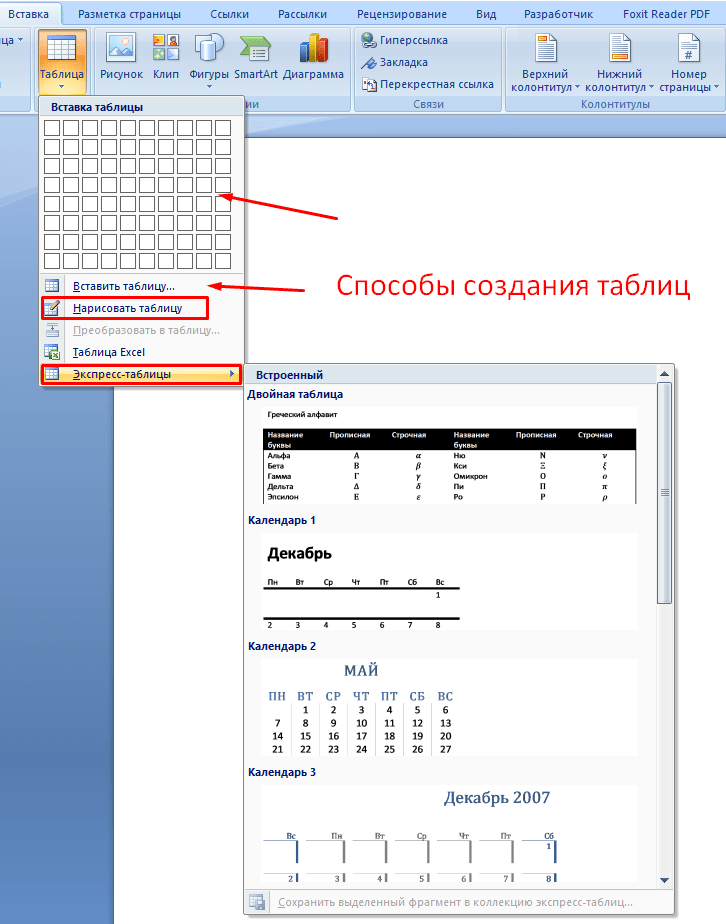
Туда нельзя вставить формулы как в Excel, но можно вставлять таблицу Excel путем копирования или создания таблицы прямо в документе Word. Для этого переходим в меню «Вставка»:
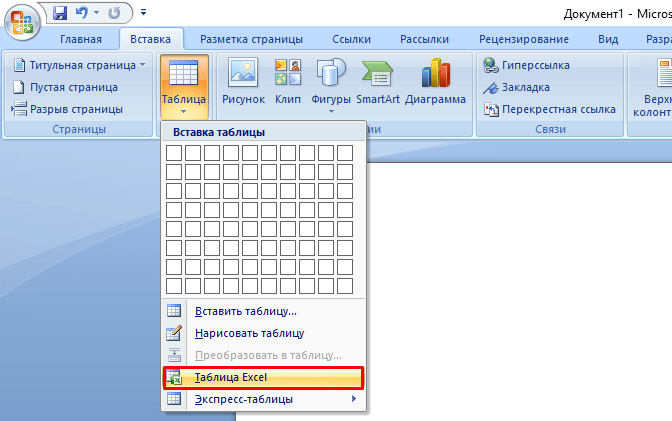
Далее, «рисуем» таблицу так, как мы делаем это в Excel:
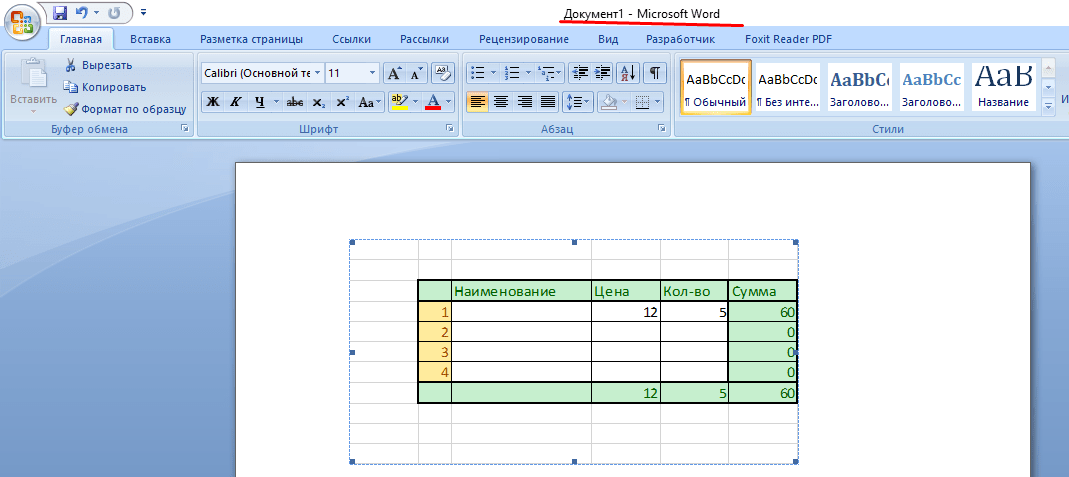
Создавать Excel таблицу в Word с помощью макроса вышеописанным способом не получится — нужны дополнительные усилия. А что касается обычной Word таблицы — можно записывать макросы в случае создания сложных макетов таблиц.
 Можно попробовать записать создание таблицы в макрос любым из этих способов и посмотреть что получится. Лично я таблицы копирую прямо из Excel, а макросы записываю в Office 2016 — там мне удобнее работать со стилями и оформлением. Удачи в освоении программы!

When using Microsoft Word, you may feel the need to repeat a specific action multiple times. This may involve reusing preset text or inserting specific text with intricate formatting. It can be a chore, and you may be wishing for an easier way to do it. Thankfully, there is one! By making use of Word’s macros, you can automate repetitive actions and make your life simpler.
What Are Macros?
So, what are macros? The best way to think of macros is as a series of instructions. You set out a series of steps that you want Word to automate, then tell Word to perform those steps whenever you like. This makes automation very easy, and can save a lot of time and effort. The easiest way to create a macro is to allow Word to record your actions, then physically perform your desired actions within the document. Once recorded, you can tell Word to repeat what you did at any time.
Making a Macro
So now that we know what they do, let’s learn to make a macro in Microsoft Word! In this example we’ll be creating a macro that automatically creates a table. This might be a useful feature if you occasionally see yourself needing to create a new table without manually making a new one or copy-pasting an existing table.
First, we need to tell Microsoft Word how to make our table. To do this, we click on “View,” then “Macros,” then “Record Macro.”

We name our macro here. For this example we’ll call it “CreateTable.”

Underneath the naming box are two buttons, “Button” and “Keyboard.” This is where you pick if you want to activate your macro via a button within Word or by pressing a hotkey on your keyboard.
Selecting the Button Option
If you select “Button,” you’ll be taken to a new popup window. It may look confusing at first, but it’s just Word allowing you to add the button to the Quick Access bar. This is where we want our button, so we’ll select the macro and click “Add >>” to add it to the list on the right.

With the macro still selected, click “Modify…” at the bottom of the list.

Here you can choose what icon your button uses. Pick something that suits your macro, then OK out of all windows.
![]()
Selecting the Keyboard Option
If you select the keyboard option, you can define which hotkey to assign the macro to. It’s compatible with quite a few combinations, such as Ctrl + [Key] and Ctrl + Shift + [Key], so pick out a hotkey that suits you. Word will let you know if anything is currently assigned to that hotkey so you don’t interfere with existing shortcuts. Once you’ve found the perfect key combination, click “Assign.”

Recording the Macro
Now that you have set up the method of activation, Microsoft Word will begin recording your actions. While it’s recording, any actions you now perform in the document will be remembered in the macro. In this example, we create our table and fill it out with the essential fields. Because our actions are being recorded, we should be careful and not make any mistakes!

Once the table is done, we click “View,” then “Macro” again, and then click “Stop recording.”

Now that our macro is recorded, we can make this table at any time we like. If we assigned it to a hotkey on the keyboard, we can press those keys to insert a table. Likewise, if we made a button for it, we can find that button in the Quick Access bar.

Regardless of which method we selected for the macro, our table is replicated when we activate it. Now we can recreate our base table with little hassle!

Deleting a Macro
When your macro has outlived its use, you can get rid of them by simply clicking “View,” then “Macros,” then “View Macros.”

Select the macro you don’t want anymore, then click “Delete.”

Macro Safety
While macros can be used to make life easier, they can also have nefarious intents! Never run macros that have come from an untrusted source or download a Word document attached to a suspicious email. “Macro viruses” can be a real problem, so make sure you stay safe when using them.
Macros Made Easy
When you need to perform repetitive actions in Word, a macro can come in great use. Now you know how to make a keyboard or button macro, how to record it, and how to use it once it’s made.
Do you see yourself using macros a lot? Do you already? Let us know below.

Simon Batt
Simon Batt is a Computer Science graduate with a passion for cybersecurity.
Subscribe to our newsletter!
Our latest tutorials delivered straight to your inbox
В Word реализована даже небольшая среда для программирования, с помощью которой можно значительно облегчить себе работу. В самом редакторе это называется макрокомандой или, как называют чаще, макросом. К сожалению, многие пользователи избегают знакомства с эти инструментом, хотя он несложен. Давайте же рассмотрим, что такое макросы в Word, как сделать собственный, включить или отключить имеющийся.
Макрокоманда (или, как ее называют, макрос) — это определенный записанный порядок действий, который можно вызывать одним нажатием клавиши. Макросы создаются на визуальном языке программирования Visual Basic for Applications, и адаптированы под нужды и навыки широкого пользователя.
Главная цель макрокоманд — автоматизировать выполнение рутинных задач и расширить базовые возможности приложения. Макросы — удобный инструмент большинства программ, обрабатывающих данные. Макросы присутствуют в MS Office, Excel, Open Office, Photoshop, 3ds Max и множестве других программ и игр. В MS Word предусмотрено создание макросов с помощью языка программирования Visual Basic. Этот способ позволяет серьезно расширить функционал программы, но требует от пользователя уверенных навыков программирования.
Макрокоманды могут быть любой длины и сложности. Они рекомендованы к освоению всем регулярным пользователям.
Зачем нужны макросы в программе Word
Макрокоманды позволяют выполнять несколько основных функций. Они предназначены для реализации следующих задач:
- Ускоряют часто выполняемые процедуры и операции внутри текстового редактора Word. Это относится к редактированию, форматированию и не только.
- Объединяют несколько команд в цельное действие «от и до». Как пример, используя макрос, можно простыми движениями моментально вставить таблицу, которая будет иметь определённые заданные размеры, а также получит нужное число столбцов и строк.
- Упрощают получение доступа к некоторым функциям и инструментам для работы с текстом, графиков и пр. При этом они могут располагаться в разных окнах и разделах программы.
- Автоматизируют сложные последовательные операции и действия.
Макрокоманды в Word упрощают выполнение задач, на которые в ином случае вы потратили бы много времени.
Как включить макрос в Word 2007
Рассмотрим, как включить макрокоманды в Word 2007, поскольку он для многих остается популярным текстовым редактором. Соблюдайте последовательность действий:
- В левом верхнем углу нажать ФАЙЛ.
- В выпавшем меню найти Параметры.

- Щёлкнуть на вкладке Центр управления безопасностью.
- Нажать кнопку Параметры центра управления безопасностью.

- Установить переключатель области Параметры макросов в положение Включить все макросы (не рекомендуется, возможен запуск опасной программы).


Остается подтвердить действие, и вы включите макросы в программе Word. Чтобы выключить макросы, надо повторить последовательность шагов, но в последнем пункте поставить галочку в соответствующий пункт.

Мнение эксперта
Попов Антон Валерьевич, консультант по работе с Word
Если у вас возникнут вопросы, задавате их мне!
Задать вопрос эксперту
Макросы в Word — это «шаблоны». Только шаблоны как комплексный набор заданий для автоматической обработки. Создавать макрокоманды можно по собственной схеме, в соответствии со своими потребностями, а впоследствии просто подключать при надобности. Если же что-то непонятно, пишите мне, и я помогу разобраться.
Что нужно помнить при работе с макросами
В 2016 году исследователи отметили всплеск активности, практически второе рождение, еще недавно казавшейся безнадежно устаревшей техники распространения нежелательного ПО — несущих злонамененную нагрузку макросов в документах Microsoft Office, т.н. «макровирусов».
Самый знаменитый макровирус, Melissa, появился в марте 1999 года. Вирус поразил по крайней мере сто тысяч компьютеров по всему миру, парализовал работу сотен компаний, ущерб экономике составил 80 миллионов долларов в одних только США.
Судя по отчетам компаний, связанных с информационной безопасностью, на сегодняшний день макровирусы все еще занимают верхние строчки в рейтингах по распространенности.
Как создать макрос в программе Word: инструкция для чайников с примером
Алгоритм действий при создании команды следующий:
- Определить порядок действий.
- Выполнить.
- Записать действия.
Для создания команды достаточно включить запись, совершить набор желаемых действий и остановить запись. В дальнейшем записанную последовательность можно назначить на горячую клавишу. А если не получится, вы сможете задать все вопросы на форуме.
Задать вопрос
Для этого откроем Word 2007 и напишем произвольный текст для примера. Затем откроем вкладку Вид, в конце этой панели увидим макросы. Теперь все готово для создания макрокоманды.
- Выделим любой кусочек написанного для примера текста.
- Макросы -> запись макроса.
- Выберите имя и укажите назначение клавишам.
- Укажите комбинацию клавиш, по которой должен срабатывать макрос, далее нажмите на кнопки назначить и закрыть. Запись макроса началась.
- Выберем размер шрифта 20, а стиль написания жирный.
- Макросы -> остановить запись.
- Макрос записан. Для того чтобы им воспользоваться выделите текст и нажмите выбранное вами сочетание клавиш.
Итак, попробуем сделать вставку таблицы 3х3 одним нажатием сочетания Ctrl+Shift+A:
- Нажимаем «Запись макроса». Откроется окно создания макрокоманды.
- Нажмем «Назначить макрос — клавишам». В появившемся меню кликнем по строке «Новое сочетание клавиш» и нажмем одновременно Ctrl+Shift+A. Назначить, закрыть.
- Переходим непосредственно к записи действия. Нажимаем «Вставка», «Таблица».
- Выделяем желаемую область, к примеру, 3х3. После создания таблицы возвращаемся в меню «Вид», «Макросы». Остановить запись. Готово.
По нажатию Ctrl+Shift+A будет создавать таблица 3х3. Это работает и при уже созданной таблице.
Как создать макрос в Word, если у вас есть готовый код
Если у вас есть готовый код, то следующий совет поможет внедрить его в ваши документы:
- В меню откройте пункт Макрос и в раскрывшемся подменю выберите команду Макросы. Это же диалоговое окно также можно открыть с помощью сочетания клавиш «Alt»+«F8».
- В поле Имя введите название будущей команды.
- В поле Макросы из выберите строку Активных шаблонов. В этом случае созданный вами макрос будет доступен для всех документов, основанных на шаблоне Normal.dot.
- В поле Описание можете ввести краткую информацию о назначении макрокоманды.
- Нажмите кнопку Создать. В то место, где находится курсор ввода (между комментариями и оператором End Sub, вставьте ваш код (скопированный без начальных операторов Sub и End Sub).

- Проверьте работоспособность, нажав кнопку Run Sub на панели инструментов редактора Visual Basic или воспользуйтесь клавишей «F5».
- Назначьте данной макрокоманде сочетание клавиш или поместите созданную кнопку на панель инструментов или добавьте кнопку на панель быстрого доступа (для Word 2007).

В результате макрокоманда будет готова, и вы сможете ей пользоваться.
Как удалить макрос в программе Word 2003, 2007 и более новых
Чтобы удалить макросы из программы Word, воспользуйтесь подсказкой для версии 2003 г.
- В меню Сервис выберите команду Макрос и в открывшемся подменю — команду Макросы. Откроется диалоговое окно.
- В поле Макросы из: выберите документ или шаблон, в котором находятся ваши макросы.
- Найдите в списке вариант команды, подлежащий удалению, выделите его и нажмите кнопку Удалить.
Если у вас версия Word 2007 г. или старше, используйте следующую подсказку:
- Перейдите на вкладку Разработчик. Если на ленте вы не видите такой вкладки, значит вам необходимо подключить ее. Для этого нажмите кнопку «Office» и выберите команду Параметры Word. В открывшемся окне на закладке Основные установите флажок на параметре Показывать вкладку «Разработчик» на ленте.
- На вкладке Разработчик в группе команд Код нажмите кнопку Макросы. Откроется диалоговое окно, как на скриншоте выше.
- Найдите в списке макрокоманду, подлежащую удалению, выделите и нажмите кнопку Удалить.
Учитывайте все перечисленное, и проблем в работе не будет.