
For any document, Word creates certain types of metadata about the document. It stores them as document properties.
These properties are standard with fixed names. You cannot change them—these are the Document’s Title, Author name, Keywords, and Comments. Other properties store statistical data about your document. These include file size, date, and time you last printed or saved the document.
Word updates these properties automatically, and you cannot edit them.
Apart from the standard document properties, Word also has custom properties.
As the name implies, you can add and modify custom document properties. By default, Word does not add any custom document property by itself.
However, you can add your own custom properties to your document. For this, you must assign a name, a data type, and a value to each custom property you are adding. Word offers a choice of four data types for each custom property—Text, Date, Number, and Yes or No.
Word also adds document library properties. These are related to documents stored on a website, a document library, or a public folder.
The necessity for Document Properties
As such, you will not be able to see any document property in the content of the document. But, you can insert their value into the document’s content. You can insert the value of any standard or custom property.
You may have a piece of text that repeats within the document. This presents a potential use for document properties. By inserting custom document properties, you can quickly automate your document. This ensures what you are entering in your document repeatedly is consistent and accurate.
For instance, you can add the document Title property in the Header on each page. You can also add it as text in the document. When you change a document property, the document’s content will change.
Document properties are flexible. Word allows you to control them outside the content of the main document. This is an advantage when your document is large.
How to View Document Properties
To see document properties, open your document. Click on the Files tab in the top menu bar. This will open the Files menu with two panes, left and right. In the left pane, click on the Info tab. In the right panel, Word displays the document properties.

To see more properties, click on Show All Properties at the bottom of the right pane.

Advanced Properties
In the right-hand pane, click on Properties. This will show another tab, Advanced Properties. Click on Advanced Properties to open the Properties dialog box.
You will see five tabs:
General — Standard data about document’s origin, its creation, modification, and access.

Summary — Custom date about document, you can fill in the blanks.

Statistics — Statistical data about the document.

Contents — Data about the document’s contents.

Custom — Data you can add to the document properties.

Once you have added the above information, Word will show these document properties in the Info screen.
Conclusion
We have given a brief introduction about document properties in MS Word and how you can use them.
Document properties, also known as metadata, are details about a file that describe or identify it. They include details such as title, author name, subject, and keywords that identify the document’s topic or contents.You can also search for documents based on their properties or insert them into your documents.
Contents
- 1 What are examples of a document property?
- 2 What are the different types of document properties?
- 3 How do I insert document properties in Word?
- 4 What are document server properties?
- 5 What is document Properties word?
- 6 Why are document properties useful?
- 7 How do I find document properties in Word for Mac?
- 8 Where is document properties in Excel?
- 9 How do you show document properties in Powerpoint?
- 10 How do you use properties in Word?
- 11 How do I change document properties in PDF?
- 12 How do I add document properties to Quick Parts?
- 13 How do you show document properties in Powerpoint for Mac?
- 14 How do I remove document properties in Word?
- 15 How do I add tags to document properties?
- 16 How do I change file properties in Windows 10?
- 17 Is document title one of the document properties that Word automatically tracks?
- 18 How do you edit document properties by entering workshop costs as the title document property?
- 19 Where is document info in Word?
- 20 What are Document Properties in Excel?
What are examples of a document property?
Document properties are strings of meta-data containing information about a document. The Author, Title and Created Date are examples of document properties.
What are the different types of document properties?
There are two types of document properties: predefined and custom.
- Predefined properties are metadata fields stored in many file formats. An example of this is the Primary author, which is the author of the input document.
- Custom properties are defined by the author.
How do I insert document properties in Word?
Inserting custom document property fields
- Click the Insert tab in the Ribbon and then click Quick Parts in the Text group.
- Select Field.
- In the list of Field names on the left, select DocProperty.
- Under Field properties, select a property name.
- To view the codes for a field in the Field box, click Field Codes.
Document server properties Workbooks that are saved to a location on a document management server, such as a Document Workspace site or a library based on Windows SharePoint Services, might contain additional document properties or information related to the server location.
What is document Properties word?
Document properties, also known as metadata, are details about a file that describe or identify it. They include details such as title, author name, subject, and keywords that identify the document’s topic or contents.You can also search for documents based on their properties or insert them into your documents.
Why are document properties useful?
Any time you have a piece of text repeated within a document, is a potential use for document properties. It’s a way to quickly and easily automate your document and ensure it’s consistent and accurate. Document properties let you replace text in places Word itself won’t go.
How do I find document properties in Word for Mac?
In Microsoft Word 2016 for Mac, the document properties settings are under the “File” menu. After clicking the :File” menu, select “Properties . . . “ (see figure 1).
Where is document properties in Excel?
View document properties
- Click on the File tab. You switch to the backstage view.
- Choose Info from the File menu. The Properties pane is shown on the right-hand side.
- Click on Properties to open the drop-down menu.
- Choose ‘Show Document Panel’ from the menu.
How do you show document properties in Powerpoint?
Click the File tab and open the backstage view; Click the Info button on left bar; At right side, you will view your presentation properties.
How do you use properties in Word?
If you are using Word 2007, click the Office button, click Prepare, then Properties. Word displays the Document Information Panel at the top of your document, just below the ribbon. Use the Document Properties drop-down list (top-left corner of the Document Information Panel) to choose Advanced Properties.
How do I change document properties in PDF?
Choose File > Properties, and then select Custom. To add a property, type the name and value, and then click Add. To change the properties, do any of the following, and then click OK: To edit a property, select it, change the Value, and then click Change.
How do I add document properties to Quick Parts?
To use the Document Property feature in Microsoft Word, follow the steps below.
- Launch Microsoft Word.
- Click the Insert tab button.
- Click the Quick Parts button in the Text group.
- Hover the cursor over Document Property.
- Select a Document Property from the list.
- A fillable field will appear in the document.
How do you show document properties in Powerpoint for Mac?
To open the Properties dialog box, click File > Properties.
- View General properties.
- View or edit Summary properties.
- View document Statistics.
- View document Content.
- View or edit Custom properties.
How do I remove document properties in Word?
How to remove identifying properties from a Microsoft Word file before submitting it.
- Go to “file”
- Select “info”
- Click on “check for issues”
- Click on “inspect document”
- In the “Document Inspector” dialog box, select the check boxes to choose the types of hidden content that you want to be inspected.
- Click “Remove All”
How do I add tags to document properties?
How to Add Tags Using Windows Explorer
- Open Windows Explorer and find the Word document.
- Right-click the file and choose Properties.
- Go to the Details tab.
- In the Tags text box, enter the keywords.
- Select OK to save the tags and close the dialog box.
How do I change file properties in Windows 10?
To Add or Modify File Property Details in Windows 10,
- Open File Explorer.
- Enable the Details pane.
- Select the file you want to edit the file property for.
- Click on the file property value to edit it. Press the Enter key to confirm your changes.
Is document title one of the document properties that Word automatically tracks?
Word keeps track of many pieces of information about your document. You can see the information maintained by Word in this manner: If you are using Word 2010 or Word 2013, display the File tab of the ribbon and then click Info | Properties | Advanced Properties.
How do you edit document properties by entering workshop costs as the title document property?
Video: Change document properties
- Select File > Info.
- Select a property that starts with Add, like Add a title, Add a tag, or Add an author.
- Enter the information.
- To see more properties, select Show all properties.
- When you’re done, select the Back arrow and Save. your changes.
Where is document info in Word?
Click the File tab to go to the Backstage area. In the left navigation panel, click the Info category. On the right side of the screen, click the Properties drop-down and choose Show Document Panel. There you have it, four simple clicks to open the Document Information Panel in Word (or Excel or PowerPoint).
What are Document Properties in Excel?
Document properties are bits of information that describe and identify a workbook, such as a title, author name, subject, and keywords in the workbook.
Document properties, also known as metadata, are details about a file that describe or identify it. They include details such as title, author name, subject, and keywords that identify the document’s topic or contents.
If you include the document properties for your files, you can easily organize and identify them later. You can also search for documents based on their properties or insert them into your documents.
Learn more about document properties
There are four types of document properties:
-
Standard properties — By default, Microsoft 365 documents are associated with a set of standard properties, such as author, title, and subject. You can specify your own text values for these properties to make it easier to organize and identify your documents. For example, in Word, you can use the Keywords property (also called Tags) to add the keyword «customers» to your sales documents. You can then search for all sales documents with that keyword.
-
Automatically updated properties — These properties include both file system properties (for example, file size or the dates when a file was created or last changed) and statistics that are maintained for you by Microsoft 365 programs (for example, the number of words or characters in a document). You cannot specify or change the automatically updated properties.
You can use the automatically updated properties to identify or find files. For example, you can search for all files created after August 3, 2015, or for all files that were last changed yesterday.
-
Custom properties — You can define additional custom properties for your Microsoft 365 documents. You can assign a text, time, or numeric value to custom properties, and you can also assign them the values yes or no. You can choose from a list of suggested names or define your own.
For more information see View or create custom properties for a file
-
Document library properties — These are properties that are associated with documents in a document library on a website or in a public folder. When you create a new document library, you can define one or more document library properties and set rules on their values. When you add documents to the document library, you are prompted to include the values for any properties that are required, or to update any properties that are incorrect. For example, a document library that collects product ideas can prompt the person for properties such as Submitted By, Date, Category, and Description. When you open a document from a document library in Word, Excel, or PowerPoint, you can edit and update these document library properties by clicking File > Info. All required properties from the document library are outlined with red borders on the Info tab in Word, Excel, and PowerPoint,.
If you want to insert any of these properties into your Word document see Add the file name, date, author, or other document properties to a header or footer.
View and change the standard properties for the current file
-
Click the File tab.
-
Click Info.
-
Click the View and edit database properties link at the top of the page.
-
In the Properties dialog box, click the tabs to select the properties that you want to view or update.
-
Click OK. Any changes you made are saved automatically.
-
Click the File tab again to return to your database.
-
Click the File tab.
-
Click Info to view the workbook properties.
-
To add or change properties, hover your pointer over the property you want to update and enter the information.
-
Click the File tab again to return to your workbook. Any changes you made are saved automatically.
Optional steps:
-
To see more properties, click the Show All Properties link at the bottom of the page.
-
To open a properties dialog box where you can add or edit all the properties at once and view document information and statistics, click Properties at the top of the page, and then click Advanced Properties.

On the Summary tab, you can add or edit the Title, Subject, Author, Manager, Company, Category, Keywords (also called Tags), and Comments.
-
-
Click the File tab.
-
Click Info to view the presentation properties.
-
To add or change properties, hover your pointer over the property you want to update and enter the information.
-
Click the File tab again to return to your presentation. Any changes you made are saved automatically.
Optional steps:
-
To see more properties, click the Show All Properties link at the bottom of the page.
-
To open a properties dialog box where you can add or edit all the properties at once and view document information and statistics, click Properties at the top of the page, and then click Advanced Properties.
On the Summary tab, you can add or edit the Title, Subject, Author, Manager, Company, Category, Keywords (also called Tags), and Comments.
-
-
Click the File tab.
-
Click Info to view the project properties.
-
To add or change properties, hover your pointer over the property you want to update and enter the information.
-
Click the File tab again to return to your project. Any changes you made are saved automatically.
Optional steps:
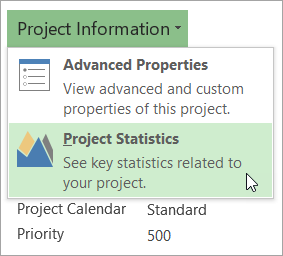
To see more properties or statistics, click Project Information at the top of the page, and then click Advanced Properties or Project Statistics.
On the Summary tab in the Properties dialog box, you can add or edit the Title, Subject, Author, Manager, Company, Category, Keywords (also called Tags), and Comments.
-
Click the File tab.
-
Click Info to view the properties.
-
Click the File tab again to return to your publication. Any changes you made are saved automatically.
Optional steps:
To open a properties dialog box where you can add or edit all the properties at once and view document information and statistics, click Publication Properties at the top of the page, and then click Advanced Properties.

On the Summary tab, you can add or edit the Title, Subject, Author, Manager, Company, Category, Keywords (also called Tags), and Comments.
-
Click the File tab.
-
Click Info to view the properties.
-
To add or change properties, hover your pointer over the property you want to update and enter the information.
-
Click the File tab again to return to your publication. Any changes you made are saved automatically.
Optional steps:
-
To open a properties dialog box where you can add or edit all the properties at once and view document information, click Properties at the top of the page, and then click Advanced Properties.
On the Summary tab, you can add or edit properties such as the Title, Subject, Author, Manager, Company, Category, Keywords (also called Tags), and Comments.
-
To add a link to related documents, click Related Documents at the bottom of the Info page, and select Add a Link to a Related Document.
-
-
Click the File tab.
-
Click Info to view the document properties.
-
To add or change properties, hover your pointer over the property you want to update and enter the information. Note that for some metadata, such as Author, you’ll have to right-click on the property and choose Remove or Edit.
-
Click the File tab again to return to your document. Any changes you made are saved automatically.
Optional steps:
-
To see more properties, click the Show All Properties link at the bottom of the page.
-
To open a properties dialog box where you can add or edit all the properties at once and view document information and statistics, click Properties at the top of the page, and then click Advanced Properties.
On the Summary tab, you can add or edit the Title, Subject, Author, Manager, Company, Category, Keywords (also called Tags), and Comments.
-
View or create custom properties for the current file
Custom properties are properties that you define for an Microsoft 365 document. You can assign a text, time, or numeric value to custom properties, and you can also assign them the values yes or no. You can choose from a list of suggested names or define your own.
-
Click the File tab.
-
Click Info.
-
Click Properties at the top of the page, and then select Advanced Properties.
Notes:
-
In Access you’d select View and edit database properties
-
In Project you’d select Project Information
-
In Publisher you’d select Publication Properties
-
Currently, you can’t view or create custom properties for Visio files
-
-
Click the Custom tab.
-
In the Name box, type a name for the custom property, or select a name from the list.
-
In the Type list, select the data type for the property that you want to add.
-
In the Value box, type a value for the property. The value that you type must match the selection in the Type list. For example, if you select Number in the Type list, you must type a number in the Value box. Values that don’t match the property type are stored as text.
-
-
Click OK.
Learn more about the document properties
There are five types of document properties:
-
Standard properties By default, Microsoft 365 documents are associated with a set of standard properties, such as author, title, and subject. You can specify your own text values for these properties to make it easier to organize and identify your documents. For example, in Word, you can use the Keywords property (also called Tags) to add the keyword «customers» to your sales files. You can then search for all sales files with that keyword.
-
Automatically updated properties These properties include both file system properties (for example, file size or the dates when a file was created or last changed) and statistics that are maintained for you by Microsoft 365 programs (for example, the number of words or characters in a document). You cannot specify or change the automatically updated properties.
You can use the automatically updated properties to identify or find documents. For example, you can search for all files created after August 3, 2005, or for all files that were last changed yesterday.
-
Custom properties You can define additional custom properties for your Microsoft 365 documents. You can assign a text, time, or numeric value to custom properties, and you can also assign them the values yes or no. You can choose from a list of suggested names or define your own.
-
Properties for your organization If your organization customized the Document Information Panel, the document properties that are associated with your document may be specific to your organization.
-
Document library properties These are properties that are associated with documents in a document library on a website or in a public folder. When you create a new document library, you can define one or more document library properties and set rules on their values. When you add documents to the document library, you are prompted to include the values for any properties that are required, or to update any properties that are incorrect. For example, a document library that collects product ideas can prompt the person for properties such as Submitted By, Date, Category, and Description. When you open a document from a document library in Word, Excel, or PowerPoint, you can edit and update these document library properties in the Document Information Panel.
View and change the properties for the current file
-
Click the File tab.
-
Click Info.
-
Click the View and edit database properties link at the top of the page.
-
In the Properties dialog box, click the tabs to select the properties that you want to view or update.
Note: If your organization customized the Document Information Panel, or if the document for which you want to view properties is saved to a document library or a document management server, additional document property views may be available.
-
Click OK. Any changes you made will be saved automatically.
-
Click the File tab again to return to your file.
-
Click the File tab.
-
Click Info to view the workbook properties.
-
To add or change properties, hover your pointer over the property you want to update and enter the information.
-
Click the File tab again to return to your workbook. Any changes you made will be saved automatically.
Optional steps:
-
To see more properties, click the Show All Properties link at the bottom of the page.
-
To open a properties dialog box where you can add or edit all the properties at once and view document information and statistics, click Properties at the top of the page, and then click Advanced Properties.
On the Summary tab, you can add or edit the Title, Subject, Author, Manager, Company, Category, Keywords (also called Tags), and Comments.
To view custom properties, click the Custom tab.
-
To see the properties in a panel within your workbook, click Properties at the top of the page and select Show Document Panel.
Note: If your organization customized the Document Information Panel, or if the document for which you want to view properties is saved to a document library or a document management server, additional document property views may be available.
-
-
Click the File tab.
-
Click Info to view the form statistics.
-
To change the Name, ID or Description of the form, click Form Template Properties, and make changes to those fields as needed.
-
To show this form in a custom category in InfoPath Filler, select the Enable custom category check box and enter a name for the custom category.
-
Click OK.
-
Click the File tab again to return to your workbook. Any changes you made will be saved automatically.
-
Click the File tab.
-
Click Info to view the presentation properties.
-
To add or change properties, hover your pointer over the property you want to update and enter the information.
-
Click the File tab again to return to your presentation. Any changes you made will be saved automatically.
Optional steps:
-
To see more properties, click the Show All Properties link at the bottom of the page.
-
To open a properties dialog box where you can add or edit all the properties at once and view document information and statistics, click Properties at the top of the page, and then click Advanced Properties.
On the Summary tab, you can add or edit the Title, Subject, Author, Manager, Company, Category, Keywords (also called Tags), and Comments.
To view custom properties, click the Custom tab.
-
To see the properties in a panel within your workbook, click Properties at the top of the page and select Show Document Panel.
Note: If your organization customized the Document Information Panel, or if the document for which you want to view properties is saved to a document library or a document management server, additional document property views may be available.
-
-
Click the File tab.
-
Click Info to view the project properties.
-
To add or change properties, hover your pointer over the property you want to update and enter the information.
-
Click the File tab again to return to your project. Any changes you made will be saved automatically.
Optional steps:
To see more properties or statistics, click Project Information at the top of the page, and then click Advanced Properties or Project Statistics.
On the Summary tab in the Properties dialog box, you can add or edit the Title, Subject, Author, Manager, Company, Category, Keywords (also called Tags), and Comments.
To view custom properties, click the Custom tab in the Properties dialog box.
Note: If your organization customized the Document Information Panel, or if the document for which you want to view properties is saved to a document library or a document management server, additional document property views may be available.
-
Click the File tab.
-
Click Info to view the properties.
-
Click the File tab again to return to your publication. Any changes you made will be saved automatically.
Optional steps:
To open a properties dialog box where you can add or edit all the properties at once and view document information and statistics, click Publication Properties at the top of the page, and then click Advanced Properties.
On the Summary tab, you can add or edit the Title, Subject, Author, Manager, Company, Category, Keywords (also called Tags), and Comments.
To view custom properties, click the Custom tab.
Note: If your organization customized the Document Information Panel, or if the document for which you want to view properties is saved to a document library or a document management server, additional document property views may be available.
-
Click the File tab.
-
Click Info to view the properties.
-
To add or change properties, hover your pointer over the property you want to update and enter the information.
-
Click the File tab again to return to your publication. Any changes you made will be saved automatically.
Optional steps:
To open a properties dialog box where you can add or edit all the properties at once and view document information, click Properties at the top of the page, and then click Advanced Properties.
On the Summary tab, you can add or edit properties such as the Title, Subject, Author, Manager, Company, Category, Keywords (also called Tags), and Comments.
Notes:
-
To add a link to related documents, click Related Documents at the bottom of the Info page, and select Add a Link to a Related Document.
-
If your organization customized the Document Information Panel, or if the document for which you want to view properties is saved to a document library or a document management server, additional document property views may be available.
-
-
Click the File tab.
-
Click Info to view the document properties.
-
To add or change properties, hover your pointer over the property you want to update and enter the information.
-
Click the File tab again to return to your document. Any changes you made will be saved automatically.
Optional steps:
-
To see more properties, click the Show All Properties link at the bottom of the page.
-
To open a properties dialog box where you can add or edit all the properties at once and view document information and statistics, click Properties at the top of the page, and then click Advanced Properties.
On the Summary tab, you can add or edit the Title, Subject, Author, Manager, Company, Category, Keywords (also called Tags), and Comments.
To view custom properties, click the Custom tab.
-
To see the properties in a panel within your workbook, click Properties at the top of the page and select Show Document Panel.
Note: If your organization customized the Document Information Panel, or if the document for which you want to view properties is saved to a document library or a document management server, additional document property views may be available.
-
View or create custom properties for a file
Custom properties are properties that you define for an Microsoft 365 document. You can assign a text, time, or numeric value to custom properties, and you can also assign them the values yes or no. You can choose from a list of suggested names or define your own.
-
Click the File tab.
-
Click Info.
-
Click the View and edit database properties link at the top of the page.
-
Click the Custom tab.
-
In the Name box, type a name for the custom property, or select a name from the list.
-
In the Type list, select the data type for the property that you want to add.
-
In the Value box, type a value for the property. The value that you type must match the selection in the Type list. For example, if you select Number in the Type list, you must type a number in the Value box. Values that don’t match the property type are stored as text.
-
-
Click Add, and then click OK.
-
Click the File tab again to return to your workbook.
-
Click the File tab.
-
Click Info.
-
Click Properties at the top of the page, and then select Advanced Properties.
-
Click the Custom tab.
-
In the Name box, type a name for the custom property, or select a name from the list.
-
In the Type list, select the data type for the property that you want to add.
-
In the Value box, type a value for the property. The value that you type must match the selection in the Type list. For example, if you select Number in the Type list, you must type a number in the Value box. Values that don’t match the property type are stored as text.
-
-
Click Add, and then click OK.
-
Click the File tab again to return to your presentation.
-
Click the File tab.
-
Click Info.
-
Click Project Information at the top of the page, and then select Advanced Properties.
-
Click the Custom tab.
-
In the Name box, type a name for the custom property, or select a name from the list.
-
In the Type list, select the data type for the property that you want to add.
-
In the Value box, type a value for the property. The value that you type must match the selection in the Type list. For example, if you select Number in the Type list, you must type a number in the Value box. Values that don’t match the property type are stored as text.
-
-
Click Add, then click OK.
-
Click the File tab again to return to your project.
-
Click the File tab.
-
Click Info.
-
Click Publication Properties at the top of the page, and then select Advanced Properties.
-
Click the Custom tab.
-
In the Name box, type a name for the custom property, or select a name from the list.
-
In the Type list, select the data type for the property that you want to add.
-
In the Value box, type a value for the property. The value that you type must match the selection in the Type list. For example, if you select Number in the Type list, you must type a number in the Value box. Values that don’t match the property type are stored as text.
-
-
Click the File tab again to return to your publication.
-
Click the File tab.
-
Click Info.
-
Click Properties at the top of the page, and then select Advanced Properties.
-
Click the Custom tab.
-
In the Name box, type a name for the custom property, or select a name from the list.
-
In the Type list, select the data type for the property that you want to add.
-
In the Value box, type a value for the property. The value that you type must match the selection in the Type list. For example, if you select Number in the Type list, you must type a number in the Value box. Values that don’t match the property type are stored as text.
-
-
Click the File tab again to return to your document.
Learn what document properties in Microsoft Word can be used for. How to add document properties in Word, how to edit and insert document properties, etc.
When used wisely, document properties and DocProperty fields can help you produce better Word documents in less time.
In this article, you will learn what a document property is and what a DocProperty field is. You will learn where to find the Advanced Properties in Word. The article explains how you can use the built-in functionality of Word to add or edit document properties and insert DocProperty fields, both via the general user interface and via macros (VBA).
The general information below about Microsoft Word document properties and DocProperty fields apply to both custom document properties and DocProperty fields you create using Word’s built-in functionality and using the Word add-in DocTools DocPropertyManager.
It can be slow and tiresome to work with Word’s built-in functionality when it comes to document properties. The DocTools DocPropertyManager Word add-in makes the work much easier and faster. Custom document properties and DocProperty fields created using DocTools DocPropertyManager will work as if they had been created using Word’s built-in functionality. However, DocTools DocPropertyManager makes it possible to perform several tasks that are not possible via the built-in functionality.
This article is relevant for Word 2007, Word 2010, Word 2013, Word 2016, Word 2019, and Word for Microsoft 365. Note that DocTools DocPropertyManager does not work with Word 2007.
What is a document property in Word?
There are different types of document properties.
- Standard document properties – can also be called built-in document properties
- Custom document properties
- Document library properties
All Word documents contain a set of standard document properties, e.g. Title, Author, Keywords, and Comments. These properties are used to store certain types of metadata about your document. The standard properties have fixed names that you cannot change. You can edit the value of some of the standard properties (e.g. Title, Author, Keywords and Comments) whereas others store statistics data that is updated automatically by Word and that cannot be edited, e.g. file size, when the document was last saved or printed.
In addition to the standard properties, you can add Word document properties yourself. Such properties are called custom document properties. Word documents do not contain any custom document properties by default. You can add as many custom document properties as you wish. Each custom document property must be assigned a name, a data type and a value. There are four data types: Text, Date, Number and Yes or No. For details about the types, see About the different data types of custom document properties below.
Document library properties are related to documents that are stored in a document library on a website or in a public folder, e.g. in relation to SharePoint. This article will not deal further with document library properties.
Back to Table of Contents
What can document properties be used for?
None of the Word document properties are visible in the document content unless you do something to insert their values into the content. This is true for both the standard and the custom document properties.
In e.g. File Explorer, you can see and search for documents with specific standard document property values. This article will concentrate on what you can use document properties for in the contents of Word documents.
You can insert the value of a document property in the document. You do so by inserting a field of the type DocProperty. A DocProperty field will show the value of the related document property – standard or custom. See How to insert a DocProperty field using the built-in functionality of Word later in this article.
For an illustration of what document properties and DocProperty fields can be used for, see this short video. The video shows the DocTools DocPropertyManager add-in in use. You can use document properties and DocProperty fields for the same purpose by using Word’s own features. The difference is that the work is more cumbersome and takes longer.
In many documents you may need the same data repeatedly. For example, a client name or a product name may occur several times. It is very helpful to use custom document properties for such data.
You can insert as many DocProperty fields related to the same document property as you wish. If you change the value of that custom document property, you only need to update fields. Then the new value will appear throughout the document. This applies regardless of whether one or many DocProperty fields exist. Thereby, you can define the value once and you are sure that the same value will be shown in every single DocProperty field related to that custom document property.
There are other ways to repeat data. For example, you can bookmark text and have the contents of the bookmark repeated by inserting cross-references to the bookmark. On the DocTools DocPropertyManager page, I have explained why the use of bookmarks and cross-references is less stable than the use of custom document properties and DocProperty fields.
Custom document properties and DocProperty fields also make it easy to create templates with flexible boilerplate text. This way, you can re-use text across documents. For example, this is useful in templates for proposals and agreements. It makes it fast and safe to update the contents with correct names and other values in the individual documents that are created. In the template, simply insert DocProperty fields as placeholders for the relevant data. Assign neutral, descriptive values to the custom document properties in the template. Then it is easy for the user to see which type of information each DocProperty holds. When a user creates a new document based on the template, he/she only needs to edit the values of the custom document properties and update fields.
For an example of the use of custom document properties and DocProperty fields, see the short video on the DocTools DocPropertyManager page.
Fact list
- A document property has a name and a value. A custom document property also has a type.
- The value of a document property can be inserted in Word documents using fields of the type DocProperty.
- You can add as many custom document properties in Word as you want.
- Custom document properties that have been added to a Word document are preserved in the document regardless of whether they are used in any DocProperty field.
- The field code of a DocProperty field must refer to the name of the document property whose value you want to appear in the document.
- You can repeat data in a document by inserting as many DocProperty fields referring to the same document property name as you wish.
- You can use DocProperty fields in Word templates as placeholders for document-specific data.
- To change the value of all instances of a specific DocProperty field, edit the value of the related document property and update fields.
Document properties in a template are inherited by new documents based on the template
If you want all documents that are based on a specific template to start with special values of standard properties (e.g. Title and Company) and/or a set of custom document properties, make sure these data are set up in the template. All documents based on the template will initially inherit the document properties and their values. Users of the template can then modify the values of the document properties in the individual document.
Once a Word document has been created, Word has no built-in feature for copying document properties from other documents.
Note that the DocTools DocPropertyManager add-in lets you import custom documents from one document to another. This makes it easy to re-use metadata between documents. The add-in also lets you export custom documents to a document for easy overview in a table. You can even edit properties directly in the table and add custom document properties based in the table data, ready for import into other documents.
Back to Table of Contents
How to edit the values of standard document properties
If you want to edit the value of standard document properties, you need to open the built-in Properties dialog box.
Where is document properties in Word?
In newer versions of Word, the Properties dialog box is well hidden. You must find it under the name Advanced Properties. Follow the instructions below.
How to open the Properties dialog box in Word
How to open the Properties dialog box depends on your version of Word. Note that at least one document must be open in Word in order to open the Properties dialog box.
Word 2010 and later versions
Select File > Info (left side of dialog box) > click the Properties drop-down > select Advanced Properties.

How to find Advanced Properties in Word.
Select Office button > Prepare (left side of dialog box) > in the Document Information Panel that opens below the Ribbon in Word, click the Properties drop-down > select Advanced Properties.
TIP: You can add the Properties dialog box to the Quick Access Toolbar (QAT) for easier access. The name of the command to find in the Word Options dialog box is Advanced Document Properties. For help on how to add a command to the QAT, see How to add a command or macro to the Quick Access Toolbar.
Note that DocTools DocPropertyManager provides easy access to the Properties dialog box in case you need to edit standard document properties.

Example of the Properties dialog box showing properties for a new, blank document. The name of the document appears in the title bar of the dialog box, in this case «Document3».
As can be seen in the illustration to the left, the Properties dialog box has a number of tabs: General, Summary, Statistics, Contents, and Custom. All tabs except Custom are related to standard properties.
The Summary tab has fields that let you specify a value for each of the following standard properties:
Title
Subject
Author
Manager
Company
Category
Keywords
Comments
To edit the values:
- Type the values you want to assign to the individual properties. You may leave any of the fields empty.
- Click OK when finished.
How to add or edit custom document properties
How to add document properties in Word
The built-in functionality of Word lets you add custom document properties via the Properties dialog box.
- Open the Properties dialog box and select the Custom tab. See How to open the built-in Properties dialog box.
- Type a name in the Name field (up to 255 characters).
- Select a data type in the Type field (see About the different data types of custom document properties for details).
- Type a value in the Value field (up to 255 characters, however, the value must comply with the data type you selected).
- Click Add to add the property to the Properties list. If you are creating only one document property, you can skip this step. If you are going to add more document properties, repeat steps 2-5.
- Click OK when finished.

The Custom tab of the Properties dialog box lets you add custom document properties. In this example, two custom document properties have been added.

Example of property with Link to content turned on.
Below the Name list, you will find a number of suggested names you can select from, if relevant. The result is the same as typing the name directly in the Name field.
Word custom properties link to content
About the Link to content check box
Note the check box Link to content, next to the Value field. Custom document properties with Link to content turned on will show a link icon to the left of the name.
If you turn on Link to content, the label Value changes to Source and the field changes to a drop-down list. The drop-down list shows the names of all bookmarks in the document. Select a bookmark name from the list. If you insert a DocProperty field that refers to the custom document property in question, Word will (or rather: may…) insert the content of the bookmark. If the content of the bookmark is changed, the content of any DocProperty field referring to that bookmark should change too when fields are updated. But that only seems to happen if you, after the bookmark change, open the Properties dialog box and click OK – and then updated fields.
There are also other important limitations to the bookmark content shown in such DocProperty fields: Only plain text is included in the field result and only up to 255 characters no matter what is included in the bookmark. This means that you cannot use Link to content to have DocProperty fields show longer texts or non- textual content like images or tables.
Since it is doubtful how safe and/or useful it is to use this Link to content option, the DocTools DocPropertyManager add-in does not let you add custom document properties with this option turned on. If a document contains custom document properties added via the built-in Properties dialog box and if Link to content is turned on, DocTools DocPropertyManager will detect this in case you attempt to modify the property. You will then be asked whether you want to modify the property via the built-in dialog box instead.
The built-in Properties dialog box cannot be resized. This makes it impossible to see the full names and/or full values in many cases.
The dialog box for creating and editing custom document properties in the DocTools DocPropertyManager add-in is flexible and has room for longer names and values. In addition, it lets you sort the properties alphabetically. Also, a Filter field makes it fast to find a specific property in the list. When you click a property in the list, you will see information about how many DocProperty fields are found in the document that refer to that property.
How to edit document properties in Word
You could as well ask: How to modify document properties in Word. The terms edit and modify mean the same in this situation. You can edit (modify) the value of a custom document property.
- Open the Properties dialog box and select the Custom tab. See How to open the built-in Properties dialog box.
- In the Properties list, select the relevant document property.
- In the Value field, edit the value.
- If you are going to add or edit (modify) more document properties now, click Modify, else click OK.
- If one or more DocProperty fields in the document refer to the modified property/properties, update fields (Ctrl+A to select all, F9 to update fields).
How to rename custom document properties in Word
The built-in functionality in Word does not let you change the name of a custom document property. The DocTools DocPropertyManager add-in lets you easily rename custom document properties.
Once you have added a custom document property, you can edit its value but you cannot change the name using Word’s built-in features. The only way to change the name of a custom document property is to delete the old property and add a new one. IMPORTANT: In addition, you will need to change the field code of any DocProperty field that refers to the custom document property in question. Otherwise, such field will show Error! Unknown document property name once fields have been updated.
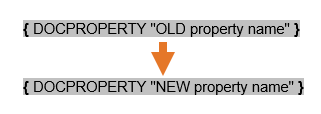
If you use Word’s built- in feature, you must change the field code in DocProperty fields if you have deleted an old document property and added a new one to change the name.
As opposed to the cumbersome procedure needed for renaming a custom document property using Word’s own features, the DocTools DocPropertyManager add-in lets you rename any existing custom document property simply by changing its name. DocTools DocPropertyManager will automatically do all the work for you, including correcting the field code in any DocProperty field that refers to the renames document property.
How to insert document properties in Word
To insert a document property in Word, you must insert a field of the type DocProperty. Using the built-in functionality, you can insert a DocProperty field either via the Field dialog box or by typing the field code manually. Both methods are described below. Note that the DocTools DocPropertyManager add-in makes it much faster and easier to insert DocProperty fields.
How to insert a DocProperty field using the Field dialog box
- In the document, click where you want the DocProperty field to be inserted.
- Select the Insert tab.
- in the Text group on the Ribbon, click the Quick Parts drop-down and select Field to open the Field dialog box.
- In the Categories list, select either (All) or Document Information,
- In the Field names list, select DocProperty.
- In the Property list, select the name of the document property whose value the DocProperty field is to show. See the illustration of the Field dialog box below.
The list includes both the standard properties and custom properties, if any.
- Click OK to insert the DocProperty field.

The Field dialog box ready for inserting a DocProperty field.
NOTE: By default, Preserve formatting during updates is turned on. If turned on, the MERGEFORMAT switch will be added to the field code. Personally, I always turn the option off since it may result in undesired formatting. For example, a field with the switch may appear with bold text if the field has once shown an error. If special formatting is desired, it is more stable to add relevant switches for the formatting directly.

DocProperty field showing field code and field result.
How to insert a DocProperty field by typing the field code manually
If you know the name of the document property you want to use, it is faster to type the field code manually than using the Field dialog box. The same is true for many other types of fields in Word.
- In the document, click where you want the DocProperty field to be inserted.
- Press Ctrl+F9 to insert a pair of field brackets (cannot be typed manually).
- Between the field brackets, type the following field code:
DOCPROPERTY «[name of property]»
where you replace [name of property] with the name of the desired property.
The use of uppercase and lowercase in the field code is without importance. If the property name consists of one word only, you may leave out the quotation marks. If the property name includes at least one space, you must add the quotes. Therefore, I recommend that you always add quotes for consistency.
- Press F9 to update the field and turn off field codes.
If the field for some reason still shows field codes, press Alt+F9 to show the field result instead.
How to fix Error! Unknown document property name
If a DocProperty field refers to a property name that does not exist in the document, the field will show an error when fields are updated: Error! Unknown document property name. See the illustration below:
![]()
Example of DocProperty field showing an error because it refers to a property that does not exist. The error test will be shown in the language of your Word.
The error will occur if you have deleted the custom document property to which the field refers. The error will also occur if you insert content that has been copied from another document and if that content includes DocProperty fields that refer to property names that don’t exist in the target document.
To fix the error, do one of the following:
- Add the missing custom document property and update fields. You can find the property name to use by checking the field code of the error field.
OR - Change the field code in the error field to match an existing custom document property. Then update the field.
OR - Delete the DocProperty field and edit the surrounding content as needed.
The DocTools DocPropertyManager add-in lets you easily add all missing custom document properties, if any, by the click of a button.
Are DocProperty fields updated automatically?
Note that DocProperty fields do not update automatically. If the value of one or more properties referred to in DocProperty fields has been changed, you need to update the fields to reflect the changes.
You can update DocProperty fields manually by selecting all (Ctrl+A) and pressing F9.
For detailed information about how all types of fields are updated, see my article Updating Fields in Word – How it Works.
Note that the DocTools DocPropertyManager add-in automatically updates DocProperty fields when needed.
About the different data types of custom document properties
As mentioned above, custom document properties can be of the types Text, Date, Number and Yes or No. Below, you will find a description of each type.
Text is the most commonly used type. The other types, Date, Number and Yes or no require specific values and in the document, such fields will not always insert a value that is identical to the value you specify in the Properties dialog box. Therefore, you must make sure that you fully understand how the values of those types work before you start using them.
I use custom document properties and DocProperty fields in the main part of the many Word documents I work with. I always define custom document properties of the type Text.
Type of custom document property
Description – how it works
DocProperty fields that insert a Text property, inserts precisely the text you specify as the value of the property. Most often, you can use the type Text for all DocProperty fields. The value can include max. 255 characters.
The built-in functionality only lets you enter plain text as the value, without any paragraph breaks or manual line breaks. The DocTools DocPropertyManager add-in lets you add the following characters:
- nonbreaking spaces
- nonbreaking hyphens
- en dashes
- em dashes
- manual line breaks
- paragraph breaks
You must enter a value in a date format that matches the definition in the regional settings on your PC.
You may need to experiment since the language settings also influence the way Date properties work.
In case of a standard Danish setting, you can, for example, use the syntax dd-mm-yyyy, e.g. 31-05-2019. A DocProperty field in the document may not always show the date as it appears in the value you specify. You may instead use the type Text. This way, you can enter the date value precisely as you want it to appear in the DocProperty fields in the document.
You must specify a number, either an integer or a decimal number. The decimal symbol to use depends on the regional settings on your PC. If the decimal symbol is a period you can, e.g., enter 12345.678 as a value. A DocProperty field in the document will show the specified value. You may enter a number value with a thousands separator but Word ignores the separator in the field result.
You may enter the following:
* -1 (corresponds to yes) or 0 (corresponds to no) or
* True (corresponds to yes) or false (corresponds to no)
When you insert DocProperty fields, the value in the document will only be ‘Y’ for yes and ‘N’ for no.
How to manage document properties and DocProperty fields via macros (VBA)
Below, you will find VBA code examples showing:
- How you can edit the values of standard document properties via VBA
- How you can add custom document properties and edit the values of custom document properties via VBA
- How you can insert DocProperty fields via VBA
These code samples may help you create useful macros. The DocTools DocPropertyManager add-in lets you do much more than that.
In order to create solid VBA code, you will need to add error handling to handle the types of errors that might occur. The code samples below do not include such error handling.
Back to Table of Contents
How to edit the values of standard document properties via VBA
Below are examples of VBA code to edit each of the standard document properties found on the Summary tab of the Properties dialog box.
By using names from the wdBuiltInProperty enumeration, you are sure to use correct names that will work in any language version of Word. Each property also has a number that can be used but your VBA code is much easier to understand if you use the names.
For a full list of the wdBuiltInProperty enumeration for Word, see https://docs.microsoft.com/en-us/office/vba/api/word.wdbuiltinproperty. Note the comments after each of the listed properties – some are not supported in Word even if they are in the list.
Examples of VBA code for editing the values of the standard properties in the active document found on the Summary tab of the Properties dialog box:
ActiveDocument.BuiltInDocumentProperties(wdPropertyTitle) = "My Title"
ActiveDocument.BuiltInDocumentProperties(wdPropertySubject) = "My Subject"
ActiveDocument.BuiltInDocumentProperties(wdPropertyAuthor) = "My Author"
ActiveDocument.BuiltInDocumentProperties(wdPropertyManager) = "My Manager"
ActiveDocument.BuiltInDocumentProperties(wdPropertyCompany) = "My Company"
ActiveDocument.BuiltInDocumentProperties(wdPropertyCategory) = "My Category"
ActiveDocument.BuiltInDocumentProperties(wdPropertyKeywords) = "My Keywords"
ActiveDocument.BuiltInDocumentProperties(wdPropertyComments) = "My Comments"
If you are editing two or more values, you should use With and End With as shown below:
With ActiveDocument
    .BuiltInDocumentProperties(wdPropertyTitle) = "My Title"
    .BuiltInDocumentProperties(wdPropertySubject) = "My Subject"
    .BuiltInDocumentProperties(wdPropertyAuthor) = "My Author"
End With
How to add a custom document property via VBA
The VBA code below adds a custom document property in the active document, with the name «My property», link to content turned off, type «Text» and value «My property value»:
ActiveDocument.CustomDocumentProperties.Add _
    name:="My property", _
    LinkToContent:=False, _
    Value:="My property value", _
    Type:=msoPropertyTypeString
The Type can be one of the following:
- msoPropertyTypeString
Corresponds to the type Text in the Properties dialog box > Custom tab. - msoPropertyTypeDate
Corresponds to the type Date in the Properties dialog box > Custom tab. - msoPropertyTypeNumber or msoPropertyTypeFloat
Corresponds to the type Number in the Properties dialog box > Custom tab.
In case of a decimal number value, the type must be msoPropertyTypeFloat. The decimal symbol must match the decimal symbol defined in regional settings.
In case of an integer value, the type must be msoPropertyTypeNumber. - msoPropertyTypeBoolean
Corresponds to the type Yes or no in the Properties dialog box > Custom tab.
For more details about the data types, see About the different data types of custom document properties.
How to edit the value of a custom document property via VBA
The VBA code below changes the value of a custom document property named «My property» to «My new property value»:
ActiveDocument.CustomDocumentProperties("My property").Value = "My new property value"
The VBA code also works if you leave out «.Value» since .Value is the default property. However, I recommend always adding the property. It makes the code easy to read and you don’t run into problems. The example below has left out the default property .Value (not recommended even if it works):
ActiveDocument.CustomDocumentProperties("My property") = "My new property value"
The new value you assign must match the type of custom document property. For example, you can only assign the value in the example above if the type of custom document property is Text. If you assign a value that does not match the type, a run-time error occurs, saying «Type mismatch».
How to insert a DocProperty field via VBA
The VBA code below inserts a DocProperty field at the selection, referring to a custom document property named «My property». If no document property with the specified name exists, the field will show an error.
If you want the MERGEFORMAT switch to be turned on for the field, change PreserveFormatting from False to True.
The double quotation marks around «My property» are needed to have quotation marks added in the field code. There are other ways of adding the quotation marks, e.g. using the character code Chr(34). You could then replace «»My property»» with this instead:
Chr(34) & «My property» & Chr(34)
Selection.Fields.Add _
    Range:=Selection.Range, _
    Type:=wdFieldEmpty, _
    Text:="DOCPROPERTY  ""My property"" ", _
    PreserveFormatting:=False
The field code of the inserted field will look like this:
{ DOCPROPERTY «My property» }
The field result depends on the value of the property named «My property».
How to handle both built-in and custom document properties in the same VBA code
If you want to be able to handle both built-in properties and custom document properties using the same macros/VBA code, see How to use a single VBA procedure to read or write both custom and built-in Document Properties.
How to find information about the field switches
In the general help on Word, you can find information about the different types of switches that can be used with specific fields.
The fastest way to find this information is often to search using your preferred browser. You can search for «field codes [TYPE OF FIELD] field» (example: «field codes docproperty field») or something similar.
More tips about working with fields in Word
Turn on field shading so you can distinguish fields from other content
In documents with fields, it is important to be able to distinguish fields from normal text so you don’t accidentally change a field result by manually modifying its result. If you manually modify a field result, the change will disappear the next time the field is updated unless the field has been locked.
Therefore, I recommend that you set the Word option for Field shading to Always (File > Options > Advanced > Show document content group > Field shading > Always). With field shading on, all fields are shown with gray shading on the screen. The gray shading is only visible on the screen in Word – it does not print and it is not visible in PDF.
Information about how different types of fields are updated
For detailed information about how all types of fields are updated, see my article Updating Fields in Word – How it Works.
Useful shortcuts related to fields in Word
For information about keyboard shortcuts related to fields, see my article Word Fields – Useful Keyboard Shortcuts.
Back to Table of Contents

Generate complete documents in seconds from re-usable text or graphics
Manage comments in Word fast and easy – review comments, extract comments to Word or Excel, etc.
Simplify and speed up the management of cross-references even in your most complex documents
Manage and repeat data in Word fast and easy with custom document properties and DocProperty fields
Extract insertions, deletions and comments from any Word document, incl. context and headings
Apply any highlight color or remove highlight in Word with a single click – customizable shortcuts
Browse pages, sections, headings, tables, graphics, etc. and find text in Word with a single click
Check safety-critical procedure documents for human factor issues in minutes – improve quality and help prevent errors
Create screen tips in Word fast and easy – with up to 2040 characters
Once you understand how custom document properties and DocProperty fields in Word work, you will be able to create Word documents more efficiently. If you use custom document properties and DocProperty fields for metadata and repeated data, if is easier for you to keep the document data updated and correct.
This article has explained how to add document properties in Word, how to edit document properties in Word, how to insert document properties using DocProperty fields, etc. I hope this article helps you in your future work with custom document properties and DocProperty fields in Word.
Document Properties is one of those long-standing parts of Office that is worth another look. It can be quite useful and not always in the ways that Microsoft intends.
At first, document properties looks like a fixed and rigid feature with limited use. However it can be used in much wider and creative ways.
Any time you have a piece of text repeated within a document, is a potential use for document properties. It’s a way to quickly and easily automate your document and ensure it’s consistent and accurate. Document properties let you replace text in places Word itself won’t go.
For example, the document Title property can show up in the Header or even as text in the document. In fact some of the supplied Header formats in Word use document properties (like Title) already.

Both places where you see ‘Flanders and Swann’ it’s actually a document property. Click on either text and you’ll see that.

Change the document property and the document changes.

In each document
Each Office document (Word, Excel and PowerPoint) has a series of hidden document properties that can be shown within a document. In Word 2013 and Word 2010 you can see them on the right-side of the Info screen.

In Word 2007 go to Start | Prepare | Properties. Word 2003 and before to File | Properties.
Some properties are set by the application itself like file size, pages, word count, creation and last modified date.
Many others can be set by you and displayed in the document. If you change that property, the document is updated automatically.
Why bother?
The smarties among you might wonder at this point … why bother with document properties? There are at least two other ways to do the same thing; find & replace or bookmarks.
That’s true, however sometimes those options aren’t suitable. Replace can change text that you don’t want changed (for example when the text to find is there in other contexts) and doesn’t always work (e.g. in multiple text boxes). Bookmarks can be confusing to find and change.
Document Properties are flexible and controlled outside the main document content which can be an advantage.
You choose the solution that suits your needs and it’s good to know all the options available. We’ll explain how document properties can be used beyond the narrow purposes that are usually explained.
Setting a property
The common document properties are set on the File | Info pane as you can see above. There are more available if you click on the See more properties at bottom right of the Info pane.

Now there’s more editable properties available:
- Title
- Tags
- Comments
- Status
- Categories
- Subject
- Hyperlink Base
- Company
- Manager
And there’s even more than that, but we’ll get to those later.
Let’s look at the Title property.

Changing the property is simple. Just click in the area ‘Add a title’ and type in the text you want. The data entry area doesn’t look editable but it changes into a text entry field when you click on it.
![]()
When you go back to the document, any place with the Title document property inserted will show that text.
Some properties are also visible from the Document Panel that appears above the document, worksheet or presentation. Go to Info | Properties | Show Document Panel (Word 2013/2010), File | Prepare | Properties (Word 2007).


Choosing ‘Advanced Properties’ then the Summary tab will show a list of the main document properties. This dialog box hasn’t changed much for many versions of Word going past more than a decade.

Within the document
You don’t even have to go to the Info pane if the property is already inserted into the document.
Click on the document property text so the content control box appears. The text in that box is editable so type away.

When you click away from the control, other instances of that property should be automatically updated.

For advanced users there are other ways to change document properties:
- Via VBA code
 BuiltInDocumentProperties( <Property Name> ).Value or
 ActiveDocument.CustomDocumentProperties(<Property Name> ).Value
- Changing the XML within the document itself. It’s in docProps/core.xml in the <dc:title> tag.


Both of these options are great for programmers and network administrators. They are easier to implement than large scale replace commands within the main document.
Inserting a document property
In Word 2007, Word 2010 and Word 2013, the main document properties are at Insert | Text | Explore Quick Parts | Document Property.

As we’ve seen already, an inserted property appears as a content control when you click on it.
In Word 2003 and before go to Insert | Field | DocProperty and choose the property you want to insert a field code.
Hovering over a control changes the background to gray.

Advanced Properties
Beyond the main document properties are ‘Advanced Properties’ available from File | Info | Properties | Advanced Properties

Under the Custom tab there’s a long list of other document properties. These ‘advanced’ properties are just more inbuilt labels that aren’t on the main panes or dialog boxes.

However these ‘advanced properties’ can’t be easily added to documents nor changed within the document like the main properties can. See Custom Properties below.
Custom Properties
The same dialog lets you add your own document properties. Any pair of text label and a property (Text,Date,Number or Yes/No) is possible.

To add a custom property, type the name/label into the Name field, choose a Type, enter a value and click Add.
Inserting Custom Properties is a little more fussy than the inbuilt properties. The standard ‘Document Properties’ insertion menu doesn’t change to allow for advanced or custom properties.
Go to Insert | Text | Quick Parts | Field | Document Information | DocProperty. Choose from the list of Properties shown which includes any custom properties.

In the document the property appears in the text where you’ve inserted it.

Press Alt + F9 to reveal the field code DOCPROPERTY that displays the custom properties.

Unlike the main document properties, you can’t change Advanced or Custom properties within the document itself. That makes Advanced and Custom properties less useful for many purposes and leads us to the simple trick that you can use.
Ignore the property name
The main document properties have names (aka labels) linked to a place for your text. Those labels are obvious things like Title, Subject etc but there’s no rule that the Subject property has to contain subject text … it can contain any text you want.
As long as you know what the property is used for … you can ignore the label.
For example, you might have a standard document for new clients. One way to insert the clients name throughout that document is to use the document property called ‘Client’. But that’s an ‘advanced’ property that’s harder to change and use.
Instead use the ‘Company’ property (or Status, Title, Subject etc.) which is more easily changed. As long as everyone using the document knows what to do, it doesn’t matter what Microsoft called the property.

Beyond Word …
Document Properties work well in Word. You can set and use properties quite easily.
In Excel and PowerPoint it’s a very different story which makes a mockery of Microsoft’s talk about consistency across the Office applications.
Both Excel and PowerPoint have document properties that you can change and even customize. But inserting those properties into documents is NOT easy at all. There’s no simple way to drop a worksheet property into a cell – amazing but true.
Excel
You’ll search in vain for an function like DocProperty() that would let you insert a document property into a cell.
Such an obvious and useful thing is completely missing. You can set Document Properties and custom properties but using them in a worksheet requires a custom VBA function.
PowerPoint
It’s even worse in PowerPoint. There are document properties available to set but no direct way to put them into slides. Since Powerpoint lacks almost all of the document automation that Word has, the only way to get document properties into a slide is VBA to search a presentation and replace text with a document property.
Wish List
Document Properties have been around for many versions of Office and appear to have been forgotten by the Microsoft Office development teams.
The Word group needs to remove the arbitrary difference between main, advanced and custom properties. All properties should be inserted as content controls and editable from within the document, just as main properties are now.
The Excel and PowerPoint development gurus need to get their act together. It should be embarrassing to both groups that document properties can be set but not easily used within their programs. The lack of an Excel function to retrieve document properties is truly astonishing.
- Free Courses
- Microsoft Word
- Word Document Properties

How to Set Document Properties in Word
Document properties are bits of information that describe and identify a document, such as a title, author name, and subject.
View and Edit Document Properties
The basic document properties are easy to find and update.
- Click the File tab.

The Info screen here will show the basic document properties in a column on the right.
The Info screen is the default when the File tab is opened. If another screen appears instead, click Info.
- Click a property field.
- Fill in the property field, then click outside of the field.

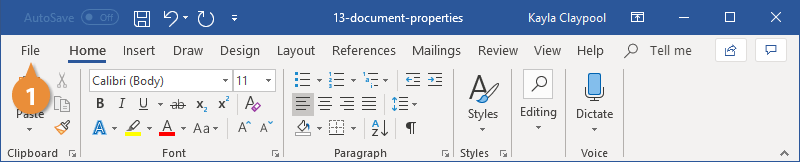
The property is saved.
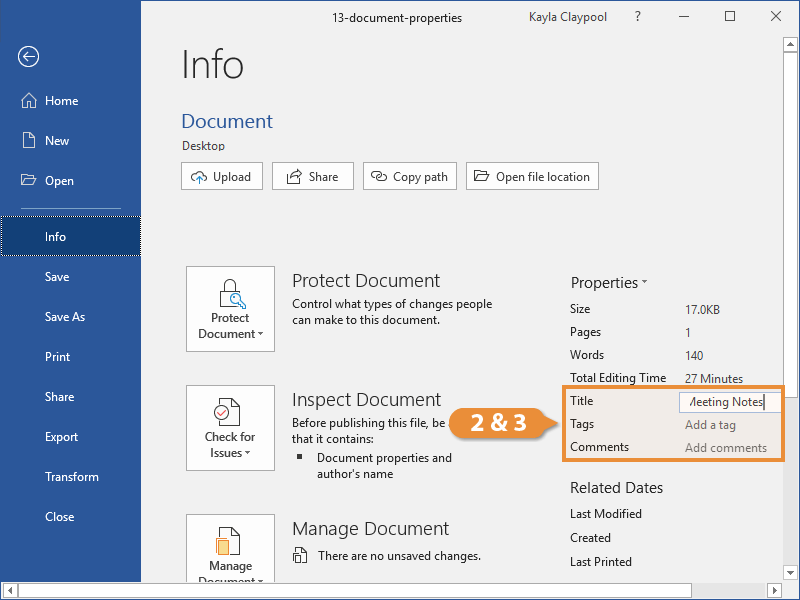
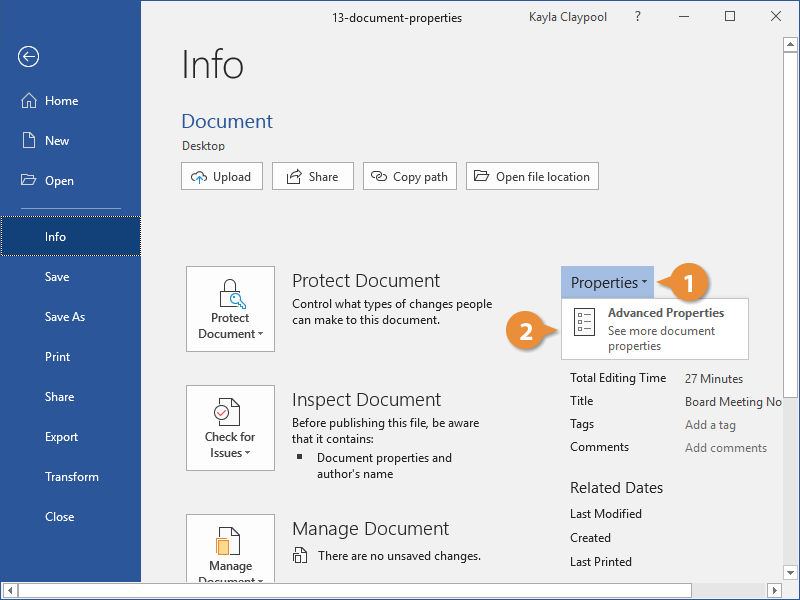
View Advanced Properties
There are additional advanced property fields that you can fill out beyond the basic fields on the Info screen.
- From the Info screen, click the Properties button.
- Select Advanced Properties.
The Document Properties dialog box opens to the Summary tab, where there are a few more properties to fill out.
- Edit the document properties.
In addition to the fields on the Summary tab, there are even more advanced properties available on the Custom tab.
- Click OK.
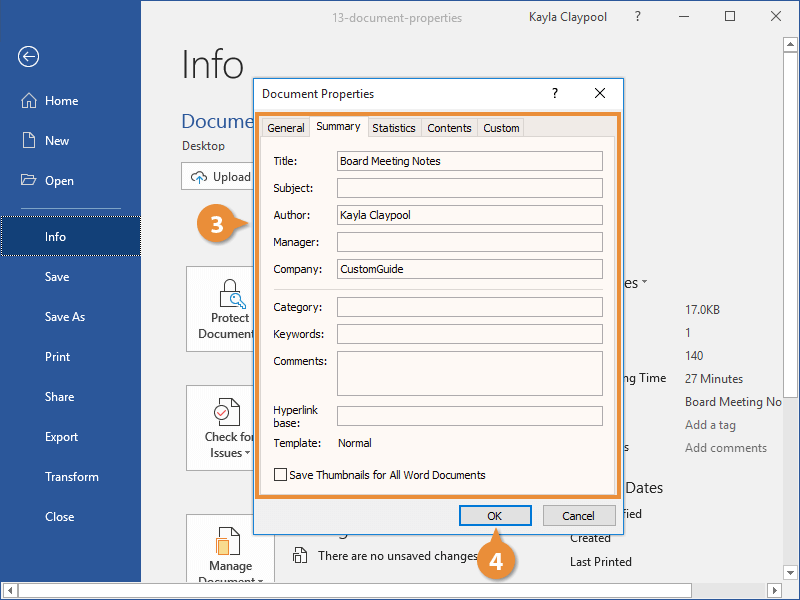
The advanced properties are saved.

FREE Quick Reference
Click to Download
Free to distribute with our compliments; we hope you will consider our paid training.
Word tracks several pieces of information stored in each document known as «properties.» These tips explain how to view and edit the information stored with your document. You may need to add information or reference it in your document, as described in these tips.
Tips, Tricks, and Answers
The following articles are available for the ‘Document Properties’ topic. Click the
article»s title (shown in bold) to see the associated article.
Blocking the First Sentence from File Info
When you save a file, the information from the start of the file is saved in the properties for the document and can be seen with very little trouble. If you want to hide this information from prying eyes, here’s how to do it.
Changing Lots of Title Properties
Word maintains a collection of descriptive properties for each document you create. One of these properties is the Title property. If you want to change this specific property in a large number of documents, you’ll need to resort to using a macro, as described in this tip.
Controlling Document Properties
Word keeps track of quite a bit of document-related information that it refers to as «properties.» Here’s how to control those properties and make changes in them.
Creating Custom Document Properties
Word allows you to keep track of any number of custom properties about a document. Here’s how to create those properties and later use them in a document.
Embedding Your Phone Number in a Document
One way you can designate your responsibility for a document is to add your phone number to it. There is no need to add your phone number in the actual document text, however. Instead you can add your phone number to the properties that Word maintains for each document.
Incorrect Last Modified Date on E-mailed Documents
Word maintains, in a document’s properties, several dates such as the date the document was created and last accessed. Those dates can and often are modified by Word at seemingly inopportune times. Here is a quick look at what you can do about this situation.
Marking Multiple Documents
After using Word for a while, it is easy to accumulate quite a few documents. At some point you may want to make a change to each of the documents in a folder. This tip explains the basics of how to easily make such a change, without the need to manually open and edit each document.
Unable to Edit Document with Embedded Fonts
What are you to do if you embed fonts in a document and then someone else cannot make changes to that document? Chances are good that this scenario has to do with the characteristics of the fonts you are embedding. Here are some things to check out.
Using Document Properties to Ensure Consistent References
If you need to refer to the same information over and over in a document, you may be interested in using custom document properties to implement those references. Defining the properties is easy and you can use the DOCPROPERTY field to later recall the information.