
Excel for Microsoft 365 Excel for Microsoft 365 for Mac Excel 2021 for Mac Excel 2019 Excel 2019 for Mac Excel 2016 Excel 2016 for Mac Excel 2013 Excel 2010 More…Less
If you have tasks in Microsoft Excel that you do repeatedly, you can record a macro to automate those tasks. A macro is an action or a set of actions that you can run as many times as you want. When you create a macro, you are recording your mouse clicks and keystrokes. After you create a macro, you can edit it to make minor changes to the way it works.
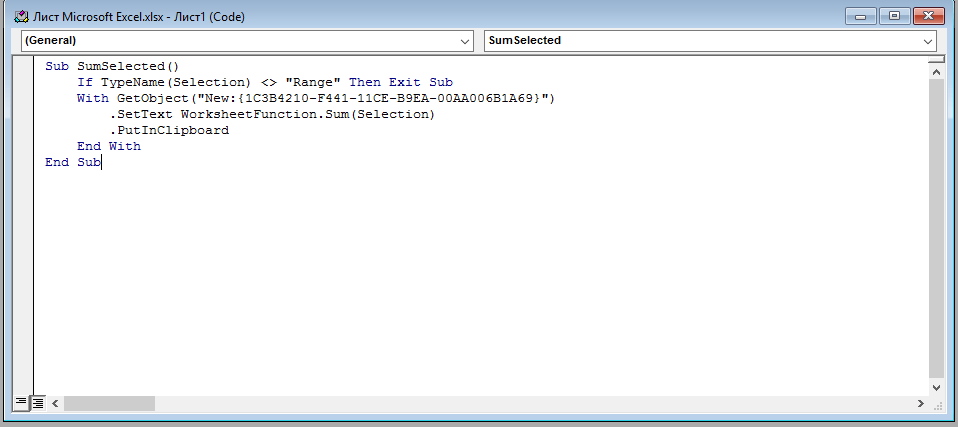
Suppose that every month, you create a report for your accounting manager. You want to format the names of the customers with overdue accounts in red, and also apply bold formatting. You can create and then run a macro that quickly applies these formatting changes to the cells you select.
How?
|
|
Before you record a macro Macros and VBA tools can be found on the Developer tab, which is hidden by default, so the first step is to enable it. For more information, see Show the Developer tab. |


|
|
Record a macro
|

|
|
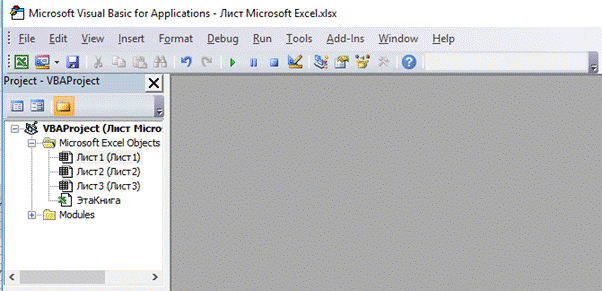
Take a closer look at the macro You can learn a little about the Visual Basic programming language by editing a macro. To edit a macro, in the Code group on the Developer tab, click Macros, select the name of the macro, and click Edit. This starts the Visual Basic Editor. See how the actions that you recorded appear as code. Some of the code will probably be clear to you, and some of it may be a little mysterious. Experiment with the code, close the Visual Basic Editor, and run your macro again. This time, see if anything different happens! |

Next steps
-
To learn more about creating macros, see Create or delete a macro.
-
To learn about how to run a macro, see Run a macro.
How?
|
|
Before you record a macro Make sure the Developer tab is visible on the ribbon. By default, the Developer tab is not visible, so do the following:
|
|
|
Record a macro
|
|
|
Take a closer look at the macro You can learn a little about the Visual Basic programming language by editing a macro. To edit a macro, in the Developer tab, click Macros, select the name of the macro, and click Edit. This starts the Visual Basic Editor. See how the actions that you recorded appear as code. Some of the code will probably be clear to you, and some of it may be a little mysterious. Experiment with the code, close the Visual Basic Editor, and run your macro again. This time, see if anything different happens! |
Need more help?
You can always ask an expert in the Excel Tech Community or get support in the Answers community.
Need more help?
Want more options?
Explore subscription benefits, browse training courses, learn how to secure your device, and more.
Communities help you ask and answer questions, give feedback, and hear from experts with rich knowledge.
#Руководства
- 23 май 2022
-

0
Как с помощью макросов автоматизировать рутинные задачи в Excel? Какие команды они выполняют? Как создать макрос новичку? Разбираемся на примере.
Иллюстрация: Meery Mary для Skillbox Media

Рассказывает просто о сложных вещах из мира бизнеса и управления. До редактуры — пять лет в банке и три — в оценке имущества. Разбирается в Excel, финансах и корпоративной жизни.
Макрос (или макрокоманда) в Excel — алгоритм действий в программе, который объединён в одну команду. С помощью макроса можно выполнить несколько шагов в Excel, нажав на одну кнопку в меню или на сочетание клавиш.
Обычно макросы используют для автоматизации рутинной работы — вместо того чтобы выполнять десяток повторяющихся действий, пользователь записывает одну команду и затем запускает её, когда нужно совершить эти действия снова.
Например, если нужно добавить название компании в несколько десятков документов и отформатировать его вид под корпоративный дизайн, можно делать это в каждом документе отдельно, а можно записать ход действий при создании первого документа в макрос — и затем применить его ко всем остальным. Второй вариант будет гораздо проще и быстрее.
В статье разберёмся:
- как работают макросы и как с их помощью избавиться от рутины в Excel;
- какие способы создания макросов существуют и как подготовиться к их записи;
- как записать и запустить макрос начинающим пользователям — на примере со скриншотами.
Общий принцип работы макросов такой:
- Пользователь записывает последовательность действий, которые нужно выполнить в Excel, — о том, как это сделать, поговорим ниже.
- Excel обрабатывает эти действия и создаёт для них одну общую команду. Получается макрос.
- Пользователь запускает этот макрос, когда ему нужно выполнить эту же последовательность действий ещё раз. При записи макроса можно задать комбинацию клавиш или создать новую кнопку на главной панели Excel — если нажать на них, макрос запустится автоматически.
Макросы могут выполнять любые действия, которые в них запишет пользователь. Вот некоторые команды, которые они умеют делать в Excel:
- Автоматизировать повторяющиеся процедуры.
Например, если пользователю нужно каждый месяц собирать отчёты из нескольких файлов в один, а порядок действий каждый раз один и тот же, можно записать макрос и запускать его ежемесячно.
- Объединять работу нескольких программ Microsoft Office.
Например, с помощью одного макроса можно создать таблицу в Excel, вставить и сохранить её в документе Word и затем отправить в письме по Outlook.
- Искать ячейки с данными и переносить их в другие файлы.
Этот макрос пригодится, когда нужно найти информацию в нескольких объёмных документах. Макрос самостоятельно отыщет её и принесёт в заданный файл за несколько секунд.
- Форматировать таблицы и заполнять их текстом.
Например, если нужно привести несколько таблиц к одному виду и дополнить их новыми данными, можно записать макрос при форматировании первой таблицы и потом применить его ко всем остальным.
- Создавать шаблоны для ввода данных.
Команда подойдёт, когда, например, нужно создать анкету для сбора данных от сотрудников. С помощью макроса можно сформировать такой шаблон и разослать его по корпоративной почте.
- Создавать новые функции Excel.
Если пользователю понадобятся дополнительные функции, которых ещё нет в Excel, он сможет записать их самостоятельно. Все базовые функции Excel — это тоже макросы.
Все перечисленные команды, а также любые другие команды пользователя можно комбинировать друг с другом и на их основе создавать макросы под свои потребности.
В Excel и других программах Microsoft Office макросы создаются в виде кода на языке программирования VBA (Visual Basic for Applications). Этот язык разработан в Microsoft специально для программ компании — он представляет собой упрощённую версию языка Visual Basic. Но это не значит, что для записи макроса нужно уметь кодить.
Есть два способа создания макроса в Excel:
- Написать макрос вручную.
Это способ для продвинутых пользователей. Предполагается, что они откроют окно Visual Basic в Еxcel и самостоятельно напишут последовательность действий для макроса в виде кода.
- Записать макрос с помощью кнопки меню Excel.
Способ подойдёт новичкам. В этом варианте Excel запишет программный код вместо пользователя. Нужно нажать кнопку записи и выполнить все действия, которые планируется включить в макрос, и после этого остановить запись — Excel переведёт каждое действие и выдаст алгоритм на языке VBA.
Разберёмся на примере, как создать макрос с помощью второго способа.
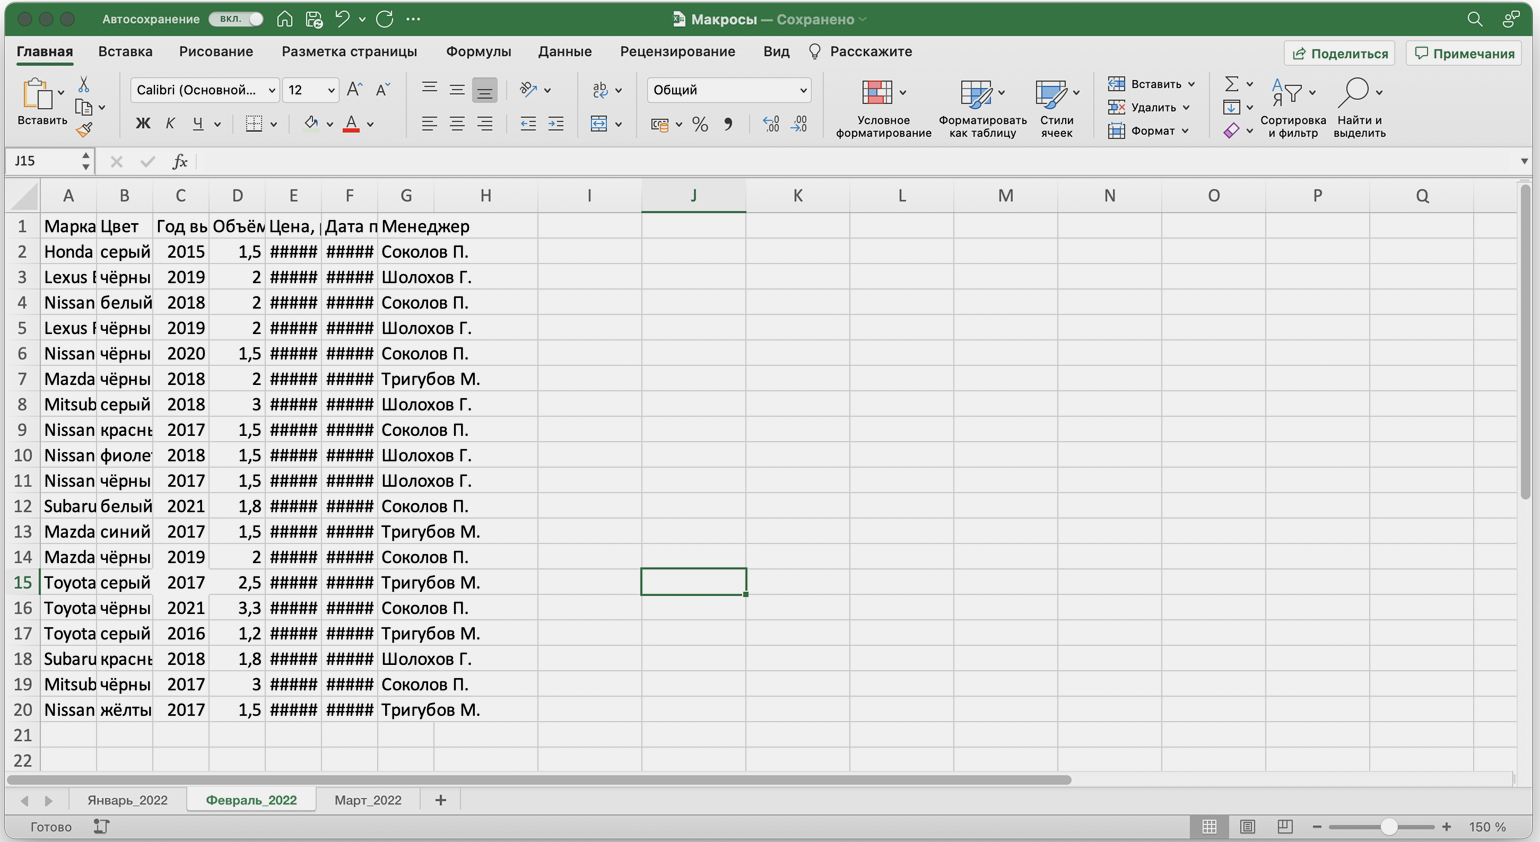
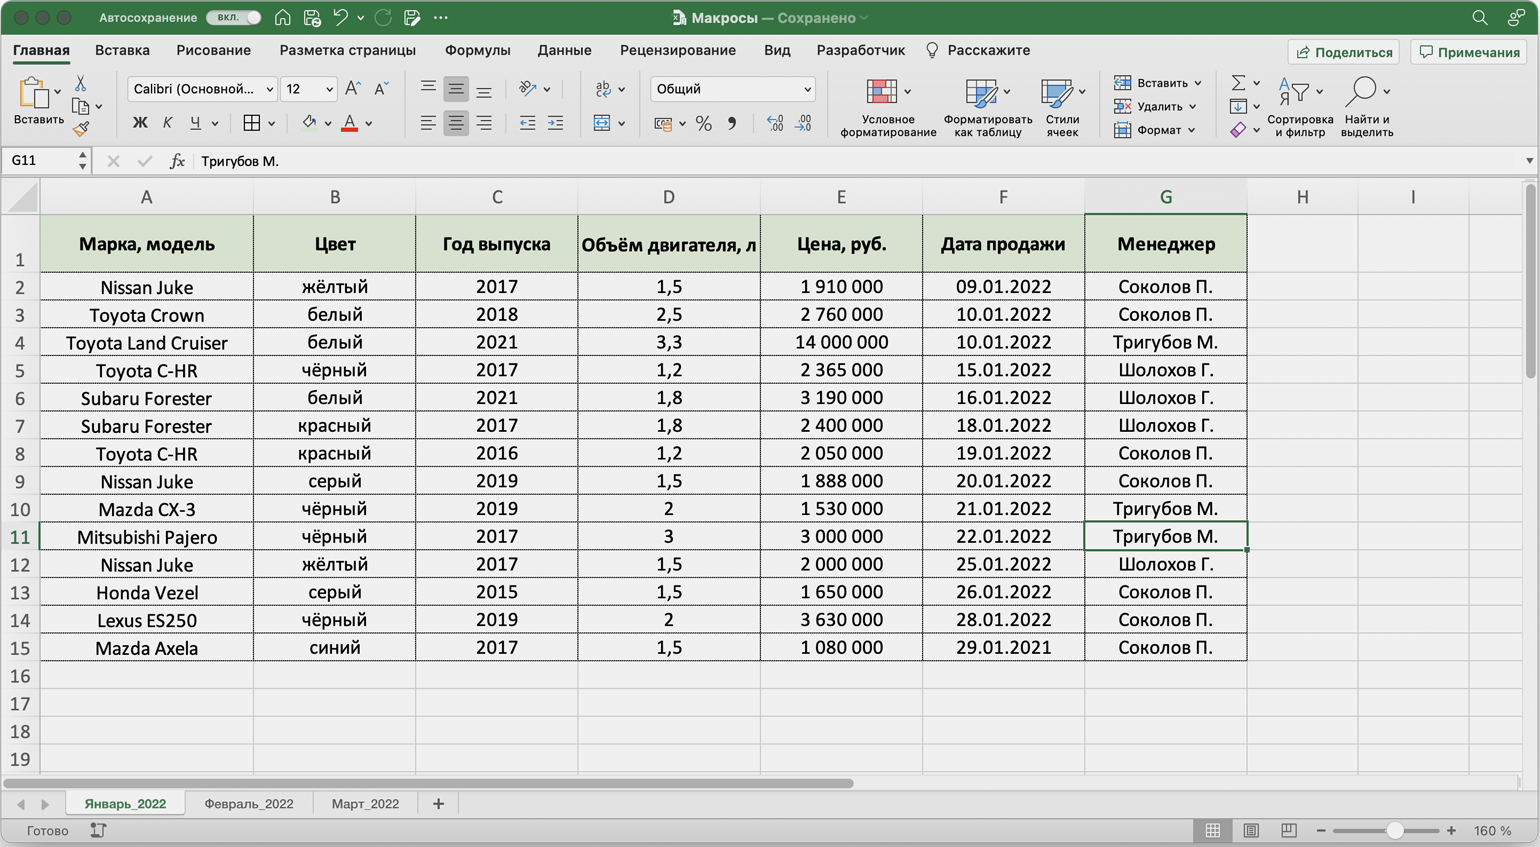
Допустим, специальный сервис автосалона выгрузил отчёт по продажам за три месяца первого квартала в формате таблиц Excel. Эти таблицы содержат всю необходимую информацию, но при этом никак не отформатированы: колонки слиплись друг с другом и не видны полностью, шапка таблицы не выделена и сливается с другими строками, часть данных не отображается.
Скриншот: Skillbox Media
Пользоваться таким отчётом неудобно — нужно сделать его наглядным. Запишем макрос при форматировании таблицы с продажами за январь и затем применим его к двум другим таблицам.
Готовимся к записи макроса
Кнопки для работы с макросами в Excel находятся во вкладке «Разработчик». Эта вкладка по умолчанию скрыта, поэтому для начала разблокируем её.
В операционной системе Windows это делается так: переходим во вкладку «Файл» и выбираем пункты «Параметры» → «Настройка ленты». В открывшемся окне в разделе «Основные вкладки» находим пункт «Разработчик», отмечаем его галочкой и нажимаем кнопку «ОК» → в основном меню Excel появляется новая вкладка «Разработчик».
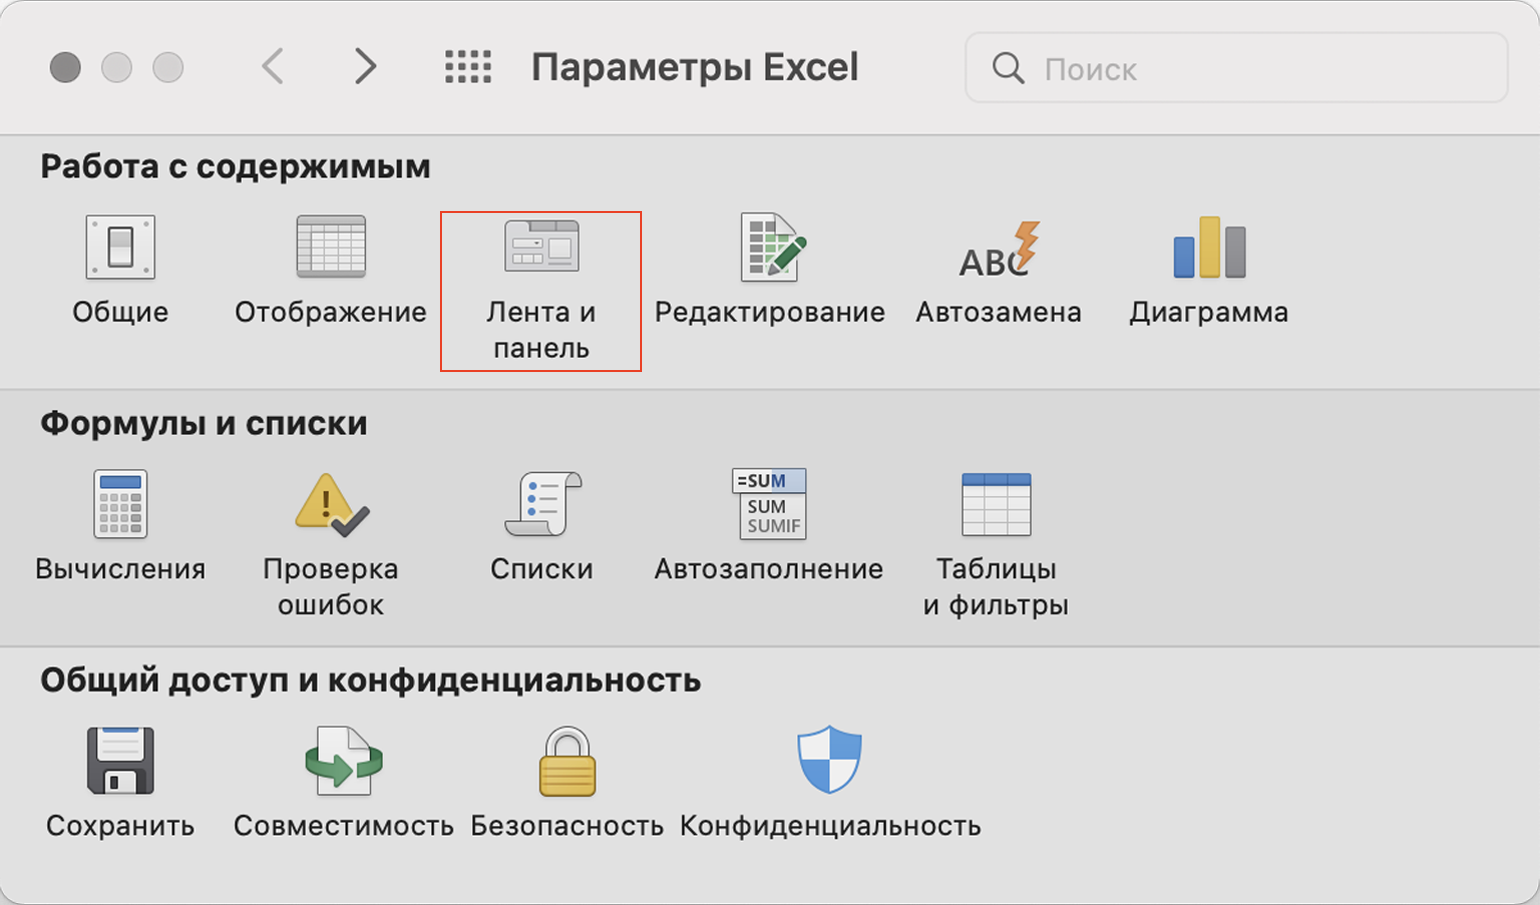
В операционной системе macOS это нужно делать по-другому. В самом верхнем меню нажимаем на вкладку «Excel» и выбираем пункт «Параметры…».
Скриншот: Skillbox Media
В появившемся окне нажимаем кнопку «Лента и панель».
Скриншот: Skillbox Media
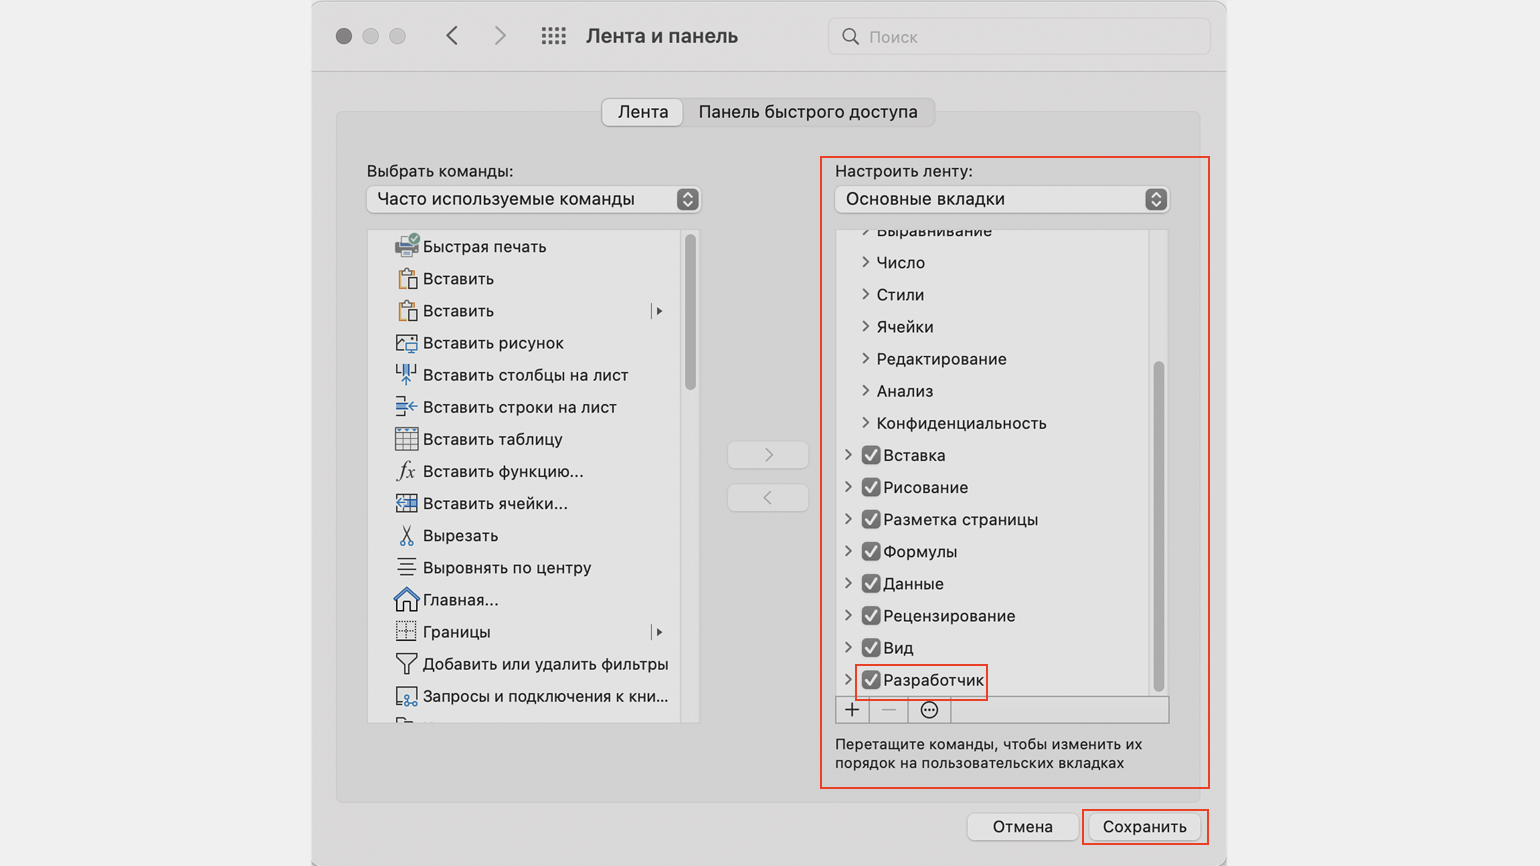
Затем в правой панели «Настроить ленту» ищем пункт «Разработчик» и отмечаем его галочкой. Нажимаем «Сохранить».
Скриншот: Skillbox Media
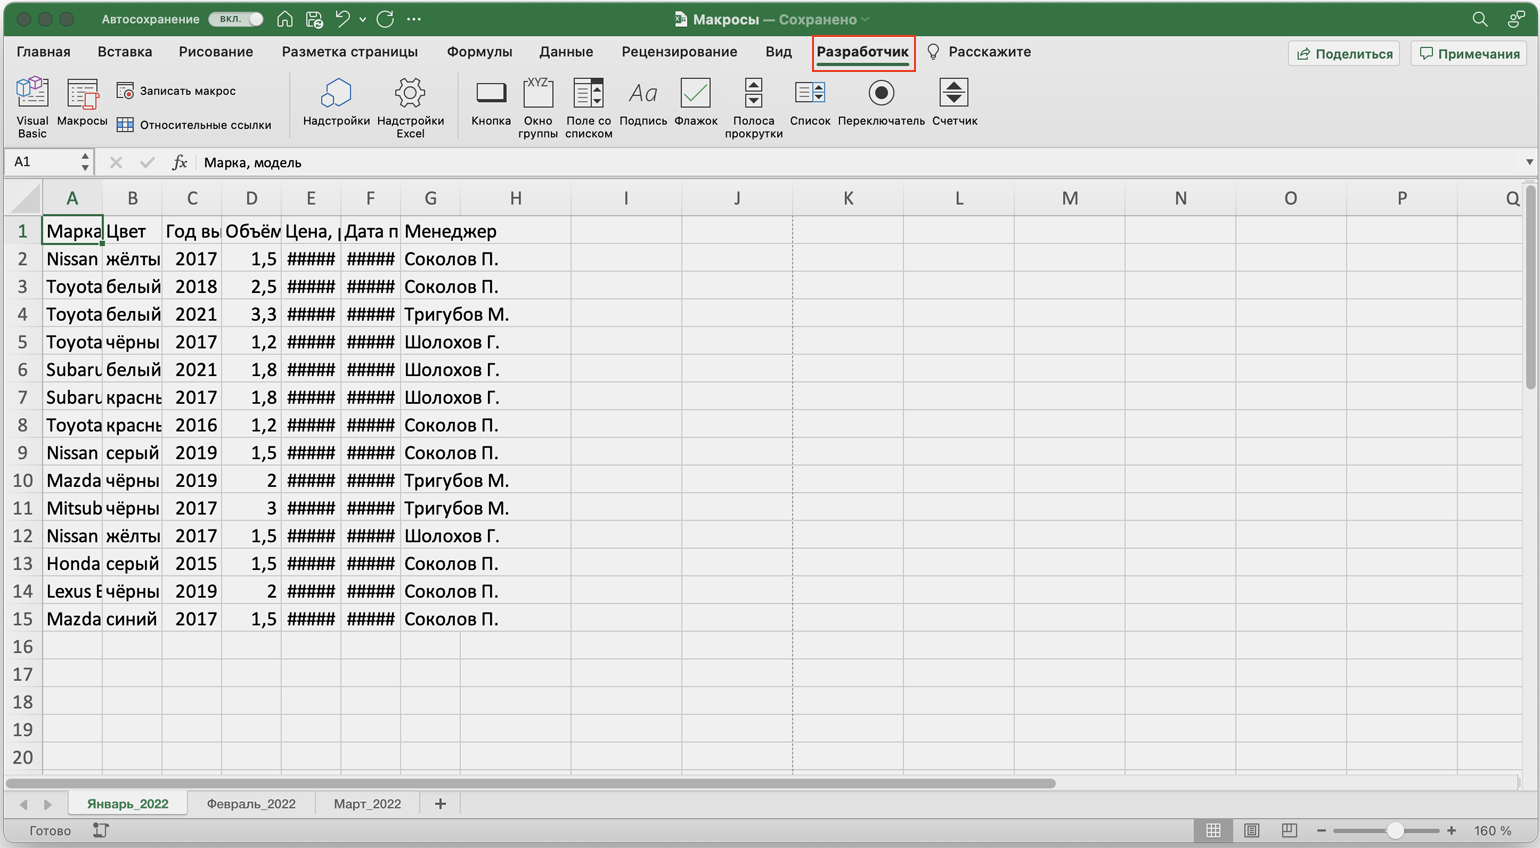
Готово — вкладка «Разработчик» появилась на основной панели Excel.
Скриншот: Skillbox Media
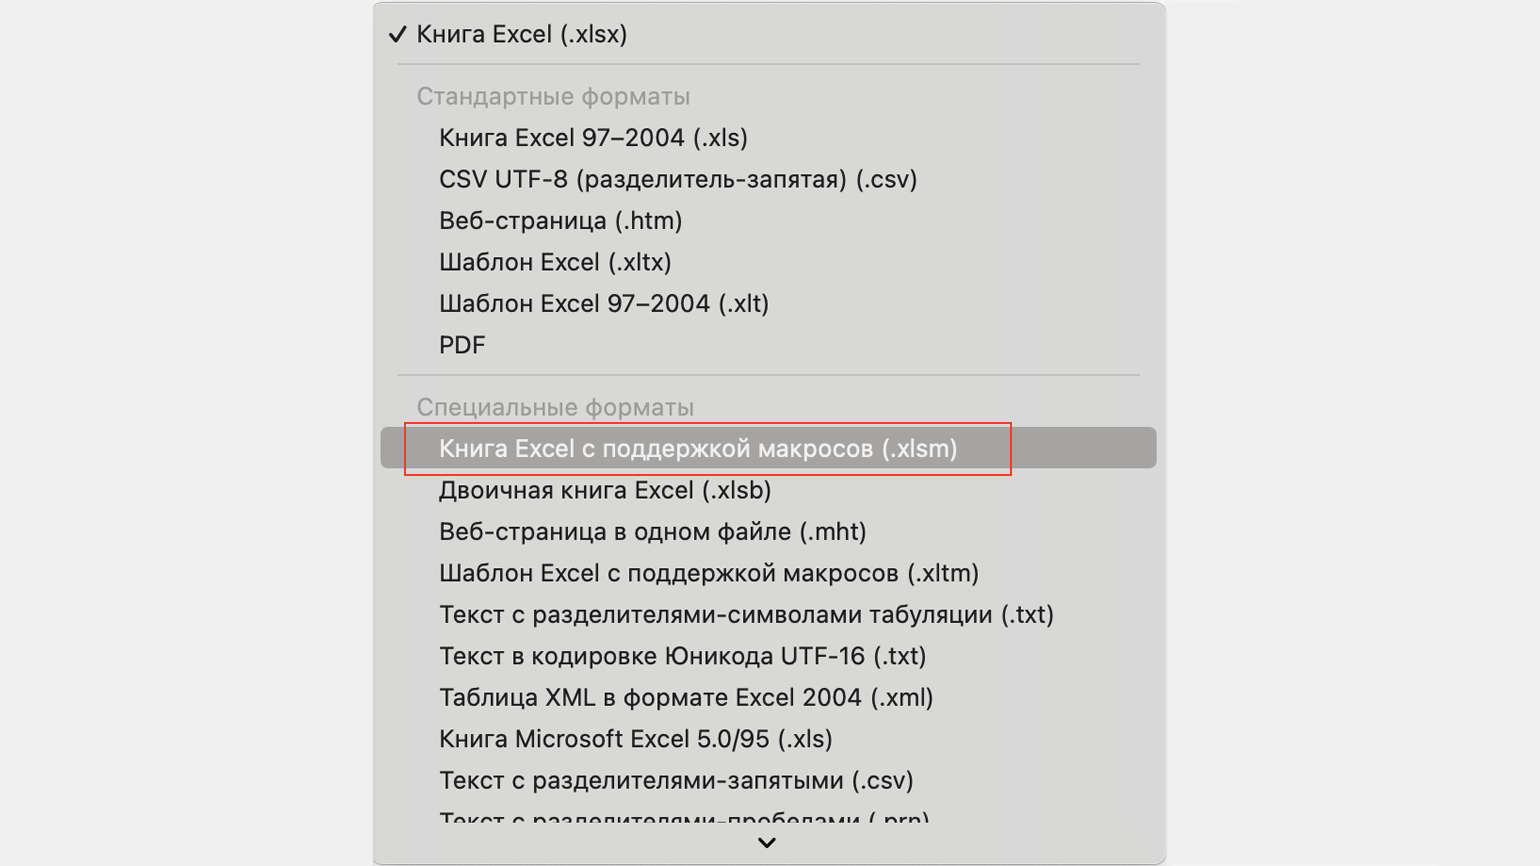
Чтобы Excel смог сохранить и в дальнейшем использовать макрос, нужно пересохранить документ в формате, который поддерживает макросы. Это делается через команду «Сохранить как» на главной панели. В появившемся меню нужно выбрать формат «Книга Excel с поддержкой макросов».
Скриншот: Skillbox Media
Перед началом записи макроса важно знать об особенностях его работы:
- Макрос записывает все действия пользователя.
После старта записи макрос начнёт регистрировать все клики мышки и все нажатия клавиш. Поэтому перед записью последовательности лучше хорошо отработать её, чтобы не добавлять лишних действий и не удлинять код. Если требуется записать длинную последовательность задач — лучше разбить её на несколько коротких и записать несколько макросов.
- Работу макроса нельзя отменить.
Все действия, которые выполняет запущенный макрос, остаются в файле навсегда. Поэтому перед тем, как запускать макрос в первый раз, лучше создать копию всего файла. Если что-то пойдёт не так, можно будет просто закрыть его и переписать макрос в созданной копии.
- Макрос выполняет свой алгоритм только для записанного диапазона таблиц.
Если при записи макроса пользователь выбирал диапазон таблицы, то и при запуске макроса в другом месте он выполнит свой алгоритм только в рамках этого диапазона. Если добавить новую строку, макрос к ней применяться не будет. Поэтому при записи макроса можно сразу выбирать большее количество строк — как это сделать, показываем ниже.
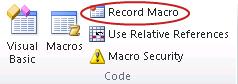
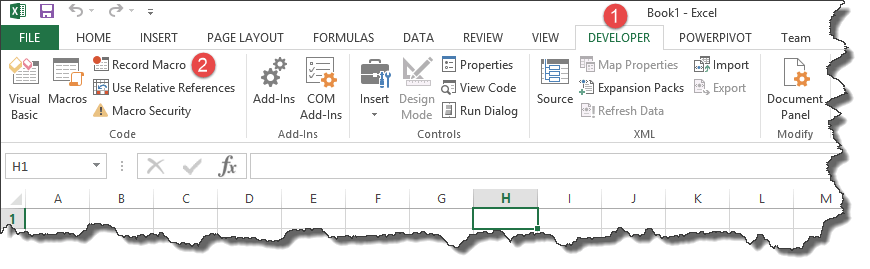
Для начала записи макроса перейдём на вкладку «Разработчик» и нажмём кнопку «Записать макрос».
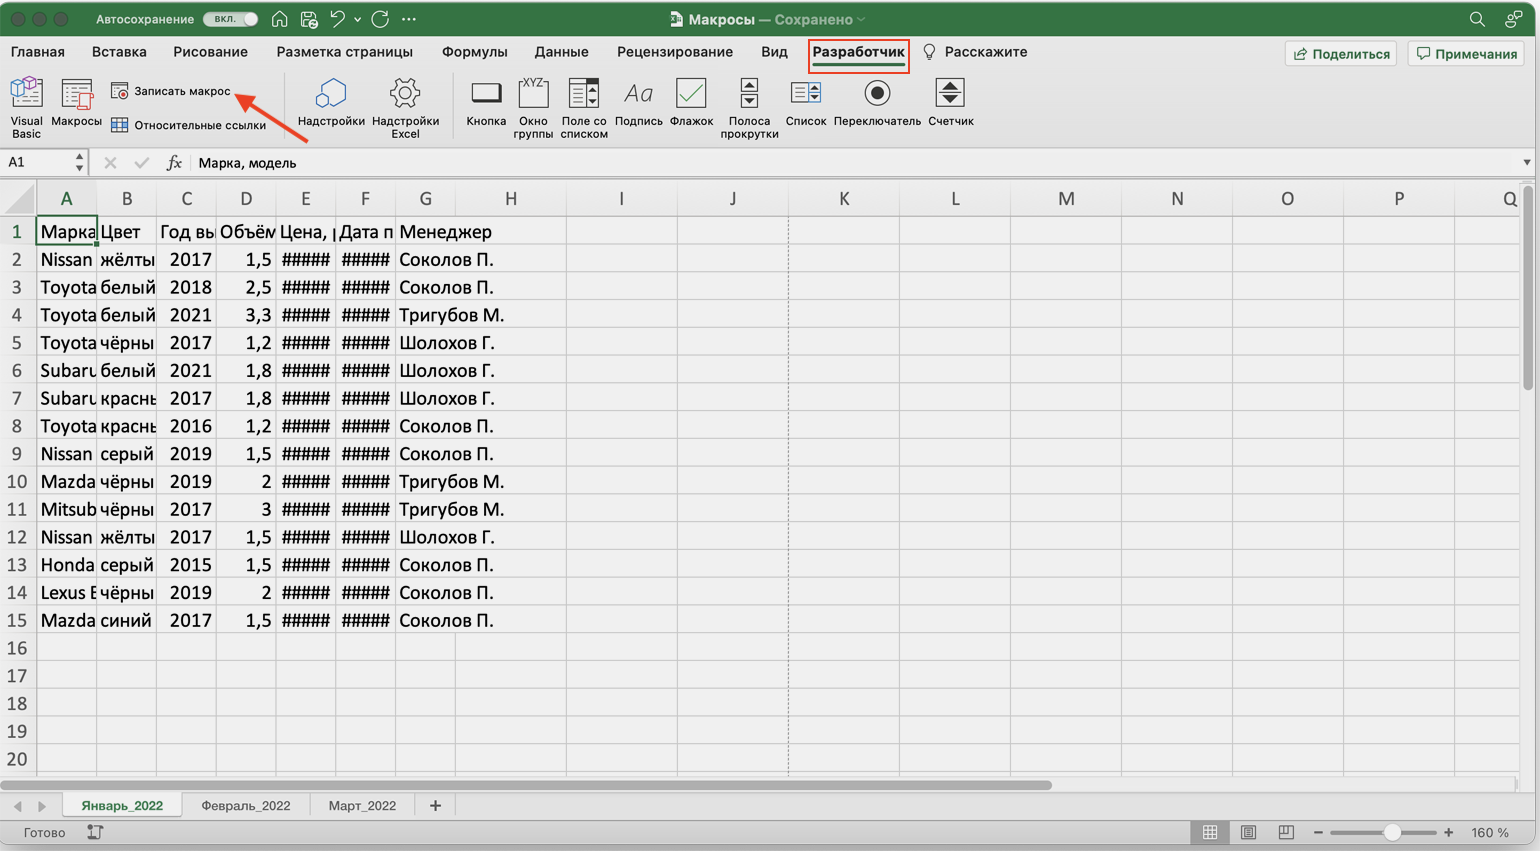
Скриншот: Skillbox Media
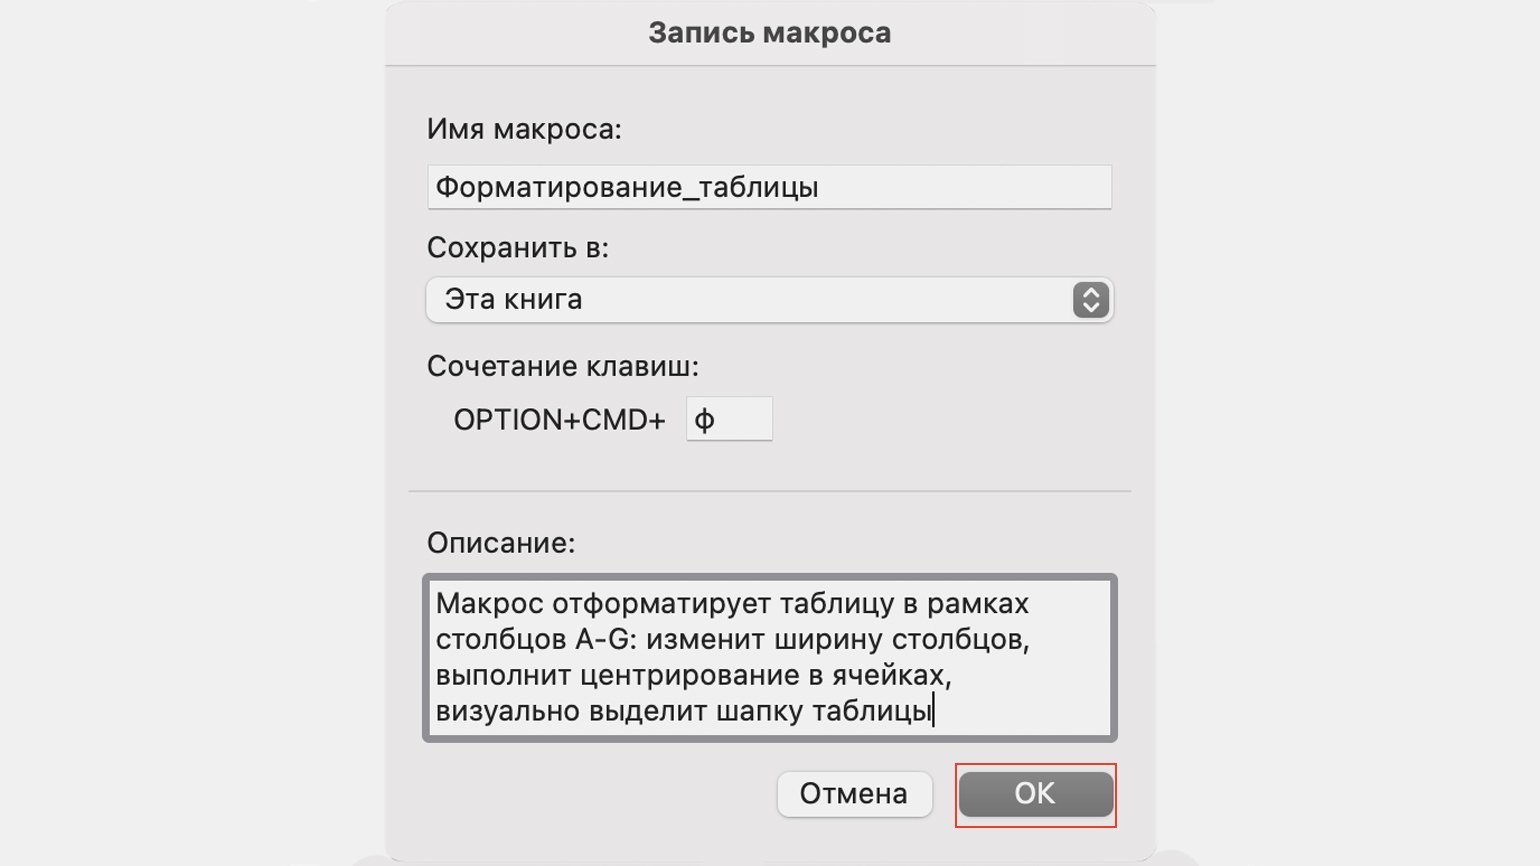
Появляется окно для заполнения параметров макроса. Нужно заполнить поля: «Имя макроса», «Сохранить в», «Сочетание клавиш», «Описание».

Скриншот: Skillbox Media
«Имя макроса» — здесь нужно придумать и ввести название для макроса. Лучше сделать его логически понятным, чтобы в дальнейшем можно было быстро его найти.
Первым символом в названии обязательно должна быть буква. Другие символы могут быть буквами или цифрами. Важно не использовать пробелы в названии — их можно заменить символом подчёркивания.
«Сохранить в» — здесь нужно выбрать книгу, в которую макрос сохранится после записи.
Если выбрать параметр «Эта книга», макрос будет доступен при работе только в этом файле Excel. Чтобы макрос был доступен всегда, нужно выбрать параметр «Личная книга макросов» — Excel создаст личную книгу макросов и сохранит новый макрос в неё.
«Сочетание клавиш» — здесь к уже выбранным двум клавишам (Ctrl + Shift в системе Windows и Option + Cmd в системе macOS) нужно добавить третью клавишу. Это должна быть строчная или прописная буква, которую ещё не используют в других быстрых командах компьютера или программы Excel.
В дальнейшем при нажатии этих трёх клавиш записанный макрос будет запускаться автоматически.
«Описание» — необязательное поле, но лучше его заполнять. Например, можно ввести туда последовательность действий, которые планируется записать в этом макросе. Так не придётся вспоминать, какие именно команды выполнит этот макрос, если нужно будет запустить его позже. Плюс будет проще ориентироваться среди других макросов.
В нашем случае с форматированием таблицы заполним поля записи макроса следующим образом и нажмём «ОК».
Скриншот: Skillbox Media
После этого начнётся запись макроса — в нижнем левом углу окна Excel появится значок записи.
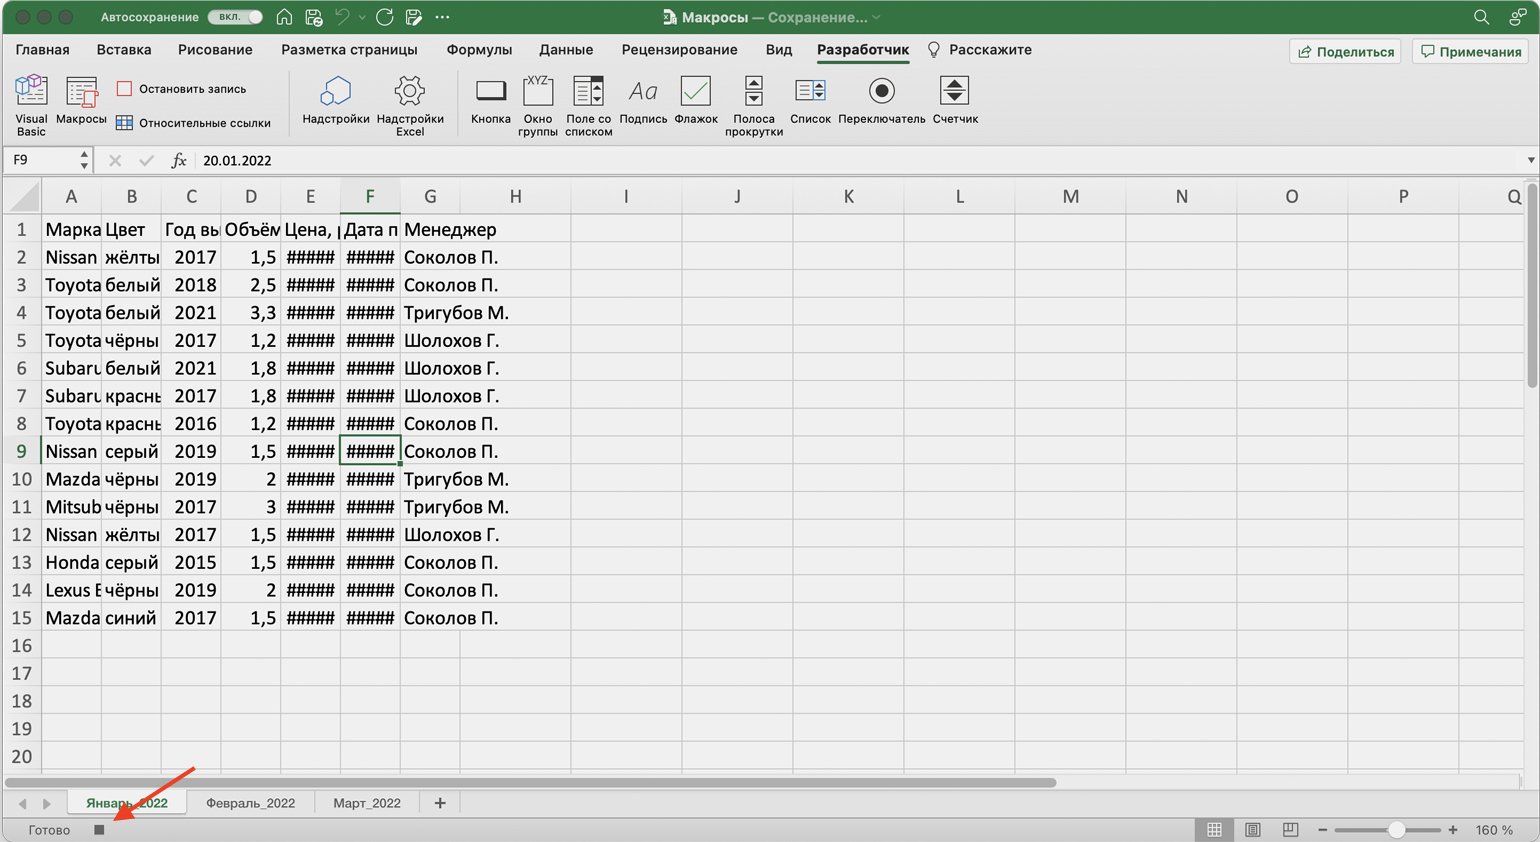
Скриншот: Skillbox Media
Пока идёт запись, форматируем таблицу с продажами за январь: меняем ширину всех столбцов, данные во всех ячейках располагаем по центру, выделяем шапку таблицы цветом и жирным шрифтом, рисуем границы.
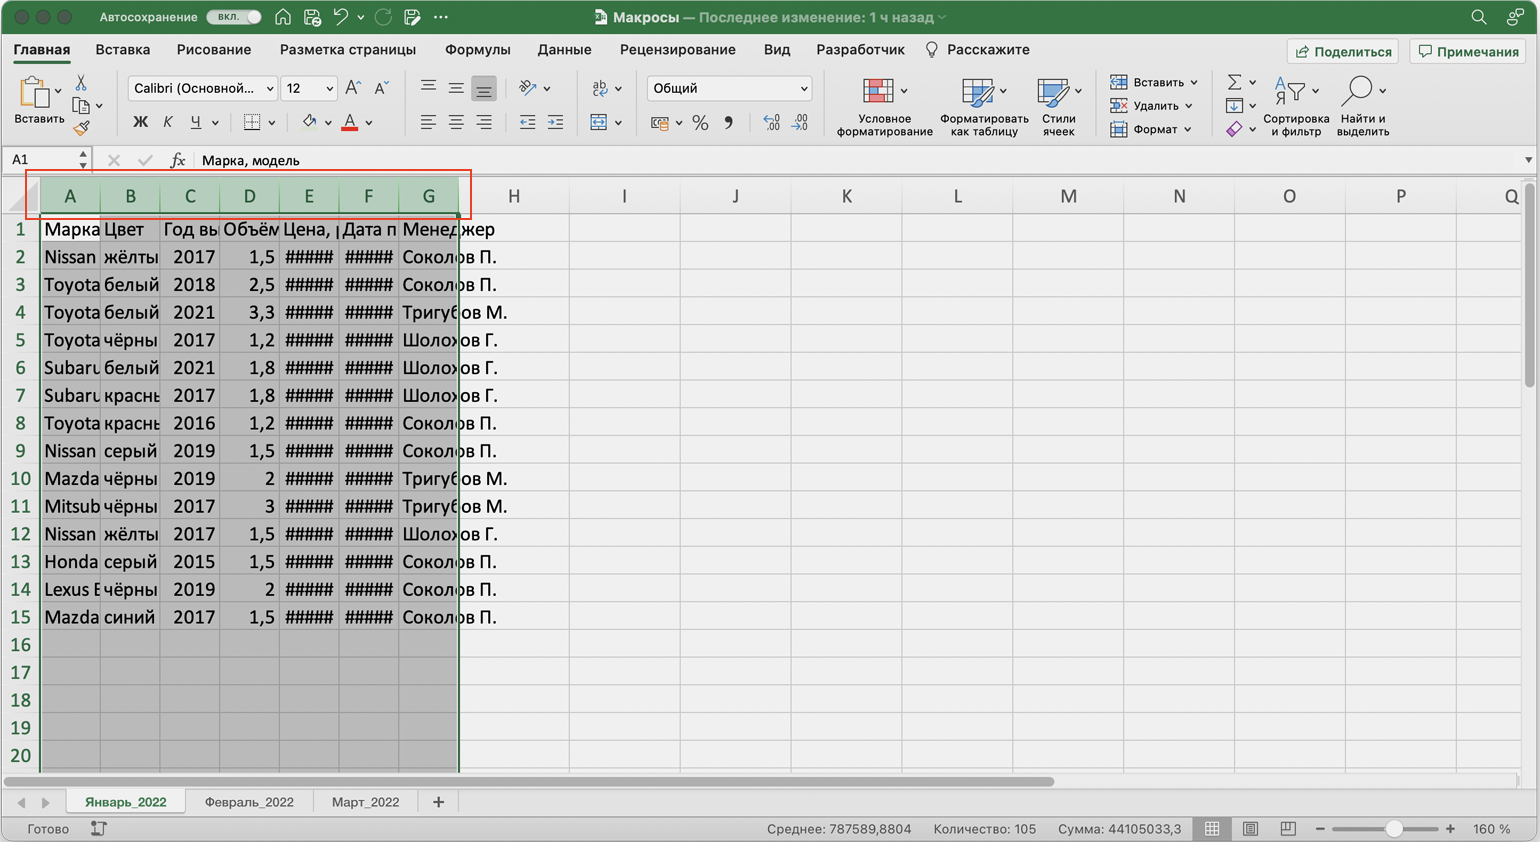
Важно: в нашем случае у таблиц продаж за январь, февраль и март одинаковое количество столбцов, но разное количество строк. Чтобы в случае со второй и третьей таблицей макрос сработал корректно, при форматировании выделим диапазон так, чтобы в него попали не только строки самой таблицы, но и строки ниже неё. Для этого нужно выделить столбцы в строке с их буквенным обозначением A–G, как на рисунке ниже.
Скриншот: Skillbox Media
Если выбрать диапазон только в рамках первой таблицы, то после запуска макроса в таблице с большим количеством строк она отформатируется только частично.

Скриншот: Skillbox Media
После всех манипуляций с оформлением таблица примет такой вид:
Скриншот: Skillbox Media
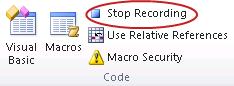
Проверяем, все ли действия с таблицей мы выполнили, и останавливаем запись макроса. Сделать это можно двумя способами:
- Нажать на кнопку записи в нижнем левом углу.
- Перейти во вкладку «Разработчик» и нажать кнопку «Остановить запись».
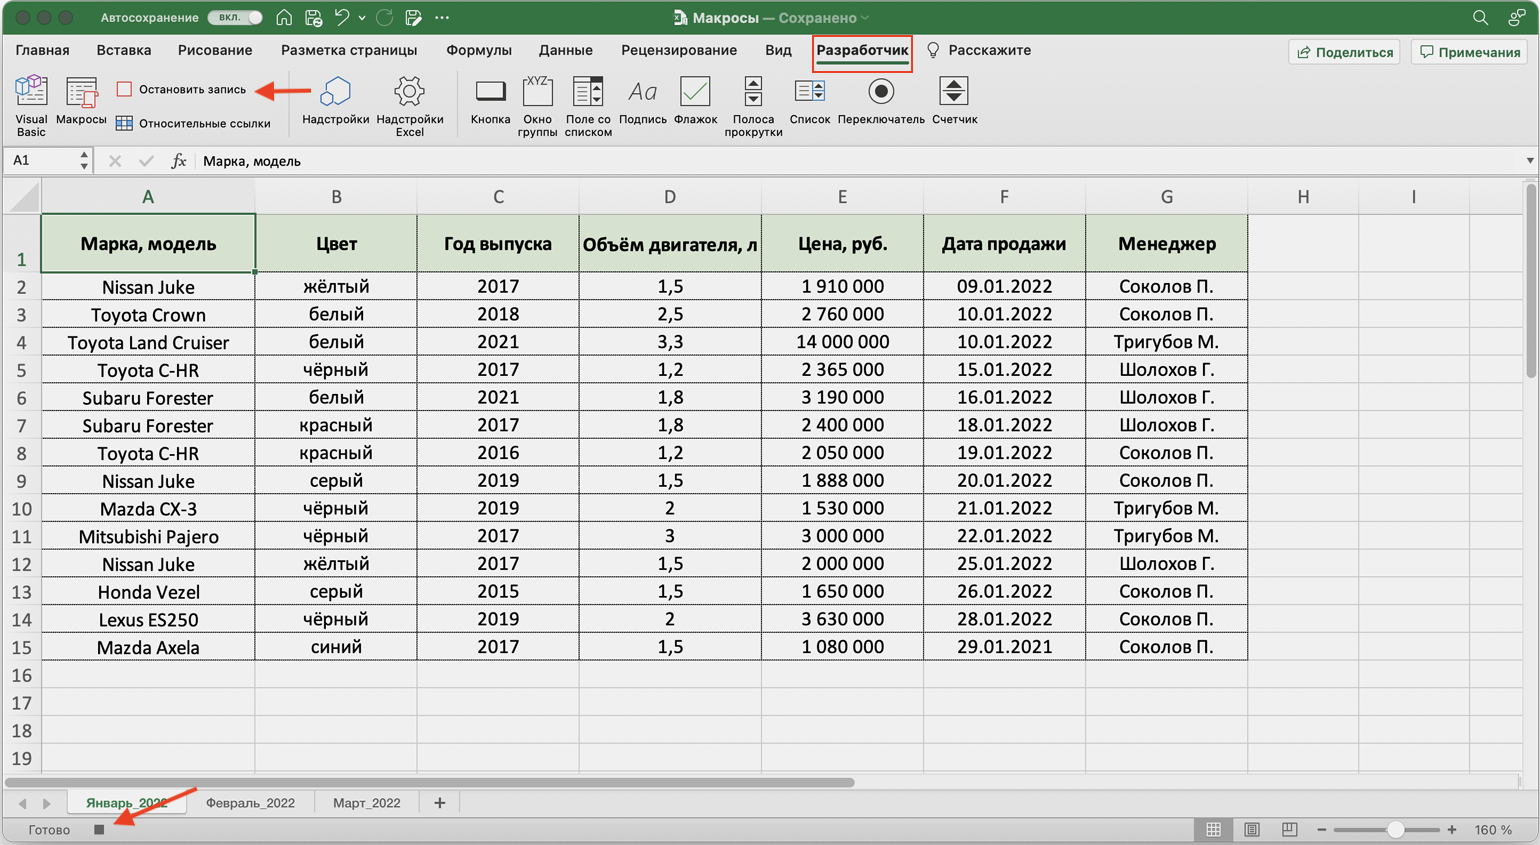
Скриншот: Skillbox Media
Готово — мы создали макрос для форматирования таблиц в границах столбцов A–G. Теперь его можно применить к другим таблицам.
Запускаем макрос
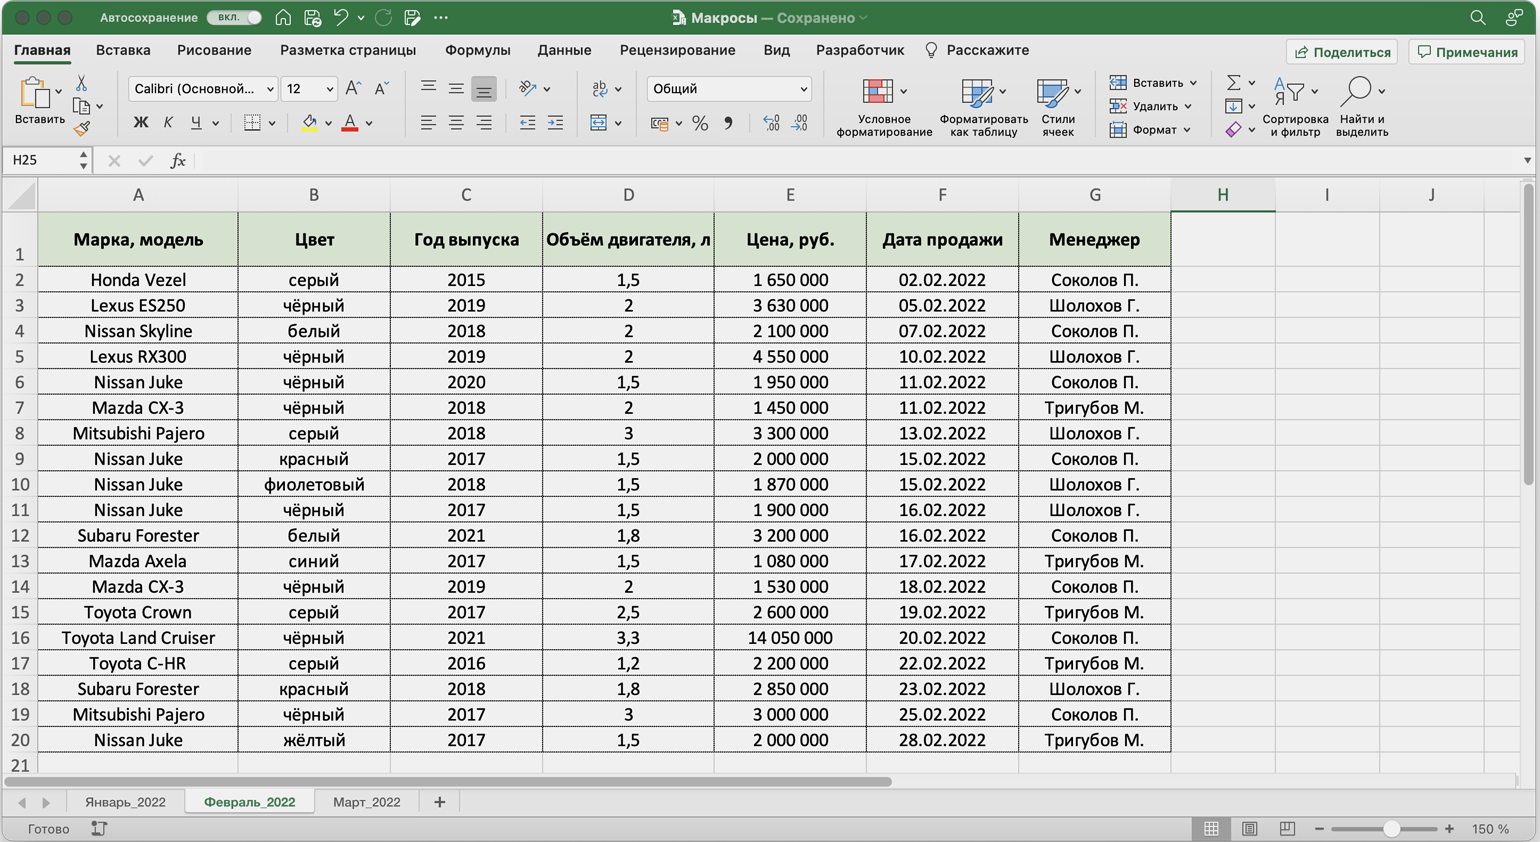
Перейдём в лист со второй таблицей «Февраль_2022». В первоначальном виде она такая же нечитаемая, как и первая таблица до форматирования.
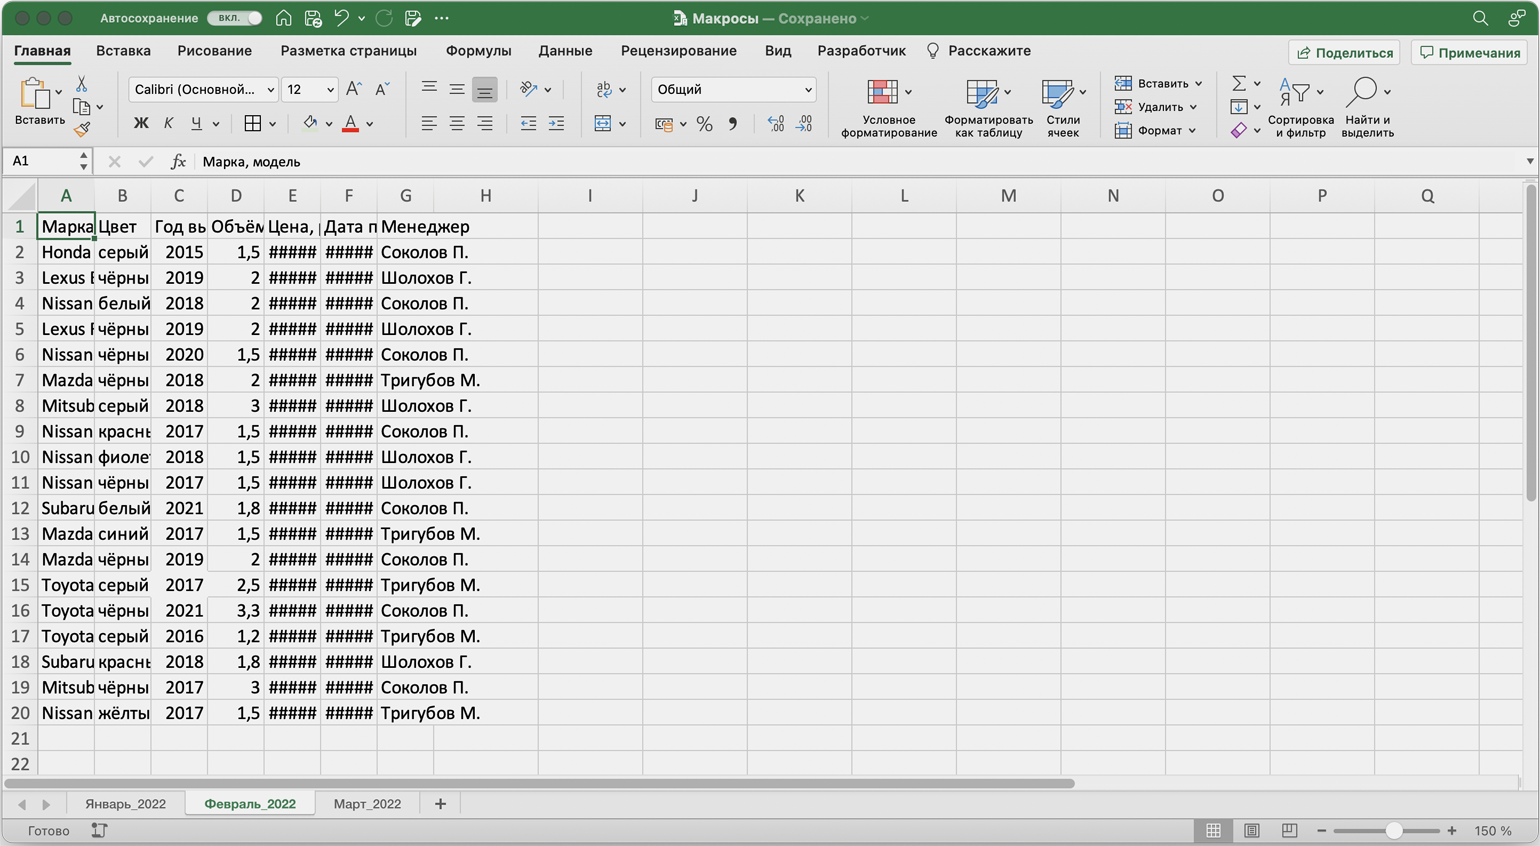
Скриншот: Skillbox Media
Отформатируем её с помощью записанного макроса. Запустить макрос можно двумя способами:
- Нажать комбинацию клавиш, которую выбрали при заполнении параметров макроса — в нашем случае Option + Cmd + Ф.
- Перейти во вкладку «Разработчик» и нажать кнопку «Макросы».
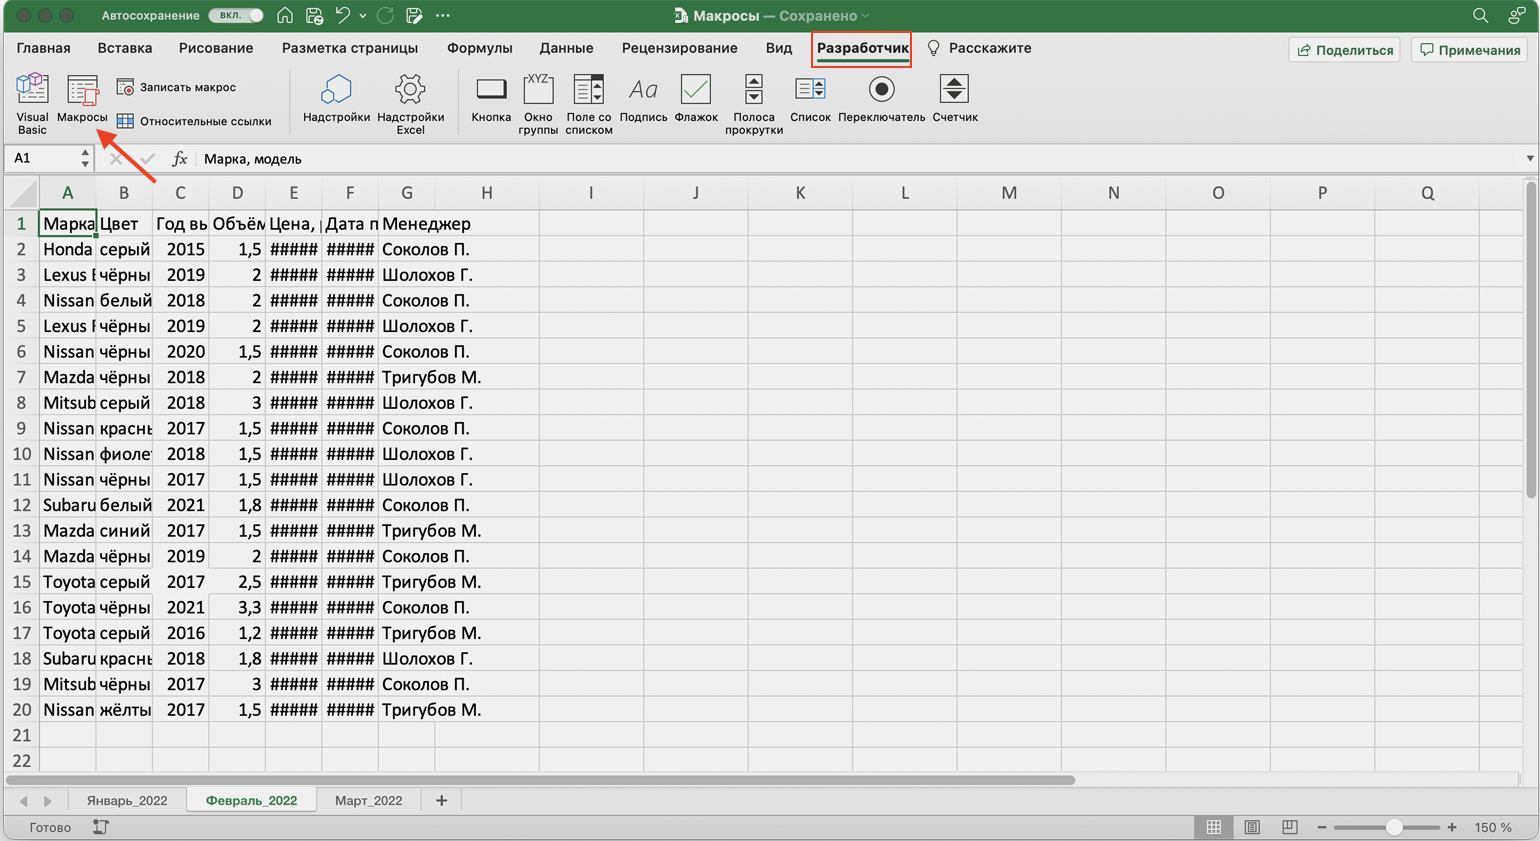
Скриншот: Skillbox Media
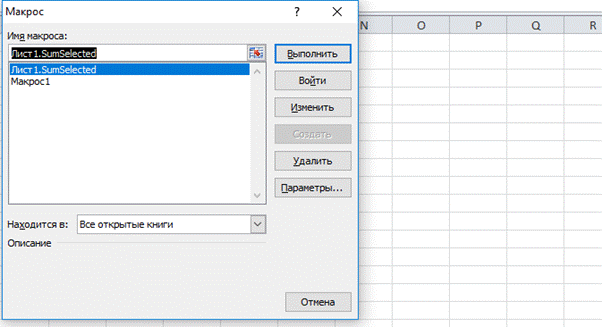
Появляется окно — там выбираем макрос, который нужно запустить. В нашем случае он один — «Форматирование_таблицы». Под ним отображается описание того, какие действия он включает. Нажимаем «Выполнить».
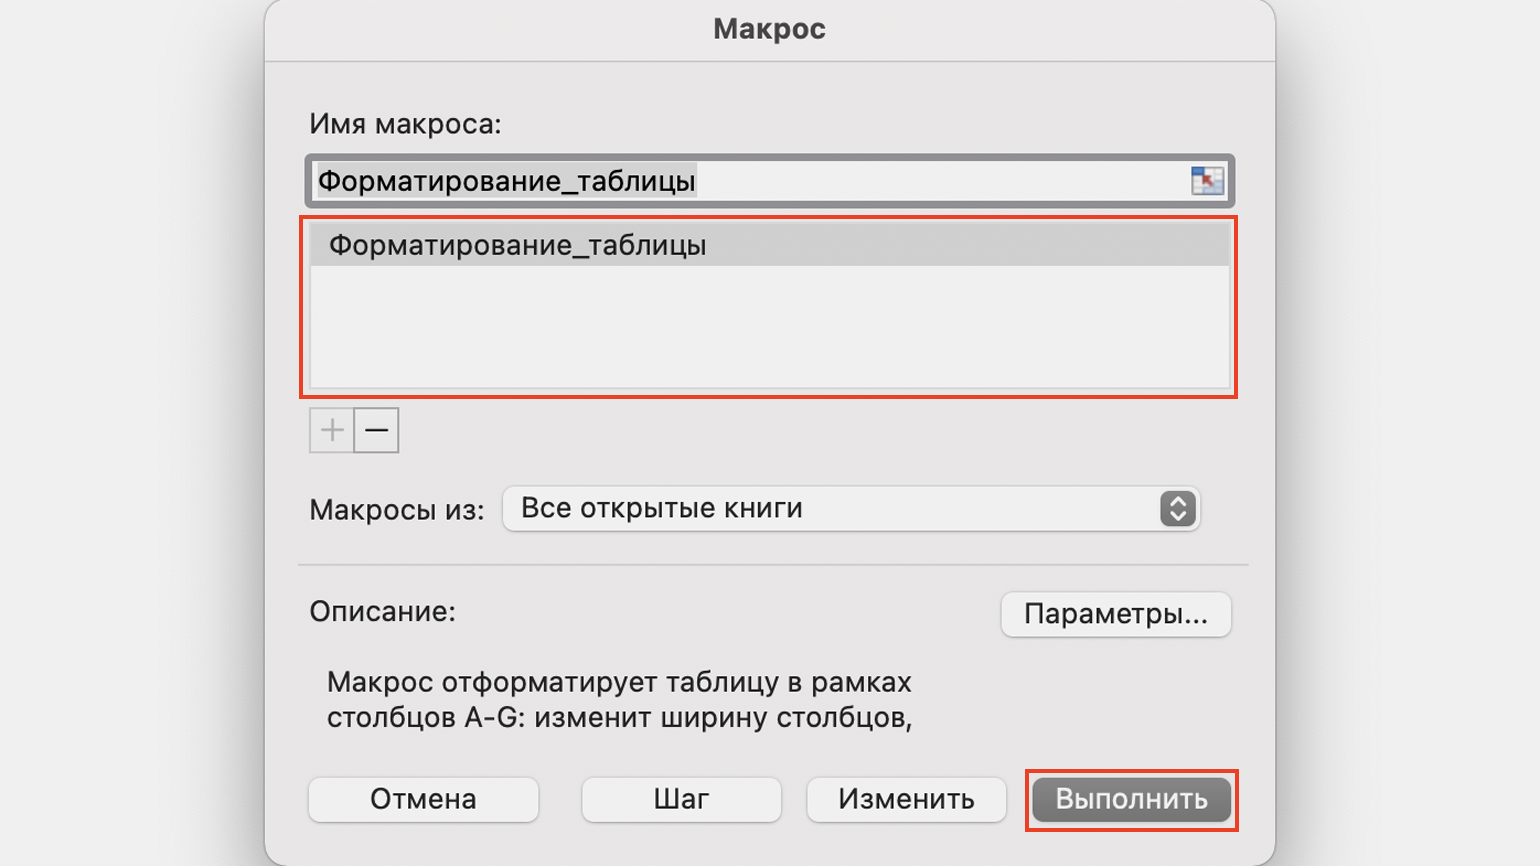
Скриншот: Skillbox Media
Готово — вторая таблица с помощью макроса форматируется так же, как и первая.
Скриншот: Skillbox Media
То же самое можно сделать и на третьем листе для таблицы продаж за март. Более того, этот же макрос можно будет запустить и в следующем квартале, когда сервис автосалона выгрузит таблицы с новыми данными.

Научитесь: Excel + Google Таблицы с нуля до PRO
Узнать больше
Excel Macro is a record and playback tool that simply records your Excel steps and the macro will play it back as many times as you want. VBA Macros save time as they automate repetitive tasks. It is a piece of programming code that runs in an Excel environment but you don’t need to be a coder to program macros. Though, you need basic knowledge of VBA to make advanced modifications in the macro.
In this Macros in Excel for beginners tutorial, you will learn Excel macro basics:
- What is an Excel Macro?
- Why are Excel Macros Used in Excel?
- What is VBA in a Layman’s Language?
- Excel Macro Basics
- Step by Step Example of Recording Macros in Excel
Why are Excel Macros Used in Excel?
As humans, we are creatures of habit. There are certain things that we do on a daily basis, every working day. Wouldn’t it be better if there were some magical way of pressing a single button and all of our routine tasks are done? I can hear you say yes. Macro in Excel helps you to achieve that. In a layman’s language, a macro is defined as a recording of your routine steps in Excel that you can replay using a single button.
For example, you are working as a cashier for a water utility company. Some of the customers pay through the bank and at the end of the day, you are required to download the data from the bank and format it in a manner that meets your business requirements.
You can import the data into Excel and format. The following day you will be required to perform the same ritual. It will soon become boring and tedious. Macros solve such problems by automating such routine tasks. You can use a macro to record the steps of
- Importing the data
- Formatting it to meet your business reporting requirements.
What is VBA in a Layman’s Language?
VBA is the acronym for Visual Basic for Applications. It is a programming language that Excel uses to record your steps as you perform routine tasks. You do not need to be a programmer or a very technical person to enjoy the benefits of macros in Excel. Excel has features that automatically generated the source code for you. Read the article on VBA for more details.
Excel Macro Basics
Macros are one of the developer features. By default, the tab for developers is not displayed in Excel. You will need to display it via customize report
Excel Macros can be used to compromise your system by attackers. By default, they are disabled in Excel. If you need to run macros, you will need to enable running macros and only run macros that you know come from a trusted source
If you want to save Excel macros, then you must save your workbook in a macro-enabled format *.xlsm
The macro name should not contain any spaces.
Always fill in the description of the macro when creating one. This will help you and others to understand what the macro is doing.
Step by Step Example of Recording Macros in Excel
Now in this Excel macros tutorial, we will learn how to create a macro in Excel:
We will work with the scenario described in the importance of macros Excel. For this Excel macro tutorial, we will work with the following CSV file to write macros in Excel.

You can download the above file here
Download the above CSV File & Macros
We will create a macro enabled template that will import the above data and format it to meet our business reporting requirements.
Enable Developer Option
To execute VBA program, you have to have access to developer option in Excel. Enable the developer option as shown in the below Excel macro example and pin it into your main ribbon in Excel.
Step 1)Go to main menu “FILE”
Select option “Options.”


Step 2) Now another window will open, in that window do following things
- Click on Customize Ribbon
- Mark the checker box for Developer option
- Click on OK button

Step 3) Developer Tab
You will now be able to see the DEVELOPER tab in the ribbon

Step 4) Download CSV
First, we will see how we can create a command button on the spreadsheet and execute the program.
- Create a folder in drive C named Bank Receipts
- Paste the receipts.csv file that you downloaded

Step 5) Record Macro
- Click on the DEVELOPER tab
- Click on Record Macro as shown in the image below
You will get the following dialogue window

- Enter ImportBankReceipts as the macro name.
- Step two will be there by default
- Enter the description as shown in the above diagram
- Click on “OK” tab
Step 6) Perform Macro Operations/Steps you want to record
- Put the cursor in cell A1
- Click on the DATA tab
- Click on From Text button on the Get External data ribbon bar
You will get the following dialogue window

- Go to the local drive where you have stored the CSV file
- Select the CSV file
- Click on Import button
You will get the following wizard

Click on Next button after following the above steps

Follow the above steps and click on next button

- Click on Finish button
- Your workbook should now look as follows

Step 7) Format the Data
Make the columns bold, add the grand total and use the SUM function to get the total amount.

Step  Stop Recording Macro
Now that we have finished our routine work, we can click on stop recording macro button as shown in the image below

Step 9) Replay the Macro
Before we save our work book, we will need to delete the imported data. We will do this to create a template that we will be copying every time we have new receipts and want to run the ImportBankReceipts macro.
- Highlight all the imported data
- Right click on the highlighted data
- Click on Delete
- Click on save as button
- Save the workbook in a macro enabled format as shown below

- Make a copy of the newly saved template
- Open it
- Click on DEVELOPER tab
- Click on Macros button
You will get the following dialogue window

- Select ImportBankReceipts
- Highlights the description of your macro
- Click on Run button
You will get the following data

Congratulations, you just created your first macro in Excel.
Summary
Macros simplify our work lives by automating most of the routine works that we do. Macros Excel are powered by Visual Basic for Applications.
Макрос, или макрокоманда — это небольшая программа, которая выполняет заданный набор действий в офисном документе. Чаще всего макросами пользуются в Microsoft Office Excel для работы с таблицами. Создать и запустить их можно внутри Excel.
Макрос — подобие скрипта: небольшой программы, четко заточенной под определенные действия, чаще всего не имеющей графического интерфейса. Программу можно представить как большую и обширную команду, заданную системе. Поэтому второе название макроса — макрокоманда.
Кто пользуется макросами в работе
Макросами желательно уметь пользоваться всем, кто активно работает с Excel. Это экономисты, разные категории менеджеров, аналитики и специалисты по маркетингу или рекламе. Им приходится обрабатывать табличные данные, иногда в больших количествах.
Умение работать с макросами — не всегда обязательное условие для получения работы, но крайне желательно и может быть полезно в любом случае, если вы часто сталкиваетесь с Excel-таблицами.
Для чего нужны макросы
Макросы помогают:
- упростить и ускорить работу с документами;
- автоматизировать рутину и сконцентрироваться на интеллектуальных задачах;
- избежать человеческих ошибок в ряде задач, таких как, например, форматирование данных в таблице;
- быстро находить нужную информацию среди большого объема данных;
- объединять работу в нескольких продуктах Microsoft Office, потому что один макрос может работать с разными программами офисного пакета;
- создавать дополнительные функции, которых нет в программе изначально, но которые могут понадобиться пользователю.
Как это работает
Работа с макросами выглядит так: сначала пользователь создает набор команд с помощью инструментов внутри Excel, потом запускает выполнение одной кнопкой. В результате то, что вручную пришлось бы делать несколько минут, выполняется автоматически и не требует усилий со стороны человека. Так автоматизируют рутинные процессы.
Сохранить макрос можно локально — для конкретного документа, или глобально — для всех документов.
Когда макрос запускают, Excel выполняет его код — совершает действия, которые в нем описаны. Это похоже на написание и запуск программы при разработке скриптов, но для создания макросов не обязательно уметь программировать.
Запускать макрос можно сколько угодно раз, и он каждый раз будет выполнять заложенные в нем действия.
VBA: язык для макросов
«Изнутри» макрос — код на языке программирования VBA, который принадлежит Microsoft. Аббревиатура расшифровывается как Visual Basic Application. Язык основан на Visual Basic, но адаптирован для использования внутри офисного пакета. Код описывает команды, которые нужно выполнить.
VBA встроен в Excel и другие программы Microsoft Office. Это значит, что они распознают язык и могут выполнять написанные на нем команды, если те поступят в программу. Писать на нем можно изнутри офисного пакета в окне Visual Basic — оно открывается через меню.
Пользователь, досконально знающий VBA, может создавать сложные макросы. Но разбираться в языке и уметь программировать для решения большинства задач не нужно. Создать макрос можно без написания кода вручную.
Создать новую макрокоманду можно двумя способами: написать код на языке VBA или записать действия с помощью специального встроенного модуля — макрорекордера.
Для обоих способов нужно открыть панель макросов. Это можно сделать через меню: вкладка «Разработчик», кнопка «Макросы». Если у вас в интерфейсе нет вкладки разработчика, кнопку можно найти в разделе «Вид» справа. А можно настроить окно так, чтобы вкладка появилась:
- перейти по пути «Файл — Параметры» или кликнуть правой кнопкой по меню;
- выбрать «Параметры Excel» и «Настроить ленту»;
- в списке «Основные вкладки» поставить галочку напротив пункта «Разработчик».
Теперь подробнее поговорим об обоих способах создания макроса.
Написать код вручную. Для этого понадобится открыть окно набора кода. Можно сделать это из вкладки «Разработчик»: там есть кнопка, которая называется Visual Basic. Если вы нажмете на нее, откроется окно. Оно будет пустым: редактор для написания кода надо открыть самостоятельно с помощью меню слева. Там есть кнопка View Code.
Второй способ открыть интерфейс для написания кода — нажать на кнопку «Макросы», ввести название нового макроса в верхней строке и нажать «Создать». В этом случае окно VBA откроется уже с пустой «заготовкой» под макрос и открытым редактором, где прописаны начало и конец команды. Останется только написать код в этом редакторе и сохранить.
Мы не будем углубляться в синтаксис и правила написания кода на Visual Basic: если человек только начинает работать с макросами, поначалу он редко пользуется этой возможностью. Хотя в будущем она может серьезно ему помочь.
Записать действия с таблицей. Второй вариант, более простой и не требующий уметь программировать, — воспользоваться макрорекордером. Так называется встроенный инструмент Excel, который «записывает» действия пользователя и потом на их основе автоматически генерирует код. Это похоже на запись видео или звука, только «пишутся» не кадры, а действия.
Выглядит это так: человек нажимает во вкладке «Разработчик» на кнопку «Записать макрос», вводит для него название, а потом выполняет действия с таблицей. Макрорекордер записывает эти действия и переводит их в код на Visual Basic, который сохраняется в виде макроса. Потом пользователь нажимает кнопку «Остановить запись», и рекордер прекращает записывать. Макрос готов, и им можно пользоваться
Пользоваться макрорекордером удобнее и быстрее для большинства действий. Его иногда рекомендуют как инструмент «для чайников», но вообще-то им пользуются и профессионалы, когда хотят сэкономить время.
Ограничения в использовании макрорекордера
Запись макроса – мощный, но не всемогущий инструмент. У нее есть ряд ограничений. С ее помощью нельзя:
- создавать сложные конструкции, например условные, когда какое-то действие выполняется, только если справедливо некоторое условие, или циклы;
- придумывать команды, которых нет в Excel изначально, и писать их с нуля;
- выполнять действия, при которых не нужно выбирать ячейку таблицы — макрорекордер работает только с ячейками, а например, открыть другой лист не сможет.
Но все перечисленное можно сделать вручную с помощью VBA. Более того: код пишется на Visual Basic, и «понимать» его может не только Excel — практически все программы офисного пакета. Поэтому макрос, написанный самостоятельно, может взаимодействовать поочередно с несколькими программами, например загружать в Excel данные из Access. Возможность работы «за пределами» Excel специфична для кода, написанного вручную.
Что лучше: писать код или записывать действия
Мы уже сказали, что макрорекордер чуть менее функционален; но есть еще одна деталь. Макрорекордер избыточен. Это значит, что при автоматической записи в макрос добавляется много лишнего, «мусорного» кода, и программы не оптимизированы. Потому они могут выполняться чуть медленнее, чем написанные вручную, и их тяжелее читать другим пользователям.
Это не значит, что от записи действий нужно отказываться. Нет, запись макросов — хороший способ сэкономить время на их создании. Но если вы знаете, что с вашей макрокомандой потом будет работать другой человек, или хотите выполнить какое-то сложное ресурсоемкое действие, лучше воспользоваться ручной записью.
В начале работы с макросами пользователь обычно не знаком с VBA или знаком, но слабо. Поэтому использование макрорекордера на этом этапе вполне оправдано и закономерно, помогает разобраться с тем, как работают макросы. Умение писать код на VBA приходит со временем, если человек постепенно учится.
Расширение файлов с макросами
Обычный файл Excel не может сохранить внутри себя макрос. Чтобы тот остался в документе и его можно было пересылать вместе с таблицей, понадобится сохранить файл с расширением .xslm — он поддерживает макросы. Файлы с расширением .xlsx их не поддерживают.
Абсолютные и относительные значения
Как и при написании функций в Excel, в макросах можно задавать абсолютные и относительные значения ячеек. По умолчанию макрос работает с абсолютными значениями — то есть, если вы кликнете в макрорекордере на ячейку B5, он при выполнении всегда будет выбирать B5. Чтобы макрос пользовался относительными значениями, то есть мог работать с разными ячейками, понадобится включить режим «Относительные ссылки». Кнопка для его включения находится прямо под кнопкой записи макроса.
В режиме относительных ссылок макрос начинает работу не с жестко зафиксированной ячейки с конкретным значением, а с той, которую сейчас выделил пользователь.
Создание макроса через запись: пошаговая инструкция
Разберем использование макрорекордера пошагово. Это довольно просто: можно с ходу создать несложный макрос и потом пользоваться им, даже если вы раньше не имели дел с макрокомандами.
Подготовка. Понадобится перейти в панель «Разработчик». Если вы хотите, чтобы макрокоманда работала не с жестко зафиксированными ячейками, а с теми, которые вы выберете, нажмите на кнопку «Относительные ссылки». Кнопка включит относительный режим. Если вам нужна работа с абсолютными значениями, проигнорируйте этот шаг.
После этого нужно будет нажать на кнопку «Запись макроса».
Параметры макроса. Откроется окно, в котором надо будет придумать уникальное имя для макрокоманды, а по желанию — комбинацию клавиш, которая будет запускать макрос. Там же надо будет:
- выбрать, где сохранится макрос — внутри открытого документа, внутри новой таблицы или в «личной книге», то есть глобально для всего Excel;
- придумать короткое описание, которое объясняет, что делает команда.
Описание и горячие клавиши не обязательны. Вариант сохранения по умолчанию — текущий документ, и им пользуются чаще всего, чтобы передавать таблицу другим можно было вместе с макросами. Личную книгу применяют, если пишут макрокоманду, которой планируют пользоваться в разных таблицах.
Кстати, личную книгу тоже можно передавать другим: это специальный файл внутри Excel, где хранится написанный пользователем код. В офисном пакете есть инструменты, позволяющие делиться этим файлом.
Запись действий. После того как вы настроите будущий макрос, понадобится нажать «ОК». Запустится запись. Макрорекордер начнет фиксировать действия, которые вы выполняете.
Это могут быть любые действия с ячейками: выделение, переход на другую ячейку, редактирование ее значения, вставка или применение форматирования. Например, записанный макрос поможет привести несколько таблиц к единому виду внешне. Пользователь выделит цветом верхнюю строку, изменит ширину столбцов и исправит выравнивание для контента.
Проверить, что макрорекордер работает, можно в левом нижнем углу окна Excel. Когда он записывает действия, там отображается значок в виде квадратика.
Особенности выполнения действий. Помните, что рекордер записывает все выделения, клики или переходы по ячейкам, поэтому старайтесь не совершать лишних действий. Если вы сделали что-то лишнее, отменить это можно, только если отредактировать код в редакторе Visual Basic — или записать макрос с самого начала.
Если вы не включили режим относительных ссылок, записанный макрос будет работать только в том диапазоне ячеек, который вы выбирали. Поэтому, если вы выделили, скажем, столбец A, то макрос не получится запустить для столбца B. Иногда это удобно — если вы точно знаете фиксированное количество столбцов или строк.
Остановка записи. Когда вы сделаете все необходимое, запись можно останавливать. Для этого нажмите кнопку «Остановить запись» в том же меню «Разработчик». Макрос запишется и сохранится. С этого момента он будет доступен для выполнения:
- если вы создали его для конкретной книги — из этой книги;
- если вы сохранили его в личную книгу — из любого документа Excel.
Как пользоваться созданным макросом
Если при создании макроса вы задали для него комбинацию горячих клавиш, то его можно в любой момент запустить с помощью этого сочетания. Но обращайте внимание на то, где вы сохранили макрос: если только в пределах конкретной таблицы — запустить его из другого документа не получится, тот просто не будет о нем знать.
Если же комбинации нет, то для запуска макроса понадобится перейти в меню «Разработчик» и там нажать на кнопку «Макросы». Откроется список созданных вами и доступных для этого документа макрокоманд. Нужно будет выбрать нужную и нажать «Выполнить». После этого макрос исполнится.
Мы советуем назначать горячие клавиши для макросов, которые вы планируете запускать часто, а через меню открывать более редко используемые.
Узнайте больше о макросах и использовании Excel на наших курсах менеджмента: мы поможем научиться современным инструментам и освоить востребованную профессию.
If you regularly work with word processing programs, database systems, or spreadsheet applications, then you know how tedious it can be to enter the same directives over and over again. More than anything, complex, multi-stage program sequences can be a real test of patience. Macros record a sequence of commands so that they can be executed automatically by the software user at any given time. Even though macros are written in a programming language, programming knowledge generally isn’t needed, as many programs — including Excel – can record simple macros and provide assistance in development. For the Microsoft spreadsheet software Excel, macros are one of the most important features.
Contents
- What is an Excel macro?
- How macros work in Excel
- Benefit of Excel macros
- How to create your own macros in Excel
- Step 1: Add the “Developer” tab
- Step 2: Create a new workbook for macros
- Step 3: Create a quick-access button for macros
- Step 4: Use the macro recording
- Excel macros in practice: Diagrams and input forms
- Excel Evergreen: Create a diagram based on a cell range
- How to create a dialog box for user input
- Transferring Excel macros
Register a domain name
Build your brand on a great domain, including SSL and a personal consultant!
![]() Private registration
Private registration
![]() 24/7 support
24/7 support
![]() Email
Email
What is an Excel macro?
Microsoft Excel is the most sought-after solution for processing, analyzing, and presenting data. Using Excel spreadsheets, which forms a key componentof the Microsoft Office Suite, Windows subscribers have been working with this program for years to create budgets, individual calendars, and a whole host of other projects. Excel is also used in business: With the software, project plans, hours lists, or budget plans are realized just as easily as graphical representations of sales figures, profits, or losses. Anyone familiar with the program learns to appreciate the various functions but at the same time, most people quickly develop a reluctance to constantly repeat routine tasks or repetitive actions that can’t easily be performed using the standard user interface.
So it comes as no surprise that the possibility to create macros in Excel is one of the core features of the spreadsheet program. There’s an integrated macro-recording tool for this purpose that uses the Visual Basic for Application (VBA) script language, which is also used in the Microsoft Office Word, PowerPoint, Access, and Outlook programs. Thanks to the language, you can easily create your own Excel macros that automatically execute defined routine commands, or add new functions to the spreadsheet calculation (i.e., algorithms for data analysis).
Excel provides various elements of the user interface in the form of hierarchically organized program objects. Each one features specific properties and methods. All available objects are related to each other in the hierarchical object model and are reflected approximately in the visual user interface, which provides buttons and input boxes for interaction with the application. By setting the properties and invoking their methods, you can edit the different objects. For example, a “Close” method exists for the “Workbook” object that can be used to close the selected workbook as well as the “ActiveSheet” property that represents the sheet currently active in the workbook.
With the help of collections, macros can also perform actions on a whole group of objects. For example, the “Worksheets” collection object causes the statements in the macro to apply to all worksheets. For the execution of a macro, you have the following three options:
- Selection in the macro menu
- Click on an individually created button
- Individual key combinations
Benefit of Excel macros
If you previously, either consciously or unconsciously, refrained from creating macros in Excel, this doesn’t necessarily have a negative effect on your Excel files. But you have chosen a rather tedious way to work. Macro technology offers a vast number of decisive advantages that make it a must for anyone who wants to get the most out of their calculation software:
- Macros reduce the error rate: With every directive that you manually enter into Excel, you increase the probability of an incorrect entry. Especially in complex command sequences and frequently repeated tasks, mistakes are quickly made that derail the entire functionality of the sheets you are working on. In a macro, only the creation process has error potential. If no errors manage to sneak in there, then the Excel macro will operate error-free every time.
- Macros reduce the work effort: You only create macros one time. You can then start using the practical command combination as often as you want by pressing the assigned key combination. It saves you a lot of time that you can now invest in other areas of work.
- Macros expand Excel: With VBA, it’s not just a case of programming macros that group commands together, you can also develop new functions. This extends the integrated function collection of your customized user-defined workbook and significantly simplifies your formulas. Excel also presents your customized functions as if they were native functions. In addition, you have the option of linking all of the macros that have been created with a button in the toolbar, which can then be used to trigger their functions.
How to create your own macros in Excel
To create your own command collection, you first have to activate the VBA editor, which is a part of the developer tools. These are not accessible on the menu list by default (also called the “ribbon” in Microsoft Office applications), so you need to add the corresponding tab in the first step.
Step 1: Add the “Developer” tab
Select the “file” tab and click on “Options”. Under the “Customize Ribbon” item, find the list of main tabs, which includes the “Developer” tab.

Check the box next to “Developer” and confirm the change by clicking “OK”. The tab will now appear in the menu ribbon.

Step 2: Create a new workbook for macros
The second step is to create a new Excel folder to serve as the basis for the macros that you are about to record. To do this, click on the “Macros” button in the “Developer” tab, enter the name of the folder (in this example, “Hello”) under “Macro name” and confirm by clicking on “Create,» at which point the VBA editor will open, including the following code:

Sub here stands for subroutine and also for a macro, which is in itself a kind of subroutine for Excel. For the respective macro, the entire code between Sub and End Sub is executed. If you would like to conduct a small test, you can extend the code of the sample “Hello” macro as follows:
Sub Hallo()
  MsgBox ("Hello world!")
End Sub
Save the result in the .xslm format, switch back to the Excel program interface, reactivate the “Macros” button, and select the “Hello” macro in the displayed list. Now, if you click on “Run,» a small information window appears with the text content you just defined.

Click on the “OK” button to close the window and stop running the macro. Then save the macro workbook in the VBA editor.
Step 3: Create a quick-access button for macros
In both the “Developer” tab and the “View” tab, you can display and run the available Excel macros. But if you need the command summary more frequently, it would make sense to create a button for quick access to the toolbar. This is done as follows:
- Go to the “File” tab.
- Open the options, and click on the menu item “Quick-access Toolbar”.
- In the “Select command” list, click on the “Macros” entry and search for the previously created “Hello” macro.
- Select this and click “Add,» then transfer it to the list of quick-access buttons.
- Before you confirm the new button via “OK,» you can first select the symbol that will be shown later. Simply select the macro and click on “Change”.
Now, next to the standard “Save,» “Undo,» and “Redo” buttons on the toolbar. There’s also the quick-access button for the “Hello” macro:

Note: You can also set a key combination for running a macro instead (“Developer” -> “Macros” -> “Options”).
Step 4: Use the macro recording
The VBA editor integrated by Microsoft into its Office applications has the benefit of you not being required to master the programming language in order to create simple Excel macros. For this, the integrated function for recording macros is perfectly adequate. For example, we’ll now create a macro that automatically renames a worksheet.
- In the developer tools, select the “Record macro” button this time.
- In the following dialog window, name the macro “RenameWorksheets” and start the recording with “OK”.
- Now rename “Table1” to “New Name” and end the macro recording by clicking on “End recording”.
If you switch back to the VBA editor now (“Developer” -> “Macros” -> “Edit”), the following code should appear:

In the first four code lines under the Sub line, each beginning with an apostrophe, are the commentary lines. These have no influence on the overall functionality of the macros and primarily simply offer a better understanding of the code. You can also temporarily deactivate code lines with the help of commentary. For this example macro, you don’t need the four automatically created lines, so you can safely delete them.
The next line contains the selection method, selecting “Table1,» which was necessary for the manual rename execution before you could give it a new name. VBA scripts don’t need objects to be selected in order to be edited, so these code lines aren’t necessary for macros in Excel. Completely revised, the code looks like this:
Sub RenameWorksheets ()
  Sheets("Table1").Name = "New Name"
End Sub
Switch back to Excel and rename the worksheet back to “Table1”. Now run the RenameWorksheets macro as a test to see if the name changes automatically. Note that the macro will have to be adapted to the new name if you want to run it again.

Excel macros in practice: Diagrams and input forms
VBA scripts enable the automation of various Excel tasks. With the help of the recording option, you will simplify your own work process andalso acquire knowledge about the high-performance programming language. Don’t hesitate to use the VBA tool if you suspect that an Excel macro will make a particular task easier.
Having already presented the general approach to macro-building in the previous paragraphs, the following two examples will now help by giving you a concise overview of how versatile the command automation is.
Excel Evergreen: Create a diagram based on a cell range
A common function of Excel tables is the visualization of input data in the form of a diagram. With this quite often tedious task, a macro can provide valuable assistance. For this, you’ll first create a macro with the name “AssortedTasks” and declare the variable for your diagram object:
Dim mydiagram As ChartobjectIn the next line, create a diagram object for the mydiagram variable to refer to:
Set mydiagram = ActiveSheet.ChartObjects.Add(100, 50, 200, 200)The values that are contained in the brackets define the position as well as the size of the diagram. The first two sets of data are the coordinates of the upper left corner, followed by the values for the width and the height. If you run the macro now, Excel automatically creates the object at the defined position and in the defined size — but it’s obviously still blank since at this point the input data is still missing.

The last step is to fill the diagram object with data, which can then be visualized accordingly. Inputting the values is required for this, as well as a further adjustment of the Excel macro since it still lacks information regarding where the information should be displayed. Within the With … End With construction, now use the SetSourceData method and specify the Selection value, which will cause the values of all cells that are marked when the macro is run to be taken into account. The code of the complete macro looks as follows:
Sub AssortedTasks()
Dim mydiagram As ChartObject
Set mydiagram = ActiveSheet.ChartObjects.Add(100, 50, 200, 200)
With mydiagram
.Chart.SetSourceData Source := Selection
End With
End Sub
For test purposes, give cells A1 through A5 the values 1 through 5 and run the macro to see the data presented to you as a bar graph. This type of diagram is created by default in Excel, as long as you don’t supply additional ChartType details.

How to create a dialog box for user input
With the help of the macro tool, you can also create an input form through which the user can interact with Excel. For example, to create an interaction window whose input value is automatically written into a defined cell, start by creating and naming the macro as usual. In our example, we give the command collection the name “InputForm”. Then you name the subroutine destination of the value entered later by the user:
Sub InputForm()
  ActiveSheet.Range("A1").Value =
End Sub
The macro ensures that the input of the user is transferred to the A1 cell of Table 1. The value of the field (Value) now needs to be assigned in the second part of the statement. We decided on the InputBox command as an example, which is very similar to the MsgBox command used in the “Hello” macro. Combined with the following three arguments, which are enclosed in quotation marks in the VBA code, a suitable input window is created.
- Prompt: With the help of the first argument, define the text of the dialog window that supports the user during input.
- Title: The “Title” argument displays the title of the input form.
- Default: Finally, you can also specify a standard input with “Default”.
A possible example code of the complete “InputForm” macro including the box and text looks as follows:
Sub InputForm()
  Table1.Range("A1").Value = InputBox("Please enter a value for the field A1.", "Title of the input form", "Value for field A1")
End Sub
If you run the following Excel macro, the corresponding dialog window will appear:

Transferring Excel macros
If you’ve created macros in your Excel workbook, you can easily use them in another document or transfer them to another user. The VBA editor has an import/export function for this purpose, with which you can save your command collection in the .bas format or integrate macros already saved in the .bas format into your current Excel document. The only requirement is that macros are activated in the target document. Since the handy scripts can contain potentially unsafe code, Excel has restrictions in place to protect users, so that all macros without a digital signature are blocked, for example, with or without a notification. The simple solution is to automatically allow all macros and make sure that all codes are trustworthy before importing.
Find the options for activating and deactivating macros is in the “Trust Center” (“Security Center” in older versions): Simply go to the “File” tab, choose “Options,» “Trust Center,» and click on the “Trust Center Settings” button. There you’ll find the “Macro Settings” menu item, which contains the settings mentioned here.

To export a macro, open the Visual Basic Editor, click on the “File” tab and then on “Export file”. Give your macro collection a meaningful name, choose the desired index, and complete the process by clicking “Save”. The exported file is only a few bytes big and can easily be sent via e-mail or transported via a portable storage device to the desired target computer. To import a macro file, proceed the same way initially but then choose “Import file” and specify the save location of the file.
HiDrive Cloud Storage with IONOS!
Based in Europe, HiDrive secures your data in the cloud so you can easily access it from any device!
![]() Highly secure
Highly secure
![]() Shared access
Shared access
![]() Available anywhere
Available anywhere
What is MACRO in Excel?
A macro in excel is a series of instructions in the form of code that helps automate manual tasks, thereby saving time. Excel executes those instructions in a step-by-step manner on the given data. For example, it can be used to automate repetitive tasks such as summation, cell formatting, information copying, etc. thereby rapidly replacing repetitious operations with a few clicks.
There are two methods to create the macros – The first is when you can record the macro, where Excel records every step automatically and then repeats it. The second is coding with VBAVBA code refers to a set of instructions written by the user in the Visual Basic Applications programming language on a Visual Basic Editor (VBE) to perform a specific task.read more, which requires good subject knowledge
Before recording a macro, the user has to activate the Developer tab in Excel. The Developer tabEnabling the developer tab in excel can help the user perform various functions for VBA, Macros and Add-ins like importing and exporting XML, designing forms, etc. This tab is disabled by default on excel; thus, the user needs to enable it first from the options menu.read more is a built-in option in Excel to create macros, generate VBA applications, design forms, import or export XML files, etc. Since it is disabled in Excel by default, it has to be enabled before creating and recording the macrosRecording macros is a method whereby excel stores the tasks performed by the user. Every time a macro is run, these exact actions are performed automatically. Macros are created in either the View tab (under the “macros” drop-down) or the Developer tab of Excel.
read more.
Table of contents
- What is MACRO in Excel?
- Enable the Developer tab
- Examples of Macros in Excel
- Example #1
- Example #2
- Adding the Macro Button
- How to View the Code of Macros?
- Creating Macro by Writing VBA Code
- How to Save the Recorded Macro in Excel?
- How to Enable “Macro Security Settings”?
- Frequently Asked Questions (FAQs)
- Recommended Articles
Let us learn the method to enable the Developer tab in Excel.
Enable the Developer tab
Below are the steps to activate the Developer tab in the Excel toolbar.
- Click on “options” in the File menu (as shown in the succeeding image).

- On clicking the “options”, the “Excel options” window will pop up.

- Select “customize ribbon” in the “Excel options” which provides a list of options in a dialog box.
Under “customize the ribbon”, select “main tabs”. Among the list of checkboxes, select “developer” and click “ok”.
- The worksheet displays the Developer tab, as highlighted in the succeeding image.

- The user can view options like “visual basic”, “macros”, “record macro”, etc. on the ribbon of Developer tab (as displayed in the image below).


Examples of Macros in Excel
Let us understand how to add macros in excel with the help of the following example.
Example #1
A list of data with different names is available in the table below. Some names have “.” symbol. We want to replace the “.” symbol with “_” by using macros in Excel.
You can download this Macro Excel Template here – Macro Excel Template

The steps to add an excel macro are listed as follows:
- Click the “record macro” option in the Developer tab.

- The “record macro” window will pop out. Name the macro “ReplaceDot” in the “macro name” box. To assign a keyboard shortcutAn Excel shortcut is a technique of performing a manual task in a quicker way.read more, type “Ctrl+q” in the “shortcut key” box.
Select the option “This Workbook” in the “store macro in” box, which will ensure the macro is stored in the particular workbook.
It is optional to fill the “description” box explaining the task. Finally, click the “ok” button.

- The “ReplaceDot” macro will start recording the user actions in Excel. The user will observe the “stop recording” button appearing in the Developer tab.

- Let us now start replacing the “.(dot)” in the names with “_(underscore)” by using the “find and replace” option. Enter “.” in the “find” and “ _” in the “replace” option, respectively. Then click the “replace all” button.
Note: Use the shortcut key “Ctrl+H” to use “find and replace” option.


- The “replace all” option replaces all the “.” (dots) with the “_” (underscores). The number of replacements and the resulting output is shown in the succeeding image.

- The final output is displayed in the below image.

- In the end, click the “stop recording” button on the Developer tab to stop the macro recording.
Example #2
We want to run the same task for a new list of names (displayed in the below image). We will run the macro “ReplaceDot,” created in the Developer ribbon.

- Select the “enable macro” option from the Developer ribbon to view the list of macros created in the Macro window. The users can choose and run the macros based on their requirement.
The succeeding image shows the result of macros running on the new list of names.

Adding the Macro Button
Let us assign a button to the macro instead of choosing the “enableTo enable macros simply means to run or execute a macro in a particular file in order to save the time spent on repetitive actions. To enable macros, select “enable all macros” from the “trust center” of the File tab (in the “options” button).
read more macroTo enable macros simply means to run or execute a macro in a particular file in order to save the time spent on repetitive actions. To enable macros, select “enable all macros” from the “trust center” of the File tab (in the “options” button).
read more” option.
There are many groups like Add-ins, Controls, and XML under the Developer ribbon.

- The user can choose the type of button to be created. Select the first button from “form controls” in the Controls tab.

- Drag the selected button anywhere in the Excel sheet. The “assign macro” dialogue box opens. The macros to be assigned are listed in the “macro name” box.
- Select the macro “ReplaceDot,” appearing in the list and click “ok”.

- A button appears in the worksheet. Right click the button and use “edit text” option to change the button text as “Button 3.” It is created on the right-hand side of the sheet, as shown in the below image.

- Select the new name list to implement the same task by running macros, as indicated in the previous section.

- Click the “Button 3” to run the assigned macro “ReplaceDot”.

- To change the button name, use the “edit text” option to replace the text “Button 3” with “ReplaceDot”.

Using the above steps, we can create, record, and assign the macro for various tasks and automate it.
How to View the Code of Macros?
The users can view the code for a recorded macro. Excel generates the code based on the steps carried out while recording the macro.
We can access the code using the shortcut “Alt+F11” or by editing the macro that was created earlier.
Let us view the code for the “ReplaceDot” macro using the following steps:
- Open the worksheet that contains the “ReplaceDot” macro. In the View tab, click the option “macros”. Select the “ReplaceDot” macro from the list and click the “edit” button.

- The “Microsoft Visual Basic for Applications” will be launched. The user can write or edit the code using this application. The below image shows the code of the “ReplaceDot” macro.

Creating Macro by Writing VBA Code
Before writing the VBA code, let us understand the “head” and “tail” of macros, which are the “sub” and “end sub.”

The user places the lines of VBA codes in the keyword “sub”. It executes the instructions in the code. The “end sub” keyword stops the execution of the “sub.”
Generally, there are two types of macros.
- “System Defined Function” – It performs actions like creating a link of all the worksheet names, deleting all worksheets and so on.
- “User-Defined Function” – To create a User Defined Function User Defined Function in VBA is a group of customized commands created to give out a certain result. It is a flexibility given to a user to design functions similar to those already provided in Excel.read more(UDF) in macro, the user uses the “function and end function” as the “head” and “tail” of the codes.
Note: A function returns a value, whereas the sub does not.
A macro is written on the Visual Basic EditorThe Visual Basic for Applications Editor is a scripting interface. These scripts are primarily responsible for the creation and execution of macros in Microsoft software.read more (VBE) of the “Microsoft Visual Basic for Applications”.
Let us learn the steps to write a simple macro in the VBA.
- Click the “module 1” in the “module” properties displayed on the left-hand side panel of the VBE window, and start writing the macro.

- Begin with “sub” followed by the macro name and end with “end sub”. The code is written between the “sub” and “end sub.”
The below image shows the “sub” and “end sub” for the macro named “simplemacro ( )”.
- Write code to display text in the message box. The “MsgBoxVBA MsgBox function is an output function which displays the generalized message provided by the developer. This statement has no arguments and the personalized messages in this function are written under the double quotes while for the values the variable reference is provided.read more” displays an input text message. All text in VBAText is a worksheet function in excel but it can also be used in VBA while using the range property. It is similar to the worksheet function and it takes the same number of arguments. These arguments are the values which needs to be converted.read more should be enclosed in double quotes.
For example, the code: MsgBox “Good Morning” (shown in the below image) displays the message “Good Morning” in the text box.

- The output is displayed in the succeeding image.

Hence, the same macro can be assigned buttons to automate the task.
How to Save the Recorded Macro in Excel?
After recording, the user saves the macro to reuse in any other worksheet in the future.
Let us follow the below-mentioned steps to save the macro:
- In the macro-enabled workbook, click “save as.”
- Select the “Excel macro-enabled workbook” option in the “save as type” box while saving the file.
- Finally, save the macros with the “.xlsm” file extension.

The guidelines for saving the macro names are stated as follows:
- Make sure that the name of recorded macros should start with letters (alphabets) or underscore.
- Use letters, numeric, and underscore characters.
- Avoid space, symbols, or punctuation marks.
- Maintain a maximum length of about 80 characters.
Note: When the user saves a macro’s name with space, Excel issues a warning (as shown in the succeeding image).

How to Enable “Macro Security Settings”?
In this section, let us learn to enable the “Macros security settings”.
When a user opens a workbook containing macros, a security warning – “Macros have been disabled” is displayed under the ribbon. Choose the “enable content” option in the box.

To eliminate the security warning, we need to change the “trust center settings” by using the following steps:
- Under the “trust center settings” in the File options, click “macro settings”.
- Choose the button, “Disable all macros with notification.”
- The security is enabled in the “Macro Security” of the Developer ribbon.

Note 1: The user can create absolute macros (functioning from cell A1) that help to reuse the macro in other worksheets.
Note 2: The usage of directional keys (rather than a mouse) for navigation in macros is reliable to add, delete, and change the data in the worksheet.
Frequently Asked Questions (FAQs)
1. What are macros in Excel?
Macros are a set of simple programs or instructions to automate the common and repetitive tasks performed in the Excel worksheet. It can be recorded, saved, and run multiple times as per the user’s requirement.
It is a time-saving tool involved in preparing data reports and manipulating data carried out frequently in a worksheet.
2. How to enable macros in Excel?
The users can eliminate the security warning in the worksheet and enable macros by using the following steps:
• Click “options” in the File tab.
• Select “trust center” in the “options” window.
• Choose the option “trust center settings”.
• Click “macro settings” on the left side of the navigation pane.
• Select “enable all macros” and click “ok”.
3. What is the difference between macro and VBA?
The difference between macro and VBA is stated as follows.
• Macros are programming codes that function in the Excel worksheet to perform automated and repetitive tasks. It saves the user’s time and extends the efficiency of Excel.
• Visual Basic for Applications (VBA) is a programming language of Excel used for creating macros.
Recommended Articles
This has been a tutorial to Macros in Excel. Here we discuss how to add Macros in Excel along with , along with practical examples and a downloadable template. You may also look at these useful functions in Excel –
- Excel Open XMLXML (Extensible Markup Language) is a text-based mark-up language that stores & organizes data in a human & machine-readable format. As it follows a specific script, you need to fulfill a particular set of prerequisites for importing the data into Excel or opening Excel Data into this format. read more
- VBA MacrosVBA Macros are the lines of code that instruct the excel to do specific tasks, i.e., once the code is written in Visual Basic Editor (VBE), the user can quickly execute the same task at any time in the workbook. It thus eliminates the repetitive, monotonous tasks and automates the process.read more
- MsgBox in Excel VBAVBA MsgBox function is an output function which displays the generalized message provided by the developer. This statement has no arguments and the personalized messages in this function are written under the double quotes while for the values the variable reference is provided.read more
Spreadsheets are infinitely flexible—especially in Excel, one of the most powerful spreadsheet apps. Most people use only a small percentage of their seemingly countless possibilities, however. Yet it doesn’t take years of training to take advantage of spreadsheets’ power and the automation magic of Excel macros.
You likely already use functions like =sum(A1:A5), the simple bits of text that add, average, and calculate your values. They’re what make spreadsheets a powerful tool for crunching numbers and text. Macros are the next step: They’re tools that automate simple tasks and help you get more done in less time. Here’s how to unlock that new part of your Excel skill set by building your own macros in Excel.
Kasper Langmann is an Excel expert and co-founder of Spreadsheeto. This post was originally published in August 2016, but has been updated with additional tips
-
What Are Excel Macros?
-
Why Macros?
-
How to Build Your First Excel Macros
-
How to Code Your Own Excel Macros
-
Connect Excel to Other Apps with Integrations
What Are Excel Macros?
Macros are code that automate work in a program—they let you add your own tiny features and enhancements to help you accomplish exactly what you need to do, quickly with just a click of abutton. In a spreadsheet tool like Excel, macros can be especially powerful. Hidden behind the normal user interface, they are more powerful than standard functions you enter into a cell (e.g.=IF(A2<100,100,A2)).
These macros make Excel work for you. They replace actions that you do manually—everything from formatting cells, copying values, and calculating totals. So with a few clicks you can quickly replace repetitive tasks.
To make these macros, you can simply record your actions in Excel to save them as repeatable steps or you can use Visual Basic for Applications (VBA), a simple programming language that’s built into Microsoft Office. We’ll show you how to use both below, as well as share examples of Excel macros to help you get started.
Tip: This guide and all examples are written in Excel 2016 for Windows, but the principles apply to Excel 2007 and newer for both Mac and PC.
Why Use Excel Macros?
Learning how to automate Excel is one of the easiest ways to speed up your work—especially because Excel is used in so many work processes. Say every week you export analytics data from your content management system (CMS) to create a report about your site. The only problem is, those data exports aren’t always in an Excel-friendly format. They’re messy and often include far more data than your report requires. This means you have to clean up empty rows, copy and paste data into the right place, and create your own charts to visualize data and make it print-friendly. All of these steps may take you hours to complete.
If there only was a way to press one button and let Excel do it for you in an instant… Well, can you guess what I’m about to say next?
There is!
All it requires is a little bit of time to set up a macro, and then that code can do the work for you automatically every time. It’s not even as difficult as it sounds.
How to Build Your First Excel Macro
You already know your way around Excel, and are familiar with its grid of cells where you enter your text and functions. To build Excel macros, though, you’ll need an extra tool that’s built into Excel: the Visual Basic Editor.
Before You Proceed: Be sure to download our project file – you’ll need it for later to follow our Excel macros tutorial.
Meet The VBA Editor
Excel has a built-in tool for writing macros called the Visual Basic Editor—or VBA Editor for short. To open that, open a spreadsheet and use the shortcut Alt + F11 (for Mac: Fn + Shift + F11).
The new window that pops up is called the VBA Editor. It’s where you’ll edit and store all of your macros. Its layout may look a bit different from this screenshot, but you can move the windows around to the order you want. Just be sure to keep the Project Explorer pane open so you can easily edit your macros.
Your macros will be made up of «Modules,» or files with your VBA code. You’ll add a new module or open an existing one in the VBA Editor, then type in the code you want. To insert a module, click «Insert» and then click «Module». You’ll then see the blank space to write your code on the right.
How to Record an Excel Macro
There are two ways to make a macro: code it or record it. The main focus of this article is on the former, but recording a macro is so simple and handy, it’s worth exploring too. Recording a macro is a good way of getting to know the basics of VBA. Later on, it serves as handy storage for code that you don’t need to memorize.
When you record a macro, you tell Excel to start the recording. Then you perform the tasks you want to be translated into VBA code. When you’re done, tell Excel to stop recording and you can use this new macro to repeat the actions you just performed again and again.
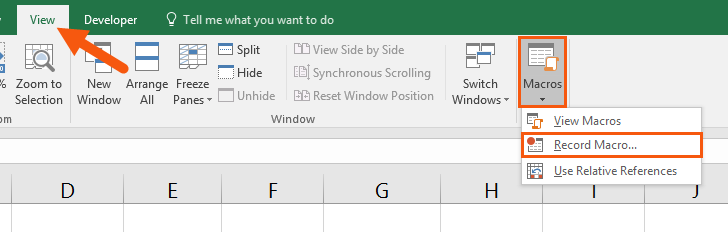
There are limitations to this, so you can’t automate every task or become an expert in automation by only recording. You’ll still need to type or edit code manually sometimes. But it’s still a handy way to get started. Here’s how: 1. Go to the «View» tab of the ribbon and click the tiny arrow below the «Macros» button. 2. Then click «Record Macro» 3. Type in the name of your macro and click «OK» to start the recording. 4. Perform the actions in your spreadsheet you want to be turned into a macro. 5. When you’re done, go to the «View» tab, click the tiny arrow below the «Record Macro» button again and select «Stop recording».
Now, use the shortcut Alt + F11 (for Mac: Fn + Shift + F11) to open the VBA Editor, and double-click «Module 1» in the Project Explorer.
This is your first code! Amazing, right? You may not have written it yourself, but it’s still generated from your actions.
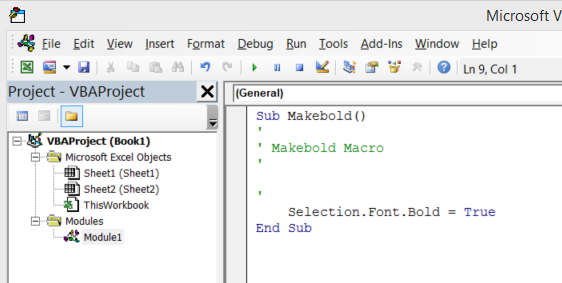
Yours probably look different than mine. Can you guess what my code does?
-
Sub Makeboldis just the textSubfollowed by the name I entered when I started recording. -
The green line doesn’t actually do anything—it’s a comment where you could add an explanation of what the macro does.
-
Selection.Font.Bold = Truemakes the values in the selected cells bold. -
End subsimply tells Excel that the macro stops here.
Now, what will happen if I change the True part of the third line to False? The macro would then remove any bold formatting from the selection instead of making it bold.
That’s how you record a simple macro. But the real power of macros comes when you can write it yourself—so let’s get started learning to write simple VBA code.
How to Code Your Own Excel Macros
Macros are just bits of code in Excel that do your bidding. Once you write the code in the VBA Editor, you can run it and let the code work its magic on your spreadsheet. But what’s even better is to build your macro into your spreadsheet, and the best tool for that is buttons.
So first, before we start coding, let’s add a button to run our macro.
Add a Button to Run Your Macro
You can use various Excel objects as buttons for running macros, but I prefer to use a shape from the «Insert» tab. When you have inserted your shape, right click it and select «Assign Macro…» Then select the macro you want to run when the shape is clicked—perhaps the one you just made with a recording and save it by clicking «OK».
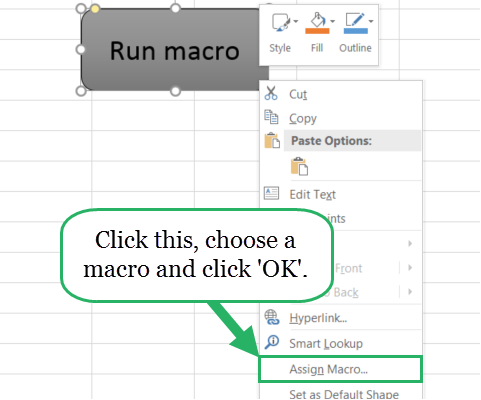
Now, when you click the shape which we just turned into a button, Excel will run the macro without having to open the code each time.
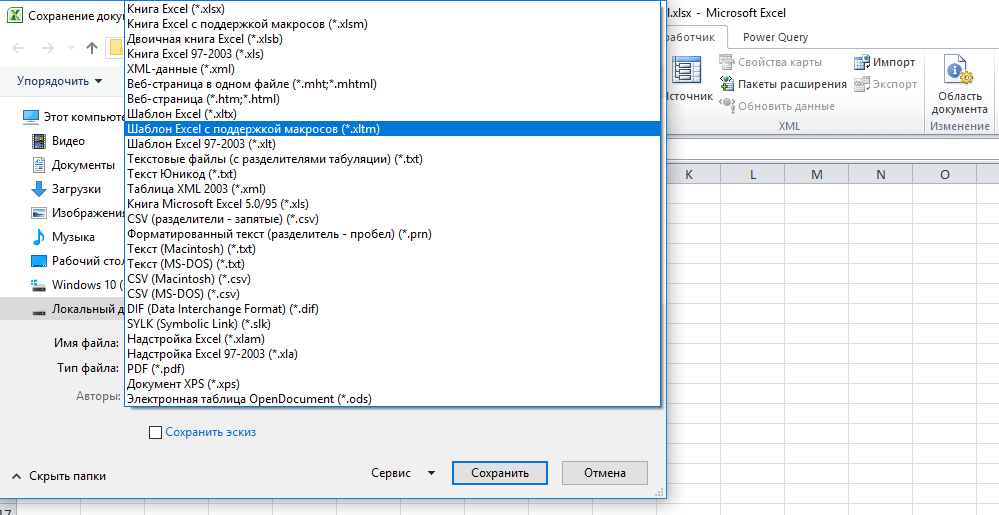
There’s one other thing to note before we get started: saving your spreadsheet with Macros. By default, Excel spreadsheet files with an .xlsx extension cannot include macros. Instead, when you save your spreadsheet, select the «Excel Macro-Enabled Workbook (*.xlsm)» format, and add your file name as normal.
Go ahead and do that to save your spreadsheet before we start coding.

Now, let’s get started with actual coding!
Copying and pasting is the simplest way to move data around, but it’s still tedious. What if your spreadsheet could do that for you? With a macro, it could. Let’s see how to code a macro that will copy data and move it around in a spreadsheet.
Open the project file you downloaded earlier and make sure the «Copy, cut, and paste» sheet is selected. This is a sample employee database with the names, departments, and salaries of some employees.
Let’s try to copy all the data in columns A through C into D through F using VBA. First, let’s look at the code we need:
Copying Cells with VBA
Copying in VBA is quite easy. Just insert this code into the VBA Editor: Range("Insert range here").Copy. Here’s some examples:
-
Range("A:C").Copy← copies column A through C -
Range("A1:C100").Copy← copies the range A1:C100
Remember when you recorded a macro before? The macro had Sub Nameofmacro() and End sub at the top and bottom line of the code. These lines must always be included. Excel makes that easy, too: When you type in «Sub» followed by the macro name in the beginning of the code, the End sub is automatically inserted at the bottom line.
Tip: Remember to enter these lines manually when you’re not using the macro recorder.
Pasting Cells with VBA
Pasting can be done in different ways depending on what you want to paste. 99% of the time, you’ll need one of these two lines of code:
-
Range("The cell/area where you want to paste").Pastespecial← pastes as normal (formulas and formatting) -
Range("The cell/area where you want to paste").Pastespecial xlPasteValues← only pastes values
Cutting Cells with VBA
If you want to relocate your data instead of copying it, you need to cut it. Cutting is quite easy and follows the exact same logic as copying.
Here’s the code: Range("Insert range here").Cut
When cutting, you can’t use the ‘PasteSpecial’ command. That means that you can’t paste values only, or formatting only. Therefore, you need these lines to paste your cells with VBA: Range(«Insert where you want to paste»).Select ActiveSheet.Paste
For example, here’s the code you’d need to cut the range A:C and paste it into D1:
-
Range("A:C").Cut -
Range("D1").Select -
ActiveSheet.Paste
Copying, cutting, and pasting are simple actions that can be done manually without breaking a sweat. But when you copy and paste the same cells several times a day, a button that does it for you can save a bunch of time. Additionally, you can combine copying and pasting in VBA with some other cool code to do even more in your spreadsheet automatically.
Adding Loops to VBA
I just showed you how to take a simple action (copying and pasting) and attach it to a button, so you can do it with a mouse click. That’s just one automated action. When you have the code to repeat itself, though, it can do longer and more complex automation tasks in seconds.
Take a look at the «Loops» sheet in the project file. It’s the same data as in the previous sheet, but every third row of the data is now moved one column to the right. This type of faulty data structure is not unusual when exporting data from older programs.
This can take a lot of time to fix manually, especially if the spreadsheet includes thousands of rows instead of the small sample data in this project file.
Let’s make a loop that fixes it for you. Enter this code in a module, then look at the explanations below the picture:
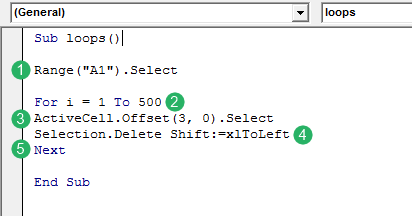
-
This line makes sure the loop starts at the top-left cell in the sheet and not accidentally messes the data up by starting somewhere else.
-
The
For i = 1 To 500line means that the number of times the loop has run (represented byi) is an increasing number that starts with 1 and ends with 500. This means that the loop will run 500 times. The number of times the loop should run depends on the actions you want it to do. Use your good sense here. 500 times is way too many for our sample dataset, but would fit perfectly if the database had 1500 rows of data. -
This line recognizes the active cell and tells Excel to move 3 rows down and select that cell, which then becomes the new active cell. If it was every fourth row that was misplaced in our data, instead of every third, we could just replace the 3 with a 4 in this line.
-
This line tells Excel what to do with this newly selected cell. In this case, we want to delete the cell in such manner that the cells to the right of the cell are moved left. That is achieved with this line. If we wanted to do something else with the misplaced rows, this is the place to do it. If we wanted to delete every third row entirely, then the line should’ve been:
Selection.Entirerow.delete. -
This line tells Excel that there are no more actions within the loop. In this case, 2 and 5 are the frame of the loop and 3 and 4 is the actions within the loop.
When we run this macro, it will result in a neat dataset without any misplaced rows.
Adding Logic to VBA
Logic is what brings a piece of code to life by making it more than just a machine that can do simple actions and repeat itself. Logic is what makes an Excel-sheet almost human—it lets it make intelligent decisions on its own. Let’s use that to automate things!
This section is about IF-statements which enables the «if-this-then-that» logic, just like the IF-function in Excel.
Let’s say the export from our website CMS was even more erroneous than expected. Every third row is still misplaced, but now, some of the misplaced rows are placed 2 columns to the right instead of 1 column to the right. Take a look at the sheet «IF-statement» in the project file to see what it looks like.
How do we take this into account in our macro? We add an IF-statement to the loop!
Let’s formulate what we want Excel to do:
We start in cell A1. Then we go three rows down (to cell A4, A7, A10, etc.) until there’s no more data. Every time we go three rows down we check this row to see if the data has been misplaced by 1 or 2 columns. Then move the data in the row either 1 or 2 columns to the left.
Now, let’s translate this into VBA code. We’ll start with a simple loop, as before:

The only thing we need now is to write what should happen within the loop. This is the «go three rows down» part that we developed back in the section about loops. Now we’re adding an IF-statement that checks how much the data is misplaced and corrects it correspondingly.
This is the final code to copy into your module editor, with each step explained below:
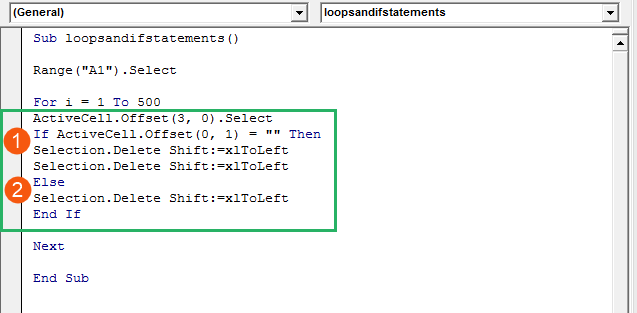
-
This is the first part of the IF-statement. It says that if the cell right of the active cell (or
Activecell.Offset(0,1)in VBA code) is blank (represented by= "") then do something. This something is the exact same action as we did when we created the loop in the first place: deleting the active cell, and moving the active row one cell to the left (accomplished with theSelection.Delete Shift:=xlToLeftcode). This time, we do it two times instead of one, because there are two blank cells in the left side of the row. -
If the above is not true, and the cell right of the active cell is not blank, then the active cell is blank. Therefore, we only need to delete the active cell and move the active row one cell to the left one time.
The IF-statement must always end with an End If to tell Excel it’s finished running. After the IF-statement, the loop can run again and again, repeating the IF-statement each time
Congratulations, you’ve just created a macro that can clean up messy data! See the animation below to see it in action (If you haven’t already tried it yourself).
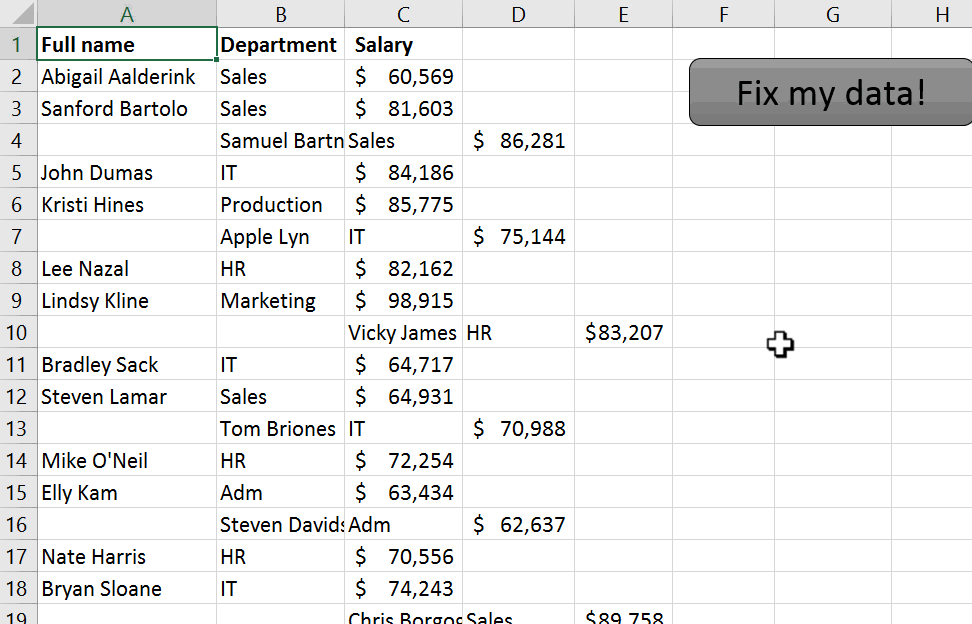
Automate Excel Without Macros
Excel macros have only one problem: they’re tied to your computer, and they can’t run in the Excel Web App or on your mobile device. And they’re best at working on data already in your spreadsheet, making it difficult to get new data from your other apps into your spreadsheet.
App integration tool Zapier can help. It connects the Office 365 for Business edition of Excel to hundreds of other apps—Stripe, Salesforce, Slack, and more—so you can log data to your spreadsheet automatically or start tasks in other apps right from Excel.
Here’s how it works. Say you want to save your Typeform form entries to an Excel spreadsheet. Just create a Zapier account, and click the Make a Zap button in the top right corner. Then, select Typeform in the app picker, and set it to watch your form for new entries.
Test your Zap, then click Continue to add another step to your Zap. This time we’ll select the Excel app, and choose to Add a Row to our spreadsheet. You could also update a row, or search your spreadsheet for a specific row if you wanted.
Now, choose your spreadsheet and worksheet, then click the + icon on the right of each spreadsheet row to select the correct form field to save to that spreadsheet row. Save and test your Zapier integration, then turn it on. Then every time your Typeform form gets filled out, Zapier will save that data to your Excel spreadsheet.
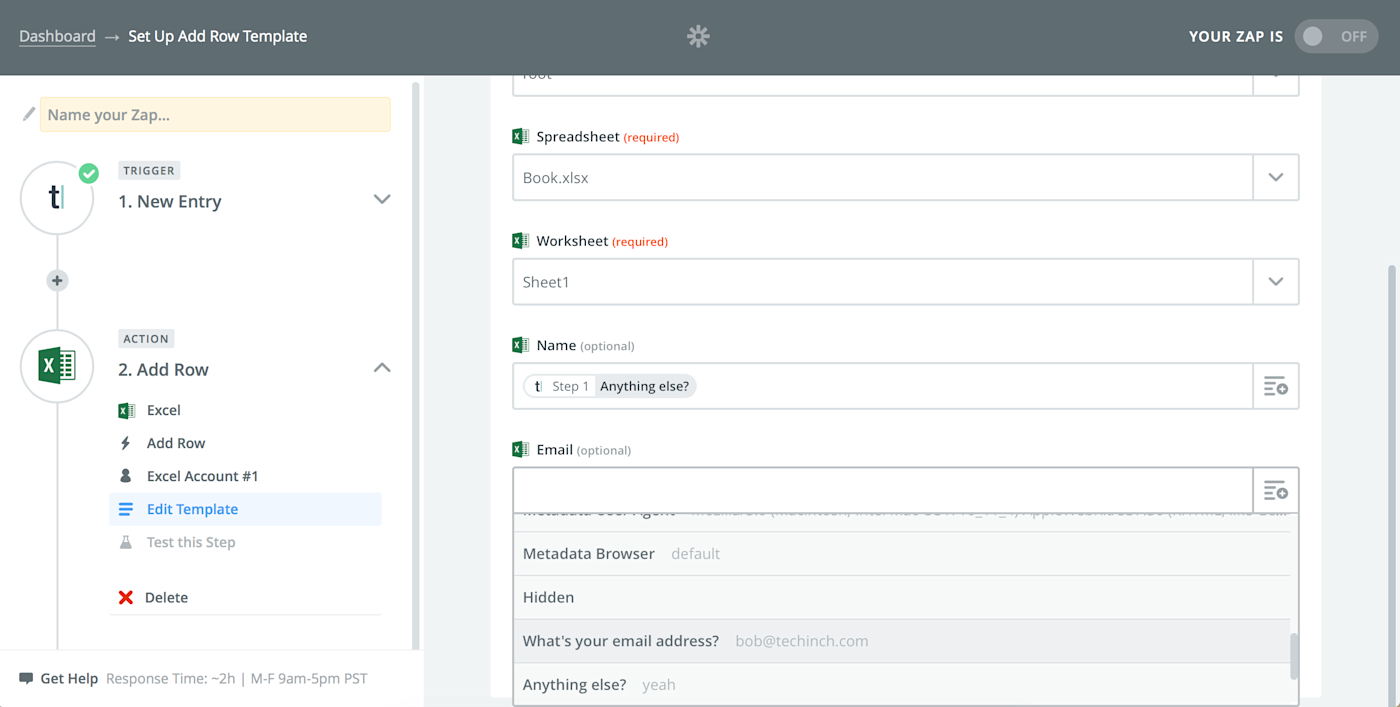
Here are some great ways to get started automating Excel with Zapier in a few clicks—or build your own Excel integrations to connect your spreadsheets to your favorite apps.
Manage Your Spreadsheet Data
Save Form Entries to an Excel Spreadsheet
Log Data to an Excel Spreadsheet
Do Work From Your Spreadsheet
Go Build Your Own Macros!
Now you’ve learned some of the most essential VBA tools to make a macro for cleaning up data and automating your work. Play around with the tricks and tools you’ve just learned, because they are the fundamentals for automation in VBA. Remember to use the macro recorder (and Google) when you feel you are in over your head.
To learn more, here are some extra resources to help you get the most out of Excel Macros:
-
Learn more about how to repeat VBA code with loops
-
Dig deeper into what you can do with
ifstatements and other logic jumps in Excel Macros -
Explore Microsoft’s Excel VBA Reference to dig into everything you can do with VBA code and macros.
-
Use Google Sheets instead of Excel? Check out our guide to Google Apps Script to learn how to automate Google Sheets
-
If you run into problems, here’s how to fix the most common errors in Excel.
![]()
Download Article
![]()
Download Article
This wikiHow teaches you how to enable, create, run, and save macros in Microsoft Excel. Macros are miniature programs which allow you to perform complex tasks, such as calculating formulas or creating charts, within Excel. Macros can save significant amounts of time when applied to repetitive tasks, and thanks to Excel’s «Record Macro» feature, you don’t have to know anything about programming in order to create a macro.
Things You Should Know
- Macros make it easy to automatic tasks in Microsoft Excel.
- To create macros yourself, you’ll need to enable macros in the Developer menu of Excel.
- Saving a macro-enabled spreadsheet is a little different than saving a spreadsheet without macros.
-
1
Open Excel. Double-click the Excel app icon, which resembles a white «X» on a green box, then click Blank workbook.
- If you have a specific file which you want to open in Excel, double-click that file to open it instead.
-
2
Click File. It’s in the upper-left side of the Excel window.
- On a Mac, click Excel in the upper-left corner of the screen to prompt a drop-down menu.
Advertisement
-
3
Click Options. You’ll find this on the left side of the Excel window.
- On a Mac, you’ll click Preferences… in the drop-down menu.
-
4
Click Customize Ribbon. It’s on the left side of the Excel Options window.[1]
- On a Mac, click instead Ribbon & Toolbar in the Preferences window.
-
5
Check the «Developer» box. This box is near the bottom of the «Main Tabs» list of options.
-
6
Click OK. It’s at the bottom of the window. You can now use macros in Excel.
- On a Mac, you’ll click Save here instead.


Advertisement
-
1
Enter any necessary data. If you opened a blank workbook, enter any data which you want to use before proceeding.
- You can also close Excel and open a specific Excel file by double-clicking it.
-
2
Click the Developer tab. It’s at the top of the Excel window. Doing so opens a toolbar here.
-
3
Click Record Macro. It’s in the toolbar. A pop-up window will appear.
-
4
Enter a name for the macro. In the «Macro name» text box, type in the name for your macro. This will help you identify the macro later.
-
5
Create a shortcut key combination if you like. Press the ⇧ Shift key along with another letter key (e.g., the E key) to create the keyboard shortcut. You can use this keyboard shortcut to run the macro later.
- On a Mac, the shortcut key combination will end up being ⌥ Option+⌘ Command and your key (e.g., ⌥ Option+⌘ Command+T).
-
6
Click the «Store macro in» drop-down box. It’s in the middle of the window. Doing so prompts a drop-down menu.
-
7
Click This Workbook. This option is in the drop-down menu. Your macro will be stored inside your spreadsheet, making it possible for anyone who has the spreadsheet to access the macro.
-
8
Click OK. It’s at the bottom of the window. Doing this saves your macro settings and begins recording.
-
9
Perform the macro’s steps. Any step you perform between clicking OK and clicking Stop Recording while be added to the macro. For example, if you wanted to create a macro which turns two columns’ worth of data into a chart, you would do the following:
- Click and drag your mouse across the data to select it.
- Click Insert
- Select a chart shape.
- Click the chart that you want to use.
-
10
Click Stop Recording. It’s in the Developer toolbar. This will save your macro.


Advertisement
-
1
Understand why you have to save the spreadsheet with macros enabled. If you don’t save your spreadsheet as a macro-enabled spreadsheet (XLSM format), the macro won’t be saved as part of the spreadsheet, meaning that other people on different computers won’t be able to use your macro if you send the workbook to them.
-
2
Click File. It’s in the upper-left corner of the Excel window (Windows) or the screen (Mac). Doing so will prompt a drop-down menu.
-
3
Click Save As. This option is on the left side of the window (Windows) or in the drop-down menu (Mac).
-
4
Double-click This PC. It’s in the column of save locations near the left side of the window. A «Save As» window will open.
- Skip this step on a Mac.
-
5
Enter a name for your Excel file. In the «Name» text box, type in the name for your Excel spreadsheet.
-
6
Change the file format to XLSM. Click the «Save as type» drop-down box, then click Excel Macro-Enabled Workbook in the resulting drop-down menu.[2]
- On a Mac, you’ll replace the «xlsx» at the end of the file’s name with xlsm.
-
7
Select a save location. Click a folder in which you want to save the Excel file (e.g., Desktop).
- On a Mac, you must first click the «Where» drop-down box.
-
8
Click Save. It’s at the bottom of the window. Doing so will save your Excel spreadsheet to your selected location, and your macro will be saved along with it.


Advertisement
-
1
Open the macro-enabled spreadsheet. Double-click the spreadsheet that has the macro in it to open the spreadsheet in Excel.
-
2
Click Enable Content. It’s in a yellow bar at the top of the Excel window. This will unlock the spreadsheet and allow you to use the macro.
- If you don’t see this option, skip this step.
-
3
Click the Developer tab. This option is at the top of the Excel window.
- You can also just press the key combination you set for the macro. If you do so, the macro will run, and you can skip the rest of this method.
-
4
Click Macros. You’ll find it in the Developer tab’s toolbar. A pop-up window will open.
-
5
Select your macro. Click the name of the macro which you want to run.
-
6
Click Run. It’s on the right side of the window. Your macro will begin running.
-
7
Wait for the macro to finish running. Depending on how large your macro is, this can take several seconds.


Advertisement
Add New Question
-
Question
Can I use a macro that I create in other spreadsheets and future spreadsheets on the same pc?

Yes, you can use a macro that you crate in other spreadsheets and future spreadsheets on the same pc.
-
Question
How can I write macros that will change a spreadsheet as soon as I create it?
You will first need a basic understanding of VBA. There are many tutorials on this.
Ask a Question
200 characters left
Include your email address to get a message when this question is answered.
Submit
Advertisement
Video
-
Macros are generally useful for automating tasks which you must perform often, such as calculating payroll at the end of the week.
Thanks for submitting a tip for review!
Advertisement
-
Although most macros are benign, some macros can maliciously change or delete information on your computer. Never open a macro from a source which you don’t trust.
Advertisement
About This Article
Article SummaryX
1. Enable Developer options in Excel.
2. Click the Developer tab.
3. Click Record Macro.
4. Enter the macro name and details.
5. Click OK.
6. Perform the macro’s steps.
7. Click Stop Recording.
Did this summary help you?
Thanks to all authors for creating a page that has been read 710,423 times.