
MS Word allows you to assign styles to each type of text in your document. Using font styles makes it easy to change all instances of one style at the same time without affecting text that uses any other style.
Furthermore, What is the default font for Windows 10?
Windows 10’s default system font, Segoe UI, looks pretty nice. However, if you have something better to replace it with, you can change the default system font on your Windows 10 PC.
Simply so What are 3 common font styles?
They appear in order of popularity.
- Helvetica. Helvetica remains the world’s most popular font. …
- Calibri. The runner up on our list is also a sans serif font. …
- Futura. Our next example is another classic sans serif font. …
- Garamond. Garamond is the first serif font on our list. …
- Times New Roman. …
- Arial. …
- Cambria. …
- Verdana.
Also, How do I use font styles in Word? How to Change Font Style in MS Word
- Select the text you want to modify.
- Select the Home tab and locate the Font group.
- Click the drop-down arrow next to font style box.
- Font style menu appears.
- With a left click select the desired font style.
What is the standard font style?
This means that when you open a new document, a default font style (Calibri), line spacing (1.15 spaces with an additional 10 points after each line), and font size (11 points) are already in place.
Why has Windows 10 changed my font? The issue might be caused by how you set up the View on your desktop. We suggest that you check what was the view that is set on your desktop icon by right-clicking the desktop click View and select Medium icons. See if it will go back to the default font that you can see before.
What is the best font for Windows 10?
They appear in order of popularity.
- Helvetica. Helvetica remains the world’s most popular font. …
- Calibri. The runner up on our list is also a sans serif font. …
- Futura. Our next example is another classic sans serif font. …
- Garamond. Garamond is the first serif font on our list. …
- Times New Roman. …
- Arial. …
- Cambria. …
- Verdana.
How do I install fonts on Windows 10?
How to Install and Manage Fonts in Windows 10
- Open the Windows Control Panel.
- Select Appearance and Personalization. …
- At the bottom, select Fonts. …
- To add a font, simply drag the font file into the font window.
- To remove fonts, just right click the chosen font and select Delete.
- Click Yes when prompted.
What font is the most attractive?
- 10 of the Most Beautiful Fonts for Web Designers. Design Tips. …
- Playfair. Some looks never go out of fashion. …
- Roboto. Roboto is a sans serif font – it’s geometric with friendly and open curves. …
- Raleway. Raleway is an elegant font with a thin weight – the unique ‘W’ really makes it stand out. …
- Pacifico. …
- Quicksand. …
- Oswald. …
- Lato.
What are the 4 types of font?
What are four main types of fonts?
- Serif fonts.
- Sans serif fonts.
- Script fonts.
- Display fonts.
What are the 5 main types of fonts?
There are five basic classifications of typefaces: serif, sans serif, script, monospaced, and display. As a general rule, serif and sans serif typefaces are used for either body copy or headlines (including titles, logos, etc.), while script and display typefaces are only used for headlines.
How do I change the font style and size?
To change the font size of selected text in desktop Excel, PowerPoint, or Word:
- Select the text or cells with text you want to change. To select all text in a Word document, press Ctrl + A.
- On the Home tab, click the font size in the Font Size box. You can also type in any size you want, within the following limits:
How do I change font size and style in Word?
To use your favorite font in Word all the time, set it as the default.
- Go to Format > Font > Font. You can also press and hold. + D to open the Font dialog box.
- Select the font and size you want to use.
- Select Default, and then select Yes.
- Select OK.
Why does Microsoft Word keep changing my font?
If a document uses a font that is on your system, and then that document is opened on a system that doesn’t have the same font, Word will substitute a different font for the missing one. This can affect the appearance of the document, even when you subsequently open it back on your original system.
What are the two types of font styles?
What are four main types of fonts?
- Serif fonts.
- Sans serif fonts.
- Script fonts.
- Display fonts.
What is the standard font and size?
Font sizes range from 8 point (extremely small) to 72 point (extremely large). The standard font size for most documents is 12 point.
What is the font and size for apa?
APA recommends you use: sans serif fonts such as 11-point Calibri, 11-point Arial, or 10-point Lucida Sans Unicode, or. serif fonts such as 12-point Times New Roman, 11-point Georgia, or normal (10-point) Computer Modern (the default font for LaTeX)
How do I fix Windows 10 font problems?
Isolate a damaged TrueType font using the Fonts folder:
- Choose Start > Settings > Control Panel.
- Double-click the Fonts icon.
- Select all of the fonts in the Fonts folder, except the fonts installed by Windows. …
- Move the selected fonts to a temporary folder on the desktop.
- Restart Windows.
- Try to re-create the problem.
Why did all the font on my computer change?
This Desktop icon and fonts issue, normally occurs when there is any settings gets changed or it may also cause due to the cache file that contains a copy of the icons for desktop objects may be damaged.
How do I fix my Windows font?
Method 3: Manually Rebuild Font Cache in Windows 10
- Press Windows key + R to open up a Run dialog box. …
- Once you’re inside the Services screen, scroll down through the list of services and locate the Windows Font Cache Service. …
- Once you’re inside the Windows Font Cache Service Properties screen, click on the General tab.
What font is most pleasing to the eye?
Designed for Microsoft, Georgia was actually created with low-resolution screens in mind, so it’s ideal for your desktop and mobile site visitors alike.
- Helvetica.
- PT Sans & PT Serif.
- Open Sans.
- Quicksand.
- Verdana.
- Rooney.
- Karla.
- Roboto.
What are the 4 major font types?
What are four main types of fonts?
- Serif fonts.
- Sans serif fonts.
- Script fonts.
- Display fonts.
Why can’t I install fonts on Windows 10?
Some users reported that they fix the installed fonts not showing up in Word windows 10 error simply by moving the file to another location. To do so, you can copy the font file and then paste it into another folder. After that, right-click the font from the new location and select Install for all users.
How do I download fonts to my PC?
Go to search in the start menu. Search for Fonts in settings. Click on the Fonts Folder to open the Font folder. Drag and Drop or Copy and Paste the unzipped fonts files into the Fonts folder to install.
How do I get more fonts on my keyboard?
Failing that, there are a couple of apps that will let you manually change your fonts for Android.
…
GO Launcher
- Copy your TTF or OTF font files to your phone.
- Long press anywhere on the home screen and select “GO Settings.”
- Choose Font > Select Font.
- Pick your font, or tap “Scan” to add files stored on your device.
This is the second in a series on formatting books for print.
Part 1 is First Steps in Formatting for Print.
______________________________
In our first article in this series, we looked at three important topics for the writer who is self-publishing print books—trim, font, and margins. Before you begin formatting the text itself, you’ll want to choose trim size (the book’s dimensions), font and font size, and margin sizes.
Once you’ve made your decisions and set up your Word doc to reflect these choices—your paper size will match the trim size and will no longer be 8 1/2 x 11 or A4, and your margins will no longer be the typical one inch on each side—you can make other changes. (A reminder that the specifics of this series relate to MS Word, although you can use other software to prepare your manuscript for publishing.)
Be sure to save your formatted document with a new name so you can go back to your working manuscript in its original form if you need to.
Justified Text
While you probably worked with text that was aligned left and jagged on the right, you’ll now want to justify the text. Justification gives you straight margins on both sides rather than jagged ones on the right and is the typical setup for print books.
One easy way to justify your text is to highlight all of it (Ctrl+A) and type Ctrl+J.
A second way is to highlight all the text and click the justified text icon in Word’s toolbar.
With both options, all text will be justified. And that means your chapter titles as well as the story text. This isn’t really a problem, however, since chapter titles will require attention for other reasons and you’ll be changing the font for those eventually. (When you set the font style for chapter titles, it’s likely that you’ll center the title, but you don’t have to. You may align the title to the left or indent to allow room for a graphic.)
Beyond highlighting all the text and then justifying it, there are other ways to justify text. You could create a font style to set up your body text to include justified text. The use of font styles makes formatting a great deal easier.
We’re going to look at font styles in some detail in this article before we go into other specifics about formatting.
Font Styles
MS Word allows you to assign styles to each type of text in your document. Using font styles makes it easy to change all instances of one style at the same time without affecting text that uses any other style.
For a novel, you’ll typically have a style for your regular body text (with indented paragraphs), a style for body text that’s not indented (first lines of chapters and/or scenes), a style for chapter numbers and/or chapter titles, styles for author names and book titles in headers (which could be separate styles), a style for page numbers in either header or footer, and styles for the front matter, including copyright, acknowledgement, and title pages.
While novels typically include author name in the left page header and novel title in the right page header, nonfiction headers are often arranged differently. Nonfiction books often include the book title in the left page header and a chapter title in the right. Nonfiction books with multiple parts may include part and chapter titles in headers and the book title in the footer. Most nonfiction doesn’t include the author name in header or footer. And you may find you need a different font style for each element in your headers and footers.
For fiction and nonfiction, you may also need a separate font style or styles for the first line of a chapter—will you use small caps for the first few words or even for the entire first line? Will you use a drop cap for the first word of a chapter? What about the first line after a scene break—indented or not?
This would be a great time to pull out several dozen books and start studying the formatting. Looking at two or three books won’t be enough—expose yourself to twenty or thirty books and layouts. See which elements appeal to you. See if you can determine why choices were made for certain books.
Does a drop cap style better fit a certain genre?
Are page numbers in the header or in the footer? Centered in the middle or flush with the margins?
Are book titles and author names in different fonts in the header? Are the fonts the same but of a different size?
Do chapters begin halfway down the page or only one third of the way? And where do chapter titles fall, halfway between the top of the page and the first line of the chapter or closer to either the top or the center of the page?
______________________________
Once you decide on the options you want to try, it’s time to set up the text.
Make sure that you’ve changed the paper sizes and the margins before you start changing the text itself.
If you’ve used font styles all along, you’ll be ahead of the game. If you haven’t, you’ll need to take time to create styles as you format. Styles make the management of text easy and nearly automatic. Once you decide on a font style for a certain type of text, you simply apply that style each time you need it. And if you need to change one or more features of the style, you change the font style itself and not the text. When you modify the style, all text based on that style is changed as well.
You can also piggyback one style on another. If you have used one style for body text that’s indented but need a style that’s exactly the same—same font, same font size, same line spacing—except you want to eliminate the indent, you can create a new font style based on the original one and simply change the indent. Just save the new font style with a different name.
This may sound confusing, but it’s actually not. This is one instance, however, when trying the steps for yourself, using sample text, will likely be helpful for making sense of the tips.
For our purposes, I’m going to walk through the process of creating a few styles and applying them to the manuscript text only, meaning only body text and chapter titles. Styling for headers and footers and front matter can be achieved the same way.
Some formatters strip all formatting from text when they’re ready to format for print, and you may want to do that as well, especially if you’ve played with a lot of different fonts and spacing. But you don’t have to. If you work with styles all along and rely on those rather than on manual tabs or extra paragraph breaks, your manuscript may only need a little tweaking before it’s ready for formatting.
Did I mention that you can add spacing to your font styles? This means that with your chapter title, you can have it begin at a certain place on a page, no more inserting dozens of paragraph breaks to move the text into place. You can also build in line spacing to be included after a paragraph containing a certain font style. So if you want your chapter’s body text to begin four line spaces after the chapter title, you can include that detail in your font style for the chapter title. You could also include spacing before a particular font style. For a nonfiction book, you may want to increase the space between multiple examples or between the final example and the resumption of the regular body text. This is easy to set up with font styles.
Anything you can apply to text can be achieved through a font style.
______________________________
When you begin a new document in Word, you’re usually using the a font style called normal. Normal may be preset to something such as Times New Roman, 12 pt., aligned left, with no indents, line spacing at 1.15, and spacing of 10 points after each paragraph. This would be common for a letter or something similar.
When you format for a manuscript that you’re submitting to an agent or publisher or are printing for yourself, you probably changed your formatting at least once—to double space the text. You may have also changed the margins to make sure they were one inch on every side.
When you format a book for print, you again need to make changes to the text’s format.
Let’s assume that you’ve got body text (the bulk of the story itself) that’s aligned left (ragged on the right) and not indented, and you’ve got chapter titles (or numbers) that you’ve centered. You now want to set up styles that will format both these types of text (plus a couple of others).
If you have only a couple of different styles of text so far, that’s great. You can format for some additional styles as you go along.
If you didn’t set up styles beforehand, the easiest way to add styles is probably to first create a body text style and change all your text to that style.
There are a couple of ways to add and modify styles, and a couple of ways to move in and out of the styles pane; I suggest that once you’re familiar with the styles pane and style dialogue boxes, you find the best options for your workflow and your experience with Word.
On the home tab, click the arrow under change styles (or type Alt+Ctrl+Shift+S). Both of these open the styles pane (or window).
You can adjust the styles pane to show only the styles you’re using for the current document, but there are other options as well. Once you get used to working with styles, you may want to play around with the options here.
Word comes with some styles already set up (such as headings and subtitles), styles that you can modify, but we’re going to set up our own styles.
To set your first style, click on the new style icon on the bottom of the styles pane. A dialogue box will open, allowing you to create a new style. Note that you can base your new style on an existing style—that’s what we’re going to do.
Give your style a name. You won’t want to use a style name that Word has reserved, so try something that means something to you and to the specific text. Let’s call our first style novel body.
Next we add a few general bits of information.
The style type will be paragraph (more on this option later), style based on normal, and style in the next paragraph will be novel body as well.
After you enter that information, you’re ready to start styling. I’m going to skip some options since we won’t need all of them, at least not to get started.
Enter font and font size. (We talked about choosing fonts for print books in part 1.)
Click on the icon that will justify the text—this is the image whose lines evenly fill out the image from left to right.
Click on the format button on the bottom of the window and go to paragraph. Here you can set up indents on the indents and spacing tab—under special, try a first line indent of .2, .25, or .3 inches. (You can always modify your choices. It’s likely that you’ll try a couple of options and combinations before settling on one that works for your book’s needs.)
Left and right indents should be set at zero. Set spacing before and after the paragraph to zero and line spacing to something like multiple 1.1. (This is a measurement you should have already worked out as you were working through margins and trim size. Yet you can always make changes.)
Save your changes.
You now have a style called novel body.
If the manuscript contains only story text and chapter titles, highlight the entire doc (Ctrl+A) and then click on novel body in the styles window. All the text will change to the format you set up for novel body. To modify the style of your chapter titles—because you won’t use the same font size and maybe not the same font—create a new style, this one for titles.
If the manuscript contains a wide variety of text that will need different styles, and if there will be a lot of text in one or more of those styles, you could still change them all first to your body style, but you don’t have to. Still, this may be the quickest way to start adding styles.
For chapter titles, you may want to center the titles and change the font and font size. You will want to start a new page with every new chapter, place the chapter title partway down the page, and include a few line spaces after the title and before the chapter’s text begins.
You can do all of that with styles.
Create a new style, just as you did the first one. Name it chapter title or something similar. After choosing the font and font size and centering the text, click on format and then paragraph.
On the indents and spacing tab, find the spacing section near the bottom of the dialogue box. This is where you’ll enter the space requirements for spacing before and after the chapter titles.
Try something like 100 points before to get started. The actual amount of space you’ll want before your title will depend on the look you want, the page dimensions, the size of your title font (and the amount of space the chapter titles take up), and the amount of space you want between the chapter title and the header and between the title and the first line of the chapter.
Play around a bit—you can always change this later.
The size of your header may also affect where your title begins, so keep that in mind. (We won’t get into headers in this article, but don’t forget that your print book will likely contain headers and/or footers.)
Next, try something like 24 points after. The is the amount of space between your title and the first line of the chapter. Again you’ll want to play around with the way this looks. Print test pages to get a more accurate sense of what a printed page would look like. Make the space between your title bigger or smaller, depending on the look you want to create. (Keep in mind that chapter titles, especially in nonfiction, may be more than one line long. Longer titles may require a smaller font or may mean you’ll need to start the chapter title higher on the page.)
What this style setting does is locate your chapter title in the same place on every page. You won’t have to adjust the title using paragraph breaks (which you’ll never want to do now that you know how to add space before and after titles).
While you’re in the paragraph dialogue box, click the line and page breaks tab. Under pagination, click page break before. With this option checked, you’ve told Word to begin a new page at every line of text that uses the chapter title style. And that means you don’t have to manually insert page breaks. Be sure to save (okay) your changes.
As an alternative to creating your own style from scratch, you can use existing styles or you can rename and/or modify existing styles.
We won’t go into all the options you have for finding the style list and for modifying styles, but one detail that you will need to know about is the style type. You’ll find this in the create new styles dialogue box. Style type is in the properties section. You have options for character, paragraph, table and a few other choices.
When you create a new style, you’ll need to decide whether the style will apply to a character or a paragraph (or one of the other options). (You’re able to modify the style type of a style that you create, but you can’t modify the style type for one of Word’s default styles.)
If the style is set to paragraph and you use the style on even a single word in a paragraph, the entire paragraph is formatted to that style.
If the style is set to character, only the highlighted characters or words will be formatted to the style. So if you want to use small caps for the first three or four words of a chapter (or maybe the first line), you wouldn’t want the entire paragraph to be formatted with small caps. In this case you’d set up the style type for character, not paragraph.
You can modify font styles by right-clicking the style name in the styles list and choosing modify and then changing font or paragraph details, or you can change text in the document first. If you change a section of text first, highlight the newly formatted text and then right click on the font style you want to change in the style list. (Once you highlight text, the font style in the styles pane should also be highlighted.) Click update [style name] to match selection. This will update all sections of text using that style.
This gives you a couple ways of modifying styles—through changing the text first and then updating the style or changing the style through a dialogue box and then applying that style to a section of text.
Keep in mind that when you modify a style, all instances of that style in the text will also change. If you need to modify a style for only some sections of text but need to keep the first font style as well, add a new style based on the other style and then apply that new style only to the text that requires that style.
Say that most of your body text will be the same but you’ve got it set to indent at the beginning of every paragraph. What do you do for paragraphs that aren’t indented, such as those at the beginning of a chapter and after a scene break? Create a new style for those. Everything will be the same between the styles except for the indent. You might call this new style no-indent first line. (The more styles you have, the more you’ll appreciate how specific you should be when you name them.)
For nonfiction, you may have dozens of styles—example text, table headings, bulleted text, image descriptions, indexes, text with extra spacing, and much more.
______________________________
You can use font styles with any kind of document, but you definitely want styles in place when you format for print. (Formatting for e-books may require a different setup.) Set your styles up when you’re writing or wait until the manuscript is finished, but be prepared to work with styles. They give consistency to the text and will make formatting for print—whether done by you or a formatter—easier and faster. Font styles also allow you to do away with extra formatting that you’ve added willy-nilly throughout a document. Use styles so that every instance of one particular type of text is formatted the same as all others.
You can even save your font styles and manuscript setup as a template that you can use for other book projects.
***
Extra tip: You know how you get all kinds of wacky formatting when you copy and paste from the Internet? Use styles to clear that odd formatting. Highlight the text and click clear all on the styles list. The apply the style(s) you want for the text.
![]()
Tags: formatting Posted in: Self-Publishing
In this chapter, we’ll talk about how to change font style and size in Microsoft Word. Besides, you can use different fonts with different sizes in Microsoft Word. Also, change the fonts and their sizes to change the look of your document.
Most of the time, you use different fonts for headings and paragraphs. Learning how to use different fonts is important. This chapter will show you how to easily change a font and its size.
Meanwhile, this is the continuation of the previous tutorial on how to use spelling and grammar checker in MS Word and How to Undo and Redo In MS Word which are part in editing documents.
Table of contents
- Font Style in Microsoft Word
- What is font style in MS Word?
- What is font size in MS Word?
- What is font in MS Word?
- What is the purpose of font in a document?
- How to Change Font Style in Microsoft Word
- How Many Font Styles are there in MS Word
- How to Change Font Style to Bold:
- How to Change the Font Style to Italics:
- How to Use the Underline Font Style:
- List of Fonts in MS Word
- Summary
What is font style in MS Word?
A font style is a group of formatting rules that you can use to quickly change the look of text, tables, and lists in your document. When you apply a style, you do a bunch of formatting tasks at once.
Moreover, it is usually used to describe a whole group of fonts that are located on the home tab. Also, people like to use font styles. So, in MS Word, the word “font” often refers to a whole group of display options, like the typeface, color, weight, and size.
Most people use regular, italic, bold, and bold-italic font styles. This is not the end, though, and not all fonts have these four. In fact, the font designer is the only one who can decide what styles a font can have.
If you understand the difference, let’s look at how to look at MS Word’s list of font styles and how to add new font types or typefaces.
What is font size in MS Word?
The font size or text size refers to the size of the characters displayed on a computer screen or printed on a page. In addition, it is a number that represents the number of points in the text’s height, or how tall the text is in points.
A font is usually measured in points. Points determine the lettering’s height. There are approximately 72 points per inch or 2.54 centimeter. For instance, font size 72 would be approximately one inch tall, whereas font size 36 would be approximately half an inch.
What is font in MS Word?
Fonts are used to change how text or a Word document looks and make it look better or fit the needs of the situation. MS Word has a lot of different fonts, such as Calibri, Times New Roman, Algerian, Arial, Century, etc.
What is the purpose of font in a document?
The purpose of fonts is that they can set the mood and feel of a place. In addition, they can show how a document should be read and which parts are more important than others just by looking at them. Fonts can even be used to speed up or slow down how long it takes to read a document. The business of professional printing has known this for a long time.
How to Change Font Style in Microsoft Word
Here are the basic steps for changing the font style in Microsoft Word.
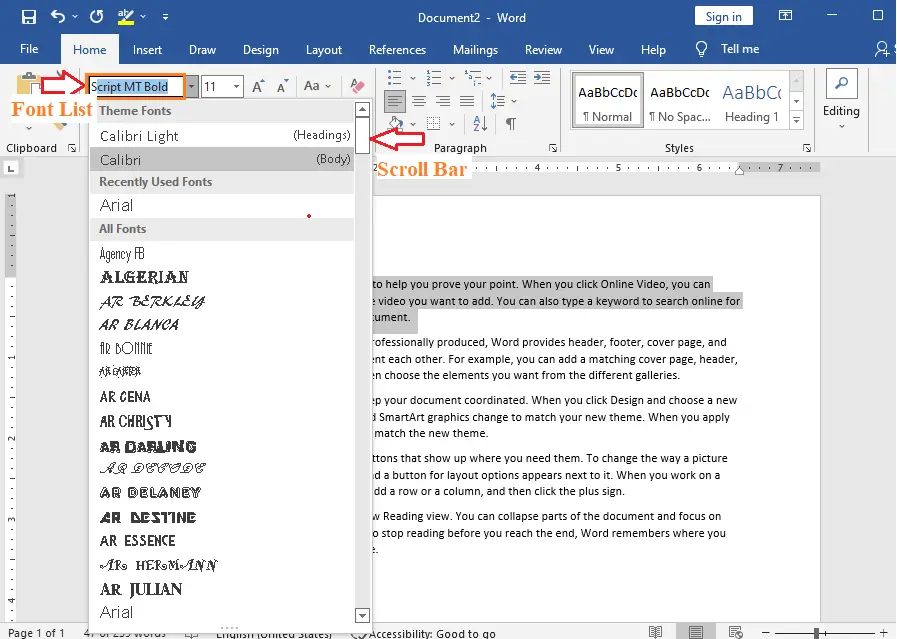
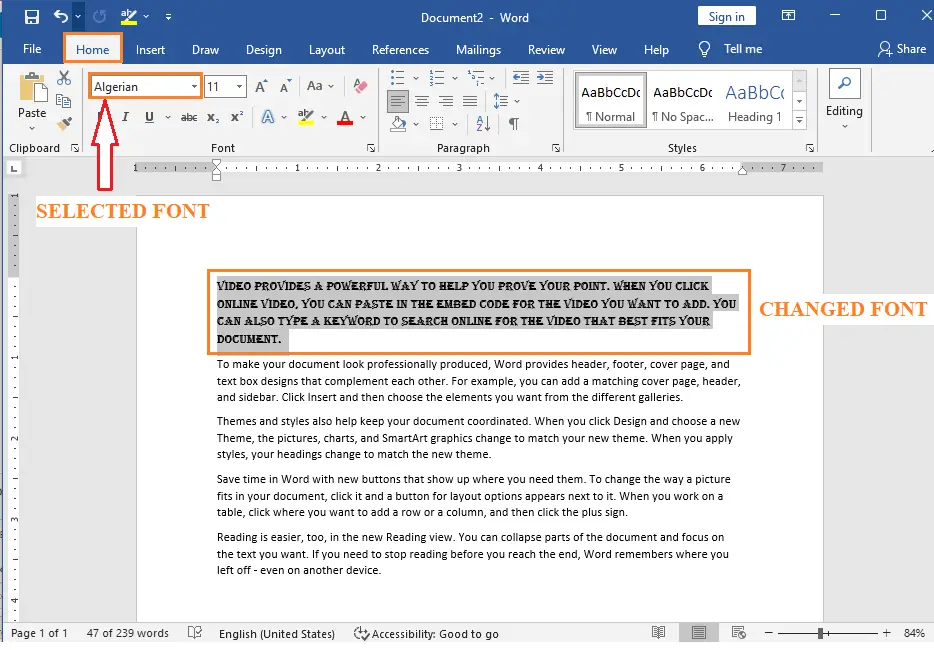
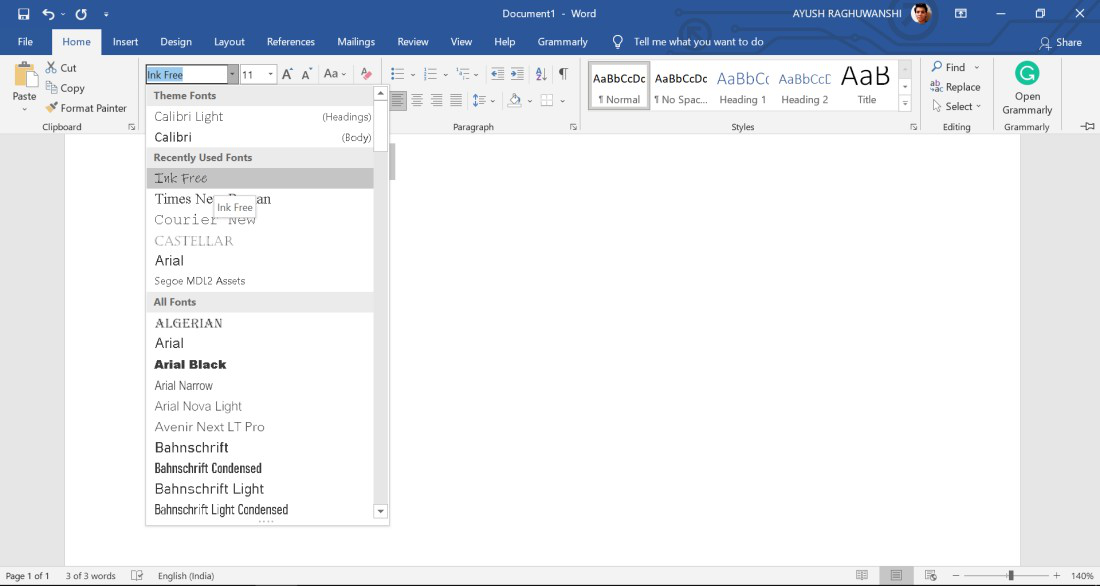
- Step 1 − Select the portion of text the font of which needs to be changed and click the Home tab. Now click the Font Type button to list down all the fonts available as shown below

- Step 2 − Try to move the mouse pointer over the listed fonts.
You will see that the text font changes when you move the mouse pointer over different fonts. You can use the Font Scroll Bar to display more fonts available.

Finally select a desired font by clicking over the font name in the list. We have selected Algerian as the font for our sample text.

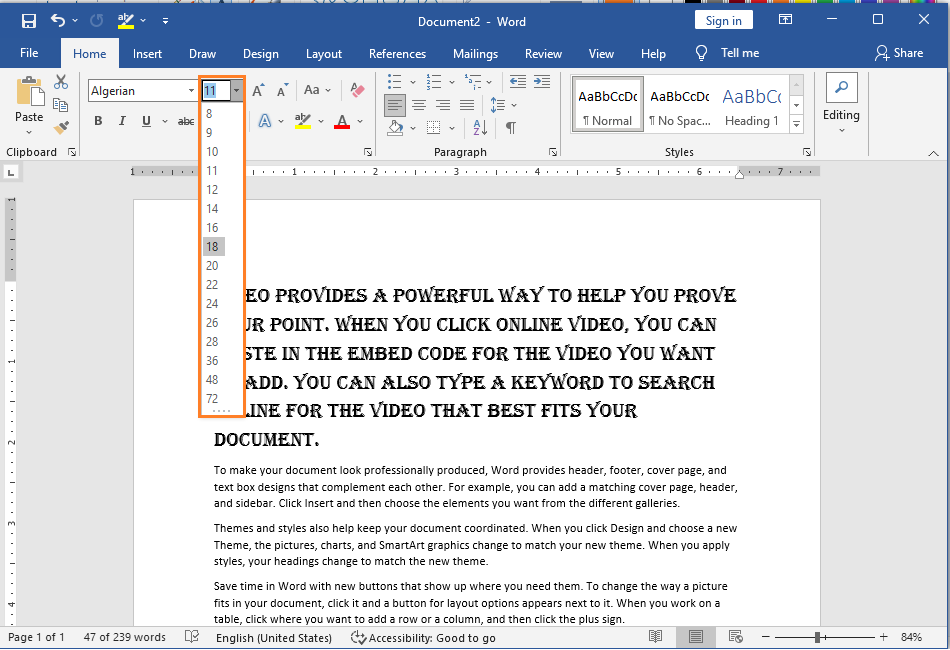
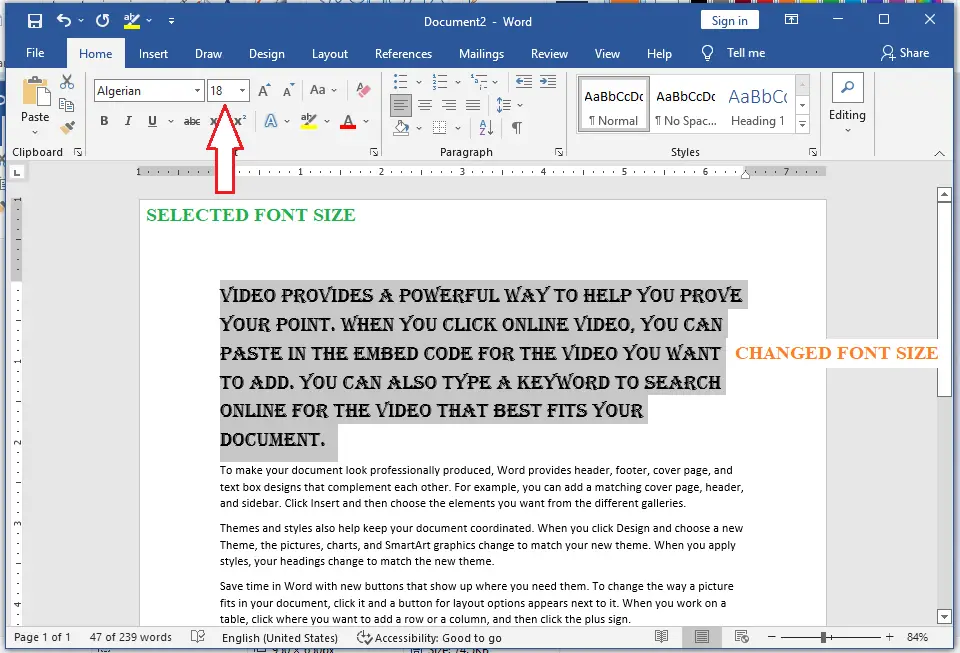
- Step 3 − Similar way, to change the font size, click over the Font Size button which will display a font size list.

You will use the same procedure to select a desired font size that you have used while selecting a font type.


How Many Font Styles are there in MS Word
MS Word has three different font styles: Bold, Italic, and Underline.
How to Change Font Style to Bold:
Step 1: Select the text you want to change the Font Style.
Step 2: Now, select the Font Style Bold from the Font Style bar under the Home menu bar.
How to Change the Font Style to Italics:
- Now, Select the text you want to change the Font Style. Then select the Italic Font Style of your choice from the Font Style bar under the Home menu bar.
How to Use the Underline Font Style:
- Now, select the Underline Font Style of your choice from the Font Style bar under the Home menu bar.
You could also use the shortcuts like:
- CTRL+B for Bold
- CTRL+I for Italics
- CRTL+U for Underline
List of Fonts in MS Word
The table below shows the list of All fonts in MS Word.
| Abadi MT Condensed Light | Impact |
| Albertus Extra Bold | Incised901 Bd BT |
| Albertus Medium | Incised901 BT |
| Allegro | Incised901 Lt BT |
| Amazone BT | Informal011 BT |
| AmerType Md BT | Jester |
| Antique Olive | Kabel Bk BT |
| Arial | Kabel Ult BT |
| Arial Black | Kaufmann Bd BT |
| Arial MT | Kaufmann BT |
| Arial Narrow | Korinna BT |
| Arrus BT | Letter Gothic |
| Aurora Cn BT | Lithograph |
| AvantGarde Bk BT | Lithograph Light |
| AvantGarde Md BT | Long Island |
| BankGothic Md BT | Lucida Console |
| Bazooka | Lucida Handwriting |
| Benguiat Bk BT | Lucida Sans |
| BernhardFashion BT | Lucida Sans Unicode |
| BernhardMod BT | Lydian BT |
| BinnerD | Marigold |
| Book Antiqua | Market |
| Bookman Old Style | Matisse ITC |
| Boulder | Monotype Corsiva |
| Bremen Bd BT | MS LineDraw |
| Calisto MT | News GothicMT |
| Calligrapher | NewsGoth BT |
| CaslonOpnface BT | OCR A Extended |
| Century Gothic | Old Century |
| Century Schoolbook | Onyx BT |
| Cezanne | OzHandicraft BT |
| CG Omega | Pegasus |
| CG Times | Pickwick |
| Charlesworth | Poster |
| Charter Bd BT | PosterBodoni BT |
| Charter BT | PTBarnum BT |
| Chaucer | Pythagoras |
| ChelthmITC Bk BT | Ribbon131 Bd BT |
| Clarendon Condensed | Sceptre |
| CloisterBlack BT | Serifa BT |
| Comic Sans MS | Serifa Th BT |
| Copperplate Gothic Bold | ShelleyVolante BT |
| Copperplate Gothic Light | Sherwood |
| CopperplGoth Bd BT | Signboard |
| Cornerstone | Socket |
| Coronet | Souvenir Lt BT |
| Courier | Staccato222 BT |
| Courier New | Steamer |
| Cuckoo | Storybook |
| Dauphin | Subway |
| Denmark | Swis721 BlkEx BT |
| English 111 Vivace BT | Swiss911 XCm BT |
| EngraversGothic BT | Tahoma |
| Exotc350 Bd BT | Technical |
| Fransiscan | Teletype |
| Freefrm721 Blk BT | Tempus Sans ITC |
| FrnkGothITC Bk BT | Times |
| Futura Bk BT | Times New Roman |
| Futura Lt BT | Times New Roman PS |
| Futura Md BT | Trebuchet MS |
| Futura ZBlk BT | Tristan |
| FuturaBlack BT | Tubular |
| Galliard BT | TypoUpright BT |
| Garamond | Unicorn |
| Geneva | Univers |
| Geometr231 BT | Univers Condensed |
| Geometr231 Hv BT | Vagabond |
| Geometr231 Lt BT | Verdana |
| GeoSlab 703 Lt BT | Westminster |
| GeoSlab 703 XBd BT | ZapfEllipt BT |
| GoudyHandtooled BT | ZapfHumnst BT |
| GoudyOLSt BT | ZapfHumnst Dm BT |
| Haettenschweiler | Zurich BlkEx BT |
| Heather | Zurich Ex BT |
| Helvetica | |
| Herald | |
| Humanst 521 Cn BT | |
| Humanst521 BT | |
| Humanst521 Lt BT |
Summary
In summary, we’ve talked about how to change font style in Microsoft Word as well as what those terms mean. In addition, we know the different fonts of Word and the font sizes available in words. We also gain insight into changing font styles step by step.
We hope this tutorial helps you as you plan to create a document in MS Word.
PREVIOUS

NEXT

 Please Note:
This article is written for users of the following Microsoft Word versions: 2007, 2010, 2013, 2016, 2019, and Word in Microsoft 365. If you are using an earlier version (Word 2003 or earlier), this tip may not work for you. For a version of this tip written specifically for earlier versions of Word, click here: Understanding Font Styles.
![]()
Written by Allen Wyatt (last updated October 9, 2021)
This tip applies to Word 2007, 2010, 2013, 2016, 2019, and Word in Microsoft 365
Word allows you to format your documents in many different ways. One of the ways you can format the characters within your document is through the use of font styles. The phrase «font styles» is easy to confuse with «character styles» and «paragraph styles.» In Word, these latter two phrases refer to styles you can define to indicate how characters and paragraphs should look. Font styles, on the other hand, are not style definitions at all; they are variations of a font that indicate different ways that font can appear. While you can define a character or paragraph style, you cannot define a font style at all.
You probably already know that you can use different fonts for displaying characters. Each font typically comes with a number of styles in which it can be displayed. For instance, if you format a character as bold, then you have specified the Bold font style.
If you want to see the available font styles for a particular font, follow these steps:
- Select the text you want to affect.
- Press Ctrl+D to display the Font dialog box. (See Figure 1.)
- From the Font list, select the font you want to use.
- Examine the Font Style list to see which styles are available for the font.
- When you are done, click on OK.
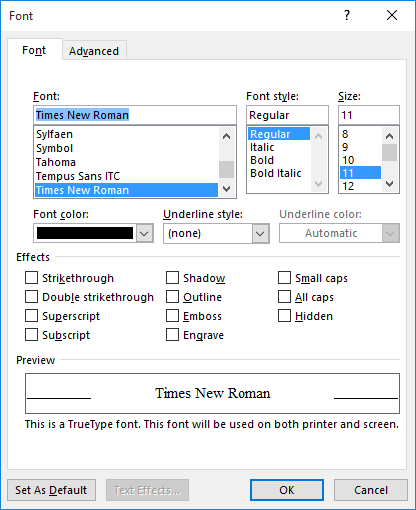
Figure 1. The Font dialog box.
You should note that different fonts have different font styles available. The most common font styles are Regular, Italic, Bold, and BoldItalic. This is not the limit, however, and not every font will include these four. Indeed, the styles available for a particular font are entirely up to the font designer.
WordTips is your source for cost-effective Microsoft Word training.
(Microsoft Word is the most popular word processing software in the world.)
This tip (13325) applies to Microsoft Word 2007, 2010, 2013, 2016, 2019, and Word in Microsoft 365. You can find a version of this tip for the older menu interface of Word here: Understanding Font Styles.
Author Bio
With more than 50 non-fiction books and numerous magazine articles to his credit, Allen Wyatt is an internationally recognized author. He is president of Sharon Parq Associates, a computer and publishing services company. Learn more about Allen…
MORE FROM ALLEN
Viewing More of the Left Margin Area
When working in Draft or Normal view, you may want to view the area just to the left of the document’s left margin. …
Discover More
Wildcards in ‘Replace With’ Text
When doing searches in Excel, you can use wildcard characters in the specification of what you are searching. However, …
Discover More
Hanging Indent Shortcut
You can use the tools on the ribbon to adjust the indent applied to a paragraph. If you want to format a hanging indent, …
Discover More
More WordTips (ribbon)
Changing All Text of a Particular Color
Need to change the color of some text in your document? This tip discusses three different ways you can approach the task …
Discover More
Double-Spacing Your Document
Need to produce a quick double-spaced printout of your document? You can do it by using the simple steps in this tip.
Discover More
Fixing Mismatched Bullets and Numbers
When you format bulleted lists or numbered lists, you may be surprised if some of the bullets or numbers don’t match the …
Discover More
In MS Word there are multiple types of formatting we can apply to a given text such as Fonts, Font Styles, Font Colors, Font Sizes, Text Highlight Colors, Clearing Formats, Change Cases, etc. Let us apply these techniques to some texts in the Word Processor and see what result it produces.
Font
Fonts are used to change the display of the text or Word Document, look more appealing, and as per the requirement of the situation. There are multiple types of fonts available in MS Word-like: Calibri, Times New Roman, Algerian, Arial, Century, etc.
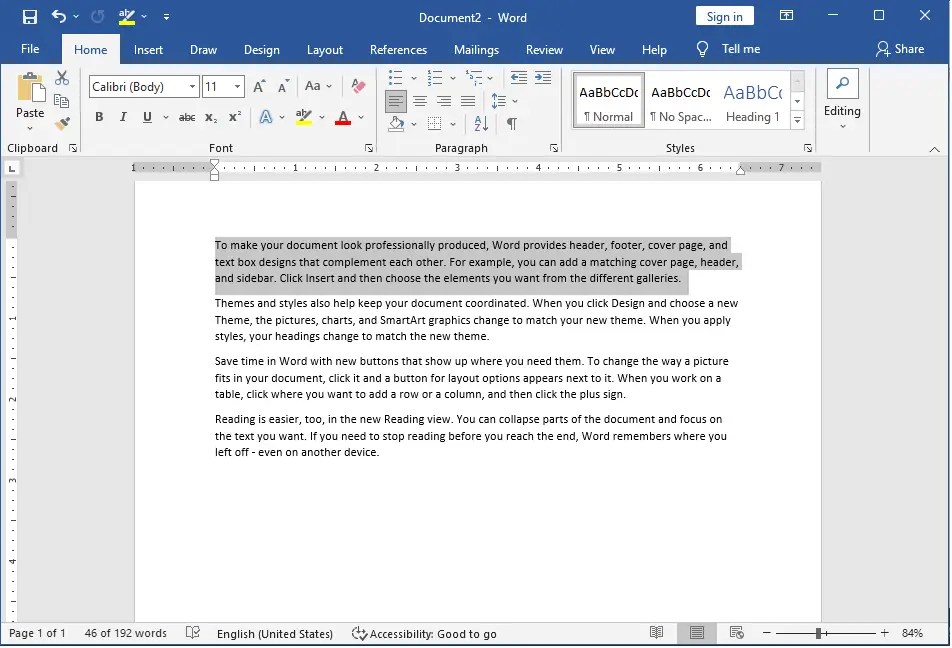
Steps to Apply:
Step 1: Select the text you want to change the font of.

Step 2: Now, select the font of your choice from the Home menu bar in MS Word.
Result:

Font Style
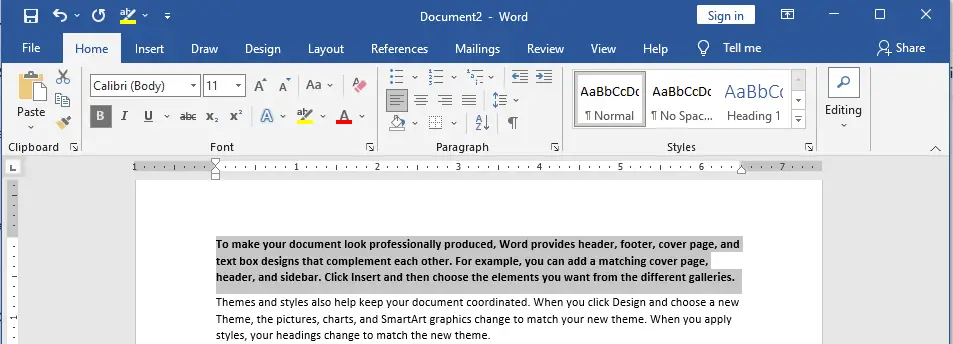
Font Styles are used to change the Look ability of the text or give more emphasis on some texts in the Word Document. There are three types of font styles in MS Word: Bold, Italics, and Underline.
Steps to Apply Bold Font Style:
Step 1: Select the text you want to change the Font Style.

Step 2: Now, select the Font Style of your choice from the Font Style bar under the Home menu bar.

Result:

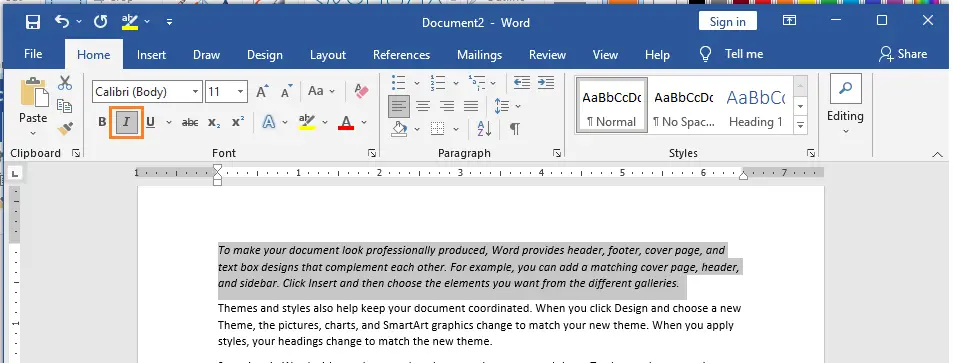
Steps to Apply Italics Font Style:
Step 1: Now, select the Font Style of your choice from the Font Style bar under the Home menu bar.

Result:

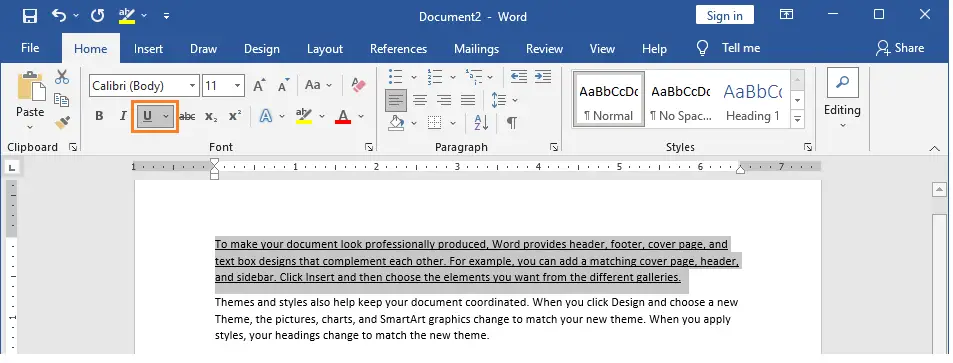
Steps to Apply Underline Font Style:
Step 1: Now, select the Font Style of your choice from the Font Style bar under the Home menu bar.

Result:

You could also use the shortcuts like:
- CTRL+B for Bold
- CTRL+I for Italics
- CTRL+U for Underline
Font Color
Font Colors have wide use in real life when using the Word Document. Be it highlighting the main points of the document or want to convey some important information. There are multiple types of Font Colors available in MS Word-like: Red, Blue, Yellow, Orange, Light blue, etc.
Steps to Apply:
Step 1: Select the text you want to change the Font Color.

Step 2: Now, select the Font Color of your choice from the Font Color bar under the Home menu bar.

Result:

Font Size
Font Sizes are used to display the text in the Word Document larger or smaller according to our needs. We generally display a heading with a Font Size of 15, Subheadings with a Font Size of 14 or 13, and paragraphs with a Font Size of 12. Many Font Sizes are available in MS Word-like: 8, 9, 10, 11, 12, 14, 16, etc.
Steps to Apply:
Step 1: Select the text you want to change the Font Size.

Step 2: Now, select the Font Size of your choice from the Font Size bar under the Home menu bar.

Result:

Text Highlight Color
As the name itself suggests, the Text Highlight Color is used to highlight text in the Word Document. There are many Text Highlight Colors available in MS Word-like: Yellow, Bright Green, Turquoise, Pink, Red, etc.
Steps to Apply:
Step 1: Select the text you want to change the Highlight Colors.

Step 2: Now, select the Color of your choice from the Text Highlight Color bar under the Home menu bar.

Result:

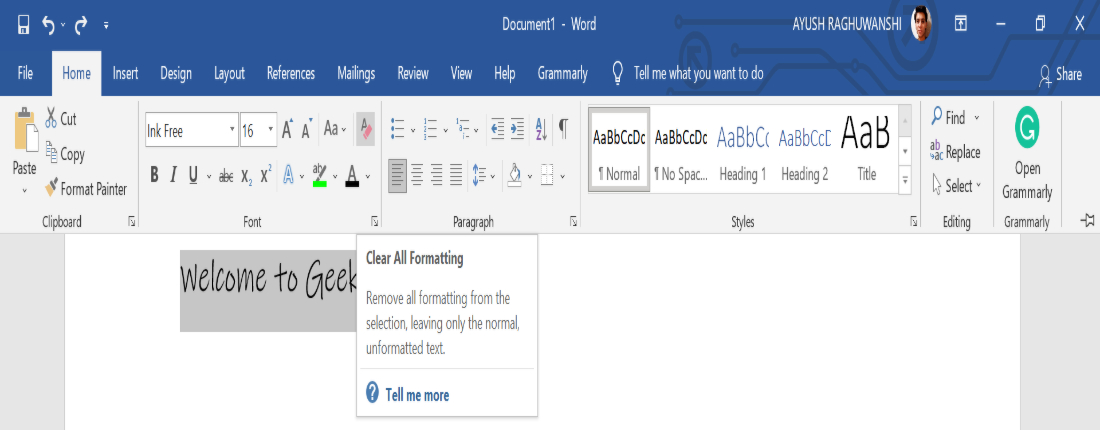
Clear Formats
MS Word provides a feature to clear the pre-formatted text. When we copy some text or information from somewhere it has some formatting applied already, so to remove it and use it according to our need in our Word Document we have to clear the Formatting.
Steps to Apply:
Step 1: Select the text you want to clear the formatting.

Step 2: Now, select the Clear All Formatting bar under the Home menu bar.
Result:

Change Case
Change Case is used to display the text in the way we want in our Word Document. There are five types of Change Cases available in MS Word-like: Sentence case, Lowercase, Uppercase, Capitalize each word, and toggle case.
Steps to Apply:
Step 1: Select the text you want to change the Case.

Step 2: Now, select the case of your choice from the Change Case bar under the Home menu bar.

Result:
