
Word for Microsoft 365 Word 2021 Word 2019 Word 2016 Word 2013 Word 2010 More…Less
If you format a document with columns (as in some newsletter layouts), the text will automatically flow from one column to the other. You can insert your own column breaks for more control over the document format.
-
Place your cursor where you want the column to break.
-
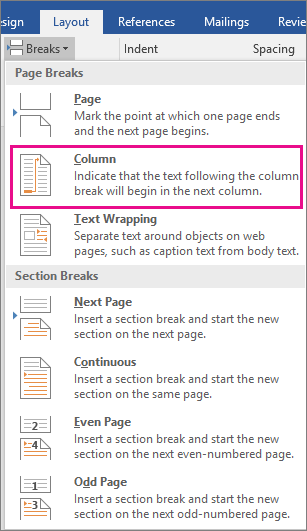
Click Layout > Breaks.

In Word 2013 or Word 2010, click Page Layout > Breaks.
-
A menu with options will appear. Click Column.
-
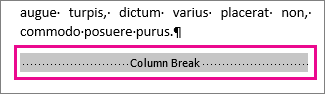
A column break is inserted. Click Home > Show/Hide
to see it.
 to see it.
Tip: The keyboard shortcut Ctrl+Shift+Enter also inserts a column break where you’ve placed your cursor.
Need more help?
Want more options?
Explore subscription benefits, browse training courses, learn how to secure your device, and more.
Communities help you ask and answer questions, give feedback, and hear from experts with rich knowledge.
Yes, it’s possible to get column text to line up the way you want
Updated on October 31, 2019
What to Know
- A column break is a hard break. Place the cursor where you want the column to break, then go to Layout > Breaks > Column.
- For columns with an even amount of text, use a continuous break: Go to Layout > Breaks > Continuous.
- Delete a break: Go to Home > Show Formatting Symbols. Place the cursor at the break you want to remove and press Delete.
This article explains how to use column breaks in Microsoft Word so you can line up text in a certain way, place something specific in a column, or evenly distribute columns. Instructions cover Word for Microsoft 365, Word 2019, Word 2016, and Word 2013.
How to Insert a Column Break
A column break places a hard break, much like a page break or section break, in the inserted location and forces the rest of the text to appear in the next column.
-
In a document that includes columns, place the cursor where you want the column to break.
The best place for a column break is typically between paragraphs or other major sections of text.
-
On the ribbon, go to the Layout tab and, in the Page Setup group, select Breaks > Column.
-
The selected location now appears at the top of the next column.
Insert a Continuous Break
If you want columns to contain an even amount of text, use a continuous break, which evenly balances the text in the columns.
-
Place the cursor at the end of the column you want balanced.
-
Go to the Layout tab and, in the Page Setup group, select Breaks > Continuous.
-
The columns are now even.
With a continuous break inserted, when text is added to a column, Word moves the text between columns to ensure columns are evenly distributed.
Delete a Break
If there’s a break in a column that you no longer need, or if the document has a column break that you can’t find, delete the column break or continuous break.
-
Go to the Home tab and, in the Paragraph group, select Show Formatting Symbols. Formatting marks, including column breaks, appear.
-
Place the cursor in the break you want to remove.
-
Press Delete on the keyboard. The column break or continuous break is removed.
Thanks for letting us know!
Get the Latest Tech News Delivered Every Day
Subscribe
Microsoft Word 2013 Tutorial
Page Numbers | Tutorial Main Menu | Training Homepage | Illustrations/Drawing
This section of the tutorial will cover document breaks, as well as the different kinds of page and section breaks that one may create.
In composing a document with multiple pages, particularly one with many chapter headings, it is sometimes difficult to format the text in such a way that some chapters do not begin at the bottom of a page (such as in the example of Fig. 3-6 below).
It also happens that when writing a paper, report, article, or book with multiple sections, difficulties with headers, footers, footnotes, and page numbers present themselves. As mentioned above in the section on Headers and Footers, Word 2013 does not automatically separate a document into sections. As a consequence, the program will duplicate the same headers and footers on each page, as well as continue page numbering and footnotes throughout the document.
For instance, when writing a paper with several sections, the header of the first section will automatically appear in the second as well (see Fig. 3-1 below).

Figure 3-1
In order to remedy this, it will be necessary to create a document break, which will indicate to Word how the document is to be partitioned. There are two types of document breaks, namely page breaks and section breaks. These two types are further subdivided into several different kinds of page and section breaks. The page breaks partition only the body text of the document, whereas the section breaks partition both the body text of the document, as well as partition page margins, headers and footers, page numbers, and the like.
Among the kinds of page breaks, there are simple page breaks, column breaks, and text wrapping breaks. The different kinds of section breaks include next page, continuous, even page, and odd page breaks. To learn more about the different kinds of page and section breaks, see their separate headings below, where they are covered in greater detail.
[Back to Top]
Inserting a Document Break

Figure 3-2
Step 1. To insert a document break, first select the place where you would like it to begin by clicking on it within the body of the document. If your section begins on the next page, as is the case in the example above (Fig. 3-2), it is best to point your cursor and click on the very beginning of the next section.

Figure 3-3
Step 2. Then in the drop-down menu, select the type of break that you want. The difference between each of these different kinds of breaks will be discussed below. For now, we will just select Continuous under Section Breaks. Note that you may not be able ordinarily to see the break itself, although its presence will be made evident in the next step.

Figure 3-4
Tip. If you want to quickly add a simple page break to your document, click on the INSERT tab above the ribbon menu, and then select the Page Break option.

Fig. 3-5
Step 3. Confirm that your break has in fact been inserted by double-clicking on the header area above the body text. On the left under the header area, you should see a grey box which says Header -Section 2-. If you see this, then the break has successfully been created.
Note. To learn how to insert or format headers now that you have made your document break, see Section 1: Headers and Footers. To learn how to insert or format page numbers, see Section 2: Page Numbers.
[Back to Top]
The Different Kinds of Document Breaks
Having covered the basics of how to create a document break, we will now turn our attention to the types of document breaks which may be created in Microsoft Word 2013.
The first type of document break is the page break, which partitions only the body text of the document. Of this type there are three kinds: simple page breaks, column page breaks, and text wrapping page breaks.
Simple Page Breaks
A simple page break will force all the text behind the cursor onto the next page. Below (Fig 3-6) is an example of what what two pages of a document might look like before inserting a simple page break.

Figure 3-6
As can be seen in the example above, Chapter One begins at the end of a page, causing the reader to turn the page two lines in. The work would read more easily if the beginning of the chapter began at the top of the next page, so a page break needs to be inserted into the document.
After the page break has been inserted, the pages will look like Fig. 3-7 below.

Figure 3-7
Column Breaks
If your document utilizes columns, when inserting a column break, any text to the right of the cursor where the break is inserted is forced into the next column. In the two examples below, Fig 3-8 shows the text before the column break, while Fig 3-9 is what the page looks like after the break has been created.
|
Figure 3-8 |
Figure 3-9 |


Text Wrapping Breaks
A text wrapping break moves any text to the right of the cursor to the next line. This kind of break may be particularly useful when your document contains images. Below are examples of a page before and after a text-wrapping break is created (Fig. 3-10 and 3-11, respectively).
|
Figure 3-10 |
Figure 3-11 |


[Back to Top]
The Different Kinds of Section Breaks
The second type of document break is the section break, which partitions both the body text of the document and its associated formatting, such as headers and footers, page numbers, footnotes, margins, etc. Of this type there are four kinds: next page section breaks, continuous section breaks, even page section breaks, and odd page section breaks.
Next Page Breaks
A next page break forces the text to the right of the cursor to the following page, as well as partitions the document into sections, allowing for a change in margins, headers and footers, as well as differently numbered pages and footnotes. This is most useful when your document must be divided into chapters or sections. Below is an example of a paper with two sections, before (Fig. 3-12) and after (Fig. 3-13) a next page break.

Figure 3-12
After the next page break is created, the new section may be formatted separately from the first, and vice versa, while still remaining part of the same document.

Figure 3-13
Note. When formatting page numbers which will begin anew for each section, it will be necessary to right-click on the page number itself, and select Format Page Numbers, to bring up the formatting window (Fig. 2-4).
[Back to Top]
Continuous Breaks
A continuous break allows for the partition of a document, allowing the user to change headers and footers, page numbers, margins, etc., yet without having to alter or otherwise move the body text of the document. This kind of section break is most useful when a document has already been composed in part or in full, but still requires different formatting such as to footnotes, headings, or pagination in separate sections of the work. This allows for one section of a document to end and another to begin on the same page.
Even Page Breaks
An even page break will shift all the text to the right of the cursor to the top of the next even page.
Odd Page Breaks
An odd page break will move the text to the right of the cursor to the top of the next odd page.
[Back to Top]