
Не секрет, что Excel довольно мощный инструмент для работы с числовыми табличными данными. Однако средства, которые предоставляет Microsoft для интеграции с ним, далеки от идеала. В частности, сложно интегрировать в Excel современные пользовательские интерфейсы. Нам нужно было дать пользователям Excel возможность работать с довольно насыщенным и функциональным интерфейсом. Мы пошли несколько другим путем, который в итоге показал хороший результат. В этой статье я расскажу, как можно организовать интерактивное взаимодействие Excel c веб-приложением на Angular и расшить Excel практически любым функционалом, который реализуем в современном веб-приложении.

Итак, меня зовут Михаил и я CTO в Exerica. Одна из проблем которые мы решаем — облегчение работы финансовых аналитиков с числовыми данными. Обычно они работают как с исходными документами финансовой и статистической отчетности, так и каким-либо инструментом для создания и поддержания аналитических моделей. Так сложилось, что 99% аналитиков работают в Microsoft Excel и делают там довольно сложные вещи. Поэтому перевести их с Excel на другие решения не эффективно и практически невозможно. Объективно, «облачные» сервисы электронных таблиц до функционала Excel пока не дотягивают. Но в современном мире инструменты должны быть удобны и соответствовать ожиданиям пользователей: открываться по клику мышки, иметь удобный поиск. А реализация в виде разных несвязанных приложений будет довольно далека от ожиданий пользователя.
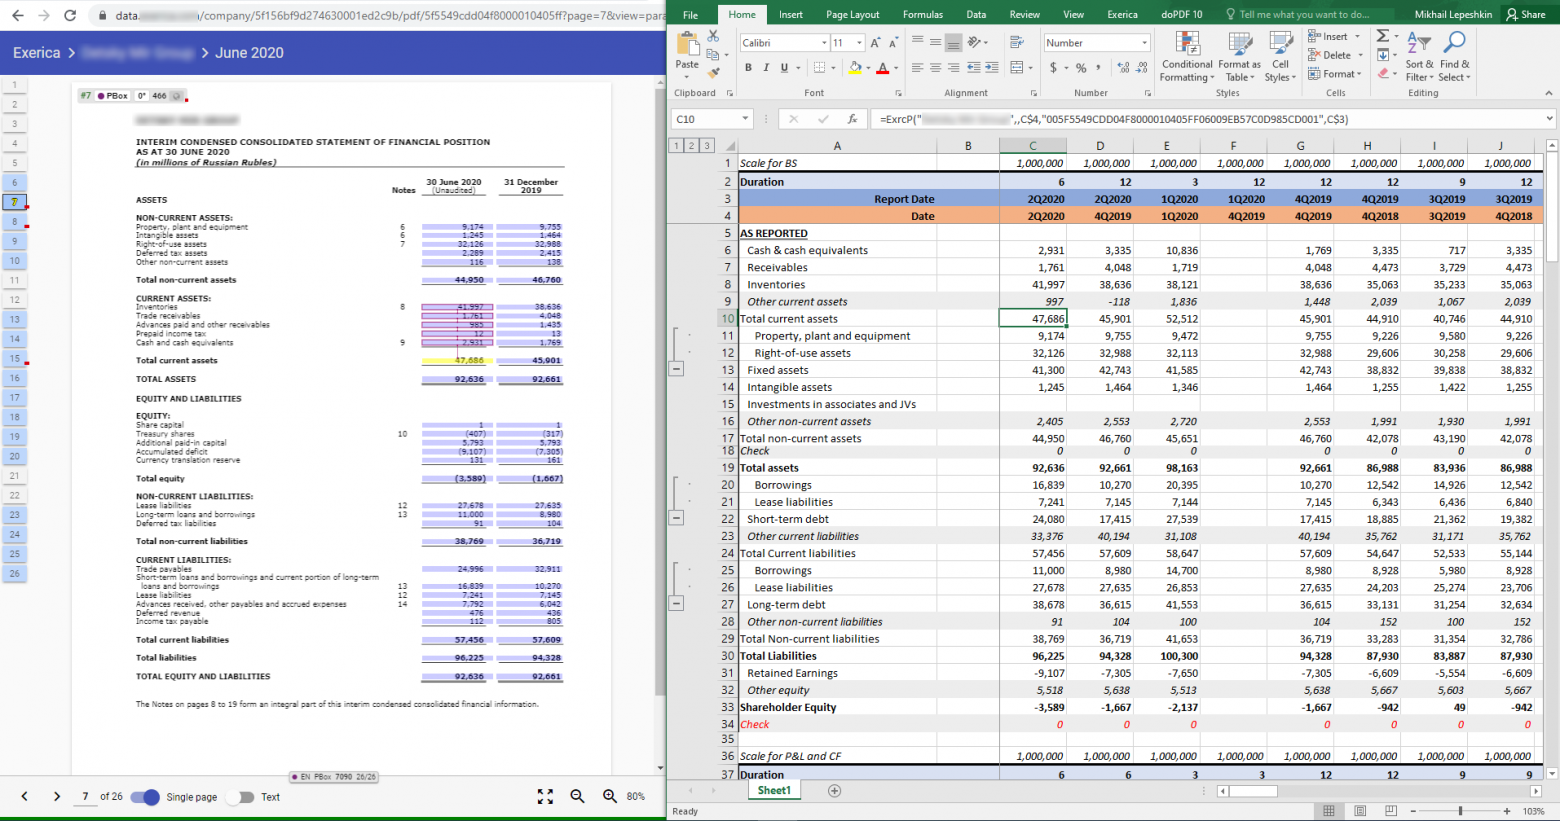
То с чем работает аналитик выглядит примерно так:

Основные данные тут — это числовые «финансовые показатели», например, доход за 1 квартал 2020 года. Для простоты буду называть их дальше просто «числами». Как видно, почти никакой связи между числами в документе и в аналитической модели нет, все только в голове у аналитика. И работа с заполнением и поддержанием модели занимает часы поиска и перебивания чисел из документа в таблицы, а потом поиск ошибок ввода. Вместе этого мы хотели бы предложить пользователю привычные инструменты: «перетаскивание», вставка через клипборд и так далее, а также быстрый просмотр исходных данных.
Что у нас уже было
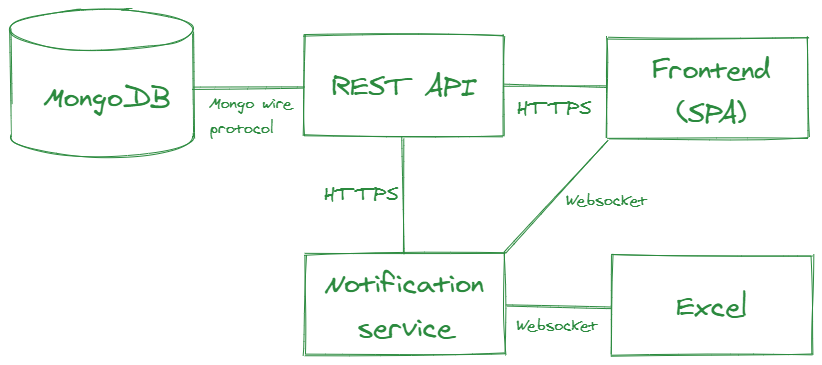
К моменту, когда мы начали реализацию интерактивного взаимодействия с Excel в виде, изложенном в этой статье, у нас уже была база данных на MongoDB, бэкэнд в виде REST API на .NET Core, фронтовое SPA на Angular и некоторые другие сервисы. Мы к этому моменту уже пробовали разные варианты интеграции в приложения электронных таблиц, в том числе и в Excel, и все они не пошли дальше MVP, но это тема отдельной статьи.

Связываем данные
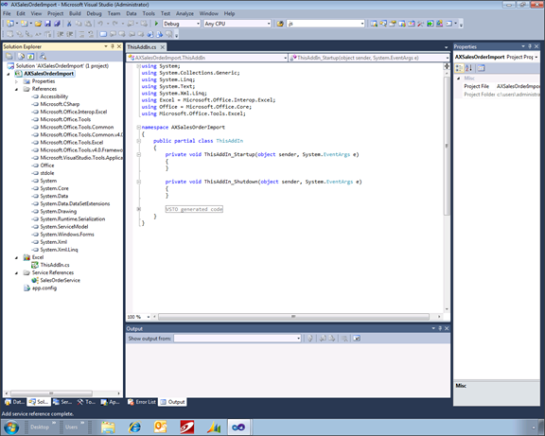
В Excel существует два распространенных инструмента, с помощью которых можно решить задачу связывания данных в таблице с данными в системе: RTD (RealTimeData) и UDF (User-Defined Functions). Чистый RTD менее удобен для пользователя в плане синтаксиса и ограничивает гибкость решения. С помощью UDF можно создать кастомную функцию, которая будет работать привычным для Excel-пользователя образом. Ее можно использовать в других функциях, она понимает ссылки типа A1 или R1C1 и вообще ведет себя как надо. При этом никто не мешает использовать механизм RTD для обновления значения функции (что мы и сделали). UDF мы разрабатывали в виде Excel addin с использованием привычного нам C# и .NET Framework. Для ускорения разработки мы использовали библиотеку Excel DNA.
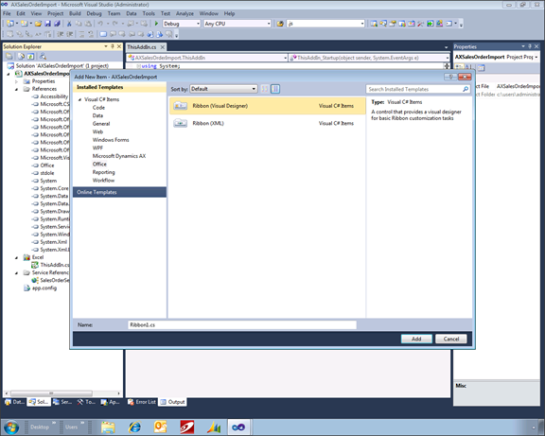
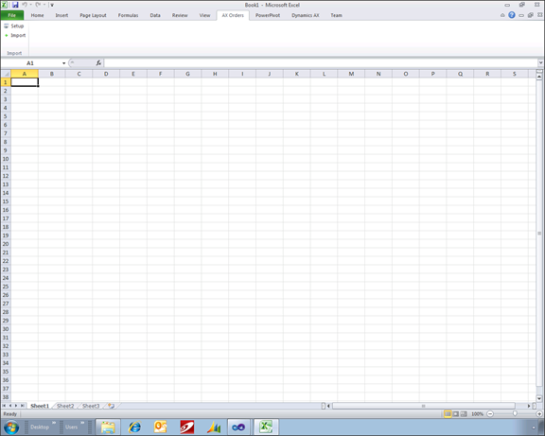
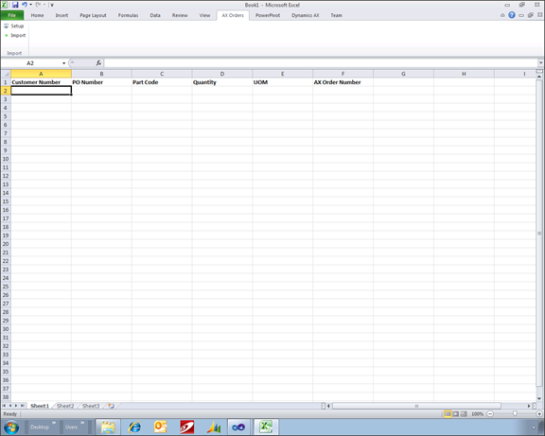
Кроме UDF наш addin реализует ribbon (панель инструментов) с настройками и некоторыми полезными функциями по работе с данными.
Добавляем интерактивность
Для передачи данных в Excel и налаживания интерактива мы разработали отдельный сервис, который предоставляет подключение по Websocket при помощи библиотеки SignalR и фактически является брокером для сообщений о событиях, которыми должны обмениваться «фронтовые» части системы в реальном времени. Он у нас называется Notification Service.
Вставляем данные в Excel
В нашем SPA мы подсвечиваем все числа, которые обнаружила система. Пользователь может выделять их, навигировать по ним и т.п. Для вставки данных мы реализовали 3 механизма, чтобы закрыть различные варианты использования:
- Перетаскивание (drag-and-drop)
- Автоматическая вставка по клику в SPA
- Копирование и вставка через клипборд
Когда пользователь инициирует drag’n’drop некоторого числа из SPA, для перетаскивания формируется ссылка с идентификатором этого числа из нашей системы (.../unifiedId/005F5549CDD04F8000010405FF06009EB57C0D985CD001). При вставке в Excel наш addin перехватывает событие вставки и парсит регэкспом вставляемый текст. При обнаружении валидной ссылки на лету подменяет ее на соответствующую формулу =ExrcP(...).
При клике на числе в SPA через Notification Service отправляется сообщение в addin, содержащее все необходимые данные для вставки формулы. Далее формула просто вставляется в текущую выделенную ячейку.
Эти способы хороши, когда пользователю нужно вставлять в свою модель по одному числу, но если надо перенести целую таблицу или ее часть, необходим другой механизм. Наиболее привычным для пользователей представляется копирование через клипборд. Однако этот способ оказался сложнее первых двух. Дело в том, что для удобства вставляемые данные должны быть представлены в нативном для Excel формате — OpenXML Spreadsheet. Наиболее просто это реализуется используя объектную модель Excel, то есть из addin’а. Поэтому процесс формирования клипборда у нас выглядит так:
- Пользователь выделяет область с числами в SPA
- Массив выделенных чисел передается на Notification Service
- Notification Service передает его в addin
- Addin формирует OpenXML и вставляет его в клипборд
- Пользователь может вставить данные из клипборда в любое место любой Excel-таблицы.
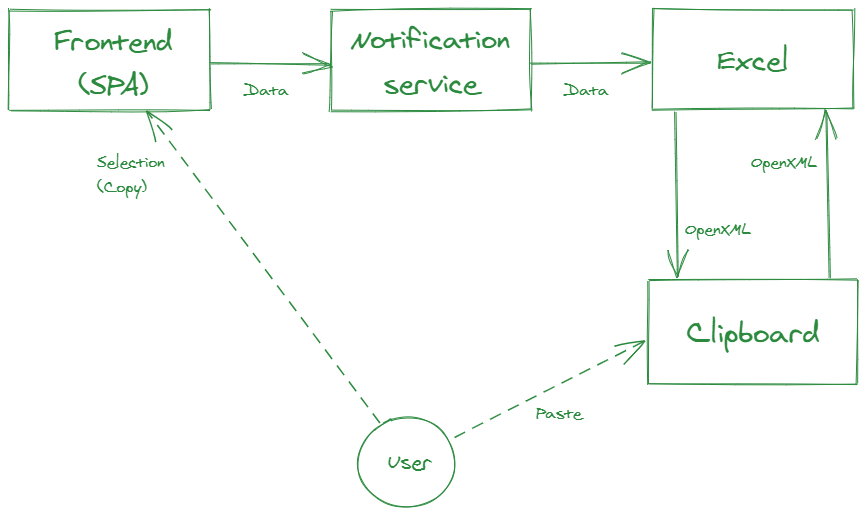
Несмотря на то, что данные проделывают довольно долгий путь, благодаря SignalR и RTD происходит это довольно быстро и абстрагированно от пользователя.
Распространяем данные
После того, как пользователь выбрал начальные данные для своей модели, их надо «распространить» все периоды (года, полугодия и кварталы), которые представляют интерес. Для этих целей одним из параметров нашей UDF является дата (период) данного числа (вспоминаем: «доход за 1 квартал 2020 года»). В Excel существует нативный механизм «распространения» формул, который позволяет заполнить ячейки той же формулой с учетом ссылок, заданных в параметрах. То есть вместо конкретной даты в формулу вставлена ссылка на нее, а далее пользователь «распространяет» ее на другие периоды, при этом в таблицу автоматически загружаются «те же» числа из других периодов.
А что это там за число?
Теперь у пользователя есть модель на несколько сотен строк и несколько десятков столбцов. И у него может возникнуть вопрос, что же там за число в ячейке L123? Чтобы получить ответ, у нас ему достаточно кликнуть на эту ячейку и в нашем SPA откроется тот самый отчет, на той самой странице, где записано кликнутое число, а число в отчете будет выделено. Вот так:
А если это не просто одно число из отчета, а результат некоторых вычислений на числах, взятых из отчета, то мы подсветим все числа, входящие в вычисляемое в Excel выражение. При этом не происходит загрузки всего приложения и подгрузки всех необходимых данных, как в случае перехода по ссылке.
В качестве заключения
Вот такая, на мой взгляд, нестандартная реализация взаимодействия между Excel и веб-приложением получилась довольно удобной для пользователя. Благодаря использованию Excel порог входа для пользователей из целевой аудитории довольно низкий. При этом мы получаем также всю мощь Excel по работе с числовыми данными. Сами данные всегда остаются связанными с источником, а также связанными во времени. Для целевых клиентов нет необходимости встраивать в бизнес-процесс работы с данными абсолютно новые внешние системы. Наше решение встраивается как дополнительный «инструмент» внутри Excel, что является стандартом де-факто для провайдеров финансовых данных.
Подобный архитектурный подход к интеграции веб-приложений с Microsoft Excel может быть применим и для решения других задач, требующих интерактива и сложных пользовательских интерфейсов при работе с числовыми и табличными данными.
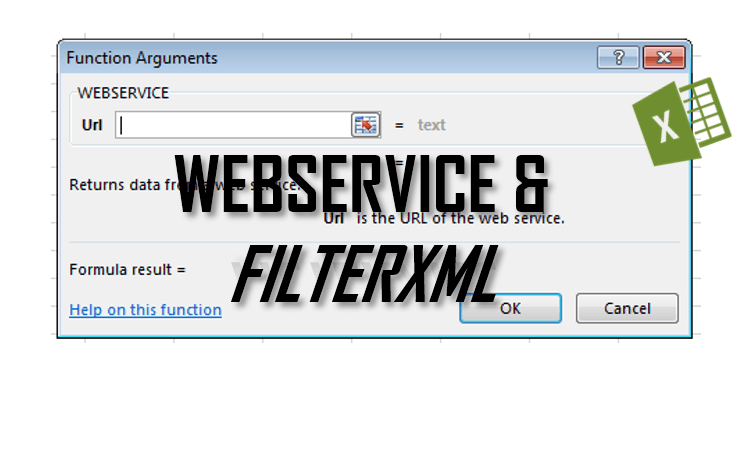
The Excel WEBSERVICE and Excel FILTERXML Worksheet functions can be used to pull Internet data from a URL into a cell in a Excel spreadsheet. While the first pulls raw HTML data the second allows you to filter XML formats.
Excel up till now has been mostly an offline application. Although, you can use VBA, PowerQuery or other similar data tools in Excel to gain access to Internet and Online data sets these could not have been easily used with the help of Third Party AddIns such as my Scrape HTML AddIn. With the introduction of the WEBSERVICE function we gain immediate and easy access to any REST WebAPI.
In today’s post I will show you several examples of how to use these functions in practice. And how to extract data from an XML REST WebApi.
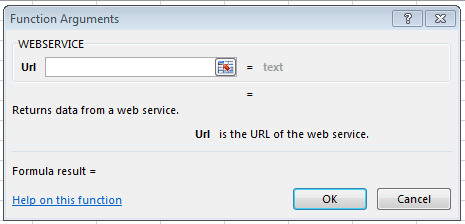
How to use the Excel WEBSERVICE function
The WEBSERVICE function downloads the HTTP response of the provided URL.
Try running the Excel WEBSERVICE function on Google:
=WEBSERVICE("https://www.google.com")
What do you get? If all goes well you should get the HTML response for the Google Web Page.
Now past the above formula to cell A1 and the below to cell A2:
=MID(A1;FIND("<title>";A1)+LEN("<title>");FIND("</title>";A1)-FIND("<title>";A1)-LEN("<title>"))
The result of this Worksheet Excel Formula should be:
Using FILTERXML in tandem with WEBSERVICE
Another function introduced in Excel 2013 is the FILTERXML function. It is designed to work in tandem with the Excel WEBSERVICE function.
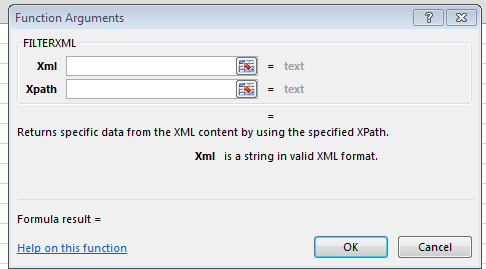
What does the FILTERXML function do?
The Excel FILTERXML Worksheet function parses a XML string (string containing XML document) and returns a single element (node or attribute) provided by a XPath.
Lots of odd words there right? So let us start breaking it down. XML is markup language for encoding documents. As a matter of fact HTML is based on XML and share a lot of similarities. Unfortunately for us HTML does not need often have to be as strictly parsed/validated as an XML does. Although some HTML could pass as XML files – in fact many Websites don’t validate as XML.
Now what is XPath? XPath is a query language for selecting XML elements such as nodes and attributes. XPath works for XML and HTML.
How to use the FILTERXML function
Now that we know what the FILTERXML functions let’s use it on a simple XML file. W3Schools fortunately has a lot of simple XML examples – let us use a simple XML Food Menu:
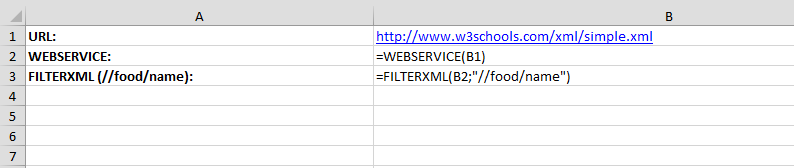
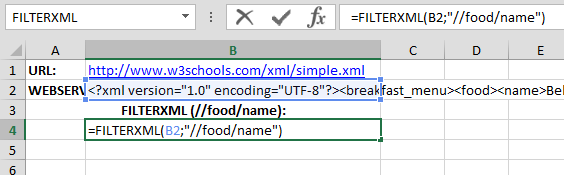
Example: WEBSERVICE and FILTERXML function
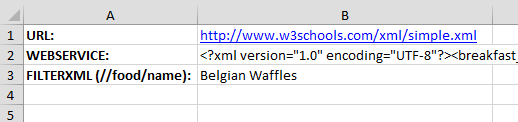
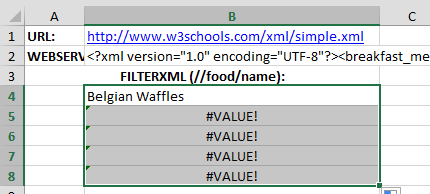
Example: WEBSERVICE and FILTERXML result
Explanation
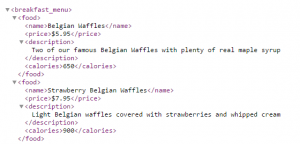 Now to explain what happens above. The XML file includes a couple of nodes – each one nested within the previous one. We start with node which hosts nodes. Each food node represents a single item in the menu. A food node contains , and node – which describe each menu item.
Now the FILTERXML functions used the following XPath: //food/name. This translates to: take the first food tag and return the contents of it name node.
Scraping a whole XML document
Now the example above is fine when you need just a single node from your XML document URL. What if you want to scrape the whole contents of that XML? Thankfully we can combine the WEBSERVICE and FILTERXML functions with Array Formulas.
In the example below I will show you how to acquire all the names of the food items in the menu. You can use a similar technique to get other items.
Input the FILTERXML formula
Input the FILTERXML formula as shown below:
=FILTERXML(B2;"//food/name")
Drag the formula down
Drag the formula down to row 8:
Hit CTRL+SHIFT+ENTER
Hit the following key combo to create and Array Formula: CTRL+SHIFT+ENTER.
That is it. Now in each row you should see the name of a food item from the menu.
Don’t like using Array Functions? You can also use the XPath node index instead:
=FILTERXML(B2;"//food[2]/name")
will return the name of the second food menu item. To replicate this across all items use this example:
=FILTERXML(B$2;"//food[" & (ROW()-ROW(B$4)+1) &"]/name")
Provide you entered this function in cell B2, simply drag it down – the items should automatically complete.
WEBSERVICE functions Restrictions
Now the WEBSERVICE function unfortunately has several restrictions that will cause the function to return a #VALUE! error instead of the string:
- If you don’t have a working Internet connection (or you are working with a proxy server)
- Incorrect arguments or URL address
- If HTTP result is not valid or contains more than the cell limit of 32767 characters
- URL is a string that contains more than the 2048 characters that are allowed for a GET HTTP request
- Protocols that aren’t supported, such as ftp:// or file://
Excel WEBSERVICE summary
The WEBSERVICE and FILTERXML functions are a great step forward to enabling access to Internet resources. These still have unfortunately a lot of limits. Especially when most websites have HTML files that exceed the 32727 character limit and often don’t parse as XML files.
This is where my VBA Web Scraping Kit fills the gap together with my Scrape HTML AddIn. The Kit has all the Web Scraping scenarios I consider possible in Excel where as the Scrape HTML AddIn extends a little the constrains of the WEBSERVICE and the FILTERXML functions
Want to learn Web Scraping?
Not satisfied? Want to know more about Web Scraping in Excel using VBA? Read my zero-to-hero Web Scraping Tutorial.
In this article, we will explaining how to implement a web service call from Microsoft Excel. The prerequisite for this? We must have web service toolkit installed.
EXCEL and the Web Services Toolkit
First, the Microsoft Excel environment has to be prepared. For use with Office 2003, Microsoft delivers the Web Services Toolkit 2.01 for download at:
http://www.microsoft.com/downloads/details.aspx?FamilyID=fa36018a-e1cf-48a3-9b35-169d819ecf18&DisplayLang=en
After the installation, the Web Services plug-in can be found in the Excel VB editor under Extras > Web Service References.
Excel is now ready to import WSDL files for the automatic creation of classes and data types to call the corresponding web services.
Creating the Web Service in SAP
The next step is to generate a web service from the SAP RFC function module and t expose it as WSDL file.
For example: convert RFC function module Z_ BAPI_XXXX_CREATEFROMDATA (any RFC enables function module) into a web service.
-
In SE37, go to Utilities->Create Web Service and follow the simple steps.
-
Go to transaction SOAMANGER and generate the WSDL.
Building the EXCEL Application
Now everything is prepared for the EXCEL application.
-
From the VB editor, choose «Web Service Reference» and mark the «Web Service URL» checkbox.
-
Type the full address of the WSDL file (e.g. C:Z_XYZ.xml).
-
A search result should appear (as shown in below snapshot).
If the WSDL file is correctly spelled and no search result appears, then it means WSDL file may be incorrect. One reason may be that in SAP, the input and output types are different (e.g. upper case for input fields, lower case for output fields).
-
Check the service and press the «add» button. The toolkit will parse the file and create type definitions and classes in the VB editor.
Wizard Results
After the upload of the WSDL file, the toolkit has added new classes of different types to the EXCEL project.
Some classes represent the table structures. In the example, the interface consists of the tables and other simple import structures leading to the structure classes (for the businesspartner tables e.g.:struc_BAPIBUS1037VBKAKOMCR).
Two other classes provide the objects for working with the web service. The method for calling the service in the example is in a class called
clsws_zcreatesalesactivity
And here the method for calling the service is implemented:
Public Sub wsm_Z_XXXX_CREATEFROMDATA (ByRef ar_BUSINESSPARTNER As
Variant, ByRef ar_GENERALDATA As Variant, ByRef ar_RETURN As Variant,
ByVal obj_SENDER As struct_BAPISENDER, ByVal str_TESTRUN As String)
Note that all table parameters are of type «variant», simple structures are of respective type «struc_xxx» and simple variables are of type «string».
In case of individual other applications, the classes and type definitions need to be checked: All tables and structure parameters from the function interface should appear as class modules named struc_xxx, including the type definitions for all fields. If not, check for restricted words in the data definitions of the WSDL file.
These fields are converted by the Web Services Toolkit in Excel according to
Public FROM_DATE As date
To avoid deserialization failed errors in the Web Service call, all «date» fields must be redefined to «string».
Public FROM_DATE As String
Calling the Service
To call the web service, an object needs to be created:
Dim SalesActivityWS As New clsws_zCreateSalesActivityS
Then all input tables need to be filled. This can be achieved for all tables as follows. First declare the table variables as ?Variant?. For example, for the businesspartners:
Dim ar_BUSINESSPARTNER as variant
Additionally, a variable of type struc_BAPIBUS1037VBKAKOMCR is needed to fill the input data. To account for more than one entry, the variable is defined as array.
Dim _StrucBusinesspartner(2) as struc_BAPIBUS1037VBKAKOMCR
Now the structure _StrucBusinesspartner can be filled from a corresponding EXCEL table or by use of VB input forms according to the needs. Finally, the input variables are transferred:
ar_BUSINESSPARTNER = _StrucBusinesspartner
And the service is called.
Call SalesActivityWS. wsm_Z_XXXX_CREATEFROMDATA ( ar_BUSINESSPARTNER,
ar_GENERALDATA, ar_RETURN, obj_SENDER, str_TESTRUN)
After the execution of the service, all ar_RETURN fields can be evaluated.
Possible Errors
If the deserialization error occurs, check again for remaining fields of type date or lower case field names.
Another error might read «too many open connections». This means the service could not log on to SAP. Check the user name and password provided in transaction SICF.
If your spreadsheet needs to access constantly updated data, or if you need to access services hosted on another computer, Excel’s Web Services support will enable you to get connected.
SOAP-based Web Services have been a key part of Microsoft’s plans for .NET, as well as a common feature of toolkits from other vendors. SOAP (the acronym doesn’t mean anything) is a protocol that uses XML to transmit information between systems. In the case you’ll explore here, it’s used to call procedures and return values. A companion specification, Web Service Definition Language (WSDL), describes Web Services so that applications can connect to them easily. Microsoft’s Web Services Reference Tool can take a WSDL file and generate VBA code your application can use to access SOAP-based web services.
This tutorial uses Excel features that are available only in Excel XP and Excel 2003 on Windows. Earlier versions of Excel do not support this, and neither do current or announced Macintosh versions of Excel.
Making this work requires downloading the Office Web Services Toolkit. As its location has changed a few times, it’s easiest to go to http://www.microsoft.com/downloads/search.aspx and search for «Office Web Services Toolkit». Separate versions are available for Office XP and Office 2003. You’ll need to install this toolkit, using the directions that come with it, before proceeding with this tutorial.
Once you’ve installed the toolkit, you can start connecting your spreadsheet to web services. To get to the Web Service References Tool (its name inside of Excel), you’ll need to select Tools » Macro » Visual Basic Editor. On the Tools menu of the VBE, you’ll find Web Services References…. Selecting this brings up the dialog box shown in figure.
The Microsoft Office Web Services Toolkit in action
You can use the search features in the top left of this dialog to find services through Microsoft’s Universal Discovery, Description and Integration (UDDI) service, or you can enter a URL for the WSDL file at the lower left. You can find a listing of public services at http://xmethods.net/, though you should definitely test to make sure the services still work before you integrate them with your spreadsheets. Many services also require license keys and sometimes license payments, but for this example you’ll use one that is available for free. It returns the IP address for a given domain name.
Start by telling Excel which service you want to use-in this case, http://www.cosme.nu/services/dns.php?wsdl. Enter that value in the URL: box at the bottom left and click Search. A search result of dns will appear in the top right, as shown in figure. Check the box to its left.
Telling the Web Services Toolkit to generate code for a web service
Clicking the Add button will make Excel generate VBA code for the service, as shown in figure.
VBA code generated by the Web Services Toolkit for accessing the dns service
Next, close the VBE and set up a very simple spreadsheet such as the one shown in figure.
A spreadsheet for adding web services
To add a button for calling the service, display the Control toolbar by right-clicking a toolbar and choosing Control Toolbox from the pop-up menu. Click the button icon, and then click the spreadsheet wherever you want the button to go. Right-click the button, and choose Properties from the pop-up menu. Under Name, enter GetData; under Caption, enter Get IP Address. Close the Properties dialog box, and your spreadsheet should look something like that shown in figure.
Spreadsheet with button for calling web services
To add the final piece, right-click the button you added and choose View Code. In the window that appears, enter this subroutine:
Private Sub GetData_Click( )
    Dim info As New clsws_dns
    Dim name As String
    Dim IP As String
    name = Range("B2").Text
    IP = info.wsm_dns(name)
    Set IPRange = Range("B3")
    IPRange.Value = IP
End Sub
This code is pretty simple. It references the object the toolkit created for the web service, and creates variables for the name and IP address. It collects the name from cell B2, calls the web service with the name as an argument, and then puts the value returned into cell B3. Once you’ve entered this code and closed the VBE, you can leave design mode by making sure the triangle and ruler icon at the left of the Control toolbar isn’t highlighted. The spreadsheet will now enable you to enter a domain name in cell B2. Clicking the Get IP Address button will put the IP address corresponding to that domain name in cell B3. Figures show this spreadsheet in action with different domain names.
A retrieved IP address
IP address resolution is one of the simpler services out there, but many times services this simple can be very useful in a spreadsheet — for instance, for currency converters, price retrieval, postal code processing, and much more. You don’t even need to learn about SOAP or WSDL to use these services, as the Web Services Toolkit takes care of all of that for you.
A few caveats are worth mentioning, however. First, the computer has to be connected to a network for a web service to work. You probably don’t want to create spreadsheets that depend heavily on web services if their users will be working on them at 30,000 feet and will be thoroughly disconnected. (Spreadsheets such as this one, which uses a web service to populate fields but doesn’t need to be connected constantly, are probably OK.)
The other major issue with web services generally is that the field is in significant flux. At the time of this writing, SOAP had moved from Version 1.1 to 1.2, and a new version of WSDL was under development; what’s more, many people feel UDDI might eventually be replaced with other technologies. For now, be certain to test the services you use, and keep an eye out for new versions of the Office Web Services Toolkit.
by updated Aug 01, 2016
Практически любая офисная деятельность связана с добавлением информации в таблицы или ее редактированием. Однако не на каждом компьютере установлен полный программный пакет MS Office. Да и на мобильное устройство его не загрузить. В этом случае можно прибегнуть к помощи сервисов, позволяющих создавать и редактировать таблицы в Excel онлайн.
- Специфика сервисов со встроенным Excel
- Microsoft Excel онлайн – лучшие альтернативы
- Office.Live — сервис для работы с электронными таблицами
- Google Таблицы — полная совместимость с формулами из Excel
- OnlyOffice — является полноценной заменой MS Office
- ZOHO Sheet — онлайн-сервис для создания электронных таблиц
- Онлайн-сервисы Яндекс Диск и Mail.Ru
- OffiDocs XLS spreadsheet — поддерживает основные функции Excel
- EtherCalc
- Заключение
Сервисы со встроенным Excel функционируют на основе интернет-подключении. При нестабильном подключении к сети они перестают работать. Это нужно учесть при выборе подобного подхода к работе таблицами. У некоторых веб-продуктов отсутствуют важные функции классического программного обеспечения Excel, например, работа с формулами, вставка информации из баз данных и т. д.
На таких платформах зачастую требуется регистрация. После ее успешного завершения пользователь получает доступ к онлайн-редактору таблиц. Многие подобные веб-сервисы работают бесплатно и автоматически сохраняют пользовательские файлы в облачном хранилище.
На сегодняшний день на просторах всемирной паутины доступно достаточно много различных платформ для работы с электронными таблицами. Эта статья познакомит вас с 7 лучшими сервисами, позволяющими работать в Excel онлайн:
- Office.Live.
- Google Таблицы.
- OnlyOffice.
- ZOHO Sheet.
- Офисный пакет Яндекс Диска (Яндекс.Документы) и облачного хранилища от Mail.Ru.
- OffiDocs XLS spreadsheet.
- EtherCalc.
Это онлайн-версия классического программного пакета Microsoft Office. Для получения доступа к функционалу этого сервиса пользователю необходимо авторизоваться. Данный сервис позволяет загружать на компьютеры файлы с разрешением .xlsx, .ods. Сохранить отредактированную электронную таблицу в формате .xls не получится.

Формулы в онлайн-версии Excel присутствуют, но в урезанном количестве. Это же самое можно сказать и о диаграммах. Пользователи получают доступ только к базовому функционалу. С компьютера можно открыть файлы в формате .xls.

С файлами можно работать в режиме совместного доступа. Для этого перейдите в меню «Файл» и выберите пункт «Поделиться».

Пригласить пользователя можно по персональной ссылке или просто сделать документ открытым для редактирования любым сторонним пользователем.
Особенности:
- есть главные функции десктопного программного обеспечения Excel;
- работает бесплатно, но потребуется учетная запись Microsoft;
- есть мобильное приложение для iOS и Android;
- часть опций урезана (количество формул и т. д.);
- файл можно редактировать совместно с другими пользователями.
Google Документы – бесплатная платформа, полностью заменяющая собой программный пакет Microsoft Office. Для того чтобы получить доступ к созданию электронных таблиц и других файлов необходимо зарегистрироваться или авторизоваться с помощью Google-аккаунта. Любые изменения в электронной таблице сохраняются мгновенно. Доступ к данным возможен с компьютера, смартфона, планшета.

Файл можно сохранить в различных форматах. Таблицы интегрированы с другими сервисами Google, поэтому интеграция данных из других файлов буквально в пару кликов. Кроме того продвинутый пользователь может написать собственные скрипты.

Достоинства платформы:
- Бесплатный редактор электронных таблиц.
- Понятный пользовательский интерфейс.
- Полная совместимость с формулами из Excel.
- Возможность организовать бесплатную совместную работу над проектом.
- Без прямой ссылки на файл нельзя воспользоваться данными.
- Присутствует поддержка импорта данных из внешних источников.
- Мгновенное сохранение всех изменений на облачное хранилище Google.
- Есть приложение для мобильных устройств.
Это готовый пакет онлайн-продуктов, который является полноценной заменой MS Office. Платформа нацелена на малый и средний бизнес, совместную работу над проектами. Бесплатный пробный период составляет 30 дней. Стоимость лицензии для домашнего использования – €139. Она оплачивается один раз и действует бессрочно.
Функционал данного редактора таблиц похож на привычный интерфейс Microsoft Excel. Пользователю предоставляются все функции, необходимые для подсчета, сравнения, сортировки данных.

Таблицы и другие документы будут доступны всем участникам группы. Реализованы комментарии, правки.
Особенности OnlyOffice:
- Понятный пользовательский интерфейс;
- Полная поддержка функционала Excel;
- Можно использовать формулы, макросы;
- Отзывчивая служба технической поддержки;
- Высокий уровень защиты информации.
Сервис бесплатный для всех пользователей. Доступна авторизация через Facebook и Google. Есть возможность зарегистрировать отдельный аккаунт. Язык интерфейса меняется в настройках профиля. Сервис работает с форматами .xls, .ods, .csv, .tsv и .xls. Пользовательский интерфейс похож на последние версии Microsoft Excel.

Данный онлайн-сервис поддерживает совместную работу с электронными таблицами. История внесения изменений также сохраняется, поэтому можно легко отслеживать, кто и когда вносил правки.
Ключевые особенности:
- бесплатный для всех пользователей;
- есть поддержка русского языка;
- поддерживает работу с формулами и графиками;
- автоматически сохраняет файлы в облачном хранилище;
- есть возможность отправки документов на печать;
- есть официальное приложение для Android и iOS.
Файлы, создаваемые в этом онлайн-сервисе, можно загрузить на компьютер в форматах tsv, html, xls, xlsx, pdf, cs, ods.

У этих сервисов схожий функционал, так как они официально приобрели лицензию на MS Online. Рассмотрим функционал на примере онлайн-сервиса от Mail.Ru. После авторизации и открытия персонального облачного хранилища пользователю предлагаются создать папку или документ. Также можно загрузить уже готовый файл. Для запуска Excel онлайн выберите вариант «Создать Таблицу».

После этого на экране появится классический интерфейс MS Excel. Файл автоматически сохраняется в формате xlsx. Над таблицами могут работать одновременно несколько человек. Для этого нужно поделиться файлом и сделать его открытым для редактирования другими пользователями. Загрузить таблицы на компьютер можно в формате xlsx или ods.

Особенности сервиса:
- функционал идентичен классическому Microsoft Excel за исключением разнообразия поддерживаемых форматов сохранения данных;
- не требует оплаты;
- для работы необходим аккаунт Mail.ru или Яндекс;
- работает быстро даже на слабых ПК;
- автоматически сохраняет файлы в облаке.
Бесплатный онлайн-редактор таблиц, не требующий регистрации. Поддерживает основные функции Excel. Запускается сразу на русском языке. Поддерживает работу с таблицами в формате xlsx и xls. Для загрузки файла с компьютера кликните на «Files».

Данный сервис автоматически подтягивает cookies из браузера, поэтому сможет восстановить файл даже после закрытия окна браузера. Но для регулярной работы рекомендуется зарегистрироваться на сайте.
Достоинства:
- бесплатный и на русском языке;
- не требуется обязательная регистрация;
- поддерживает основные функции Excel (формулы, сортировку и т. д.);
- сохраняет файлы в режиме онлайн (после регистрации);
- есть функция отправки отредактированного файла на указанный адрес электронной почты.
Бесплатный сервис, не требующий регистрации и оплаты услуг. Его пользовательский интерфейс частично русифицирован. Данный онлайн-инструмент поддерживает основные функции Excel, но может оказаться трудным в освоении для пользователей, привыкших работать в классическом MS Office.

Прямо на главной странице сервиса можно загрузить с компьютера файл в формате .csv, .ods, .xlsx, .xlsm или .xls.

Особенности:
- бесплатный и русифицированный;
- поддерживает различные форматы файлов;
- широкий функционал;
- можно связаться с разработчиками при возникновении проблем с сервисом.
Выбор сервиса Excel онлайн зависит от задач, стоящих перед пользователем. Лучшим продуктом в этой сфере считаются Google Таблицы. Этот сервис предоставляет множество возможностей для работы с таблицами, включая создание собственных скриптов и добавление сторонних плагинов. Файл и любые изменения в нем автоматически сохраняют в облачном хранилище Google. Аналогичными функциями обладает Excel в облаке от Mail.Ru и Яндекс.Диске.
Для быстрого просмотра простых электронных таблиц подойдут сервисы EtherCalc и OffiDocs XLS spreadsheet. Эти онлайн-продукты быстро работают в любом браузере и не требовательны к производительности компьютера пользователя.
Пожалуйста, оставляйте свои отзывы по текущей теме статьи. За комментарии, подписки, дизлайки, отклики, лайки низкий вам поклон!
- Download source files — 30.4 Kb
Introduction
Web Services are reusable applications that expose an interface that can be accessed over the internet. Web services use XML to provide a platform and language independent implementation of distributed application services and information.
Web services allow us to utilize the services provided by the other organizations. We can consume the web services not only from applications developed using various programming languages but also from Microsoft office tools like Access, Excel, and Word etc. In this article we will explore how we can access a web service from Microsoft Excel using Microsoft Office XP Web Services Toolkit 2.0, which simplifies the process of accessing and utilizing an XML webservice.
Details
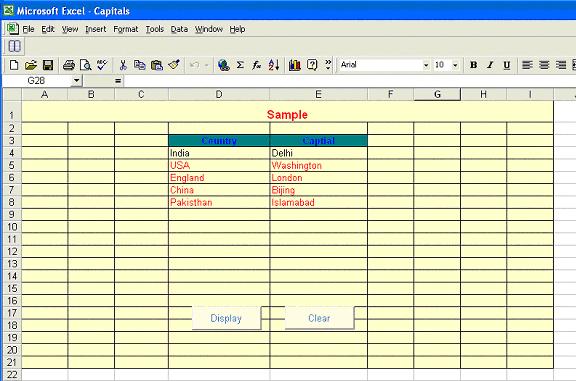
The example includes a webservice, which returns 5 countries and their capitals. Capitals.xls has 2 buttons. When a user clicks on the display button, Capitals.xls sheet accesses the web service and displays the data provided by the webservice. Clicking on the clear button clears the data from the XL sheet.

Now lets see how we can develop this application. Lets start by creating an excel sheet. Drag and drop a button from the visual basic toolbox. (You can get the VB toolbox from the View menu). Now to add a reference to the web service . For this we will use the VB editor (Alt-F11). From the tools menu bar add the reference of Microsoft Soap tool kit. Now lets add the web service reference. For this click on the web reference in the tools menu of the VB editor. You can either search for a web service or if you know the URL of a web service u can directly add it. Now you are ready to access the web service. We can do this by creating an object of the web service class and displaying the result in the excel sheet.
Dim module As clsws_Service1
Dim value As String
Dim data() As String
Dim range1 As Range
Dim range2 As Range
Dim j As Integer
Set module = New clsws_Service1
value = module.wsm_getCapitals()
data = Split(value)
j = 0
Application.ActiveSheet.Range("A4").Activate
Set range1 = Range(Range("A4"), Range("A22"))
For Each range2 In range1
    If j < 9 Then
     range2.Offset(0, 3).value = data(j)
     range2.Offset(0, 4).value = data(j + 1)
     j = j + 2
   End If
Next range2
Working on .NET for last 6 years. Currently working for TCS.


In a VBA module in excel 2007, is it possible to call a web service? If so, any code snippets? How would I add the web reference?
![]()
bluish
25.9k27 gold badges120 silver badges179 bronze badges
asked Jan 23, 2009 at 22:49
![]()
2
![]()
loopasam
2,9672 gold badges21 silver badges21 bronze badges
answered Jan 23, 2009 at 22:53
![]()
2
answered Jan 29, 2010 at 21:05
1
In Microsoft Excel Office 2007 try installing «Web Service Reference Tool» plugin. And use the WSDL and add the web-services. And use following code in module to fetch the necessary data from the web-service.
Sub Demo()
    Dim XDoc As MSXML2.DOMDocument
    Dim xEmpDetails As MSXML2.IXMLDOMNode
    Dim xParent As MSXML2.IXMLDOMNode
    Dim xChild As MSXML2.IXMLDOMNode
    Dim query As String
    Dim Col, Row As Integer
    Dim objWS As New clsws_GlobalWeather

    Set XDoc = New MSXML2.DOMDocument
    XDoc.async = False
    XDoc.validateOnParse = False
    query = objWS.wsm_GetCitiesByCountry("india")

    If Not XDoc.LoadXML(query) Then  'strXML is the string with XML'
        Err.Raise XDoc.parseError.ErrorCode, , XDoc.parseError.reason
    End If
    XDoc.LoadXML (query)

    Set xEmpDetails = XDoc.DocumentElement
    Set xParent = xEmpDetails.FirstChild
    Worksheets("Sheet3").Cells(1, 1).Value = "Country"
    Worksheets("Sheet3").Cells(1, 1).Interior.Color = RGB(65, 105, 225)
    Worksheets("Sheet3").Cells(1, 2).Value = "City"
    Worksheets("Sheet3").Cells(1, 2).Interior.Color = RGB(65, 105, 225)
    Row = 2
    Col = 1
    For Each xParent In xEmpDetails.ChildNodes
        For Each xChild In xParent.ChildNodes
            Worksheets("Sheet3").Cells(Row, Col).Value = xChild.Text
            Col = Col + 1
        Next xChild
        Row = Row + 1
        Col = 1
    Next xParent
End Sub
![]()
answered Sep 14, 2015 at 12:42
![]()
Excel 2013 Read Data from a web service and bash the JSON till you can get what you want out of it (given the JSON will always be in the same format).
This code should just work without the need for any plugins.
You will need your own free API key from the currency converter website though.
I used it to load the USD to GBP value into a cell on my sheet.
Option Explicit

Sub Test_LateBinding()

    Dim objRequest As Object
    Dim strUrl As String
    Dim blnAsync As Boolean
    Dim strResponse As String

    Set objRequest = CreateObject("MSXML2.XMLHTTP")
    strUrl = "https://free.currconv.com/api/v7/convert?q=USD_GBP&compact=ultra&apiKey=[MY_API_KEY]"
    blnAsync = True

    With objRequest
        .Open "GET", strUrl, blnAsync
        .SetRequestHeader "Content-Type", "application/json"
        .Send
        While objRequest.readyState <> 4
            DoEvents
        Wend
        strResponse = .responsetext
    End With

    Dim responseArray() As String
    responseArray = Split(strResponse, ":", -1)

    Dim value As String
    value = responseArray(1)

    Dim valueArray() As String
    valueArray = Split(value, "}", -1)

    Dim finalValue As String
    finalValue = valueArray(0)

    Sheet2.Cells(22, "C") = finalValue
End Sub
answered Jul 30, 2021 at 5:21
![]()
AndyAndy
2,0591 gold badge28 silver badges28 bronze badges