
Web severs are everywhere.
Heck you are interacting with one right now!
No matter what type of software engineer you are, at some point in your career you will have to interact with web servers. May be you are building an API server for a backend service. Or may be you are just configuring a web server for your website.
In this article, I will cover how to create the most basic http web server in Python.
But because I want to make sure you understand what we are building, I am going to give an overview first about what web servers are and how they work.
If you already know how web servers work, then you can skip directly to this section.
- What is an HTTP server?
- The TCP socket address
- Create a simple HTTP file
- Create an HTTP web server
What is an HTTP Server?
An HTTP web server is nothing but a process that is running on your machine and does exactly two things:
1- Listens for incoming http requests on a specific TCP socket address (IP address and a port number which I will talk about later)
2- Handles this request and sends a response back to the user.
Let me make my point less abstract.
Imagine you pull up your Chrome browser and type www.yahoo.com in the address bar.

Of course you are going to get the Yahoo home page rendered on your browser window.
But what really just happened under the hood?
Actually a lot of things have happened and I might dedicate a whole article to explain the magic behind how this happened.
But for the sake of simplicity, I will abstract away some of the details and talk about this at a very high level.
At a high level, when you type www.yahoo.com on your browser, your browser will create a network message called an HTTP request.
This Request will travel all the way to a Yahoo computer that has a web server running on it. This web server will intercept your request, and handle it by responding back with the html of the Yahoo home page.
Finally your browser renders this html on the screen and that’s what you see on your screen.

Every interaction with the Yahoo home page after that (for example, when you click on a link) initiates a new request and response exactly like the first one.
To reiterate, the machine that receives the http request has a software process called a web server running on it. This web server is responsible for intercepting these requests and handling them appropriately.
Alright, now that you know what a web server is and what its function is exactly, you might be wondering how does the request reach that yahoo machine in the first place?
Good question!
In fact this is one of my favorite questions that I ask potential candidates in a coding interview.
Let me explain how, but again….at a high level.
The TCP Socket Address

Any http message (whether it is a request or response) needs to know how to reach its destination.
In order to reach its destination, each http message carries an address called the destination TCP address.
And each TCP address is composed of an IP address and a port number.
I know all these acronyms (TCP, IP, etc..) might be overwhelming if your networking concepts are not strong.
I will try to keep it simple but if you are interested in improving your knowledge of networking concepts, I highly recommend this book by Ross and Kurose.
So where is that address when all you did was type www.yahoo.com on your browser?
Well, this domain name is converted into an IP address through a large distributed database called the DNS.
Do you want to check out what this IP address is?
Easy! Head to your terminal and do the following:
$ host yahoo.com
yahoo.com has address 98.138.219.231
yahoo.com has address 98.137.246.8
yahoo.com has address 98.138.219.232
yahoo.com has address 72.30.35.9
yahoo.com has address 98.137.246.7
yahoo.com has address 72.30.35.10
yahoo.com has IPv6 address 2001:4998:44:41d::3
yahoo.com has IPv6 address 2001:4998:c:1023::5
yahoo.com has IPv6 address 2001:4998:c:1023::4
yahoo.com has IPv6 address 2001:4998:58:1836::10
yahoo.com has IPv6 address 2001:4998:58:1836::11
yahoo.com has IPv6 address 2001:4998:44:41d::4
yahoo.com mail is handled by 1 mta5.am0.yahoodns.net.
yahoo.com mail is handled by 1 mta6.am0.yahoodns.net.
yahoo.com mail is handled by 1 mta7.am0.yahoodns.net.
As you can see, the DNS will translate yahoo.com to any of the addresses above.
The IP address alone will allow the HTTP message to arrive at the right machine, but you still need the port number in order for the HTTP request to arrive exactly at the web server.
In other words, the web server is a regular network application that is listening on a specific port.
And the http request MUST be addressed to that port.
So where is the port number when you type www.yahoo.com?
By default, the port number is 80 for http and 443 for https, so even though you haven’t explicitly specified the port number, it is still there.
And if the web server is listening on a non-default port number (neither 80 nor 443), you must explicitly specify the port number like this:

By now you should have all the necessary information to create an http web server in Python.
So without further ado, let’s get started.
Create a simple HTML file
Here is what we want to do.
We want to create a simple http server that serves a static html web page.
Let’s create our html page.
<html>
    <head>
        <title>Python is awesome!</title>
    </head>
    <body>
        <h1>Afternerd</h1>
        <p>Congratulations! The HTTP Server is working!</p>
    </body>
</html>
Now go ahead and save this file as index.html
With the web page that we want to serve out of the way, the next step is to create a web server that will serve this html page.
In order to create a web server in Python 3, you will need to import two modules: http.server and socketserver

Notice that in Python 2, there was a module named SimpleHTTPServer. This module has been merged into http.server in Python 3
Let’s take a look at the code to create an http server
import http.server
import socketserver

PORT = 8080
Handler = http.server.SimpleHTTPRequestHandler

with socketserver.TCPServer(("", PORT), Handler) as httpd:
    print("serving at port", PORT)
    httpd.serve_forever()
Just like that we have a functional http server.
Now let’s dissect this code line-by-line.
First, as I mentioned earlier, a web server is a process that listens to incoming requests on specific TCP address.
And as you know by now a TCP address is identified by an ip address and a port number.
Second, a web server also needs to be told how to handle incoming requests.
These incoming requests are handled by special handlers. You can think of a web server as a dispatcher, a request comes in, the http server inspects the request and dispatches it to a designated handler.
Of course these handlers can do anything you desire.
But what do you think the most basic handler is?
Well, that would be a handler that just serves a static file.
In other words, when I go to yahoo.com, the web server at the other end sends back a static html file.
This is in fact what we are exactly trying to do.
And that, my friend, is what the http.server.SimpleHTTPRequestHandler is: a simple HTTP request handler that serves files from the current directory and any of its subdirectories.
Now let’s talk about the socketserver.TCPServer class.
An instance of TCPServer describes a server that uses the TCP protocol to send and receive messages (http is an application layer protocol on top of TCP).
To instantiate a TCP Server, we need two things:
1- The TCP address (IP address and a port number)
2- The handler
socketserver.TCPServer(("", PORT), Handler)As you can see, the TCP address is passed as a tuple of (ip address, port number)
Passing an empty string as the ip address means that the server will be listening on any network interface (all available IP addresses).
And since PORT stores the value of 8080, then the server will be listening on incoming requests on that port.
For the handler, we are passing the simple handler that we talked about earlier.
Handler = http.server.SimpleHTTPRequestHandler
Well, how about serve_forever?
serve_forever is a method on the TCPServer instance that starts the server and begins listening and responding to incoming requests.
Cool, let’s save this file as server.py in the same directory as index.html because by default the SimpleHTTPRequestHandler will look for a file named index.html in the current directory.
In that directory, start the web server:
$ python server.py
serving at port 8080
By doing that, you now have an HTTP server that is listening on any interface at port 8080 waiting for incoming http requests.
It’s time now for the fun stuff!
Open your browser and type localhost:8080 in the address bar.

Awesome! Looks like everything is working fine.
But hey what is localhost?
localhost is a host name that means this computer. It is used to access the network services that are running on the host via the loopback network interface.
And since the web server is listening on any interface, it is also listening on the loopback interface.
You want to know what IP address corresponds to localhost?
You got it.
$ host localhost
localhost has address 127.0.0.1
localhost has IPv6 address ::1
Host localhost not found: 3(NXDOMAIN)
In fact you can totally replace localhost with 127.0.0.1 in your browser and you would still get the same result.
Try it out 🙂
One Final Word
You can actually start a web server with python without even having to write any scripts.
Just go to your terminal and do the following (but make sure you are on python 3)
python -m http.server 8080By default, this server will be listening on all interfaces and on port 8080.
If you want to listen to a specific interface, do the following:
python -m http.server 8080 --bind 127.0.0.1Also starting from Python 3.7, you can use the –directory flag to serve files from a directory that is not necessarily the current directory.
So the question now is, why would you ever need to write a script when you can just invoke the server easily from the terminal?
Well, remember that you are using the SimpleHTTPRequestHandler. If you want to create your custom handlers (which you will probably want to do) then you won’t be able to do that from the terminal.
Learning Python?
Check out the Courses section!
Featured Posts
- The Python Learning Path (From Beginner to Mastery)
- Learn Computer Science (From Zero to Hero)
- Coding Interview Preparation Guide
- The Programmer’s Guide to Stock Market Investing
- How to Start Your Programming Blog?
Are you Beginning your Programming Career?
I provide my best content for beginners in the newsletter.
- Python tips for beginners, intermediate, and advanced levels.
- CS Career tips and advice.
- Special discounts on my premium courses when they launch.
And so much more…
Subscribe now. It’s Free.
There are several types of web servers on the market and among them is Apache, one of the oldest servers
Although new, more modern and efficient alternatives have emerged in recent years, Apache continues to be a reference server.
Statistically, Apache covers 33.7% of the top 1000 sites, just behind Nginx with its 38.8%
It is widely used in Unix-like operating systems, and can be used on almost all platforms such as Windows, OS X, OS/2, etc
In this detailed guide, we will see:
- What Apache is precisely;
- Its importance;
- How it works;
- Its advantages and disadvantages;
- Difference between it and other Web servers on the market;
- Its installation and configuration ;
- etc.
Let’s start!
Chapter 1: What is the Apache server and how does it work?
1.1) What is Apache and what does it do?
The Apache server is one of the most powerful free Web servers on the market. It was created in 1995 by Rob McCool, then an employee of NCSA
According to the statistics of W3techs, its use is 31.5% of all websites for which the server is known

This is the core technology of theApache Software Foundationit is the core technology of the Apache platform, responsible for more than a dozen projects involving :
- Web transmission technologies
- Data processing;
- And the execution of distributed applications
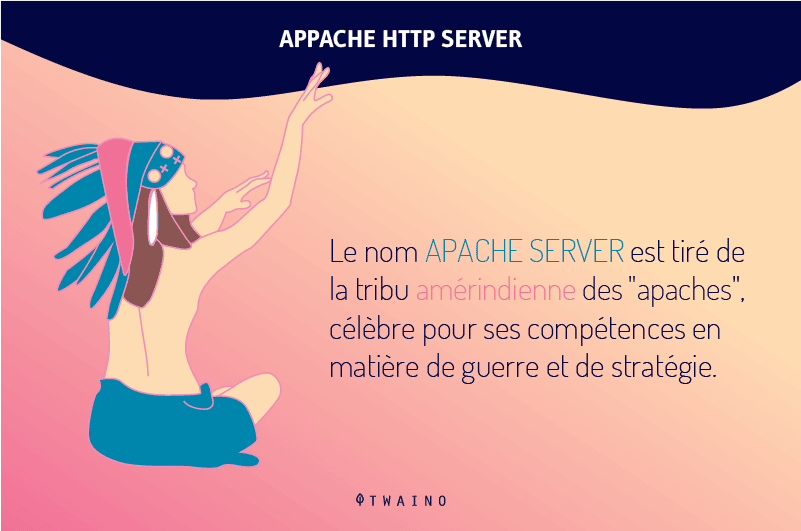
Why Apache? The word, Apache, was taken from the name of the American Native Tribe ” Apache “, famous for its skills in warfare and strategy.
Initially, it was just a group of patches for the NCSA HTTPd web server, which the author then completely replaced by rewriting all the original code.
In short, Apache is an open source HTTP Web server developed and maintained by a community of users around theApache Software Foundation. It is used to respond to content requests from Web clients (browsers).
Currently and since 1996, it is the most used free Web server in the world because of its security and stability.
In addition, most web hosting companies work with Apache servers.
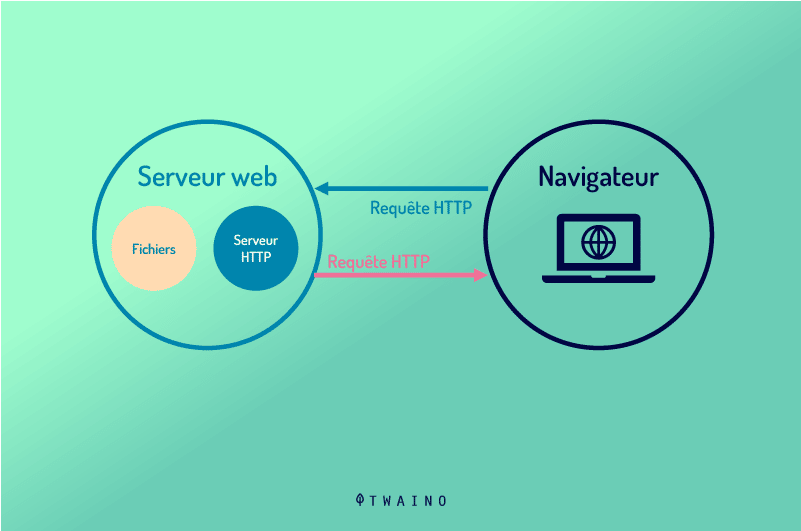
1.1.1. What is a web server?
A web server is a program that processes and returns information when a user makes a request
In other words, it hosts websites on one or more servers and displays the content (websites) of the server via client software (a browser).
Most servers are Linux-compatible. The most important Linux Web servers are Apache and NGINX.
1.1.2. What is the biggest challenge of a Web server?
The files that servers process are written in different languages
- Python
- Java
- PHP
- Etc.
When a user wants to load a page from a website, his browser sends a request to the server, and Apache returns a response with all the requested files:
- Text
- Images;
- Videos
- Etc.
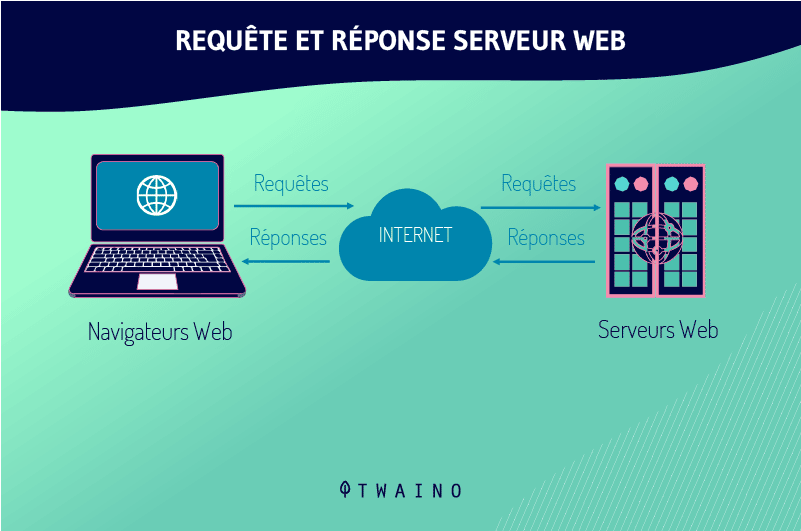
In short, the server provides the pages requested by different users and guarantees a correct and secure communication. The server and the client communicate via the HTTP protocol
1.2) How does an Apache server work?
The main functionality of this web service is to provide users with all the files needed to view the web. The users’ requests are usually made via a browser:
- Chrome
- Firefox
- Safari;
- Etc.
Apache ensures that the communication between the web server and the web client (user requesting the information) is smooth and consistent.
Thus, when a user makes an HTTP request via the browser to enter a specific website or URL, Apache returns the requested information via the HTTP protocol.
For example, when a user writes twaino.com in his browser, this request will reach our Apache server, which will provide the texts, images, styles… via the HTTP protocol.
In addition, Apache allows you to apply a high level of customization through its modular system.
In fact, the server has a structure module-based that allows you to enable and disable various features like
- security modules like mod_security
- caching modules like Varnish;
- or header customization modules like mod_headers.
These Apache modules should be used with caution as they can affect the security and functionality of the web server. (We’ll see more details on Apache modules below).
Apache also allows you to customize your hosting’s PHP settings through the .htaccess file.
1.3. Some features of Apache
It is a web server with support for HTTP/1.1 and later HTTP/2.0 according to RFC 7540
It was one of the first servers to support VirtualHost (also known as virtual site) for domains and IPs following the normal RFC 2616 standard
This allows multiple domains to be hosted on the same server with the same IP, something that today seems basic but in the 90s was a revolution.
Among the main features of Apache, we find the following:
- It is free and open source;
- Easy to install and configure;
- Highly extensible and adaptable thanks to modules;
- Built-in features for user authentication and validation;
- Support for languages such as Perl, PHP and Python.
Chapter 2: What are the advantages and disadvantages of Apache?
2.1. Advantages of Apache
Some of the advantages that we can find in an Apache server are the following:
- Support: It is one of the most used servers for more than two decades, so behind it there is a very large community accompanied by extensive documentation.
- Cross-platform: It runs on both Microsoft Windows, Unix/Linux and Mac, making it an excellent service for both a server and a development environment on any workstation.
- Features: It contains a large number of official and third-party modules that allow you to extend the functionality of the server.
- Simplicity: It is one of the simplest servers to install and configure, especially in Linux distributions where it is part of the repositories of each distribution. In the case of Windows, it can be found packaged with the MySQL server and PHP in a single installer which makes installation much easier.
- Security: Apache has built-in features to secure the software with Authorization and Authentication modules and Access Control functions, as well as support for SSL/TLS certificate encryption.
- It has a large community of developers around the world, who help improve the software, as the original source code is freely available for viewing;
- Module-based structure;
- It is open source and free;
- High level of security through constant updates;
- Customization via independent .htaccess in each hosting;
- Compatible with the main CMS, online stores and e-learning platforms;
- It is one of the oldest web servers on the market, therefore super reliable;
- Allows you to enable and disable features;
- Easy to use for beginners.
2.2 Disadvantages of Apache
Here are the two disadvantages of Apache:
- Performance can be affected on high traffic pages, especially after 10,000 connections;
- If the modules are not used properly, security holes can be generated.
The only notable drawback is the poor performance compared to other alternatives on the market that are faster and able to handle much more traffic with the same resources.
Chapter 3: Differences Between Apache and Other Major Web Servers
3.1. Apache versus Nginx
Although NGINX is relatively young (born in 2004), it has become popular very quickly because of the advantages it offers in handling high traffic of more than 10,000 connections at a time.
Source: Apache Vs NGINX – Which Is The Best Web Server for You?
It can be defined as an application for Web servers. It was mainly designed to solve the problem that some servers like Apache had: Owners of sites with a lot of traffic were having performance difficulties.
NGINX allows all requests to a Web site to be made in a single process and provides better scalability.
For this reason, it is used by international brands such as Netflix, Airbnb, Pinterest or Wikipedia
In short, for high-traffic websites, NGINX is what you need and for sites with fewer visits, Apache is ideal.
To provide a high-performance web service in terms of connection, some servers have an Apache and Nginx configuration running in parallel.
3.1.1. The differences between Nginx and Apache
The American server Apache and the Russian Ngnix have been fighting and gaining ground in the world of web hosting. They are two of the most used resources for managing thousands of websites on local servers.
And although both servers serve the same purpose of keeping the world connected, it is worth reviewing what their most important differences are and here you will learn more about them.
3.1.1.1 They have a different structure and scope
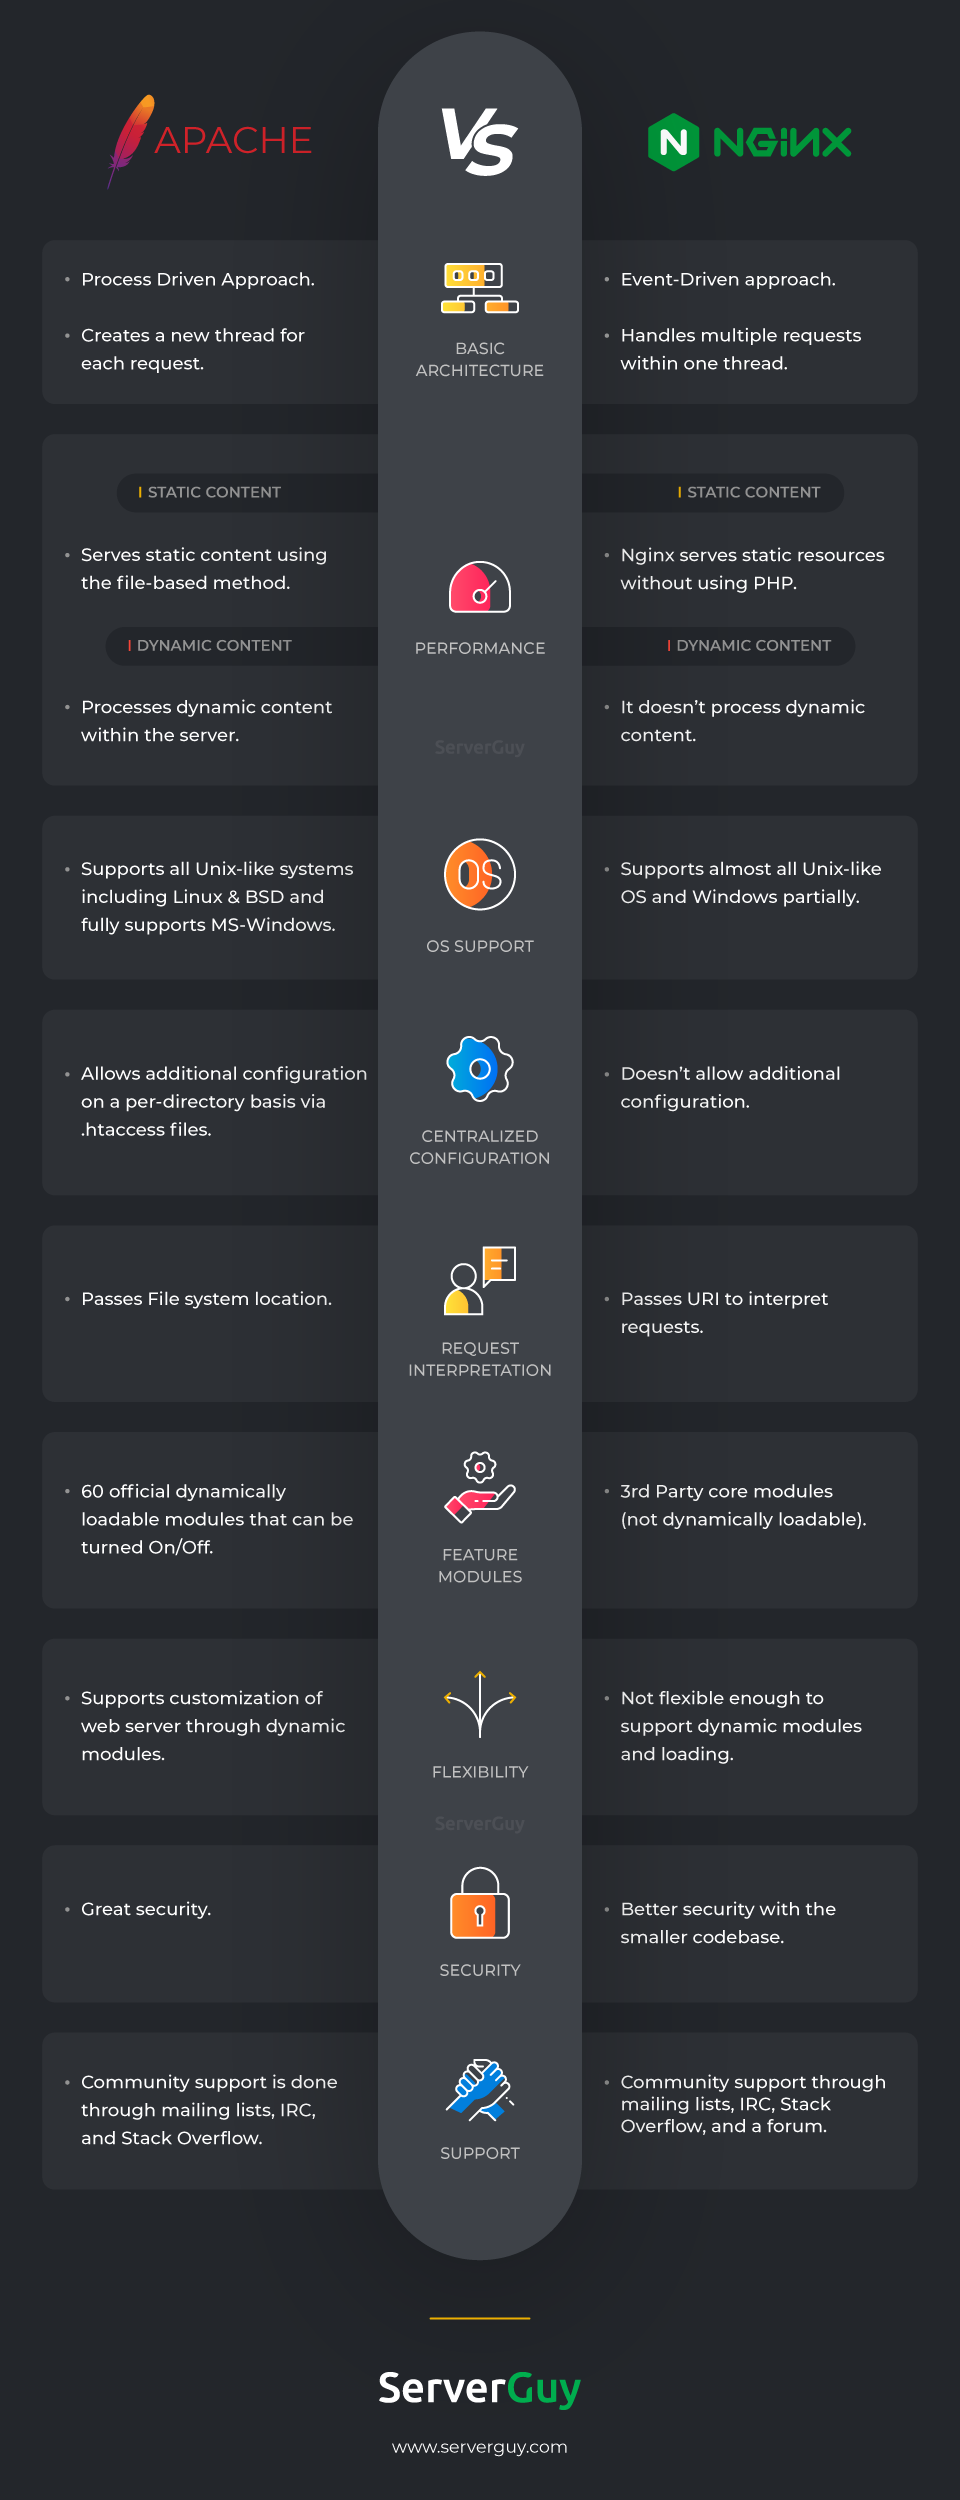
The Apache web server has a simple software structure, is open source and processes a user request via HTTP or HTTPS, one at a time.
On the other hand, Ngnix is more robust, open source and suitable for all types of websites and web traffic, as it can handle a large number of parallel connections from the work process.
3.1.1.2. Apache utility for shared hosting
One feature of Apache, unlike Nginx, is that the customer can choose the configuration of his web site on the server without affecting the others, or changing the overall server layout in shared hosting.
The above function is possible from .htaccess files, with which each directory of the web page can be configured independently.
Although this is a great advantage, this flexibility in configuration can affect the performance of the server when it receives a large number of requests.
3.1.1.3. Compatibility of the two servers
Apache is highly compatible with Linux, Windows and the most commonly used CMS for creating and managing websites such as WordPress and Joomla.
On the other hand, Nginx still does not achieve ideal synchronization with Windows, but it is also compatible with popular content managers and the Python programming language.
3.1.1.4. Apache and Nginx facilitate the web-user relationship
Web servers have come to us to facilitate the exchange of information
If we look at it from a more specific point of view, they allow pages to achieve their goals by maintaining a loading speed that allows the user to quickly get what he is looking for.
There is no doubt about the usefulness of Web servers, Apache and Nginx are valuable
3.1.1.5. Other differences
- CPU and memory usage is consistent on Nginx even under heavy loads compared to Apache.
- Apache uses conventional file-based methods to handle static content and dynamic content by integrating the language renderer, while Nginx lacks the ability to render dynamic content natively.
- Apache allows additional per-directory configuration by evaluating and interpreting directives in hidden files called .htaccess, while Nginx does not allow additional per-directory configuration by evaluating and interpreting directives.
- Apache interprets .htaccess while Nginx does not interpret .htaccess
- Requests are served faster by Nginx than by Apache.
- The security level is high in Nginx compared to Apache, because Nginx does not allow distributing access to directory-level settings to an individual user.
- Apache was designed as a web server, while Nginx was designed as a web server as well as a proxy server.
- In Apache, modules are loaded and unloaded dynamically, but in Nginx, modules are not loaded dynamically.
- In Nginx, modules are selected and then compiled into the main software, while in Apache, this is done dynamically.
Now that their differences stand out, it’s up to you to decide which one is right for the type of project you want to set up.
3.2. Apache versus Tomcat
Tomcat (Apache tomcat) is a sub-project of the Apache Foundation and is a project at the same level as the Apache server (i.e. httpd)

Tomcat is intended exclusively for Java applications.
In terms of similarity between the two, we have :
- They are developed by the Apache organization;
- They have the function of HTTP service;
- They are open source and free.
In terms of distinction, we have
1. Tomcat is special in that it is also a Java web container and can handle JSPs, while Apache usually comes with PHP and cannot handle JSPs.
2. Apache only allows static web pages and requires Tomcat to handle dynamic web pages like Jsp. Tomcat can also be used for static pages but in some cases it is less efficient than Apache .
3. It cannot be configured as simply as Apache.
4. Apache and Tomcat integration:
- – If the client requests a static page, only the Apache server must answer the request;
- – If the client requests a dynamic page, the Tomcat server answers the request.
5. Apache and Tomcat are independent and can be integrated in the same server.
6. Apache is implemented in the C language and supports various features and modules to extend the basic functionality. Tomcat is written in Java and is better suited for Servlet and JSP.
7. Apache is a web server (static parsing, like HTML), tomcat is a Java application server (dynamic parsing, like JSP).
8. Tomcat is just a servlet container, which can be considered as an extension of apache, but can work independently of apache.
9. Apache is an ordinary server, which only supports HTML web pages, i.e. normal web pages. In contrast, Tomcat is a jsp/servlet container, and it also supports HTML, JSP, ASP, PHP, CGI, etc.
10. Apache focuses on the HTTP server and Tomcat on the servlet engine
11. Unlike Tomcat, Apache can run for a year without restarting, and the stability is very good.
3.3. Apache versus LiteSpeed
Many modern server solutions use an existing technology as a base to build on. This is exactly the case with LiteSpeed.

LiteSpeed Web Server (LSWS) was first released in 2003 and was marketed as a replacement for Apache
It has the ability to read Apache configuration files, execute the same commands and fully integrate with all control panels such as cPanel, Plesk and DirectAdmin.
The main improvements were in performance and scalability.
Although LiteSpeed was intended to replace Apache, it does not use the same code base. In fact, its event-driven architecture makes the solution much more similar to Nginx
The software uses predictive mechanisms to handle incoming traffic spikes and lighten the load on the server.
Now it’s time to compare LiteSpeed vs Apache and find out which one is better:
- Popularity – LiteSpeed vs Apache – Winner: Apache
There could be only one winner for this factor. After all, Apache was already conquering the market. When LiteSpeed arrived, its competitor was already powering over 50% of all websites.
In fact, the percentage varies depending on the third-party source you are looking at.
According to Netcraft’s April 2020 report, Apache has already lost the top spot to Nginx, now holding only 25% of the market share
On the other hand, web survey giant W3Techs tells a different story. Their recent report on usage statistics shows that Apache is still king, ruling 39% of the Internet. Nginx is second with 31.9% and LiteSpeed is in 5th place, responsible for 6.4% of online sites.
Therefore, it is clear that the winner here is Apache.
- Performance (static content) – LiteSpeed vs Apache – Winner: LiteSpeed
Due to its asynchronous architecture, LiteSpeed is much more flexible with higher traffic and concurrent connections
It uses an intelligent caching methodology in which the system caches compressed files instead of creating a new request every time the user tries to view them.
In this way, LSWS is able to increase PHP server performance by 50%, eventually making it up to six times faster than Apache for static content.
There is another advantage: LiteSpeed works wonders when it comes to compressing pages. This way, each new request is not only served faster, but also uses less RAM.
Therefore, LiteSpeed lives up to its name.
- Performance (dynamic content) – LiteSpeed vs Apache: Equality
Most websites today are dynamic. They use server-side scripts, which determine how the server handles requests from different users.
Content Management Systems (CMS) are tools often used to create dynamic content: WordPress, Magento, Joomla, Drupal… it is very likely that your site uses a CMS solution
However, there is no clear winner when you put LiteSpeed’s performance to the test against Apache.
You can easily pre-configure it with modules like FastCGI and PHP-FPM. This way it will be able to handle higher loads and speed up your pages in a multi-user PHP environment.
LSWS is just as good, and benchmarks have confirmed this notion. Apache offered slightly better raw speed, but LiteSpeed’s advanced page compression gave it a slight advantage for larger websites.
- Operating System Support – LiteSpeed vs Apache – Winner: Apache
The operating system is another crucial element in the configuration of your website. Linux servers are still the dominant solution in the field of web hosting. Therefore, Unix-like operating systems are a natural choice
In this regard, it wouldn’t make much difference which web server you use.
Apache is compatible with all versions and instances of the Linux operating system
- Fedora;
- Ubuntu;
- RedHat
- Etc
And since LiteSpeed uses Apache as a base… well, you can connect the dots.
For Windows users, things change.
While Apache is fully optimized for Windows instances, LiteSpeed is not operating system friendly. According to the developers, Windows systems are quite different from Unix-like solutions and require many adjustments to the existing configuration.
Here Apache wins the duel.
- Security – LiteSpeed vs Apache – Winner: LiteSpeed
the security aspect should never be neglected. Cybercrime reports show a staggering 600% increase in online attacks since 2017, causing an estimated $500 billion in losses to the global economy.
Apache comes with everything you need to secure a web server. You can apply security rules, block user access or remove unnecessary modules
Moreover, Apache tries to follow the latest server security standards, frequently releasing vulnerability patches and security optimizations.
Nevertheless, you need some knowledge of administration and reconfiguration. LiteSpeed provides high-level protection for the website from the start
It supports Apache’s mod_security rules, so you can expect the same enhanced server defenses.
However, there are some things LiteSpeed excels at, and one of them is certainly protection against brute force and other DDoS attacks
In a simulated test, LSWS easily handled the same number of server requests that previously caused Apache to crash.
Every little bit counts, and LiteSpeed will have to win this one.
- Support – LiteSpeed vs Apache – Winner: LiteSpeed
Comparing LiteSpeed’s web server to Apache’s in terms of support, both solutions maintain detailed documentation for anyone interested in self-help
Naturally, the guides are a bit more technically oriented, but even a novice user can find enough learning material.
Still, LiteSpeed seems to have a better organized community. In addition to dedicated forums, LSWS users have their own groups on Slack and Facebook, where optimization tips are often discussed or customer problems solved.
As for live technical support, Apache simply does not have any. The software is open source, so the community is your best option for live support
In comparison, LiteSpeed is a commercial product, so they duly offer dedicated support. You can easily submit a help ticket from your user area, and operators are generally helpful.
You can even opt for premium support with LiteSpeed and get services such as:
- Installing modules
- Configuration of DDoS packages;
- Or removal of blacklists.
Of course, these services can be quite expensive. For example, $999 per year for server management seems too expensive for a start-up or a small business. But if you don’t have an IT person and can afford it, the experts at LSWS may be just what you’re looking for.
LiteSpeed wins this round because of the wide variety of support options and dedicated assistance it offers.
- Prize – LiteSpeed vs Apache – Winner: Apache
Apache already has the upper hand here. The software has always been distributed for free, which is one of the reasons why it is such a popular solution for web server management.
As a proprietary platform, LiteSpeed is a paid product, with prices ranging from $10/month to $92/month at higher levels. There is also a free version, but it is quite limited: it can only support one domain and gives about 2 GB of RAM.
In the end, if price is your main selling point, free (Apache) will always beat paid (LiteSpeed).
3.4. Apache versus Lighttpd
About 10 years ago (while Nginx was still in its infancy), Lighttpd was a lightweight alternative server to Apache, as it better supported simultaneous connections of thousands of users.

Source: Wikipedia
Lighttpd is a software written in C by Jan Kneschke, distributed under BSD license and available for Unix and Linux.
One of the features of the web server is that it consumes very little RAM and CPU resources. This makes it particularly useful for VPS or Dedicated servers with low resources.
It supports communication and integration with FastCGI, SCGI and CGI. Therefore, it is able to respond to page requests made in any programming language.
One of the disadvantages of lighttpd is that it does not support .htaccess, as well as the fact that it lacks comprehensive documentation and a massively adopted community, unlike its rivals Apache and Nginx.
Here are 7 main differences between Apache and Lighttpd servers:
- Nginx and Lighttpd are probably the two most well-known asynchronous servers, and Apache is by far the most well-known process-based server.
- Most tests show that there is an inherent performance gain in using Lighttpd over Apache.
- Apache supports CGI and FastCGI. It is tested and its implementation has not changed for years. You can find documents that are over ten years old and still valid. Lighttpd supports CGI and FastCGI via the module.
- Lighttpd supports X-Sendfile since version 1.5. Apache 1 does not support X-Sendfile. For Apache 2 there is a third party module.
- URL rewriting in Apache can be handled in a configuration (at site level) or via a replacement in the .htaccess state. In Lighttpd, you are limited to rewriting only via the configuration level, which means that for platforms like WordPress, you’ll have to hard code following the format rewrite rule.
- Lighttpd is distributed under the terms of the revised BSD license. This licensing option greatly reduces collaborative friction between Lighttpd code and code from other projects distributed under other licenses. Apache uses the Apache 2.0 license of the same name, which is sometimes considered “permissive” in the sense that it is an open source license that is not a copyleft license.
- Installing PHP is not as easy in Lighttpd as in Apache because there is no module for it.
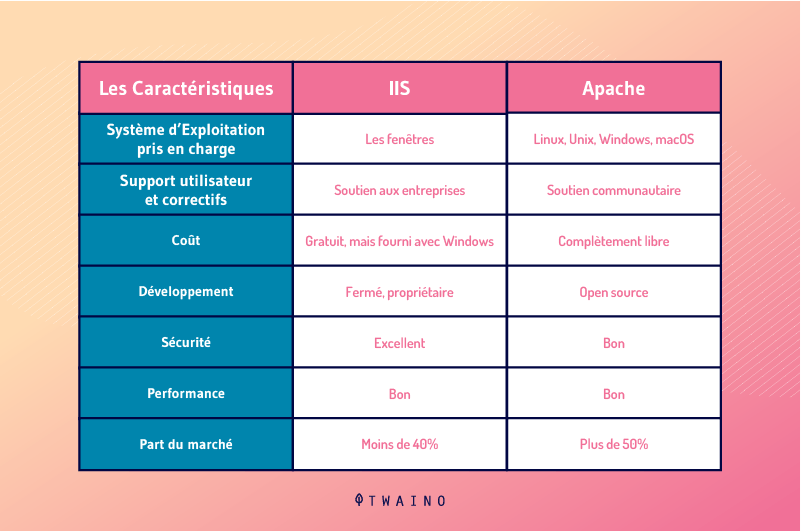
3.5. Apache versus IIS
IIS(Internet Information Services – formerly called Internet Information Server) is a web server created by Microsoft for its server operating systems

Although it is a proprietary system, it relies on several publicly available protocols, including:
- The Hypertext Transfer Protocol (HTTP)
- The Simple Mail Transfer Protocol (SMTP);
- And the file transfer protocol (FTP)
Its first version was introduced with Windows NT Server version 4 and has undergone several updates. Currently, the most recent version is IIS 10 (only available on Windows Server 2019)
After the launch of the .NET platform in 2002, IIS also acquired the role of managingASP.NET
ASP.NET, like its direct competitor JSP, is compiled before execution. This feature has advantages over interpreted options such as ASP and PHP.
Now, which one to choose?
Apache and IIS both have their advantages and disadvantages
- IIS comes with Windows but Apache does not have high profile enterprise support
- Apache has excellent security but does not offer the excellent .NET support of IIS
- Apache is free and IIS is not free;
- Language modules are easier to install on IIS because you just need to run the installer;
- IIS comes with the ASP library, ready to run scripts that use the language, while with Apache, the user has to install the appropriate packages;
- Etc
The final choice may well be defined by the solution that best meets your unavoidable needs
The following summary table can also help you:
Here is a short list of sites and their web servers:

3.6. Apache versus Caddy
Caddy is an open source web server platform designed to be simple, easy to use and secure
Written in Go with no dependencies, Caddy is easy to download and works on almost any platform that Go compiles on.

By default, Caddy supports automatic HTTPS by provisioning and renewing certificates via Let’s Encrypt. Unlike Apache, Caddy provides these features out of the box, and it also comes with automatic redirection of HTTP traffic to HTTPS.
Compared to Apache, Caddy’s configuration files are much smaller. In addition, Caddy runs on TLS 1.3, the latest standard for transport security.
In terms of performance, Caddy has proven to be competitive with Apache (but behind Nginx) both in terms of requests processed per second and load stability.
Another possible disadvantage of Caddy is that it currently holds a small market share, which may limit resources for troubleshooting
Chapter 4: Apache Installation and Configuration
4.1 Installing and Configuring the Apache Server: Short Video Tutorials
To help you see everything clearly, we have selected a few short, self-explanatory tutorial videos for the installation and configuration of the Apache HTTP Server:
- Tutorial to Install and configure Apache Web Server on Windows 10
- Tutorial to install and configure Apache on Linux:
- Tutorial to install and configure the Apache web server in Ubuntu Linux (for beginners)
4.2. Starting Apache
Use the following commands:
- To start the Apache service
sudo service apache2 start
- To check if the Apache configuration is valid and to reload
sudo apache2ctl configtest
sudo service apache2 reload
- To list the available Apache HTTP Server modules
/etc/init.d/apache2 -l
4.3. Configuring Apache via .htaccess
Use the “.htacess” file to configure some of the Apache HTTP behaviors. A major application of this file is to redirect a URL to other URLs.
The following .htacess file redirects http://twaino.com to http://www.twaino.com. It also redirects access to a certain web page to another web page via a 301 redirect

The 301 redirect will tell search engines that this page has been moved and is the recommended method for moving web pages.
Here is an explicit video that can help you with the configuration of Apache via .htacess
4.4. Using modules on Apache Http
Apache Http supports the use of modules. To enable modules, use a2enmod + command. To enable the rewrite module for example, use a2enmod rewrite.
Here is a video that explains how to enable/disable modules in Apache2: https: //youtu.be/YkZC38HfOQU
4.5. Performance – Enable gzip compression
To optimize the download time of your web pages, you can enable gzip compression. This requires the Apache module“mod_deflate” which can be installed with the following command:
a2enmod deflate
sudo /etc/init.d/apache2 restart
Compression can be enabled in the default configuration file for this module located in /etc/apache2/mods-available/deflate.conf or via the file “.htaccess“.
# compress all text & html:
AddOutputFilterByType DEFLATE text/plain
AddOutputFilterByType DEFLATE text/html
AddOutputFilterByType DEFLATE text/xml
AddOutputFilterByType DEFLATE text/css
AddOutputFilterByType DEFLATE application/xml
AddOutputFilterByType DEFLATE application/xhtml+xml
AddOutputFilterByType DEFLATE application/rss+xml
AddOutputFilterByType DEFLATE application/javascript
AddOutputFilterByType DEFLATE application/x-javascript
[[Other Apache modules]] == Support for php and wordpress :
sudo apt-get install libapache2-mod-fcgid
sudo apt-get install php5-cgi
Then activate the corresponding modules:
sudo a2enmod fastcgi
sudo a2enmod proxy
# required for wordpress blog
sudo a2enmod rewrite
Chapter 5: How to secure the Apache Web server?
Securing your web server is very important, it means:
- Prevent your confidential information from being displayed
- Protecting your data;
- And restricting access.
Here are 7 common things that can improve the security of your Apache web servers:
5.1. Hide Apache version and operating system information
Generally, Apache displays its version and operating system name in errors.
An attacker can use this information to launch an attack using publicly available vulnerabilities in the particular server or operating system version.
In order to prevent the Apache web server from displaying this information, you must modify the “ server signature ” option available in the apache configuration file. By default it is“ON“, you need to put it“OFF“.
You can also set“ServerTokens Prod” which tells the web server to return only Apache and to remove major and minor versions of the operating system.
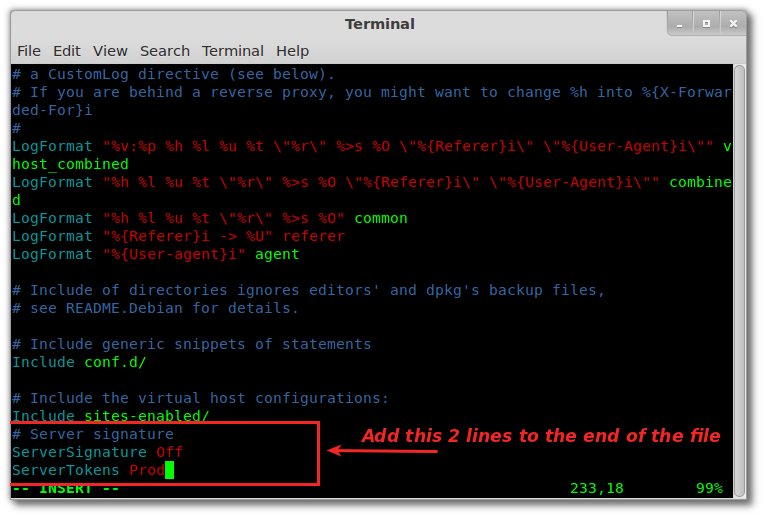
Source : Unixmen
After changing the configuration file, you need to restart/reload your apache web server to make it effective.
5.2. Disable directory listing
If the root directory of your document does not have an index file, by default your apache web server will display the entire contents of the document’s root directory.
This feature can be disabled for a specific directory via the “options directive” option available in the Apache configuration file.
5.3. Disable unnecessary modules
It is recommended to disable all unnecessary modules that are not used. You can see the list of enabled modules available in your apache configuration file.
Many of the modules listed can be disabled like:
- mod_imap
- mod_include
- mod_info
- mod_userdir
- mod_autoindex ;
- etc
They are hardly used by production web servers.
Once you have removed the modules that are not useful, save the file.
Restart the Apache services with the following command:
/etc/init.d/httpd restart
5.4. Restrict access to files outside the Web root directory
If you want to make sure that files outside the web root directory are not accessible, you need to make sure that the directory is restricted with the“Allow” and“Deny” option in your web server configuration file.
Once you have restricted access outside the web root directory, you will not be able to access any files located in any other folder on your web server. You will therefore get a 404 return code.
5.5. Use mod_evasive to refute DoS attack
If you want to protect your web server against Dos (i.e. Denial of Service), you should enable the mod_evasive module
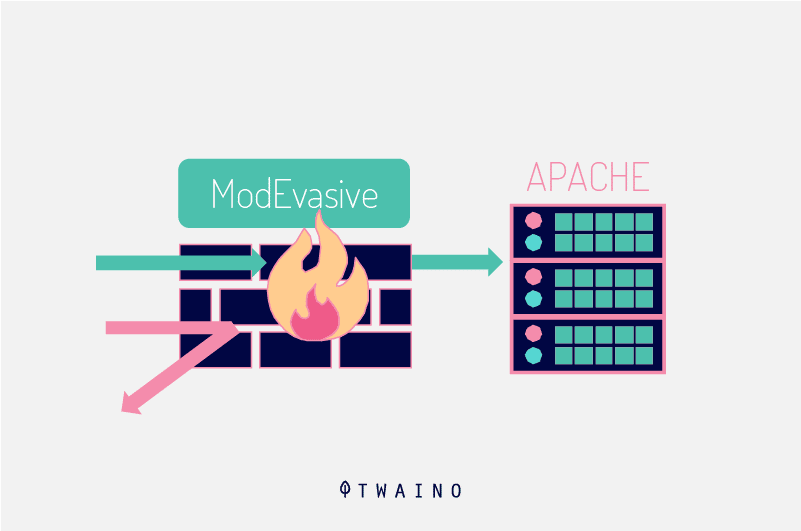
This is a third-party module that detects the Dos attack and prevents it from doing as much damage as it would if it were to take its course
It could be downloaded here : Download the file here.
5.6. Use mod_security to improve apache security
This module works as a firewall for Apache and allows you to monitor the traffic in real time. It also prevents the web server from brute force attacks
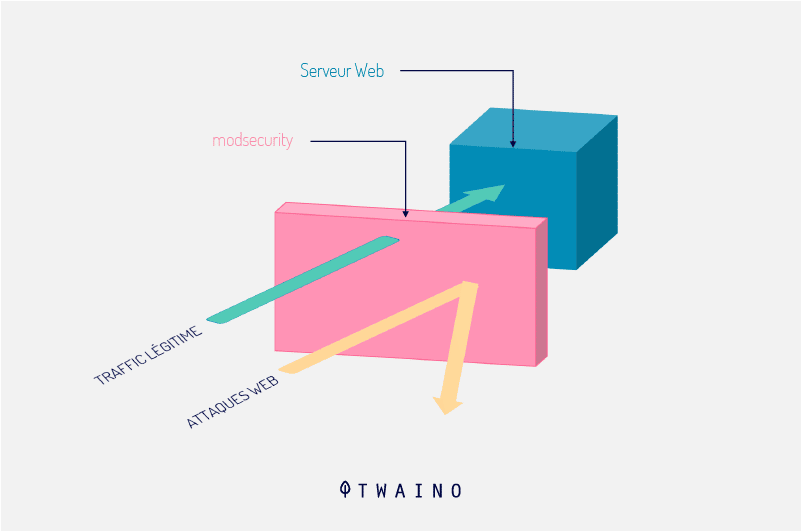
The mod_security module can be installed with the default package manager of your distribution.
5.7. Limit the size of requests
Apache has no restrictions on the total size of the http request that could lead to a DoS attack. However, you can limit the request size of an Apache “LimitRequestBody” directive with the directory tag
The value can be set between 0 and 2 GB (i.e. 2147483647 bytes) depending on your needs.
Chapter 6: Modular architecture of the HTTP server
The server has a modular architecture consisting of :
- a Core that supports the common basic functions
- then a series of proprietary/third party modules that extend its functionality that can be enabled or disabled in an installation as needed.
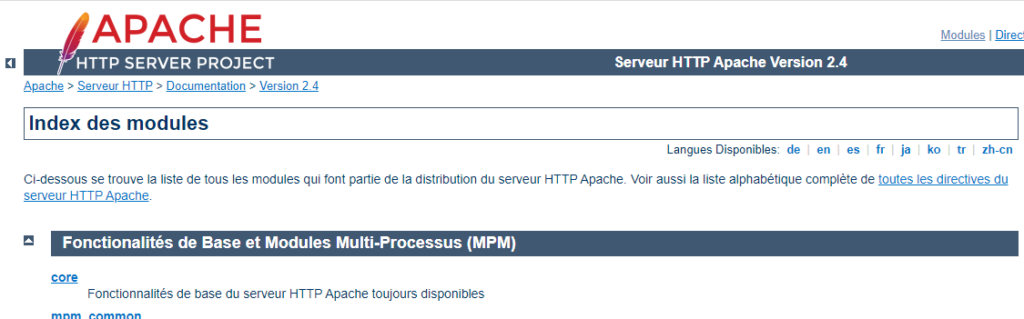
Among the best known are auth_basic and mod_rewrite, which are the ones a programmer uses most. The list is actually much longer
The complete list of modules can be seen in the module index available in the Apache documentation:
Among the most important modules, we can find the MPM ( Multi-Processing-Module ) modules which define the internal architecture
The way the work is distributed can vary depending on the MPM module used:
- Multi-processing prefork (mpm-prefork);
- Multiprocessing worker (mpm-worker);
- Multiprocessing event (mpm-event) ;
- ITK multiprocessing (mpm-itk).
These multi-processing modules (also called MPM) are the ones in charge of processing HTTP requests, managing the processes and the different execution threads of the service.
The choice of the module is a crucial decision since it will determine whether or not the server will function properly, depending on the use you wish to give the server.
6.1. mpm_prefork
The default module used by the server for processing is mpm-prefork. This module opens different processes to organize the work
It is considered the safest because there are some configurations and modules that are not safe to use with thread processing
Therefore, it is safer to use the server with mpm-prefork which instead of opening threads opens independent processes.
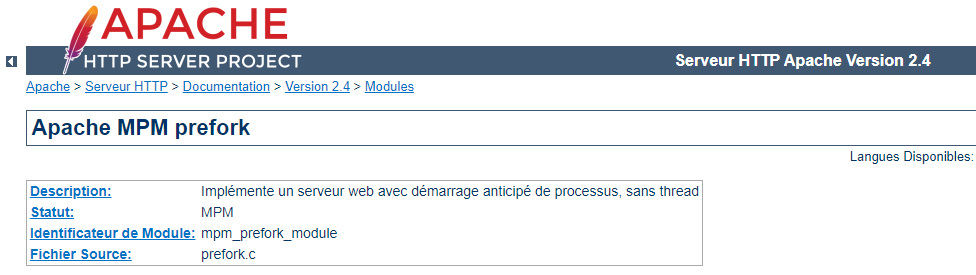
Although security is gained, it is also the one that consumes the most resources since independent processes consume much more CPU and RAM memory than threads.
6.2. mpm_worker
This module has better performance than mpm-prefork. Its function is to open several processes as prefork, and each of them in turn opens different threads to respond to requests.
Basically, it has two drawbacks
- The first is that it has a poorer error handling than prefork and in case of a thread failure, it can lose requests;
- And the second is that not all available modules are safe to use in this mode.
For example, the easiest way to do PHP configuration in Apache is via mod_php, but this module cannot be used with Worker. Therefore, it must be replaced by an example of PHP-FPM
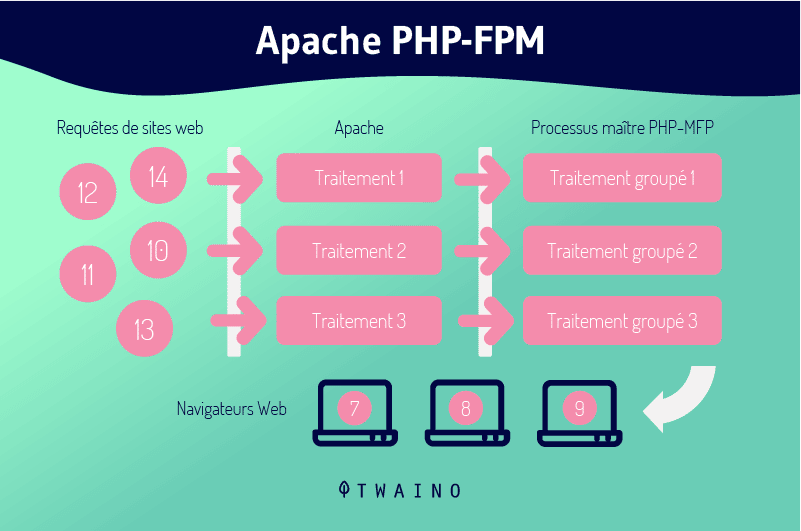
The latter in turn adds an improvement in resource usage, both memory and CPU.
6.3. mpm_event
Event is quite similar to mpm-worker in that it is based on it. It focuses on improving persistent requests for which Worker is not so good.
Normally a connection will be closed if it doesn’t have more information. To re-transmit a new connection, it involves a round trip communication to establish some parameters.
Once the communication is established, it is much more efficient to keep the channel open. This is done throughKeep-Alive requests that facilitate keeping a connection open until the client or server decides to close it.
This is where Event outperforms Worker and for the rest they share the advantages as well as the disadvantages since Event is based on Worker only with the improvement of these requests.
6.4. mpm_itk
This is the most recent module and like Prefork (which works with child processes instead of threads), the main innovation of this module is that it allows you to assign each VirtualHost (each hosted domain) a user.
This way of separating sites with different users allows :
- each site to have its own security permissions ;
- and that the user processes cannot interact with each other, obtaining confidentiality and security of the data.
The same thing can be achieved with PHP-FPM where each site can work with its respective user
However, the configuration of each one is more cumbersome and involves more memory usage since there is a PHP-FPM process for each site.
Chapter 7: Other Questions About the Apache Server
7.1. What is Apache?
Apache2 HTTP Server is a web server that uses the http protocol. It is developed by the Apache Software Foundation (ASF). It is open source, cross-platform (works on different operating systems), free and downloadable. The project website is www.apache.org.
7.2. Why is Apache so popular?
Apache is open source, and as such, it is developed and maintained by a large group of global volunteers. One of the main reasons it is so popular is that the software can be downloaded and used by anyone for free.
In addition, the Apache web server is an easy to customize environment, it is fast, reliable and highly secure. This makes it a common choice for the best companies.
7.3. How do I know if my Apache server is working?
- Access your server using your favorite SSH client.
- Enter the following command: sudo service apache2 status.
- If Apache is running, you will see the following message Apache is running (pid 26874).
7.4. What does Apache include?
Apache has modules for :
- Security ;
- Caching;
- URL rewriting;
- Password authentication;
- And so on
You can also adjust your own server settings via a file called .htaccess, which is an Apache configuration file.
7.5. How is the Apache server installed?
To install apache as a service :
- In the Windows menu, search for: cmd;
- Run cmd with administrator rights;
- Go to the apache : cd c:Apache24bin.
- Install the service with the instruction : httpd.exe -k install.
- Finally, start apache with the instruction : httpd.exe -k start.
7.6. How do I know if I am using Apache?
There are several ways to know the software used by our server, one of them is to use tools such as GTMetrix, Pingdom…
The easiest way would be to analyze the website via Pingdom, from the File Requests section.
7.7. What communication port does the Apache web server use?
By default, the Apache HTTP server is configured to listen on port 80 for insecure web communications and on port 443 for secure web communications.
7.8. What are the versions of Apache?
There are currently three versions of Apache running: versions 2.0, 2.2 and 2.4. Previously, there was version 1.3 which is the best known and the one that meant the big expansion of the server.
7.9. How do I start, restart or stop the Apache server?
To start, stop or restart Apache as a web server, you just need to access the terminal of your server via ssh and execute one of the following commands:
- Start Apache: /etc/init.d/ apache2 start.
- Restart Apache: /etc/init.d/ apache2 restart.
- Stop Apache: /etc/init.d/apache2 stop . 5/5 – (3 votes)
7.10. how does Apache work?
As a web server, Apache is responsible foraccepting directory requests (HTTP) from Internet users and sending them the desired informationin the form of files and web pages
Most web software and code is designed to work with Apache’s functionality.
7.what is MySQL and PHP in Apache?
Apache is the web server that processes requests and serves web resources and content via HTTP
MySQL is the database that stores all your information in an easily searchable format.
PHP is the programming language that works with Apache to help create dynamic web content.
7.12. Can Nginx replace Apache?
Both solutions are capable of handling various workloads. Although Apache and Nginx share many qualities, they should not be considered entirely interchangeable.
7.13. Is Nginx the same as Apache?
The main difference between Apache and NGINX is their design architecture
Apache uses a process-oriented approach and creates a new thread for each request. NGINX, on the other hand, uses an event-driven architecture to handle multiple requests within a single thread.
In summary
As we have seen before, Apache is the Web server that thousands of hosting companies around the world work with.
It is ideal for small and medium-sized businesses that want to be present in the digital world. Very compatible with WordPress that allows you to work in a simple and orderly way.
I hope this guide has helped you weigh the pros and cons to make the right decision for your project!
Thanks for reading and see you soon!
In this article, we explain what web servers are, how web servers work, and why they are important.
| Prerequisites: |
You should already know how the Internet works, and understand the difference between a web page, a website, a web server, and a search engine. |
|---|---|
| Objective: |
You will learn what a web server is and gain a general understanding of how it works. |
Summary
The term web server can refer to hardware or software, or both of them working together.
- On the hardware side, a web server is a computer that stores web server software and a website’s component files (for example, HTML documents, images, CSS stylesheets, and JavaScript files). A web server connects to the Internet and supports physical data interchange with other devices connected to the web.
- On the software side, a web server includes several parts that control how web users access hosted files. At a minimum, this is an HTTP server. An HTTP server is software that understands URLs (web addresses) and HTTP (the protocol your browser uses to view webpages). An HTTP server can be accessed through the domain names of the websites it stores, and it delivers the content of these hosted websites to the end user’s device.
At the most basic level, whenever a browser needs a file that is hosted on a web server, the browser requests the file via HTTP. When the request reaches the correct (hardware) web server, the (software) HTTP server accepts the request, finds the requested document, and sends it back to the browser, also through HTTP. (If the server doesn’t find the requested document, it returns a 404 response instead.)

To publish a website, you need either a static or a dynamic web server.
A static web server, or stack, consists of a computer (hardware) with an HTTP server (software). We call it «static» because the server sends its hosted files as-is to your browser.
A dynamic web server consists of a static web server plus extra software, most commonly an application server and a database. We call it «dynamic» because the application server updates the hosted files before sending content to your browser via the HTTP server.
For example, to produce the final webpages you see in the browser, the application server might fill an HTML template with content from a database. Sites like MDN or Wikipedia have thousands of webpages. Typically, these kinds of sites are composed of only a few HTML templates and a giant database, rather than thousands of static HTML documents. This setup makes it easier to maintain and deliver the content.
Deeper dive
To review: to fetch a webpage, your browser sends a request to the web server, which searches for the requested file in its own storage space. Upon finding the file, the server reads it, processes it as needed, and sends it to the browser. Let’s look at those steps in more detail.
Hosting files
First, a web server has to store the website’s files, namely all HTML documents and their related assets, including images, CSS stylesheets, JavaScript files, fonts, and video.
Technically, you could host all those files on your own computer, but it’s far more convenient to store files all on a dedicated web server because:
- A dedicated web server is typically more available (up and running).
- Excluding downtime and system troubles, a dedicated web server is always connected to the Internet.
- A dedicated web server can have the same IP address all the time. This is known as a dedicated IP address. (Not all ISPs provide a fixed IP address for home lines.)
- A dedicated web server is typically maintained by a third party.
For all these reasons, finding a good hosting provider is a key part of building your website. Examine the various services companies offer. Choose one that fits your needs and budget. (Services range from free to thousands of dollars per month.) You can find more details in this article.
Once you have web hosting service, you must upload your files to your web server.
Communicating through HTTP
Second, a web server provides support for HTTP (Hypertext Transfer Protocol). As its name implies, HTTP specifies how to transfer hypertext (linked web documents) between two computers.
A Protocol is a set of rules for communication between two computers. HTTP is a textual, stateless protocol.
- Textual
-
All commands are plain-text and human-readable.
- Stateless
-
Neither the server nor the client remember previous communications. For example, relying on HTTP alone, a server can’t remember a password you typed or remember your progress on an incomplete transaction. You need an application server for tasks like that. (We’ll cover that sort of technology in other articles.)
HTTP provides clear rules for how a client and server communicate. We’ll cover HTTP itself in a technical article later. For now, just be aware of these things:
- Usually only clients make HTTP requests, and only to servers. Servers respond to a client‘s HTTP request. A server can also populate data into a client cache, in advance of it being requested, through a mechanism called server push.
- When requesting a file via HTTP, clients must provide the file’s URL.
- The web server must answer every HTTP request, at least with an error message.
On a web server, the HTTP server is responsible for processing and answering incoming requests.
- Upon receiving a request, an HTTP server checks if the requested URL matches an existing file.
- If so, the web server sends the file content back to the browser. If not, the server will check if it should generate a file dynamically for the request (see Static vs. dynamic content).
-
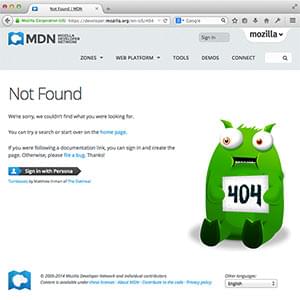
If neither of these options are possible, the web server returns an error message to the browser, most commonly
404 Not Found.
The 404 error is so common that some web designers devote considerable time and effort to designing 404 error pages.

Static vs. dynamic content
Roughly speaking, a server can serve either static or dynamic content. Remember that the term static means «served as-is». Static websites are the easiest to set up, so we suggest you make your first site a static site.
The term dynamic means that the server processes the content or even generates it on the fly from a database. This approach provides more flexibility, but the technical stack is more complex, making it dramatically more challenging to build a website.
There are so many application server technologies that it’s difficult to suggest a particular one. Some application servers cater to specific website categories like blogs, wikis, or e-commerce; others are more generic. If you’re building a dynamic website, take the time to choose technology that fits your needs. Unless you want to learn web server programming (which is an exciting area in itself!), you don’t need to create your own application server. That’s just reinventing the wheel.
Next steps
![]()
PC clients communicating via the network with a web server serving static content only.

The inside and front of a Dell PowerEdge server, a computer designed to be mounted in a rack mount environment. It is often used as a web server.

Multiple web servers may be used for a high-traffic website.

Web server farm with thousands of web servers used for super-high traffic websites.

A web server is computer software and underlying hardware that accepts requests via HTTP (the network protocol created to distribute web content) or its secure variant HTTPS. A user agent, commonly a web browser or web crawler, initiates communication by making a request for a web page or other resource using HTTP, and the server responds with the content of that resource or an error message. A web server can also accept and store resources sent from the user agent if configured to do so.[1]
[2]
The hardware used to run a web server can vary according to the volume of requests that it needs to handle. At the low end of the range are embedded systems, such as a router that runs a small web server as its configuration interface. A high-traffic Internet website might handle requests with hundreds of servers that run on racks of high-speed computers.
A resource sent from a web server can be a pre-existing file (static content) available to the web server, or it can be generated at the time of the request (dynamic content) by another program that communicates with the server software. The former usually can be served faster and can be more easily cached for repeated requests, while the latter supports a broader range of applications.
Technologies such as REST and SOAP, which use HTTP as a basis for general computer-to-computer communication, as well as support for WebDAV extensions, have extended the application of web servers well beyond their original purpose of serving human-readable pages.
History[edit]

First web proposal (1989) evaluated as «vague but exciting…»

The world’s first web server, a NeXT Computer workstation with Ethernet, 1990. The case label reads: «This machine is a server. DO NOT POWER IT DOWN!!»
This is a very brief history of web server programs, so some information necessarily overlaps with the histories of the web browsers, the World Wide Web and the Internet; therefore, for the sake of clearness and understandability, some key historical information below reported may be similar to that found also in one or more of the above-mentioned history articles.
Initial WWW project (1989-1991)[edit]
In March 1989, Sir Tim Berners-Lee proposed a new project to his employer CERN, with the goal of easing the exchange of information between scientists by using a hypertext system. The proposal titled «HyperText and CERN», asked for comments and it was read by several people. In October 1990 the proposal was reformulated and enriched (having as co-author Robert Cailliau), and finally, it was approved.[3] [4] [5]
Between late 1990 and early 1991 the project resulted in Berners-Lee and his developers writing and testing several software libraries along with three programs, which initially ran on NeXTSTEP OS installed on NeXT workstations:
[6]
[7]
[5]
- a graphical web browser, called WorldWideWeb;
- a portable line mode web browser;
- a web server, later known as CERN httpd.
Those early browsers retrieved web pages from web server(s) using a new basic communication protocol that was named HTTP 0.9.
In August 1991 Tim Berner-Lee announced the birth of WWW technology and encouraged scientists to adopt and develop it.[8] Soon after, those programs, along with their source code, were made available to people interested in their usage.[6] In practice CERN informally allowed other people, including developers, etc., to play with and maybe further develop what it has been made till that moment. This was the official birth of CERN httpd. Since then Berner-Lee started promoting the adoption and the usage of those programs along with their porting to other OSs.[5]
Fast and wild development (1991-1995)[edit]
Number of active web sites (1991-1996)[9][10]
In December 1991 the first web server outside Europe was installed at SLAC (U.S.A.).[7] This was a very important event because it started trans-continental web communications between web browsers and web servers.
In 1991-1993 CERN web server program continued to be actively developed by the www group, meanwhile, thanks to the availability of its source code and the public specifications of the HTTP protocol, many other implementations of web servers started to be developed.
In April 1993 CERN issued a public official statement stating that the three components of Web software (the basic line-mode client, the web server and the library of common code), along with their source code, were put in the public domain.[11] This statement freed web server developers from any possible legal issue about the development of derivative work based on that source code (a threat that in practice never existed).
At the beginning of 1994, the most notable among new web servers was NCSA httpd which ran on a variety of Unix-based OSs and could serve dynamically generated content by implementing the POST HTTP method and the CGI to communicate with external programs. These capabilities, along with the multimedia features of NCSA’s Mosaic browser (also able to manage HTML FORMs in order to send data to a web server) highlighted the potential of web technology for publishing and distributed computing applications.
In the second half of 1994, the development of NCSA httpd stalled to the point that a group of external software developers, webmasters and other professional figures interested in that server, started to write and collect patches thanks to the NCSA httpd source code being available to the public domain. At the beginning of 1995 those patches were all applied to the last release of NCSA source code and, after several tests, the Apache HTTP server project was started.[12][13]
At the end of 1994 a new commercial web server, named Netsite, was released with specific features. It was the first one of many other similar products that were developed first by Netscape, then also by Sun Microsystems, and finally by Oracle Corporation.
In mid-1995 the first version of IIS was released, for Windows NT OS, by Microsoft. This marked the entry, in the field of World Wide Web technologies, of a very important commercial developer and vendor that has played and still is playing a key role on both sides (client and server) of the web.
In the second half of 1995 CERN and NCSA web servers started to decline (in global percentage usage) because of the widespread adoption of new web servers which had a much faster development cycle along with more features, more fixes applied, and more performances than the previous ones.
Explosive growth and competition (1996-2014)[edit]
Number of active web sites (1996-2002)[10][14]

At the end of 1996 there were already over fifty known (different) web server software programs that were available to everybody who wanted to own an Internet domain name and/or to host websites.[15] Many of them lived only shortly and were replaced by other web servers.
The publication of RFCs about protocol versions HTTP/1.0 (1996) and HTTP/1.1 (1997, 1999), forced most web servers to comply (not always completely) with those standards. The use of TCP/IP persistent connections (HTTP/1.1) required web servers both to increase a lot the maximum number of concurrent connections allowed and to improve their level of scalability.
Between 1996 and 1999 Netscape Enterprise Server and Microsoft’s IIS emerged among the leading commercial options whereas among the freely available and open-source programs Apache HTTP Server held the lead as the preferred server (because of its reliability and its many features).
In those years there was also another commercial, highly innovative and thus notable web server called Zeus (now discontinued) that was known as one of the fastest and most scalable web servers available on market, at least till the first decade of 2000s, despite its low percentage of usage.
Apache resulted in the most used web server from mid-1996 to the end of 2015 when, after a few years of decline, it was surpassed initially by IIS and then by Nginx. Afterward IIS dropped to much lower percentages of usage than Apache (see also market share).
From 2005-2006 Apache started to improve its speed and its scalability level by introducing new performance features (e.g. event MPM and new content cache).[16][17] As those new performance improvements initially were marked as experimental, they were not enabled by its users for a long time and so Apache suffered, even more, the competition of commercial servers and, above all, of other open-source servers which meanwhile had already achieved far superior performances (mostly when serving static content) since the beginning of their development and at the time of the Apache decline were able to offer also a long enough list of well tested advanced features.
In fact, a few years after 2000 started, not only other commercial and highly competitive web servers, e.g. LiteSpeed, but also many other open-source programs, often of excellent quality and very high performances, among which should be noted Hiawatha, Cherokee HTTP server, Lighttpd, Nginx and other derived/related products also available with commercial support, emerged.
Around 2007-2008 most popular web browsers increased their previous default limit of 2 persistent connections per host-domain (a limit recommended by RFC-2616) [18] to 4, 6 or 8 persistent connections per host-domain, in order to speed up the retrieval of heavy web pages with lots of images, and to mitigate the problem of the shortage of persistent connections dedicated to dynamic objects used for bi-directional notifications of events in web pages.[19] Within a year, these changes, on average, nearly tripled the maximum number of persistent connections that web servers had to manage. This trend (of increasing the number of persistent connections) definitely gave a strong impetus to the adoption of reverse proxies in front of slower web servers and it gave also one more chance to the emerging new web servers that could show all their speed and their capability to handle very high numbers of concurrent connections without requiring too many hardware resources (expensive computers with lots of CPUs, RAM and fast disks).[20]
New challenges (2015 and later years)[edit]
In 2015, RFCs published new protocol version [HTTP/2], and as the implementation of new specifications was not trivial at all, a dilemma arose among developers of less popular web servers (e.g. with a percentage of usage lower than 1% .. 2%), about adding or not adding support for that new protocol version.[21][22]
In fact supporting HTTP/2 often required radical changes to their internal implementation due to many factors (practically always required encrypted connections, capability to distinguish between HTTP/1.x and HTTP/2 connections on the same TCP port, binary representation of HTTP messages, message priority, compression of HTTP headers, use of streams also known as TCP/IP sub-connections and related flow-control, etc.) and so a few developers of those web servers opted for not supporting new HTTP/2 version (at least in the near future) also because of these main reasons:[21][22]
- protocols HTTP/1.x would have been supported anyway by browsers for a very long time (maybe forever) so that there would be no incompatibility between clients and servers in next future;
- implementing HTTP/2 was considered a task of overwhelming complexity that could open the door to a whole new class of bugs that till 2015 did not exist and so it would have required notable investments in developing and testing the implementation of the new protocol;
- adding HTTP/2 support could always be done in future in case the efforts would be justified.
Instead, developers of most popular web servers, rushed to offer the availability of new protocol, not only because they had the work force and the time to do so, but also because usually their previous implementation of SPDY protocol could be reused as a starting point and because most used web browsers implemented it very quickly for the same reason. Another reason that prompted those developers to act quickly was that webmasters felt the pressure of the ever increasing web traffic and they really wanted to install and to try — as soon as possible — something that could drastically lower the number of TCP/IP connections and speedup accesses to hosted websites.[23]
In 2020–2021 the HTTP/2 dynamics about its implementation (by top web servers and popular web browsers) were partly replicated after the publication of advanced drafts of future RFC about HTTP/3 protocol.
Technical overview[edit]

PC clients connected to a web server via Internet
The following technical overview should be considered only as an attempt to give a few very limited examples about some features that may be implemented in a web server and some of the tasks that it may perform in order to have a sufficiently wide scenario about the topic.
A web server program plays the role of a server in a client–server model by implementing one or more versions of HTTP protocol, often including the HTTPS secure variant and other features and extensions that are considered useful for its planned usage.
The complexity and the efficiency of a web server program may vary a lot depending on (e.g.):[1]
- common features implemented;
- common tasks performed;
- performances and scalability level aimed as a goal;
- software model and techniques adopted to achieve wished performance and scalability level;
- target hardware and category of usage, e.g. embedded system, low-medium traffic web server, high traffic Internet web server.
Common features[edit]
Although web server programs differ in how they are implemented, most of them offer the following common features.
These are basic features that most web servers usually have.
- Static content serving: to be able to serve static content (web files) to clients via HTTP protocol.
- HTTP: support for one or more versions of HTTP protocol in order to send versions of HTTP responses compatible with versions of client HTTP requests, e.g. HTTP/1.0, HTTP/1.1 (eventually also with encrypted connections HTTPS), plus, if available, HTTP/2, HTTP/3.
- Logging: usually web servers have also the capability of logging some information, about client requests and server responses, to log files for security and statistical purposes.
A few other more advanced and popular features (only a very short selection) are the following ones.
- Dynamic content serving: to be able to serve dynamic content (generated on the fly) to clients via HTTP protocol.
- Virtual hosting: to be able to serve many websites (domain names) using only one IP address.
- Authorization: to be able to allow, to forbid or to authorize access to portions of website paths (web resources).
- Content cache: to be able to cache static and/or dynamic content in order to speed up server responses;
- Large file support: to be able to serve files whose size is greater than 2 GB on 32 bit OS.
- Bandwidth throttling: to limit the speed of content responses in order to not saturate the network and to be able to serve more clients;
- Rewrite engine: to map parts of clean URLs (found in client requests) to their real names.
- Custom error pages: support for customized HTTP error messages.
Common tasks[edit]
A web server program, when it is running, usually performs several general tasks, (e.g.):[1]
- starts, optionally reads and applies settings found in its configuration file(s) or elsewhere, optionally opens log file, starts listening to client connections / requests;
- optionally tries to adapt its general behavior according to its settings and its current operating conditions;
- manages client connection(s) (accepting new ones or closing the existing ones as required);
- receives client requests (by reading HTTP messages):
- reads and verify each HTTP request message;
- usually performs URL normalization;
- usually performs URL mapping (which may default to URL path translation);
- usually performs URL path translation along with various security checks;
- executes or refuses requested HTTP method:
- optionally manages URL authorizations;
- optionally manages URL redirections;
- optionally manages requests for static resources (file contents):
- optionally manages directory index files;
- optionally manages regular files;
- optionally manages requests for dynamic resources:
- optionally manages directory listings;
- optionally manages program or module processing, checking the availability, the start and eventually the stop of the execution of external programs used to generate dynamic content;
- optionally manages the communications with external programs / internal modules used to generate dynamic content;
- replies to client requests sending proper HTTP responses (e.g. requested resources or error messages) eventually verifying or adding HTTP headers to those sent by dynamic programs / modules;
- optionally logs (partially or totally) client requests and/or its responses to an external user log file or to a system log file by syslog, usually using common log format;
- optionally logs process messages about detected anomalies or other notable events (e.g. in client requests or in its internal functioning) using syslog or some other system facilities; these log messages usually have a debug, warning, error, alert level which can be filtered (not logged) depending on some settings, see also severity level;
- optionally generates statistics about web traffic managed and/or its performances;
- other custom tasks.
Read request message[edit]
Web server programs are able:[24]
[25]
[26]
- to read an HTTP request message;
- to interpret it;
- to verify its syntax;
- to identify known HTTP headers and to extract their values from them.
Once an HTTP request message has been decoded and verified, its values can be used to determine whether that request can be satisfied or not. This requires many other steps, including security checks.
URL normalization[edit]
Web server programs usually perform some type of URL normalization (URL found in most HTTP request messages) in order:
- to make resource path always a clean uniform path from root directory of website;
- to lower security risks (e.g. by intercepting more easily attempts to access static resources outside the root directory of the website or to access to portions of path below website root directory that are forbidden or which require authorization);
- to make path of web resources more recognizable by human beings and web log analysis programs (also known as log analyzers / statistical applications).
The term URL normalization refers to the process of modifying and standardizing a URL in a consistent manner. There are several types of normalization that may be performed, including the conversion of the scheme and host to lowercase. Among the most important normalizations are the removal of «.» and «..» path segments and adding trailing slashes to a non-empty path component.
URL mapping[edit]
«URL mapping is the process by which a URL is analyzed to figure out what resource it is referring to, so that that resource can be returned to the requesting client. This process is performed with every request that is made to a web server, with some of the requests being served with a file, such as an HTML document, or a gif image, others with the results of running a CGI program, and others by some other process, such as a built-in module handler, a PHP document, or a Java servlet.»[27]
In practice, web server programs that implement advanced features, beyond the simple static content serving (e.g. URL rewrite engine, dynamic content serving), usually have to figure out how that URL has to be handled, e.g.:
- as a URL redirection, a redirection to another URL;
- as a static request of file content;
- as a dynamic request of:
- directory listing of files or other sub-directories contained in that directory;
- other types of dynamic request in order to identify the program / module processor able to handle that kind of URL path and to pass to it other URL parts, i.e. usually path-info and query string variables.
One or more configuration files of web server may specify the mapping of parts of URL path (e.g. initial parts of file path, filename extension and other path components) to a specific URL handler (file, directory, external program or internal module).[28]
When a web server implements one or more of the above-mentioned advanced features then the path part of a valid URL may not always match an existing file system path under website directory tree (a file or a directory in file system) because it can refer to a virtual name of an internal or external module processor for dynamic requests.
URL path translation to file system[edit]
Web server programs are able to translate an URL path (all or part of it), that refers to a physical file system path, to an absolute path under the target website’s root directory.[28]
Website’s root directory may be specified by a configuration file or by some internal rule of the web server by using the name of the website which is the host part of the URL found in HTTP client request.[28]
Path translation to file system is done for the following types of web resources:
- a local, usually non-executable, file (static request for file content);
- a local directory (dynamic request: directory listing generated on the fly);
- a program name (dynamic requests that is executed using CGI or SCGI interface and whose output is read by web server and resent to client who made the HTTP request).
The web server appends the path found in requested URL (HTTP request message) and appends it to the path of the (Host) website root directory. On an Apache server, this is commonly /home/www/website (on Unix machines, usually it is: /var/www/website). See the following examples of how it may result.
URL path translation for a static file request
Example of a static request of an existing file specified by the following URL:
http://www.example.com/path/file.html
The client’s user agent connects to www.example.com and then sends the following HTTP/1.1 request:
GET /path/file.html HTTP/1.1
Host: www.example.com
Connection: keep-alive
The result is the local file system resource:
/home/www/www.example.com/path/file.html
The web server then reads the file, if it exists, and sends a response to the client’s web browser. The response will describe the content of the file and contain the file itself or an error message will return saying that the file does not exist or its access is forbidden.
URL path translation for a directory request (without a static index file)
Example of an implicit dynamic request of an existing directory specified by the following URL:
http://www.example.com/directory1/directory2/
The client’s user agent connects to www.example.com and then sends the following HTTP/1.1 request:
GET /directory1/directory2 HTTP/1.1
Host: www.example.com
Connection: keep-alive
The result is the local directory path:
/home/www/www.example.com/directory1/directory2/
The web server then verifies the existence of the directory and if it exists and it can be accessed then tries to find out an index file (which in this case does not exist) and so it passes the request to an internal module or a program dedicated to directory listings and finally reads data output and sends a response to the client’s web browser. The response will describe the content of the directory (list of contained subdirectories and files) or an error message will return saying that the directory does not exist or its access is forbidden.
URL path translation for a dynamic program request
For a dynamic request the URL path specified by the client should refer to an existing external program (usually an executable file with a CGI) used by the web server to generate dynamic content.[29]
Example of a dynamic request using a program file to generate output:
http://www.example.com/cgi-bin/forum.php?action=view&orderby=thread&date=2021-10-15
The client’s user agent connects to www.example.com and then sends the following HTTP/1.1 request:
GET /cgi-bin/forum.php?action=view&ordeby=thread&date=2021-10-15 HTTP/1.1
Host: www.example.com
Connection: keep-alive
The result is the local file path of the program (in this example, a PHP program):
/home/www/www.example.com/cgi-bin/forum.php
The web server executes that program, passing in the path-info and the query string action=view&orderby=thread&date=2021-10-15 so that the program has the info it needs to run. (In this case, it will return an HTML document containing a view of forum entries ordered by thread from October 15th, 2021). In addition to this, the web server reads data sent from the external program and resends that data to the client that made the request.
Manage request message[edit]
Once a request has been read, interpreted, and verified, it has to be managed depending on its method, its URL, and its parameters, which may include values of HTTP headers.
In practice, the web server has to handle the request by using one of these response paths:[28]
- if something in request was not acceptable (in status line or message headers), web server already sent an error response;
- if request has a method (e.g.
OPTIONS) that can be satisfied by general code of web server then a successful response is sent; - if URL requires authorization then an authorization error message is sent;
- if URL maps to a redirection then a redirect message is sent;
- if URL maps to a dynamic resource (a virtual path or a directory listing) then its handler (an internal module or an external program) is called and request parameters (query string and path info) are passed to it in order to allow it to reply to that request;
- if URL maps to a static resource (usually a file on file system) then the internal static handler is called to send that file;
- if request method is not known or if there is some other unacceptable condition (e.g. resource not found, internal server error, etc.) then an error response is sent.
Serve static content[edit]
![]()
PC clients communicating via network with a web server serving static content only.
If a web server program is capable of serving static content and it has been configured to do so, then it is able to send file content whenever a request message has a valid URL path matching (after URL mapping, URL translation and URL redirection) that of an existing file under the root directory of a website and file has attributes which match those required by internal rules of web server program.[28]
That kind of content is called static because usually it is not changed by the web server when it is sent to clients and because it remains the same until it is modified (file modification) by some program.
NOTE: when serving static content only, a web server program usually does not change file contents of served websites (as they are only read and never written) and so it suffices to support only these HTTP methods:
OPTIONSHEADGET
Response of static file content can be sped up by a file cache.
Directory index files[edit]
If a web server program receives a client request message with an URL whose path matches one of an existing directory and that directory is accessible and serving directory index file(s) is enabled then a web server program may try to serve the first of known (or configured) static index file names (a regular file) found in that directory; if no index file is found or other conditions are not met then an error message is returned.
Most used names for static index files are: index.html, index.htm and Default.htm.
Regular files[edit]
If a web server program receives a client request message with an URL whose path matches the file name of an existing file and that file is accessible by web server program and its attributes match internal rules of web server program, then web server program can send that file to client.
Usually, for security reasons, most web server programs are pre-configured to serve only regular files or to avoid to use special file types like device files, along with symbolic links or hard links to them. The aim is to avoid undesirable side effects when serving static web resources.[30]
Serve dynamic content[edit]
![]()
PC clients communicating via network with a web server serving static and dynamic content.
If a web server program is capable of serving dynamic content and it has been configured to do so, then it is able to communicate with the proper internal module or external program (associated with the requested URL path) in order to pass to it parameters of client request; after that, web server program reads from it its data response (that it has generated, often on the fly) and then it resends it to the client program who made the request.[citation needed]
NOTE: when serving static and dynamic content, a web server program usually has to support also the following HTTP method in order to be able to safely receive data from client(s) and so to be able to host also websites with interactive form(s) that may send large data sets (e.g. lots of data entry or file uploads) to web server / external programs / modules:
POST
In order to be able to communicate with its internal modules and/or external programs, a web server program must have implemented one or more of the many available gateway interface(s) (see also Web Server Gateway Interfaces used for dynamic content).
The three standard and historical gateway interfaces are the following ones.
- CGI
- An external CGI program is run by web server program for each dynamic request, then web server program reads from it the generated data response and then resends it to client.
- SCGI
- An external SCGI program (it usually is a process) is started once by web server program or by some other program / process and then it waits for network connections; every time there is a new request for it, web server program makes a new network connection to it in order to send request parameters and to read its data response, then network connection is closed.
- FastCGI
- An external FastCGI program (it usually is a process) is started once by web server program or by some other program / process and then it waits for a network connection which is established permanently by web server; through that connection are sent the request parameters and read data responses.
Directory listings[edit]
![]()
Directory listing dynamically generated by a web server.
A web server program may be capable to manage the dynamic generation (on the fly) of a directory index list of files and sub-directories.[31]
If a web server program is configured to do so and a requested URL path matches an existing directory and its access is allowed and no static index file is found under that directory then a web page (usually in HTML format), containing the list of files and/or subdirectories of above mentioned directory, is dynamically generated (on the fly). If it cannot be generated an error is returned.
Some web server programs allow the customization of directory listings by allowing the usage of a web page template (an HTML document containing placeholders, e.g. $(FILE_NAME), $(FILE_SIZE), etc., that are replaced with the field values of each file entry found in directory by web server), e.g. index.tpl or the usage of HTML and embedded source code that is interpreted and executed on the fly, e.g. index.asp, and / or by supporting the usage of dynamic index programs such as CGIs, SCGIs, FCGIs, e.g. index.cgi, index.php, index.fcgi.
Usage of dynamically generated directory listings is usually avoided or limited to a few selected directories of a website because that generation takes much more OS resources than sending a static index page.
The main usage of directory listings is to allow the download of files (usually when their names, sizes, modification date-times or file attributes may change randomly / frequently) as they are, without requiring to provide further information to requesting user.[32]
Program or module processing[edit]
An external program or an internal module (processing unit) can execute some sort of application function that may be used to get data from or to store data to one or more data repositories, e.g.:[citation needed]
- files (file system);
- databases (DBs);
- other sources located in local computer or in other computers.
A processing unit can return any kind of web content, also by using data retrieved from a data repository, e.g.:[citation needed]
- a document (e.g. HTML, XML, etc.);
- an image;
- a video;
- structured data, e.g. that may be used to update one or more values displayed by a dynamic page (DHTML) of a web interface and that maybe was requested by an XMLHttpRequest API (see also: dynamic page).
In practice whenever there is content that may vary, depending on one or more parameters contained in client request or in configuration settings, then, usually, it is generated dynamically.
Send response message[edit]
Web server programs are able to send response messages as replies to client request messages.[24]
An error response message may be sent because a request message could not be successfully read or decoded or analyzed or executed.[25]
NOTE: the following sections are reported only as examples to help to understand what a web server, more or less, does; these sections are by any means neither exhaustive nor complete.
Error message[edit]
A web server program may reply to a client request message with many kinds of error messages, anyway these errors are divided mainly in two categories:
- HTTP client errors, due to the type of request message or to the availability of requested web resource;[33]
- HTTP server errors, due to internal server errors.[34]
When an error response / message is received by a client browser, then if it is related to the main user request (e.g. an URL of a web resource such as a web page) then usually that error message is shown in some browser window / message.
[edit]
A web server program may be able to verify whether the requested URL path:[35]
- can be freely accessed by everybody;
- requires a user authentication (request of user credentials, e.g. such as user name and password);
- access is forbidden to some or all kind of users.
If the authorization / access rights feature has been implemented and enabled and access to web resource is not granted, then, depending on the required access rights, a web server program:
- can deny access by sending a specific error message (e.g. access forbidden);
- may deny access by sending a specific error message (e.g. access unauthorized) that usually forces the client browser to ask human user to provide required user credentials; if authentication credentials are provided then web server program verifies and accepts or rejects them.
URL redirection[edit]
A web server program may have the capability of doing URL redirections to new URLs (new locations) which consists in replying to a client request message with a response message containing a new URL suited to access a valid or an existing web resource (client should redo the request with the new URL).[36]
URL redirection of location is used:[36]
- to fix a directory name by adding a final slash ‘/’;[31]
- to give a new URL for a no more existing URL path to a new path where that kind of web resource can be found.
- to give a new URL to another domain when current domain has too much load.
Example 1: a URL path points to a directory name but it does not have a final slash ‘/’ so web server sends a redirect to client in order to instruct it to redo the request with the fixed path name.[31]
From:
/directory1/directory2
To:
/directory1/directory2/
Example 2: a whole set of documents has been moved inside website in order to reorganize their file system paths.
From:
/directory1/directory2/2021-10-08/
To:
/directory1/directory2/2021/10/08/
Example 3: a whole set of documents has been moved to a new website and now it is mandatory to use secure HTTPS connections to access them.
From:
http://www.example.com/directory1/directory2/2021-10-08/
To:
https://docs.example.com/directory1/2021-10-08/
Above examples are only a few of the possible kind of redirections.
Successful message[edit]
A web server program is able to reply to a valid client request message with a successful message, optionally containing requested web resource data.[37]
If web resource data is sent back to client, then it can be static content or dynamic content depending on how it has been retrieved (from a file or from the output of some program / module).
Content cache[edit]
In order to speed up web server responses by lowering average HTTP response times and hardware resources used, many popular web servers implement one or more content caches, each one specialized in a content category.[38]
[39]
Content is usually cached by its origin, e.g.:
- static content:
- file cache;
- dynamic content:
- dynamic cache (module / program output).
File cache[edit]
Historically, static contents found in files which had to be accessed frequently, randomly and quickly, have been stored mostly on electro-mechanical disks since mid-late 1960s / 1970s; regrettably reads from and writes to those kind of devices have always been considered very slow operations when compared to RAM speed and so, since early OSs, first disk caches and then also OS file cache sub-systems were developed to speed up I/O operations of frequently accessed data / files.
Even with the aid of an OS file cache, the relative / occasional slowness of I/O operations involving directories and files stored on disks became soon a bottleneck in the increase of performances expected from top level web servers, specially since mid-late 1990s, when web Internet traffic started to grow exponentially along with the constant increase of speed of Internet / network lines.
The problem about how to further efficiently speed-up the serving of static files, thus increasing the maximum number of requests/responses per second (RPS), started to be studied / researched since mid 1990s, with the aim to propose useful cache models that could be implemented in web server programs.[40]
In practice, nowadays, many popular / high performance web server programs include their own userland file cache, tailored for a web server usage and using their specific implementation and parameters.[41]
[42]
[43]
The wide spread adoption of RAID and/or fast solid-state drives (storage hardware with very high I/O speed) has slightly reduced but of course not eliminated the advantage of having a file cache incorporated in a web server.
Dynamic cache[edit]
Dynamic content, output by an internal module or an external program, may not always change very frequently (given a unique URL with keys / parameters) and so, maybe for a while (e.g. from 1 second to several hours or more), the resulting output can be cached in RAM or even on a fast disk.[44]
The typical usage of a dynamic cache is when a website has dynamic web pages about news, weather, images, maps, etc. that do not change frequently (e.g. every n minutes) and that are accessed by a huge number of clients per minute / hour; in those cases it is useful to return cached content too (without calling the internal module or the external program) because clients often do not have an updated copy of the requested content in their browser caches.[45]
Anyway, in most cases those kind of caches are implemented by external servers (e.g. reverse proxy) or by storing dynamic data output in separate computers, managed by specific applications (e.g. memcached), in order to not compete for hardware resources (CPU, RAM, disks) with web server(s).[46]
[47]
Kernel-mode and user-mode web servers[edit]
A web server software can be either incorporated into the OS and executed in kernel space, or it can be executed in user space (like other regular applications).
Web servers that run in kernel mode (usually called kernel space web servers) can have direct access to kernel resources and so they can be, in theory, faster than those running in user mode; anyway there are disadvantages in running a web server in kernel mode, e.g.: difficulties in developing (debugging) software whereas run-time critical errors may lead to serious problems in OS kernel.
Web servers that run in user-mode have to ask the system for permission to use more memory or more CPU resources. Not only do these requests to the kernel take time, but they might not always be satisfied because the system reserves resources for its own usage and has the responsibility to share hardware resources with all the other running applications. Executing in user mode can also mean using more buffer/data copies (between user-space and kernel-space) which can lead to a decrease in the performance of a user-mode web server.
Nowadays almost all web server software is executed in user mode (because many of the aforementioned small disadvantages have been overcome by faster hardware, new OS versions, much faster OS system calls and new optimized web server software). See also comparison of web server software to discover which of them run in kernel mode or in user mode (also referred as kernel space or user space).
Performances[edit]
To improve the user experience (on client / browser side), a web server should reply quickly (as soon as possible) to client requests; unless content response is throttled (by configuration) for some type of files (e.g. big or huge files), also returned data content should be sent as fast as possible (high transfer speed).
In other words, a web server should always be very responsive, even under high load of web traffic, in order to keep total user’s wait (sum of browser time + network time + web server response time) for a response as low as possible.
Performance metrics[edit]
For web server software, main key performance metrics (measured under vary operating conditions) usually are at least the following ones (i.e.):[48]
[49]
- number of requests per second (RPS, similar to QPS, depending on HTTP version and configuration, type of HTTP requests and other operating conditions);
- number of connections per second (CPS), is the number of connections per second accepted by web server (useful when using HTTP/1.0 or HTTP/1.1 with a very low limit of requests / responses per connection, i.e. 1 .. 20);
- network latency + response time for each new client request; usually benchmark tool shows how many requests have been satisfied within a scale of time laps (e.g. within 1ms, 3ms, 5ms, 10ms, 20ms, 30ms, 40ms) and / or the shortest, the average and the longest response time;
- throughput of responses, in bytes per second.
Among the operating conditions, the number (1 .. n) of concurrent client connections used during a test is an important parameter because it allows to correlate the concurrency level supported by web server with results of the tested performance metrics.
Software efficiency[edit]
The specific web server software design and model adopted (e.g.):
- single process or multi-process;
- single thread (no thread) or multi-thread for each process;
- usage of coroutines or not;
… and other programming techniques, such as (e.g.):
- zero copy;
- minimization of possible CPU cache misses;
- minimization of possible CPU branch mispredictions in critical paths for speed;
- minimization of the number of system calls used to perform a certain function / task;
- other tricks;
… used to implement a web server program, can bias a lot the performances and in particular the scalability level that can be achieved under heavy load or when using high end hardware (many CPUs, disks and lots of RAM).
In practice some web server software models may require more OS resources (specially more CPUs and more RAM) than others to be able to work well and so to achieve target performances.
Operating conditions[edit]
There are many operating conditions that can affect the performances of a web server; performance values may vary depending on (i.e.):
- the settings of web server (including the fact that log file is or is not enabled, etc.);
- the HTTP version used by client requests;
- the average HTTP request type (method, length of HTTP headers and optional body);
- whether the requested content is static or dynamic;
- whether the content is cached or not cached (by server and/or by client);
- whether the content is compressed on the fly (when transferred), pre-compressed (i.e. when a file resource is stored on disk already compressed so that web server can send that file directly to the network with the only indication that its content is compressed) or not compressed at all;
- whether the connections are or are not encrypted;
- the average network speed between web server and its clients;
- the number of active TCP connections;
- the number of active processes managed by web server (including external CGI, SCGI, FCGI programs);
- the hardware and software limitations or settings of the OS of the computer(s) on which the web server runs;
- other minor conditions.
Benchmarking[edit]
Performances of a web server are typically benchmarked by using one or more of the available
automated load testing tools.
Load limits[edit]
A web server (program installation) usually has pre-defined load limits for each combination of operating conditions, also because it is limited by OS resources and because it can handle only a limited number of concurrent client connections (usually between 2 and several tens of thousands for each active web server process, see also the C10k problem and the C10M problem).
When a web server is near to or over its load limits, it gets overloaded and so it may become unresponsive.
Causes of overload[edit]
At any time web servers can be overloaded due to one or more of the following causes (e.g.).
- Excess legitimate web traffic. Thousands or even millions of clients connecting to the website in a short amount of time, e.g., Slashdot effect.
- Distributed Denial of Service attacks. A denial-of-service attack (DoS attack) or distributed denial-of-service attack (DDoS attack) is an attempt to make a computer or network resource unavailable to its intended users.
- Computer worms that sometimes cause abnormal traffic because of millions of infected computers (not coordinated among them).
- XSS worms can cause high traffic because of millions of infected browsers or web servers.
- Internet bots Traffic not filtered/limited on large websites with very few network resources (e.g. bandwidth) and/or hardware resources (CPUs, RAM, disks).
- Internet (network) slowdowns (e.g. due to packet losses) so that client requests are served more slowly and the number of connections increases so much that server limits are reached.
- Web servers, serving dynamic content, waiting for slow responses coming from back-end computer(s) (e.g. databases), maybe because of too many queries mixed with too many inserts or updates of DB data; in these cases web servers have to wait for back-end data responses before replying to HTTP clients but during these waits too many new client connections / requests arrive and so they become overloaded.
- Web servers (computers) partial unavailability. This can happen because of required or urgent maintenance or upgrade, hardware or software failures such as back-end (e.g. database) failures; in these cases the remaining web servers may get too much traffic and become overloaded.
Symptoms of overload[edit]
The symptoms of an overloaded web server are usually the following ones (e.g.).
- Requests are served with (possibly long) delays (from 1 second to a few hundred seconds).
- The web server returns an HTTP error code, such as 500, 502,[50][51] 503,[52] 504,[53] 408, or even an intermittent 404.
- The web server refuses or resets (interrupts) TCP connections before it returns any content.
- In very rare cases, the web server returns only a part of the requested content. This behavior can be considered a bug, even if it usually arises as a symptom of overload.
Anti-overload techniques[edit]
To partially overcome above average load limits and to prevent overload, most popular websites use common techniques like the following ones (e.g.).
- Tuning OS parameters for hardware capabilities and usage.
- Tuning web server(s) parameters to improve their security and performances.
- Deploying web cache techniques (not only for static contents but, whenever possible, for dynamic contents too).
- Managing network traffic, by using:
- Firewalls to block unwanted traffic coming from bad IP sources or having bad patterns;
- HTTP traffic managers to drop, redirect or rewrite requests having bad HTTP patterns;
- Bandwidth management and traffic shaping, in order to smooth down peaks in network usage.
- Using different domain names, IP addresses and computers to serve different kinds (static and dynamic) of content; the aim is to separate big or huge files (
download.*) (that domain might be replaced also by a CDN) from small and medium-sized files (static.*) and from main dynamic site (maybe where some contents are stored in a backend database) (www.*); the idea is to be able to efficiently serve big or huge (over 10 – 1000 MB) files (maybe throttling downloads) and to fully cache small and medium-sized files, without affecting performances of dynamic site under heavy load, by using different settings for each (group) of web server computers, e.g.:https://download.example.comhttps://static.example.comhttps://www.example.com
- Using many web servers (computers) that are grouped together behind a load balancer so that they act or are seen as one big web server.
- Adding more hardware resources (i.e. RAM, fast disks) to each computer.
- Using more efficient computer programs for web servers (see also: software efficiency).
- Using the most efficient Web Server Gateway Interface to process dynamic requests (spawning one or more external programs every time a dynamic page is retrieved, kills performances).
- Using other programming techniques and workarounds, especially if dynamic content is involved, to speed up the HTTP responses (i.e. by avoiding dynamic calls to retrieve objects, such as style sheets, images and scripts), that never change or change very rarely, by copying that content to static files once and then keeping them synchronized with dynamic content).
- Using latest efficient versions of HTTP (e.g. beyond using common HTTP/1.1 also by enabling HTTP/2 and maybe HTTP/3 too, whenever available web server software has reliable support for the latter two protocols) in order to reduce a lot the number of TCP/IP connections started by each client and the size of data exchanged (because of more compact HTTP headers representation and maybe data compression).
Caveats about using HTTP/2 and HTTP/3 protocols
Even if newer HTTP (2 and 3) protocols usually generate less network traffic for each request / response data, they may require more OS resources (i.e. RAM and CPU) used by web server software (because of encrypted data, lots of stream buffers and other implementation details); besides this, HTTP/2 and maybe HTTP/3 too, depending also on settings of web server and client program, may not be the best options for data upload of big or huge files at very high speed because their data streams are optimized for concurrency of requests and so, in many cases, using HTTP/1.1 TCP/IP connections may lead to better results / higher upload speeds (your mileage may vary).[54][55]
[edit]

Chart:
Market share of all sites for most popular web servers 2005–2021

Chart:
Market share of all sites for most popular web servers 1995–2005
Below are the latest statistics of the market share of all sites of the top web servers on the Internet by Netcraft.
| Date | nginx (Nginx, Inc.) | Apache (ASF) | OpenResty (OpenResty Software Foundation) | Cloudflare Server (Cloudflare, Inc.) | IIS (Microsoft) | GWS (Google) | Others |
|---|---|---|---|---|---|---|---|
| October 2021[56] | 34.95% | 24.63% | 6.45% | 4.87% | 4.00% (*) | 4.00% (*) | Less than 22% |
| February 2021[57] | 34.54% | 26.32% | 6.36% | 5.0% | 6.5% | 3.90% | Less than 18% |
| February 2020[58] | 36.48% | 24.5% | 4.00% | 3.0% | 14.21% | 3.18% | Less than 15 % |
| February 2019[59] | 25.34% | 26.16% | N/A | N/A | 28.42% | 1.66% | Less than 19% |
| February 2018[60] | 24.32% | 27.45% | N/A | N/A | 34.50% | 1.20% | Less than 13% |
| February 2017[61] | 19.42% | 20.89% | N/A | N/A | 43.16% | 1.03% | Less than 15% |
| February 2016[62] | 16.61% | 32.80% | N/A | N/A | 29.83% | 2.21% | Less than 19% |
NOTE: (*) percentage rounded to integer number, because its decimal values are not publicly reported by source page (only its rounded value is reported in graph).
See also[edit]
- Server (computing)
- Application server
- Comparison of web server software
- HTTP server (core part of a web server program that serves HTTP requests)
- HTTP compression
- Web application
- Open source web application
- List of AMP packages
- Variant object
- Virtual hosting
- Web hosting service
- Web container
- Web proxy
- Web service
Standard Web Server Gateway Interfaces used for dynamic contents:
- CGI Common Gateway Interface
- SCGI Simple Common Gateway Interface
- FastCGI Fast Common Gateway Interface
A few other Web Server Interfaces (server or programming language specific) used for dynamic contents:
- SSI Server Side Includes, rarely used, static HTML documents containing SSI directives are interpreted by server software to include small dynamic data on the fly when pages are served, e.g. date and time, other static file contents, etc.
- SAPI Server Application Programming Interface:
- ISAPI Internet Server Application Programming Interface
- NSAPI Netscape Server Application Programming Interface
- PSGI Perl Web Server Gateway Interface
- WSGI Python Web Server Gateway Interface
- Rack Rack Web Server Gateway Interface
- JSGI JavaScript Web Server Gateway Interface
- Java Servlet, JavaServer Pages
- Active Server Pages, ASP.NET
References[edit]
- ^ a b c Nancy J. Yeager; Robert E. McGrath (1996). Web Server Technology. ISBN 1-55860-376-X. Archived from the original on 20 January 2023. Retrieved 22 January 2021.
- ^ William Nelson; Arvind Srinivasan; Murthy Chintalapati (2009). Sun Web Server: The Essential Guide. ISBN 978-0-13-712892-1. Archived from the original on 20 January 2023. Retrieved 14 October 2021.
- ^ Zolfagharifard, Ellie (24 November 2018). «‘Father of the web’ Sir Tim Berners-Lee on his plan to fight fake news». The Telegraph. London. ISSN 0307-1235. Archived from the original on 11 January 2022. Retrieved 1 February 2019.
- ^ «History of Computers and Computing, Internet, Birth, The World Wide Web of Tim Berners-Lee». history-computer.com. Archived from the original on 4 January 2019. Retrieved 1 February 2019.
- ^ a b c Tim Berner-Lee (1992). «WWW Project History (original)». CERN (World Wide Web project). Archived from the original on 8 December 2021. Retrieved 20 December 2021.
- ^ a b Tim Berner-Lee (20 August 1991). «WorldWideWeb wide-area hypertext app available (announcement)». CERN (World Wide Web project). Archived from the original on 2 December 2021. Retrieved 16 October 2021.
- ^ a b Web Administrator. «Web History». CERN (World Wide Web project). Archived from the original on 2 December 2021. Retrieved 16 October 2021.
- ^ Tim Berner-Lee (2 August 1991). «Qualifiers on hypertext links …» CERN (World Wide Web project). Archived from the original on 7 December 2021. Retrieved 16 October 2021.
- ^ Ali Mesbah (2009). Analysis and Testing of Ajax-based Single-page Web Applications. ISBN 978-90-79982-02-8. Retrieved 18 December 2021.
- ^ a b Robert H’obbes’ Zakon. «Hobbes’ Internet Timeline v5.1 (WWW Growth) NOTE: till 1996 number of web servers = number of web sites». ISOC. Archived from the original on 15 August 2000. Retrieved 18 December 2021.
{{cite web}}: CS1 maint: unfit URL (link) - ^ Tim Smith; François Flückiger. «Licensing the Web». CERN (World Wide Web project). Archived from the original on 6 December 2021. Retrieved 16 October 2021.
- ^ «NCSA httpd». NCSA (web archive). Archived from the original on 1 August 2010. Retrieved 16 December 2021.
- ^ «About the Apache HTTPd server: How Apache Came to be». Apache: HTTPd server project. 1997. Archived from the original on 7 June 2008. Retrieved 17 December 2021.
- ^ «Web Server Survey, NOTE: number of active web sites in year 2000 has been interpolated». Netcraft. Archived from the original on 27 December 2021. Retrieved 27 December 2021.
- ^ «Netcraft: web server software (1996)». Netcraft (web archive). Archived from the original on 30 December 1996. Retrieved 16 December 2021.
- ^ «Overview of new features in Apache 2.2». Apache: HTTPd server project. 2005. Archived from the original on 27 November 2021. Retrieved 16 December 2021.
- ^ «Overview of new features in Apache 2.4». Apache: HTTPd server project. 2012. Archived from the original on 26 November 2021. Retrieved 16 December 2021.
- ^ «Connections, persistent connections: practical considerations». RFC 2616, Hypertext Transfer Protocol — HTTP/1.1. pp. 46–47. sec. 8.1.4. doi:10.17487/RFC2616. RFC 2616.
- ^ «Maximum concurrent connections to the same domain for browsers». 2017. Archived from the original on 21 December 2021. Retrieved 21 December 2021.
- ^ «Linux Web Server Performance Benchmark — 2016 results». RootUsers. Archived from the original on 23 December 2021. Retrieved 22 December 2021.
- ^ a b «Will HTTP/2 replace HTTP/1.x?». IETF HTTP Working Group. Archived from the original on 27 September 2014. Retrieved 22 December 2021.
- ^ a b «Implementations of HTTP/2 in client and server software». IETF HTTP Working Group. Archived from the original on 23 December 2021. Retrieved 22 December 2021.
- ^ «Why just one TCP connection?». IETF HTTP Working Group. Archived from the original on 27 September 2014. Retrieved 22 December 2021.
- ^ a b «Client/Server Messaging». RFC 7230, HTTP/1.1: Message Syntax and Routing. pp. 7–8. sec. 2.1. doi:10.17487/RFC7230. RFC 7230.
- ^ a b «Handling Incomplete Messages». RFC 7230, HTTP/1.1: Message Syntax and Routing. p. 34. sec. 3.4. doi:10.17487/RFC7230. RFC 7230.
- ^ «Message Parsing Robustness». RFC 7230, HTTP/1.1: Message Syntax and Routing. pp. 34–35. sec. 3.5. doi:10.17487/RFC7230. RFC 7230.
- ^ R. Bowen (29 September 2002). «URL Mapping» (PDF). Apache software foundation. Archived (PDF) from the original on 15 November 2021. Retrieved 15 November 2021.
- ^ a b c d e «Mapping URLs to Filesystem Locations». Apache: HTTPd server project. 2021. Archived from the original on 20 October 2021. Retrieved 19 October 2021.
- ^ «Dynamic Content with CGI». Apache: HTTPd server project. 2021. Archived from the original on 15 November 2021. Retrieved 19 October 2021.
- ^ Chris Shiflett (2003). HTTP developer’s handbook. Sams’s publishing. ISBN 0-672-32454-7. Archived from the original on 20 January 2023. Retrieved 9 December 2021.
- ^ a b c ASF Infrabot (22 May 2019). «Directory listings». Apache foundation: HTTPd server project. Archived from the original on 7 June 2019. Retrieved 16 November 2021.
- ^ «Apache: directory listing to download files». Apache: HTTPd server. Archived from the original on 2 December 2021. Retrieved 16 December 2021.
- ^ «Client Error 4xx». RFC 7231, HTTP/1.1: Semantics and Content. p. 58. sec. 6.5. doi:10.17487/RFC7231. RFC 7231.
- ^ «Server Error 5xx». RFC 7231, HTTP/1.1: Semantics and Content. pp. 62-63. sec. 6.6. doi:10.17487/RFC7231. RFC 7231.
- ^ «Introduction». RFC 7235, HTTP/1.1: Authentication. p. 3. sec. 1. doi:10.17487/RFC7235. RFC 7235.
- ^ a b «Response Status Codes: Redirection 3xx». RFC 7231, HTTP/1.1: Semantics and Content. pp. 53–54. sec. 6.4. doi:10.17487/RFC7231. RFC 7231.
- ^ «Successful 2xx». RFC 7231, HTTP/1.1: Semantics and Content. pp. 51-54. sec. 6.3. doi:10.17487/RFC7231. RFC 7231.
- ^ «Caching Guide». Apache: HTTPd server project. 2021. Archived from the original on 9 December 2021. Retrieved 9 December 2021.
- ^ «NGINX Content Caching». F5 NGINX. 2021. Archived from the original on 9 December 2021. Retrieved 9 December 2021.
- ^ Evangelos P. Markatos (1996). «Main Memory Caching of Web Documents». Computer networks and ISDN Systems. Archived from the original on 20 January 2023. Retrieved 9 December 2021.
- ^ «IPlanet Web Server 7.0.9: file-cache». Oracle. 2010. Archived from the original on 9 December 2021. Retrieved 9 December 2021.
- ^ «Apache Module mod_file_cache». Apache: HTTPd server project. 2021. Archived from the original on 9 December 2021. Retrieved 9 December 2021.
- ^ «HTTP server: configuration: file cache». GNU. 2021. Archived from the original on 9 December 2021. Retrieved 9 December 2021.
- ^ «Apache Module mod_cache_disk». Apache: HTTPd server project. 2021. Archived from the original on 9 December 2021. Retrieved 9 December 2021.
- ^ «What is dynamic cache?». Educative. 2021. Archived from the original on 9 December 2021. Retrieved 9 December 2021.
- ^ «Dynamic Cache Option Tutorial». Siteground. 2021. Archived from the original on 20 January 2023. Retrieved 9 December 2021.
- ^ Arun Iyengar; Jim Challenger (2000). «Improving Web Server Performance by Caching Dynamic Data». Usenix. Retrieved 9 December 2021.
- ^ Omid H. Jader; Subhi R. M. Zeebaree; Rizgar R. Zebari (12 December 2019). «A State of Art Survey For Web Server Performance Measurement And Load Balancing Mechanisms» (PDF). IJSTR: INTERNATIONAL JOURNAL OF SCIENTIFIC & TECHNOLOGY RESEARCH. Archived (PDF) from the original on 21 January 2022. Retrieved 4 November 2021.
- ^ Jussara M. Almeida; Virgilio Almeida; David J. Yates (7 July 1997). «WebMonitor: a tool for measuring World Wide Web server performance». First Monday. doi:10.5210/fm.v2i7.539. Archived from the original on 4 November 2021. Retrieved 4 November 2021.
- ^ Fisher, Tim; Lifewire. «Getting a 502 Bad Gateway Error? Here’s What to Do». Lifewire. Archived from the original on 23 February 2017. Retrieved 1 February 2019.
- ^ «What is a 502 bad gateway and how do you fix it?». IT PRO. Archived from the original on 20 January 2023. Retrieved 1 February 2019.
- ^ Fisher, Tim; Lifewire. «Getting a 503 Service Unavailable Error? Here’s What to Do». Lifewire. Archived from the original on 20 January 2023. Retrieved 1 February 2019.
- ^ Fisher, Tim; Lifewire. «Getting a 504 Gateway Timeout Error? Here’s What to Do». Lifewire. Archived from the original on 23 April 2021. Retrieved 1 February 2019.
- ^ many (24 January 2021). «Slow uploads with HTTP/2». github. Archived from the original on 16 November 2021. Retrieved 15 November 2021.
- ^ Junho Choi (24 August 2020). «Delivering HTTP/2 upload speed improvements». Cloudflare. Archived from the original on 16 November 2021. Retrieved 15 November 2021.
- ^ «October 2021 Web Server Survey». Netcraft. Archived from the original on 15 November 2021. Retrieved 15 November 2021.
- ^ «February 2021 Web Server Survey». Netcraft. Archived from the original on 15 April 2021. Retrieved 8 April 2021.
- ^ «February 2020 Web Server Survey». Netcraft. Archived from the original on 17 April 2021. Retrieved 8 April 2021.
- ^ «February 2019 Web Server Survey». Netcraft. Archived from the original on 15 April 2021. Retrieved 8 April 2021.
- ^ «February 2018 Web Server Survey». Netcraft. Archived from the original on 17 April 2021. Retrieved 8 April 2021.
- ^ «February 2017 Web Server Survey». Netcraft. Archived from the original on 14 March 2017. Retrieved 13 March 2017.
- ^ «February 2016 Web Server Survey». Netcraft. Archived from the original on 27 January 2022. Retrieved 27 January 2022.
External links[edit]
- Mozilla: what is a web server?
- Netcraft: news about web server survey
A web server is software and hardware that uses HTTP (Hypertext Transfer Protocol) and other protocols to respond to client requests made over the World Wide Web. The main job of a web server is to display website content through storing, processing and delivering webpages to users. Besides HTTP, web servers also support SMTP (Simple Mail Transfer Protocol) and FTP (File Transfer Protocol), used for email, file transfer and storage.
Web server hardware is connected to the internet and allows data to be exchanged with other connected devices, while web server software controls how a user accesses hosted files. The web server process is an example of the client/server model. All computers that host websites must have web server software.
Web servers are used in web hosting, or the hosting of data for websites and web-based applications — or web applications.
How do web servers work?
Web server software is accessed through the domain names of websites and ensures the delivery of the site’s content to the requesting user. The software side is also comprised of several components, with at least an HTTP server. The HTTP server is able to understand HTTP and URLs. As hardware, a web server is a computer that stores web server software and other files related to a website, such as HTML documents, images and JavaScript files.
When a web browser, like Google Chrome or Firefox, needs a file that’s hosted on a web server, the browser will request the file by HTTP. When the request is received by the web server, the HTTP server will accept the request, find the content and send it back to the browser through HTTP.
More specifically, when a browser requests a page from a web server, the process will follow a series of steps. First, a person will specify a URL in a web browser’s address bar. The web browser will then obtain the IP address of the domain name — either translating the URL through DNS (Domain Name System) or by searching in its cache. This will bring the browser to a web server. The browser will then request the specific file from the web server by an HTTP request. The web server will respond, sending the browser the requested page, again, through HTTP. If the requested page does not exist or if something goes wrong, the web server will respond with an error message. The browser will then be able to display the webpage.
Multiple domains also can be hosted on one web server.
Examples of web server uses
Web servers often come as part of a larger package of internet- and intranet-related programs that are used for:
- sending and receiving emails;
- downloading requests for File Transfer Protocol (FTP) files; and
- building and publishing webpages.
Many basic web servers will also support server-side scripting, which is used to employ scripts on a web server that can customize the response to the client. Server-side scripting runs on the server machine and typically has a broad feature set, which includes database access. The server-side scripting process will also use Active Server Pages (ASP), Hypertext Preprocessor (PHP) and other scripting languages. This process also allows HTML documents to be created dynamically.
Dynamic vs. static web servers
A web server can be used to serve either static or dynamic content. Static refers to the content being shown as is, while dynamic content can be updated and changed. A static web server will consist of a computer and HTTP software. It is considered static because the sever will send hosted files as is to a browser.
Dynamic web browsers will consist of a web server and other software such as an application server and database. It is considered dynamic because the application server can be used to update any hosted files before they are sent to a browser. The web server can generate content when it is requested from the database. Though this process is more flexible, it is also more complicated.
Common and top web server software on the market
There are a number of common web servers available, some including:
- Apache HTTP Server. Developed by Apache Software Foundation, it is a free and open source web server for Windows, Mac OS X, Unix, Linux, Solaris and other operating systems; it needs the Apache license.
- Microsoft Internet Information Services (IIS). Developed by Microsoft for Microsoft platforms; it is not open sourced, but widely used.
- Nginx. A popular open source web server for administrators because of its light resource utilization and scalability. It can handle many concurrent sessions due to its event-driven architecture. Nginx also can be used as a proxy server and load balancer.
- Lighttpd. A free web server that comes with the FreeBSD operating system. It is seen as fast and secure, while consuming less CPU power.
- Sun Java System Web Server. A free web server from Sun Microsystems that can run on Windows, Linux and Unix. It is well-equipped to handle medium to large websites.
Leading web servers include Apache, Microsoft’s Internet Information Services (IIS) and Nginx — pronounced engine X. Other web servers include Novell’s NetWare server, Google Web Server (GWS) and IBM’s family of Domino servers.
Considerations in choosing a web server include how well it works with the operating system and other servers; its ability to handle server-side programming; security characteristics; and the publishing, search engine and site-building tools that come with it. Web servers may also have different configurations and set default values. To create high performance, a web server, high throughput and low latency will help.
Web server security practices
There are plenty of security practices individuals can set around web server use that can make for a safer experience. A few example security practices can include processes like:
- a reverse proxy, which is designed to hide an internal server and act as an intermediary for traffic originating on an internal server;
- access restriction through processes such as limiting the web host’s access to infrastructure machines or using Secure Socket Shell (SSH);
- keeping web servers patched and up to date to help ensure the web server isn’t susceptible to vulnerabilities;
- network monitoring to make sure there isn’t any or unauthorized activity; and
- using a firewall and SSL as firewalls can monitor HTTP traffic while having a Secure Sockets Layer (SSL) can help keep data secure.
This was last updated in July 2020
Continue Reading About web server
- How to encrypt and secure a website using HTTPS
- Essential versus nonessential services for a Windows Web server
- Web server management best practices and essential features
- How does a Web server model differ from an application server model?
- Learn the major types of server hardware and their pros and cons
Оглавление
- Что определяет хорошего разработчика ПО?
- Что же такое веб-сервер?
- Как общаться с клиентами по сети
- Простейший TCP сервер
- Простейший TCP клиент
- Заключение
- Cсылки по теме
Лирическое отступление: что определяет хорошего разработчика?

Разработка ПО — это инженерная дисциплина. Если вы хотите стать действительно профессиональным разработчиком, то необходимо в себе развивать качества инженера, а именно: системный подход к решению задач и аналитический склад ума. Для вас должно перестать существовать слово магия. Вы должны точно знать как и почему работают системы, с которыми вы взаимодействуете (между прочим, полезное качество, которое находит применение и за пределами IT).
К сожалениею (или к счастью, ибо благоприятно складывается на уровне доходов тех, кто осознал), существует огромное множество людей, которые пишут код без должного понимания важности этих принципов. Да, такие горе-программисты могут создавать работающие до поры до времени системы, собирая их из найденных в Интернете кусочков кода, даже не удосужившись прочитать, как они реализованы. Но как только возникает первая нестандартная проблема, решение которой не удается найти на StackOverflow, вышеупомянутые персонажи превращаются в беспомощных жертв кажущейся простоты современной разработки ПО.
Для того, чтобы не оказаться одним из таких бедолаг, необходимо постоянно инвестировать свое время в получение фундаментальных знаний из области Computer Science. В частности, для прикладных разработчиков в большинстве случаев таким фундаментом является операционная система, в которой выполняются созданные ими программы.
Веб-фреймворки и контейнеры приложений рождаются и умирают, а инструменты, которыми они пользуются, и принципы, на которых они основаны, остаются неизменными уже десятки лет. Это означает, что вложение времени в изучение базовых понятий и принципов намного выгоднее в долгосрочной перспективе. Сегодня мы рассмотрим одну из основных для веб-разработчика концепций — сокеты. А в качестве прикладного аспекта, мы разберемся, что же такое на самом деле веб-сервер и начнем писать свой.
Что такое веб-сервер?
Начнем с того, что четко ответим на вопрос, что же такое веб-сервер?
В первую очередь — это сервер. А сервер — это процесс (да, это не железка), обслуживающий клиентов. Сервер — фактически обычная программа, запущенная в операционной системе. Веб-сервер, как и большинство программ, получает данные на вход, преобразовывает их в соответствии с бизнес-требованиями и осуществляет вывод данных. Данные на вход и выход передаются по сети с использованием протокола HTTP. Входные данные — это запросы клиентов (в основном веб-браузеров и мобильных приложений). Выходные данные — это зачастую HTML-код подготовленных веб-страниц.
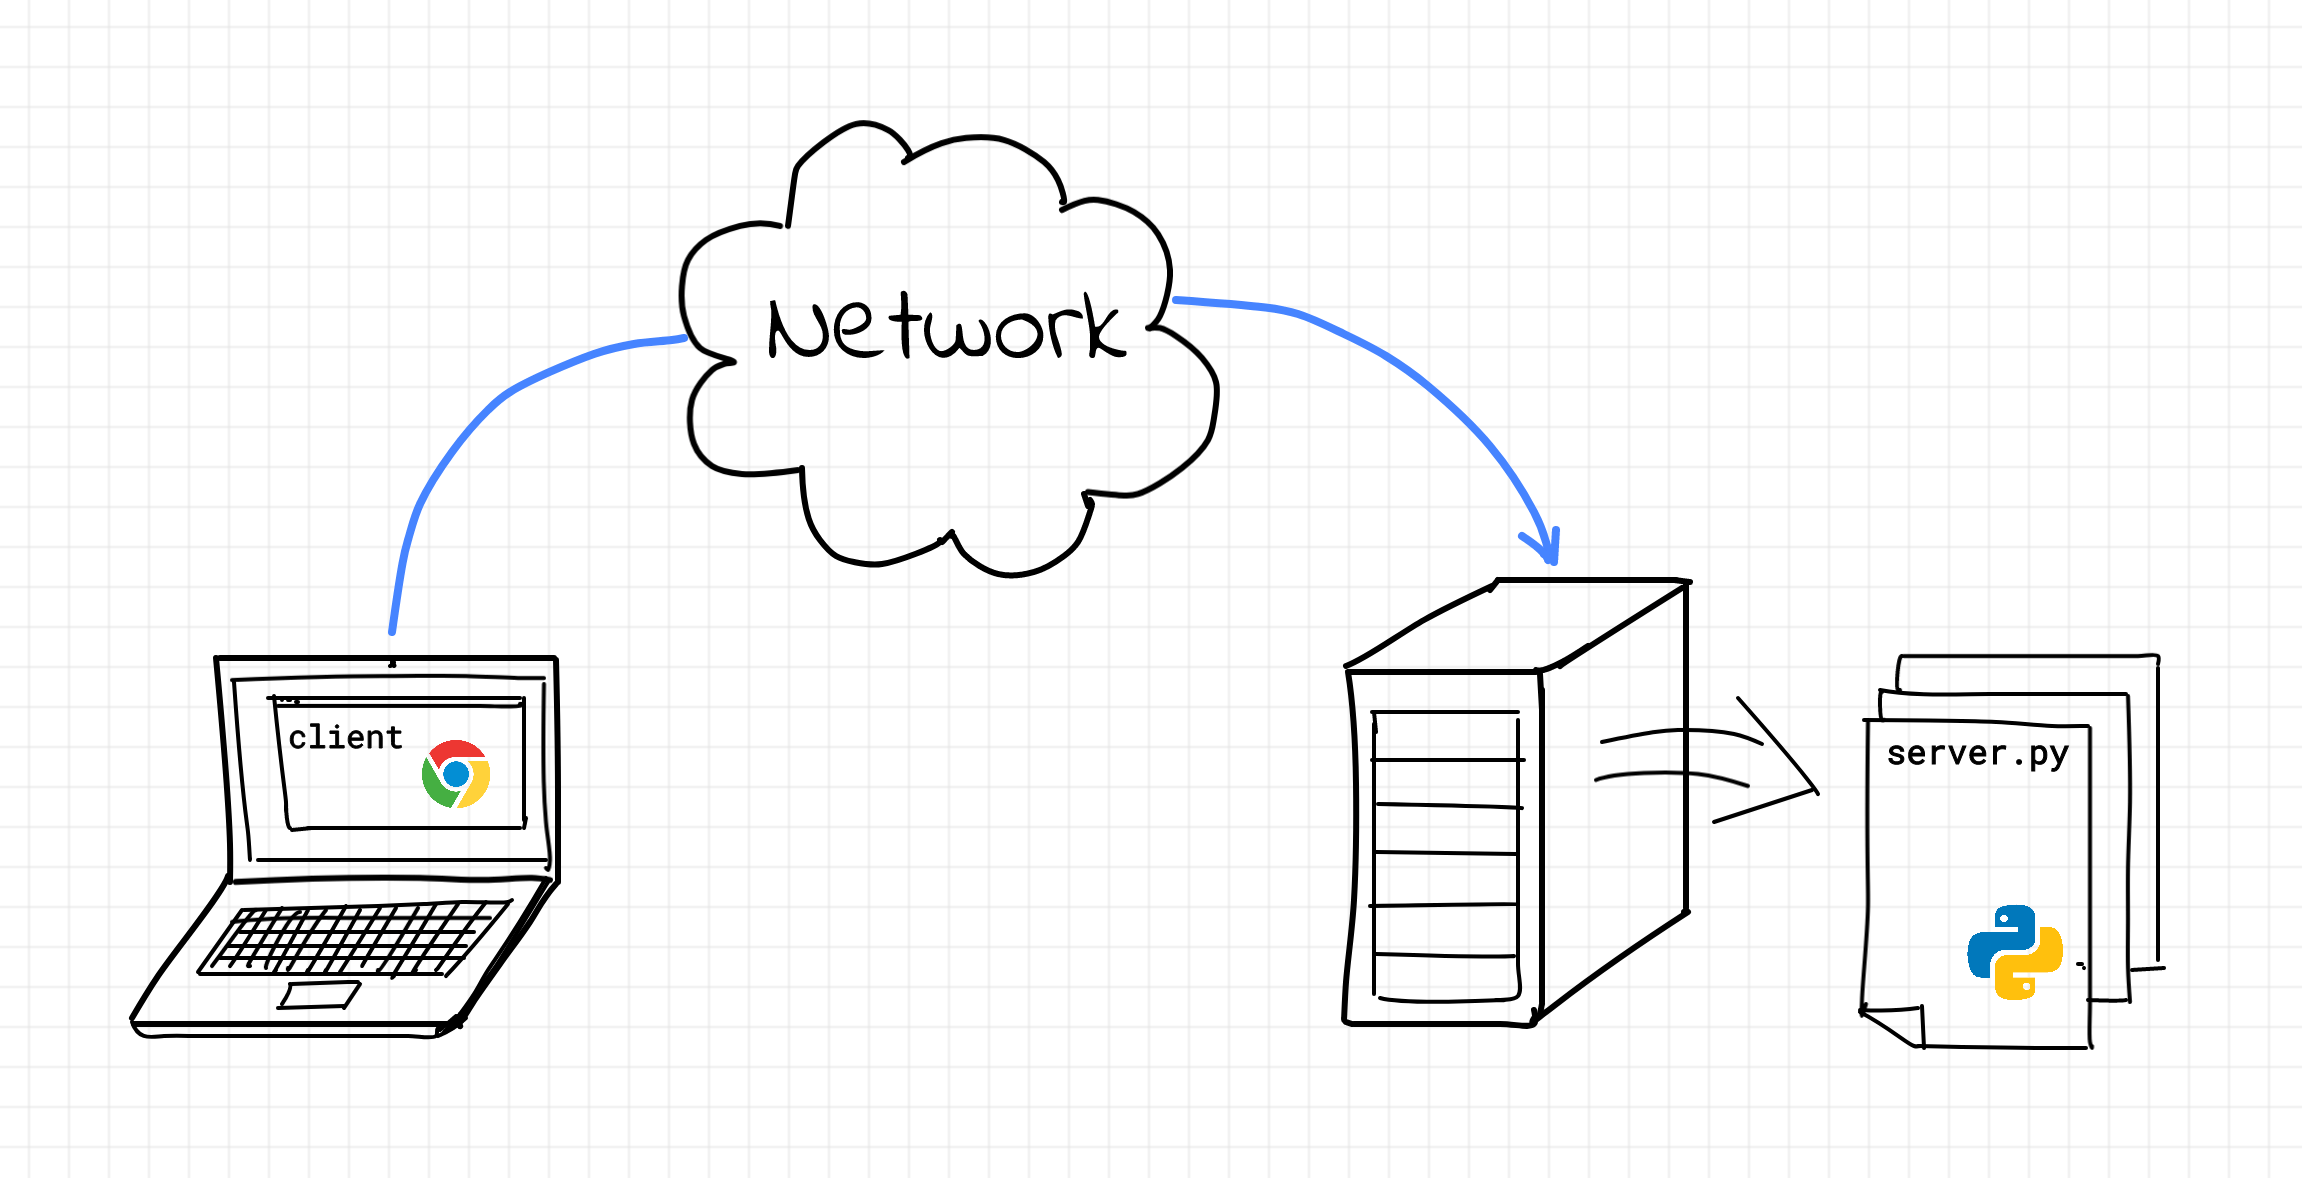
На данном этапе логичными будут следующие вопросы: что такое HTTP и как передавать данные по сети? HTTP — это простой текстовый (т.е. данные могут быть прочитаны человеком) протокол передачи информации в сети Интернет. Протокол — это не страшное слово, а всего лишь набор соглашений между двумя и более сторонами о правилах и формате передачи данных. Его рассмотрение мы вынесем в отдельную тему, а далее попробуем понять, как можно осуществлять передачу данных по сети.
Как компьютеры взаимодействуют по сети
В Unix-подобных системах принят очень удобный подход для работы с различными устройствами ввода/вывода — рассматривать их как файлы. Реальные файлы на диске, мышки, принтеры, модемы и т.п. являются файлами. Т.е. их можно открыть, прочитать данные, записать данные и закрыть.
При открытии файла операционной системой создается т.н. файловый дескриптор. Это некоторый целочисленный идентификатор, однозначно определяющий файл в текущем процессе. Для того, чтобы прочитать или записать данные в файл, необходимо в соответсвующую функцию (например, read() или write()) передать этот дескриптор, чтобы четко указать, с каким файлом мы собираемся взаимодействовать.
int fd = open("/path/to/my/file", ...);

char buffer[1024];
read(fd, buffer, 1024);
write(fd, "some data", 10);

close(fd);
Очевидно, что т.к. общение компьютеров по сети — это также про ввод/вывод, то и оно должно быть организовано как работа с файлами. Для этого используется специальный тип файлов, т.н. сокеты.
Сокет — это некоторая абстракция операционной системы, представляющая собой интерфейс обмена данными между процессами. В частности и по сети. Сокет можно открыть, можно записать в него данные и прочитать данные из него.
Т.к. видов межпроцессных взаимодействий с помощью сокетов множество, то и сокеты могут иметь различные конфигурации: сокет характеризуется семейством протоколов (IPv4 или IPv6 для сетевого и UNIX для локального взаимодействия), типом передачи данных (потоковая или датаграммная) и протоколом (TCP, UDP и т.п.).
Далее будет рассматриваться исключительно клиент-серверное взаимодействие по сети с использованием сокетов и стека протоколов TCP/IP.
Предположим, что наша прикладная программа хочет передать строку «Hello World» по сети, и соответствующий сокет уже открыт. Программа осуществляет запись этой строки в сокет с использованием функции write() или send(). Как эти данные будут переданы по сети?
Т.к. в общем случае размер передаваемых программой данных не ограничен, а за один раз сетевой адаптер (NIC) может передать фиксировнный объем информации, данные необходимо разбить на фрагменты, не превышающие этот объем. Такие фрагменты называются пакетами. Каждому пакету добавляется некоторая служебная информация, в частности содержащая адреса получателя и отправителя, и они начинают свой путь по сети.
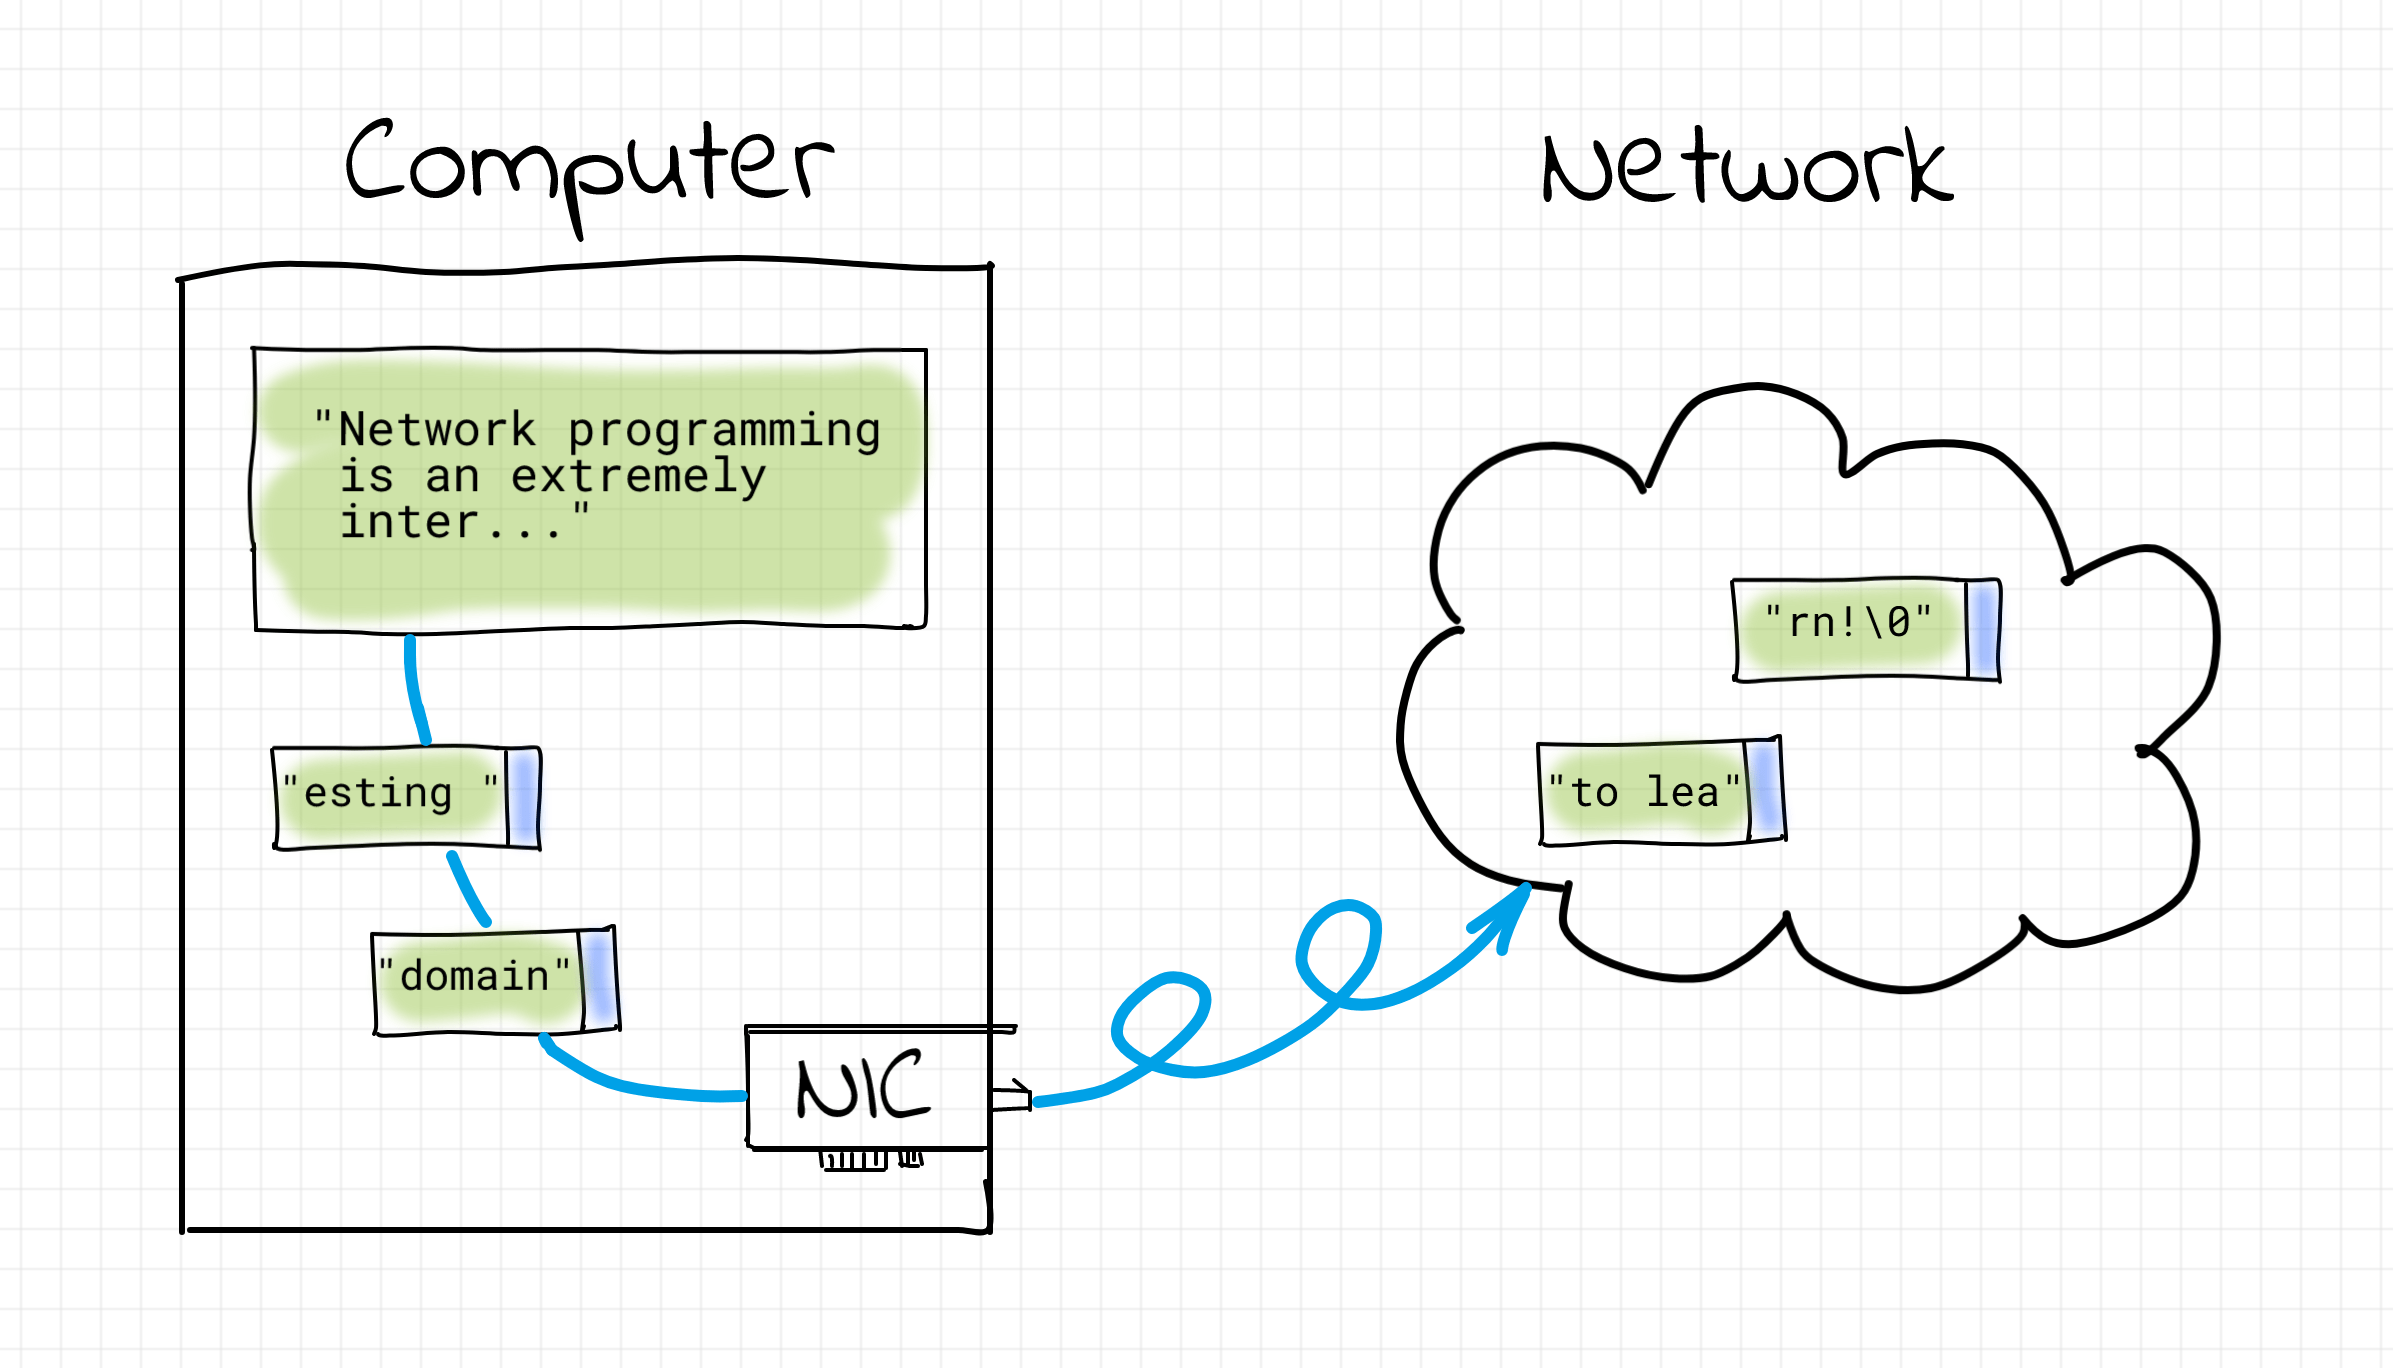
Адрес компьютера в сети — это т.н. IP-адрес. IP (Internet Protocol) — протокол, который позволил объединить множество разнородных сетей по всеми миру в одну общую сеть, которая называется Интернет. И произошло это благодаря тому, что каждому компьютеру в сети был назначен собственный адрес.
В силу особенности маршрутизации пакетов в сети, различные пакеты одной и той же логической порции данных могут следовать от отправителя к получателю разными маршрутами. Разные маршруты могут иметь различную сетевую задержку, следовательно, пакеты могут быть доставлены получателю не в том порядке, в котором они были отправлены. Более того, содержимое пакетов может быть повреждено в процессе передачи.
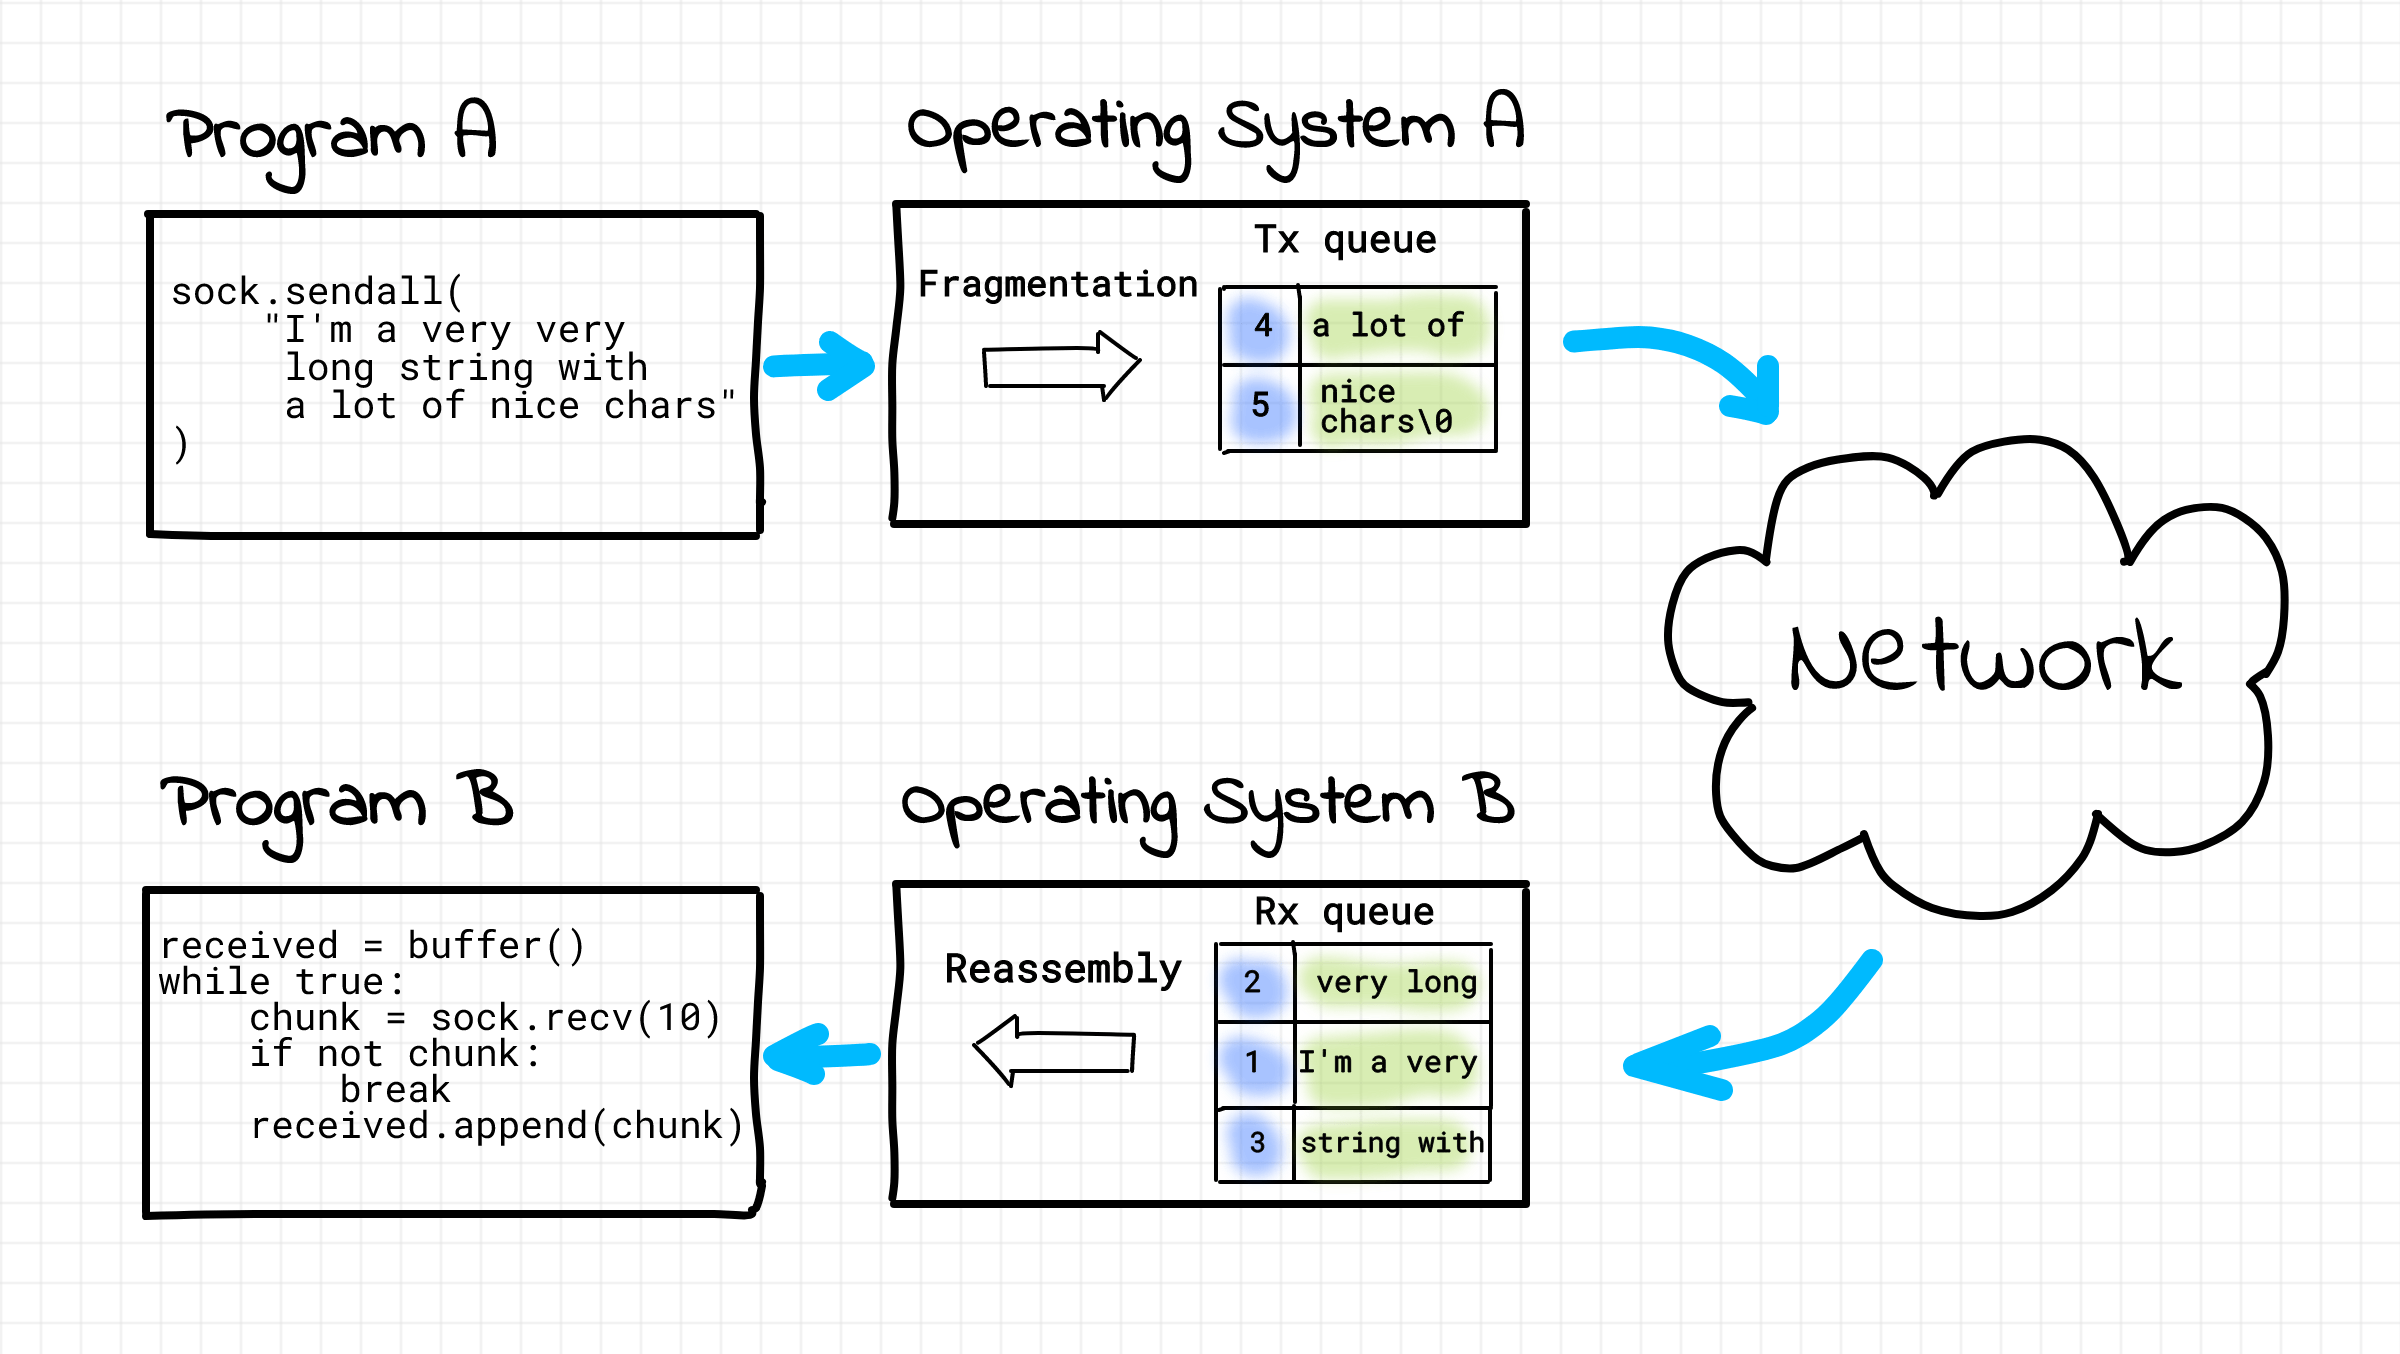
Вообще говоря, требование получать пакеты в том же порядке, в котором они были отправлены, не всегда является обязательным (например, при передаче потокового видео). Но, когда мы загружаем веб-страницу в браузере, мы ожидаем, что буквы на ней будут расположены ровно в том же порядке, в котором их нам отправил веб-сервер. Именно поэтому HTTP протокол работает поверх надеждного протокола передачи данных TCP, который будет рассмотрен ниже.
Чтобы организовать доставку пакетов в порядке их передачи, необходимо добавить в служебную информацию каждого пакета его номер в цепочке пакетов и на принимающей стороне делать сборку пакетов не в порядке их поступления, а в порядке, определенном этими номерами. Чтобы избежать доставки поврежденных пакетов, необходимо в каждый пакет добавить контрольную сумму и пакеты с неправильной контрольной суммой отбрасывать, ожидая, что они будут отправлены повторно.
Этим занимается специальный протокол потоковой передачи данных — TCP.
TCP — (Transmission Control Protocol — протокол управления передачей) — один из основных протоколов передачи данных в Интернете. Используется для надежной передачи данных с подтверждением доставки и сохранением порядка пакетов.
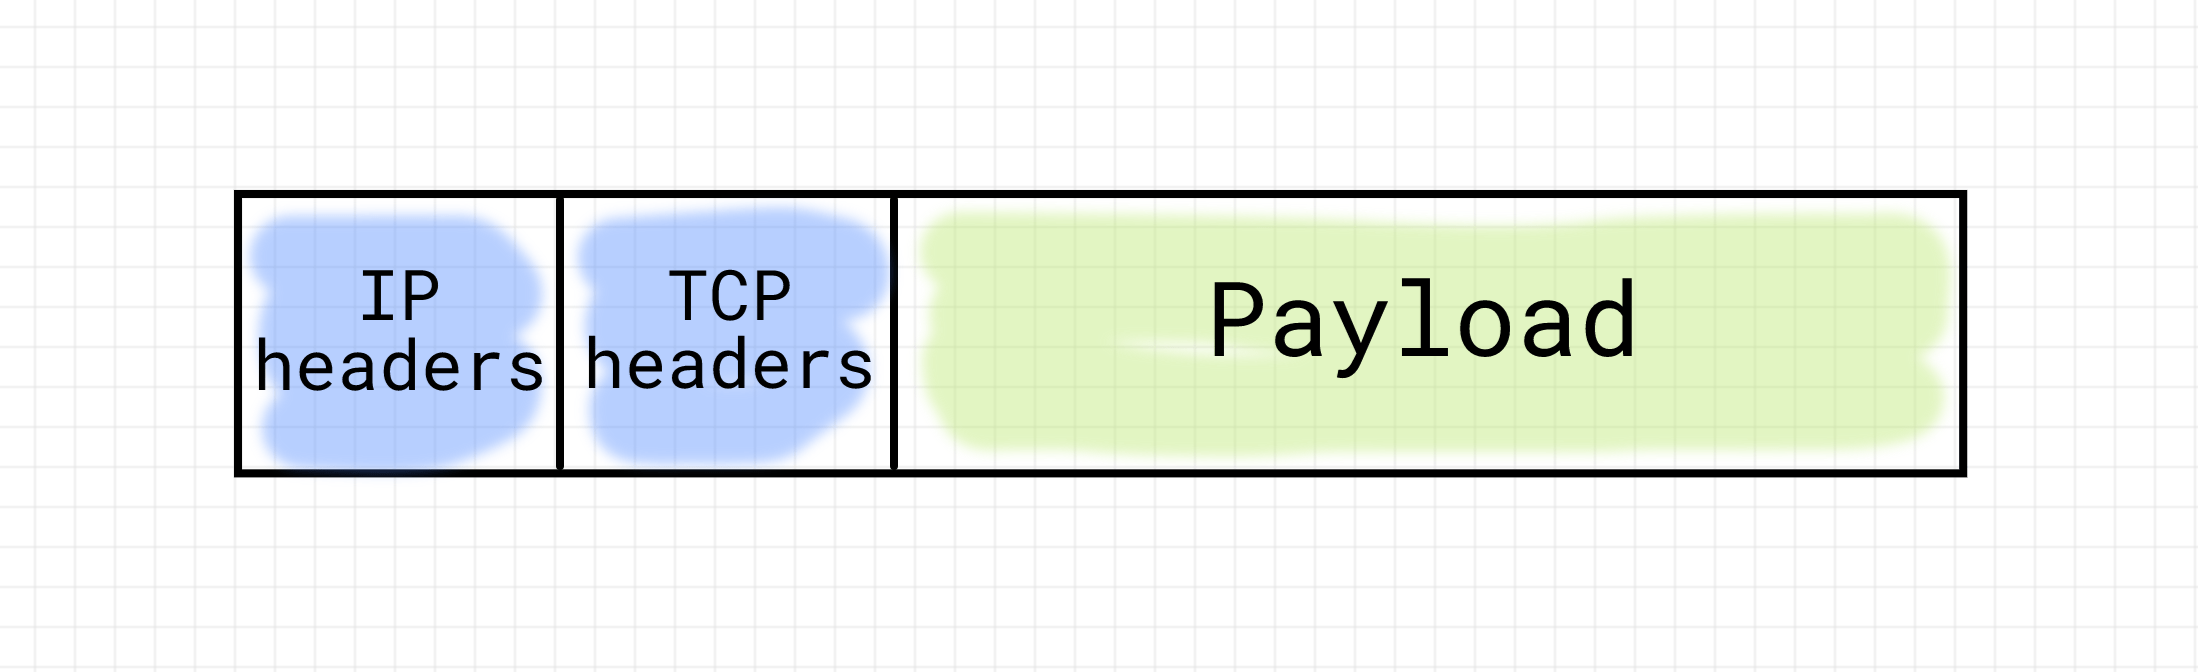
В силу того, что передачей данных по сети по протоколу TCP на одном и том же компьютере может заниматься одновременно несколько программ, для каждого из таких сеансов передачи данных необходимо поддерживать свою последовательность пакетов. Для этого TCP вводит понятие соединения. Соединение — это просто логическое соглашение между принимающей и передающей сторонами о начальных и текущих значениях номеров пакетов и состоянии передачи. Соединение необходимо установить (обменявшись несколькими служебными пакетами), поддерживать (периодически передавать данные, чтобы не наступил таймаут), а затем закрыть (снова обменявшись несколькими служебными пакетами).
Итак, IP определяет адрес компьютера в сети. Но, в силу наличия TCP соединений, пакеты могут принадлежать различным соединениям на одной и той же машине. Для того, чтобы различать соединения, вводится понятие TCP-порт. Это всего лишь пара чисел (одно для отправителя, а другое для получателя) в служебной информации пакета, определяющая, в рамках какого соединения должен рассматриваться пакет. Т.е. адрес соединения на этой машине.
Простейший TCP сервер
Теперь перейдем к практике. Попробуем создать свой собственный TCP-сервер. Для этого нам понадобится модуль socket из стандартной библиотеки Python.
Основная проблема при работе с сокетами у новичков связана с наличием обязательного магического ритуала подготовки сокетов к работе. Но имея за плечами теоретические знания, изложенные выше, кажущаяся магия превращается в осмысленные действия. Также необходимо отметить, что в случае с TCP работа с сокетами на сервере и на клиенте различается. Сервер занимается ожиданием подключений клиентов. Т.е. его IP адрес и TCP порт известны потенциальным клиентам заранее. Клиент может подключиться к серверу, т.е. выступает активной стороной. Сервер же ничего не знает об адресе клиента до момента подключения и не может выступать инициатором соединения. После того, как сервер принимает входящее соединения клиента, на стороне сервера создается еще один сокет, который является симметричным сокету клиента.
Итак, создаем серверный сокет:
# python3

import socket

serv_sock = socket.socket(socket.AF_INET,      # задамем семейство протоколов 'Интернет' (INET)
                          socket.SOCK_STREAM,  # задаем тип передачи данных 'потоковый' (TCP)
                          proto=0)             # выбираем протокол 'по умолчанию' для TCP, т.е. IP
print(type(serv_sock))                         # <class 'socket.socket'>
А где же обещанные int fd = open("/path/to/my/socket")? Дело в том, что системный вызов open() не позволяет передать все необходимые для инициализации сокета параметры, поэтому для сокетов был введен специальный одноименный системный вызов socket(). Python же является объектно-ориентированным языком, в нем вместо функций принято использовать классы и их методы. Код модуля socket является ОО-оберткой вокрут набора системных вызовов для работе с сокетами. Его можно представить себе, как:
class socket:  # Да, да, имя класса с маленькой буквы :(
    def __init__(self, sock_familty, sock_type, proto):
      self._fd = system_socket(sock_family, sock_type, proto)

    def write(self, data):
        # на самом деле вместо write используется send, но об этом ниже
        system_write(self._fd, data)

    def fileno(self):
        return self._fd
Т.е. доступ к целочисленному файловому дескриптору можно получить с помощью:
print(serv_sock.fileno()) # 3 или другой int
Так мы работаем с серверным сокетом, а в общем случае на серверной машине может быть несколько сетевых адаптеров, нам необходимо привязать созданный сокет к одному из них:
serv_sock.bind(('127.0.0.1', 53210)) # чтобы привязать сразу ко всем, можно использовать ''
Вызов bind() заставляет нас указать не только IP адрес, но и порт, на котором сервер будет ожидать (слушать) подключения клиентов.
Далее необходимо явно перевести сокет в состояние ожидания подключения, сообщив об этом операционной системе:
backlog = 10  # Размер очереди входящих подключений, т.н. backlog
serv_sock.listen(backlog)
После этого вызова операционная система готова принимать подключения от клиентов на этом сокете, хотя наш сервер (т.е. программа) — еще нет. Что же это означает и что такое backlog?
Как мы уже выяснили, взаимодействие по сети происходит с помощью отправки пакетов, а TCP требует установления соединения, т.е. обмена между клиентом и сервером несколькими служебными пакетами, не содержащими реальных бизнес-данных. Каждое TCP соединение обладает состоянием. Упростив, их можно представить себе так:
СОЕДИНЕНИЕ УСТАНАВЛИВАЕТСЯ -> УСТАНОВЛЕНО -> СОЕДИНЕНИЕ ЗАКРЫВАЕТСЯ
Таким образом, параметр backlog определяет размер очереди для установленных, но еще не обработанных программой соединений. Пока количество подключенных клиентов меньше, чем этот параметр, операционная система будет автоматически принимать входящие соединения на серверный сокет и помещать их в очередь. Как только количество установленных соединений в очереди достигнет значения backlog, новые соединения приниматься не будут. В зависимости от реализации (GNU Linux/BSD), OC может явно отклонять новые подключения или просто их игнорировать, давая возможность им дождаться освобождения места в очереди.
Теперь необходимо получить соединение из этой очереди:
client_sock, client_addr = serv_sock.accept()
В отличие от неблокирующего вызова listen(), который сразу после перевода сокета в слушающее состояние, возвращает управление нашему коду, вызов accept() является блокирующим. Это означает, что он не возвращает управление нашему коду до тех пор, пока в очереди установленных соединений не появится хотя бы одно подключение.
На этом этапе на стороне сервера мы имеем два сокета. Первый, serv_sock, находится в состоянии LISTEN, т.е. принимает входящие соединения. Второй, client_sock, находится в состоянии ESTABLISHED, т.е. готов к приему и передаче данных. Более того, client_sock на стороне сервера и клиенсткий сокет в программе клиента являются одинаковыми и равноправными участниками сетевого взаимодействия, т.н. peer’ы. Они оба могут как принимать и отправлять данные, так и закрыть соединение с помощью вызова close(). При этом они никак не влияют на состояние слушающего сокета.
Пример чтения и записи данных в клиентский сокет:
while True:
    data = client_sock.recv(1024)
    if not data:
        break
    client_sock.sendall(data)
И опять же справедливый вопрос — где обещанные read() и write()? На самом деле с сокетом можно работать и с помощью этих двух функций, но в общем случае сигнатуры read() и write() не позволяют передать все возможные параметры чтения/записи. Так, например, вызов send() с нулевыми флагами равносилен вызову write().
Немного коснемся вопроса адресации. Каждый TCP сокет определяется двумя парами чисел: (локальный IP адрес, локальный порт) и (удаленный IP адрес, удаленный порт). Рассмотрим, какие адреса на данный момент у наших сокетов:
serv_sock:
  laddr (ip=<server_ip>, port=53210)
  raddr (ip=0.0.0.0, port=*)  # т.е. любой

client_sock:
  laddr (ip=<client_ip>, port=51573)  # случайный порт, назначенный системой
  raddr (ip=<server_ip>, port=53210)  # адрес слушающего сокета на сервере
Полный код сервера выглядит так:
# python3

import socket

serv_sock = socket.socket(socket.AF_INET, socket.SOCK_STREAM, proto=0)
serv_sock.bind(('', 53210))
serv_sock.listen(10)

while True:
    # Бесконечно обрабатываем входящие подключения
    client_sock, client_addr = serv_sock.accept()
    print('Connected by', client_addr)

    while True:
        # Пока клиент не отключился, читаем передаваемые
        # им данные и отправляем их обратно
        data = client_sock.recv(1024)
        if not data:
            # Клиент отключился
            break
        client_sock.sendall(data)

    client_sock.close()
Подключиться к этому серверу можно с использованием консольной утилиты telnet, предназначенной для текстового обмена информацией поверх протокола TCP:
telnet 127.0.0.1 53210
> Trying 192.168.0.1...
> Connected to 192.168.0.1.
> Escape character is '^]'.
> Hello
> Hello
Простейший TCP клиент
На клиентской стороне работа с сокетами выглядит намного проще. Здесь сокет будет только один и его задача только лишь подключиться к заранее известному IP-адресу и порту сервера, сделав вызов connect().
# python3

import socket

client_sock = socket.socket(socket.AF_INET, socket.SOCK_STREAM)
client_sock.connect(('127.0.0.1', 53210))
client_sock.sendall(b'Hello, world')
data = client_sock.recv(1024)
client_sock.close()
print('Received', repr(data))
Заключение
Запоминать что-то без понимания, как это работает — злое зло не самый разумный подход для разработчика. Работа с сокетами тому отличный пример. На первый взгляд может показаться, что уложить в голове последовательность приготовления клиентских и серверных сокетов к работе практически не возможно. Это происходит из-за того, что не сразу понятен смысл производимых манипуляций. Однако, понимая, как осуществляется сетевое взаимодействие, API сокетов сразу становится прозрачным и легко оседает в подкорке. А с точки зрения полезности полученных знаний, я считаю. что понимание принципов сетевого взаимодействия жизненно важно для разработки и отладки действительно сложных веб-проектов.
Другие статьи из серии:
- Пишем свой веб-сервер на Python: процессы, потоки и асинхронный I/O
- Пишем свой веб-сервер на Python: протокол HTTP
- Пишем свой веб-сервер на Python: стандарт WSGI
- Пишем свой веб-сервер на Python: фреймворк Flask
Ссылки по теме
Справочная информация:
- Сокеты
- Веб-сервер
- Протокол
- Файловый дескриптор
- Межпроцессное взаимодействие
- Пакет
- IP
- TCP
- Порт
- Модуль
socket
Литература
- Beej’s Guide to Network Programming — отличные основы
- UNIX Network Programming — продвинутый уровень
Мой вебинар на данную тему можно посмотреть на сайте GeekBrains.Ru.
HTTP & Web Servers
<– back to Mobile Web Specialist Nanodegree homepage
Resource Links
Python Docs
- The Python Tutorial
- BaseHTTPRequestHandler
- Executing modules as scripts
- urllib.parse
- url-quoting
- Requrests Quickstart
Utilities
- Let’s Encrypt is a great site to learn about HTTPS in a hands-on way, by creating your own HTTPS certificates and installing them on your site.
- HTTP Spy is a neat little Chrome extension that will show you the headers and request information for every request your browser makes.
Setup
Welcome to our course on HTTP and Web Servers! In this course, you’ll learn how web servers work. You’ll write web services in Python, and you’ll also write code that accesses services out on the web.
This course isn’t about installing Apache on a Linux server, or uploading HTML files to the cloud. It’s about how the protocol itself works. The examples you’ll build in this course are meant to illustrate the low-level behaviors that higher-level web frameworks and services are built out of.
Getting Started
You’ll be using the command line a lot in this course. A lot of the instructions in this course will ask you to run commands on the terminal on your computer. You can use any common terminal program —
- On Windows 10, you can use the bash shell in Windows Subsystem for Linux.
- On earlier versions of Windows, you can use the Git Bash terminal program from Git.
- On Mac OS, you can use the built-in Terminal program, or another such as iTerm.
- On Linux, you can use any common terminal program such as gnome-terminal or xterm.
Python 3
This course will not use a VM (virtual machine). Instead, you will be running code directly on your computer. This means you will need to have Python installed on your computer. The code in this course is built for Python 3, and will not all work in Python 2.
- Windows and Mac: Install it from python.org: https://www.python.org/downloads/
- Mac (with Homebrew): In the terminal, run
brew install python3 - Debian/Ubuntu/Mint: In the terminal, run
sudo apt-get install python3
Open a terminal and check whether you have Python installed:
$ python --version
Python 2.7.12

$ python3 --version
Python 3.5.2
Depending on your system, the Python 3 command may be called
pythonorpython3. Take a moment to check! Due to changes in the language, the examples in this course will not work in Python 2.In the screenshot above, the
pythoncommand runs Python 2.7.12, while the python3 command runs Python 3.5.2. In that situation, we’d want to usepython3for this course.
Interactive Python
You should be familiar with the Python interactive interpreter. When you see code examples with the >>> prompt in this course, those are things you can try out in Python on your own computer. For instance:
>>> from urllib.parse import urlparse
>>> urlparse("https://classroom.udacity.com/courses/ud303").path
'/courses/ud303'
Git
You will need to have the git version control software installed. If you don’t have it already, you can download it from https://git-scm.com/downloads.
$ git --version
git version 2.18.0
You’ll be using Git to download course materials from the Github repository https://github.com/udacity/course-ud303. (You don’t need to do this yet.) You’ll also use it as part of an exercise on deploying a server to a hosting provider.
Nmap
You’ll also need to install ncat, which is part of the Nmap network testing toolkit. We’ll be using ncat to investigate how web servers and browsers talk to each other.
- Windows: Download and run https://nmap.org/dist/nmap-7.30-setup.exe
- Mac (with Homebrew): In the terminal, run brew install nmap
- Mac (without Homebrew): Download and install https://nmap.org/dist/nmap-7.30.dmg
- Debian/Ubuntu/Mint: In the terminal, run sudo apt-get install nmap
To check whether ncat is installed and working, open up two terminals. In one of them, run ncat -l 9999 then in the other, ncat localhost 9999.
Then type something into each terminal and press Enter. You should see the message on the opposite terminal:
I’ve got two terminals open on my computer. I run
ncatas a server in the terminal on the left. Ncat dash little L 9999. Now it’s listening on port 9999.On the right, I run
ncatas a client, and tell it to connect to localhost port 9999. They’re connected now, but they’re not saying anything yet. Let’s change that.On the server side, I type in a message. “Hello from server”, and you see it shows up on the client side.
Now I send a message from the client to the server. And sure enough, it shows up over on the server side.
This shows that each end of the connections can send data to the other.
Now, none of this is happening over HTTP. This is at the network layer below HTTP, called TCP. But we can use this to experiment with HTTP servers, which we’ll do later in this lesson.
For now, I’ll have the server say goodbye, and then I’ll shut the client down by typing control-c. You should try this out yourself to make sure
ncatis installed and working right on your computer.
What’s going on here? Well, one of the ncat programs is acting as a very simple network server, and the other is acting as a client.
Note: If you get an error such as “Address already in use”, this means that another program on your computer is using port 9999. You can pick another port number and use it. Make sure to use the same port number on the server and client sides.
To exit the ncat program, type Control-C in the terminal. If you exit the server side first, the client should automatically exit. This happens because the server ends the connection when it shuts down.
You’ll be learning much more about the interaction between clients and servers throughout this course.
6. Requests & Responses
6.1 Introduction
This is a course about HTTP and web servers.

HTTP, the Hypertext Transfer Protocol, is the language that web browsers and web servers speak to each other. Every time you open a web page, or download a file,or watch a video like this one, it’s HTTP that makes it possible.
In this course, you’ll take a look at how all that takes place.
- In lesson one, you’ll explore the building blocks of HTTP.
- In lesson two, you’ll write web server and client programs from the ground up and handle user input from HTML forms.
- In lesson three, you’ll learn about web server hosting, cookies, and many other more practical aspects of building web services.
This course is a bridge. It’s going to connect your knowledge of basic web technologies, like HTML, with your experience writing code in Python.
With that foundation, you can go on to learn and build many more awesome things.
6.2 First Web Server
An HTTP transaction always involves a client and a server. You’re using an HTTP client right now, your web browser.
Your browser sends HTTP requests to web servers, and servers send responses back to your browser.
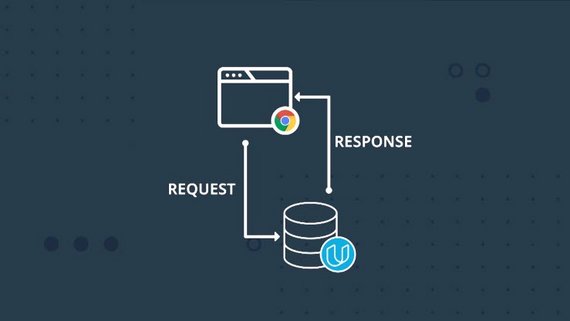
Displaying a simple web page can involve dozens of requests — for the HTML page itself, for images or other media, and for additional data that the page needs.
HTTP was originally created to serve hypertext documents, but today is used for much more. As a user of the web, you’re using HTTP all the time.
A lot of smartphone apps use HTTP under the hood to send requests and receive data. Web browsers are just the most common — and complicated — user interface for web technology. But browsers are not the only web client around. HTTP is powerful and widely supported in software, so it’s a common choice for programs that need to talk to each other across the network, even if they don’t look anything like a web browser.
Exercise: Running your first web server
So what about the other end, the web server? Well, it turns out that a web server can actually be a lot simpler than a browser. Browsers have all this user interface and animation and graphics stuff going on. A server just needs to do one thing: handle incoming requests.
The Python http.server module can run a built-in web server on your computer. It’s not a web app you’d publish to the world; it’s a demonstration of Python’s HTTP abilities. We’ll be referring to this as the demo server in this lesson.
So, let’s get started with the demo web server.
Open up a terminal; cd to a directory that has some files in it — maybe a directory containing some text files, HTML files, or images — then run python3 -m http.server 9000 in your terminal.
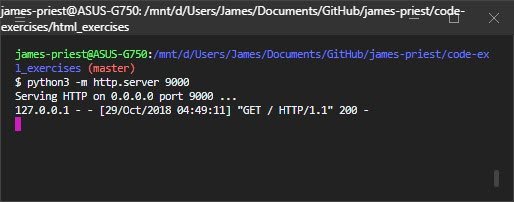
When you start up the demo server, it will print a message telling you that it’s serving HTTP. Leave it running, and leave the terminal open. Now try accessing http://localhost:9000/ from your browser. You should see something like this, although the file names you see will be different from mine:
And that’s the Python demo web server, running on your own computer. It serves up files on your local disk so you can look at them in your browser.
This may not seem like much of a big deal — after all, if you just wanted to access files on your local computer in your browser, you could use file:// URIs. But the demo server is actually a web server. If you have another computer on the same local network, you could use it to access files served up by this server.
When you put localhost:9000 in your browser, your browser sends an HTTP request to the Python program you’re running. That program responds with a piece of data, which your browser presents to you. In this case, it’s showing you a directory listing as a piece of HTML. Use your browser’s developer tools to look at the HTML that it sends.
Note: If you have a file called index.html in that directory, you’ll see the contents of that file in your browser instead of the directory listing. Move that file somewhere else and reload the page, and you will see the directory listing like the one above.
6.2 Question 1
What happens if you make up a web address that doesn’t correspond to a file you actually have, like http://localhost:9000/NotExistyFile?
6.2 Answer 1
The browser gives an error response with a 404 error code, and the server keeps running.
404 is the HTTP status code for “Not Found”. On Highway 101, not far from the Udacity office in Mountain View, there’s a sign that tells the distance to Los Angeles. As it happens, it’s 404 miles from Mountain View to Los Angeles, so the sign says Los Angeles 404. And so, every web programmer in Silicon Valley has probably heard the “Los Angeles Not Found” joke at least once.
What’s a server anyway
A server is just a program that accepts connections from other programs on the network.
When you start a server program, it waits for clients to connect to it — like the demo server waiting for your web browser to ask it for a page. Then when a connection comes in, the server runs a piece of code — like calling a function — to handle each incoming connection. A connection in this sense is like a phone call: it’s a channel through which the client and server can talk to each other. Web clients send requests over these connections, and servers send responses back.
Take a look in the terminal where you ran the demo server. You’ll see a server log with an entry for each request your browser sent:

Hey wow, what is all this stuff? There are some dates and times in there, but what’s GET / HTTP/1.1, or for that matter 127.0.0.1? And what’s that 200 doing over there?
How do these things relate to the web address you put into your browser? Let’s take a look at that next.
6.3 Parts of a URI
A web address is also called a URI for Uniform Resource Identifier. You’ve seen plenty of these before. From a web user’s view, a URI is a piece of text that you put into your web browser that tells it what page to go to. From a web developer’s view, it’s a little bit more complicated.
You’ve probably also seen the term URL or Uniform Resource Locator. These are pretty close to the same thing; specifically, a URL is a URI for a resource on the network. Since URI is slightly more precise, we’ll use that term in this course. But don’t worry too much about the distinction.
A URI is a name for a resource — such as this lesson page, or a Wikipedia article, or a data source like the Google Maps API. URIs are made out of several different parts, each of which has its own syntax. Many of these parts are optional, which is why URIs for different services look so different from one another.
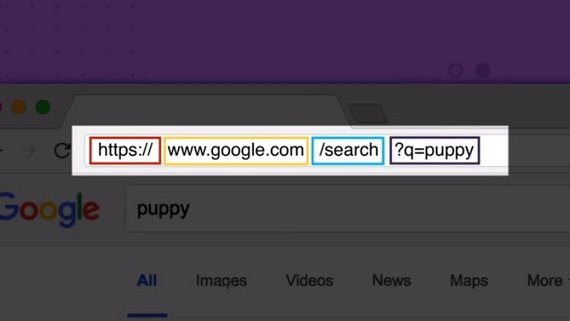
Here is an example of a URI: https://en.wikipedia.org/wiki/Fish
This URI has three visible parts, separated by a little bit of punctuation:
httpsis the scheme;en.wikipedia.orgis the hostname;- and
/wiki/Fishis the path.
Different URIs can have different parts; we’ll see more below.
Scheme
The first part of a URI is the scheme, which tells the client how to go about accessing the resource. Some URI schemes you’ve seen before include http, https, and file. File URIs tell the client to access a file on the local filesystem. HTTP and HTTPS URIs point to resources served by a web server.
HTTP and HTTPS URIs look almost the same. The difference is that when a client goes to access a resource with an HTTPS URI, it will use an encrypted connection to do it. Encrypted Web connections were originally used to protect passwords and credit-card transactions, but today many sites use them to help protect users’ privacy. We’ll look more into HTTPS near the end of this course.
There are many other URI schemes out there, though. You can take a look at [the official list](http://www.iana.org/assignments/uri-schemes/uri-schemes.xhtml!
6.3 Question 1
Which of these are real URI schemes actually used on the Web?
- mailto
- data
- magnet
- postal
Hostname
In an HTTP URI, the next thing that appears after the scheme is a hostname — something like www.udacity.com or localhost. This tells the client which server to connect to.
You’ll often see web addresses written as just a hostname in print. But in the HTML code of a web page, you can’t write <a href="www.google.com">this</a> and get a working link to Google. A hostname can only appear after a URI scheme that supports it, such as http or https. In these URIs, there will always be a :// between the scheme and hostname.
We’ll see more about hostnames later on in the lesson. By the way, not every URI has a hostname. For instance, a mailto URI just has an email address: mailto:spam@example.net is a well-formed mailto URI. This also reveals a bit more about the punctuation in URIs: the : goes after the scheme, but the // goes before the hostname. Mailto links don’t have a hostname part, so they don’t have a //.
Path
In an HTTP URI (and many others), the next thing that appears is the path, which identifies a particular resource on a server. A server can have many resources on it — such as different web pages, videos, or APIs. The path tells the server which resource the client is looking for.
On the demo server, the paths you see will correspond to files on your filesystem. But that’s just the demo server. In the real world, URI paths don’t necessarily equate to specific filenames. For instance, if you do a Google search, you’ll see a URI path such as /search?q=ponies. This doesn’t mean that there’s literally a file on a server at Google with a filename of search?q=ponies. The server interprets the path to figure out what resource to send. In the case of a search query, it sends back a search result page that maybe never existed before.
When you write a URI without a path, such as http://udacity.com, the browser fills in the default path, which is written with a single slash. That’s why http://udacity.com is the same as http://udacity.com/ (with a slash on the end).
The path written with just a single slash is also called the root. When you look at the root URI of the demo server — http://localhost:8000/ — you’re not looking at the root of your computer’s whole filesystem. It’s just the root of the resources served by the web server. The demo server won’t let a web browser access files outside the directory that it’s running in.
6.3 Question 2
Here is a URI: http://example.net/google.com/ponies
What is the hostname in this URI?
- www.example.net
- example.net
- google.com
- /google.com/ponies
Relative URI references
Take a look at the HTML source for the demo server’s root page. Find one of the <a> tags that links to a file. In mine, I have a file called cliffsofinsanity.png, so there’s an <a> tag that looks like this:
<a href="cliffsofinsanity.png">cliffsofinsanity.png</a>
URIs like this one don’t have a scheme, or a hostname — just a path. This is a relative URI reference. It’s “relative” to the context in which it appears — specifically, the page it’s on. This URI doesn’t include the hostname or port of the server it’s on, but the browser can figure that out from context. If you click on one of those links, the browser knows from context that it needs to fetch it from the same server that it got the original page from.
Other URI parts
There are many other parts that can occur in a URI. Consider the difference between these two Wikipedia URIs:
- https://en.wikipedia.org/wiki/Oxygen
- https://en.wikipedia.org/wiki/Oxygen#Discovery
If you follow these links in your browser, it will fetch the same page from Wikipedia’s web server. But the second one displays the page scrolled to the section about the discovery of oxygen. The part of the URI after the # sign is called a fragment. The browser doesn’t even send it to the web server. It lets a link point to a specific named part of a resource; in HTML pages it links to an element by id.
In contrast, consider this Google Search URI:
- https://www.google.com/search?q=fish
The ?q=fish is a query part of the URI. This does get sent to the server.
There are a few other possible parts of a URI. For way more detail than you need for this course, take a look at this Wikipedia article:
- https://en.wikipedia.org/wiki/Uniform_Resource_Identifier#Generic_syntax
(Hey, look, it’s another fragment ID!)
6.4 Hostnames and Ports
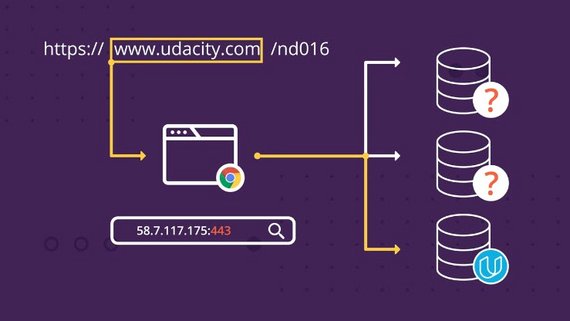
Hostnames
A full HTTP or HTTPS URI includes the hostname of the web server, like www.udacity.com or www.un.int or www.cheeseboardcollective.coop (my favorite pizza place in the world, in Berkeley CA). A hostname in a URI can also be an IP address: for instance, if you put http://216.58.194.174/ in your browser, you’ll end up at Google.
Why is it called a hostname? In network terminology, a host is a computer on the network; one that could host services.
The Internet tells computers apart by their IP addresses; every piece of network traffic on the Internet is labeled with the IP addresses of the sending and receiving computers. In order to connect to a web server such as www.udacity.com, a client needs to translate the hostname into an IP address. Your operating system’s network configuration uses the Domain Name Service (DNS) — a set of servers maintained by Internet Service Providers (ISPs) and other network users — to look up hostnames and get back IP addresses.
In the terminal, you can use the host program to look up hostnames in DNS:
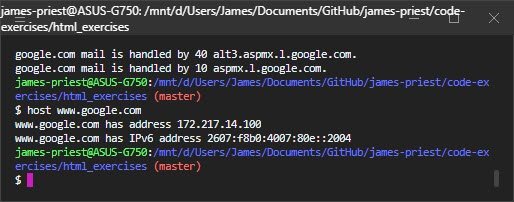
Some systems don’t have the host command, but do have a similar command called nslookup. This command also displays the IP address for the hostname you give it; but it also shows the IP address of the DNS server that’s giving it the answer:
6.4 Question 1
Use the host or nslookup command to find the IPv4 address for the name localhost. What is it?
- 1.2.3.4
- 127.0.0.1
- 0.0.0.0
- ::1
IP addresses come in two different varieties: the older IPv4 and the newer IPv6. When you see an address like 127.0.0.1 or 216.58.194.164, those are IPv4 addresses. IPv6 addresses are much longer, such as 2607:f8b0:4005:804::2004, although they can also be abbreviated.
Localhost
The IPv4 address 127.0.0.1 and the IPv6 address ::1 are special addresses that mean “this computer itself” — for when a client (like your browser) is accessing a server on your own computer. The hostname localhost refers to these special addresses.
When you run the demo server, it prints a message saying that it’s listening on 0.0.0.0. This is not a regular IP address. Instead, it’s a special code for “every IPv4 address on this computer”. That includes the localhost address, but it also includes your computer’s regular IP address.
6.4 Question 2
Use host or nslookup command to find the IPv4 addresses of en.wikipedia.org and ja.wikipedia.org — the servers the Wikipedia in English and Japanese.
Are these sites on the same IP address?
- Yes, they are on the same IP address
- No, they are on different IP addresses.
As of October 2016, these sites were on the same IP address, but the Wikimedia Foundation can move their servers around sometimes — so you might have gotten a different answer.
A single web server can have lots of different web sites running on it, each with their own hostname. When a client asks the server for a resource, it has to specify what hostname it intends to be talking to. We’ll see more about this later, in the section on HTTP headers.
Ports
When you told your browser to connect to the demo server, you gave it the URI http://localhost:9000/. This URI has a port number of 9000. But most of the web addresses you see in the wild don’t have a port number on them. This is because the client usually figures out the port number from the URI scheme.
For instance, HTTP URIs imply a port number of 80, whereas HTTPS URIs imply a port number of 443. Your Python demo web server is running on port 9000. Since this isn’t the default port, you have to write the port number in URIs for it.
What’s a port number, anyway? To get into that, we need to talk about how the Internet works. All of the network traffic that computers send and receive — everything from web requests, to login sessions, to file sharing — is split up into messages called packets. Each packet has the IP addresses of the computer that sent it, and the computer that receives it. And (with the exception of some low-level packets, such as ping) it also has the port number for the sender and recipient. IP addresses distinguish computers; port numbers distinguish programs on those computers.
We say that a server “listens on” a port, such as 80 or 8000. “Listening” means that when the server starts up, it tells its operating system that it wants to receive connections from clients on a particular port number. When a client (such as a web browser) “connects to” that port and sends a request, the operating system knows to forward that request to the server that’s listening on that port.
Why do we use port 9000 instead of 80 for the demo server? For historical reasons, operating systems only allow the administrator (or root) account to listen on ports below 1024. This is fine for production web servers, but it’s not convenient for learning.
6.4 Question 3
Which of the URIs below refers to the same resource as https://en.wikipedia.org/wiki/Fish?
http://en.wikipedia.org/wiki/Fishhttps://en.wikipedia.org:443/wiki/Fishhttp://en.wikipedia.org:80/wiki/Fishhttp://en.wikipedia.org:8000/wiki/Fish
6.5 HTTP GET Requests

HTTP GET requests
Take a look back at the server logs on your terminal, where the demo server is running. When you request a page from the demo server, an entry appears in the logs with a message like this:
127.0.0.1 - - [29/Oct/2018 06:23:35] "GET /images/bg1.jpg HTTP/1.1" 200 -
Take a look at the part right after the date and time. Here, it says "GET /images/bg1.jpg HTTP/1.1". This is the text of the request line that the browser sent to the server. This log entry is the server telling you that it received a request that said, literally, GET /images/bg1.jpg HTTP/1.1.
This request has three parts.
The word GET is the method or HTTP verb being used; this says what kind of request is being made. GET is the verb that clients use when they want a server to send a resource, such as a web page or image. Later, we’ll see other verbs that are used when a client wants to do other things, such as submit a form or make changes to a resource.
/bg1.jpg is the path of the resource being requested. Notice that the client does not send the whole URI of the resource here. It doesn’t say https://localhost:9000/images/bg1.jpg. It just sends the path.
Finally, HTTP/1.1 is the protocol of the request. Over the years, there have been several changes to the way HTTP works. Clients have to tell servers which dialect of HTTP they’re speaking. HTTP/1.1 is the most common version today.
Exercise: Send a request by hand
You can use ncat to connect to the demo server and send it an HTTP request by hand. (Make sure the demo server is still running!)
Terminal 1
$ python3 -m http.server 9000
Serving HTTP on 0.0.0.0 port 9000 ...
Terminal 2
Try it out:
Use ncat 127.0.0.1 9000 to connect your terminal to the demo server.
Then type these two lines:
GET / HTTP/1.1
Host: localhost
After the second line, press Enter twice. As soon as you do, the response from the server will be displayed on your terminal. Depending on the size of your terminal, and the number of files the web server sees, you will probably need to scroll up to see the beginning of the response!
6.5 Question
Which of these things do you see in the server’s response?
- A line end with
200 OK - The date and time.
- A Python error message
- A piece of HTML
- A message that says
Ncat: connection refused
If your server works like mine, you’ll see a status line that says HTTP/1.0 200 OK, then several lines of headers including the date as well as some other information, and a piece of HTML code. These parts make up the HTTP response that the server sends.
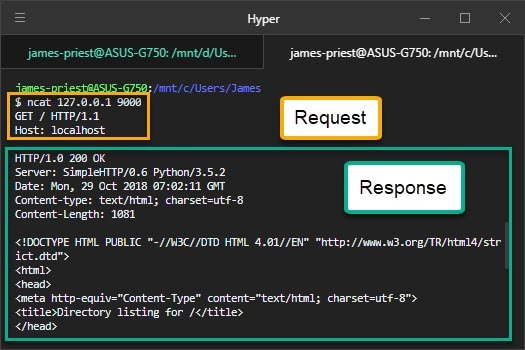
On the next page, we’ll look at the parts of the HTTP response in detail.
6.6 HTTP Responses
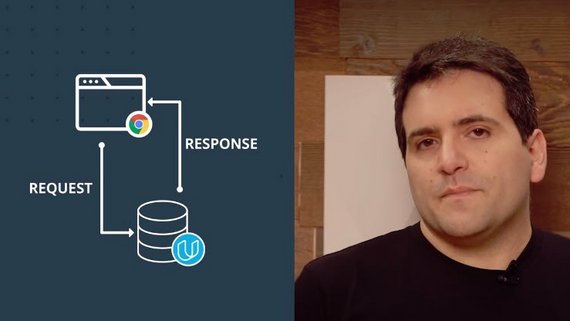
HTTP responses
Take another look at what you got back from the web server in the previous exercise.
After you typed Host: localhost and pressed Enter twice, the server sent back a lot of text. This is an HTTP response. One of these exchanges — a request and response — is happening every time your browser asks a server for a page, an image, or anything else.
Here’s another one to try. Use ncat to connect to google.com port 80, and send a request for the path / on the host google.com:
GET / HTTP/1.1
Host: google.com
Make sure to send
Host: google.comexactly … don’t slip awwwin there. These are actually different hostnames, and we want to take a look at the difference between them. And press Enter twice!
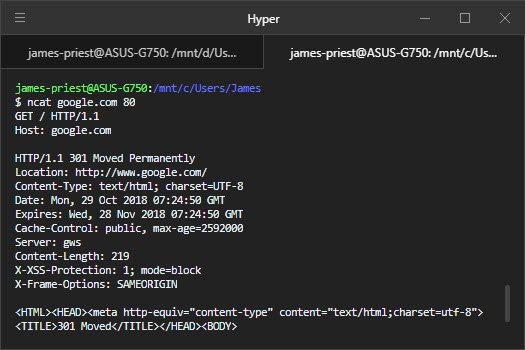
The HTTP response is made up of three parts: the status line, some headers, and a response body.
The status line is the first line of text that the server sends back. The headers are the other lines up until the first blank line. The response body is the rest — in this case, it’s a piece of HTML.
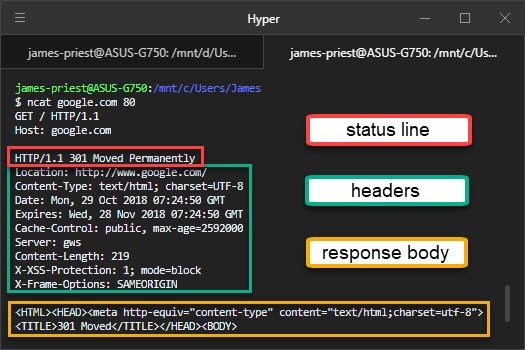
Status line
In the response you got from your demo server, the status line said HTTP/1.0 200 OK. In the one from Google, it says HTTP/1.1 301 Moved Permanently. The status line tells the client whether the server understood the request, whether the server has the resource the client asked for, and how to proceed next. It also tells the client which dialect of HTTP the server is speaking.
The numbers 200 and 301 here are HTTP status codes. There are dozens of different status codes. The first digit of the status code indicates the general success of the request. As a shorthand, web developers describe all of the codes starting with 2 as “2xx” codes, for instance — the x’s mean “any digit”.
- 1xx — Informational. The request is in progress or there’s another step to take.
- 2xx — Success! The request succeeded. The server is sending the data the client asked for.
- 3xx — Redirection. The server is telling the client a different URI it should redirect to. The headers will usually contain a Location header with the updated URI. Different codes tell the client whether a redirect is permanent or temporary.
- 4xx — Client error. The server didn’t understand the client’s request, or can’t or won’t fill it. Different codes tell the client whether it was a bad URI, a permissions problem, or another sort of error.
- 5xx — Server error. Something went wrong on the server side.
You can find out much more about HTTP status codes in this Wikipedia article or in the specification for HTTP.
6.6 Question 1
Look back at the reponse Google sent, specifically the status line and the first header line:
HTTP/1.1 301 Moved Permanently
Location: http://www.google.com/
What do you think Google’s server wants the client to do?
- Go to http://www.google.com/ instead of http://google.com/.
- Show the user an error message saying they got the wrong web address.
- Go away forever and never come back
The server sent a 301 status code, which is a kind of redirection. It’s telling the client that if it wants to get the Google home page, the client needs to use the URI http://www.google.com/.
The server response here is an example of good user interface on the Web. Google wants browsers to use www.google.com instead of google.com. But instead of showing the user an error message, they send a redirect. Browsers will automatically follow the redirect and end up on the right site.
An HTTP response can include many headers. Each header is a line that starts with a keyword, such as Location or Content-Type, followed by a colon and a value. Headers are a sort of metadata for the response. They aren’t displayed by browsers or other clients; instead, they tell the client various information about the response.
Many, many features of the Web are implemented using headers. For instance, cookies are a Web feature that lets servers store data on the browser, for instance to keep a user logged in. To set a cookie, the server sends the Set-Cookie header. The browser will then send the cookie data back in a Cookie header on subsequent requests. You’ll see more about cookies later in this course.
For the next quiz, take a look at the Content-Type header sent by the Google server and the demo server. Both servers send the exact same value:
Content-Type: text/html; charset=utf-8
What do you think this means?
6.6 Question 2
What does the Content-Type header sent by the two servers mean? Content-Type: text/html; charset=utf-8
- The server did not understand the client’s request. The server only understands text that is written in the languages HTML or UTF-8
- To get the right web page, the client should connect to the server named charset=utf8 and request an HTML document.
- The server is telling the client that the response body is an HTML document written in UTF-8 text.
A Content-type header indicates the kind of data that the server is sending. It includes a general category of content as well as the specific format. For instance, a PNG image file will come with the Content-type image/png. If the content is text (including HTML), the server will also tell what encoding it’s written in. UTF-8 is a very common choice here, and it’s the default for Python text anyway.
Very often, the headers will contain more metadata about the response body. For instance, both the demo server and Google also send a Content-Length header, which tells the client how long (in bytes) the response body will be. If the server sends this, then the client can reuse the connection to send another request after it’s read the first response. Browsers use this so they can fetch multiple pieces of data (such as images on a web page) without having to reconnect to the server.
Response body
The headers end with a blank line. Everything after that blank line is part of the response body. If the request was successful (a 200 OK status, for instance), this is a copy of whatever resource the client asked for — such as a web page, image, or other piece of data.
But in the case of an error, the response body is where the error message goes! If you request a page that doesn’t exist, and you get a 404 Not Found error, the actual error message shows up in the response body.
Exercise: Be a web server!
Use ncat -l 9999 to listen on port 9999. Connect to it with your web browser at http://localhost:9999/. What do you see in your terminal?
- A Pythin error message that starts with “NameError”
- A JavaScript error message that starts with “Uncaught SyntaxError”
- An HTTP request that starts with “GET / HTTP1.1”.
- Nothing; it just sits there
You should see an HTTP request that starts with GET. This is your browser talking!
Keep that terminal open!
Next, send an HTTP response to your browser by typing it into the terminal, right under where you see the headers the browser sent to you:
HTTP/1.1 307 Temporary Redirect
Location: https://www.eff.org/
At the end, press Enter twice to send a blank line to mark the end of headers.
6.6 Question 4
What happens in your browser after sending it the response described above?
- it crashes.
- It requests five more web pages from you.
- It opens the web page of the Electronic Frontier Foundation (EFF),
- It doesn’t do anything; it just sits there.
By sending a 307 redirect code, you told your browser to go to a different URL, specifically the one in the Location header. And sure enough, that’s the EFF.
Do it again! Run ncat -l 9999 to play a server, and get your browser to access it. But this time, instead of sending a 307 redirect, send a 200 OK with a piece of text in it:
HTTP/1.1 200 OK
Content-type: text/plain
Content-length: 50

Hello, browser! I am a real HTTP server, honestly!
(Remember the blank line between headers and body!)
6.6 Question 5
What happens in your browser after you send it the HTTP response with 200 OK?
- It catches you in the act of pretending to be a server, and displays a warning that humans are not allowed to be HTTP servers.
- It displays the message that you typed in plain text
- It turns into a tofu elephant and lies away in a passing breeze.
You aren’t just pretending to be a web server; you have actually sent a valid HTTP response to the browser.
6.7 Conclusion
Now I’ve been working with servers since the late’90s, and every time I find myself talking to a server by hand like that, I feel like I’m getting away with something sneaky.
It actually turns out you can do something similar with email servers to send fake email. Don’t be evil though.
But seriously, there’s only so much you can learn about web servers and clients by pretending to be one by hand.
In the next lesson, you’ll write code to do that for you. And as it turns out, a piece of code that pretends to be a web server, well, it is a web server. Sneaky.
Congratulations!
You have demonstrated your ability to play the part of an HTTP client or server by hand. You can carry out conversations in HTTP with all manner of interesting clients and servers.
Fortunately, Python makes it much easier than this when building real web applications. Rather than sending and answering HTTP requests by hand, in the next lesson, you’ll be writing Python code to do it for you.
Downloadable exercises
In the next two lessons, you’ll be doing several exercises involving running Python server code on your own computer. To get ready for these exercises, you’ll need to download the starter code. To do this, open your terminal and run these commands:
git clone https://github.com/udacity/course-ud303
cd course-ud303
git remote remove origin
This will put your shell into a directory called course-ud303 containing the downloadable exercises. Take a look around at the subdirectories here. For each exercise, you’ll be using one of them.
6.7 Question 1
To get ready for Lesson 2, download the exercise material and take a look around the exercises
git clone https://github.com/udacity/course-ud303cd course-ud303git remote remove origin- I looked around in the subdirectories of
course-ud303
7. The Web from Python
7.1 Python’s http.server
In the last lesson, you used the built-in demo web server from the Python http.server module. But the demo server is just that — a demonstration of the module’s abilities. Just serving static files out of a directory is hardly the only thing you can do with HTTP. In this lesson, you’ll build a few different web services using http.server, and learn more about HTTP at the same time. You’ll also use another module, requests, to write code that acts as an HTTP client.
These modules are written in object-oriented Python. You should already be familiar with creating class instances, defining subclasses, and defining methods on classes. If you need a refresher on the Python syntax for these object-oriented actions, you might want to browse the Python tutorial on classes or take another look at the sections on classes in our Programming Foundations with Python course.
In the exercises in this lesson, you’ll be writing code that runs on your own computer. You’ll need the starter code that you downloaded at the end of the last lesson, which should be in a directory called course-ud303. And you’ll need your favorite text editor to work on these exercises.
Servers and handlers
Web servers using http.server are made of two parts: the HTTPServer class, and a request handler class. The first part, the HTTPServer class, is built in to the module and is the same for every web service. It knows how to listen on a port and accept HTTP requests from clients. Whenever it receives a request, it hands that request off to the second part — a request handler — which is different for every web service.
Here’s what your Python code will need to do in order to run a web service:
- Import
http.server, or at least the pieces of it that you need. - Create a subclass of
http.server.BaseHTTPRequestHandler. This is your handler class. - Define a method on the handler class for each HTTP verb you want to handle. (The only HTTP verb you’ve seen yet in this course is
GET, but that will be changing soon.)- The method for GET requests has to be called
do_GET. - Inside the method, call built-in methods of the handler class to read the HTTP request and write the response.
- The method for GET requests has to be called
- Create an instance of
http.server.HTTPServer, giving it your handler class and server information — particularly, the port number. - Call the
HTTPServerinstance’sserve_forevermethod.
Once you call the HTTPServer instance’s serve_forever method, the server does that — it runs forever, until stopped. Just as in the last lesson, if you have a Python server running and you want to stop it, type Ctrl-C into the terminal where it’s running. (You may need to type it two or three times.)
Exercise: The hello server
Let’s take a quick tour of an example! In your terminal, go to the course-ud303 directory you downloaded earlier. Under the Lesson-2 subdirectory, you’ll find a subdirectory called 0_HelloServer. Inside, there’s a Python program called HelloServer.py. Open it up in your text editor and take a look around. Then run it in your terminal with python3 HelloServer.py. It won’t print anything in the terminal … until you access it at http://localhost:8000/ in your browser.
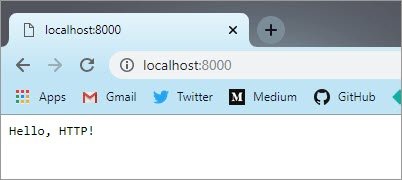
HelloServer.py
#!/usr/bin/env python3
#
# The *hello server* is an HTTP server that responds to a GET request by
# sending back a friendly greeting.  Run this program in your terminal and
# access the server at http://localhost:8000 in your browser.

from http.server import HTTPServer, BaseHTTPRequestHandler

class HelloHandler(BaseHTTPRequestHandler):
    def do_GET(self):
        # First, send a 200 OK response.
        self.send_response(200)

        # Then send headers.
        self.send_header('Content-type', 'text/plain; charset=utf-8')
        self.end_headers()

        # Now, write the response body.
        self.wfile.write("Hello, HTTP!n".encode())

if __name__ == '__main__':
    server_address = ('', 8000)  # Serve on all addresses, port 8000.
    httpd = HTTPServer(server_address, HelloHandler)
    httpd.serve_forever()
A tour of the hello server
Open up HelloServer.py in your text editor. Let’s take a look at each part of this code, line by line.
from http.server import HTTPServer, BaseHTTPRequestHandler
The http.server module has a lot of parts in it. For now, this program only needs these two. I’m using the from syntax of import so that I don’t have to type http.server over and over in my code.
class HelloHandler(BaseHTTPRequestHandler):
  def do_GET(self):
This is the handler class. It inherits from the BaseHTTPRequestHandler parent class, which is defined in http.server. I’ve defined one method, do_GET, which handles HTTP GET requests. When the web server receives a GET request, it will call this method to respond to it.
As you saw in the previous lesson, there are three things the server needs to send in an HTTP response:
- a status code
- some headers
- and the response body
The handler parent class has methods for doing each of these things. Inside do_GET, I just call them in order.
    # First, send a 200 OK response.
    self.send_response(200)
The first thing the server needs to do is send a 200 OK status code; and the send_response method does this. I don’t have to tell it that 200 means OK; the parent class already knows that.
    # Then send headers.
    self.send_header('Content-type', 'text/plain; charset=utf-8')
    self.end_headers()
The next thing the server needs to do is send HTTP headers. The parent class supplies the send_header and end_headers methods for doing this. For now, I’m just having the server send a single header line — the Content-type header telling the client that the response body will be in UTF-8 plain text.
    # Now, write the response body.
    self.wfile.write("Hello, HTTP!n".encode())
The last part of the do_GET method writes the response body.
The parent class gives us a variable called self.wfile, which is used to send the response. The name wfile stands for writable file. Python, like many other programming languages, makes an analogy between network connections and open files: they’re things you can read and write data to. Some file objects are read-only; some are write-only; and some are read/write.
self.wfile represents the connection from the server to the client; and it is write-only; hence the name. Any binary data written to it with its write method gets sent to the client as part of the response. Here, I’m writing a friendly hello message.
What’s going on with .encode() though? We’ll get to that in a moment. Let’s look at the rest of the code first.
if __name__ == '__main__':
  server_address = ('', 8000)  # Serve on all addresses, port 8000.
  httpd = HTTPServer(server_address, HelloHandler)
  httpd.serve_forever()
This code will run when we run this module as a Python program, rather than importing it. The HTTPServer constructor needs to know what address and port to listen on; it takes these as a tuple that I’m calling server_address. I also give it the HelloHandler class, which it will use to handle each incoming client request.
At the very end of the file, I call serve_forever on the HTTPServer, telling it to start handling HTTP requests. And that starts the web server running.
HelloServer.py
#!/usr/bin/env python3
#
# The *hello server* is an HTTP server that responds to a GET request by
# sending back a friendly greeting.  Run this program in your terminal and
# access the server at http://localhost:8000 in your browser.

from http.server import HTTPServer, BaseHTTPRequestHandler


class HelloHandler(BaseHTTPRequestHandler):
    def do_GET(self):
        # First, send a 200 OK response.
        self.send_response(200)

        # Then send headers.
        self.send_header('Content-type', 'text/plain; charset=utf-8')
        self.end_headers()

        # Now, write the response body.
        self.wfile.write("Hello, HTTP!n".encode())

if __name__ == '__main__':
    server_address = ('', 8000)  # Serve on all addresses, port 8000.
    httpd = HTTPServer(server_address, HelloHandler)
    httpd.serve_forever()
End of the tour
That’s all that’s involved in writing a basic HTTP server in Python. But the hello server isn’t very interesting. It doesn’t even do as much as the demo server. No matter what query you send it, all it has to say is hello. (Try it: http://localhost:8000/goodbye)
In the rest of this lesson, we’ll build servers that do much more than say hello.
7.2 What about .encode()

In the last exercise you saw this bit of code in the hello server:
self.wfile.write("Hello, HTTP!n".encode())
I mentioned that I’d explain the .encode() part later. Well, here goes!
The short version
An HTTP response could contain any kind of data, not only text. And so the self.wfile.write method in the handler class expects to be given a bytes object — a piece of arbitrary binary data — which it writes over the network in the HTTP response body.
If you want to send a string over the HTTP connection, you have to encode the string into a bytes object. The encode method on strings translates the string into a bytes object, which is suitable for sending over the network. There is, similarly, a decode method for turning bytes objects into strings.
That’s all you need to know about text encodings in order to do this course. However, if you want to learn even more, read on …
The long version
Text strings look simple, but they are actually kind of complicated underneath. There are a lot of different ways that computers can represent text in memory and on the network.
Older software — including older versions of Python — tended to assume that each character takes up only one byte of memory. That works fine for some human languages, like English and Russian, but it doesn’t work at all for other human languages, like Chinese; and it really doesn’t work if you want to handle text from multiple languages in the same program.
These words all mean cat:
gato قط 猫 گربه кіт बिल्ली ねこ
The Web is international, so browsers and servers need to support all languages. This means that the old one-byte assumption is completely thrown out. But when programs use the network, they need to know how long a piece of data is in terms of bytes. That has to be figured out unambiguously at some point in time. The way Python does this is by making us encode strings into bytes objects when we want to send them over a binary channel (such as an HTTP connection).
This Japanese word for cat is two characters long. But when it’s encoded in binary, it’s six bytes long:
>>> len('ねこ')
2
>>> len('ねこ'.encode())
6
The most common encoding these days is called UTF-8. It is supported by all major and minor browsers and operating systems, and it supports characters for almost all the world’s languages. In UTF-8, a single character may be represented as anywhere from one to four bytes, depending on language.
English text with no accent marks still takes up one byte per character:
>>> len('cat')
3
>>> len('cat'.encode())
3
UTF-8 is the default encoding in Python. When you call the encode method on a string without passing it another encoding, it assumes you mean UTF-8. This is the right thing to do, so that’s what the code in this course does.
For even more detail …
The Python Unicode HOWTO is a definitive guide to the history of string encodings in Python.
Okay, now let’s get back to writing web servers!
7.3 The echo server
The hello server doesn’t do anything with the query you send it. It just always sends back the same piece of text. Let’s modify it into a server that sends back whatever request path you send it, like an echo. For instance, if you access the page http://localhost:8000/bears, you will see “bears” in your browser. We’ll call this the echo server.
In order to echo back the request, the server needs to be able to look at the request information. That’s something that http.server lets your code do. But to find out how, let’s take a look in the documentation.
7.3 Question 1
Take a look at the Python documentation for the BaseHTTPRequestHandler parent class. What’s the name of the instance variable that contains the request path?
- url
- request
- requestline
- path
path is the right answer. Which means that in do_GET, you’ll need to access self.path to get the request path.
Exercise: Turn HelloHandler into EchoHandler
Change directory to course-ud303/Lesson-2/1_EchoServer. Here, you’ll find a file called EchoServer.py. However, the code in that file is just a copy of the hello server code! For this exercise, modify this code so that it echoes back the request path that it receives. For instance, if you access http://localhost:8000/puppies, you should see the word “puppies” in your browser.
While you’re at it, rename it from HelloHandler to EchoHandler, to better describe what we’ll have it do now. When you’re done, run EchoServer.py and test it out with some different request paths.
What didn’t get echoed
Once you have EchoServer.py running on your machine, try these three test URIs:
- http://localhost:8000/bears
- http://localhost:8000/spiders_from_mars#stardust
- http://localhost:8000/giant-squid?color=green
Then take a look at this quiz:
7.3 Question 2
Which of these silly words did not show up in the server’s response when you tried the URIs above?
- bears
- stardust
- green
How did you build the echo server
The only difference in the code between EchoHandler and HelloHandler is what they write in the response body. The hello server always writes the same message, while the echo server takes its message from the request path. Here’s how I did it — a one-line change at the end of do_GET:
self.wfile.write(self.path[1:].encode())
What I’m doing here is taking the path (for instance "/bears"), using a string slice to remove the first character (which is always a slash), and then encoding the resulting string into bytes, then writing that to the HTTP response body.
You could also do it in several lines of code:
message = self.path[1:]  # Extract 'bears' from '/bears', for instance
message_bytes = message.encode()  # Make bytes from the string
self.wfile.write(message_bytes)  # Send it over the network
Make sure to keep EchoServer.py around! We’ll use it later in the course to look at queries.
7.3 Question 3
The echo server wants to listen on the same port that the hello server does: port 8000. What happens if you try to start EchoServer.py while HelloServer.py is still running or vice versa?
- The new server exists with an
OSErrorexception. - The old server exits with an
OSErrorexception. - The new server is assigned to listen on port 8001 instead of 8000.
- Nothing unusual happens; they coexist just fine.
- Your computer gets 423,827 viruses.
The new server exits. Under normal conditions, only one program on your computer can listen on a particular port at the same time. If you want to have both servers running, you have to change the port number from 8000 to something else.
Note: Windows 10 has a different behavior from all other operating systems (including earlier Windows versions) when two processes try to listen on the same port.
Instead of exiting with an error, the new server will stop and wait for the old server to exit. If you are using Windows 10, be on the lookout for this behavior in your network servers!
EchoServer.py
#!/usr/bin/env python3
#
# The *echo server* is an HTTP server that responds to a GET request by
# sending the query path back to the client.  For instance, if you go to
# the URI "http://localhost:8000/Balloon", the echo server will respond
# with the text "Balloon" in the HTTP response body.
#
# Instructions:
#
# The starter code for this exercise is the code from the hello server.
# Your assignment is to change this code into the echo server:
#
#   1. Change the name of the handler from HelloHandler to EchoHandler.
#   2. Change the response body from "Hello, HTTP!" to the query path.
#
# When you're done, run it in your terminal.  Try it out from your browser,
# then run the "test.py" script to check your work.

from http.server import HTTPServer, BaseHTTPRequestHandler


class EchoHandler(BaseHTTPRequestHandler):
    def do_GET(self):
        # First, send a 200 OK response.
        self.send_response(200)

        # Then send headers.
        self.send_header('Content-type', 'text/plain; charset=utf-8')
        self.end_headers()

        # Now, write the response body.
        self.wfile.write(self.path[1:].encode())

if __name__ == '__main__':
    server_address = ('', 8000)  # Serve on all addresses, port 8000.
    httpd = HTTPServer(server_address, EchoHandler)
    httpd.serve_forever()
7.4 Queries & quoting
Unpacking query parameters
When you take a look at a URI for a major web service, you’ll often see several query parameters, which are a sort of variable assignment that occurs after a ? in the URI. For instance, here’s a Google Image Search URI:
https://www.google.com/search?q=gray+squirrel&tbm=isch
This will be sent to the web server as this HTTP request:
GET /search?q=gray+squirrel&tbm=isch HTTP/1.1
Host: www.google.com
The query part of the URI is the part after the ? mark. Conventionally, query parameters are written as key=value and separated by & signs. So the above URI has two query parameters, q and tbm, with the values gray+squirrel and isch.
(isch stands for Image Search. I’m not sure what tbm means.)
There is a Python library called urllib.parse that knows how to unpack query parameters and other parts of an HTTP URL. (The library doesn’t work on all URIs, only on some URLs.) Take a look at the urllib.parse documentation here. Check out the urlparse and parse_qs functions specifically. Then try out this demonstration in your Python interpreter:
>>> from urllib.parse import urlparse, parse_qs, parse_qsl
>>> address = 'https://www.google.com/search?q=gray+squirrel&tbm=isch'
>>> parts = urlparse(address)
>>> print(parts)
ParseResult(scheme='https', netloc='www.google.com', path='/search',
  params='', query='q=gray+squirrel&tbm=isch', fragment='')
>>> print(parts.query)
q=gray+squirrel&tbm=isch
>>> query = parse_qs(parts.query)
>>> query
{'q': ['gray squirrel'], 'tbm': ['isch']}
>>> parse_qsl(parts.query)
[('q', 'gray squirrel'), ('tbm', 'isch')]
>>>
7.4 Question 1
What does parse_qs('texture=fuzzy&animal=gray+squirrel') return?
- The list
['texture', 'fuzzy', 'animal', 'gray+squirrel'] - The dictionary
{'texture': 'fuzzy', 'animal', 'gray squirrel'} - The dictionary
{'texture': ['fuzzy'], 'animal': ['gray squirrel']}
URL quoting
Did you notice that 'gray+squirrel' in the query string became 'gray squirrel' in the output of parse_qs? HTTP URLs aren’t allowed to contain spaces or certain other characters. So if you want to send these characters in an HTTP request, they have to be translated into a “URL-safe” or “URL-quoted” format.
“Quoting” in this sense doesn’t have to do with quotation marks, the kind you find around Python strings. It means translating a string into a form that doesn’t have any special characters in it, but in a way that can be reversed (unquoted) later.
(And if that isn’t confusing enough, it’s sometimes also referred to as URL-encoding or URL-escaping).
One of the features of the URL-quoted format is that spaces are sometimes translated into plus signs. Other special characters are translated into hexadecimal codes that begin with the percent sign.
Take a look at the documentation for urllib.parse.quote and related functions. Later in the course when you want to construct a URI in your code, you’ll need to use appropriate quoting. More generally, whenever you’re working on a web application and you find spaces or percent-signs in places you don’t expect them to be, it means that something needs to be quoted or unquoted.
7.5 HTML and forms
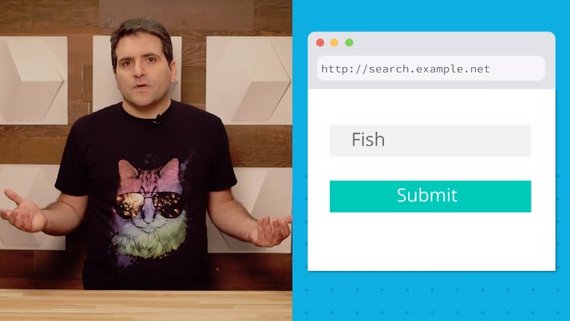
Exercise: HTML and forms
Most of the time, query parameters don’t get into a URL by the user typing them out into the browser. Query parameters often come from a user submitting an HTML form. So dust off your HTML knowledge and let’s take a look at a form that gets submitted to a server.
If you need a refresher on HTML forms, take a look at the MDN introduction (gentle) or the W3C standard reference (more advanced).
Here’s a piece of HTML that contains a form:
<!DOCTYPE html>
<title>Login Page</title>
<form action="http://localhost:8000/" method="GET">
<label>Username:
  <input type="text" name="username">
</label>
<br>
<label>Password:
  <input type="password" name="pw">
</label>
<br>
<button type=submit>Log in!</button>
This HTML is also in the exercises directory, under Lesson-2/2_HTMLForms/LoginPage.html. Open it up in your browser.
Before pressing the submit button, start up the echo server again on port 8000 so you can see the results of submitting the form.
7.5 Question 1
What happens when you fill out the form and submit it?
- Nothing; the browser just sits there.
- You see the username and password you entered in the output from the echo server
- Your browser logs into your favorite web site and deletes all your favorite things.
The form inputs, with the names username and pw, become query parameters to the echo server.
Exercise: Form up for action
Let’s do another example! This HTML form has a pull-down menu with four options.
<!DOCTYPE html>
<title>Search wizardry!</title>
<form action="http://www.google.com/search" method=GET>
  <label>Search term:
    <input type="text" name="q">
  </label>
  <br>
  <label>Corpus:
    <select name="tbm">
      <option selected value="">Regular</option>
      <option value="isch">Images</option>
      <option value="bks">Books</option>
      <option value="nws">News</option>
    </select>
  </label>
  <br>
  <button type="submit">Go go!</button>
</form>
This form is in the HTML file SearchPage.html in the same directory. Open it up in your browser.
This form tells your browser to submit it to Google Search. The inputs in the form supply the q and tbm query parameters. (And if Google ever changes the way their search query parameters work, this example is going to be totally broken.)
7.5 Question 2
Using these two different forms as examples, can you tell what data in the form tells the browser which server to submit the form to?
- The URI in the form
actionattribute. - The text in the
submitbutton. - The browser looks up the form’s
titlein the DNS.
Yes. The form action is the URI to which the form fields will be submitted.
7.6 GET and POST
In the last lesson, I mentioned that GET is only one of many HTTP verbs, or methods.
When a browser submits a form via GET, it puts all of the form fields into the URI that it sends to the server. These are sent as a query, in the request path — just like search engines do. They’re all jammed together into a single line. Since they’re in the URI, the user can bookmark the resulting page, reload it, and so forth.
This is fine for search engine queries, but it’s not quite what we would want for (say) a form that adds an item to your shopping cart on an e-commerce site, or posts a new message on a comments board. GET methods are good for search forms and other actions that are intended to look something up or ask the server for a copy of some resource. But GET is not recommended for actions that are intended to alter or create a resource. For this sort of action, HTTP has a different verb, POST.
Idempotence
Vocabulary word of the day: idempotent. An action is idempotent if doing it twice (or more) produces the same result as doing it once. “Show me the search results for ‘polar bear’” is an idempotent action, because doing it a second time just shows you the same results. “Add a polar bear to my shopping cart” is not, because if you do it twice, you end up with two polar bears.
POST requests are not idempotent. If you’ve ever seen a warning from your browser asking you if you really mean to resubmit a form, what it’s really asking is if you want to do a non-idempotent action a second time.
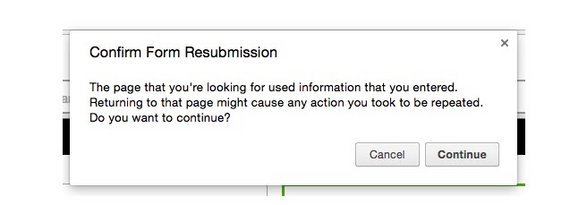
(Important note if you’re ever asked about this in a job interview: idempotent is pronounced like “eye-dem-poe-tent”, or rhyming with “Hide ‘em, Joe Tent” — not like “id impotent”.)
7.6 Question 1
Here’s a list of several (non-HTTP) actions. Makr the ones that are idempotent.
- Adding zero to a numeric variable. (In Python,
x += 0.) - Adding five to a numeric variable. (In Python,
x += 5.) - Setting a variable to the value 5. (In Python,
x = 5.) - Looking up an entry in a dictionary. (In Python,
h = words["hello"].)
Adding zero to a number is idempotent, since you can add zero as many times as you want and the original number is unchanged. Adding five to a number is not idempotent, because if you do it twice you’ll have added ten. Setting a variable to the value 5 is idempotent: doing it twice is the same as doing it once. Looking up an entry in a dictionary doesn’t alter anything, so it’s idempotent.
Exercise: Be a server and receive a POST request
Here’s a piece of HTML with a form in it that is submitted via POST:
<!DOCTYPE html>
<title>Testing POST requests</title>
<form action="http://localhost:9999/" method="POST">
  <label>Magic input:
    <input type="text" name="magic" value="mystery">
  </label>
  <br>
  <label>Secret input:
     <input type="text" name="secret" value="spooky">
  </label>
  <br>
  <button type="submit">Do a thing!</button>
</form>
This form is in your exercises directory as Lesson-2/2_HTMLForms/PostForm.html. Open it up in your browser. You should see a form. Don’t submit that form just yet. First, open up a terminal and use ncat -l 9999 to listen on port 9999. Then type some words into the form fields in your browser, and submit the form. You should see an HTTP request in your terminal. Take a careful look at this request!
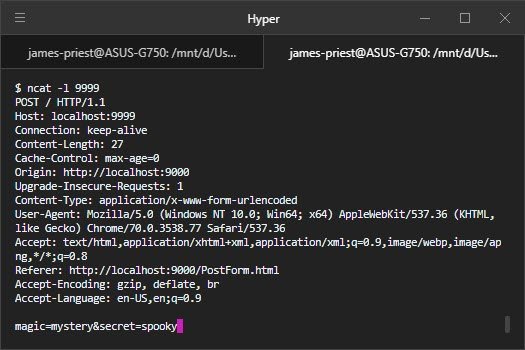
7.6 Question 2
What’s different about this HTTP request from ones you’ve seen before?
- The request line says “POST” instead of “GET”.
- The form data is not in the URI path of the request.
- The form data is somewhere else in the request.
- The for data is written backwards.
The first three are true! Try changing POST to GET in the form and restarting ncat, and see how this affects the request you see when you submit the form.
When a browser submits a form as a POST request, it doesn’t encode the form data in the URI path, the way it does with a GET request. Instead, it sends the form data in the request body, underneath the headers. The request also includes Content-Type and Content-Length headers, which we’ve previously only seen on HTTP responses.
By the way, the names of HTTP headers are case-insensitive. So there’s no difference between writing
Content-Lengthorcontent-lengthor evenConTent-LeNgTh… except, of course, that humans will read your code and be confused by that last one.
7.7 A server for POST
One approach that I like to use when designing a new piece of code is to imagine that it already exists, and think through the ways that a user would use it. Coming up with these narratives is a useful tool to plan out what the code will need to do.
In the next few exercises, you’ll be building a messageboard server. When a user goes to the main page in their browser, it’ll display a form for writing messages, as well as a list of the previously written messages. Submitting the form will send a request to the server, which stores the submitted message and then re-displays the main page.
In order to test your messageboard server, you’ll need to install the requests module, which is a Python module for making HTTP requests. We’ll see much more about this module later in this lesson. For now, just run pip3 install requests in your terminal to install it.
7.7 Question 1
Which HTTP method do you think this server will need to use?
- Only GET
- Only POST
- GET for submitting messages, and POST for viewing them
- GET for viewing messages, and POST for submitting them
We’ll be using a GET request to display the messageboard’s existing contents, and POST to update the contents by creating new messages. Creating new messages is not idempotent — we don’t want duplicates.
Why don’t we want to use GET for submitting the form? Imagine if a user did this. They write a message and press the submit button … and the message text shows up in their URL bar. If they press reload, it sends the message again. If they bookmark that URL and go back to it, it sends the message again. This doesn’t seem like such a great experience. So we’ll use POST for message submission, and GET to display the main page.
POST handlers read the request body
Previously you’ve written handler classes that have just a single method, do_GET. But a handler class can have do_POST as well, to support GET and POST requests. This is exactly how the messageboard server will work. When a GET request comes in, the server will send the HTML form and current messages. When a POST request comes in with a new message, the server will store the message in a list, and then return all the messages it’s seen so far.
The code for a do_POST method will need to do some pretty different things from a do_GET method. When we’re handling a GET request, all the user data in the request is in the URI path. But in a POST request, it’s in the request body. Inside do_POST, our code can read the request body by calling the self.rfile.read method. self.rfile is a file object, like the self.wfile we saw earlier — but rfile is for reading the request, rather than writing the response.
However, self.rfile.read needs to be told how many bytes to read … in other words, how long the request body is.
7.7 Question 2
How do you think our code can tell how much data is in the request body of a POST request from a web browser?
- The browser always sends exactly 1024 bytes.
- Our code should read repeatedly until it gets an empty string.
- The browser sends the length of the request body in the
Content-Lengthheader. - The first two bytes of the request body encode the length of the request body.
If there’s a request body at all, the browser will send the length of the request body in the Content-Length header.
The handler class gives us access to the HTTP headers as the instance variable self.headers, which is an object that acts a lot like a Python dictionary. The keys of this dictionary are the header names, but they’re case-insensitive: it doesn’t matter if you look up 'content-length' or 'Content-Length'. The values in this dictionary are strings: if the request body is 140 bytes long, the value of the Content-length entry will be the string "140". We need to call self.rfile.read(140) to read 140 bytes; so once we read the header, we’ll need to convert it to an integer.
But in an HTTP request, it’s also possible that the body will be empty, in which case the browser might not send a Content-length header at all. This means we have to be a little careful when accessing the headers from the self.headers object. If we do self.headers['content-length'] and there’s no such header, our code will crash with a KeyError. Instead we’ll use the .get dictionary method to get the header value safely.
So here’s a little bit of code that can go in the do_POST handler to find the length of the request body and read it:
length = int(self.headers.get('Content-length', 0))
data = self.rfile.read(length).decode()
Once you read the message body, you can use urllib.parse.parse_qs to extract the POST parameters from it.
With that, you can now build a do_POST method!
Exercise: Messageboard, Part One
The first step to building the messageboard server is to build a server that accepts a POST request and just echoes it back to the browser. The starter code for this exercise is in Lesson-2/3_MessageboardPartOne.
There are several steps involved in doing this, so here’s a checklist —
Messageboard Part One
- Find the length of the POST request data.
- Read the correct amount of request data.
- Extract the “message” field from the request data
- Run the
MessageboardPartOne.pyserver. - Run the
MessageboardPartOne.htmlfile in your browser and submit it. - Run the test script
test.pywith the server running.
Solution, Part One
You can see my version of the solution to the Messageboard Part One exercise in the 3_MessageboardPartOne/solution subdirectory. As before, there are lots of variations on how you can do this exercise; if the tests in test.py pass, then you’ve got a good server!
#!/usr/bin/env python3
#
# Step one in building the messageboard server:
# An echo server for POST requests.
#
# Instructions:
#
# This server should accept a POST request and return the value of the
# "message" field in that request.
#
# You'll need to add three things to the do_POST method to make it work:
#
# 1. Find the length of the request data.
# 2. Read the correct amount of request data.
# 3. Extract the "message" field from the request data.
#
# When you're done, run this server and test it from your browser using the
# Messageboard.html form.  Then run the test.py script to check it.

from http.server import HTTPServer, BaseHTTPRequestHandler
from urllib.parse import parse_qs


class MessageHandler(BaseHTTPRequestHandler):
    def do_POST(self):
        # 1. How long was the message? (Use the Content-Length header.)
        length = int(self.headers.get('Content-length', 0))

        # 2. Read the correct amount of data from the request.
        data = self.rfile.read(length).decode()

        # 3. Extract the "message" field from the request data.
        message = parse_qs(data)["message"][0]

        # Send the "message" field back as the response.
        self.send_response(200)
        self.send_header('Content-type', 'text/plain; charset=utf-8')
        self.end_headers()
        self.wfile.write(message.encode())

if __name__ == '__main__':
    server_address = ('', 8000)
    httpd = HTTPServer(server_address, MessageHandler)
    httpd.serve_forever()
Exercise: Messageboard, Part Two
So far, this server only handles POST requests. To submit the form to it, you have to load up the form in your browser as a separate HTML file. It would be much more useful if the server could serve the form itself.
This is pretty straightforward to do. You can add the form in a variable as a Python string (in triple quotes), and then write a do_GET method that sends the form.
You can choose to start from where you left off in the previous exercise; or if you like, you can start from the code in the 4_MessageboardPartTwo directory.
When you’re done, you should have a server that you can access in your browser at http://localhost:8000/. Going there should display the form. Submitting the form should get the message echoed back. That’s most of the way to a messageboard server … let’s keep going!
Messageboard, Part Two
- Add a string variable that contains the HTML form from
Messageboard.html - Add a
do_GETmethod that returns the form. - Run the server and test it in your browser at http://localhost:8000.
- Run the tests in
test.pywith the server running.
Solution, Part Two
You can see my version of the solution to the Messageboard Part Two exercise in the 4_MessageboardPartTwo/solution subdirectory.
#!/usr/bin/env python3
#
# Step two in building the messageboard server:
# A server that handles both GET and POST requests.
#
# Instructions:
#
# 1. Add a string variable that contains the form from Messageboard.html.
# 2. Add a do_GET method that returns the form.
#
# You don't need to change the do_POST method in this exercise!
#
# To test your code, run this server and access it at http://localhost:8000/
# in your browser.  You should see the form.  Then put a message into the
# form and submit it.  You should then see the message echoed back to you.

from http.server import HTTPServer, BaseHTTPRequestHandler
from urllib.parse import parse_qs

form = '''<!DOCTYPE html>
  <title>Message Board</title>
  <form method="POST" action="http://localhost:8000/">
    <textarea name="message"></textarea>
    <br>
    <button type="submit">Post it!</button>
  </form>
'''


class MessageHandler(BaseHTTPRequestHandler):
    def do_POST(self):
        # How long was the message?
        length = int(self.headers.get('Content-length', 0))

        # Read the correct amount of data from the request.
        data = self.rfile.read(length).decode()

        # Extract the "message" field from the request data.
        message = parse_qs(data)["message"][0]

        # Send the "message" field back as the response.
        self.send_response(200)
        self.send_header('Content-type', 'text/plain; charset=utf-8')
        self.end_headers()
        self.wfile.write(message.encode())

    def do_GET(self):
        # First, send a 200 OK response.
        self.send_response(200)

        # Then send headers.
        self.send_header('Content-type', 'text/html; charset=utf-8')
        self.end_headers()

        # Encode & send the form
        self.wfile.write(form.encode())

if __name__ == '__main__':
    server_address = ('', 8000)
    httpd = HTTPServer(server_address, MessageHandler)
    httpd.serve_forever()
On the next page, you’ll get into part three. But first, once you have your server up and running, try testing it out with some silly queries in this quiz:
7.7 Question 3
Bring your messageboard server up and send it some requests from your browser with different URI paths, like http://localhost:8000/bears or http://localhost:8000/udacity-rocks/my-foxes.
Does it do anything different based on the URI path?
- Yes, it does.
- No, it doesn’t
This particular server doesn’t look at the URI path at all. Any GET request will get the form. Any POST request will save a message.
7.8 Post-Redirect-Get
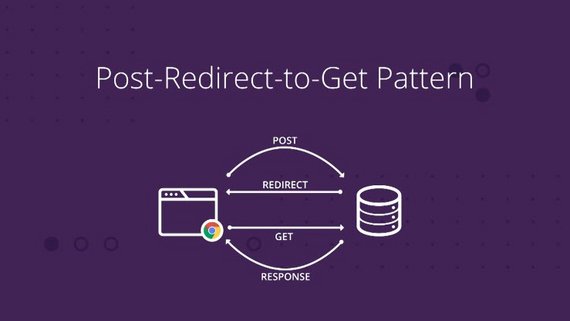
There’s a very common design pattern for interactive HTTP applications and APIs, called the PRG or Post-Redirect-Get pattern. A client POSTs to a server to create or update a resource; on success, the server replies not with a 200 OK but with a 303 redirect. The redirect causes the client to GET the created or updated resource.
This is just one of many, many ways to architect a web application, but it’s one that makes good use of HTTP methods to accomplish specific goals. For instance, wiki sites such as Wikipedia often use Post-Redirect-Get when you edit a page.
For the messageboard server, Post-Redirect-Get means:
- You go to http://localhost:8000/ in your browser. Your browser sends a GET request to the server, which replies with a
200 OKand a piece of HTML. You see a form for posting comments, and a list of the existing comments. (But at the beginning, there are no comments posted yet.) - You write a comment in the form and submit it. Your browser sends it via
POSTto the server. - The server updates the list of comments, adding your comment to the list. Then it replies with a
303redirect, setting theLocation: /header to tell the browser to request the main page viaGET. - The redirect response causes your browser to go back to the same page you started with, sending a
GETrequest, which replies with a200 OKand a piece of HTML…
One big advantage of Post-Redirect-Get is that as a user, every page you actually see is the result of a GET request, which means you can bookmark it, reload it, and so forth — without ever accidentally resubmitting a form.
Exercise: Messageboard, Part Three
Update the messageboard server to a full Post-Redirect-Get pattern, as described above. You’ll need both do_GET and do_POST handlers; the do_POST handler should reply with a 303 redirect with no response body.
The starter code for this exercise is in the 5_MessageboardPartThree directory. I’ve added the logic that actually stores the messages into a list; all you need to do is implement the HTTP steps described above.
When you’re done, test it in your browser and with the test.py script, as before.
Messageboard, Part Three
- In the
do_POSTmethod, send a 303 redirect back to the root page (/). - In the
do_GETmethod, assemble the response data together out of the form template and the stored messages. - Run the server and test it in your browser.
- Run the tests in
test.pywith the server running.
Solution, part three
You can see my version of the solution to the Messageboard Part Three exercise in the 5_MessageboardPartThree/solution subdirectory. Your code might not look the same as mine; stylistic variations are normal! But if the tests in test.py pass, you’ve got a good server.
MessageboardPartThree.py
#!/usr/bin/env python3
#
# Step two in building the messageboard server.
#
# Instructions:
# 1. In the do_POST method, send a 303 redirect back to the / page.
# 2. In the do_GET method, put the response together and send it.
from http.server import HTTPServer, BaseHTTPRequestHandler
from urllib.parse import parse_qs
memory = []
form = '''<!DOCTYPE html>
<title>Message Board</title>
<form method="POST">
<textarea name="message" id="message"></textarea>
<br>
<button type="submit">Post it!</button>
</form>
<pre>
{}
</pre>
<script>
window.onload = () => document.querySelector("#message").focus();
</script>
'''
class MessageHandler(BaseHTTPRequestHandler):
def do_POST(self):
# How long was the message?
length = int(self.headers.get('Content-length', 0))
# Read the correct amount of data from the request.
data = self.rfile.read(length).decode()
# Extract the "message" field from the request data.
message = parse_qs(data)["message"][0]
# Escape HTML tags in the message so users can't break world+dog.
message = message.replace("<", "<")
# Store it in memory.
memory.append(message)
# 1. Send a 303 redirect back to the root page.
self.send_response(303)
self.send_header('Location', '/')
self.end_headers()
def do_GET(self):
# First, send a 200 OK response.
self.send_response(200)
# Then send headers.
self.send_header('Content-type', 'text/html; charset=utf-8')
self.end_headers()
# 2. Put the response together out of the form and the stored messages.
msg = form.format("n".join(memory))
# 3. Send the response.
self.wfile.write(msg.encode())
if __name__ == '__main__':
server_address = ('', 8000)
httpd = HTTPServer(server_address, MessageHandler)
httpd.serve_forever()
7.9 Making requests
Now let’s turn from writing web servers to writing web clients. The requests library is a Python library for sending requests to web servers and interpreting the responses. It’s not included in the Python standard library, though; you’ll need to install it. In your terminal, run pip3 install requests to fetch and install the requests library.
Then take a look at the quickstart documentation for requests and try it out.
7.9 Question 1
Assuming you’ve still got your messageboard werver running on port 8000, how yould you send a GET request to it using the requests library?
requests.fetch("http://localhost/", port=8000)requests.get("http://localhost:8000/")requests.transmit("GET", "localhost:8000", "/")
The requests function for performing GET requests is requests.get, and it takes the URI as an argument.
Response objects
When you send a request, you get back a Response object. Try it in your Python interpreter:
>>> import requests
>>> a = requests.get('http://www.udacity.com')
>>> a
<Response [200]>
>>> type(a)
<class 'requests.models.Response'>
7.9 Question 2
Use the documentation for the requests module to answer this question!
If you have a response object called r, how can you get the reponse body — for instance, the HTML that the server sent?
r.textr.content- Both of the above, but they’re different.
Both, but they’re different. r.content is a bytes object representing the literal binary data that the server sent. r.text is the same data but interpreted as a str object, a Unicode string.
Handling errors
Try fetching some different URIs with the requests module in your Python interpreter. More specifically, try some that don’t work. Try some sites that don’t exist, like http://bad.example.com/, but also try some pages that don’t exist on sites that do, like http://google.com/ThisDoesNotExist.
What do you notice about the responses that you get back?
uri = "http://bad.example.com/"
r = requests.get(uri)
7.9 Question 3
Using the requests module, try making GET requests to nonexistent site or pages, e.g. http://bad.example.com or http://google.com/NotExisty. Mark all of the statements that are true.
- Accessing a nonexistent site raises a Python exception.
- Accessing a nonexistent site gives you a object
rwherer.status_codeis an error code. - Accessing a nonexistent page on a real site raises a Python exception.
- Accessing a nonexistent page on a real site gives you an object
rwherer.status_codeis an error code.
The first and last answers are correct, according to the way that HTTP is designed to work.
If the requests.get call can reach an HTTP server at all, it will give you a Response object. If the request failed, the Response object has a status_code data member — either 200, or 404, or some other code.
But if it wasn’t able to get to an HTTP server, for instance because the site doesn’t exist, then requests.get will raise an exception.
However: Some Internet service providers will try to redirect browsers to an advertising site if you try to access a site that doesn’t exist. This is called DNS hijacking, and it’s nonstandard behavior, but some do it anyway. If your ISP hijacks DNS, you won’t get exceptions when you try to access nonexistent sites. Standards-compliant DNS services such as Google Public DNS don’t hijack.
7.10 Using a JSON API
As a web developer, you will deal with data in a lot of different formats, especially when your code calls out to APIs provided by other developers. It’s not uncommon for a large software system to have parts that deal with a dozen or more different data formats. Fortunately, usually someone else has already written libraries to help you read and write these formats.
JSON is a data format based on the syntax of JavaScript, often used for web-based APIs. There are a lot of services that let you send HTTP queries and get back structured data in JSON format. You can read more about the JSON format at http://www.json.org/.
Python has a built-in json module; and as it happens, the requests module makes use of it. A Response object has a .json method; if the response data is JSON, you can call this method to translate the JSON data into a Python dictionary.
Try it out! Here, I’m using it to access the Star Wars API, a classic JSON demonstration that contains information about characters and settings in the Star Wars movies:
>>> a = requests.get('http://swapi.co/api/people/1/')
>>> a.json()['name']
'Luke Skywalker'
7.10 QUIZ QUESTION
What happens if you call r.json() on a Response that isn’t made of JSON data, such as the Udacity main page?
- It returns an empty dictionary
- It raises an exception defined in Python’s json library
- It raises AttributeError; the method is only defined on valid JSON responses
- It returns a dictionary containing a string which is the response data.
Specifically, it raises a json.decoder.JSONDecodeError exception. If you want to catch this exception with a try block, you’ll need to import it from the json module.
There’s a great example of an API on the site http://uinames.com/, a service that makes up fake names and user account information. You can find the full API documentation under the little menu at the top right.
For this exercise, all you’ll need is this URI and a couple of query parameters:
http://uinames.com/api/
The query parameters to use are ext, which gives you a record with more fields, and region, which lets you specify which country you want your imaginary person to come from. For instance, to have the API invent a person from Italy:
http://uinames.com/api?ext®ion=Italy
(It’s not perfect. For instance, currently it makes up North American phone numbers for everyone, regardless of where they live.)
Exercise: Use JSON with UINames.com
The starter code for this exercise is in the Lesson-2/6_UsingJSON directory, with the filename UINames.py. In this exercise, use the JSON methods described above to decode the response from the uinames.com site.
Use JSON with UINames.com
- Decode the JSON data returned by the
GETrequest. - Print out the JSON data fields in the specified format
- Test your code by running
UINames.py - Run the test script in
test.py
UINames.py
#!/usr/bin/env python3
#
# Client for the UINames.com service.
#
# 1. Decode the JSON data returned by the UINames.com API.
# 2. Print the fields in the specified format.
#
# Example output:
# My name is Tyler Hudson and the PIN on my card is 4840.
import requests
def SampleRecord():
r = requests.get("http://uinames.com/api?ext®ion=United%20States",
timeout=2.0)
# 1. Add a line of code here to decode JSON from the response.
json = r.json()
return "My name is {} {} and the PIN on my card is {}.".format(
# 2. Add the correct fields from the JSON data structure.
json['name'],
json['surname'],
json['credit_card']['pin']
)
if __name__ == '__main__':
print(SampleRecord())
7.11 The bookmark server
You’re almost to the end of this lesson. One more exercise to go.
In this one you’ll write a piece of code that both accepts requests as a web server and makes requests as a web client.
This will put together a bunch of things that you’ve learned this lesson. It’s a server that serves up an HTML form via a GET request then accepts that form submission by a POST request.
It checks web addresses using the request module to make sure they work and it uses the Post-Redirect-Get design.
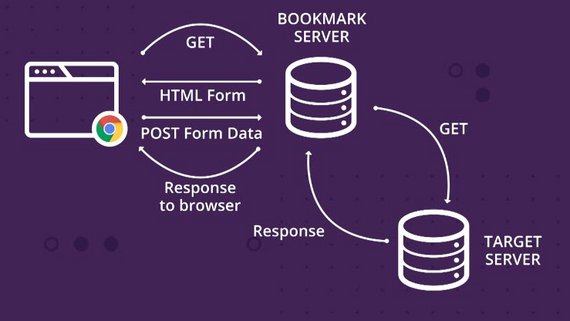
Exercise: The bookmark server
You’re almost to the end of this lesson! One more server to write…
You’ve probably seen URL-shortening services such as TinyURL or Google’s goo.gl, this service will be turning down support by Google Starting March 30, 2018.
They let you create short URI paths like https://tinyurl.com/jye5r6l that redirect to a longer URI on another site. It’s easier to put a short URI into an email, text message, or tweet. In this exercise, you’ll be writing a service similar to this.
Like the messageboard server, this bookmark server will keep all of its data in memory. This means that it’ll be reset if you restart it.
Your server needs to do three things, depending on what kind of request it receives:
- On a GET request to the / path, it displays an HTML form with two fields. One field is where you put the long URI you want to shorten. The other is where you put the short name you want to use for it. Submitting this form sends a POST to the server.
- On a POST request, the server looks for the two form fields in the request body. If it has those, it first checks the URI with
requests.getto make sure that it actually exists (returns a 200).- If the URI exists, the server stores a dictionary entry mapping the short name to the long URI, and returns an HTML page with a link to the short version.
- If the URI doesn’t actually exist, the server returns a 404 error page saying so.
- If either of the two form fields is missing, the server returns a 400 error page saying so.
- On a GET request to an existing short URI, it looks up the corresponding long URI and serves a redirect to it.
The starter code for this exercise is in the 7_BookmarkServer directory. I’ve given you a skeleton of the server; your job is to fill out the details!
The bookmark server
- Write the
checkURIfunction. This function should take a URI as an argument, and returnTrueif that URI could be successfully fetched, andFalseif it can’t - Write the code inside
do_GETthat sends a 303 redirect to a known name. - Write the code inside
do_POSTthat sends a 400 error if the form fields are not present in the POST - Write the code inside
do_POSTthat sends a 303 redirect to the form after saving a newly submitted URI. - Write the code inside
do_POSTthat sends a 404 error if a URI is not successfully checked (i.e. if CheckURI returnsFalse)
BookmarkServer.py
#!/usr/bin/env python3
#
# A *bookmark server* or URI shortener.

import http.server
import requests
from urllib.parse import unquote, parse_qs

memory = {}

form = '''<!DOCTYPE html>
<title>Bookmark Server</title>
<form method="POST">
    <label>Long URI:
        <input name="longuri">
    </label>
    <br>
    <label>Short name:
        <input name="shortname">
    </label>
    <br>
    <button type="submit">Save it!</button>
</form>
<p>URIs I know about:
<pre>
{}
</pre>
'''


def CheckURI(uri, timeout=5):
    '''Check whether this URI is reachable, i.e. does it return a 200 OK?

    This function returns True if a GET request to uri returns a 200 OK, and
    False if that GET request returns any other response, or doesn't return
    (i.e. times out).
    '''
    try:
        r = requests.get(uri, timeout=timeout)
        # If the GET request returns, was it a 200 OK?
        return r.status_code == 200
    except requests.RequestException:
        # If the GET request raised an exception, it's not OK.
        return False


class Shortener(http.server.BaseHTTPRequestHandler):
    def do_GET(self):
        # A GET request will either be for / (the root path) or for /some-name.
        # Strip off the / and we have either empty string or a name.
        name = unquote(self.path[1:])

        if name:
            if name in memory:
                # We know that name! Send a redirect to it.
                self.send_response(303)
                self.send_header('Location', memory[name])
                self.end_headers()
            else:
                # We don't know that name! Send a 404 error.
                self.send_response(404)
                self.send_header('Content-type', 'text/plain; charset=utf-8')
                self.end_headers()
                self.wfile.write("I don't know '{}'.".format(name).encode())
        else:
            # Root path. Send the form.
            self.send_response(200)
            self.send_header('Content-type', 'text/html')
            self.end_headers()
            # List the known associations in the form.
            known = "n".join("{} : {}".format(key, memory[key])
                              for key in sorted(memory.keys()))
            self.wfile.write(form.format(known).encode())

    def do_POST(self):
        # Decode the form data.
        length = int(self.headers.get('Content-length', 0))
        body = self.rfile.read(length).decode()
        params = parse_qs(body)

        # Check that the user submitted the form fields.
        if "longuri" not in params or "shortname" not in params:
            self.send_response(400)
            self.send_header('Content-type', 'text/plain; charset=utf-8')
            self.end_headers()
            self.wfile.write("Missing form fields!".encode())
            return

        longuri = params["longuri"][0]
        shortname = params["shortname"][0]

        if CheckURI(longuri):
            # This URI is good!  Remember it under the specified name.
            memory[shortname] = longuri

            # Serve a redirect to the form.
            self.send_response(303)
            self.send_header('Location', '/')
            self.end_headers()
        else:
            # Didn't successfully fetch the long URI.
            self.send_response(404)
            self.send_header('Content-type', 'text/plain; charset=utf-8')
            self.end_headers()
            self.wfile.write(
                "Couldn't fetch URI '{}'. Sorry!".format(longuri).encode())

if __name__ == '__main__':
    server_address = ('', 8000)
    httpd = http.server.HTTPServer(server_address, Shortener)
    httpd.serve_forever()
7.12 Conclusion
You know it took me several tries to get the URI shortening server right for that
last exercise. And even though it looks pretty bare-bones when you see it from the browser, there’s a lot of things going on in there.
There’s different response codes. There’s a couple of headers. There’s parsing the post body.
All in all, my version turned out to be about a hundred lines of code. If you got
that code working too you should feel proud of yourself.
Go get a cookie. Oh hey, speaking of cookies, web cookies are one of the many things we’re going to be talking about in the next lesson.
You did it
In this lesson, you’ve built up your knowledge of HTTP by building servers and clients that speak it. You’ve built Python programs that act as web servers, web clients, and both at once. That’s pretty awesome!
The next lesson will be a tour of some more advanced HTTP features that are essential to the modern web: cookies, encryption, and more.
8. Real World HTTP
8.1 Deploy to Heroku
Localhost. We’ve been seeing a lot of that lately. Far too much, I’m afraid.
As a web developer, you don’t just want to put your server up on your own localhost where only you can use it. You want to run that server on the real web where other people can see it, and interact with it
In this lesson, you’ll start out by deploying the server from last lesson onto a web hosting service, where you can show it off to your friends and colleagues.
Then, we’ll be talking about some other real world aspects of HTTP and web services, like cookies and encryption.
Can I just host my web service at home
Maybe! Plenty of people do, but not everyone can. It’s a common hobbyist activity, but not something that people would usually do for a job.
There’s nothing fundamentally special about the computers that run web servers. They’re just computers running an operating system such as Linux, Mac OS, or Windows (usually Linux). Their connection to the Internet is a little different from a typical home or mobile Internet connection, though. A server usually needs to have a stable (static) IP address so that clients can find it and connect to it. Most home and mobile systems don’t assign your computer a static IP address.
Also, most home Internet routers don’t allow incoming connections by default. You would need to reconfigure your router to allow it. This is totally possible, but way beyond the scope of this course (and I don’t know what kind of router you have).
Lastly, if you run a web service at home, your computer has to be always on.
So, for the next exercise in this course, you’ll be deploying one of your existing web services to Heroku, a commercial service that will host it on the web where it will be publicly accessible.
Steps to deployment
Here’s an overview of the steps you’ll need to complete. We’ll be going over each one in more detail.
- Check your server code into a new local Git repository.
- Sign up for a free Heroku account.
- Download the Heroku command-line interface (CLI).
- Authenticate the Heroku CLI with your account:
heroku login - Create configuration files
Procfile,requirements.txt, andruntime.txtand check them into your Git repository. - Modify your server to listen on a configurable port.
- Create your Heroku app:
heroku create your-app-name - Push your code to Heroku with Git:
git push heroku master
Check in your code
Heroku (and many other web hosting services) works closely with Git: you can deploy a particular version of your code to Heroku by pushing it with the git push command. So in order to deploy your code, it first needs to be checked into a local Git repository.
This Git repository should be separate from the one created when you downloaded the exercise code (the course-ud303 directory). Create a new directory outside of that directory and copy the bookmark server code (the file BookmarkServer.py from last lesson) into it. Then set this new directory up as a Git repository:
git initgit add BookmarkServer.pygit commit -m "Checking in my bookmark server!"
For a refresher on using Git, take a look at our Git course.
Sign up for a free Heroku account
First, visit this link and follow the instructions to sign up for a free Heroku account:
https://signup.heroku.com/dc
Make sure to write down your username and password!
Install the Heroku CLI and authenticate
You’ll need the Heroku command-line interface (CLI) tool to set up and configure your app. Download and install it now. Once you have it installed, the heroku command will be available in your shell.
From the command line, use heroku login to authenticate to Heroku. It will prompt you for your username and password; use the ones that you just set up when you created your account. This command will save your authentication information in a hidden file (.netrc) so you will not need to ender your password again on the same computer.
Create configuration files
There are a few configuration files that Heroku requires for deployment, to tell its servers how to run your application. For the case of the bookmark server, I’ll just give you the required content for these files. These are just plain text files and can be created in your favorite text editor.
runtime.txt tells Heroku what version of Python you want to run. Check the currently supported runtimes in the Heroku documentation; this will change over time! As of early 2017, the currently supported version of Python 3 is python-3.6.0; so this file just needs to contain the text python-3.6.0.
requirements.txt is used by Heroku (through pip) to install dependencies of your application that aren’t in the Python standard library. The bookmark server has one of these: the requests module. We’d like a recent version of that, so this file can contain the text requests>=2.12. This will install version 2.12 or a later version, if one has been released.
Procfile is used by Heroku to specify the command line for running your application. It can support running multiple servers, but in this case we’re only going to run a web server. Check the Heroku documentation about process types for more details. If your bookmark server is in BookmarkServer.py, then the contents of Procfile should be web: python BookmarkServer.py.
Create each of these files in the same directory as your code, and commit them all to your Git repository.
$ cat runtime.txt
python-3.6.0
$ cat requirements.txt
requests>=2.112
$ cat Procfile
web: python BookmarkServer.py
Listen on a configurable port
There’s one small change that you have to make to your server code to make it run on Heroku. The bookmark server from Lesson 2 listens on port 8000. But Heroku runs many users’ processes on the same computer, and multiple processes can’t (normally) listen on the same port. So Heroku needs to be able to tell your server what port to listen on.
The way it does this is through an environment variable — a configuration variable that is passed to your server from the program that starts it, usually the shell. Python code can access environment variables in the os.environ dictionary. The names of environment variables are usually capitalized; and the environment variable we need here is called, unsurprisingly, PORT.
The port your server listens on is configured when it creates the HTTPServer instance, near the bottom of the server code. We can make it work with or without the PORT environment variable, like so:
if __name__ == '__main__':
    port = int(os.environ.get('PORT', 8000))   # Use PORT if it's there.
    server_address = ('', port)
    httpd = http.server.HTTPServer(server_address, Shortener)
    httpd.serve_forever()
To access os.environ, you will also need to import os at the top of the file.
Make these changes to your server code, run the server locally to test that it still works, then commit it to your Git repository:
git add BookmarkServer.py
git commit -m "Use PORT from environment."
Create and push your app
Before you can put your service on the web, you have to give it a name. You can call it whatever you want, as long as the name is not already taken by another user! Your app’s name will appear in the URI of your deployed service. For instance, if you name your app silly-pony, it will appear on the web at https://silly-pony.herokuapp.com/.
Use heroku create <your-app-name> to tell Heroku about your app and give it a name. Again, you can choose any name you like, but it will have to be unique — the service will tell you if you’re choosing a name that someone else has already claimed.
Finally, use git push heroku master to deploy your app!
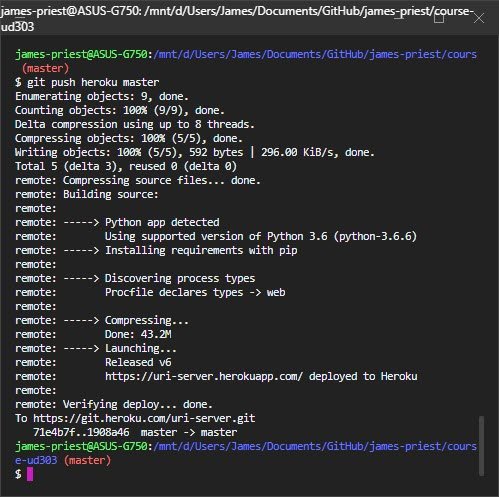
If all goes well, your app will now be accessible on the web! The URI appears in the output from the git command.
Accessing server logs
If your app doesn’t work quite right as deployed, one resource that can be very helpful is the server log. You can view this by typing
You can also view them from the Heroku dashboard.
Take a look at https://dashboard.heroku.com/apps/uri-server/logs, except replace “uri-server” with your own app’s name.
Deploying your service
- I’ve committed my server code to a Git repository.
- I’ve signed up for a Heroku account and installed the CLI.
- I’ve added a
runtime.txt. - I’ve added a
requirements.txtwithrequests. - I’ve added a
Profilewith thewebprocess defined. - I’ve changed my server code to listen on a port defined by the environment.
- I’ve committed these changes to my Git repository.
- I’ve logged into Heroku from the command line and pushed my app.
- I’ve tested it and it works!
8.2 Multi-threaded Model
Now that you’ve deployed that server, try using the deployed version. No more localhost– now you have a version that you can send around all your friends so they can post really weird things in it.
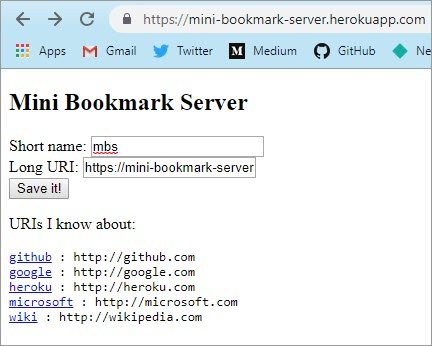
But let’s take a look at one limitation this version has and how to work around it.
Handling more requests
Try creating a link in it where the target URI is the bookmark server’s own URI. What happens when you try to do that?
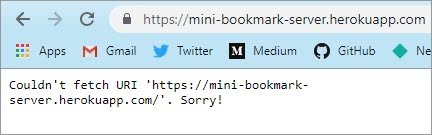
When I do this, the app gives me an error, saying it can’t fetch that web page. That’s weird! The server is right there; it should be able to reach itself! What do you think is going on here?
8.2 Question 1
Why can’t the bookmark server fetch a page from itself?
- It needs to use the name
localhostto do that, not it’s public web address. http.servercan only handle one request at a time.- The hosting service is blocking the app’s request as spam.
- Web sites are not allowed to link to themselves; it would create an infinite loop.
The basic, built-in http.server.HTTPServer class can only handle a single request at once. The bookmark server tries to fetch every URI that we give it, while it’s in the middle of handling the form submission.
It’s like an old-school telephone that can only have one call at once. Because it can only handle one request at a time, it can’t “pick up” the second request until it’s done with the first … but in order to answer the first request, it needs the response from the second.
Concurrency
Being able to handle two ongoing tasks at the same time is called concurrency, and the basic http.server.HTTPServer doesn’t have it. It’s pretty straightforward to plug concurrency support into an HTTPServer, though. The Python standard library supports doing this by adding a mixin to the «HTTPServer` class. A mixin is a sort of helper class, one that adds extra behavior the original class did not have. To do this, you’ll need to add this code to your bookmark server:
import threading
from socketserver import ThreadingMixIn

class ThreadHTTPServer(ThreadingMixIn, http.server.HTTPServer):
    "This is an HTTPServer that supports thread-based concurrency."
Then look at the bottom of your bookmark server code, where it creates an HTTPServer. Have it create a ThreadHTTPServer instead:
if __name__ == '__main__':
    port = int(os.environ.get('PORT', 8000))
    server_address = ('', port)
    httpd = ThreadHTTPServer(server_address, Shortener)
    httpd.serve_forever()
Commit this change to your Git repository, and push it to Heroku. Now when you test it out, you should be able to add an entry that points to the service itself.
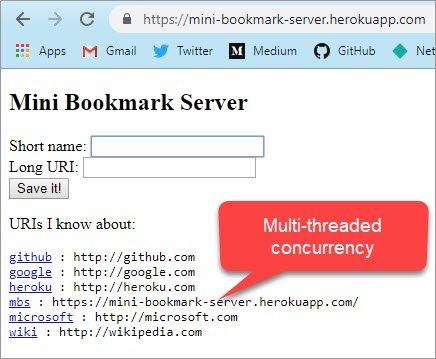
8.2 Question 2
Try posting an entry to your bookmark server that points to the server itself now. Did it work? If so, the server is now able to handle a second incoming request while processing another request.
- Yes, it worked!
- Not quite.
8.3 Apache & Nginx
If you look up most popular web server using your favorite search engine, you’re not going to see Python’s http.server on the list. You’ll see programs like Apache, NGINX, and Microsoft IIS.

These specialized web server programs handle a large number of requests very quickly. Let’s take a look at what these do, and how they relate to the rest of the web service picture.
Static content and more
The Web was originally designed to serve documents, not to deliver applications. Even today, a large amount of the data presented on any web site is static content — images, HTML files, videos, downloadable files, and other media stored on disk.
Specialized web server programs — like Apache, Nginx, or IIS — can serve static content from disk storage very quickly and efficiently. They can also provide access control, allowing only authenticated users to download particular static content.
Routing and load balancing
Some web applications have several different server components, each running as a separate process. One thing a specialized web server can do is dispatch requests to the particular backend servers that need to handle each request. There are a lot of names for this, including request routing and reverse proxying.
Some web applications need to do a lot of work on the server side for each request, and need many servers to handle the load. Splitting requests up among several servers is called load balancing.
Load balancing also helps handle conditions where one server becomes unavailable, allowing other servers to pick up the slack. A reverse proxy can health check the backend servers, only sending requests to the ones that are currently up and running. This also makes it possible to do updates to the backend servers without having an outage.
Concurrent users
Handling a large number of network connections at once turns out to be complicated — even more so than plugging concurrency support into your Python web service.
As you may have noticed in your own use of the web, it takes time for a server to respond to a request. The server has to receive and parse the request, come up with the data that it needs to respond, and transmit the response back to the client. The network itself is not instantaneous; it takes time for data to travel from the client to the server.
In addition, a browser is totally allowed to open up multiple connections to the same server, for instance to request resources such as images, or to perform API queries.
All of this means that if a server is handling many requests per second, there will be many requests in progress at once — literally, at any instant in time. We sometimes refer to these as in-flight requests, meaning that the request has “taken off” from the client, but the response has not “landed” again back at the client. A web service can’t just handle one request at a time and then go on to the next one; it has to be able to handle many at once.
8.3 Question 1
In Spetember 2016, the English Wikipedia received about 250 million page views per day. That’s an average of about 2,900 page views every second. Let’s imagine that an average page view involves three HTTP queries (the page HTML itself and two images), and the each HTTP query takes 0.1 seconds (or 100 milliseconds) to serve.
About how many requests are in flight at any instant?
- Less than 100
- Between 100 and 1,000
- Between 1,000 and 9,000
- Over 9,000
If each page view involves three queries, then there are about 8,700 queries per second. Each one takes 0.1 seconds, so about 870 are going to be in-flight at any instant. So “between 100 and 1,000” is the right answer here.
Caching
Imagine a web service that does a lot of complicated processing for each request — something like calculating the best route for a trip between two cities on a map. Pretty often, users make the same request repeatedly: imagine if you load up that map, and then you reload the page — or if someone else loads the same map. It’s useful if the service can avoid recalculating something it just figured out a second ago. It’s also useful if the service can avoid re-sending a large object (such as an image) if it doesn’t have to.
One way that web services avoid this is by making use of a cache, a temporary storage for resources that are likely to be reused. Web systems can perform caching in a number of places — but all of them are under control of the server that serves up a particular resource. That server can set HTTP headers indicating that a particular resource is not intended to change quickly, and can safely be cached.
There are a few places that caching usually can happen. Every user’s browser maintains a browser cache of cacheable resources — such as images from recently-viewed web pages. The browser can also be configured to pass requests through a web proxy, which can perform caching on behalf of many users. Finally, a web site can use a reverse proxy to cache results so they don’t need to be recomputed by a slower application server or database.
All HTTP caching is supposed to be governed by cache control headers set by the server. You can read a lot more about them in this article by Google engineer Ilya Grigorik.
Capacity
Why serve static requests out of cache (or a static web server) rather than out of your application server? Python code is totally capable of sending images or video via HTTP, after all. The reason is that — all else being equal — handling a request faster provides a better user experience, but also makes it possible for your service to support more requests.
If your web service becomes popular, you don’t want it to bog down under the strain of more traffic. So it helps to handle different kinds of request with software that can perform that function quickly and efficiently.
8.3 Question 2
Imagine that you have a service that is handling 6,000 requests per second. One-third of its requests are for the site’s CSS file, which doesn’t change very often. So browsers shouldn’t need to fetch it every time they load the site. If you tell the browser to cache the CSS, 1% of visitors will need to fetch it. After this change, about how many requests will the service be getting?
- About 60 requests per second.
- About 420 requests per second.
- About 4,020 requests per second.
- About 6,060 requests per second.
2,000 requests per second are the CSS file, so the other 4,000 requests are other things. Those 4,000 will be unaffected by this change.
The 2,000 CSS requests will be reduced by 99%, to 20 requests.
This means that after the caching improvement, the service will be getting 4,020 requests per second.
8.4 Cookies
Earlier in this course, you saw quite a lot about HTTP headers. There are a couple of particular headers that are especially important for web applications– the Set-Cookie and Cookie headers.
These headers are used to store and transmit cookies. Now an HTTP cookie isn’t a tasty snack. It’s a piece of data that a web server asks a browser to store and send back.
Cookies are immensely important to many web applications. They make it possible to
- stay logged in to a website
- or to associate multiple queries into a single session
- they’re also used to track users for advertising purposes.
Let’s take a look at how cookies work.
Cookies
Cookies are a way that a server can ask a browser to retain a piece of information, and send it back to the server when the browser makes subsequent requests. Every cookie has a name and a value, much like a variable in your code; it also has rules that specify when the cookie should be sent back.
What are cookies for? A few different things. If the server sends each client a unique cookie value, it can use these to tell clients apart. This can be used to implement higher-level concepts on top of HTTP requests and responses — things like sessions and login. Cookies are used by analytics and advertising systems to track user activity from site to site. Cookies are also sometimes used to store user preferences for a site.
How cookies happen
The first time the client makes a request to the server, the server sends back the response with a Set-Cookie header. This header contains three things: a cookie name, a value, and some attributes. Every subsequent time the browser makes a request to the server, it will send that cookie back to the server. The server can update cookies, or ask the browser to expire them.
Seeing cookies in your browser
Browsers don’t make it easy to find cookies that have been set, because removing or altering cookies can affect the expected behavior of web services you use. However, it is possible to inspect cookies from sites you use in every major browser. Do some research on your own to find out how to view the cookies that your browser is storing.
Here’s a cookie that I found in my Chrome browser, from a web site I visited:
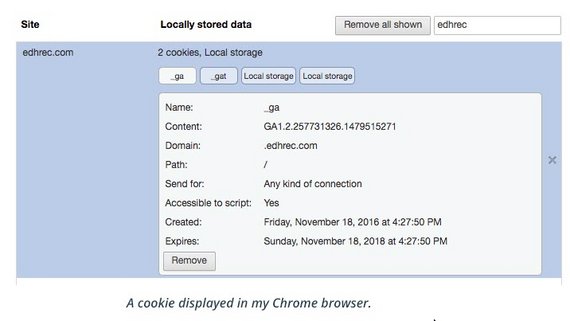
What are all these pieces of data in my cookie? There are eight different fields there!
By the way, if you try to research “cookie fields” with a web search, you may get a lot of results from the Mrs. Fields cookie company. Try “HTTP cookie fields” for more relevant results.
The first two, the cookie’s name and content, are also called its key and value. They’re analogous to a dictionary key and value in Python — or a variable’s name and value for that matter. They will both be sent back to the server. There are some syntactic rules for which characters are allowed in a cookie name; for instance, they can’t have spaces in them. The value of the cookie is where the “real data” of the cookie goes — for instance, a unique token representing a logged-in user’s session.
The next two fields, Domain and Path, describe the scope of the cookie — that is to say, which queries will include it. By default, the domain of a cookie is the hostname from the URI of the response that set the cookie. But a server can also set a cookie on a broader domain, within limits. For instance, a response from www.udacity.com can set a cookie for udacity.com, but not for com.
The fields that Chrome describes as “Send for” and “Accessible to script” are internally called Secure and HttpOnly, and they are boolean flags (true or false values). The internal names are a little bit misleading. If the Secure flag is set, then the cookie will only be sent over HTTPS (encrypted) connections, not plain HTTP. If the HttpOnly flag is set, then the cookie will not be accessible to JavaScript code running on the page.
Finally, the last two fields deal with the lifetime of the cookie — how long it should last. The creation time is just the time of the response that set the cookie. The expiration time is when the server wants the browser to stop saving the cookie. There are two different ways a server can set this: it can set an Expires field with a specific date and time, or a Max-Age field with a number of seconds. If no expiration field is set, then a cookie is expired when the browser closes.
Using cookies in Python
To set a cookie from a Python HTTP server, all you need to do is set the Set-Cookie header on an HTTP response. Similarly, to read a cookie in an incoming request, you read the Cookie header. However, the format of these headers is a little bit tricky; I don’t recommend formatting them by hand. Python’s http.cookies module provides handy utilities for doing so.
To create a cookie on a Python server, use the SimpleCookie class. This class is based on a dictionary, but has some special behavior once you create a key within it:
from http.cookies import SimpleCookie, CookieError

out_cookie = SimpleCookie()
out_cookie["bearname"] = "Smokey Bear"
out_cookie["bearname"]["max-age"] = 600
out_cookie["bearname"]["httponly"] = True
Then you can send the cookie as a header from your request handler:
self.send_header("Set-Cookie", out_cookie["bearname"].OutputString())
To read incoming cookies, create a SimpleCookie from the Cookie header:
in_cookie = SimpleCookie(self.headers["Cookie"])
in_data = in_cookie["bearname"].value
Be aware that a request might not have a cookie on it, in which case accessing the Cookie header will raise a KeyError exception; or the cookie might not be valid, in which case the SimpleCookie constructor will raise http.cookies.CookieError.
Important safety tip: Even though browsers make it difficult for users to modify cookies, it’s possible for a user to modify a cookie value. Higher-level web toolkits, such as Flask (in Python) or Rails (in Ruby) will cryptographically sign your cookies so that they won’t be accepted if they are modified. Quite often, high-security web applications use a cookie just to store a session ID, which is a key to a server-side database containing user information.
Another important safety tip: If you’re displaying the cookie data as HTML, you need to be careful to escape any HTML special characters that might be in it. An easy way to do this in Python is to use the
html.escapefunction, from the built-inhtmlmodule!
For a lot more information on cookie handling in Python, see the documentation for the http.cookies module.
Exercise: A server that remembers you
In this exercise, you’ll build a server that asks for your name, and then stores your name in a cookie on your browser. You’ll be able to see that cookie in your browser’s cookie data. Then when you visit the server again, it’ll already know your name.
The starter code for this exercise is in Lesson-3/2_CookieServer.
- In the
doPOSTmethod, set the cookie fields: it’s value, domain (localhost) and max-age. - In the
do_GETmethod, extract and decode the returned cookie value. - Run the cookie serverand test it in your browser at http://localhost:8000
- Run the
test.pyscript to test the running server. - Inspect your browser’s cookies for the
localhostdomain and find the cookie your your server created!
Many web frameworks use cookies “under the hood” without you having to explicitly set them like this. But by doing it this way first, you’ll know what’s going on inside your applications.
How it looks on my browser
DNS domains and cookie security
Back in Lesson 1, you used the host or nslookup command to look up the IP addresses of a few different web services, such as Wikipedia and your own localhost. But domain names play a few other roles in HTTP besides just being easier to remember than IP addresses. A DNS domain links a particular hostname to a computer’s IP address. But it also indicates that the owner of that domain intends for that computer to be treated as part of that domain.
Imagine what a bad guy could do if they could convince your browser that their server evilbox was part of (say) Facebook, and get you to request a Facebook URL from evilbox instead of from Facebook’s real servers. Your browser would send your facebook.com cookies to evilbox along with that request. But these cookies are what prove your identity to Facebook … so then the bad guy could use those cookies to access your Facebook account and send spam messages to all your friends.
In the immortal words of Dr. Egon Spengler: It would be bad.
This is just one reason that DNS is essential to web security. If a bad guy can take control of your site’s DNS domain, they can send all your web traffic to their evil server … and if the bad guy can fool users’ browsers into sending that traffic their way, they can steal the users’ cookies and reuse them to break into those users’ accounts on your site.
8.5 HTTPS for security
As a web user, you’ve probably heard of HTTPS, the encrypted version of HTTP. Whenever you see that little green lock upin your browser or an HTTPS URI, you’re looking at an encrypted website.
For a user, HTTPS does two really important things. It protects your data from eavesdroppers on the network, and it also checks the authenticity of the site you’re talking to. For a web developer, HTTPS lets you offer those assurances to your users.
Originally, HTTPS was used to protect credit card information, passwords, and other high-security information. But as web security and privacy got more and more important, a lot of major sites started using it on every connection.
Today, sites like Google, Facebook, and Wikipedia–and Udacity–default to HTTPS for every connection.
Now earlier in this lesson, you deployed a service on the web in a way that already makes use of HTTPS. We can use that to test it out and see how it works.
What HTTPS does for you
When a browser and a server speak HTTPS, they’re just speaking HTTP, but over an encrypted connection. The encryption follows a standard protocol called Transport Layer Security, or TLS for short. TLS provides some important guarantees for web security:
- It keeps the connection private by encrypting everything sent over it. Only the server and browser should be able to read what’s being sent.
- It lets the browser authenticate the server. For instance, when a user accesses https://www.udacity.com/, they can be sure that the response they’re seeing is really from Udacity’s servers and not from an impostor.
- It helps protect the integrity of the data sent over that connection — checking that it has not been (accidentally or deliberately) modified or replaced.
Note: TLS is also very often referred to by the older name SSL (Secure Sockets Layer). Technically, SSL is an older version of the encryption protocol. This course will talk about TLS because that’s the current standard.
8.5 Question 1
Here are a few different malicious things that an attacker could do to normal HTTP traffic. Each of the three guarantees (privacy, authenticity, and integrity) helps defend agains one of them. Match them up!
| Attack | Defense |
|---|---|
| You’re reading your email in a coffee shop, and the shop owner can read your email off of their Wi-Fi network you’re using. | Privacy Authenticity Integrity |
| You think you’re loggin into Facebook, but actually you’re sending your FB password to a server in the coffee shop’s back room | Privacy Authenticity Integrity |
| The coffe shop owner doesn’t like cat pics, so they replace all the cat pics on the web page you’re looking at with pics of celery. | Privacy Authenticity Integrity |
Inspecting TLS on your service
If you deployed a web service on Heroku earlier in this lesson, then HTTPS should already be set up. The URI that Heroku assigned to your app was something like https://yourappname.herokuapp.com/.
From there, you can use your browser to see more information about the HTTPS setup for this site. However, the specifics of where to find this information will depend on your browser. You can experiment to find it, or you can check the documentation: Chrome, Firefox, Safari.
Note: In some browser documentation you’ll see references to SSL certificates. These are the same as TLS certificates. Remember, SSL is just the older version of the encryption standard.
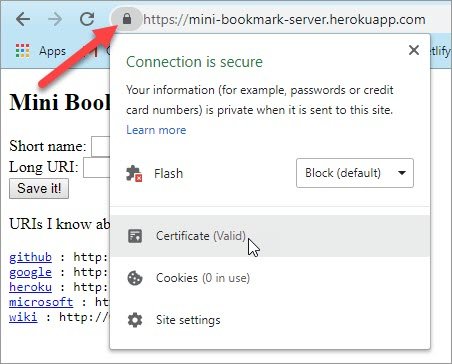
Click the lock icon to view details of the HTTPS connection.

Viewing TLS certificate details for the herokuapp.com certificate.
What does it mean?
Well, there are a lot of locks in these pictures. Those are how the browser indicates to the user that their connection is being protected by TLS. However, these dialogs also show a little about the server’s TLS setup.
Keys and certificates
The server-side configuration for TLS includes two important pieces of data: a private key and a public certificate. The private key is secret; it’s held on the server and never leaves there. The certificate is sent to every browser that connects to that server via TLS. These two pieces of data are mathematically related to each other in a way that makes the encryption of TLS possible.
The server’s certificate is issued by an organization called a certificate authority (CA). The certificate authority’s job is to make sure that the server really is who it says it is — for instance, that a certificate issued in the name of Heroku is actually being used by the Heroku organization and not by someone else.
The role of a certificate authority is kind of like getting a document notarized. A notary public checks your ID and witnesses you sign a document, and puts their stamp on it to indicate that they did so.
8.5 Question 2
Take a look at the TLS certificate presented for your deployed app, or the screenshots above from my version of it. What organization was this server certificate issued to? Who issued it?
- It was issued to Heroku, and the issuer is SHA2 High Assurance.
- It was issued to DigiCert, and the issuer is the state of California.
- It was issued to Heroku, and the issuer is the state of California.
- It was issued to Heroku, and the issuer is DigiCert.
- It was issued to
localhost, and the issuer is port 8000.
DigiCert, Inc. is the issuer, or certificate authority, that issued this TLS certificate. Heroku, Inc. is the organization to which it was issued.
How does TLS assure privacy?
The data in the TLS certificate and the server’s private key are mathematically related to each other through a system called public-key cryptography. The details of how this works are way beyond the scope of this course. The important part is that the two endpoints (the browser and server) can securely agree on a shared secret which allows them to scramble the data sent between them so that only the other endpoint — and not any eavesdropper — can unscramble it.
How does TLS assure authentication?
A server certificate indicates that an encryption key belongs to a particular organization responsible for that service. It’s the job of a certificate authority to make sure that they don’t issue a cert for (say) udacity.com to someone other than the company who actually runs that domain.
But the cert also contains metadata that says what DNS domain the certificate is good for. The cert in the picture above is only good for sites in the .herokuapp.com domain. When the browser connects to a particular server, if the TLS domain metadata doesn’t match the DNS domain, the browser will reject the certificate and put up a big scary warning to tell the user that something fishy is going on.
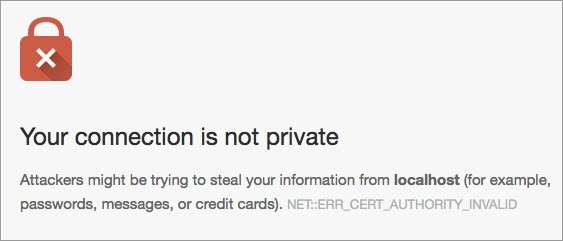
A big scary warning that Chrome displays if a TLS certificate is not valid.
How does TLS assure integrity?
Every request and response sent over a TLS connection is sent with a message authentication code (MAC) that the other end of the connection can verify to make sure that the message hasn’t been altered or damaged in transit.
8.5 Question 3
Suppose that an attacker were able to trick your browser into sending your udacity.com requests to the attacker’s server instead of Udacity’s real servers. What could the attacker do with that evil ability?
- Steal your udacity.com cookies, use them to log into the real site as you, and post terrible span to the discussion forums.
- Make this course appear with terrible images in it instead of nice friendly ones.
- Send fake email through your Gmail account or post spam to your friends on Facebook.
- Cause your computer to explode.
If your browser believes the attacker’s server is udacity.com, it will send your udacity.com authentication cookies to the attacker’s server. They can then put those cookies in their own web client and masquerade as you when talking to the real site. Also, if your browser is fetching content from the attacker’s server, the attacker can put whatever they want in that content. They could even forward most of the content from the real server.
However, compromising Udacity’s site would not allow an attacker to break into your Gmail or Facebook accounts, and fortunately it wouldn’t let the attacker blow up your computer either.
8.5 Question 4
When your browser talks to your deployed service over HTTPS, there are still some ways that an attacker could spy on the communication. Mark the cases that HTTPS does not protect against.
- A malicious program on your computer taking a screenshot of your browser.
- An attacker monitoring the WiFi network in the coffee shop you’re in when you deploy your app.
- Your Internet service provider tying to read the contents of your connection as it passes through their network.
- An attacker guessing your Heroku password and replacing your service with a malicious one.
- An attacker who had broken into Heroku’s servers themselves
HTTPS only protects your data in transit. It doesn’t protect it from an attacker who has taken over your computer, or the computer that’s running your service. So items 1, 4, and 5 are not things that HTTPS can help with.
8.6 Beyond GET and POST
API’s are a huge part of the modern web. A lot of web applications make use of a server side part that exposes an API and the client side part that sends queries to that API.
But not every API call make sense as a GET or a POST query. The GET method is really for requesting a copy of a resource. And POST is for things that act more or less like form submission.
But there are a bunch of other methods in HTTP. Let’s see what those are.
All of the other methods
The different HTTP methods each stand for different actions that a client might need to perform upon a server-hosted resource. Unlike GET and POST, their usage isn’t built into the normal operation of web browsers; following a link is always going to be a GET request, and the default action for submitting an HTML form will always be a GET or POST request.
However, other methods are available for web APIs to use, for instance from client code in JavaScript. If you want to use other methods in your own full-stack applications, you’ll have to write both server-side code to accept them, and client-side JavaScript code to make use of them.
PUT for creating resources
The HTTP PUT method can be used for creating a new resources. The client sends the URI path that it wants to create, and a piece of data in the request body. A server could implement PUT in a number of different ways — such as storing a file on disk, or adding records to a database. A server should respond to a PUT request with a 201 Created status code, if the PUT action completed successfully. After a successful PUT, a GET request to the same URI should return the newly created resource.
8.6 Question 1
PUT can be used for actions such as uploading a file to a web site. However, it’s not the most common way to do file uploads. PUT has to be done in application code (e.g.JavaScript), whereas with another method it’s pssible to do uploads with just HTML on the client side. What method do you think this describes?
GETPOSTUPLOAD
Most file uploads are done via POST requests. For examples, see this article at MDN.
DELETE for, well, deleting things
The destructive counterpart to PUT is DELETE, for removing a resource from the server. After a DELETE has happened successfully, further GET requests for that resource will yield 404 Not Found … unless, of course, a new resource is later created with the same name!
8.6 Question 2
What’s something that we would almost always want the client to do before allowing it to delete resouces in your application?
- Create a new resouce to replace it
- Establish a doubly encrypted protocal tunnel
- Log in, or otherwise authenticate
Most applications that involve creating and deleting resources on the server are going to require authentication, to make sure that the client is actually someone we want to trust with that power.
PATCH for making changes
The PATCH method is a relatively new addition to HTTP. It expresses the idea of patching a resource, or changing it in some well-defined way. (If you’ve used Git, you can think of patching as what applying a Git commit does to the files in a repository.)
However, just as HTTP doesn’t specify what format a resource has to be in, it also doesn’t specify in what format a patch can be in: how it should represent the changes that are intended to be applied. That’s up to the application to decide. An application could send diffs over HTTP PATCH requests, for instance. One standardized format for PATCH requests is the JSON Patch format, which expresses changes to a piece of JSON data. A different one is JSON Merge Patch.
HEAD, OPTIONS, TRACE for debugging
There are a number of additional methods that HTTP supports for various sorts of debugging and examining servers.
HEADworks just like GET, except the server doesn’t return any content — just headers.OPTIONScan be used to find out what features the server supports.TRACEechoes back what the server received from the client — but is often disabled for security reasons.
8.6 Question 3
If HTTP method are the “verbs” in the protocol, what are the “objects” (in the grammatical sense)?
- URIs (e.g. https://en.wikipedia.org/wiki/Transport_Layer_Security)
- Servers (e.g. en.wikipedia.org)
- Status codes (e.g.200 OK)
- URI schemes (e.g. https)
- Authenticated users, content-types, and network latency
An HTTP method asks the server to do something to a resource, which is named by a URI.
Great responsibility
HTTP can’t prevent a service from using methods to mean something different from what they’re intended to mean, but this can have some surprising effects. For instance, you could create a service that used a GET request to delete content. However, web clients don’t expect GET requests to have side-effects like that. In one famous case from 2006, an organization put up a web site where “edit” and “delete” actions happened through GET requests, and the result was that the next search-engine web crawler to come along deleted the whole site.
The standard tells all
For much more about HTTP methods, consult the HTTP standards documents.
8.7 HTTP/1.1 vs HTTP/2
HTTP has been around for almost 30 years now and it’s seen some pretty big changes.
The first version of HTTP didn’t even have a version number on it, but it was later called version 0.9. It was really simple. It only supported GET Requests, it expected all responses to be in HTML, and it didn’t even have any headers.
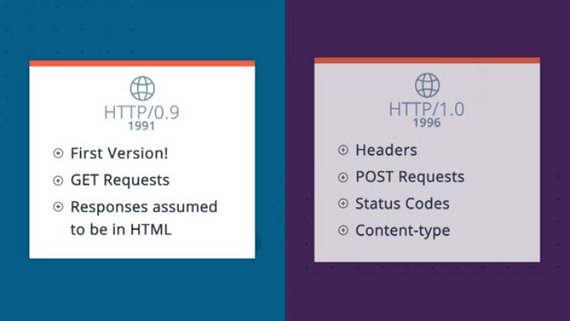
HTTP 1.0 came out in 1996. It added Headers, Post Requests for forms, Status Codes, and Content Types. A lot of features were then added by browser and server developers without immediately getting standardized. That’s where Cookies came from.
HTTP 1.1 followed in 1999, and was significantly revised in 2007, including a lot of those changes. It added improved Caching, a whole bunch of features to make Requests more efficient, and the ability to host multiple websites on the same serverand IP address by using the Host Header.
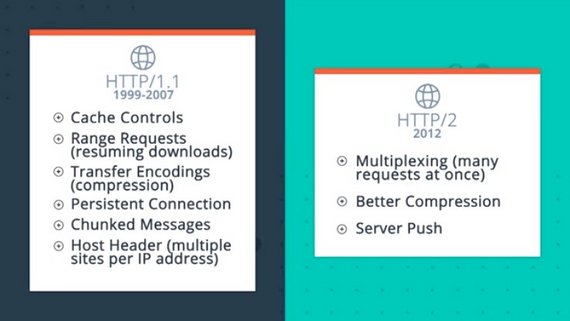
As of the end of 2016, HTTP 1.1 is what 90% of the web is using. But there’s a whole new version now too.
HTTP 2 was designed to make HTTP much more efficient, especially for busy services that involve large numbers of Requests. HTTP 1.1 isn’t going away, but let’s take a look at what the new one does.
HTTP/2
The new version of HTTP is called HTTP/2. It’s based on earlier protocol work done at Google, under the name SPDY (pronounced “speedy”).
Unfortunately, we can’t show you very much about HTTP/2 in Python, because the libraries for it are not very mature yet (as of early 2017). We’ll still take a look at the motivations for the changes that HTTP/2 brings, though.
Some other languages are a little bit more up to the minute; one of the best demonstrations of HTTP/2’s advantages is in the Gophertiles demo from the makers of the Go programming language. In order to see the effects, you’ll need to be using a browser that supports HTTP/2. Check CanIUse.com to check that your browser does!
This demo lets you load the same web page over HTTP/1.1 and HTTP/2. It also lets you add extra latency (delay) to each request, simulating what happens when you access a server that’s far away or when you’re on a slow network. The latency options are zero (no extra latency), 30 milliseconds, 200 milliseconds, and one second. Try it out!
A partly -loaded Gophertiles demo, using HTTP/1 with a server latency of 1 second.
8.7 Question
In the Gophertiles demo, try the HTTP/2 and HTTP/1 links with 1 second of latency. What do you notice about the time it takes to load all the images?
- HTTP/1 loads much more quickly than HTTP/2
- They’re about the same.
- HTTP/2 loads much more quickly than HTTP/1.
HTTP/2 should load much faster than HTTP/1, if your browser is using it!
Other HTTP/2 demos
You don’t have to take the Go folks’ word for it, either; there’s http://www.http2demo.io/ too, and also https://http2.akamai.com/demo. Each of these demos works similarly to the Gophertiles demo, and will show you much the same effects. The HTTP/2 one is (on average) a whole lot faster, especially with high latency.
But why is it faster? To answer that, we first need to look at some browser behavior in HTTP/1.1.
Exercise: Multiple connections
Since the early days of HTTP, browsers have kept open multiple connections to a server. This lets the browser fetch several resources (such as images, scripts, etc.) in parallel, with less waiting. However, the browser only opens up a small number of connections to each server. And in HTTP/1.1, each connection can only request a single resource at a time.
As an exercise, take a look at the server in Lesson-3/3_Parallelometer. Try running this server on your computer and accessing it at http://localhost:8000 to see parallel requests happening. The code here is based on the threading server that you’ve seen earlier in this lesson.
Depending on your browser, you may see different numbers, but most likely the biggest one you’ll see is 6. Common browsers such as Chrome, Firefox, and Safari open up as many as six connections to the same server. And under HTTP/1.1, only one request can effectively be in flight per connection, which means that they can only have up to six requests in flight with that server at a time.
Multiplexing
But if you’re requesting hundreds of different tiny files from the server — as in this demo or the Gophertiles demo — it’s kind of limiting to only be able to fetch six at a time. This is particularly true when the latency (delay) between the server and browser gets high. The browser can’t start fetching the seventh image until it’s fully loaded the first six. The greater the latency, the worse this affects the user experience.
HTTP/2 changes this around by multiplexing requests and responses over a single connection. The browser can send several requests all at once, and the server can send responses as quickly as it can get to them. There’s no limit on how many can be in flight at once.
And that’s why the Gophertiles demo loads much more quickly over HTTP/2 than over HTTP/1.
Server push
When you load a web page, your browser first fetches the HTML, and then it goes back and fetches other resources such as stylesheets or images. But if the server already knows that you will want these other resources, why should it wait for your browser to ask for them in a separate request? HTTP/2 has a feature called server push which allows the server to say, effectively, “If you’re asking for index.html, I know you’re going to ask for style.css too, so I’m going to send it along as well.”
Encryption
The HTTP/2 protocol was being designed around the same time that web engineers were getting even more interested in encrypting all traffic on the web for privacy reasons. Early drafts of HTTP/2 proposed that encryption should be required for sites to use the new protocol. This ended up being removed from the official standard … but most of the browsers did it anyway! Chrome, Firefox, and other browsers will only attempt HTTP/2 with a site that is using TLS encryption.
Many more features
Now you have a sense of where HTTP development has been going in the past few years. You can read much more about HTTP/2 in the HTTP/2 FAQ.
8.8 Learning Resources
Congratulations. You’ve reached the end this course. You’ve learned a lot in the past few lessons, and you’ve done a lot.
You’ve built code that interacts with the web in a bunch of ways–
- as a server
- as a client
- both at once
But you’ve also built up your own knowledge of the protocols that the web is built out of. I hope that will serve you well in the rest of your education as a web developer. Go build things.
Resources
Here are some handy resources for learning more about HTTP:
- Mozilla Developer Network’s HTTP index page contains a variety of tutorial and reference materials on every aspect of HTTP.
- The standards documents for HTTP/1.1 start at RFC 7230. The language of Internet standards tends to be a little difficult, but these are the official description of how it’s supposed to work.
- The standards documents for HTTP/2 are at https://http2.github.io/.
- Let’s Encrypt is a great site to learn about HTTPS in a hands-on way, by creating your own HTTPS certificates and installing them on your site.
- HTTP Spy is a neat little Chrome extension that will show you the headers and request information for every request your browser makes.
Approx. read time : 7 min
A program that uses HTTP for serving files that create web pages for users in response to their requests that are sent by the HTTP clients of their computer is called as a web server.
If any server delivers an XML document to another device, it can be a web server. In simple words, a web server is an Internet server that responds to HTTP requests for delivering content and services.
Let’s take an example, if you are working on your computer, browsing your web and a message pop ups from your friend that “I had just read a great article at the following URL: https://www.milesweb.com/blog”.
So, you will insert this URL into your browser and press enter. That’s it!
The web server on which your website is based in the world doesn’t matter at all as the page you have browsed immediately appears on your computer screen.
A web server is never disconnected from internet. Each of the web servers has a unique address that comprises of a series of four numbers between 0 and 255. These numbers are separated with a period (.).
With the web server, the hosting providers can manage multiple domains (users) on a single server.
A web hosting provider rents the space on a server or cluster of servers for people to create their online presence with a website.
Types of Web Servers
There are mainly four types of web servers – Apache, IIS, Nginx and LiteSpeed.
 Apache Web Server
Apache web server is one of the most popular web servers developed by the Apache Software Foundation. Open source software, Apache supports almost all operating systems such as Linux, Windows, Unix FreeBSD, Mac OS X and more. Approximately, 60% of the machines run on Apache Web Server.
You can easily customize an apache web server due to its modular structure. Since it’s an open source, your own modules can be added to the server when you want to make modifications to suit your requirements.
It is highly stable as compared to other web servers and the administrative issues on it can be resolved easily. It is possible to install Apache on multiple platforms successfully.
The Apache’s latest versions offer you the flexibility to handle more requests when compared to its earlier versions.
IIS Web Server
A Microsoft product, IIS is a server that offers all the features such as Apache. Since it’s not an open source, adding personal modules as well as modifying becomes a bit difficult.
It supports all the platforms that run Windows operating system. Additionally, you also get good customer support, if there is any issue.
 Nginx Web Server
Nginx is the next open source web server after Apache. It comprises of IMAP/POP3 proxy server. The significant features offered by Nginx are high performance, stability, simple configuration and low resource usage.
No threads are used to handle the requests by Nginx, instead a highly scalable event-driven architecture that uses small and predictable amount of memory under load is utilized. It has become popular recently and hosts about 7.5% of all the domains globally. Many web hosting companies have started using this server.
LiteSpeed Web Server
A high-performance Apache drop-in replacement, LiteSpeed (LSWS) is the 4th popular web server on the internet and is a commercial web server.
When you upgrade your web server to LiteSpeed, you will experience improved performance that too with low operating cost.
This server is compatible with the most common Apache features such as .htaccess, mod_rewrite and mod_security.
It has the ability to load Apache configuration files directly and work as a drop in replacement Apache with almost all the hosting control panels. It can replace the Apache within 15 minutes without any downtime.
LSWS replaces all the Apache functions which other front-end proxy solutions can’t do to simplify the use and make the transition from Apache smooth and easy.
Searching for VPS Hosting with LiteSpeed Web Server? Try MilesWeb VPS Hosting and experience superior website performance with LiteSpeed Web Server.
Apache Tomcat
 Apache Tomcat
An open source Java servlet container, Apache Tomcat functions as a web server. A Java program that expands the capabilities of a server is called as a Java servlet. Servlets can respond to any types of requests but they most commonly implement applications hosted on web servers. These web servlets are Java equivalent to other dynamic web content technologies such as PHP and ASP.NET. Sun Microsystems donated Tomcat’s code base to the Apache Software Foundation in 1999 which became a top-level Apache project in 2005. Currently, it powers just under 1% of all websites.
Released under the Apache License version 2, Apache Tomcat is typically used to run Java applications. But, it can be extended with Coyote, so that it can also perform the role of a normal web server that serves local files as HTTP documents.
Often, Apache Tomcat is listed among other open source Java application servers. Some examples are Wildfly, JBoss, and Glassfish.
Node.js

Node.js is basically a server-side JavaScript environment that is used for network applications such as web servers. It was originally written by Ryan Dahl in 2009. Having a smaller market position, Node.js runs 0.2% of all websites. The Node.js project, managed by the Node.js Foundation, is assisted by the Linux Foundation’s Collaborative Projects program.
Node.js differs from other popular web servers because it is mainly a cross-platform runtime environment for building network applications with. An event-driven architecture is applied by Node.js which is capable of asynchronous I/O. Due to these design choices throughput and scalability are optimized in web applications which helps to run real-time communication and browser games. Node.js also helps in understanding the difference in web development stacks, where Node.js is clearly part of the HTML, CSS, and JavaScript stack, as opposed to Apache or NGINX which are a part of several different software stacks.
Node.js is released under a mix of licenses.
 Lighttpd
Pronounced as “lightly”, Lighttpd was initially release in March 2003. It currently runs approximately 0.1% of all websites and is distributed under a BSD license.
Lighttpd stands unique due to its small CPU load, low memory footprint, and speed optimizations. An event-driven architecture is used by it and is optimized for a large number of parallel connections, and supports FastCGI, Auth, Output-compression, SCGI, URL-rewriting and many more features. It is a popularly used web server for the web frameworks such as Catalyst and Ruby on Rails.
There are also some other types of servers as below:
Mail Server: In a mail server, you get a centrally-located pool of disk space to store and share different documents in the form of emails for network users. All the data is stored in a single location and so, administrators need to backup files only from one computer.
Application Server: It acts as a set of components which can be accessed by the software developer via an API defined by the platform itself. These components are usually performed in the environment similar to its web server(s) for the web applications. Their main job is to support the construction of dynamic pages.
File Transfer Protocol (FTP) Server: A separate control and data connections are used by the FTP between the client and the server. It is possible for the FTP users to authorize themselves in the form of a username and password.
However, they can connect using anonymous names, if the server isn’t configured to allow them. For transmission security, the username and password need to be encrypted using the FTP and SSL.
Database Server: A computer program that offers database services to other computer programs or computers with the use of client-server functionality is called as a database server. There are some DBMSs (example: MySQL) depend on the client-server model for database access. This type of server is accessible either via a “front end” that runs on the user’s computer where the request is made or the “back end” where it is served such as data analysis and storage.
Domain Name System (DNS) Server: A computer server that hosts a network service for offering responses to queries is called a name server. It maps either an addressing component or numeric identification. This is done by the server to give response to a network service protocol request.
These DNS servers primarily translate the human- memorable domain names and host names into the corresponding numeric Internet protocol (IP) addresses. DNS also helps to recognize a namespace of the Internet, used to identify and locate computer systems and resources on the Internet.
Concluding…
The web hosting companies mainly select the web servers based on the requirement of clients, the number of clients on a single server, the applications/software clients use and the amount of traffic a web server can handle generated by the clients. So, while selecting a web server first of all think on all these aspects and then select one.
Веб-сервер — это просто скрипт
Время на прочтение
7 мин
Количество просмотров 17K
Есть категория людей, которые особо ценят надёжность, стабильность, безопасность и свободу информации. Наверное, именно такие люди поднимают медиасерверы Plex и Jellyfin, запускают ноды Bitcoin, мосты Tor, инстансы Mastodon и Matrix, приложения YunoHost, VPN-узлы Tailscale и так далее. Это как бы естественный процесс.
Децентрализация, пиринг, автономность, самохостинг — вот основные принципы. Максимальная независимость от условий окружающей среды, государств, банков и прочих внешних факторов. Когда у вас надёжный фундамент под ногами и суверенная автономность с финансовой независимостью, то проблемы сторонних сервисов уходят на второй план. Конечно, сбои в их работе неприятны, но не критичны, если предусмотреть запасные варианты.
У обывателей часто возникает вопрос: наверное, это очень трудно? Поднять свои серверы? На самом деле сложность задачи часто переоценивают. Давайте посмотрим на примере простого веб-сервера.
Самый простой веб-сервер — это вообще одна строка в консоли вроде такой:
while true;
do echo -e "HTTP/1.1 200 OKnn$(iostat)"
| nc -l -k -p 8080 -q 1;
done
Самый простой домашний NAS — старый смартфон или одноплатник за пять долларов с подключённым HDD/microSD/SSD/etc. Так что ничего сложного.

Ещё один пример минимализма. Одноплатник ZimaBoard (разработка: апрель 2022 года) — простой домашний сервер на архитектуре x86 (Intel). Хотя можно собрать NAS ещё дешевле на базе RPi
Веб-сервер — это просто скрипт
Интересный пример веб-сервера из скриптов — Sherver. Это довольно навороченный и многофункциональный веб-сервер на чистом Bash, в каком-то роде улучшенная версия bashttpd.
Сервер состоит из нескольких скриптов. Первый из них — ./sherver.sh. Чтобы поднять Sherver, клонируем репозиторий и запускаем ./sherver.sh. На старте можно указать рабочий порт: ./sherver.sh 8080 (по умолчанию такой и стоит).
И всё. После этого в браузере открываем http://localhost:8080/ — и всё работает. Сайт грузится из html, картинок и других ресурсов, которые мы закинули в папку /files.
То есть вся концепция веб-сервера — это простая, даже примитивная вещь. Суть в том, что если кто-то стучится к нашему компьютеру по порту 8080, то открываем соединение и выдаём файл (или другой контент, например, результат исполнения любой программы в stdout). Вот что такое сервер в данном контексте.
Если вам говорят, что поднять веб-сервер сложно, просто покажите ему такой скрипт. Для работы Sherver в системе должны присутствовать следующие инструменты:
envsubst, если хотите использовать шаблоныsocatдля работы сервера (можно и netcat, но он не очень хорошо справляется с параллельными HTTP-запросами)
Sherver работает по протоколу HTTP 1.0 и лучше всего подходит для выдачи нескольких страничек по внутренней сети. Конечно, он не выдержит очень большую нагрузку и его обязательно нужно прикрыть файрволом, который предотвращает вторжения извне.
Строго говоря, Sherver вообще не следует показывать в интернет, потому что добром это точно не закончится, ведь, по сути, мы передаём консоль системы в браузер клиента.
Его можно использовать или как экстренную «заглушку» в специфических ситуациях (см. ниже про историю создания), или как сервер во внутренней сети, закрытой снаружи. Например, в домашней или корпоративной сети.
Некоторые особенности Sherver:
- не нуждается в конфигурировании: просто добавляем файлы в папки
scriptsиfolders; - отдаёт любые HTML-страницы, независимо от сложности, в том числе со сложным JavaScript и множеством скриптов или файлов для загрузки;
- отдаёт файлы (текстовые или бинарные, картинки) с корректным MIME-типом;
- поддерживает динамические страницы;
- поддерживает шаблоны HTML, чтобы не дублировать заголовки и футеры;
- парсит URL-запросы;
- поддерживает GET и POST;
- работает с кэшем клиента;
- легко расширяется:
- запускает любые скрипты или исполняемые файлы любых языков (через stdout);
- для удобства поставляется с библиотекой баш-функций.
Основные ограничения:
- поддержка только HTTP GET и POST запросов, хотя остальные тоже можно добавить;
- отсутствие параллелизма;
- если страница должна загрузить много файлов, файлы отправляются один за другим;
- если на сайт заходят два пользователя, второму нужно подождать, пока обслужат первого;
- практически полное отсутствие безопасности.
Автор Sherver и сам в каком-то смысле хакер, поэтому неоднократно предупреждает пользователей ни в коем случае не открывать этот сервер в большой интернет, только в локалку. Для интернета лучше запустить тот же nginx, там гораздо больше скриптов на все случаи жизни (шутка).
История создания
История создания этого веб-сервера довольно любопытная. Автор работал консультантом в сторонней компании, можно сказать, хакер-фрилансер — и его срочно вызвали к клиенту, у которого взломали веб-сайт и разместили в форме регистрации на деловую конференцию голую модель в шляпе. Во время расследования пришлось действовать в спешке, люди непрерывно звонили в офис, жалуясь на эротику. Поэтому хакер быстро отключил сервер от сети. А затем поставил вместо него маленькую «заглушку», чтобы народ вместо онлайн-регистрации просто звонил по телефону:
#!/bin/bash
while : ; do cat conference.txt | nc -l 80; done
Содержание conference.txt:
HTTP/1.1 200 OK
Content-Type: text/html; charset=ISO-8859-1
Content-Length: 216
Connection: close
Server: brad

<!doctype html>
<html>
<head>
<title>Conference</title>
</head>
<body>
<h1>Conference Registration</h1>
<p>The registration system is down for maintenance. Please call 1-800-123-4567 to register.</p>
</body>
</html>
В принципе, можно сделать ещё проще:
while :; do nc -l 80 < conference.txt; doneИ это всё.
Оказалось, полезная штука. Подобная заглушка спасла в экстренной ситуации. А иногда больше ничего и не надо. Так и родился проект Sherver.
Ещё одна похожая разработка — Bash-web-server. Это примерно то же самое, что и Sherver, только без зависимостей, то есть без использования дополнительных утилит типа socat и netcat.
Вообще, существует целая коллекция однострочных веб-серверов на разных языках программирования.
Простой почтовый сервер — Docker Mailserver
На своём хостинге можно поднять почтовый сервер типа Gmail. В этой пошаговой инструкции утверждается, что процедура занимает всего 30 минут (домены у приличного человека есть заранее, то есть регистрировать ничего не надо). Это не так сложно, как многие думают.
TL;DR
- Установить и настроить контейнер Docker Mailserver:
mkdir mail cd mail DMS_GITHUB_URL='https://raw.githubusercontent.com/docker-mailserver/docker-mailserver/master' wget "${DMS_GITHUB_URL}/docker-compose.yml" wget "${DMS_GITHUB_URL}/mailserver.env" wget "${DMS_GITHUB_URL}/setup.sh" chmod a+x ./setup.sh ./setup.sh help- Прописать домен
- Настроить Certbot ( Let’s Encrypt)
- Включить защиту сервера:
ENABLE_CLAMAV=1 ENABLE_FAIL2BAN=1- Создать аккаунты:
docker run --rm -v "/mnt/volume_lon1_01/config/:/tmp/docker-mailserver/" docker.io/mailserver/docker-mailserver setup email add <user@domain>- Настроить DKIM и DMARC
Говорят, что опенсорсная программка Rspamd фильтрует спам не хуже, чем «AI-инфраструктура» всяких Gmail’ов.
Есть и другие нюансы по установке. Но в целом в прошлые времена без контейнеров всё это было намного сложнее.
Необязательно всё держать прямо у себя дома, можно для некоторых модулей использовать и стороннюю инфраструктуру. Но со своим доменом можно легко менять почтовых провайдеров, если что.
Свой DNS-сервер
В принципе, на своём компьютере можно поднять даже полноценный DNS-сервер. Не так легко придумать, зачем он может понадобиться обычному человеку. Но вот крупные компании и провайдеры часто запускают DNS-серверы в корпоративной сети по многим причинам, в том числе для безопасности.
Интересно, что некоторые платные DNS-провайдеры предлагают услуги по «пробиву китайского файрвола». Дело в том, что из-за фильтрации трафика для пользователей изнутри Китая увеличивается задержка при доступе к ресурсам «снаружи». Поэтому западным компаниям предлагается конкретная услуга Managed DNS for China.

Ещё одна причина установки DNS-сервера — туннелирование IPv4-трафика (см. iodine). Например, если файрвол жёстко блокирует трафик, но при этом разрешает доступ к DNS, то можно использовать такой хак.
Полная минификация сайта
Если всерьёз поднимать минимальный веб-сервер на собственном хостинге, то это будет самый простой сайт без всяких изысков. Возможно, даже упакованный в один HTML-файл, см. нашу прошлую статью «Простые сайты снова в моде. Минимализм возвращается».
Есть хорошие инструкции по полной минификации сайта, включая картинки, CSS, шрифты, JavaScript и так далее.
Вообще, минификация рекомендуется для сайтов любого типа. С одной стороны, на разные клиентские устройства можно выдавать разный контент, в зависимости от размера экрана и скорости соединения. С другой стороны, можно выдавать всем минимальную версию сайта. Это лучше, чем потерять хотя бы одного посетителя, который не увидит контент из-за плохого качества связи.
Самые простые, но эффективные оптимизации:
- перекодировать картинки в WebP (особенно 24-битные PNG)
- убрать неиспользуемые CSS и JavaScript (инструмент Coverage в Chrome DevTools)
- проверка сайта в Search Console
- кэширование статичных объектов
- повсеместный gzip
Зачем вообще нужен свой сервер?

Picasa
Помните Picasa? Великолепное нативное приложение для работы с фотоархивом. До сих пор ни одна программа даже близко не приблизилась к Picasa по функциональности. Что с ней стало? То же самое, что с тысячами других приложений примерно в то же время. Разработку прекратили ради облачной альтернативы (в данном случае Google Photos).

То есть программное обеспечение, которое мы использовали на своих компьютерах просто «переехало» в облако. Это имеет смысл с точки зрения корпорации, которая стремится сократить издержки, упростить обновления, а также привязать пользователей, взяв их файлы в «заложники». Программисты высочайшего класса работают над одной задачей — максимизация прибыли корпораций от рекламы. Их цель — привлечь ваше внимание и удержать его с помощью персонализации контента и психологических манипуляций.
Но в итоге может получиться так, что под контролем человека ничего не остаётся. Файлы, деньги, имущество — всё это может исчезнуть за одну секунду по решению третьих лиц.
По факту это происходит уже сейчас. В вашей коллекции видео на YouTube или песен на Spotify иногда просто исчезают файлы. Потом файлы начнут исчезать в бэкапах и на мобильных устройствах, которые синхронизированы с облаком. Сам аккаунт могут заблокировать, хотя вы ничего плохого не сделали. В интернете полно таких историй. Не говоря уже о блокировке доступа к сайту со стороны третьих лиц, которые действуют через вашего интернет-провайдера. Это крайне неприятная ситуация.
Вот почему нужен собственный сервер с избыточным бэкапом. Пусть даже в подвале, но свой.
По теме:
- Awesome-Selfhosted: курируемый список инструментов для своего хостинга
- r/selfhosted/: тематическое сообщество на Reddit с обсуждением альтернатив популярным облачным сервисам
- Local-First Software, описание концепции
События вокруг показывают, что никакой стабильности нет. А может, никогда и не будет. Сплошной хаос, где никому нельзя доверять. Только себе.
Люди скажут вам спасибо за сервер, файловый архив и бэкапы, когда в очередной раз начнут растерянно метаться после потери связи/аккаунта/файлов/денег, как это неоднократно происходило в последние десятилетия.
НЛО прилетело и оставило здесь промокод для читателей нашего блога:
— 15% на все тарифы VDS (кроме тарифа Прогрев) — HABRFIRSTVDS.