Contents
- Excel for Web Scraping
- Ways to Extract Data Using Excel
- How to Scrape Data from Website using Excel
- What is Excel Web Query
- Getting Started
- Advanced tactics
- Limitations with Excel
- What’s the Solution

Excel or not, web scraping is hugely important, isn’t it?
It is vital for your business whatever it may be.
Do you ever wonder how?
Well, to start with, web scraping is the process of extracting web data.
Why do you need web data?
You need web data because you base all your decisions related to business strategy on web data.
Whether it is price intelligence, sentiment analysis, or lead generation, you need data to arrive at your strategy.
With the e-commerce boom, businesses have gone online. Every moment, companies change their strategies and you need to keep a close watch on the market trends.
Guess what you need?
Data. Live. Current. Up-to-the-minute.
The question is how to get it?
Web scraping is the way out.
It can enable you to scrape web data in an automated fashion and allow you to save the same in a format of your choice. Isn’t it amazing?
It truly is.
There are various tools and techniques. But one of the great ways to scrape data in such a manner is to leverage excel for web scraping.
You might wonder how but no worries.
Here’s a complete, step-by-step tutorial to use excel to scrape data:
Excel is amazing anyway. You are no stranger to Excel. You use it for various purposes.
However, you have perhaps not yet explored how to capitalize on its potential for web scraping.
As you know, Excel is a fantastic tool to deal with data in a structured format!
Why Excel is great is because it cannot only carry out basic data computations but also perform data collection as well as analysis.
It’s quite obvious how Excel can sort, apply filter, use chart, use group and outline data, use pivot table for data analysis.
There is always a huge amount of data that needs to be scraped. It is this data that needs to be analyzed for new insights and business strategy. Where Excel comes in handy is that we need to import into Excel in order to analyze it.
When you use Excel as a web scraper tool, what it does is that it saves a lot of time and energy to scrape web data.
Here’re the ways to use it to extract web data:
1. Copy/Paste
Anyone who has used excel knows how to use the copy/past method. Anyway, it works in this way. All you need to do is to view or export the data to a new Excel, CSV or text file and then copy and paste data into the destination Excel worksheet. It should be quite easy for anyone conversant with Excel. There could be other methods more efficient for recurring use of workbooks.
2. Push
On the other hand, you can also use this method wherein you push the data from system into a specific worksheet in an existing workbook. Bear in mind that not all applications support this method. However, when they do, it will save you a step, in return some time and energy!
3. Pull
Likewise, you can pull data directly from the external data source with the help of external data feature of Excel.
This particular blog post focuses on this feature, and the relevant details related to the same.
How to Scrape Data from Website using Excel?
Excel web query is an excellent way to automate the routine task of accessing a web page and copying the data on an Excel sheet.
If you use web query, you can instruct Excel where to look (web page) and what to copy (tables of data). What this will accomplish is that Excel will automatically import the data onto a worksheet for you.
What is Excel Web Query?
It’s merely a feature in Excel. What it does is that it enables you to extract data stored on the Internet.
You would be amazed by how it can automatically find tables on the web page and let you select the particular one that you need data from.
This feature is quite useful because it creates HTML content in an Excel worksheet by passing along the necessary parameters required by the structure of the web page to display data in a workbook.
Web queries can also be fairly useful for a scenario wherein a standard ODBC (Open Database Connectivity) connect would not be easy to create or maintain for merely getting data from the web pages.
Getting Started
The best way to understand the way Excel can effectively scrape data is through an example. So we would try to retrieve Forecast data from timeanddate.com.
However, you got to remember that this sample tutorial is possible using Excel 2013 for Windows. You might not see the same kind of steps or efficiency if you use older/newer version of the program.
Step 1: Creating Excel Web Query
Step 2: Select Data
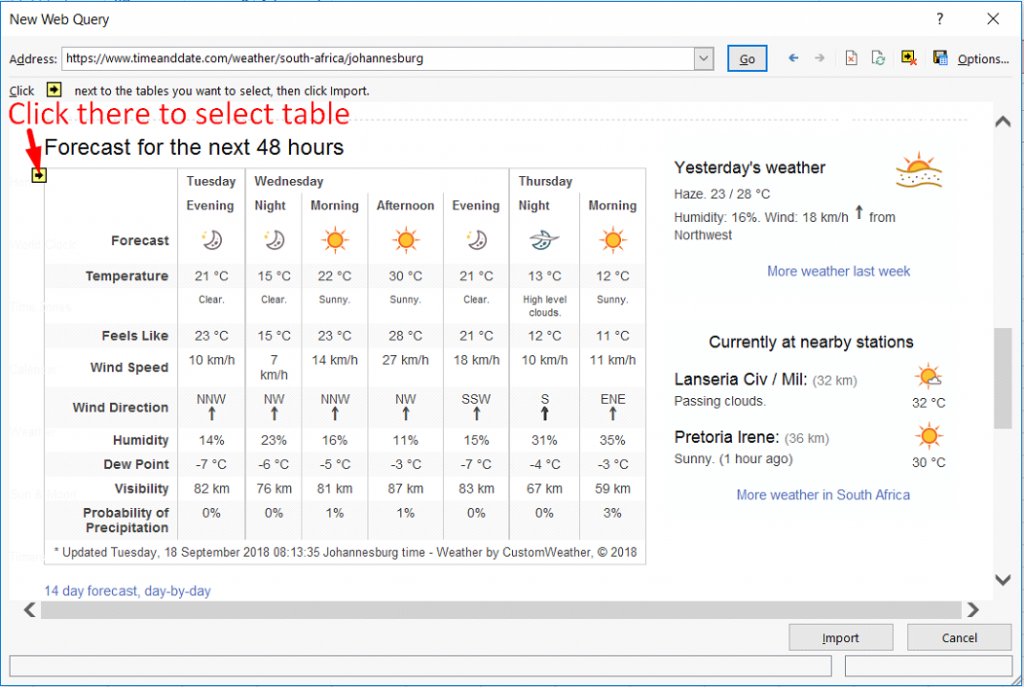
- In the New Web Query dialog box, you will be able to see a yellow box with a black arrow right at the top left of every table on the page.
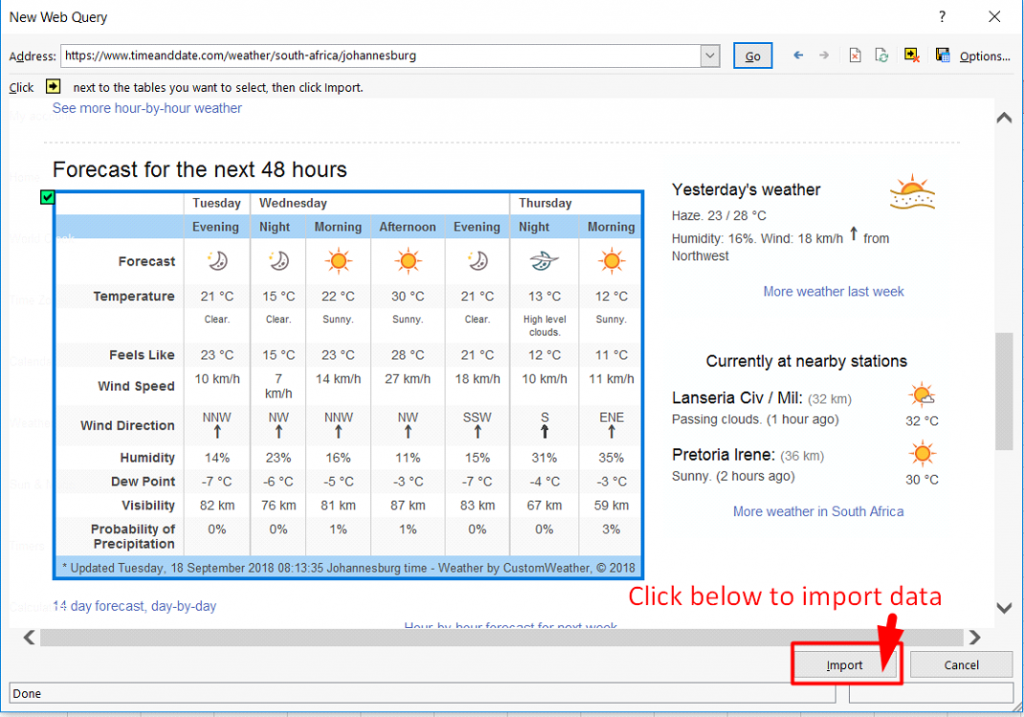
- By positioning your mouse cursor over one of these arrows, the corresponding table becomes outlined in blue. If this is the table you wish to import into your spreadsheet, click on the arrow so that it changes to a green box with a checkmark and the table is highlighted in blue.
- For this example, we will select table: Forecast for the next 48 hours as shown in screenshot given below.
Step 3: Store Data to Worksheet
- Once you have completed the selection of tables to import, click on the Import button to store data into the worksheet.
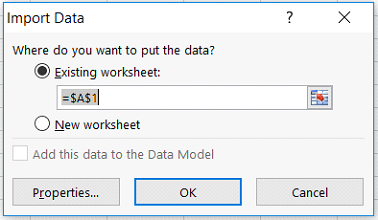
- Now, Excel would display the Import Data dialog box.
- In the Import Data dialog box, instruct Excel where to place the imported web data.
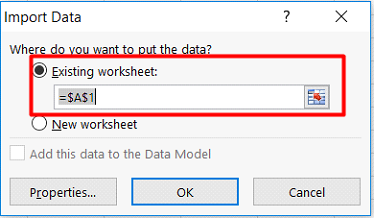
- Then, select the Existing Worksheet radio button to place the table data into the existing, open, empty worksheet. Alternatively, select the New Worksheet radio button to have Excel place the table data into a newly inserted blank sheet.
- For this example, we will choose existing worksheet, and click OK button to store data in existing worksheet.
- Now, Excel would place the table data into the specified location. Sometimes, grabbing the table data might take a few moments. Excel makes an effort to grab and arrange the table information.
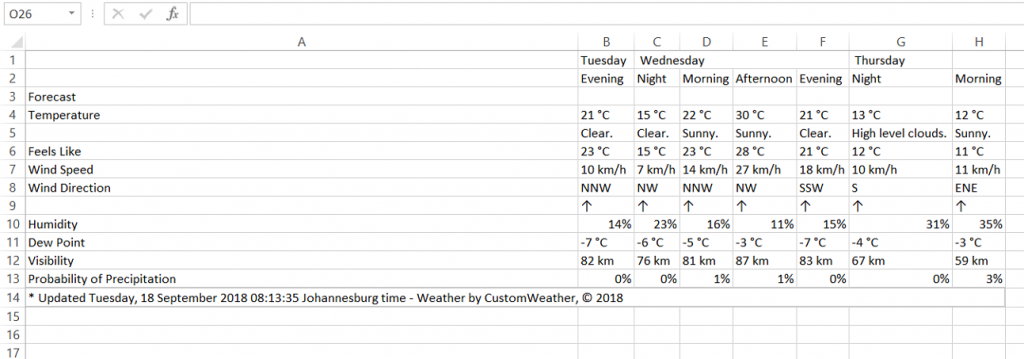
- Output would look somewhat like screenshot given below:
Advanced tactics
1. Customizing web query
- Once you create a Web Query, you can customize it to suit your needs. To access Web query properties, right-click on a cell in the query results and choose Edit Query.
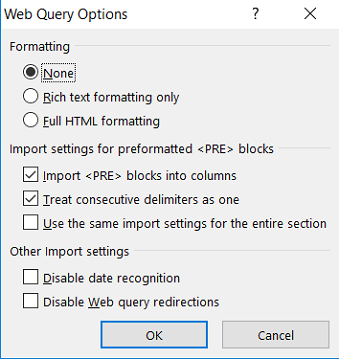
- When the Web page you’re querying appears, click on the Options button in the upper-right corner of the window to open the dialog box shown in screenshot given below.
- The options here allow you to change how the query interacts with the Web page itself.
2. Auto refreshing Data
3. Data analysis
- Data Analysis is a process of inspecting, cleaning, transforming and modeling data with the goal of discovering useful information, suggesting conclusions and supporting decision-making
- Excel is useful because it provides commands, functions and tools that make your data analysis tasks easy. You can avoid many time consuming and/or complex calculations using Excel.
- Here you can find more about data analysis with excel.
Another example of Web Scraping using excel:
Limitations with Excel
- Not Scalable
- While Excel is great for extracting HTML tables from the web, you would do well to remember that it is not a proper web scraping tool or solution. If you wish to scrape data for business insights, Excel is not hugely helpful because it cannot extract large quantities of data. In short, you cannot scale it up as you can with a proper web scraping tool.
- Not able to scrape data that you want
- When you use Excel, you can merely extract data which is in table format.
- If you need to extract data which is not in table format, you need to find some other solution.
- Other limitations
- Moreover, you can’t get to use important features like Ajax pagination, infinite scrolling, deduplication etc. for web scraping when you use Excel for web scraping.
What’s the Solution???
- You basically need a web scraping tool or service through which you can do web scraping in a scalable fashion and provide a feature like Ajax pagination, infinite scrolling, deduplication etc.
- To sum it up, make sure you select the right kind of web scraping tool or service provider that provides good customer support and cloud-based infrastructure.
Excel Web Query — What in the world is that? If you are like the other 99.9% of MS Excel users, you probably have never heard of microsoft excel web queries (note: statistic made up).
Excel web queries are powerful! Web queries are basically like having a web browser built into Excel that attempts to format the content, putting individual pieces of data into separate cells. You can then use Excel formulas (like =A1/B2) to work directly with the data you’ve downloaded. And you don’t have to know anything about perl, cgi, php, javascript, etc.
Getting Started with Sample Excel Web Queries
The example web queries that come with Excel are usually for importing stock quote data into Excel. For more information about using web queries to download Stock Quotes into Excel, take a look at the Excel Stock Quotes Template.
Although importing stock quotes into Excel happened to be the reason I came across Excel web queries, I have since found many other ways to use them.
It is not the web query itself that is the secret that this article is about. Instead, it’s the ability to make a DYNAMIC Web Query!
By dynamic, I’m not talking about using «refresh» to update the data. What I mean is the ability to change the parameters of the web query, such as typing in a new stock symbol into a cell and having the table update automatically.
If you find yourself using the internet to gather data by filling out forms and copying and pasting data over and over, an excel web query might be the solution to your monotonous woes. It’s not always going to be better, and it’s not always going to work, but it’s worth a try, especially since a simple web query could boost your productivity!
Excel Web Query «.iqy» Files
The real key to creating a dynamic excel web query is to create your own «.iqy» file. In it’s basic form, the «.iqy» file is simply a TEXT file with three main lines:
WEB 1 https://www.thedomain.com/script.pl?paramname=value¶m2=value2
You can create the file using a simple text editor! Most text editors will save a new file with the .txt extension, but you can change the extension to .iqy after you create your text file. If it is already a .iqy file and you want to edit it, you may need to right-click on it to select NotePad or WordPad (or some other text editor) to open it.
The third line is the important one! It’s simply the URL or web page address. Notice that it contains two parameters. If you don’t know what parameters are for, just browse the web for a while and pay attention to what shows up in the address bar of your browser. Go to Google.com for instance, and look up «excel web query».
Parameter name / value pairs are listed after the «?» in the URL and are separated by an «&«.
Make the Web Query Dynamic
To make the query dynamic, replace the value of each parameter in the web query file (queryname.iqy) with:
["paramname","Enter the value for paramname:"]
Want to see how this would apply to a Google search? The form that I used above consists of HTML code that looks like this:
<form action="https://www.google.com/search">
<input type="text" name="q" value="excel web query">
<input type="submit" value="Search Google">
</form>
Notice that «q» is the name of the parameter, and the action tells you what the URL should be. The dynamic web query file for a simple google search would look like this:
WEB
1
https://www.google.com/search?q=["keyword","Enter the Search Term:"]
Let’s Create a Web Query
- Open up a text editor and copy the Google example. Save the file as GoogleSearch.iqy
- Open up Excel and enter a search term in Cell B3
- Open the web query file you just saved (GoogleSearch.iqy) by double-clicking on the file, or open Excel and go to Data > Existing Connections > Browse for More.
- When prompted for the search term, enter =B3. If that doesn’t work, just enter a search term for now.
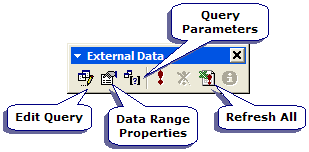
Play around with the web query options and properties by right-clicking within the query results and selecting Parameters or Data Range Properties or Edit Query.
When you go to Edit Query, you can choose to select a specific portion or table within the page or the entire page (by clicking on one of the yellow arrow boxes in the preview). Then, you can save your new query as a .iqy file and look at what parameters it uses.
WEB
1
https://www.google.com/search?q=["q","Enter the Search Term:"]

Selection=EntirePage
Formatting=RTF
PreFormattedTextToColumns=True
ConsecutiveDelimitersAsOne=True
SingleBlockTextImport=False
DisableDateRecognition=False
DisableRedirections=True
When you have the query looking just the way you want it, save the Excel web query (an icon or button for saving the web query is in the «Edit Query» window. When you save the new query, your «.iqy» file will include the options you have selected.
Other Example Web Queries
Below are a few examples of .iqy files that you might try. Websites often change, or they may change the way their APIs work, so these examples might not work forever.
Example 1: Get historical daily stock prices from Investopedia. Note that the start and end dates are text, so if you are setting up date parameters in Excel, the cells you link to need to be text rather than date values. This query uses 3 parameters: Symbol, StartDate, EndDate.
See this article for other sources for historical stock quotes.
Example 2: Get data from a published Google Spreadsheet. See my article Excel Stock Quotes in Excel to see how you can publish a Google Spreadsheet and then use a web query to get the data into Excel.
Become a Web Query Wiz
Take a few minutes to think about what mundane or repetitive tasks YOU do on the internet, particularly cases where you go to the same sites over and over to get data. If you find yourself copying and pasting or re-typing information into Excel so that you can perform calculations with the data, you may have found an ideal use for an excel web query.
There are two main things that you need in order to become a Web Query Wiz.
- A working knowledge of Excel formulas. By this, I mean the ability to use text-manipulation and other formulas. A GREAT book for both learning and reference (and the one that I use all the time) is John Walkenbach’s «Excel Formulas». If you are an avid Excel user, it will probably be the best investment you will make for a long time! The only problem I have with the book is that I need TWO copies — one for work and one for home.
- A working knowledge of HTML. This is the hard part unless you are a web designer or programmer. The articles listed in the side bar will help to some extent, but ultimately this issue was the reason why I didn’t write a more detailed tutorial. Something that will be a great help is to learn about how <form> tags work. Here is my favorite reference.
If you found this article interesting, be sure to check out some of my other Excel tips.
— Jon Wittwer, President
Vertex42, LLC
Московская биржа предоставляет возможность скачивать котировки и другую информацию по ценным бумагам при помощи специальных ссылок.
Если мы введем такую ссылку в Power Query, создав запрос из интернета, то получим интересующие нас котировки прямо в Excel.
Excel-Web-Query
A library for web queries as used by Microsoft Excel.
What is a web query and what is this library for?
A web query is a file that tells Microsoft Excel where and how to fetch data from the web.
This library lets you create web queries in the appropriate format. This allows your applications
to wrap URLs in a way that Microsoft Excel understands. Microsoft Excel can then import data by querying
these URLs.
How to use web queries in Microsoft Excel
- Create a web query and save it with the file extension «iqy»
- Open Microsoft Excel, go to the «Data» menu, select «Get External Data» and
«Run Web Query» / «Run Saved Query», select your web query file and import it - Microsoft Excel will now automatically import the response from the URL in your web
query whenever it imports external data
How to use this library
Add Jitpack as a repository to your project and add a dependency for excel-web-query in order to
use this library (the code snippet below uses Gradle’s Kotlin DSL):
repositories {
    maven { url = uri("https://jitpack.io") }
}

dependencies {
    implementation("com.github.spartusch:excel-web-query:latest.release")
}
The actual usage of the library is straightforward:
Create a new WebQuery by calling WebQueryFactory.create.
This library is written in Kotlin but tested with Java and Kotlin.
Example on how to create a ResponseEntity for Spring MVC
Java
final var webQuery = WebQueryFactory.create(uri);
final var headers = new HttpHeaders();

headers.set(HttpHeaders.CONTENT_TYPE, webQuery.getContentType());
headers.set(HttpHeaders.CONTENT_LENGTH, String.valueOf(webQuery.getContentLength()));
headers.set(HttpHeaders.CONTENT_DISPOSITION, WebQuery.getContentDisposition("webquery.iqy"));

final var response = new ResponseEntity<>(new ByteArrayResource(webQuery.getContentBytes()), headers, HttpStatus.OK);
Kotlin
val webQuery = WebQueryFactory.create(uri)
val headers = HttpHeaders()

headers[HttpHeaders.CONTENT_TYPE] = webQuery.contentType
headers[HttpHeaders.CONTENT_LENGTH] = webQuery.contentLength.toString()
headers[HttpHeaders.CONTENT_DISPOSITION] = WebQuery.getContentDisposition("webquery.iqy")

val response = ResponseEntity(ByteArrayResource(webQuery.contentBytes), headers, HttpStatus.OK)
How to build and publish this library
Build this library with Gradle and publish it, e.g. locally:
./gradlew publishToMavenLocal
You can also build a base image for Docker:
Уровень сложности
Средний
Время на прочтение
9 мин
Количество просмотров 14K
Работая в IoT-сфере и плотно взаимодействуя с одним из основных элементов данной концепции технологий – сетевым сервером, столкнулся вот с какой проблемой (задачей): необходимо отправлять много запросов для работы с умными устройствами на сетевой сервер. На сервере был реализован REST API с оболочкой Swagger UI, где из графической оболочки можно было отправлять только разовые запросы. Анализ сторонних клиентов, типа Postman или Insomnia показал, что простого визуального способа поместить в скрипт массив из необходимого перечня идентификаторов устройств (или любых других элементов сервера), для обращения к ним – не нашлось.
Так как большая часть работы с выгрузками и данными была в Excel, то решено было вспомнить навыки, полученные на учебе в университете, и написать скрипт на VBA, который бы мою задачку решал.
Необходимо было:
-
получать информацию по устройствам с различными параметрами фильтрации (GET);
-
применять изменения в конфигурации по устройствам: имя, профиль устройства, сетевые лицензии и пр. (PUT);
-
отправлять данные для конфигурации и взаимодействия с устройствами (POST).
И сегодня я расскажу вам про то, как с помощью Excel, пары формул и самописных функций на VBA можно реализовать алгоритм, отправляющий любое необходимое количество REST-API запросов с использованием авторизации Bearer Token.
Данная статья будет полезная тем, кто воспользуется данным решением под Windows, но еще больше она будет полезна тем людям, которые хотят использовать данное решение на MacOS (с Excel x64) . Как вы уже догадались, ниже будут рассмотрены два варианта реализации под разные системы, так как с MacOS есть нюанс.
Часть 1. Реализация решения под Windows
GET
Начнем с самого простого: GET – запросов. В данном примере необходимо получить ответ (информацию) от сервера по заданному списку устройств.
Для реализации GET – запросов нам дано:
1) Ссылка, в которой указываются параметры запроса.
https://dx-api.thingpark.io/core/latest/api/devices?deviceEUI=
2) Заголовки запроса + Токен авторизации (Bearer Token)
—header ‘Accept: application/json’ —header ‘Authorization: Bearer
eyJhbGciOiJSUzI1NiIsInR5cCI6IkpXVCJ9.eyJzY29wZSI6WyJTVUJTQ1JJQkVSOjY3MDAiXSwiZXhwIjozNzc0MTY0MzE4LCJqdGkiOiI5OTNiOTk1Ny03NGY1LTQ5MDgtYjg4Ni0xYjk5NTVkZDQwZTEiLCJjbGllbnRfaWQiOiJkZXYxLWFwaS9lcnRoLnRlY2guZGVzayt2bGFkaXNsYXYuZ2F0Y2Vua29AZ21haWwuY29tIn0.dqybsMdVXXpQV8_ykufNZoQpSPZrVA67uieOJan-qs8W7rAImyy0552buniHXPWy6ilvdwJKPCdIKE__LghP6A
3) Параметр, указываемый в ссылке (в данном примере это идентификаторы устройств – DevEUI):
1ABCDEFF00AABBCC
0016ACC4DCF15A23
D88039FFFE954DF4
0000000000001103
0000000000001104
Имея такие данные на входе, делаем в Excel лист-шаблон, который заполняем в соответствии с тем, что имеем:
-
столбец А уходит вот значения параметров
-
столбец F уходит под ссылку-родителя
-
столбец H уходит под заголовки, где в ячейке H1 единоразово для текущего листа указывается токен:
=СЦЕП("--header 'Accept: application/json' --header 'Authorization: Bearer ";$H$1;"'")
-
столбец I уходит под URL (ссылки-дети, на основе ссылки-родителя)
=СЦЕПИТЬ($F$1;A2)
-
столбец J уходит под результат (ответ от сервера)
Далее, нам необходимо реализовать подпрограмму(макрос) отправки GET-запросов. Состоит она из четырех частей:
-
цикла, который считает количество строк для работы по листу, пробегая по столбцу А с 2 по первую пустую ячейку, чтобы у цикла был конец.
-
функции, для работы с REST API (используется стандартная, библиотека Msxml2.XMLHTTP.6.0, встроенная в Windows., поэтому сложностей с реализацией не возникает. Для MacOS есть альтернатива)
-
временной задержки, в случае если нужно отправлять запросы не сразу, после получения ответа, а задав время ожидания
-
таймером, который показывает время выполнения всего макроса после завершения
Код:
Sub GET_Request()

Dim i As Integer
Dim j As Integer
Dim objHTTP As Object
Dim Json As String
Dim result As String
Dim URL As String
Dim Token As String
a = Timer

    i = 1
        Do While Not IsEmpty(Cells(i, 1))
        i = i + 1
        Loop
    i = i - 1
    'MsgBox i

    For j = 2 To i
        Json = Range("D" & j)
        URL = Range("I" & j)
        Token = Range("H1")

        Set objHTTP = CreateObject("Msxml2.XMLHTTP.6.0")
            objHTTP.Open "GET", URL, False
            objHTTP.setRequestHeader "Content-type", "application/json"
            objHTTP.setRequestHeader "Accept", "application/json"
            objHTTP.setRequestHeader "Authorization", "Bearer " + Token
            objHTTP.Send (Json)
            result = objHTTP.responseText
            Range("J" & j).Value = result
        Set objHTTP = Nothing
        'Application.Wait (Now + TimeValue("0:00:01"))
    Next j

MsgBox Timer - a

End Sub
Привязываем подпрограмму к кнопкам для удобства и выполним скрипт. Получается:
Таким образом, скрипт проходит по столбцу I, забирая из значения каждой ячейки URL, для тех строк, где в столбце А есть значения (которые и подставляются в URL). Для удобства также сделаны кнопки очистки полей и подсветка запросов условным форматированием, в случае успешного ответа на запрос.
PUT
Чуть-чуть усложним задачу и перейдем к PUT-запросам. В данном примере необходимо изменить профиль устройства, чтобы сервер по-другому с ним взаимодействовал.
К исходным данным для GET – запроса добавляется тело запроса с ключем-значением (п4). Итого дано:
1) Ссылка, в которой указываются параметры запроса.
https://dx-api.thingpark.io/core/latest/api/devices/
2) Заголовки запроса + Токен авторизации (Bearer Token)
—header ‘Content-Type: application/json’ —header ‘Accept: application/json’ —header ‘Authorization: Bearer
eyJhbGciOiJSUzI1NiIsInR5cCI6IkpXVCJ9.eyJzY29wZSI6WyJTVUJTQ1JJQkVSOjY3MDAiXSwiZXhwIjozNzc0MTY0MzE4LCJqdGkiOiI5OTNiOTk1Ny03NGY1LTQ5MDgtYjg4Ni0xYjk5NTVkZDQwZTEiLCJjbGllbnRfaWQiOiJkZXYxLWFwaS9lcnRoLnRlY2guZGVzayt2bGFkaXNsYXYuZ2F0Y2Vua29AZ21haWwuY29tIn0.dqybsMdVXXpQV8_ykufNZoQpSPZrVA67uieOJan-qs8W7rAImyy0552buniHXPWy6ilvdwJKPCdIKE__LghP6A
3) Параметр, указываемый в ссылке (в данном примере это внутренние идентификаторы устройств – hRef):
17272
18199
17242
17245
17248
4) Тело запроса, с ключом и значением:
{«deviceProfileId»:»LORA/GenericA.1.0.3a_ETSI»}
Немного дополняем новый PUT-лист в Excel по сравнению с GET (остальное без изменений):
-
новый столбец B теперь отвечает за ключ deviceProfileId (ячейка B1), а все значения ниже за его возможные значения)
-
столбец D отвечает за формирование итогового тела сообщения в формате JSON.
=СЦЕПИТЬ("'{""";$B$1;""":""";B2;"""";"}'")
Немного поменяем макрос и вынесем его в отдельную подпрограмму:
Код:
Sub PUT_Request()

Dim i As Integer
Dim j As Integer
Dim objHTTP As Object
Dim Json As String
Dim result As String
Dim URL As String
Dim Token As String
a = Timer

    i = 1
        Do While Not IsEmpty(Cells(i, 1))
        i = i + 1
        Loop
    i = i - 1
    'MsgBox i

    For j = 2 To i
        Json = Range("D" & j)
        URL = Range("I" & j)
        Token = Range("H1")

        Set objHTTP = CreateObject("Msxml2.XMLHTTP.6.0")
            objHTTP.Open "PUT", URL, False
            objHTTP.setRequestHeader "Content-type", "application/json"
            objHTTP.setRequestHeader "Accept", "application/json"
            objHTTP.setRequestHeader "Authorization", "Bearer " + Token
            objHTTP.Send (Json)
            result = objHTTP.responseText
            Range("J" & j).Value = result
        Set objHTTP = Nothing
        'Application.Wait (Now + TimeValue("0:00:01"))
    Next j

MsgBox Timer - a

End Sub
Привяжем макрос к кнопке и выполним.
Логика абсолютно аналогична GET запросу.
POST
Для POST запросов все аналогично PUT. Только немного меняется код в части типа запроса. В данном примере на устройство отправляется команда-конфигурация с указанием тела посылки (payload_hex) и порта (fport) для конкретного устройства.
Код:
Sub PUT_Request()

Dim i As Integer
Dim j As Integer
Dim objHTTP As Object
Dim Json As String
Dim result As String
Dim URL As String
Dim Token As String
a = Timer

    i = 1
        Do While Not IsEmpty(Cells(i, 1))
        i = i + 1
        Loop
    i = i - 1
    'MsgBox i

    For j = 2 To i
        Json = Range("D" & j)
        URL = Range("I" & j)
        Token = Range("H1")

        Set objHTTP = CreateObject("Msxml2.XMLHTTP.6.0")
            objHTTP.Open "PUT", URL, False
            objHTTP.setRequestHeader "Content-type", "application/json"
            objHTTP.setRequestHeader "Accept", "application/json"
            objHTTP.setRequestHeader "Authorization", "Bearer " + Token
            objHTTP.Send (Json)
            result = objHTTP.responseText
            Range("J" & j).Value = result
        Set objHTTP = Nothing
        'Application.Wait (Now + TimeValue("0:00:01"))
    Next j

MsgBox Timer - a

End Sub
Получившаяся таблица выглядит следующим образом:
На этом часть для Windows заканчивается. Здесь все оказалось довольно просто: стандартная библиотека, простенький алгоритм перебора значений в цикле.
Часть 2. Реализация решения под MacOS и Excel 64-bit
В виду того, что работал я на двух машинах под управлением разных ОС, хотелось, чтобы решение было универсальным. В итоге, собрав по крупицам информацию по интернет-форумам с данной тематикой у меня вышло следующее решение. Принцип работы его остается схожим, а изменения были внесены в часть, где использовалась стандартная библиотека WindowsMsxml2.XMLHTTP.6.0, которой в MacOS не было по понятным причинам.
Чтобы обойти данное ограничение, был выбран единственный рабочий подход через cUrl, exec и функции. Данное решение точно работает под версией MacOS 10.14 и Excel 16.51. Функция ниже, в том или ином виде, встречается на различных форумах, однако на текущих версиях софта – не работает. В итоге, после небольших правок получили рабочий вариант:
Была отлажена функция вызова ExecShell:
Код:
Option Explicit
Private Declare PtrSafe Function popen Lib "/usr/lib/libc.dylib" (ByVal Command As String, ByVal Mode As String) As LongPtr
Private Declare PtrSafe Function pclose Lib "/usr/lib/libc.dylib" (ByVal file As LongPtr) As Long
Private Declare PtrSafe Function fread Lib "/usr/lib/libc.dylib" (ByVal outStr As String, ByVal size As LongPtr, ByVal items As LongPtr, ByVal stream As LongPtr) As Long
Private Declare PtrSafe Function feof Lib "/usr/lib/libc.dylib" (ByVal file As LongPtr) As LongPtr

Function execShell(Command As String, Optional ByRef exitCode As Long) As String
    Dim file As LongPtr
    file = popen(Command, "r")

    If file = 0 Then
        Exit Function
    End If

    While feof(file) = 0
        Dim chunk As String
        Dim read As Long
        chunk = Space(500)
        read = fread(chunk, 1, Len(chunk) - 1, file)
        If read > 0 Then
            chunk = Left$(chunk, read)
            execShell = execShell & chunk
        End If
    Wend

    exitCode = pclose(file)

End Function
И написаны отдельные функции для работы с различным методами GET / PUT / POST, которые на входе принимают URL и параметры):
Код:
Function HTTPGet(sUrl As String, sQuery As String) As String

    Dim sCmd As String
    Dim sResult As String
    Dim lExitCode As Long

    sCmd = "curl -X GET " & sQuery & "" & " " & sUrl
    sResult = execShell(sCmd, lExitCode)
    HTTPGet = sResult

End Function

Function HTTPPost(sUrl As String, sQuery1 As String, sQuery2 As String) As String

    Dim sCmd As String
    Dim sResult As String
    Dim lExitCode As Long

    sCmd = "curl -X POST " & sQuery1 & "" & " -d " & sQuery2 & "" & " " & sUrl
    sResult = execShell(sCmd, lExitCode)
    HTTPPost = sResult

End Function

Function HTTPPut(sUrl As String, sQuery1 As String, sQuery2 As String) As String

    Dim sCmd As String
    Dim sResult As String
    Dim lExitCode As Long

    sCmd = "curl -X PUT " & sQuery1 & "" & " -d " & sQuery2 & "" & " " & sUrl
    sResult = execShell(sCmd, lExitCode)
    HTTPPut = sResult

End Function
Так как мы заменяем библиотеку Msxml2.XMLHTTP.6.0 – поменялась реализация макросов в этой части: мы заменили Msxml2 на написанные выше функции и получили следующее:
Код:
'GET-запросы
Sub SendGETRequest()

Dim i As Integer
Dim j As Integer
Dim result As String
Dim URL As String
Dim Auth As String

a = Timer

    'Подсчет заполненных ячеек первого столбца
    i = 1
        Do While Not IsEmpty(Cells(i, 1))
        i = i + 1
        Loop
    i = i - 1

    'Цикл, который отправляет запрос от 2 до последнего элемента
    For j = 2 To i
        URL = Range("I" & j)
        Auth = Range("H" & j)
        result = HTTPGet(URL, Auth)
        Range("J" & j).Value = result
        'Application.Wait (Now + TimeValue("0:00:01"))
    Next j

MsgBox Timer - a

End Sub


'PUT-запросы
Sub SendPUTRequest()

Dim i As Integer
Dim j As Integer
Dim result As String
Dim URL As String
Dim Auth As String
Dim Message As String


a = Timer

    'Подсчет заполненных ячеек первого столбца
    i = 1
        Do While Not IsEmpty(Cells(i, 1))
        i = i + 1
        Loop
    i = i - 1

    'Цикл, который отправляет запрос от 2 до последнего элемента
    For j = 2 To i
        Message = Range("D" & j)
        URL = Range("I" & j)
        Auth = Range("H" & j)
        result = HTTPPut(URL, Auth, Message)
        Range("J" & j).Value = result
        'Application.Wait (Now + TimeValue("0:00:01"))
    Next j

MsgBox Timer - a

End Sub


'POST-запросы
Sub SendPOSTRequest()

Dim i As Integer
Dim j As Integer
Dim result As String
Dim URL As String
Dim Auth As String
Dim Message As String

a = Timer

    'Подсчет заполненных ячеек первого столбца
    i = 1
        Do While Not IsEmpty(Cells(i, 1))
        i = i + 1
        Loop
    i = i - 1

    'Цикл, который отправляет запрос от 2 до последнего элемента
    For j = 2 To i
        Message = Range("D" & j)
        URL = Range("I" & j)
        Auth = Range("H" & j)
        result = HTTPPost(URL, Auth, Message)
        Range("J" & j).Value = result
        'Application.Wait (Now + TimeValue("0:00:01"))
    Next j

MsgBox Timer – a
Итог
В итоге, у меня получилось аналогичное windows по работе и функционалу решение для MacOS c использованием Excel 64-bit.
На просторах интернета я не нашел какого-то сборного и единого описания, только фрагменты кода и подходов, которые в большинстве случаев не работали полностью или частично. Поэтому решил объединить все в рабочее решение и выложить на хабр для истории.
На текущий момент я все еще не встретил иного решения, которое бы позволяло в пару кликов копипастить тысячи идентификаторов и параметров из excel и массово их отправлять на сервер. Надеюсь, кому-то пригодится 
Если такие сторонние решения есть, а я не в курсе, и все можно было сделать проще, быстрее и изящнее – делитесь опытом в комментариях.
Примечание:
Файл-пример, который можно потыкать, пока жив сервер и «бессрочный» токен:
https://disk.yandex.ru/d/y7EVtn8afM4QPg
Открытое описание API, если кому-то будет любопытно

