
Excel incorporates Power Query (also called Get & Transform) technology to provide greater capability when importing, refreshing, and authenticating data sources, managing Power Query data sources, and shaping the data into a table that fits your requirements.
Note: Viewing and refreshing queries is available to all Office 365 Subscribers.
Additional functionality is available to all Office 365 Subscribers with Business or Enterprise plans.
You can refresh data sources on Excel for the web:
-
To refresh all data sources in a workbook, select Data > Refresh All.
-
To refresh all queries in the workbook, select Data > Queries, and then in the Queries pane, select Refresh All
 .
. -
To refresh a specific query, select Data > Queries, and then in the Queries pane, next to the query name, select Refresh
. -
To refresh a specific query group, select Data > Queries, and then in the Queries pane, next to the group name, select Refresh
.To refresh a specific PivotTable connected to a query, select a cell in the PivotTable, and then select Data > Refresh.
 .
.For more information about supported data sources in Excel for the Web, see Power Query data sources in Excel versions.
You can view your queries and related details in the Queries task pane. You can also perform various grouping tasks to better organize your queries. For more information, see Manage queries.
Need more help?
Excel Web Query — What in the world is that? If you are like the other 99.9% of MS Excel users, you probably have never heard of microsoft excel web queries (note: statistic made up).
Excel web queries are powerful! Web queries are basically like having a web browser built into Excel that attempts to format the content, putting individual pieces of data into separate cells. You can then use Excel formulas (like =A1/B2) to work directly with the data you’ve downloaded. And you don’t have to know anything about perl, cgi, php, javascript, etc.
Getting Started with Sample Excel Web Queries
The example web queries that come with Excel are usually for importing stock quote data into Excel. For more information about using web queries to download Stock Quotes into Excel, take a look at the Excel Stock Quotes Template.
Although importing stock quotes into Excel happened to be the reason I came across Excel web queries, I have since found many other ways to use them.
It is not the web query itself that is the secret that this article is about. Instead, it’s the ability to make a DYNAMIC Web Query!
By dynamic, I’m not talking about using «refresh» to update the data. What I mean is the ability to change the parameters of the web query, such as typing in a new stock symbol into a cell and having the table update automatically.
If you find yourself using the internet to gather data by filling out forms and copying and pasting data over and over, an excel web query might be the solution to your monotonous woes. It’s not always going to be better, and it’s not always going to work, but it’s worth a try, especially since a simple web query could boost your productivity!
Excel Web Query «.iqy» Files
The real key to creating a dynamic excel web query is to create your own «.iqy» file. In it’s basic form, the «.iqy» file is simply a TEXT file with three main lines:
WEB 1 https://www.thedomain.com/script.pl?paramname=value¶m2=value2
You can create the file using a simple text editor! Most text editors will save a new file with the .txt extension, but you can change the extension to .iqy after you create your text file. If it is already a .iqy file and you want to edit it, you may need to right-click on it to select NotePad or WordPad (or some other text editor) to open it.
The third line is the important one! It’s simply the URL or web page address. Notice that it contains two parameters. If you don’t know what parameters are for, just browse the web for a while and pay attention to what shows up in the address bar of your browser. Go to Google.com for instance, and look up «excel web query».
Parameter name / value pairs are listed after the «?» in the URL and are separated by an «&«.
Make the Web Query Dynamic
To make the query dynamic, replace the value of each parameter in the web query file (queryname.iqy) with:
["paramname","Enter the value for paramname:"]
Want to see how this would apply to a Google search? The form that I used above consists of HTML code that looks like this:
<form action="https://www.google.com/search">
<input type="text" name="q" value="excel web query">
<input type="submit" value="Search Google">
</form>
Notice that «q» is the name of the parameter, and the action tells you what the URL should be. The dynamic web query file for a simple google search would look like this:
WEB
1
https://www.google.com/search?q=["keyword","Enter the Search Term:"]
Let’s Create a Web Query
- Open up a text editor and copy the Google example. Save the file as GoogleSearch.iqy
- Open up Excel and enter a search term in Cell B3
- Open the web query file you just saved (GoogleSearch.iqy) by double-clicking on the file, or open Excel and go to Data > Existing Connections > Browse for More.
- When prompted for the search term, enter =B3. If that doesn’t work, just enter a search term for now.
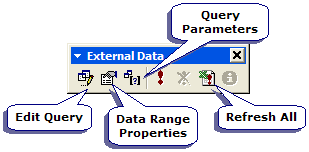
Play around with the web query options and properties by right-clicking within the query results and selecting Parameters or Data Range Properties or Edit Query.
When you go to Edit Query, you can choose to select a specific portion or table within the page or the entire page (by clicking on one of the yellow arrow boxes in the preview). Then, you can save your new query as a .iqy file and look at what parameters it uses.
WEB
1
https://www.google.com/search?q=["q","Enter the Search Term:"]

Selection=EntirePage
Formatting=RTF
PreFormattedTextToColumns=True
ConsecutiveDelimitersAsOne=True
SingleBlockTextImport=False
DisableDateRecognition=False
DisableRedirections=True
When you have the query looking just the way you want it, save the Excel web query (an icon or button for saving the web query is in the «Edit Query» window. When you save the new query, your «.iqy» file will include the options you have selected.
Other Example Web Queries
Below are a few examples of .iqy files that you might try. Websites often change, or they may change the way their APIs work, so these examples might not work forever.
Example 1: Get historical daily stock prices from Investopedia. Note that the start and end dates are text, so if you are setting up date parameters in Excel, the cells you link to need to be text rather than date values. This query uses 3 parameters: Symbol, StartDate, EndDate.
See this article for other sources for historical stock quotes.
Example 2: Get data from a published Google Spreadsheet. See my article Excel Stock Quotes in Excel to see how you can publish a Google Spreadsheet and then use a web query to get the data into Excel.
Become a Web Query Wiz
Take a few minutes to think about what mundane or repetitive tasks YOU do on the internet, particularly cases where you go to the same sites over and over to get data. If you find yourself copying and pasting or re-typing information into Excel so that you can perform calculations with the data, you may have found an ideal use for an excel web query.
There are two main things that you need in order to become a Web Query Wiz.
- A working knowledge of Excel formulas. By this, I mean the ability to use text-manipulation and other formulas. A GREAT book for both learning and reference (and the one that I use all the time) is John Walkenbach’s «Excel Formulas». If you are an avid Excel user, it will probably be the best investment you will make for a long time! The only problem I have with the book is that I need TWO copies — one for work and one for home.
- A working knowledge of HTML. This is the hard part unless you are a web designer or programmer. The articles listed in the side bar will help to some extent, but ultimately this issue was the reason why I didn’t write a more detailed tutorial. Something that will be a great help is to learn about how <form> tags work. Here is my favorite reference.
If you found this article interesting, be sure to check out some of my other Excel tips.
— Jon Wittwer, President
Vertex42, LLC
Web queries offer a handy way to import data from selected tables into a worksheet—but Excel isn’t as accommodating as it should be, especially when it comes to parameters. These tricks will let you work around Excel’s limitations so that you can get the data you need.
An Excel Web query allows you to bring data from a Web site
into an Excel worksheet. It will find any tables on the Web page and let you
select the ones containing data you want to put into your worksheet, allowing
for dynamic updates from the Web page. Web queries are not just useful for
pulling information from standard HTML pages. They can also be used quite
nicely in situations where a standard ODBC connection would be difficult or
impossible to create or maintain, such as a worksheet that’s used by
salespeople around the country.
We’re going to work through a basic example to get a feel
for how Web queries operate. Then, we’ll look at a couple of tricks that allow
you to work around some Excel limitations and see how a little VBA code can
give you the results you want. You can download this Excel workbook to see a
sample implementation of these techniques.
Getting started
To demonstrate the process, we’re going to start with a
simple Web query using Yahoo! Finance historical stock prices. This is a great
example because the data we’re interested in is presented in a plain, tabular
format. Another advantage is that the URL contains the stock symbol (GOOG, in
this case), so it will be easy to manipulate via a VBA macro, and it has little
confusing information in it. Finally, this Web query doesn’t put important
information in images or through links.
To create the Web query:
- Select
the first cell in which you want results to appear. - Choose
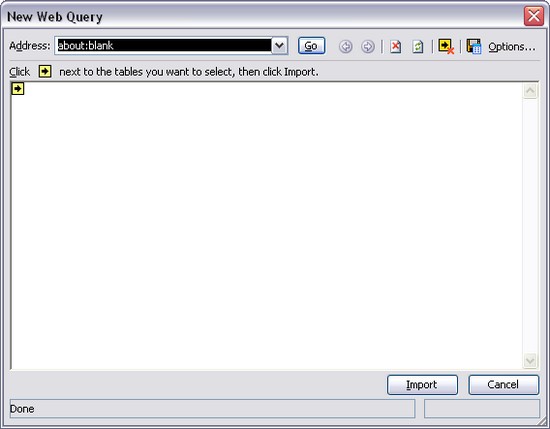
Data | Import External Data | New Web Query to open the dialog box shown in Figure A.
|
Figure A |
 |
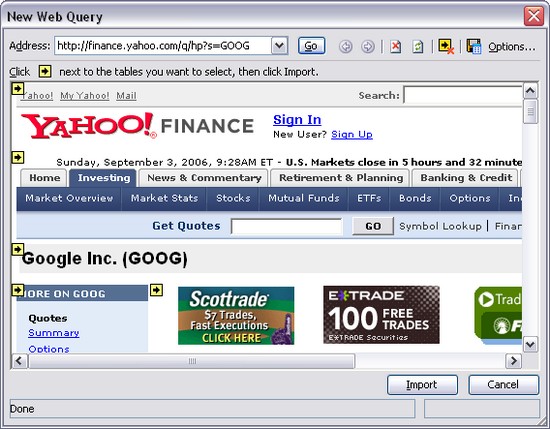
- Enter
the URL to query in the Address area and click the Go button (Figure B).
|
Figure B |
 |
- Select
the table you want to use for the query (Figure
C).
|
Figure C |
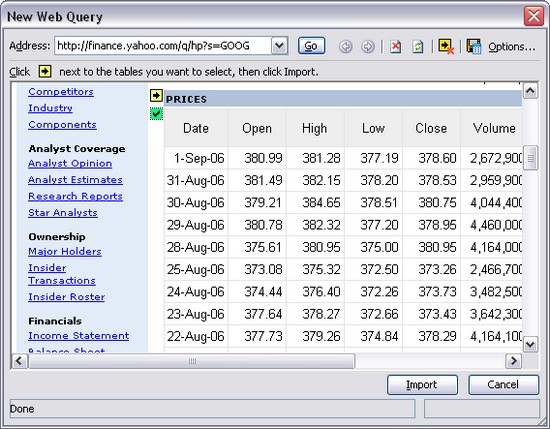 |
- Click
the Import button.
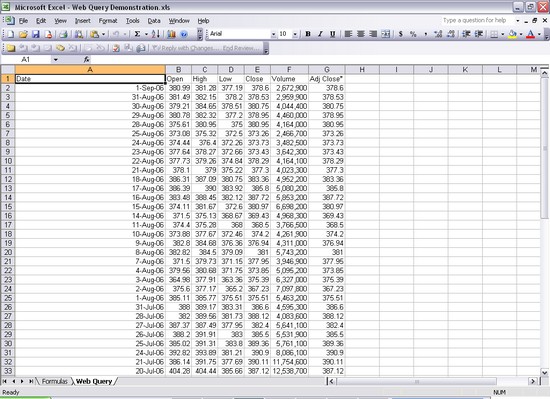
That’s it. The data is now in your worksheet (Figure D).
|
Figure D |
 |
Customizing the query
After you create a Web query, you can customize it to meet
your needs. To access Web query properties, right-click on a cell in the query
results and choose Edit Query. (You can also click Edit Query on the External
Data toolbar or choose Data | Import External Data | Edit Query.) When the Web
page you’re querying appears, click the Options button in the upper-right
corner of the window to open the dialog box shown in Figure E. The options here allow you change how the query interacts
with the Web page itself.
|
Figure E |
 |
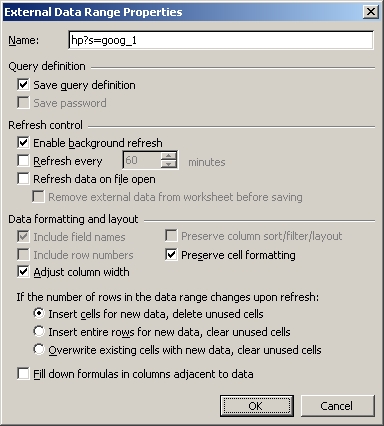
In addition, you have the same choice of Data Range
options that you have with other external data queries, such as ODBC queries. Just
right-click on a cell in your query results and choose Data Range Properties
(or click Edit Query on the External Data toolbar or choose Data | Import
External Data | Data Range Properties) to open the dialog box shown in Figure F. You’ll probably want to
change the Data Range’s name from the default to a name you
can easily access through a macro. In this example, we’ll rename the Data Range
to Stock Prices.
|
Figure F |
 |
Parameters
Unfortunately, working with parameters is not as straightforward
as it could be. The wizard that created the sample query above doesn’t allow
you to put in parameters. When it fetches the Web page, it will escape the parameter
identifiers in the URL and return a page without the right results. For many
Web pages, this prevents you from selecting the table you want to use for the
import, so you’ll need to work around this Excel limitation. The Web query
parameters let you use set values, get the values from a worksheet range,
prompt the user for input, or set values programmatically via VBA macros.
One workaround is to create your query as outlined above and
then run a VBA macro to dynamically change the Connection property of the query
to provide the correct URL for Web pages that use the GET data. In this
example, we could use code similar to
Listing A
.
For Web pages that use GET
data, this is a perfectly fine solution. For Web pages that use POST data, this
is not a solution. Those scenarios will require a little bit of manual labor. You’ll
need to open a text editor and create an IQY (Internet Query) file as a plain
text file to use as the basis for your data import. The IQY file should have four
lines:
Type of Query
Query Version
URL
POST Parameters
The Query Type line should just be WEB and the Query Version
line can be whatever you want (1 is just fine). The URL line should be the URL
itself. The parameters should be in the following format:
Parameter1=Value1&Parameter2=[“Value 2”, >”Please input a value for Parameter 2: “]
This is where you can work a couple of tricks. With that
sample parameter line, “Value1” will be passed as the value for Parameter1, but
the user will be prompted with the phrase “Please input a value for Parameter
2:” to provide the value for Parameter2. This works with GET as well as POST
queries. The prompt text is optional.
In this example, we just need a single parameter–the stock
symbol. So our Web Query file looks like this:
WEB
1
http://finance.yahoo.com/q/hp
s=[“Stock Symbol”]
Once you’ve created the query file, you can use it in the
worksheet. Choose Data | Import External Data | Import Data and point the Open dialog
box to the query file you created. You’ll be prompted to specify the stock
symbol to be used. Your query results will then show up in the worksheet.
One final trick is to use this query file to fool the import
wizard into allowing you to select the exact table of desired data and still
use parameters. Once the query file has been loaded, you can edit the query in
Excel. The query won’t work because the editor won’t pass our values along
properly. It will, however, show you the Web page, and from there you can
navigate or search or whatever you need to do to see the page with the table so
you can select it. Once you’ve selected the table (just like creating a Web
query through the wizard), you can edit the parameters to use the desired methodology
(prompts, hard-coded values, or data from a worksheet range). You can also now
set these values through VBA code.
Once the Web Query has been created from the file, you no
longer need the file. It doesn’t have to be distributed with the Excel worksheet.
Working with the query through
VBA
The DataRange gets added to the QueryTables collection, which is a
member of the Worksheet object, and can be referenced by index
number or by the DataRange name. In our
example, ThisWorkbook.Sheets(“Web Query”).QueryTables(“Stock
Prices”) refers to our Web query. The most common use of VBA with
the Web Query is to have its Refresh()
method force the data to be refreshed from the source and reloaded into the worksheet.
You can also use the SetParam() method on the Parameter property of the QueryTable object to manually set (or
prompt the user to input) the value of the parameter (the Value property is read only). The sample piece of code in
Listing B
takes the stock symbol as a string, puts it into the
parameter, and then updates the query’s data.
Excel-Web-Query
A library for web queries as used by Microsoft Excel.
What is a web query and what is this library for?
A web query is a file that tells Microsoft Excel where and how to fetch data from the web.
This library lets you create web queries in the appropriate format. This allows your applications
to wrap URLs in a way that Microsoft Excel understands. Microsoft Excel can then import data by querying
these URLs.
How to use web queries in Microsoft Excel
- Create a web query and save it with the file extension «iqy»
- Open Microsoft Excel, go to the «Data» menu, select «Get External Data» and
«Run Web Query» / «Run Saved Query», select your web query file and import it - Microsoft Excel will now automatically import the response from the URL in your web
query whenever it imports external data
How to use this library
Add Jitpack as a repository to your project and add a dependency for excel-web-query in order to
use this library (the code snippet below uses Gradle’s Kotlin DSL):
repositories {
    maven { url = uri("https://jitpack.io") }
}

dependencies {
    implementation("com.github.spartusch:excel-web-query:latest.release")
}
The actual usage of the library is straightforward:
Create a new WebQuery by calling WebQueryFactory.create.
This library is written in Kotlin but tested with Java and Kotlin.
Example on how to create a ResponseEntity for Spring MVC
Java
final var webQuery = WebQueryFactory.create(uri);
final var headers = new HttpHeaders();

headers.set(HttpHeaders.CONTENT_TYPE, webQuery.getContentType());
headers.set(HttpHeaders.CONTENT_LENGTH, String.valueOf(webQuery.getContentLength()));
headers.set(HttpHeaders.CONTENT_DISPOSITION, WebQuery.getContentDisposition("webquery.iqy"));

final var response = new ResponseEntity<>(new ByteArrayResource(webQuery.getContentBytes()), headers, HttpStatus.OK);
Kotlin
val webQuery = WebQueryFactory.create(uri)
val headers = HttpHeaders()

headers[HttpHeaders.CONTENT_TYPE] = webQuery.contentType
headers[HttpHeaders.CONTENT_LENGTH] = webQuery.contentLength.toString()
headers[HttpHeaders.CONTENT_DISPOSITION] = WebQuery.getContentDisposition("webquery.iqy")

val response = ResponseEntity(ByteArrayResource(webQuery.contentBytes), headers, HttpStatus.OK)
How to build and publish this library
Build this library with Gradle and publish it, e.g. locally:
./gradlew publishToMavenLocal
You can also build a base image for Docker:
In other documents we have show you how to use the Visual Crossing Weather Data Services capability to do Query API loading of weather data directly into Excel.
There are three primary Excel use cases for Weather Data.
1) Load a fixed query set of data into a table and reference that table for further analysis.
Loading Weather Data into Excel via Web Query URL
2) A variation on the fixed query load is the 15-day forecast query which is dynamically always showing the next 15 days from “today”. So while the URL Query doesn’t change, the users will add a refresh option either manually or on load of the spreadsheet.
How to automaticall refresh weather data in Microsoft Excel
3) Dynamically pass in data to replace parameters in the API Query string based upon Excel data. Users will want to pass in locations, lists of locations, dates and other parameters. In this document we will focus on this option.
The Initial Query String
First let’s repeat what we have done in previous queries and visit the Visual Crossing Query Builder page and build a simple one-location query for Forecast data and load it into Excel. Follow along with steps from link found in number 1 above which uses the following page:
https://www.visualcrossing.com/weather/weather-data-services
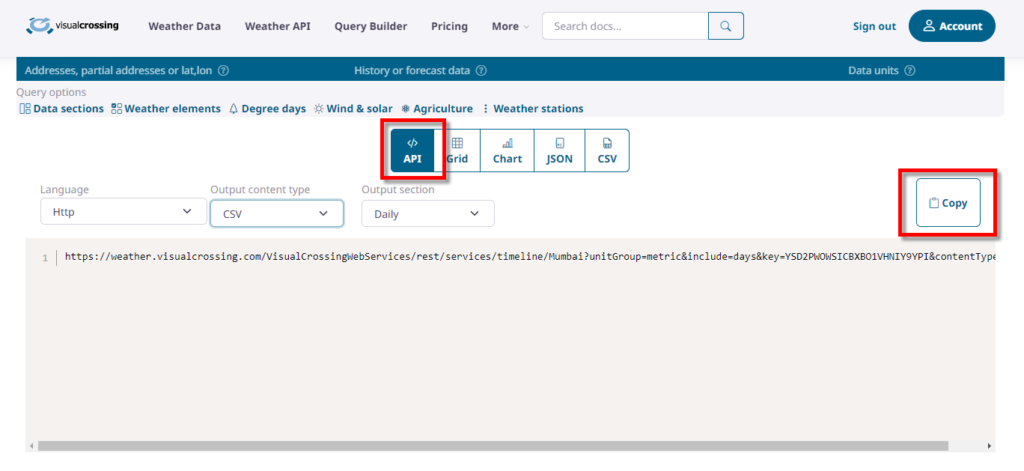
Once you have a successful forecast data query, switch to the API tab to see our query string. Make sure the language drop down is set to ‘Http’ and the Output content type one to ‘CSV’. Click on the ‘Copy’ button to put the string in our system copy/paste buffer:
Next we load it into Excel by visiting the “Data” tab, selecting the “From Web” option and pasting in our URL String copied from the Visual Crossing Weather Data Query Builder above.
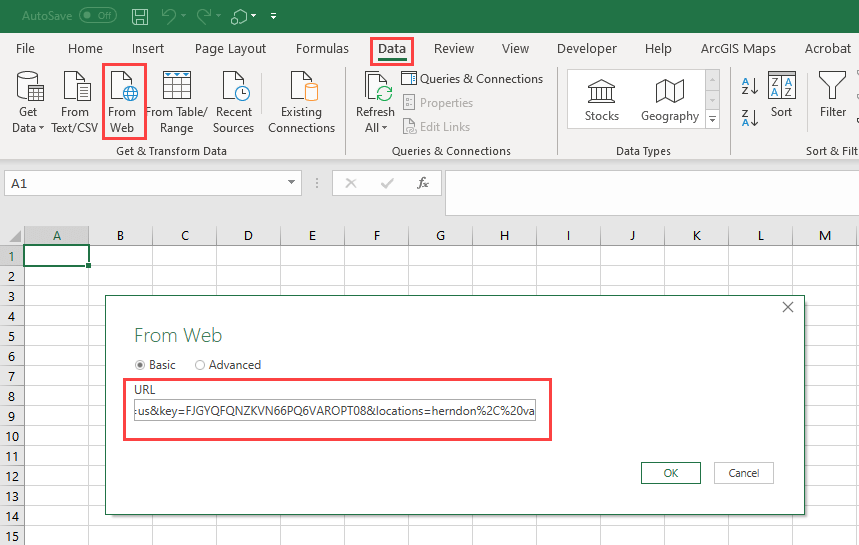
Click ‘OK’ and ask to Load the data which will give us the following working query:
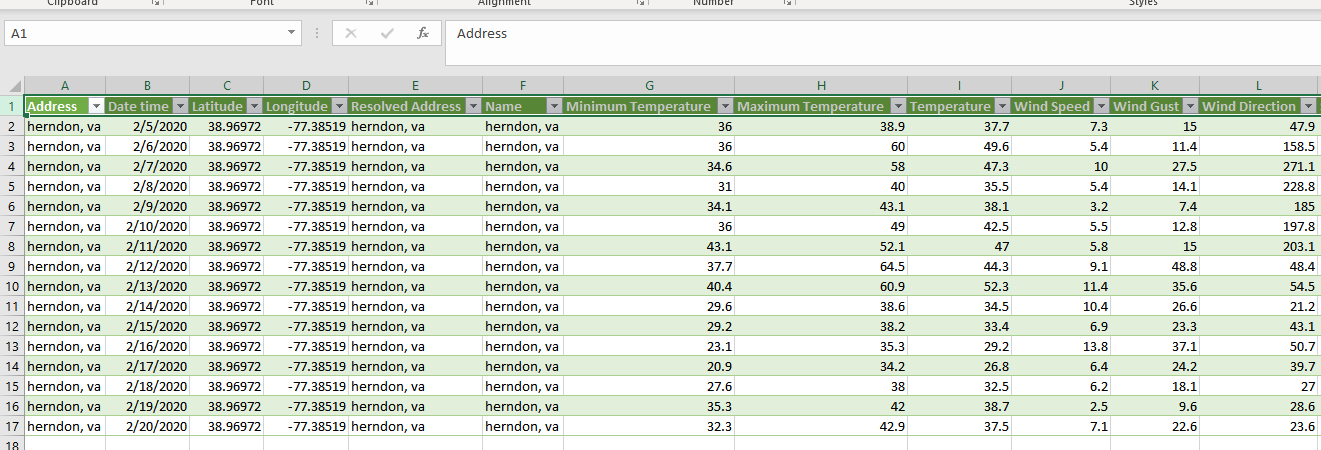
This is the step where the other document ends but here we will begin to use parameters to customize this query.
Preparing Data for the Query
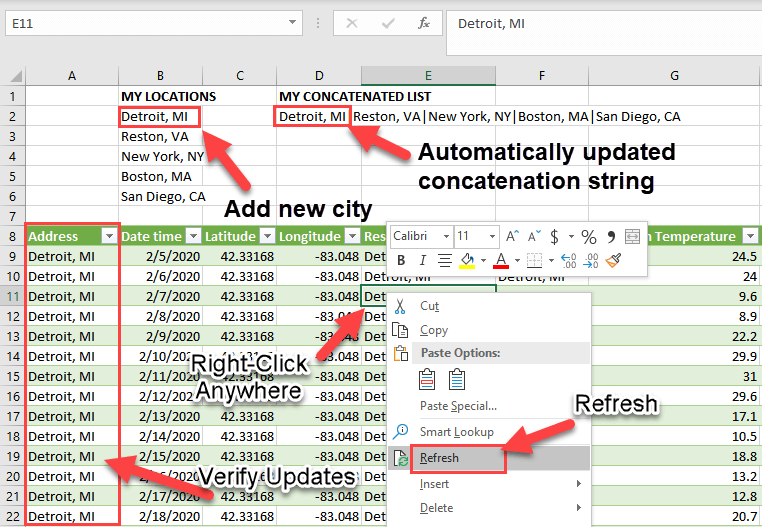
The first step is to insert some blank rows at the top of the page and enter in a list of 5 locations. This is just an area of cells with no real definition for now but will serve as our data entry area so that our users can simply update this list to get weather for these locations. To build this area simply type in the cells as seen below. Please note that we put a header “MY LOCATIONS” but this is not necessary and should not be in the data table we define. It is just for clarity.
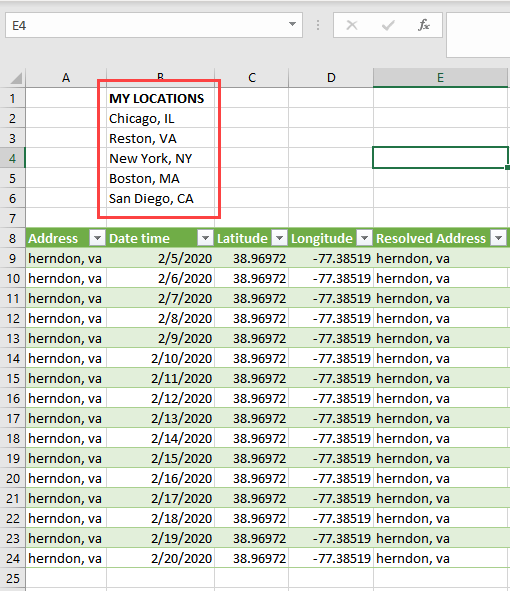
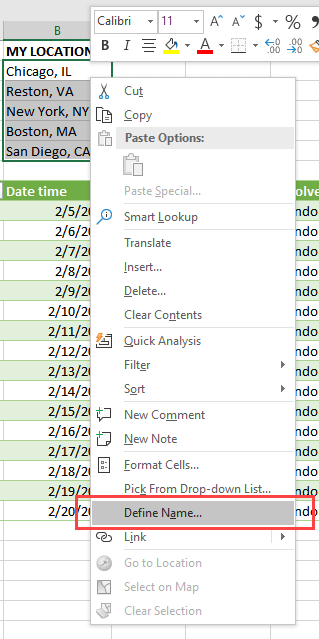
Select the list of Cities (without the header) and create a defined table name for this area. The easiest is to Right-click on the locations selection and use the “Define Name” option. We will name our table “RAWLIST” for now.

This range is now defined and can be accessed from anywhere simply by referencing RAWLIST. However, if you prefer you can also use your own literal range definitions of cells such as “b2:b6”.
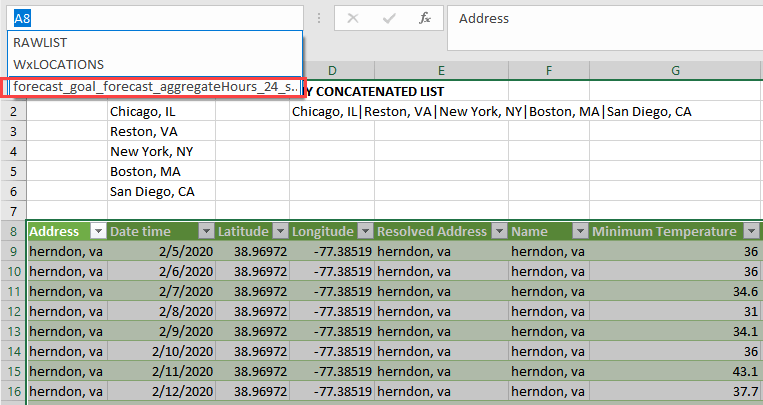
Now it is our job to make sure this list can be insert into the query so that we can retrieve multiple locations dynamically. The first step is to concatenate the list into a string that can be inserted into the URL. We want our list of city cells to be in a single string such as “Chicago, IL|Reston, VA|New York, NY”. Please note that the query has to have a list that is delimited by the pipe “|” symbol.
To do this we will use the TEXTJOIN function in Excel. (Please note that there many ways to create this same list in Excel so feel free to use your favorite technique) Click into a new cell and insert the following function.

For our example it looks like the following:
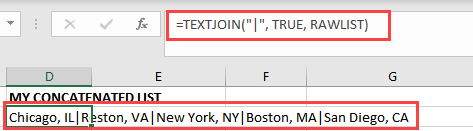
The first Parameter is the pipe symbol in quotes to define our delimiter, we put in “TRUE” as the second paramter to ignore any empty cells and we reference our table range called “RAWLIST” as the final parameter which is the list of locations.
Please note in the image above that we have a nicely joined single string ready to insert into the query. We will again right-click on our cell and give it a range name using the “Define Name” feature. We will call this range “WxLOCATIONS”.
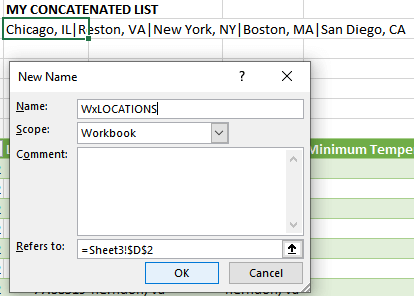
NOTE: Previously we used the named range feature for ease of use, but for the next exercise it is required that our concatenated list has a name. We will refer to this name in the query steps.
Inserting Parameters into the Query
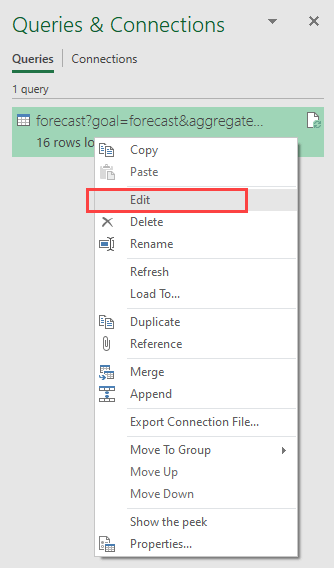
Lets starting by selecting our query that we made in step one, the easiest way to do this is to select it from the list of ranges as seen below or use the “Queries & Connections” window to select it.
On the right hand side of the sheet you should now see the “Queries & Connections” window. Select our query and right-click to choose to ‘Edit’ this query.
The query editor will open up as seen below and we have chosen the ‘Advanced Editor’ view:

Once opened you can see the text of query. If you look closely you will see the string that we copied from the Visual Crossing Weather Query Builder in the ‘Source’ definition. But notice that our string is only part of the query which also defines columns, types and many other pieces of metadata. We must be careful to only edit the portion we pasted in.
The first thing we need to do is to define a variable that will contain our concatenated list. To do this enter the following text above the ‘Source’ entry:
WxLoc=Excel.CurrentWorkbook(){[Name="WxLOCATIONS"]}[Content]{0}[Column1],
This new line is telling the query to define “WxLoc” as the contents of the WxLOCATIONS range from the current workbook. It is asking for the first row (row zero) of the default ‘Column1’ name. We only have one row and one column for our concatenated string anyway. Please make certain to have the comma at the end of the text to indicate the end of your variable Definition for “WxLoc”. Here is what your query should look like:

The last edit is to our original query string. Find the following text in the ‘Source’ definition:

The string says “Herndon, VA” with some escape characters, this is becauseour original query was a hardcoded query to one location at Herndon, VA. Now we need to make the locations definition dynamic. Simply replace the text after the “locations=” and before the closing parenthesis with the following:
"&WxLoc&" "
and will now look like:
locations="&WxLoc&" ")
We are basically saying that the first part of our query string + ‘OUR LOCATIONS LIST’ + last part of our query string is our new string. Effectively we are concatenating a variable into the query string by cutting out the hardcoded “Herndon, VA” string and inserting our dynamic concatenated string.
Once this is in place, the query will now dynamically grab our locations list and use it in the query to the Visual Crossing Weather Engine whenever the query is refreshed.
We can now click ‘Done’ on this query editor and the system will validate your string changes. If you get an error just double check your work and naming. Usually a misplaced quote or comma is the culprit. If successful you may see a warning from the system that looks like this:
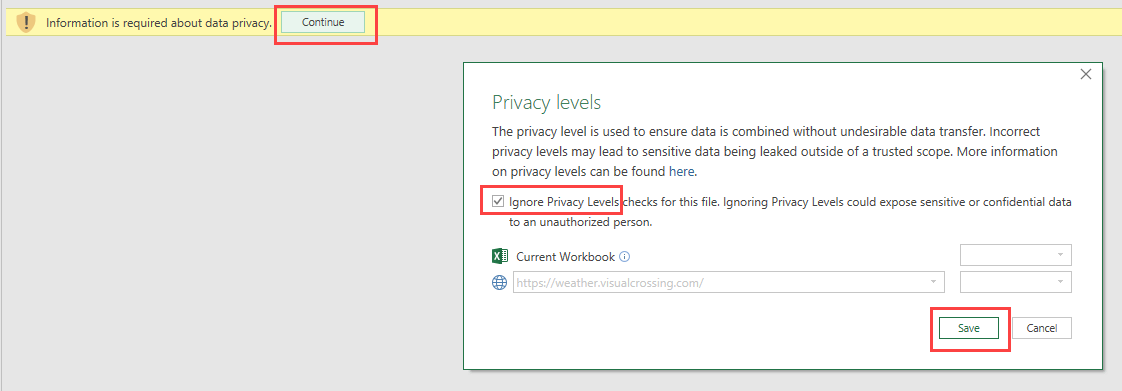
This warning is Excel telling you that it is sending your data (list of locations) to a remote server and it needs your permission to do this. You can set the permission levels that serve your scenario best. For this exercise we will choose to Ignore the Privacy Levels, Save it and click ‘Continue’ on the warning bar.
Now we can see the results of our new query in the query preview window:
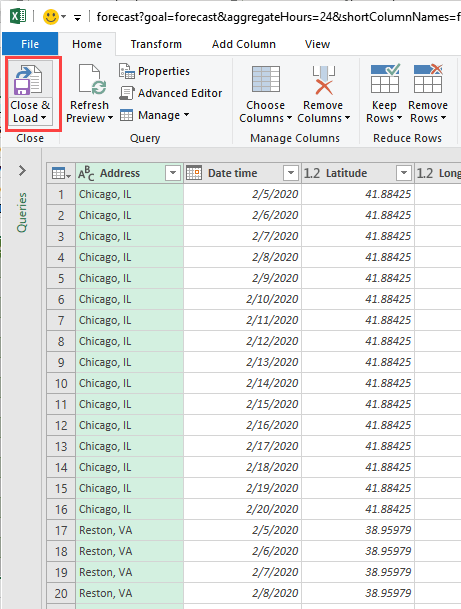
We can now verify that it is returning weather data for our list of cities. Just click ‘Close and Load’ to finish the query. Now we are back in our workbook and we can see the results of our work.

Test and Add Features
To test our work further you can update the list and then click ‘Refresh’ on the query and it will update the data live.
Please remember to set your refresh policy. Above we simply right clicked on the query results and chose ‘Refresh’. Our document here describes the common ways to refresh the query data automatically:
How to automatically refresh Weather Data in Microsoft Excel
However, this scenario may call for more user interaction such as putting in a button or dynamically detecting changes in your table range. All of which can be enabled easily using VBA objects. We found the simplest variation was to use the ‘Developer’ tab on the Ribbon Bar (may need to be added to the ribbon) and add a button then record a refresh Macro for the button to activate. There are many other enhancements here such as adding dynamic checklists of locations, hiding the concatenation string and much more, but we will leave that to the Excel expert in you to explore.