
The instructions provided in this article are sufficient for creating an automated integration. But please note that we are not responsible for the outcome if you use the instructions incorrectly, specify incorrect settings, or if there are changes in the app’s API. If you need help with the setup, we can offer this premium integration at an additional fee.
An API is a ‘bridge‘ through which one app obtains/sends information from/to another app. This means that you can load miscellaneous data from your source app to your Excel workbook using the REST API. Moreover, you can even schedule data loads via the API to Excel sheet without any VBA coding! Read our guide to learn how you can do this.
How to use API in Excel – options you have
Basically, you have three options to link API to Excel:
- Power Query: You can query data from APIs using Excel’s built-in tool.
- Coupler.io: This third-party importer will let you automate data exports via APIs to Excel on a custom schedule.
- VBA: This is a code-based option that is suitable for tech-savvy Excel users.
Let’s check out each option in action so that you can make the best choice for your needs. For this, we asked Richard, a cryptocurrency enthusiast, to help us.
Richard wants to analyze the growth tendency of the top crypto coins. To do this, he needs to load data from CryptoCompare using their JSON API.

For testing, Richard will use the following API URL that will load data about the price for five cryptocoins: Bitcoin, Ethereum, Terra, Binance Coin, and Tether.
https://min-api.cryptocompare.com/data/pricemulti?fsyms=BTC,ETH,LUNA,BNB,USDT&tsyms=USD,EUR&api_key={enter-api-key}
Note: This API requires authorization, so Richard has already generated a free API key.
So, let’s start with the option that allows you to schedule exports via API to Excel.
How to regularly pull API data into Excel
For scheduled exports of data from API to Microsoft Excel, Richard will use Coupler.io. It’s a solution that allows you to connect to multiple sources and load data from them to Excel, Google Sheets, or BigQuery. You can export data on demand and automate import on a custom schedule, such as every day or every hour.
For Richard’s case, we’ll use the JSON integration with Excel. Let’s see how it works.
Excel API example with Coupler.io
Sign up to Coupler.io with your Microsoft account. Click Add new importer – this is a boilerplate to set up your connection to API. Choose JSON as a source application and Microsoft Excel as the destination application. Then complete the following steps to load data from API to Excel sheet.
Source
- Insert the API URL to the JSON URL field. Click Continue.
https://min-api.cryptocompare.com/data/pricemulti
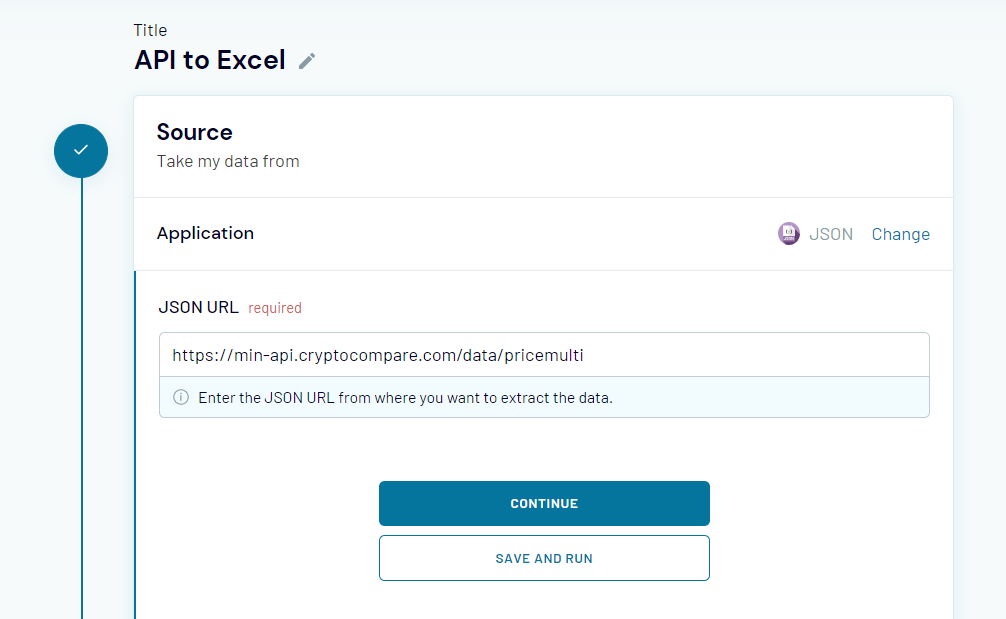
Note: You’ve noticed that this API URL differs from the one mentioned in the beginning. It lacks attached query strings because Coupler.io provides separate fields to specify request headers and URL query parameters. So, Richard will use those to demonstrate how they work.

- Request headers – here, you can apply specific headers to your request, such as Authorization, as Richard did.
authorization: Apikey {enter-api-key}
- URL query parameters – this field is for query parameters for your requests to the API. In Richard’s case, he specified the following strings:
fsyms: BTC,ETH,LUNA,BNB,USDT
tsyms: USD,EUR
Other fields, Request body, Columns, and Path are optional. You can learn more about them in the Coupler.io Help Center.
Note: You can find information about the parameters used in those fields in the API documentation of your application. Pay attention to the information about API authentication and details of API endpoints – these are usually located in separate sections.
Now you’re ready to Jump to the Destination Settings.
Destination
- Select a workbook on OneDrive and a worksheet where the data will be loaded. You can select an existing Excel worksheet or create a new one. Click Continue.

Note: Optionally, you can change the first cell for your imported data range, change the import mode, and add a column that contains the date and time of the last update.
Clicking on Save and Run loads the data from API to Excel right away. But Richard needs to automate this export on a recurring basis, so he needs to complete another step.
How to get data from API in Excel recurrently
You can configure the schedule for your JSON importer during the initial setup or at any other time. For this, you need to toggle on the Automatic data refresh and configure the frequency:
- Interval – from every month to every 15 minutes.
- Days of week – select the days you want to have the importer run.
- Time preferences – select the time when you want to have your data importer from the API.
- Schedule time zone – do not forget to specify the time zone for your dataflow.

That’s it! Let’s check out the results of the records pulled from API to Excel sheet?

The imported data does not look very neat. Nevertheless, you can create a separate sheet where the data will be transformed to the format you want and link Excel sheets. Therefore, every time Coupler.io refreshes your data, it will be automatically refreshed on the linked sheet.
Connect API to Excel with Power Query
Power Query is a data transformation engine within Excel. As well, it allows you to query data from different sources including REST APIs. Here is what you need to do to link API to Excel.
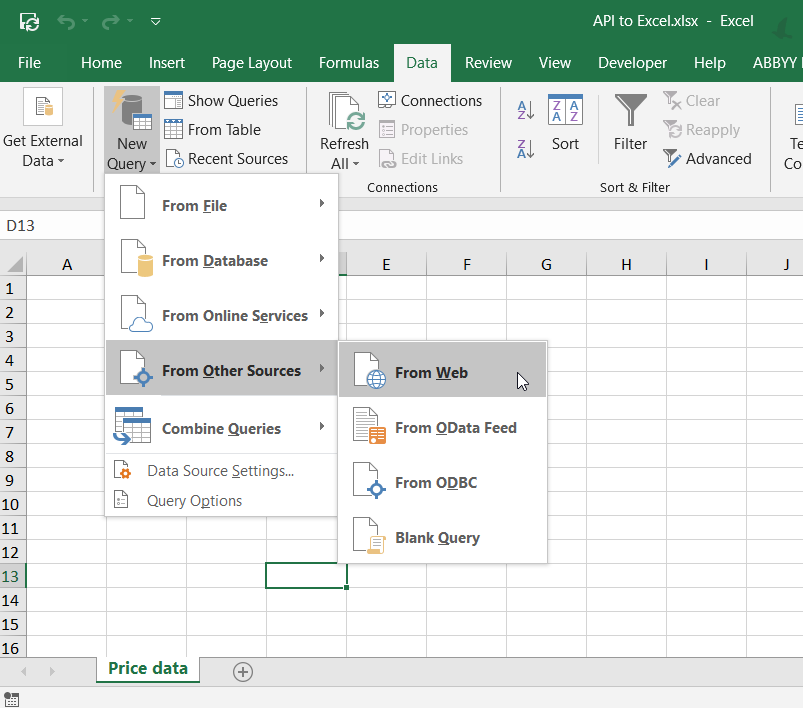
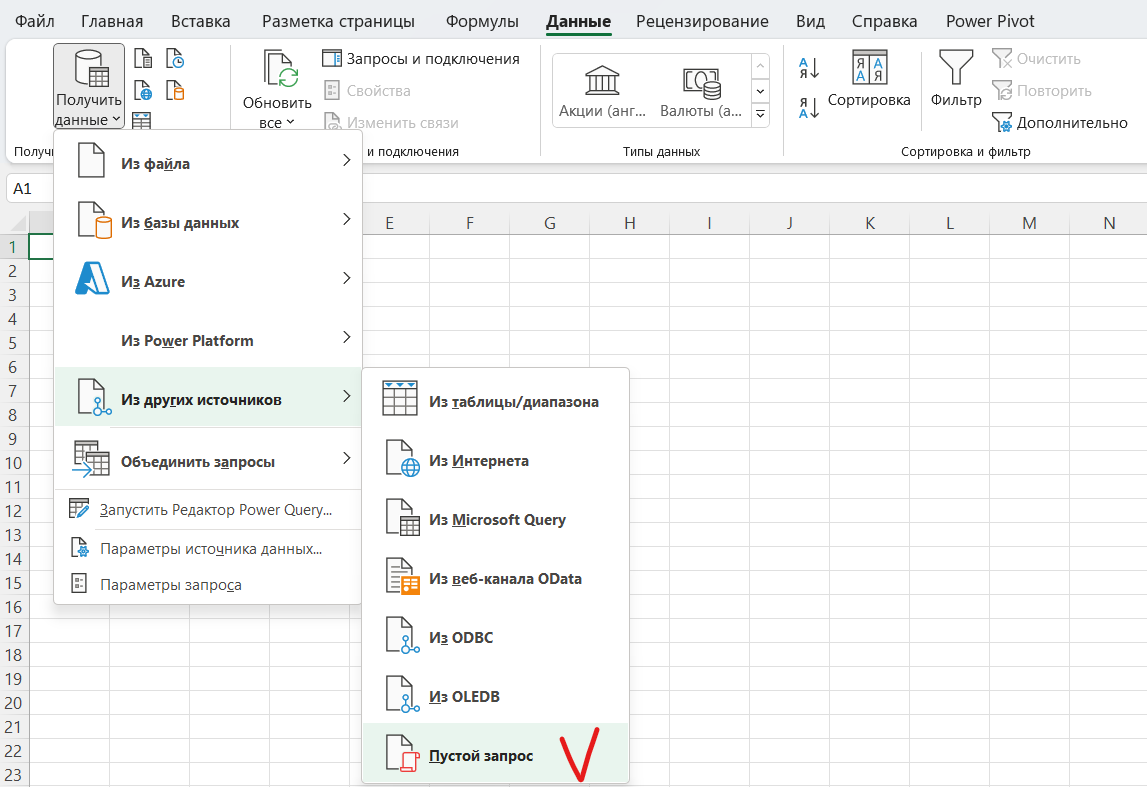
- In your Excel workbook, go to Data => New Query => From Other Sources => From Web.
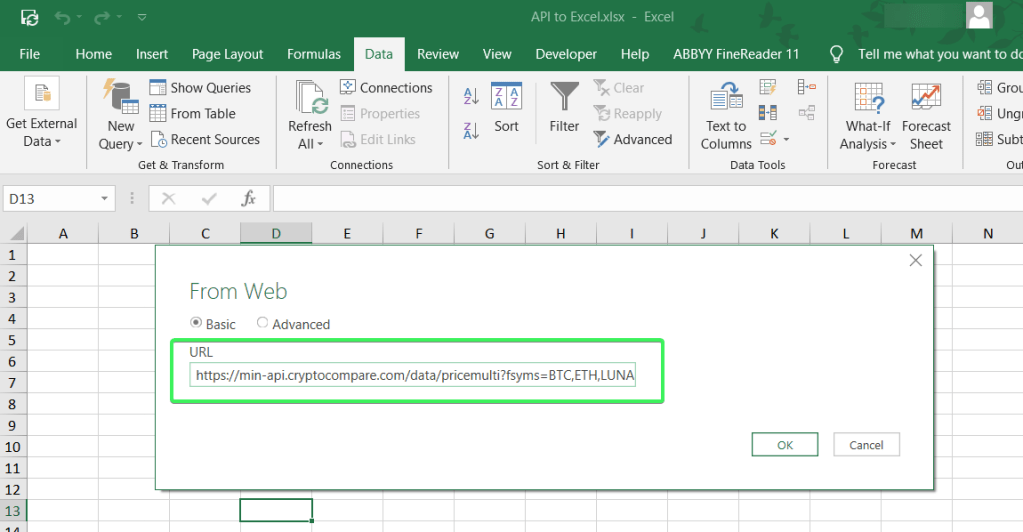
- Insert the API URL and click OK.
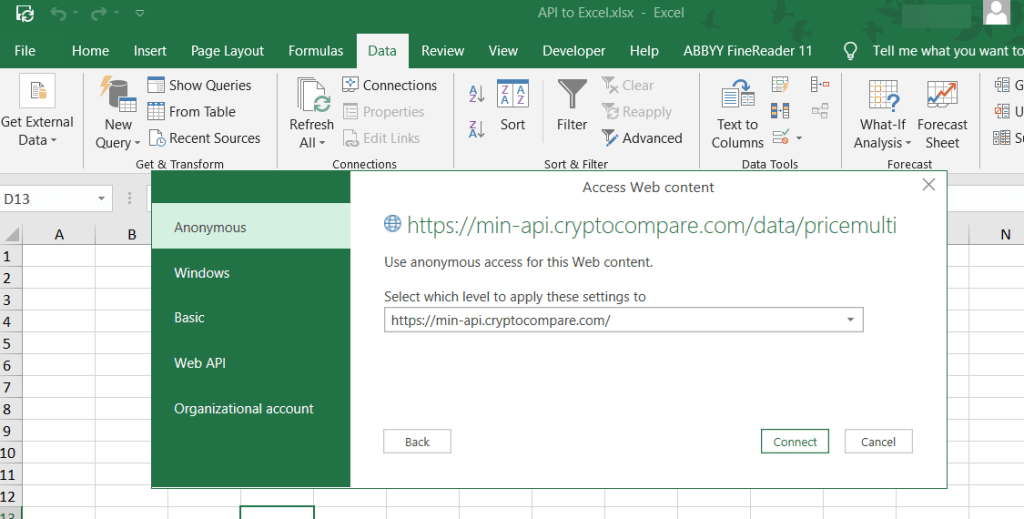
- Choose the web content access. For this example, we can go with Anonymous. Click Connect.
- The Power Query editor will open where you can preview the data loaded from API. Go to the Convert tab and click Into Table.

- This will convert the data from API to a table, and you’ll be able to transform it before loading it to the Excel workbook, for example, transposing rows to columns or vice versa.
- You see that values in the Value column are hidden. The reason is that you need to select which columns to display. For this, click on the Expand button and select the columns. Click OK.

- Now you see two columns: Value.USD and Value.EUR. When all the necessary transformations are done, click Close & Load.

There you go!

You can also check out the details of your connection.

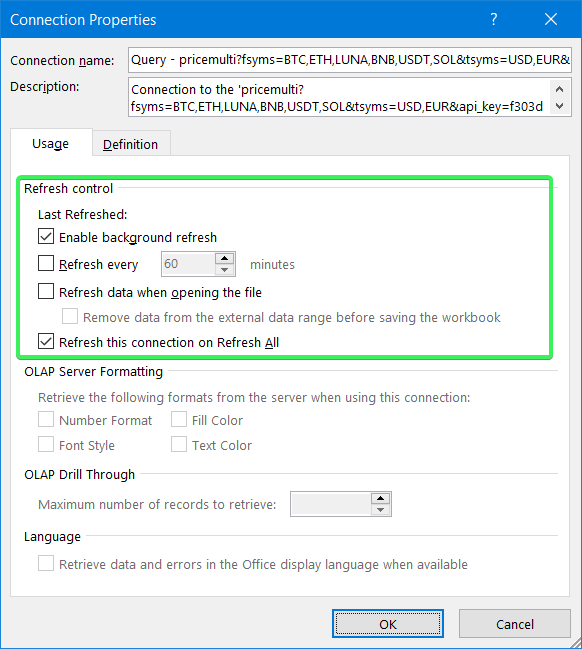
Can you link API to Excel on a schedule with PowerQuery?
You can refresh data from the API on demand or set up a frequency for the automatic refresh. For this, go to Data => Connections => Properties… and configure the Refresh control.
The Power Query setup looks somewhat intricate because the main purpose of this tool is to transform data. So, it’s better to use Power Query in combination with Coupler.io – your data will go to Excel on a schedule where you can transform it with Power Query as you wish.
How to connect API to Excel using VBA
The answer is very simple – you need to learn VBA and implement your coding knowledge. 🙂 The benefit of a code-based solution is that you can make it custom. This is achievable if you’re proficient in coding and specifically VBA. Alternatively, you can find some templates on GitHub or somewhere else and tweak them. But it is unlikely that you will find a code sample that will cover all your needs.
Which way to connect API to Excel sheet is the best one?
The built-in PowerQuery functionality seems to be the actionable option to link API to Excel. It allows you to grab data and transform it on the go. However, the main drawback of PowerQuery is that it’s only available for the Excel desktop app. If this is not an issue for you, you can go with it.
The no-code way is the choice of many, including Richard. For his needs with low data volume and infrequent data refresh, he can use the Coupler.io Personal plan. In addition to the option of connecting API to Excel sheet, you can benefit from many ready-to-use integrations, as well as other destination apps – Google Sheets and BigQuery. You can try out Coupler.io for free with a 14-day trial.
Who’s going to choose the VBA script to connect API to Excel? This is the way for tech-savvy Excel experts who prefer to create custom functions and integrations for their liking. If you are one of those, then it’s probably your way as well.
-

A content manager at Coupler.io whose key responsibility is to ensure that the readers love our content on the blog. With 5 years of experience as a wordsmith in SaaS, I know how to make texts resonate with readers’ queries✍🏼

Back to Blog
Focus on your business
goals while we take care of your data!
Try Coupler.io
If you need to extract a lot of data from a website, consider collecting the data using a package for web scraping with Google Sheets and Excel compatibility.
Table of Contents
-
- 1. Why Use an API to Scrape Data?
- 2. How to Scrape Data into Excel and Google Sheets
- 3. How to Convert Output to Table-Data
Excel and Google Sheets are excellent ways to organize data when you’re extracting many different types from various pages on the website. For instance, if you need to gather the data for more than 300 new products that span more than 20 pages on an eCommerce website, you should scrape data from websites to Excel and Google Sheets to save time and energy.
It’s possible to manually scrape data to Excel and Google Sheets but to boost your business agility, you should use an Application Programming Interface (API) while scraping data. APIs will allow you to engage in automated data scraping from websites into Excel without the need for manual input.
Read on to learn more about how to scrape data from a website into Excel. If you’re already familiar with some of the questions we answer below, feel free to use the Table of Contents to skip to the section(s) you’re most interested in. We’ve provided a step-by-step tutorial showing how you can use an API to pull data from a website into Excel and Google Sheets, using our free Scraping Robot API as an example.
Why Use an API to Scrape Data?

Before we explain how to scrape data from a website into Google Sheets and Excel, let’s discuss how APIs work and why you should use an API to extract data.
APIs are software programs that bridge different web applications or software. Without APIs, these applications and software would not be able to communicate or exchange information or functionalities. In many ways, APIs function like your computer monitor—without your monitor, you wouldn’t be able to see what your computer is doing. Similarly, without an API, many applications—including Excel and Google Sheets—wouldn’t be able to process, store, or manipulate the data you’ve extracted from your website.
In the data scraping world, APIs are used to connect to any database or analytics software. Scraping Robot’s free web scraping API, for instance, can connect to any software and allow you to extract data from any website. APIs can also help you collect data in real-time and move data directly to your software or application without manual input.
Scraping websites without an API is possible, but extremely time-consuming. You would have to download the page yourself and go through all of the HTML elements by hand. Without thorough knowledge and experience of various coding languages and HTML, it’s difficult to scrape websites without an API. As such, you should use an API to pull data from a website into Excel and Google Sheets.

Step 1: Pick and download a web scraping API.
When you are web scraping Google Sheets or Excel data, start by downloading and installing an Excel web scraping API of your choice.
Before you choose your ideal scraper, keep in mind that not every scraper was made equal. To find the best one for you, ask the following questions:
- What functions are a must for you? What do you want to do with the extracted data?
- What is my budget?
- Will I be extracting data from multiple websites at once? If yes, how many sites?
- Not every scraping tool lets you extract data from multiple sites at once. If you’re short on time and need to extract a lot of information from many sites at once, look for a program that allows you to do this.
- Is the scraping tool secure?
- This is an important question to ask if you’re extracting sensitive or confidential data.
For this example, we’ll be using Scraping Robot’s free API. One of the best scraping APIs available, Scraping Robot API is browser-based and doesn’t require you to download or install anything. It allows you to scrape HTML content as well as individual DOM elements on web pages.
Compared to other APIs, this API also lets you extract more information at once. Most web scrapers use an extraction sequence for HTML elements on a page, which means you have to manually pick a category to extract after the first category (typically text) is done. On the other hand, Scraping Robot API automatically gives you every HTML category.
For more information, check out our documentation here.
Step 2: Copy the URL you want to scrape.
Go to the website page you want to scrape and copy the URL.
Step 3: Paste the target site’s URL into your scraper’s bar and click “Run.”
This will start the scraping process. You should receive the final HTML output within a couple of seconds.
Step 4: Download the HTML output.
You should see an option to download the extracted content in your scraper. In Scraping Robot, you’ll see an option to “Download Results” under the black box at the bottom. Once you click on this button, the HTML output will download to your computer.
How to Convert Output to Table-Data

You now have the HTML output, but you need to convert it into a tabular format. Converting the output to table-data will move the extracted information from your web scraper to Excel. Without converting, you will have a hard time gathering and manipulating data, particularly if you want to aggregate the data of many scrapes in one Google Sheet or Excel document.
API response data structure
Before we talk about how to convert the HTML output to table-data let’s take a look at how API responses typically look like. In this example, we’ll be scraping music.apple.com and our goal is to collect a list of track names using XPath.
The API’s JSON response should look like this:
“status”: “SUCCESS”,
“date”: “Tue, 14 Sep 2021 15:21:13 GMT”,
“url”: “https://music.apple.com/us/artist/pearl-jam/467464/see-all?section=top-songs”,
“httpCode”: 200,
“result”: {
“xpathElements”: [
{
“xpath”: “//div[@class=”songs-list-row__song-name”]”,
“textNodes”: [
“Black”,
“Alive”,
“Even Flow”,
“Jeremy”,
“Yellow Ledbetter”,
“Better Man”,
“Last Kiss”,
“Daughter”,
“Better Man”,
“Just Breathe”,
“Just Breathe”,
“Elderly Woman Behind the Counter In a Small Town”,
“Even Flow”,
“Once”,
“Release”,
“Daughter”,
“Sirens”,
“Garden”,
“Elderly Woman Behind the Counter In a Small Town”,
“Jeremy”,
“Why Go”,
“Animal”,
“Yellow Ledbetter”,
“Porch”,
“Oceans”,
“Yellow Ledbetter”,
“Given to Fly”,
“Corduroy”,
“Go”,
“Rearviewmirror”,
“Dissident”,
“Who You Are”,
“Dance Of The Clairvoyants”,
“Last Kiss”,
“Alive (2004 Remix)”,
“Nothingman”,
“Rearviewmirror”,
“Superblood Wolfmoon”,
“State of Love and Trust”,
“World Wide Suicide”,
“Corduroy”,
“Dissident”,
“Deep”,
“Alive (2008 Brendan O’Brien Mix)”,
“Black (2004 Remix)”
],
“htmlElements”: [
“<div tabindex=”-1” role=”checkbox” dir=”auto” aria-checked=”false” class=”songs-list-row__song-name”><!–%+b:32%–>Black<!–%-b:32%–></div>”,
“<div tabindex=”-1” role=”checkbox” dir=”auto” aria-checked=”false” class=”songs-list-row__song-name”><!–%+b:32%–>Alive<!–%-b:32%–></div>”,
“<div tabindex=”-1” role=”checkbox” dir=”auto” aria-checked=”false” class=”songs-list-row__song-name”><!–%+b:32%–>Even Flow<!–%-b:32%–></div>”,
“<div tabindex=”-1” role=”checkbox” dir=”auto” aria-checked=”false” class=”songs-list-row__song-name”><!–%+b:32%–>Jeremy<!–%-b:32%–></div>”,
“<div tabindex=”-1” role=”checkbox” dir=”auto” aria-checked=”false” class=”songs-list-row__song-name”><!–%+b:32%–>Yellow Ledbetter<!–%-b:32%–></div>”,
“<div tabindex=”-1” role=”checkbox” dir=”auto” aria-checked=”false” class=”songs-list-row__song-name”><!–%+b:32%–>Better Man<!–%-b:32%–></div>”,
“<div tabindex=”-1” role=”checkbox” dir=”auto” aria-checked=”false” class=”songs-list-row__song-name”><!–%+b:32%–>Last Kiss<!–%-b:32%–></div>”,
“<div tabindex=”-1” role=”checkbox” dir=”auto” aria-checked=”false” class=”songs-list-row__song-name”><!–%+b:32%–>Daughter<!–%-b:32%–></div>”,
“<div tabindex=”-1” role=”checkbox” dir=”auto” aria-checked=”false” class=”songs-list-row__song-name”><!–%+b:32%–>Better Man<!–%-b:32%–></div>”,
“<div tabindex=”-1” role=”checkbox” dir=”auto” aria-checked=”false” class=”songs-list-row__song-name”><!–%+b:32%–>Just Breathe<!–%-b:32%–></div>”,
“<div tabindex=”-1” role=”checkbox” dir=”auto” aria-checked=”false” class=”songs-list-row__song-name”><!–%+b:32%–>Just Breathe<!–%-b:32%–></div>”,
“<div tabindex=”-1” role=”checkbox” dir=”auto” aria-checked=”false” class=”songs-list-row__song-name”><!–%+b:32%–>Elderly Woman Behind the Counter In a Small Town<!–%-b:32%–></div>”,
“<div tabindex=”-1” role=”checkbox” dir=”auto” aria-checked=”false” class=”songs-list-row__song-name”><!–%+b:32%–>Even Flow<!–%-b:32%–></div>”,
“<div tabindex=”-1” role=”checkbox” dir=”auto” aria-checked=”false” class=”songs-list-row__song-name”><!–%+b:32%–>Once<!–%-b:32%–></div>”,
“<div tabindex=”-1” role=”checkbox” dir=”auto” aria-checked=”false” class=”songs-list-row__song-name”><!–%+b:32%–>Release<!–%-b:32%–></div>”,
“<div tabindex=”-1” role=”checkbox” dir=”auto” aria-checked=”false” class=”songs-list-row__song-name”><!–%+b:32%–>Daughter<!–%-b:32%–></div>”,
“<div tabindex=”-1” role=”checkbox” dir=”auto” aria-checked=”false” class=”songs-list-row__song-name”><!–%+b:32%–>Sirens<!–%-b:32%–></div>”,
“<div tabindex=”-1” role=”checkbox” dir=”auto” aria-checked=”false” class=”songs-list-row__song-name”><!–%+b:32%–>Garden<!–%-b:32%–></div>”,
“<div tabindex=”-1” role=”checkbox” dir=”auto” aria-checked=”false” class=”songs-list-row__song-name”><!–%+b:32%–>Elderly Woman Behind the Counter In a Small Town<!–%-b:32%–></div>”,
“<div tabindex=”-1” role=”checkbox” dir=”auto” aria-checked=”false” class=”songs-list-row__song-name”><!–%+b:32%–>Jeremy<!–%-b:32%–></div>”,
“<div tabindex=”-1” role=”checkbox” dir=”auto” aria-checked=”false” class=”songs-list-row__song-name”><!–%+b:32%–>Why Go<!–%-b:32%–></div>”,
“<div tabindex=”-1” role=”checkbox” dir=”auto” aria-checked=”false” class=”songs-list-row__song-name”><!–%+b:32%–>Animal<!–%-b:32%–></div>”,
“<div tabindex=”-1” role=”checkbox” dir=”auto” aria-checked=”false” class=”songs-list-row__song-name”><!–%+b:32%–>Yellow Ledbetter<!–%-b:32%–></div>”,
“<div tabindex=”-1” role=”checkbox” dir=”auto” aria-checked=”false” class=”songs-list-row__song-name”><!–%+b:32%–>Porch<!–%-b:32%–></div>”,
“<div tabindex=”-1” role=”checkbox” dir=”auto” aria-checked=”false” class=”songs-list-row__song-name”><!–%+b:32%–>Oceans<!–%-b:32%–></div>”,
“<div tabindex=”-1” role=”checkbox” dir=”auto” aria-checked=”false” class=”songs-list-row__song-name”><!–%+b:32%–>Yellow Ledbetter<!–%-b:32%–></div>”,
“<div tabindex=”-1” role=”checkbox” dir=”auto” aria-checked=”false” class=”songs-list-row__song-name”><!–%+b:32%–>Given to Fly<!–%-b:32%–></div>”,
“<div tabindex=”-1” role=”checkbox” dir=”auto” aria-checked=”false” class=”songs-list-row__song-name”><!–%+b:32%–>Corduroy<!–%-b:32%–></div>”,
“<div tabindex=”-1” role=”checkbox” dir=”auto” aria-checked=”false” class=”songs-list-row__song-name”><!–%+b:32%–>Go<!–%-b:32%–></div>”,
“<div tabindex=”-1” role=”checkbox” dir=”auto” aria-checked=”false” class=”songs-list-row__song-name”><!–%+b:32%–>Rearviewmirror<!–%-b:32%–></div>”,
“<div tabindex=”-1” role=”checkbox” dir=”auto” aria-checked=”false” class=”songs-list-row__song-name”><!–%+b:32%–>Dissident<!–%-b:32%–></div>”,
“<div tabindex=”-1” role=”checkbox” dir=”auto” aria-checked=”false” class=”songs-list-row__song-name”><!–%+b:32%–>Who You Are<!–%-b:32%–></div>”,
“<div tabindex=”-1” role=”checkbox” dir=”auto” aria-checked=”false” class=”songs-list-row__song-name”><!–%+b:32%–>Dance Of The Clairvoyants<!–%-b:32%–></div>”,
“<div tabindex=”-1” role=”checkbox” dir=”auto” aria-checked=”false” class=”songs-list-row__song-name”><!–%+b:32%–>Last Kiss<!–%-b:32%–></div>”,
“<div tabindex=”-1” role=”checkbox” dir=”auto” aria-checked=”false” class=”songs-list-row__song-name”><!–%+b:32%–>Alive (2004 Remix)<!–%-b:32%–></div>”,
“<div tabindex=”-1” role=”checkbox” dir=”auto” aria-checked=”false” class=”songs-list-row__song-name”><!–%+b:32%–>Nothingman<!–%-b:32%–></div>”,
“<div tabindex=”-1” role=”checkbox” dir=”auto” aria-checked=”false” class=”songs-list-row__song-name”><!–%+b:32%–>Rearviewmirror<!–%-b:32%–></div>”,
“<div tabindex=”-1” role=”checkbox” dir=”auto” aria-checked=”false” class=”songs-list-row__song-name”><!–%+b:32%–>Superblood Wolfmoon<!–%-b:32%–></div>”,
“<div tabindex=”-1” role=”checkbox” dir=”auto” aria-checked=”false” class=”songs-list-row__song-name”><!–%+b:32%–>State of Love and Trust<!–%-b:32%–></div>”,
“<div tabindex=”-1” role=”checkbox” dir=”auto” aria-checked=”false” class=”songs-list-row__song-name”><!–%+b:32%–>World Wide Suicide<!–%-b:32%–></div>”,
“<div tabindex=”-1” role=”checkbox” dir=”auto” aria-checked=”false” class=”songs-list-row__song-name”><!–%+b:32%–>Corduroy<!–%-b:32%–></div>”,
“<div tabindex=”-1” role=”checkbox” dir=”auto” aria-checked=”false” class=”songs-list-row__song-name”><!–%+b:32%–>Dissident<!–%-b:32%–></div>”,
“<div tabindex=”-1” role=”checkbox” dir=”auto” aria-checked=”false” class=”songs-list-row__song-name”><!–%+b:32%–>Deep<!–%-b:32%–></div>”,
“<div tabindex=”-1” role=”checkbox” dir=”auto” aria-checked=”false” class=”songs-list-row__song-name”><!–%+b:32%–>Alive (2008 Brendan O’Brien Mix)<!–%-b:32%–></div>”,
“<div tabindex=”-1” role=”checkbox” dir=”auto” aria-checked=”false” class=”songs-list-row__song-name”><!–%+b:32%–>Black (2004 Remix)<!–%-b:32%–></div>”
]
}
],
“html”: “<!DOCTYPE html><html prefix=”og: http://ogp.me/ns#” dir=”ltr” lang=”en-US” hydrated=””><head>n <meta charset=”utf-8”><style data-styles=””>apple-podcast-player,apple-tv-plus-player,apple-music-uploaded-content,apple-music-video-player,apple-tv-plus-preview,amp-chrome-player,amp-footer-player,apple-music-card-player,amp-lyrics,amp-episode-list-control,amp-next-episode-control,apple-music-artwork-lockup,apple-music-progress,apple-music-volume,amp-playback-controls-autoplay,apple-music-radio-column-player,amp-ambient-video,amp-background-video,amp-footer-player-metadata,amp-footer-player-progress,amp-launch-button,amp-mediakit-root,amp-playback-controls-pip,amp-text-multiline,amp-transition,state-holder,”></div>n …”
}
Notice that this API response contains the following main fields for the root level:
- date: date of request
- httpCode: the HTTP response code
- status: the status of the task being processed
- url: the page URL
- result: This field has the most useful scraped data, such as nested JSON-objects
The result-field contains three main child fields:
- xPathElements, which contains the data gathered for each provided XPath
- selectorElements, which has the data for each provided CSS selector
- Html, which is the full HTML code of the page
Since our goal is to scrape a list of track names using XPath from music.apple.com, we will be focusing on xPathElements and selectorElements. Each of these elements is associated with a single XPath/selector.
For instance, the segment below is a single XPath/selector:
“xpath”: “//div[@class=”songs-list-row__song-name”]”,
“textNodes”: [
“Black”,
“Alive”,
“Even Flow”,
“Jeremy”,
“Yellow Ledbetter”
],
“htmlElements”: [
“<div tabindex=”-1” role=”checkbox” dir=”auto” aria-checked=”false” class=”songs-list-row__song-name”><!–%+b:32%–>Black<!–%-b:32%–></div>”,
“<div tabindex=”-1” role=”checkbox” dir=”auto” aria-checked=”false” class=”songs-list-row__song-name”><!–%+b:32%–>Alive<!–%-b:32%–></div>”,
“<div tabindex=”-1” role=”checkbox” dir=”auto” aria-checked=”false” class=”songs-list-row__song-name”><!–%+b:32%–>Even Flow<!–%-b:32%–></div>”,
“<div tabindex=”-1” role=”checkbox” dir=”auto” aria-checked=”false” class=”songs-list-row__song-name”><!–%+b:32%–>Jeremy<!–%-b:32%–></div>”,
“<div tabindex=”-1” role=”checkbox” dir=”auto” aria-checked=”false” class=”songs-list-row__song-name”><!–%+b:32%–>Yellow Ledbetter<!–%-b:32%–></div>”
]
}
These segments contain three child fields:
- Xpath, which is a string containing the XPath/selector
- textNodes, which contains the text entries found within all the elements the API has found for this XPath/selector
- htmlElements, which is the HTML code for all of the elements found within this particular XPath/selector
Transforming XPath/Selectors to tabular forms for Excel or Google Sheets
Now, let’s transform this JSON response into a tabular form in Excel or Google Sheets.
For Excel, follow these steps:
- Open a new spreadsheet.
- Click on the Data tab.
- Click “Get Data” on the far right and select “From File.” Then, click the applicable option. For instance, if scraping API’s results are in .JSON format, select “From JSON.”
- Your Excel sheet should now be populated.
- If you have other data associated with other XPath or selectors, add them to the table using the same method.
Follow these steps for Google Sheets:
- Open a new spreadsheet.
- Go to the “File” and select “Import.”
- You will now see a window with four tabs: “My Drive,” “Shared with me,” “Recent,” and “Upload.” Click on “Upload” and pick the file you want to convert into a table. Make sure the checkbox “Convert text to numbers, dates, and formulas” is unselected.
- Pick your import location and separator type and click on the “Import data” button.
If you want to add metadata related to this project to the table, add them to the table. At this point, you’re almost done. All you have to do is add in the table headers so you know what’s what.
Conclusion

Learning how to pull data from a website into Excel or Google Sheets seems difficult, but with powerful scraping APIs like Scraping Robot’s free API, you’ll be able to extract, aggregate, and manipulate data with just a few clicks of your mouse.
Scraping Robot API can be used with any scraping program, but if you’re new to scraping or you want to try out a new scraping tool, consider getting Scraping Robot.
Scraping Robot allows you to scrape websites into JSON—no browser scaling, proxy management, blocks, or captchas required. Our system was built for developers and allows you to use our API to extract and aggregate data within minutes.
We provide the following features and more:
- Automatic metadata parsing
- Javascript rendering
- No proxies required—we will handle this for you
- Stats and usage
- Guaranteed successful results
- Session management (coming soon)
- Webhook callbacks (coming soon)
- POST requests (coming soon)
- Output to Sheets or Zapier (coming soon)
- Screenshots of browser (coming soon)
What’s more, there’s no monthly commitment. You can start with us for free—we offer 5000 free scrapes with all features included. If you need more scrapes, you can then move to the Business and Enterprise tiers, which offer hundreds of thousands of scrapes at extremely affordable prices.
Interested or have questions about Scraping Robot? Contact us today to learn more. Our support team is available 24/7.
The information contained within this article, including information posted by official staff, guest-submitted material, message board postings, or other third-party material is presented solely for the purposes of education and furtherance of the knowledge of the reader. All trademarks used in this publication are hereby acknowledged as the property of their respective owners.
Related Articles
Power Query умеет подключаться не только к web страничкам, но и к API, не требующим авторизации. Если API позволяет анонимным пользователям забирать данные, Power Query подойдёт идеально.
Подключимся к API застройщика, чтобы отслеживать актуальную стоимость квартиры. Находим нужную квартиру на сайте застройщика: https://beta.pik.ru/flat/801472.
«https://api.pik.ru/v1/flat?id=» — URL адрес, по которому застройщик предоставляет информацию, а «801472» – идентификатор квартиры.
Информация на сайте показана красиво, но разбросана по разным вкладкам.
Мы же хотим получить лаконичную табличку в Excel:
| Адрес |
| Стоимость |
| Скидка |
| Заселение до |
| Площадь |
| Комнаты |
| Этаж |
| Ссылка |
GET-запрос к API ПИК на Power Query
Для разнообразия воспользуюсь Power Query в Excel. Создаем пустой запрос:
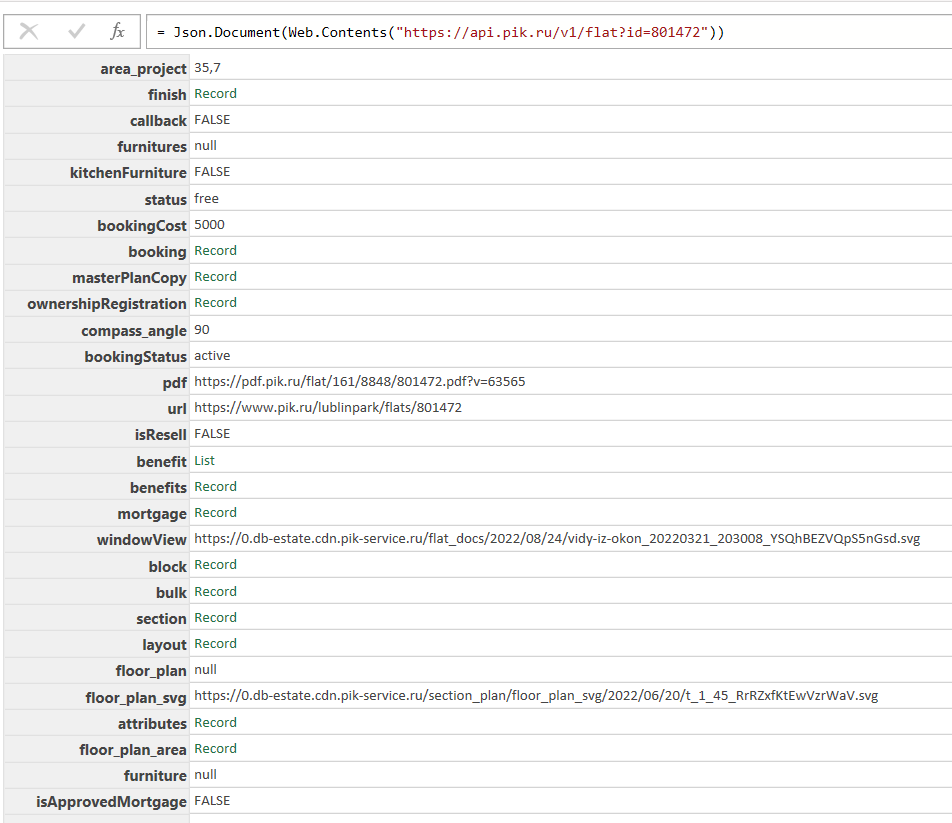
В строке формул пишем:
Json.Document(Web.Contents("https://api.pik.ru/v1/flat?id=801472"))В результате получаем строку с вложенными составными элементами, которые также могут содержать вложенные элементы:
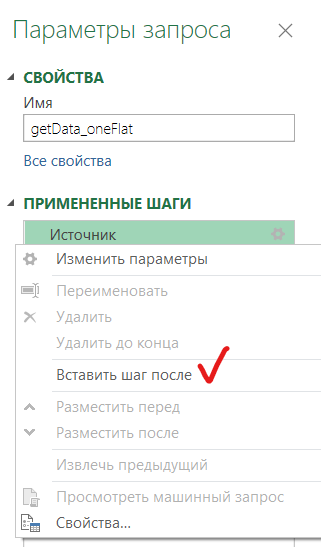
Называем запрос «getData_oneFlat» и вставляем пустой шаг после шага Источник (чтобы открыть меню — щелкаем правой кнопкой мышки на шаг Источник):
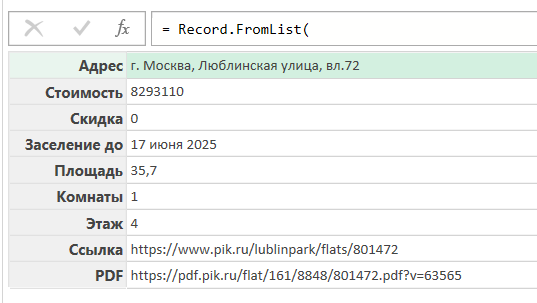
С помощью функции Record.FromList формируем строку с нужными данными, используя шаг Источник. В строке формул пишем:
Record.FromList(
{Источник[block][address], Источник[price], Источник[discount], Источник[bulk][date_till], Источник[area], Источник[rooms], Источник[floor], Источник[url], Источник[pdf]},
type [ Адрес = text, Стоимость = number, Скидка = number, Заселение до = text, Площадь = number, Комнаты = number, Этаж = number, Ссылка = text, PDF = text])
Давайте разбираться как работает функция Record.FromList:
- Первый аргумент функции отвечает за содержимое полей – это список:
{Источник[block][address], Источник[price]} - Источник[price] – возвращает содержимое поля price
- Источник[block][address] – возвращает содержимое поля address из Record вложенной в поле block
- Второй аргумент отвечает за названия и тип полей – это строка:
type [Адрес = text, Стоимость = number]
Результат — строка нужных нам значений:
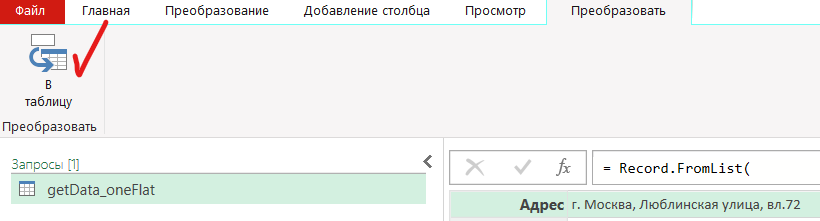
Преобразуем строку в таблицу:
Выгрузим результат на лист Excel и посмотрим что получилось:
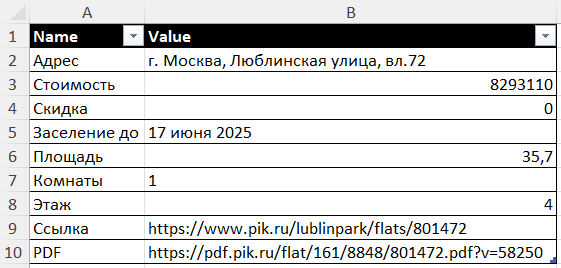
Такой формат нас устроит, теперь мы видим всю информацию по квартире в удобной таблице.
Несколько GET-запросов с помощью функции
Теперь попробуем забрать сразу несколько квартир и разместить их в одной табличке.
Для этого убираем последний шаг и создаём функцию getData от параметра flat (номер квартиры), заменяя сам номер на «flat»:
(flat as text)=>
let
   Источник = Json.Document(Web.Contents("https://api.pik.ru/v1/flat?id="& flat )),
   create_table = Record.FromList(
{Источник[block][address],
Источник[price],
Источник[discount],
Источник[bulk][date_till],
Источник[area],
Источник[rooms],
Источник[floor],
Источник[url],
Источник[pdf]
},
type [
Адрес = text,
Стоимость = number,
Скидка = number,
Заселение до = text,
Площадь = number,
Комнаты = number,
Этаж = number,
Ссылка = text,
PDF = text
])
in
   create_table
Теперь наша функция будет получать данные по той квартире, которую мы укажем в параметре.
Составляем на листе Excel список интересных нам квартир:
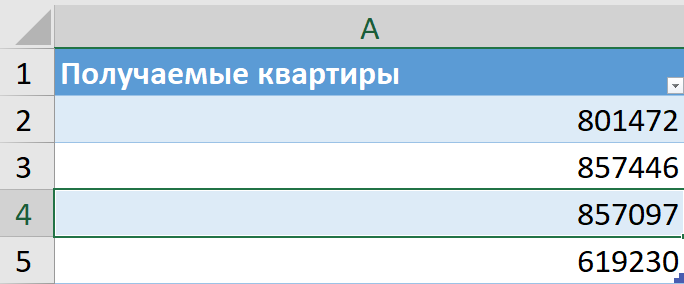
Загружаем список квартир в Power Query, выставляем столбцу текстовый тип. Затем добавляем новый столбец с вызовом нашей функции от каждой квартиры в списке, получается такой код:
let
   Источник = Excel.CurrentWorkbook(){[Name="Таблица2"]}[Content],
   #"Измененный тип" = Table.TransformColumnTypes(Источник,{{"Получаемые квартиры", type text}}),
   #"Вызвана настраиваемая функция" = Table.AddColumn(#"Измененный тип", "getData", each getData([Получаемые квартиры]))
in
   #"Вызвана настраиваемая функция"
Таблица в Power Query выглядит так:
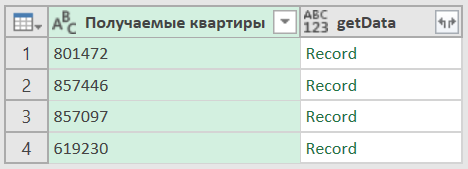
Нажимаем на стрелочки справа от «getData» и разворачиваем нужные столбцы, а затем выгружаем всё на лист Excel. Теперь у нас есть табличка со стоимостью, скидками, площадью и датами заселения для всех интересных нам объектов:

Заключение
Пример вызова API сайта компании ПИК показывает как Power Query может быть полезен в бытовых задачах. Используйте PQ если вам нужно быть в курсе изменений данных, будь то стоимость квартиры или цена товара в интернет-магазине.
Если компания предоставляет данные по открытому API, вы всегда можете использовать магию Power Query и вывести эти данные себе в Excel-файл. Можно сравнить несколько товаров/категорий или вообще написать алгоритм, который будет отображать только самые интересные товары.
you can use NPOI
using Microsoft.AspNetCore.Hosting;
using Microsoft.AspNetCore.Mvc;
using NPOI.SS.UserModel;
using NPOI.SS.Util;
using NPOI.XSSF.UserModel;
using System.Collections.Generic;
using System.IO;

namespace export_excel.Controllers
{

    [ApiController]
    [Route("[controller]")]
    public class ExportExcelController : ControllerBase
    {

        private readonly IHostingEnvironment _hostingEnvironment;

        public ExportExcelController(IHostingEnvironment hostingEnvironment)
        {
            _hostingEnvironment = hostingEnvironment;
        }

        // https://localhost:5001/ExportExcel/Export
        // https://localhost:5001/static-file/employee.xlsx
        [HttpGet]
        [Route("Export")]
        public IActionResult Export()
        {
            List<Employee> list = new List<Employee>()
            {
                new Employee{ emp_code = "152110032", Name = "Nguyen Hong Anh", Phone = "0909998789" },
                new Employee{ emp_code = "152110055", Name = "Tran Phuong Dung", Phone = "0909993456" },
                new Employee{ emp_code = "152110022", Name = "Do Bich Ngoc", Phone = "0909991237" },
                new Employee{ emp_code = "152110025", Name = "Tran Thu Ha", Phone = "0909990987" },
            };
            // New workbook.
            XSSFWorkbook wb = new XSSFWorkbook();
            // New worksheet.
            ISheet sheet = wb.CreateSheet();
            // Write to sheet.
            // Tạo row
            var row0 = sheet.CreateRow(0);
            // At first row, merge 3 columns.
            // Create cell before merging.
            row0.CreateCell(0);
            CellRangeAddress cellMerge = new CellRangeAddress(0, 0, 0, 2);
            sheet.AddMergedRegion(cellMerge);
            row0.GetCell(0).SetCellValue("Employee information");
            // Ghi tên cột ở row 1
            var row1 = sheet.CreateRow(1);
            row1.CreateCell(0).SetCellValue("emp_code");
            row1.CreateCell(1).SetCellValue("fullname");
            row1.CreateCell(2).SetCellValue("Phone");
            // Traversaling array, then write continous.
            int rowIndex = 2;
            foreach (var item in list)
            {
                // Init new row.
                var newRow = sheet.CreateRow(rowIndex);
                // set values.
                newRow.CreateCell(0).SetCellValue(item.emp_code);
                newRow.CreateCell(1).SetCellValue(item.Name);
                newRow.CreateCell(2).SetCellValue(item.Phone);
                // Increase index.
                rowIndex++;
            };
            if (!System.IO.File.Exists("c:\myfiles\employee.xlsx"))

            {
                FileStream fs = new FileStream(@"c:myfilesemployee.xlsx", FileMode.CreateNew);
                wb.Write(fs);
            }
            var path = Path.Combine(@"c:myfilesemployee.xlsx");
            return File(System.IO.File.OpenRead(path), contentType: "application/vnd.openxmlformats-officedocument.spreadsheetml.sheet; charset=utf-8", fileDownloadName: "employee.xlsx");
        }

    }

    public class Employee
    {
        public string emp_code;
        public string Name;
        public string Phone;
    }

}
File Startup.cs
using Microsoft.AspNetCore.Builder;
using Microsoft.AspNetCore.Hosting;
using Microsoft.Extensions.Configuration;
using Microsoft.Extensions.DependencyInjection;
using Microsoft.Extensions.FileProviders;
using Microsoft.Extensions.Hosting;
using System.IO;

namespace export_excel
{
    public class Startup
    {
        public Startup(IConfiguration configuration)
        {
            Configuration = configuration;
        }

        public IConfiguration Configuration { get; }

        public void ConfigureServices(IServiceCollection services)
        {
            services.AddControllers();
        }

        public void Configure(IApplicationBuilder app, IWebHostEnvironment env)
        {
            if (env.IsDevelopment())
            {
                app.UseDeveloperExceptionPage();
            }
            app.UseHttpsRedirection();
            app.UseRouting();
            app.UseAuthorization();
            app.UseStaticFiles(new StaticFileOptions
            {
                FileProvider = new PhysicalFileProvider(
            // Path.Combine(env.ContentRootPath, @"c:audio")),
            // Path.Combine(@"c:audio")),
            Path.Combine(@"c:myfiles")),
                RequestPath = "/static-file"
            });
            app.UseEndpoints(endpoints =>
            {
                endpoints.MapControllers();
            });
        }
    }

}
You can use 1 of 2 ways, go to
https://localhost:5001/ExportExcel/Export
or
https://localhost:5001/static-file/employee.xlsx
- Download sample — 650.6 KB
Introduction
This article will walk you through the generic export to Excel feature which is tried and well tested, using C# in WEB API and by using NPOI.
This article is specific to .NET Framework, whereas, I have tried in .NET Core, it works perfectly fine. So hold on and let’s jump over it.
Before We Begin the Journey
The main concept of this article is to develop generic Excel to export functionality by importing NPOI and add the below explained 2 cs files included in the sample and then jet set go.
Explore the Code
I have created a GitHub repository for you to explore the code with ASP.NET MVC, which is right here:
- https://github.com/ansaridawood/.NET-Generic-Excel-Export-Sample
Background
We are using NPOI DLL for this export which is free to use, refer to NPOI NuGet for more details.
More often, we need to develop an export to Excel feature in our applications, many of us usually create boring string builder, then convert it to Excel or use Interop or ITextSharp or NPOI or something else to achieve the same result.
All the above-listed ways are absolutely correct in their own context and fine, but what if there could be a way to export to Excel as simple as passing an object and getting the required output, our life would have been easier, isn’t it?
This is what I am going to explain in this article.
Using the Code
First of all, there is a utility function called Export() which simply converts your C# List object to NPOI object and then finally provides to HttpResponseMessage type, which can be used in your WEB API Action.
You need 2 files to achieve it — refer to the solution attached in this article for a better understanding >> ExcelExport folder in Root directory:
- AbstractDataExport.cs — contains common code
- AbstractDataExportBridge.cs — converts
Listto NPOI Excel object
What does AbstractDataExport.cs do?
Refer to Export(List exportData, string fileName, string sheetName = DefaultSheetName)
Let’s begin with our first file, AbstractDataExport.cs
Creating a New Excel object — _workbook = new XSSFWorkbook();
- Creating a New Excel Sheet object —
_sheet = _workbook.CreateSheet(_sheetName); - Invokes
WriteData()— explained later - Finally, creating and returning
MemoryStreamobject
using NPOI.SS.UserModel;
using NPOI.XSSF.UserModel;
using System;
using System.Collections.Generic;
using System.IO;
using System.Net;
using System.Net.Http;
using System.Net.Http.Headers;

namespace GenericExcelExport.ExcelExport
{
    public interface IAbstractDataExport
    {
        HttpResponseMessage Export(List exportData, string fileName, string sheetName);
    }

    public abstract class AbstractDataExport : IAbstractDataExport
    {
        protected string _sheetName;
        protected string _fileName;
        protected List _headers;
        protected List _type;
        protected IWorkbook _workbook;
        protected ISheet _sheet;
        private const string DefaultSheetName = "Sheet1";

        public HttpResponseMessage Export
              (List exportData, string fileName, string sheetName = DefaultSheetName)
        {
            _fileName = fileName;
            _sheetName = sheetName;

            _workbook = new XSSFWorkbook();
            _sheet = _workbook.CreateSheet(_sheetName);

            var headerStyle = _workbook.CreateCellStyle();
            var headerFont = _workbook.CreateFont();
            headerFont.IsBold = true;
            headerStyle.SetFont(headerFont);

            WriteData(exportData);


            var header = _sheet.CreateRow(0);
            for (var i = 0; i < _headers.Count; i++)
            {
                var cell = header.CreateCell(i);
                cell.SetCellValue(_headers[i]);
                cell.CellStyle = headerStyle;


            }

            using (var memoryStream = new MemoryStream())
            {
                _workbook.Write(memoryStream);
                var response = new HttpResponseMessage(HttpStatusCode.OK)
                {
                    Content = new ByteArrayContent(memoryStream.ToArray())
                };

                response.Content.Headers.ContentType = new MediaTypeHeaderValue
                       ("application/vnd.openxmlformats-officedocument.spreadsheetml.sheet");
                response.Content.Headers.ContentDisposition =
                       new ContentDispositionHeaderValue("attachment")
                {
                    FileName = $"{_fileName}_{DateTime.Now.ToString("yyyyMMddHHmmss")}.xlsx"
                };

                return response;
            }
        }


        public abstract void WriteData(List exportData);
    }
}
Now, let’s proceed towards our second and final file, i.e., AbstractDataExportBridge.cs. Below is the explanation for WriteData(List exportData):
- Converts
ListtoDataTable Reflectionto read property name, your column header will be coming from here- Loop through
DataTableto create Excel Rows
There are areas of improvement here, you can make necessary changes like removing DataTable completely.
using NPOI.SS.UserModel;
using System;
using System.Collections.Generic;
using System.ComponentModel;
using System.Data;
using System.Text.RegularExpressions;

namespace GenericExcelExport.ExcelExport
{
    public class AbstractDataExportBridge : AbstractDataExport
    {
        public AbstractDataExportBridge()
        {
            _headers = new List<string>();
            _type = new List<string>();
        }

        public override void WriteData<T>(List<T> exportData)
        {
            PropertyDescriptorCollection properties = TypeDescriptor.GetProperties(typeof(T));

            DataTable table = new DataTable();

            foreach (PropertyDescriptor prop in properties)
            {
                var type = Nullable.GetUnderlyingType(prop.PropertyType) ?? prop.PropertyType;
                _type.Add(type.Name);
                table.Columns.Add(prop.Name, Nullable.GetUnderlyingType(prop.PropertyType) ??
                                  prop.PropertyType);
                string name = Regex.Replace(prop.Name, "([A-Z])", " $1").Trim();

                _headers.Add(name);
            }

            foreach (T item in exportData)
            {
                DataRow row = table.NewRow();
                foreach (PropertyDescriptor prop in properties)
                    row[prop.Name] = prop.GetValue(item) ?? DBNull.Value;
                table.Rows.Add(row);
            }

            IRow sheetRow = null;

            for (int i = 0; i < table.Rows.Count; i++)
            {
                sheetRow = _sheet.CreateRow(i + 1);

                for (int j = 0; j < table.Columns.Count; j++)
                {
                    ICell Row1 = sheetRow.CreateCell(j);
                    string cellvalue = Convert.ToString(table.Rows[i][j]);


                    if (string.IsNullOrWhiteSpace(cellvalue))
                    {
                        Row1.SetCellValue(string.Empty);
                    }
                    else if (_type[j].ToLower() == "string")
                    {
                        Row1.SetCellValue(cellvalue);
                    }
                    else if (_type[j].ToLower() == "int32")
                    {
                        Row1.SetCellValue(Convert.ToInt32(table.Rows[i][j]));
                    }
                    else if (_type[j].ToLower() == "double")
                    {
                        Row1.SetCellValue(Convert.ToDouble(table.Rows[i][j]));
                    }
                    else if (_type[j].ToLower() == "datetime")
                    {
                        Row1.SetCellValue(Convert.ToDateTime
                             (table.Rows[i][j]).ToString("dd/MM/yyyy hh:mm:ss"));
                    }
                    else
                    {
                        Row1.SetCellValue(string.Empty);
                    }
                }
            }
        }
    }
}
Points of Interest
I came across this solution when I had over 20 forms to provide Excel export feature, and I wasn’t willing to use a traditional approach which will be lengthy in my case.
There are always areas of improvement in all things. If you see any areas of improvement here, please update in the comments.
History
- 27th April, 2018: Initial draft
- 12th August, 2019: Performance improvement based on new findings in my applications
This member has not yet provided a Biography. Assume it’s interesting and varied, and probably something to do with programming.